User Guide SlideShare - goodnotes.com User Guide.pdf · Connect your iPad with your computer using...
33
USER GUIDE GET STARTED WITH GOODNOTES
Transcript of User Guide SlideShare - goodnotes.com User Guide.pdf · Connect your iPad with your computer using...

USER GUIDEGET STARTED WITH GOODNOTES

0. AGENDA
WHAT YOU’RE GOING TO LEARN
1. Before you start
2. Basics - Getting Started
3. Categories
4. Handwriting Search & -Recognition
5. Thumbnail Panel
6. Import and Export
7. Tabs and Shortcuts
8. Palm Rejection
9. Auto-Backup
10. iCloud
11. TV out
12. Paper Templates
13. Using a Smart Stylus

1. BEFORE YOU START
AN INTRODUCTION TO GOODNOTES
“GoodNotes is a simple yet powerful application that lets you take beautiful handwritten notes and annotate PDFs.“
This guide is for all those who want…
‣ to get to know the app and become familiar with it
‣ seek for answers to their questions
‣ improve their skills and master the art of digital note taking

2. BASICS - GETTING STARTED
GET TO KNOW THE MAIN FEATURES
Create Your First Notebook
When you first open GoodNotes, you will be presented with an empty library.
The library lets you manage your notebooks visually. To create your first notebook,
1. Tap the + button on the toolbar.
2. Tap Create Notebook.
You can choose amongst a great variety of covers and paper templates by tapping on the preview.

2. BASICS - GETTING STARTED
GET TO KNOW THE MAIN FEATURES
ToolbarAfter you have opened the notebook, a toolbar will be shown above the page. The function of each button is illustrated below
Back to Library Thumbnails Add Shape-Recognition Zoom-Window
Pen Highlighter Eraser Lasso-Tool
Read-Only Mode Undo Redo More Options

2. BASICS - GETTING STARTED
GET TO KNOW THE MAIN FEATURESAdd Handwriting
The default tool selected is the pen tool, which will probably be the tool you will use the most.
Use one of your fingers or a stylus to write something on the page.
Colors and Thickness Settings1. Tap the pen button on the toolbar.
2. Tap the color or thickness you would like to use in the popup window.
Hint: Add more of your favorite colors to the presets by tapping Edit. Arrange them by pressing and holding.

2. BASICS - GETTING STARTED
GET TO KNOW THE MAIN FEATURES
Highlighter and EraserYou can highlight handwriting, images, PDFs and text boxes.
Use the eraser to remove your handwriting and highlighting.
Hint: Tapping on the eraser twice, will bring up additional settings. Try auto-deselect for an even more seamless writing experience!

2. BASICS - GETTING STARTED
GET TO KNOW THE MAIN FEATURES
Shape Recognition
With shape recognition, you can easily insert lines, polygons, circles and ellipses.
1. Select the pen tool or the highlighter tool.
2. Tap the shape recognition button to turn on shape recognition mode.
3. Your handwriting will be turned into proper shapes.
4. Tap the shape recognition button again to turn it off.
Hint: The highlighter combined with shape recognition works wonderfully to highlight PDF texts or ebooks.

2. BASICS - GETTING STARTED
GET TO KNOW THE MAIN FEATURES
Text Boxes and Images
Insert
1. Long press anywhere on a page to open the long press menu.
2. Tap Image or Text.
3. Tap outside the image or the text box to finish.
Edit
To edit existing text boxes or images, tap and hold on it and then tap Edit.
Hint: You can also use the + button to add text boxes or images
2. BASICS - GETTING STARTED
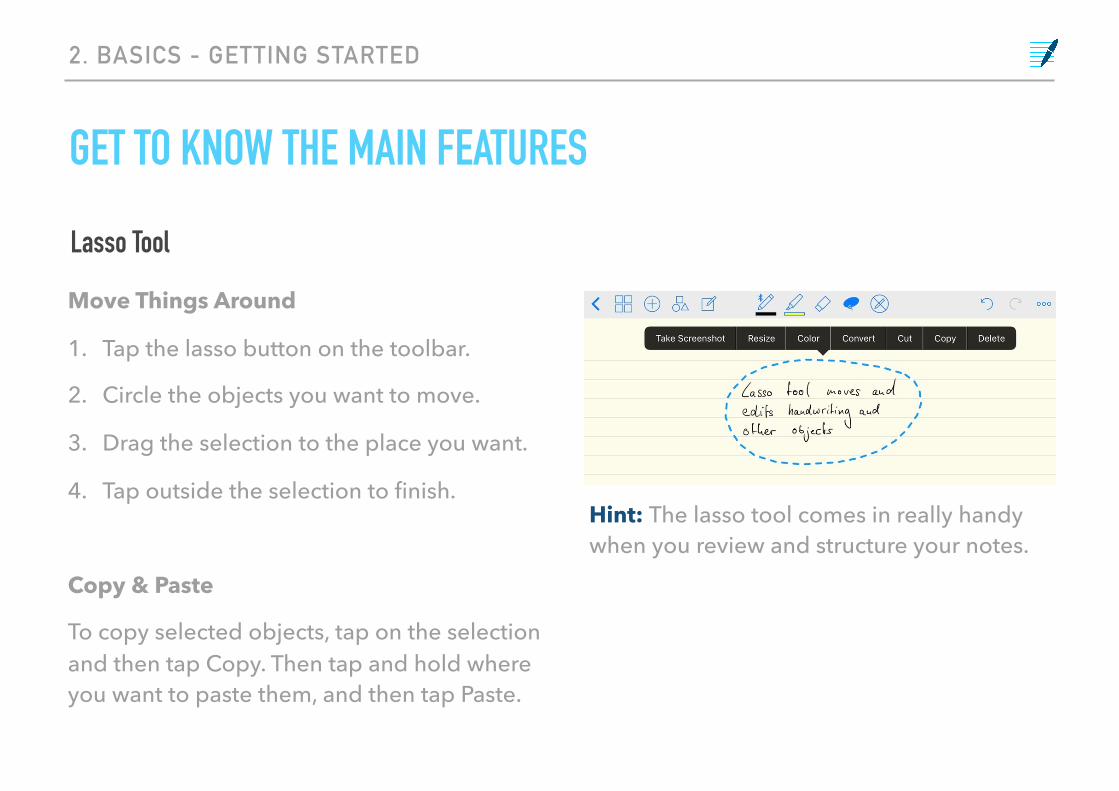
GET TO KNOW THE MAIN FEATURES
Lasso Tool
Move Things Around
1. Tap the lasso button on the toolbar.
2. Circle the objects you want to move.
3. Drag the selection to the place you want.
4. Tap outside the selection to finish.
Copy & Paste
To copy selected objects, tap on the selection and then tap Copy. Then tap and hold where you want to paste them, and then tap Paste.
Hint: The lasso tool comes in really handy when you review and structure your notes.

2. BASICS - GETTING STARTED
GET TO KNOW THE MAIN FEATURES
Scrolling and Turning Pages
Use two fingers to scroll; swipe left or right to turn to next or previous page. In read-only mode, use only one finger.
If Apple Pencil is activated, you can also navigate with one finger.
Hint: Swiping to the right will also add the next page to your notebook if you arrived at the end. You can disable this in Options.

2. BASICS - GETTING STARTED
GET TO KNOW THE MAIN FEATURES
Zoom Window 1/2GoodNotes provides a zoom window to assist you to write in small size with your fingers or with capacitive styluses. It contains a zoomed view corresponding to a rectangular area on a page.
Moving the Zoom Window
Tapping on anywhere on a page will move the zoom window to that position. You can also drag and drop the zoom window cursor

2. BASICS - GETTING STARTED
GET TO KNOW THE MAIN FEATURES
Zoom Window 2/2
Writing Continuously
1. Begin writing near the left.
2. Continue to write towards the right; a blue rectangle will appear on the left.
3. You should be able to see the last part of what you have just written inside the blue rectangle. Continue your writing inside the blue rectangle.
4. The zoom window moves forward automatically when you lift your finger.
Hint: The zoom window offers additional settings, like page margin or favorite colors. Tap twice on the favorite colors to change them.

3. CATEGORIES
ORGANIZE YOUR NOTEBOOKS AND DOCUMENTS
Create a Category GoodNotes gives you the option to create master-categories and normal categories. A master category can contain multiple other categories.
1. Tap on Categories in the library
2. Tap the + button
3. Choose what kind of category you want to create
Rename/Delete/Move
Long press on the category to perform further actions. You can also swipe left to delete it.
4. HANDWRITING SEARCH & -RECOGNITION
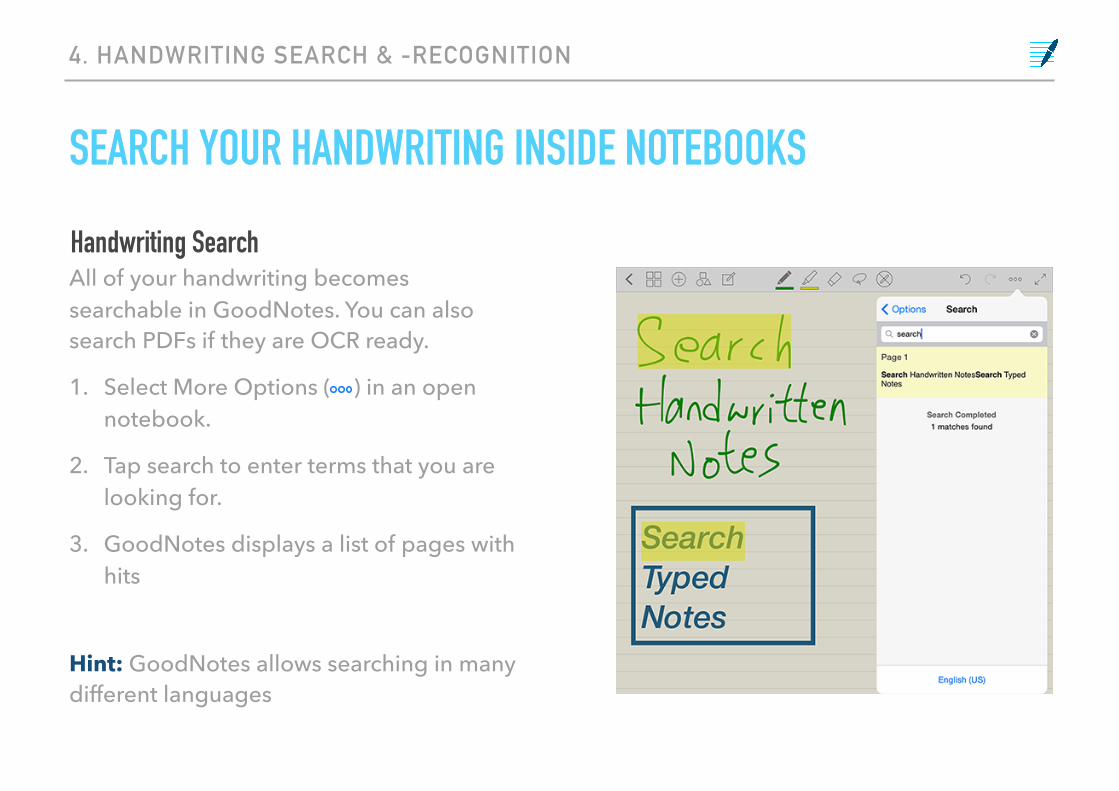
SEARCH YOUR HANDWRITING INSIDE NOTEBOOKS
Handwriting SearchAll of your handwriting becomes searchable in GoodNotes. You can also search PDFs if they are OCR ready.
1. Select More Options ( ) in an open notebook.
2. Tap search to enter terms that you are looking for.
3. GoodNotes displays a list of pages with hits
Hint: GoodNotes allows searching in many different languages

4. HANDWRITING SEARCH & -RECOGNITION
CONVERT HANDWRITTEN NOTES TO TEXT
Converting1. Select the lasso tool in the toolbar
2. Select the notes you want to convert
3. Tap on the selection again and choose Convert
You can copy the text to the clipboard and send it via email or to other third party apps.
Hint: Try taking notes while brainstorming, converting them and sending them to any third party app to organize your ideas and tasks there

5. THUMBNAIL PANEL
QUICK GLANCE AND EASY MANAGEMENT OF PAGES
Reordering Pages1. Tap and hold the thumbnail
2. Move it to the position you want
3. Release
Copy, Delete and Rotate Pages1. Tap Edit in thumbnail view
2. Select the pages you want
3. Tap Copy or Rotate
Hint: Learn more about moving pages between different notebooks on the upcoming slides.
6. IMPORT AND EXPORT
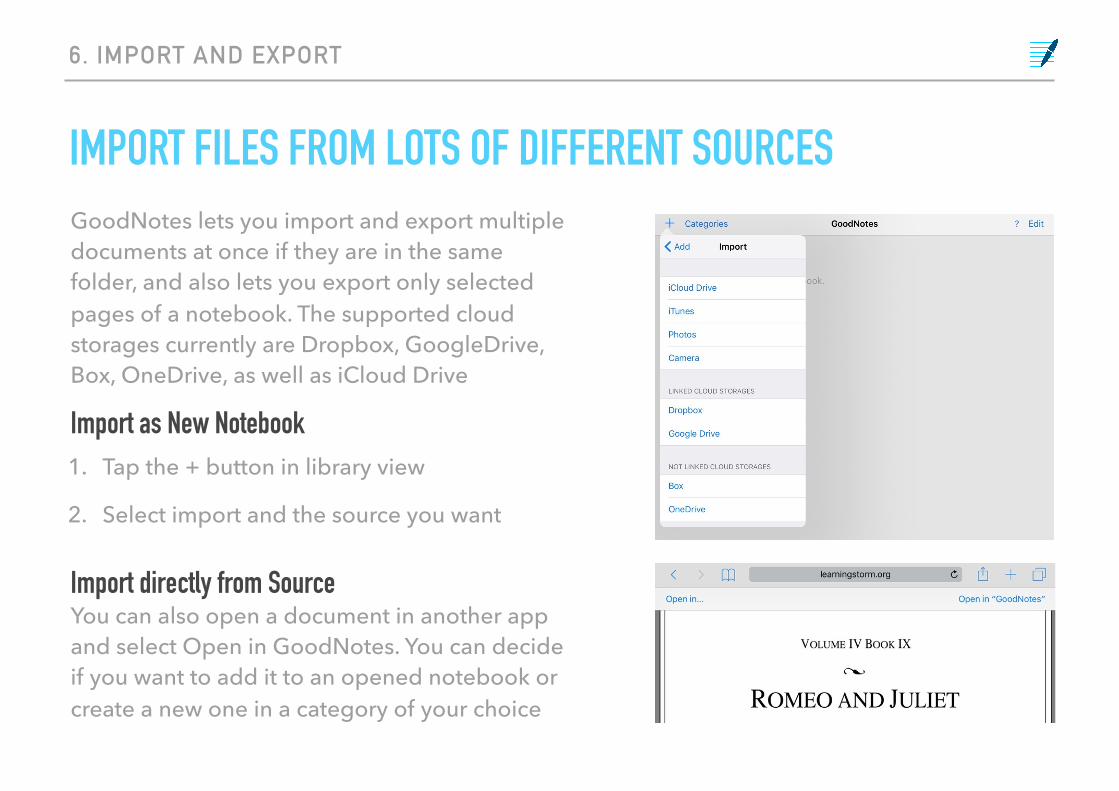
IMPORT FILES FROM LOTS OF DIFFERENT SOURCES
Import directly from Source
Import as New Notebook1. Tap the + button in library view
2. Select import and the source you want
GoodNotes lets you import and export multiple documents at once if they are in the same folder, and also lets you export only selected pages of a notebook. The supported cloud storages currently are Dropbox, GoogleDrive, Box, OneDrive, as well as iCloud Drive
You can also open a document in another app and select Open in GoodNotes. You can decide if you want to add it to an opened notebook or create a new one in a category of your choice
6. IMPORT AND EXPORT
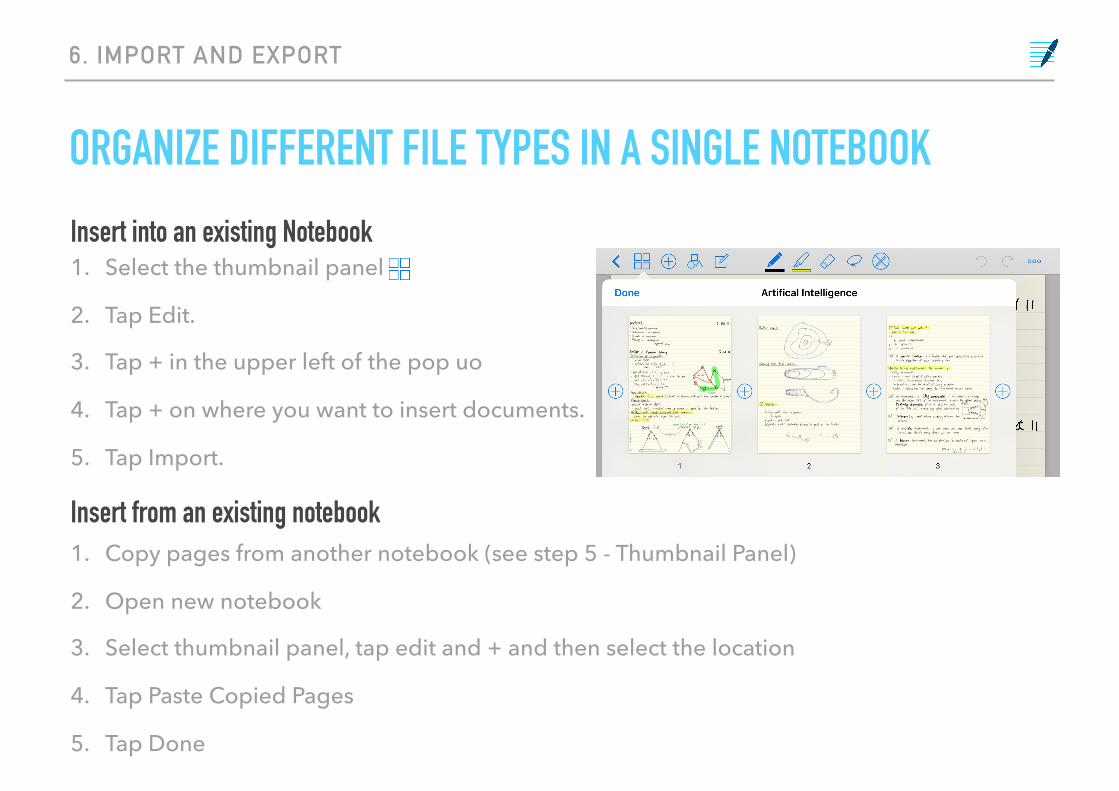
ORGANIZE DIFFERENT FILE TYPES IN A SINGLE NOTEBOOKInsert into an existing Notebook1. Select the thumbnail panel
2. Tap Edit.
3. Tap + in the upper left of the pop uo
4. Tap + on where you want to insert documents.
5. Tap Import.
Insert from an existing notebook1. Copy pages from another notebook (see step 5 - Thumbnail Panel)
2. Open new notebook
3. Select thumbnail panel, tap edit and + and then select the location
4. Tap Paste Copied Pages
5. Tap Done
6. IMPORT AND EXPORT
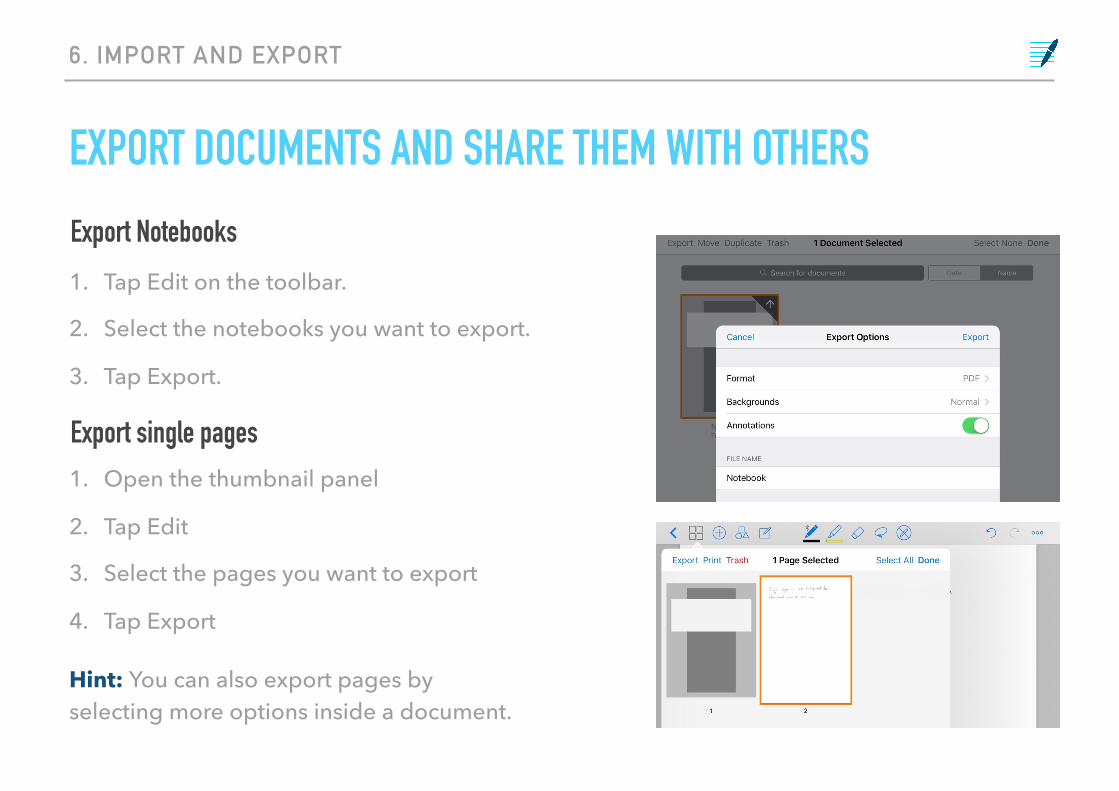
EXPORT DOCUMENTS AND SHARE THEM WITH OTHERSExport Notebooks1. Tap Edit on the toolbar.
2. Select the notebooks you want to export.
3. Tap Export.
Export single pages1. Open the thumbnail panel
2. Tap Edit
3. Select the pages you want to export
4. Tap Export
Hint: You can also export pages by selecting more options inside a document.

6. IMPORT AND EXPORT
OTHER WAYS OF EXPORTING AND SHARING FILESiTunes File SharingInstructions below show how you can transfer files between your computer and the iTunes File Sharing folder of GoodNotes. If you want to import documents into GoodNotes with a USB cable, you need to put them into the file sharing folder first.
1. Connect your iPad with your computer using a USB cable and open iTunes.
2. Select your iPad on the left panel.
3. Select Apps at the top.
4. Scroll down to the File Sharing section.
5. Select GoodNotes on the left.
6. Drag and drop files between your computer and the GoodNotes Documents panel.
7. To import transferred files, please follow the above instructions. (Choose iTunes and select the transferred files.)

6. IMPORT AND EXPORT
OTHER WAYS OF EXPORTING AND SHARING FILESWi-Fi File Transfer
If your iPad and your computer are in the same Wi-Fi network, you can also transfer files between the iTunes File Sharing folder of GoodNotes and your computer without using a USB cable. To begin…
1. Tap the Options button in library.
2. Tap Wi-Fi File Transfer.
3. On your computer, open the website written on the alert.
4. Tap a file to download to your computer or choose a file to upload.
5. To import transferred files, please follow the instructions in iTunes File Sharing

7. TABS AND SHORTCUTS
OPEN MULTIPLE DOCUMENTS AND SWITCH BETWEEN THEMTabs - Default Settings1. Open an existing notebook 2. Exit the notebook and open another notebook 3. Both will be presented in tabs 4. Change between tabs by tapping on them or
using shortcuts (see below) 5. single tap on a tab to change the name 6. To close a tab, press the X
Disable Auto-Tab CreationTo disable tabs choose Options>Settings>Document Editing. You can still open a notebook in a new tab by long-pressing on the notebook cover in the library view

7. TABS AND SHORTCUTS
SHORTCUTS FOR BETTER NAVIGATION
ShortcutsGoodNotes allows several shortcuts when a bluetooth keyboard is connected:
⌘ 1: Switch to Tab 1 ⌘ 2: Switch to Tab 2 control tab: Show next Tab control shift tab: Show previous Tab option =: Zoom In option -: Zoom Out ⌘ W: Close current Tab

8. PALM REJECTION
YOUR PALM DOESN’T INTERFERE WITH YOUR WRITINGGoodNotes provides a palm rest function and an intelligent automatic palm rejection algorithm to assist with your note-taking.
Configuration of Palm Rejection1. Tap the Options button located at the
bottom right.
2. Tap Settings.
3. Tap Palm Rejection.
4. Tap Configuration.
5. Rotate the hand picture with one finger to the angle of your writing posture.
Hint: If you write with your left hand and the toolbar is interfering with your writing position try moving it to the bottom by tapping Options>Settings>Document Editing>Toolbar Position.

8. PALM REJECTION
REST YOUR PALM ON THE DISPLAY WHILE WRITING
The palm rest lets you rest your palm on the lower part of the screen without making any changes. It is disabled by default; please enable it from the Settings window if you want to use it. The palm rest can be resized by dragging its control handle; tapping on its control handle will open it when it is closed, and close it when it is opened.
Palm Rest
Hint: The zoom-window also has a built-in palm rest that you can adjust by dragging the control-

9. AUTO-BACKUP
KEEPS YOU FILES SAVEEnable auto-backup to have your documents uploaded to a cloud storage such as Dropbox automatically. Note that if you delete documents in GoodNotes, their backup copies inside the cloud storage will not be deleted.
Configuration of Auto-Backup1. Tap the Options button located at the
bottom right.
2. Tap Settings.
3. Tap Automatic Backup.

10. ICLOUD
SYNC ACROSS ALL OF YOUR DEVICES
To sync your GoodNotes files please enable “Use iCloud“ on all of your devices in Options>Settings>iCloud. The documents will be synced automatically and will be stored locally as well as in iCloud.
Enable iCloud Sync
Hint: Sync does not only work between iPad and iPhone but also with GoodNotes for Mac.
Changes to documents are auto-saved about every 15 seconds, when you tap the back button to return to the library view, and when the home button is pressed. iCloud will sync the changes automatically after documents are auto-saved.
How does it work?

11. TV-OUT
POWERFUL FEATURE FOR TEACHING AND PRESENTINGWhen connected, the external screen only shows the content and hides all user interface elements by default. This can be disabled in Options>Settings>General>TV-Out and Airplay.
Locking the screenNormally, when you zoom and move the page on your iPad, it will be reflected also in the external display. You can lock the page position and zoom scale in the external display by tapping on the lock button on the toolbar. When the external display is locked, you can zoom in to write while showing the audience an unzoomed page.
12. PAPER TEMPLATES
MORE INFORMATION ABOUT PAPER TEMPLATES
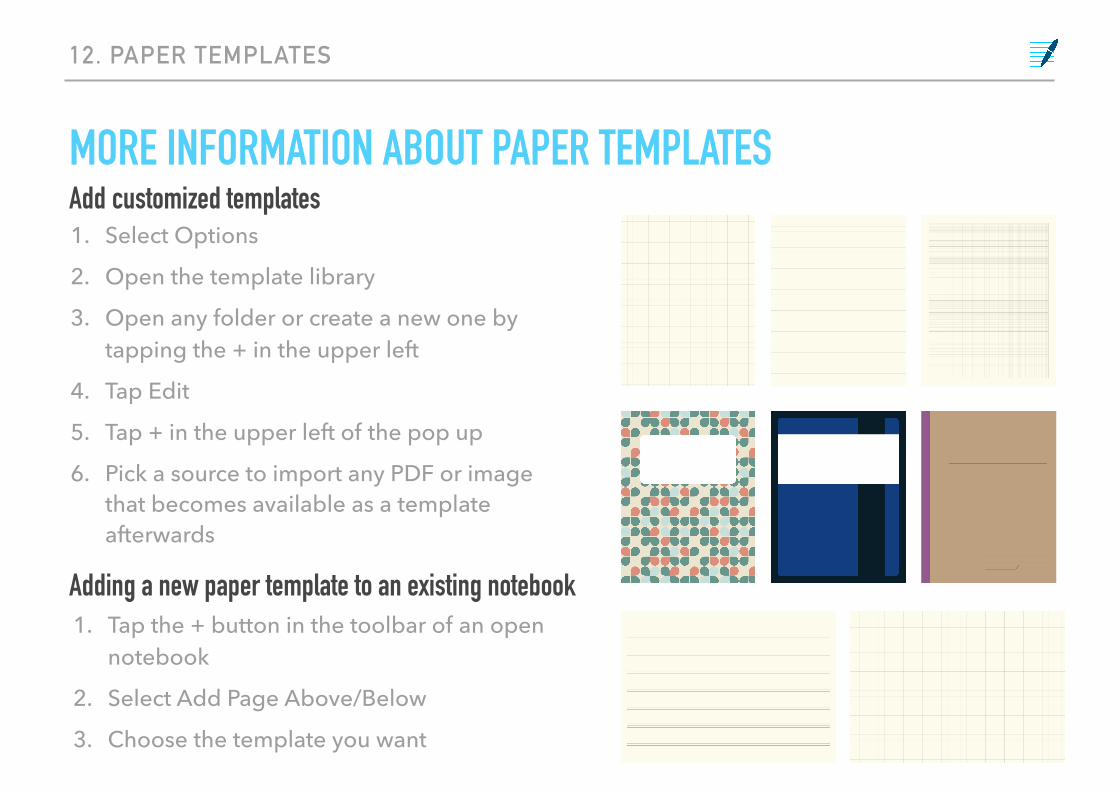
Adding a new paper template to an existing notebook1. Tap the + button in the toolbar of an open
notebook
2. Select Add Page Above/Below
3. Choose the template you want
Add customized templates1. Select Options
2. Open the template library
3. Open any folder or create a new one by tapping the + in the upper left
4. Tap Edit
5. Tap + in the upper left of the pop up
6. Pick a source to import any PDF or image that becomes available as a template afterwards

13. USING A SMART STYLUS
DIFFERENT SMART STYLUS TYPES CAN BE USED
Pairing a Smart Stylus1. Select Options > Settings > Smart Stylus
2. Choose the stylus that you like to use
3. Adapt the settings for the stylus of your choice
GoodNotes supports many different smart styluses and will constantly add more. Visit the Support Help Desk to see more details.

HINTS
REVIEW ALL THE HINTSHint: Add more of your favorite colors to the presets by tapping Edit. Arrange them by pressing and holding.
Hint: Tapping on the eraser twice, will bring up additional settings. Try auto-deselect for an even more seamless writing experience!
Hint: The highlighter combined with shape recognition works wonderfully to highlight PDF texts or ebooks.
Hint: The lasso tool comes in really handy when you review and structure your notes.
Hint: Swiping to the right will also add the next page to your notebook if you arrived at the end. You can disable this in Options.
Hint: The zoom window offers additional settings, like page margin or favorite colors. Tap twice on the favorite colors to change them.
Hint: GoodNotes allows searching in many different languagesHint: Try taking notes while brainstorming, converting them and sending them to any third party app to organize your ideas and tasks there
Hint: You can also export pages by selecting more options inside a document.
Hint: If you write with your left hand and the toolbar is interfering with your writing position try moving it to the bottom by tapping Options>Settings>Document Editing>Toolbar Position.
Hint: The zoom-window also has a built-in palm rest that you can adjust by dragging the control-
Hint: Sync does not only work between iPad and iPhone but also with GoodNotes for Mac.
© Time Base Technology Limited 2016. Apple, the Apple logo, iPad, and iPhone are trademarks of Apple Inc., registered in the U.S. and other countries. App Store is a service mark of Apple Inc.
www.goodnotesapp.com