User Guide - · PDF fileContents Important instructions retain for future use....
24
CAFE BARISTA User Guide EM5000
Transcript of User Guide - · PDF fileContents Important instructions retain for future use....

CAFE BARISTAUser Guide
Need help with your appliance? Contact our customer service team or visit our website for information and tips on getting the most from your appliance.
Australia | visit www.sunbeam.com.au phone 1300 881 861 mail Units 5 & 6, 13 Lord Street, Botany NSW 2019 Australia. New Zealand | visit www.sunbeam.co.nz phone 0800 786 232 mail Level 6, Building 5, Central Park, 660–670 Great South Road, Greenlane, Auckland.
Sunbeam Corporation Limited | ABN 45 000 006 771Sunbeam Corporation is a division of GUD Holdings Limited.
Sunbeam is a registered trademark.
Made in China to Sunbeam’s specification.Due to minor changes in design or otherwise, the product you buy may differ slightly from the one shown here.Approved by the appropriate electrical regulatory authorities.
©Copyright Sunbeam 2015.
01/15
EM5000
Australia
www.sunbeam.com.au 1300 881 861 Units 5 & 6, 13 Lord Street, Botany NSW 2019 Australia New Zealand
www.sunbeam.co.nz 0800 786 232 Level 6, Building 5, Central Park, 660-670 Great South Road, Greenlane, Auckland New Zealand

Sub HeadingBody copy with not indent applied.• Bullet copy Bullet copy Bullet copy Bullet
copy Bullet copy Bullet copy Bullet copy Bullet copy
2
Heading

Contents
Important instructions – retain for future use.
Sunbeam’s Safety Precautions 2Selecting the right coffee 3Features of your Cafe Barista 4Control Panel 6Before using your appliance for the first time 7Operating Instructions 8Care and Cleaning 15Troubleshooting Guide 18

2
Sunbeam’s Safety PrecautionsSAFETY PRECAUTIONS FOR YOUR SUNBEAM ESPRESSO MACHINE.• Always place the unit on a flat, level surface.• Do not operate without water in reservoir.• Do not remove the filter holder during water flow or
coffee flow as the unit is under pressure. Removing the filter holder during operation can lead to a scalding or injury.
• Clean the steam nozzle only when the unit has been switched off and allowed to cool.
• Disconnect the plug from the power outlet if there is any problem during the coffee making process or prior to cleaning your appliance.
• Do not allow the power cord to come into contact with the hot parts of the appliance (cup warming plate, filter holder, steam nozzle).
• Keep hands away from hot parts of the appliance, including the cup warming plate, filter holder and steam nozzle.
If you have any concerns regarding the performance and use of your appliance, please visit www.sunbeam.com.au or contact the Sunbeam Consumer Service Line.
Ensure the above safety precautions are understood.
Sunbeam is very safety conscious when designing and manufacturing consumer products, but it is essential that the product user also exercise care when using an electrical appliance. Listed below are precautions which are essential for the safe use of an electrical appliance:
• Read carefully and save all the instructions provided with an appliance.
• Always turn the power off at the power outlet before you insert or remove a plug. Remove by grasping the plug - do not pull on the cord.
• Turn the power off and remove the plug when the appliance is not in use and before cleaning.
• Do not use your appliance with an extension cord unless this cord has been checked and tested by a qualified technician or service person.
• Always use your appliance from a power outlet of the voltage (A.C. only) marked on the appliance.
• This appliance is not intended for use by persons (including children) with reduced physical, sensory or mental capabilities, or lack of experience and knowledge, unless they have been given supervision or instruction concerning use of the appliance by a person responsible for their safety.
• Children should be supervised to ensure that they do not play with the appliance.
• The temperature of accessible surfaces may be high when the appliance is operating.
• Never leave an appliance unattended while in use.
• Do not use an appliance for any purpose other than its intended use.
• Do not place an appliance on or near a hot gas flame, electric element or on a heated oven.
• Do not place on top of any other appliance.• Do not let the power cord of an appliance hang
over the edge of a table or bench top or touch any hot surface.
• Do not operate any electrical appliance with a damaged cord or after the appliance has been damaged in any manner. If damage is suspected, return the appliance to the nearest Sunbeam Appointed Service Centre for examination, repair or adjustment.
• For additional protection, Sunbeam recommend the use of a residual current device (RCD) with a tripping current not exceeding 30mA in the electrical circuit supplying power to your appliances.
• Do not immerse the appliance in water or any other liquid unless recommended.
• Appliances are not intended to be operated by means of an external timer or separate remote control system.
• This appliance is intended to be used in household and similar applications such as: staff kitchen areas in shops, offices and other working environments; farm houses; by clients in hotels, motels and other residential type environments; bed and breakfast type environments.

3
Selecting the right coffee
The CoffeeThe coffee should be freshly ground and dark roasted. You may want to try a French or Italian roast ground for espresso. Pre-ground coffee will only retain its flavour for 7–8 days, provided it is stored in an airtight container and in a cool, dark area. Do not store in refrigerator or freezer. Whole beans are recommended to be ground just before use. Coffee beans stored in an airtight container will keep its flavour for up to 4 weeks.
The GrindThis is a vital step in the espresso making process if you are grinding your own coffee and takes practice. The coffee must be of a fine grind.
• The correct grind should look like salt.• If the grind is too fine, the water will not flow
through the coffee even under pressure. These grinds look like powder and feel like flour when rubbed between fingers.
• If the grind is too coarse, the water flows through the coffee too fast, preventing a full-flavoured extraction.
Be sure to use a quality grinder for uniform consistency. A conical or burr mill grinder is recommended for a consistent and fine espresso grind.

4
Features of your Sunbeam Cafe BaristaBrewing head
Porta-Filter
Frothed Milk Dispensing Tube
Cup Height Adjusting Tray
Removable Drip Tray and Lid
Water Reservoir Lid
Removable Water Reservoir

5
Control Panel
Milk Reservoir Lid
Froth Control Knob
Froth Tuber Lever
Removable Milk Reservoir
On/Off Switch "I/O" (See right hand side of appliance)
Porta Filter
1 cup and 2 cup filter
Measuring Scoop/Tamper
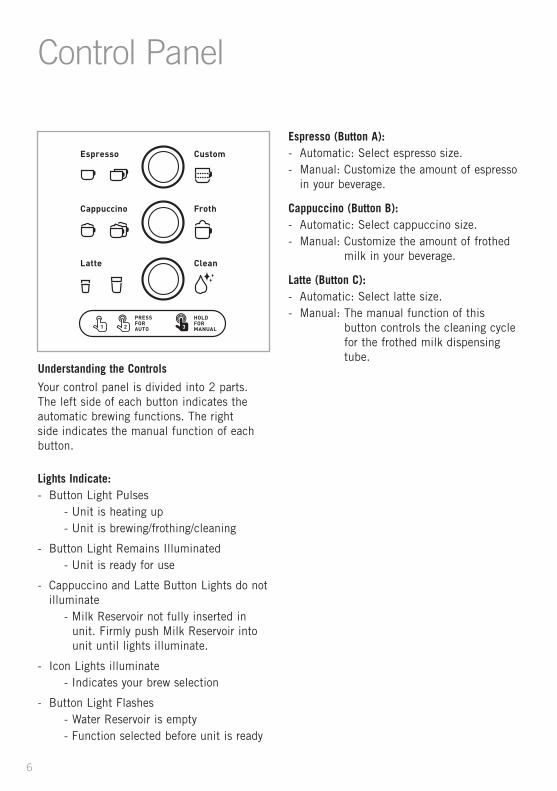
Understanding the Controls
Your control panel is divided into 2 parts. The left side of each button indicates the automatic brewing functions. The right side indicates the manual function of each button.
Lights Indicate:- Button Light Pulses
- Unit is heating up- Unit is brewing/frothing/cleaning
- Button Light Remains Illuminated- Unit is ready for use
- Cappuccino and Latte Button Lights do not illuminate
- Milk Reservoir not fully inserted in unit. Firmly push Milk Reservoir into unit until lights illuminate.
- Icon Lights illuminate - Indicates your brew selection
- Button Light Flashes - Water Reservoir is empty - Function selected before unit is ready
Espresso (Button A):- Automatic: Select espresso size.- Manual: Customize the amount of espresso
in your beverage.
Cappuccino (Button B):- Automatic: Select cappuccino size.- Manual: Customize the amount of frothed
milk in your beverage.
Latte (Button C):- Automatic: Select latte size.- Manual: The manual function of this
button controls the cleaning cycle for the frothed milk dispensing tube.
6
Control Panel

7
Before using your appliance for the first timeStep 1 - Clean the appliance1. Make sure unit is unplugged and the On/Off
switch is in the Off position “O”.2. Remove stickers and labels from the unit. NOTE: REMOVE THE RED PLUG FOUND AT THE
BASE OF THE WATER RESERVOIR.3. Remove and wash the water reservoir, milk
reservoir, porta-filter, 2 filters and measuring scoop in a mixture of mild detergent and water. Rinse each thoroughly and place back onto appliance.
NOTE: Porta-filter and water reservoir are NOT dishwasher safe.
Step 2 - Prime the unit (must be completed prior to first use) 1. Plug unit in and turn unit ON (“l”) using the
On/Off switch.2. Fill water reservoir up to the “MAX” level
with water and place back on unit.3. Fill milk reservoir up to the “MAX” level with
water and place back on unit. Be sure to firmly push the milk reservoir into place until Cappuccino and Latte buttons illuminate.
4. Place porta-filter in the unit ensuring it is properly locked. For more instructions, refer to the “Placing the Porta-Filter” section on page 10 of this manual.
5. Place a large cup under porta-filter.6. Aim the tip of the frothed milk dispensing
tube inside the cup.7. Once all 3 lights on the control panel stop
pulsing and illuminated, press the Latte " " button twice brew double latte, the unit stops automatically.
8. Once step 7 is complete, the 3 control panel lights will remain illuminated indicating that the unit is ready for use.

8
IMPORTANT: Unit must be primed prior to first use. See page 7.
Filling the Water Reservoir
A. Lift the removable water reservoir from the unit and fill with fresh water up to the “MAX” line. Do not fill past the “MAX” line. Never use warm or hot water to fill the water reservoir.
B. Close the water reservoir lid and place it back in the unit ensuring it fits tightly.
Filling the Milk Reservoir
If you plan to prepare cappuccino or latte, remove the milk reservoir from the unit. Lift the lid and pour the quantity of cold milk you estimate you will need. Do not fill past the “MAX” line. When done, place the milk reservoir back in the unit ensuring it fits tightly and the Cappuccino and Latte buttons are illuminated or pulsing.
NOTE: Be sure to firmly push Milk Reservoir into unit until Cappuccino and Latte buttons light illuminate/pulse.NOTE: You can use any type of milk, i.e. whole milk, low fat milk, organic or soy milk.
Operating Instructions
Figure 1
Figure 2

9
Operating Instructions - continued
Choosing the Filter
Select the filter to be used as follows:
A. FOR A SINGLE SHOT – use the filter for a single shot of espresso if using ground coffee.
B. FOR A DOUBLE SHOT OR TWO SINGLE SHOTS – use filter for a double shot.
Inserting the Filter
A. To insert the selected filter in the porta-filter.
Figure 3
a. b.Figure 4

10
Operating Instructions - continued
Filling with Coffee
a. Fill the filter with fresh, fine ground espresso coffee (do not overfill).
b. Tamp and compress the ground coffee firmly and evenly. Coffee should be 3mm below top of filter after tamping.
c. Clean any excess coffee from the rim to ensure proper fit under brew head and avoid leaks.
Placing the Porta-Filter
a. Position porta-filter underneath the brew head.
b. Position handle so that the handle lines up with the open lock icon “ ” on the unit and fits into the groove.
c. Then, slowly turn it to the right until the retention clip is aligned with the closed lock symbol “ ” on the unit.
Figure 5a
Figure 5b
Figure 5c
Figure 6a
Figure 6b
Figure 6c

11
Operating Instructions - continued
Placing the Cup(s)
a. Pull out the height adjustment tray if you are using a small “demitasse” cup to brew espresso.
b. Keep the height adjustment tray inside its compartment if you are using a larger cup to brew cappuccino.
c. Keep the height adjustment tray inside its compartment if you are brewing into a larger cup.
Caution: When brewing cappuccino or latte, make sure to adjust the frothing tube lever to aim the frothed milk dispensing tube inside your cup
Turning the Unit on
a. Make sure unit is plugged in.
b. Turn unit on “I”.
The 3 control panel lights will start pulsing during heating until the brew and steam heaters reach the perfect temperature. Once these lights become solid, the unit is ready to use.
NOTE: It is normal for the Espresso function to be ready before the Cappuccino and Latte functions.
NOTE: If you leave your unit on for 15 minutes without using, your unit will go into sleep mode. Press any button to reactivate.
Figure 7a
Figure 7b
Figure 7c
Latte
Figure 8a
Figure 8a

12
Operating Instructions - continued
SELECT THE FUNCTION
Preparing Espresso
a. Press the Espresso Button “ ” once to brew one single shot.
b. Press the Espresso Button “ ” twice to brew a double shot.
c. Press and hold the Espresso Button “ ” for 3 seconds to customize the brewing to your preference. When done, press the Espresso Button “ ” once again to stop brewing. For safety, unit will automatically stop after brewing 150ml.
The unit will start brewing the espresso according to your selection. The unit will turn off automatically and the lights will become solid indicating that the cycle has been completed. Your delicious espresso is ready to be enjoyed.
Note: For a small cup, use the single shot filter. For a large cup, use the double shot filter.
IMPORTANT: Make sure to clean the Frothed Milk Dispensing Tube after use. See Cleaning instructions on page 15 for instructions.
Figure 9a
Figure 9b
CappuccinoFrothLatte
Clean
Max
Cappuccino
Latte
Espresso
Custom
Froth
Clean
Figure 9b
x1
x2
hold for 3 sec.
Figure 10a
x1
Figure 10b
x2

13
Operating Instructions - continued
To add additional Frothed Milk/ Froth Milk separately
The Café Barista also allows you to manually add more frothed milk to your beverage or froth milk separately. To add more frothed milk to your beverage, place your beverage on the unit and ensure the Frothed Milk Dispensing Tube is aimed towards the center of your cup. Next, Press and Hold the Cappuccino Button “ ” for 3 seconds and the unit will begin to add more frothed milk. When done, press the Cappuccino Button “ ” once again to stop the unit. For frothing milk separately, follow the same instructions but place an empty cup on the unit instead. The frothed milk can be used for macchiato, hot chocolate, chai latte, etc.
Preparing Cappuccino
Prior to preparing your cappuccino, adjust the amount of froth milk according to your preference by turning the Froth Control Knob to the right for more froth and to the left for less froth.
Note: The froth intensity can be adjusted during the brewing cycle.
Clean
Figure 11
hold for 3 sec.
Figure 12a
MORE FROTH
Figure 12b
LESS FROTH

14
Operating Instructions - continued
a. Press the Cappuccino Button “ ” once to brew a small cup of cappuccino.
b. Press the Cappuccino Button “ ” twice to brew a large cup of cappuccino.
Note: For a small cup, use the single shot filter. For a large cup, use the double shot filter.
Important: Make sure to clean the Frothed Milk Dispensing Tube after use. See Cleaning instructions on page 15 for instructions.
Preparing Latte
Prior to preparing your latte, adjust the amount of froth according to your preference by turning the Froth Control Knob to the right for more froth and to the left for less froth.
a. Press the Latte Button “ ” once to brew a small cup of latte.
b. Press the Latte Button “ ” twice to brew a large cup of latte.
Note: For a small cup, use the single shot filter. For a large cup, use the double shot filter.
IMPORTANT: Make sure to clean the Frothed Milk Dispensing Tube after use. See Cleaning instructions on page 15 for instructions.
Figure 13a
x1
Figure 13b
x2
Figure 14a
MORE FROTH
Figure 14b
LESS FROTH
15
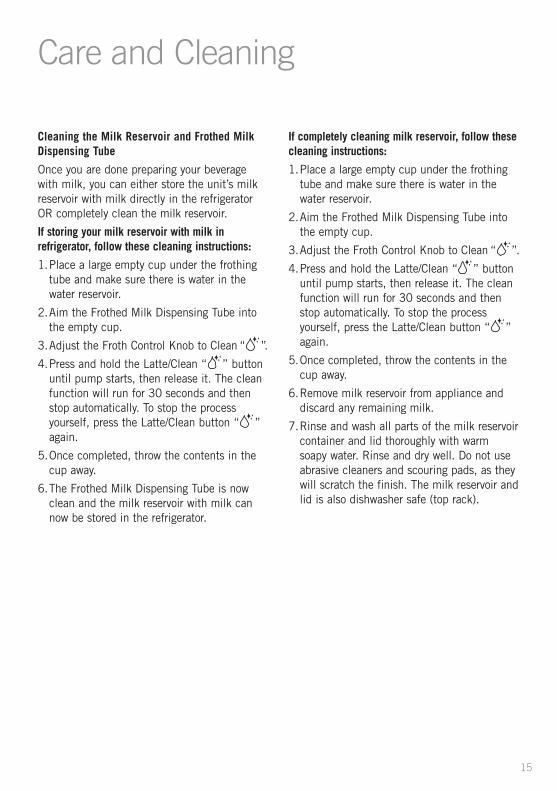
Cleaning the Milk Reservoir and Frothed Milk Dispensing Tube
Once you are done preparing your beverage with milk, you can either store the unit’s milk reservoir with milk directly in the refrigerator OR completely clean the milk reservoir.
If storing your milk reservoir with milk in refrigerator, follow these cleaning instructions:
1. Place a large empty cup under the frothing tube and make sure there is water in the water reservoir.
2. Aim the Frothed Milk Dispensing Tube into the empty cup.
3. Adjust the Froth Control Knob to Clean “ ”
4. Press and hold the Latte/Clean “ ” button until pump starts, then release it. The clean function will run for 30 seconds and then stop automatically. To stop the process yourself, press the Latte/Clean button “ ” again.
5. Once completed, throw the contents in the cup away.
6. The Frothed Milk Dispensing Tube is now clean and the milk reservoir with milk can now be stored in the refrigerator.
If completely cleaning milk reservoir, follow these cleaning instructions:
1. Place a large empty cup under the frothing tube and make sure there is water in the water reservoir.
2. Aim the Frothed Milk Dispensing Tube into the empty cup.
3. Adjust the Froth Control Knob to Clean “ ”
4. Press and hold the Latte/Clean “ ” button until pump starts, then release it. The clean function will run for 30 seconds and then stop automatically. To stop the process yourself, press the Latte/Clean button “ ” again.
5. Once completed, throw the contents in the cup away.
6. Remove milk reservoir from appliance and discard any remaining milk.
7. Rinse and wash all parts of the milk reservoir container and lid thoroughly with warm soapy water. Rinse and dry well. Do not use abrasive cleaners and scouring pads, as they will scratch the finish. The milk reservoir and lid is also dishwasher safe (top rack).
Care and Cleaning
.
.

16
Care and Cleaning - continued
Cleaning the Porta-Filter, Filter and Brew Head
WARNING: Some of the metal parts might still be hot. Do not touch them with your hands until they have cooled.
1. Turn unit Off (“O”) using the On/Off switch and unplug the power cord from the electrical outlet.
2. Remove the porta-filter and discard the espresso grounds. Wash both the porta-filter and filter with warm soapy water and rinse them well.
Note: The porta-filter and filters are not dishwasher safe.3. Wipe the lower part of the brew head where
the porta-filter is attached to the unit with a damp cloth or paper towel. This will remove any espresso grounds that might remain.
4. Attach the porta-filter (without any filter) back onto the unit.
5. Make sure there is water in the water reservoir.
6. Place a large empty cup under the porta-filter.
7. Plug unit in and turn unit ON (“l”) using the On/Off switch.
8. Once the Espresso button “ ” stops pulsing and remains illuminated, press and hold the Espresso button “ ” until pump starts, then release it. The unit will dispense water for about 50 seconds and then stop automatically. To stop the process yourself, press the Espresso button “ ” again.
Note: When completed, do not store the porta-filter by leaving attached to the unit. This can adversely affect the seal between the brew head and the porta-filter when brewing espresso.
Cleaning the Water Reservoir
Discard the remaining water by removing the reservoir and turning it upside down over the sink. It is recommended to empty the water reservoir between uses. Wash the water reservoir with soapy water, rinse it well and wipe it dry. Do not wash the water reservoir in the dishwasher.
Cleaning the Unit
1. Wipe housing with a soft wet cloth. Do not use abrasive cleaners or scouring pads, as they will scratch the finish.
2. Do not store the porta-filter in the brew head. This can adversely affect the seal between the brew head and the porta-filter while brewing espresso.
CAUTION: Do not immerse appliance in water.

17
Descaling
Mineral deposits built-up in the unit will affect the operation of the appliance. Your appliance must be descaled when you begin to notice an increase in the time required to brew espresso, or when there is excessive steaming. Also, you may notice a build-up of white deposits on the surface of the brew head. The frequency of cleaning depends upon the hardness of the water used. The following table gives the suggested cleaning intervals.
Suggested Cleaning Intervals
To Descale Water Reservoir
Use Sunbeam Liquid Descaler, a simple to use, non toxic cleaner available from Sunbeam appointed Service Agents.
1. Fill the reservoir with fresh, undiluted white household vinegar.
2. Allow appliance to sit overnight with the vinegar solution in the water reservoir.
3. Discard vinegar by removing the reservoir and turning it upside down over the sink.
4. Rinse the water reservoir thoroughly with tap water by filling tank half full with water and then pouring the water back out into the sink, repeating this step twice.
Care and Cleaning - continued
To Descale Internal Parts
1. Make sure you descale the inside of the water reservoir first by following the “descaling” steps above.
2. Make sure to switch the on/off button to the off “O” position and the power cord is disconnected from the electrical outlet. Fill the reservoir half way with white vinegar.
3. Insert the porta-filter (with filter and no coffee) and place jar/carafe or regular cup on top of the drip tray and under the porta-filter.
4. Plug the power cord into the electrical outlet.
5. Press the on/off button to switch the unit on “I”, once the 3 control panel illuminates solidly, press the Espresso/Custom Button “ ” twice. The vinegar will start flowing through the unit and it will stop automatically.
6. Place a pitcher or large cup (with at least 325 mL/11-ounce capacity) under the tube. Fill the milk reservoir with water and place it back on the unit. Turn the Froth Control Knob clockwise to the clean position “ ” then press the latte/clean button “ ” for 3 seconds to activate the clean function. The unit will start releasing steam through the frothing tube for 30 seconds. When done, throw the contents of the cup away.
7. Repeat Steps 1 – 6 as necessary using only tap water to rinse any remaining traces of vinegar out of the machine.
Type of Water Cleaning FrequencySoft Water (Filtered Water) Every 80 Brew Cycles
Hard Water (Tap Water) Every 40 Brew Cycles

18
Troubleshooting GuideProblem Possible Cause Solution
Coffee does not come out.
• No water in reservoir.• Coffee grind is too fine.• Too much coffee in the filter.• Appliance was not turned on or
plugged in.• Coffee has been tamped/
compressed too much.
• Add water.• Grind medium ground coffee.• Fill filter with less coffee.• Plug unit into electrical outlet
and turn it on.• Refill filter basket with coffee
DO NOT TAMP too much.
Coffee comes out around the edge of the porta-filter.
• Porta-filter not rotated to full lock position.
• Coffee grounds around the filter basket rim.
• Too much coffee in the filter.
• Rotate filter holder to full lock position.
• Wipe off rim and shower head seal.
• Fill with less coffee.
Milk is not foamy after frothing or it is not coming out of the frothing tube.
• Ran out of steam.• Milk is not cold enough.• Frothing tube is blocked.
• Ensure there is enough water in the water reservoir.
• Chill milk prior to making cappuccino or latte.
• Follow the instructions to clean the milk reservoir & frothing tube.
Coffee comes out too quickly.
• Ground coffee is too coarse.• Not enough coffee in filter.
• Use a finer grind.• Use more coffee.
Coffee is too weak. • Using small filter for double shot of espresso.
• Ground coffee is too coarse.
• Use large filter for double shot of espresso.
• Use a finer grind.
The three control panel lights are flashing alternatively.
• Water tank is out of water. • Add water to reservoir.
Cappuccino and/or Latte control button lights do not illuminate.
• Milk Reservoir not inserted.• Milk Reservoir not fully
inserted.
• Place Milk Reservoir on unit.• If Milk Reservoir is on unit,
push in firmly until Cappuccino and Latte control button lights illuminate.
Water is not being pulled in from the water reservoir.
• Red plug was not removed from base of water reservoir tank.
• Water reservoir tank not placed correctly on unit.
• Remove red plug from base of water reservoir tank. Red plug may also be found in hole on unit where water reservoir attaches at its base.
• Place water reservoir correctly.

Notes

Notes

CAFE BARISTAUser Guide
Need help with your appliance? Contact our customer service team or visit our website for information and tips on getting the most from your appliance.
Australia | visit www.sunbeam.com.au phone 1300 881 861 mail Units 5 & 6, 13 Lord Street, Botany NSW 2019 Australia. New Zealand | visit www.sunbeam.co.nz phone 0800 786 232 mail Level 6, Building 5, Central Park, 660–670 Great South Road, Greenlane, Auckland.
Sunbeam Corporation Limited | ABN 45 000 006 771Sunbeam Corporation is a division of GUD Holdings Limited.
Sunbeam is a registered trademark.
Made in China to Sunbeam’s specification.Due to minor changes in design or otherwise, the product you buy may differ slightly from the one shown here.Approved by the appropriate electrical regulatory authorities.
©Copyright Sunbeam 2015.
01/15
EM5000
Australia
www.sunbeam.com.au 1300 881 861 Units 5 & 6, 13 Lord Street, Botany NSW 2019 Australia New Zealand
www.sunbeam.co.nz 0800 786 232 Level 6, Building 5, Central Park, 660-670 Great South Road, Greenlane, Auckland New Zealand