User Guide - Wordfast images and topics contained in this user guide are not representative of every...
173
User Guide Copyright © Wordfast, LLC 2017. All rights reserved.
Transcript of User Guide - Wordfast images and topics contained in this user guide are not representative of every...

User Guide
Copyright © Wordfast, LLC 2017. All rights reserved.

Copyright © Wordfast, LLC 2017. Page 2 of 173
Table of ContentsAbout this Guide..................................................................................................................................................... 7
Conventions.......................................................................................................................................................7
Typographical............................................................................................................................................ 7
Icons.......................................................................................................................................................... 7
1 Release Notes Summary................................................................................................................................... 8
New Features and Improvements.................................................................................................................... 8
Fixed Issues...................................................................................................................................................... 8
2 About Wordfast Pro......................................................................................................................................... 10
Key Advantages.............................................................................................................................................. 10
3 Get Started........................................................................................................................................................ 11
Requirements.................................................................................................................................................. 11
Install and Activate Wordfast Pro................................................................................................................... 11
Online Activation..................................................................................................................................... 12
Manual Activation....................................................................................................................................13
Manage Licenses............................................................................................................................................ 14
View Current License..............................................................................................................................15
Re-install License....................................................................................................................................15
View Updates.......................................................................................................................................... 15
4 Start Wordfast Pro........................................................................................................................................... 17
Project Files Perspective................................................................................................................................ 17
TXLF Editor Perspective.................................................................................................................................17
Right-Click Menu.....................................................................................................................................19
Unlabeled Status Buttons and Icons...................................................................................................... 19
Help................................................................................................................................................................. 20
5 Projects..............................................................................................................................................................21
Search and Sort..............................................................................................................................................21
Create Project................................................................................................................................................. 22
Open Project................................................................................................................................................... 25
Modify Project................................................................................................................................................. 26
Remove Project...............................................................................................................................................27
Recalculate Progress...................................................................................................................................... 28
Package Files..................................................................................................................................................28
Import Package....................................................................................................................................... 29
Export Package.......................................................................................................................................30
Import SDL Package.......................................................................................................................................32
6 Project Files...................................................................................................................................................... 34

Copyright © Wordfast, LLC 2017. Page 3 of 173
Add Files......................................................................................................................................................... 34
Add Folders.....................................................................................................................................................35
Open Source File............................................................................................................................................35
Close Project...................................................................................................................................................36
Bilingual Export............................................................................................................................................... 36
Analyze............................................................................................................................................................37
Transcheck Report..........................................................................................................................................40
Segment Changes Report.............................................................................................................................. 42
Export Notes Report....................................................................................................................................... 44
Clean Up......................................................................................................................................................... 46
Remove Files.................................................................................................................................................. 47
7 Project TM......................................................................................................................................................... 49
Create Local TM............................................................................................................................................. 49
Add Local TM..................................................................................................................................................50
Connect To Remote TM................................................................................................................................. 51
Open TM......................................................................................................................................................... 54
Modify TM....................................................................................................................................................... 55
Copy TM..........................................................................................................................................................56
Import TM........................................................................................................................................................56
Export TM........................................................................................................................................................57
Remove TM.....................................................................................................................................................58
8 Project Terminology.........................................................................................................................................59
Terminology Lists (Glossaries)....................................................................................................................... 59
Create Local Glossary............................................................................................................................ 59
Add Local Glossary.................................................................................................................................60
Connect To Remote Glossary................................................................................................................ 61
Open Glossary........................................................................................................................................ 63
Import Glossary.......................................................................................................................................64
Export Glossary.......................................................................................................................................65
Blacklist............................................................................................................................................................65
Create Local Blacklist............................................................................................................................. 66
Add Local Blacklist..................................................................................................................................67
Connect To Remote Blacklist................................................................................................................. 67
Open Blacklist......................................................................................................................................... 68
Import Blacklist........................................................................................................................................69
Export Blacklist........................................................................................................................................70
Options............................................................................................................................................................ 71
Modify a Glossary or Blacklist................................................................................................................ 71
Remove a Glossary or Blacklist............................................................................................................. 72
9 Reports.............................................................................................................................................................. 74
Open Report....................................................................................................................................................74

Copyright © Wordfast, LLC 2017. Page 4 of 173
Remove Report............................................................................................................................................... 75
Export.............................................................................................................................................................. 76
10 Reference Files............................................................................................................................................... 77
Add Reference Files....................................................................................................................................... 77
Open File.........................................................................................................................................................78
Show Instructions............................................................................................................................................78
Remove File.................................................................................................................................................... 78
11 Translate Files................................................................................................................................................ 80
Open and Translate File.................................................................................................................................80
Chain Files...................................................................................................................................................... 81
Translate All Segments...................................................................................................................................82
Table Filter...................................................................................................................................................... 83
Find and Replace Content..............................................................................................................................85
TXLF Editor Progress Bar.............................................................................................................................. 87
Spell Check File..............................................................................................................................................88
Translation Memory.........................................................................................................................................89
TM Color Codes......................................................................................................................................89
Leverage TM........................................................................................................................................... 90
Concordance Search.............................................................................................................................. 91
View TM Leverage Results.....................................................................................................................92
Terminology List..............................................................................................................................................93
Terminology Color Codes....................................................................................................................... 94
Search Term........................................................................................................................................... 94
Add Term................................................................................................................................................ 95
Edit Term.................................................................................................................................................96
Remove Term......................................................................................................................................... 97
Insert Term..............................................................................................................................................97
Copy Term.............................................................................................................................................. 98
View and Copy Synonym....................................................................................................................... 98
Tags.................................................................................................................................................................99
View Tags............................................................................................................................................... 99
Copy Tag...............................................................................................................................................100
Copy All Tags....................................................................................................................................... 100
Clear All Tags....................................................................................................................................... 101
Edit Tag.................................................................................................................................................101
Delete Tag.............................................................................................................................................102
Notes............................................................................................................................................................. 102
View Notes............................................................................................................................................ 103
Add Note............................................................................................................................................... 103
Edit Note............................................................................................................................................... 104
Delete Note........................................................................................................................................... 105

Copyright © Wordfast, LLC 2017. Page 5 of 173
Export Notes......................................................................................................................................... 106
Segments.......................................................................................................................................................106
View Segment History.......................................................................................................................... 107
Commit to the TM.................................................................................................................................107
Verify Segment......................................................................................................................................107
Copy Source......................................................................................................................................... 108
Copy All Sources.................................................................................................................................. 109
Lock Segment....................................................................................................................................... 109
Clear Target.......................................................................................................................................... 109
Clear All Targets................................................................................................................................... 110
Unconfirm Segment.............................................................................................................................. 110
Edit Source............................................................................................................................................111
Accented Characters.............................................................................................................................111
Transcheck.................................................................................................................................................... 112
Enable Transcheck............................................................................................................................... 112
Transcheck During Translation.............................................................................................................113
Transcheck All.......................................................................................................................................113
View Transcheck Warning.................................................................................................................... 114
Machine Translation......................................................................................................................................115
Auto-Propagate..............................................................................................................................................115
Auto-Suggest.................................................................................................................................................117
Preview PDF................................................................................................................................................. 117
Live Preview..................................................................................................................................................117
Formatting Tools........................................................................................................................................... 119
Format................................................................................................................................................... 119
Tags.......................................................................................................................................................120
Options.................................................................................................................................................. 120
Save File....................................................................................................................................................... 121
12 Quick Tools...................................................................................................................................................122
Analyze..........................................................................................................................................................123
Cleanup......................................................................................................................................................... 125
Pseudo Translation....................................................................................................................................... 127
Bilingual Export............................................................................................................................................. 129
Bilingual Import............................................................................................................................................. 131
13 Preferences................................................................................................................................................... 134
General Preferences..................................................................................................................................... 134
Colors.................................................................................................................................................... 134
General..................................................................................................................................................135
Fonts......................................................................................................................................................136
Icons...................................................................................................................................................... 137
Layout....................................................................................................................................................138
Copyright © Wordfast, LLC 2017. Page 6 of 173
Segment................................................................................................................................................ 140
Shortcuts............................................................................................................................................... 141
Warnings............................................................................................................................................... 142
Tags.......................................................................................................................................................143
Auto-Propagation...................................................................................................................................145
Auto-Suggestion.................................................................................................................................... 146
Spellchecker.......................................................................................................................................... 147
Machine Translation..............................................................................................................................148
New Project Preferences.............................................................................................................................. 150
Replacement......................................................................................................................................... 151
Translation Memory.............................................................................................................................. 152
Terminology...........................................................................................................................................153
Penalties................................................................................................................................................154
Transcheck............................................................................................................................................ 155
Segmentation........................................................................................................................................ 165
Filters.....................................................................................................................................................166
User Preferences.......................................................................................................................................... 167
Default Settings.....................................................................................................................................168
Export or Import Preferences............................................................................................................... 169
14 FAQs.............................................................................................................................................................. 171
Copyright © Wordfast, LLC 2017. Page 7 of 173
About this GuideThe images and topics contained in this user guide are not representative of every product configuration. Eachproduct installation is configured to meet the needs of the intended users, who may or may not require certainfeatures and options. Therefore, the features and options covered in this user guide may differ from thoseavailable on your product configuration.
ConventionsCONVENTIONS
TypographicalThe following table explains the typographical conventions used in this guide.
Bold User interface controls, commands, and keywords in body text.
italic Represents an input field where user input is expected.
<…> Generic parameters that must be replaced by specific code or text.
[…] Generic parameters that are replaced by dynamic text.
CONVENTIONS
IconsThe following table explains the icon conventions used in this guide.
Note:This icon designates a note or helpful suggestion or reference relating to the surrounding text.
Best Practice:This icon designates a suggestion for best practice relating to the surrounding text.
Alert:This icon designates a warning or alert relating to the surrounding text. In this situation, the usershould exercise caution to avoid an undesirable result.
Copyright © Wordfast, LLC 2017. Page 8 of 173
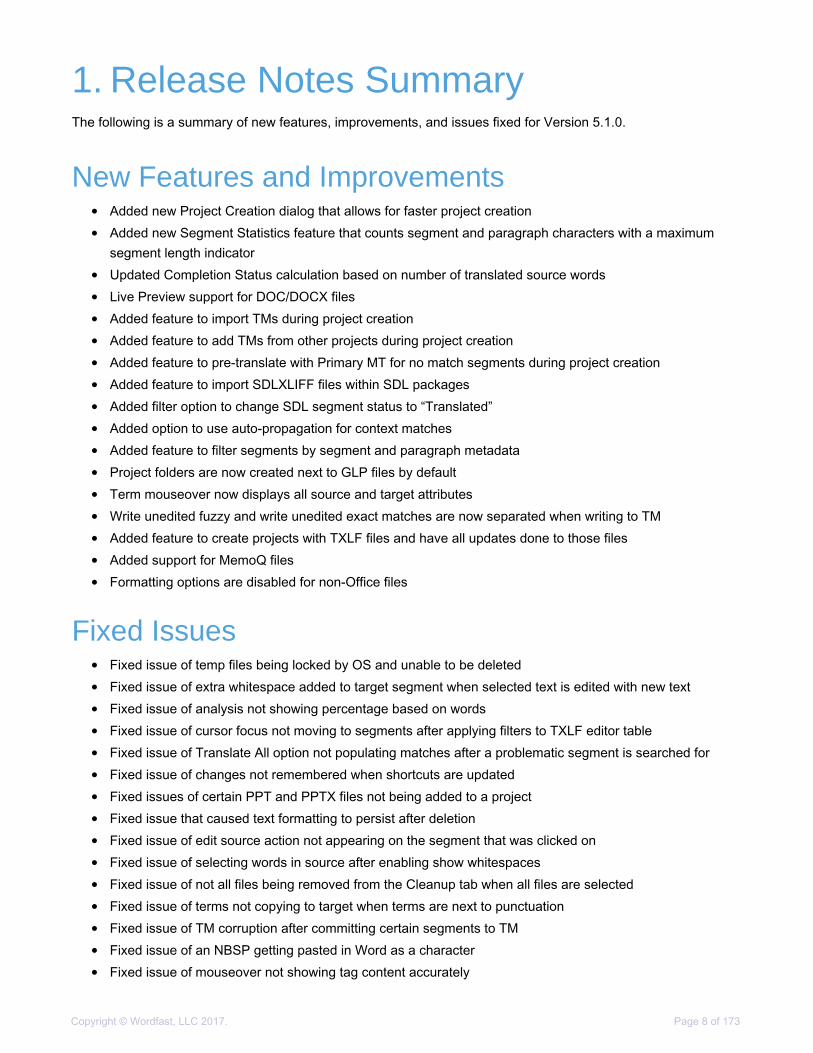
1. Release Notes SummaryThe following is a summary of new features, improvements, and issues fixed for Version 5.1.0.
New Features and Improvements• Added new Project Creation dialog that allows for faster project creation
• Added new Segment Statistics feature that counts segment and paragraph characters with a maximumsegment length indicator
• Updated Completion Status calculation based on number of translated source words
• Live Preview support for DOC/DOCX files
• Added feature to import TMs during project creation
• Added feature to add TMs from other projects during project creation
• Added feature to pre-translate with Primary MT for no match segments during project creation
• Added feature to import SDLXLIFF files within SDL packages
• Added filter option to change SDL segment status to “Translated”
• Added option to use auto-propagation for context matches
• Added feature to filter segments by segment and paragraph metadata
• Project folders are now created next to GLP files by default
• Term mouseover now displays all source and target attributes
• Write unedited fuzzy and write unedited exact matches are now separated when writing to TM
• Added feature to create projects with TXLF files and have all updates done to those files
• Added support for MemoQ files
• Formatting options are disabled for non-Office files
Fixed Issues• Fixed issue of temp files being locked by OS and unable to be deleted
• Fixed issue of extra whitespace added to target segment when selected text is edited with new text
• Fixed issue of analysis not showing percentage based on words
• Fixed issue of cursor focus not moving to segments after applying filters to TXLF editor table
• Fixed issue of Translate All option not populating matches after a problematic segment is searched for
• Fixed issue of changes not remembered when shortcuts are updated
• Fixed issues of certain PPT and PPTX files not being added to a project
• Fixed issue that caused text formatting to persist after deletion
• Fixed issue of edit source action not appearing on the segment that was clicked on
• Fixed issue of selecting words in source after enabling show whitespaces
• Fixed issue of not all files being removed from the Cleanup tab when all files are selected
• Fixed issue of terms not copying to target when terms are next to punctuation
• Fixed issue of TM corruption after committing certain segments to TM
• Fixed issue of an NBSP getting pasted in Word as a character
• Fixed issue of mouseover not showing tag content accurately

1. Release Notes Summary Wordfast
Copyright © Wordfast, LLC 2017. Page 9 of 173
• Fixed issue of the target column display in the bilingual table preview
• Fixed Find and Replace issue of a tooltip blocking the cursor
• Fixed issue of curly quotes causing false positives in Transcheck for en_CA
• Fixed issue that caused Undo action to be disabled after Copy All Sources action
• Fixed issue of all exact TUs being deleted when one of the duplicates was deleted in TM Admin
• Fixed issue of translation disappearing from target segments when scrolling through the file
• Fixed issue of spell-check red underline disappearing unexpectedly
• Fixed issue of Google or Microsoft MTs being enabled without an API key
• Fixed issue that caused secondary TM marking (asterisk) to disappear from the Score column

Copyright © Wordfast, LLC 2017. Page 10 of 173
2. About Wordfast ProWordfast Pro is a translation and editing application designed to improve the way in which translators work. Itpresents translators with a collaborative environment where Translation Memory (TM) files can be accessedquickly and efficiently. Wordfast Pro is a flexible application that can work with desktop TM files or interact directlywith a powerful TM server application. It can also operate as a stand-alone tool to supplement existing translationworkflows.
Key Advantages• TM compatibility: Tabular TM format allows for simple integration of Trados, SDLX or Déjà Vu TM files.
• Format flexibility: Native format is TXLF, a XML-based pivot format. Filters exist for DOC, PPT, XLS, PDF,HTML, MIF, INX, JSP, RC and TTX files.
• Collaborative environment: Users can interact with TM Server and share translation memory assets in real-time.
• Automated editing: Multilingual spell checkers and terminology recognition improves the speed andaccuracy in the review process.
Copyright © Wordfast, LLC 2017. Page 11 of 173
3. Get StartedThis section provides the basic information to get started in Wordfast Pro.
Wordfast Pro is a desktop application that can be installed and accessed on your computer.
RequirementsWordfast Pro requires the following:
• Java JRE. If not present, it is installed automatically during Wordfast Pro installation
• Activation of the full Wordfast Pro installation requires a license and registration
• Minimum RAM of 2GB
• Minimum resolution of 1366 x 768 is recommended
• Operating systems: Microsoft Windows 7, 8, and 10, OSX 10.10+
Install and Activate Wordfast ProTo install and activate Wordfast Pro:
1. Download the Wordfast Pro installer from http://www.wordfast.com/.
2. Run the installer.

3. Get Started Wordfast
Copyright © Wordfast, LLC 2017. Page 12 of 173
Wordfast Pro opens in Demo mode.
With an unlicensed Wordfast Pro working in Demo mode, you are limited to creating bilingual projects andstoring up to 500 translation units (TUs) in your Translation Memory. When the TUs are exceeded, an errormessage is displayed.
To activate Wordfast Pro, a license must be obtained and registered online or offline.
INSTALL AND ACTIVATE WORDFAST PRO
Online ActivationYou can activate Wordfast Pro online using the activation key requested when you installed Wordfast Pro.
To register Wordfast Pro online:
1. Open Wordfast Pro.
2. On the Help tab, click License Management.
3. On the License Manager dialog, click Online Registration.

3. Get Started Wordfast
Copyright © Wordfast, LLC 2017. Page 13 of 173
4. Enter the Activation Key and click OK.
5. Restart Wordfast Pro.
Your Wordfast Pro installation is now activated.
To resolve any license issues, log in to Wordfast Pro and select Support > Hotline.
INSTALL AND ACTIVATE WORDFAST PRO
Manual ActivationIf you need to activate Wordfast Pro manually, a License file is emailed to you as an attachment. Extract theattachment and save this license file to your computer.
To register Wordfast Pro offline:
1. Open Wordfast Pro.
2. On the Help tab, click License Management.
3. On the License Manager dialog, click Manual Registration.

3. Get Started Wordfast
Copyright © Wordfast, LLC 2017. Page 14 of 173
4. Enter the Activation Key and click Generate.
The text string "Copy the string below..." is displayed in the text box below the instruction text.
5. Copy this text into an email and send it to the email address provided on the Manual Registration dialog boxbelow the Activation Key field.
6. Copy the license file that is returned in an email from Wordfast to the computer containing Wordfast Pro.
7. On the License Manager dialog, click Manual Registration, and browse to the license file.
8. Select the license file and click OK.
9. Restart Wordfast Pro.
The license is now active.
To resolve any license issues, log in to Wordfast Pro and select Support > Hotline.
Manage LicensesYou can install, reinstall, view your current license information, and view WordFast Pro updates on the Help tab.
Wordfast Pro automatically checks for updates. If an update is available, a notification is displayedwhen you start Wordfast Pro.
Refer to Help for more information on Wordfast Pro licensing.

3. Get Started Wordfast
Copyright © Wordfast, LLC 2017. Page 15 of 173
MANAGE LICENSES
View Current LicenseYou can view the current license and keep track of the days remaining to the license expiration date.
To view the current Wordfast Pro license:
1. Open Wordfast Pro.
2. On the Help tab, click License Management.
MANAGE LICENSES
Re-install LicenseYou can reinstall your Wordfast Pro license by re-activating Wordfast Pro.
To re-install your license:
1. Get a new activation code for Wordfast Pro from http://www.wordfast.com/.
2. Follow the instructions for:
• Online Activation
• Manual Activation
MANAGE LICENSES
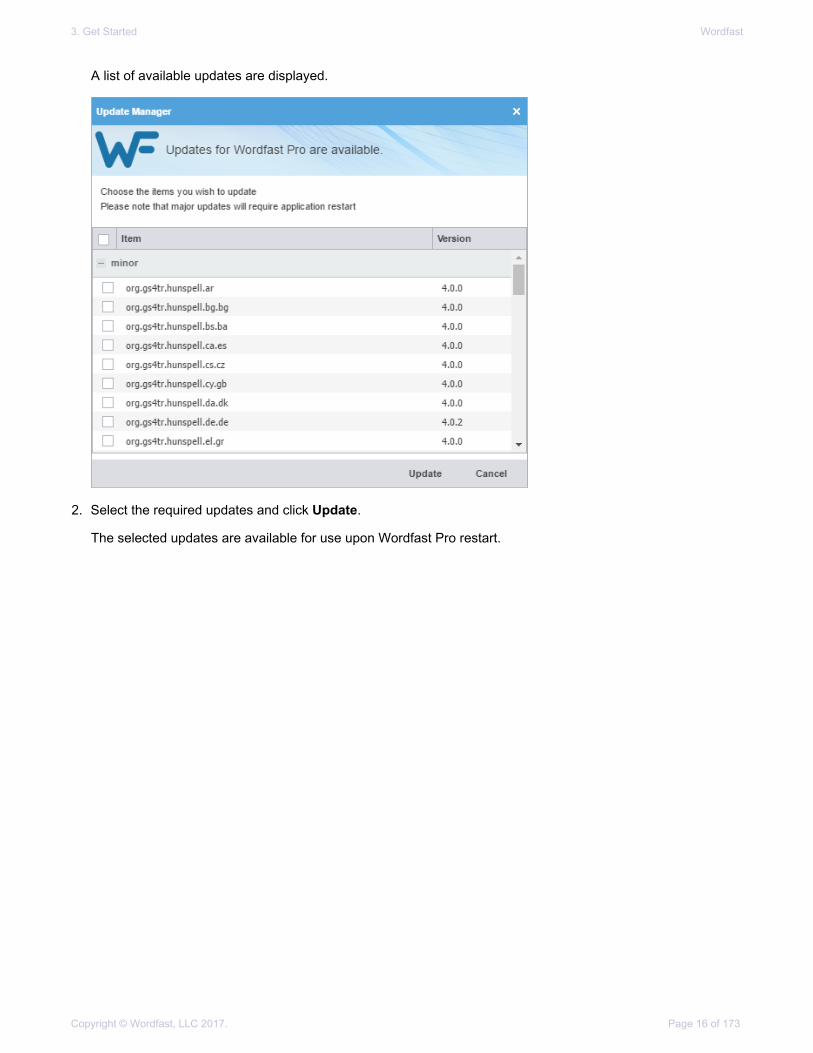
View UpdatesUpon opening Wordfast Pro, an update notification is displayed when there are newer versions or updatedHunspell spelling dictionaries available.
Alternatively, check for updates as follows:
1. On the Help tab, click Wordfast Pro Update.
3. Get Started Wordfast
Copyright © Wordfast, LLC 2017. Page 16 of 173
A list of available updates are displayed.
2. Select the required updates and click Update.
The selected updates are available for use upon Wordfast Pro restart.

Copyright © Wordfast, LLC 2017. Page 17 of 173
4. Start Wordfast ProAfter Wordfast Pro has been installed and activated on your computer it is ready to use.
To start Wordfast Pro:
• Open Wordfast Pro by double-clicking the Wordfast icon on the desktop or from the Start menu.
Wordfast Pro is open and the Projects tab is displayed.
Project Files PerspectiveWhen a project is opened from the Project List tab, Wordfast Pro displays the Project Files tab. The TXLF filesfor translation are listed here.
TXLF Editor PerspectiveWhen you open a file for translation or review, you are in the TXLF Editor. The TXLF Editor user interfaceTranslation tab is the main workspace for translation and review and opens by default.

4. Start Wordfast Pro Wordfast
Copyright © Wordfast, LLC 2017. Page 18 of 173
Function Tabs This bar lists all tabs that fit in your display and are used to accessthe various tools of the application.
Tools Ribbon This ribbon contains buttons for the available tools of the active tabthat fit in your display.
File Name Tab(s) This bar lists all open files or a chained file. Each open file shows asa separate tab across this bar.
Table Filters Use this row to provide the filter criteria and other controls forsearches in the open file.
Source Segment The collection of numbered segments (color coded) that resultedfrom analyzing the source file(s).
Target Segment This is the translation work area that includes:
• Target column where the translation is entered or leveragedfrom the translation memory
• Segment Score column contains the TM match scorerepresented as a percentage
• Status column indicates the status of a segment
• Verify segment column contains a checkmark , whenclicked automatically modifies and commits a 100%, fuzzy orMT match segment
Editor Tabs In this work area a number of functions are available, including:

4. Start Wordfast Pro Wordfast
Copyright © Wordfast, LLC 2017. Page 19 of 173
• TM Lookup
• Notes
• Segment History
• Metadata
• TranscheckTerminology Use this work area for searching and adding terms to terminology
lists (glossaries), if enabled.Additional Tools This lists tools that do not fit in your display area. This will not be
visible if your display area is large enough to accommodate all theavailable tools.
TXLF EDITOR PERSPECTIVE
Right-Click MenuThe TXLF Editor Context Menu can be accessed by right-clicking anywhere in the Source or Target segments.
TXLF EDITOR PERSPECTIVE
Unlabeled Status Buttons and IconsThe unlabeled status icons used in the TXLF Editor are described in the following table.
Button Description Icon Description
Accumulate the selected table filters A note has been added to the segment
Select the term search target forTerminology and Table Filters
The segment is locked and cannot beedited

4. Start Wordfast Pro Wordfast
Copyright © Wordfast, LLC 2017. Page 20 of 173
Button Description Icon Description
Collapse the lower panel Information is available
Apply the selected table filterTranscheck error. A non-linguistic errorhas occurred in the segment
Clear the search filtersThe segment has been repeated morethan once in the file
Collapse the options ribbonThe segment is marked unconfirmed andcannot be committed to the TM
Click to add a term to the glossary The source segment has been modified
Click to verify a segment, and commit itto the TM
HelpYou can refer to the online help through the Help tab that is located in the Project List, Current Project, and TXLFEditor views.
On the Help tab you can:
• Provide feedback
• View the latest Wordfast Pro updates
• Manage your Wordfast Pro license
• Display your version of Wordfast Pro
• Access online help

Copyright © Wordfast, LLC 2017. Page 21 of 173
5. ProjectsThe Projects tab is the starting point of using Wordfast Pro. Project creation is a one-time process that allows youto add files, source and target languages, translation memories (TMs), glossaries, reference files, and file formatfilters that can be used to prepare files for translation. When files for translation are added to a project, they areautomatically leveraged against the connected TMs and glossaries.
Search and SortProjects, Project Files, Project TM, Project Terminology, Reports, and Reference Files can be searched andsorted using the column headers. An example of using search and sort options on the Projects tab is describedbelow.
Enter a search string to view specific projects and projects in a particularlocation.
To view projects in a specific language pair, select a source and targetlanguage from the drop-down lists.
Click to clear the entered search filters.
Click to sort the project details in ascending or descending order.
Click the sort menu to order the project details based on a specific columnheader.

5. Projects Wordfast
Copyright © Wordfast, LLC 2017. Page 22 of 173
Create ProjectA project must be created in Wordfast Pro, before translating files. A project is the repository that contains sourceand target languages, glossary, translation memory (TM), and reference files. A project also includes file formatfilters that allow to prepare the translation files.
To create a project:
1. On the Projects tab, click Create Project.
2. On the Project Creation dialog, enter a project name.
3. (Optional) If you want to reuse the profile of a previously created local project, select one from the ReuseProject drop-down list.
When reusing a project, all existing translation memories, glossaries or blacklists are removed. Awarning message is displayed before you proceed with this action.
5. Projects Wordfast
Copyright © Wordfast, LLC 2017. Page 23 of 173
4. Enter the Save Project To location or click Browse... to navigate to the location where the project must besaved.
5. Select the Source Languages and Target Language(s) from the drop-down lists.
You can refine the Source Language and Target Language drop-down list results by starting to type alanguage name.
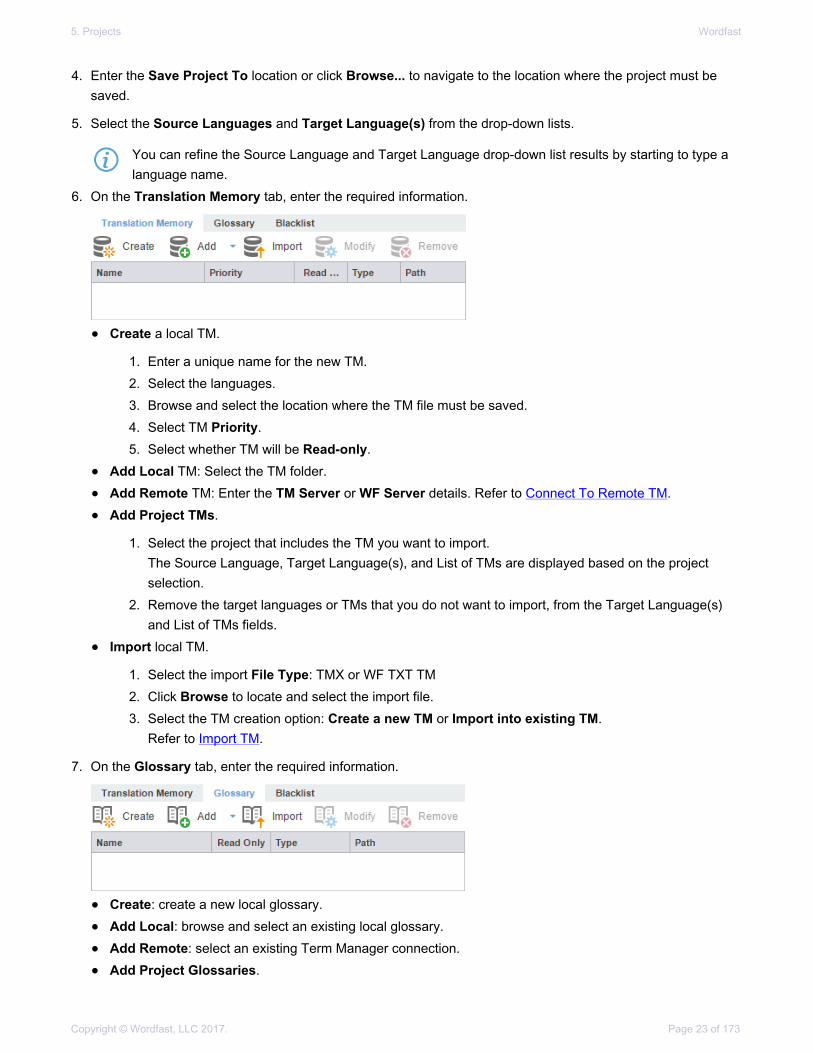
6. On the Translation Memory tab, enter the required information.
• Create a local TM.
1. Enter a unique name for the new TM.2. Select the languages.3. Browse and select the location where the TM file must be saved.4. Select TM Priority.5. Select whether TM will be Read-only.
• Add Local TM: Select the TM folder.
• Add Remote TM: Enter the TM Server or WF Server details. Refer to Connect To Remote TM.
• Add Project TMs.
1. Select the project that includes the TM you want to import.The Source Language, Target Language(s), and List of TMs are displayed based on the projectselection.
2. Remove the target languages or TMs that you do not want to import, from the Target Language(s)and List of TMs fields.
• Import local TM.
1. Select the import File Type: TMX or WF TXT TM2. Click Browse to locate and select the import file.3. Select the TM creation option: Create a new TM or Import into existing TM.
Refer to Import TM.
7. On the Glossary tab, enter the required information.
• Create: create a new local glossary.
• Add Local: browse and select an existing local glossary.
• Add Remote: select an existing Term Manager connection.
• Add Project Glossaries.

5. Projects Wordfast
Copyright © Wordfast, LLC 2017. Page 24 of 173
1. Select the project that includes the glossaries that you want to import.The Source Language, Target Language(s), and List of Glossaries are displayed based on theproject selection.
2. Remove the target languages or glossaries that you do not want to import, from the TargetLanguage(s) and List of Glossaries fields.
• Import local glossary.
1. Select the import File Type: TBX or Tab delimited.2. Click Browse to locate and select the import file.3. Select the glossary creation option: Create a new glossary or Import into existing glossary.
Refer to Import Glossary.
8. On the Blacklist tab, enter the required information.
• Create: create a new local blacklist.
• Add Local: browse and select an existing local blacklist.
• Add Remote: select an existing Term Manager connection.
• Import local blacklist.
1. Select the import File Type: TXT2. Click Browse to locate and select the Import File.3. Select the blacklist creation option: Create a new blacklist or Import into existing blacklist.
Refer to Import Blacklist.
9. On the Source Files tab, add the source files.
• Click Add File or Add Folder to browse to the file or folder.
• Drag the file(s) from a folder to the Files panel.
To copy source files into the Source File folder within the Project folder on your computer, go toPreferences > General and select the Copy Source Files into Source Folder checkbox on thedialog. Refer to General.
10. On the Reference Files tab, add the reference files.

5. Projects Wordfast
Copyright © Wordfast, LLC 2017. Page 25 of 173
• Click Add File to browse to the reference file.
• Click Add Folder to select a folder and add all reference files within.
11. (Optional) Select the additional Options.• Run analysis report on documents: analyzes source files against TMs and generates a report. This
report can also be viewed under the Reports tab, after opening the project.
• Pre-translate TXLF files: populates TM leverage when TXLF files are open.
• Use primary MT on no match segments: leverages primary MT when no matches are received from thelocal and remote TMs. This option is only available if Pre-translate TXLF files is selected.
12. Click Create Project to analyze the files and display the project creation summary.
13. (Optional) Select Open created project and click OK, to open the new project.
The project is created.
Open ProjectProjects must be opened before any files can be opened for translation.

5. Projects Wordfast
Copyright © Wordfast, LLC 2017. Page 26 of 173
To open a project on the Projects tab:
• Select a project and click Open Project, or double-click the project.
The Project Files tab is displayed.
Modify ProjectYou can change a project's name, source language, and target language using the Modify Project option.
To modify a project on the Projects tab:
1. Select a project and click Modify Project
2. On the Modify Project dialog, change the Project Name, if required.

5. Projects Wordfast
Copyright © Wordfast, LLC 2017. Page 27 of 173
3. Add or remove the Target Language(s), if required and click OK.
The project is modified and the project list is displayed.
Remove ProjectTo remove a project from the Projects tab:
1. Select the project to remove, and click Remove Project.
2. On the Remove dialog, select one of the following:
• Remove from the list only: removes the project from the Projects list but retains the project resources inthe Project folder on your computer
• Remove from the list and move the following resources to Archive folder: moves the project TXLF,reference, and source files to the Archive sub-folder within the Project folder on your computer
3. Click OK.

5. Projects Wordfast
Copyright © Wordfast, LLC 2017. Page 28 of 173
The selected project is no longer in the Projects list.
After a project is removed it can be added again. Removed projects are not erased and can beretrieved from the Project folder on your computer using Add Project option.
Recalculate ProgressThe Recalculate Progress option calculates and updates the progress of all projects in the projects list. If theprojects list contains more than 100 projects, it could take up to 10 minutes to complete the update of all projects.You can recalculate the progress of an open project.
This option is useful to update the progress of projects with TXLF files that were created or edited in olderWordfast Pro versions. The project progress bar displays N/A, if these older TXLF files are included in theprojects.
To recalculate progress of projects:
• On the Projects tab, click Recalculate Progress.
The progress is recalculated and updated to reflect the current % Complete status of the projects.
If an error occurs for any of the TXLF files, then all subsequent TXLF files and projects on the list arenot updated.
Package FilesA Package file contains all of the required information to work on a translation project. Using a Package file,complete or incomplete projects can be shared between different Wordfast Pro users.
A Package file can include:
• All target translatable files and reference files
• Translation Memory connection
• Glossary connection
• Instructions
• Background Information
• Reference Files
• Source Files
To use a Package file, import the file into Wordfast Pro. Once imported, Wordfast Pro connects to the translationmemories and glossaries, and provides you access to all the translatable files and additional resources withoutany additional setup or configuration.
Completed projects can be shared with other users by exporting the package.
The steps to import and export are described in the following topics:
5. Projects Wordfast
Copyright © Wordfast, LLC 2017. Page 29 of 173
• Import Package
• Export Package
PACKAGE FILES
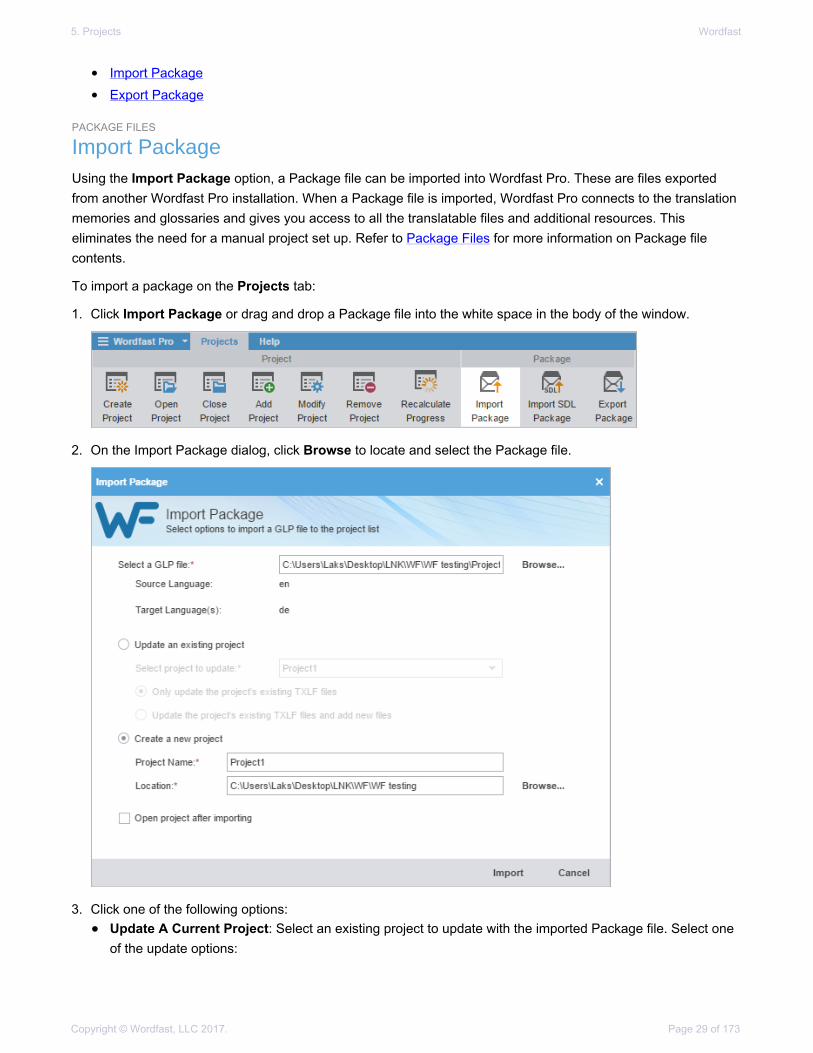
Import PackageUsing the Import Package option, a Package file can be imported into Wordfast Pro. These are files exportedfrom another Wordfast Pro installation. When a Package file is imported, Wordfast Pro connects to the translationmemories and glossaries and gives you access to all the translatable files and additional resources. Thiseliminates the need for a manual project set up. Refer to Package Files for more information on Package filecontents.
To import a package on the Projects tab:
1. Click Import Package or drag and drop a Package file into the white space in the body of the window.
2. On the Import Package dialog, click Browse to locate and select the Package file.
3. Click one of the following options:• Update A Current Project: Select an existing project to update with the imported Package file. Select one
of the update options:

5. Projects Wordfast
Copyright © Wordfast, LLC 2017. Page 30 of 173
◦ Only update existing project TXLF files
◦ Update existing and add new files
• Create New Project: Select to create a new project. Enter the new project details:
◦ Project Name: Enter a unique name for the project.
◦ Location: The location of the Package file is displayed as the default location. Click Browse... andselect a location to save the new project in.
4. (Optional) Select Open project after importing to open the updated or new project when the importcompletes.
5. Click Import.
If Open project after importing is selected, the current project view opens listing the files for translation.
PACKAGE FILES
Export PackageUsing the Export Package option, a complete project package can be shared with other Wordfast Pro users.Refer to Package Files for more information on Package file contents.
To export a package on the Projects tab:
1. Select the project and click Export Package.
2. On the Export Package dialog, select the export type:

5. Projects Wordfast
Copyright © Wordfast, LLC 2017. Page 31 of 173
• Entire Project: select to export all target languages and their associated resources.
• Specific target languages and resources: select the Target Language(s) and resources to be includedin the export.
◦ Source Files
◦ TXLF Files
◦ Glossaries
◦ Translation Memories
◦ Reference Files
◦ Blacklists
3. Select a Naming Convention.• GLP Name to select a default name
• Custom Name to enter a name of your choice
4. Select a location where the Package file will be saved and click Export.
The exported Package file is built and saved to the selected folder location.

5. Projects Wordfast
Copyright © Wordfast, LLC 2017. Page 32 of 173
Import SDL PackageUsing the Import SDL Package option, an SDL Package file can be imported into Wordfast Pro. When an SDLPackage file is imported, the source files are converted to the Wordfast Pro compatible format. The translationmemories, glossaries and reference file cannot be imported into the project.
To import an SDL package on the Projects tab:
1. Click Import SDL Package or drag and drop an SDL Package file into the application window.
2. On the Import Package dialog, click Browse to locate and select the SDL Package file.
If the SDL Package file contains target languages that are not supported, a warning message isdisplayed.

5. Projects Wordfast
Copyright © Wordfast, LLC 2017. Page 33 of 173
3. Enter the new Project Name.
4. Browse and select the location to save the new project.
5. (Optional) Select Open project after importing to open the project automatically after it is imported.
6. Click Import.
The SDL Package file is imported. If Open project after importing is selected, the current project view opensand the files for translation are displayed.
Copyright © Wordfast, LLC 2017. Page 34 of 173
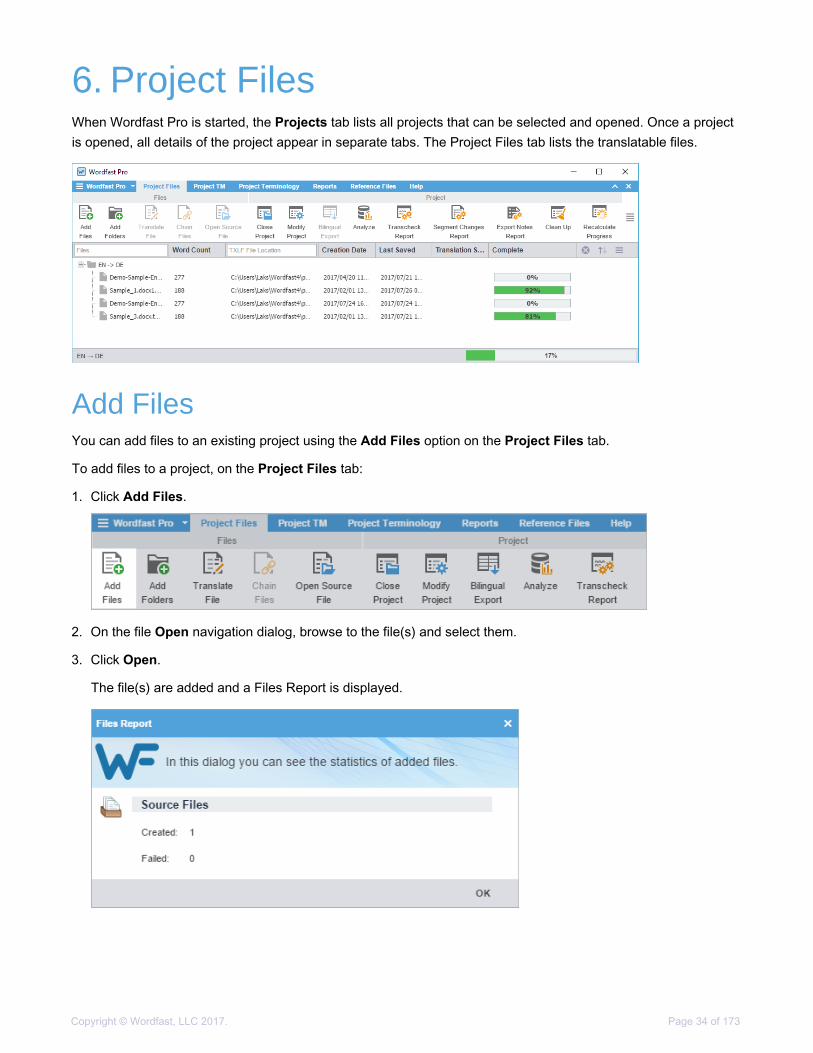
6. Project FilesWhen Wordfast Pro is started, the Projects tab lists all projects that can be selected and opened. Once a projectis opened, all details of the project appear in separate tabs. The Project Files tab lists the translatable files.
Add FilesYou can add files to an existing project using the Add Files option on the Project Files tab.
To add files to a project, on the Project Files tab:
1. Click Add Files.
2. On the file Open navigation dialog, browse to the file(s) and select them.
3. Click Open.
The file(s) are added and a Files Report is displayed.

6. Project Files Wordfast
Copyright © Wordfast, LLC 2017. Page 35 of 173
Add FoldersYou can add a folder containing multiple files to an existing project using the Add Folders option on the ProjectFiles tab.
To add a folder to a project:
1. On the Project Files tab, click Add Folders.
2. Click Select Folder.
The files in the selected folder are added and a Files Report is displayed.
Open Source FileYou can open the source of the translatable file in the original format using the Open Source File option on theProject Files tab.
To open a source file on the Project Files tab:
• Click Open Source File.
The source file opens in its default application. If the default application is not set, you are prompted to choosea program.

6. Project Files Wordfast
Copyright © Wordfast, LLC 2017. Page 36 of 173
Close ProjectThere can only be one project open at a time, therefore, an open project must be closed before opening another.When you are finished working on a project, you can close it using the Close Project option on the Project Filestab.
• On the Project Files tab, click Close Project.
The project is closed and the Projects tab is displayed.
Bilingual ExportThe Bilingual export option allows you to export the TXLF file with highlighted glossary terms into a DOC formatand edit using Microsoft Word. Bilingual export and import can also be done outside the Projects dashboard byusing the Quick Tools. Refer to Bilingual Export and Bilingual Import.
To complete bilingual export of TXLF files on the Project Files tab:
1. On the Project Files tab, select a file or multiple files by pressing the Ctrl key, and click Bilingual Export.
Files that are open in the TXLF Editor cannot be selected for Bilingual Export. If glossaries areavailable, the exported document will have highlighted source terms and target terms in comments.The Bilingual Export Options must be selected in Preferences > General Preferences > General.Refer to Bilingual Export.
2. On the Select bilingual file location dialog, select the folder to save the bilingual exported Word documents.

6. Project Files Wordfast
Copyright © Wordfast, LLC 2017. Page 37 of 173
The log is displayed. This log and the exported documents are saved in the selected folder.
A sample of the bilingual export is given below.
AnalyzeIn Analyzing Projects, files for translation are compared to a Translation Memory to leverage reusable content andpre-translate files.
To analyze files:
1. On the Project Files tab, click Analyze Project.
2. On the Project Analyze dialog, select the language(s) or file(s) to be analyzed.

6. Project Files Wordfast
Copyright © Wordfast, LLC 2017. Page 38 of 173
3. Select the Analysis Options as follows (refer to Translation Memory):
a) Select Pretranslate to create translated TXLF files, including the options:
• % matches: select the percentage ofmatches to pre-translate
• Copy all tags on segments when there isno TM match
• Copy segment source to target when thereis no TM match
• Do nothing

6. Project Files Wordfast
Copyright © Wordfast, LLC 2017. Page 39 of 173
Selecting Pretranslate is an optional step. The percentage defines the minimum leverage required topretranslate a specific segment.
b) Calculate analysis report percentage by: Words or Segments
c) Select the format for the output report under Report Settings:
• Show only analysis report summary
• Export Report: Enter the Report Name,select the Report Type, and browse andselect the Report Location folder
d) Select the Translation Memory by:
• Language
• TM Name
4. Click Analyze.
6. Project Files Wordfast
Copyright © Wordfast, LLC 2017. Page 40 of 173
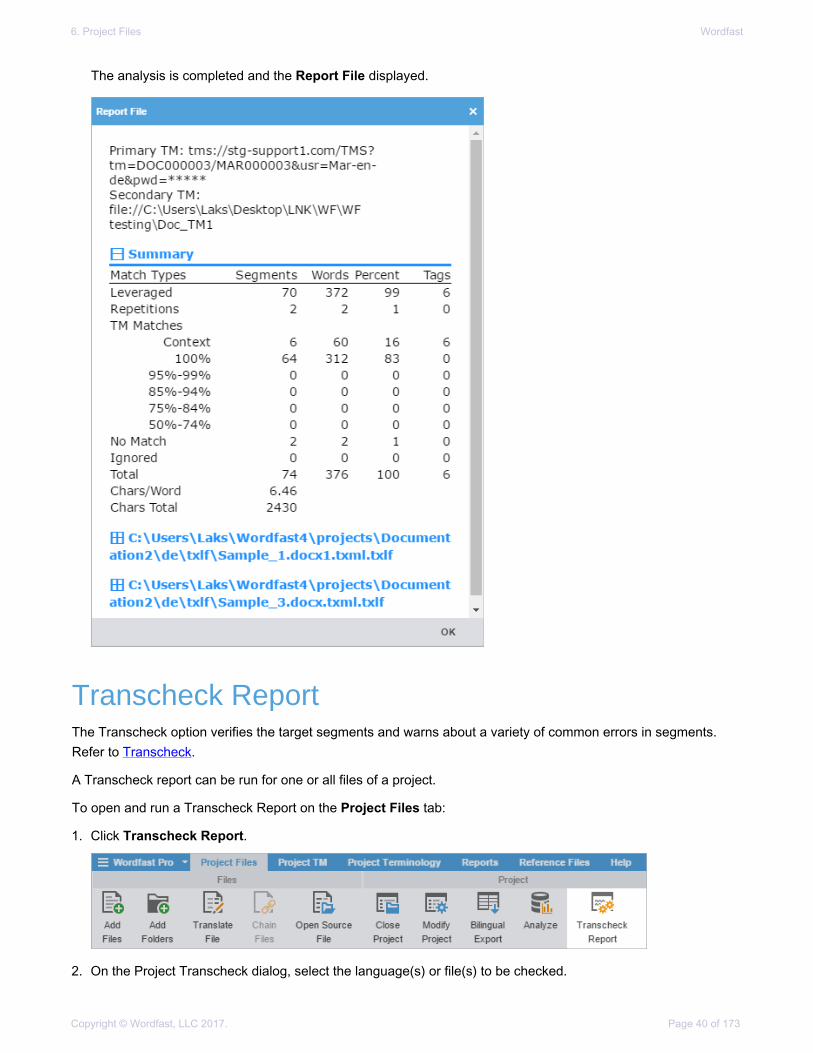
The analysis is completed and the Report File displayed.
Transcheck ReportThe Transcheck option verifies the target segments and warns about a variety of common errors in segments.Refer to Transcheck.
A Transcheck report can be run for one or all files of a project.
To open and run a Transcheck Report on the Project Files tab:
1. Click Transcheck Report.
2. On the Project Transcheck dialog, select the language(s) or file(s) to be checked.

6. Project Files Wordfast
Copyright © Wordfast, LLC 2017. Page 41 of 173
3. Select the Transcheck Tests to be completed. Refer to Transcheck for more information on each Transchecktest.
The Consistency check is only accessible through the Project Transcheck dialog. There are two typesof consistency checks:
• Source consistency check: searches for segments with same target translation but the sourcesegments have differences.
• Target consistency check: searches for segments with same source segments but the targettranslations have differences.
The differences such as, case, numbers, tags, and whitespace to check consistency in source andtarget can be ignored by selecting the appropriate checkboxes.
4. Enter the Report Name and browse and select the Report Location folder.
5. (Optional) Select the Glossary or Blacklist to be used during Transcheck.
If the Terminology Check or Blacklist Check tests are enabled, verify that a glossary and blacklistare selected.
6. Click Run Transcheck.
6. Project Files Wordfast
Copyright © Wordfast, LLC 2017. Page 42 of 173
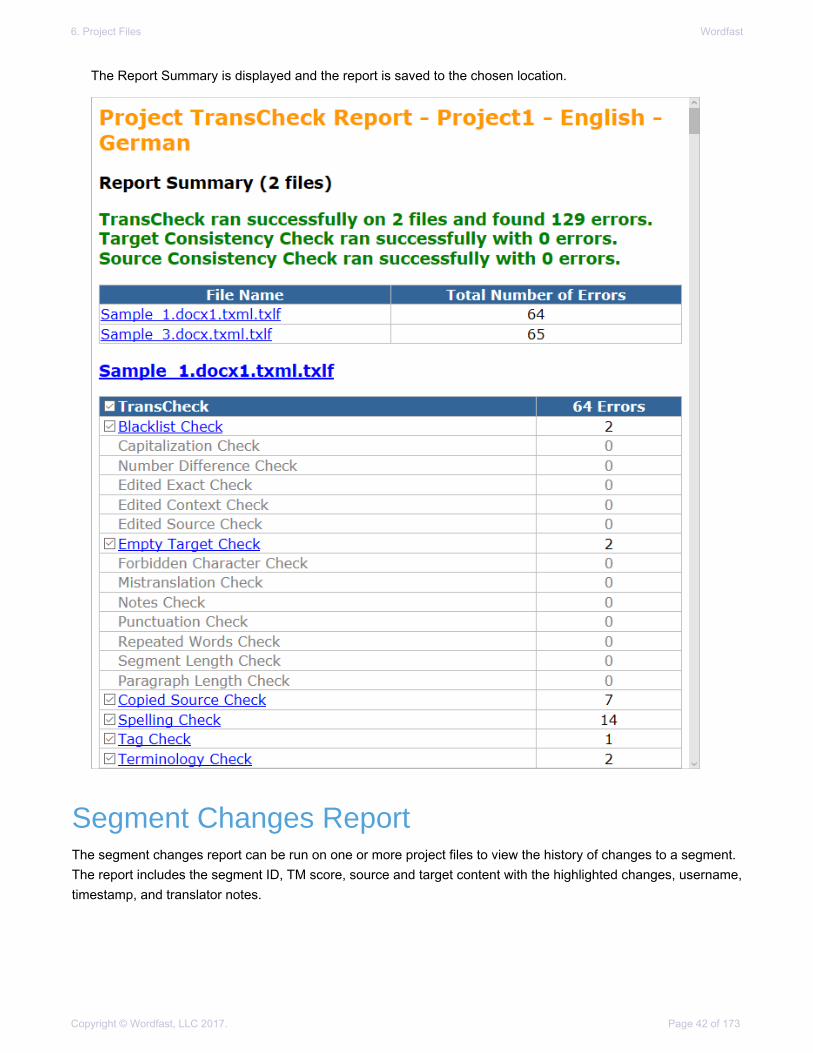
The Report Summary is displayed and the report is saved to the chosen location.
Segment Changes ReportThe segment changes report can be run on one or more project files to view the history of changes to a segment.The report includes the segment ID, TM score, source and target content with the highlighted changes, username,timestamp, and translator notes.

6. Project Files Wordfast
Copyright © Wordfast, LLC 2017. Page 43 of 173
To generate a segment changes report, on the Project Files tab:
1. Select one or multiple files by pressing the Ctrl key, and click Segment Changes Report.
2. On the Segment Changes Report dialog, select the languages or files to be checked.
3. (Optional) Select Add Notes column for export to include the translator's note for each segment.
4. Browse and select the Report Location folder where you want to save the segment changes report.
5. Click Export.

6. Project Files Wordfast
Copyright © Wordfast, LLC 2017. Page 44 of 173
The Segment Changes Summary and Segment Changes Report are displayed.
Export Notes ReportThe notes report is an HTML file that includes all notes added to the bilingual project files.
To export notes:
1. On the Project Files tab, click Export Notes Report.
2. On the Export Notes Report dialog, select the languages or files.

6. Project Files Wordfast
Copyright © Wordfast, LLC 2017. Page 45 of 173
3. Browse and select the Report Location folder, and click Export.
The Export Notes Summary is displayed.
4. Click OK.
The notes report is saved in the selected folder.

6. Project Files Wordfast
Copyright © Wordfast, LLC 2017. Page 46 of 173
Clean UpAfter files are translated, the Translation Memory (TM) is updated and the files are cleaned up. The clean upprocess converts the bilingual TXLF files into translated target files in the source format.
To clean up and update the TM:
1. On the Projects tab, click Clean Up.
The Project Clean Up dialog is displayed.
2. Select the languages to clean up by selecting one of the following:• All Language Pairs
• Specific Language Pairs
• Single Language Pair

6. Project Files Wordfast
Copyright © Wordfast, LLC 2017. Page 47 of 173
3. Select where the translated files are placed:• Place translated files in the project folder
• Place translated files in the original path of source file
• Enter the location to put translated file
• Don't create translated file
4. (Optional) Select Create subfolders by language.
5. (Optional) Select Add language suffix to the translated file name.
6. Select TM Overwrite Options.
7. Select the TM(s) to Update.
8. Click Clean Up.
A confirmation message is displayed, and the cleaned files are saved at the selected location.
Remove FilesTo remove a file or files:
1. Click the Project Files tab, select one or more files by pressing the Ctrl key, and click Remove File(s).
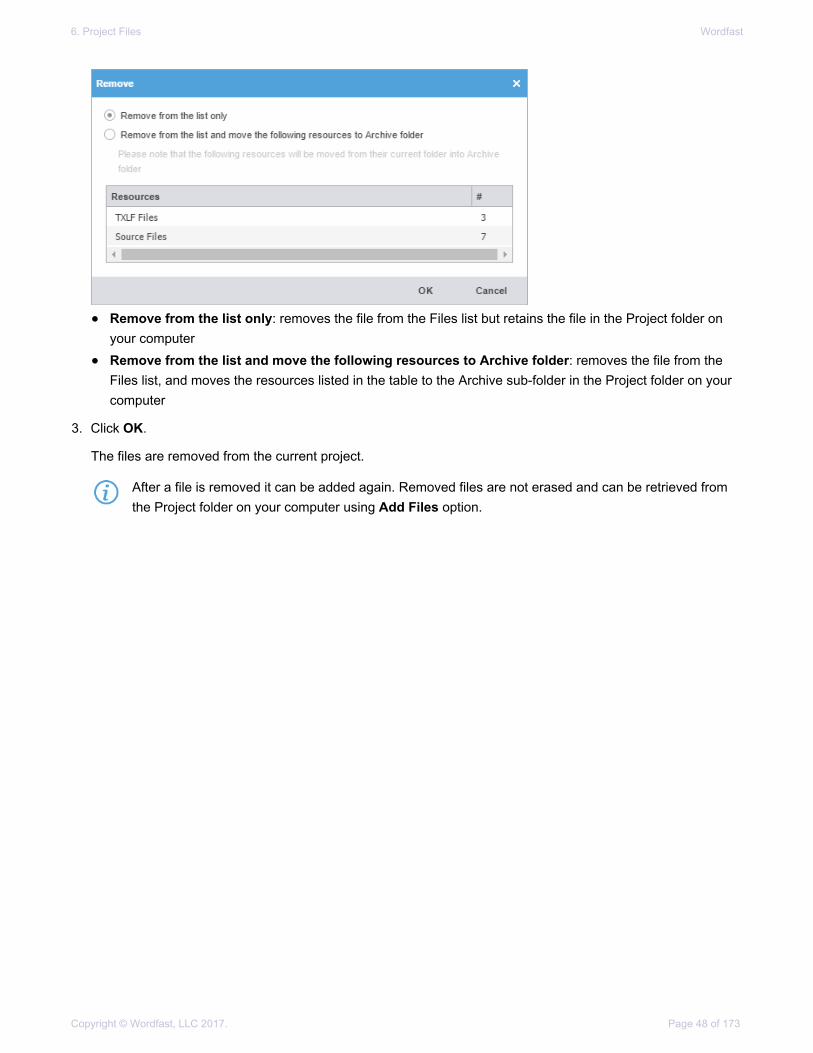
2. On the Remove dialog, select one of the following:
6. Project Files Wordfast
Copyright © Wordfast, LLC 2017. Page 48 of 173
• Remove from the list only: removes the file from the Files list but retains the file in the Project folder onyour computer
• Remove from the list and move the following resources to Archive folder: removes the file from theFiles list, and moves the resources listed in the table to the Archive sub-folder in the Project folder on yourcomputer
3. Click OK.
The files are removed from the current project.
After a file is removed it can be added again. Removed files are not erased and can be retrieved fromthe Project folder on your computer using Add Files option.

Copyright © Wordfast, LLC 2017. Page 49 of 173
7. Project TMTranslation memory (TM) is designed to provide maximum content re-use and to facilitate collaboration amonglocalization resources. Translators can leverage reusable content using two different types of TMs:
• Local TM: The local TM is located on your computer and can only be accessed and updated by you.
• Remote TM: The remote TM is located on a server that can be accessed by several translators at the sametime. The translators can leverage the available content and also update the TM with new reusable content.
TMs can be managed both by project managers and translators from the Project TM tab.
Create Local TMTo create a local translation memory, on the Project TM tab:
1. Click Create Local.

7. Project TM Wordfast
Copyright © Wordfast, LLC 2017. Page 50 of 173
The Translation Memory dialog is displayed.
2. Enter the translation memory information.
NameEnter the TM name. It is recommended to enter a name that includes the client ororganization name and the TM's language to easily identify it.
Target LanguageSelect the target languages. The target language selection is limited to thoseconfigured in the project.
Location Enter the location where the new TM will be saved.
PriorityThe priority determines the sequence of reference during translation where thePrimary TM is referenced first, followed by the Secondary TMs. Only one TM canbe selected as primary.
Selected Select checkbox to use this local TM for the current project.
Read-OnlySelect checkbox to allow users to leverage the TM but not update it with newtranslation.
3. Click OK.
The new translation memory is displayed in the project TM list.
Add Local TMYou can add translation memories (TM) created by Wordfast Pro 4 or 5 only. If you want to add TMs fromWordfast Classic or Wordfast 3, use the Import TM option. Refer to Import TM.

7. Project TM Wordfast
Copyright © Wordfast, LLC 2017. Page 51 of 173
To add a local translation memory to a project:
1. On the Project TM tab, click Add Local.
2. On Opening TM navigation dialog, browse to the local TM folder, and select it.
3. Click Select Folder.
The selected translation memory is added to the project and displayed in the project TM list.
Connect To Remote TMYou can connect to TMs residing on other computers.
To connect to a remote translation memory:
1. On the Project TM tab, click Connect To Remote.

7. Project TM Wordfast
Copyright © Wordfast, LLC 2017. Page 52 of 173
The Connect to Remote TM dialog is displayed.
2. To add a TM Server:
a) Click the TM Server tab.
b) Enter a unique name in the Symbolic Name field.
c) Enter the remote translation memory URL using the following format: tm://address:port/TMS?
The URL Settings are populated automatically when you enter the URL string.
d) Select a Priority from the drop-down list.
The priority determines the sequence of reference during translation where the Primary TM is referencedfirst, followed by the Secondary TMs. Only one TM can be selected as primary.
e) (Optional) Select the Selected checkbox to use this translation memory for the current project.
f) (Optional) Select the Read Only checkbox to allow users to leverage the TM but not update it with newtranslation.
3. To add a WF Server:

7. Project TM Wordfast
Copyright © Wordfast, LLC 2017. Page 53 of 173
a) Click the WF Server tab.
b) Enter a unique name in the Symbolic Name field.
c) Enter the remote translation memory URL using the following format: wf://jsmith:password@12345
The URL Settings are populated automatically when you enter the URL string. The Password andWorkgroup ID fields depend on the the server settings and are optional.
d) (Optional) Select Use TM Write Password to provide password to clean up target content and update theTM.
If a password is not set in the WF Server, then select the checkbox and leave the text input fieldempty.
e) Select a Priority from the drop-down list.
The priority determines the sequence of reference during translation where the Primary TM is referencedfirst, followed by the Secondary TMs. Only one TM can be selected as primary.
f) (Optional) Select Selected checkbox to use this translation memory for the current project.
g) (Optional) Select Read Only checkbox to allow users to leverage the TM but not update it with newtranslation.
4. Click OK.
The new translation memory is added to the project and displayed in the project TM list.
7. Project TM Wordfast
Copyright © Wordfast, LLC 2017. Page 54 of 173
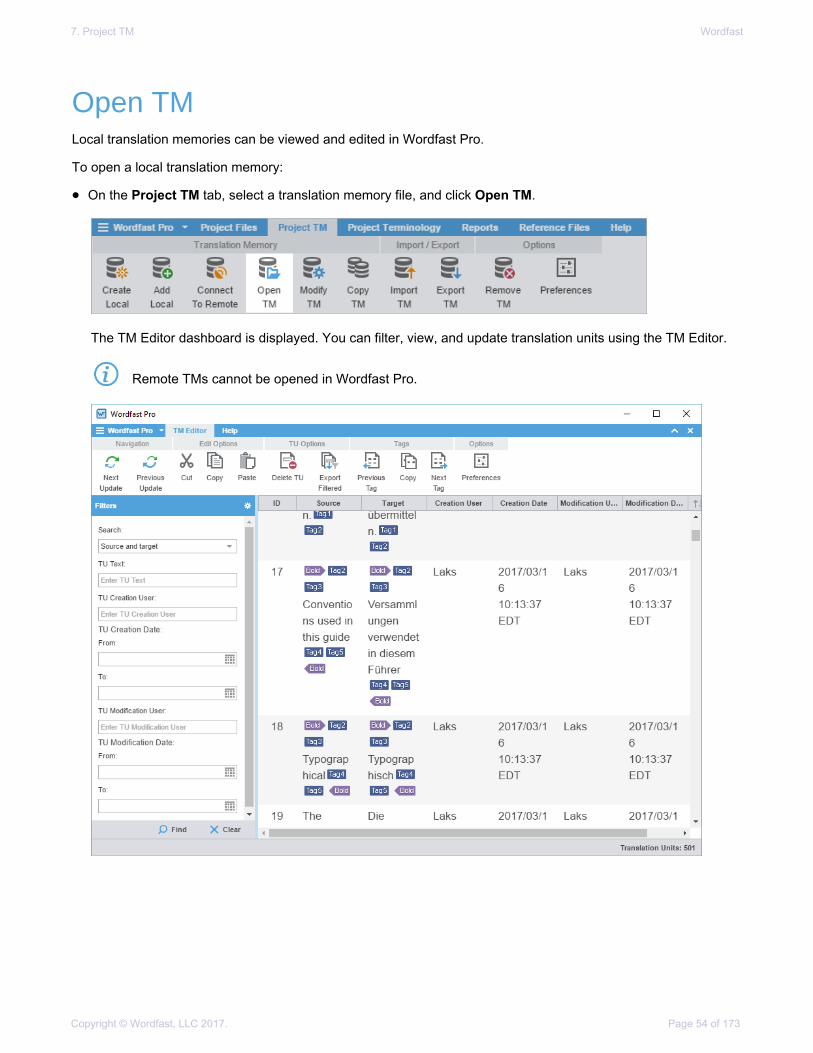
Open TMLocal translation memories can be viewed and edited in Wordfast Pro.
To open a local translation memory:
• On the Project TM tab, select a translation memory file, and click Open TM.
The TM Editor dashboard is displayed. You can filter, view, and update translation units using the TM Editor.
Remote TMs cannot be opened in Wordfast Pro.
7. Project TM Wordfast
Copyright © Wordfast, LLC 2017. Page 55 of 173
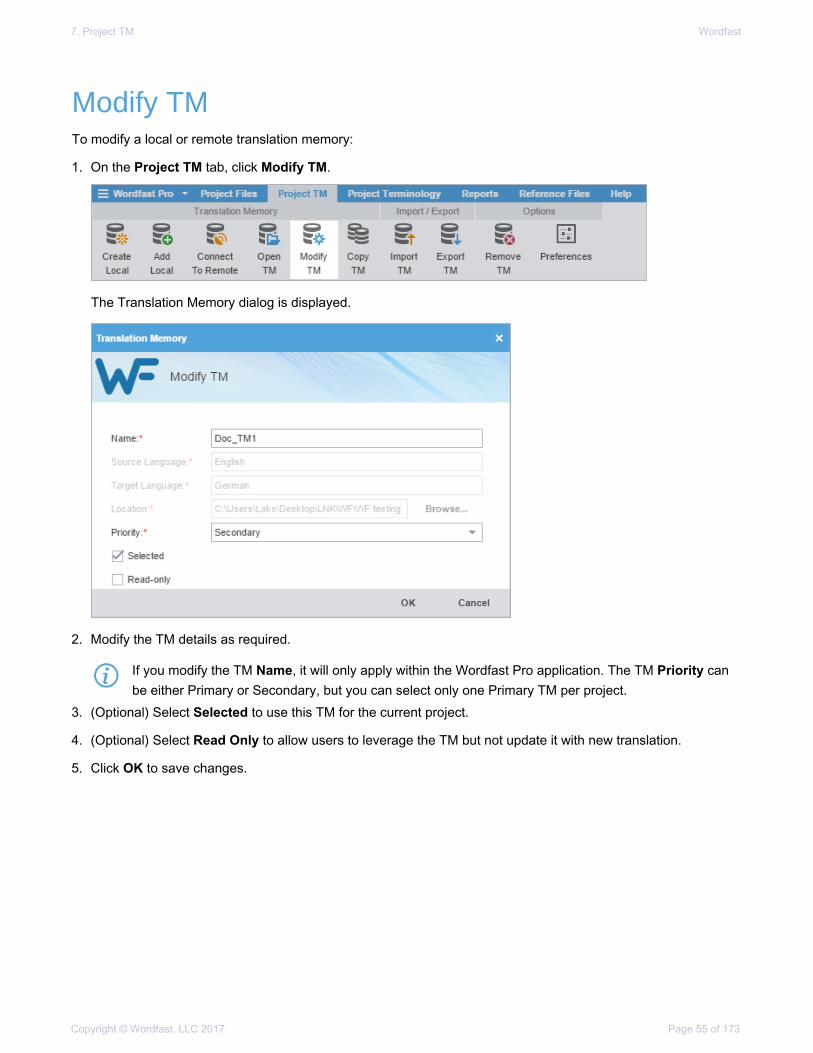
Modify TMTo modify a local or remote translation memory:
1. On the Project TM tab, click Modify TM.
The Translation Memory dialog is displayed.
2. Modify the TM details as required.
If you modify the TM Name, it will only apply within the Wordfast Pro application. The TM Priority canbe either Primary or Secondary, but you can select only one Primary TM per project.
3. (Optional) Select Selected to use this TM for the current project.
4. (Optional) Select Read Only to allow users to leverage the TM but not update it with new translation.
5. Click OK to save changes.

7. Project TM Wordfast
Copyright © Wordfast, LLC 2017. Page 56 of 173
Copy TMTo copy a local translation memory:
1. On the Project TM tab, select a translation memory and click Copy TM.
The Copy Translation Memory dialog is displayed.
2. Enter the TM Name for the copy.
3. Browse and select the Location where the TM will be saved.
4. Select Flip Languages, to reverse the source and target languages, and click Copy.
A copy of the translation memory is saved in the selected folder location.
The copied TM will be in Wordfast Pro 4 or 5 TM format.
Import TMTo import a local translation memory, on the Project TM tab:
1. Click Import TM.

7. Project TM Wordfast
Copyright © Wordfast, LLC 2017. Page 57 of 173
The Import Translation Memory dialog is displayed.
2. Select the import File Type:• WF Classic TM: This format provides backward compatibility for WordFast Classic and WordFast 3.
• TMX: Translations Memory eXchange is a standard file format supported by all translation tools.
3. Click Browse to locate and select the Import File.
4. Select the TM creation option:• Create New TM: to import the TM into a new TM file
• Import Into Existing TM: imports the TM into one of the available TM files. Select the Existing TM and theaction to be taken If TU already exists
5. Click OK.
The translation memory is imported and displayed in the project TM list.
Export TMTo export a local translation memory:
1. On the Project TM tab, select the translation memory, and click Export TM.

7. Project TM Wordfast
Copyright © Wordfast, LLC 2017. Page 58 of 173
The Export Translation Memory dialog is displayed.
2. Select a different Translation Memory from the drop-down list, if required.
3. Select the file Export Type from the drop-down list.
4. Browse and select the folder location where the exported File will be saved and click OK.
The selected translation memory is exported to the selected folder location.
Remove TMWhen a translation memory is removed from a project, the local TM file is retained in the TM folder on yourcomputer.
To remove a translation memory:
1. On the Project TM tab, select the translation memory that you want to remove, and click Remove TM.
2. On the Remove TM dialog, click Yes.
The selected translation memory is removed from the project TM list.
The removed TM can be added to the project again by clicking Add Local. A remote TM can be added againto a project by clicking Connect to Remote and entering the URL.
Copyright © Wordfast, LLC 2017. Page 59 of 173
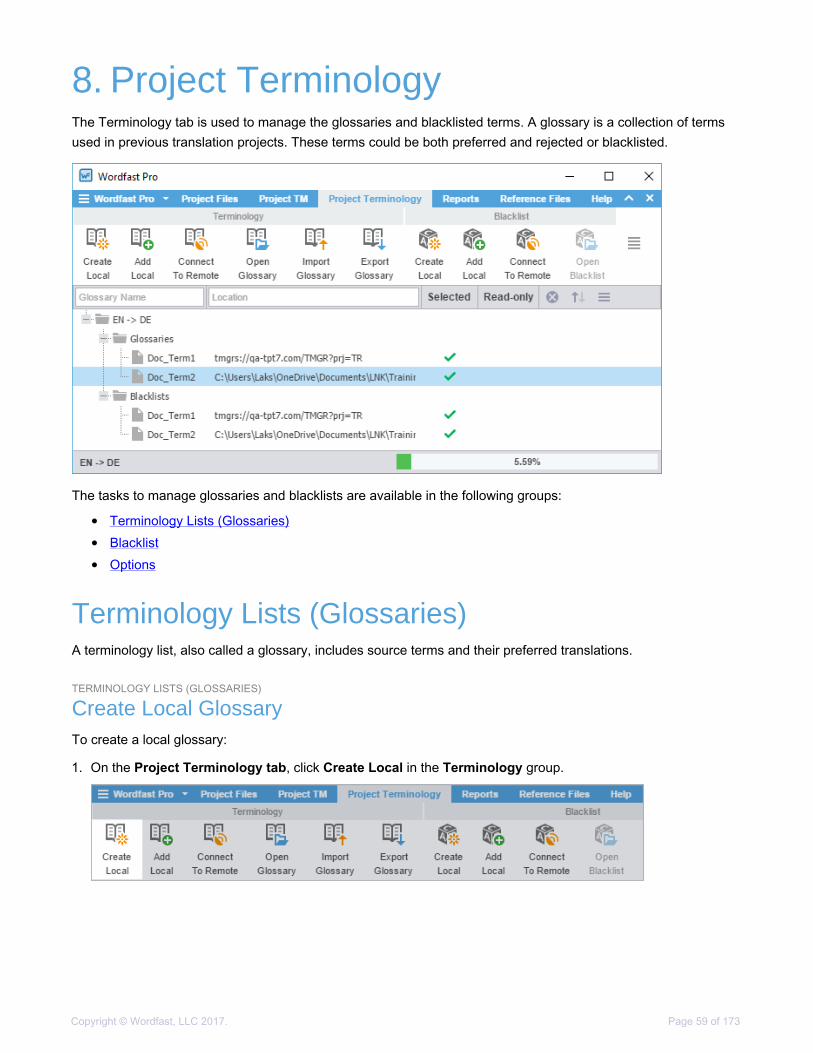
8. Project TerminologyThe Terminology tab is used to manage the glossaries and blacklisted terms. A glossary is a collection of termsused in previous translation projects. These terms could be both preferred and rejected or blacklisted.
The tasks to manage glossaries and blacklists are available in the following groups:
• Terminology Lists (Glossaries)
• Blacklist
• Options
Terminology Lists (Glossaries)A terminology list, also called a glossary, includes source terms and their preferred translations.
TERMINOLOGY LISTS (GLOSSARIES)
Create Local GlossaryTo create a local glossary:
1. On the Project Terminology tab, click Create Local in the Terminology group.

8. Project Terminology Wordfast
Copyright © Wordfast, LLC 2017. Page 60 of 173
The Create Glossary dialog is displayed
2. Enter the glossary information.
NameEnter the glossary name. It is recommended to enter a name that includes a clientor organization name and the glossary language to easily identify it.
Source Language The source language is populated based on the project.
Target LanguageSelect the target language for the glossary. The target language selection is limitedto those configured in the project.
Location Enter the location where the new glossary will be saved.
Selected Select this checkbox to use this local glossary for the current project.
Read Only Select this checkbox to allow users to leverage the glossary but not update it withnew terms.
3. Click OK.
The new glossary is displayed in the project terminology list.
TERMINOLOGY LISTS (GLOSSARIES)
Add Local GlossaryYou can add glossaries created by Wordfast Pro 4 or 5 only. If you want to add glossaries from Wordfast Classicor Wordfast 3, use the Import Glossary option. Refer to Import Glossary.
To add a local glossary:
1. On the Project Terminology tab, click Add Local in the Terminology group.
2. On the Creating Glossary navigation dialog, browse to the glossary folder that you want to add, and select it.

8. Project Terminology Wordfast
Copyright © Wordfast, LLC 2017. Page 61 of 173
3. Click Select Folder.
The selected glossary is added to the project and displayed in the project terminology list.
TERMINOLOGY LISTS (GLOSSARIES)
Connect To Remote GlossaryYou can connect to a glossary residing on another computer.
To connect to a remote glossary:
1. On the Project Terminology tab, click Connect To Remote in the Terminology group.
The Connect to Term Manager dialog is displayed.

8. Project Terminology Wordfast
Copyright © Wordfast, LLC 2017. Page 62 of 173
2. To add a Term Manager (TMGR) Server:
a) Click the TMGR Server tab.
b) Enter a unique name in the Name field.
c) Select a Target Language from the drop-down list.
d) Enter the remote glossary URL using the following format: tmgr://address:port/TMGR?
The URL Settings are populated automatically when you enter the URL string.
e) (Optional) Select Selected checkbox to use this glossary for the current project.
f) (Optional) Select Read Only checkbox to allow users to leverage the glossary but not update it with newterms.
g) (Optional) Select Create Blacklist Connection checkbox to add a blacklist if available in TMGR.
3. To add a WF Server:
a) Click the WF Server tab.
b) Enter a unique name in the Name field.
c) Select a Target Language from the drop-down list.
d) Enter the remote glossary URL using the following format: wf://jsmith:password@12345
The URL Settings are populated automatically when you enter the URL string.
e) (Optional) Select Selected checkbox to use this glossary for the current project.
f) (Optional) Select Read Only checkbox to allow users to leverage the glossary but not update it with newterms.
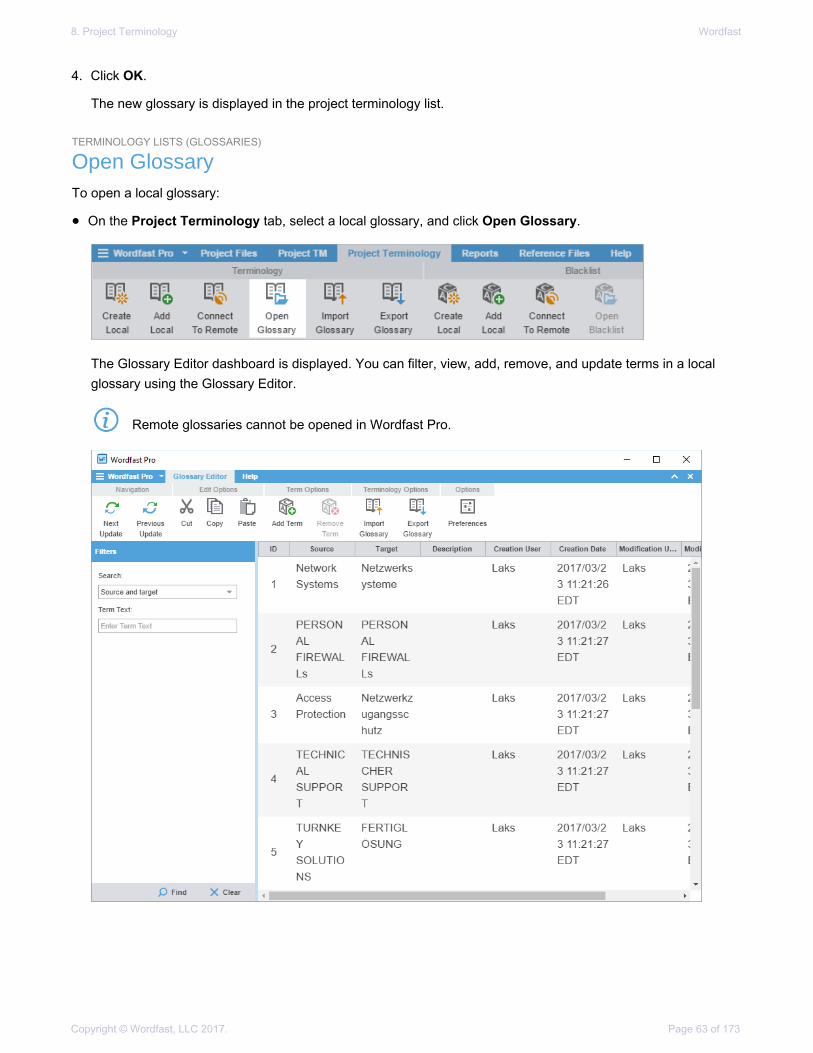
8. Project Terminology Wordfast
Copyright © Wordfast, LLC 2017. Page 63 of 173
4. Click OK.
The new glossary is displayed in the project terminology list.
TERMINOLOGY LISTS (GLOSSARIES)
Open GlossaryTo open a local glossary:
• On the Project Terminology tab, select a local glossary, and click Open Glossary.
The Glossary Editor dashboard is displayed. You can filter, view, add, remove, and update terms in a localglossary using the Glossary Editor.
Remote glossaries cannot be opened in Wordfast Pro.

8. Project Terminology Wordfast
Copyright © Wordfast, LLC 2017. Page 64 of 173
TERMINOLOGY LISTS (GLOSSARIES)
Import GlossaryTo import a local glossary:
1. On the Project Terminology tab, click Import Glossary.
The Import Glossary dialog is displayed.
2. Select the import File Type:• Tab delimited text file (TXT): Wordfast Classic and Wordfast Pro 3 format
• Term Base eXchange (TBX): This format can be used with other CAT tools
3. Click Browse to locate and select the Import File.
4. Select the glossary creation option:• Create a new glossary: to import the glossary into a new glossary file
• Import into existing glossary: to import the glossary into one of the existing glossary files.
Select the Existing Glossary and the action to be taken If the term already exists.
5. Select Clear before import to overwrite the existing glossary, and click OK.
The glossary is imported and is displayed in the project terminology list.

8. Project Terminology Wordfast
Copyright © Wordfast, LLC 2017. Page 65 of 173
TERMINOLOGY LISTS (GLOSSARIES)
Export GlossaryTo export a local glossary:
1. On the Project Terminology tab, select a glossary, and click Export Glossary.
The Export Glossary dialog is displayed.
2. Select the glossary that you want to export.
3. Select the file Export Type from the drop-down list:• Tab delimited text file (TXT): Wordfast Classic and Wordfast Pro 3 format
• Term Base eXchange (TBX): This format can be used with other CAT tools
4. Click Browse and select the folder location where the exported File will be saved, and click OK.
The glossary is exported to the selected folder location.
BlacklistA blacklist includes words or phrases that should not be used in the target segment.
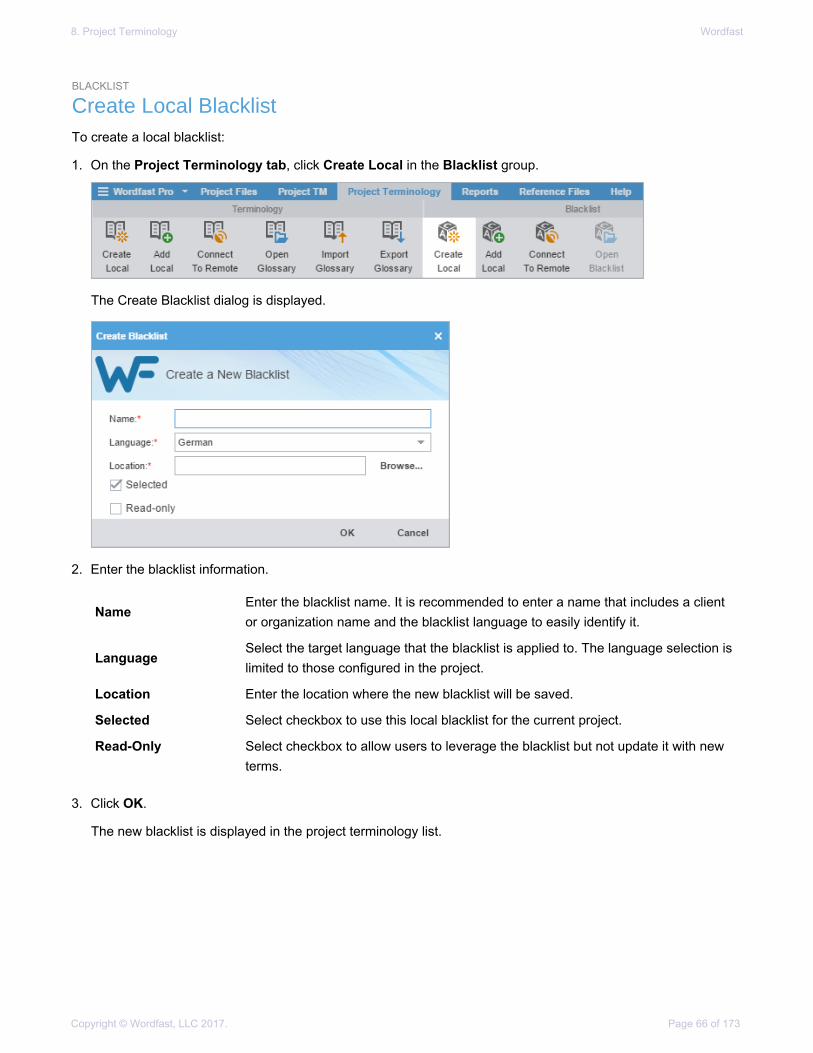
8. Project Terminology Wordfast
Copyright © Wordfast, LLC 2017. Page 66 of 173
BLACKLIST
Create Local BlacklistTo create a local blacklist:
1. On the Project Terminology tab, click Create Local in the Blacklist group.
The Create Blacklist dialog is displayed.
2. Enter the blacklist information.
NameEnter the blacklist name. It is recommended to enter a name that includes a clientor organization name and the blacklist language to easily identify it.
LanguageSelect the target language that the blacklist is applied to. The language selection islimited to those configured in the project.
Location Enter the location where the new blacklist will be saved.
Selected Select checkbox to use this local blacklist for the current project.
Read-Only Select checkbox to allow users to leverage the blacklist but not update it with newterms.
3. Click OK.
The new blacklist is displayed in the project terminology list.

8. Project Terminology Wordfast
Copyright © Wordfast, LLC 2017. Page 67 of 173
BLACKLIST
Add Local BlacklistTo add a local blacklist:
1. On the Project Terminology tab, click Add Local in the Blacklist group.
2. On the Creating Blacklist navigation dialog, browse to the blacklist folder that you want to add, and select it.
3. Click Select Folder.
The selected blacklist is added to the project and displayed in the project terminology list.
BLACKLIST
Connect To Remote BlacklistTo connect to a remote blacklist:
1. On the Project Terminology tab, click Connect To Remote.

8. Project Terminology Wordfast
Copyright © Wordfast, LLC 2017. Page 68 of 173
The Connect to Term Manager dialog is displayed.
2. Enter a unique name in the Name text input field.
3. Select a target language from the drop-down list.
4. Enter the remote glossary URL. following the example shown in the placeholder text.
The rest of the URL Settings are populated automatically when you enter the URL.
5. (Optional) Select the Selected checkbox to use this blacklist for the current project.
6. Click OK.
The new glossary is displayed in the project terminology list.
BLACKLIST
Open BlacklistTo open a local blacklist :
• On the Project Terminology tab, select a local blacklist, and click Open Blacklist.
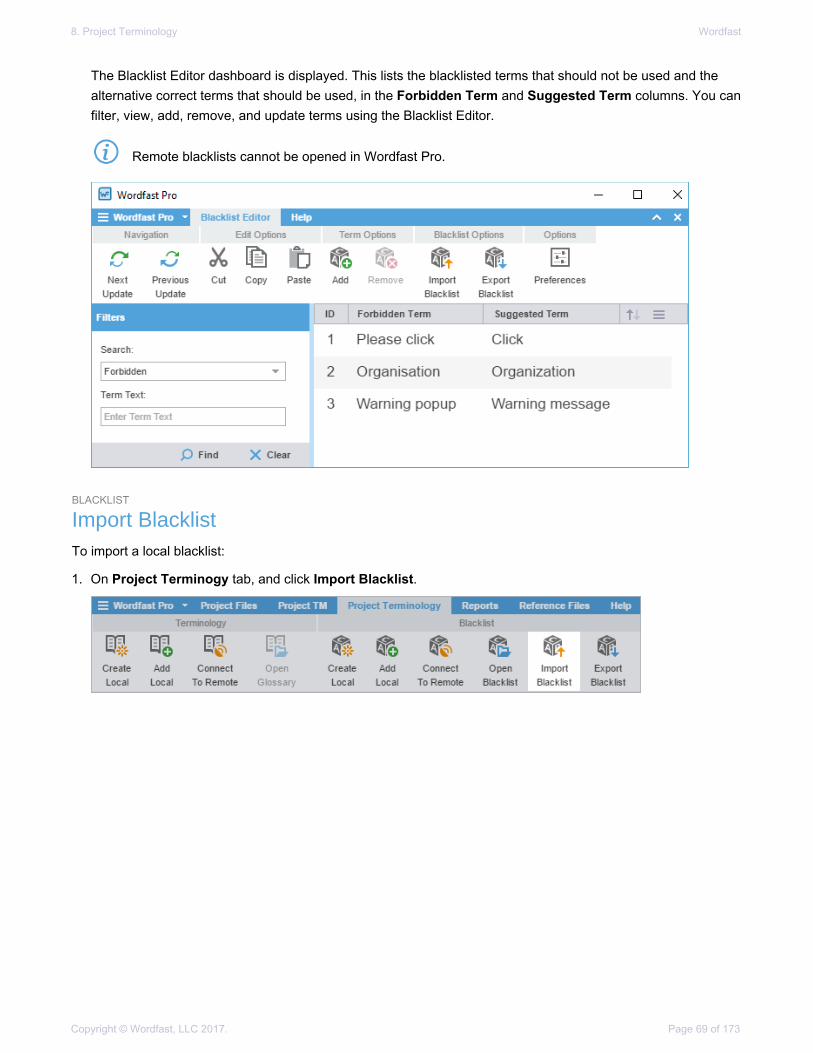
8. Project Terminology Wordfast
Copyright © Wordfast, LLC 2017. Page 69 of 173
The Blacklist Editor dashboard is displayed. This lists the blacklisted terms that should not be used and thealternative correct terms that should be used, in the Forbidden Term and Suggested Term columns. You canfilter, view, add, remove, and update terms using the Blacklist Editor.
Remote blacklists cannot be opened in Wordfast Pro.
BLACKLIST
Import BlacklistTo import a local blacklist:
1. On Project Terminogy tab, and click Import Blacklist.
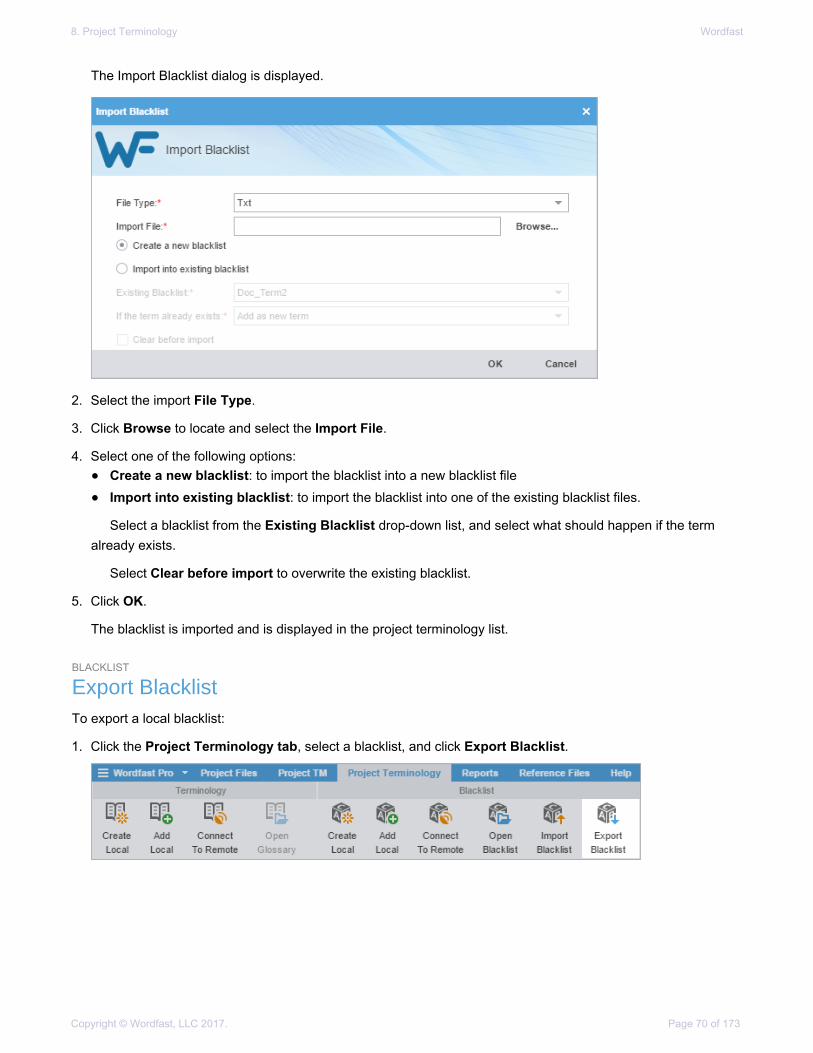
8. Project Terminology Wordfast
Copyright © Wordfast, LLC 2017. Page 70 of 173
The Import Blacklist dialog is displayed.
2. Select the import File Type.
3. Click Browse to locate and select the Import File.
4. Select one of the following options:• Create a new blacklist: to import the blacklist into a new blacklist file
• Import into existing blacklist: to import the blacklist into one of the existing blacklist files.
Select a blacklist from the Existing Blacklist drop-down list, and select what should happen if the termalready exists.
Select Clear before import to overwrite the existing blacklist.
5. Click OK.
The blacklist is imported and is displayed in the project terminology list.
BLACKLIST
Export BlacklistTo export a local blacklist:
1. Click the Project Terminology tab, select a blacklist, and click Export Blacklist.

8. Project Terminology Wordfast
Copyright © Wordfast, LLC 2017. Page 71 of 173
The Export Blacklist dialog is displayed.
2. Select the Blacklist that you want to export.
3. Select the file Export Type.
4. Click Browse, select the folder location where the exported file will be saved, and click OK.
The blacklist is exported to the selected folder location.
OptionsYou can use the Options group of the Project Terminology tab to modify and remove glossaries and blacklists.
OPTIONS
Modify a Glossary or BlacklistTo modify a glossary or blacklist:
1. Click the Project Terminology tab, select a glossary or blacklist that you want to modify, and click Modify.

8. Project Terminology Wordfast
Copyright © Wordfast, LLC 2017. Page 72 of 173
A Modify dialog is displayed, based on the file type, glossary, or blacklist.
2. Modify the glossary or blacklist details as required, and click OK to save all changes.
Refer to Terminology Lists (Glossaries) and Blacklist for more information on modifying local and remoteglossaries or blacklists.
OPTIONS
Remove a Glossary or BlacklistWhen a glossary or blacklist is removed from a project, the glossary or blacklist file is retained in the glossaryor blacklist folder on your computer. It can be added again to the project by clicking Add Local or Connect toRemote on the Project Terminology tab.
To remove a glossary or blacklist, on the Project Terminology tab:
1. Click the Project Terminology tab, select a glossary or blacklist that you want to remove, and click Remove.

8. Project Terminology Wordfast
Copyright © Wordfast, LLC 2017. Page 73 of 173
The Remove dialog is displayed.
2. Click Yes.
The selected glossary or blacklist is removed from the project terminology list.
A remote glossary or blacklist can be added again to the project by clicking Connect To Remote and enteringits URL.

Copyright © Wordfast, LLC 2017. Page 74 of 173
9. ReportsThe Reports tab displays all analysis and cleanup reports that can be exported for reference into CSV, HTML,XLS, and PDF formats.
Open ReportTo open a report:
• On the Reports tab, select a report, and double-click.

9. Reports Wordfast
Copyright © Wordfast, LLC 2017. Page 75 of 173
The Report File is displayed.
Remove ReportTo remove a report on the Reports tab:
1. Follow the steps in Open Project.
2. On the Reports tab, select a report, and click Remove Report.
The report is removed from the reports list.
After a report is removed it can be viewed again. Removed reports are not erased and can beretrieved from the Project folder on your computer.
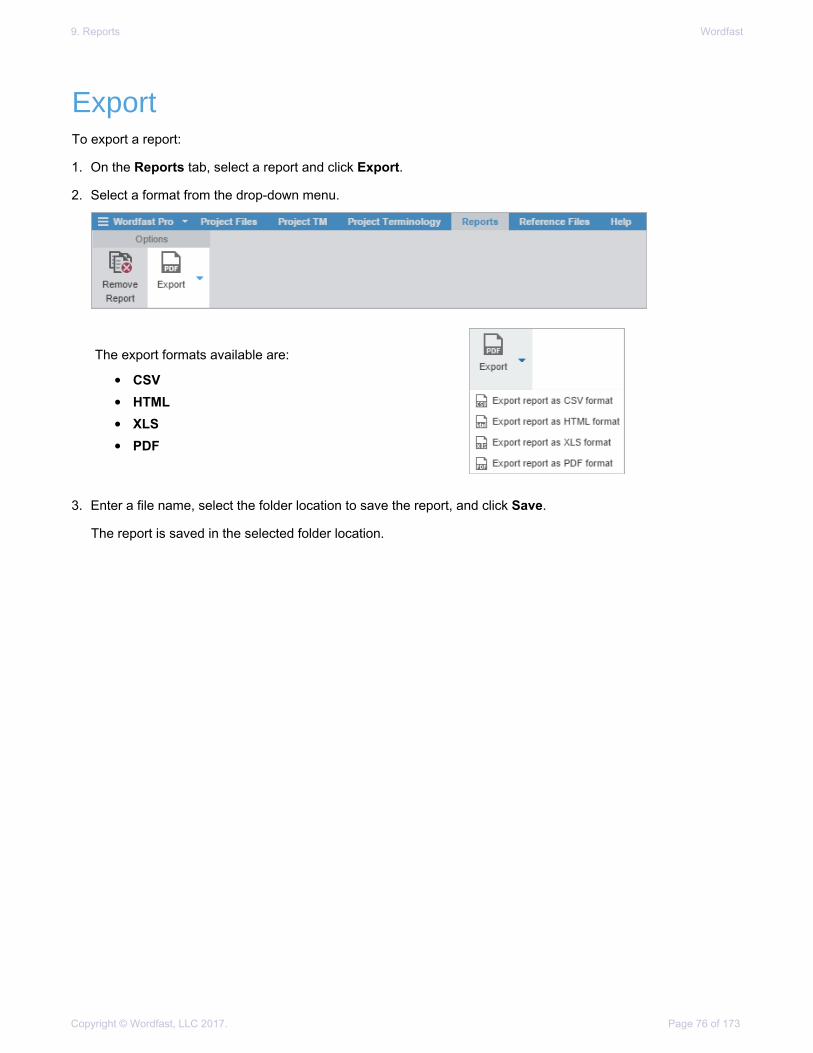
9. Reports Wordfast
Copyright © Wordfast, LLC 2017. Page 76 of 173
ExportTo export a report:
1. On the Reports tab, select a report and click Export.
2. Select a format from the drop-down menu.
The export formats available are:
• CSV
• HTML
• XLS
3. Enter a file name, select the folder location to save the report, and click Save.
The report is saved in the selected folder location.
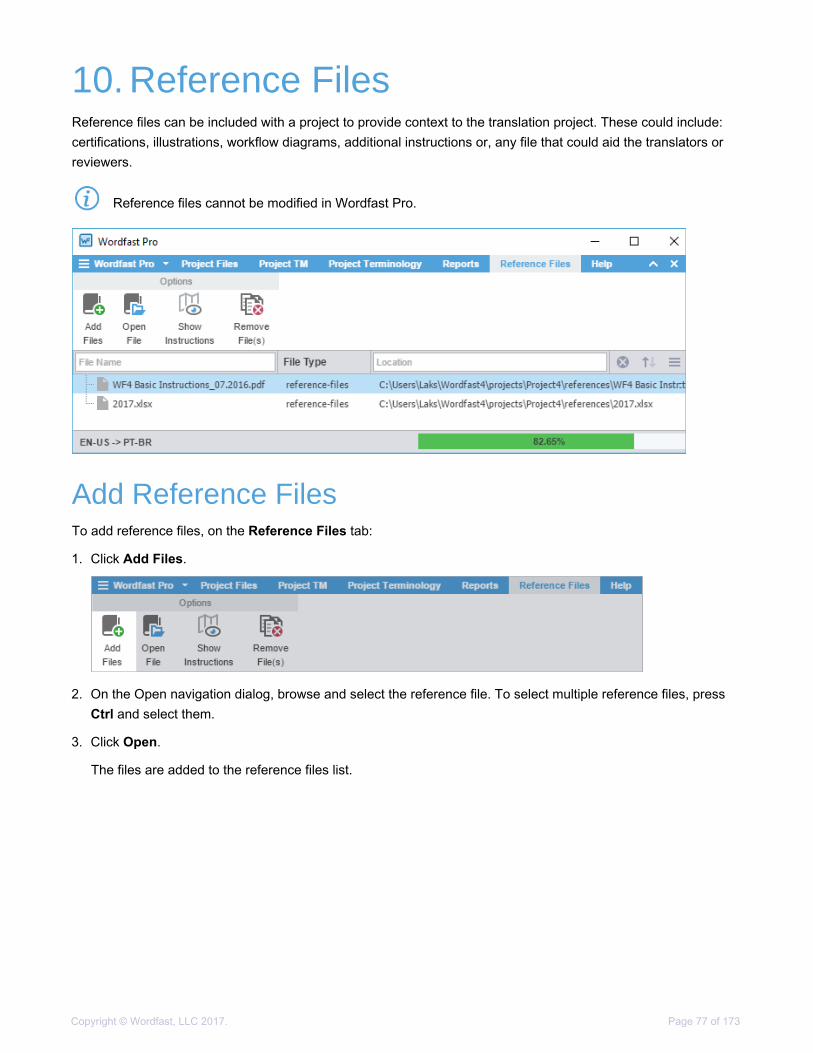
Copyright © Wordfast, LLC 2017. Page 77 of 173
10. Reference FilesReference files can be included with a project to provide context to the translation project. These could include:certifications, illustrations, workflow diagrams, additional instructions or, any file that could aid the translators orreviewers.
Reference files cannot be modified in Wordfast Pro.
Add Reference FilesTo add reference files, on the Reference Files tab:
1. Click Add Files.
2. On the Open navigation dialog, browse and select the reference file. To select multiple reference files, pressCtrl and select them.
3. Click Open.
The files are added to the reference files list.

10. Reference Files Wordfast
Copyright © Wordfast, LLC 2017. Page 78 of 173
Open FileTo open a reference file:
• On the Reference Files tab, select a reference file, and click Open File.
The selected file opens.
Show InstructionsInstructions are included in the Package files that can be imported into Wordfast Pro. The instructions areavailable for viewing through the Reference Files tab.
To view instructions on the Reference Files tab:
1. Follow the steps in Open Project.
2. On the Reference Files tab, click Show Instructions.
The Instructions dialog is displayed.
Remove FileTo remove reference files:
1. On the Reference Files tab, select the files you want to remove.

10. Reference Files Wordfast
Copyright © Wordfast, LLC 2017. Page 79 of 173
2. Click Remove File(s).
3. On the Remove dialog, select one of the following:
• Remove from the list only: removes the reference file from the files list but retains the reference filesresources in the Project folder on your computer
• Remove from the list and move the following resources to Archive folder: removes the reference filefrom the files list and moves the resources listed in the table to the Archive folder within the Project folderon your computer
4. Click OK.
The selected file is removed from the reference file list.
After a reference file is removed it can be added again. Removed reference files are not deleted andcan be retrieved from the Project folder on your computer using the Add Files option.

Copyright © Wordfast, LLC 2017. Page 80 of 173
11. Translate FilesAfter completing the initial steps of creating a project, connecting to translation memories, and glossaries, theproject files are ready for translation in the TXLF editor.
Open and Translate FileAfter a project is opened, the files that comprise the project are accessible from the Project Files tab. When theproject has numerous files, the files can be chained together into one contiguous file. Refer to Chain Files.
To open a file for translation:
1. On the Project Files tab, select a file and click Translate File.
The source and the leveraged target content is displayed in the Translation tab.
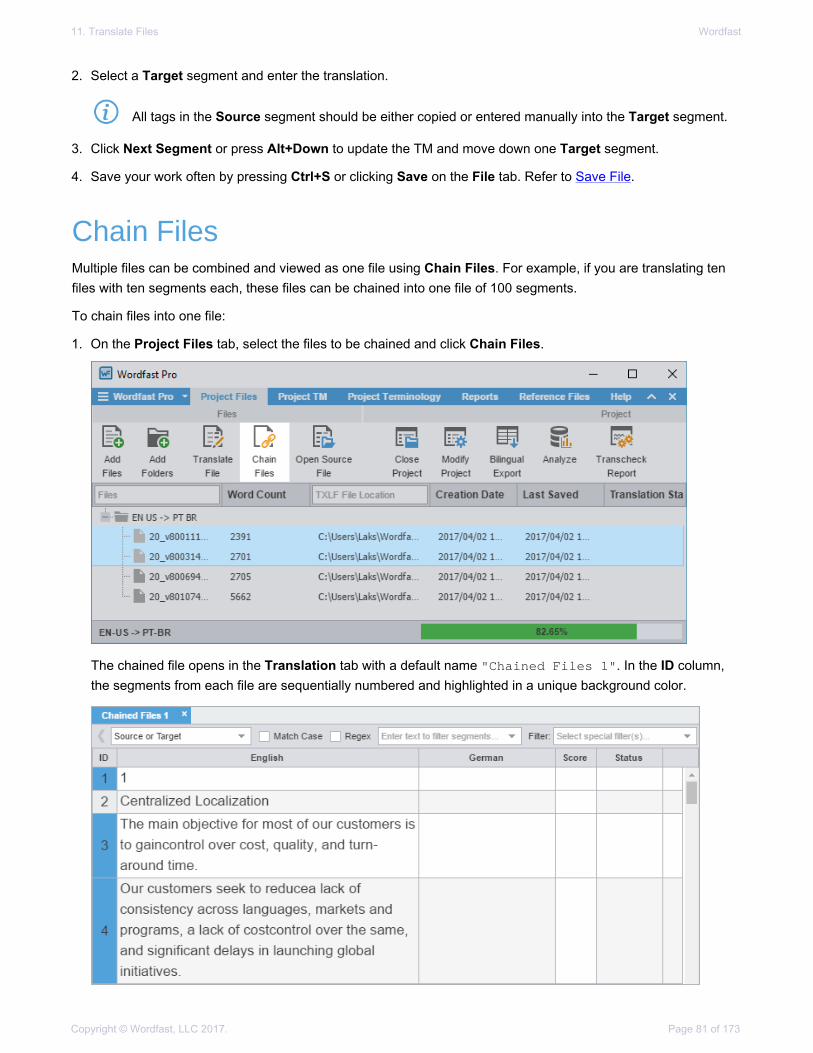
11. Translate Files Wordfast
Copyright © Wordfast, LLC 2017. Page 81 of 173
2. Select a Target segment and enter the translation.
All tags in the Source segment should be either copied or entered manually into the Target segment.
3. Click Next Segment or press Alt+Down to update the TM and move down one Target segment.
4. Save your work often by pressing Ctrl+S or clicking Save on the File tab. Refer to Save File.
Chain FilesMultiple files can be combined and viewed as one file using Chain Files. For example, if you are translating tenfiles with ten segments each, these files can be chained into one file of 100 segments.
To chain files into one file:
1. On the Project Files tab, select the files to be chained and click Chain Files.
The chained file opens in the Translation tab with a default name "Chained Files 1". In the ID column,the segments from each file are sequentially numbered and highlighted in a unique background color.

11. Translate Files Wordfast
Copyright © Wordfast, LLC 2017. Page 82 of 173
2. Click in any segment.
The file name changes from the chained name to the source file name of the active segment.
3. Translate and review the segments. At the end of a file in the set, you can see a file divider and the segmentID restarts at 1.
4. Press Ctrl+S or click Save on the File tab to save the chained file.
When the chained file is saved, the segments are restored to their original files and the chained format is notretained.
Chained files can only be opened in the TXLF Editor. You can open and work on multiple sets ofchained files. Chained files cannot be exported and saved as a single TXLF file. The Get BilingualTable option can be used to download the chained files as one document.
Translate All SegmentsThe Translate All option completes the translation of all segments by leveraging the connected TMs.
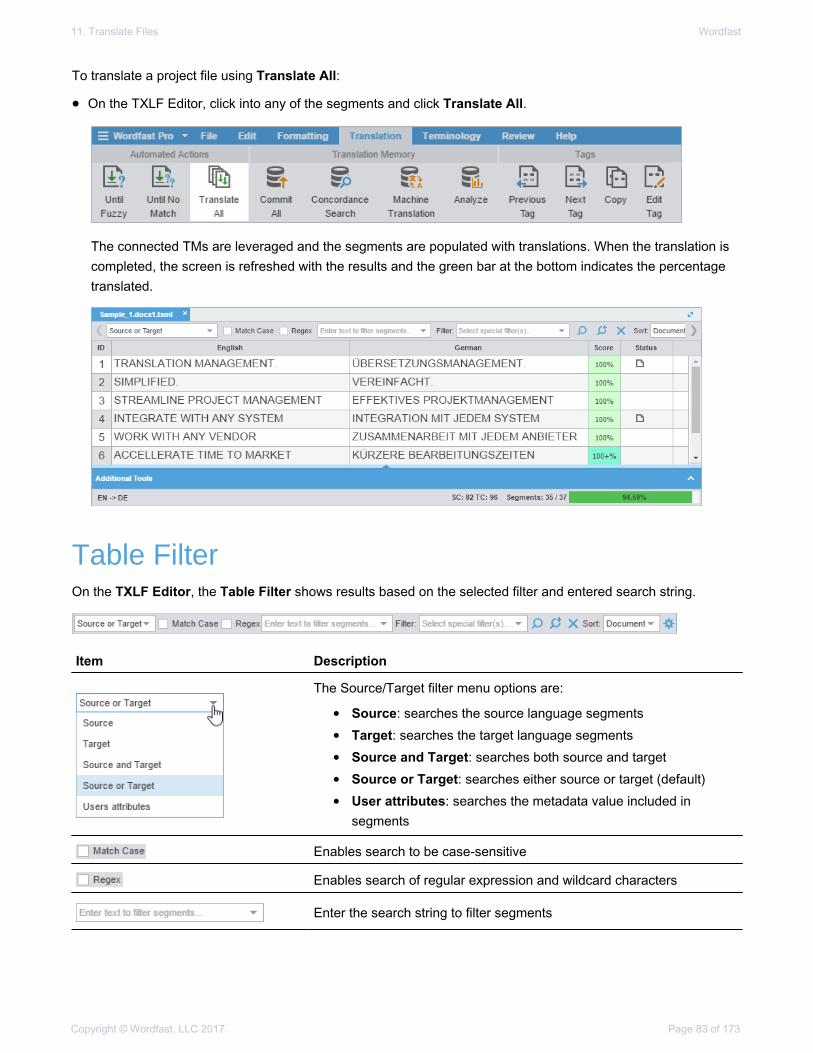
11. Translate Files Wordfast
Copyright © Wordfast, LLC 2017. Page 83 of 173
To translate a project file using Translate All:
• On the TXLF Editor, click into any of the segments and click Translate All.
The connected TMs are leveraged and the segments are populated with translations. When the translation iscompleted, the screen is refreshed with the results and the green bar at the bottom indicates the percentagetranslated.
Table FilterOn the TXLF Editor, the Table Filter shows results based on the selected filter and entered search string.
Item Description
The Source/Target filter menu options are:
• Source: searches the source language segments
• Target: searches the target language segments
• Source and Target: searches both source and target
• Source or Target: searches either source or target (default)
• User attributes: searches the metadata value included insegments
Enables search to be case-sensitive
Enables search of regular expression and wildcard characters
Enter the search string to filter segments

11. Translate Files Wordfast
Copyright © Wordfast, LLC 2017. Page 84 of 173
Item Description
Drop-down list of all available search filter criteria:
• 100% match segments: segments matching completely in theTM
• All except 100% and Context match segments: segments withpartial TM match, no match, or modified segments
• All except auto-propagated: all statuses except the segmentsthat are auto-propagated
• Auto-propagated segments: all auto-propagated matches
• Committed segments: segments with translated contentcommitted to the TM
• Context match segments: all 100+% context matches. Contextmatches provide more refined matches that are based oncontextual references in the TM. For example, a segmentis considered a context match when the previous and nextsegments also have a 100% match against the TM
• Duplicate segments: segments being duplicated in the file
• Edited source segments: source segments that have changed
• Empty target segments: segments without a translated target
• Fuzzy match segments: segments with partial TM match
• Machine translated segments: segments translated by amachine. This option requires Machine Translation to be enabledin the project
• Modified segments: all modified segments. By default allmodified segments are highlighted in pink
• No match segments: segments with no match in the TM
• Segments with Transcheck warnings: segments withTranscheck warning status
• Segments with history: segments that have been edited andhas a segment revision history viewable in the Segment Historytab
• Segments with notes: segments containing comments
• Segments with repetitions: segments with repeated text strings
• Short segments: segments of fewer than {#} words, paragraphsor other blocks
• Unconfirmed segments: segments marked unconfirmed
Apply the selected filter
Add a selection of filters to apply in order of selection
Clear all fields in the Table Filter tool bar and view the original contentand sorting
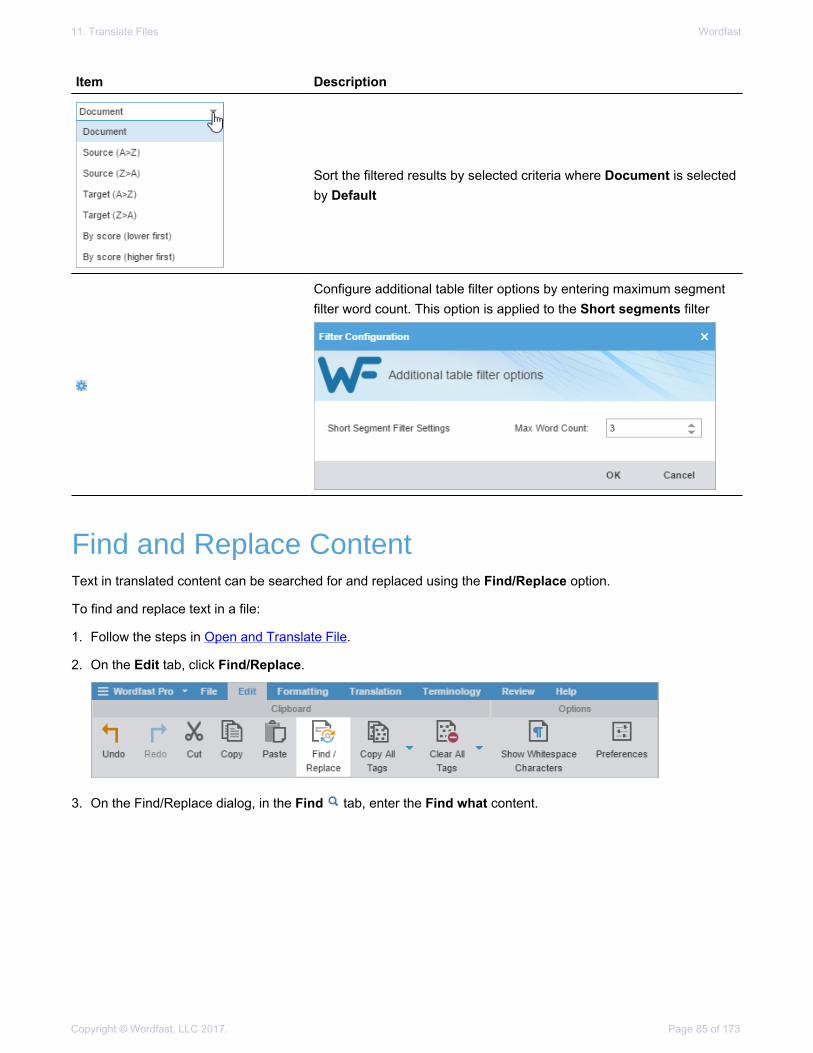
11. Translate Files Wordfast
Copyright © Wordfast, LLC 2017. Page 85 of 173
Item Description
Sort the filtered results by selected criteria where Document is selectedby Default
Configure additional table filter options by entering maximum segmentfilter word count. This option is applied to the Short segments filter
Find and Replace ContentText in translated content can be searched for and replaced using the Find/Replace option.
To find and replace text in a file:
1. Follow the steps in Open and Translate File.
2. On the Edit tab, click Find/Replace.
3. On the Find/Replace dialog, in the Find tab, enter the Find what content.
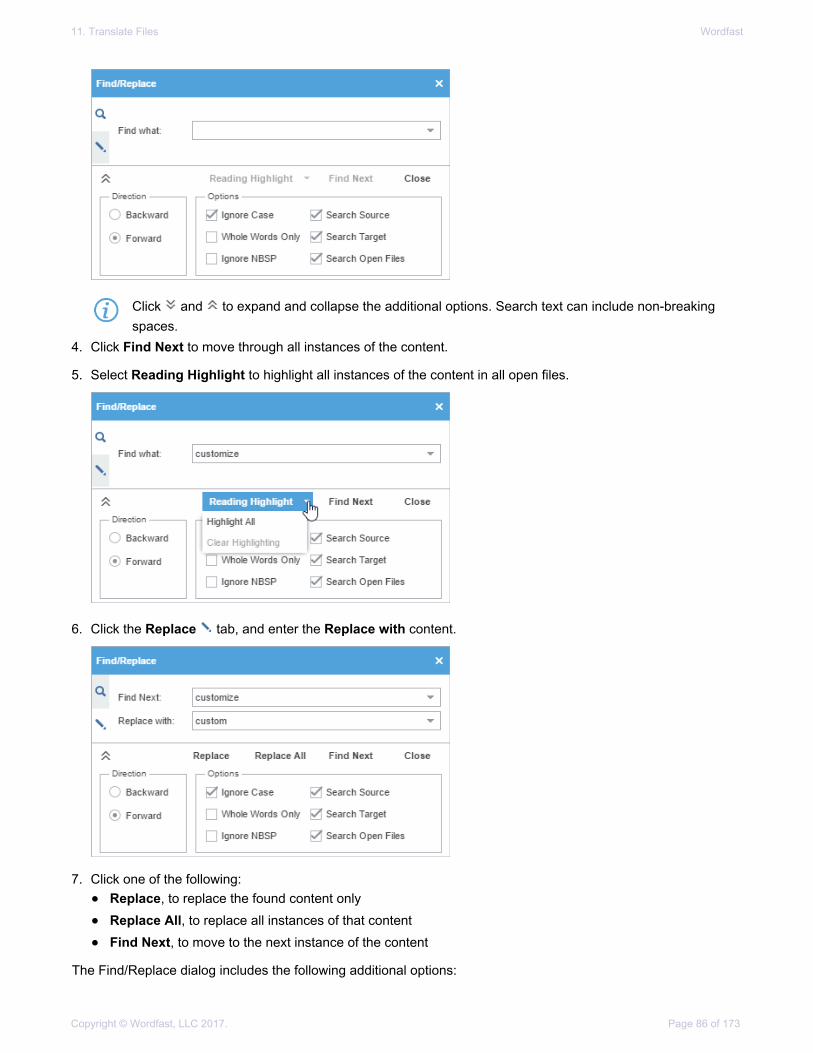
11. Translate Files Wordfast
Copyright © Wordfast, LLC 2017. Page 86 of 173
Click and to expand and collapse the additional options. Search text can include non-breakingspaces.
4. Click Find Next to move through all instances of the content.
5. Select Reading Highlight to highlight all instances of the content in all open files.
6. Click the Replace tab, and enter the Replace with content.
7. Click one of the following:• Replace, to replace the found content only
• Replace All, to replace all instances of that content
• Find Next, to move to the next instance of the content
The Find/Replace dialog includes the following additional options:

11. Translate Files Wordfast
Copyright © Wordfast, LLC 2017. Page 87 of 173
Backward Search from cursor location to file beginning
Forward Search from cursor location to file end
Ignore Case Search for all instances of a word or phrase ignoring case
Whole Words Only
Search for all instances of only whole word matches
Note: This checkbox will be disabled if multiple words or punctuation isadded to the search.
Ignore Non-breaking SpaceSearch for all instances of a word or phrase including non-breakingspaces
Search Source Search for all instances of a word or phrase in the source only
Search Target Search for all instances of a word or phrase in the target only
Search Through Open Files Search for all instances of a word or phrase in all open files
TXLF Editor Progress BarThe TXLF Editor progress bar is located in the bottom right-hand corner of the window. The progress bar providesa quick view of the number of completed segments, segment and paragraph word counts, alerts when the wordcount exceeds the maximum limit, percentage completed, and number of words that require translation.
The progress bar changes when you navigate between segments. It includes the following information.
Number of segments completed / total number of segments.
Number of characters in source segment / number of characters in targetsegment / maximum characters allowed in target segment.The number of characters and maximum characters allowed in the target segmentturn red when it exceeds the maximum character allowed.
Number of characters in the source paragraph / Number of characters in targetparagraph/ Maximum characters allowed in target paragraph.The number of characters and maximum characters allowed in the targetparagraph turn red when it exceeds the maximum character allowed.
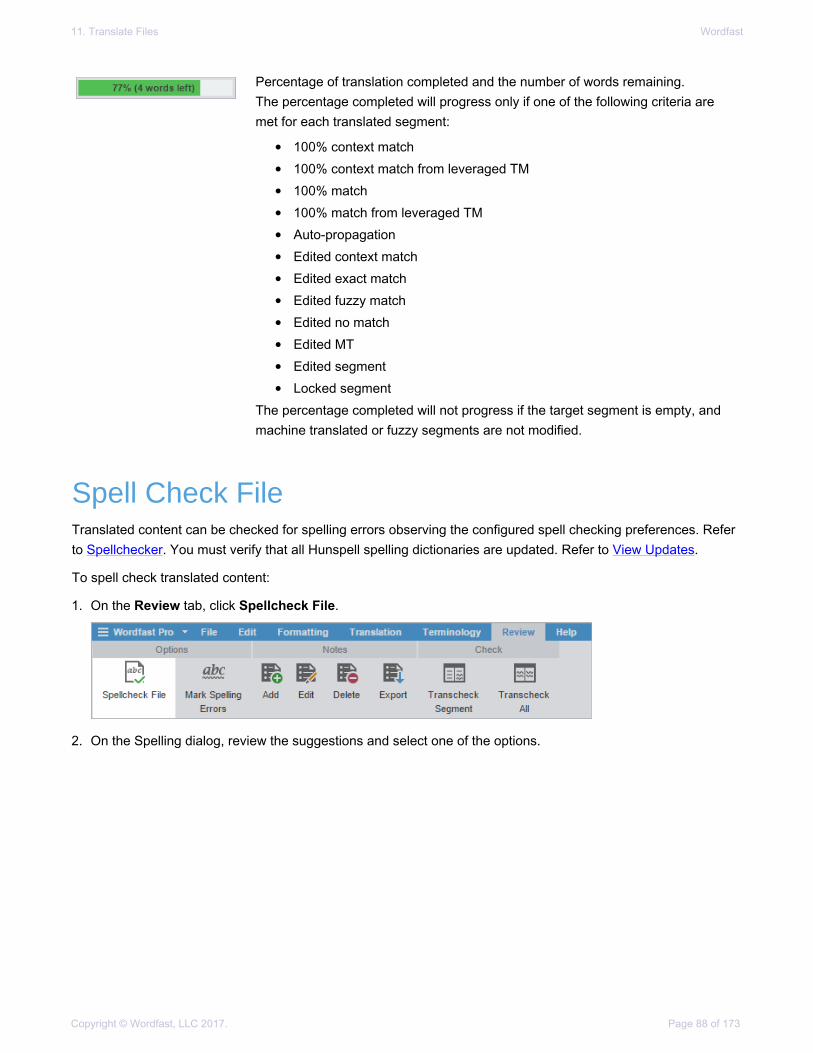
11. Translate Files Wordfast
Copyright © Wordfast, LLC 2017. Page 88 of 173
Percentage of translation completed and the number of words remaining.The percentage completed will progress only if one of the following criteria aremet for each translated segment:
• 100% context match
• 100% context match from leveraged TM
• 100% match
• 100% match from leveraged TM
• Auto-propagation
• Edited context match
• Edited exact match
• Edited fuzzy match
• Edited no match
• Edited MT
• Edited segment
• Locked segmentThe percentage completed will not progress if the target segment is empty, andmachine translated or fuzzy segments are not modified.
Spell Check FileTranslated content can be checked for spelling errors observing the configured spell checking preferences. Referto Spellchecker. You must verify that all Hunspell spelling dictionaries are updated. Refer to View Updates.
To spell check translated content:
1. On the Review tab, click Spellcheck File.
2. On the Spelling dialog, review the suggestions and select one of the options.

11. Translate Files Wordfast
Copyright © Wordfast, LLC 2017. Page 89 of 173
Ignore Once Ignore the suggested change for the word once
Ignore All Ignore the suggested change for all the occurrences of the word in the file
Change Accept the suggested change for the word
Change All Accept the suggested change for all the occurrences of the word in the file
To view spell checking preferences, click Preferences. Refer to Spellchecker.
If spell checking is not available for the target language the following warning message is displayed.
Translation MemoryTranslation memory (TM) is designed to provide maximum content re-use and facilitate collaboration betweenglobally distributed localization resources.
TRANSLATION MEMORY
TM Color CodesWhen a project is connected to a translation memory (TM), all project files are leveraged against it. Each segmentis highlighted in different colors to represent the TM match.

11. Translate Files Wordfast
Copyright © Wordfast, LLC 2017. Page 90 of 173
Color Description
Yellow Fuzzy match
Grey No match
Green 100% match
Dark Green Context match. A segment is considered a context match in the followingscenarios:
• if the segments have correct checksum or attribute match
• if the previous and next segments also have a 100% match
• if the 100% matched segment is a single paragraph
Pink Modified segment
Purple Modified segment updated or committed to the TM
Light Purple Auto-propagated. A segment is considered auto-propagated when asegment is translated and committed, and other repetitive segments areautomatically updated with the translation
Light Pink Machine Translated
TRANSLATION MEMORY
Leverage TMWhen a segment is leveraged, the best possible translation is populated from the connected translation memoriesor machine translation engines.
To leverage a translation memory:
1. Follow the steps in Open and Translate File.
2. On the TXLF Editor, click into any of the segments and click one of the following:
• Leverage to retrieve suggestions from the active TM for the selected source segment
• Until Fuzzy to retrieve suggestions from the active TM until the next Fuzzy match
• Until No Match to retrieve suggestions from the active TM for the all source segments until no exact matchis found
• Translate All to automatically translate all segments
The leveraged content is displayed in the Target column when a match is found. When Machine Translation isenabled, the Machine Translation match is populated.

11. Translate Files Wordfast
Copyright © Wordfast, LLC 2017. Page 91 of 173
TRANSLATION MEMORY
Concordance SearchThe Translation Memory lookup pane is used to view concordance search results. This search looks for specificsource segment text in the translation memory. The results show source and target segments.
To use the concordance search:
1. On the TXLF Editor, enter a word or phrase in the TM Lookup text box and press Enter or click Find Sourceor Find Target.
The TM lookup results are displayed.
2. To further refine the search, select More Options.
Case Sensitive Filter by case
Exact Filter for only those terms that appear in the same order
Automatic Leverage TM Lookup pane is updated automatically when navigating to a newsegment
Diff Highlight Highlight the difference between source and TM source
Include Private TU (GLTMS) Include private Translation Units in the search for remote GLTMS TMs

11. Translate Files Wordfast
Copyright © Wordfast, LLC 2017. Page 92 of 173
TRANSLATION MEMORY
View TM Leverage ResultsTranslation Memory leverage search occurs automatically, as a user navigates through the segments, to providethe users with the best possible full segment matches from the TM. It is also the only search that uses scoring todecide which match is the best.
To view TM leverage results in TM Lookup:
1. On the TXLF Editor, click in any of the source or target segments.
The TM Lookup tab is populated with TM leverage results.
2. You can view the following TM leverage details:
Source The source column shows source segment from the TM. The source is highlighted inred and green only if there is a difference of source segment with respect to the TUpresent in the TM.
Target The target segment from the TM.
Score The TM leverage score. The scores are denoted as follows:
• Percent (%): 100% and fuzzy matches
• Plus (+): Context matches
• Asterisk (*): Secondary TM match
• Red outline around score box: TU has penaltiesRefer to TM Color Codes for more information on TM color codes.
TM Name The name of the TM that was leveraged. If multiple TMs are leveraged, then theprimary TM leverage will appear first, followed by secondary TMs.
Creation Date The date when the translation unit (TU) was created in the TM.
Creation User The user who created the TU.
Last Modified The date when the TU was last modified.
Modification User The user who modified the TU.
Custom Attribute Attribute name and values for a TU
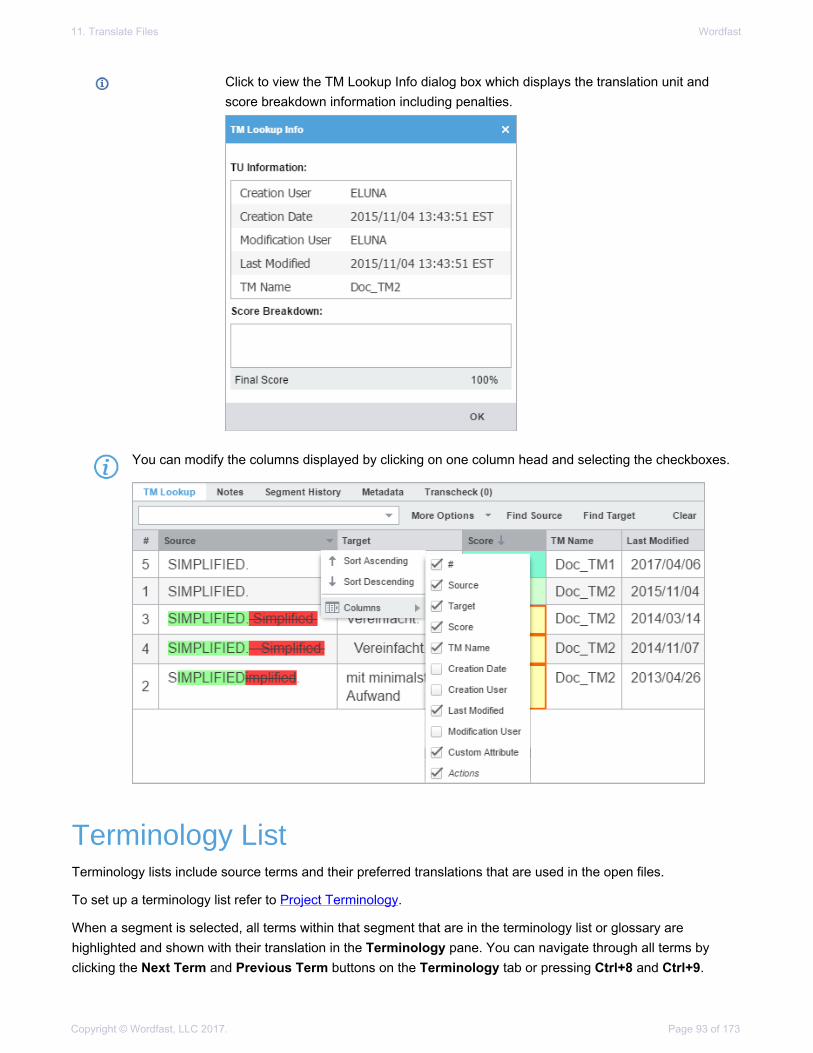
11. Translate Files Wordfast
Copyright © Wordfast, LLC 2017. Page 93 of 173
Click to view the TM Lookup Info dialog box which displays the translation unit andscore breakdown information including penalties.
You can modify the columns displayed by clicking on one column head and selecting the checkboxes.
Terminology ListTerminology lists include source terms and their preferred translations that are used in the open files.
To set up a terminology list refer to Project Terminology.
When a segment is selected, all terms within that segment that are in the terminology list or glossary arehighlighted and shown with their translation in the Terminology pane. You can navigate through all terms byclicking the Next Term and Previous Term buttons on the Terminology tab or pressing Ctrl+8 and Ctrl+9.

11. Translate Files Wordfast
Copyright © Wordfast, LLC 2017. Page 94 of 173
TERMINOLOGY LIST
Terminology Color CodesWhen a project is connected to a terminology list or glossary, all terms that exist in an open file are highlightedin different color codes. The terms are highlighted when the user selects a segment or by clicking HighlightAll Terms under the Terminology tab. These color codes represent the type of translation match against theterminology list or glossary.
Source/Target Target Exact Match Target Fuzzy Match Target No Match
Source Exact Match Green/Green Green/Yellow Red/No color
Source Fuzzy Match Yellow/Green Yellow/Yellow Purple/No color
TERMINOLOGY LIST
Search TermTo search terms using the Terminology pane:
• Enter a term in the Search Glossaries (Source) field.

11. Translate Files Wordfast
Copyright © Wordfast, LLC 2017. Page 95 of 173
The search results from the connected glossaries are displayed.
TERMINOLOGY LIST
Add TermTerms can be added to local and remote glossaries. To add terms to the remote glossary, you must have therequired user permissions. You cannot add terms to a glossary that is marked as read-only.
To add terms to a glossary from the Terminology pane:
1. Do one of the following:• On the TXLF Editor, select a word in the source segment and the translation in the target segment, and
click the Add button in the Terminology pane. The Add Term dialog is displayed.
• On the TXLF Editor, select a term in the source segment only, and click the Add button in theTerminology pane. The Add Term dialog is displayed where you can enter the translation for the term inthe Target field.

11. Translate Files Wordfast
Copyright © Wordfast, LLC 2017. Page 96 of 173
2. (Optional) Enter a term Description.
3. Select the Glossary to save the term and click OK.
The new term is added to the glossary.
TERMINOLOGY LIST
Edit TermYou can edit the terms in the local glossary only, not the remote glossary.
To edit a term in the glossary:
1. On the TXLF Editor Terminology pane, select the term to edit.
2. Click the Edit button .
3. On the Edit term dialog, edit the term as required and click Modify.

11. Translate Files Wordfast
Copyright © Wordfast, LLC 2017. Page 97 of 173
The term edits are applied and displayed on the Terminology pane.
TERMINOLOGY LIST
Remove TermTerms can only be removed from a local glossary. They cannot be removed from remote glossaries or glossariesthat are marked as read-only.
To remove a term in the glossary:
1. On the TXLF Editor Terminology pane, select the term to remove.
2. Click the Remove button .
3. On the Warning message, click Yes.
The term is removed from the local glossary.
TERMINOLOGY LIST
Insert TermTo insert a term into the current target:
1. On the TXLF Editor, click in the target segment where the term should be inserted.
2. Select the term to insert from the Terminology pane.
3. Click the Insert button .
The selected term is inserted into the target segment at the selected location.
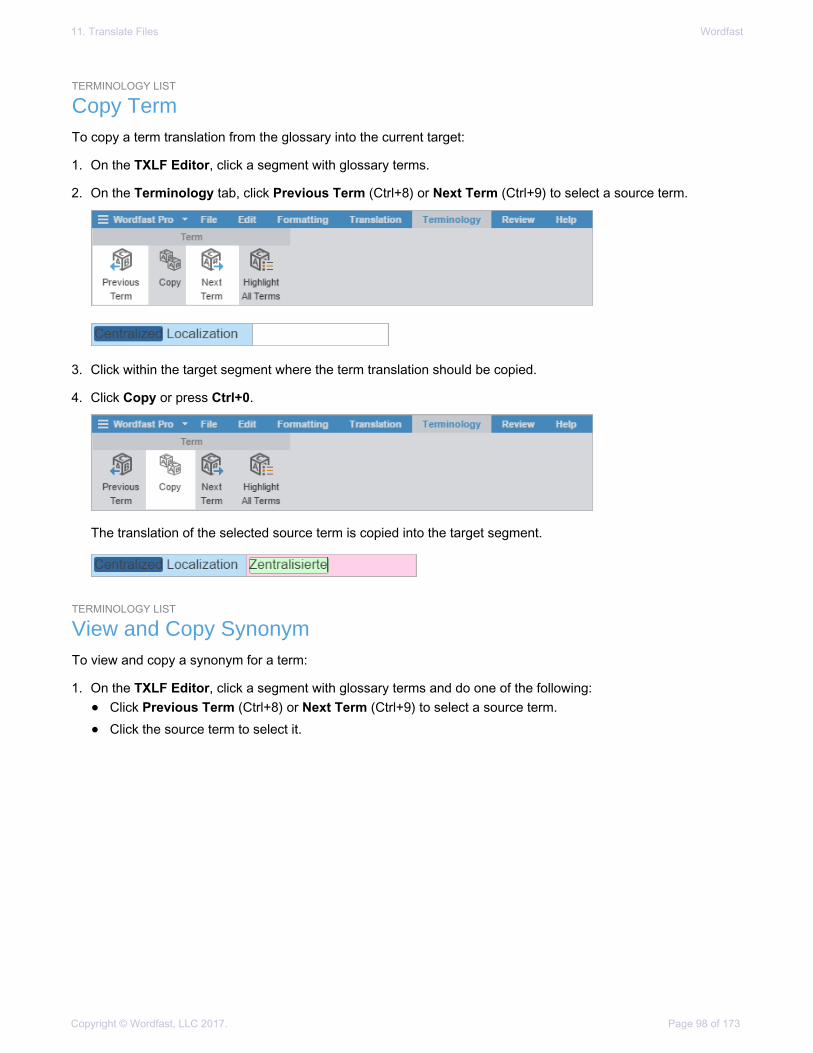
11. Translate Files Wordfast
Copyright © Wordfast, LLC 2017. Page 98 of 173
TERMINOLOGY LIST
Copy TermTo copy a term translation from the glossary into the current target:
1. On the TXLF Editor, click a segment with glossary terms.
2. On the Terminology tab, click Previous Term (Ctrl+8) or Next Term (Ctrl+9) to select a source term.
3. Click within the target segment where the term translation should be copied.
4. Click Copy or press Ctrl+0.
The translation of the selected source term is copied into the target segment.
TERMINOLOGY LIST
View and Copy SynonymTo view and copy a synonym for a term:
1. On the TXLF Editor, click a segment with glossary terms and do one of the following:• Click Previous Term (Ctrl+8) or Next Term (Ctrl+9) to select a source term.
• Click the source term to select it.

11. Translate Files Wordfast
Copyright © Wordfast, LLC 2017. Page 99 of 173
The source term is highlighted with a broad border. The term synonyms appear as a pop-up and in theTerminology pane.
2. Click within the target segment where the term translation should be copied.
3. Do one of the following:• Click Copy or press Ctrl+0 and select the preferred term translation.
• Select the preferred term translation from the Terminology pane.
The selected translation of the source term is copied into the target segment.
TagsA tag is inline text that is wrapped in a special character pair and is not translatable. For example, HTML codetags within a sentence. Target segments should have the same tags as the source segment. However, dependingon the language, sometimes a tag is not needed. If an attempt is made to save a target segment with missingtags, a warning message is displayed.
TAGS
View TagsTo view tags:
1. Follow the steps in Open and Translate File
The source and the leveraged target content appear in the Translation tab. If tags exist in the sourcesegment, they appear in purple, if they are formatting tags, and gray for non-formatting tags.
The first tag in a selected segment appears in red. For example, the numeral one ( ) is highlighted in red toindicate it is a selected tag.
Tags may appear as full size or shortened based on the preferences selected in Preferences > GeneralPreferences > Tags. Refer to Tags.

11. Translate Files Wordfast
Copyright © Wordfast, LLC 2017. Page 100 of 173
2. Mouse over a tag to view the tool-tip information.
Tags should not be edited or deleted. Refer to Tags for more information on tag preferences such asmode, representation, and font size.
TAGS
Copy TagTags can be selected and copied individually or copied as a group.
To copy a tag:
1. Follow the steps in Open and Translate File
The file appears under the Translation tab. If tags exist in the source segment, they appear in purple if theyare formatting tags and gray for non-formatting tags. The first tag in a selected segment appears in red.
2. Select the tag to be copied.
3. Drag the selected tag into the target segment or click Copy or press Ctrl-Alt-Down.
The tag is copied and the target segment is highlighted in pink.
TAGS
Copy All TagsTo copy all tags:
1. Follow the steps in Open and Translate File
The file appears under the Translation tab. If tags exist in the source segment, they appear in purple if theyare formatting tags and gray for non-formatting tags. The first tag in a selected segment appears in red.
2. On the Edit tab, click Copy All Tags in the Clipboard group, to expand the drop-down menu.
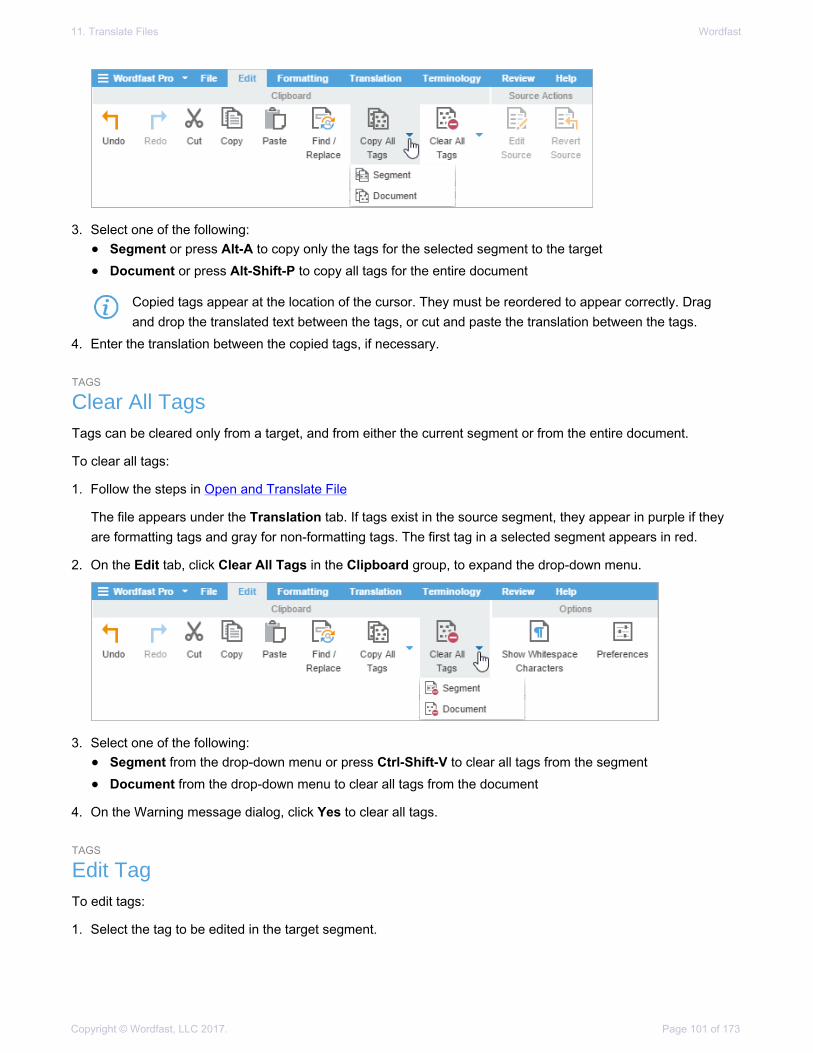
11. Translate Files Wordfast
Copyright © Wordfast, LLC 2017. Page 101 of 173
3. Select one of the following:• Segment or press Alt-A to copy only the tags for the selected segment to the target
• Document or press Alt-Shift-P to copy all tags for the entire document
Copied tags appear at the location of the cursor. They must be reordered to appear correctly. Dragand drop the translated text between the tags, or cut and paste the translation between the tags.
4. Enter the translation between the copied tags, if necessary.
TAGS
Clear All TagsTags can be cleared only from a target, and from either the current segment or from the entire document.
To clear all tags:
1. Follow the steps in Open and Translate File
The file appears under the Translation tab. If tags exist in the source segment, they appear in purple if theyare formatting tags and gray for non-formatting tags. The first tag in a selected segment appears in red.
2. On the Edit tab, click Clear All Tags in the Clipboard group, to expand the drop-down menu.
3. Select one of the following:• Segment from the drop-down menu or press Ctrl-Shift-V to clear all tags from the segment
• Document from the drop-down menu to clear all tags from the document
4. On the Warning message dialog, click Yes to clear all tags.
TAGS
Edit TagTo edit tags:
1. Select the tag to be edited in the target segment.

11. Translate Files Wordfast
Copyright © Wordfast, LLC 2017. Page 102 of 173
2. Right-click on the tag and select Edit Tag from the drop-down menu or on the Translation tab, click Edit Tag inthe Tag group.
Tags in the source segment should not be edited.
Ensure that all tag edits are valid, otherwise the TXLF file could become corrupt. 3. On the Edit Tag dialog, edit the tag as required, and click OK.
TAGS
Delete TagTags can be deleted only in the target segment.
To delete tags:
1. Follow the steps in Open and Translate File
The file appears under the Translation tab. If tags exist in the source segment, they appear in purple if theyare formatting tags and gray for non-formatting tags. The first tag in a selected segment appears in red.
2. On the TXLF Editor, select the tag in the target segment.
3. Do one of the following:• Press Delete
• On the Edit tab, click Cut
• Press Backspace
To undo the change, on the Edit tab, click Undo.
NotesWhile translating or reviewing translated content, notes specific to each segment can be added.
A project's notes can be viewed and managed on the Notes pane and the Review tab.

11. Translate Files Wordfast
Copyright © Wordfast, LLC 2017. Page 103 of 173
NOTES
View NotesTo view notes:
1. Follow the steps in Open and Translate File
The source and the leveraged target content appear in the Translation tab. The segments with notes willinclude a Note icon in the Status column.
2. Select a segment with notes, and click the Notes tab in the Editor Tabs work area.
NOTES
Add NoteTo add a note:
1. On the TXLF Editor, select a segment where the note is to be added and do one of the following:• On the Review tab, click Add in the Notes group.
• On the Notes tab in the Editor Tabs work area, click Add.
• Right-click the segment and click Add.
2. On the Add/Edit Notes dialog, select the note Type, enter the text, and click OK.

11. Translate Files Wordfast
Copyright © Wordfast, LLC 2017. Page 104 of 173
The note appears under the Notes tab and the Notes icon appears in the Status column.
NOTES
Edit NoteTo edit a note:
1. On the TXLF Editor, select a segment where the note is to be edited, or select the note on the Notes tab inthe Editor Tabs work area.
2. Do one of the following:• On the Review tab, click Edit in the Notes group.
• On the Notes tab in the Editor Tabs work area, click Edit.
• Right-click the segment and click Edit.
3. On the Add/Edit Notes dialog, edit the note as required, and click OK.
The modified note appears under the Notes tab.

11. Translate Files Wordfast
Copyright © Wordfast, LLC 2017. Page 105 of 173
NOTES
Delete NoteTo delete a note:
1. On the TXLF Editor, select a segment where the note is to be deleted, or select the note on the Notes tab inthe Editor Tabs work area.
2. Do one of the following:• On the Review tab, click Delete in the Notes group.
• On the Notes tab in the Editor Tabs work area, click Delete.
• Right-click the segment and click Delete.
The note is deleted from the segment and the notes icon disappears from the Status column.

11. Translate Files Wordfast
Copyright © Wordfast, LLC 2017. Page 106 of 173
NOTES
Export NotesTo export notes of an open file:
1. On the TXLF Editor, do one of the following:• On the Review tab, click Export in the Notes group.
• On the Notes tab in the Editor Tabs work area, click Export.
• Right-click the segment and click Export.
2. On the Export Notes navigation dialog, browse and select a location to save the exported notes file.
3. Enter a name for the file and click Save.
All the notes for the open file are saved in the selected folder location as a Word document.
SegmentsSegments are parts of the file that are divided by formatting or punctuation. Segments may be sentences, wordsor numbers, depending on the formatting of the source file. When a file is converted to a translatable TXLF format,all complete sentences become separate segments. Once these segments are translated, they are saved andcommitted to the translation memory and leveraged in future translations. Translation memory leveraging reducesthe time and expense of future translations by automatically and consistently translating reoccurring words andphrases.

11. Translate Files Wordfast
Copyright © Wordfast, LLC 2017. Page 107 of 173
SEGMENTS
View Segment HistoryOn the TXLF Editor, the Segment History tab is used to view the segment changes in the currently open file.
SEGMENTS
Commit to the TMAfter translating segments, the translation memory should be updated with the translation. The Commit All optionupdates all target segments and the Commit option updates the current target segment to the TM.
To update the translation memory on the TXLF Editor:
• On the Translation tab, click Commit All in the Translation Memory group or Commit in the Segmentgroup.
The translation memory is updated for the entire file or the current segment. When a modified segment iscommitted to the TM, the highlight color changes to purple.
SEGMENTS
Verify SegmentThe Verify Segment option enables you to automatically modify and commit a 100%, fuzzy, or MT match segmentin case it does not require any changes. You are no longer required to edit a segment if the content is correct.You can also verify segments that are not active.
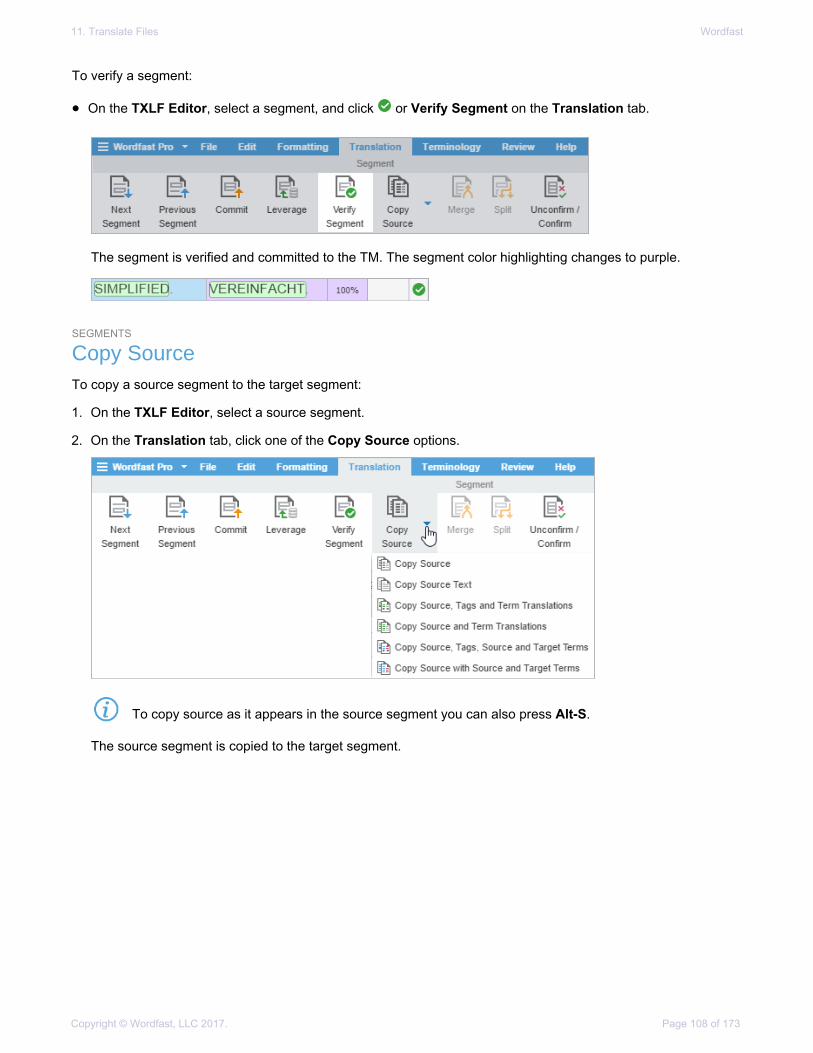
11. Translate Files Wordfast
Copyright © Wordfast, LLC 2017. Page 108 of 173
To verify a segment:
• On the TXLF Editor, select a segment, and click or Verify Segment on the Translation tab.
The segment is verified and committed to the TM. The segment color highlighting changes to purple.
SEGMENTS
Copy SourceTo copy a source segment to the target segment:
1. On the TXLF Editor, select a source segment.
2. On the Translation tab, click one of the Copy Source options.
To copy source as it appears in the source segment you can also press Alt-S.
The source segment is copied to the target segment.

11. Translate Files Wordfast
Copyright © Wordfast, LLC 2017. Page 109 of 173
SEGMENTS
Copy All SourcesTo copy all source segments to all target segments:
• On the TXLF Editor, click Copy All Sources on the Translation tab.
All source content is copied into the target segments.
SEGMENTS
Lock SegmentThe confirmed, proofread, and translated segments can be locked to ensure that they are not changed.
To lock a segment:
1. On the TXLF Editor, select the segment to lock.
2. On the Translation tab, click Lock Segment.
The Locked Segment icon is displayed in the Status column of the selected segment.
SEGMENTS
Clear TargetTo clear a target segment:
1. On the TXLF Editor, select the target segment.
2. On the Translation tab, click Clear Target.
3. On the Clear Current Segment Target message dialog, click Yes to clear the target.
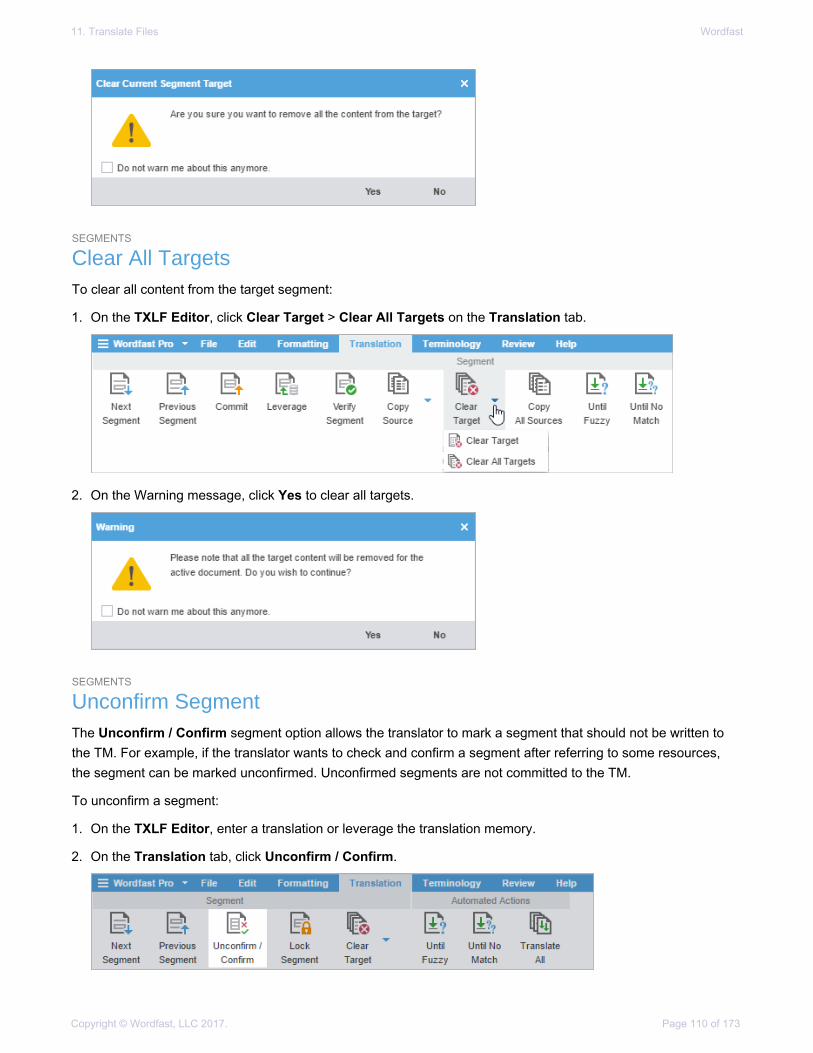
11. Translate Files Wordfast
Copyright © Wordfast, LLC 2017. Page 110 of 173
SEGMENTS
Clear All TargetsTo clear all content from the target segment:
1. On the TXLF Editor, click Clear Target > Clear All Targets on the Translation tab.
2. On the Warning message, click Yes to clear all targets.
SEGMENTS
Unconfirm SegmentThe Unconfirm / Confirm segment option allows the translator to mark a segment that should not be written tothe TM. For example, if the translator wants to check and confirm a segment after referring to some resources,the segment can be marked unconfirmed. Unconfirmed segments are not committed to the TM.
To unconfirm a segment:
1. On the TXLF Editor, enter a translation or leverage the translation memory.
2. On the Translation tab, click Unconfirm / Confirm.
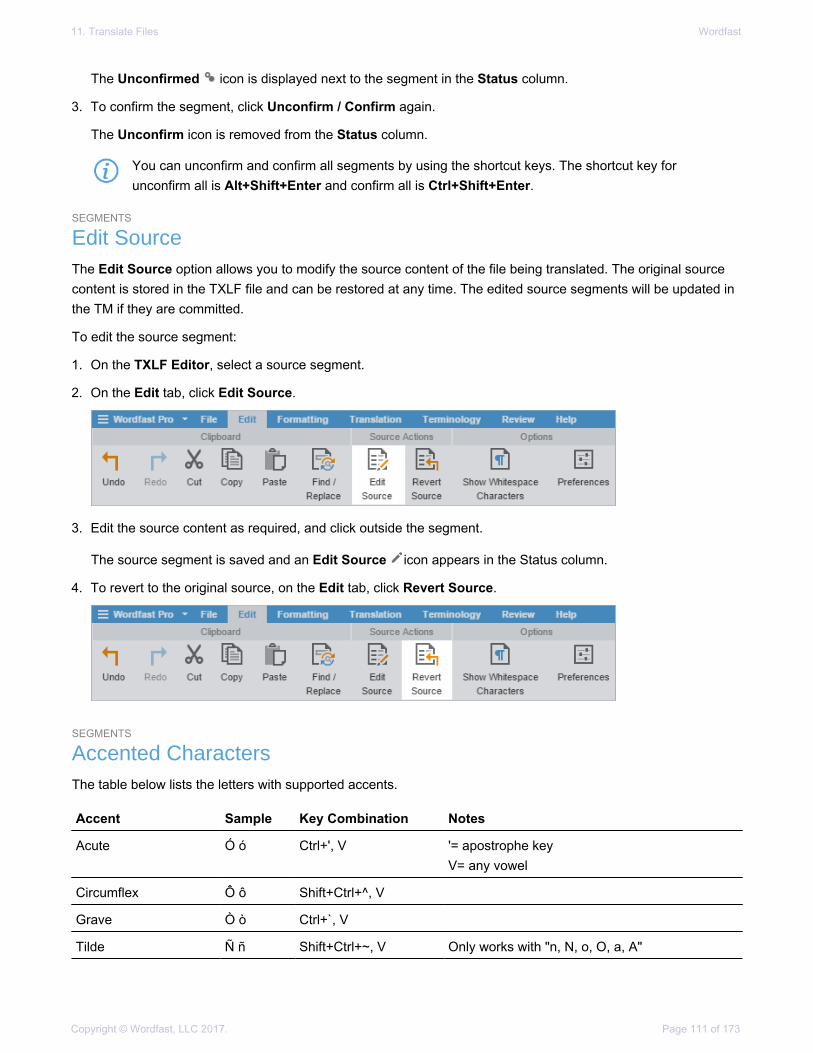
11. Translate Files Wordfast
Copyright © Wordfast, LLC 2017. Page 111 of 173
The Unconfirmed icon is displayed next to the segment in the Status column.
3. To confirm the segment, click Unconfirm / Confirm again.
The Unconfirm icon is removed from the Status column.
You can unconfirm and confirm all segments by using the shortcut keys. The shortcut key forunconfirm all is Alt+Shift+Enter and confirm all is Ctrl+Shift+Enter.
SEGMENTS
Edit SourceThe Edit Source option allows you to modify the source content of the file being translated. The original sourcecontent is stored in the TXLF file and can be restored at any time. The edited source segments will be updated inthe TM if they are committed.
To edit the source segment:
1. On the TXLF Editor, select a source segment.
2. On the Edit tab, click Edit Source.
3. Edit the source content as required, and click outside the segment.
The source segment is saved and an Edit Source icon appears in the Status column.
4. To revert to the original source, on the Edit tab, click Revert Source.
SEGMENTS
Accented CharactersThe table below lists the letters with supported accents.
Accent Sample Key Combination Notes
Acute Ó ó Ctrl+', V '= apostrophe keyV= any vowel
Circumflex Ô ô Shift+Ctrl+^, V
Grave Ò ò Ctrl+`, V
Tilde Ñ ñ Shift+Ctrl+~, V Only works with "n, N, o, O, a, A"
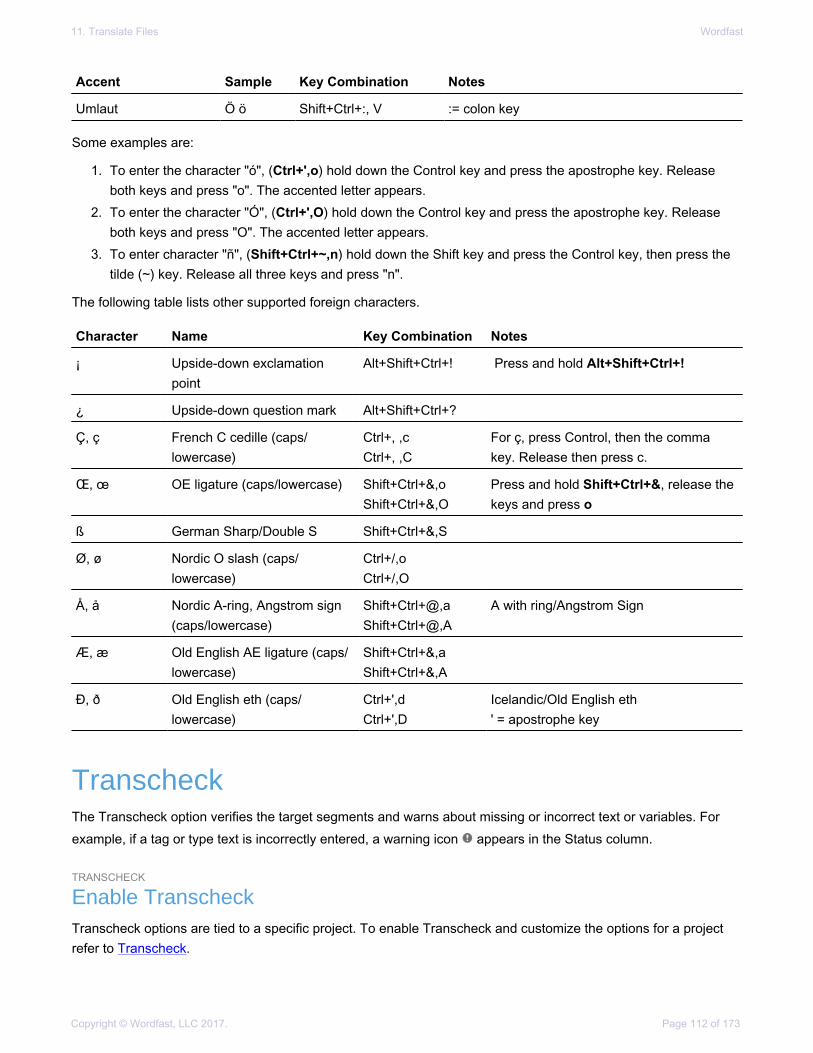
11. Translate Files Wordfast
Copyright © Wordfast, LLC 2017. Page 112 of 173
Accent Sample Key Combination Notes
Umlaut Ö ö Shift+Ctrl+:, V := colon key
Some examples are:
1. To enter the character "ó", (Ctrl+',o) hold down the Control key and press the apostrophe key. Releaseboth keys and press "o". The accented letter appears.
2. To enter the character "Ó", (Ctrl+',O) hold down the Control key and press the apostrophe key. Releaseboth keys and press "O". The accented letter appears.
3. To enter character "ñ", (Shift+Ctrl+~,n) hold down the Shift key and press the Control key, then press thetilde (~) key. Release all three keys and press "n".
The following table lists other supported foreign characters.
Character Name Key Combination Notes
¡ Upside-down exclamationpoint
Alt+Shift+Ctrl+! Press and hold Alt+Shift+Ctrl+!
¿ Upside-down question mark Alt+Shift+Ctrl+?
Ç, ç French C cedille (caps/lowercase)
Ctrl+, ,cCtrl+, ,C
For ç, press Control, then the commakey. Release then press c.
Œ, œ OE ligature (caps/lowercase) Shift+Ctrl+&,oShift+Ctrl+&,O
Press and hold Shift+Ctrl+&, release thekeys and press o
ß German Sharp/Double S Shift+Ctrl+&,S
Ø, ø Nordic O slash (caps/lowercase)
Ctrl+/,oCtrl+/,O
Å, å Nordic A-ring, Angstrom sign(caps/lowercase)
Shift+Ctrl+@,aShift+Ctrl+@,A
A with ring/Angstrom Sign
Æ, æ Old English AE ligature (caps/lowercase)
Shift+Ctrl+&,aShift+Ctrl+&,A
Ð, ð Old English eth (caps/lowercase)
Ctrl+',dCtrl+',D
Icelandic/Old English eth' = apostrophe key
TranscheckThe Transcheck option verifies the target segments and warns about missing or incorrect text or variables. Forexample, if a tag or type text is incorrectly entered, a warning icon appears in the Status column.
TRANSCHECK
Enable TranscheckTranscheck options are tied to a specific project. To enable Transcheck and customize the options for a projectrefer to Transcheck.
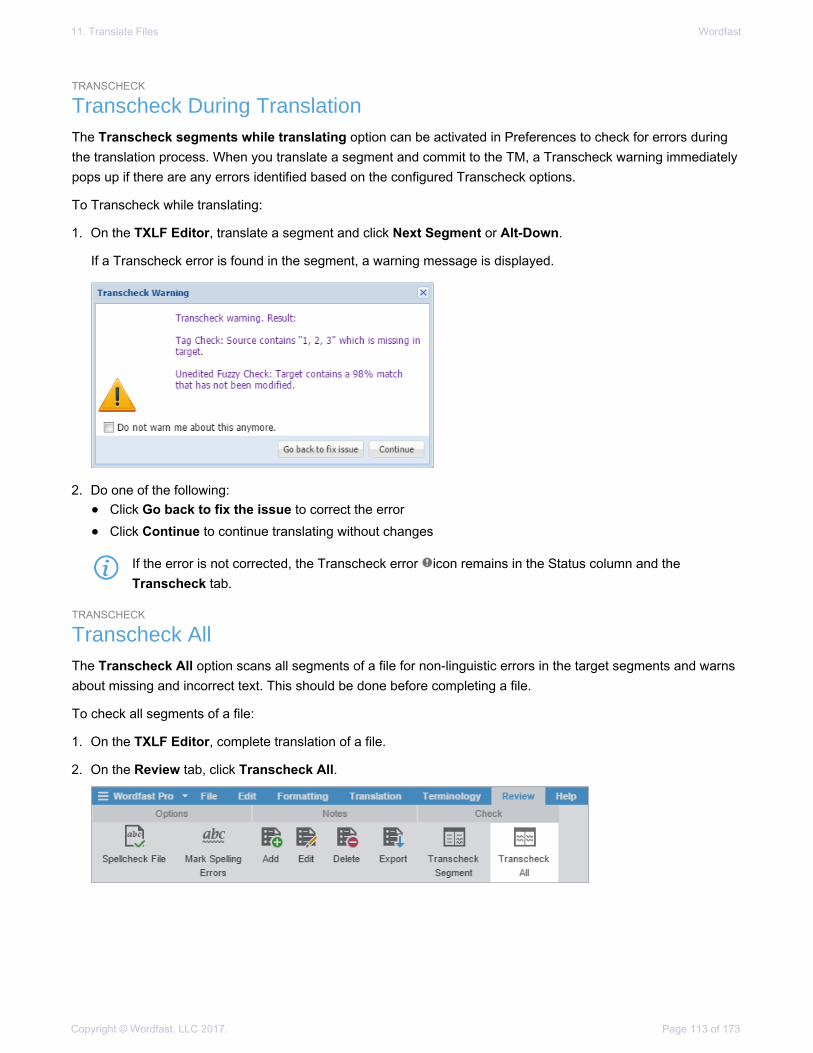
11. Translate Files Wordfast
Copyright © Wordfast, LLC 2017. Page 113 of 173
TRANSCHECK
Transcheck During TranslationThe Transcheck segments while translating option can be activated in Preferences to check for errors duringthe translation process. When you translate a segment and commit to the TM, a Transcheck warning immediatelypops up if there are any errors identified based on the configured Transcheck options.
To Transcheck while translating:
1. On the TXLF Editor, translate a segment and click Next Segment or Alt-Down.
If a Transcheck error is found in the segment, a warning message is displayed.
2. Do one of the following:• Click Go back to fix the issue to correct the error
• Click Continue to continue translating without changes
If the error is not corrected, the Transcheck error icon remains in the Status column and theTranscheck tab.
TRANSCHECK
Transcheck AllThe Transcheck All option scans all segments of a file for non-linguistic errors in the target segments and warnsabout missing and incorrect text. This should be done before completing a file.
To check all segments of a file:
1. On the TXLF Editor, complete translation of a file.
2. On the Review tab, click Transcheck All.
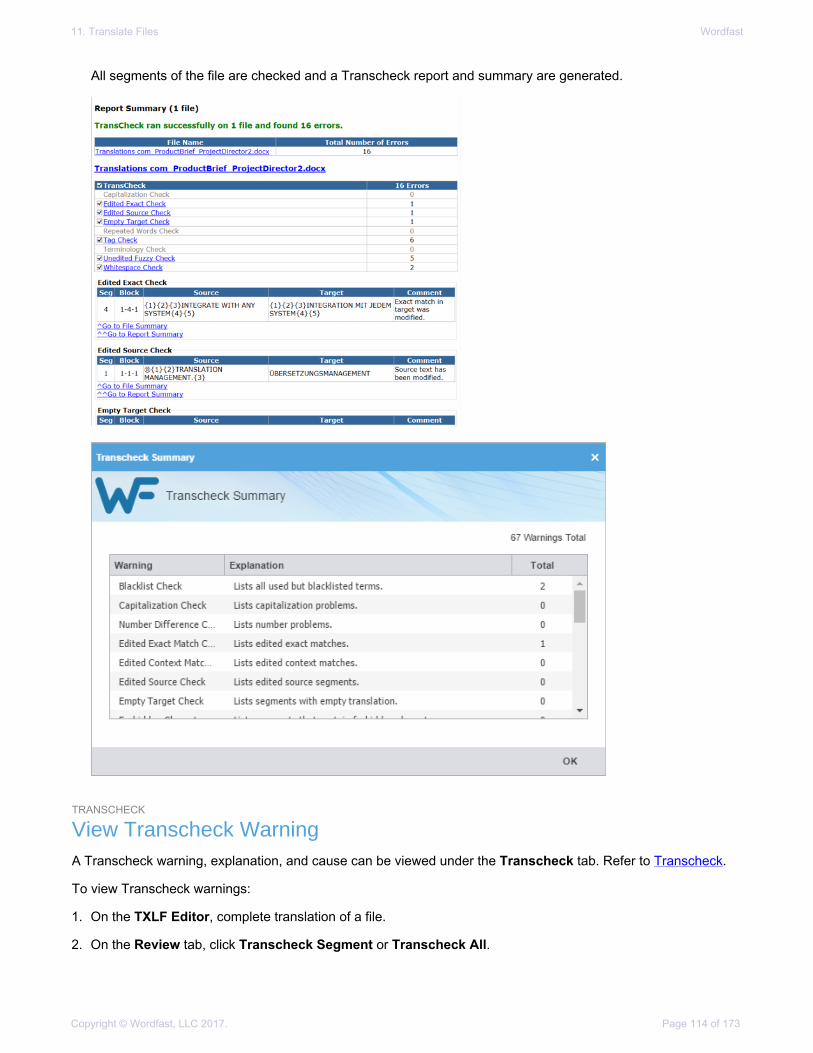
11. Translate Files Wordfast
Copyright © Wordfast, LLC 2017. Page 114 of 173
All segments of the file are checked and a Transcheck report and summary are generated.
TRANSCHECK
View Transcheck WarningA Transcheck warning, explanation, and cause can be viewed under the Transcheck tab. Refer to Transcheck.
To view Transcheck warnings:
1. On the TXLF Editor, complete translation of a file.
2. On the Review tab, click Transcheck Segment or Transcheck All.

11. Translate Files Wordfast
Copyright © Wordfast, LLC 2017. Page 115 of 173
3. Click in the segment with a Transcheck error icon in the Status column.
The Transcheck tab displays the warning, explanation, and cause.
The "(3)" indicates the number of errors found in the selected segment.
4. Go to the next segment by clicking Next error on the Transcheck tab.
5. Do one of the following:• Correct the error and click Refresh
• Click Ignore warning to continue reviewing the warnings without changes
If the error is not corrected, the Transcheck error icon remains in the Status column and in theTranscheck tab.
Machine TranslationWordfast Pro includes an automated machine translation feature that populates translations whenever a file isopen or when there are no translation memory segment matches. To enable specific Machine Translation options,refer to Machine Translation.
Auto-PropagateAuto-propagation or leveraging repetitive content re-uses segments that are repeated in a file. You can enableauto-propagation by selecting preferences in Preferences > General Preferences > Auto-Propagation. Refer toAuto-Propagation.

11. Translate Files Wordfast
Copyright © Wordfast, LLC 2017. Page 116 of 173
To leverage repetitive content:
1. On the TXLF Editor, select any translatable segment. In this example, the duplicate segments have beenlocated with a filtered search.
2. Enter the translation into the first target segment.
3. Commit the term by using one of the following methods:• Click Commit
• Click Next Segment or press Alt+Down
The entered target segment is saved to the TM and automatically propagates this target segment for allrepeats of the source segment throughout the file.

11. Translate Files Wordfast
Copyright © Wordfast, LLC 2017. Page 117 of 173
Auto-SuggestThe Auto-Suggest option populates suggestions based on source content, such as numbers, URLs, and propernames. It can also suggest terms for the glossary, translation memory (TM) matches, and sub-segment TMmatches. To enable Auto-Suggest, refer to Auto-Suggestion.
Preview PDFYou can preview files that have MS Office source formats as a PDF, to view the translated content in its originalformat.
To preview files as PDF on the TXLF Editor:
1. On the File tab, select a file with some translated content, and click Preview.
2. Select Office Preview or Html Preview.
Only one of the preview options will be active at a time, based on the source format of the selectedfile.
The preview of the translated content is displayed.
Live PreviewIn the TXLF Editor, you can generate a dynamic live preview of the translated file. The Live Preview option onlyworks on source MS Word DOC or DOCX files.
To generate a live preview on the TXLF Editor:
1. On the File tab, select a file with some translated content and click Preview > Live Preview.
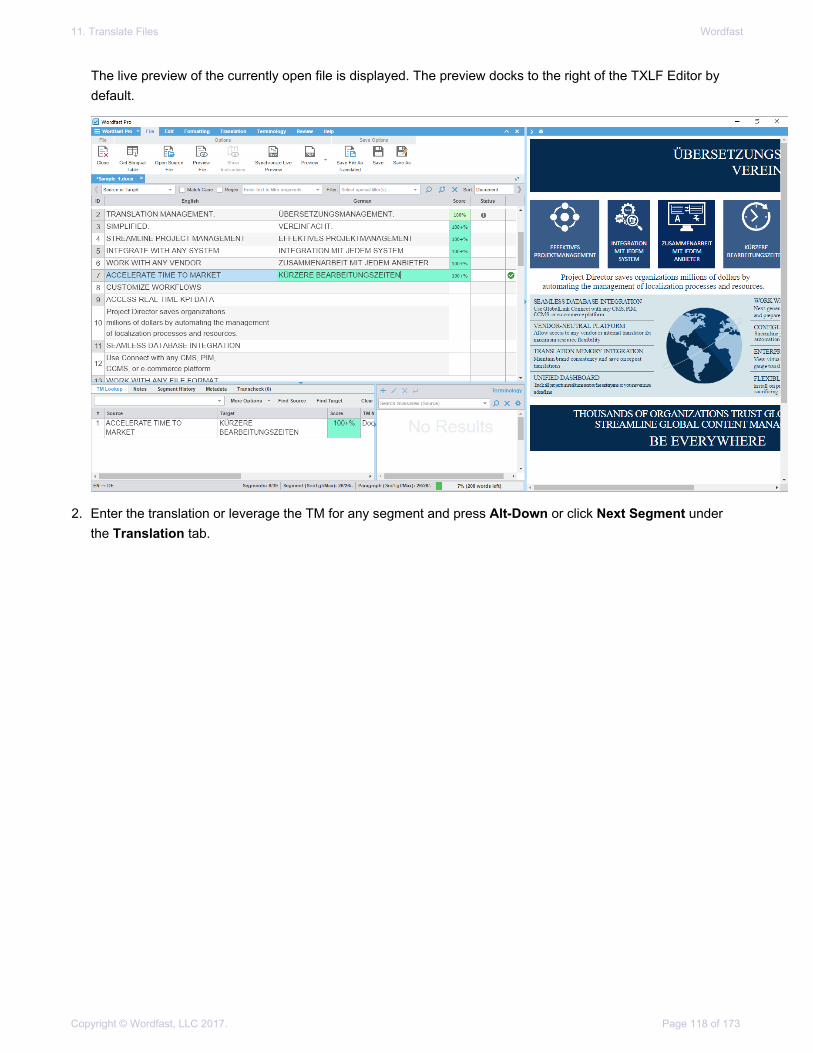
11. Translate Files Wordfast
Copyright © Wordfast, LLC 2017. Page 118 of 173
The live preview of the currently open file is displayed. The preview docks to the right of the TXLF Editor bydefault.
2. Enter the translation or leverage the TM for any segment and press Alt-Down or click Next Segment underthe Translation tab.

11. Translate Files Wordfast
Copyright © Wordfast, LLC 2017. Page 119 of 173
The new translation is displayed in the live preview.
To view the live preview when working on a segment, click Synchronize Live Preview. You can usethis option if you want to view the preview before updating the TM or moving to another segment.
To view or work on a specific segment, you can click on that segment in the live preview. The cursoris placed in the segment.
To collapse and expand the live preview, click and respectively.
To change the position of the live preview, click to display the following options.
Undock Preview displays in a separate browser tab
Dock to left Preview displays to the left of the TXLF Editor
Dock to bottom Preview displays to the bottom of the TXLF Editor
Dock to right Preview displays to the right of the TXLF Editor by default
Close Closes the preview
Formatting ToolsThe Formatting tab in the TXLF Editor includes formatting tools that can be used to edit the target content format.
The formatting tools are categorized in three sections:
FORMATTING TOOLS
FormatThe Format options are available only for MS Office source files. The formatting options are:
Button Keyboard Shortcut Description
Ctrl+B Format the selected text as bold.
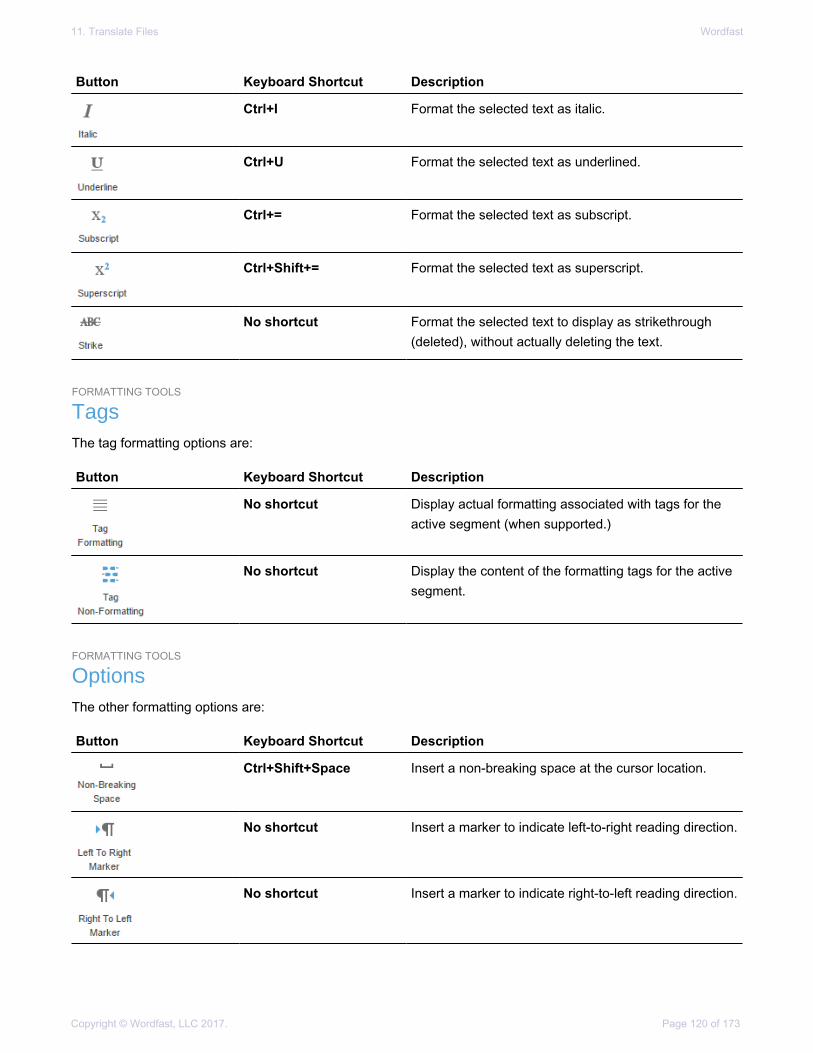
11. Translate Files Wordfast
Copyright © Wordfast, LLC 2017. Page 120 of 173
Button Keyboard Shortcut Description
Ctrl+I Format the selected text as italic.
Ctrl+U Format the selected text as underlined.
Ctrl+= Format the selected text as subscript.
Ctrl+Shift+= Format the selected text as superscript.
No shortcut Format the selected text to display as strikethrough(deleted), without actually deleting the text.
FORMATTING TOOLS
TagsThe tag formatting options are:
Button Keyboard Shortcut Description
No shortcut Display actual formatting associated with tags for theactive segment (when supported.)
No shortcut Display the content of the formatting tags for the activesegment.
FORMATTING TOOLS
OptionsThe other formatting options are:
Button Keyboard Shortcut Description
Ctrl+Shift+Space Insert a non-breaking space at the cursor location.
No shortcut Insert a marker to indicate left-to-right reading direction.
No shortcut Insert a marker to indicate right-to-left reading direction.
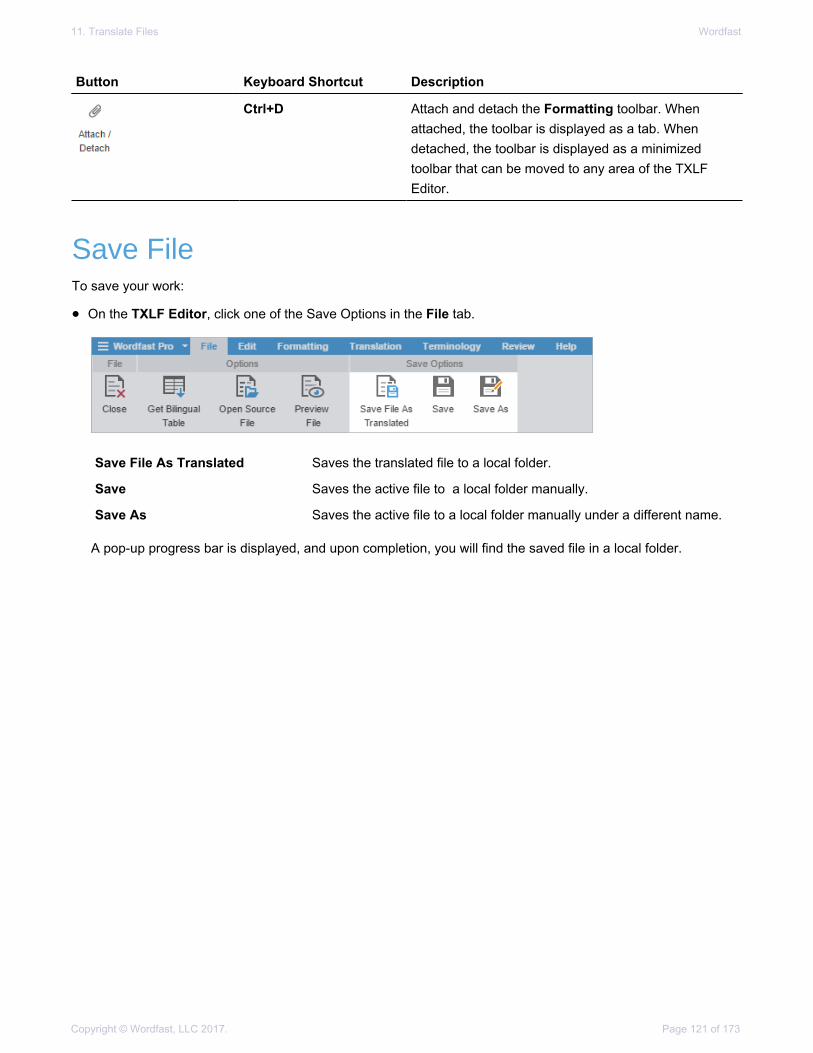
11. Translate Files Wordfast
Copyright © Wordfast, LLC 2017. Page 121 of 173
Button Keyboard Shortcut Description
Ctrl+D Attach and detach the Formatting toolbar. Whenattached, the toolbar is displayed as a tab. Whendetached, the toolbar is displayed as a minimizedtoolbar that can be moved to any area of the TXLFEditor.
Save FileTo save your work:
• On the TXLF Editor, click one of the Save Options in the File tab.
Save File As Translated Saves the translated file to a local folder.
Save Saves the active file to a local folder manually.
Save As Saves the active file to a local folder manually under a different name.
A pop-up progress bar is displayed, and upon completion, you will find the saved file in a local folder.

Copyright © Wordfast, LLC 2017. Page 122 of 173
12. Quick ToolsQuick Tools provides a collection of tools for users to create and work with files outside of projects. These toolsare primarily used by Project Managers before sending the files to translators.
To open Quick Tools:
1. On the Wordfast Pro dashboard, click the Wordfast Pro tab, and select Quick Tools.
2. On Quick Tools, select the tabs based on the task to be completed.

12. Quick Tools Wordfast
Copyright © Wordfast, LLC 2017. Page 123 of 173
Refer to the following sections for more information on Quick Tools:
• To run a project file analysis, refer to Analyze
• To clean up and update the Translation Memory, refer to Cleanup
• To preview what is translatable and the complexity of formatting in the target, refer to Pseudo Translation
• To complete bilingual export of files, refer to Bilingual Export
• To complete bilingual import of files, refer to Bilingual Import
AnalyzeTo analyze files:
1. On the Wordfast Pro dashboard, click the Wordfast Pro tab, and select Quick Tools.

12. Quick Tools Wordfast
Copyright © Wordfast, LLC 2017. Page 124 of 173
The Analysis tab is displayed by default.
2. To add files, do one of the following:• Click Add File to browse and select a file from a folder. To add multiple files, press the Ctrl key and select
the files.
• Click Add Folder to browse and select a folder and add all files within.
• Drag and drop files into the Source Files pane.
3. Add and select the Translation Memory.
Selecting a TM is not required to generate an analysis report. The reports without TM leverage willdisplay the word count.
4. Select the Source Language and Target Language.
5. Select the Options:
• Fuzzy match threshold: Select the percentage of match
• Create TXLF files
• TXLF file location: Browse and select the location to save the TXLF files
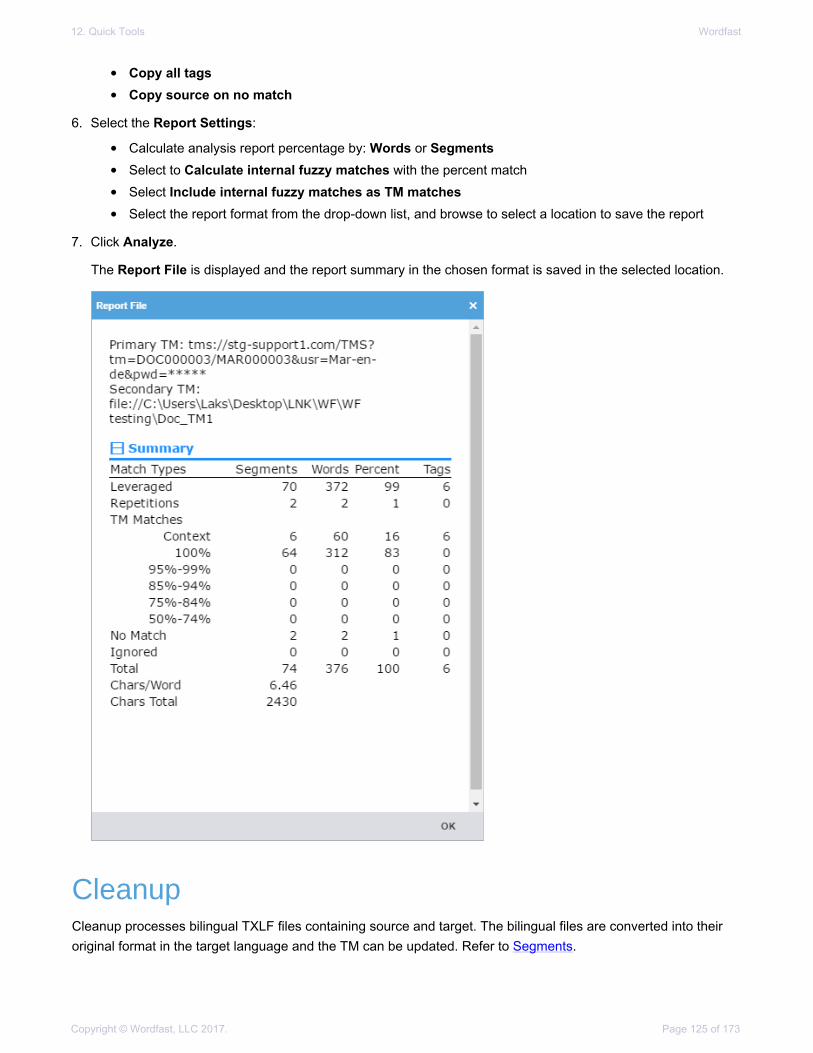
12. Quick Tools Wordfast
Copyright © Wordfast, LLC 2017. Page 125 of 173
• Copy all tags
• Copy source on no match
6. Select the Report Settings:
• Calculate analysis report percentage by: Words or Segments
• Select to Calculate internal fuzzy matches with the percent match
• Select Include internal fuzzy matches as TM matches
• Select the report format from the drop-down list, and browse to select a location to save the report
7. Click Analyze.
The Report File is displayed and the report summary in the chosen format is saved in the selected location.
CleanupCleanup processes bilingual TXLF files containing source and target. The bilingual files are converted into theiroriginal format in the target language and the TM can be updated. Refer to Segments.
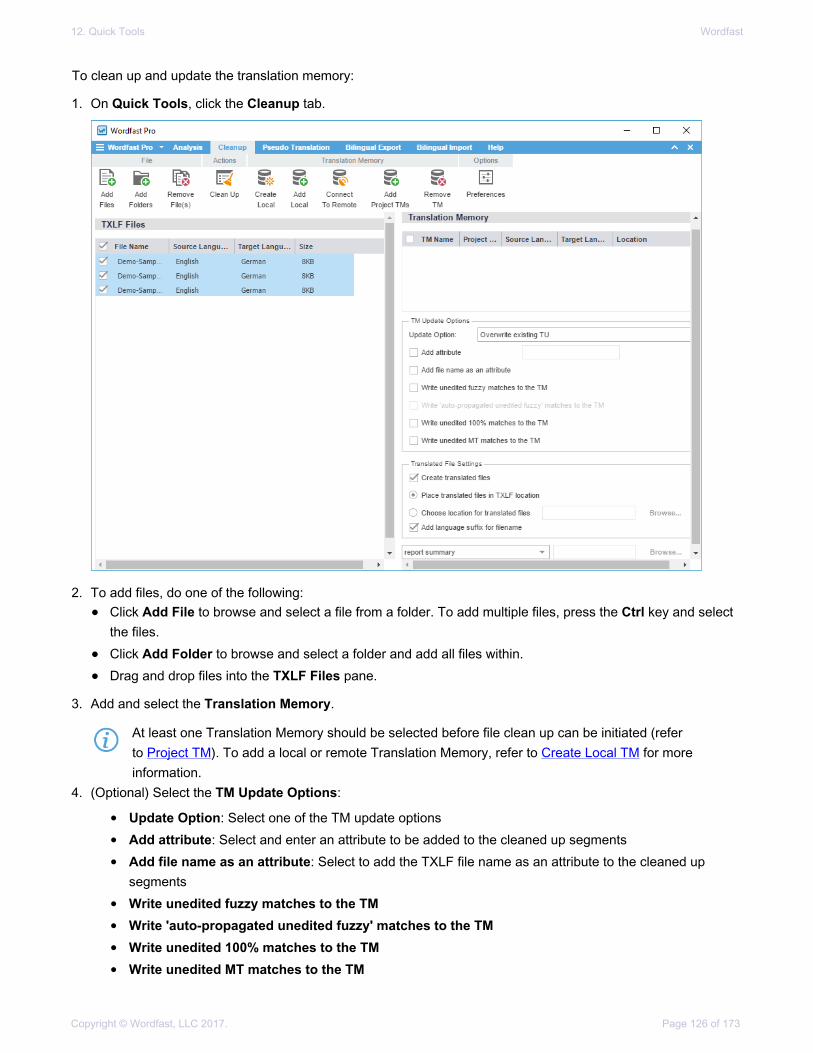
12. Quick Tools Wordfast
Copyright © Wordfast, LLC 2017. Page 126 of 173
To clean up and update the translation memory:
1. On Quick Tools, click the Cleanup tab.
2. To add files, do one of the following:• Click Add File to browse and select a file from a folder. To add multiple files, press the Ctrl key and select
the files.
• Click Add Folder to browse and select a folder and add all files within.
• Drag and drop files into the TXLF Files pane.
3. Add and select the Translation Memory.
At least one Translation Memory should be selected before file clean up can be initiated (referto Project TM). To add a local or remote Translation Memory, refer to Create Local TM for moreinformation.
4. (Optional) Select the TM Update Options:
• Update Option: Select one of the TM update options
• Add attribute: Select and enter an attribute to be added to the cleaned up segments
• Add file name as an attribute: Select to add the TXLF file name as an attribute to the cleaned upsegments
• Write unedited fuzzy matches to the TM
• Write 'auto-propagated unedited fuzzy' matches to the TM
• Write unedited 100% matches to the TM
• Write unedited MT matches to the TM
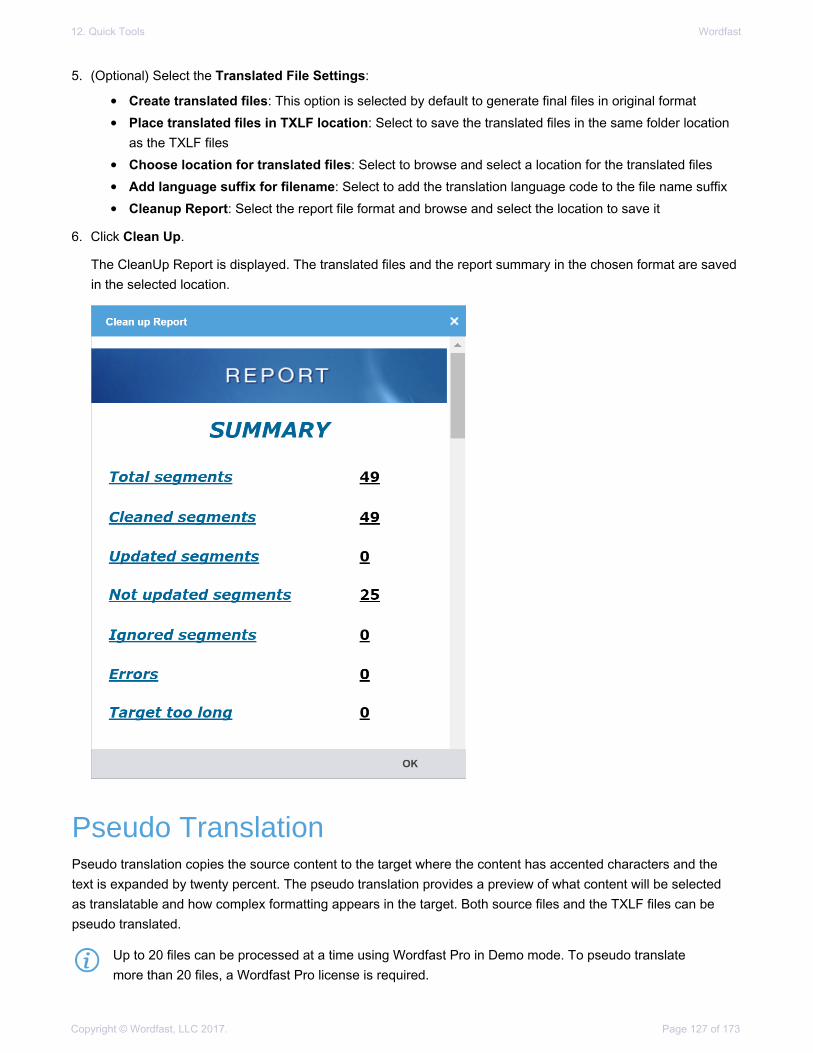
12. Quick Tools Wordfast
Copyright © Wordfast, LLC 2017. Page 127 of 173
5. (Optional) Select the Translated File Settings:
• Create translated files: This option is selected by default to generate final files in original format
• Place translated files in TXLF location: Select to save the translated files in the same folder locationas the TXLF files
• Choose location for translated files: Select to browse and select a location for the translated files
• Add language suffix for filename: Select to add the translation language code to the file name suffix
• Cleanup Report: Select the report file format and browse and select the location to save it
6. Click Clean Up.
The CleanUp Report is displayed. The translated files and the report summary in the chosen format are savedin the selected location.
Pseudo TranslationPseudo translation copies the source content to the target where the content has accented characters and thetext is expanded by twenty percent. The pseudo translation provides a preview of what content will be selectedas translatable and how complex formatting appears in the target. Both source files and the TXLF files can bepseudo translated.
Up to 20 files can be processed at a time using Wordfast Pro in Demo mode. To pseudo translatemore than 20 files, a Wordfast Pro license is required.

12. Quick Tools Wordfast
Copyright © Wordfast, LLC 2017. Page 128 of 173
To pseudo translate files:
1. On Quick Tools, click the Pseudo Translation tab.
2. Select the file type for pseudo translation:• TXLF: Select and add a TXLF file
• Source: Select and add source files, select Source Language, Target Language, and Pseudotranslation Options
3. To add files, do one of the following:• Click Add File to browse and select a file from a folder. To add multiple files, press the Ctrl key and select
the files.
• Click Add Folder to browse and select a folder and add all files within.
• Drag and drop files into the Files pane.
4. Select the files to be pseudo translated and click Pseudo Translate.
Only one file type, either TXLF or Source can be selected at a time.
A Pseudo Translate completed message is displayed.
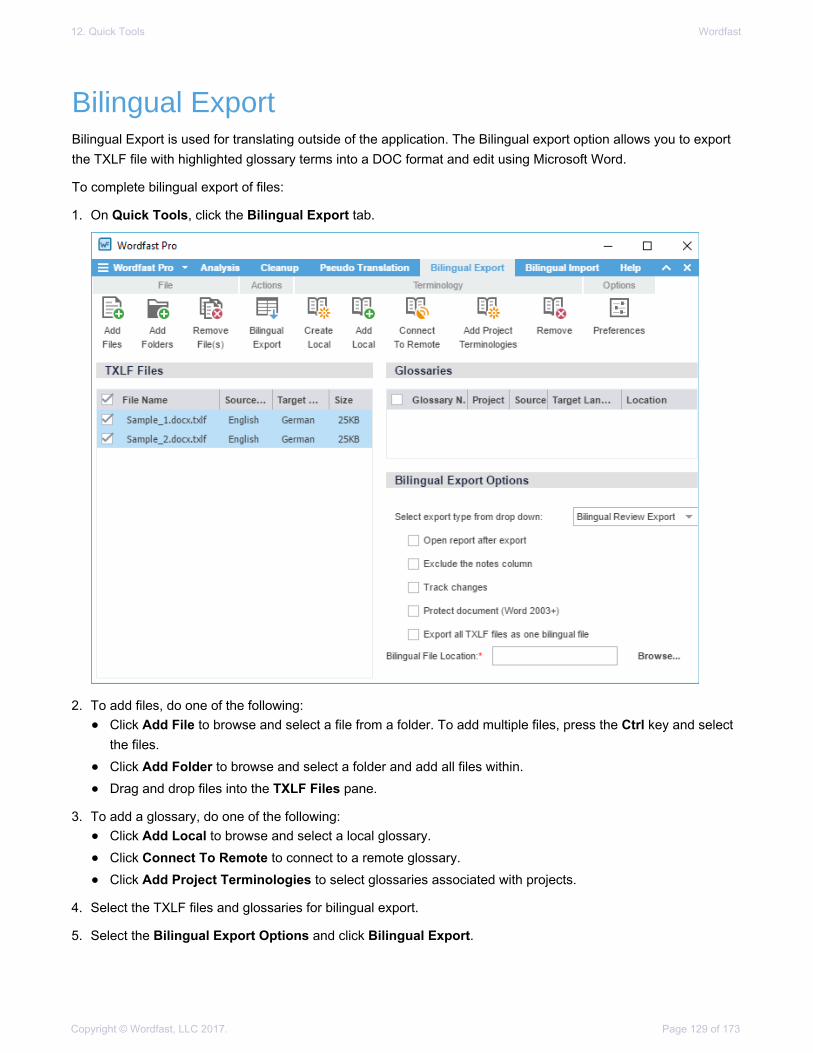
12. Quick Tools Wordfast
Copyright © Wordfast, LLC 2017. Page 129 of 173
Bilingual ExportBilingual Export is used for translating outside of the application. The Bilingual export option allows you to exportthe TXLF file with highlighted glossary terms into a DOC format and edit using Microsoft Word.
To complete bilingual export of files:
1. On Quick Tools, click the Bilingual Export tab.
2. To add files, do one of the following:• Click Add File to browse and select a file from a folder. To add multiple files, press the Ctrl key and select
the files.
• Click Add Folder to browse and select a folder and add all files within.
• Drag and drop files into the TXLF Files pane.
3. To add a glossary, do one of the following:• Click Add Local to browse and select a local glossary.
• Click Connect To Remote to connect to a remote glossary.
• Click Add Project Terminologies to select glossaries associated with projects.
4. Select the TXLF files and glossaries for bilingual export.
5. Select the Bilingual Export Options and click Bilingual Export.

12. Quick Tools Wordfast
Copyright © Wordfast, LLC 2017. Page 130 of 173
Export Type The export type options are:
• Bilingual Review Export: creates a bilingual Word document
• WFC Bilingual Export: creates a WF Classic compatibledocument
• MS-Word Table: creates an Word document with the source andtarget in a two-column table
Open report after export Automatically displays the Export Report after the Bilingual Exportaction
Exclude the notes column Removes the Notes column from the exported Word document. Whenremoved, the notes from the TXLF file are displayed in the Worddocument as Comments
Track changes Selects track changes in the exported Word document
Protect document (Word 2003+) Protects the Word document by allowing editing of content only in theavailable table space. This helps avoid any errors when the document isimported.
Export all TXLF files as onebilingual file
Exports all TXLF files that are being converted to bilingual Worddocuments
Bilingual File Location Browse and select the folder to save the bilingual export documents

12. Quick Tools Wordfast
Copyright © Wordfast, LLC 2017. Page 131 of 173
The bilingual export log is displayed. This log and the exported document in the chosen export type are savedin the selected folder.
You must not edit the table format, merge or expand segments or add text outside of the target ornotes column. Doing any of these actions could result in errors during bilingual import.
A sample of the bilingual export is given below.
Bilingual ImportBilingual Import is used for importing the translated or edited bilingual exported Word document. During thisimport you must add both the edited bilingual Word document and the corresponding TXLF file that was usedduring export. Once the bilingual import is complete, the translations or edits made in the bilingual exported Worddocument are reflected in the TXLF file.

12. Quick Tools Wordfast
Copyright © Wordfast, LLC 2017. Page 132 of 173
To complete bilingual import of files:
1. On Quick Tools, click the Bilingual Import tab.
You must upload both the translated or edited bilingual Word document and the source TXLF file.When adding files, remember to select the correct file format from the drop-down list. You must selectMS Word Document when uploading the bilingual Word document and WF TXLF Document whenuploading the TXLF file.
2. To add files, do one of the following:• Click Add File to browse and select a file from a folder. To add multiple files, press the Ctrl key and select
the files.
• Click Add Folder to browse and select a folder and add all files within.
• Drag and drop files into the Bilingual Files and TXLF Files panel.
• The Bilingual Files panel displays the File Name, File Type, Size and Counter. The first numberin the Counter indicates the count of TXLF files in the bilingual file that are paired with theadded files in the TXLF Files panel. The second number indicates the total count of TXLF filesthat were used during Bilingual Export.
• The TXLF Files panel displays the File Name, Source Language, Target Language, Size andPaired. When the bilingual Word document and the corresponding TXLF file are paired, a
green check appears. If the files are not paired, a red cross appears.
3. Select the Bilingual and TXLF files for bilingual import. To select multiple bilingual files, press the Ctrl key andselect the files.
4. Select the Bilingual Import Options and click Bilingual Import.
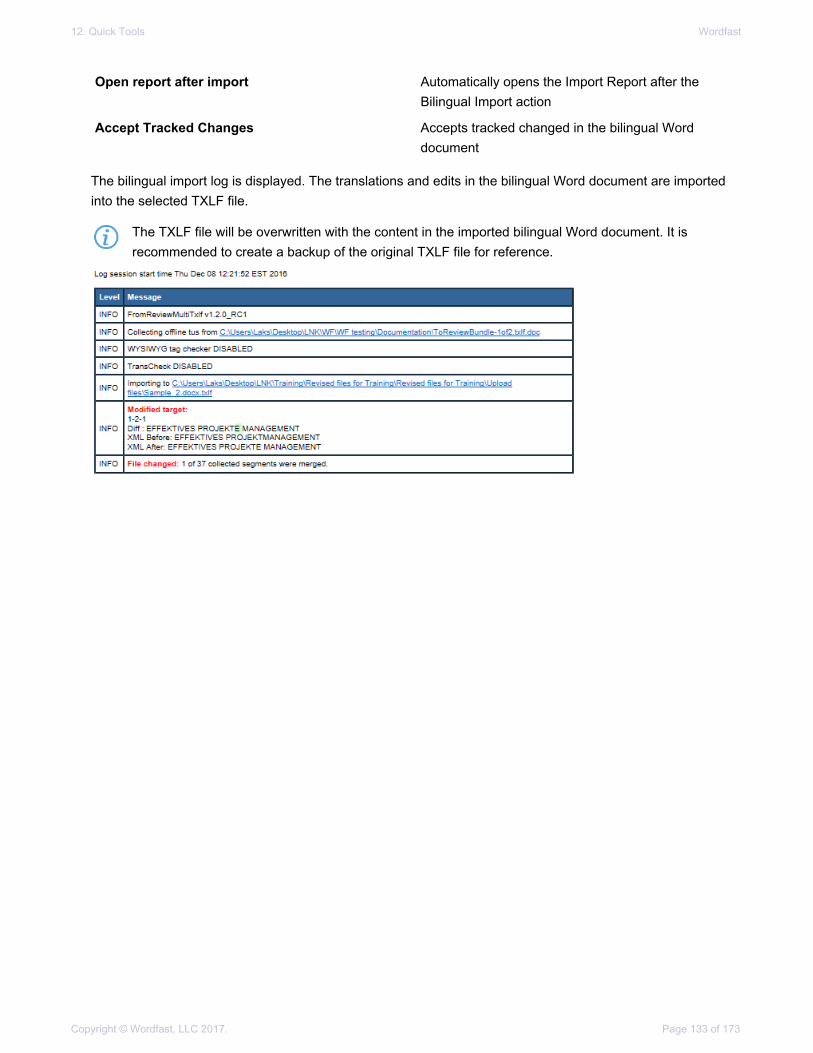
12. Quick Tools Wordfast
Copyright © Wordfast, LLC 2017. Page 133 of 173
Open report after import Automatically opens the Import Report after theBilingual Import action
Accept Tracked Changes Accepts tracked changed in the bilingual Worddocument
The bilingual import log is displayed. The translations and edits in the bilingual Word document are importedinto the selected TXLF file.
The TXLF file will be overwritten with the content in the imported bilingual Word document. It isrecommended to create a backup of the original TXLF file for reference.

Copyright © Wordfast, LLC 2017. Page 134 of 173
13. PreferencesThe Wordfast Pro user interface is controlled by the preference options. You can configure these throughPreferences and by pressing F9. Preferences can be accessed on the Wordfast Pro tab drop-down menu,Projects tab, Project Files tab, Quick Tools, and the TXLF Editor.
General PreferencesGeneral preferences cover the user interface and TXLF editor specific preferences.
GENERAL PREFERENCES
ColorsVarying colors are used to differentiate between types of content in the TXLF editor.
To customize the colors used in the TXLF Editor:
1. Click Colors in the General Preferences group.
2. Click the colored image for any Item Name in the Color column and select another color in the color palette.

13. Preferences Wordfast
Copyright © Wordfast, LLC 2017. Page 135 of 173
3. Click OK to save the change(s) and close the Preferences.
GENERAL PREFERENCES
GeneralTo customize general and preferences:
1. Click General in the General Preferences group.
2. Enter the User Name that will be displayed for Notes, TM, and segment changes.
3. Modify the general preferences as follows and click OK.
General Preferences
Copy Source Files into SourceFolder
Creates a sub folder within the project folder to save source files.
Add score column to bilingual table Select to add TM score to the exported bilingual table.
Bilingual Review Export: This option allows you to export the TXLF file with highlighted glossary terms into aDOC format and edit using Microsoft Word.
Open report after export Automatically opens the export report in a new browser after theexport action.
Exclude the notes column Excludes the notes column from the exported MS Word document.
Track changes Turns on or off, the track changes option in the exported MS Worddocument.

13. Preferences Wordfast
Copyright © Wordfast, LLC 2017. Page 136 of 173
Protect document (Word 2003+) Write protects the document, allowing users to edit only the targetsegment content and add notes. The other parts of the documentare not writable.
GENERAL PREFERENCES
FontsTo customize fonts, click Fonts in the General Preferences group.
The following tables list the standard fonts and associated sizes.
FONTS
Application Specific Fonts
Application Font Name Font Size
TXLF (TXML) Editor Font Arial 13
TM Lookup Font Arial 12
Glossary Lookup Font Arial 12
Blacklist Editor Font Arial 13
Translation Memory Editor Font Arial 13
Terminology Editor Font Arial 13
13. Preferences Wordfast
Copyright © Wordfast, LLC 2017. Page 137 of 173
Application Font Name Font Size
Notes View Font Arial 12
Segment History Font Arial 12
Transcheck Font Arial 12
FONTS
Add Language Specific Fonts
Language Font Name
Bengali Bangla
Malayalam Kartika
Telugu Gautami
Tamil Latha
Kannada Tunga
Afrikaans Arial
Afrikaans (South Africa) Arial
Chinese SimSun
Chinese (Taiwan) PMingLiU
Chinese (China) SimSun
Hebrew Arial
Hebrew (Israel) Arial
Japanese MS Gothic UI
Japanese (Japan) MS Gothic UI
Korean Batang
Thai Tahoma
Thai (Thailand) Tahoma
Vietnamese: Arial Arial
Vietnamese (Vietnam): Arial Arial
GENERAL PREFERENCES
IconsThe icons appearance on the various tabs can be modified to the extent of relative size and the inclusion orexclusion of the icon title.

13. Preferences Wordfast
Copyright © Wordfast, LLC 2017. Page 138 of 173
To customize the icon appearance:
1. Click Icons in the General Preferences group.
2. Select a preferred icon size.
3. Select Display text to enable or disable the inclusion of description text with the icons and click OK.
GENERAL PREFERENCES
LayoutThe layout preferences provide some control of the TXLF editor view.

13. Preferences Wordfast
Copyright © Wordfast, LLC 2017. Page 139 of 173
To change the layout options:
1. Click Layout in the General Preferences group.
2. Modify the layout options as follows and click OK.
Table View
Hide ID Column Hide the segment ID column.
Hide Score Column Hide the Translation Memory score column.
Hide Table Header Hide the editor table header.
Score Column Position
Before Target Place the Translation Memory score column before the targetsegment column.
After Target Place the Translation Memory score column after the targetsegment column.
Current Project
Display Language Codes in CurrentProject View
Always include locale information in the view for current projects.
Display Full Language Name in theCurrent Project View
Always include the complete language name in the view for currentprojects.
Status Bar Representation

13. Preferences Wordfast
Copyright © Wordfast, LLC 2017. Page 140 of 173
Language Codes Include the language codes on the Status Bar.
Full Language Name Include the complete language name on the Status Bar.
GENERAL PREFERENCES
SegmentThis option allows you to configure segment behavior in the TXLF editor.
To configure segment actions:
1. Click Segment in the General Preferences group.
2. Select the segment options as follows.
Next/Previous Segment actionleverages next/previous segment
Enable or disable the writing and leveraging action of the Next/Previous Segment command.
Open last edited segment whenopening a file
Go to the last segment edited when a file is opened.
Leverage the first opened segmenton click
View the Translation Memory leverage of the first open segmentwhen you open a TXLF file for translation.
Capitalize the first letter of the targetsegment (Except Asian Languages)
Translated segment are converted to sentence case, but not forAsian languages.
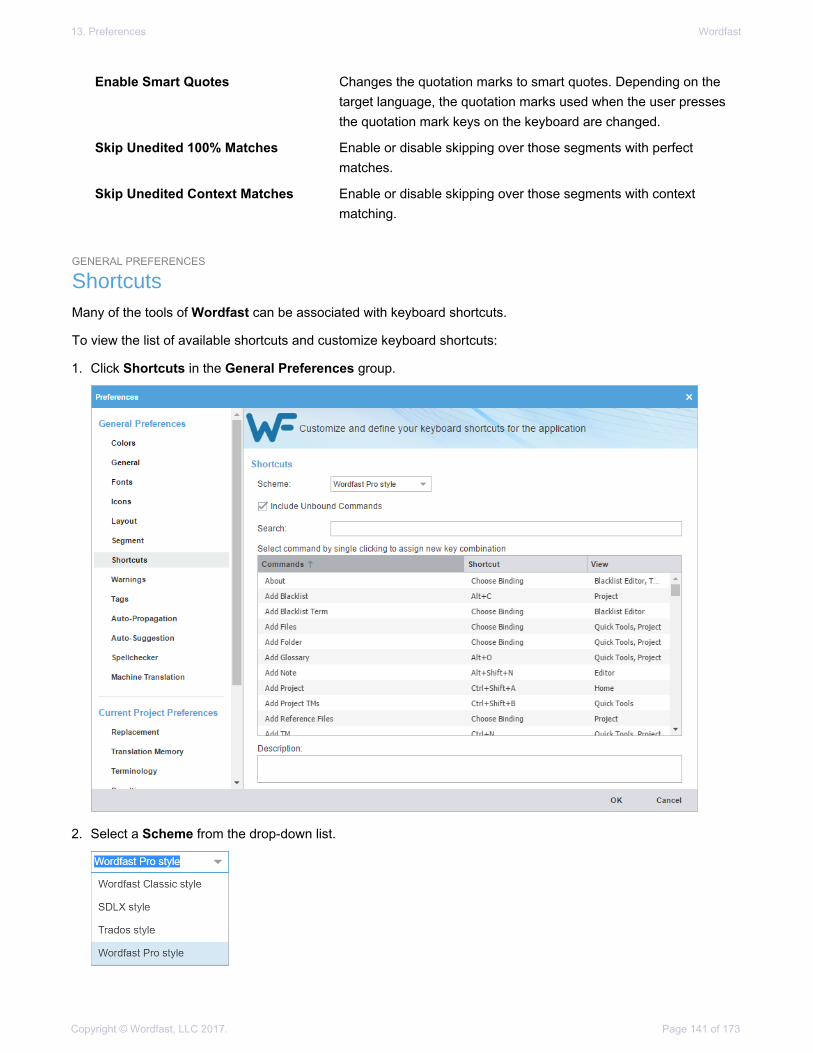
13. Preferences Wordfast
Copyright © Wordfast, LLC 2017. Page 141 of 173
Enable Smart Quotes Changes the quotation marks to smart quotes. Depending on thetarget language, the quotation marks used when the user pressesthe quotation mark keys on the keyboard are changed.
Skip Unedited 100% Matches Enable or disable skipping over those segments with perfectmatches.
Skip Unedited Context Matches Enable or disable skipping over those segments with contextmatching.
GENERAL PREFERENCES
ShortcutsMany of the tools of Wordfast can be associated with keyboard shortcuts.
To view the list of available shortcuts and customize keyboard shortcuts:
1. Click Shortcuts in the General Preferences group.
2. Select a Scheme from the drop-down list.

13. Preferences Wordfast
Copyright © Wordfast, LLC 2017. Page 142 of 173
3. Select a Command from the command list, and enter a new sequence of keys in the Shortcut column andclick OK.
If the shortcut key sequence is in use a warning message is displayed.
The shortcut key is modified to the new sequence.
When changing or creating new shortcut key sequences, the sequence must begin with a Ctrl, Alt, orShift, or must be a Function key (F1) or, a combination of these.
GENERAL PREFERENCES
WarningsThe messages that are presented to the user can be limited to some extent. Most of the messages—referred tohere as warnings—are selected by default. To modify the warning inclusion list, select or deselect the check boxfor a given warning to enable or disable that warning.

13. Preferences Wordfast
Copyright © Wordfast, LLC 2017. Page 143 of 173
To select warnings:
1. Click Warnings in the General Preferences group.
2. Select the warnings to be displayed in the application and click OK.
GENERAL PREFERENCES
TagsThis option allows you to configure the tag mode, representation, and font size.

13. Preferences Wordfast
Copyright © Wordfast, LLC 2017. Page 144 of 173
To configure tag options:
1. Click Tags in the General Preferences group.
2. The tag options are listed in the following tables. Modify the options as required.
Text Formatting
Show supported textformatting
Show actual formatting associated with formatting tags (when supported).When selected, a preview is displayed.
Show formatting as Tags Show the content of the formatting tags. When selected, a preview isdisplayed, as shown in the example above.
Tag Naming
Full Name View full name of the tag. For example, Font.
Short Name View short name of the tag. For example, F.
Numbered Tags View the tag as a number.
Remove incomplete tag pairs Delete incomplete or incorrect tags.
Apply source segmentformatting to target segment
When the source segment is within a tag, the source segment formatting isapplied to the target segment.
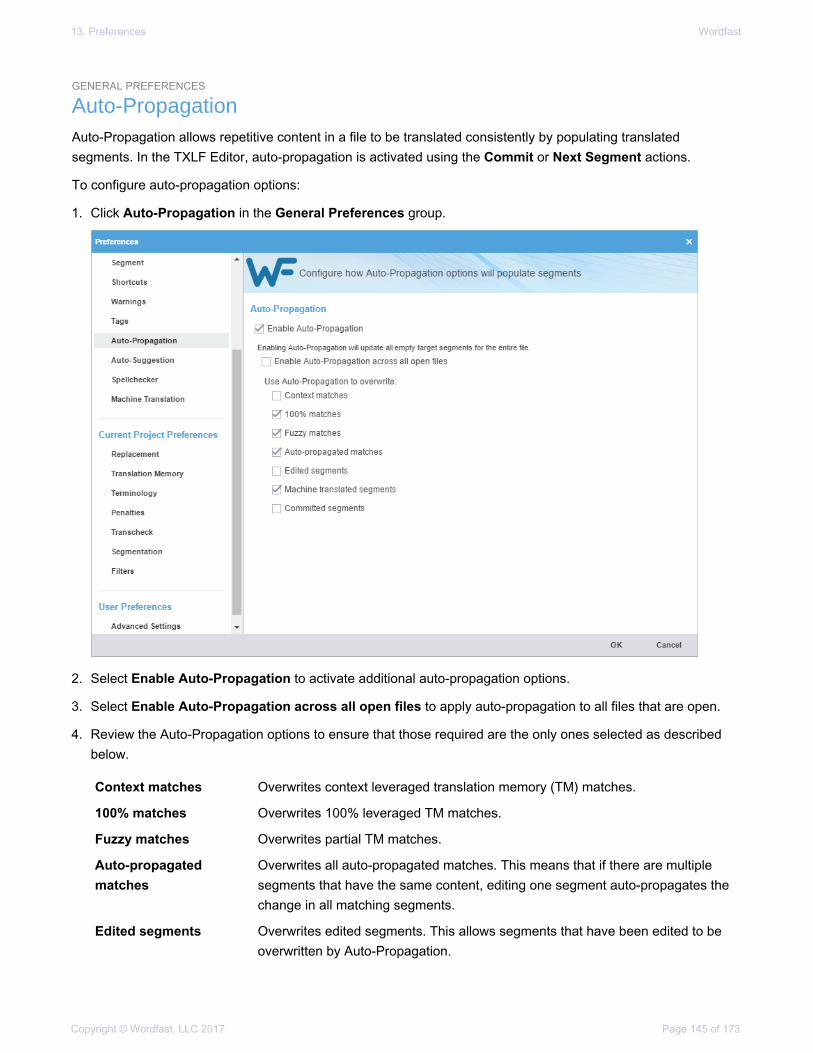
13. Preferences Wordfast
Copyright © Wordfast, LLC 2017. Page 145 of 173
GENERAL PREFERENCES
Auto-PropagationAuto-Propagation allows repetitive content in a file to be translated consistently by populating translatedsegments. In the TXLF Editor, auto-propagation is activated using the Commit or Next Segment actions.
To configure auto-propagation options:
1. Click Auto-Propagation in the General Preferences group.
2. Select Enable Auto-Propagation to activate additional auto-propagation options.
3. Select Enable Auto-Propagation across all open files to apply auto-propagation to all files that are open.
4. Review the Auto-Propagation options to ensure that those required are the only ones selected as describedbelow.
Context matches Overwrites context leveraged translation memory (TM) matches.
100% matches Overwrites 100% leveraged TM matches.
Fuzzy matches Overwrites partial TM matches.
Auto-propagatedmatches
Overwrites all auto-propagated matches. This means that if there are multiplesegments that have the same content, editing one segment auto-propagates thechange in all matching segments.
Edited segments Overwrites edited segments. This allows segments that have been edited to beoverwritten by Auto-Propagation.

13. Preferences Wordfast
Copyright © Wordfast, LLC 2017. Page 146 of 173
Machine translatedsegments
Overwrites machine translated content.
Committed segments Overwrites translated content that is committed to the TM.
GENERAL PREFERENCES
Auto-SuggestionThe Auto-Suggestion option populates suggestions based on source content, such as numbers, URLs, andproper names. It can also suggest terms for the glossary, Translation Memory (TM) matches, and Sub-segmentTM matches.
To configure auto-suggestion:
1. Click Auto-Suggestion in the General Preferences group.
2. Select Enable Auto-Suggestion checkbox and additional auto-suggest options and click OK.
With Auto-Suggestion enabled, there are four options available:
Source Suggests changes to source of the segment: numbers andcapitalized words only.
Glossary Suggests terms from the glossary.
TM Suggests translations from the TM.
TM Sub-Segment Suggests parts of segments from the TM.
MT Suggests machine translation.

13. Preferences Wordfast
Copyright © Wordfast, LLC 2017. Page 147 of 173
GENERAL PREFERENCES
SpellcheckerSpell check is supported in Microsoft Office and Hunspell.
To enable or disable spell check:
1. Click Spellchecker in the General Preferences group.
2. Select or deselect Enable Spell Checking.
3. If Check for spelling errors as you type is selected, choose one of the following:• Microsoft Office
Microsoft Office must be installed on your computer.
• Hunspell
Hunspell dictionaries are available for the following languages. Any of these languages can beinstalled by going to Help > Wordfast 4 Update, choosing the required language JAR and clickingUpdate.
Arabic AR Korean (South Korea) KO-KR
Basque (Basque) EU-ES Latvian (Latvia) LV-LV
Bosnian (Bosnia) BS-BA Lithuanian (Lithuania) LT-LT
Bulgarian (Bulgaria) BG-BGNorwegian (BokmålNorway)
NB-NO
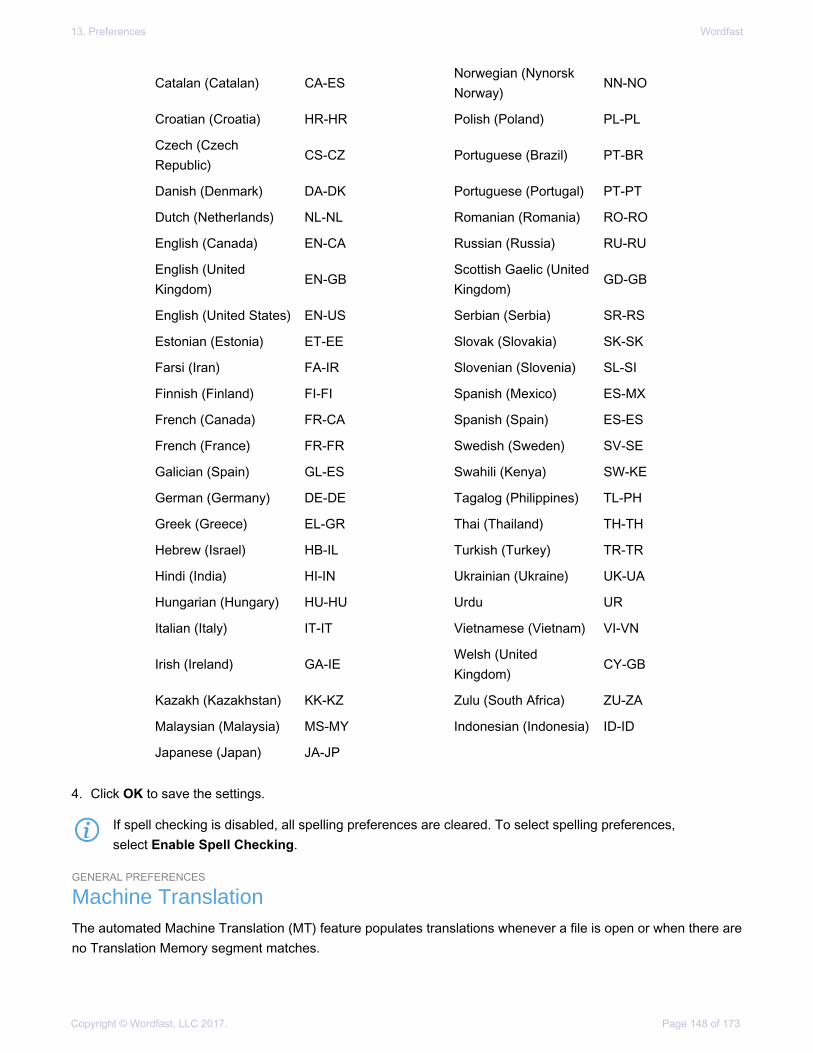
13. Preferences Wordfast
Copyright © Wordfast, LLC 2017. Page 148 of 173
Catalan (Catalan) CA-ESNorwegian (NynorskNorway)
NN-NO
Croatian (Croatia) HR-HR Polish (Poland) PL-PL
Czech (CzechRepublic)
CS-CZ Portuguese (Brazil) PT-BR
Danish (Denmark) DA-DK Portuguese (Portugal) PT-PT
Dutch (Netherlands) NL-NL Romanian (Romania) RO-RO
English (Canada) EN-CA Russian (Russia) RU-RU
English (UnitedKingdom)
EN-GBScottish Gaelic (UnitedKingdom)
GD-GB
English (United States) EN-US Serbian (Serbia) SR-RS
Estonian (Estonia) ET-EE Slovak (Slovakia) SK-SK
Farsi (Iran) FA-IR Slovenian (Slovenia) SL-SI
Finnish (Finland) FI-FI Spanish (Mexico) ES-MX
French (Canada) FR-CA Spanish (Spain) ES-ES
French (France) FR-FR Swedish (Sweden) SV-SE
Galician (Spain) GL-ES Swahili (Kenya) SW-KE
German (Germany) DE-DE Tagalog (Philippines) TL-PH
Greek (Greece) EL-GR Thai (Thailand) TH-TH
Hebrew (Israel) HB-IL Turkish (Turkey) TR-TR
Hindi (India) HI-IN Ukrainian (Ukraine) UK-UA
Hungarian (Hungary) HU-HU Urdu UR
Italian (Italy) IT-IT Vietnamese (Vietnam) VI-VN
Irish (Ireland) GA-IEWelsh (UnitedKingdom)
CY-GB
Kazakh (Kazakhstan) KK-KZ Zulu (South Africa) ZU-ZA
Malaysian (Malaysia) MS-MY Indonesian (Indonesia) ID-ID
Japanese (Japan) JA-JP
4. Click OK to save the settings.
If spell checking is disabled, all spelling preferences are cleared. To select spelling preferences,select Enable Spell Checking.
GENERAL PREFERENCES
Machine TranslationThe automated Machine Translation (MT) feature populates translations whenever a file is open or when there areno Translation Memory segment matches.

13. Preferences Wordfast
Copyright © Wordfast, LLC 2017. Page 149 of 173
To enable machine translation:
1. Click Machine Translation in the General Preferences group.
2. Select one of the following:• Show MT results in TM Lookup when there is no TM match, to show machine translated content when
there are no local or remote TM matches.
• Always show MT results in TM Lookup, to show machine translated content when a segment isleveraged. TM matches appear in TM Lookup with the MT matches.
3. Select check boxes to allow All unedited segments in active document to be leveraged with MT, and toRemove MT score from score column when segment is edited.
4. Select Google Translator, Microsoft Translator, or WorldLingo as the primary machine translator. GoogleTranslate, Microsoft Translate, and WorldLingo can all be enabled at one time, but only one can be selectedas primary machine translator.
5. Select the options for each machine translator, and perform any additional tasks as required by the machinetranslator.

13. Preferences Wordfast
Copyright © Wordfast, LLC 2017. Page 150 of 173
Translator Options
Enable GoogleTranslator
Enable MicrosoftTranslator
Enable WorldLingoLanguages are limited to WorldLingo Languages listed below.
6. Read the disclaimer and click OK.
WorldLingo is limited to the language set listed below:
• Arabic
• Chinese Simplified
• Chinese Traditional
• Dutch
• English
• French
• German
• Greek
• Italian
• Japanese
• Korean
• Portuguese
• Russian
• Spanish
• Swedish
New Project PreferencesIf this is being accessed for a new project, the preferences are all set as defaults. For current projects, thepreferences reflect whatever has been set up for this project by the Project Manager.
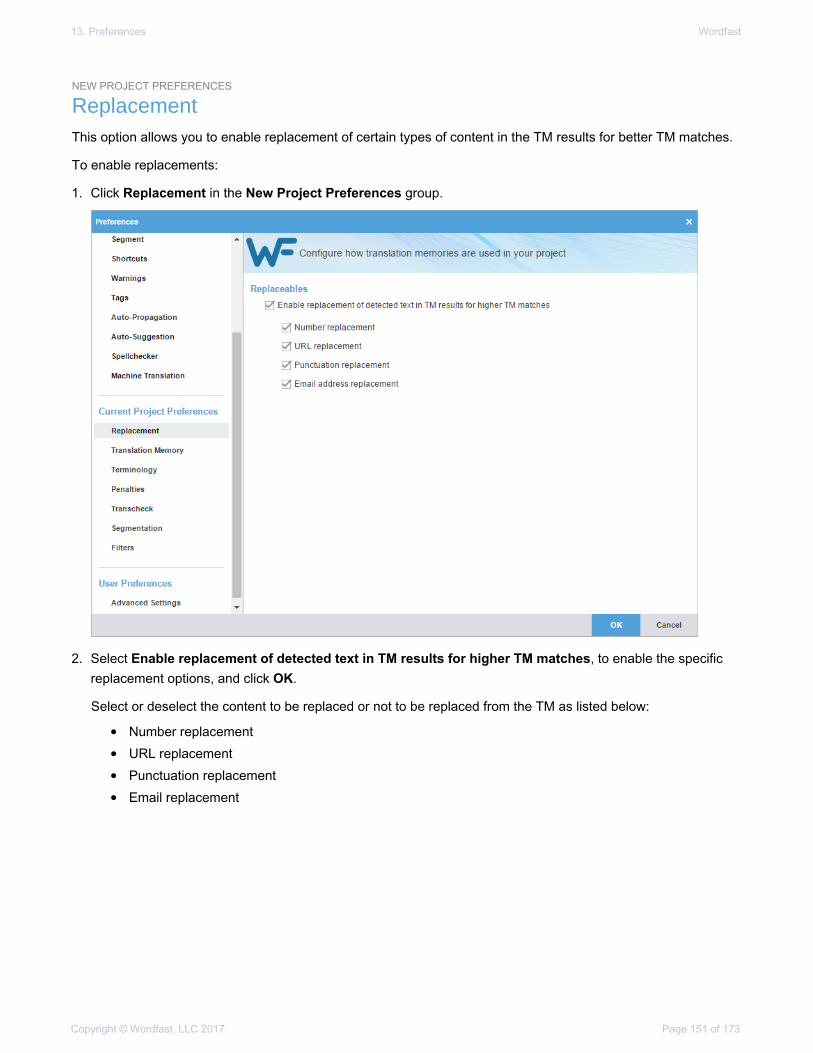
13. Preferences Wordfast
Copyright © Wordfast, LLC 2017. Page 151 of 173
NEW PROJECT PREFERENCES
ReplacementThis option allows you to enable replacement of certain types of content in the TM results for better TM matches.
To enable replacements:
1. Click Replacement in the New Project Preferences group.
2. Select Enable replacement of detected text in TM results for higher TM matches, to enable the specificreplacement options, and click OK.
Select or deselect the content to be replaced or not to be replaced from the TM as listed below:
• Number replacement
• URL replacement
• Punctuation replacement
• Email replacement

13. Preferences Wordfast
Copyright © Wordfast, LLC 2017. Page 152 of 173
NEW PROJECT PREFERENCES
Translation MemoryTo select translation memory options:
1. Click Translation Memory in the New Project Preferences group.
2. Select Write 'exact' matches to TM to commit 100% matches to a TM.
3. Select Write 'unedited MT' to TM to commit unedited machine translated matches to a TM.
4. Select Write 'unedited fuzzy' to TM to commit unedited fuzzy matches to a TM.
5. Select Write 'unedited autopropagated fuzzy' to TM to commit unedited autopropagated fuzzy matches to aTM.
6. Select Copy source when..., to copy the source to the target segment when there is no match and the TM isleveraged.
7. Select the Fuzzy Match Threshold percentage.
This percentage specifies the TM leverage limit for a fuzzy match. For example, if a value of 75% isentered, the tool marks all the translations which are leveraged below 75% match as a 'No match'segment.
8. Select the analysis Report Settings:• Calculate analysis report Percentage by Words or Segments
• Calculate Internal Fuzzy Matches in percentage and Include Internal Fuzzy Matches in TM Matches

13. Preferences Wordfast
Copyright © Wordfast, LLC 2017. Page 153 of 173
9. Select only one condition to be followed when editing an existing translation unit. The options are as follows:• Add to TM by overwriting the existing TU (default): Overwrite the existing translation unit
• Add to TM; overwrite the existing TU if attributes are identical: Overwrite the existing translation unit ifthe attributes match
• Only add to TM the new TU; do not overwrite the existing TU: No overwrite, just add new TUs to theexisting translation unit
• Add to TM; do not overwrite the existing TU: No overwrite, just add TUs to the existing translation unit
• Do not add to TM: No addition to be made to the existing translation unit
10. Select the Total number of TUs shown in TM Lookup pane and click OK.
NEW PROJECT PREFERENCES
TerminologyTerminology lists or glossaries are used to leverage previously translated text, resulting in lower costs and greaterconsistency.
To select terminology options:
1. Click Terminology in the New Project Preferences group.
2. Select Enable fuzzy term recognition, to view fuzzy matches.
3. Select Enable term highlighting when typing terms, to indicate terminology matches by highlight whenentered in the translation.
4. Select Ignore case for term highlighting, to ignore case difference in terminology matches.

13. Preferences Wordfast
Copyright © Wordfast, LLC 2017. Page 154 of 173
5. Select the number of matches to be viewed and click OK.
NEW PROJECT PREFERENCES
PenaltiesPenalties are defined to maintain a high quality of content leveraged from Translation Memory. A relative value isassigned to each of the penalties, which are then taken into account when calculating the translation score. Thisscore is used to differentiate between golden or 100 %, fuzzy, and no match.
To select penalties for TM matches:
1. Click Penalties in the New Project Preferences group.
2. Select the categories desired, supply their thresholds, and click OK. The following table shows a list ofpenalties with their descriptions.
Case Differences in case is considered
Non Literal Differences in special characters, including punctuation, space, apostrophe,dash, quote, etc,.
Tag Differences in tagging
Whitespace Differences in blank spacing
Align Differences in Translation Units with alignment attributes
Machine Translation Differences in Translation Units based on Machine Translation
Multiple Translation Differences in Translation Units based on duplicates within the TM with differenttranslations

13. Preferences Wordfast
Copyright © Wordfast, LLC 2017. Page 155 of 173
Local TM Differences in Translation Unit from local desktop copy
Remote TM Differences in Translation Unit from remote TM
Private TU Differences in work-group Translation Unit from remote TM
Public TU Differences in non-work-group Translation Unit from remote TM
Secondary TM Indicates that the translation is leveraged from a secondary TM
Attribute Differences in attributes
If attribute is not When custom attribute in the Translation Unit does not match the text boxattribute
If filename attributedoes not match
When the file name attribute in the Translation Unit does not match the TXLF filename
NEW PROJECT PREFERENCES
TranscheckTranscheck searches a translation for missing or incorrect text or variables. Transcheck configuration is specific toa given project. For example, if a tag is missing or incorrect text was entered, a warning symbol is displayed in theStatus column.
To select Transcheck options:
1. Click Transcheck in the New Project Preferences group.
The Transcheck options are displayed. In the following image only the base options are shown. Many optionspresent additional related options when they are selected.
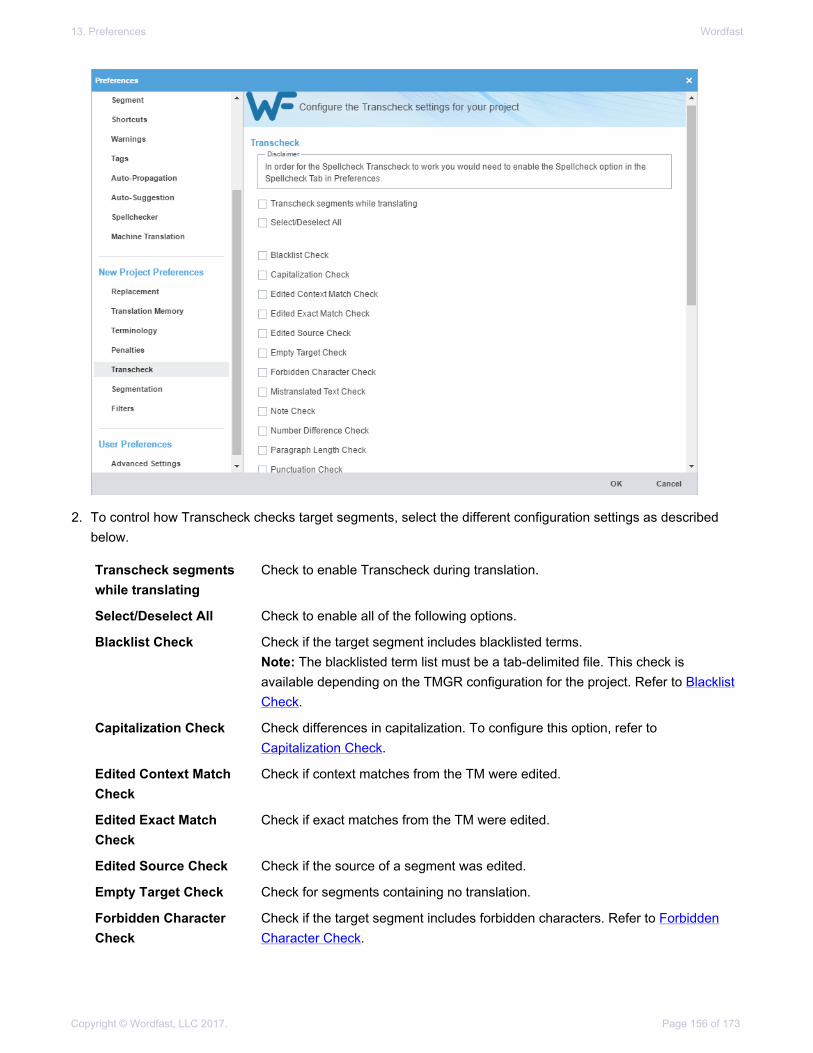
13. Preferences Wordfast
Copyright © Wordfast, LLC 2017. Page 156 of 173
2. To control how Transcheck checks target segments, select the different configuration settings as describedbelow.
Transcheck segmentswhile translating
Check to enable Transcheck during translation.
Select/Deselect All Check to enable all of the following options.
Blacklist Check Check if the target segment includes blacklisted terms.Note: The blacklisted term list must be a tab-delimited file. This check isavailable depending on the TMGR configuration for the project. Refer to BlacklistCheck.
Capitalization Check Check differences in capitalization. To configure this option, refer toCapitalization Check.
Edited Context MatchCheck
Check if context matches from the TM were edited.
Edited Exact MatchCheck
Check if exact matches from the TM were edited.
Edited Source Check Check if the source of a segment was edited.
Empty Target Check Check for segments containing no translation.
Forbidden CharacterCheck
Check if the target segment includes forbidden characters. Refer to ForbiddenCharacter Check.

13. Preferences Wordfast
Copyright © Wordfast, LLC 2017. Page 157 of 173
Mistranslated TextCheck
Check if a segment has common translation errors. This generates a report thatlists the correct and wrong usage of translated text. Refer to Mistranslated TextCheck.
Note Check Check if notes exist in a segment. This generates a report of segments withnotes. When Transcheck is run in the TXLF Editor, an alert is displayed for everysegment that has notes.
Number DifferenceCheck
Check if the numerals in the source segment match the target segment. Refer toNumber Difference Check.
Paragraph Length Check Check if the target paragraph length has exceeded the maximum characterlength set for the paragraph.
Punctuation Check Check for consistency in punctuation between source and target segments.Refer to Punctuation Check.
Repeated Word Check Check for repeated words in the translation.
Segment Length Check Check if the translation complies with preset limits on characters and words.Refer to Segment Length Check.
Extended PunctuationCheck
Check for consistency in extended punctuation between source and targetsegments.
Copied Source Check Check for copied source text in the target. Refer to Copied Source Check.
Spelling Check Check spelling as the translation is entered. Refer to Spell Check.
Note: If the spell check language is not available, a message is displayedinforming the user that Transcheck will continue but a spell check will not takeplace.
Tag Check Check for missing tags in the target segments. Refer to Tag Check.
Terminology Check Check if the terms in the source segment are translated correctly based on theterminology list. Refer to Terminology Check.
Unconfirmed SegmentCheck
Check if segment is marked unconfirmed.
Unedited Exact Check Check if exact matches were not edited.
Unedited Fuzzy Check Check if fuzzy matches were not edited.
Unedited MT Check Check if machine translated matches were not edited.
Untranslatable TextCheck
Check if the untranslatable content in source and target segments is consistent.Refer to Untranslatable Text Check.
Untranslated Text Check Check if any segments are not translated; for example, if Copy Source was usedto enter translation.
Whitespace Check Check for mismatched or double white spaces in the target segment. Refer toWhitespace Check.
3. Click OK.
The Transcheck configuration is complete and active for the current project.

13. Preferences Wordfast
Copyright © Wordfast, LLC 2017. Page 158 of 173
TRANSCHECK
Blacklist CheckTo configure the checking for blacklisted words for a given project from the Preferences option:
1. Click Transcheck.
2. Select Blacklist Check.
The related options are displayed.
3. Select the appropriate options.
Skip exact matches Do not check the blacklist when there is an exact match
Skip context matches Do not check the blacklist when there is a context match
TRANSCHECK
Capitalization CheckTo configure the checking for capitalization differences for a given project from the Preferences option:
1. Click Transcheck.
2. Select Capitalization Check.
The related options are displayed.
3. Select the appropriate options.
All Caps Mismatch Check text in the target that is all in upper case, when the source isnot all in upper case
First Word Case Difference Check Check the first letter of the first word is capitalized consistently insource and in target
Target Capitalization MismatchCheck
Check upper case text in the target that is in lower case in thesource

13. Preferences Wordfast
Copyright © Wordfast, LLC 2017. Page 159 of 173
Source Capitalization MismatchCheck
Check upper case text in the source that is in lower case in thetarget
Skip exact matches Disable or enable checking for capitalization on exact matches
Skip context matches Disable or enable checking for capitalization on context matches
TRANSCHECK
Forbidden Character CheckTo configure the checking for forbidden characters from the Preferences option:
1. Click Transcheck.
2. Select Forbidden Character Check.
The forbidden characters check is enabled.
3. Click Add to add or edit a forbidden character.
Add a character to be forbidden over the NEW character string and click Update.
To remove a forbidden character from Forbidden Character checking, highlight the character andclick Remove.
TRANSCHECK
Mistranslated Text CheckThe mistranslated text check identifies common translation errors. This check is configured by the projectmanager and sent in the GLP package and it includes common mistranslation errors and the correspondingcorrect translation. This configuration cannot be set up on the Wordfast Pro user interface.
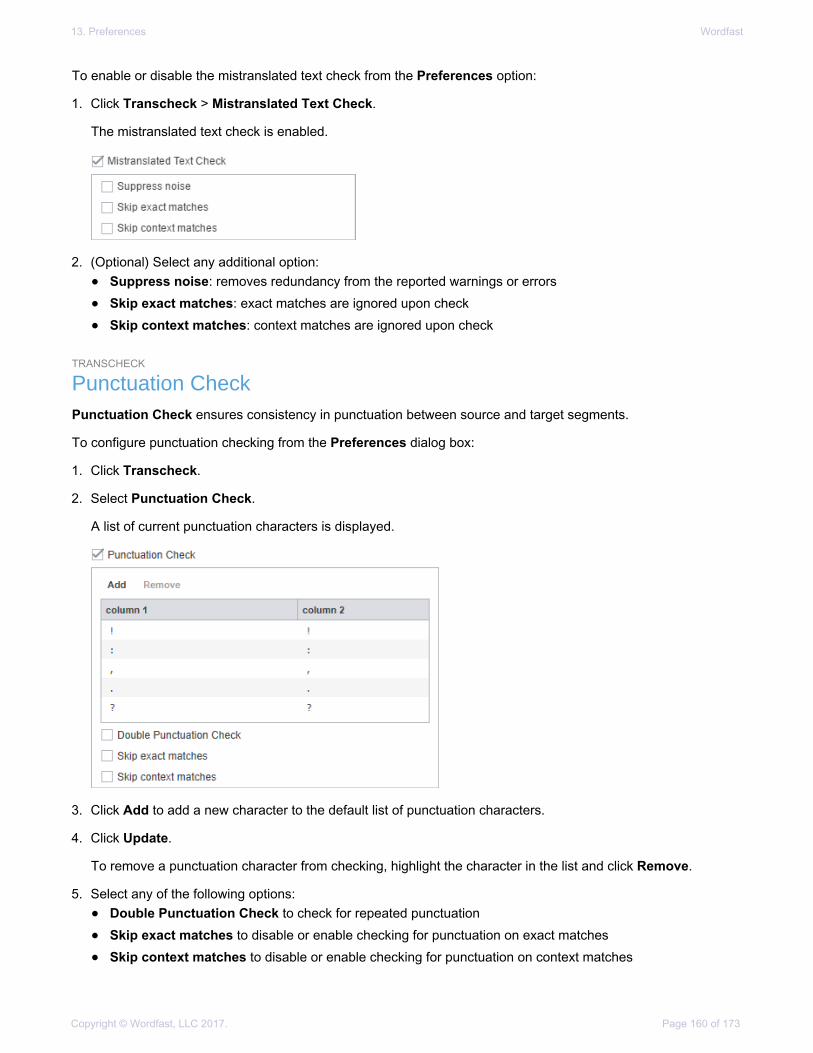
13. Preferences Wordfast
Copyright © Wordfast, LLC 2017. Page 160 of 173
To enable or disable the mistranslated text check from the Preferences option:
1. Click Transcheck > Mistranslated Text Check.
The mistranslated text check is enabled.
2. (Optional) Select any additional option:• Suppress noise: removes redundancy from the reported warnings or errors
• Skip exact matches: exact matches are ignored upon check
• Skip context matches: context matches are ignored upon check
TRANSCHECK
Punctuation CheckPunctuation Check ensures consistency in punctuation between source and target segments.
To configure punctuation checking from the Preferences dialog box:
1. Click Transcheck.
2. Select Punctuation Check.
A list of current punctuation characters is displayed.
3. Click Add to add a new character to the default list of punctuation characters.
4. Click Update.
To remove a punctuation character from checking, highlight the character in the list and click Remove.
5. Select any of the following options:• Double Punctuation Check to check for repeated punctuation
• Skip exact matches to disable or enable checking for punctuation on exact matches
• Skip context matches to disable or enable checking for punctuation on context matches
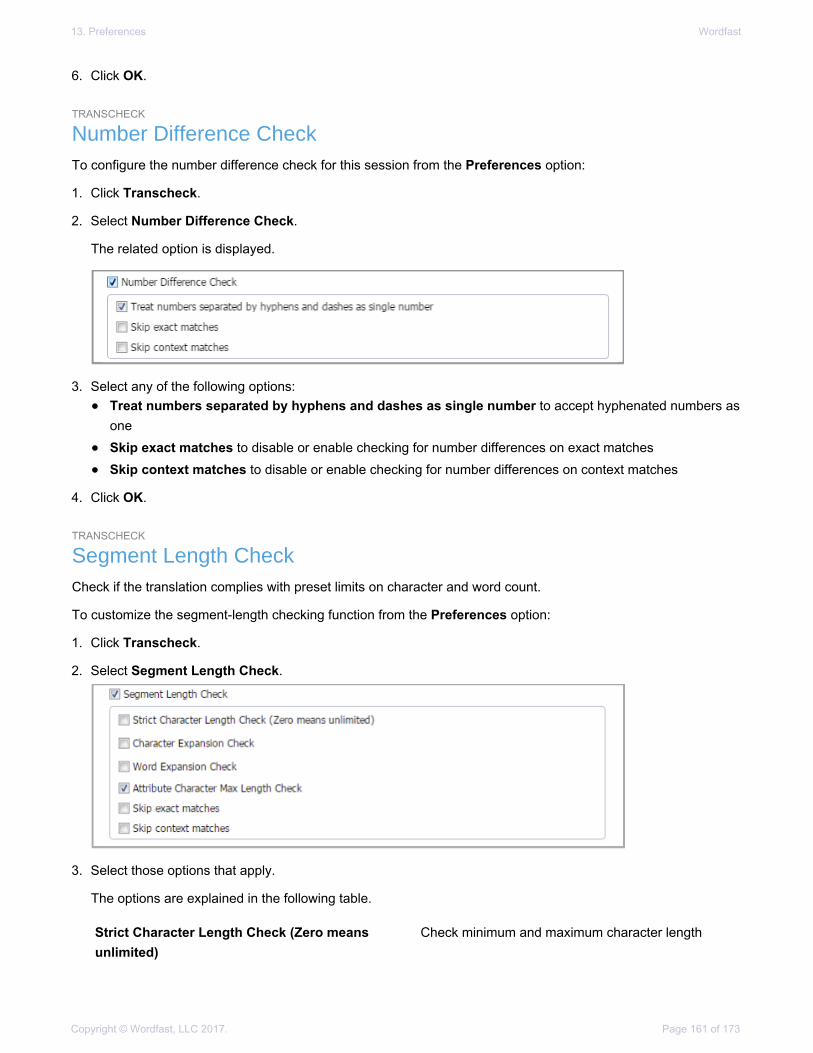
13. Preferences Wordfast
Copyright © Wordfast, LLC 2017. Page 161 of 173
6. Click OK.
TRANSCHECK
Number Difference CheckTo configure the number difference check for this session from the Preferences option:
1. Click Transcheck.
2. Select Number Difference Check.
The related option is displayed.
3. Select any of the following options:• Treat numbers separated by hyphens and dashes as single number to accept hyphenated numbers as
one
• Skip exact matches to disable or enable checking for number differences on exact matches
• Skip context matches to disable or enable checking for number differences on context matches
4. Click OK.
TRANSCHECK
Segment Length CheckCheck if the translation complies with preset limits on character and word count.
To customize the segment-length checking function from the Preferences option:
1. Click Transcheck.
2. Select Segment Length Check.
3. Select those options that apply.
The options are explained in the following table.
Strict Character Length Check (Zero meansunlimited)
Check minimum and maximum character length

13. Preferences Wordfast
Copyright © Wordfast, LLC 2017. Page 162 of 173
Character Expansion Check Check minimum and maximum character expansion,as a percentage
Word Expansion Check Check minimum and maximum word expansion, as apercentage
Attribute Character Max Length Check Check attribute text that exceeds the maximumcharacter length
Skip exact matches Disable or enable checking for segment length onexact matches
Skip context matches Disable or enable checking for segment length oncontext matches
TRANSCHECK
Copied Source CheckTo customize the copied source checking operation from the Preferences option:
1. Click Transcheck.
The related options are displayed.
2. Select any options that apply from the following list:
• Skip exact matches when checking for copied source
• Skip context matches when checking for copied source
• Skip tokens when checking for copied source
TRANSCHECK
Spell CheckTo customize the spell checking operation from the Preferences option:
1. Click Transcheck.
2. Select Spelling Check.
The related options are displayed.
3. Select select any options that apply from the following list:
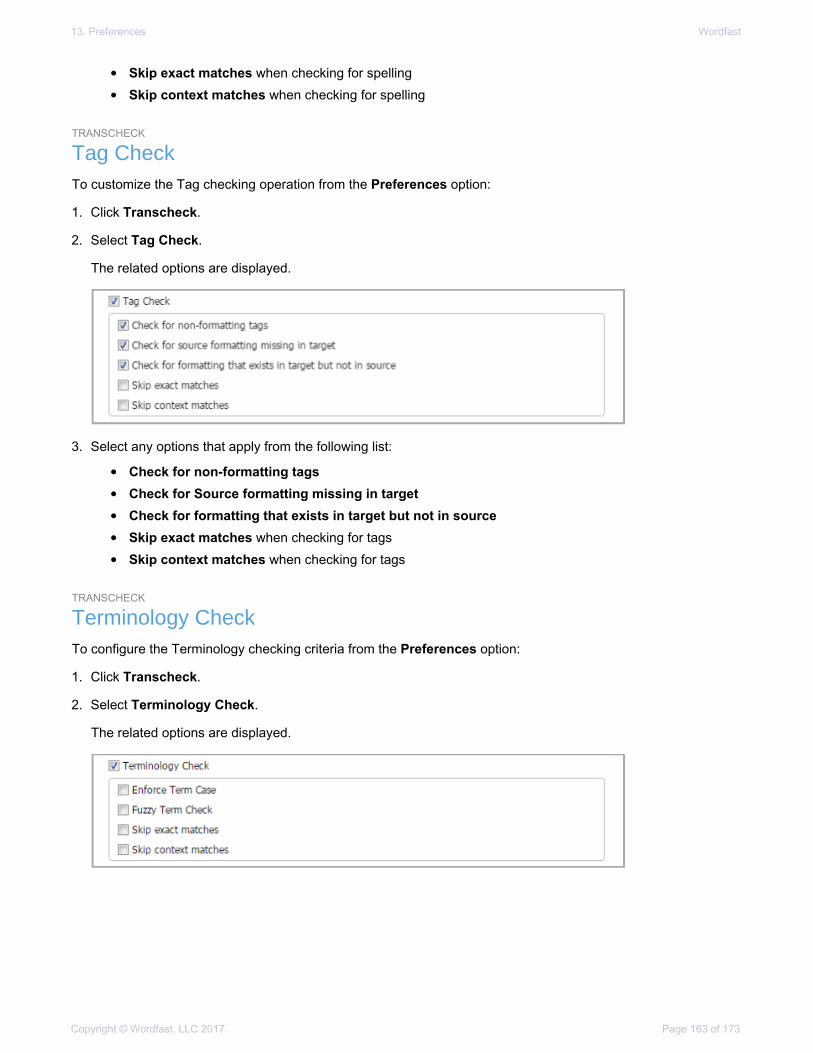
13. Preferences Wordfast
Copyright © Wordfast, LLC 2017. Page 163 of 173
• Skip exact matches when checking for spelling
• Skip context matches when checking for spelling
TRANSCHECK
Tag CheckTo customize the Tag checking operation from the Preferences option:
1. Click Transcheck.
2. Select Tag Check.
The related options are displayed.
3. Select any options that apply from the following list:
• Check for non-formatting tags
• Check for Source formatting missing in target
• Check for formatting that exists in target but not in source
• Skip exact matches when checking for tags
• Skip context matches when checking for tags
TRANSCHECK
Terminology CheckTo configure the Terminology checking criteria from the Preferences option:
1. Click Transcheck.
2. Select Terminology Check.
The related options are displayed.

13. Preferences Wordfast
Copyright © Wordfast, LLC 2017. Page 164 of 173
3. Select any of the following options that apply.• Enforce Term Case: Check based on exact case matching
• Fuzzy Term Check: Include terms that approximately match
• Skip exact matches when checking for terminology
• Skip context matches when checking for terminology
TRANSCHECK
Untranslatable Text CheckTo configure the handling of untranslatable text checking from the Preferences option:
1. Click Transcheck.
2. Select Untranslatable Text Check.
The Untranslatable Text Check expands to a dialog.
3. To retain the untranslatable text in the target segment, click Add.
4. Enter the untranslatable text to be retained.
5. Enter a custom regular expression as necessary.
6. To remove untranslatable text from the check, highlight the text in the list and click Remove.
7. Select any of the following options that apply:• Skip exact matches when checking for untranslatable text
• Skip context matches when checking for untranslatable text
TRANSCHECK
Whitespace CheckTo configure white-space for this session from the Preferences option:
1. Click the Transcheck.
2. Select Whitespace Check.
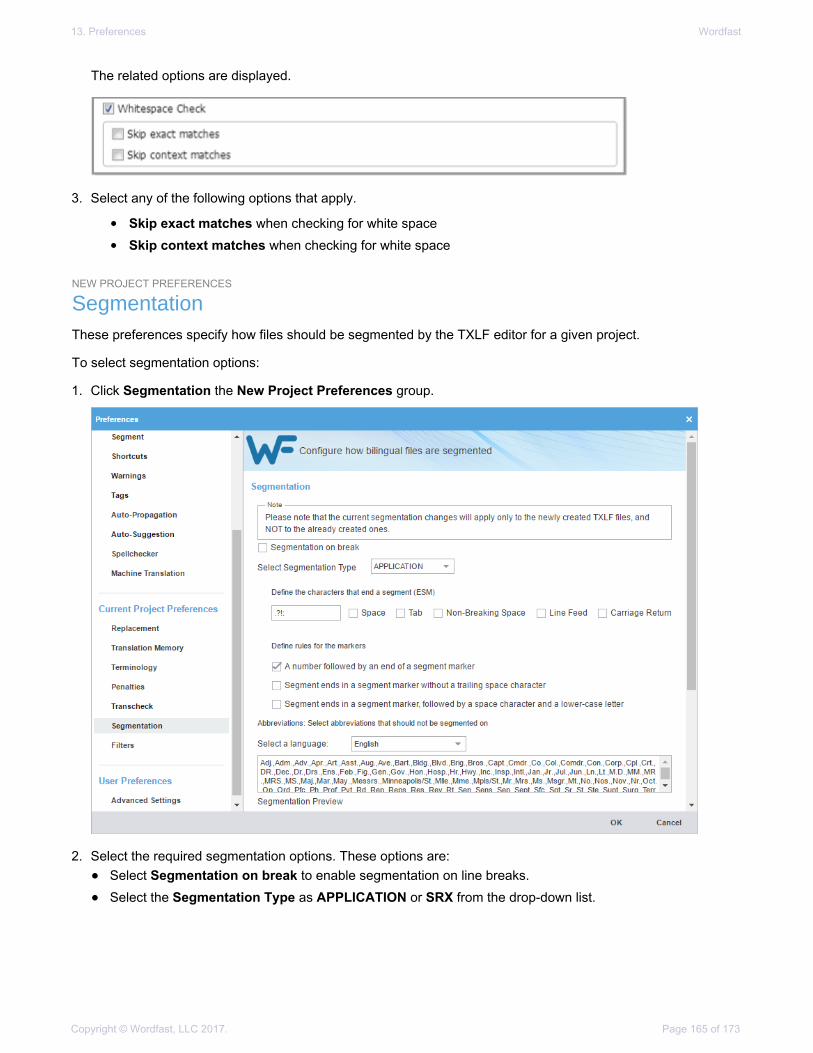
13. Preferences Wordfast
Copyright © Wordfast, LLC 2017. Page 165 of 173
The related options are displayed.
3. Select any of the following options that apply.
• Skip exact matches when checking for white space
• Skip context matches when checking for white space
NEW PROJECT PREFERENCES
SegmentationThese preferences specify how files should be segmented by the TXLF editor for a given project.
To select segmentation options:
1. Click Segmentation the New Project Preferences group.
2. Select the required segmentation options. These options are:• Select Segmentation on break to enable segmentation on line breaks.
• Select the Segmentation Type as APPLICATION or SRX from the drop-down list.

13. Preferences Wordfast
Copyright © Wordfast, LLC 2017. Page 166 of 173
3. Define the characters that end a segment (ESM):• Enter specific characters into the input field to specify custom segment end characters
• Select Space to enable white-spaces as a segment end character
• Select Tab to enable tabs as a segment end character
• Select Non Breaking Space to enable non-breaking white-spaces as a segment end character
• Select Line Feed to enable line-feed ASCII codes as a segment end character
• Select Carriage Return to enable carriage return ASCII codes as a segment end character
4. Define the rules for the markers, select those that apply:• A number followed by an end of a segment marker.
• Segment ends in a segment marker without a trailing space character.
• Segment ends in a segment marker, followed by a space character and a lower-case letter.
5. Select abbreviations that should not be used in segmenting and click OK
NEW PROJECT PREFERENCES
FiltersTo select file filter options:
1. Click Filters in the New Project Preferences group.

13. Preferences Wordfast
Copyright © Wordfast, LLC 2017. Page 167 of 173
2. Select the Extract numbers from the drop-down list to define the filter action on source segments that containonly numbers. The options are:• all: extracts all segments with only numbers for translation
• time_date_measure: extracts only segments with time and date
• none: does not extract any segments with only numbers
3. To select the file filter settings for the open project, click a filter to list the current settings in the FormatSettings box.
To add custom file filters, see Add New File Filter.
FILTERS
Add New File FilterYou can create a new filter based on one of the supported filters.
Only file filters that appear in the list of filters can be modified into additional file filters with a newSymbolic Name.
To add a new file filter:
1. Click Filters in the New Project Preferences group.
2. Click Add.
3. On the New Filter dialog, select the desired filter to use as a template for a new filter.
4. Enter the filter information, and click OK.
User PreferencesThe User Preferences includes the user specific Advanced Settings.

13. Preferences Wordfast
Copyright © Wordfast, LLC 2017. Page 168 of 173
USER PREFERENCES
Default SettingsThis Preferences option provides the means to restore the current preferences of a Wordfast Pro installation tofactory or default settings.
To restore Wordfast Pro to factory settings:
1. Click Advanced Settings in User Preferences group.
2. In the Default Settings section, click:• Restore Original to revert this Wordfast Pro installation preferences to those of a new installation.
A warning message is displayed.
This action removes all the projects, TMs, and glossaries in the Wordfast Pro installation.
• Restore Defaults to revert this Wordfast Pro installation preferences to default preferences.
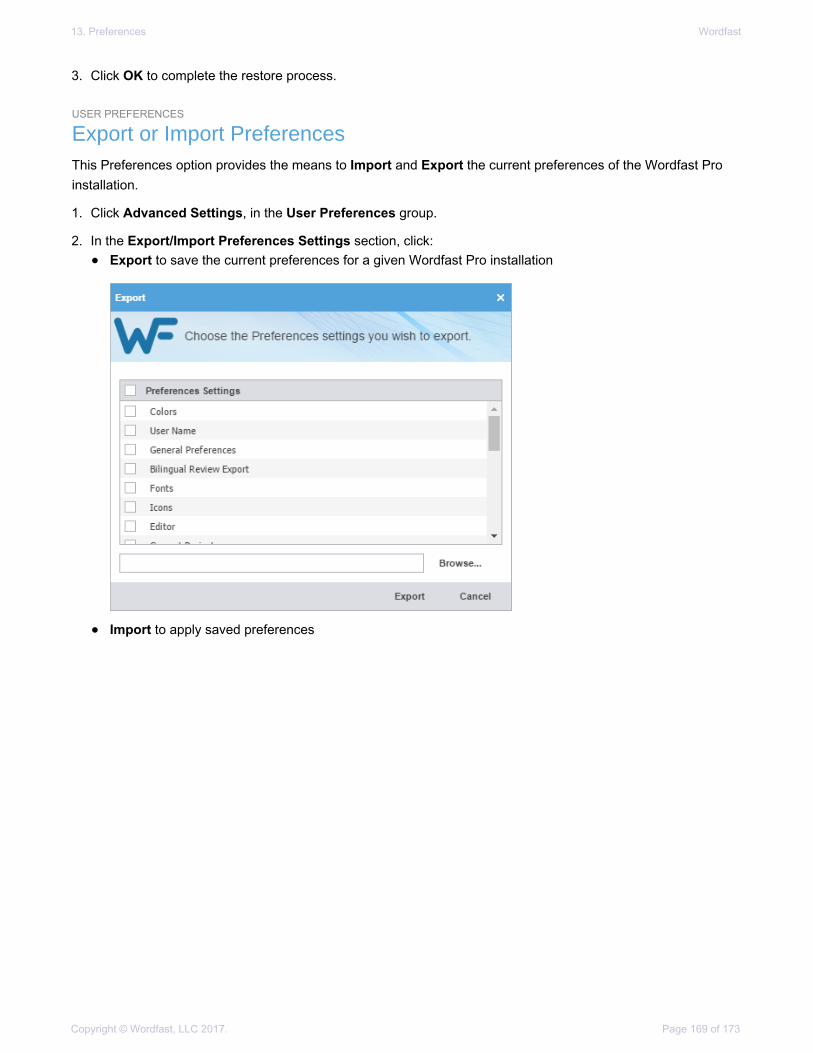
13. Preferences Wordfast
Copyright © Wordfast, LLC 2017. Page 169 of 173
3. Click OK to complete the restore process.
USER PREFERENCES
Export or Import PreferencesThis Preferences option provides the means to Import and Export the current preferences of the Wordfast Proinstallation.
1. Click Advanced Settings, in the User Preferences group.
2. In the Export/Import Preferences Settings section, click:• Export to save the current preferences for a given Wordfast Pro installation
• Import to apply saved preferences

13. Preferences Wordfast
Copyright © Wordfast, LLC 2017. Page 170 of 173
3. Enter Customization String List, if required and click OK.

Copyright © Wordfast, LLC 2017. Page 171 of 173
14. FAQsHow do I obtain a Wordfast Pro License and install the application?
When you purchase a Wordfast license, you will receive an installer and a license certificate whichcontains login credentials for our website. When you install Wordfast Pro for the first time, it will be inDemo mode.When you login to our website using the credentials on your license certificate, an activation key isprovided. Enter the activation key in Help > License Management. This will change the Demo modeto a full version.Refer to Install and Activate Wordfast Pro.
What does Wordfast Pro Demo mode mean?
When in Demo mode, you are limited to creating bilingual projects and storing up to 500 translationunits in your Translation Memory. To get a full version, you must upload a license. Refer to Installand Activate Wordfast Pro.
What happens if a corrupted file is uploaded for translation?
When creating a project, if one of the files are corrupted or invalid, you will still be able to create aproject with the clean files. The corrupt or invalid file will not be uploaded, and a warning messagewill be displayed.
How do I chain individual files?
Instead of opening files one-by-one to display in individual tabs, you can chain files to open in asingle tab as long as these files are in the same batch. You cannot chain files across batches.Chaining files has the following main advantages:
• Open hundreds of files within seconds
• Filter or search and replace in one pass as opposed to once per individual fileRefer to Chain Files.
Why is the Analyze button inactive when a chained file is opened for translation?
The Analyze button on the TXLF Editor is inactive when a chained file is opened because thetranslation memory cannot provide the best results.
What are the different ways to analyze files?
The analysis process converts source files into TXLF, and leverages the content against existingtranslation memories and generates a report listing matches, non-matches, word count, charactercount, and segment count. Source files can be analyzed in the following ways:
• Analyze files within a project from the Project Files tab (Refer to Analyze)
• Analyze any files outside of the project files from the Quick Tools tab (Refer to Analyze)
• Analyze a file open for translation in the TXLF Editor by clicking the Analyze button under theTranslation tab
How do I Skip 100% and 100%+ Segments when Navigating through Grid?
14. FAQs Wordfast
Copyright © Wordfast, LLC 2017. Page 172 of 173
To skip 100% and 100%+ segments when navigating to the next segment that requires linguisticchanges, you have two options:
• Filter for All except 100% and Context match segments (Refer to Table Filter)
• Set preferences to Skip 100% and 100%+ segments (Refer to Segment)The second option is preferred because it allows you so see the 100% and 100%+ segments forcontext while editing adjacent No Match and Fuzzy match or MT pre-translations.
How do I share and commit translations to TMs in real time?
To share your translation as soon as you are done translating or editing a segment, you must commitit to the TM. Committing a segment will turn the color highlight from pink to purple. You can commit asegment to the TM as follows:
• Move to the next segment using ALT + .
• Click Translation > Commit.
• Press Alt+Q.If a segment does not require any changes, for example, if the 99% match or the MT match islinguistically correct, you can verify the segment. Verifying the segment will also commit it and turnthe color highlight to purple. You can verify a segment as follows:
• Click the check mark next to the segment.
• Click the Translation > Verify.
• Press Ctrl+Alt+V.Once the segment is committed to the TM, it becomes a private translation unit (TU) that ispenalized at 1%. As a 99% match, the segment is listed following the 100% match. Your preliminarytranslations go through additional steps such as editing and proofing. This private TU is elevatedto a public TU once the last linguistic step in the translation workflow is completed. A public TU isleveraged during analysis automatically at 100% or 100%+.
How do I keep translations from getting written to the master TM?
To prevent a segment from getting written to the TM:
1. Open the file for translation and click on the segment that you do not want to write to the TM.2. On the Translation tab, click Unconfirm/Confirm. An unconfirmed segment will show a bull’s
eye icon in the Status column, and will not be written to the TM.3. To write the segment to the TM, select the segment and click Unconfirm/Confirm again. The
bull’s eye icon disappears and the segment is written to the TM.4. On the Translation tab, click Unconfirm / Confirm All to unconfirm or confirm all segments in
the file.
How do I apply formatting correctly in WordFast Pro?

14. FAQs Wordfast
Copyright © Wordfast, LLC 2017. Page 173 of 173
Inline formatting can be applied to the target segment in two ways:
1. You can enter tag(s) from the source language segment for basic styles such as bold and italicusing the buttons on the Formatting tab. However, these formatting buttons could introducetags in the target that do not match the source. Unless the linguist identifies these mismatchedtags using Transcheck and corrects them, they will prevent effected TXLF files from convertinginto monolingual files at the align stage.
2. To avoid the mismatched tags, after opening a file for translation, go to Preferences > Tagsand select Show Formatting as Tags.Since this preference persists from one WFP session to another you only have to set it once.This preference enables you to reuse tags from the source using the Copy button under theTranslation tab. If the tag preference is set to Show Text Formatting (when supported), youmust apply formatting using the buttons in the Formatting tab, unless you toggled segment-by-segment from Tag Formatting to Tag Non-Formatting.
Why is the Whole Words Only checkbox inactive in Find/Replace dialog?
In the Find and Replace dialog, the Whole Words Only checkbox will be inactive if multiple wordsor punctuation are added in the Find field.
What are Preferences for and how can I access them?
All the user interface options and features can be customized in the General, Current project andUser preferences groups. Preferences can be accessed in the following ways:
• Wordfast Pro tab drop-down menu
• Projects tab
• Project Files tab
• Quick Tools
• TXLF EditorRefer to Preferences.
What are the different ways that I can preview a file as PDF during translation?
You can preview any MS Office or HTML file as a PDF on the TXLF Editor > File tab. Refer toPreview PDF.