User Guide for OM-DAQ-USB-2401 Multiple Channel USB Data
56
OM-DAQ-USB-2401 Multiple Channel USB Data Acquisition Module e-mail: [email protected] For latest product manuals: www.omegamanual.info Shop online at omega.com ® User’s Guide
Transcript of User Guide for OM-DAQ-USB-2401 Multiple Channel USB Data

OM-DAQ-USB-2401Multiple Channel USB Data
Acquisition Module
e-mail: [email protected] For latest product manuals:
www.omegamanual.info
Shop online at omega.com ®
User’s Guide

Servicing North America:U.S.A.: Omega Engineering, Inc., One Omega Drive, P.O. Box 4047 Stamford, CT 06907-0047 USA
Toll-Free: 1-800-826-6342 (USA & Canada only) Customer Service: 1-800-622-2378 (USA & Canada only) Engineering Service: 1-800-872-9436 (USA & Canada only) Tel: (203) 359-1660 Fax: (203) 359-7700 e-mail: [email protected]
For Other Locations Visit omega.com/worldwide
omega.com [email protected]
The information contained in this document is believed to be correct, but OMEGA accepts no liability for any errors it contains, and reserves the right to alter specifications without notice.WARNING: These products are not designed for use in, and should not be used for, human applications.

i
OM-DAQ-USB-2400Multiple Channel USB Data Acquisition Module
TABLE OFCONTENTS
Page Section 1 - Introduction ...................................................................... 1-1
1.1 Precautions ............................................................................................... 1-11.2 Safety Warnings and IEC Symbols ........................................................ 1-21.3 Statement on CE Marking ....................................................................... 1-21.4 General Description and System Components ................................... 1-2
Section 2 - Hardware ......................................................................... 2-12.1 Package Inspection .................................................................................. 2-12.2 Included Items .......................................................................................... 2-1
Section 3 - Hardware Setup ................................................................ 3-13.1 OM-DAQ-USB-2400 Components ......................................................... 3-13.2 USB Hubs and Power Adaptors ............................................................ 3-1 3.2.1 USB-powered Hubs ................................................................... 3-2 3.2.2 Self-powered Hubs .................................................................... 3-2 3.2.3 Power Adaptors ......................................................................... 3-23.3 Connecting Your OM-DAQ-USB-2401 Acquistition Systems To PC . 3-33.4 Connecting Various Hardware Setups ................................................. 3-4 3.4.1 Direct Connection To Computer USB Port(s) ........................ 3-4 3.4.2 Connection To USB-powered Hub .......................................... 3-5 3.4.3 Connections To Self-powered and USB-powered Hubs ...... 3-5 3.5 OM-DAQ-USB-2401 Mounting .............................................................. 3-6 3.5.1 OM-DAQ-USB-2401 Wall Mounting ....................................... 3-7 3.5.2 OM-DAQ-USB-2401 DIN Rail Mounting ............................... 3-8
Section 4 - Software ........................................................................... 4-14.1 Getting Started ......................................................................................... 4-14.2 Software Installation ................................................................................ 4-1 4.2.1 System Requirements ................................................................ 4-1 4.2.2 Software Setup ............................................................................ 4-24.3 DAQ Central Software Operation ......................................................... 4-4 4.3.1 Main Control Window Pull-Down Operations ..................... 4-6 4.3.2 Device Configuration ................................................................ 4-84.4 Power Line Rejection ............................................................................. 4-144.5 Optical Isolation ...................................................................................... 4-144.6 A/D Conversion .................................................................................... 4-144.7 Input Ranges .................................................................................................... 4-154.8 Analog Input Configuration ................................................................. 4-154.9 Measurement Duration, Scan Time, and Resolution ........................ 4-164.10 Automatic Calibration .......................................................................... 4-174.11 Thermocouple Measurements ........................................................... 4-18
Section 5 - Signal Management ........................................................... 5-15.1 Channel Control and Expansion ........................................................... 5-15.2 Scan Time and Resolution ...................................................................... 5-1 5.2.1 Scan Time .................................................................................... 5-1 5.2.2 Resolution [Effective Number of Bits (ENOB, RMS)] ............ 5-15.3 Under Sampling and Aliasing ............................................................... 5-2
Page

ii
OM-DAQ-USB-2400Multiple Channel USB Data Acquisition Module
TABLE OFCONTENTS
5.4 Triggering ................................................................................................. 5-45.5 Signal Modes ............................................................................................ 5-45.6 System Noise ............................................................................................ 5-65.7 Averaging ................................................................................................. 5-65.8 Analog Filtering ....................................................................................... 5-65.9 Input and Source Impedance ................................................................. 5-75.10 Crosstalk .................................................................................................. 5-78.1 Service and Calibration ........................................................................... 7-1
Section 6 - CE Conformity .................................................................... 6-16.1 OM-DAQ-USB-2401 Design for CE Conformity ................................. 6-1
Section 7 - Troubleshooting ................................................................. 7-17.1 Basic Checklist .......................................................................................... 7-17.2 Symptoms and Solutions ........................................................................ 7-1
Section 8 - Service and Calibration ...................................................... 8-18.1 Service and Calibration ........................................................................... 8-1
Section 9 - Specifications ..................................................................... 9-1
Section 10 - Approvals and Regulatory Compliance .......................... 10-110.1 International Usage and CE Marking ............................................... 10-1

iii
List of FiguresSection Figure Description .............................................................. PageSection 1 1-1 IEC Symbols .............................................................. 1-2 1-2 System Components ................................................. 1-3
Section 3 3-1 OM-DAQ-USB-2401 Hardware and Dimensions ... 3-1 3-2 Connection of an OM-DAQ-USB-2401 System to a Computer USB Port .......................................... 3-3 3-3 Direct Connection to Computer USB Port ............ 3-4 3-4 Connection to USB-powered Hub .......................... 3-5 3-5 Connection to Self-powered Hub and to USB-powered Hub ....................................... 3-6 3-6 OM-DAQ-USB-2401 Wall Mounting ..................... 3-7 3-7 OM-DAQ-USB-2401 Wall Mounting Dimensions ................................................................ 3-7 3-8 OM-DAQ-USB-2401 Rail Mounting ...................... 3-8
Section 4 4-1 Welcome Screen ........................................................ 4-2 4-2 Select Install Screen .................................................. 4-2 4-3 Confirm Installation Screen ..................................... 4-3 4-4 Main Control Window ............................................. 4-4 Table 4-1 Toolbar Buttons ......................................................... 4-5 4-5 File Menu ................................................................... 4-6 4-6 Device Menu .............................................................. 4-6 4-7 Tools Menu ................................................................ 4-7 4-8 Help Menu ................................................................. 4-7 4-9 Configuration Mode Channels Tab Screen ........... 4-8 4-10 Scan Options .............................................................. 4-9 4-11 Unit Options .............................................................. 4-9 4-12 Automatic Calibration ............................................. 4-9 4-13 Trigger Options ....................................................... 4-10 4-14 “Start Trigger” Options .......................................... 4-10 4-15 “Stop Trigger” Options .......................................... 4-10 4-16 Data Tab ................................................................... 4-11 4-17 Data “Save Behavior” Option ............................... 4-11 4-18 Main Window Screen ............................................. 4-12 4-19 Gauges Screen ......................................................... 4-12 4-20 Bars Screen ............................................................... 4-12 4-21 Digital Screen .......................................................... 4-12 4-22 Table Screen ............................................................. 4-12 4-23 Waveform Screen .................................................... 4-13 4-24 Sample Options Screen .......................................... 4-13
OM-DAQ-USB-2400Multiple Channel USB Data Acquisition Module
LIST OFFIGURES

iv
List of FiguresSection Figure Description ............................................................. Page 4-25 OM-DAQ-USB-2400 Block Diagram .................... 4-14 4-26 OM-DAQ-USB-2401 Single-ended and Differential
Conections to Analog Input Channels Diagram ....4-16 4-27 Calibration/Scan Arrangement ............................ 4-17
Section 5 Table 5-1 Scan Rate vs Resolution (ENOB, RMS) ................. 5-2 5-1 Examples of Under Sampling ................................. 5-3 5-2 Trigger Source Diagram .......................................... 5-4 5-3 Noise Reduction in Differential Mode .................. 5-5 5-4 Example of Floating Differential Circuit ................5-5 5-5 Analog to Digital Converter .................................... 5-7
Section 6 6-1 OM-DAQ-USB-2401 With Ferrite Cores Installed .. 6-1 6-2 Ferrite Core ................................................................ 6-2
Section 9 Table 9-1 Thermocouple Accuracy (C) for OM-DAQ-USB-2400 ................................................. 9-1
OM-DAQ-USB-2400Multiple Channel USB Data Acquisition Module
LIST OFFIGURES

Section 1 - Introduction Please read this manual completely before installing and operating your Omega data acquisition system. It’s important to read and follow all notes, cautions, warnings and safety precautions before operating this device. “Device” refers to your data acquisition unit.
1.1 Precautions• This device is not designed for use in any medical or nuclear applications.• Do not operate this device in flammable or explosive environments.• Never operate with a power source other than the one recommended in this
manual or listed on product labels.• This device has been designed for dry, moisture free indoor applications only.• Do not operate this device outside of the recommended use outlined in this
manual.• Never use your data acquisition unit as a portable device. Your unit has been
designed to be operated in a permanent installation only.
There are no user serviceable parts inside your device. Attempting to repair or service your unit may void your warranty.
The discharge of static electricity can damage some electronic components. Semiconductor devices are especially susceptible to ESD damage. You should always handle components carefully, and you should never touch connector pins or circuit components unless you are following ESD guidelines in an appropriate ESD controlled area. Such guidelines include the use of properly grounded mats and wrist straps, ESD bags and cartons, and related procedures.
Never remove a USB cable from an active OM-DAQ-USB-2401 unit while an acquisition is in progress. An active unit is any unit that is currently open and has channels configured for scanned input. Such disconnection may require you to exit and then re-launch Omega DAQ Central, after the USB cable has been connected.
1-1
Introduction 1
NOTE:
NOTE:
NOTE:

When using OM-DAQ-USB-2401 unit to acquire data, computer energy save modes can cause false data readings. Prior to using the unit, ensure your computer’s energy save mode is disabled. If needed, consult your PC user’s manual to disable energy save (power suspension) modes.
1.2 Safety Warnings and IEC SymbolsThis device is marked with international safety and hazard symbols in accordance with IEC standards. It is important to read and follow all precautions and instructions in this manual before operating or commissioning this device as it contains important information relating to safety and EMC. Failure to follow all safety precautions may result in injury and or damage to your device. Use of this device in a manner not specified will void your warranty.
IEC symbols Description
Caution, refer to accompanying documentation
EU’s Waste Electrical and Electronic Equipment Compliance
Figure 1-1. IEC Symbols
1.3 Statement on CE MarkingIt is the policy of OMEGA® to comply with all worldwide safety and EMI/EMC regulations that apply. OMEGA is constantly pursuing certification of its products to the European New Approach Directives. OMEGA will add the CE mark to every appropriate device upon certification. For additional information see Section 10 - Approvals & Regulatory Compliance.
1.4 General Description & System ComponentsThe OM-DAQ-USB-2401 is a USB 2.0 full speed thermocouple/voltage input data acquisition module (fully compatible with both USB 1.1 and USB 2.0 ports). This stand-alone module draws power from the USB port to operate. An external (optional) power supply can be used. All configurable options (including individual channel input type and range) are software programmable. The OM-DAQ-USB-2401 has user programmable voltage inputs that range from ±30 mV to ±10V, full scale. The compact, modular packaging ensures ease of use in a variety of applications. Units can be DIN rail or wall mounted with the included hardware or easily operated on a bench. All analog input channels can be measured sequentially at about 1 ms per channel. A total of 1000 samples per second can be taken, divided across all active channels.*
Introduction1
1-2
NOTE:

*At highest scan rate, 1000 samples/sec +/- 1% with one channel on, +/- 5% with all channels on.
The main items you will be using in your data acquisition system are the OM-DAQ-USB-2401 unit, its USB cable, and power adaptor.
Figure 1-2. System Components
Introduction 1
1-3
NOTE:
USB
POWERADAPTER
(OPTIONAL)
OM-DAQ-USB-2401MODULE
PC WITH USB CONNECTION (NOT INCLUDED)

Section 2 - HardwareIt is important that you read this manual completely and follow all safety precautions before operating this instrument.
2.1 Package InspectionRemove the packing list and verify that you have received all your equipment. If you have any questions about the shipment, please call our Customer Service Department at 1-800-622-2378 or 203-359-1660. We can also be reached on the Internet at omega.com, e-mail: [email protected]. When you receive the shipment, inspect the container and equipment for any signs of damage. Note any evidence of rough handling in transit. Immediately report any damage to the shipping agent.
The carrier will not honor any damage claims unless all shipping material is saved for inspection. After examining and removing contents, save packing material and carton in the event reshipment is necessary.
2.2 Included ItemsThe following items are supplied in the box:• 1 Omega OM-DAQ-USB-2401 data acquisition module• 1 Omega DAQ Central software CD• 1 USB Cable• 1 9Vdc Power Adaptor• 1 Mounting Kit (8 screws, 2 mounting brackets, 2 DIN rail adaptors)• 1 Omega screwdriver• 1 OM-DAQ-USB-2400 Series User Manual (this one, M-5025)• 1 OM-DAQ-USB-2400 Series Quickstart Manual (MQS-5025)• 2 Type K Thermocouples with Stripped Leads
2-1
Hardware2
NOTE:

Section 3 - Hardware Setup3.1 OM-DAQ-USB-2401 System Components
Figure 3-1. OM-DAQ-USB-2401 Hardware and Dimensions
The external power port is used in applications which have USB hubs that are not self-powered. See the next section for more information.
The ‘STATUS LED’ blinking at Scan Rate means an acquisition is in progress. At a fast scan rate, the ‘STATUS LED’ appears solid. The ‘POWER LED’ in solid means the unit has power
3.2 USB Hubs and Power AdaptorsWith the use of USB hubs you can connect up to 10 DAQ units to one PC. USB hubs can be of the self-powered type, or of the USB-powered type. Both types of hubs are available from a variety of vendors.
3-1
Hardware Setup 3
CHANNEL 1 & 2ANALOG INPUT
A1H
A1L
A2H
A2L
COM
COM
COM
EXC
12 V OUT
CHANNEL 3 & 4ANALOG INPUT
A3H
A3L
A4H
A4L
COM
COM
COM
EXC
12 V OUT
CHANNEL 5 & 6ANALOG INPUT
A5H
A5L
A6H
A6L
COM
COM
COM
EXC
12 V OUT
CHANNEL 7 & 8ANALOG INPUT
A7H
A7L
A8H
A8L
COM
COM
COM
EXC
12 V OUT !
!
OM-DAQ-USB-2400 SERIESUSB DATA ACQUISITION SYSTEM
9V1.0 A
- +
USB
EXTPWR
STATUSPWRIND
127 (5.00)
97(3.80)
107(4.20)
POWER SUPPLY
POWER LED
STATUS LED
USB PORTDIMENSIONS mm (in)
38(1.5)
NOTE:
NOTE:

3.2.1 USB-powered Hubs These hubs draw all power from the host USB connector’s power pins. The power is used for hub internal functions and for the hub’s ports. Each port of a USB-powered hub must be capable of supplying at least 100 mA.3.2.2 Self-powered HubsThese hubs draw power from a source other than the host USB connector, with exception that they may draw up to 100 mA from their upstream connection for hub internal functions. The external power is used for hub internal functions and for the hub’s ports. Each port of a self-powered hub must be capable of supplying 500 mA.3.2.3 Power Adaptors Power adaptors, also referred to as auxiliary power packs, are required for some self-powered hubs, and for DAQ modules that are powered from USB-powered hubs. In addition, DAQ units will require the use of a power adaptor when used with certain laptops.
When using a power adaptor with your DAQ system, be sure to supply power (from the adaptor to the DAQ unit) before connecting the USB cable. This allows the DAQ to inform the host computer (upon connection of the USB cable) that the unit requires minimal power from the computer.
Power adaptors for use with the DAQ have a current limit of 500 mA (min.) and a voltage range of +7.5 to +12 Volts DC. These specifications are provided on the end-face of the DAQ unit.If the computer does not recognize the DAQ unit, make sure the computer’s USB port is properly enabled and is in good working order. If the computer still fails to recognize the DAQ unit, the use of an external 9v DC power adaptor may be required.
The use of certain notebook computers may require the use of a power adaptor with your DAQ unit.
Hardware Setup3
3-2
NOTE:
NOTE:

3.3 Connecting Your OM-DAQ-USB-2401 Acquisition System to PC
When using a power adaptor with your DAQ system, be sure to supply power (from the adaptor to the DAQ) before connecting the USB cable. This allows your DAQ to inform the host computer (upon connection of the USB cable) that the unit requires minimal power from the computer.
Use an approved high-speed USB cable to connect the DAQ system to one of the host computer’s USB ports. There is no need for an additional power source in this setup since the power pins (of the PC’s USB connection) supply 500 mA at 4 to 5.25 V. Additional setup examples are described in this chapter, some of which involve USB hubs and/or power adaptors.
Figure 3-2. Connection of an OM-DAQ-USB-2401 System to a Computer USB Port
Certain notebook computers require the use of a power adaptor with your DAQ unit.
Hardware Setup 3
3-3
NOTE:
NOTE:
USB
POWERADAPTER(OPTIONAL)

3.4 Connecting Various Hardware SetupsON-DAQ-USB-2401 data acquisition systems range from simple to complex. One example of a simple system is that of one OM-DAQ-USB-2401 connected to a PC’s USB connector. A much more complex system is one that contains 10 OM-DAQ-USB-2401 units and a combination of USB-powered and self-powered hubs. Despite the wide range of possibilities in between, use of the following examples should enable you to properly connect your system.
In the examples that follow, the USB hubs have four external ports (downstream ports). The USB hubs used in your system may have more. Connections can be adjusted accordingly.
3.4.1 Direct Connection to Computer USB Port(s)In this example, one DAQ unit is connected by cable to one of the computer’s USB ports. The number of USB connectors may vary from PC to PC. When you connect DAQ units directly to a USB connector in this manner, no additional power source is required since the computer’s USB connector power pins supply the DAQ with adequate power (500 mA at 4.75 to 5.25 V).
Figure 3-3. Direct Connection to a Computer USB Port(s)
Hardware Setup3
3-4
USB
POWERADAPTER(OPTIONAL)
NOTE:

3.4.2 Connection to USB-powered HubIn this example, two OM-DAQ-USB-2401s are connected by cable to individual ports of a single USB-powered hub. Since the hub receives all its power from the computer’s USB, the hub cannot supply adequate power to the DAQ units. Because of this aspect of insufficient power, each unit is connected to its own power adaptor.
Figure 3-4. Connection to USB-Powered Hub
The power adaptors used must be capable of supplying at least 500 mA and have a voltage rating of +7.5 to +12 Vdc.
3.4.3 Connections to Self-Powered and USB-powered HubsThis example illustrates a system that makes use of four DAQ units and two different style USB hubs. Two DAQs are connected by cable to individual ports of a self-powered USB hub. In addition, the self-powered hub is connected to a downstream USB-powered hub, which is also connected to two DAQ units.Notice that the DAQ units connected to the self-powered hub have no adaptors connected to them. This is because the hub receives external power (in addition to the PC supplied USB power), which is capable of supporting the downstream devices connected directly to it. In comparison, the three OM-DAQ-USB-2401s connected to the USB-powered hub each require their own power adaptor. As in example 3.4.2, the power adaptors used must be capable of supplying at least 500 mA and have a voltage rating of +7.5 to +12 Vdc.
Hardware Setup 3
3-5
USB
USBHUB
POWERADAPTER
POWERADAPTER
NOTE:

Figure 3-5. Connections to Self-Powered Hub and to USB-Powered Hub
USB port locations vary from PC to PC.
3.5 OM-DAQ-USB-2401 MountingThe OM-DAQ-USB-2401 mounting kit contains the following accessories:• 2 mounting brackets (to be used for either wall or DIN rail)• 4 long screws (to be used for either wall or DIN rail)• 4 short screws (to be used for the DIN rail)• 2 DIN rail plastic adaptors
Hardware Setup3
3-6
USB
USBHUB
USBHUB
POWERADAPTER
POWERADAPTER
POWERADAPTER
NOTE:

3.5.1 OM-DAQ-USB-2401 Wall MountingIn order to mount the OM-DAQ-USB-2401 to the wall, you will need to:1. Remove the rear screws from the OM-DAQ-USB-2401.2. Align the mounting brackets with the rear holes on the DAQ unit (make sure
that the ears are facing outwards, like in the figure below).3. Use the longer screws to reconnect the mounting brackets to the body of the
enclosure, in the same direction as the screws that were removed from the DAQ unit.
4. Drill 2 holes for #4 screws, 5.50" apart. Tip: Hold the DAQ unit with mounting brackets attached, up against the wall; use the holes as a guide to mark where you will drill holes in the wall.
5. Install the two screws into the wall.6. Mount the DAQ unit on the wall by passing the screw head through the larger
mounting bracket holes and then sliding it down.
Figure 3-6. OM-DAQ-USB-2401 Wall Mounting
Figure 3-7. OM-DAQ-USB-2401 Wall Mounting Dimensions
Hardware Setup 3
3-7
133 (5.50)MOUNTING HOLE DISTANCE
146 (6.00)
Ø62 PLACES
(0.25)
107(4.20)
Ø3 2 PLACES
(0.125)
CHANNEL 1 & 2ANALOG INPUT
A1H
A1L
A2H
A2L
COM
COM
COM
EXC
12 V OUT
CHANNEL 3 & 4ANALOG INPUT
A3H
A3L
A4H
A4L
COM
COM
COM
EXC
12 V OUT
CHANNEL 5 & 6ANALOG INPUT
A5H
A5L
A6H
A6L
COM
COM
COM
EXC
12 V OUT
CHANNEL 7 & 8ANALOG INPUT
A7H
A7L
A8H
A8L
COM
COM
COM
EXC
12 V OUT !
!
OM-DAQ-USB-2400 SERIESUSB DATA ACQUISITION SYSTEM

Hardware Setup3
3-8
3.5.2 OM-DAQ-USB-2401 DIN Rail MountingIn order to mount the OM-DAQ-USB-2401 to a DIN-Rail, you will need to:1. Attach the DIN-rail plastic adaptors to the mounting brackets, using the four
shorter screws.2. Remove the rear screws from the OM-DAQ-USB-2401.3. Align the mounting brackets with the rear holes on the DAQ unit (make sure
that the ears are facing inwards, like in the figure below).4. Use the longer screws to reconnect the mounting brackets to the body of the
enclosure, in the same direction as the screws that were removed from the DAQ unit.
5. Attach the DAQ unit to the DIN rail, using the plastic adaptors attached to the mounting brackets.
Figure 3-7. OM-DAQ-USB-2401 Rail Mounting

4-1
Software 4
Section 4 - Software4.1 Getting Started
The following program files are included on the Omega DAQ Central User Software CD supplied with your data acquisition unit. These files can also be downloaded from the omega.com website should you misplace your CD.• DAQ Central data logging software installer• Omega.DAQ .NET API
When using Omega DAQ modules to acquire data, computer energy save modes can cause false data readings. Prior to using Omega DAQ modules, ensure your computer’s energy save mode is disabled. If needed, consult your PC user’s manual to disable energy save (power suspension) modes.
4.2 Software Installation4.2.1 System RequirementsMinimum Requirements:• Processor: 800 MHz• Hard Drive Space: 300 megabytes• Ram: 512 megabytes or higher• 1 Available USB Port• CD-ROM Drive or Internet connection• Windows XP Service Pack 3 (32-bit), Windows Vista (32-bit), Windows 7 (32-
bit), or Windows 7 (64-bit)Recommended Requirements:• Processor: 1.5 GHz• Hard Drive Space: 300 megabytes• Ram: 1.5 gigabytes• 1 Available USB Port• CD-ROM Drive or Internet connection• Windows XP Service Pack 3 (32-bit), Windows Vista (32-bit), Windows 7 (32-
bit), or Windows 7 (64-bit)
NOTE:

Software4
4-2
4.2.2 Software SetupInsert the DAQ Central Software CD that was included with your DAQ unit into the CD-ROM drive on your PC. Your system should begin the installation process automatically. If the software installation does not start automatically: open: “My Computer”, double-click your CD-ROM drive, and run “setup.exe”.
Figure 4-1. Welcome Screen
This welcome screen should be visible on your computer screen. To continue with installing the program click the “Next >” button.From this screen you select the folder were you want the program files installed on your PC. The default setting will install the software under your “Program” folders in a new folder named “Omega” To continue with installing the program click the “Next >” button.
Figure 4-2. Select Install Screen

Software 4
4-3
Figure 4-3. Confirm Installation Screen
The setup wizard now has all the information to complete the installation of the software on your PC. To continue with installing the program click the “Next >” button.During the install process, a Windows Command Prompt may pop up. No interaction is required in this window; it is automatically installing or updating the device’s USB drivers. Please let this process complete before closing the software installation wizard.Congratulations! You have just successfully installed the DAQ Central Program on your PC. To end installing the program and close the setup wizard click the “Close” Button.

Software4
4-4
4.3 DAQ Central Software OperationBelow is the basic flow of operation when using the software:1. Highlight desired device.2. Open Device Configuration window.3. Set channels, sample rate, triggering, and data output file.4. Click “OK” to confirm Device Configuration.5. Open any desired Data Displays.6. Click the Start button.Details on the various windows and options can be found in the rest of this chapter.
Figure 4-4. Main Control Window

TOOLBAR BUTTONS
Start Button Initiates data acquisition for the highlighted device. Even if a Start Trigger is set, this must be pressed to Arm the device.
Stop Button Stops data acquisition for the highlighted device. If a Stop Trigger is set, this will cancel the trigger.
Device Accesses the Device Configuration Configuration window for the selected device. Icon The Device Configuration window
is used to set up all device options, including channels, sample rate, triggers, and data output file.
Gauges Display Opens a Gauges window. Button Displays measurements in analog
meter format.
Bars Display Opens a Bars window. Displays Button measurements in a bar graph
format.
Digital Display Opens a Digital meter window. Button Displays measurements in a digital
meter format.
Table Display Opens a Table window. Displays Button measurements in a table format.
Waveforms Opens a Waveform window. Display Button Displays the measurements in a
scrolling chart.
Device Display Displays: List - The available connected DAQ
devices - DAQ2401DEMO – Demo/simulation device for testing software features without hardware.- LEDs – Will flash green during the data acquisition.
Table 4-1. Toolbar Buttons
Software 4
4-5

4.3.1 Main Control Window Pull-Down OperationsBelow are the operations that are available in the Pull-Down Menus of the DAQ Central Main Control Window.
Figure 4-5. File Menu
Open Configuration Opens Device Configuration settings from a saved file
Save Configuration As Saves current Device Configuration settings to a new file name
These settings files contain all of the data that is found in the Device Configuration window.
Figure 4-6. Device Menu
Detect Devices Detects available OM-DAQ-USB-2401 devices which are currently connected to the computer through the USB.
Configuration Same function as Configuration button . Accesses the device Configuration window to configure ‘Channels’ settings, ‘Triggers’ settings, and ‘Data’ settings.
Start Acquisition Same function as Start button .. Initiates data acquisition for the highlighted device. Even if a Start Trigger is set, this must be selected to Arm the device.
Stop Acquisition Same function as Stop button . Stops data acquisition for the highlighted device. If a Stop Trigger is set, this will cancel the trigger.
Software4
4-6

Figure 4-7. Tools Menu
Export Data File – To convert data file from binary file to .csv file
Figure 4-8. Help Menu
Check for Updates To check for the latest Omega DAQ Central software update information through the Internet connection.
About To view software version.
Software 4
4-7

Section 4.3.2 Device ConfigurationThe Device Configuration window contains the Channel, Triggers, and Data tabs. Details for these tabs are below. When finished making changes, press “OK” to confirm the changes or “Cancel” to abandon the changes.
Figure 4-9. Configuration Mode - Channels Tab Screen
Channels TabThe Channels tab contains a spreadsheet designed for setting up channels for data acquisition. Depending on the column, you can make changes to the information contained in a cell by placing the mouse cursor in the cell. All columns except “Channel” are editable. Those with drop-down arrows are limited to the choices in the drop-down list.You can use your PC’s keypad arrow and tab keys to select new “active cells” in the spreadsheet.
Software4
4-8

Configuration Parameter Settings
Channel The input channel’s name (not editable) AN1D = analog channel 1, differential input AN1H = analog channel 1, single-ended high input AN1L = analog channel 1, single-ended low input Etc.
Nickname You can specify the Nickname (e.g., Oven 1, Monitor Room)
Units You can specify the Engineering Unit. When switching between voltage and thermocouple ranges, this will automatically switch to the default units for that range. However, any units label may be typed in here.
On/Off To turn on or turn off the selected input channel
Single/Diff You can select input channel as Single-ended or Differential input.
Range You can select the voltage input range or thermocouple type for each input channel. Thermocouples must always be used with Differential input.
Scale and You can rescale the input signal. This scaled/offset Offset value will appear in all data displays, and in any saved
data files.
Sampling can be set in terms of “Scan Rate” or “Scan Time”. Scan Rate = 1/(Scan Time).For example, if you are acquiring 4 voltage inputs at 250 Hz, you will receive 250 complete scans per second. Meaning each channel will send 250 pieces of data every second, for a total of (4 x 250) = 1000 pieces of data.The maximum scan rate is affected by the number of channels turned on. Selecting thermocouple input also lowers the maximum scan rate.
Figure 4-10. Scan Options
Figure 4-11. Units Options
Figure 4-12. Automatic Calibration
Software 4
4-9

Figure 4-13. Trigger Options
The Triggers tab is used to set up triggers for starting and stopping data acquisition. The Start Trigger and the Stop Trigger each have a different set of available trigger types:
Figure 4-14. “Start Trigger” Options
Figure 4-15. “Stop Trigger” Options
Trigger Types
Manual Acquisition is manually started/stopped.
Level Set trigger to stop/start acquisition when the input level is either above or below a certain threshold.
Date/Time Set trigger to stop/start acquisition at a certain date and time, as per the PC’s clock.
Time Span Set trigger to stop acquisition after a certain elapsed time.
Scan Count Set trigger to stop acquisition after a certain number of scans have been acquired.
Software4
4-10

For all Start Trigger types, the device must be armed by pushing the Start Button on the main window. Data storage and display will not begin until the device triggers.
Data Tab
Figure 4-16. Data Tab
To save data to a file on the PC, select the Data tab and choose a filename. This data can be saved in Binary or Delimited (.csv) format. • Binary format is faster, and is recommended for slower PCs. Binary format also
creates files that are about 50% smaller than Delimited files. Binary files can be converted to “.csv” format later by selecting Tools --> Export Data File.
• Delimited format can use either commas or tabs as the delimiter, and the time can be saved as Elapsed Time or as a Date/Time stamp.
There are three “Save Behavior” options:
FIG 4-17. Data ‘Save Behavior’ Options
Auto-overwrite If a file with the same name already exists, it will be automatically overwritten when the Start Acquisition button is pressed.
Prompt for If a file with the same name already exists, a prompt overwrite will appear when the Start Acquisition button is pressed.
Add creation A timestamp is added to the filename, in the format time to YYYY-MM-DD-hhmm-ss. For example, MyFile.bin filename becomes MyFile-2011-1031-1121-03.bin. The timestamp will be automatically added
every time the Start Acquisition button is pressed, so multiple acquisitions can be easily stored to the same folder without revisiting the Device Configuration window.
Data DisplaysFrom the Main Window, you can choose to view live data from any combination of Gauges, Bars, Digital Displays, Tables, and Waveforms. These displays can be opened by clicking the appropriate button in the Main Window.
Software 4
4-11
NOTE:

Software4
4-12
Figure 4-18. Main Window Screen
Figure 4-19. Gauges Screen Figure 4-20. Bars Screen
Figure 4-21. Digital Screen Figure 4-22. Table Screen

Figure 4-23. Waveform Screen
Each Data Display can be customized by clicking the Options Icon .Each Data Display’s Options screen lets you choose which device channels to display in that window. Channels can be added or removed with the Add
Display and Delete Display buttons. Confirm changes by clicking theOK button. Start Acquisition by clicking the Play button on the Main Window. Acquisition can be stopped with the Stop button.
On the Waveforms screen it is also possible to adjust the graph range by clicking on the high and low values of the Y-axis and entering new values.
Figure 4-24. Sample Options Screen
Software 4
4-13

Software4
4-14
4.4 Power Line RejectionThe OM-DAQ-USB-2401 Series can take readings while making use of 50/60Hz line cycle rejection. While in the line cycle rejection mode, the maximum sample rate is as follows:• 50 Hz rejection: Scan Rate (SR) Range: 0.153Hz < SR <= 1Hz• 60 Hz rejection: Scan Rate (SR) Range: 1Hz < SR <= 1.667Hz
Figure 4-25. OM-DAQ-USB-2400 Block Diagram
4.5 Optical IsolationYour DAQ unit is optically isolated from its host PC by up to 500 Vdc. This means that an inadvertent application of such voltage to the DAQ unit will not affect the PC. In addition to isolation, the device maintains all sensitive acquisition-related circuitry external to the PC. This physical isolation of circuitry from the PC results in less noise and more accurate measurements.
4.6 A/D ConversionOM-DAQ-USB-2401 uses an extremely low-noise, 24-bit analog-to-digital (A/D) converters. They provide complete high-resolution measurement solutions for the most demanding applications.
Power LED
Power Jack
Power Supply
Local Power
Digital Isolators
IsolationBarrier
IsolatedPower Supply
USBController
Gain =x2, 1/8
Gain =x2, 1/8
Gain =x1,2,4,8,16
32,64
24–BitA/DPGAMUX
PGIA
PGIA
SE/DI
SE/DI
MUX
MUX
CJC
CJC
CJC
1MΩ
1MΩ
1MΩ
1MΩ
+12v
+12v
CJC
Activity LED
USBJack
4Analog Inputs
4Analog Inputs
+12v outputExcitation voltage
+12v outputExcitation voltage
4Analog Inputs
4Analog Inputs
+12v outputExcitation voltage
+12v outputExcitation voltage
MCU32Bit
OMB-DAQ-USB-2401 Series Block Diagram

The converter is comprised of a 4th-order, delta-sigma (∆∑) analog-to-digital (A/D) converter modulator followed by a programmable digital filter. A flexible input multiplexer handles differential or single-ended signals; the programmable filter allows the user to optimize between a resolution of up to 23 bits noise-free. Examples of scan sequences, with various channel resolutions and calibration arrangements, appear in Table 5-1 on page 5-2.
4.7 Input RangesYou can individually select the input range for each channel. For example, one channel could be used for volts and another for temperature. Omega’s OM-DAQ-USB-2401 automatically assigns the appropriate units depending on two factors:• The selected range and • Measurement unit preferences Measurement unit preferences can be modified from the Omega DAQ Central ‘Channels’ tag of the ‘Configuration’ window. Chapter 4 provides more detailed information.
The maximum voltage input range (full scale) is –10 to +10 Vdc. The lowest programmable voltage input range is -30mV to +30 mV. A complete list of the OM-DAQ-USB-2401’s programmable ranges appears on page 8-1.
Each analog input channel has the following user-specified measurement parameters:• Signal type: volts, or thermocouple type J, K, T, E, R, S, B, or N • Full scale voltage: from -10 to + 10 Vdc; with programmable ranges as
indicated on page 8-1. • Resolution/sample period: from 22.5 bit RMS at 0.153 samples/sec, to 17 bit
RMS at 50 samples/sec or greater
These rates were obtained with a 16-channel scan.
4.8 Analog Input ConfigurationThe OM-DAQ-USB-2401 includes 16 analog signal inputs which may be used as 16 single-ended inputs, 8 differential inputs, or as a combination of single-ended and differential inputs with up to 16 connections.Single-ended inputs are used with signals that share the same common low (COM), such as multiple batteries which have their negative sides connected in common. Differential inputs are required when signals do not share the same common low, such as in the typical use of thermocouples.
Software 4
4-15
NOTE:
NOTE:

In DAQ applications, thermocouples should not be connected single-ended. Doing so can result in noise and false readings. This is especially true when acquiring other high-amplitude signals in conjunction with thermocouple signals that are connected single-ended.
The DAQ units include built-in cold-junction compensation (CJC), which is automatically invoked when you select TC measurements. The OM-DAQ-USB-2401 automatically converts acquired voltage readings into compensated-linearized temperature readings. This DAQ system can make thermocouple and volts measurements concurrently.
Figure 4-26. OM-DAQ-USB-2401 Single-Ended and Differential Connections to Analog Input Channels Diagram
Figure Notes: *V1 and V2 are single-ended inputs. *V3 is a thermocouple and is a differential input.
4.9 Measurement Duration, Scan Time, and ResolutionIn relation to sampling analog input, the terms measurement duration, sample rate, and resolution have the following meanings: Measurement duration (per channel) – the amount of time used for sampling a channel’s input signal. The measurement durations for the OM-DAQ-USB-2401’s analog channels range from very slow (400 milliseconds for one measurement duration) to very fast (1 millisecond for one measurement duration).Scan Time (per scan) - The amount of time used for scanning (sampling) all selected channels’ input signal. For the OM-DAQ-USB-2401, the scan rates range from very slow (1 hour per scan) to very fast (1 milliseconds per scan).
Software4
4-16
NOTE:
V1
V2
COM
V3
V3+
V3-
A1H
A1L
COM
A2H
A2L
OM-DAQ-USB-2401TERMINAL BLOCK
(PARTIAL)

Resolution (Effective Number of Bits - ENOB, RMS) – The number of reliable data bits that exist for a signal’s measurement. The greater the resolution, the more detailed the reading. For example, with an increased resolution, a reading of 5.12 V could become 5.11896 V. The DAQ actually provides for 24 bits of data information; however, the accuracy of the least significant bits decreases as the measurement duration speeds up.
When measuring variable input signals (as opposed to relatively steady input signals), the variable signals will require more samples/sec to obtain a realistic signal representation.
At a scan time greater than 6.5 seconds, the last 1.5 bits are considered unreliable, resulting in a resolution of 22.5 bits. At a very fast scan time (1 millisecond), the seven least significant bits are unreliable, resulting in 17 bit accuracy. When you select the Scan Time you also determine the scan (sample) rate and resolution for the applicable channel. For the DAQ’s analog input applications, scan (sample) rates range from 0.0002778 samples/sec (1 hr/scan) up to 1000 samples/sec (m/scan), and corresponding resolution ranges from 22.5 to 17 bits.
4.10 Automatic CalibrationThe DAQ unit contains a built-in source for performing automatic self-calibrations. These calibrations can be performed between scans periodically throughout the measurement process, as indicated in the following figure. Such calibration ensures accurate measurements, even in environments that experience significant temperature fluctuations. The figure below shows an initial calibration followed by the scan/calibrate, scan/calibrate pattern.
The continuous calibration feature is built into the DAQ system. With Auto-Calibration enabled, you mayn experience slower sample rates especially with multiple channels turned on.
Figure 4-27. Calibration/Scan Arrangement
Software 4
4-17
NOTE:
NOTE:
0SCAN PERIOD
TIME
INITIAL CALIBRATION CALIBRATIONSCAN CALIBRATIONSCAN CALIBRATIONSCAN

4.11 Thermocouple MeasurementsThe OM-DAQ-USB-2401 provides effortless thermocouple (TC) measurements. The unit includes built-in cold-junction compensation (CJC), which is automatically invoked when you select TC measurements. The DAQ unit automatically converts acquired voltage readings into compensated-linearized temperature readings. A DAQ system can make thermocouple and volts measurements concurrently.
Software4
4-18

Section 5 – Signal Management 5.1 Channel Control and Expansion
In the OM-DAQ-USB-2401 system, the quantities and types of DAQ units used determine the system’s channel capacity. Up to 10 OM-DAQ-USB-2401s can be used with one host PC. See the Specifications for more detailed channel information.
5.2 Scan Time and Resolution5.2.1 Scan TimeScan Time (per scan) - The amount of time used for scanning (sampling) all selected channels’ input signal. For the OM-DAQ-USB-2401, the scan rates range from very slow (1 hour per scan) to very fast (1 milliseconds per scan).5.2.2 Resolution (Effective Number of Bits – ENOB, RMS)Resolution (Effective Number of Bits - ENOB, RMS) – The number of reliable data bits that exist for a signal’s measurement. The greater the resolution, the more detailed the reading, for example, with increased resolution a reading of 5.12 V could become 5.11896 V. The DAQ actually provides for 24 bits of data information; however, the accuracy of the least significant bits becomes less as the measurement duration speeds up. At a scan time greater than 6.5 seconds, the last 1.5 bits are considered unreliable, resulting in a resolution of 22.5 bits. At a very fast scan time ( 1 milliseconds), the seven most least significant bits are unreliable, resulting in 17 bit accuracy.When you select the Scan Time you also determine the scan(sample) rate and resolution for the applicable channel. For the DAQ’s analog input applications, scan(sample) rates range from 0.0002778 samples/sec up to 1000 samples/sec and corresponding resolution ranges from 22.5 to 17 bits.
5-1
Signal Management 5

Scan Rate vs. Resolution2
Resolution Scan Rate3,4(Scans (ENOB5
Speed Designation Scan Time1 (s) per Second - SPS) RMS)
Very Slow, 50 / 60 Hz rejection 3600s>=ST >= 6.5s 0.0002778=< SR <= 22.5 0.153
Slow, 50 Hz rejection 6.5s> ST >= 1s 0.153 < SR <=1 21
Slow, 60 Hz rejection 1s> ST >=0.6s 1 < SR <= 1.67 20.9
Medium, 60 Hz rejection 0.6s> ST >=0.3s 1.67 < SR <= 3.33 20.4
Medium, 50 Hz rejection 0.3s> ST >=0.2s 3.33 < SR <= 5 20.3
Medium 0.2s> ST >=0.05s 5 < SR <= 20 19.2
Fast 0.05s> ST >=0.02s 20 < SR <= 50 18.7
Very Fast 0.02s> ST >=0.001s 50< SR <= 1000 17
Table 5-1. Scan Rate vs. Resolution (ENOB, RMS)
Notes: 1. Scan Rate = 1/(Scan Time); 2. Each channel can have independent measurement duration and resolution. 3. The scan rates and resolutions shown were obtained with a 16-channel scan and with continuous self-calibration. 4. When measuring TC input, the CJC measurements will be treated as a channel. 5. ENOB, Effective Number of Bits
5.3 Under Sampling and AliasingWhen you select the Scan Time you also determine the scan rate and resolution for the applicable channel. As shown in the previous table, scan rates range from 0.0002778 scans/sec up to 1000 scans/sec and corresponding resolution ranges from 22.5 to 17 bit (for the DAQ’s analog input applications).When measuring highly variable input signals (as opposed to relatively steady input signals), the variable signals will require more scans/sec to obtain a realistic signal representation. When too few samples are taken, the term under sampling is often used. Under sampling tends to lower the signal’s graphed amplitude. This is also known as aliasing. In such cases, the inadequate number of samples results in a “flattening” of the signal. Gross under sampling can even result in a relatively flat line, even though the actual signal is a waveform.For best results the sample rate (scan rate) should be at least 10 times the measurement frequency. If possible it is recommended that you set the scan rate to 20 times the frequency of the input signal.
Signal Management5
5-2
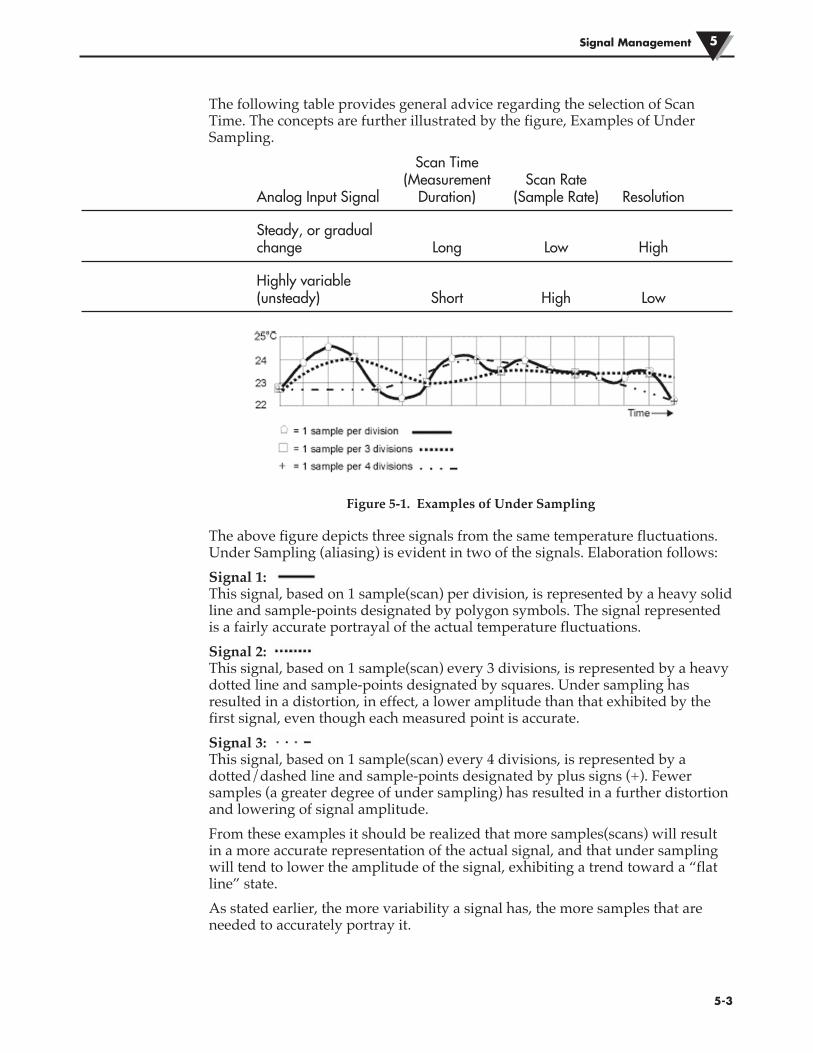
The following table provides general advice regarding the selection of Scan Time. The concepts are further illustrated by the figure, Examples of Under Sampling.
Scan Time (Measurement Scan Rate Analog Input Signal Duration) (Sample Rate) Resolution
Steady, or gradual change Long Low High
Highly variable (unsteady) Short High Low
Figure 5-1. Examples of Under Sampling
The above figure depicts three signals from the same temperature fluctuations. Under Sampling (aliasing) is evident in two of the signals. Elaboration follows:Signal 1: This signal, based on 1 sample(scan) per division, is represented by a heavy solid line and sample-points designated by polygon symbols. The signal represented is a fairly accurate portrayal of the actual temperature fluctuations.Signal 2: This signal, based on 1 sample(scan) every 3 divisions, is represented by a heavy dotted line and sample-points designated by squares. Under sampling has resulted in a distortion, in effect, a lower amplitude than that exhibited by the first signal, even though each measured point is accurate.Signal 3: This signal, based on 1 sample(scan) every 4 divisions, is represented by a dotted/dashed line and sample-points designated by plus signs (+). Fewer samples (a greater degree of under sampling) has resulted in a further distortion and lowering of signal amplitude.From these examples it should be realized that more samples(scans) will result in a more accurate representation of the actual signal, and that under sampling will tend to lower the amplitude of the signal, exhibiting a trend toward a “flat line” state.As stated earlier, the more variability a signal has, the more samples that are needed to accurately portray it.
Signal Management 5
5-3

5.4 TriggeringTriggering controls an acquisition cycle. Once the system is armed, a trigger is required to collect the data.The user must determine the triggering requirement based on the nature of the measurement and the amount of data needed to satisfy the system’s purpose. The trigger source can be a software command or an analog input channel on reaching a specified voltage level can be used to trigger the system.
Figure 5-2. Trigger Source Diagram
5.5 Signal Modes OM-DAQ-USB-2401 units operate in one of two modes, (1) single-ended mode, or (2) differential mode. These terms (single-ended mode and differential mode) apply to their use in this manual. In other sources these terms may be used in a different manner.Choosing between differential and single-ended inputs is made by software command. The following text briefly describes the two signal modes.Single-ended mode refers to a mode, or circuit set-up, in which a voltage is measured between one signal line and common ground voltage (Vcm). The measured voltage may be shared with other channels. The advantage of a single-ended non-differential mode [over differential mode] is that it provides for a higher channel count, for example: 16 channels instead of 8.
In DAQ applications, thermocouples should not be connected single-ended. Doing so can result in noise and false readings. This is especially true when acquiring other high-amplitude signals in conjunction with thermocouple signals that are connected single-ended.
Signal Management5
5-4
- FALLING
TYPE OFTRIGGER SOURCE
IMMEDIATESTART TIME
TRIGGER EVENT
TIME
SCAN PERIOD
SCAN GROUPPOST-TRIGGER SCAN COUNT
CHANNEL VALUE - RISING
NOTE:

Differential mode refers to a mode, or circuit set-up, in which a voltage is measured between two signal lines. The measured differential voltage is used for a single channel. An advantage of using differential inputs is that they reduce signal errors and the induction of noise resulting from ground current. The following illustration is an example of how noise is reduced, or canceled-out, when using the differential
Figure 5-3. Noise Reduction in Differential Mode
In the schematic, voltage signal S2 is subtracted from signal S1, resulting in the output signal shown. The noise spikes (having the same polarity, phase, and magnitude in each input signal) cancel each other out. This results in a clean differential signal (S1 - S2). Floating-differential measurements are made when low-level signals must be measured in the presence of high levels of common-mode noise (e.g., a non-grounded thermocouple). When the signal source has no direct connection to the system analog common, one must be provided. In Omega Daq the connection to analog common is provided in the circuitry with both the channel high and channel low connected to analog common. Both of these connections to common are made through 1 MΩ resistors. No additional connections of channel high and low to common should be made.
Figure 5-4. Example of Floating Differential Circuit
Differential signal hookups do not provide isolation or any kind of circuit protection.
Signal Management 5
5-5
NOTE:

Resolution: An analog-to-digital converter (ADC) converts an analog voltage to a digital number. The digital number represents the input voltage in discrete steps with finite resolution. ADC resolution is determined by the number of bits that represent the digital number. An n-bit ADC has a resolution of 1 part in 2n. Thus, 12 and 16 bit resolutions are as follows:• 12-bit resolution: 1 part in 4096 (212), corresponding to 2.44 mV in a 10 V
range.• 16-bit resolution: 1 part in 65,536 (216), corresponding to 0.153 mV in a 10 V
range.
5.6 System NoiseLaboratory and industrial environments often have multiple sources of electrical noise. An AC power line is a source of 50/60 Hz noise. Heavy equipment (air conditioners, elevators, pumps, etc.) can be a source of noise, particularly when turned on and off. Local radio stations are a source of high-frequency noise, and computers and other electronic equipment can create noise in a multitude of frequency ranges. Thus, an absolute noise-free environment for data acquisition is not realistic. Fortunately, noise-reduction techniques such as averaging, filtering, differential voltage measurement, and shielding are available to reduce noise to an acceptable level.
5.7 AveragingCertain acquisition programs apply averaging after several samples have been collected. Depending on the nature of the noise, averaging can reduce noise by the square root of the number of averaged samples. Although averaging can be effective, it suffers from several drawbacks. Noise in measurements only decreases as the square root of the number of measurements—reducing RMS noise significantly may require many samples. Thus, averaging is suited to low-speed applications that can provide many samples.
Only random noise is reduced or eliminated by averaging. Averaging does not reduce or eliminate periodic signals.
5.8 Analog FilteringA filter is an analog circuit element that attenuates an incoming signal according to its frequency. A lowpass filter attenuates frequencies above the cutoff frequency. Conversely, a high-pass filter attenuates frequencies below the cutoff. As frequency increases beyond the cutoff point, the attenuation of a singlepole, low-pass filter increases slowly. Multi-pole filters provide greater attenuation beyond the cutoff frequency but may introduce phase (time delay) problems that could affect some applications.
Signal Management5
5-6
NOTE:

5.9 Input and Source ImpedanceAs illustrated below, the input impedance (Ri) of an analog-to-digital converter combines with the transducer’s source impedance (Rs) forming a voltage divider. This divider distorts the voltage being read at the analog-to-digital converter. The actual voltage read is represented by the equation: VADC = VT x Ri / (Rs + Ri)The input impedance (Ri) of most ADCs is at least 1 MΩ; low source impedance (Rs) usually presents no problem. Some transducers, such as piezoelectric types, have high source impedance, and should therefore be used with a charge-sensitive amplifier of low output impedance. As described in the following paragraphs, multiplexing can greatly reduce the effective input impedance of an analog-to-digital converter.
Figure 5-5. Analog to Digital Converter
5.10 CrosstalkCrosstalk is a type of noise related to source impedance and capacitance, in which signals from one channel leak into an adjacent channel, resulting in interference or signal distortion. The impact of source impedance and stray capacitance can be estimated by using the following equation. T = RC Where T is the time constant, R is the source impedance, and C is the stray capacitance.High source (transducer) impedance can be a problem in multiplexed A/D systems. When using more than 1 channel, the channel input signals are multiplexed into the A/D. The multiplexer samples each signal and then switches to the next input signal. A high-impedance input interacts with the multiplexer’s stray capacitance and causes crosstalk and inaccuracies in the A/D sample.A solution to high source impedance in relation to multiplexers involves the use of buffers. The term buffer has several meanings; but in this case, buffer refers to an operational amplifier having high input impedance but very low output impedance. Placing such a buffer on each channel (between the transducer and the multiplexer) prevents the multiplexer’s stray capacitance from combining with the high input impedance. This use of a buffer also stops transient signals from propagating backwards from the multiplexer to the transducer.
Signal Management 5
5-7

Section 6 - CE Conformity6.1 OM-DAQ-USB-2401 Design for CE Conformity
The OM-DAQ-USB-2401 has been designed to meet requirements as outlined in European Community EMC Directive EN61326. Three ferrite cores are included in the OM-DAQ-USB-2401 package. When powering the unit using the adapter, the ferrite cores must be attached to both the USB cable and the power adapter to meet EFT (Electrical Fast Transient) specifications. Refer to Figure 6-1.
Figure 6-1. OM-DAQ-USB-2401 with Ferrite Cores Installed
To maintain CE certification and install the ferrite cores, perform the following: 1. Using a small screw driver or other suitable instrument, unsnap the ferrite
core to open it (as shown in Figure 6-2). 2. Install one ferrite core on each far end of the USB cable, and one ferrite core in
the middle of the cable (as shown in Figure 6-1). 3. Install one ferrite core on each far end of the power adapter, and one ferrite
core in the middle of the cable (as shown in Figure 6-1).
6-1
CE Conformity6
(MIDPOINT OF CABLES)
USB
POWERADAPTER

Figure 6-2 Ferrite Core
The ferrite cores may be removed from the DAQ unit; however, in order to conform to CE standards, all of the ferrite cores must be attached to the USB cable and power adapter.
If the user is not using the power adapter but relying on power from the host USB connection, no ferrites are required.
CE Conformity 6
6-2
UNSNAPFERRITE
CORESHERE
NOTE:

Section 7 – Troubleshooting7.1 Basic Checklist
Power – Check USB cable connection. The green “PWR IND” LED should be lit on the DAQ device. If using a powered USB hub, make sure its power cable is plugged in.Signal – Check signal lines and connections. Connectors must be free of corrosion. Signal lines should be undamaged and free of sharp bends and twists. Signal paths should avoid potential sources of noise (high voltage and electromagnetic interference).Device Selection – Make sure the serial number selected in the software matches the serial number of your device. Each data display will show the serial number (or Nickname, if assigned) of the device it is currently displaying. “DAQ2401DEMO” is a software demo device which outputs a sine wave.Software Updates – A software update may be available. In DAQ Central, choose “Check For Updates” from the Help Menu on an Internet-connected PC.
7.2 Symptoms and SolutionsUSB drivers are not found or hardware installation fails. This can happen if the device is plugged into the computer’s USB port before software installation is complete. The program “C:\Program Files\Omega\DAQ Central\USB Drivers\CDM20814_Setup.exe” can be run to reinstall the USB drivers. All non-critical USB devices should be unplugged while this program runs, including all DAQ devices. The “20814” portion of this filename may be different, and the “DAQ Central\USB Drivers” directory may be in a different location if an alternate directory was chosen during installation.Data does not appear or data does not make sense. See “Device Selection” under Basic Checklist. Stop the acquisition and check the Triggers tab of the Device Configuration window. A trigger may be set to start acquisition at a future date. Try setting both Start and Stop triggers to manual and restarting acquisition.The Device Configuration screen is grayed out. A data acquisition may be running. A device’s configuration can not be edited during acquisition.The waveform scale is too small/large The vertical scale can be adjusted by clicking the max and min values on the y-axis. The horizontal scale can be adjusted from the Waveform Options screen, which is accessed by clicking the Options button at the top of the Waveform window. The “Scans to graph” setting determines how many data points (scans) will appear along the x-axis. A higher number shows a greater span of time, but uses more of the PC’s RAM and may slow it down.The main DAQ Central window does not respond. A configuration window may be open. Configuration windows must be closed before continuing to interact with the software. Check your desktop and Windows taskbar for a Device Configuration window or an Options window.The device does not appear in the device list. Select “Detect Devices” from the Device menu to re-scan for connected devices. See also “Power” under “Basic Checklist” and “USB drivers…” in this section.Thermocouple inputs are noisy. If you experience noise from thermocouple wires, you can connect a 100K resistor from AxL to COM to eliminate some noise.7-1
Troubleshooting7

Section 8 – Service & CalibrationYour Omega DAQ components have been built and factory calibrated to meet or exceed the specifications listed here in this manual. The following section provides information on how to have your device serviced.
8.1 Service & CalibrationIf any of your DAQ system components require service or calibration, please call our Customer Service Department at 1-800-622-2378 or 203-359-1660. They will assist you in arranging the return and service of your device. We can also be reached on the Internet at www.omega.com, e-mail: [email protected]
8-1
Service and Calibration 8

Section 9 – SpecificationsGeneral Isolation: 500V from PCExternal Excitation Output Voltage: +12v DC Regulated, Maximum total current output 67mAPower Requirements: Powered from USB port max 500 mA,
or from external 7.5 to 12 Vdc, (1.0 A recommended)
Thermocouple Types: J, K, T, E, R, S, B, NCold-Junction Compensation Accuracy: ±1.0°C Isolation: 500 Vdc from PC commonChannel Capacities: Volts Inputs: 8 DE, or 16 SE Thermocouple Inputs: 8 DE * DE = Differential Mode, SE = Single ended modeEnvironmental: 0 to 50°C (0 to 122°F)
95% RH (non-condensing)Operating Temperature: 0 to 50°C (32 to 122°F), 0 to 95% RH non –condensingAnalog Input Accuracy (exclusive of noise) Differential Input: 0.015% of reading + .004% of range
(In very slow mode)+ 10uV (exclusive of noise)
Single-end Input: 0.05% of reading + 0.01% of range (In very slow mode) + 50uV (exclusive of noise)
Storage Temperature: -40 to 85°C (-40 to 185°F)Weight: 0.5 lbs (0.23 kg)Dimensions: 107 W x 128 L x 39mm H (4.2 x 5.1 x 1.5")Input Voltage Range: Software-programmable On A
Per-channel BasisDifferential/Single-ended: -10 to 10V -5 to 5V -2.5 to 2.5V -2 to 2V -1 to V -500 to 500 mV -250 to 250 mV -125 to 125 mV -75 to 75 mV -30 to 30 mV
9-1
Specifications9

Thermocouple Input Range: Type J: -18 to 1200°C (0 to 2192°F) Type K: -129 to 1372°C (-200 to 2502°F) Type T: -101 to 400°C (-150 to 752°F) Type E: -184 to 1000°C (-300 to 1832°F) Type R: 204 to 1768°C (400 to 3214°F) Type S: 204 to 1768°C (400 to 3214°F) Type B: 538 to 1820°C (1000 to 3308°F) Type N: -129 to 1300°C (-200 to 2372°F)
Cold Junction Compensation Accuracy: ±1.0°CInput Voltage Range Relative To Analog Common (COM): -10 to +10 Vdc Input Resistance: 1MΩ (single ended);
2MΩ (differential); ±5%Absolute Maximum Input Voltage: ±20 V maximum,
relative to analog commonWarm-up: 1 hour to rated specificationsUSB Device Type: USB 2.0 (full-speed)Device Compatibility: USB 1.1, USB 2.0Power Supply: From USB(Port) or 9 Vdc adaptor External Power Source: Required when used with a bus-powered
hub;DIN Rail Mounted For Rack Application: OptionalOpen Thermocouple Detect: Automatically enable when a channel is configured for a thermocouple sensor.Limitations of the Total Recording Memory Size: 1 G or 500M (in PC) MCU: 32 bit
All temperature specifications assume unit is held in relatively still air environment.
UNIV-AC-100/240, the external power supply is a Universal Power Adaptor. It is a 100-240 VAC to+9 Vdc output adaptor
Specifications 9
9-2
NOTE:
NOTE:

Table 9-1. Thermocouple Accuracy (ºC) for OM-DAQ-USB-2401
TC Type Temp. Typical Fast (°C) Slow
-18 1.3 3.8 J 0 1.1 3 1200 0.9 2.5
-129 1.8 5 K 0 1.4 3.9 1372 1.3 3.7
-101 1.6 4.5 T 0 1.4 4 400 1 2.9
-184 1.2 3.4 E 0 0.9 2.6 1000 0.7 1.9
204 5.2 14.8 R 700 4.6 13.1 1768 3.9 11
204 5.6 16 S 700 5.2 14.7 1768 4.6 12.8
B 538 7.9 13.7 1820 4.8 13.7
-129 2.6 7.3 N 0 2 5.9 1300 1.4 4
Thermocouple accuracy excludes cold junction compensation error.
Specifications9
9-3
NOTE:

10.1 International Usage & CE Marking The OM-DAQ-USB-2401 multiple channel USB data acquisition module is CE marked and certified for use in several European countries. Please contact OMEGA for information on International Regulatory Compliance for each country.It is your (the user’s) responsibility to insure that these products are operated within the guidelines here in this manual and in conformance with all local or national regulations and laws.
10-1
Approvals and Regulatory Compliance 10

NOTES:
10-2

NOTES:
10-3

NOTES:
10-4

WARRANTY/DISCLAIMEROMEGA ENGINEERING, INC. warrants this unit to be free of defects in materials and workmanship for a period of 13 months from date of purchase. OMEGA’s WARRANTY adds an additional one (1) month grace period to the normal one (1) year product warranty to cover handling and shipping time. This ensures that OMEGA’s customers receive maximum coverage on each product. If the unit malfunctions, it must be returned to the factory for evaluation. OMEGA’s Customer Service Department will issue an Authorized Return (AR) number immediately upon phone or written request. Upon examination by OMEGA, if the unit is found to be defective, it will be repaired or replaced at no charge. OMEGA’s WARRANTY does not apply to defects resulting from any action of the purchaser, including but not limited to mishandling, improper interfacing, operation outside of design limits, improper repair, or unauthorized modification. This WARRANTY is VOID if the unit shows evidence of having been tampered with or shows evidence of having been damaged as a result of excessive corrosion; or current, heat, moisture or vibration; improper specification; misapplication; misuse or other operating conditions outside of OMEGA’s control. Components in which wear is not warranted, include but are not limited to contact points, fuses, and triacs.OMEGA is pleased to offer suggestions on the use of its various products. However, OMEGA neither assumes responsibility for any omissions or errors nor assumes liability for any damages that result from the use of its products in accordance with information provided by OMEGA, either verbal or written. OMEGA warrants only that the parts manufactured by the company will be as specified and free of defects. OMEGA MAKES NO OTHER WARRANTIES OR REPRESENTATIONS OF ANY KIND WHATSOEVER, EXPRESSED OR IMPLIED, EXCEPT THAT OF TITLE, AND ALL IMPLIED WARRANTIES INCLUDING ANY WARRANTY OF MERCHANTABILITY AND FITNESS FOR A PARTICULAR PURPOSE ARE HEREBY DISCLAIMED. LIMITATION OF LIABILITY: The remedies of purchaser set forth herein are exclusive, and the total liability of OMEGA with respect to this order, whether based on contract, warranty, negligence, indemnification, strict liability or otherwise, shall not exceed the purchase price of the component upon which liability is based. In no event shall OMEGA be liable for consequential, incidental or special damages.CONDITIONS: Equipment sold by OMEGA is not intended to be used, nor shall it be used: (1) as a “Basic Component” under 10 CFR 21 (NRC), used in or with any nuclear installation or activity; or (2) in medical applications or used on humans. Should any Product(s) be used in or with any nuclear installation or activity, medical application, used on humans, or misused in any way, OMEGA assumes no responsibility as set forth in our basic WARRANTY/DISCLAIMER language, and, additionally, purchaser will indemnify OMEGA and hold OMEGA harmless from any liability or damage whatsoever arising out of the use of the Product(s) in such a manner.
OMEGA’s policy is to make running changes, not model changes, whenever an improvement is possible. This affords our customers the latest in technology and engineering.OMEGA is a registered trademark of OMEGA ENGINEERING, INC.© Copyright 2014 OMEGA ENGINEERING, INC. All rights reserved. This document may not be copied, photocopied, reproduced, translated, or reduced to any electronic medium or machine-readable form, in whole or in part, without the prior written consent of OMEGA ENGINEERING, INC.
FOR WARRANTY RETURNS, please have the following information available BEFORE contacting OMEGA:1. Purchase Order number under which the product
was PURCHASED,2. Model and serial number of the product under
warranty, and3. Repair instructions and/or specific problems relative to the product.
FOR NON-WARRANTY REPAIRS, consult OMEGA for current repair charges. Have the following information available BEFORE contacting OMEGA:1. Purchase Order number to cover the COST
of the repair,2. Model and serial number of the product, and3. Repair instructions and/or specific problems relative to the product.
RETURN REQUESTS/INQUIRIESDirect all warranty and repair requests/inquiries to the OMEGA Customer Service Department. BEFORE RETURNING ANY PRODUCT(S) TO OMEGA, PURCHASER MUST OBTAIN AN AUTHORIZED RETURN (AR) NUMBER FROM OMEGA’S CUSTOMER SERVICE DEPARTMENT (IN ORDER TO AVOID PROCESSING DELAYS). The assigned AR number should then be marked on the outside of the return package and on any correspondence.The purchaser is responsible for shipping charges, freight, insurance and proper packaging to prevent breakage in transit.

M5025/0514
Where Do I Find Everything I Need for Process Measurement and Control?
OMEGA…Of Course!Shop online at omega.com SM
TEMPERATUREMU Thermocouple, RTD & Thermistor Probes, Connectors, Panels & Assemblies MU Wire: Thermocouple, RTD & ThermistorMU Calibrators & Ice Point ReferencesMU Recorders, Controllers & Process MonitorsMU Infrared Pyrometers
PRESSURE, STRAIN AND FORCEMU Transducers & Strain GagesMU Load Cells & Pressure GagesMU Displacement TransducersMU Instrumentation & Accessories
FLOW/LEVELMU Rotameters, Gas Mass Flowmeters & Flow ComputersMU Air Velocity IndicatorsMU Turbine/Paddlewheel SystemsMU Totalizers & Batch Controllers
pH/CONDUCTIVITYMU pH Electrodes, Testers & AccessoriesMU Benchtop/Laboratory MetersMU Controllers, Calibrators, Simulators & PumpsMU Industrial pH & Conductivity Equipment
DATA ACQUISITIONMU Data Acquisition & Engineering SoftwareMU Communications-Based Acquisition SystemsMU Plug-in Cards for Apple, IBM & CompatiblesMU Data Logging SystemsMU Recorders, Printers & Plotters
HEATERSMU Heating CableMU Cartridge & Strip HeatersMU Immersion & Band HeatersMU Flexible HeatersMU Laboratory Heaters
ENVIRONMENTAL MONITORING AND CONTROLMU Metering & Control InstrumentationMU RefractometersMU Pumps & TubingMU Air, Soil & Water MonitorsMU Industrial Water & Wastewater TreatmentMU pH, Conductivity & Dissolved Oxygen Instruments