
User Guide For ECC Applicants -...
17
User Guide For ECC Applicants
Transcript of User Guide For ECC Applicants -...

User Guide
For ECC Applicants
2
User Guide for ECC Applicants
Please take a moment to read the instructions below before using the ECC Online
Application System.
This document includes the following:
A. Accessing the System
B. Account Registration
C. Recovering your password
D. Changing User Account Security Information
a. Changing Password
b. Changing Password Recovery Information
E. Logging in and out the system
F. Preparing an ECC Application
a. Project Type Coverage
b. Project Type Description
c. Project Area and Geo-Coordinates
d. Project Area in the Map
e. Basic Project Information
f. IEE Checklist & Other Requirements
g. Order of Payment – Application Fee
h. Uploading ECC Application Requirements
i. Resuming the Pending ECC Application
j. Submitting the ECC Application
G. Verifying Status of ECC Application
H. Application for Action / Additional Information Required
a. Viewing the required action
b. Attaching the required documents
I. Downloading the Decision Document (ECC/Denial Letter)
J. Uploading of the Notarized ECC
K. ECC Publication in EMB Website
L. Technical Support
3
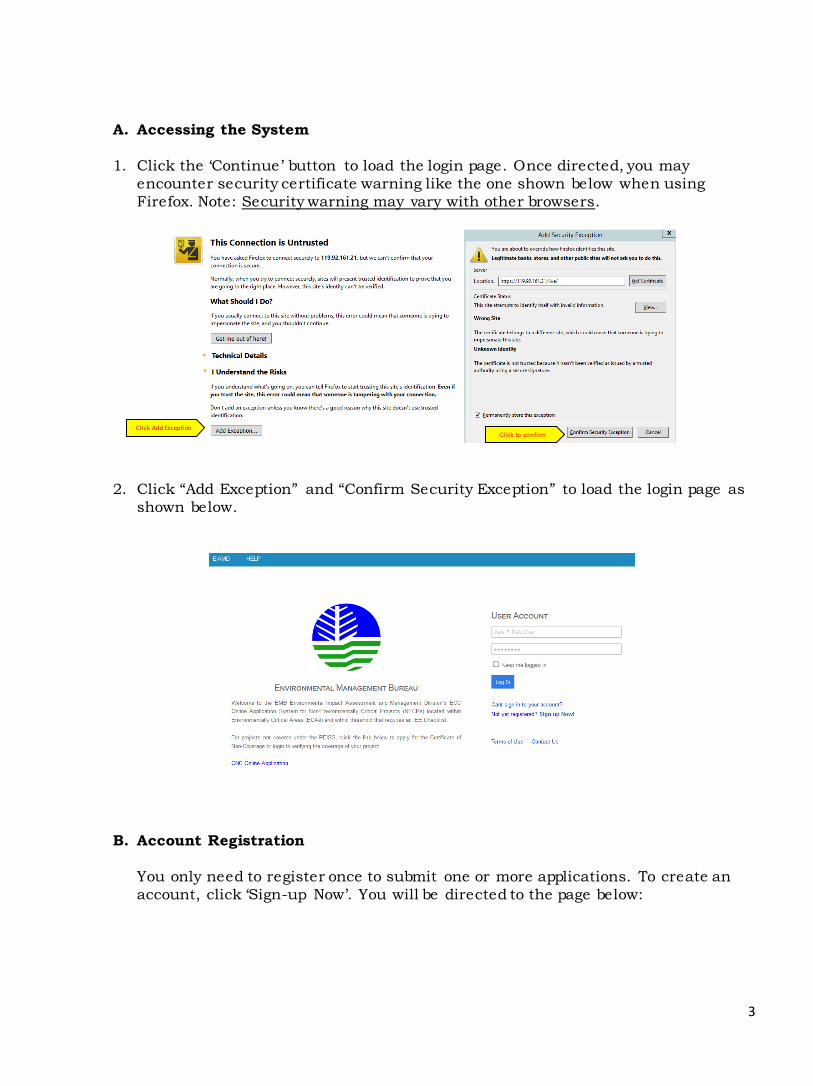
A. Accessing the System
1. Click the ‘Continue’ button to load the login page. Once directed, you may
encounter security certificate warning like the one shown below when using
Firefox. Note: Security warning may vary with other browsers.
2. Click “Add Exception” and “Confirm Security Exception” to load the login page as
shown below.
B. Account Registration
You only need to register once to submit one or more applications. To create an
account, click ‘Sign-up Now’. You will be directed to the page below:
Click Add Exception Click to confirm
4
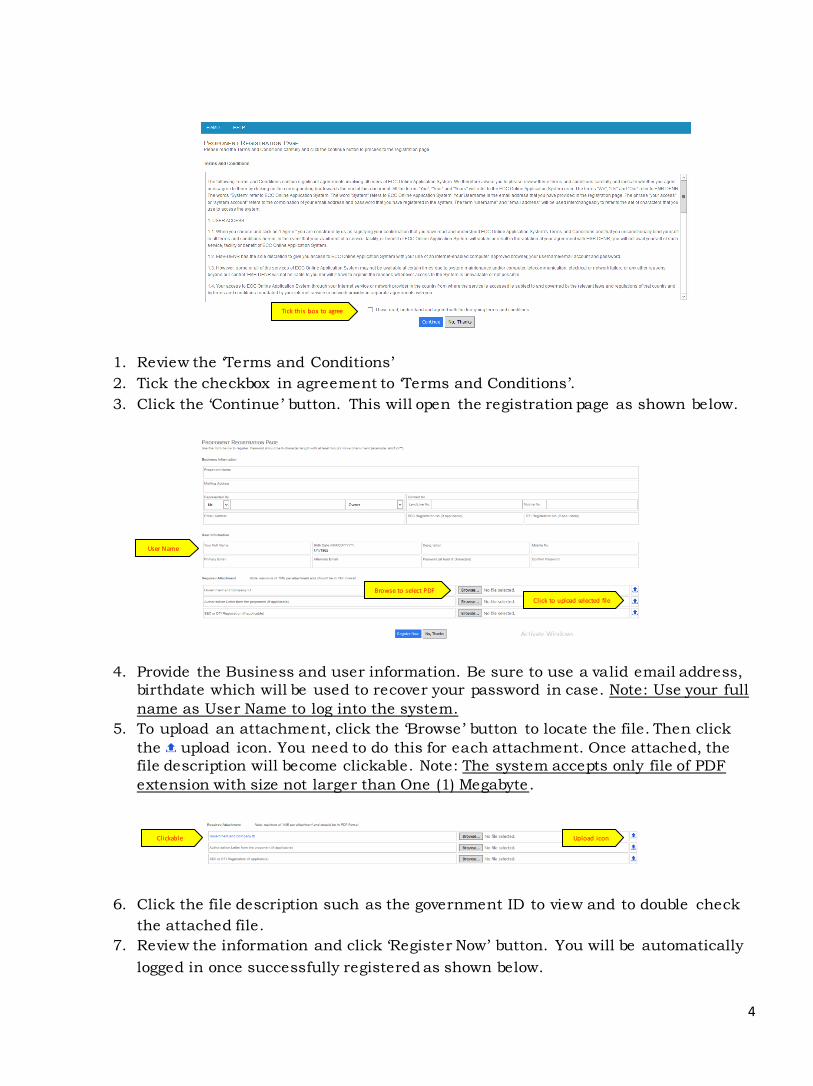
1. Review the ‘Terms and Conditions’
2. Tick the checkbox in agreement to ‘Terms and Conditions’.
3. Click the ‘Continue’ button. This will open the registration page as shown below.
4. Provide the Business and user information. Be sure to use a valid email address,
birthdate which will be used to recover your password in case. Note: Use your full
name as User Name to log into the system.
5. To upload an attachment, click the ‘Browse’ button to locate the file. Then click
the upload icon. You need to do this for each attachment. Once attached, the
file description will become clickable. Note: The system accepts only file of PDF
extension with size not larger than One (1) Megabyte.
6. Click the file description such as the government ID to view and to double check
the attached file.
7. Review the information and click ‘Register Now’ button. You will be automatically
logged in once successfully registered as shown below.
Clickable Upload icon
Browse to select PDF
Tick this box to agree
User Name
Click to upload selected file

5
C. Recovering your password
In the event that you forgot your password, follow the steps below. The password
will be sent to the email address you used during the registration.
1. From the login page, click ‘Can’t sign-in to your account’ to open the recovery
page as shown below.
2. Provide the Surname, email address and Birth Date you used during registration.
3. Click ‘Recover’ button.
4. Check your email for the system notification.
D. Changing User Account Security Information
For security purposes, it is recommended that you change your password right after
logging in for the first time and also periodically. Note: Password should be at least 8
characters in length with a combination of alpha and non-alphanumeric characters.
Changing Password
1. Hover your mouse over the Welcome menu located at the right top portion of the
page.
User Name

6
2. Click ‘Manage Account’
3. Provide the ‘Current’ and ‘New password’
4. Click ‘Change’ Button
Changing Password Recovery Information
Email Address and birthdate are used when recovering your password. You can
update your mobile number and email address using the ‘manage account’ page, as
shown above.
1. Provide the new information and click the ‘Update’ button.
E. Logging in and out of the system
1. From the log in page, provide the full name and password you used during the
registration.
2. To log out, hover your mouse on the welcome menu located at the top-right
portion of the page.
Sign out
To open security page

7
F. Preparing an ECC Application
Once logged in you can now start drafting an application. You can draft more than one
application if you have multiple projects. Note: You need to reach step 6 to save the draft
application.
1. From the menu, click ‘New Application’
2. In Step 1, answer the question. Note: Project with existing ECC or established
prior to 1982 with expansion or modification is not covered by the ECC Online
Application System. You have to personally visit the EMB regional office where the
project is located.
3. Click the ‘Next’ button to go to Step 2 for the project type.
Project Type Coverage
4. In Step 2, provide the keyword for the major type or component of your proposed
project. In this case ‘water’. Note: Refer to Annex A of the Revised Guidelines for
Coverage Screening and Standardized Requirement under Philippine PEIS System
(EMB MC 005-2014).
5. Click the Search icon.
6. From the search result, locate the appropriate type of project.
7. Provide the capacity and click the select icon. Note: Capacity should include
numeric and period only. Comma and spaces not allowed.
Click to draft application
Click to forward to next step
Provide keyword and click search icon
Enter capacity and
click select icon

8
You will be able to proceed to Step 3 for project description if the type and
capacity of your proposed project requires an IEE Checklist
Project Type Description
8. In Step 3, provide the description of the proposed project and other details. Note:
Maximum of 4000 characters only including spaces.
Project Area and Geo-Coordinates
9. Click ‘Next’ button to proceed to Step 4 for the geo-coordinates.
10.In Step 4, for project such as road, click the Line shape, else click the
Polygon. Note: Each shape represent a single project area.
11.Click the OK button to add a line or polygon. The new area will not appear in the
dropdown list. In this case, Area 1.
You can copy and paste the project description, however, total
characters should not exceed 4000 characters including spaces
Click shape
to add
area
Click ok
Area is added
Total Areas added

9
12.Enter the coordinates then click ‘Add Point’. You need a minimum of 2 points for
line area and 3 points for polygon. Note: You have to pad “0” to comply with the
number of characters in the longitude and latitude. Please see example below.
Note: Coordinates should be entered in sequence from point to point. Make sure
to double check the coordinates before and after adding the point.
13.You can remove erroneous point by clicking the corresponding delete icon.
14.To remove the whole area, click ‘Remove Area’ button. Note: This action will
permanently remove the selected area and its coordinates.
Project Area in the Map
15.You can view the project area in the google map by clicking the Map Icon.
Note: Google map may take some time to completely render in the page. Some
browsers will also prevent a pop-up window from displaying, as shown below.
16. Click the ‘Options’ and select ‘Allow pop-ups from…’
14o 12” 3’ should be entered as 14o 012” 003.0000’
Click to remove the
corresponding point only
Click to view in google map
Click and
select allow
10
17. Double click the mouse left or right button inside the map to zoom in and out or
press the left mouse button while dragging the map to move focus.
18. Close the map and click ‘Next’ to forward to Step 5 for the Basic Project
Information.
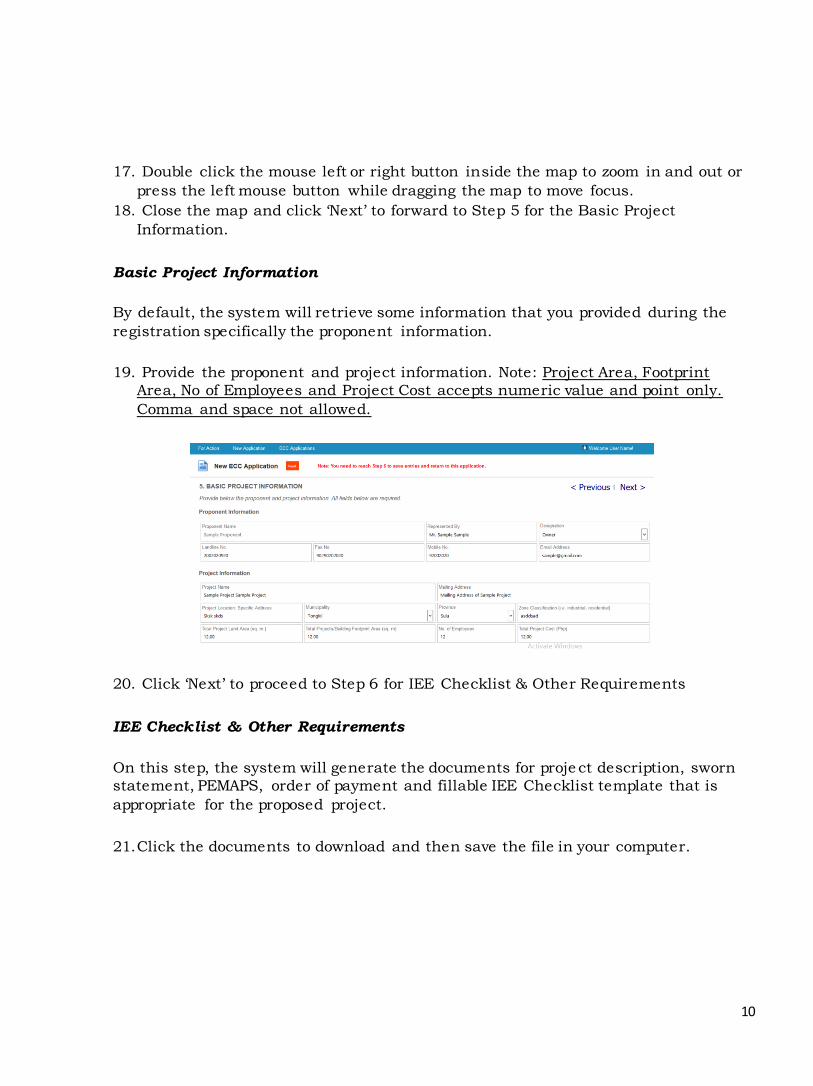
Basic Project Information
By default, the system will retrieve some information that you provided during the
registration specifically the proponent information.
19. Provide the proponent and project information. Note: Project Area, Footprint
Area, No of Employees and Project Cost accepts numeric value and point only.
Comma and space not allowed.
20. Click ‘Next’ to proceed to Step 6 for IEE Checklist & Other Requirements
IEE Checklist & Other Requirements
On this step, the system will generate the documents for proje ct description, sworn
statement, PEMAPS, order of payment and fillable IEE Checklist template that is
appropriate for the proposed project.
21.Click the documents to download and then save the file in your computer.

11
Note: For fillable pdf, you need to download and save the file in your computer to
be able to edit and save changes.
22. Print all documents and fill-up the forms for notary.
Order of Payment – Application Fee
23. Using the Order of Payment, pay the corresponding application fee in the nearest
LandBank branch.
24. Click ‘Next’ to proceed to Step 7 for the complete list of ECC application
requirements.
Uploading ECC Application Requirements
In this step, the core ECC application requirements for your proposed project are
listed. Note: There may be special requirements unique to your project that were
not included in the list. In this case, additional information will be required by the
EMB during the application process.
25. Upload the initial documents such as the notarized IEE Checklist, Bank Receipt
and other available documents. Note: The system allows only PDF file not larger
than 10MB.
26. Click the ‘browse’ button to select the file
27. Click the corresponding upload icon.
Click to download
and save files to
your computer
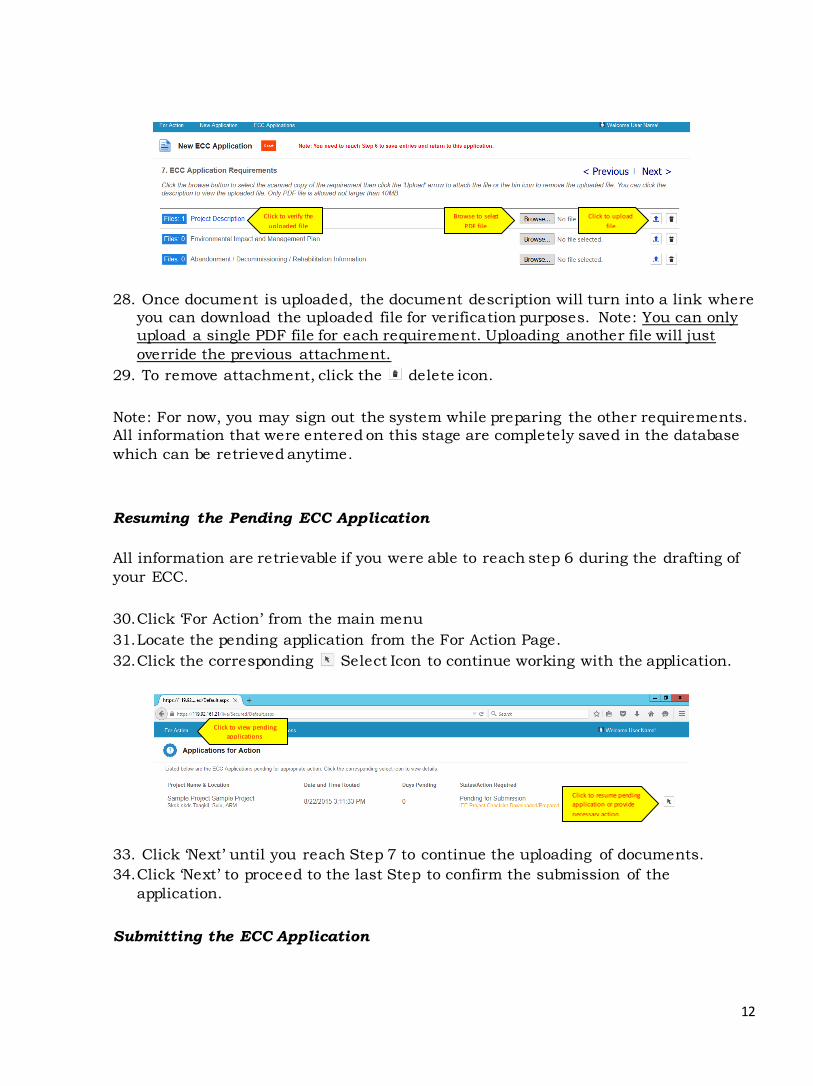
12
28. Once document is uploaded, the document description will turn into a link where
you can download the uploaded file for verification purposes. Note: You can only
upload a single PDF file for each requirement. Uploading another file will just
override the previous attachment.
29. To remove attachment, click the delete icon.
Note: For now, you may sign out the system while preparing the other requirements.
All information that were entered on this stage are completely saved in the database
which can be retrieved anytime.
Resuming the Pending ECC Application
All information are retrievable if you were able to reach step 6 during the drafting of
your ECC.
30.Click ‘For Action’ from the main menu
31.Locate the pending application from the For Action Page.
32.Click the corresponding Select Icon to continue working with the application.
33. Click ‘Next’ until you reach Step 7 to continue the uploading of documents.
34.Click ‘Next’ to proceed to the last Step to confirm the submission of the
application.
Submitting the ECC Application
Browse to select
PDF file
Click to upload
file
Click to verify the
uploaded file
Click to resume pending
application or provide
necessary action
Click to view pending
applications

13
Take time to review the application before submitting online. Make sure that you
have also attached the required documents.
35. Click ‘Next’ to open the confirmation window.
36. Click ‘Ok’ to confirm the submission.
Your application will be received by the default recipient of the EMB regional office
where your project is located.
G. Verifying Status of ECC Application
Once your application is submitted, you can verify its status and location by clicking
the ‘ECC Applications’ from the menu.
1. Click ‘ECC Applications’ from the menu
2. Locate the Application from the list to view status and location.

14
3. You can also click the select icon to view routing history.
H. Application for Action / Additional Information Required
There are instances when the application may be returned to you for clarification,
additional information or for the notarization of ECC. In this case, the application
requires appropriate action on your part. All returned applications will appear in
your ‘For action’ page. This page serves as your inbox.
Viewing the required action
1. Click the ‘For Action’ from the menu.
2. Locate the application from the list and click the select icon to open the
application.
3. Click the select icon to view details and provide action. This will open the
application Action Page as shown below.
To view list of
applications
Status and
current location
Routing History
Application for Action
Click to open
application Required Action

15
4. Click the status in Recent Activity to view any associated attachments such as
evaluation report.
Attaching the required documents
When an application is returned for additional information, the required files will be
added in the list of the required documents. This may include the previous
attachment that did not pass during the evaluation.
1. Select the required document from the list
2. Click ‘Browse ’ to select the corresponding electronic copy of the document. Note:
Only PDF File not larger than 10MBPs is allowed.
3. Click the upload icon. The uploaded documents will appear in the list as shown
below.
4. Double check the attached documents by clicking the uploaded files.
5. Provide Remarks
6. Click the ‘Return’ button
I. Downloading the Decision Document (ECC/Denial Letter)
Once the ECC Application is approved, it will appear in your ‘For Action’ page for
downloading and then uploading of the notarized version of the document.
1. Click ‘For Action’ from the menu
2. Locate the approved application from the list
Required Action
Select Upload
Uploaded file

16
3. Click the select icon to open the Action Page
4. From the action page, click the action required in the ‘Recent Activity’ to download
associated attachment, in this case the signed ECC.
5. Print the ECC and affix your signature for notary.
6. Return to this page to upload the notarized copy of the ECC.
J. Uploading of the Notarized ECC
The notarized ECC shall be submitted back to EMB to complete the application
process. It is recommended that you upload the full version (all pages) of the
notarized ECC.
1. Click ‘For Action’ from the menu
2. Locate the approved application from the list
3. Click the select icon to open the Action Page
4. Select ‘Notarized ECC’ from the list of required attachment.
5. Click browser to select the scanned copy of the Notarized ECC
6. Click the Upload icon.
7. Provide the Remarks
8. Click the ‘Return’ button
Click to view and download the signed ECC
Should be
selected
Upload Icon

17
K. ECC Publication in EMB Website
The Notarized ECC together with the signed version will become accessible to other
agencies and the public from the E-Library of the EMB website.
1. Click ‘ECC Online Application – ECC Issued. This will direct you to the list of
issued ECCs.
2. Locate your project from the List of Issued ECCs.
3. Click ‘View Certificate’
L. Technical Support
For technical concerns, please call (02) 920-2232 or send an email to
[email protected]. Please include screenshots of the page before and after you
encounter the error to help expedite in resolving the issue.
Click to view
certificate
ECC
Certificate
s
Search