User guide - client software - Amazon S3 · User guide - client software Introduction Installation...
17
User guide - client software Introduction Installation Update Getting started Application overview Screen sharing User list Set language Eco mode (low bandwidth settings) Selecting camera, microphone and speaker Advanced settings System requirements & Network settings Last updated on June 13, 2017 © 2016 alfatraining Bildungszentrum e.K. 1
Transcript of User guide - client software - Amazon S3 · User guide - client software Introduction Installation...

User guide - client softwareIntroductionInstallationUpdateGetting startedApplication overviewScreen sharingUser listSet languageEco mode (low bandwidth settings)Selecting camera, microphone and speakerAdvanced settingsSystem requirements & Network settings
Last updated on June 13, 2017© 2016 alfatraining Bildungszentrum e.K.
1

Introduction
The alfaview client software is part of the alfaview video conferencing platform alfaview.com.
alfaview can be installed without administrative rights on any modern computer running a MicrosoftWindows or Apple macOS operating system. It is designed to be launched from a web browser and leadsthe user directly into an online meeting. The multilingual user interface shows all participants with theircamera image including an audio connection. Depending on the individual permissions of the participant,additional features like screen sharing or document upload are available.
2

Installation
Download
Download the alfaview software from the downloadssection on the alfaview platform alfaview.com/downloads.
Installation on Microsoft Windows
To start the installation process, double-click thesetup file.Follow the instructions in the installer dialog.
Installation on Apple macOS
Open the disk image file with a double click.To install, simply drag the application icon into theApplications folder.
3

Update
Update on Microsoft Windows
A blue notification bar will appear at the top edge of the application when a new version is available. Click onthe link in the notification to start the update process. The application will quit, update, and relaunchautomatically. The whole process usually takes less than a minute.
Update on Apple macOS
Currently, updates for the macOS version will not be announced inside the application. Check periodically fornew versions in the downloads section of the alfaview platform. The update procedure for macOS is the sameas described under installation.
4

Getting started
Step 1: Login & application launch
The application can only be launched from within thealfaview platform.
Log in on the alfaview platform alfaview.com/login.Make sure the alfaview application is installed.Click on the Join button of a room in the room
list of your alfaview account.The alfaview application should launch instantly.
Upon first launch of the application, the following stepshave to be considered:
Your internet browser will prompt you to selectthe application that should be associated withthe Join button. Choose the alfaviewapplication and tick the option to remember your choice.A window will present the terms of use. Read the terms carefully and confirm your acceptance.The terms of use can also be found in the downloads section on the alfaview platformalfaview.com/downloads.
Step 2: Activate microphone & camera
When the application launches, you will see and hear allother participants in the meeting room.
Plugin your headset and select it as source formicrophone and speaker in the settings panel.Activate the microphone by clicking on themicrophone symbol in the main menu.The microphone must be activated manually.To reduce ambient noise, you can adjust themicrophone sensivity in the settings panel.The attached or built-in camera should be selectedand activated automatically.
5

Application overview
Main menu
The main menu in the upper center of the application controls the main functions:
MicrophoneCameraScreen sharing
It also displays the name of the meeting on the left and optional informational icons on the right.
Video area
The video area shows the video streams of allparticipants in a meeting:
Each video element holds the name of therespective participant in its bottom left corner.When a participant is speaking, a blue border willappear around the video element.Moderators will appear at the top of the video area.If a participant does not enable the camera, a usersymbol or the user’s initials will be shown instead ofthe video.Videos are sorted by the names of the participants.
6

Stage area
The stage area shows shared media such as screensharing streams, whiteboards or documents.
If the stage area is active (e.g. screen sharingactive), the video area is compressed and moved tothe left.If multiple media items are shared, a preview itemappears at the bottom of the stage.Each preview item shows the name of theparticipant that shares the media.To switch between multiple shared media, thepreview item can be activated on click.The active preview item shows a blue border.
Sidebar
The sidebar currently incorporates the user list, chatfunctionality and application settings.
Each tab in the sidebar represents a group offunctions.The sidebar appears when clicking on a sidebaricon and disappears when clicking outside of thesidebar.You can also use the bottom arrow icon to open andclose the sidebar.Each sidebar tab can be configured to stay open byclicking the triple dot icon in the upper right corner of a sidebar tab, then PIN .
The sidebar itself can be displayed at the left or the right by clicking on the bottom sidebar icon.
7

Screen sharing
Screen sharing can be initialized from the screen share button in the upper main menu.
Start screen sharing
Click on the screen sharing icon in the main menuto trigger the blue area selection frame. Theselection frame sets the boundaries of the sharedarea on your screen.Drag the frame to the desired location you want toshare.Adjust the frame size by dragging each border tothe desired position.You can see the pixel size of the captured area inthe title bar of the screenshare frame.Activate screen sharing with the blue STARTbutton.All participants will see the screen sharing after afew seconds.
Stop screen sharing
To stop sharing your screen, you can either click the main menu’s screen share icon again, or the redSTOP button in the screen share frame.
8

Pause / Resume screen sharing
To pause screen sharing, click on the FREEZEbutton in the screen share frame.When screen sharing is paused, participants willsee a freeze frame.This can be used to resize or reposition the screenshare frame without the participants watching theprocess.It can also be used to save bandwidth when sharingcontent that does not change.When screen sharing is paused, the screen shareframe color will change to amber.To resume screen sharing click on the UNFREEZEbutton in the screen share frame.
Drawing mode (beta feature)
This feature is currently in development and subject tochanges in form and function.
To activate the drawing mode, click on the DRAWbutton in the screenshare frame.To start drawing, simply hold the mouse button andmove the mouse inside the screenshare frame.Release the mouse to stop drawing.The drawing will be seen instantly by all participants.Only the participant who launches the screen sharecan draw.You can choose from four basic colors in the titlebar of the screenshare frame.While in drawing mode you cannot access the underlying application.Click on the CLEAR button to remove the drawing and exit the drawing mode.
Multiple screen sharing (beta feature)
9
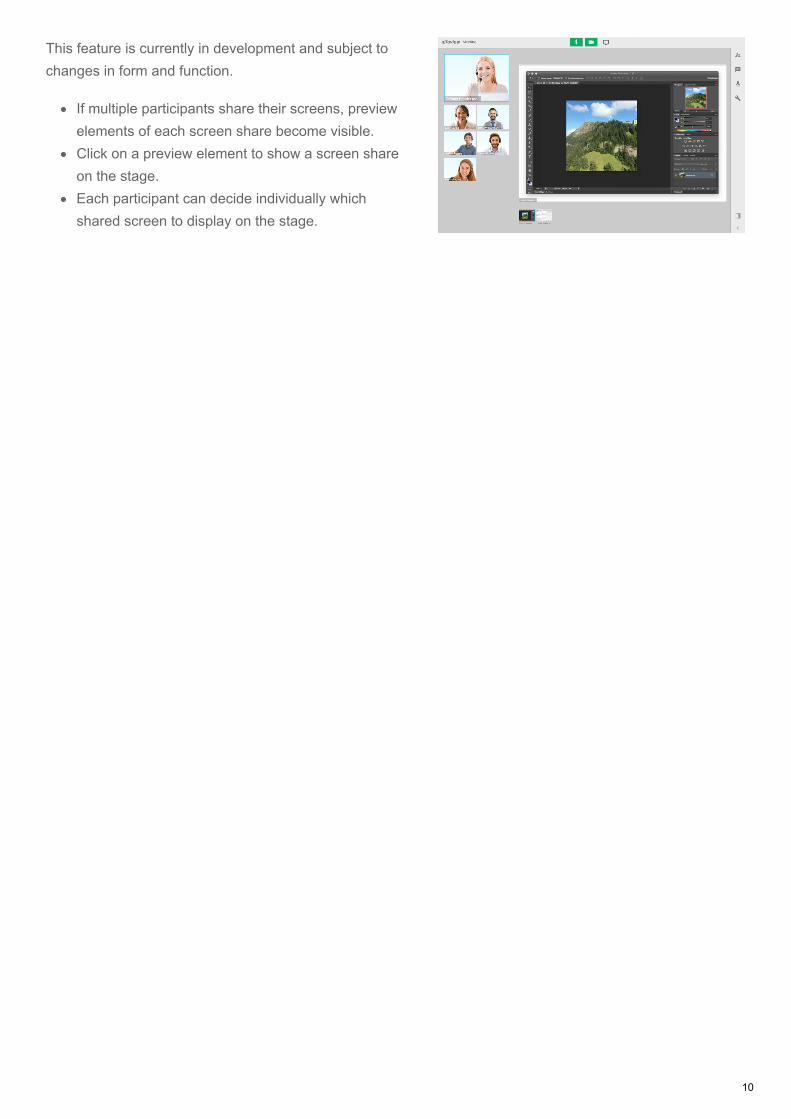
This feature is currently in development and subject tochanges in form and function.
If multiple participants share their screens, previewelements of each screen share become visible.Click on a preview element to show a screen shareon the stage.Each participant can decide individually whichshared screen to display on the stage.
10

User list
Click on the user icon in the sidebar to display the userlist.
All active participants in a meeting will be listed inthe user list.Participants will be listed with their initials, name,and location. Edit these values in your personalprofile page on the alfaview platform.The circular avatar element shows the participant’sinitials or a user icon if no initials were set.When a participant is speaking, a blue border willappear around the avatar element.Moderators will appear at the top of the user list andare tagged with a star icon.Use the search field at the bottom of the user list tofind specific participants.
The user list allows for additional configuration:
Click on the triple dot icon in the upper right cornerof the user list.The user list elements can be displayed in a morecompact way using the SLIM button.
You can also define which sorting method should beapplied to the user list by toggling the sort buttonbetween CITY or NAME .
Like every sidebar element, the user list can beconfigured to stay open using the PIN button.
However, this will reduce the amount of screen realestate available to, for example, the video area.
11

Set language
To set the language of the application, click on thesettings icon in the sidebar. You will find a dropdown listwith all available languages in the upper settings section.
Currently, English and German are available.The default language after installation is English.
12

Eco mode (low bandwidth settings)
To activate the eco mode click on the settings icon in thesidebar. You will find this option in the upper settingssection.
When the eco mode is active, participant videos willbe turned off.Only moderator videos, screen sharing streams andyour own video will remain visible.Your own video will be transmitted at a lowerquality.All other functions like e.g. audio remain unaffectedby this setting.This is especially useful in low bandwidth situations or when experiencing an unreliable internetconnection.To save additional bandwidth, turn off your camera in the main menu.An informational icon will be displayed on the right side of the main menu when this setting is active.
13
Selecting camera, microphone and speaker
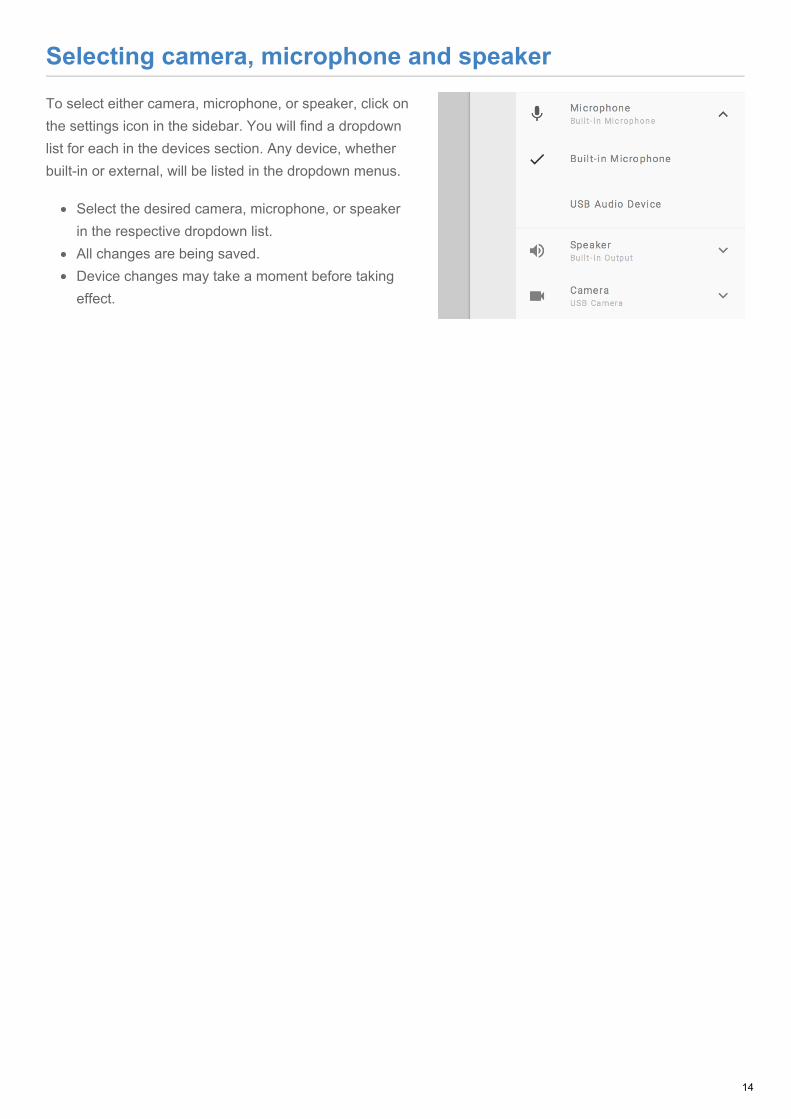
To select either camera, microphone, or speaker, click onthe settings icon in the sidebar. You will find a dropdownlist for each in the devices section. Any device, whetherbuilt-in or external, will be listed in the dropdown menus.
Select the desired camera, microphone, or speakerin the respective dropdown list.All changes are being saved.Device changes may take a moment before takingeffect.
14

Advanced settings
To configure advanced settings, click on the settings icon in the sidebar. You will find the followingconfiguration elements in the advanced settings section:
Microphone sensitivity
To adjust microphone sensitivity, you need toactivate the microphone in the main menu.Click on the settings element to access thesensitivity slider.Speak a few sentences. The slider indicates themicrophone input level.While speaking, adjust the slider to be just within theindicated input level.A good starting value is slightly to the right of the center.
Push-to-talk
Push-to-talk allows you to activate the microphonemanually at the press of a key. This is especially helpfulwhen operating at a place with a lot of ambient noise.
Activate the push-to-talk settings element.Activate the microphone in the main menu.The microphone button now turns amber instead ofgreen and shows a strike through microphone icon.While speaking press and hold the <CTRL> key
on your keyboard.The microphone button now turns green and shows a normal microphone icon.Additionally, you will see a blue border around your video to indicate microphone activity to allparticipants.Release the <CTRL> key when you are done speaking.
15

Mute speaker
To mute the whole application, toggle the mutespeaker switch. This setting is not being saved. Theapplication always starts unmuted by default.An informational icon is displayed on the right sideof the main menu when this setting is active.
HQ video
To broadcast your video in high quality, activate theHQ video switch.Quality and frame rate will be increased.Be aware that this setting consumes morebandwidth of your internet connection.An informational icon is displayed on the right side of the main menu when this setting is active.
Mirror local video
This setting does not affect the way your video isseen by others.Only you will see the video in a mirrored version.Use this setting if you are more comfortable withhaving the same effect as if looking into a mirror.
Dark theme
Activate this setting to switch to a dark theme.This is useful when working in dark environments.
Experiments
This switch activates an additional sidebar tab.Settings in the experimental section will not bedescribed in this user guide.
16

System requirements & Network settings
Operating System
Windows 7 or higher (64-bit only)Mac OS X 10.10 (Yosemite) or newerLinux (unsupported, not available yet)
Hardware
1.5 gigahertz (GHz) or faster 64-bit (x64) processorat least 2 GB of RAMMicrophone and speakers (headset recommended)Webcam
Internet connection
Cable or DSL connection with 6 MBit/s downstream (16 MBit/s recommended)
Network
A wired network connection is preferred over a wireless one.
Port 5380 Data service (TCP)Port 5387 Audio serivce (UDP)Port 5388 Video service (TCP)Port 5389 Realtime event channel (TCP)
Until further notice we recommend to open the port range 5380-5390 (outgoing, TCP & UDP).
17