User Guide | Beta - PC*MILER
125
User Guide | Beta v10.3.0 | Revision 1.0
Transcript of User Guide | Beta - PC*MILER
User Guide | Beta v10.3.0 | Revision 1.0
Copyrights The following copyrights will apply to the extent your Licensed Product includes these features and/or data.
You may print one (1) copy of this document for your personal use. Otherwise, no part of this document may be reproduced, transmitted, transcribed, stored in a retrieval system, or translated into any language, in any form or by any means electronic, mechanical, magnetic, optical, or otherwise, without prior written permission from ALK Technologies, Inc.
Copyright © 1986-2017 ALK Technologies, Inc. All Rights Reserved.
ALK Data © 2017 – All Rights Reserved.
ALK Technologies, Inc. reserves the right to make changes or improvements to its programs and documentation materials at any time and without prior notice.
PC*MILER®, CoPilot® Truck™, ALK®, RouteSync®, and TripDirect® are registered trademarks of ALK Technologies, Inc.
Microsoft and Windows are registered trademarks of Microsoft Corporation in the United States and other countries.
IBM is a registered trademark of International Business Machines Corporation.
Xceed Toolkit and AvalonDock Libraries Copyright © 1994-2016 Xceed Software Inc., all rights reserved. The Software is protected by Canadian and United States copyright laws, international treaties and other applicable national or international laws.
Satellite Imagery © DigitalGlobe, Inc. All Rights Reserved.
Weather data provided by Environment Canada (EC), U.S. National Weather Service (NWS), U.S. National Oceanic and Atmospheric Administration (NOAA), and AerisWeather. © Copyright 2017. All Rights Reserved.
Traffic information provided by INRIX © 2017. All rights reserved by INRIX, Inc.
Standard Point Location Codes (SPLC) data used in PC*MILER products is owned, maintained and copyrighted by the National Motor Freight Traffic Association, Inc.
Statistics Canada Postal Code™ Conversion File which is based on data licensed from Canada Post Corporation.
Natural Resources Canada information licensed under the Contains information licensed under the Open Government License – Canada. http://open.canada.ca/en/open-government-licence-canada
United Kingdom full postal code data supplied by Ordnance Survey Data © Crown copyright and database right 2017. OS OpenData™ is covered by either Crown Copyright, Crown Database copyright, or has been licensed to the Crown.
Certain Points of Interest (POI) data by Infogroup © Copyright 2017. All Rights Reserved.
Geographic feature POI data compiled by the U.S. Geological Survey.
Oil and Gas field content provided by GEOTrac Systems Inc. © Copyright 2017. All rights reserved.
Made with Natural Earth. Free vector and raster map data @ naturalearthdata.com.
Copyright HERE Data © 2017 – All rights Reserved. HERE Data © is subject to the terms set forth at http://corporate.navteq.com/supplier_terms.html.
Source of map data for Mexico provided by lnstituto Nacional de Estadistica y Geografia. The use of this information does not represent an official position by INEGI, nor does INEGI endorse, integrate, sponsor or support ALK Technologies, Inc.
Retail Fuel Prices for Pilot Flying J locations are subject to change and are subject to Pilot Flying J’s disclaimer set forth at http://www.pilotflyingj.com/disclaimer.
National Elevation Data produced by the U.S. Geological Survey.
Geospatial Information Authority of Japan website (http://www.gsi.go.jp/kankyochiri/gm_japan_e.html).
Copyright SanGIS 2009 – All Rights Reserved.
Data provided by permission of King County, Washington.
Data provided by permission of © Jackson County, Georgia.
PC*MILER|Mapping User’s Guide i
PC*MILER® Product Line END-USER LICENSE AGREEMENT
1. Grant of License: Subject to the terms, conditions, use limitations and payment of fees as set
forth herein, ALK Technologies, Inc. ("ALK") grants the end-user ("you") a non-assignable, non-transferable, non-exclusive license to install and use the PC*MILER solution(s) (including traffic data or any other subscriptions as applicable) you have purchased ("PC*MILER") on a single personal computer. The PC*MILER software, data and documentation are provided for your personal, internal use only and not for resale. They are protected by copyright held by ALK and its licensors and are subject to the following terms and conditions which are agreed to by you, on the one hand, and ALK and its licensors (including their licensors and suppliers) on the other hand.
2. Title: You acknowledge that the PC*MILER computer programs, data, concepts, graphics,
documentation, manuals and other material owned by, developed by or licensed to ALK, including but not limited to program output (together, "program materials"), are the exclusive property of ALK or its licensors. You do not secure title to any PC*MILER program materials by virtue of this license.
3. Copies: You may make one (1) copy of the PC*MILER program materials, provided you
retain such copy in your possession and use it solely for backup purposes. You agree to reproduce the copyright and other proprietary rights notices of ALK and its licensors on such a copy. Otherwise, you agree not to copy, reverse engineer, interrogate, or decode any PC*MILER program materials or attempt to defeat protection provided by ALK for preventing unauthorized copying or use of PC*MILER or to derive any source code or algorithms therefrom. You acknowledge that unauthorized use or reproduction of copies of any program materials or unauthorized transfer of any copy of the program materials is a serious crime and is grounds for suit for damages, injunctive relief and attorney's fees.
4. Limitations on Transfer: This license is granted to you by ALK. You may not directly or
indirectly lease, sublicense, sell, disseminate, or otherwise transfer PC*MILER or any PC*MILER program materials to third parties, or offer information services to third parties utilizing the PC*MILER program materials without ALK's prior written consent. To comply with this limitation, you must uninstall and deactivate PC*MILER from your computer prior to selling or transferring that computer to a third party.
5. Anti-Piracy Protection: PC*MILER may include product activation and other technology to
prevent unauthorized use and copying. If provided with an install product key code (the "Product Key Code"), or any other similar mechanism, you will need to activate PC*MILER with the associated method in order to use it. If you try to activate or install an excessive or unauthorized number of times or in an unauthorized environment, the ALK Anti-Piracy Protection may cause PC*MILER to lock and prevent you from further activating or using PC*MILER Refer to ALK's help page at https://activate.alk.com for more information about our Product Activation and Anti-Piracy Protection.
6. Limitations on Network Access: You may not allow end-users or software applications on
other computers or devices to directly or indirectly access this copy of PC*MILER via any

PC*MILER|Mapping User’s Guide ii
type of computer or communications network (including but not limited to local area networks, wide area networks, intranets, extranets, the internet, virtual private networks, Wi-Fi, Bluetooth, and cellular and satellite communications systems), using middleware (including but not limited to Citrix MetaFrame and Microsoft Terminal Server) or otherwise (including but not limited to access through PC*MILER interface products), or install or use PC*MILER on a network file server, without first notifying ALK, executing a written supplemental license agreement, and paying the license fee that corresponds to the number and types of uses to which access is to be allowed.
7. Limitations on Data Extraction: You may manually extract data (including but not limited to
program output such as distances, maps, and driving directions) from PC*MILER and use it in other applications on the same computer on which PC*MILER is legally licensed and installed, as permitted below. You may not transfer data extracted from PC*MILER onto any other computer or device unless you have licensed PC*MILER for that computer or device. You agree that you will not, nor will you permit your trade partners or anyone else to, use content derived from PC*MILER, including route line data, nor display such data or integrate such data into another provider's service, including, but not limited to, Google or Bing. You agree not to pre-fetch, retrieve, cache, index, or store any data, content, or other portion of the product output at any time, provided, however, that you may temporarily store (for less than thirty (30) days) limited amounts of such content for the sole and exclusive purpose of enhancing the performance of your implementation due to network latency, and only if you do so securely and in a manner that: (a) does not permit use of the content outside of the scope of this Agreement; (b) does not manipulate or aggregate any content or portion thereof; (c) does not prevent ALK from accurately tracking usage; and (d) does not modify attribution of the product in any way.
8. Limitations on Mobile Communications: Without limiting the generality of the foregoing, you
may not transmit PC*MILER street-level driving directions through mobile communications systems such as satellite, or cellular services or to mobile devices such as computers, telematics systems, on board or mobile computers or Smartphones, handhelds, pagers, electronic recording devices or telephones without first executing a written supplemental license agreement with ALK and paying the license fee that corresponds to the number and types of devices and systems to and through which transmission is to be permitted.
9. Limitations on Disclosure: You may disclose PC*MILER distances to trading partners, in the
course of their providing services to you, for specific origin-destination moves for which you provide transportation services and use PC*MILER distances as a basis for payment. You may not make any other disclosure of PC*MILER programs and materials, including, but not limited to, program output, to anyone outside the legal entity that paid for and holds this license, without prior written permission of ALK. You acknowledge that the PC*MILER programs and materials, developed by or licensed to ALK are very valuable to ALK and its licensors, and their use or disclosure to third parties, except as permitted by this license or by a written supplemental license agreement with ALK, is strictly prohibited.
10. Security: You agree to take reasonable and prudent steps to safeguard the security of the
PC*MILER program materials and to notify ALK immediately if you become aware of the theft or unauthorized possession, use, transfer or sale of the PC*MILER program materials licensed to you by ALK.
PC*MILER Product End-User License Agreement iii
11. Acceptance: You are deemed to have accepted the PC*MILER program materials upon receipt.
12. Warranties: ALK represents and warrants that:
a) For ninety (90) days from date of purchase, PC*MILER, when delivered and properly installed, will function substantially according to its specifications on a computer purchased independently by you.
b) For ninety (90) days from date of purchase, the software media on which ALK provides PC*MILER to you will function substantially free of errors and defects. ALK will replace defective media during the warranty period at no charge to you unless the defect is the result of accident, abuse, or misapplication of the product.
c) THE FOREGOING WARRANTIES ARE IN LIEU OF ALL OTHER WARRANTIES EXPRESS OR IMPLIED, INCLUDING WITHOUT LIMITING THE GENERALITY OF THE FOREGOING ANY WARRANTY OF MERCHANTABILITY OR FITNESS FOR A PARTICULAR USE. THE PC*MILER PROGRAM, DATA AND DOCUMENTATION IS SOLD "AS IS". IN NO EVENT SHALL ALK OR ITS LICENSORS BE LIABLE FOR ANY INDIRECT, SPECIAL OR CONSEQUENTIAL DAMAGES SUCH AS, BUT NOT LIMITED TO, LOSS IN CONNECTION WITH OR ARISING OUT OF THE EXISTENCE OF THE FURNISHING, FUNCTIONING OR USE OF ANY ITEM OF SOFTWARE, DATA OR SERVICES PROVIDED FOR IN THIS AGREEMENT. IN NO EVENT SHALL DAMAGES TO WHICH ALK MAY BE SUBJECT UNDER THIS AGREEMENT EXCEED THE CONTRACT PRICE. THIS WARRANTY SHALL NOT ACCRUE TO THE BENEFIT OF THIRD PARTIES OR ASSIGNEES.
13. Disclaimer: The data may contain inaccurate, incomplete or untimely information due to the
passage of time, changing circumstances, sources used and the nature of collecting comprehensive geographic data, any of which may lead to incorrect results. PC*MILER's suggested routings, fuel and traffic data are provided without a warranty of any kind. The user assumes full responsibility for any delay, expense, loss or damage that may occur as a result of their use.
14. Termination: This Agreement will terminate immediately upon any of the following events:
a) If you seek an order for relief under the bankruptcy laws of the United States or similar laws of any other jurisdiction, or a composition with or assignment for the benefit of creditors, or dissolution or liquidation, or if proceedings under any bankruptcy or insolvency law are commenced against you and are not discharged within thirty (30) calendar days.
b) If you materially breach any terms, conditions, use limitations, payment obligations, or any other terms of this Agreement.
c) Upon expiration of any written supplemental license agreement between you and ALK of which this license is a part.
PC*MILER|Mapping User’s Guide iv
15. Obligations on Termination: Termination or expiration of this Agreement shall not be construed to release you from any obligations that existed prior to the date of such termination or expiration.
16. Hold Harmless and Indemnity: Except as otherwise provided in your agreement with ALK,
the following article applies: To the maximum extent permitted by applicable law, you agree to hold harmless and indemnify ALK and its parent company, subsidiaries, affiliates, officers, agents, licensors, owners, co-branders, other partners, and employees from and against any third party claim (other than a third party claim for Intellectual Property Rights) arising from or in any way related to your use of PC*MILER, including any liability or expense arising from all claims, losses, damages (actual and/or consequential), suits, judgments, litigation costs and attorney's fees, of every kind and nature. ALK shall use good faith efforts to provide you with written notice of such claim, suit or action.
17. Disclosure for Products Containing Certain Data:
a) Historical or Real-time Traffic data: traffic data, including historical traffic data, is licensed as an optional subscription service which must be renewed annually for continued use. ALK and its licensor(s) will use commercially reasonable efforts to make traffic data available at least 99.5% of the time each calendar month, excluding minor performance or technical issues as well as downtime attributable to necessary maintenance, and Force Majeure.
This data is provided to you "as is," and you agree to use it at your own risk. ALK and its licensors (and their licensors and suppliers) make no guarantees, representations or warranties of any kind, express or implied, arising by law or otherwise, including but not limited to, content, quality, accuracy, completeness, effectiveness, reliability, fitness for a particular purpose, usefulness, use or results to be obtained from this Data, or that the Data or server will be uninterrupted or error-free.
18. Limitations on Export: You hereby expressly agree not to export PC*MILER, in whole or in
part, or any data derived therefrom, in violation of any export or other laws or regulations of the United States. You acknowledge and agree that ALK commodities, technology or software that will be exported from the United States will be in accordance with U.S. Export Administration Regulations. Diversion contrary to U.S. law is prohibited. Export or re-export of ALK goods may require an export license or may be prohibited as it pertains to commodities, technology or software of U.S. origin.
19. Aggregated Data: Except as otherwise provided in your agreement with ALK, the following
article applies: ALK may, from time to time, share information about You with parent and sister or affiliated companies for business purposes and when necessary for it to perform work under this End User License Agreement. In addition, ALK may, and is hereby authorized to, use, share and provide certain aggregated, non-identifiable information derived from Your use of PC*MILER to third parties.
20. ALK Cloud Feature: ALK Cloud feature, if used, will store in an anonymized way Your data
in a cloud account in order to allow You to securely synchronize Your data with other users in Your organization. End-User data is deemed the confidential information of the End-User. For more information, you may refer to ALK's Privacy Policy.
PC*MILER Product End-User License Agreement v
21. Internet-Based Services Components: Certain features of PC*MILER require connection to the Internet directly or through a wireless connection in order to function. Such features may result in the transfer of certain data over such connection, which may or may not be encrypted. You are solely responsible for obtaining any necessary Internet, data or wireless subscription plans with the applicable service providers and you must comply with applicable third party terms of agreement when using PC*MILER. You further acknowledge that ALK is not responsible for the availability of the Internet or wireless connections or the security or integrity of data transmitted over such connections.
22. Geographic Restrictions: The Content and Services (as defined below) are provided for
access for different areas in the world. You acknowledge and agree that you may not be able to access all or some of the same Content and Services depending as to where you are located in the world. Access to PC*MILER may not be legal by certain persons or in certain countries. At all times, you are responsible for compliance with local laws.
23. Content and Services: PC*MILER may provide you with access to ALK's proprietary
websites including without limitation at www.alk.com (the "Website") and products and services accessible thereon, and certain features, functionality, and content accessible on or through PC*MILER may be hosted on the Website (collectively, "Content and Services"). Your access to and use of such Content and Services are governed by this License and the Website's terms of use located at www.alk.com, which are incorporated herein by this reference. Your access to and use of such Content and Services may require you to acknowledge your acceptance of such terms of use and/or to register with the Website, and your failure to do so may restrict you from accessing or using certain of PC*MILER's features and functionality. Any violation of such terms of use will also be deemed a violation of this License. ALK DOES NOT PROVIDE ANY WARRANTY FOR, OR GUARANTEE THE AVAILABILITY OF, PRODUCTS AND SERVICES PURCHASED OR ADVERTISED THROUGH THE APPLICATION.
24. Technical Support: For one (1) year from date of purchase, ALK will provide you technical
support on the PC*MILER product(s) purchased to those that are current on their payment. 25. Disclosure for Optional Content Displayed in PC*MILER for Additional Purchase: Traffic
data, including historical traffic data, and any other optional content licensed as a subscription service must be renewed annually for continued use. You agree and acknowledge that ALK is not responsible for the content displayed which belongs to third parties, and advising you for the end of your subscription.
26. Additional Use Terms, Conditions, Restrictions and Obligations: This Agreement and your
use of PC*MILER is expressly subject to the ALK Privacy Policy and the HERE and ALK End User License Agreement terms and conditions respectively ("HERE EULA") and ("ALK EULA") set forth below. YOU ACKNOWLEDGE AND AGREE THAT YOU MAY NOT USE PC*MILER IF YOU DO NOT ACCEPT THE TERMS AND CONDITIONS OF BOTH THE HERE AND ALK EULA AND YOU ACKNOWLEDGE THAT YOU HAVE REVIEWED AND ACCEPT THE TERMS AND CONDITIONS OF BOTH THE HERE AND ALK EULA BY INSTALLING OR ACTUALLY USING PC*MILER.
PC*MILER|Mapping User’s Guide vi
27. Copyright: United States copyright law and international treaty provisions protect PC*MILER and the data transmitted by PC*MILER. You agree that no title to the intellectual property in PC*MILER or the data is transferred to you. You further acknowledge that title and ownership rights will remain the exclusive property of ALK or its licensors, and you will not acquire any rights to PC*MILER or the data except as expressly set out in this license. You agree that any copies of PC*MILER will contain the same proprietary notices that appear on and in PC*MILER. The Copyright to PC*MILER is held by ALK Technologies, Inc., 1 Independence Way, Princeton, NJ 08540 USA. Full contact details are available at www.alk.com.
28. Miscellaneous: This agreement shall be construed and applied in accordance with the laws
of the State of New Jersey. The Courts of the State of New Jersey shall be the exclusive forum for all actions or interpretation pertaining to this agreement. Any amendments or addenda to this agreement shall be in writing executed by all parties hereto. This is the entire agreement between the parties and supersedes any prior or contemporaneous agreements or understandings. Should any provision of this agreement be found to be illegal or unenforceable, then only so much of this agreement as shall be illegal or unenforceable shall be stricken and the balance of this agreement shall remain in full force and effect.
29. Date: This EULA was last updated on August 9, 2017. Visit https://www.pcmiler.com/eula
for regular updates. General Content Terms and Conditions
The following terms shall apply to the use of map data for the countries specified below to the extent that your product and/or services uses map data for each respective country:
FOR HERE DATA
This end user license agreement applies to HERE data included in your Software ("HERE EULA"), if any, as well as to HERE data you obtain separately that is formatted for use with your Software. The data ("Data") is provided for your personal, internal use only and not for resale. It is protected by copyright, and is subject to the following terms and conditions which are agreed to by you, on the one hand, and ALK Technologies Inc. ("ALK") and its licensors (including their licensors and suppliers) on the other hand.
© 2017 HERE. All rights reserved. Personal Use Only: You agree to use this Data together with PC*MILER for the solely personal, non-commercial purposes for which you were licensed, and not for service bureau, time-sharing or other similar purposes. Accordingly, but subject to the restrictions set forth in the following paragraphs, you may copy this Data only as necessary for your personal use to (i) view it, and (ii) save it, provided that you do not remove any copyright notices that appear and do not modify the Data in any way. You agree not to otherwise reproduce, copy, modify, decompile, disassemble or reverse engineer any portion of this Data, and may not transfer or distribute it in any form, for

PC*MILER Product End-User License Agreement vii
any purpose, except to the extent permitted by mandatory laws. Multi-disc sets may only be transferred or sold as a complete set as provided by ALK and not as a subset thereof. Restrictions: Except where you have been specifically licensed to do so by ALK, and without limiting the preceding paragraph, you may not (a) use this Data with any products, systems, or applications installed or otherwise connected to or in communication with vehicles, capable of vehicle navigation, positioning, dispatch, real time route guidance, fleet management or similar applications; or (b) with or in communication with any positioning devices or any mobile or wireless-connected electronic or computer devices, including without limitation cellular phones, palmtop and handheld computers, pagers, and personal digital assistants or PDAs. Warning: The Data may contain inaccurate or incomplete information due to the passage of time, changing circumstances, sources used and the nature of collecting comprehensive geographic data, any of which may lead to incorrect results. No Warranty: This Data is provided to you "as is," and you agree to use it at your own risk. ALK and its licensors (and their licensors and suppliers) make no guarantees, representations or warranties of any kind, express or implied, arising by law or otherwise, including but not limited to, content, quality, accuracy, completeness, effectiveness, reliability, fitness for a particular purpose, usefulness, use or results to be obtained from this Data, or that the Data or server will be uninterrupted or error-free. Disclaimer of Warranty: ALK AND ITS LICENSORS (INCLUDING THEIR LICENSORS AND SUPPLIERS) DISCLAIM ANY WARRANTIES, EXPRESS OR IMPLIED, OF QUALITY, PERFORMANCE, MERCHANTABILITY, FITNESS FOR A PARTICULAR PURPOSE OR NON-INFRINGEMENT. Some States, Territories and Countries do not allow certain warranty exclusions, so to that extent the above exclusion may not apply to you. Disclaimer of Liability: ALK AND ITS LICENSORS (INCLUDING THEIR LICENSORS AND SUPPLIERS) SHALL NOT BE LIABLE TO YOU: IN RESPECT OF ANY CLAIM, DEMAND OR ACTION, IRRESPECTIVE OF THE NATURE OF THE CAUSE OF THE CLAIM, DEMAND OR ACTION ALLEGING ANY LOSS, INJURY OR DAMAGES, DIRECT OR INDIRECT, WHICH MAY RESULT FROM THE USE OR POSSESSION OF THE INFORMATION; OR FOR ANY LOSS OF PROFIT, REVENUE, CONTRACTS OR SAVINGS, OR ANY OTHER DIRECT, INDIRECT, INCIDENTAL, SPECIAL OR CONSEQUENTIAL DAMAGES ARISING OUT OF YOUR USE OF OR INABILITY TO USE THIS INFORMATION, ANY DEFECT IN THE INFORMATION, OR THE BREACH OF THESE TERMS OR CONDITIONS, WHETHER IN AN ACTION IN CONTRACT OR TORT OR BASED ON A WARRANTY, EVEN IF ALK OR ITS LICENSORS HAVE BEEN ADVISED OF THE POSSIBILITY OF SUCH DAMAGES. Some States, Territories and Countries do not allow certain liability exclusions or damages limitations, so to that extent the above may not apply to you. Export Control: You agree not to export from anywhere any part of the Data provided to you or any direct product thereof except in compliance with, and with all licenses and approvals required under, applicable export laws, rules and regulations.

PC*MILER|Mapping User’s Guide viii
Entire Agreement: These terms and conditions constitute the entire agreement between ALK (and its licensors, including their licensors and suppliers) and you pertaining to the subject matter hereof, and supersedes in their entirety any and all written or oral agreements previously existing between us with respect to such subject matter. Governing Law: The above terms and conditions shall be governed by the laws of Illinois, without giving effect to (i) its conflict of laws provisions, or (ii) the United Nations Convention for Contracts for the International Sale of Goods, which is explicitly excluded. You agree to submit to the jurisdiction of the Illinois for any and all disputes, claims and actions arising from or in connection with the Data provided to you hereunder. Government End Users: If the Data is being acquired by or on behalf of the United States Government or any other entity seeking or applying rights similar to those customarily claimed by the United States government, the Data is a "commercial item" as that term is defined at 48 C.F.R ("FAR") 2.101, is licensed in accordance with End-User Terms and each copy of Data delivered or otherwise furnished shall be marked and embedded as appropriate with the following "Notice of Use" and shall be treated in accordance with such Notice. Notice of Use Contractor (Manufacturer/Supplier) Name: HERE Contractor (Manufacturer/Supplier) Address: 425 W. Randolph Street, Chicago, Illinois 60606 This Data is a commercial item as defined in FAR 2.101 and is subject to these End User Terms under which this Data was provided © 2017 HERE. All rights reserved If the Contracting Officer, federal government agency, or any federal official refuses to use the legend provided herein, the Contracting Officer, federal government agency, or any federal official must notify HERE prior to seeking additional or alternative rights in the Data.
FOR ALK DATA
This end user license agreement applies to ALK Data included in PC*MILER if any, as well as to ALK data you obtain separately that is formatted for use with your Software ("ALK EULA"). The data ("Data") is provided for your personal, internal use only and not for resale. It is protected by copyright, and is subject to the following terms and conditions which are agreed to by you, on the one hand, and ALK Technologies, Inc. ("ALK") and its licensors (including their licensors and suppliers) on the other hand. © 2017 ALK. All rights reserved. Personal Use Only: "You" means you as an End-user or as a "Company" on behalf of its End-Users which are subject to either a Non-Disclosure Agreement as employees or a
PC*MILER Product End-User License Agreement ix
License Agreement that contains the same restrictions as herein as a Value Added Reseller. Also as used in this EULA "personal use" can also be understood in more general terms as for a Company's use. You agree to use this Data together with PC*MILER for the solely personal, non-commercial purposes for which you were licensed, and not for service bureau, time-sharing or other similar purposes. Accordingly, but subject to the restrictions set forth in the following paragraphs, you may copy this Data only as necessary for your personal use to (i) view it, and (ii) save it, provided that you do not remove any copyright notices that appear and do not modify the Data in any way. You agree not to otherwise reproduce copy, modify, decompile, disassemble or reverse engineer any portion of this Data, and may not transfer or distribute it in any form, for any purpose, except to the extent permitted by mandatory laws.
Restrictions: Except where you have been specifically licensed to do so by ALK in the case of an integrated solution bundled or intended for use with specific smartphones, similar mobile communication device(s) or personal navigation device(s), and without limiting the preceding paragraph, you may not use this Data (a) with any products, systems, or applications installed or otherwise connected to or in communication with vehicles, capable of vehicle navigation, positioning, dispatch, real time route guidance, fleet management or similar applications; or (b) with or in communication with any positioning devices or any mobile or wireless-connected electronic or computer devices, including without limitation cellular phones, smartphones, palmtop and handheld computers, pagers, and personal digital assistants or PDAs.
Warning: The Data may contain inaccurate, untimely or incomplete information due to the passage of time, changing circumstances, sources used and the nature of collecting comprehensive geographic data, any of which may lead to incorrect results. The Data is based on official highway maps, the Code of Federal Regulations, and information provided by state governments and other licensors. It is provided without a warranty of any kind. The user assumes full responsibility for any delay, expense, loss or damage that may occur as a result of use of the Data.
No Warranty: This Data is provided to you "as is," and you agree to use it at your own risk. ALK and its licensors (and their licensors and suppliers) make no guarantees, representations or warranties of any kind, express or implied, arising by law or otherwise, including but not limited to, content, quality, accuracy, completeness, effectiveness, reliability, fitness for a particular purpose, usefulness, use or results to be obtained from this Data, or that the Data or server will be uninterrupted or error-free.
Disclaimer of Warranty: ALK AND ITS LICENSORS (INCLUDING THEIR LICENSORS AND SUPPLIERS) DISCLAIM ANY WARRANTIES, EXPRESS OR IMPLIED, OF QUALITY, PERFORMANCE, MERCHANTABILITY, AND/OR FITNESS FOR A PARTICULAR PURPOSE OR NON-INFRINGEMENT. Some States, Territories and Countries do not allow certain warranty exclusions, so to that extent the above exclusion may not apply to you. Disclaimer of Liability: ALK AND ITS LICENSORS (INCLUDING THEIR LICENSORS AND SUPPLIERS) SHALL NOT BE LIABLE TO YOU: IN RESPECT OF ANY CLAIM, DEMAND OR ACTION, IRRESPECTIVE OF THE NATURE OF
PC*MILER|Mapping User’s Guide x
THE CAUSE OF THE CLAIM, DEMAND OR ACTION ALLEGING ANY LOSS, INJURY OR DAMAGES, DIRECT OR INDIRECT, WHICH MAY RESULT FROM THE USE OR POSSESSION OF THE INFORMATION; OR FOR ANY LOSS OF PROFIT, REVENUE, CONTRACTS OR SAVINGS, OR ANY OTHER DIRECT, INDIRECT, INCIDENTAL, SPECIAL OR CONSEQUENTIAL DAMAGES ARISING OUT OF YOUR USE OF OR INABILITY TO USE THIS INFORMATION, ANY DEFECT IN THE INFORMATION, OR THE BREACH OF THESE TERMS OR CONDITIONS, WHETHER IN AN ACTION IN CONTRACT OR TORT OR BASED ON A WARRANTY, EVEN IF ALK OR ITS LICENSORS HAVE BEEN ADVISED OF THE POSSIBILITY OF SUCH DAMAGES. Some States, Territories and Countries do not allow certain liability exclusions or damages limitations, so to that extent the above may not apply to you.
Export Control: You agree not to export from anywhere any part of the Data provided to you or any direct product thereof except in compliance with and with all licenses and approvals required under, applicable export laws, rules and regulations.
Entire Agreement: These terms and conditions constitute the entire agreement between ALK (and its licensors, including their licensors and suppliers) and you pertaining to the subject matter hereof, and supersedes in their entirety any and all written or oral agreements previously existing between us with respect to such subject matter.
Governing Law: The above terms and conditions shall be governed by the laws of the State of New Jersey. The courts of the State of New Jersey shall have exclusive jurisdiction to settle any and all disputes, claims and actions arising from or in connection with the Data provided to you hereunder. You agree to submit to such jurisdiction.
FOR CANADA TERRITORY DATA
The following provisions apply to data for Canada provided by Canada Post Corporation as the owner of the copyright, and Statistics Canada as the owner of all intellectual property rights, in the same data (collectively "Canada Post Data"). Neither Canada Post Data or Statistics Canada, shall be liable: (i) in respect of any claim, demand or action, irrespective of the nature or causes of the claim whatsoever, alleging any loss, injury or damages, direct or indirect, which may result from End User's use or possession of Canada Post Data; or (ii) in any way for loss of revenues or contracts, or any other consequential loss of any kind resulting from any defect in such Canada Post Data. End User agrees to indemnify and save harmless Canada Post and Statistics Canada and its officers, employees, agents from all claims alleging loss, costs, expenses, damages or injuries (including injuries resulting in death) arising out of End User's possession or use of Canada Data.

PC*MILER|Mapping User’s Guide xi
Table of Contents
PC*MILER® Product Line END-USER LICENSE AGREEMENT .................................. i 1. GETTING STARTED ................................................................................................. 1
1.1 Requirements ......................................................................................................................2 1.2 Installing PC*MILER|Mapping ..........................................................................................2 1.3 Technical Support ................................................................................................................3 1.4 Accessing User Guides for PC*MILER Products ..............................................................3 1.5 Distributing Applications That Use PC*MILERMapping .................................................4 1.6 Licensing .............................................................................................................................4
2. MAP LAYERS ............................................................................................................ 5 2.1 The Concept of Layers ........................................................................................................5 2.2 Layer Control ......................................................................................................................5 2.3 Overlapping Pins .................................................................................................................6
3. PROGRAMMING WITH THE DLL INTERFACE ........................................................ 8 3.1 Getting Started ....................................................................................................................8 3.2 Built-in Functionality ..........................................................................................................9 3.3 Using PC*MILER|Mapping DLL Functions ....................................................................11
3.3.1 Map Management Functions....................................................................................12 3.4 Map Manipulation Functions ............................................................................................14
3.4.1 Map Style and Dimensions ......................................................................................14 3.4.2 Map Drawers ............................................................................................................18 3.4.3 Scroll, Print, Copy and Redraw ...............................................................................19 3.4.4 Toggle Display Features ..........................................................................................19 3.4.5 Toggle Legends ........................................................................................................21 3.4.6 Adding or Removing Detail .....................................................................................22 3.4.7 Frame and Zoom Functions .....................................................................................23 3.4.8 Layer Control Functions ..........................................................................................25 3.4.9 Callback Functions...................................................................................................26 3.4.10 Callback Ability .....................................................................................................28 3.4.11 Displaying Pins, Trips, and Lines in the Map Window .........................................34 3.4.12 Saving .GIF Images ...............................................................................................36 3.4.13 Saving .PNG, .GIF, or .BMP Images .....................................................................37
3.5 Plot Functions ...................................................................................................................38 3.5.1 Pin and Label Functions...........................................................................................39 3.5.2 Assigning Alias Names To Colors ...........................................................................42 3.5.3 Assigning Alias Names To Bitmaps ........................................................................42 3.5.4 Setting a Custom Font For Labels ...........................................................................42 3.5.5 Pin Label Positioning ...............................................................................................43 3.5.6 Trip and Line Functions ...........................................................................................43 3.5.7 Pinmap Functions.....................................................................................................45 3.5.8 Map Region Functions .............................................................................................46
PC*MILER|Mapping User’s Guide xii
3.6 Geofence and Highlight Functions ...................................................................................47 3.6.1 Geofence Functions .................................................................................................47 3.6.2 State Highlight Functions ........................................................................................52 3.6.3 Street Highlight Functions .......................................................................................53
3.7 Management Functions .....................................................................................................54 3.8 Multiple Map Windows (‘Ex’ Functions).........................................................................55
4. USING PC*MILER|MAPPINGWITH EXCEL ............................................................ 57 4.1 Enabling the Add-In Manually .........................................................................................57 4.2 Disabling the Add-In Manually ........................................................................................59 4.3 Enable/Disable Autoloading of PC*MILER|Mapping .....................................................59 4.4 Functions Available Through the Excel Interface ............................................................59
4.4.1 Plotting an Icon ........................................................................................................60 4.4.2 PC*MILER|Mapping Icons .....................................................................................61 4.4.3 Plotting a Route Between Two Points .....................................................................63 4.4.4 Plotting a Line Between Two Points .......................................................................64 4.4.5 Deleting Icons ..........................................................................................................66 4.4.6 Deleting Lines ..........................................................................................................68 4.4.7 Deleting Trips ..........................................................................................................69 4.4.8 PCMG Functions Available in Excel .......................................................................70
5. USING THE PC*MILER|MAPPING COM SERVER ................................................ 71 5.1 Summary of the Objects ....................................................................................................71 5.2 PCMMapMgr PROPERTIES AND METHODS .............................................................75 5.3 PCMMap PROPERTIES AND METHODS ....................................................................76 5.4 PCMMapSettings PROPERTIES .....................................................................................95
6. TROUBLE-SHOOTING (HELPFUL HINTS) ............................................................ 97
APPENDIX A: LOCATION OF HEADER FILES & SAMPLE CODE ........................... 99
APPENDIX B: THE PCMSERVE.INI FILE ................................................................. 100
APPENDIX C: ERROR CODES ................................................................................ 105
APPENDIX D: ALPHABETICAL FUNCTION INDEX ................................................ 106
APPENDIX E: DEPRECATED API’S ........................................................................ 111
PC*MILER|Mapping User’s Guide 1
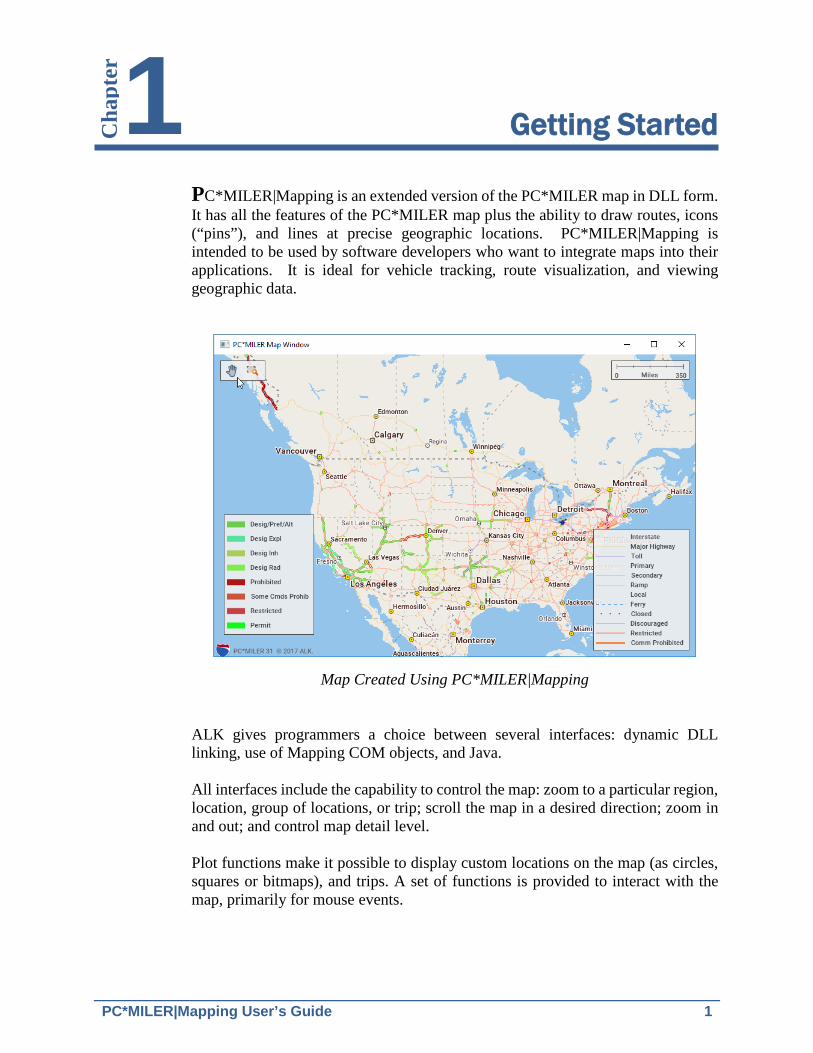
Getting Started PC*MILER|Mapping is an extended version of the PC*MILER map in DLL form. It has all the features of the PC*MILER map plus the ability to draw routes, icons (“pins”), and lines at precise geographic locations. PC*MILER|Mapping is intended to be used by software developers who want to integrate maps into their applications. It is ideal for vehicle tracking, route visualization, and viewing geographic data.
Map Created Using PC*MILER|Mapping ALK gives programmers a choice between several interfaces: dynamic DLL linking, use of Mapping COM objects, and Java. All interfaces include the capability to control the map: zoom to a particular region, location, group of locations, or trip; scroll the map in a desired direction; zoom in and out; and control map detail level. Plot functions make it possible to display custom locations on the map (as circles, squares or bitmaps), and trips. A set of functions is provided to interact with the map, primarily for mouse events.
1 Cha
pter
PC*MILER|Mapping User’s Guide 2
For Windows applications, the client application will not be able to attach to the window handle and write on top of the map window owned by the mapping dll. We suggest that you use our extensive set of API functions to plot on top of the map to ensure high quality graphics. For web applications, PC*MILER|Mapping includes the capability to generate GIF images in the desired dimensions. Since the GIF image is sent to the client application as a buffer or file, the client application may overlay their own graphics on top of our map. As stated above for Windows applications, we suggest that you use our extensive set of API functions to plot on top of the map to ensure high quality graphics. PC*MILER|Mapping allows users to draw routes and plot geographic information on the PC*MILER map from other Windows applications such as Microsoft Excel and Microsoft Access, and can be used by developers with their own applications. PC*MILER|Mapping support is provided for use with ‘C’, ‘C++’, Visual Basic, and Delphi.
1.1 Requirements PC*MILER|Mapping requires a base installation of PC*MILER or PC*MILER|Streets. For a complete list of PC*MILER platforms and requirements, see the PC*MILER User’s Guide. (To access the User’s Guide, see section 1.4 below.) Additionally, the Mapping application requires: • 7.5 MB extra free space on your hard disk
• A development system. Interface definitions for Borland C++ and Visual Basic are currently supported, but other development systems should have no trouble calling PC*MILER|Mapping.
1.2 Installing PC*MILER|Mapping PC*MILER|Mapping is a PC*MILER add-on product that can be installed when you install PC*MILER or at a later time. To install Mapping along with PC*MILER, you simply make sure that “PC*MILER|Mapping” is checked on the list of PC*MILER components when you are prompted during the installation process. If you are adding the PC*MILER|Mapping module at a later time, see the PDF User’s Guide that was included with the PC*MILER installation (refer to Adding New PC*MILER Products in Chapter 2). To access the User’s Guide, see section 1.4 below.
Chapter 1: Getting Started 3
1.3 Technical Support If you have unresolved questions about PC*MILER|Mapping or problems with the software, visit us at www.pcmiler.com/support for online support, product training resources, and much more. You can also contact us in the following ways: Phone: 1.800.377.6453, ext. 2 or 1.609.683.0220, ext 2 Fax: 609.252.8196 Email:[email protected] Web Site: www.pcmiler.com Hours: 8:00am – 5:00pm EST, Mon-Fri When calling, ask for “PC*MILER Technical Support”. Please be sure to have your PC*MILER|Mapping Product Key Code, version number, Windows version number, and hardware configuration information (manufacturer, speed, and monitor type) available before your call. Please include this information in your message if you are contacting us by email.
1.4 Accessing User Guides for PC*MILER Products
NOTE: You must have Adobe Acrobat Reader on your computer to properly view a PC*MILER product’s user guide. If you do not have this program installed already, a free copy can be downloaded from www.adobe.com. To make Adobe Reader your default reader, from within the Adobe Reader application select the Edit menu > Preferences > General and click Select Default PDF Handler. Select Adobe Reader from the drop-down, and click Apply then OK to close the Preferences dialog. To view the user guide for any PC*MILER product without first opening an application, select the Windows Start button > All Programs (or the equivalent on your system) > PCMILER 31 > and select one of the user guides. To search for a keyword or phrase in a user guide, use Adobe Reader’s Find option in the Edit menu or on the tool bar. All user guides can also be accessed at www.pcmiler.com/support.
PC*MILER|Mapping User’s Guide 4
1.5 Distributing Applications That Use PC*MILERMapping Purchasing PC*MILER|Mapping does not entitle you to redistribute any portions of this product. You may NOT redistribute ALK’s highway database, source code, interface definitions, or the PC*MILER for Applications DLL. Your clients can purchase additional versions of the PC*MILER engine and database directly from ALK. ALK Technologies’ sales representatives can be reached at 1-800-377-MILE.
1.6 Licensing Unless you buy additional licenses, only one copy of PC*MILER| Mapping at a time can attach to the highway database. You can connect more client applications by purchasing additional database licenses from ALK (multi-user licenses). If you plan to connect many users to a network version of the PC*MILER database, ALK has attractive pricing for LAN versions.
PC*MILER|Mapping User’s Guide 5
Map Layers
2.1 The Concept of Layers PC*MILER|Mapping uses the concept of layers to allow users to control certain types of map objects. All map objects are divided into layers such as Cities, Roads, Parks, Trips, etc. The user can control the visibility of each layer and the order in which they are displayed. For example, road shields normally should be drawn on top of roads.
2.2 Layer Control You can control what features are displayed and in what order features are drawn on the map using the Map Features dialog box, a part of the regular Win32 DLL interface (this feature is not included in COM interface or Java). To open this dialog, first click on the map with the right mouse button, then choose Features…from the menu that pops up.
Using the Map Features dialog box, you can hide or display all the listed features such as stop names, cities, road shields, road names, places of interest, etc.
2 Cha
pter
PC*MILER|Mapping User’s Guide 6
Features that are checked will be displayed. Click on a feature on the list to toggle the check mark on/off. Use the Show All and Hide All buttons to select or remove all the checkmarks. Click on the Reset button to return to the default settings. The order (from bottom to top) in which the features appear in the dialog box determines the order in which they are drawn: items on the bottom of the list are drawn under the ones at the top. To change a feature’s position on the list, highlight it and click the Raise, Lower, To Top, or To Bottom button. Click OK to close the Map Features box and redraw the map. Note that the features in the lower list can’t be moved to another position.
2.3 Overlapping Pins When you create a layer with multiple pins in the same location, DTOD|Mapping will create a group icon at that location that enables you to see a list of the pins in the cluster and information about them. This feature reduces the number of pins on the map and provides easy access to individual pins in close proximity to each other. To see the list of pins represented by this icon, first click on the map with the right mouse button, then choose Pick/Label>Pick Pins. The cursor shape will change to a hand with a pointing finger. Now click on the target icon to bring up the Selected Pins dialog box. This dialog lists all the pins at the location you clicked. The number of pins listed is in parentheses in the title bar.
To see more detailed information about a pin as shown below, highlight it on the list and click OK, or double-click on the item you wish to select.

Chapter 2: Map Layers 7
PC*MILER|Mapping User’s Guide 8
Programming With the DLL Interface Programming with the regular DLL interface involves linking your Windows application to the PC*MILER|Mapping DLLs (statically or dynamically), then creating a map window (it can be a child of an existing window, or a completely new window), and then working with this window through DLL calls. All functions of this interface start with the prefix “PCMG”. PC*MILER|Mapping also includes a set functions to create and work with multiple map windows (see section 3.8).
3.1 Getting Started After completing the Full Installation you should have a Windows program group containing an icon for a test program to verify your installation. Starting this program will bring up the map window displaying the North American highway system and allow you to use the map’s built-in functionality. The PC*MILER|Mapping installation includes the following two main DLLs: MapWindow DLL pcmgw32.dll (PC*MILER and PC*MILER|Worldwide)
pmwsmap.dll (PC*MILER|Streets) Provides functions to create and manipulate a map window that displays the PC*MILER network containing U.S., Canadian, and Mexican political boundaries, state boundaries, city names, highways, roads.
Mapping DLL pcmgmp32.dll (PC*MILER and PCMILER|Worldwide)
pmwscomm.dll (PC*MILER|Streets) This DLL provides functions to plot geographic information such as icons, routes, and lines in the map window.
3 Cha
pter
Chapter 3: Programming With the DLL Interface 9
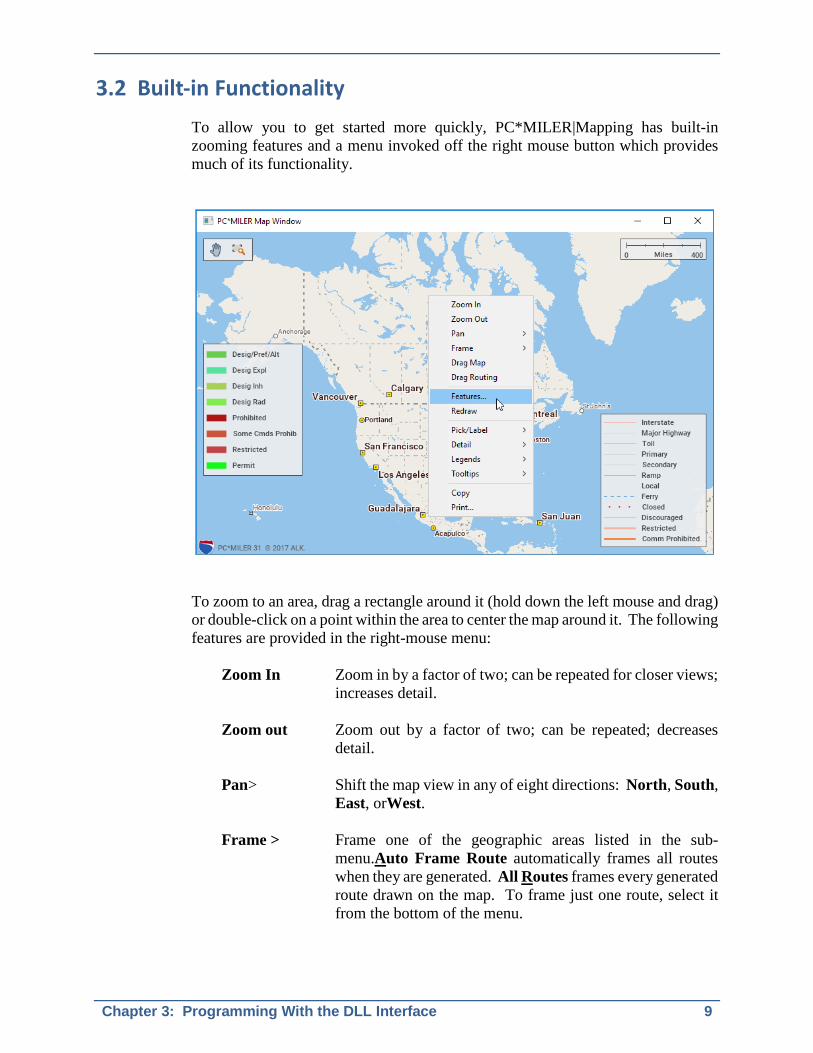
3.2 Built-in Functionality To allow you to get started more quickly, PC*MILER|Mapping has built-in zooming features and a menu invoked off the right mouse button which provides much of its functionality.
To zoom to an area, drag a rectangle around it (hold down the left mouse and drag) or double-click on a point within the area to center the map around it. The following features are provided in the right-mouse menu:
Zoom In Zoom in by a factor of two; can be repeated for closer views; increases detail.
Zoom out Zoom out by a factor of two; can be repeated; decreases
detail. Pan> Shift the map view in any of eight directions: North, South,
East, orWest. Frame > Frame one of the geographic areas listed in the sub-
menu.Auto Frame Route automatically frames all routes when they are generated. All Routes frames every generated route drawn on the map. To frame just one route, select it from the bottom of the menu.

PC*MILER|Mapping User’s Guide 10
Drag Map In Drag Map mode, the user can drag the map in any direction to change the view. Click the left mouse button, hold, and drag.
Drag Routing Enables the user to drag a route onto a different road,
creating a new via point. Features… Invoke the Features dialog box to control which features are
drawn on the map and the order in which they are drawn. Redraw Redraw the current display in the map window. Pick/Label > Choose one from the sub-menu:
Label Cities: Enable user to label and deselect locations and road intersections with the mouse.
Pick Pins: Enable user to click on the pins and display a window listing information about the icon. Clear: Delete all labels that have been added manually.
Detail > Add to, reduce or return to the default number of roads, road
names and place names drawn on the map. (Choose More, Less, or Default from the submenu).
Legends > Show/Hide the Scale of Miles, Road Legend, Route
Legend, Restriction Legend(with PC*MILER| HazMat installed), and/or Traffic Legend (with Traffic features installed).
Tooltips > Select Route Distance to have a tooltip appear when the
cursor is placed over a route on the map. The tooltip will display the distance between the selected point and the route’s origin, and between the selected point and the route’s final destination.
Copy Copythe map to the clipboard for retrieval in other Windows
programs.
Print… Print the map that is currently displayed in the map window.
Chapter 3: Programming With the DLL Interface 11
3.3 Using PC*MILER|Mapping DLL Functions This section explains how to create applications that use the PC*MILER|Mapping DLL’s. While this section is geared to ‘C’ programmers, it should apply to any language that can call DLL’s using the Pascal calling convention. Function references for all the subroutines described in Chapter 3 can also be found in the header files in the PC*MILER|Mapping installation – see Appendix A. Please have a look at the sample code included with PC*MILER|Mapping for a detailed example of how to use the DLL. The location of these files is usually C:\ALK Technologies\PCMILER31\Mapping. Building an application with the MapWindow DLL is similar to using other DLL’s from C programs. You’ll need to specify the directories that contain header and library files for the MapWindow DLLin your project. If you installed PC*MILER|Mapping in the default location C:\ALK Technologies\PCMILER31, the headers and the libraries will be in C:\ALK Technologies\ PCMILER31\Mapping. Sample code will also be in the Mapping directory. All the function declarations of pcmgw32.dll (or pmwsmap.dll for PC*MILER|Streets)are included in pcmgwin.h. All the function declarations of pcmgmp32.dll(or pmwscomm.dll for PC*MILER|Streets)are included in pcmgmap.h. Call LoadLibrary at runtime to load the DLL and then call GetProcAddress to retrieve the entry points for the functions exported from the DLL. Examples of this method using Visual C++ are included in the subdirectory MAPPING\MSVCPP of your PC*MILER installation. You can also either link the application with the supplied import libraries (pcmgw32.lib, pcmgmp32.lib), or include the IMPORTS section from the included def files (pcmgw32.def, pcmgmp32.def) in your project’s module definition file. NOTE: Beginning with Version 14, all PC*MILER DLL’s are compiled with Visual C++. So the included lib files may not be compatible with compilers other than Visual C++. We strongly recommend that the LoadLibrary method should be used. Differences in PC*MILER and PC*MILER|Streets DLL filenames and directories are summarized below:

PC*MILER|Mapping User’s Guide 12
PC*MILER and PC*MILER|Worldwide PC*MILER|Streets
C:\...PCMILER31\MAPPING C:\...PCMILER31\MAPPING
pcmgw32.dll pmwsmap.dll pcmgmp32.dll pmwscomm.dll pcmgw32.lib pmwsmap.lib pcmsmp32.lib pmwscomm.dll pcmgw32.def pmwsmap.def pcmsmp32.def pmwscomm.def PCMSERVE.INI PCMSERVE.INI
3.3.1 Map Management Functions
There are potentially four steps, using the functions described in this section, for opening and closing map windows: 1. Initialize the data for a new map window using PCMGInitMap(). 2. Create the new map window using either PCMGCreateMapWindow() or
PCMGCreateMapChild(). 3. Close the new map window using PCMGCloseMap(), or completely close the
application using PCMGCleanupMap(). 4. If PCMGCloseMap() was used to close a particular map window, you may
reinitialize and reopen a new map window (steps 1 and 2 above), or reopen an existing map window using PCMGResizeMapChild(). If you called PCMGCleanupMap() and then wish to use PC*MILER|Mapping again, you must call PCMGInitMap() as in step 1 above.
BOOL _PCMGWFN PCMGInitMap(const char *appName, const char *iniFile);
The function PCMGInitMapwill initialize data for a new map window. Your application must call this function before calling any other MapWindow DLL functions. The first argument is the name of the calling application. The second argument is the name of the INI file. The DLL uses this to locate the PC*MILER database. Both arguments may be Null. The default ini file name is pcmserve.ini. The return value is TRUE if the initialization is successful, otherwise the return value is FALSE.
Chapter 3: Programming With the DLL Interface 13
HWND _PCMGWFN PCMGCreateMapWindow(HWND parentHWnd, const char title, int width, int height);
PCMGCreateMapWindow()creates a new map window. It automatically displays the PC*MILER network containing U.S, Canadian and Mexican political boundaries, state boundaries, city names, highways and roads. The first argument is the handle to the parent window. If the first argument is NULL, PC*MILER|Mapping creates the map window as a child of the desktop window – PC*MILER|Mapping creates a standalone overlapped map window as a child to this parent window and sets the title, width and the height for the map window. This map window always stays on top of the parent window and it has a title and border. This function returns the valid handle to the map window if it creates the map window successfully. It returns NULL on error. This is how your application should call these functions: HWND mapWin; if (PCMGInitMap("Test App", "pcmserve.ini")) { mapWin = PCMGCreateMapWindow(parentWindow, "Test Map Window", 400, 300); }
HWND _PCMGWFN PCMGCreateMapChild(HWND parentWin);
PCMGCreateMapChild() creates a new map window as a child of the parent window. In this case, the map window is not a standalone window. Instead it gets created in the client rectangle of the parent window. The new map window does not have a title or border. The first argument, which is the handle to the parent window, must not be NULL. This function returns the valid handle to the map window, if it creates the map window successfully. It returns NULL in case of error or if the parent window handle is NULL. A Delphi canvas, Visual Basic Form or a Borland OWL TFrameWindow could all be parent windows. In order to resize the map canvas, you should forward resize messages from the parent to the map window child using PCMGResizeMapChild.
PC*MILER|Mapping User’s Guide 14
BOOL _PCMGWFN PCMGResizeMapChild(short redraw);
This function returns FALSE if the parent window does not exist. Otherwise it resizes a map canvas to the parent’s size. Calling this function will make the map child resize itself to fit exactly inside the parent window. Use this function only if you have created the map window with PCMGCreateMapChild. PCMGCloseMap();
PCMGCloseMap() is used to close a particular map window if open. If closing the application completely, use the function PCMGCleanupMap()(see below). BOOL _PCMGWFN PCMGCleanupMap();
PCMGCleanupMap()frees all map data and closes the PC*MILER|Mapping application. This function should only be used to completely close the application. To close a particular window, use PCMGCloseMap(). If you want to use PC*MILER|Mapping again after calling PCMGCleanupMap(), you first need to call PCMGInitMap() as in step 1 at the beginning of this section. HWND _PCMGWFN PCMGGetDefaultMapID();
Gets the default map ID.
3.4 Map Manipulation Functions
NOTE: The PushMapView, PopMapView, GetMapView, and SetMapView functions have been discontinued. The functions in this section allow you to manipulate the map window. All functions return a negative value in case of error. See Appendix Cfor a list of error codes.
3.4.1 Map Style and Dimensions
The functions below are for managing map styles and dimensions. LRESULT _PCMGWFN PCMGGetMapStyleList(char* pList, long lListSize);
The above function returns a list of valid style names the user can select from. The list of names will be delimited by the "|" character. The argument pList must be a
Chapter 3: Programming With the DLL Interface 15
pre-allocated memory buffer that gets populated with the list. long lListSize should indicate the available size of the buffer. LRESULT _PCMGWFN PCMGGetActiveMapStyle(char* pSyleName, longbufSize);
Gets the name of the currently active map style. Parameters: pStyleName Empty buffer where the active style name is placed bufSize Size of the empty buffer Return Values: <0 Internal error, operation failed >=0 Operation successful LRESULT _PCMGWFN PCMGSetMapStyle(const char* pStyleName);
Using the above function, the user can specify what style to use for the map. The name given will be checked to ensure it is a valid style name. If it is, the map’s style will be updated appropriately. If not, the map will remain unchanged and a -1 value will be returned. See the PC*MILER User’s Guide or Help for more on available map styles. LRESULT _PCMGWFN PCMGGetMapWindowDims(long *llLat, long *llLon, long *urLat, long *urLon);
The above function returns the lower left and upper right corners of the map projection rectangle in lat/long coordinates as long values. The user must supply four (4) valid long pointers that will be populated with the relevant information. After the data is returned, each value can be divided by 1000000.0 to get the decimal version of the lat/long values if desired.
LRESULT _PCMGWFN PCMGSetProjectionRect(float latitude1, float latitude2, float longitude2);
Allows the user to specify a desired projection rectangle for the PC*MILER map. The rectangle is defined by the lower left corner and the upper right corner of the desired viewing area using latitude/longitude coordinates in decimal format. PC*MILER will do its best to adjust the maps projection rectangle to match the user specified one. We cannot guarantee that it will match exactly though. Calling this function will generate a map resize event. Parameters: latitude1 Lower left hand corner latitude coordinate longitude1 Lower left hand corner longitude coordinate latitude2 Upper right hand corner latitude coordinate longitude2 Upper right hand corner longitude coordinate
PC*MILER|Mapping User’s Guide 16
Return Values: <0 Internal error, operation failed >=0 Operation successful LRESULT _PCMGWFN PCMGGetProjectionRect(float* latitude1, float* latitude2, float* longitude2);
Returns the current projection rectangle of the PC*MILER map. The coordinates will be the lower left and upper right corners of the rectangle. They will be given as latitude/longitude coordinates in decimal format. Parameters: latitude1 Lower left hand corner latitude coordinate longitude1 Lower left hand corner longitude coordinate latitude2 Upper right hand corner latitude coordinate longitude2 Upper right hand corner longitude coordinate Return Values: <0 Internal error, operation failed >=0 Operation successful LRESULT _PCMGWFN PCMGSetProjectionOnRadius(float latitude, float latitude, long radius);
Allows the user to specify the projection rectangle of the map based on a center point and desired viewing radius. The center point is specified as a latitutde/longitude coordinate in decimal format and the radius is specified in whole miles. Calling this function will generate a map resize event. Parameters: latitude Latitude of the desired center point longitude Longitude of the desired center point radius Desired radius (in miles) to encapsulate in the projection rectangle Return Values: <0 Internal error, operation failed >=0 Operation successful LRESULT _PCMGWFN PCMGSetProjectionCenter(float latitude, float longitude);
Allows the user to re-center the projection rectangle of the map to the specified coordinate. The dimensions and zoom level of the map will remain the same, just readjusted to the new center. The center coordinate is specified as a latitude/longitude coordinate in decimal format. Calling this function will generate a map resize event.
Chapter 3: Programming With the DLL Interface 17
Parameters: latitude Latitude of the desired center point longitude Longitude of the desired center point Return Values: <0 Internal error, operation failed >=0 Operation successful LRESULT _PCMGWFN PCMGPixelToLatLong(long x, long y, float *latitude, float *longitude);
Will convert a window (x,y) coordinate into a latitude/longitude coordinate within the map’s current projection rectangle. The lat/long coordinate will be given in decimal format. Parameters: x x-coordinate to be converted y y-coordinate to be converted latitude Where the converted latitude coordinate is stored longitude Where the converted longitude coordinate is stored Return Values: <0 Internal error, operation failed >=0 Operation successful LRESULT _PCMGWFN PCMGLatLongToPixel(float latitude, float longitude, long *x, long *y);
Will convert a latitude/longitude coordinate into a window (x,y) coordinate. The latitude/longitude coordinate is not required to be within the map’s current projection rectangle for this to work. This function can return coordinates outside the bounds of the actual map window. Parameters: latitude The latitude coordinate, in decimal format, to convert longitude The longitude coordinate, in decimal format, to convert x Where the converted x coordinate is stored y Where the converted y coordinate is stored Return Values: <0 Internal error, operation failed >=0 Operation successful

PC*MILER|Mapping User’s Guide 18
3.4.2 Map Drawers
LRESULT _PCMGWFN PCMGGetDrawerCount();
This function returns the number of drawers or features offered by the PC*MILER map. Examples of a drawer are Roads, Cities, Hazmat, Time Zones, etc. Return Values: <0 Internal error, operation failed >=0 The number of drawers currently loaded by the PC*MILER map LRESULT _PCMGWFN PCMGGetDrawerInfo(long index, char* displayName, long bufSize, bool* visible);
This function retrieves basic information about a specific PC*MILER drawer based on an index value. It returns the drawer’s display name as well as its current visibility state on the PC*MILER map. Parameters: index Index of the drawer for which to get information displayName Buffer in which to store the drawer’s display name displaySize Size of the display name buffer visible Boolean in which to store the drawer’s visibility state Return Values: <0 Internal error, operation failed >=0 Operation successful LRESULT _PCMGWFN PCMGSetDrawerVisible(const char* displayName, bool visible);
Allows the user to set whether a specific drawer is visible on the map or not. The drawer’s display name is used as the unique identifier for the specific drawer you want to set visibility for. Parameters: displayName Display name of the drawer visible Visibility state to set the drawer to Return Value: <0 Internal error, operation failed >=0 Operation successful
Chapter 3: Programming With the DLL Interface 19
3.4.3 Scroll, Print, Copy and Redraw
LRESULT _PCMGWFN PCMGScrollMapView(int direction);
This function allows you to scroll the map window one ‘page’ in a given compass direction. The argument ‘direction’ must be one of the values from the list below: DIR_WEST DIR_NORTHEAST DIR_EAST DIR_NORTHWEST DIR_NORTH DIR_SOUTHEAST DIR_SOUTH DIR_SOUTHWEST LRESULT _PCMGWFN PCMGPrintMap(BOOL showDlg, const char *title);
Print the map. Pass FALSE for showDlg to bypass PRINT dialog. The second argument, title, is the name that appears on top of the printed map. LRESULT _PCMGWFN PCMGPrintMapOnDC(HDC hDC, const char *title);
Print the map directly on a printer DC. Client app needs to prepare DC. The second argument, title, is the name that appears on top of the printed map. LRESULT _PCMGWFN PCMGCopyMap();
Copy the map to the clipboard. Allows pasting into other Windows applications. LRESULT _PCMGWFN PCMGRedraw();
Force a redraw of the entire map. For more on using this function, also see the description of PCMGSetRedraw() in section 3.7.
3.4.4 Toggle Display Features
LRESULT _PCMGWFN PCMGSetCityLabeling(BOOL onOff);
Turns city labeling on or off. When on, clicking a road intersection with the left mouse will label it with a city or intersection name. Clicking again will remove the label. LRESULT _PCMGWFN PCMGGetCityLabeling();
Gets the current status of “City Labeling Mode”, whether on or off.
PC*MILER|Mapping User’s Guide 20
LRESULT _PCMGWFN PCMGToggleCityPicking();
Turns “City Labeling Mode” on and off. When on, clicking a road intersection with the left mouse will label it with a city or intersection name. Clicking again will remove the label. LRESULT _PCMGWFN PCMGSetRoadLabeling(BOOL onOff);
(Deprecated in Version 28) Turns road labeling on or off. When on, clicking a road will place a shield on the road. Clicking again will remove the shield. LRESULT _PCMGWFN PCMGGetRoadLabeling();
(Deprecated in Version 28) Gets the on/off status of “Road Labeling Mode”. LRESULT _PCMGWFN PCMGToggleRoadPicking();
(Deprecated in Version 28) Turns “Road Labeling Mode” on and off. When on, clicking a road with the left mouse will place a shield on the road. Clicking again will remove the shield.
LRESULT _PCMGWFN PCMGSetPinPicking(BOOL onOff);
Turns pin picking on or off. When on, clicking a pushpin will display information about that pin.
LRESULT _PCMGWFN PCMGGetPinPicking();
Gets the current status of “Pin Picking Mode”, whether on or off. LRESULT DLLFUNC PCMGTogglePinPicking();
Turns “Pin Picking Mode” on and off. When on, clicking a pushpin displays information about that pin. LRESULT _PCMGWFN PCMGClearLabels();
Clears all labels created by the user when in “City Labeling” mode. LRESULT _PCMGWFN PCMGClearLabels();
Clears all labels created by the user when in “City Labeling” mode. LRESULT _PCMGWFN PCMGGetLayerVisible(const char *buffer, bool *onoff);
Returns True is the layer is visible, False if it is not.

Chapter 3: Programming With the DLL Interface 21
NOTE: If you zoom out from an area that you have custom labelled as described above, the labels will disappear as the level of detail decreases. When you zoom back in again, your labels will reappear. LRESULT _PCMGWFN PCMGToggleRouteDistTooltip();
Toggles the state of distance to destination tooltips on route lines. LRESULT _PCMGWFN PCMGSetRouteDistTooltip(BOOL onOff);
Used to explicitly set the state of distance to destination tooltips on route lines on or off. LRESULT _PCMGWFN PCMGGetRouteDistTooltip ();
Returns the current state of the distance to destination tooltip feature, on or off.
3.4.5 Toggle Legends
NOTE: Legends can be dragged around the map window.
LRESULT DLLFUNC PCMGSetRoadLegend(BOOL onOff);
Turns the Road Legend on and off. The road legend identifies the road types displayed on the map.
LRESULT _PCMGWFN PCMGToggleRoadLegend();
An alternate way to turn the Road Legend on/off. LRESULT _PCMGWFN PCMGGetRoadLegend();
Gets the status of the “Road Legend” function, whether on or off. LRESULT _PCMGWFN PCMGToggleRouteLegend();
Toggles the Route Legend on/off. The Route Legend identifies routes on the map by color and number and may be dragged around the map. LRESULT _PCMGWFN PCMGSetRouteLegend(BOOL onOff);
Explicitly sets the visibility state of the Route Legend, on or off. LRESULT _PCMGWFN PCMGGetRouteLegend();
Returns the visibility of the Route Legend, on or off.

PC*MILER|Mapping User’s Guide 22
LRESULT DLLFUNC PCMGToggleRestrictionsLegend;
Toggles the visibilityf the Restrictions Legend on the map. This legend identifies the PC*MILER|HazMat road types displayed on the map. LRESULT DLLFUNC PCMGSetRestrictionsLegend(BOOL onOff);
Explicitly sets the visibility of the Restrictions Legend, on or off. LRESULT DLLFUNC PCMGGetRestrictionsLegend;
Returns the visibility state of the Restrictions Legend, on or off. LRESULT DLLFUNC PCMGToggleTrafficLegend;
Toggles the visibility of the Traffic Legend on the map. This legend identifies the colors that are used to show traffic conditions on the map. LRESULT DLLFUNC PCMGSetTrafficLegend(BOOL onOff);
Explicitly sets the visibility of the Traffic Legend, on or off. LRESULT DLLFUNC PCMGGetTrafficLegend;
Returns the visibility state of the Traffic Legend, on or off. LRESULT DLLFUNC PCMGSetScale(BOOL onOff);
Turns the Scale of Miles on and off. When distances are measured in kilometers, displays a Scale of Kilometers. LRESULT _PCMGWFN PCMGGetScale();
Returns the visibility of the Scale of Miles legend, whether on or off. LRESULT _PCMGWFN PCMGToggleScale();
Toggles the Scale of Miles on and off.
3.4.6 Adding or Removing Detail
LRESULT _PCMGWFN PCMGAddDetail();
Increases the number of roads, road names and city names displayed. Each call to the function increases the level of detail by the same amount as zooming in a level. May be called multiple times to dramatically increase the level of detail.
Chapter 3: Programming With the DLL Interface 23
LRESULT _PCMGWFN PCMGRemoveDetail();
Decreases the number of roads, road names and city names displayed. Each call to the function decreases the level of detail by the same amount as zooming out a level. The function may be called multiple times to dramatically decrease the level of detail. LRESULT _PCMGWFN PCMGDefaultDetail();
Resets the number of roads, road names and city names displayed to the default. LRESULT _PCMGWFN PCMGGetDetailAdjust();
Returns the detail level adjustment value; i.e. the amount the user has increased or decreased the detail level over the base value. LRESULT _PCMGWFN PCMGGetDetailLevel();
Returns the current detail level of the map.
3.4.7 Frame and Zoom Functions
LRESULT _PCMGWFN PCMGSetUSWindow();
Frames the continental United States. LRESULT _PCMGWFN PCMGSetNAWindow();
Frames North America. LRESULT _PCMGWFN PCMGSetCanWindow();
Frames Canada. LRESULT _PCMGWFN PCMGSetMexWindow();
Frames Mexico. NOTE: The above functions will not be supported for 32-bit in future releases of PC*MILER|Mapping. Users should be using the new set of frame functions below. Use the following functions to frame different areas of the map. LRESULT _PCMGWFN PCMGNumFrameAreas(); LRESULT _PCMGWFN PCMGGetFrameArea(int index, char *buffer, int bufSize);
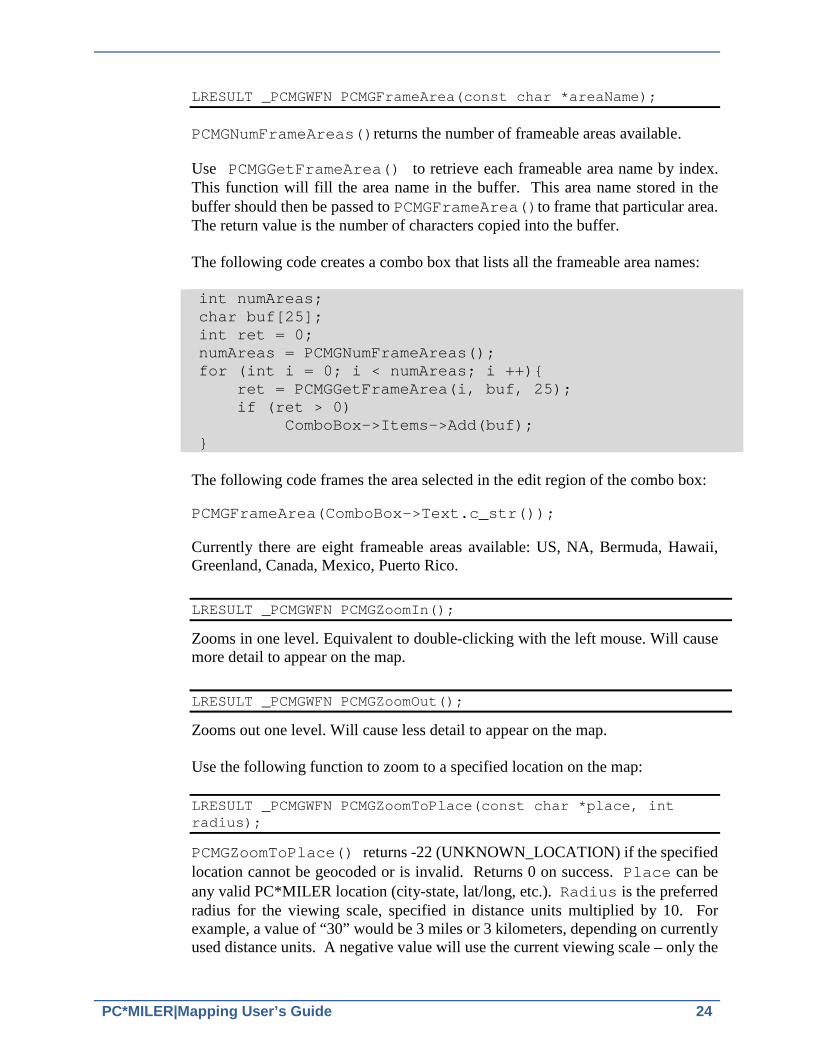
PC*MILER|Mapping User’s Guide 24
LRESULT _PCMGWFN PCMGFrameArea(const char *areaName); PCMGNumFrameAreas()returns the number of frameable areas available. Use PCMGGetFrameArea() to retrieve each frameable area name by index. This function will fill the area name in the buffer. This area name stored in the buffer should then be passed to PCMGFrameArea()to frame that particular area. The return value is the number of characters copied into the buffer. The following code creates a combo box that lists all the frameable area names: int numAreas; char buf[25]; int ret = 0; numAreas = PCMGNumFrameAreas(); for (int i = 0; i < numAreas; i ++){ ret = PCMGGetFrameArea(i, buf, 25); if (ret > 0) ComboBox->Items->Add(buf); }
The following code frames the area selected in the edit region of the combo box: PCMGFrameArea(ComboBox->Text.c_str()); Currently there are eight frameable areas available: US, NA, Bermuda, Hawaii, Greenland, Canada, Mexico, Puerto Rico. LRESULT _PCMGWFN PCMGZoomIn();
Zooms in one level. Equivalent to double-clicking with the left mouse. Will cause more detail to appear on the map. LRESULT _PCMGWFN PCMGZoomOut();
Zooms out one level. Will cause less detail to appear on the map. Use the following function to zoom to a specified location on the map: LRESULT _PCMGWFN PCMGZoomToPlace(const char *place, int radius);
PCMGZoomToPlace() returns -22 (UNKNOWN_LOCATION) if the specified location cannot be geocoded or is invalid. Returns 0 on success. Place can be any valid PC*MILER location (city-state, lat/long, etc.). Radius is the preferred radius for the viewing scale, specified in distance units multiplied by 10. For example, a value of “30” would be 3 miles or 3 kilometers, depending on currently used distance units. A negative value will use the current viewing scale – only the
Chapter 3: Programming With the DLL Interface 25
center of the map will change, the map scale stays the same. A value of 0 for the radius will cause Mapping to use the default radius specified in the PCMSERVE.INI, for example: [Defaults] FrameRadius=30
3.4.8 Layer Control Functions
LRESULT _PCMGWFN PCMGShowLayer(const char *pLayerName);
LRESULT _PCMGWFN PCMGHideLayer(const char *pLayerName);
Using these functions, you can show or hide a layer by its display name. Layers are groups of features on the map. Some layers, like roads and political boundaries, are provided with the map. Other layers, like groups of pins, routes and lines, are created by the user. IMPORTANT NOTE: Beginning in Version 28, a new “Large Cities” layer has been added for large cities like New York, Philadelphia, Los Angeles, etc. To show/hide all cities on the map, two separate calls must be made for “Cities” and “Large Cities”. LRESULT _PCMGWFN PCMGPlotLabel(LAYER layerID, OBJECT_ID ID, IMPORT importance, STYLE style, LOCATION locations, LPCSTR options);
Using this function, you can highlight a place on the map. This draws a stop label similar to PC*MILER stops. LRESULT _PCMGWFN PCMGDeleteLabel(LAYER layerID, OBJECT_ID ID);
Using this function, you can delete a highlighted label from the map. LRESULT DLLFUNC PCMGSetUseOverlapIcon(const char *playerName, BOOL onOff);
This function enables or disables the display of the overlap icon by layer for multiple pins that overlap. LRESULT DLLFUNC PCMGSetOverlapIconName(const char *playerName, const char *pIconName);
Allows the user to specify the icon to be used by layer as an overlap icon.
PC*MILER|Mapping User’s Guide 26
3.4.9 Callback Functions
Callback functions are used to enable user interaction between the map and the rest of the application, in particular, notification of mouse events related to pin picking. This is provided so that users can override the default behavior that the PC*MILER|Mapping window exhibits when the user is performing pin picking. More information is available below in section 3.4.10, Callback Ability. LRESULT DLLFUNC PCMGSetReceiver(HWND hWnd);
This function assigns the provided window handle to receive specific mouse event messages from the PC*MILER|Mapping window. The PC*MILER|Mapping window will send standard window messages to the specified window. This window must have a standard message handling callback function defined or else it will not receive any of these window messages. Read more on the types of messages that are sent in section 3.4.10, Callback ability. LRESULT DLLFUNC PCMGSetCallBack(BOOL onOff);
This function sets the use of callbacks on or off. If callbacks are turned on then the PC*MILER|Mapping window will broadcast specific mouse event messages to the previously designated window handle. When turned off, the mouse event messages will not be broadcast and the PC*MILER|Mapping window will perform the default mouse actions. LRESULT_PCMGWFN PCMGSetMouseInterceptCallback(MouseInterceptCallback callback);
This function registers a callback function that will be passed a specific set of mouse events as they happen on the map. This callback will be the first function to receive these events and will give the user the first chance to act on them before the PC*MILER map does. The mouse messages we will send to this callback are: WM_LBUTTONDOWN (0x0201) WM_LBUTTONUP (0x0202) WM_LBUTTONDBLCLK (0x0203) WM_RBUTTONDOWN (0x0204 WM_RBUTTONUP (0x0205) WM_MOUSEMOVE (0x0200) WM_MOUSELEAVE (0x02A3) Parameters: callback A function pointer to the user defined callback function Return Values: <0 Internal error, operation failed >=0 Operation successful

Chapter 3: Programming With the DLL Interface 27
The callback function signature is defined as follows: typedef cdecl bool (*MouseInterceptCallback) (unsigned long mapID, unsigned long mode, unsigned long msgID, long windowX, long windowY, unsigned long modKeys); Parameters: mapID Unique ID of the map generating the mouse message mode Value indicating current mode of the mouse. This mode is
PC*MILER-specific msgID One of the seven mouse event ID’s listed above windowX x window coordinate where the mouse event occurred windowY y window coordinate where the mouse event occurred modKeys Value indicating what (if any) modifier keys were pressed during
the mouse event Return Values: True Indicates that the callback has handled the given mouse message. This
will cause the PC*MILER map to bypass any further processing of this mouse message.
False Indicates that the callback did not fully handle the message. The PC*MILER map will be allowed to process this message as normal.
LRESULT_PCMGWFN PCMGSetMapResizeCallback(MapResizeCallback callback);
This function registers a callback function that will be called after every map resize event generated by the PC*MILER map. The callback is simply used to pass the user information about the map after an event occurs. Parameters: callback A function pointer to the user-defined callback function. Return Values: <0 Internal error, operation failed >=0 Operation successful The callback function signature is defined as follows: typedef cdecl void (*MapResizeCallback) (unsigned long mapID, long zoomLevel, float latitude1, float longitude1, float latitude2, float longitude2); Parameters: mapID Unique ID of the map generating the resize event zoomLevel Current zoom level of the map latitude1 Current lower left latitude of the map projection rectangle in
decimal format longitude1 Current lower left longitude of the map projection rectangle in
decimal format
PC*MILER|Mapping User’s Guide 28
latitude2 Current upper right latitude of the map projection rectangle in decimal format
longitude2 Current upper right longitude of the map projection rectangle in decimal format
3.4.10 Callback Ability
CRITICAL NOTE For PREVIOUS MAPPING CALLBACK USERS: In Version 25, all mouse messages were updated to include the map ID value at the end of the data string in lpData. Customer code that parses this string may have to be updated to properly handle this new value at the end of the string. PC*MILER|Mapping has the ability to broadcast specific mouse messages to the calling application based on user interaction. There are four different mouse actions that will cause a mouse event message to be broadcast:
1) Left mouse click of a pin 2) Right mouse click of a pin 3) General mouse movement 4) Mouse mode changed
If callbacks are turned on, a mouse event message will be generated and sent to the registered callback window. The contents of the message are packed into a COPYDATASTRUCT, which is defined below. struct COPYDATASTRUCT {
Unsigned long dwData; Unsigned long cbData; Void* lpData;
}
The contents of each field of this structure are detailed below: dwData: The PC*MILER|Mapping code puts two separate values inside of this unsigned long value, one value is in the lower 16 bits, the other in the upper 16 bits. The upper 16 bits contains a value indicating the message type being returned. The lower 16 bits contains a value indicating what the current mouse mode is. The upper 16 bits are the most important as this value will tell you which mouse action occurred and dictates how the rest of the structure should be interpreted. There are 5 possible values that can be returned from the PC*MILER|Mapping mouse events:
1 = Mouse Move event. 2 = Mouse Mode Changed event.
Chapter 3: Programming With the DLL Interface 29
9 = Left Mouse Click event on a selected pin. 10 = Left Mouse Click event on no pin. 11 = Right Mouse Click event on a pin or set of pins.
In C/C++ customers can use the macro HIWORD() to extract the upper 16 bits of this variable and LOWORD() to extract the lower 16 bits. cbData: The value of this variable tells us how many bytes are pointed to by the lpData variable. lpData: If this variable is not NULL, it will point to a C-style string containing more detailed information related to the mouse event being reported. In each case, if there are multiple individual pieces of data they will be separated by the | character. Below are the details of what each mouse mode puts into this string.
Mouse Move: “location|mapID”. The location could either be a lat/long pair, a city name, or a road name. It is dependent on what the mouse cursor is currently moving over. Right Mouse Click on a pin: “pin_layer_name|pin_name|pin_location|x|y|mapID” Left Mouse Click: message type 9: “pin_layer_name|pin_name|pin_location|mapID” message type 10: ”None|mapID”
Mouse Mode Change: “mapID”
Sample code including lat/long coordinates is below: /************************************************* * This file contains two examples of how to use the PCMGWIN DLL from 'C' and 'C++'. Code similar to this structure can be used from Delphi, Visual Basic, PowerBuilder, etc. This example contains code to handle the callback feature. * Note: this program requires you to link with BOTH the libs for PCMGMAP.DLL and PCMGWIN.DLL. i.e. link with the files PCMGMAP.LIB and PCMGWIN.LIB. * Copyright 1999-2016, ALK Technologies, Inc. ALL RIGHTS RESERVED. *************************************************/ #include <windows.h> #include <owl\dialog.h> #include <stdio.h> #include <string.h> #include "pcmgmap.h"
PC*MILER|Mapping User’s Guide 30
#include "pcmgwin.h" HWND OpenMapWindow(HWND parentWindow); void PlotExamples();
char iniFileName[100] = "pcmserve.ini"; #ifdef __cplusplus #include <owl/applicat.h> #include <owl/framewin.h> #include <owl/listbox.h> #define BUFLEN 256 #define LISTID 100 #define LISTWIDTH 600 #define LISTHEIGHT 400 #define CM_SAVE 0x100 class TMsgList : public TListBox { public: TMsgList(); };
TMsgList::TMsgList() : TListBox(0, LISTID, 0, 0, LISTWIDTH, LISTHEIGHT) {
Attr.Style |= LBS_DISABLENOSCROLL | LBS_NOINTEGRALHEIGHT;
Attr.Style &= ~LBS_SORT; }
/************************************************/ class TEngineWindow : public TFrameWindow { public: TEngineWindow(const char *title); int AddString(const char *str)
{ return(pListBox->AddString(str)); } LRESULT StringMessage(WPARAM, LPARAM); // Save menu command... void SetupWindow(); private: TMsgList *pListBox; DECLARE_RESPONSE_TABLE(TEngineWindow); }; DEFINE_RESPONSE_TABLE1(TEngineWindow, TFrameWindow) EV_WM_SYSCOMMAND, EV_MESSAGE(WM_COPYDATA, StringMessage), END_RESPONSE_TABLE;

Chapter 3: Programming With the DLL Interface 31
LRESULT TEngineWindow::StringMessage(WPARAM wParam, LPARAM lParam) { int ret; char *str = NULL; char buffer[BUFLEN]; COPYDATASTRUCT *cds = (COPYDATASTRUCT *)lParam; if (!cds) return(-1); switch (HIWORD(cds->dwData)) {
case 1: // lpData contains the lat long coords
wsprintf(buffer, "MSG_STRING: %s", (char *) cds->lpData);
return 1; break; case 2:
/* These are the label/pick modes that can be selected from the menu */
// No Mode = 0 // Label Cities = 2 // Pick Pins = 4 wsprintf(buffer, "MSG_MODE: %ld",
(long) LOWORD(cds->dwData)); break; case 9:
/* when the user clicks with the left mouse button then the folowing information is returned: */
// layerId, pinId, location // the information is separated with '|''s
wsprintf(buffer, "MSG_PICK_SYMBOL: %ld", (long) cds->lpData); break;
/* when the user clicks with the left mouse button on any empty location on the map, then the folowing information is returned (works only in pin-picking mode): */ case 10: /* location (latitude/longitude) precision can be controlled by LatLongDigits parameter in Pcmserve.ini (see Appendix) */
wsprintf(buffer, "MSG_PICK_LOCATION: %ld", (long) cds->lpData);
PC*MILER|Mapping User’s Guide 32
break; case 11: /* Only if the PCMGSetCallBack has been called to enable callbacks i.e. onOff = 1, then the menu, when the right mouse is clicked, has been disabled, so that the application can bring up its own menu */ /* The following pin information is also returned: layerId, pinId, location, xCoord, yCoord */ /* the information is separated with '|''s */
wsprintf(buffer, "MSG_RT_MOUSE_CLK: %ld", (long) cds->lpData); break;
}
str = buffer; if (pListBox && str) {
ret = pListBox->AddString(str); // Do not delete the string: is managed by calling app. return(ret);
} else
return(-1); }
TEngineWindow::TEngineWindow(const char *title) :
TFrameWindow(0, title, new TMsgList(), TRUE) {
pListBox = dynamic_cast<TMsgList *> (GetClientWindow());
} void TEngineWindow::SetupWindow() {
TFrameWindow::SetupWindow(); }
/************************************************* COMMON FUNCTIONS: *************************************************/
/* Open a new PC*MILER|MapWin window */ HWND OpenMapWindow(HWND parentWindow, char *iniFile) {
HWND mapWin;

Chapter 3: Programming With the DLL Interface 33
/* Load map data. Pass in calling application name and INI file name */
if (PCMGInitMap("Test App", iniFile)) {
/* Must have a valid parentWindow */ if (!parentWindow)
parentWindow = ::GetDesktopWindow(); /* Create an OVERLAPPED window (not a child window) */
mapWin = PCMGCreateMapWindow(parentWindow, "PC*MILER Test MapWindow", 400, 300);
} return(mapWin);
}
/************************************************* * CLASS LIBRARY EXAMPLE (BORLAND OWL SPECIFIC): * WARNING: This will only compile under BORLAND 4.0 or later! You must adapt this code for Visual C++ and MFC. *************************************************/
class TestApp : public TApplication {
public: TestApp (char far *name) : TApplication(name) { } ~TestApp() { PCMGCleanupMap(); } void InitMainWindow(); void InitInstance();
}; void TestApp::InitInstance() {
HWND mapWindow; TApplication::InitInstance();
/* Initialize and create the map window */ mapWindow = OpenMapWindow(MainWindow->HWindow, iniFileName); PCMGSetReceiver(MainWindow->HWindow); PCMGSetCallBack(1); if (!mapWindow)
::MessageBox(MainWindow->HWindow, "Could not create PCMGW32 DLL map", "Error", MB_OK);
}
void TestApp::InitMainWindow() {
TFrameWindow *pFrame;
PC*MILER|Mapping User’s Guide 34
/* Create the application's main window */ pFrame = new TEngineWindow("Test App [Main
Window]"); SetMainWindow(pFrame); pFrame->Attr.X = 100; pFrame->Attr.Y = 100; pFrame->Attr.W = 600; pFrame->Attr.H = 400;
}
int OwlMain(int argc, char **argv)
{ if (1 < argc) strcpy (iniFileName, argv[1]); TestApp testApp("Test App"); return(testApp.Run());
}
#endif /* #ifdef __cplusplus */
3.4.11 Displaying Pins, Trips, and Lines in the Map Window
There are several ways to display pins in the map window using the Mapping DLL, pcmgmp32.dll (for PC*MILER|Streets, pmwscomm.dll). One way is to link both the MapWindow DLL and the Mapping DLL with your application. In this case, the Mapping DLL directly calls the MapWindow DLL functions. Or you can have two separate applications linking each DLL individually. In this case, PC*MILER|Mapping sends Windows messages to the map window to display the icons. When the map window receives these messages, it processes these messages to display icons on the map. Make sure that you have the map window open before calling any of the PC*MILER|Mapping functions because the communication fails otherwise. By default, the PC*MILER|Mapping communicates with a window whose title has ‘PC*MILER’ as the first eight characters. However, you can create a map window with any title. Use the functionPCMGSetDisplayWindow(provided in PC*MILER|Mapping) to connect the map window to PC*MILER|Mapping. PCMGSetDisplayWindowis used to give PC*MILER|Mapping a handle to the map window.

Chapter 3: Programming With the DLL Interface 35
You need to call SetDisplayWindow before you call any other PC*MILER|Mapping functions. If you are linking both the DLL’s in your application, then your code should look like this: HWND mapWin; if (PCMGInitMap("Test App", iniFile)) { /* Create an OVERLAPPED window */ mapWin = PCMGCreateMapWindow(parentWindow, "Test Map", 400, 300); /* Now point PC*MILER|Mapping DLL at the new map window and DLL */ if (mapWin) { PCMGSetDisplayWindow (mapWin); PCMGPlotPin("Pins", "Truck1", "1", "Red Truck", "Chicago, IL", "Test Truck"); } }
If you don’t link these two DLLs together, and if you are trying to display icons in the map window from other applications that are linked with the Mapping DLL, you need to do the following: 1. Find the map window’s window handle. 2. Call PCMGSetDisplayWindow with the handle found in Step 1. The sample Borland C++ program to do this is below. The complete example program is in the file mpwint32.cpp located in the mapping directory of your PC*MILER installation. int DemoRun() { HWND mapwin = FindDisplayWindow(); if (mapwin) { PCMGSetDisplayWindow (mapwin); PCMGPlotPin("Layer2", "A Pin", "1", "Red Truck 5", "Pittsburgh,PA", "Label1|Label2|Label3"); } return 0; }
PC*MILER|Mapping User’s Guide 36
static HWND FindDisplayWindow() { HWND win; // Return value is 0 if found, 1 if not. if (0 == EnumWindows(FindClientWin, (long) &win)) return (win); else return (NULL); } //Title of the map window #define MAP_WIN_TITLE "Test Map" static BOOL CALLBACK FindClientWin (HWND win, LPARAM param) { char buffer[256]; HWND *pWin = (HWND *)param; // If window has no title, go to the next one. if (0 == GetWindowText(win, buffer, 255)) return(1); if( 0 == strncmp(MAP_WIN_TITLE, buffer, strlen(MAP_WIN_TITLE))) { *pWin = win; return(0); } return(1); }
3.4.12 Saving .GIF Images
The following functions enable you to create and save .GIF map images. long PCMGCreateGifFile(long sx, long sy, char* buffer, long scale_loc);
The above function saves the .GIF image of the current map to a given file. X and y are the dimensions of the image. Returns 1 on success. The following constants represent the five possible options for positioning the legend: 0 NO_SCALE 1 TOP_LEFT_SCALE 2 TOP_RIGHT_SCALE
Chapter 3: Programming With the DLL Interface 37
3 BOTTOM_LEFT_SCALE 4 BOTTOM_RIGHT_SCALE BOTTOM_RIGHT_SCALE is the default position. long PCMGCreateGifBuffer(long x, long y, char *buffer, long *bufLen, scale_loc);
This function gets called twice, once to return the buffer length, and a second time to fill the buffer based on the length that was returned. The constants listed above for positioning the legend apply to this function as well. Here is how the function would be used in C#: PCMGMap.PCMGCreateGifBuffer(x, y, null, ref bufLen, 0); imageBuffer = new StringBuilder(bufLen); ret = PCMGMap.PCMGCreateGifBuffer(x, y, imageBuffer, ref bufLen, 0); filename += “.gif”; Interrogate the value of “ret”.
3.4.13 Saving .PNG, .GIF, or .BMP Images
The following functions enable you to save .PNG, .GIF or .BMP map images. long PCMGCreateImageFile(int ImageFormat long sx, long sy, const char* buffer);
Example in C#: <image button handler>
{ int x = pbMapWin.Size.Width; int y = pbMapWin.Size.Height; <which image button was selected?> imageFormat = 2; fileExt = ".gif"; imageFormat = 3; fileExt = ".png"; imageFormat = 1; fileExt = ".bmp"; ret = PCMGMap.PCMGCreateImageFile(imageFormat, x, y, <filename>); <if (ret < 0) then error> }
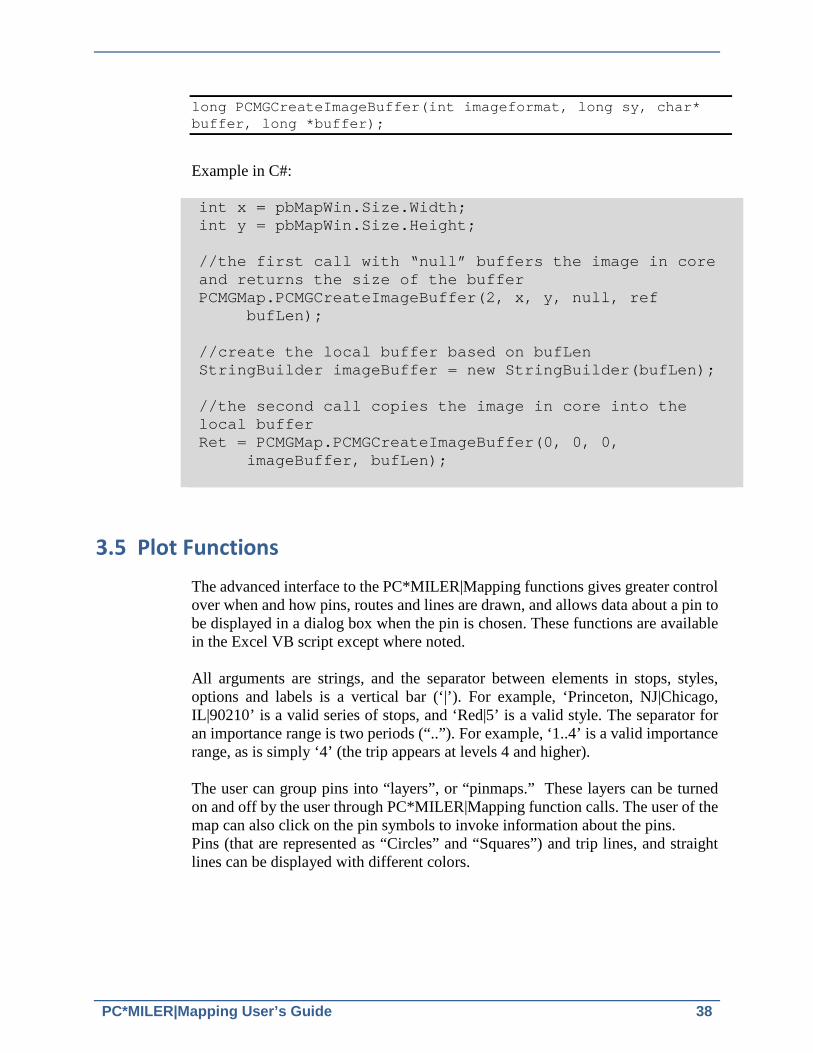
PC*MILER|Mapping User’s Guide 38
long PCMGCreateImageBuffer(int imageformat, long sy, char* buffer, long *buffer);
Example in C#: int x = pbMapWin.Size.Width; int y = pbMapWin.Size.Height; //the first call with “null” buffers the image in core and returns the size of the buffer PCMGMap.PCMGCreateImageBuffer(2, x, y, null, ref bufLen); //create the local buffer based on bufLen StringBuilder imageBuffer = new StringBuilder(bufLen); //the second call copies the image in core into the local buffer Ret = PCMGMap.PCMGCreateImageBuffer(0, 0, 0, imageBuffer, bufLen);
3.5 Plot Functions The advanced interface to the PC*MILER|Mapping functions gives greater control over when and how pins, routes and lines are drawn, and allows data about a pin to be displayed in a dialog box when the pin is chosen. These functions are available in the Excel VB script except where noted. All arguments are strings, and the separator between elements in stops, styles, options and labels is a vertical bar (‘|’). For example, ‘Princeton, NJ|Chicago, IL|90210’ is a valid series of stops, and ‘Red|5’ is a valid style. The separator for an importance range is two periods (“..”). For example, ‘1..4’ is a valid importance range, as is simply ‘4’ (the trip appears at levels 4 and higher). The user can group pins into “layers”, or “pinmaps.” These layers can be turned on and off by the user through PC*MILER|Mapping function calls. The user of the map can also click on the pin symbols to invoke information about the pins. Pins (that are represented as “Circles” and “Squares”) and trip lines, and straight lines can be displayed with different colors.

Chapter 3: Programming With the DLL Interface 39
3.5.1 Pin and Label Functions
NOTE: See the following sections for descriptions of how to assign alias names to colors and bitmaps, and how to create custom settings for fonts in labels. long PCMGPlotPin(LAYER layerID, OBJECT_ID ID, IMPORT importance, MARKER symbol, LOCATION location, PIN_LABEL labels);
Create or update a pin. The pin is uniquely identified by layerID and ID. If the given pin does not exist, it is created. If it does exist, all data for the pin is updated. The return code is negative if there is an error. If the layer identified by layerID does not exist, then a layer is created. The field ID can be any text string. The field importance determines a level of importance for the given pin. The importance of a pin determines at what level of detail the pin is drawn. Level of detail works as follows: as the user zooms in to tighter areas on the map, the level of detail increases. This means that less significant roads, places, and pins come into view as the user zooms in. There are six levels of detail. For pins, importance can be a number between 1 and 6. Importance level 1 is the most important; pins with importance level 1 are always shown. Pins with importance level 6 are only shown when the user is zoomed in very tight. If you do not care about importance, specify “1” for the importance argument. Pins with importance level 1 will always be shown. Importance can be specified as a range, such as “1..3”. If a pin’s importance is specified as a range, then it will only be shown when the map’s level of detail falls into that range. For example, suppose a pin is assigned the importance range “1..5”. The pin will show up when the map’s level of detail is between 1 and 5. Detail level 5 roughly corresponds to a zoom level of a single state. Therefore, the pin will not show up when the map is zoomed in tighter than a single state. Ranges can be useful when trying to reduce clutter on the map. Using importance ranges, one could set up different views of the same data, each with different levels of detail. For example, suppose one is trying to plot 200 trucks in two neighboring states. When the map is zoomed to the entire United States, the 200 truck icons in those two states become very cluttered. To solve this problem, one could create two pins--one for each state--that are displayed at importance levels “1..3”. Then, the 200 truck pins could be marked with importance levels “4..6”. This has the effect of showing two pins--one in each state--at the U.S. level. As the user “zooms down” to the state level, the two aggregate pins will disappear, and the 200 truck pins will appear.

PC*MILER|Mapping User’s Guide 40
The field symbol must specify a valid symbol. Symbols can either be the names of .BMP files, or they can be built-in PCMGS symbols. See section 4.4.2, PC*MILER|Mapping Icons for symbols provided with PC*MILER|Mapping. The field location is a text string specifying one of the following:
Location Type Description Examples Postal Code A postal code. (See the PCMSERVE.INI
Appendixon setting the U.S. vs. Mexican postal code format default.)
80903
City, State A PC*MILER city name, followed by two-character state abbreviation.
Princeton, NJ
Canadian Postal Code
The six character postal code in the following format: L#L #L#. (Available as an add-on data module.)
K7L 4E7
SPLC Code The six or nine digit SPLC. (Available as an add-on data module.)
221094000 221099240
Latitude, Longitude
Two coordinates are specified here. Each coordinate can have one of two formats. The first format is an 8 character string, described below. The second format is decimal degrees. In the 8 character string format, a coordinate is specified as follows: Digits 1-3 specify the hours portion of the measurement. Digits 4-5 specify the minutes portion of the measurement. Digits 6-7 specify the seconds portion of the measurement. Digit 8 is one of the following: ‘N’, ‘n’, ‘W’, ‘w’. The last digit determines if the coordinate is a latitude or longitude. The last character is optional. If it is NOT present, then the first coordinate is assumed to be latitude and the second coordinate is assumed to be longitude. In the decimal degrees format, the two coordinates are expressed as decimal degrees. Again, the last character is one of ‘N’, ‘n’, ‘W’, ‘w’. This determines whether the given coordinates is latitude or longitude. If the last character is NOT
0401750N,0742131W 0401750 / 0742131 0742131w 0401750n 040.2972N, 074.35861w
Chapter 3: Programming With the DLL Interface 41
present, then the first coordinate is assumed to be the latitude. The coordinates must be separated by at least one of the characters from the following set: space (‘ ‘), comma (‘,’), forward slash (‘/’), backward slash (‘\’), semicolon (‘;’), and colon (‘:’).
Custom Place A custom place name created in PC*MILER.
My House
Place Name with local Street Address
Available only with PC*MILER|Streets. A street address can be added to any of the above place names, must be separated from the place name by a semi-colon (;).
Kingston, NJ; 16 Laurel Avenue
The field labels is an optional list of up to 8 values for PC*MILER to store and display in an information dialog when the pin is clicked on. The values in the list are delimited by vertical bars. For example, the following function call will display a red route 4 pixels wide from Princeton to San Diego via Chicago, generated using PC*MILER Shortest routing, and visible when zoomed in at least 3, but not more than 5, times: retCode = PCMGPlotPin(“MyLayer”, “MyPin”, “3..5”, “Red Truck”,“Chicago, IL”, “On time|Carrying Oranges|Unit 35B”); long PCMGDeletePin(LAYER layerID, OBJECT_ID ID);
This function removes the pin identified by ID in the layer layerID. long PCMGFramePin(LAYER layerID, OBJECT_ID ID);
This function zooms the map to center the pin specified by layerID and ID. long PCMGPlotLabel(LAYER layerID, OBJECT_ID ID);
This function highlights a place on the map. It draws a stop label similar to PC*MILER stop labels. long PCMGDeleteLabel(LAYER layerID, OBJECT_ID ID);
This function removes a stop label from the map.
PC*MILER|Mapping User’s Guide 42
3.5.2 Assigning Alias Names To Colors
To assign alias names to colors, use the [Map\Colors] section of the map_opts.ini file located in your PC*MILER installation folder in ALK Technologies\PCMILER31\App. For example, the color RGB(255,0,255) can be named “Purple” by adding:
[Map\Colors] Purple=(255,0,255)
3.5.3 Assigning Alias Names To Bitmaps
The bitmap image aliases used by thePCMGPlotPin function are stored in the [Map\Bitmaps] section of the map_opts.ini file located in your PC*MILER installation folder – usually in C:\ALK Technologies\PCMILER31\App. You can create your own alias names that point to the location of additional bitmaps by adding lines to this section of the .ini file. Here is an example of such a line: [Map\Bitmaps] Yellow Lpushpin=c:\ALK Technologies\PCMILER31\Bitmaps\ lpin_y.bmp Yellow Lpushpin= lpin_y.bmp
3.5.4 Setting a Custom Font For Labels
The default font for pins and labels created using the functions PCMGPlotLabel and PCMGPlotPin (see section 3.5.1) is ‘System’, size=16, bold. You can change this default setting in the map_opts.ini file, located in your PC*MILER installation folder in ALK Technologies\PCMILER31\App. In this .ini file, font styles for specific layers are described in sections with the heading [Map\Pinmaps\Labels\<Layer Name>]. “Layer” is the first argument in the PCMGPlotPin and PCMGPlotLabel functions. So, for example, to set the font style for a layer named “Homes”, a section like this would be added to the map_opts.ini: [Map\Pinmaps\Labels\Homes] FontHeight=12 FontName=“Arial” FontWeight=“Bold” (could be also “Regular”) FontItalic=1 FontColor=“Purple” (could also be an integer, see section 3.5.2 above)
NOTE: This logic does not apply to trips. Stop labels always use the default (System, size 16) font. The Mapping DLL could be modified to apply the logic used for labels and pins for trips if necessary.
Chapter 3: Programming With the DLL Interface 43
3.5.5 Pin Label Positioning
The position of a label can be specified by concatenating the “ | “ character plus one of (LEFT, RIGHT, BOTTOM, TOP) to the end of the bitmap parameter in the PCMGPlotPin function. Examples:
PCMGPlotPin (“layer1”, “WhiteHouse”, “1..3”, “RED CIRCLE 5|LEFT”, “20500 Washington, CD; 1600 Pennsylvania Avenue”, “White House”);
PCMGPlotPin (“layer1”, “WhiteHouse”, “1..3”, “whitehouse.bmp|LEFT”, “20500 Washington, CD; 1600 Pennsylvania Avenue”, “White House”);
3.5.6 Trip and Line Functions
IMPORTANT NOTE: Drawing more than about 50 route lines on the map simultaneously is not recommended, individual routes cannot be seen clearly when there is alarge number of them on the map. long PCMGPlotTrip(LAYER layerID, OBJECT_ID ID, IMPORT importance, STYLE style, LOCATION locations, PIN_LABEL options);
Draws a trip’s route over the PC*MILER network where layerID is the feature layer to add the new trip to, ID is its unique identifier, importance is a range of numbers denoting which levels of detail it will appear at, style is what color and width to use, locations is the list of stops (PC*MILER place names only) that make up the trip, and options is a list of routing options PC*MILER will use to calculate the route. All arguments are strings, and the separator between elements in stops, styles, and options is a vertical bar (‘|’). For example, ‘Princeton, NJ|Chicago, IL|90210’ is a valid series of stops, and ‘Red|5’ is a valid style. The separator for an importance range is two periods (“..”). For example, ‘1..4’ is a valid importance range, as is simply ‘4’ (the trip appears at levels 4 and higher). Valid routing options are:
Routing types: ‘PRAC’, ‘SHORT’, ‘NATL’, ‘TOLL’, ‘POV’, or ‘AIR’. Case is not important and the following will also work: ‘Practical’, ‘Shortest’, and ‘National’. (See the PC*MILER User’s Guide or Help for descriptions.)
PC*MILER|Mapping User’s Guide 44
Hub mode: Routes will display in Hub mode if you use ‘HUB’ as an option, and in regular mode with ‘NOHUB’.
Borders: Routes will stay within a country if you specify borders as ‘CLOSED’, or will cross borders if you specify ‘OPEN’.
Custom: Routes will display respecting the avoided and favored roads set in PC*MILER. You can specify the option as ‘CUSTOM’ or ‘NOCUSTOM’.
Use Highway Only: ‘USESTREETS’ to use local streets in route calculations, or ‘USEHIGHWAY’ to calculate the route using an air distance from the midpoint of the nearest highway segment to the postal code or city/state destination.
Vehicle Type: ‘HEAVY’ or ‘LIGHT’. Case is not important and the following will also work: ‘Heavy’ and ‘Light’.
Haz Types: ‘GENERAL’*, ‘EXPLOSIVE’, ‘INHALANT’, ‘RADIOACTIVE’, ‘CORROSIVE’, or ‘FLAMMABLE’. (See the PC*MILER User’s Guide or Help for descriptions.) * This route type is now ‘Other’ in the PC*MILER UI. NOTE: You can set defaults for these and other routing and management options in the pcmserve.ini file (see Appendix B for a list of pcmserve.inisettings). NOTE for PC*MILER|Streets Users: When stops are city names or postal codes, by default “Highway Only” routing is used. See the PC*MILER User’s Guide for a description of this option, and Appendix B in this guide to change the default. For example, the following function call will display a red route 4 pixels wide from Princeton to San Diego via Chicago, generated using PC*MILER Shortest routing, and visible when zoomed in at least 3, but not more than 5, times: retCode = PCMGPlotTrip(“MyLayer”, “MyRoute”, “3..5”, “Red|4”, “08540|Chicago, IL|San Diego, CA”, “Short|NOHUB”); long PCMGDeleteTrip(LAYER layerID, OBJECT_ID ID);
This function removes the trip identified by ID in the layer layerID. long PCMGFrameTrip(LAYER layerID, OBJECT_ID ID);
The above function zooms the map to include a view of the entire trip identified by ID in the layer layerID. long PCMGPlotLine(LAYER layerID, OBJECT_ID ID, IMPORT importance, STYLE style, LOCATION locations);
where layerID is the feature layer to add the new line to, ID is its unique identifier, importance is a range of numbers denoting which levels of detail it will appear at,

Chapter 3: Programming With the DLL Interface 45
style is what color and width to use, and locations is the list of points (PC*MILER place names or LatLong coordinates) that make up the line. All arguments are strings, and the separator between elements in points and styles is a vertical bar (‘|’). For example, ‘Princeton, NJ|Chicago, IL|90210’ is a valid series of points, and ‘Red|5’ is a valid style. The separator for an importance range is two periods (“..”). For example, ‘1..4’ is a valid importance range, as is simply ‘4’ (the trip appears at levels 4 and higher). retCode = PCMGPlotLine(“MyLayer”, “MyRoute”, “3..5”, “Red|4”, “08540|Chicago, IL|San Diego, CA”, “Short|NOHUB”); long PCMGDeleteLine(LAYER layerID, OBJECT_ID ID);
This function removes the line identified by ID in the layer layerID.
3.5.7 Pinmap Functions
The user can group pins into “layers”, or “pinmaps.” These layers can be turned on and off by the user through PC*MILER|Mapping function calls or interactively from within PC*MILER. The user of the map can click on the pin symbols to invoke information about the pins. In PC*MILER, go into ‘picking’ mode by clicking on the ‘Pick Pin’ speed button in the tool bar. Once in ‘Pick Pin’ mode, clicking once on a pin in the map will invoke an information dialog containing the data sent across with PCMGPlotPin(). long PCMGSetInfoLabels(LAYER layerID, OBJECT_ID id, IMPORTANCE importance, MARKER symbol, LOCATION loc, PIN_LABEL labels);
Sets the “titles” of the given pinmap layer identified by layerID. The titles form the left-hand column in pop-up information windows which are invoked when the user clicks on a pin in the map. If the pinmap identified by layerID does not exist, then a pinmap with that name is created. ID is the label for the id of the chosen pin. Importance is a space filler and is not displayed. Symbol is the label for the symbol of the chosen pin. Loc is the label for the location of the chosen pin. Labels contains up to eight titles for the eight data fields which may be passed from PCMGPlotPin. If they are not specified, the default labels are “Data1..Data8”.
PC*MILER|Mapping User’s Guide 46
For example: retCode = PCMGSetInfoLabels (“MyLayer”, “ID:”, “Importance”, “Symbol:”, “Location:”, “Store:|Time: |Move:|Product”)
long PCMGDeletePinmap(LAYER layerID);
This function removes the layer identified by layerID from the map. All pins in the layer are deleted. long PCMGShowPinmap(LAYER layerID, BOOL show);
The above function changes the visibility of the layer specified by layerID. If the show parameter is non-zero, the layer is visible. If the show parameter is zero, the layer is hidden. It is NOT deleted. Layers can be shown or hidden as often as desired. long PCMGFramePinmap(LAYER layerID);
This function zooms the map to include all of the pins in the pinmap layer layerID. long PCMGDeleteTripLayer(LAYER layerID);
This function removes the layer identified by layerID from the map. All trips in the layer are deleted. long PCMGFrameTrip(LAYER layerID, OBJECT_ID ID);
This function zooms the map to include all of the pins in the pinmap layer layerID. long PCMGFrameTripLayer(LAYER layerID);
This function zooms the map to include all trips in the trip layer layerID.
3.5.8 Map Region Functions
The following functions can be used in applications using PC*MILER|Worldwide or PC*MILER|DTOD mapping, when region selection is needed. long PCMGNumRegions();
long PCMGGetRegionName(int idx, char *name, int bufsize);
long PCMGSwitchRegion(const char *regionid);
Chapter 3: Programming With the DLL Interface 47
PCMGNumRegions() returns the number of map regions (“NA”, “Europe”, “Asia”, etc.). As an example, if a web menu is being built, assume “N” number of regions is returned. PCMGGetRegionName() is then called (in a loop) to get each region’s name, passing indexes from 0 through N, and the region names are added to the menu. Example: char region [100]; int num_regs; num_regs = PCMGNumRegions(); for (int i = 0; i < num_regs; i++) { PCMSGetRegionName (i, region, 100); }
When the user of the menu picks a region, the software calls PCMGSwitchRegion() to zoom in on this region.
LRESULT _PCMGWFN PCMGSetDefaultRegion(char *regionId);
LRESULT _PCMGWFN PCMGGetDefaultRegion(char *regionId, int bufSize);
Use PCMGSetDefaultRegion to set a default region; regionId can be ‘NA’, ‘SA’, ‘Africa’, ‘Asia’, ‘Europe’, ‘ME’, or ‘Oceania’. PCMGGetDefaultRegion returns the existing default region.
3.6 Geofence and Highlight Functions
NOTE: Two settings in the PCMSERVE.INI file can be edited to control the autosaving of road preferences on shutdown. See Appendix B, The PCMSERVE.INI File and look under [MappingOptions] in the INI.
3.6.1 Geofence Functions
A “geofence” is a virtual perimeter assigned to a geographic area so that when the perimeter of that selected area is crossed, a notification is generated. It may be used in many different scenarios, for example:
• Drawing a zone around a warehouse to identify a delivery or billing zone. • Alerting dispatchers when a vehicle leaves a designated area, for example,
leaving New York City when they aren’t authorized to do so.
PC*MILER|Mapping User’s Guide 48
• Receiving an alert if an asset has crossed into a high crime area. New tools were added to the PC*MILER user interface and PC*MILER|Mapping in Version 25 to create geofences and assign different sizes, colors, and locations to them. Each geofence can be set to generate a route warning identifying when a route enters/exits its perimeter. In the PC*MILER user interface, users can perform the following tasks related to geofencing:
• Assign and modify the characteristics of a geofence:
- Define its shape – set it to a circle, rectangle, or user-defined polygon - Define its coloring – define the border color, border width and fill color - Define its size – identify perimeter boundaries using the provided shapes
or use the free form drawing tools
• Uniquely name an individual geofence
• Create, modify, delete and name sets of geofences that consists of one or more geofences
• Use the geofence’s perimeter to generate route alerts/warnings in reports when the perimeter is crossed
• Use the geofence’s perimeter to consider the roads in the geofenced area as avoided so that when a route is generated it will not consider those roads in route calculations
• Turn on/off a geofence displayed on the map as well as its status when generating routes
In PC*MILER|Mapping, the functions described below are used to plot and manage geofences, in sets or one by one, on the map.
LRESULT _PCMGWFN PCMGAddGeofence(const char *pName, char cShapeType, const char *pPoints);
Creates a new geofence based on a collection of points. • pName = name of the newly-created geofence • cShape = the type of shape of the geofence • pPoints = the collection of points that represents the new geofence
cShape can be either 0, 1, or 2. These values correspond to a specific geofence shape type. 0 = Rectangle, 1 = Circle, 2 = Free form polygon. This shape type will govern what pPoints must contain (described below). pPoints should be a string containing a list of lat long coordinates that will be used to define the boundaries of the new geofence. The required format of this string is given below. If creating a rectangular geofence, there must be 2 lat/long coordinates (no more, no less) which define two opposing corners of the

Chapter 3: Programming With the DLL Interface 49
rectangle. A circular geofence must be defined in the same way. In this case the rectangle will define the bounding box for the desired circle. If creating a free-form polygon geofence, there must be at least 3 distinct lat longs given to form a valid polygon. There is no upper limit on the number of points that can be given for a free-form polygon. The order that the points are given in will be the same order used to render the final polygon. It is not necessary to repeat the first vertex again at the end of the list. pPoints valid string format: “lat1,long1|lat2,long2|lat3,long3|…”
LRESULT _PCMGWFN PCMGDeleteGeofence(unsigned long fenceID);
Deletes an existing geofence, using its ID.
LRESULT _PCMGWFN PCMGActivateGeofence(unsigned long fenceID, int iActiveState); (deprecated in v28, use ActivateGeofenceSet() instead
Activates the specified geofence and sets its active state to one of two possible states. iActiveState can be either 0, 1, or 2: 0 = The geofence is turned off and will not be actively drawn on the screen or
used for routing/reporting purposes. 1 = The geofence will be drawn on the map and will only generate report
warnings when a route passes through it. If the use of custom roads is turned on, a geofence in this active state will not be avoided by routes.
2 = The geofence will be drawn on the map and will generate a report warning if a route passes through it. If the use of custom roads is turned on, a geofence in this state will be actively avoided for all routes.
LRESULT _PCMGWFN PCMGIsGeofenceActive(unsigned long fenceID); (deprecated in v28, use IsGeofenceSetActive() instead
Retrieves the activation status of the specified geofence.
LRESULT _PCMGWFN PCMGModifyGeofenceColor(unsigned long fenceID, unsigned char R, unsigned char G, unsigned char B); (deprecated in v28, use ModifyGeofenceSetColor() instead
Modifies the color of the area inside the perimeter of a specified geofence by supplying R,G,B values for the color.
LRESULT _PCMGWFN PCMGModifyGeofenceBorderColor(unsigned long fenceID, unsigned char R, unsigned char G, unsigned char B); (deprecated in v28, use ModifyGeofenceSetBorderColor() instead

PC*MILER|Mapping User’s Guide 50
Modifies the color of the perimeter of a specified geofence by supplying R,G,B values for the color. LRESULT _PCMGWFN PCMGFindGeofenceID(const char *pName);
Retrieves the ID of a specified geofence, using its assigned name.
LRESULT _PCMGWFN PCMGSetGeofenceName(unsigned long fenceID, const char *pName);
Renames an existing geofence, pName = the new name. LRESULT _PCMGWFN PCMGGetGeofenceName(unsigned long fenceID, char *pName, int bufLen);
Retrieves the name of an existing geofence, identified by its ID. LRESULT _PCMGWFN PCMGAddGeofenceSet(const char *pName);
Creates a new geofence set based on the name provided by the user. LRESULT _PCMGWFN PCMGAddGeofenceToSet(unsigned long fenceID, unsigned long setID);
Adds an existing geofence to an existing set based on the geofence ID and set ID. If the geofence is already a member of another set then it will automatically be removed from the old set and put into the new set. If either the geofence or the set does not exist, an error will be returned. LRESULT _PCMGWFN PCMGRemoveGeofenceFromSet(unsigned long fenceID, unsigned long setID);
Removes a geofence from an existing geofence set based on the geofence ID and set ID. LRESULT _PCMGWFN PCMGDeleteGeofenceSet(unsigned long setID);
Deletes an existing geofence set.
LRESULT _PCMGWFN PCMGActivateGeofenceSet(unsigned long setID, int iActiveState);
Activates a geofence set based on the set ID and assigns it to one of two possible states. iActiveState can be either 0, 1, or 2:
0 = The set is turned off and will not be actively drawn on the screen or used for routing/reporting purposes.
Chapter 3: Programming With the DLL Interface 51
1 = The set will be drawn on the map and will only generate report warnings when a route passes through one of its geofences. If the use of custom roads is turned on, sets in this active state will not be avoided by routes.
2 = The set will be drawn on the map and will generate a report warning if a route passes through one of its geofences. If the use of custom roads is turned on, the set in this state will be actively avoided for all routes.
LRESULT _PCMGWFN PCMGIsGeofenceSetActive(unsigned long setID);
Queries the activation status of a geofence set based on the set ID.
LRESULT _PCMGWFN PCMGFindGeofenceSetID(const char *pName);
Queries the ID of a geofence set based on its name.
LRESULT _PCMGWFN PCMGModifyGeofenceSetColor(unsigned long setID, unsigned char R, unsigned char G, unsigned char B);
Modifies the color within the perimeter of the geofence set by the supplying R,G,B values of the desired color. LRESULT _PCMGWFN PCMGModifyGeofenceSetBorderColor(unsigned long setID, int width, unsigned char R, unsigned char G, unsigned char B);
Modifies the width and color of the perimeter of the geofence set by the supplying R,G,B values of the desired color. LRESULT _PCMGWFN PCMGGetGeofenceSetColor(unsigned long setID, unsigned char* R, unsigned char* G, unsigned char* B);
Retrieves the color within the perimeter of a geofence set, using R,G,B values.
LRESULT _PCMGWFN PCMGGetGeofenceSetBorderColor(unsigned long setID, int*width, unsigned char* R, unsigned char* G, unsigned char* B);
Retrieves the width and color of the perimeter of a set, using R,G,B values.
LRESULT _PCMGWFN PCMGSetGeofenceSetName(unsigned long setID, const char *pName);
Renames a geofence set using the geofence ID, pName = the new name.
LRESULT _PCMGWFN PCMGGetGeofenceSetName(unsigned long setID, char *pName, int bufLen);

PC*MILER|Mapping User’s Guide 52
Retrieves the name of a geofence set, identified by ID. bufLen = the length of the provided buffer.
LRESULT _PCMGWFN PCMGNumGeofenceSets();
Retrieves the number of existing geofence sets.
LRESULT _PCMGWFN PCMGGetGeofenceSet(unsigned long index, char *pName, unsigned long* pID);
Retrieves the name and set ID of an existing geofence set.
LRESULT _PCMGWFN PCMGNumGeofencesInSet(unsigned long setID);
Retrieves the number of geofences in the specified set.
LRESULT _PCMGWFN PCMGGetGeofenceFromSet(unsigned long setID, unsigned long fenceIndex, char *pName, unsigned long *pID);
Retrieves the specified geofence from a geofence set. fenceIndex = an index of the geofences with the set.
LRESULT _PCMGWFN PCMGGetGeofenceContainingPoint(const char *SetName, const char *FenceName, const char *Location, char *FenceNamesStr, long Size);
Returns a character string of geofence names separated by a “|” that contain a given location for an optionally supplied set and fence name (geofences may overlap and a single point on the map maybe contained in more than one).
3.6.2 State Highlight Functions
The state highlight functions let users highlight a state as a zone on the map. There are Ex versions of each of the functions below (see section 3.8). LRESULT _PCMGWFN PCMGAddStateHighlight(const char* pStateAbbrev, unsigned char R, unsigned char G, unsigned char B);
This function makes the specified state into a highlighted zone. pStateAbbrev is a standard two-letter abbreviation as recognized by PC*MILER (if necessary, see the PC*MILER User’s Guide or online Help for a complete list of abbreviations). The color of the highlight is set using numeric R,G,B values. LRESULT _PCMGWFN PCMGDeleteStateHighlight(const char* pStateAbbrev);
Deletes an existing state highlight.
Chapter 3: Programming With the DLL Interface 53
LRESULT _PCMGWFN PCMGGetStateHighlightColor(const char* pStateAbbrev, unsigned char *R, unsigned char *G, unsigned char *B);
Queries the color of an existing state highlight.
3.6.3 Street Highlight Functions
LRESULT _PCMGWFN PCMGAddStreetHighlight(const char* streetName);
This function searches the map’s current projection rectangle for a specific street based on the given name information. Any results found by the geocoding engine will then be highlighted on the map. This highlight will be preserved until the user chooses to remove it explicitly. Each call to this API will generate one internal highlight record that tracks all of the highlighted road segments found. Each record is indexed based on the input string. If the same input is given multiple times, only one record will be maintained. This feature will only work when licensed for PC*MILER|Streets data and when the map is zoomed in far enough to view street level data. Parameters: streetName Name of the street to highlight. Text should not contain any city,
state/ZIP/SPLC information, just the street name information Return Values: -4 Street data not visible on the map, operation failed <0 Internal error, operation failed 0 operation successful LRESULT _PCMGWFN PCMGDeleteStreetHighlight(const char* streetName);
This function removes a specific street highlight from the map. The input to this function should match the input used when adding a street highlight to the map. If it does not, the desired highlight might not be properly removed from the map. Params: streetName Name of the street to highlight Return Values: <0 Internal error, operation failed 0 operation successful
PC*MILER|Mapping User’s Guide 54
LRESULT _PCMGWFN PCMGDeleteAllStreetHighlights();
Removes all street highlights from the map. Return Values: <0 Internal error, operation failed 0 operation successful
3.7 Management Functions
HMODULE PCMGGetDisplayModule(void);
This function returns a handle to PC*MILER. It is provided for backward compatibility, and is not needed for 32-bit applications. Note: This function is not part of the Excel interface. HWND PCMGGetDisplayWindow(void);
This function returns a handle to PC*MILER for Window’s main window. Note: This function is not part of the Excel interface. void PCMGSetDisplayModule(HMODULE mod);
The above function is used to give PC*MILER|Mapping the module handle for PC*MILER. It is provided for backward compatibility, and is not needed for 32-bit applications. Do not use this unless you are an expert. Normally, you will not have to call this function, as PC*MILER|Mapping searches for and finds PC*MILER when function calls are made. This function is provided for unusual circumstances. Note: This function is not part of the Excel interface. void DECLARE PCMGSetDisplayWindow(HWND win);
This function is used to give PC*MILER|Mapping a handle to the main window of PC*MILER. Do not use this unless you are an expert. Normally, you will not have to call this function, as PC*MILER|Mapping searches for and finds PC*MILER when PC*MILER|Mapping function calls are made. This function is provided for extraordinary circumstances. Note: This function is not part of the Excel interface. void PCMGSetRedraw(BOOL onOff);
(Deprecated in Version 30) This function enables/disables automated redrawing of the map. It is used when many pins, trips or lines are being sent in a short period of time to prevent excessive redrawing of the map. The strategy is to turn the redraw off, send many draw objects, then turn redraw back on so that there will be a single
Chapter 3: Programming With the DLL Interface 55
redraw of the map. Note that turning on the automated redraw does not automatically force a redraw to occur – a call to PCMGRedraw() must be added after re-enabling redraws to get the desired effect. In order for this function to work properly, you must first call PCMGSetDisplayWindow()and pass the window handle that PCMGCreateChildMap() returns. Then PCMGSetRedraw() can be used as desired. Code should be modified to do this: HWND hwnd = PCMGCreateChildMap(parent) PCMGSetDisplayWindow(hwnd)
LRESULT _PCMGWFN PCMGTrafficStatus(); An API has been added to query the PC*MILER Traffic Features subscription status. May return the following: -1 = an unlimited subscription that is not set to expire; -2 = there is no subscription and Traffic Features are not accessible; or if a number greater than or equal to 0 is returned, it is the number of days left until the traffic subscription expires.
3.8 Multiple Map Windows (‘Ex’ Functions) PC*MILER|Mapping now allows you to create multiple map windows. To create and use more than one map window, you use an “Ex” version of the Mapping DLL functions you are already familiar with. To create an additional new map window, instead of using PCMGCreateMapWindow or PCMGCreateMapChild you use PCMGCreateMapWindowExor PCMGCreateMapChildEx. The difference between the regular and the Ex version of these functions is that the regular function returns the map window’s window handle, whereas the Ex version returns a unique identifier that is used in all other Ex functions to determine which map window should be manipulated. Most PC*MILER|Mapping functions have an Ex version – (see the pcmgwinex.h file in the PC*MILER|Mapping installation folder for a complete list of Ex functions – the location is usually C:\ALK Technologies\PCMILER31\Mapping\C_CPP). All Ex functions take one extra argument which is a mapid. In addition, one new Ex function – described below – has been added that enables you to close a particular map window. Use PCMGCleanupMap() if you want to close all open map windows while completely closing the Mapping application (see section 3.3.1 for important information on opening/closing map windows).
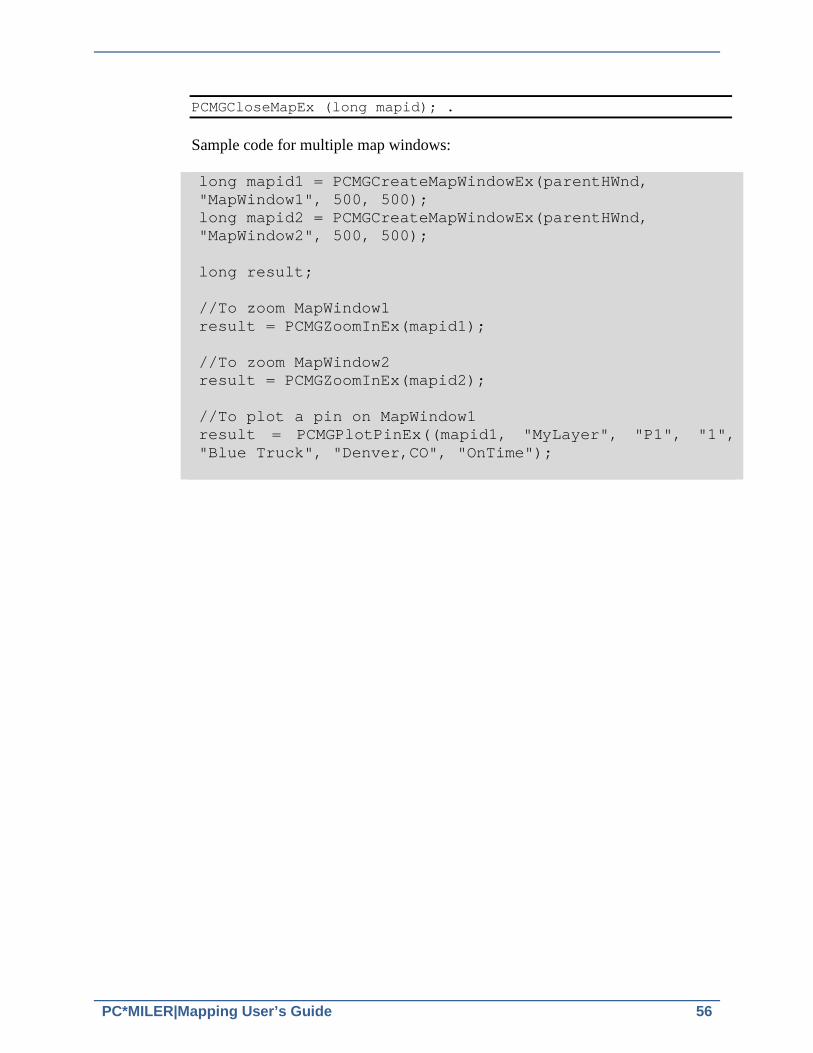
PC*MILER|Mapping User’s Guide 56
PCMGCloseMapEx (long mapid); .
Sample code for multiple map windows: long mapid1 = PCMGCreateMapWindowEx(parentHWnd, "MapWindow1", 500, 500); long mapid2 = PCMGCreateMapWindowEx(parentHWnd, "MapWindow2", 500, 500); long result; //To zoom MapWindow1 result = PCMGZoomInEx(mapid1); //To zoom MapWindow2 result = PCMGZoomInEx(mapid2); //To plot a pin on MapWindow1 result = PCMGPlotPinEx((mapid1, "MyLayer", "P1", "1", "Blue Truck", "Denver,CO", "OnTime");
PC*MILER|Mapping User’s Guide 57
Using PC*MILER|Mappingwith Excel If PC*MILER|Spreadsheets was purchased and installed, PC*MILER|Mapping will include an Add-In for Excel 97 or higher. To complete the installation you must enable the Add-In manually from within Excel, or configure Excel to automatically load the Add-In each time you open the program. After enabling the Add-In, you must start the PC*MILER|Mapping program (double-click the PC*MILER|Mapping program icon). With the Mapping program and Excel running simultaneously, you may plot icons, routes and lines from Excel to the PC*MILER map. If you start the map window from your own program, the first eight characters in the map window title must be “PC*MILER” to connect to Excel. NOTE: All the functions available through this Add-in are listed in the Excel User Defined function category under the Insert|Function menu command.
4.1 Enabling the Add-In Manually For Microsoft Office 2003 (or older):
1. Open Excel. 2. In the top tool bar menu, select Tools>Add-Ins…>Browse. 3. Navigate to the folder where PC*MILER is installed and go to the Excel
folder. The default location of the Excel folder is …\ALK Technologies\ PCMILER31\Excel.
4. In the …\Excel folder, click on the Pcmgmp32.xla file then click OK. 5. In the Add-Ins dialog box, "PC*MILER|Mapping" will appear in the list of
products with a check next to it. This confirms that the Add-In is activated. 6. Click OK to continue. The setup is now complete. The PC*MILER|Mapping functions are now ready to be used and will be available every time you start Excel.
4 Cha
pter
PC*MILER|Mapping User’s Guide 58
For Microsoft Office 2007 and 2010:
1. Open Excel.
2. Click on the Microsoft symbol in the upper left-hand corner of the screen (Excel 2007), or click on the File menu (Excel 2010).
3. In the list that opens, click on the Excel Options button at the bottom (Excel 2007) or the Options menu option (Excel 2010).
4. In the dialog box that opens, in the left-hand column menu click on Add-Ins.
5. In the right-hand side of the dialog box, there's a drop down menu next to Manage. Select Excel Add-Ins if it is not already selected, then click the Go button to continue.
6. In the Add-Ins dialog box that opens, click Browse and navigate to the folder where PC*MILER is installed and go to the Excel folder (the default location is C:\ALK Technologies\PCMILER31\Excel).
7. In the …\Excel folder, click on the Pcmgmp32.xla file, then click OK. 8. In the Add-Ins dialog box, "PC*MILER|Mapping" will appear in the list of
products with a check next to it. This confirms that the Add-In is activated. 9. Click OK to continue. The remaining steps below are necessary only if you wish to turn off security warning messages for this spreadsheet. 10. Click on the Microsoft symbol in the upper left-hand corner of the
screen.. 11. In the list that opens, at the bottom click on the Excel Options button. 12. In the dialog box that opens, in the left-hand column menu listing click on
Trust Center. Then click on the Trust Center Settings button on the right. 13. Click on Trusted Locations in the left-hand column menu. 14. Check if the location of the Excel folder from Step 6 is in the list of
trusted locations; if not, click Add New Location… . 15. Click Browse… and navigate to the location of the Excel folder. 16. Select “Subfolders of this location are also trusted”, then click OK. 17. In the Trust Center, check “Allow Trusted Locations on my network”,
then click OK. The setup is now complete. The PC*MILER|Mapping functions are now ready to be used and will be available every time you start Excel.
Chapter 4: Using PC*MILER\Mapping With Excel 59
4.2 Disabling the Add-In Manually 1. Start Excel.
2. For Microsoft Office 2003: Under the Tools menu, choose Add-Ins, then remove the check next to “PC*MILER|Mapping” and click OK.
For Microsoft Office 2007:
Click the Microsoft Office button , click Excel Options, and then click Add-Ins. In the Manage pick list at the bottom of the window that opens, select Excel Add-Ins if it is not already selected. Then click “Go…” and remove the check next to “PC*MILER| Mapping”, and click OK. For Microsoft Office 2010: Click File then Options to open the Excel Options dialog. On the left, click Add-Ins. In the Manage pick list at the bottom of the window that opens, select Excel Add-Ins if it is not already selected. Then click “Go…” and remove the check next to “PC*MILER| Mapping”, and click OK.
The PC*MILER|Mapping functions are now removed. They will not be available the next time you start Excel.
4.3 Enable/Disable Autoloading of PC*MILER|Mapping To have PC*MILER|Mapping functions always available, copy the file pcmgmp32.xla to the Excel startup directory. This directory is called xlstart and is located in the directory where Excel is installed. For more information see Excel Help under the search item “Startup Directory”. To Disable Autoloading of PC*MILER|Mapping: Remove the file pcmgmp32.xla from the Excel xlstart directory.
4.4 Functions Available Through the Excel Interface The set of functions described in this section is available only through the PC*MILER|Mapping Microsoft® Excel interface. There are two ways to use PC*MILER|Mapping formulas in Excel: either type them directly into a cell or use the Formula Wizard (see the Excel Help search topic “Formulas, Entering”). The sections below list the Excel functions, and provide descriptions of their specific tasks.

PC*MILER|Mapping User’s Guide 60
To help you begin using the Excel functions, an interactive demo file named MAPFNS.xlsx can be found in your PC*MILER installation folder, usually C:\ALK Technologies\PCMILER31\EXCEL. NOTE: Any cells in Excel that contain postal codes must be formatted properly. In the Excel Format menu choose Cells… > Number, then under “Category” highlight “Special > Zip Code” and click OK. If the formatting is not correct, preceding zeros may be dropped – for example, the postal code “08540” would become “8540”.
4.4.1 Plotting an Icon
You can either plot a set of pins without naming each one, using PlotPin(), or you can give each one an identifier which will allow you to modify its settings using PlotPinID(). The prototype of the function PlotPin is: PlotPin (icon, location [, label])
PlotPindraws an icon on the map at the point specified by location. Icon may be one of the icons provided with PC*MILER|Mapping, or the filename of a .BMP file. Location is a PC*MILER place name, postal code, SPLC (add-on data module), Canadian Postal Code (add-on data module), lat/long coordinate, or a custom place name created in PC*MILER. If you are using PC*MILER|Streets, a street address may be added, separated from the place name by a semicolon; for example, “kingston, nj; 16 laurel avenue”. Label is an optional string which appears under the icon. Icons plotted with PlotPin are deleted using the function DeletePins. The prototype of the function PlotPinID() is: PlotPinID (ID, icon, location [, label])
PlotPinIDdraws an icon, identified by ID, on the map at the point specified by location. ID can be any string or other unique identifier. Icon may be one of the icons provided with PC*MILER|Mapping, or the filename of a .BMP file. Location is a PC*MILER place name, postal code, SPLC (add-on data module), Canadian Postal Code (add-on data module), lat/long coordinate, or a custom place name created in PC*MILER. If you are using PC*MILER|Streets, a street address may be added, separated from the place name by a semicolon; for example, “kingston, nj; 16 laurel avenue”. Label is a string which appears under the icon and is optional. Icons plotted with PlotPinID are NOT deleted using the function DeletePins. You must delete them individually using DeletePinID.

Chapter 4: Using PC*MILER\Mapping With Excel 61
4.4.2 PC*MILER|Mapping Icons
A PC*MILER|Mapping icon is a text string composed of two parts: type and color separated by a space. In addition to the icons pictured below are a Box and Circle. If you plot a Box or Circle, you can add a size argument (eg. ‘Red Box 10’) which sets the box’s size in pixels. You can also plot icons of your own design. To do so, pass the complete path to a .BMP (bitmap format) file to the PlotPin or PlotPinID functions. For example, if you pass the path ‘c:\ALK Technologies\PCMILER31\icon.bmp’ (a sample icon included in your installation) to either function, you’ll see a new bitmap with the word ‘ICON’ on it displayed on your map. You can generate your own bitmaps using the Paint program included with Windows. NOTE: Size the canvas first before beginning to paint your bitmap. Bitmaps must be in .BMP format to load.
Example: To plot an icon without a label:
Example: To plot an icon without a label, using a street address (only available with PC*MILER| Streets installed):
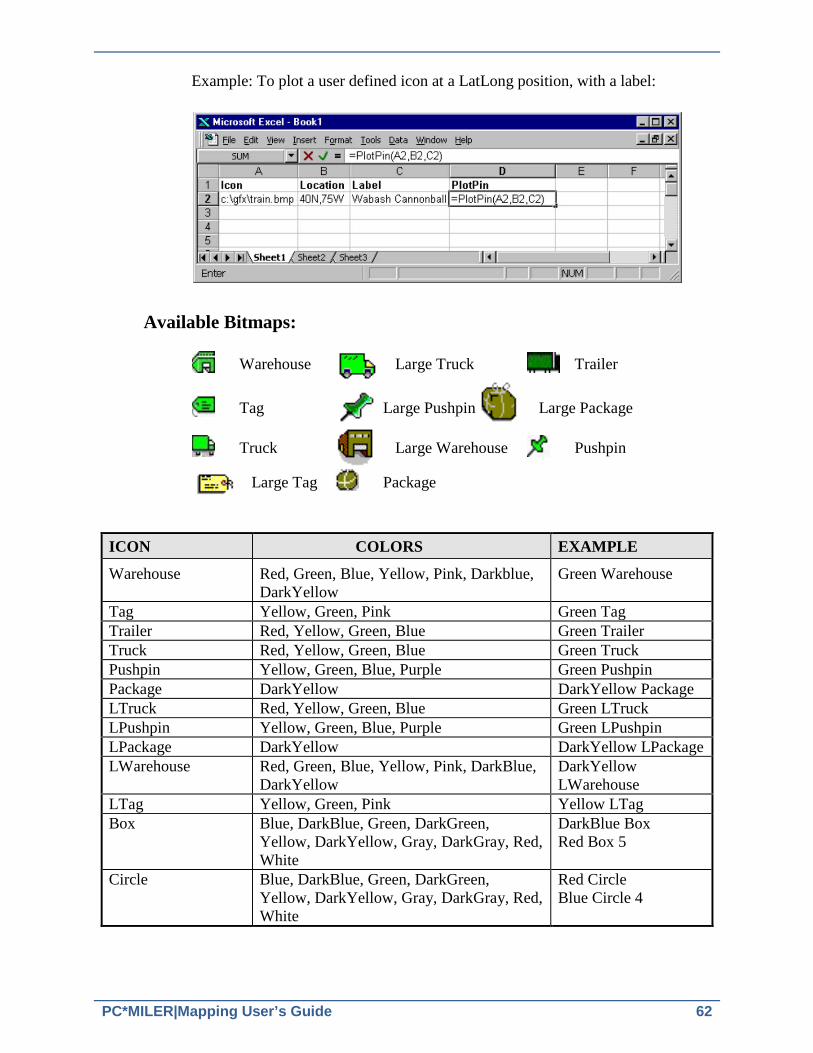
PC*MILER|Mapping User’s Guide 62
Example: To plot a user defined icon at a LatLong position, with a label:
Available Bitmaps:
Warehouse Large Truck Trailer
Tag Large Pushpin Large Package
Truck Large Warehouse Pushpin
Large Tag Package
ICON COLORS EXAMPLE
Warehouse Red, Green, Blue, Yellow, Pink, Darkblue, DarkYellow
Green Warehouse
Tag Yellow, Green, Pink Green Tag Trailer Red, Yellow, Green, Blue Green Trailer Truck Red, Yellow, Green, Blue Green Truck Pushpin Yellow, Green, Blue, Purple Green Pushpin Package DarkYellow DarkYellow Package LTruck Red, Yellow, Green, Blue Green LTruck LPushpin Yellow, Green, Blue, Purple Green LPushpin LPackage DarkYellow DarkYellow LPackage LWarehouse Red, Green, Blue, Yellow, Pink, DarkBlue,
DarkYellow DarkYellow LWarehouse
LTag Yellow, Green, Pink Yellow LTag Box Blue, DarkBlue, Green, DarkGreen,
Yellow, DarkYellow, Gray, DarkGray, Red, White
DarkBlue Box Red Box 5
Circle Blue, DarkBlue, Green, DarkGreen, Yellow, DarkYellow, Gray, DarkGray, Red, White
Red Circle Blue Circle 4
Chapter 4: Using PC*MILER\Mapping With Excel 63
4.4.3 Plotting a Route Between Two Points
You can either plot a set of trips without naming each one, using PlotTrip(), or you can give each one an identifier which will allow you to modify its settings using PlotTripID(). The prototype for the function PlotTrip is: PlotTrip (origin, destination [, style]);
PlotTrip runs a route between origin and destination from the PC*MILER database and draws the route on the map. Origin and destination may be designated as PC*MILER place names, postal codes, six digit Canadian postal codes (available as an add-on data module), SPLC codes (available as an add-on data module), latitude/longitude coordinates, or custom place names created in PC*MILER. If you are using PC*MILER|Streets, a street address may be added, separated from the place name by a semicolon; for example, “kingston, nj; 16 laurel avenue”. NOTE for PC*MILER|Streets Users: When stops are city names or postal codes, by default “Highway Only” routing is used. See the PC*MILER User’s Guide for a description of this option, and Appendix B in this guide to change the default. Style is a text string and is composed of two parts: color and width (in pixels) separated by a space. It is optional. The colors available are the same as the ones listed for Box and Circle pins above. The default color is Green and the default width is 5. Routes plotted with PlotTrip are deleted using the function DeleteTrips. The prototype for the function PlotTripID is: PlotTripID (ID, origin, destination [, style]);
PlotTripIDruns a route, identified by ID, between origin and destination from the PC*MILER database and draws the route on the map. ID can be any string or other unique identifier. Origin and destination may be designated as PC*MILER place names, postal codes, six digit Canadian Postal Codes (available as an add-on data module), SPLC codes (available as an add-on data module), latitude/longitude coordinates, or custom place names created in PC*MILER. If you are using PC*MILER|Streets, a street address may be added, separated from the place name by a semicolon; for example, “kingston, nj; 16 laurel avenue”. Style is a text string and is composed of two parts: color and width (in pixels) separated by a space. It is optional. The colors available are the same as the ones listed for Box and Circle pins above. The default color is Green and the default width is 5. Trips plotted with PlotTripID are NOT deleted using the function DeleteTrips. You must delete them individually using DeleteTripID.

PC*MILER|Mapping User’s Guide 64
Example: To plot a simple trip:
Example: To plot a simple trip with a street address (PC*MILER|Streets only):
Example: To plot a route with a custom line style:
4.4.4 Plotting a Line Between Two Points
You can either plot a set of lines without naming each one, using PlotLine(), or you can give each one an identifier which will allow you to modify its settings using PlotLineID().

Chapter 4: Using PC*MILER\Mapping With Excel 65
The prototype for the function PlotLine is: PlotLine (Origin, Destination [, style]);
PlotLinedraws a line between origin and destination on the map. Origin and destination may be designated as PC*MILER place names, postal codes, six digit Canadian Postal Codes (available as an add-on data module), SPLC codes (available as an add-on data module), latitude/longitude coordinates, or custom place names created in PC*MILER. If you are using PC*MILER|Streets, a street address may be added, separated from the place name by a semicolon; for example, “kingston, nj; 16 laurel avenue”. Style is a text string and is composed of two parts: color and width (in pixels) separated by a space. It is optional. The colors available are the same as the ones listed for Box and Circle pins above. The default color is Blue and the default width is 4. Lines plotted with PlotLine are deleted using the function DeleteLines. The prototype for the function PlotLineID is: PlotLineID (ID, Origin, Destination [, style]);
PlotLineIDdraws a line, identified by ID, between origin and destination on the map. ID can be any string or other unique identifier. Origin and destination may be designated as PC*MILER place names, postal codes, six digit Canadian Postal Codes (available as an add-on data module), SPLC codes (available as an add-on data module), lat/long coordinates, or custom place names created in PC*MILER. If you are using PC*MILER|Streets, a street address may be added, separated from the place name by a semicolon; for example, “kingston, nj; 16 laurel avenue”. Style is a text string and is composed of two parts: color and width (in pixels) separated by a space. It is optional. The colors available are the same as the ones listed for Box and Circle pins above. The default color is Blue and the default width is 4. Lines plotted with PlotLineID are NOT deleted using the function DeleteLines. You must delete them individually using DeleteLineID. Example: To plot a simple line:

PC*MILER|Mapping User’s Guide 66
Example: To plot a simple line with a local street address (available with PC*MILER|Streets only): Example: To plot a line with lat/long and specified style:
4.4.5 Deleting Icons
The function DeletePins deletes all pins on the map layer, the prototype is: DeletePins();
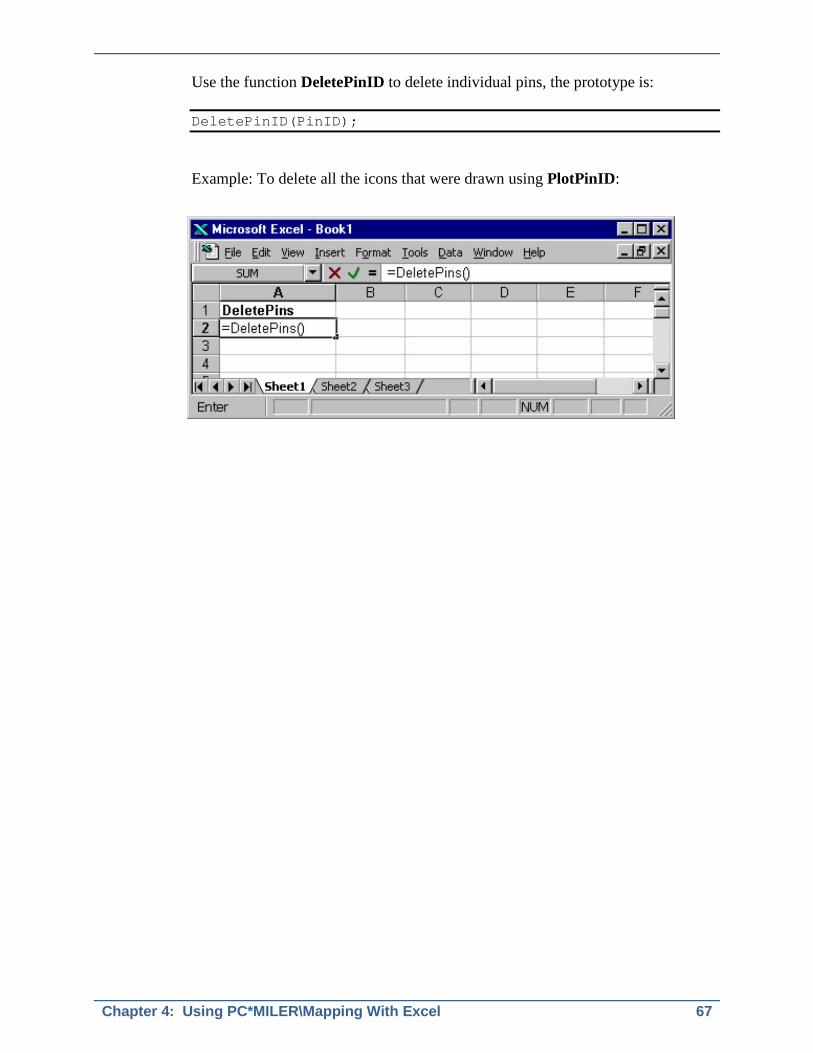
Chapter 4: Using PC*MILER\Mapping With Excel 67
Use the function DeletePinID to delete individual pins, the prototype is: DeletePinID(PinID);
Example: To delete all the icons that were drawn using PlotPinID:
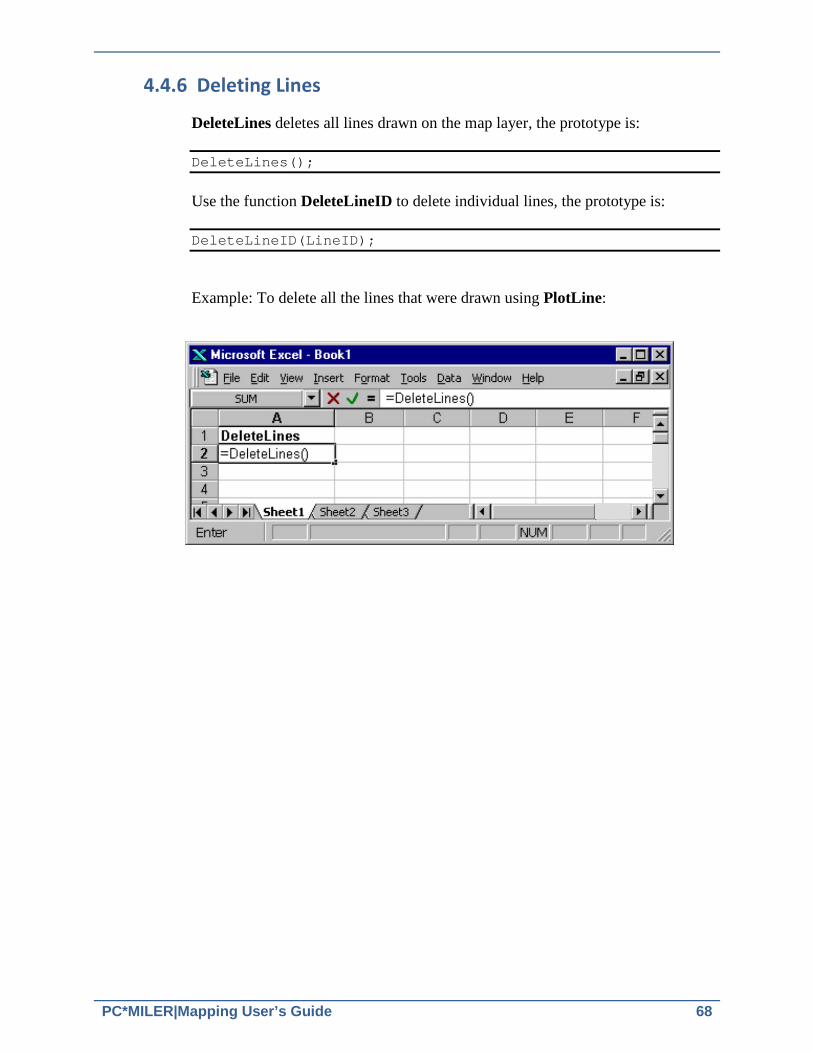
PC*MILER|Mapping User’s Guide 68
4.4.6 Deleting Lines
DeleteLines deletes all lines drawn on the map layer, the prototype is: DeleteLines();
Use the function DeleteLineID to delete individual lines, the prototype is: DeleteLineID(LineID);
Example: To delete all the lines that were drawn using PlotLine:
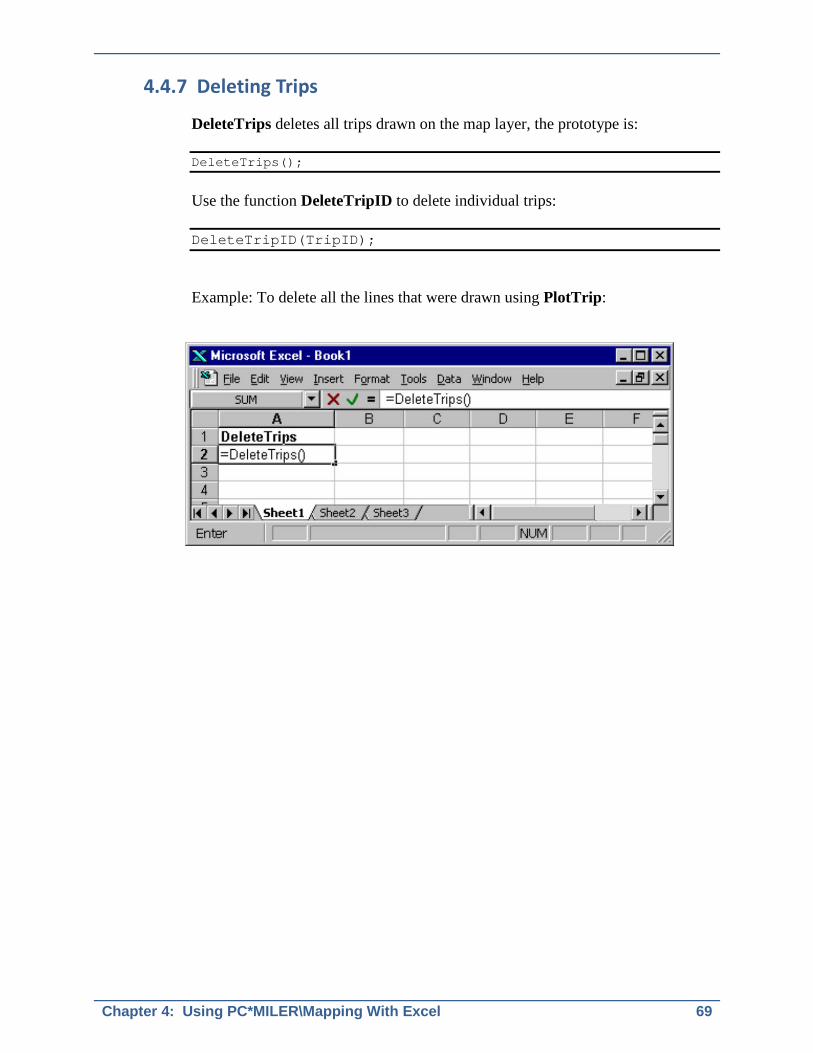
Chapter 4: Using PC*MILER\Mapping With Excel 69
4.4.7 Deleting Trips
DeleteTrips deletes all trips drawn on the map layer, the prototype is: DeleteTrips();
Use the function DeleteTripID to delete individual trips: DeleteTripID(TripID);
Example: To delete all the lines that were drawn using PlotTrip:
PC*MILER|Mapping User’s Guide 70
4.4.8 PCMG Functions Available in Excel
In addition to the functions described in sections 4.4.1 – 4.4.7, there are several other PC*MILER|Mapping functions that are now available for use in Excel. These functions start with the prefix “PCMG”, and include additional arguments for those users who would like to have expanded capability in Excel. You will see them listed under User Defined in the list of available functions in the Insert Function dialog. Please refer to Chapter 3 for detailed descriptions of these functions. PCMGPlotLine PCMGDeleteLine PCMGPlotPin PCMGFramePin PCMGDeletePin PCMGShowPinmap PCMGFramePinmap PCMGDeletePinmap PCMGPlotTrip PCMGDeleteTrip PCMGSetInfoLabels

PC*MILER|Mapping User’s Guide 71
Using the PC*MILER|Mapping COM Server
The PC*MILER|Mapping COM Server can be called from Active Server Pages (ASP), Visual Basic, and all of the other OLE-compatible languages. Examples of calling from Active Server Pages (ASP) using VBScript are included in the installation. The PC*MILER|Mapping COM Server must be registered before using. If you have not registered the component during the installation, register the DLL by calling Regsvr32 pcmgole.dll. NOTE: When using PC*MILER|Mapping with COM via Internet Information Services (IIS) you must configure the website to be set up using phsyical path credentials that are a part of the "Administrators" user group. The directory where the code is stored should have "Full Control" for the user or users as well. When configuring the Application Pool being used, we recommend enabling 32-Bit Applications, Classic Managaed Pipeline Mode, and a Identity of Network Service if running the PC*MILER|Mapping sample.
5.1 Summary of the Objects
5 Cha
pter
Figure 1: RELATIONSHIPS OF OBJECTS — How to get from one object to another
MapMgr
Map
MapSettings
LEGEND
Object = Method or Property =
PC*MILER|Mapping User’s Guide 72
The PC*MILER|Mapping COM Server provides two main COM objects: the PCMMapMgr object and the PCMMap object. PCMMapMgr provides a connection to the PC*MILER|Mapping DLL, and allows you to create multiple map windows. You need to create an instance of the PCMMapMgr object first in order to use PC*MILER|Mapping COM Server. Once an instance of the PCMMapMgr object is created, you can create a PCMMap object. Methods:
• Use the IsOK method to make sure there were no errors creating the PCMMapMgr object.
• Use the CreateMap method to create a PCMMap object.
Call the CreateObject function with the object’s ProgID.
Dim mapMgrObj as Object Dim ret Set mapMgrObj = CreateObject("Pcmgole.PCMMapMgr") ret = mapMgrObj.IsOK If (ret <= 0) Then //Error handling
The version-independent ProgID for the PC*MILER|Mapping OLE is “Pcmgole.PCMMapMgr”. The PCMMap is created each time a map is to be created and all map functionality is accessed through this object. The PCMMap object is not the same as the map window you create using the PC*MILER|Mapping function PCMGCreateMapWindow. In order to draw a PC*MILER map in any windows object’s client area, you need to call the Paint method when responding to a WM_PAINT event. If you are using it on the web, you do not need to call the Paint method. Instead use the CreateGif method to create a .gif image of the map. NOTE: It is the user’s responsibility to delete all objects that have been created. PCMMapSettings can be used to get the map settings. It returns the map’s center, zoom level and the detail level. The syntax is:
mapSettingsObj = mapMgrObj.MapSettings The PCMMapSettings object is useful to recreate the map if you are using it in a stateless web application. Before destroying the PCMMap object, call MapSettings to save the map’s center, zoom level and the detail level. Then next time after creating a new PCMMap object, call SetMapSettings with the
Chapter 5: Using the PC*MILER|Mapping COM Server 73
previously saved values to recreate the map that was destroyed. Any user-created layers such as trips, pins, lines and labels will not be recreated. Users need to call appropriate functions to create these layers again.
Objects, properties and methods listed PCMMapMgr OBJECT PROPERTIES AND METHODS
PROPERTIES: IsOK BOOL (read) ErrorCode long (read)
METHODS:
CreateMap PCMMap OBJECT PROPERTIES AND METHODS
PROPERTIES: MapID long (read) MapSettings long (read) NumFrameAreas long (read)
METHODS: CreateGifFile CreateGifBytes CopyToClipboard GetFrameArea FrameArea SetGifDirectory ZoomIn ZoomOut ZoomTo ZoomToPlace GetGifLocationXY MoreDetail LessDetail Pan SetMapSettings SetScaleUnits ToggleRoadLegend ToggleRouteLegend ToggleScaleLegend UpdateRoute UpdateRoute2 FrameRoute

PC*MILER|Mapping User’s Guide 74
Paint Print PlotPin SetUseOverlapIcon SetOverlapIconName FramePin FramePinMap DeletePin PlotLabel DeleteLabel PlotLine DeleteLine PlotTrip FrameTrip DeleteTrip DeletePinMap ShowPinMap ShowLayer PCMMapSettings OBJECT PROPERTIES
PROPERTIES: x long (read)
y long (read) xzoom long (read) yzoom long (read) detail long (read)
Chapter 5: Using the PC*MILER|Mapping COM Server 75
5.2 PCMMapMgr PROPERTIES AND METHODS
IsOK property (read) Description: Checks that the PCMMapMgr object was created with no errors. Visual Basic Syntax: Ret = mapMgrObj.isOK Remarks: Returns S_OK if the object is in a valid state, S_FALSE if not.
ErrorCode property (read) Description: Returns the PCMMapMgr object error code. Visual Basic Syntax: mapMgrErrorCode = mapMgrObj.ErrorCode Part Type Description mapMgrErrorCode long mapMgrObj error code Remarks: Returns pcmgmp32.dll or pmwscomm.dll specific error codes.
CreateMap method Description: Returns a PCMMap object. Visual Basic Syntax: mapObj = mapMgrObj.CreateMap Com – Interface: HRESULT CreateMap([out, retval] IPCMMap** mapObj); Part Type Description mapObj object PCMMap object Remarks: Returns the map object.
PC*MILER|Mapping User’s Guide 76
5.3 PCMMap PROPERTIES AND METHODS
MapID property (read) Description: Returns a unique id for each map created by the CreateMap method. Visual Basic Syntax: id = mapObj.MapID Part Type Description id long the unique id for this map Remarks: Returns -1 if errors occurred on creation.
MapSettings property (read) Description:
Returns a PCMMapSettings object. This object can be used to get the map settings. It returns the map’s center, zoom level and the detail level.
Visual Basic Syntax: mapSettingsObj = mapMgrObj.MapSettings Part Type Description mapSettingsObj object map settings object Remarks:
PCMMapSettings object is useful to recreate the map if you are using it in a stateless web application. Before destroying the PCMMap object, call MapSettings to save the map’s center, zoom level and the detail level. Then next time after creating a new PCMMap object, call SetMapSettings with the previously saved values to recreate the map that was destroyed. Any user-created layers such as trips, pins, lines and labels will not be recreated. Users need to call appropriate functions to create these layers again.

Chapter 5: Using the PC*MILER|Mapping COM Server 77
NumFrameAreas property (read) Description: Returns the number of frameable areas available through this map. Visual Basic Syntax: num = mapObj.NumFrameAreas Part Type Description num long the number of frameable areas Remarks: PCMGNumFrameAreas
CopyToClipboard method Description: Places the current gif image on the system Clipboard. Visual Basic Syntax: mapObj. CopyToClipboard (hdc) Com – Interface: HRESULT CopyToClipboard([in] long hdc); Part Type Description hdc long Handle to the device context
CreateGifFile method Description: Creates a .gif file of the map on disk. Visual Basic Syntax: mapObj.CreateGifFile(width, height, gifId, option) Com – Interface:
HRESULT CreateGifFile([in] long width, [in] long height, BSTR gifId, [in] long option);
Part Type Description width long desired width of the .gif in pixels height long desired height of the .gif in pixels gifId string filename of the .gif (may have full path) option long desired scale legend option

PC*MILER|Mapping User’s Guide 78
Remarks:
Returns 1 on success. The following constants respresent the five possible options for positioning the legend:
0 NO_SCALE 1 TOP_LEFT_SCALE 2 TOP_RIGHT_SCALE 3 BOTTOM_LEFT_SCALE 4 BOTTOM_RIGHT_SCALE BOTTOM_RIGHT_SCALE is the default position.
CreateGifBytes method Description: Creates a gif image in memory. Visual Basic Syntax: mapObj.CreateGifBytes(width, height, option, buffer) Com – Interface:
HRESULT CreateGifBytes([in] long width, [in] long height,[in] long option, VARIANT *buffer);
Part Type Description width long desired width of the gif image in pixels height long desired height of the gif image in pixels option long desired scale legend option buffer VARIANT buffer Remarks:
Returns 1 on success. The following constants respresent the five possible options for positioning the legend:
0 NO_SCALE 1 TOP_LEFT_SCALE 2 TOP_RIGHT_SCALE 3 BOTTOM_LEFT_SCALE 4 BOTTOM_RIGHT_SCALE BOTTOM_RIGHT_SCALE is the default position.

Chapter 5: Using the PC*MILER|Mapping COM Server 79
DeleteLabel method Description: Deletes the label identified by id in the layer layerid. Visual Basic Syntax: mapObj.DeleteLabel(layerid, id) Com – Interface: HRESULT DeleteLabel([in] BSTR, [in] BSTR); Part Type Description layerid string id of the layer containing the label to be deleted id string unique identifier of the label
DeleteLine method Description: Deletes the line identified by id in the layer layerid. Visual Basic Syntax: mapObj.DeleteLine(layerid, id) Com – Interface: HRESULT DeleteLine([in] BSTR, [in] BSTR); Part Type Description layerid string id of the layer containing the line to be deleted id string unique identifier of line Remarks:
Refer to section 3.5 of this manual.
DeletePin method Description: Deletes the pin identified by id in the layer layerid. Visual Basic Syntax: mapObj.DeletePin(layerid, id) Com – Interface: HRESULT DeletePin([in] BSTR, [in] BSTR);

PC*MILER|Mapping User’s Guide 80
Part Type Description layerid string layerid of the layer containing the pin to be deleted id string id of the pin to be deleted Remarks:
Refer to section 3.5.1, Pin and Label Functions.
DeletePinMap method Description:
Removes the Pin layer identified by layerid from the map. Visual Basic Syntax: mapObj.DeletePinMap(layerid) Com – Interface: HRESULT DeletePinMap([in] BSTR); Part Type Description layerid string id of the layer to be deleted Remarks:
Use this function to remove an entire layer. All objects in the layer are deleted. This function can be used to remove Pin layers, Trip layers, Line layers and Label layers.
DeleteTrip method Description: Deletes the trip identified by id in the layer layerid. Visual Basic Syntax: mapObj.DeleteTrip(layerid, id) Com – Interface: HRESULT DeleteTrip([in] BSTR, [in] BSTR); Part Type Description layerid string id of the layer containing the trip to be removed id string id of the trip to be removed Remarks:
Refer to section 3.5.6, Trip and Line Functions.
Chapter 5: Using the PC*MILER|Mapping COM Server 81
FrameArea method Description: Frames the area specified by the string parameter. Visual Basic Syntax: mapObj.FrameArea(area) Com – Interface: HRESULT FrameArea(BSTR areaName); Part Type Description area string the string name of the area Remarks: PCMGFrameArea
FramePin method Description: Zooms the map to center the pin specified by layerid and id. Visual Basic Syntax: mapObj.FramePin(layerid, id) Com – Interface: HRESULT FramePin(layerid, id); Part Type Description layerid string layerid of the layer containing the pin to be framed id string id of the pin to be framed Remarks:
Refer to section 3.5.1, Pin and Label Functions.
FramePinMap method Description: Zooms the map to include all of the pins in the pinmap layer layerid. Visual Basic Syntax: mapObj.FramePinMap(layerid) Com – Interface: HRESULT FramePinMap([in] BSTR);
PC*MILER|Mapping User’s Guide 82
Part Type Description layerid string id of the layer containing the pins to be framed Remarks:
Refer to section 3.5.7, Pinmap Functions.
FrameRoute method Description: Frames the trip represented by the trip ID. Visual Basic Syntax: mapObj.FrameRoute(tripID) Com – Interface: HRESULT FrameRoute([in] long tripID); Part Type Description tripID long trip id Remarks:
The user must have the PC*MILER|Connect object to display trip information on the map.
FrameTrip method Description: Frames the route plotted by PlotTrip. Visual Basic Syntax: mapObj.FrameTrip(layered, id) Com – Interface: HRESULT FrameTrip([in] BSTR, [in] BSTR); Part Type Description layerid string should match layered parameter in PlotTrip call id string should match id parameter in PlotTrip call Remarks: PlotTrip
Chapter 5: Using the PC*MILER|Mapping COM Server 83
GetFrameArea method Description:
Gets the string name of the frameable area indexed by which. Which must be 0 to NumFrameAreas-1.
Visual Basic Syntax: area = mapObj.GetFrameArea(which) Com – Interface: HRESULT GetFrameArea([in] long which, [out, retval] BSTR* area); Part Type Description area string the string name of the area which long index of the frameable area Remarks: PCMGGetFrameArea
LessDetail method Description:
Decreases the number of roads, road names and city names displayed. Each call to the function decreases the level of detail by the same amount as zooming out a level. The function may be called multiple times to dramatically decrease the level of detail.
Visual Basic Syntax: mapObj.LessDetail Com – Interface: HRESULT LessDetail(); Remarks: PCMGRemoveDetail
MoreDetail method Description:
Increases the number of roads, road names and city names displayed. Each call to the function increases the level of detail by the same amount as zooming in a level. The function may be called multiple times to dramatically increase the level of detail.
Visual Basic Syntax: mapObj.MoreDetail
PC*MILER|Mapping User’s Guide 84
Com – Interface: HRESULT MoreDetail(); Remarks: PCMGAddDetail
Paint method Description:
Draws the map. This function should be used when responding to a WM_PAINT message, usually in your OnPaint message-handler member function.
Visual Basic Syntax: mapObj.Paint(hdc, hwnd) Com – Interface: HRESULT Paint([in] long hdc, [in] long hwnd); Part Type Description Hdc long Handle to the device context to draw in. Hwnd long Handle to the window to be painted. Remarks: Returns S_OK if the function was successful , S_FALSE if not.
Pan method Description:
Moves the viewable area of the map in one of eight directions (N, S, E, W, NE, NW, SE, SW).
Visual Basic Syntax: mapObj.Pan(dir, factor) Com – Interface: HRESULT Pan([in] long dir, [in] double factor); Part Type Description dir long direction to pan factor double distance factor Remarks:
The following constants represent the eight possible directions for panning:
Chapter 5: Using the PC*MILER|Mapping COM Server 85
NORTH 0 NORTHEAST 1 EAST 2 SOUTHEAST 3 SOUTH 4 SOUTHWEST 5 WEST 6 NORTHWEST 7
The distance factor determines how far on the map the viewable area moves and represents the map size in tenths. A factor of 0.0 does not move the viewable area and a factor of 1.0 moves the viewable area exactly one map size. That is, panning with a factor of 1.0 will completely move the area so no locations in the previous view are in the subsequent view. A factor of 0.5 will move the view ½ of the map’s area in the direction specified.
PlotLabel method Description: Draws a label on the map. Visual Basic Syntax: mapObj.PlotLabel(layerid, id, importance, style, locations, label) Com – Interface:
HRESULT PlotLabel([in] BSTR, [in] BSTR, [in] BSTR, [in] BSTR, [in] BSTR, [in] BSTR);
Part Type Description layerid string id of the layer to which the new label will be added id string unique identifier of new label importance string level of importance (determines at what level of detail the label will be drawn);1 to 6, with 1 being most important style string which color and line width to use locations string location of label (PC*MILER place names only) label string text of label
PC*MILER|Mapping User’s Guide 86
PlotLine method Description: Draws a line on the map. Visual Basic Syntax: mapObj.PlotLine(layerid, id, importance, style, locations) Com – Interface:
HRESULT PlotLine([in] BSTR, [in] BSTR, [in] BSTR, [in] BSTR, [in] BSTR);
Part Type Description layerid string id of the layer to which the new line will be added id string unique identifier of new line importance string level of importance (determines at what level of detail the line will be drawn);1 to 6, with 1 being most important style string which color and line width to use locations string list of stops that make up the line (PC*MILER place names only) Remarks:
Refer to section 3.5.6, Trip and Line Functions.
PlotPin method Description: Draws an icon on the map. Visual Basic Syntax: mapObj.PlotPin(layerid, id, importance, symbol, location, labels) Com – Interface:
HRESULT PlotPin([in] BSTR, [in] BSTR, [in] BSTR, [in] BSTR, [in] BSTR, [in] BSTR);
Part Type Description layerid string layer that contains the pin (will be created if none exists) id string unique identifier for the pin (pin will be created if none exists) importance string level of importance (determines at what level of detail pin will be drawn); 1 to 6, with 1 being most important symbol string .bmp file name, or PCMGS symbol

Chapter 5: Using the PC*MILER|Mapping COM Server 87
location string ZIP or postal code, city/state, Canadian postal code, SPLC code, or lat/long labels string (optional) list of up to eight values Remarks:
Refer to section 3.5.1, Pin and Label Functions.
SetUseOverlapIcon method Description: Sets overlapping mode for pin layer Visual Basic Syntax: mapObj.SetUseOverlapIcon(layerid, on_off) Com – Interface: HRESULT SetUseOverlapIcon ([in] BSTR, [in] BOOL); Part Type Description layerid string layer that contains the pin (will be created if none exists) on_off boolean Remarks:
Refer to section 3.4.8, Layer Control Functions.
SetOverlapIconName method Description: Sets overlapping icon for pin layer Visual Basic Syntax: mapObj.SetOverlapIconName(layerid, icon) Com – Interface: HRESULT SetOverlapIconName ([in] BSTR, [in] BSTR); Part Type Description layerid string layer that contains the pin (will be created if none exists) icon string .bmp file name, or PCMGS symbol Remarks: Refer to section 3.4.8, Layer Control Functions.

PC*MILER|Mapping User’s Guide 88
PlotTrip method Description: Draws a route’s trip over the PC*MILER network on the map. Visual Basic Syntax: mapObj.PlotTrip(layerid, id, importance, style, locations, options) Com – Interface:
HRESULT PlotTrip([in] BSTR, [in] BSTR, [in] BSTR, [in] BSTR, [in] BSTR, [in] BSTR);
Part Type Description layerid string the feature layer to which the new trip will be added id string unique identifier of the trip importance string level of importance (determines at what level of detail the trip will be drawn); 1 to 6, with 1 being most important style string which line color and width to use locations string list of stops that make up the trip (PC*MILER place names only) options string list of PC*MILER routing options to use when calculating the trip Remarks:
Refer to section 3.5.6, Trip and Line Functions.
Print method Description: Prints the map to a printer device. Visual Basic Syntax: mapObj.Print (hdc, title) Com – Interface: HRESULT Print ([in] long hdc, [in] BSTR, title); Part Type Description hdc long handle to the printer device context. title string title for the printed map. Remarks: Returns S_OK if the function was successful , S_FALSE if not.

Chapter 5: Using the PC*MILER|Mapping COM Server 89
SetGifDirectory method Description:
Sets the default directory or folder to store .gif images created by CreateGifFile.
Visual Basic Syntax: mapObj.SetGifDirectory(dir) Com – Interface: HRESULT SetGifDirectory([in] BSTR); Part Type Description dir string name of the directory or folder. Remarks: Ignore this if you are always using a full path in CreateGifFile.
SetMapSettings method Description: Set the mapping settings for this map. Visual Basic Syntax: mapMgrObj.SetMapSettings(x, y, xzoom, yzoom, detail) Com – Interface:
HRESULT SetMapSettings([in] long x, [in] long y, [in] long xzoom, [in] long yzoom, [in] long detail);
Part Type Description x long x coordinate of the map’s center. y long y coordinate of the map’s center. xzoom long xzoom level yzoom long yzoom level detail long detail level
PC*MILER|Mapping User’s Guide 90
SetScaleUnits method Description: Set scale units of the map to miles or kilometers. Visual Basic Syntax: mapObj.SetScaleUnits(units) Com – Interface: HRESULT SetScaleUnits([in] long units); Part Type Description units long miles or kilometers Remarks: Sets the maps units to either miles (0) or kilometers(1).
ToggleScaleLegend method Description: Sets the scale legend visibility. Visual Basic Syntax: mapObj.ToggleScaleLegend(on_off) Com – Interface: HRESULT ToggleScaleLegend([in] int value); Part Type Description Value int set to 0 to hide the legend, set to nonzero to show the legend
ToggleRoadLegend method Description: Sets the road legend visibility. Visual Basic Syntax: mapObj.ToggleRoadLegend(on_off) Com – Interface: HRESULT ToggleRoadLegend([in] int value); Part Type Description Value int set to 0 to hide the legend, set to nonzero to show the legend
Chapter 5: Using the PC*MILER|Mapping COM Server 91
ToggleRouteLegend method Description: Sets the route legend visibility. Visual Basic Syntax: mapObj.ToggleRouteLegend(on_off) Com – Interface: HRESULT ToggleRouteLegend([in] int value); Part Type Description Value int set to 0 to hide the legend, set to nonzero to show the legend
ShowLayer method Description: Use this function to show or hide the layer identified by layerid. Visual Basic Syntax: mapObj. ShowLayer(layerid, onoff) Com – Interface: HRESULT ShowLayer([in] BSTR, [in] BOOL ); Part Type Description layerid string layer name onoff BOOL show if true, or hide if false Remarks:
This function can be used to show or hide Trip layers, Line layers, Label layers, and any PC*MILER layers. Use True to turn the layer on, use False to turn the layer off.
ShowPinMap method Description: Use this function to show or hide the Pin layer identified by layerid. Visual Basic Syntax: mapObj.ShowPinMap(layerid, onoff) Com – Interface: HRESULT ShowPinMap([in] BSTR, [in] BOOL);
PC*MILER|Mapping User’s Guide 92
Part Type Description layerid string layer name onoff BOOL true or false Remarks:
This function can be used to show or hide only pin layers (layers will not be deleted). Use True to turn the layer on, False to turn the layer off. Refer to section 3.5.7, Pinmap Functions.
UpdateRoute method Description:
Updates the map with information in the trip represented by the trip ID. Visual Basic Syntax: mapObj.UpdateRoute(tripID) Com – Interface: HRESULT UpdateRoute([in] long tripID); Part Type Description tripID long trip id Remarks:
The user must have the PC*MILER|Connect object to display trip information on the map.
UpdateRoute2 method Description:
Updates the map with information in the trip represented by the trip ID and drawn with style represented by the Style.
Visual Basic Syntax: mapObj.UpdateRoute2(tripID, Style) Com – Interface: HRESULT UpdateRoute2([in] tripID, [in] Style); Part Type Description tripID long trip id Style string style (line width and color, separated by vertical bar, for example “red|5”) Remarks:
This function is the extension of UpdateRoute. See section 4.4.3, Plotting a Route Between Two Points for a description of style variable.

Chapter 5: Using the PC*MILER|Mapping COM Server 93
ZoomIn method Description:
Zooms in one level. Equivalent to double-clicking with the left mouse. Will cause more detail to appear on the map.
Visual Basic Syntax: mapObj.ZoomIn Com – Interface: HRESULT ZoomIn(); Remarks: PCMGZoomIn
ZoomOut method Description: Zooms out one level. Will cause less detail to appear on the map. Visual Basic Syntax: mapObj.ZoomOut Com – Interface: HRESULT ZoomOut(); Remarks: PCMGZoomOut
ZoomTo method Description: Zooms to a rectangle on the map. Visual Basic Syntax: mapObj.ZoomTo(left, top, right, bottom) Com – Interface:
HRESULT ZoomTo([in] long left, [in] long top, [in] long right, [in] long bottom);
Part Type Description left long left of the rectangle top long top of the rectangle right long right of the rectangle bottom long bottom of the rectangle

PC*MILER|Mapping User’s Guide 94
ZoomToPlace method Description: Zooms to a place on the map. Visual Basic Syntax: mapObj.ZoomToPlace(placename) Com – Interface: HRESULT ZoomToPlace([in] BSTR); Part Type Description placename string name of the place
GetGifLocationXY method Description:
This function does the opposite of the one above, it returns an (x,y) point in the GIF image corresponding to a given location (location can be any valid PCM location: Lat/Long, postal code, city/state, or POI).
Visual Basic Syntax: mapObj.GetGifLocationXY(width, height, BSTR) Com – Interface:
HRESULT GetGifLocationXY ([in] long width, [in] long height, [in] BSTR, [out] long *x, [out] long *y);
Part Type Description width long width of GIF in pixels height long height of GIF in pixels BSTR string PC*MILER Lat/Long, postcode, city/state, POI x long horizontal position y long vertical position Remarks: PCMGGetGifLocationXY
Chapter 5: Using the PC*MILER|Mapping COM Server 95
5.4 PCMMapSettings PROPERTIES
X property (read) Description: Returns the x coordinate of the map settings object. Visual Basic Syntax: xcoord = MapSettingsObj.x Part Type Description xcoord long the x coordinate of this object
Y property (read) Description: Returns the y coordinate of the map settings object. Visual Basic Syntax: ycoord = MapSettingsObj.y Part Type Description ycoord long the y coordinate of this object
Xzoom property (read) Description: Returns the xzoom level of the map settings object. Visual Basic Syntax: xzoomlevel = MapSettingsObj.xZoom Part Type Description xzoomlevel long the xzoom level
PC*MILER|Mapping User’s Guide 96
Yzoom property (read) Description: Returns the yzoom level of the map settings object. Visual Basic Syntax: yzoomlevel = MapSettingsObj.yZoom Part Type Description yzoomlevel long the yzoom level
Detail property (read) Description: Returns the detail level of the map settings object. Visual Basic Syntax: detaillevel = MapSettingsObj.Detail Part Type Description detaillevel long the detail level

PC*MILER|Mapping User’s Guide 97
Trouble-shooting (Helpful Hints)
‘Run-time error ‘1004’: Programmatic access to Visual Basic Project is not trusted’
To resolve this issue, follow these steps (or equivalent steps in your version of Excel – these are for Excel 10): 1. Select File > Options. 2. Select Trust Center > Trust Center Settings. 3. Select Macro Settings. 4. Check “Trust access to the VBA project object model”.
Postal codes with leading zero’s
If you enter a postal code with a leading zero (e.g. 08540) Excel may interpret it as a number and remove the leading zero. To correct this problem, either type an apostrophe in front of the postal code (e.g. ‘08540) or format the field as text.
‘Cannot access PCMGMP32.XLA’ error When you open the Add-in dialog box, a dialog box appears that gives the above error. Microsoft has acknowledged this problem and is researching it. Please call Microsoft and refer to document number Q128186 for a status update if you are experiencing this problem. To access pcmgmp32.xla, exit and restart Excel and manually enable the Add-In (see Chapter 4).
‘Cannot find VBAEN.OLB’ error Excel will attempt to access this file when it tries to load the Add-In. First, make sure that the file vbaen.olb exists. It should be either in the Windows directory or the SYSTEM subdirectory inside the Windows directory. If the file does not exist, you must re-install Windows. If the file exists, then the problem is in the Windows Registration File (reg.dat). The location of vbaen.olb is saved in the reg.dat. Make sure the path to this file in the reg.dat points to the correct location. You can run REGEDIT /V to view/edit
6 Cha
pter
PC*MILER|Mapping User’s Guide 98
the reg.dat. Note: We do not support making modifications to this file. Please make a backup copy before making any changes. Look for the key "TypeLib". Look for the Win17 selection. Under this section should be a complete path to the vbaen.olb. Ensure the full path is correct.
‘Sub or function not defined’ error When making calls to PC*MILER|Mapping from a macro sheet, you may see this message. To fix the problem, from the Tools menu select References and make sure that pcmgmp32.xla is checked.
PC*MILER|Mapping won’t restart Under certain circumstances when using Windows for Workgroups the pcmgmap.exe will not start after it has been opened and closed. To restart it you must exit Windows. To avoid this problem, always exit Excel before exiting the PC*MILER|Mapping program.
Bitmaps do not draw On some machines with very little video memory (like laptops), bitmaps may not be drawn on the screen. To reduce the demand on video memory, change video drivers to reduce the number of colors being rendered or move to a lower resolution video mode.
You have problems using custom routing from PC*MILER If you have problems using custom routing that you created in PC*MILER, set the value of the following item in the PCMSERVE.INI file to TRUE: CustomRoute = TRUE The PCMSERVE.INI file is located in your Windows or Winnt folder. See Appendix B.
PC*MILER|Mapping User’s Guide 99
Appendix A:
Location of Header Files & Sample Code The header files pcmgmap.h, pcmgwin.h, and pcmgwinex.h for unmanaged win32 applications can be found in the C_CPP folder of the PC*MILER|Mapping installation (usually C:\ALK Technologies\ PCMILER31\Mapping\C_CPP). Sample code is in the same location. Pcmgmap.def and pcmgwin.def are found in the Mapping folder. Other subfolders in the Mapping folder include additional files containing sample code and additional documentation, along with descriptive ReadMe files.
A App
endi
x
PC*MILER|Mapping User’s Guide 100
Appendix B:
The PCMSERVE.INI File
PC*MILER|Mapping and PC*MILER|Connect share the same INI file (PCMSERVE.INI). You can modify the INI file to set default trip options so that these options are active each time PC*MILER|Mapping starts up. This file is located in your Windows or Windows NT folder, and can be opened using Notepad, Wordpad, or another text editor. Note that trip options can also be set using the API functions or in the PC*MILER user interface. An option set with an API function takes precedence over both the INI setting and the setting in the user PC*MILER interface. The order of precedence is as follows:
1. Options that are set using PC*MILER|Mapping functions prevail over the default options set in PC*MILER and the INI file.
2. Options set in PCMSERVE.INI prevail over those set in PC*MILER. 3. Options set in PC*MILER as defaults take effect only in the absence of settings 1 and 2.
NOTE: Beginning in Version 26, customizations in the PCMSERVE.INI file from the previous version are retained when you install a new version of PC*MILER.
Settings in the INI that can be added or edited are listed below. If you open the INI file, you won’t see all of these settings in it.If any key doesn’t have a value or is not found in the INI file, it assumes the default value or the value set in the PC*MILER user interface.
Key
Valid Values Description
[Engine] ShowEngine= 0
1 Should Connect automaticallystart the engine (1) or not (0). Default = 0
[MapLogging] Enable= 0
1 Should log files be generated (1) or not (0). Default = 0
File= Path/file name of log file. For example: File=C:\Program Files\ALK Technologies\ PCMiler_2017_3\pcm_map.log
Append= 0
1 Append to old file (1) or write over (0). Default = 0
B App
endi
x
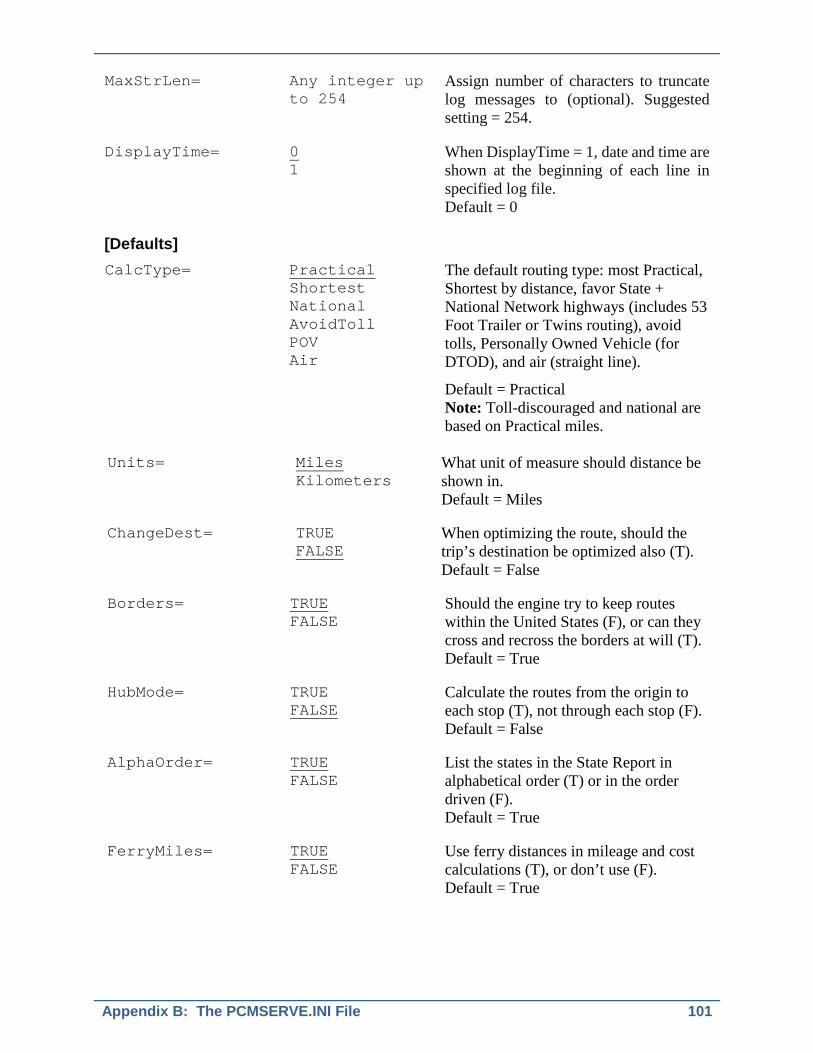
Appendix B: The PCMSERVE.INI File 101
MaxStrLen= Any integer up to 254
Assign number of characters to truncate log messages to (optional). Suggested setting = 254.
DisplayTime= 0 1
When DisplayTime = 1, date and time are shown at the beginning of each line in specified log file. Default = 0
[Defaults] CalcType= Practical
Shortest National AvoidToll POV Air
The default routing type: most Practical, Shortest by distance, favor State + National Network highways (includes 53 Foot Trailer or Twins routing), avoid tolls, Personally Owned Vehicle (for DTOD), and air (straight line).
Default = Practical Note: Toll-discouraged and national are based on Practical miles.
Units= Miles
Kilometers What unit of measure should distance be shown in. Default = Miles
ChangeDest= TRUE FALSE
When optimizing the route, should the trip’s destination be optimized also (T). Default = False
Borders= TRUE FALSE
Should the engine try to keep routes within the United States (F), or can they cross and recross the borders at will (T). Default = True
HubMode= TRUE FALSE
Calculate the routes from the origin to each stop (T), not through each stop (F). Default = False
AlphaOrder= TRUE FALSE
List the states in the State Report in alphabetical order (T) or in the order driven (F). Default = True
FerryMiles= TRUE FALSE
Use ferry distances in mileage and cost calculations (T), or don’t use (F). Default = True

PC*MILER|Mapping User’s Guide 102
LightVehicle= TRUE FALSE
Should the DLL use Light Vehicle routing (only available if Streets data is installed with PC*MILER). Default=False
MAPPING=
TRUE FALSE
(AS/400 parameter) Default = False
EXPMAP=
TRUE FALSE
(AS/400 parameter) Default = False
[Options] CustomRoute= TRUE
FALSE Should PC*MILER|Connectuse Custom routing. Default = False
HazRoute= (with PC*MILER|Hazmat add-on only)
None General* Explosive Inhalant Radioactive Corrosive Flammable HarmfultoWater
Hazardous material routing types for North America are: none (hazmat routing disabled), general, explosive, inhalant, radioactive, corrosive, or flammable. For Europe or Oceania, hazmat route types are: none, general, explosive, flammable, or harmful to water. Default (all regions) = None *NOTE: “General” = “Other” in the PC*MILER UI, they are the same route type and algorithm.
PartialCityMatch= TRUE FALSE
Enables the return of a city match on a partial match of 28 characters. Default = False
HistoricalRoadSpeeds=
TRUE FALSE
Toggles activation of traffic data for use in time-based routing. Equivalent to the “Use Traffic Data” button in PC*MILER. Default = False
TranslateAlias=
TRUE FALSE
This setting pertains to geocoding in PC*MILER|FuelTax. It changes “*” and “()” in a custom place name to a “Zip-City-State; Address” format.
UseUSPostCodes=
TRUE FALSE
When set to TRUE, if a 5-digit postal code might be a U.S. or a Mexican code, the U.S. code will be used. Default = True (see note below)
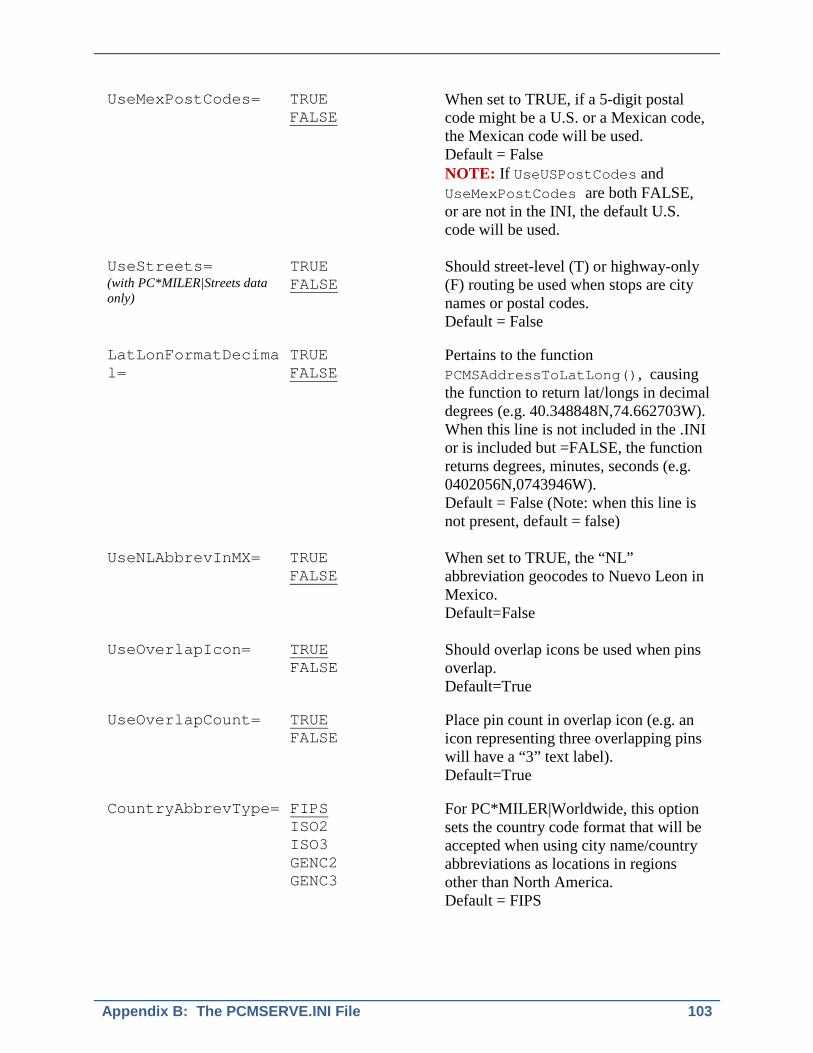
Appendix B: The PCMSERVE.INI File 103
UseMexPostCodes=
TRUE FALSE
When set to TRUE, if a 5-digit postal code might be a U.S. or a Mexican code, the Mexican code will be used. Default = False NOTE: If UseUSPostCodes and UseMexPostCodes are both FALSE, or are not in the INI, the default U.S. code will be used.
UseStreets= (with PC*MILER|Streets data only)
TRUE FALSE
Should street-level (T) or highway-only (F) routing be used when stops are city names or postal codes. Default = False
LatLonFormatDecimal=
TRUE FALSE
Pertains to the function PCMSAddressToLatLong(), causing the function to return lat/longs in decimal degrees (e.g. 40.348848N,74.662703W). When this line is not included in the .INI or is included but =FALSE, the function returns degrees, minutes, seconds (e.g. 0402056N,0743946W). Default = False (Note: when this line is not present, default = false)
UseNLAbbrevInMX= TRUE FALSE
When set to TRUE, the “NL” abbreviation geocodes to Nuevo Leon in Mexico. Default=False
UseOverlapIcon= TRUE FALSE
Should overlap icons be used when pins overlap. Default=True
UseOverlapCount= TRUE FALSE
Place pin count in overlap icon (e.g. an icon representing three overlapping pins will have a “3” text label). Default=True
CountryAbbrevType= FIPS ISO2 ISO3 GENC2 GENC3
For PC*MILER|Worldwide, this option sets the country code format that will be accepted when using city name/country abbreviations as locations in regions other than North America. Default = FIPS
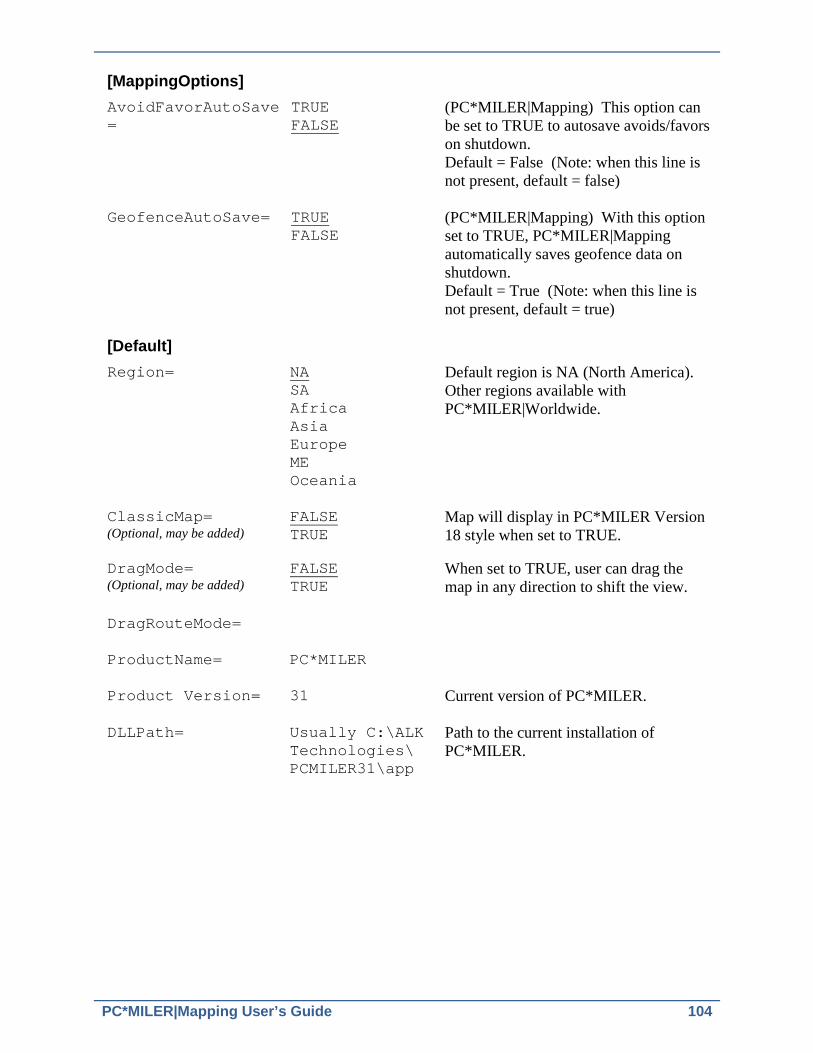
PC*MILER|Mapping User’s Guide 104
[MappingOptions] AvoidFavorAutoSave=
TRUE FALSE
(PC*MILER|Mapping) This option can be set to TRUE to autosave avoids/favors on shutdown. Default = False (Note: when this line is not present, default = false)
GeofenceAutoSave= TRUE FALSE
(PC*MILER|Mapping) With this option set to TRUE, PC*MILER|Mapping automatically saves geofence data on shutdown. Default = True (Note: when this line is not present, default = true)
[Default] Region= NA
SA Africa Asia Europe ME Oceania
Default region is NA (North America). Other regions available with PC*MILER|Worldwide.
ClassicMap= (Optional, may be added)
FALSE TRUE
Map will display in PC*MILER Version 18 style when set to TRUE.
DragMode= (Optional, may be added)
FALSE TRUE
When set to TRUE, user can drag the map in any direction to shift the view.
DragRouteMode=
ProductName= PC*MILER
Product Version= 31 Current version of PC*MILER.
DLLPath= Usually C:\ALK Technologies\ PCMILER31\app
Path to the current installation of PC*MILER.

PC*MILER|Mapping User’s Guide 105
Appendix C: Error Codes General error -10 Pin map does not exist -20 Failed to create pin map -21 Unknown location -22 Bad bit map -23 Bad bit map file -24 Pin does not exist -25 Bad importance value -26 Map does not exist -27 Failed to create route -28 Not enough stops -29 Invalid stop -30 Trip not ready -31 Route not run -32 Invalid style -33 Invalid route options -34 Failed to create line -35 Invalid point -36 Not enough points -37 Invalid arguments -38 Route does not exist -39 Line does not exist -40
C App
endi
x
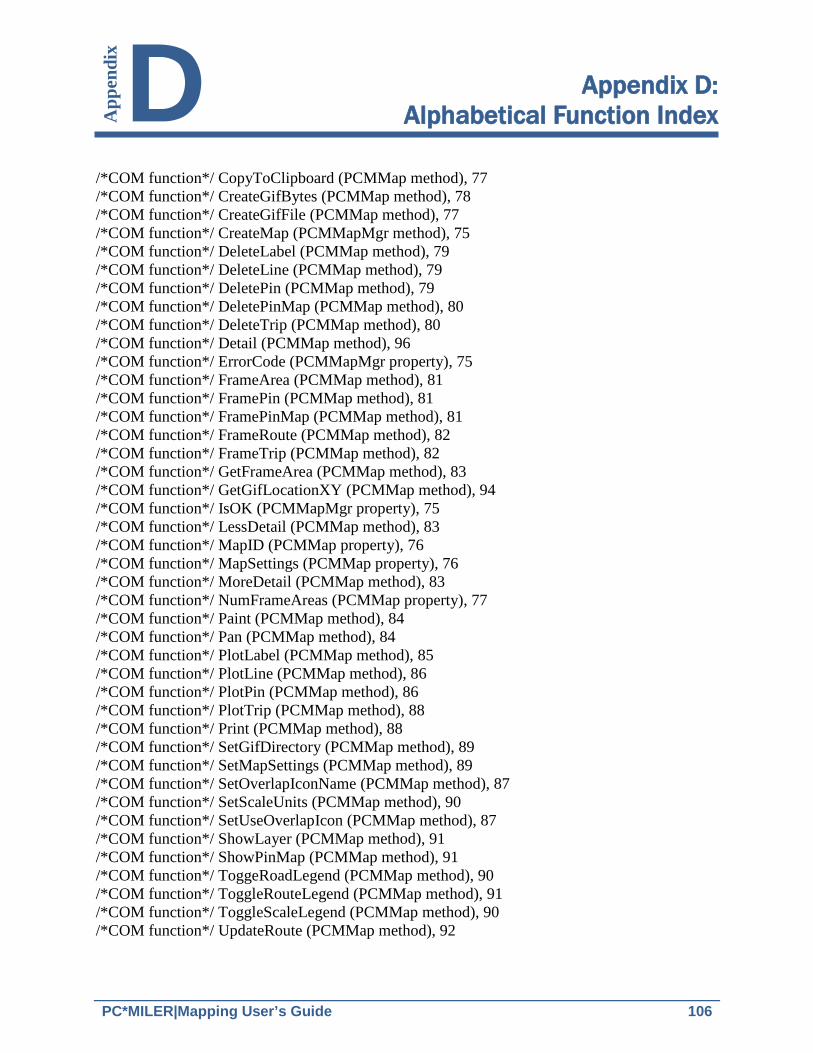
PC*MILER|Mapping User’s Guide 106
Appendix D: Alphabetical Function Index
/*COM function*/ CopyToClipboard (PCMMap method), 77 /*COM function*/ CreateGifBytes (PCMMap method), 78 /*COM function*/ CreateGifFile (PCMMap method), 77 /*COM function*/ CreateMap (PCMMapMgr method), 75 /*COM function*/ DeleteLabel (PCMMap method), 79 /*COM function*/ DeleteLine (PCMMap method), 79 /*COM function*/ DeletePin (PCMMap method), 79 /*COM function*/ DeletePinMap (PCMMap method), 80 /*COM function*/ DeleteTrip (PCMMap method), 80 /*COM function*/ Detail (PCMMap method), 96 /*COM function*/ ErrorCode (PCMMapMgr property), 75 /*COM function*/ FrameArea (PCMMap method), 81 /*COM function*/ FramePin (PCMMap method), 81 /*COM function*/ FramePinMap (PCMMap method), 81 /*COM function*/ FrameRoute (PCMMap method), 82 /*COM function*/ FrameTrip (PCMMap method), 82 /*COM function*/ GetFrameArea (PCMMap method), 83 /*COM function*/ GetGifLocationXY (PCMMap method), 94 /*COM function*/ IsOK (PCMMapMgr property), 75 /*COM function*/ LessDetail (PCMMap method), 83 /*COM function*/ MapID (PCMMap property), 76 /*COM function*/ MapSettings (PCMMap property), 76 /*COM function*/ MoreDetail (PCMMap method), 83 /*COM function*/ NumFrameAreas (PCMMap property), 77 /*COM function*/ Paint (PCMMap method), 84 /*COM function*/ Pan (PCMMap method), 84 /*COM function*/ PlotLabel (PCMMap method), 85 /*COM function*/ PlotLine (PCMMap method), 86 /*COM function*/ PlotPin (PCMMap method), 86 /*COM function*/ PlotTrip (PCMMap method), 88 /*COM function*/ Print (PCMMap method), 88 /*COM function*/ SetGifDirectory (PCMMap method), 89 /*COM function*/ SetMapSettings (PCMMap method), 89 /*COM function*/ SetOverlapIconName (PCMMap method), 87 /*COM function*/ SetScaleUnits (PCMMap method), 90 /*COM function*/ SetUseOverlapIcon (PCMMap method), 87 /*COM function*/ ShowLayer (PCMMap method), 91 /*COM function*/ ShowPinMap (PCMMap method), 91 /*COM function*/ ToggeRoadLegend (PCMMap method), 90 /*COM function*/ ToggleRouteLegend (PCMMap method), 91 /*COM function*/ ToggleScaleLegend (PCMMap method), 90 /*COM function*/ UpdateRoute (PCMMap method), 92
D App
endi
x

Appendix D: Alphabetical Function Index 107
/*COM function*/ UpdateRoute2 (PCMMap method), 92 /*COM function*/ X (PCMMap property), 95 /*COM function*/ Xzoom (PCMMap property), 95 /*COM function*/ Y (PCMMap property), 95 /*COM function*/ Yzoom (PCMMap method), 96 /*COM function*/ ZoomIn (PCMMap method), 93 /*COM function*/ ZoomOut (PCMMap method), 93 /*COM function*/ ZoomTo (PCMMap method), 93 /*COM function*/ ZoomToPlace (PCMMap method), 94 /*COM object*/ PCMMap, 72 /*COM object*/ PCMMapSettings, 72 /*Excel function*/ DeleteLineID, 68 /*Excel function*/ DeletePinID, 67 /*Excel function*/ DeletePins, 67 /*Excel function*/ DeleteTripID, 69 /*Excel function*/ DeleteTrips, 69 /*Excel function*/ DeletLines, 68 /*Excel function*/ PlotLine, 65 /*Excel function*/ PlotLineID, 65 /*Excel function*/ PlotPin, 60 /*Excel function*/ PlotPinID, 60 /*Excel function*/ PlotTrip, 63 /*Excel function*/ PlotTripID, 63 PCMGActivateGeofence, 49 PCMGActivateGeofenceSet, 50 PCMGAddDetail, 22 PCMGAddGeofence, 48 PCMGAddGeofenceSet, 50 PCMGAddGeofenceToSet, 50 PCMGAddStateHighlight, 52 PCMGAddStreetHighlight, 53 PCMGCleanupMap, 14, 33, 55 PCMGClearLabels, 20 PCMGCloseMap, 12, 14 PCMGCloseMapEx, 56 PCMGCopyMap, 19 PCMGCreateChildMap, 55 PCMGCreateGifBuffer, 37 PCMGCreateGifFile, 36 PCMGCreateImageBuffer, 38 PCMGCreateImageFile, 37 PCMGCreateMapChild, 12, 13 PCMGCreateMapChildEx, 55 PCMGCreateMapWindow, 12, 13, 33, 35 PCMGCreateMapWindowEx, 55 PCMGDefaultDetail, 23
PC*MILER|Mapping User’s Guide 108
PCMGDeleteAllStreetHighlights, 54 PCMGDeleteGeofence, 49 PCMGDeleteGeofenceSet, 50 PCMGDeleteLabel, 25, 41 PCMGDeleteLine, 45, 70 PCMGDeletePin, 41, 70 PCMGDeletePinmap, 46, 70 PCMGDeleteStateHighlight, 52 PCMGDeleteStreetHighlight, 53 PCMGDeleteTrip, 70 PCMGDeleteTripLayer, 46 PCMGFindGeofenceID, 50 PCMGFindGeofenceSetID, 51 PCMGFrameArea, 24 PCMGFramePin, 41, 70 PCMGFramePinmap, 46, 70 PCMGFrameTrip, 46 PCMGFrameTripLayer, 46 PCMGGetActiveMapStyle, 15 PCMGGetCityLabeling, 19 PCMGGetDefaultMapID, 14 PCMGGetDefaultRegion, 47 PCMGGetDetailAdjust, 23 PCMGGetDetailLevel, 23 PCMGGetDisplayModule, 54 PCMGGetDisplayWindow, 54 PCMGGetDrawerCount, 18 PCMGGetDrawerInfo, 18 PCMGGetFrameArea, 24 PCMGGetGeofenceContainingPoint, 52 PCMGGetGeofenceFromSet, 52 PCMGGetGeofenceName, 50 PCMGGetGeofenceSet, 52 PCMGGetGeofenceSetBorderColor, 51 PCMGGetGeofenceSetColor, 51 PCMGGetGeofenceSetName, 51 PCMGGetLayerVisible, 20 PCMGGetMapStyleList, 14 PCMGGetMapWindowDims, 15 PCMGGetPinPicking, 20 PCMGGetProjectionRect, 16 PCMGGetRegionName, 47 PCMGGetRestrictionsLegend, 22 PCMGGetRoadLabeling, 20 PCMGGetRoadLegend, 21 PCMGGetRouteDistTooltip, 21 PCMGGetRouteLegend, 21 PCMGGetScale, 22
Appendix D: Alphabetical Function Index 109
PCMGGetStateHighlightColor, 53 PCMGGetTrafficLegend, 22 PCMGHideLayer, 25 PCMGInitMap, 12, 33, 35 PCMGIsGeofenceActive, 49 PCMGIsGeofenceSetActive, 51 PCMGLatLongToPixel, 17 PCMGModifyGeofenceBorderColor, 49 PCMGModifyGeofenceColor, 49 PCMGModifyGeofenceSetBorderColor, 51 PCMGModifyGeofenceSetColor, 51 PCMGNumFrameAreas, 24 PCMGNumGeofenceSets, 52 PCMGNumGeofencesInSet, 52 PCMGNumRegions, 47 PCMGPixelToLatLong, 17 PCMGPlotLabel, 25, 41, 42 PCMGPlotLine, 44, 70 PCMGPlotPin, 35, 39, 41, 42, 43, 44, 45, 70 PCMGPlotTrip, 43, 70 PCMGPrintMap, 19 PCMGPrintMapOnDC, 19 PCMGRedraw, 19 PCMGRemoveDetail, 23 PCMGRemoveGeofenceFromSet, 50 PCMGResizeMapChild, 14 PCMGScrollMapView, 19 PCMGSetCallBack, 26, 32, 33 PCMGSetCanWindow, 23 PCMGSetCityLabeling, 19 PCMGSetDefaultRegion, 47 PCMGSetDisplayModule, 54 PCMGSetDisplayWindow, 34, 35, 54, 55 PCMGSetDrawerVisible, 18 PCMGSetGeofenceName, 50 PCMGSetGeofenceSetName, 51 PCMGSetInfoLabels, 45, 70 PCMGSetMapResizeCallback, 27 PCMGSetMapStyle, 15 PCMGSetMexWindow, 23 PCMGSetMouseInterceptCallback, 26 PCMGSetNAWindow, 23 PCMGSetOverlapIconName, 25 PCMGSetPinPicking, 20 PCMGSetProjectionCenter, 16 PCMGSetProjectionOnRadius, 16 PCMGSetProjectionRect, 15 PCMGSetReceiver, 26, 33

PC*MILER|Mapping User’s Guide 110
PCMGSetRedraw, 54, 70 PCMGSetRestrictionsLegend, 22 PCMGSetRoadLabeling, 20 PCMGSetRoadLegend, 21 PCMGSetRouteDistTooltip, 21 PCMGSetRouteLegend, 21 PCMGSetScale, 22 PCMGSetTrafficLegend, 22 PCMGSetUseOverlapIcon, 25 PCMGSetUSWindow, 23 PCMGShowLayer, 25 PCMGShowPinmap, 46, 70 PCMGSwitchRegion, 47 PCMGToggleCityPicking, 20 PCMGTogglePinPicking, 20 PCMGToggleRestrictionsLegend, 22 PCMGToggleRoadLegend, 21 PCMGToggleRoadPicking, 20 PCMGToggleRouteDistTooltip, 21 PCMGToggleRouteLegend, 21 PCMGToggleScale, 22 PCMGToggleTrafficLegend, 22 PCMGTrafficStatus, 55 PCMGZoomIn, 24 PCMGZoomOut, 24 PCMGZoomToPlace, 24

PC*MILER|Mapping User’s Guide 111
Appendix E: Deprecated API’s
API/Option Name Deprecated in Version
ADMIN/Management Functions:
PCMGGetDebug 28
PCMGSetDebug 28
PCMGSetCustomMode 28
Legend Functions
PCMGCreateLegendGIF 28
Map Display Functions
PCMGGetShapePts 28
PCMGSetShapePts 28
PCMGToggleRoadPicking 28
PCMGToggleRoadPickingEx 28
PCMGToggleShapePts 28
PCMGGetRoadLabeling 28
PCMGGetRoadLabelingEx 28
PCMGSetRoadLabeling 28
PCMGSetRoadLabelingEx 28
E App
endi
x