User Guide - Amazon S3...User Guide This User Guide is an encyclopedia of Pro Q knowledge. It...
73
Continuous Glucose Monitoring System User Guide Insertion p 21 Removal p 31
Transcript of User Guide - Amazon S3...User Guide This User Guide is an encyclopedia of Pro Q knowledge. It...

Continuous GlucoseMonitoring System
User Guide
Insertion p 21
Removal p 31


WARNING:
Please review the product instructions before using the Dexcom Pro Q Continuous Glucose Monitoring System (Pro Q). Indications, contraindications, warnings, precautions, cautions, and other important user information can be found in the product instructions that are included with, or accompany, the Pro Q.

Dexcom Pro Q System User Guide
2
Table of ContentsPart 1: System Overview
Chapter 1 | Dexcom Pro Q System1.1 Introduction . . . . . . . . . . . . . . . . . . . . . . . 41.2 Parts . . . . . . . . . . . . . . . . . . . . . . . . . . . . . 41.3 Resources . . . . . . . . . . . . . . . . . . . . . . . . . 61.4 Glossary . . . . . . . . . . . . . . . . . . . . . . . . . . .7
Chapter 2 | Indications for Use and Safety Statements
2.1 Dexcom Pro Q Safety Statements . . . . 9
Chapter 3 | Risks and Benefits3.1 Risks . . . . . . . . . . . . . . . . . . . . . . . . . . . . . 123.2 Benefits. . . . . . . . . . . . . . . . . . . . . . . . . . 13
Part 2: Insertion & Removal
Chapter 4 | Insertion4.1 Introduction . . . . . . . . . . . . . . . . . . . . . . 154.2 Prepare to Insert Sensor . . . . . . . . . . . 154.4 Insert Sensor . . . . . . . . . . . . . . . . . . . . . 184.5 Attach Transmitter . . . . . . . . . . . . . . . . 22
Chapter 5 | Removal5.1 Introduction . . . . . . . . . . . . . . . . . . . . . . 245.2 Remove Sensor and Transmitter . . . . 24
Part 3: Troubleshooting
Chapter 6 | Troubleshooting6.1 Introduction . . . . . . . . . . . . . . . . . . . . . . 276.2 Applicator. . . . . . . . . . . . . . . . . . . . . . . . 276.3 Sensor . . . . . . . . . . . . . . . . . . . . . . . . . . . .31
Part 4: Appendices
Appendix A | Support Teams . . . . . . . .34
Appendix B | Security and Air Travel . . . . . . . . . . . . . . . . . . . . . . . . . .36
Appendix C | Care of Dexcom Pro Q . . . . . . . . . . . . . . . . . . . . .38
Appendix D | Warranty . . . . . . . . . . . . .39
Appendix E | Technical Information . . . . . . . . . . . . . . . . . . . . . . .43
Appendix F | Label Symbols . . . . . . . . 66
Index . . . . . . . . . . . . . . . . . . . . . . . . . . . . .69

1System Overview
• Introduction
• Indications for Use and Safety Statement
• Risks and Benefits

Dexcom Pro Q System User Guide
4Chapter 1: System Overview
Chapter 1 | System Overview
1.1 IntroductionThe Dexcom Pro Q Continuous Glucose Monitoring System tracks and stores a participant's glucose data every 5 minutes. The glucose data is downloaded and reviewed by a health assessment program. The program, which can review glucose trends and may propose adjustments to a participant's medication, diet, or exercise as needed for healthier living.
Dexcom Pro Q is blinded; the participant won’t see their current readings. However, the readings are recorded and are downloaded later.
An authorized data extraction tool downloads glucose data after a sensor session. See dexcom.com/guides for instruction related to data extraction.
Please note: Images in this User Guide are representational and may differ from the Dexcom Pro Q.
1.2 PartsThis section is a quick overview of each component. Specifics for each are in the following chapters.
The Dexcom Pro Q has these parts:
• Single-use applicator and built-in sensor
• Single-use transmitter
ApplicatorFor safety, the applicator is packaged in a sterile sealed pouch. The applicator inserts the built-in sensor. The sensor is held in the body by an adhesive patch. The transmitter snaps into a holder on the outside of that patch. The transmitter holder is held on the body with the adhesive patch.

Dexcom Pro Q System User Guide
5Chapter 1: System Overview
The sensor wire is made of silver and platinum with polymer membranes. Once inserted, the thin, flexible wire measures glucose levels in the interstitial fluid for up to 10 days.
Applicator with built-in sensor:
• Inserts sensor wire under the skin
• Disposable, for one use only
Sensor:
• Measures glucose levels in fluid in between cells (interstitial fluid)
• Disposable, for one use only
Transmitter
The transmitter snaps into the transmitter holder and records glucose information.
Transmitter:
• Stores sensor readings for future analysis
• One use only
• Water resistant
Chapter 4 has more information on sensor insertion and transmitter attachment.

Dexcom Pro Q System User Guide
6Chapter 1: System Overview
1.3 Resources
There are three resources for Dexcom Pro Q:
Participant Guide
This sheet is given to the participant. It is their primary source of information and a helpful reminder of when to return for Pro Q removal.
User Guide
This User Guide is an encyclopedia of Pro Q knowledge. It provides an overview of the Dexcom Pro Q, detailing features, important safety information, and more.
Download the User Guide or ask for a printed version:
• Download a PDF at dexcom.com/guides
• Ask for a free copy by phone:
• Toll free: 1.844.857.6319 (M – F, 6 AM – 6 PM PST)
Insertion/Removal Instructions
This sheet is in the sensor box. It is a short, step-by-step guide on inserting and removing the Dexcom Pro Q.

Dexcom Pro Q System User Guide
7Chapter 1: System Overview
1.4 Glossary
A1CBlood test used to diagnose type 1 or 2 diabetes and to gauge how well someone is managing their diabetes. A1C reflects average blood sugar level for the past 2 to 3 months.
Blood Glucose (BG) Value Amount of glucose in the blood measured by a meter.
Continuous Glucose Reading
Sensor inserted under the skin checks glucose levels in interstitial fluid. A transmitter stores readings to be retrieved later.
Contraindication Situations in which the Pro Q shouldn't be used because it may be harmful to the user.
Default Preset option for a device setting.
Hyperglycemia High BG. Same as "high" or "high blood sugar."
Hypoglycemia Low BG. Same as "low" or "low blood sugar."
Indications How, for what purposes, and under what circumstances the Pro Q should be used.
IP
The International Electrotechnical Commission (IEC) is a nonprofit, non-governmental, international organization created to produce safety standards for electronics. One of the safety standards is the Ingress Protection (IP) Marking, which classifies and rates how protected an electronic device is against dust, water, accidental contact, etc.

Dexcom Pro Q System User Guide
8Chapter 1: System Overview
mg/dL Milligrams per deciliter. The standard unit of measure for BG readings in the United States.
Precaution Special care for the safe and effective use of the Pro Q.
Safety Statement
Intended uses of Pro Q and relevant warnings, precautions, and contraindications.
Sensor Glucose Reading (sensor reading)
The glucose concentration measured in the interstitial fluid.
Sensor Session The period (up to 10 days) after inserting a new sensor. During this time glucose is recorded every 5 minutes for retrieval later.
WarningDescribes serious and life-threatening circumstances, the consequences, and how to avoid the hazard while using the Pro Q.

Dexcom Pro Q System User Guide
9Chapter 2: Indications for Use and Safety Statements
Chapter 2 | Indications for Use and Safety Statements
2.1 Dexcom Pro Q Safety StatementsIndications for Use
The Dexcom Pro Q Continuous Glucose Monitoring System (Dexcom Pro Q System) is a factory calibrated continuous glucose recording device indicated for the retrospective discovery, analysis and interpretation of glycemic variability in persons age 2 years and older under the supervision of a healthcare professional. The Dexcom Pro Q System collects and processes data for aiding in the management of a disease or condition related to glycemic control.
Interpretation of the data recorded by the Dexcom Pro Q System results should be made only by a qualified healthcare professional based on glucose trends and several sequential readings over time. The Dexcom Pro Q System aids in detecting glucose excursions facilitating care plan adjustments. The Dexcom Pro Q System is also intended to interface with digitally connected devices.
Contraindication
• No MRI/CT/Diathermy – MR Unsafe
Don’t wear the system (sensor, transmitter) for magnetic resonance imaging (MRI), computed tomography (CT) scan, or high-frequency electrical heat (diathermy) treatment.
The Dexcom Pro Q hasn’t been tested in those situations. The magnetic fields and heat could damage the components of the Dexcom Pro Q, which may cause inaccurate Dexcom Pro Q sensor glucose readings (Dexcom Pro Q readings).
Warnings
• Do not use the Dexcom Pro Q if participant is pregnant, on dialysis, or critically ill. It is not known how different conditions or medications common to theses populations may affect performance of the system.
MR

Dexcom Pro Q System User Guide
10Chapter 2: Indications for Use and Safety Statements
• Don’t ignore broken or detached sensor wires. A sensor wire could remain under the skin. If this happens, please contact our 24/7 Technical Support.
• If a sensor wire breaks off under the skin and it can't be seen, don’t try to remove it. Contact a HCP. Also seek professional medical help if participant has symptoms of infection or inflammation – redness, swelling, or pain – at the insertion site.
• Don’t use a damaged or cracked transmitter. A damaged transmitter could cause injuries from electrical shocks and may make the Dexcom Pro Q not work correctly.
• Don’t modify any component or accessory in order to maintain safety.
• The transmitter is small and may pose a choking hazard. Don’t put it in mouth or let children hold it without adult supervision.
• The sensor is approved for use in the following sites:
Ages 2-17 years: Insert in abdomen or upper buttocks
Ages 18 years and older: Insert on abdomen
• Store sensors at room temperature or in a refrigerator with a temperature range between 36°F and 86°F. Don’t store sensors in the freezer.
Cautions
• Some skin care products, such as sunscreens and insect repellents, can make the plastic used in the Dexcom Pro Q crack. Before using the Dexcom Pro Q, make sure there are no cracks in the transmitter, and transmitter holder. If there is a crack,

Dexcom Pro Q System User Guide
11Chapter 2: Indications for Use and Safety Statements
please contact Technical Support. Do not allow these skin care products to contact the Dexcom Pro Q. After using skin care products, wash hands before touching the Dexcom Pro Q. If any skin care products get on the Dexcom Pro Q, immediately wipe with a clean cloth.
• Don’t use expired sensors. Check the package label for the expiration date. It’s in YYYY-MM-DD (Year-Month-Day) format.
• Don’t use sensor if its sterile package has been damaged or opened, because it might cause an infection.
• Sensor insertion/removal should only be conducted by, or under the supervision of, a healthcare practitioner.
• Clean and dry hands and put on gloves before inserting a sensor.
• Clean the insertion site with alcohol wipes to prevent infections. Don’t insert the sensor until skin is dry. If the insertion site is not clean and completely dry, it may run the risk of infection or the transmitter holder not sticking well.
• Keep the safety guard on until the Dexcom Pro Q applicator is placed against participant's skin. Accidentally pushing the button before the applicator is placed against the participant's skin may cause injury.
• Sensor placement cautions:
– At least 3 inches from insulin pump infusion set or injection site
– Away from waistband, scarring, tattoos, irritation, and bones
– Unlikely to be bumped, pushed, or laid on while sleeping
• The Dexcom Pro Q is a prescription-only medical device and is meant for the intended patient’s use only. Never share the transmitter; it is tied to the Dexcom Pro Q readings.
• The Dexcom Pro Q system is not for screening or diagnosis of diabetes.
• When wearing the Dexcom Pro Q, a patient should ask for hand-wanding or full-body pat-down and visual inspection instead of going through the Advanced Imaging Technology (AIT) body scanner (also called a millimeter wave scanner) or putting any part of the Dexcom Pro Q in the baggage x-ray machine.

Dexcom Pro Q System User Guide
12Chapter 3: Risks and Benefits
Chapter 3 | Risks and BenefitsWhen using any medical device, there are risks and benefits.
3.1 RisksThe risks with using Dexcom Pro Q are:
• Sensor insertion issues
• Interfering substance risks
This section covers each of those risks in detail.
Follow system instructions.
Sensor Insertion RisksIt’s uncommon, but inserting the sensor can cause infection, bleeding, or pain, and wearing the adhesive patch can irritate the skin. Only a few patients in the clinical studies supporting Dexcom Pro Q got slight redness and swelling.
No sensor wires broke in the supporting clinical studies; however, there is a remote chance a sensor wire could break or detach and remain under the skin. Sterile broken sensor wires usually don’t pose a significant medical risk. If a sensor wire breaks off or detaches and remains under the skin, contact your HCP and Technical Support (M – F, 6 AM – 6 PM PST):
• Toll free: 1.844.857.6319
Interfering Substance Risks• Hydroxyurea Precaution
Hydroxyurea is a medication used in the treatment of diseases including cancer and sickle cell anemia; it is known to interfere with values from the sensor. If your patient is taking hydroxyurea, their sensor glucose values will be higher than the actual glucose, which could result in errors in retrospective discovery, analysis, and interpretation of glycemic variability. The level of inaccuracy depends on the amount of hydroxyurea in the body. Do not use Dexcom CGM System for assessing glucose control if your patient is taking hydroxyurea.

Dexcom Pro Q System User Guide
13Chapter 3: Risks and Benefits
• Acetaminophen Precaution
In previous generations of Dexcom CGM systems (G4/G5), acetaminophen could affect sensor readings. However, with the Dexcom Pro Q, a participant can take a standard or maximum acetaminophen dose of 1 gram (1,000 mg) every 6 hours. Taking higher than the maximum dose of acetaminophen (e.g. > 1 gram every 6 hours in adults) may affect the Dexcom Pro Q readings and make them look higher than they really are.
3.2 BenefitsSome benefits of using the Dexcom Pro Q are:
• Reviewing historical glucose levels
Knowing Your TrendsThe Dexcom Pro Q records a glucose reading every 5 minutes for up to 10 days. After the wear period, it will provide reports and views of a participant's glucose information so they can identify and reflect on trends, patterns, and how their body responds to different things, like exercise or pizza. This provides a better picture of a participant's glucose and lets them see how their daily habits impact their glucose trends.

2Insertion & Removal
• Insertion
• Removal

Dexcom Pro Q System User Guide
15Chapter 4: Insertion
Chapter 4 | Insert Dexcom Pro Q
4.1 IntroductionSensor insertion should only be conducted by, or under the supervision of, a healthcare practitioner. After this chapter, the user will be able to:
• Prepare for sensor insertion
• Insert a sensor
• Attach transmitter to transmitter holder
4.2 Prepare to Insert SensorBefore inserting a sensor, gather:
Dexcom Items (confirm both boxes are Pro Q):
• Sensor pack
– Check expiration date on sensor. Don’t use if expired.
– Don’t open the sensor until ready to insert the sensor.
• Transmitter box
User's Items:
• Alcohol wipes
• Gloves
PRECAUTION
Check Package
Don’t use sensor if its sterile package has been damaged or opened, because it might cause an infection.

Dexcom Pro Q System User Guide
16Chapter 4: Insertion
PRECAUTION
Don’t Use if Expired
Don’t use expired sensors, because they may give incorrect results. Check the package label for the expiration date, which is in YYYY-MM-DD format.
4.3 Choose Sensor Site
Choosing a comfortable, effective place for the sensor is important. Discuss ideal sensor insertion sites with the participant.
Those 18 years and older can only use their abdomen.
People from 2 to 17 years old can use either their abdomen or upper buttocks.
TipsDo:
• Make sure area is clean and free of lotions, perfumes, and medications
• If needed, shave the area so adhesive patch sticks securely
Don’t:
• Don't use bony sites, such as over the ribs
• Don't use sites where sensor can be rubbed – by a belt, waist band, seat belt strap – or lain on while sleeping
18 years and older 2-17 years
or

Dexcom Pro Q System User Guide
17Chapter 4: Insertion
PRECAUTION
Where to Insert: Things to Check
Keep the safety guard on until the Pro Q applicator has been placed against skin. If the safety guard is removed first, someone may get hurt by accidentally pushing the button that inserts the sensor before it is ready.
Sensor placement is important. Choose a site:
• Away from waistband, scarring, tattoos, irritation, and bones
• Unlikely to be bumped, pushed, or lain on while sleeping

Dexcom Pro Q System User Guide
18Chapter 4: Insertion
4.4 Insert SensorThe sensor is inside the applicator. Before inserting the sensor, become familiar with its applicator.
Safety Guard Protects button
Remove when ready to insert sensor
Button Inserts sensor under the skin
Sensor Sensor inserts through this hole
Adhesive
Transmitter Holder
Transmitter snaps in
Keeps sensor and transmitter holder on skin

Dexcom Pro Q System User Guide
19Chapter 4: Insertion
Thoroughly wash and dry hands.
Put on gloves.
Clean insertion site with alcohol.
Let dry.
Optional Step: Skin Adhesive
• Create an empty oval on the skin with the skin adhesive, such as Mastisol® or Skin Tac™.
• Let skin adhesive dry.
• Insert sensor on clean skin in center of oval.
Get the applicator. Check its packaging.
Make sure to use the same applicator. Peel off cover.
Check sensor for damage.
1
3 4
2

Dexcom Pro Q System User Guide
20Chapter 4: Insertion
XXXXXXXX
Pull off both adhesive labels.
Don’t touch adhesive.
Place applicator horizontally on participant's skin.
Firmly press down, sticking adhesive to the skin.
Fold and break safety guard and throw it away.
Push and release button to insert sensor.
5 6
7 8

Dexcom Pro Q System User Guide
21Chapter 4: Insertion
Remove applicator.
Throw out applicator following local guidelines for disposal of blood-contacting components.
What’s left on the participant?
• Sensor wire• Transmitter holder
The sensor has been inserted successfully.
WARNING
Wire Breaks Off
Don’t ignore broken or detached sensor wires. A sensor wire could remain under a the skin. If this happens, please contact our 24/7 Technical Support.
If a sensor wire breaks off under the skin and it can't be seen, don’t try to remove it. Contact an HCP. Also seek professional medical help if symptoms of infection or inflammation – redness, swelling, or pain – appear at the insertion site.
9 10
Having problems?Have questions or need help? Contact Technical Support at:
• Phone: Available Monday – Friday, 6:00 AM – 6:00 PM Pacific Time
• Toll free: 1.844.857.6319

Dexcom Pro Q System User Guide
22Chapter 4: Insertion
Remove transmitter from box.
4.5 Attach TransmitterNow that the sensor is inserted, attach the transmitter.
Wipe bottom of transmitter with alcohol wipe. Let dry.
Be careful with the bottom of the transmitter:
• Don't touch its metal dots
• Don't scratch it – that may harm the waterproof seal
Slide transmitter tab into the slot at the narrow end of the holder.
Press the wide end of the transmitter until it clicks into the holder.
1
3 4
2

Dexcom Pro Q System User Guide
23Chapter 4: Insertion
Secure by rubbing fingers around the patch three times, smoothing patch edges.
Overpatch Medical tape
Loose Transmitter PatchThe patch should stay on the skin with its own adhesive, but the patch may start to peel up. If it peels up, use either the overpatch or another adhesive, such as medical tape (brand names include Blenderm™, Tegaderm™, Smith & Nephew IV3000®, 3M™ tape) for extra support. Order overpatches at dexcom.com/order.
Tips for putting on the overpatch or extra adhesive tape:
• Put overpatch or tape over white patch on all sides for even support
• Don’t put overpatch or tape over or under the transmitter or its plastic holder
5

Dexcom Pro Q System User Guide
24Chapter 5: Removal
Chapter 5 | Remove Sensor and Transmitter
5.1 IntroductionSensor removal should only be conducted by, or under the supervision of, a healthcare practitioner. After this chapter, the user will be able to:• Remove a sensor and transmitter
5.2 Remove Sensor and TransmitterThe sensor and the transmitter are removed together.
1 2
Grasp the wide rounded edge of the holder. Bend holder edge down to break it and release the transmitter.
Thoroughly wash and dry hands.
Put on gloves.
Pull patch off like a bandage. The transmitter, holder, and sensor all come off with the patch.

Dexcom Pro Q System User Guide
25Chapter 5: Removal
See dexcom.com/guides for instruction related to data extraction.
Pull transmitter straight out.
43
Place transmitter and transmitter holder into bag and seal. Send bag to program administrator for data extraction.

3Troubleshooting
• Introduction
• Applicator
• Sensor

Dexcom Pro Q System User Guide
27Chapter 6: Troubleshooting
Chapter 6 | Troubleshooting
6.1 IntroductionTroubleshooting sections are categorized by function or system component. The solutions here are brief. Specific chapters referenced provide more detailed answers.
If the problem isn’t listed, or the solution here doesn’t fix it, contact Technical Support at:
• Phone: Available Monday – Friday, 6:00 AM – 6:00 PM Pacific Time
• Toll Free: 1.844.857.6319
6.2 Applicator
Orange Button Stuck
Problem
Can’t push the applicator orange button in
Solution
• Fold and break off safety guard before pushing orange button
• See Chapter 5

Dexcom Pro Q System User Guide
28Chapter 6: Troubleshooting
Adhesive Backing Won’t Come Off
Problem
Backing won’t come off the patch
Solution
• Lift the backing by the tab
Adhesive Patch Won’t Stick
Problem
The adhesive patch won’t stay on participant's skin for the entire sensor session
Solution
• Before applying sensor: Use an optional skin adhesive (such as Mastisol® or Skin Tac™)
• After applying sensor: Put overpatch or tape over patch
• Order overpatches at dexcom.com/order

Dexcom Pro Q System User Guide
29Chapter 6: Troubleshooting
• Tape brand names include Blenderm, Tegaderm, Smith & Nephew IV3000, and 3M
• See Chapter 5
Applying Overpatch
Applying tape

Dexcom Pro Q System User Guide
30Chapter 6: Troubleshooting
Applicator Sticks to Skin
Problem
The applicator won’t come off participant's skin after button is pushed to insert the sensor
Solution
• Remove applicator and adhesive patch:
1. Gently pull applicator up until adhesive patch is seen
2. Using a finger or thumb, hold front edge of patch and peel from skin

Dexcom Pro Q System User Guide
31Chapter 6: Troubleshooting
3. While holding the front edge of the adhesive patch, gently rock back applicator, away from participant's body
4. Check insertion site to make sure the sensor isn’t left on the skin
5. Don’t try to reuse applicator
6. Contact Technical Support:
• Phone: Available Monday – Friday, 6:00 AM– 6:00 PM Pacific Time
• Toll Free: 1.844.857.6319
6.3 SensorProblem
Sensor is coming out of participant's body
WARNING
Wire Breaks Off
Don’t ignore broken or detached sensor wires. A sensor wire could remain under participant's skin. If this happens, please contact Dexcom 24/7 Technical Support.
If a sensor wire breaks off under participant's skin and it can't be seen, don’t try to remove it. Contact an HCP. Also seek professional medical help if symptoms of infection or inflammation – redness, swelling, or pain – appear at the insertion site.

Dexcom Pro Q System User Guide
32Chapter 6: Troubleshooting
Solution
• Remove the sensor (see Chapter 5)
Preventing sensor problems
Make sure:
• A good insertion site has been selected (see Chapter 4)
• Nothing is rubbing against transmitter holder, like a seatbelt or waistband
• Insertion site is clean and dry before sensor insertion
• Transmitter is snapped securely in transmitter holder
• Transmitter holder isn’t dislodged and patch isn’t peeling

4Appendices
• Support Teams
• Security and Air Travel
• Care of Dexcom Pro Q
• Warranty
• Technical Information
• Label Symbols
• Index

Dexcom Pro Q System User Guide
34Appendix A: Support Teams
Appendix A | Support TeamsDexcom has three support teams to help, each with their own specialty:
• Dexcom Technical Support Team
• Dexcom Patient Care Team
• Dexcom Sales Support Team
A.1 Dexcom Technical Support TeamThis team assists with all system-related issues as well as software-related issues. They provide replacement units, resolve technical issues, and take product complaints. They don’t offer medical advice.
Contact Information• Internet: dexcom.com/support
• Phone: Available Monday – Friday, 6:00 AM – 6:00 PM Pacific Time
• Toll Free: 1.844.857.6319

Dexcom Pro Q System User Guide
35Appendix A: Support Teams
A.2 Dexcom Patient Care Team
The Dexcom Patient Care Team is a group of Certified Diabetes Educators (CDE) and Registered Nurses (RNs) offering customer care and individualized education services around Dexcom Pro Q, including:
• Product training – both initial and ongoing (for example, how to use a specific feature)
• Regularly scheduled webinars at dexcom.com/web-based-education
• How to optimize your Dexcom Pro Q use
Contact Information• Internet: dexcom.com/dexcom-care
• Phone: Available Monday – Friday, 5:30 AM – 8:00 PM Pacific Time (subject to change)
• Toll Free: 1.844.857.6319
A.3 Corporate• Internet: dexcom.com
• Address: 6340 Sequence Drive San Diego, CA 92121

Dexcom Pro Q System User Guide
36Appendix B: Security and Air Travel
Appendix B | Security and Air TravelThe Dexcom Pro Q can be a great travel companion – a participant can go through metal detectors and hand-wanding.
B.1 SecurityGoing through security often means a person and their belongings go through a metal detector, x-ray machine, or even a body scanner. This section shows which are OK for Dexcom Pro Q components and which haven’t been tested and should be avoided.
Security Equipment to UseHand-wanding, pat-downs, visual inspection, and walk-through metal detectors: any of these methods can be used without worrying about damaging Pro Q components.
Security Equipment to AvoidBody scanners: don't go through an advanced imaging technology (AIT) body scanner, like the millimeter wave scanners.
X-ray machines: Don’t put Pro Q components through x-ray machines.
If concerned about the security equipment, tell the Security Officer a continuous glucose monitor is being worn, which requires hand-wanding or a full-body pat-down with a visual inspection of the sensor and transmitter. Let the Security Officer know the sensor cannot be removed because it’s inserted under their skin.

Dexcom Pro Q System User Guide
37Appendix B: Security and Air Travel
PRECAUTION
Going Through Security Checkpoint
When wearing a Dexcom Pro Q, ask for hand-wanding or a full-body pat-down and visual inspection instead of going through the Advanced Imaging Technology (AIT) body scanner (also called a millimeter wave scanner).
A Dexcom Pro Q can be worn for the walk-through metal detector.
Because Dexcom hasn’t tested every x-ray and scanner, it is unknown if they could damage the Dexcom Pro Q.
If unsure what kind of machine it is, to be safe – either ask the officer, request hand-wanding, or request a full-body pat-down.
B.2 Still Have Questions?Visit the TSA website at tsa.gov.
Email: [email protected]
Phone: 1.855.787.2227

Dexcom Pro Q System User Guide
38Appendix C: Care of Dexcom Pro Q
Appendix C | Care of Dexcom Pro Q
C.1 Pro Q Maintenance
Applicator/Sensor• Keep in sterile package until ready for use
• Don’t use if sensor has expired
– May be unsterile
– Expiration date is on package in year-month-day format
• Don’t use lotions, sunscreen, insect repellent, or similar items on the sensor
Transmitter• Keep in box until ready for use
• Check transmitter and don’t use if damaged
• Transmitter is water resistant
• Don’t use lotions, sunscreen, insect repellent, or similar items on the transmitter
C.2 System DisposalFollow your area’s local waste management requirements.

Dexcom Pro Q System User Guide
39Appendix D: Warranty
Appendix D | WarrantyThis appendix covers our warranty information outlining what Dexcom covers and for how long.
D.1 Dexcom Transmitter Limited Warranty
What’s Covered and for How Long?Dexcom, Inc. (“Dexcom”) provides a limited warranty to the original purchaser (“you” or “Purchaser”) that the Dexcom Pro Q transmitter (the “transmitter”) is free from defects in material and workmanship under normal use (“Limited Warranty”) for the period commencing on the date of first use by the original purchaser (the “Date of First Use”) and expiring three (3) months thereafter; provided, that, the Date of First use occurs within five (5) months of the date of shipment (or disbursement) of the transmitter to you (“Warranty Period”).
Note: If you received this transmitter as a replacement for an in-warranty transmitter, the Limited Warranty for the replacement transmitter shall continue for the remaining Warranty Period on the original transmitter, but the replacement is not subject to any other warranty.
What Isn't Covered?This Limited Warranty is based on the Purchaser properly using the CGM system in a timely manner and in accordance with the documentation provided by Dexcom. You are not permitted to use the CGM system otherwise. Misusing the CGM system, improperly accessing it or the information it processes and transmits, “jailbreaking” your CGM system or cell phone, and taking other unauthorized actions may put you at risk, cause the CGM system to malfunction, are not permitted and void your Limited Warranty.
This Limited Warranty doesn't cover:
• Defects or damage resulting from accident, misuse, abuse, neglect, unusual physical, electrical or electromechanical stress, modification of any part of the product, or cosmetic damage.
• Equipment with the ID number removed or made illegible.

Dexcom Pro Q System User Guide
40Appendix D: Warranty
• All surfaces and other externally exposed parts that are scratched or damaged due to normal use.
• Malfunctions resulting from the use of the transmitter in conjunction with accessories, ancillary products, and peripheral equipment, whether hardware or software, not furnished or approved by Dexcom.
• Defects or damage from improper testing, operation, maintenance, installation, or adjustment.
• Installation, maintenance, and service of products or services other than the CGM system (which may be subject to a separate limited warranty), whether provided by Dexcom or any other party; this includes your cell phone or smart device and your connection to the Internet.
• A transmitter which has been taken apart physically or which has had any of its software accessed in any unauthorized manner.
• Water damage to transmitter
• Beyond specifications listed in the Dexcom Pro Q User Guide
• Your options to get the User Guide:
• Download or view: dexcom.com/guides
• Online request form to receive a free printed copy: dexcom.com/guides
• Request a free copy by mail
• Request a free copy by phone: Toll free: 1.844.857.6319 (M – F, 6 AM – 6 PM PST)
Dexcom’s Obligations Under the Limited WarrantyDuring the Warranty Period, Dexcom will replace, without charge to purchaser, any defective transmitter.
To return, you must send the transmitter to an authorized Dexcom Technical Support Department. Make sure you package the transmitter adequately for shipping.

Dexcom Pro Q System User Guide
41Appendix D: Warranty
The return package needs to include:
• Transmitter
• Sales receipt or comparable substitute proof of sale showing the date of purchase
• Transmitter’s serial number
• Seller’s name and address
• Purchaser’s name and address for Dexcom to ship the replacement
Call Dexcom Technical Support Department for delivery information or help:
• Toll free: 1.844.857.6319 (M – F, 6 AM – 6 PM PST)
Upon receipt by Dexcom of a defective transmitter covered by this Limited Warranty, Dexcom will promptly replace the defective transmitter.
If Dexcom determines the transmitter isn’t covered by this Limited Warranty, Purchaser must pay all shipping charges for the transmitter’s return by Dexcom.
Limits on Dexcom’s Warranty and Liability ObligationsThe Limited Warranty described above is the exclusive warranty for the transmitter, and in lieu of all other warranties, expressed or implied, either in fact or by operations of law, statutory or otherwise.
Dexcom expressly excludes and disclaims all other warranties, express or implied, including without limitation any warranty of merchantability, fitness for a particular purpose, or non-infringement, except to the extent prohibited by applicable law.
Dexcom shall not be liable for any special, incidental, consequential, or indirect damages, however caused, and on any theory of liability, arising in any way out of the sale, use, misuse, or inability to use, any Dexcom Pro Q or any feature or service provided by Dexcom for use with the Dexcom Pro Q.
These limits on Dexcom’s warranty and liability obligations apply even if Dexcom, or its agent, has been advised of such damages and notwithstanding any failure of essential purpose of this Limited Warranty and the limited remedy provided by Dexcom.
This Limited Warranty is only provided to the original Purchaser and can’t be transferred to anyone else, and states Purchaser’s exclusive remedy.

Dexcom Pro Q System User Guide
42Appendix D: Warranty
If any portion of this Limited Warranty is illegal or unenforceable by reason of any law, such partial illegality or enforceability shall not affect the enforceability of the remainder of this Limited Warranty. This Limited Warranty will be enforced to the maximum extent permitted by law.

Dexcom Pro Q System User Guide
43Appendix E: Technical Information
Appendix E | Technical Information
E.1 Device Performance CharacteristicsNOTE: The device performance described in this section are from studies conducted for the Dexcom G6 CGM System (G6). The performance of the G6 is relevant because the Dexcom Pro Q System uses the same sensor and transmitter.
The G6 uses a glucose sensor to continuously measure and monitor your glucose levels. Once the sensor code is entered, the G6 reports glucose readings every 5 minutes. The G6’s performance was evaluated in clinical studies in which G6 readings were assessed against blood glucose values tested by a laboratory reference method for subjects 6 years of age and older and by fingerstick blood glucose meter for pediatric subjects 2 to 5 years of age. The performance characteristics of the G6 presented in the following sections conform to the guidance for devices in the same classification.
Clinical Study OverviewTo demonstrate the performance of the G6, two prospective clinical studies were conducted at 11 centers across the United States. The studies included both adult (18 years and older) and pediatric (2 to 17 years) participants. The studies evaluated the G6 performance, in terms of its safety, effectiveness, and precision. The studies enrolled a total of 380 participants with 99% having Type 1 diabetes mellitus and 1% having insulin using Type 2 diabetes mellitus.
Participants wore either one or two sensors for up to 10 days. A subset of participants wore two sensors for the precision study to compare variability of readings between sensors. Adult participants wore their G6(s) in the abdomen only; pediatric subjects had the choice of either abdomen or upper buttocks. Clinic session(s) took place at the beginning (Day 1, 2), middle (Day 4, 5), and end (Day 7, 10) of the G6 lifecycle. Depending on the participant’s age, they participated in either 1, 2 or 3 clinic sessions of varying duration.
• Adult subjects: two (2) or three (3) 12-hour clinic sessions
• Pediatric subjects 13-17 years of age: one (1) 12-hour clinic session

Dexcom Pro Q System User Guide
44Appendix E: Technical Information
• Pediatric subjects 6-12 years of age: one (1) 6-hour clinic session
• Pediatric subjects 2-5 years of age: one (1) 4-hour clinic session (compared to fingerstick blood glucose meter measurements only).
While using the G6 in the clinic, subjects had their blood glucose measured every 15 minutes with a laboratory reference method, the Yellow Springs Instrument 2300 STAT Plus™ Glucose Analyzer. This instrument is referred to as the “YSI.” Readings from the G6 were reported every 5 minutes and paired with YSI values in order to characterize the accuracy of the G6’s glucose reading. No venous sampling was obtained for 14 pediatric subjects aged 2 to 5 years.
In Study 1, under close observation by the study investigator staff, the participant’s glucose levels were deliberately manipulated per a protocol to raise or lower glucose to achieve YSI glucose samples within target glucose bins. Glucose manipulations were done to assess performance over the range that CGM measures glucose (40-400 mg/dl). In Study 2, participants managed their glucose as they normally do; glucose was not deliberately manipulated.
The data from these prospective clinical studies were further processed and analyzed at Dexcom to assess performance of factory calibration.
AccuracyAccuracy of the G6 is characterized by assessing its readings against blood glucose values from YSI. Accuracy of the G6 was assessed with paired G6 readings to YSI blood glucose values. For blood glucose values less than or equal to 70 mg/dL, the absolute difference in mg/dL between the two glucose results was calculated. For values greater than 70 mg/dL, the absolute difference (%) relative to the YSI values was calculated. In addition, the mean absolute relative difference (MARD) shows the average amount the sensor readings differ from the YSI glucose. The percentages of total readings within 20 mg/dL or 20% (20/20%) are provided in Tables 1-A. The tables are further categorized within CGM glucose ranges, within age groups, and sensor wear locations (Tables 1-B to 1-E) and categorized within YSI glucose ranges (Tables 1-F to 1-I). These tables show how likely the CGM readings match the true blood glucose levels (measured by YSI in the study). These tables include overall pooled data from both G6 studies.
For example, the total number of data pairs considered in the analysis was 25,101. Of these, 91.7% of the G6 readings fall within ± 20 mg/dL of the YSI blood glucose values < 70 mg/dL and within ± 20% of YSI blood glucose values ≥ 70 mg/dL.

Dexcom Pro Q System User Guide
45Appendix E: Technical Information
Table 1-A. G6 Accuracy to YSI (n=324)
Patient Population
Number of subjects
Total number of paired CGM-YSI
Percent within 20/20%
YSI
% (95% LB)
Day 1
Percent within 20/20%
YSI
MARD (%)
Overall 324 25,101 91.7 (90.6) 87.8 9.8
Adults (18+ YO) 159 19,329 91.6 (90.3) 87.1 9.9
Pediatrics (6-17 YO) 165 5,772 92.0 (89.8) 90.2 9.6
Pediatrics (2-5 YO)* 8 82 92.7 (86.6) NA 9.9
* No YSI measurements were taken for this age group; results presented are from in-clinic CGM-SMBG matched paired measurements.1CGM readings are within 40-400 mg/dL, inclusive.
Table 1-B. G6 Accuracy to YSI within CGM Glucose Ranges (Adults; n=159)
CGM Glucose Range1 (mg/dL)
Number of paired CGM-YSI
Percent within 15 mg/dL YSI
Percent within 20 mg/dL YSI
Percent within 40 mg/dL YSI
Percent within 15% YSI
Percent within 20% YSI
Percent within 40% YSI
Mean bias (mg/dL)
MARD (%)
<54 383 84.3 90.6 98.4 -6.9 13.8
54-69 1,537 89.6 95.1 99.5 -0.5 11.5
70-180 9,453 74.1 86.8 99.3 -2.8 10.9
181-250 4,093 80.2 92.1 99.9 -10.0 9.3
>250 3,863 91.1 97.7 100.0 -3.8 7.1
1CGM readings are within 40-400 mg/dL, inclusive.

Dexcom Pro Q System User Guide
46Appendix E: Technical Information
Table 1-C. G6 Accuracy to YSI within CGM Glucose Ranges (Pediatrics*; n=165)
CGM Glucose Range1 (mg/dL)
Number of paired CGM-YSI
Percent within 15 mg/dL YSI
Percent within 20 mg/dL YSI
Percent within 40 mg/dL YSI
Percent within 15% YSI
Percent within 20% YSI
Percent within 40% YSI
Mean bias (mg/dL)
MARD (%)
<54 90 48.9 62.2 85.6 -20.0 26.0
54-69 262 85.5 88.5 96.6 -5.9 13.3
70-180 3,144 80.0 90.8 99.5 -0.3 9.7
181-250 1,360 83.4 93.5 99.9 -1.2 8.9
>250 916 89.3 95.9 99.9 9.2 7.4
* Includes pediatric subjects 6-17 years of age; no YSI measurements were taken for pediatric subjects 2-5 years of age.
1 CGM readings are within 40-400 mg/dL, inclusive.
Table 1-D. G6 Accuracy to YSI within CGM Glucose Ranges (Pediatrics*, Abdomen; n=99)
CGM Glucose Range1 (mg/dL)
Number of paired CGM-YSI
Percent within 15 mg/dL YSI
Percent within 20 mg/dL YSI
Percent within 40 mg/dL YSI
Percent within 15% YSI
Percent within 20% YSI
Percent within 40% YSI
Mean bias (mg/dL)
MARD (%)
<54 60 40.0 51.7 80.0 -24.1 28.9
54-69 177 87.0 88.1 96.0 -6.3 13.4
70-180 1,910 80.6 91.0 99.5 -1.1 9.7
181-250 775 81.9 95.0 100.0 -2.3 9.1
>250 574 89.2 96.5 99.8 8.0 7.5
* Includes pediatric subjects 6-17 years of age; no YSI measurements were taken for pediatric subjects 2-5 years of age.
1 CGM readings are within 40-400 mg/dL, inclusive.

Dexcom Pro Q System User Guide
47Appendix E: Technical Information
Table 1-E. G6 Accuracy to YSI within CGM Glucose Ranges (Pediatrics*, Buttocks; n=66)
CGM Glucose Range1 (mg/dL)
Number of paired CGM-YSI
Percent within 15 mg/dL YSI
Percent within 20 mg/dL YSI
Percent within 40 mg/dL YSI
Percent within 15% YSI
Percent within 20% YSI
Percent within 40% YSI
Mean bias (mg/dL)
MARD (%)
<54 30 66.7 83.3 96.7 -11.7 20.1
54-69 85 82.4 89.4 97.6 -5.2 13.2
70-180 1,234 78.9 90.4 99.4 0.9 9.7
181-250 585 85.3 91.6 99.8 0.1 8.5
>250 342 89.5 94.7 100.0 11.1 7.3
* Includes pediatric subjects 6-17 years of age; no YSI measurements were taken for pediatric subjects 2-5 years of age.
1 CGM readings are within 40-400 mg/dL, inclusive.
Table 1-F. G6 Accuracy to YSI within YSI Glucose Ranges (Adults; n=159)
YSI Glucose Range (mg/dL)
Number of paired CGM-YSI
Percent within 15 mg/dL YSI
Percent within 20 mg/dL YSI
Percent within 40 mg/dL YSI
Percent within 15% YSI
Percent within 20% YSI
Percent within 40% YSI
Mean bias (mg/dL)
MARD (%)
<54 483 88.2 95.9 99.8 6.0 15.8
54-69 1,783 88.8 96.1 99.9 4.0 12.4
70-180 8,713 76.8 89.0 99.6 -0.8 10.3
181-250 3,940 83.0 92.7 99.8 -7.2 8.8
>250 4,410 83.4 93.3 99.8 -13.5 8.6

Dexcom Pro Q System User Guide
48Appendix E: Technical Information
Table 1-G. G6 Accuracy to YSI within YSI Glucose Ranges (Pediatrics*; n=165)
YSI Glucose Range (mg/dL)
Number of paired CGM-YSI
Percent within 15 mg/dL YSI
Percent within 20 mg/dL YSI
Percent within 40 mg/dL YSI
Percent within 15% YSI
Percent within 20% YSI
Percent within 40% YSI
Mean bias (mg/dL)
MARD (%)
<54 47 95.7 100.0 100.0 5.0 11.8
54-69 309 86.1 95.1 100.0 2.8 13.7
70-180 3,099 79.9 90.4 98.8 1.7 9.8
181-250 1,401 84.9 93.3 99.8 -0.8 9.0
>250 916 85.2 94.0 100.0 -3.3 8.0
* Includes pediatric subjects 6-17 years of age; no YSI measurements were taken for pediatric subjects 2-5 years of age.
Table 1-H. G6 Accuracy to YSI within YSI Glucose Ranges (Pediatrics*, Abdomen; n=99)
YSI Glucose Range (mg/dL)
Number of paired CGM-YSI
Percent within 15 mg/dL YSI
Percent within 20 mg/dL YSI
Percent within 40 mg/dL YSI
Percent within 15% YSI
Percent within 20% YSI
Percent within 40% YSI
Mean bias (mg/dL)
MARD (%)
<54 28 100.0 100.0 100.0 4.2 11.3
54-69 201 90.0 96.0 100.0 3.0 12.8
70-180 1,904 79.3 89.5 98.5 0.4 10.2
181-250 761 84.9 94.9 99.6 -1.4 9.1
>250 602 85.4 95.8 100.0 -3.9 8.1
* Includes pediatric subjects 6-17 years of age; no YSI measurements were taken for pediatric subjects 2-5 years of age.

Dexcom Pro Q System User Guide
49Appendix E: Technical Information
Table 1-I. G6 Accuracy to YSI within YSI Glucose Ranges (Pediatrics*, Buttocks; n=66)
YSI Glucose Range (mg/dL)
Number of paired CGM-YSI
Percent within 15 mg/dL YSI
Percent within 20 mg/dL YSI
Percent within 40 mg/dL YSI
Percent within 15% YSI
Percent within 20% YSI
Percent within 40% YSI
Mean bias (mg/dL)
MARD (%)
<54 19 89.5 100.0 100.0 6.2 12.6
54-69 108 78.7 93.5 100.0 2.4 15.2
70-180 1,195 80.8 92.0 99.2 3.8 9.3
181-250 640 84.8 91.4 100.0 -0.1 8.8
>250 314 84.7 90.4 100.0 -2.1 7.8
* Includes pediatric subjects 6-17 years of age; no YSI measurements were taken for pediatric subjects 2-5 years of age.
Trend AccuracyTrend accuracy explains how well the G6 captures the time-dependent characteristics of glucose fluctuation.
The following examples quantify G6’s Trend Accuracy:
1. When the G6 CGM rate of change is rapidly rising (≥ 2 mg/dL/min), how often is reference glucose also rising? The answer is 71.3% of the time for adults and 67.1% for pediatrics.
2. When the G6 CGM rate of change is rapidly falling (≤ 2 mg/dl/ min), how often is reference glucose also falling? The answer is 98.0% of the time.
3. When the G6 CGM rate of change is stable (≥ -1 mg/dL/min and ≤ 1 mg/dl/ min), how often is glucose changing rapidly (≥ 2 mg/dL/min or ≤ 2 mg/dl/ min)? The answer is only 1.9% of the time.

Dexcom Pro Q System User Guide
50Appendix E: Technical Information
Table 2-A. Trend Accuracy Rate of Change (Adults; n=159)
CGM Rate Range
(mg/dL/min)
YSI glucose range (mg/dL)CGM-YSI
Pairs (n)<-2 [-2,-1) [-1,-0) [0,1] (1,2] >2
<-2 53.3% 35.0% 9.9% 1.5% 0.0% 0.2% 463
[-2,-1) 7.4% 56.9% 32.5% 2.9% 0.3% 0.0% 2,077
[-1,0) 0.4% 9.5% 76.9% 12.5% 0.6% 0.1% 7,986
[0,1] 0.1% 1.0% 26.2% 60.6% 10.6% 1.6% 5,199
(1,2] 0.0% 0.4% 3.1% 26.8% 52.9% 16.8% 1,734
>2 0.1% 0.1% 0.8% 5.6% 22.1% 71.3% 1,367

Dexcom Pro Q System User Guide
51Appendix E: Technical Information
Table 2-B. Trend Accuracy Rate of Change (Pediatrics*; n=165)
CGM Rate Range
(mg/dL/min)
YSI glucose range (mg/dL)CGM-YSI
Pairs (n)<-2 [-2,-1) [-1,-0) [0,1] (1,2] >2
<-2 47.9% 37.0% 12.8% 1.9% 0.0% 0.5% 211
[-2,-1) 6.6% 55.5% 33.8% 3.4% 0.6% 0.1% 686
[-1,0) 0.5% 8.9% 73.7% 15.8% 1.0% 0.0% 2,048
[0,1] 0.0% 0.8% 25.5% 62.9% 10.0% 0.8% 1,666
(1,2] 0.0% 0.4% 4.4% 35.9% 48.0% 11.4% 546
>2 0.0% 0.5% 1.7% 7.1% 23.6% 67.1% 423
* Includes pediatric subjects 6-17 years of age; no YSI measurements were taken for pediatric subjects 2-5 years of age.
Sensor Stability
Sensors can be worn for up to 10 days. Performance was estimated by calculating the percentage of G6 readings within 15 mg/dL or 15% (15/15%), 20 mg/dL or 20% (20/20%), and 40 mg/dL or 40% (40/40%) of the YSI values at the beginning (Day 1, 2), middle (Day 4, 5), and end (Day 7, 10) of the G6 lifecycle. For blood glucose values less than or equal to 70 mg/dL, the absolute difference in mg/dL between the two glucose results was calculated. For values greater than 70 mg/dL, the absolute difference (%) relative to the YSI values was calculated. In addition, the mean absolute relative difference (MARD) shows the average amount the sensor readings differ from the YSI glucose. The MARD values included in Table 3-A and 3-B show consistent accuracy and sensor stability over the 10-day life of the sensor.

Dexcom Pro Q System User Guide
52Appendix E: Technical Information
Table 3-A. Sensor Stability Relative to YSI (Accuracy over Time1) (Adults; n=159)
Wear Period
Number of paired CGM-YSI
MARD (%)
Percent within
15/15% YSI (%)
Percent within
20/20% YSI (%)
Percent within
40/40% YSI (%)
Beginning 6,696 10.9 76.5 88.0 99.6
Middle 6,464 9.2 84.3 94.6 99.8
End 6,169 9.6 82.3 92.4 99.8
1 CGM readings are within 40-400 mg/dL, inclusive.
Table 3-B. Sensor Stability Relative to YSI (Accuracy over Time1) (Pediatrics*; n=165)
Wear Period
Number of paired CGM-YSI
MARD (%)
Percent within
15/15% YSI (%)
Percent within
20/20% YSI (%)
Percent within
40/40% YSI (%)
Beginning 2,167 9.9 81.2 92.1 99.8
Middle 1,268 9.1 83.1 93.7 99.8
End 2,337 9.4 83.1 91.1 98.5
* Includes pediatric subjects 6-17 years of age; no YSI measurements were taken for pediatric subjects 2-5 years of age.
1 CGM readings are within 40-400 mg/dL, inclusive.

Dexcom Pro Q System User Guide
53Appendix E: Technical Information
Sensor Life
Sensors can be worn for up to 10 days (238 hours; 240 hours less 2 hours warm-up period). To estimate how long a sensor will work over 10 days, all sensors worn were evaluated to determine how many days/hours of readings each sensor provided.
For adults, a total of 164 sensors were evaluated. Ninety-four percent (94%) of the sensors lasted through the end of the entire wear period (e.g., Day 10) (see Figure 1-A). Among the 164 sensors evaluated, 8 sensors (4.9%) had “early sensor shut-off” where the sensor algorithm would have detected sensors that did not function as intended and shut them off.
For pediatrics, a total of 210 sensors were evaluated. Seventy-seven percent (77%) of the sensors lasted through the end of the entire wear period (e.g., Day 10) (see Figure 1-B). Among the 210 sensors evaluated, 28 sensors (13.3%) had “early sensor shut-off” where the sensor algorithm would have detected sensors that did not function as intended and shut them off.

Dexcom Pro Q System User Guide
54Appendix E: Technical Information
Table 4-A. Sensor Survival Rate by Wear Day (Adults; n=164)
Wear Day Number of Sensors Survival Rate (%)
1 162 99.4%
2 160 98.8%
3 158 98.8%
4 155 98.8%
5 154 98.1%
6 154 98.1%
7 150 96.8%
8 146 96.2%
9 144 94.9%
10 139* 93.5%
* Includes sensors that survived more than 9.5 days (228 hours) of wear.

Dexcom Pro Q System User Guide
55Appendix E: Technical Information
Figure 1-A. Kaplan Meier Curve of Sensor Life (Adults; N = 164)Note: “# of Censored” refers to sensors excluded from the survival analysis due to
reasons not related to the device (e.g., subject dropped out of study)
Sensor Day
1 1 0 0 1 0 2 1 221 1 2 3 0 0 2 3 30
164 162 160 158 155 154 154 150 146 144 139
0 1 2 3 4 5 6 7 8 9 10
0.0
0.2
0.4
0.6
0.8
1.0
# of Failures# at Risk
# of Censored
Surv
ival
Pro
babi
lity

Dexcom Pro Q System User Guide
56Appendix E: Technical Information
Table 4-B. Sensor Survival Rate by Wear Day (Pediatrics; n=210)
Wear Day Number of Sensors Survival Rate (%)
1 206 99.0%
2 204 99.0%
3 196 97.1%
4 193 95.6%
5 184 91.1%
6 175 88.6%
7 164 85.5%
8 157 83.4%
9 146 79.2%
10 142* 76.8%
* Includes sensors that survived more than 9.5 days (228 hours) of wear.

Dexcom Pro Q System User Guide
57Appendix E: Technical Information
Figure 1-B. Kaplan Meier Curve of Sensor Life (Pediatrics; N = 210)Note: “# of Censored” refers to sensors excluded from the survival analysis due to
reasons not related to the device (e.g., subject dropped out of study)
Number of Readings Provided*
The G6 is capable of capturing a reading every 5 minutes, or up to 288 readings per day. The percentage of readings you can expect to receive from the G6 over the sensor life is 98.6%. More than 97% of the sensors captured readings at least 90% of the time. For the G6 with auto-applicator, approximately 99% of the sensors captured readings every 5 minutes at least 90% of the time. Table 5 below describes the reading captured rate by each wear day over the sensor life.
Sensor Day
2 0 4 3 9 5 6 4 482 2 4 0 0 4 5 3 03
210 206 204 196 193 184 175 164 157 146 142
0 1 2 3 4 5 6 7 8 9 10
# of Failures# at Risk
# of Censored
Surv
ival
Pro
babi
lity
0.0
0.2
0.4
0.6
0.8
1.0

Dexcom Pro Q System User Guide
58Appendix E: Technical Information
Table 5. Reading Capture Rate by Wear Day (n=374)
Wear Day Number of Sensors Capture Rate (%)
1 374 97.6
2 368 98.6
3 364 98.7
4 354 98.6
5 348 98.5
6 338 98.5
7 329 98.2
8 314 97.8
9 303 97.0
10 290 96.4

Dexcom Pro Q System User Guide
59Appendix E: Technical Information
Study 2 OverviewThe purpose of the Study 2 was to assess the performance of the System with an automatic sensor applicator, which is the final G6 CGM System configuration. The automatic applicator was designed to provide more consistent sensor insertions. The data from Study 2 was also further processed at Dexcom to assess performance of factory calibration. The G6 Glucose Program CGM System uses the automatic applicator and does not require calibration by the user.
The study was a prospective, multi-center, single-arm study that enrolled 76 subjects at four (4) US clinical sites. No glucose manipulations were performed in this sub-study. Subjects participated in assigned clinic sessions (Day 1, 2, 4-5, 7 and/or 10):
• Adult subjects: two (2) 12-hour clinic sessions
• Pediatric subjects 13-17 years of age: one (1) 12-hour clinic session
• Pediatric subjects 6-12 years of age: one (1) 6-hour clinic session
Accuracy (Study 2 - Automatic Applicator)
Accuracy of the G6 is characterized by assessing its readings against blood glucose values from YSI. Accuracy of the G6 was assessed with paired G6 readings to YSI blood glucose values. For glucose value less than or equal to 70 mg/dL, the absolute difference in mg/dL between the two glucose results was calculated. For glucose value greater than 70 mg/dL, the absolute difference (%) relative to the YSI values was calculated. The percentages of total readings within 20 mg/dL or 20% over the System lifecycle and on Day 1 are provided in Table 5. The results are also presented for pediatrics and adults separately.
For example, the total number of data pairs considered in the analysis was 3,532. Of these, 92% of the System readings fall within ± 20 mg/dL of the YSI blood glucose values < 70 mg/dL and within ± 20% of YSI blood glucose values ≥ 70 mg/dL for adults and 96% readings fall within 20/20% for pediatrics.
Dexcom Pro Q System User Guide
60Appendix E: Technical Information
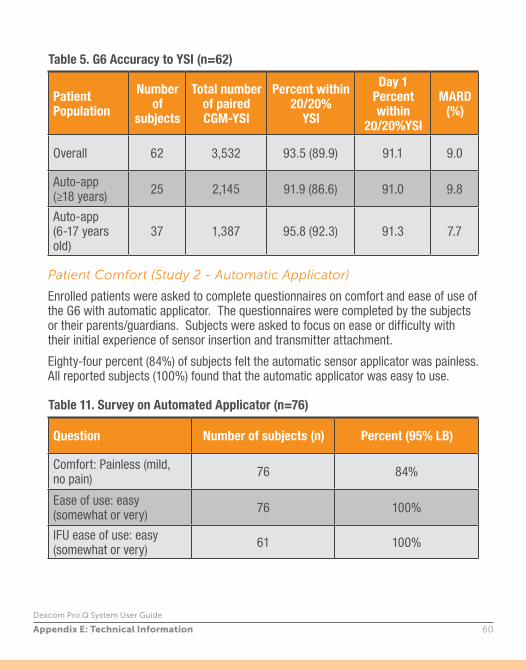
Table 5. G6 Accuracy to YSI (n=62)
Patient Population
Number of
subjects
Total number of paired CGM-YSI
Percent within 20/20%
YSI
Day 1 Percent within
20/20%YSI
MARD (%)
Overall 62 3,532 93.5 (89.9) 91.1 9.0
Auto-app (≥18 years) 25 2,145 91.9 (86.6) 91.0 9.8
Auto-app (6-17 years old)
37 1,387 95.8 (92.3) 91.3 7.7
Patient Comfort (Study 2 - Automatic Applicator)
Enrolled patients were asked to complete questionnaires on comfort and ease of use of the G6 with automatic applicator. The questionnaires were completed by the subjects or their parents/guardians. Subjects were asked to focus on ease or difficulty with their initial experience of sensor insertion and transmitter attachment.
Eighty-four percent (84%) of subjects felt the automatic sensor applicator was painless. All reported subjects (100%) found that the automatic applicator was easy to use.
Table 11. Survey on Automated Applicator (n=76)
Question Number of subjects (n) Percent (95% LB)
Comfort: Painless (mild, no pain) 76 84%
Ease of use: easy (somewhat or very) 76 100%
IFU ease of use: easy (somewhat or very) 61 100%

Dexcom Pro Q System User Guide
61Appendix E: Technical Information
Adverse EventsNo serious adverse events (AEs) or device-related serious adverse events occurred during the studies. There was a total of 24 mild to moderate AEs which occurred during the studies (among 374 sensors). 13 of these AEs occurred due to either skin irritation, such as erythema (redness) or edema (swelling), at the sensor needle insertion area or around the adhesive area, or mild to moderate excoriation and infection.
E.2 Product SpecificationsWARNING: Portable RF communications equipment (including peripherals such as antenna cables and external antennas) should be used no closer than 30 cm (12 inches) to any part of the G6 CGM system including cables specified by the manufacturer. Otherwise, degradation of the performance of this equipment could result.
Sensor Product Specifications
Part #STS-DE-001 Sensor 1 PackSTS-DE-003 Sensor 3 Pack
Glucose Range 40 – 400 mg/dL
Sensor Useful Life Up to 10 days
Storage and Transport Conditions
Temperature: 36° F – 86° FStore sensors in a cool, dry place
Sterilization Sterile by radiation
Transmitter Product Specifications
Part # 9445-19
Memory Storage N/A
Electrical Safety Class Internally Powered

Dexcom Pro Q System User Guide
62Appendix E: Technical Information
Transmitter Product Specifications
Battery Longevity (Typical)
Transmitter usage life is 10 calendar days from activation plus 30 days for data extraction provided storage time of 8 months or less from date of manufacture
Battery Charging Time Non-rechargeable
Operational Conditions
Ambient temperature is 10°C-42°C (50°F – 107.6°F)
Equilibrium temperature of less than 0.5°C (0.9°F) above ambient
Humidity: 10% – 95% RH
Storage and Transport Conditions
Temperature: 32° F – 113° F
Humidity: 10% – 95% RH
Operating Altitude -1,300 feet to 13,800 feet
Limited Warranty/Useful Life 3 months
Moisture Protection IP28: Protection against insertion of large objects and immersion in water for up to 8 feet for 24 hours
Protection Against Electrical Shock Type BF applied part
Alarm Audible Output N/A
TX/RX Frequencies 2.402 – 2.480 GHz
Bandwidth 1.07 MHz
Maximum Output Power 1.0 mW EIRP
Modulation Gaussian Frequency-Shift Keying
Data Rate 1 Mbps
Communication Range 20 feet

Dexcom Pro Q System User Guide
63Appendix E: Technical Information
Security MeasuresAfter completion of a sensor session, the Dexcom Pro Q System is designed to transmit data between the transmitter and authorized data extraction device in accordance to the industry standard BLE protocols. It will not accept radio frequency (RF) communications using any other protocol, including Bluetooth classic communication protocols.
In addition to the security provided by the BLE connection, communication between the transmitter and authorized data extraction device is protected by additional levels of security and safety mitigations using an encrypted and proprietary data format. This format embeds various methods to verify data integrity and to detect potential instances of data tampering. While the format is proprietary, industry standard protocols (e.g., RSA and AES) and used in different parts of this proprietary data format.
Communication between an authorized data extraction device and Dexcom Servers is protected by a number of mechanisms, designed to safeguard against data corruption. This includes industry standard JWT token based authentication and authorization. All such communication takes place exclusively over encrypted data path using industry standard SSL format.

Dexcom Pro Q System User Guide
64Appendix E: Technical Information
Electromagnetic Immunity and Emissions Declaration and GuidanceThe transmitter is intended for use in the electromagnetic environment specified in the next table. The customer or the user of the transmitter should ensure that it is used in such an environment.
Transmitter Electromagnetic Immunity Specifications
Immunity Test Transmitter Compliance Level
Electrostatic Discharge (ESD)
IEC 61000-4-2
± 8 kV Contact
± 15 kV Air
Power Frequency
(50/60 Hz) Magnetic Field
IEC 61000-4-8
30 A/m
Radiated Fields Disturbance
IEC 61000-4-3
10 V/m
at 80 MHz to 2700 MHz
(AM modulation)
Radiated and Conducted Fields Aircraft Use
FAA RTCA/DO-160 edition G Section 20 Category T.
Can be used on aircraft according to the directions provided by the operator of the aircraft
Electromagnetic interference can still occur in the home health care environment as control over the EMC environment cannot be guaranteed. An interference event can be recognized by gaps in G6 readings or gross inaccuracies.

Dexcom Pro Q System User Guide
65Appendix E: Technical Information
Electromagnetic Emissions SpecificationsThe G6 is intended for use in the electromagnetic environment specified in the next table. The customer or the user of the G6 should ensure that it is used in such an environment.
Electromagnetic Emissions Specifications
Immunity Test Compliance
Radio Frequency Emissions
CISPR 11 / FCC part 15Group 1, Class B
RF Emissions
CISPR 11Meets FAA RTCA/DO-160 edition G Section 21, Category M for in-cabin use.
E.3 FCC Compliance StatementsThis G6 CGM transmitter complies with Part 15 of the FCC Rules. Operation is subject to the following two conditions:
1. This device may not cause harmful interference, and
2. This device must accept any interference received, including interference that may cause undesired operation.
G6 transmitter FCC ID: PH29588

Dexcom Pro Q System User Guide
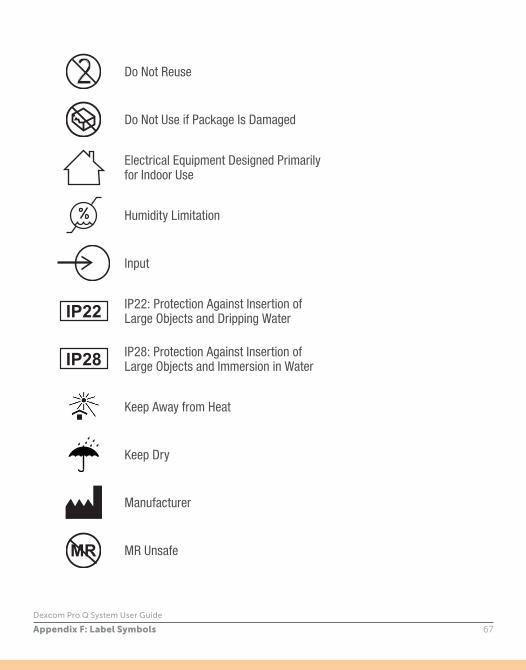
66Appendix F: Label Symbols
Appendix F | Label SymbolsSymbols may be found on the sensor and transmitter package. These symbols refer to the proper and safe use of the Dexcom Pro Q. This table shows what each symbol means. They are also found in the Symbols Glossary at dexcom.com/symbols.
~ Alternating Current
Batch/Lot Number
Bluetooth
REF Catalog Number
Caution
Class II Equipment
Consult Instructions for Use
Date of Manufacture
Direct Current
Dexcom Pro Q System User Guide
67Appendix F: Label Symbols
Do Not Reuse
Do Not Use if Package Is Damaged
Electrical Equipment Designed Primarily for Indoor Use
Humidity Limitation
Input
IP22: Protection Against Insertion of Large Objects and Dripping Water
IP28: Protection Against Insertion of Large Objects and Immersion in Water
Keep Away from Heat
Keep Dry
Manufacturer
MR MR Unsafe

Dexcom Pro Q System User Guide
68Appendix F: Label Symbols
Non-Ionizing Radiation
PN Part Number
Prescription Required
Refer to Instruction Manual/Booklet
SN Serial Number
SB Ship-By Date
STERILE R Sterile by Radiation
Temperature Limitation
Type BF Applied Part
Use By Date

Dexcom Pro Q System User Guide
69Index
IndexCGM System
Basic maintenance, 38
Disposal, 5, 21, 38
Overview, 4
Storage, 10
Safety statement
Contraindications, 9
Indications, 9
Warnings, 9
Sensor Session
Attaching transmitter, 22
Definition, 8
Inserting sensor, 18
Insertion site, 10, 11, 16, 17
Prepping for sensor insertion, 15
System Components, 4
Technical Information, 43
Transmitter
Attaching, 22
Care, 38
Overview, 5
Remove from Sensor, 24
Troubleshooting, 27
Warranty, 39
© 2020 Dexcom, Inc. All rights reserved.
Covered by patents dexcom.com/patents.
Dexcom and Dexcom Pro Q are registered trademarks of Dexcom, Inc. in the United States and may be in other countries. Bluetooth is a registered trademark owned by Bluetooth SIG, Inc. Apple is a trademark of Apple Inc., registered in the U.S. and other countries. Android is a registered trademark owned by Alphabet Inc. All other marks are property of their respective owners.

Dexcom, Inc.
6340 Sequence Drive
San Diego, CA 92121 USA
Tech Support: 1.844.857.6319
Web: dexcom.com
LBL016581 Rev 004© 2020 Dexcom, Inc. All rights reserved.Rev Date: 03/2020