Use templates to revolutionize your screen design … Works3_Catalog L_NA...Kawasan Industri...
15
Mitsubishi iQ Platform Compatible GOT1000 Screen Design Software MELSOFT GT Works3 Compatible with Windows® 7 Use templates to revolutionize your screen design style
Transcript of Use templates to revolutionize your screen design … Works3_Catalog L_NA...Kawasan Industri...

Mitsubishi iQ Platform Compatible GOT1000 Screen Design SoftwareMELSOFT GT Works3
Compatible withWindows® 7
This catalog explains the typical features and functions of MELSOFT GT Works3 and does not provide restrictions and other information on usage and module combinations. When using the products, always read the user's manuals of the products.Mitsubishi Electric will not be held liable for damage caused by factors found not to be the cause of Mitsubishi Electric; machine damage or lost profits caused by faults in the Mitsubishi Electric products; damage, secondary damage, accident compensation caused by special factors unpredictable by Mitsubishi Electric; damages to products other than Mitsubishi Electric products; and to other duties.
• To use the products given in this catalog properly, always read the related manuals before starting to use them.
• The products within this catalog have been manufactured as general-purpose parts for general industries and have not been designed or manufactured to be incorporated into any devices or systems used in purpose related to human life.
• Before using any product for special purposes such as nuclear power, electric power, aerospace, medicine or passenger movement vehicles, consult with Mitsubishi.
• The products within this catalog have been manufactured under strict quality control. However, when installing the product where major accidents or losses could occur if the product fails, install appropriate backup or failsafe functions in the system.
L(NA)08170ENG-C 1201(MDOC)New publication, effective January 2012
Specifications subject to change without notice.
Mitsubishi iQ Platform Compatible GOT1000 Screen Design SoftwareMELSOFT GT Works3
Sales office
Mitsubishi Electric Automation Inc.500 Corporate Woods Parkway, Vernon Hills, IL 60061, U.S.A.
MELCO-TEC Representacao Comercial e Assessoria Tecnica Ltda. Av. Paulista, 1439, cj74, Bela Vista, Sao Paulo CEP: 01311-200 - SP Brazil
Mitsubishi Electric Europe B.V. German BranchGothaer Strasse 8, D-40880 Ratingen, Germany
Mitsubishi Electric Europe B.V. UK Branch Travellers Lane, Hatfield, Hertfordshire, AL10 8XB, U.K.
Mitsubishi Electric Europe B.V. Italian Branch Viale Colleoni 7-20041 Agrate Brianza (Milano), Italy
Mitsubishi Electric Europe B.V. Spanish BranchCarretera de Rubí 76-80, E-08190 Sant Cugat del Vallés (Barcelona), Spain
Mitsubishi Electric Europe B.V. French Branch25, Boulevard des Bouvets, F-92741 Nanterre Cedex, France
Mitsubishi Electric Europe B.V. -o.s. Czech OfficeAvenir Business Park, Radicka 714/113a, 158 00 Praha 5, Czech Republic
Mitsubishi Electric Europe B.V. Polish Branch Krakowska 50, 32-083 Balice, Poland
Mitsubishi Electric Europe B.V. Russian Branch Moscow Office52, bld. 3, Kosmodamianskaya nab., RU-115054, Moscow, Russia
Circuit Breaker Industries Ltd.9 Derrick Road, Spartan, Gauteng P.O. Box 100, Kempton Park 1620, South Africa
Mitsubishi Electric Automation (China) Ltd.Mitsubishi Electric Automation Center, No.1386 Hongqiao Road,Changning District, Shanghai, China
Setsuyo Enterprise Co., Ltd.6F., No.105, Wugong 3rd, Wugu Dist, New Taipei City 24889, Taiwan, R.O.C.
Mitsubishi Electric Automation Korea Co., Ltd.3F, 1480-6, Gayang-Dong, Gangseo-Gu, Seoul 157-200, Korea
Mitsubishi Electric Asia Pte, Ltd.307 Alexandra Road #05-01/02, Mitsubishi Electric Building, Singapore
Mitsubishi Electric Automation (Thailand) Co., Ltd.Bang-Chan Industrial Estate No.111, Soi Serithai 54,T.Kannayao, A.Kannayao, Bangkok 10230, Thailand
P.T. Autoteknindo Sumber MakmurMuara Karang Selatan, Block A / Utara No.1 Kav. No.11,Kawasan Industri Pergudangan, Jakarta- Utara 14440,P.O. Box 5045, Indonesia
Mitsubishi Electric India Pvt. Ltd.2nd Floor, DLF Building No.9B, DLF Cyber City Phase III, Gurgaon 122002, Haryana, India
Mitsubishi Electric Australia Pty. Ltd.348 Victoria Road, P.O. Box 11, Rydalmere, N.S.W. 2116, Australia
Country/Region
USA
Brazil
Germany
UK
Italy
Spain
France
Czech Republic
Poland
Russia
South Africa
China
Taiwan
Korea
Singapore
Thailand
Indonesia
India
Australia
Tel/Fax
Tel: +1-847-478-2100Fax: +1-847-478-2253
Tel: +55-11-3146-2200Fax: +55-11-3146-2217
Tel: +49-2102-486-0Fax: +49-2102-486-1120
Tel: +44-1707-27-6100Fax: +44-1707-27-8695
Tel: +39-039-60531 Fax: +39-039-6053-312
Tel: +34-935-65-3131Fax: +34-935-89-2948
Tel: +33-1-5568-5568Fax: +33-1-5568-5757
Tel: +420-251-551-470Fax: +420-251-551-471
Tel: +48-12-630-47-00Fax: +48-12-630-47-01
Tel: +7-495-721-2070Fax: +7-495-721-2071
Tel: +27-11-977-0770Fax: +27-11-977-0761
Tel: +86-21-2322-3030Fax: +86-21-2322-3000
Tel: +886-2-2299-2499Fax: +886-2-2299-2509
Tel: +82-2-3660-9530Fax: +82-2-3664-8372
Tel: +65-6470-2480Fax: +65-6476-7439
Tel: +66-2906-3238Fax: +66-2906-3239
Tel: +62-21-663-0833Fax: +62-21-663-0832
Tel: +91-124-4630300Fax: +91-124-4630399
Tel: +61-2-9684-7777Fax: +61-2-9684-7245
HEAD OFFICE: TOKYO BLDG., 2-7-3, MARUNOUCHI, CHIYODA-KU, TOKYO 100-8310, JAPANNAGOYA WORKS: 1-14, YADA-MINAMI 5, HIGASHI-KU, NAGOYA, JAPAN
Use templates to revolutionize your screen design style

2 3
Customizable templates simplify screen development, improve efficiency and reduce effort.
Supporting realistic and beautiful screen designing!Use the extensive parts library and font variations to design realistic and high-grade screens such as operation panel screen.
Design your desired screen with simple settings!Advanced functions, such as creating original templates, greatly reduce your screen creation time while enabling you to create high-level screens with simple settings.
Intuitive, easy-to-use operations to adjust the screen creation environment and utilize existing data!Various concepts, such as optimizing operations and using existing data, are incorporated to improve your screen design efficiency.
Want to increase your screen design efficiency? Reuse or create a unique screen?
Then “MELSOFT GT Works3” with its intuitive flexible templates is the perfect answer.
Whether creating an all new front end for your system or reworking an existing design, ready-to-use templates reduce
engineering development, time and effort. Developers can easily choose from a wide range of original templates or
freely create new ones to meet any requirement or standard.

A selected object or graphic’s settings are displayed as a tree view. Set colors, devices, etc., on the property sheet without opening a dialog box. When selecting multiple objects or graphics, change color, character size, etc., all at the same time.
Property Sheet
Reduce workspace clutter by moving objects off of the display area.
Temporary Area
Batch parameter check and system labels of MELSOFT Navigator are supported.
MELSOFT iQ Works Improves Design Efficiency (P.23)
GT Works3 comes with various tools such as the Data Transfer Tool and GT Converter2.
Related Tools (P.23, 24)
Enhanced "easy-to-use" functions for
efficient screen design!
View the whole project, create a new screen, and add and delete screens with ease.
Work TreeP.8
The object settings are listed allowing settings to be confirmed and revised easily!
Data BrowserP.13
Preview operation without connecting to a GOT.
SimulatorP.19
Vividly colored icons make distinguishing active functions from inactive ones easy.
Tool Bar P.8
Parts are easy to select. High resolution graphics and parts are easy create and incorporate into projects.
Library P.9
User-friendly dialog boxes and object settings.
Dialog Box P.9
New functions improve your screen design efficiency than ever before!
Many convenient and efficient development functions are included!
● Use “templates” to greatly reduce your screen creation time! (P.10)
● Make batch changes with a single right-click! (P.16)
● Register parts with a single right-click! (P.16)
● Easily create addition and subtraction word switches! (P.17)
Editor <Screen Design Area>P.10
Communication settings and drivers are automatically selected and downloaded to the GOT with the project data.
Communication with GOT P.18
The Help Function is available for quick reference!P.21
Screen data is portable and forward compatible.Visualization has evolved to offer more than what you see is what you get.
GOT1000 Screen Design Software
4 5
6 7
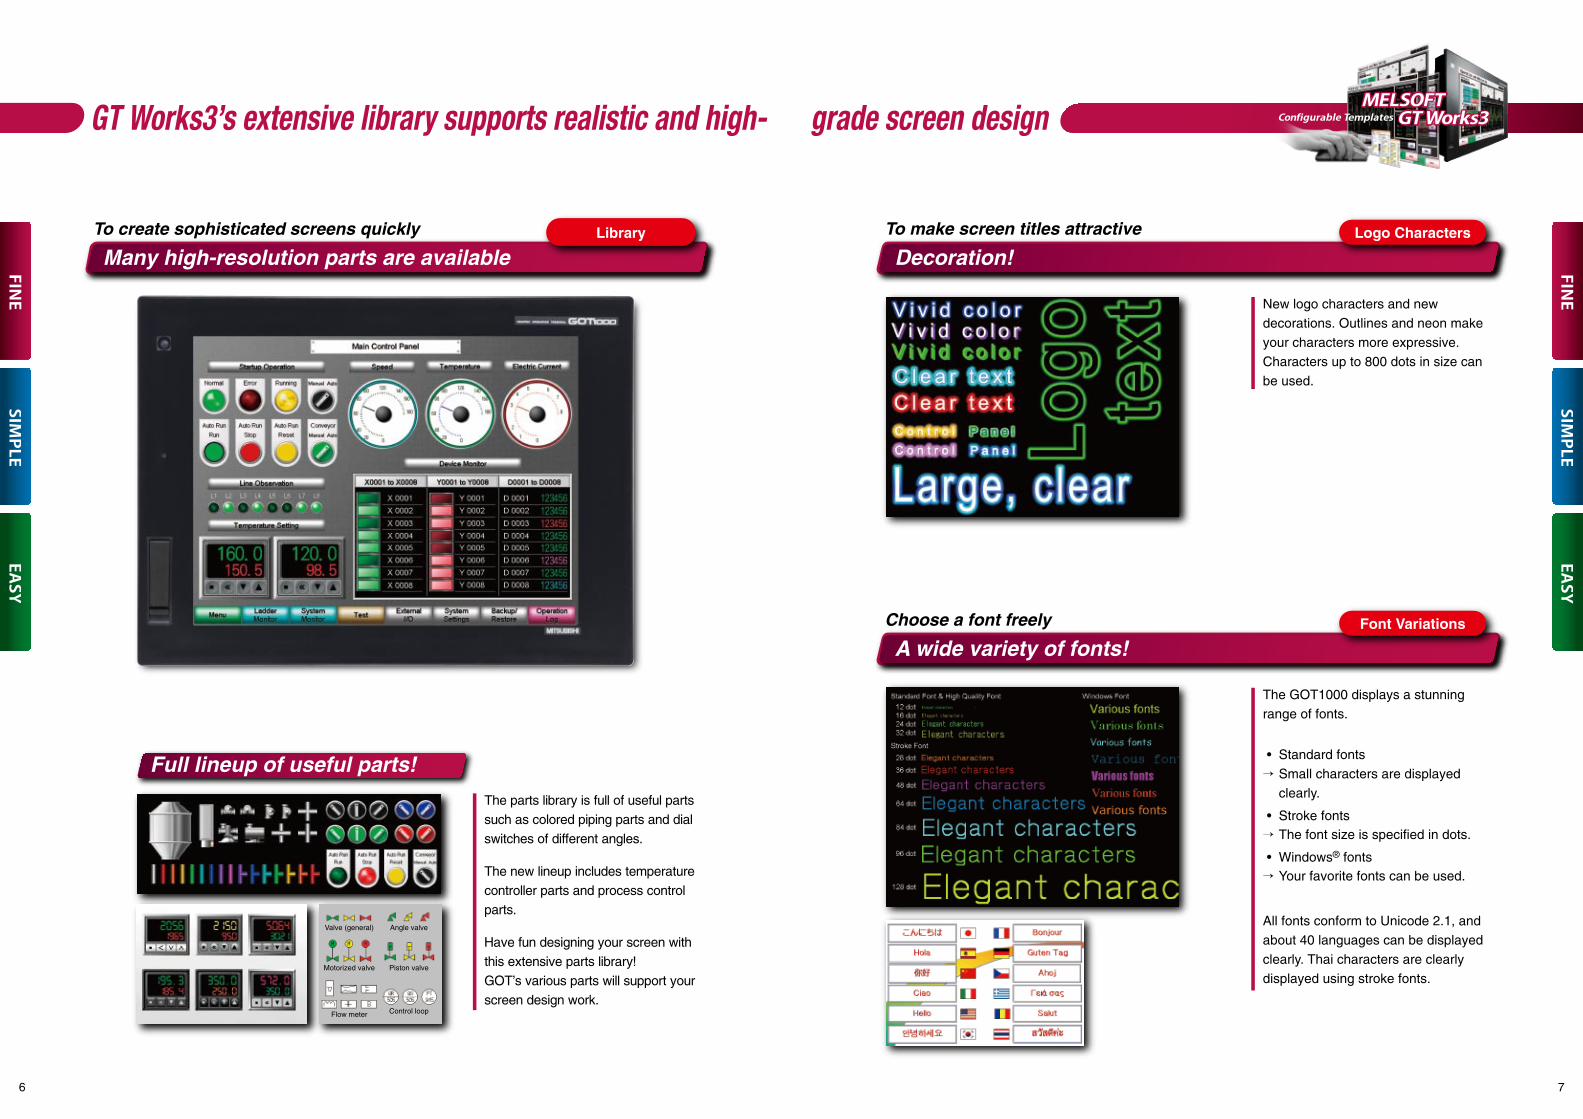
New logo characters and new
decorations. Outlines and neon make
your characters more expressive.
Characters up to 800 dots in size can
be used.
The parts library is full of useful parts
such as colored piping parts and dial
switches of different angles.
The new lineup includes temperature
controller parts and process control
parts.
Have fun designing your screen with
this extensive parts library!
GOT’s various parts will support your
screen design work.
The GOT1000 displays a stunning
range of fonts.
• Standard fonts
→ Small characters are displayed
clearly.
• Stroke fonts→ The font size is specified in dots.
• Windows® fonts→ Your favorite fonts can be used.
All fonts conform to Unicode 2.1, and
about 40 languages can be displayed
clearly. Thai characters are clearly
displayed using stroke fonts.
Library Logo Characters
Font Variations
Valve (general) Angle valve
Motorized valve Piston valve
Flow meter Control loop
GT Works3’s extensive library supports realistic and high- grade screen design
To create sophisticated screens quickly To make screen titles attractive
Choose a font freely
Many high-resolution parts are available Decoration!
A wide variety of fonts!
Full lineup of useful parts!

8 9
Simply designed full-color icons and
easy explanations let anyone design
screens easily. Previous selections
are stored to increase design work
efficiency.
Say you select the bit switch from the
menu to create a switch object -- the
bit switch icon is immediately
displayed so you can just click the
icon to create another bit switch – no
need to choose from a function menu.
Finding objects in the parts library is
easy and you can simply choose a
library by object type, by function,
from the recently used library list, or
from the “My Favorites” folder.
To create a visual masterpiece - just
choose parts from the library and
place the objects on screen - what
could be easier?
To register a part, just select it and
drag and drop it into the library.
Register a part in the “My Favorites”
folder with a single right-click.
Choose settings and operations using
simple terms and display items.
Object settings, ON/OFF conditions
and other states can be modified and
displayed directly from the
configuration dialog box - saving
valuable time and effort.
Dialog tabs with “*” marks quickly
show designers that object settings
have been modified.
Setting items in a project are
categorized clearly into projects,
systems, and screens. Everything is
displayed so you can find what you
want quickly. Create new screens or
comments just by double-clicking on
“New”.
Work Tree Library
Tool Bar Dialog Box
Double-click tocreate new data.
< Project >
< System >
< Screen >
Point to the icon withthe mouse to displayan explanation offunctions and operations.
Just click and place a part.To register,
drag and drop.
Compare and check images of ON/OFF state or each set range.
Bringing you high-level screen design with simple, easy- to-use settings and operations
With all these settings – which should I choose?
Setting items are categorized so you can choose what you want more quickly
New icons simplify function selection and improve efficiencyWhat function best fits my application?
Lots of libraries -- but what are they for?
Cut library retrieval time!
But what items do I set?
Terms and display items are improved to make settings easier!

10 11
<Changing colors>
<Changing devices>
<Creating and associating template attributes>
✽: For more details on the templates registered in the system library, please refer to page 12.
<Creating a new template> <Completed template>
<Items that can be registered in template> Figures and objects on the same screen editor
<Types that can be registered and changed in template attributes>
Devices (bits, words), numerical values, text, colors, figures , fonts , font size
Version Upgrade
Create a template from frequently used screens and parts.
Template attributes such as devices and colors can be specified in a template.
By associating attributes of individual objects to the template attributes, devices, colors, and other
attributes can easily be changed at a time.
Editor
Numerical display (D500, D600)
All colors for the template attribute “Motor A Color” are changed at a time!
Monitor devices for trend graph (D500, D600)
The following colors are set as the template attribute “Motor A Color”:• Meter Needle Color• Numerical Color• Graph Color
Select figures and objects to be registered, and create a new template.
Create template attributes.• Type (word, color, etc.)• Template attribute name
Change devices in the template attribute at a time! (D500-D600)→(D100-D200)
Associate individual attributes of figures and objects to the template attributes with drag and drop.
Set the head device (D500→D100)
When the created template is saved in the library, it can easily be used in other projects, thus greatly
improving your screen designing efficiency.
The system library contains various templates (function screens, controller monitor screens, etc.) which
can be used freely.
Change the color
Trend graph
Meter attributes
Numerical display attributes
Trend graph attributes
Meter (D500, D600)
Meter
Numerical display
New template completed!
Quickly design your screens using a full range of templates. Original templates can also be created and saved
Enhance your work performance by saving your frequently used screens as “templates”
Use “templates” to greatly reduce your screen creation time!

12 13
<Changing operation settings>
<Copy/paste of multiple cells> Change names of Go To Screen switches to Main Menu (screen No.1) from “Menu” to “Main Menu” on all screens.
<Servo amplifier monitor> <Temperature controller monitor for various brands><Inverter monitor>
<Special module monitor><CC-Link network monitor>
<Historical (graph + list)><Device monitor (bit)>
<Rotary switch> <3-position selector switch> <Analog clock>
<Clock (alarm and historical)> <Radio switch>
Select a template from the System Library and put it on the editor!
The settings of objects used in the project can be
displayed and edited in the list.
The settings for the “script”, “status monitor” and
“trigger actions”, etc., used in base/window
screens can also be displayed and edited.
Operability in the list has been increased to
improve efficiency of data editing when many
screens are included or when existing screens are
imported in the data.
● Directly edit devices and text in the list
● Change devices, text and colors in a batch
● Change action settings and fonts
● Copy and paste multiple cells
● Sort and narrow down items by using devices and keywords
Copy and paste to multiple cells!
Edit directly in the list or edit from a setting dialog.
Select various template screens and parts according to your target or application.
Template screens are available in three sizes: XGA , VGA and QVGA .
Double-click
Menu
Device monitor
Advanced alarm
Historical (graph + list)
Document display
Calendar
Clock data change
Select a template from the System Library and put it on the editor!
CC-Link network monitor
Special module monitor
Servo amplifier monitor
Inverter monitor
Temperature controller monitor for various brands
Rotary switch
3-position selector switch
Analog clock
Clock (alarm and historical)
Radio switch, etc.
Changing the part colors and devices, which used to be bothersome, is now easy by using the templates.
Editor Editor
Increase your screen design ef�ciency with an extensive library of ready-to-use templates
“Menus”, “graphs” and “monitors”… Why spend lots of time making these frequently used screens?
Visit the diverse lineup of ready-to-use “templates”!Quickly find out the settings of objects in the project
“Data Browser” makes it easy to check and modify settings
Templates are continuously updated
Parts
Controller Monitor Screen
Function Screens

14 15
Drag the object to display the guide
line -- Place the object using the
mouse.
Guide lines can be displayed to the
left/right, center, or top/bottom of
figures and objects.
The guide lines can also be displayed
at the center of the screen and the
boundary between the screen display
area and the temporary area.
<Confirmation of screen selection switches>
<Switching lamp/switch display (states)>State 0 State 1
<Switching lamp/switch display (ON/OFF)>
<Changing numerical display/input preview value>
OFF ON
State 2
Copy the specified number of figures
or objects all at once. When copying
objects containing devices, assign
device numbers by setting the
increment.
Batch corrections including devices,
colors, figures and channel numbers
can be done all at once.
With the width/height/coordinate input
function, change the size of selected
objects and rearrange them all at the
same time by inputting width, height,
and coordinates.
The screen display can be switched in the
Screen Preview. The editing screen can be
opened in sequence with the preview screen so
modifications can be made and then viewed in
real-time on the preview screen.
Lamp/switch displays (ON/OFF, states) can be
changed for each object separately.
Preview values of numerical display/input and
ASCII display/input objects can be changed.
Simple simulation and screen switching can be checked in the Screen Preview window. By turning
certain switches ON/OFF, entering device values, and printing/saving specific screen images, you can
easily create specification documents and operation manuals.
The screen will change when the screen selection switch is clicked.
The state can also be switched by pressing Alt key + click (next state) or Shift key + click (previous state).
Guide line
Dragging
< Batch correction -- changing color >
< Width/height/coordinate input >
Editor Editor
Editor
Editor
Data checking and correction work is now so easy
Easily check the screen switching and ON/OFF displays!
Simple simulation with “Screen Preview”To place an object using only the mouse
Correct positioning along a guide line
To lay out multiple figures and objects
Use the continuous copy function to lay things out!
To change settings for multiple figures or objects at the same time
Easy correction with batch change and width/height/coordinate input functions!

16 17
Change multiple figures easily with
one operation while checking images
of switches and lamps.
Right-click
When multiple objects are selected
and the right-button is clicked, the
batch change menu will appear.
This menu simplifies the batch
change of devices, colors, figures
and channel numbers.
Easily register parts by selecting the
required figure and right-clicking.
Right-click
Four different states can be indicated
by combining touch states and device
states of a touch switch.
The style and the text can also be
specified for the state when the
switch does not work.
Convert switch and lamp objects
easily with just one click.
Word switches which add or subtract
values can be created easily.
Addition and subtraction are possible
even when the data format is
“unsigned BIN” or “BCD”.
When RUN lamp is OFF
When RUN lamp is ON
See the touched section!
See the touched section!
Touch
When touched
When touched
When switch is not working
Touch
SwitchLamp
One-click conversion
Right-click
Editor
Editor
Editor
Editor
Editor
Editor
Aiming to reduce screen creation time to the �nest details with simple and intuitive operations
To effortlessly change figures
Change figures by just right-clicking
If only batch changes could be made more easily
Make batch changes with a single right-click!
With so many parts to register, it just takes too much time…
Register parts with a single right-click!
Is there an intuitive way to find out the operation state?
Use a switch to display four states and indicate an invalid state!
To efficiently change objects
A single click toggles a switch and lamp!
Create frequently used switches as easily as possible
Easily create addition and subtraction word switches!

18 19
✽: GX Works2 or GX Simulator is required separately.
Displayed in order from top:• Monitor device• Switch’s lamp function device• Display/operation trigger device
Use your PC to check screen data operation -- check alarms and monitor screen
changes and devices. Debug data while correcting the screen.
Start and update the simulator with one click and test devices easily.
The simulator stores screen images in BMP and JPEG formats -- convenient for
preparing operating manuals.
All GOT1000 models including GT14 , GT12, and GT10 can be simulated.
In addition to the monitor device, the
switch’s lamp function device and
display/action trigger device can be
displayed.
The setting details for the entire
screen can be checked at a glance
without opening setting dialogs or
checking property sheets. Use this
easy function to prevent device
setting mistakes.
Communication with GOT
Simulator
The “write mode” can be selected
when transferring data. By selecting
“project data OS batch write”, the
OSs✽4 required by the GOT are
automatically selected according to
the contents of the screen data. The
selected OSs are transferred together
with the screen data to the GOT.
● “Project data OS batch write”: The required data is automatically selected according to the contents of the screen data. Use this convenient function when transferring data to the GOT for the first time.
● “Difference in verification with GOT”, “Difference after the previous write”: Since only difference data is selected, the communication time can be shortened. This is convenient for debugging and making corrections.
● “Select write data”: Data can be selected freely.
The required OS and screen data are automatically selected according to the selected mode
All you have to is press the “GOT Write” button
Select write mode!
✽1: GT16/GT14 only.✽2: Excluding GT14/GT10. GT105/GT104 can transmit data using GT10-50FNB and GT1030/GT1020 by using GT10-LDR.✽3: GT16/GT15/GT14/GT12 only. If the IP address is unknown, GOTs in the Ethernet network can be searched. (GT16 only.)✽4: Dedicated system files required for using GOT.✽5: GT14 only.
• USB• RS-232• Ethernet✽3
Via a modem (screen data and resource data only)
OfficeJob site
USB memory✽1 CF card✽2
SD card✽5
CF card, etc.
Communication/monitor
Program loading
Device values and ON/OFF statuses can be changed
GT Works3 simulation function
GX Works2 simulator (virtual PLC)
To correct screen data,just click “Update”!
Just click the mouse
The simulator starts
Editor
Simple, one-click operations are your effective tool for checking and transferring data
Is there any way to see specified devices at a glance?
Display lamp function devices and trigger devices of switches!
Does the software really check the OS automatically when transferring data to the GOT?
Select the OS and transfer data with a single click!
To check created data without the actual machine!
Simulation with a click!

20 21
Initial settings for objects and figures
can be tailored to suit the individual
programmer or designer. Frequently
used objects can be pre-loaded and
pre-configured to reduce the time
to configure.
Registered data is sharable with other
projects and personal computers to
design screens efficiently.
Displayed (Always displayed window)
Automatically hidden (tabbed window)
Objects on the “My Favorites” tool
folder in the library are displayed on
the “My Favorites” tool bar.
An object can be added to the
“My Favorites” folder just by drag and
drop, or by right click on the
object. Place it by clicking on the tool
bar.
The window is automatically hidden
using the push pin. When you need
the window, put the mouse on the tab
and the window is displayed. Make
more room in the work area for
smaller size PC screens.
The window can be located anywhere
above, below, to the left, or right
based on the docking guide arrow.
When the F1 key is pressed, help for the currently active dialog opens immediately!
Easily check the information you need.
“Contents” is displayed
Tabbed window
Setting method is displayed.
Related items are also displayed.
Before customization
Numericaldisplayicon
Right-click on a set object and register it by choosing “Set to Default”.
Click and place
My Favoritestool bar
Registered parts are displayed on the “My Favorites” tool bar!
To register, drag and drop or right-click.
My Favorites
Automaticallyhidden
Displayed
Window display mode isset by just clicking on thepush pin.
or
Always displayed window
Click or hold the mouseon the window tab.
Displayed window
When the key is pressed while the Device setting dialog is displayed
Search the informa-tion you need from the “Contents” or “Index” tab.
The device list for the configured devices is displayed. There's no need to open your manual!
Click and place
Set the device
When the key is pressed while the Lamp setting dialog is displayed
Personalize the screen design environment to further reduce screen creation time
Instantly suit your preferences
Change initial settings as you like
To reuse the same parts often
Select your favorite parts directly from the tool bar!
To customize your screen design environment
Customize windows, icons, and tool bars
Find the information you need at your fingertips!
The Help Function eliminates the need for manuals

22 23
MELSOFT iQ Works
Select comments in Microsoft® Excel
or GX Works2 and paste them into a
comment list.
Import and export are also available
for the data created in CSV/Unicode
text file format.
Configure a system combining GOT
and PLCs and set up GOT I/F and
communication drivers using
MELSOFT Navigator, the system
management software for the FA
integrated engineering software
package MELSOFT iQ Works.
System labels set by MELSOFT
Navigator can be used in GT Works3.
Verify project data.
q Verifying project data between
data on GOT and data on a
personal computer.
w Verifying project data being edited
on a personal computer with other
project data.
The cover, screen images, and the list
of set devices can be printed or
output to a file. Prepare specifications
and operation manuals easily.
Use the Data Transfer Tool to transfer
screen data from a PC without
GT Works3.
● Applicable GOTs
GOT800, GO900 and GOT1000
● Transferable data
Project data
Resource data (GOT1000 only)
Data transfer tool
Copy
Copy
Right-click, choose “Paste from Excel” from the menu, and paste.
Microsoft® Excel
GX Works2
Different data is in different colors.
What is MELSOFT Navigator?MELSOFT Navigator is a MELSOFT iQ Works software application enabling you to create system configurations, set up GOT I/F and communication drivers, check power supply capacity and the number of input/output points, as well as set parameters including I/O assignment.
What is a system label?A system label makes names of devices in connected equipment easy to understand. System labels can be shared with PLC/motion controller programs of MELSOFT iQ Works. For details, see the MELSOFT iQ Works catalog <L(NA)08232ENG>.
MELSOFT Navigator
GT Works3
Create screens using system labels.
A PC without GT Works3
USB✽1/RS-232/Ethernet✽2
Transferring screendata using the DataTransfer Tool.
✽1: GOT1000 only.✽2: GOT1000 (GT16/GT15/GT14/GT12) only.
Streamlined data manipulation goes beyond conventional screen design software
To enter comments and create recipe data quickly
Improve work efficiency working with other applications
How do these two pieces of data differ?
Verifying project data
Preparing specifications
Printing to prepare specifications easily
What can I do with MELSOFT iQ Works?
MELSOFT iQ Works lets you design systems more efficiently
Do I need to install screen design software on my PC?
Data transfer does not require screen design software!

24 25
GT Designer2 Classic
GOT900 Series screen data is edited
using GT Designer2 Classic provided
with GT Works3!
Supported screen design softwareGOT800 Series screen design software (SW3NIW-A8GOTP)Digital Electronics Corporation (Pro-face) screen design software (GP-PRO/PB 3 Series)
✽: Some data and functions may not be convertible.
GT Converter2
GT Converter2 converts project data
created by previous screen design
software applications to GT Works3
compatible data.
GT Works3(GOT1000)GT Converter2GOT800
Product Model
GT Designer3 Version1 Screen Design Manual (Fundamentals) 1/2, 2/2GT Designer3 Version1 Screen Design Manual (Functions) 1/2, 2/2GOT1000 Series Connection Manual (Mitsubishi Products) for GT Works3GOT1000 Series Connection Manual (Non-Mitsubishi Products 1) for GT Works3GOT1000 Series Connection Manual (Non-Mitsubishi Products 2) for GT Works3GOT1000 Series Connection Manual (Microcomputer, MODBUS Products, Peripherals) for GT Works3GT Simulator3 Version1 Operating Manual for GT Works3GT Converter2 Version3 Operating Manual for GT Works3
080866ENG080867ENG080868ENG080869ENG080870ENG080871ENG080861ENG080862ENG
■Product configuration
■Related major manuals
SW1DNC-GTWK3-ESW1DNC-GTWK3-EA
GT Works3Version1
* Manuals are supplied as PDFs with the software package in the CD-ROM. Printed manuals are also available.
Description
Single license (English version)Multiple-license (English version)✽1
Manual title Manual No.
■MELSOFT GT Works3 (English version) operating environment■MELSOFT GT Works3 (English version) operating environment
Supporting your screen design work by making much use of existing data assets
How do I edit GOT900 Series screen data?
Data is edited using GT Designer2 Classic!
Can I use screen data for the GOT800 Series?
Data can be converted into the GOT1000 format with GT Converter2
✽1: The desired number of licenses (2 or more) can be purchased. For details, please contact your local sales office.
Item Details
PC PC/AT compatible machine on which the following OS operates
OS (English, Simplified Chinese, Traditional Chinese, Korean, German versions)
Microsoft® Windows® 7 (64bit/32bit) (Enterprise, Ultimate, Professional, Home Premium, Starter)Microsoft® Windows Vista® (32bit) (Enterprise, Ultimate, Business, Home Premium, Home Basic)Microsoft® Windows® XP Service Pack2 or later (32bit) (Professional, Home Edition)Microsoft® Windows® 2000 Professional Service Pack4
CPU 1GHz or more recommended
Required memoryMicrosoft® Windows® 7, Microsoft® Windows Vista®: 1GB or more recommendedMicrosoft® Windows® XP, Microsoft® Windows® 2000: 512MB or more recommended
Display Resolution XGA (1024 x 768 dots) or more
Available hard disk spaceTo install GT Designer3: 2GB or more recommendedTo run GT Designer3: 512MB or more recommended
Display colors High Color (16 bits) or more
Software
Simulation on a PC requires the following software:• GX Works2 version 1.12N or later✽1 or GX Simulator version 5.00A or later✽1.
* The applicable software version of GX Works2 or GX Simulator varies depending on the PLC CPU to be simulated.
PLC CPU to be simulated GX Simulator GX Works2 versionQCPU (A mode), ACPU, motion controller CPU (A series) 5.00A or later
–QnACPU
5.40E or laterFX0 series, FX0N series, FX0S series,
FX1 series, FX1N series, FX1NC series, FX1S series,FX2 series, FX2C series, FX2N series, FX2NC series
1.24A or later
QCPU (Q mode) (except Q00J/Q00/Q01CPU)1.12N or later
Q00JCPU, Q00CPU, Q01CPU 6.00A or later
Q02PHCPU, Q06PHCPU 7.20W or later
–Q12PHCPU, Q25PHCPU 6.10L or later
Q12PRHCPU, Q25PRHCPU 6.20W or later
FX3UC series, FX3U series✽2 7.08J or later1.24A or later
FX3G series✽2 7.22Y or later
Q00UJCPU, Q00UCPU, Q01UCPU, Q02UCPU, Q03UDCPU, Q04UDHCPU, Q06UDHCPU,
Q10UDHCPU, Q13UDHCPU, Q20UDHCPU, Q26UDHCPU, Q03UDECPU, Q04UDEHCPU,
Q06UDEHCPU, Q10UDEHCPU, Q13UDEHCPU, Q20UDEHCPU, Q26UDEHCPU
7.23Z or later 1.12N or later
LCPU – 1.24A or later
Q50UDEHCPU, Q100UDEHCPU – 1.30G or later
Others Mouse, keyboard, printer, CD-ROM drive (for installation only), sound function (sound card)✽3, speaker✽3 used with the above OS
Applicable GOT GOT1000 series
Applicable software version GT Works3 Version 1.40S or later
✽1: Use GT Simulator3, GX Developer, GX Simulator, and GX Works2 of the same language version.✽2: The GOT-A900 cannot be simulated.✽3: May be required when the simulation function is used.
[Cautions]• The software installation and the GOT-A900 simulation require administrator authority.• Using GT Works3 application requires an account higher than the standard user in Windows® 7 and Windows Vista®.• To use GT Works3 alongside another application in Windows® 7 and Windows Vista®, use an administrator account to run it if an administrator accout is used to run
the other application.• The following functions are not supported in Windows® 7, Windows Vista®, or Windows® XP.
Compatible Mode, Fast User Switching, Desktop Theme (Font) Change, Remote Desktop• Windows XP Mode, Windows Touch More are not supported in Windows® 7.

26 27
MEMO MEMO
Mitsubishi Electric Corporation Nagoya Works and Himeji Works are factories certified for ISO14001 (standards for environmental management systems) and ISO9001 (standards for quality assurance management systems).

Mitsubishi iQ Platform Compatible GOT1000 Screen Design SoftwareMELSOFT GT Works3
Compatible withWindows® 7
This catalog explains the typical features and functions of MELSOFT GT Works3 and does not provide restrictions and other information on usage and module combinations. When using the products, always read the user's manuals of the products.Mitsubishi Electric will not be held liable for damage caused by factors found not to be the cause of Mitsubishi Electric; machine damage or lost profits caused by faults in the Mitsubishi Electric products; damage, secondary damage, accident compensation caused by special factors unpredictable by Mitsubishi Electric; damages to products other than Mitsubishi Electric products; and to other duties.
• To use the products given in this catalog properly, always read the related manuals before starting to use them.
• The products within this catalog have been manufactured as general-purpose parts for general industries and have not been designed or manufactured to be incorporated into any devices or systems used in purpose related to human life.
• Before using any product for special purposes such as nuclear power, electric power, aerospace, medicine or passenger movement vehicles, consult with Mitsubishi.
• The products within this catalog have been manufactured under strict quality control. However, when installing the product where major accidents or losses could occur if the product fails, install appropriate backup or failsafe functions in the system.
L(NA)08170ENG-C 1201(MDOC)New publication, effective January 2012
Specifications subject to change without notice.
Mitsubishi iQ Platform Compatible GOT1000 Screen Design SoftwareMELSOFT GT Works3
Sales office
Mitsubishi Electric Automation Inc.500 Corporate Woods Parkway, Vernon Hills, IL 60061, U.S.A.
MELCO-TEC Representacao Comercial e Assessoria Tecnica Ltda. Av. Paulista, 1439, cj74, Bela Vista, Sao Paulo CEP: 01311-200 - SP Brazil
Mitsubishi Electric Europe B.V. German BranchGothaer Strasse 8, D-40880 Ratingen, Germany
Mitsubishi Electric Europe B.V. UK Branch Travellers Lane, Hatfield, Hertfordshire, AL10 8XB, U.K.
Mitsubishi Electric Europe B.V. Italian Branch Viale Colleoni 7-20041 Agrate Brianza (Milano), Italy
Mitsubishi Electric Europe B.V. Spanish BranchCarretera de Rubí 76-80, E-08190 Sant Cugat del Vallés (Barcelona), Spain
Mitsubishi Electric Europe B.V. French Branch25, Boulevard des Bouvets, F-92741 Nanterre Cedex, France
Mitsubishi Electric Europe B.V. -o.s. Czech OfficeAvenir Business Park, Radicka 714/113a, 158 00 Praha 5, Czech Republic
Mitsubishi Electric Europe B.V. Polish Branch Krakowska 50, 32-083 Balice, Poland
Mitsubishi Electric Europe B.V. Russian Branch Moscow Office52, bld. 3, Kosmodamianskaya nab., RU-115054, Moscow, Russia
Circuit Breaker Industries Ltd.9 Derrick Road, Spartan, Gauteng P.O. Box 100, Kempton Park 1620, South Africa
Mitsubishi Electric Automation (China) Ltd.Mitsubishi Electric Automation Center, No.1386 Hongqiao Road,Changning District, Shanghai, China
Setsuyo Enterprise Co., Ltd.6F., No.105, Wugong 3rd, Wugu Dist, New Taipei City 24889, Taiwan, R.O.C.
Mitsubishi Electric Automation Korea Co., Ltd.3F, 1480-6, Gayang-Dong, Gangseo-Gu, Seoul 157-200, Korea
Mitsubishi Electric Asia Pte, Ltd.307 Alexandra Road #05-01/02, Mitsubishi Electric Building, Singapore
Mitsubishi Electric Automation (Thailand) Co., Ltd.Bang-Chan Industrial Estate No.111, Soi Serithai 54,T.Kannayao, A.Kannayao, Bangkok 10230, Thailand
P.T. Autoteknindo Sumber MakmurMuara Karang Selatan, Block A / Utara No.1 Kav. No.11,Kawasan Industri Pergudangan, Jakarta- Utara 14440,P.O. Box 5045, Indonesia
Mitsubishi Electric India Pvt. Ltd.2nd Floor, DLF Building No.9B, DLF Cyber City Phase III, Gurgaon 122002, Haryana, India
Mitsubishi Electric Australia Pty. Ltd.348 Victoria Road, P.O. Box 11, Rydalmere, N.S.W. 2116, Australia
Country/Region
USA
Brazil
Germany
UK
Italy
Spain
France
Czech Republic
Poland
Russia
South Africa
China
Taiwan
Korea
Singapore
Thailand
Indonesia
India
Australia
Tel/Fax
Tel: +1-847-478-2100Fax: +1-847-478-2253
Tel: +55-11-3146-2200Fax: +55-11-3146-2217
Tel: +49-2102-486-0Fax: +49-2102-486-1120
Tel: +44-1707-27-6100Fax: +44-1707-27-8695
Tel: +39-039-60531 Fax: +39-039-6053-312
Tel: +34-935-65-3131Fax: +34-935-89-2948
Tel: +33-1-5568-5568Fax: +33-1-5568-5757
Tel: +420-251-551-470Fax: +420-251-551-471
Tel: +48-12-630-47-00Fax: +48-12-630-47-01
Tel: +7-495-721-2070Fax: +7-495-721-2071
Tel: +27-11-977-0770Fax: +27-11-977-0761
Tel: +86-21-2322-3030Fax: +86-21-2322-3000
Tel: +886-2-2299-2499Fax: +886-2-2299-2509
Tel: +82-2-3660-9530Fax: +82-2-3664-8372
Tel: +65-6470-2480Fax: +65-6476-7439
Tel: +66-2906-3238Fax: +66-2906-3239
Tel: +62-21-663-0833Fax: +62-21-663-0832
Tel: +91-124-4630300Fax: +91-124-4630399
Tel: +61-2-9684-7777Fax: +61-2-9684-7245
HEAD OFFICE: TOKYO BLDG., 2-7-3, MARUNOUCHI, CHIYODA-KU, TOKYO 100-8310, JAPANNAGOYA WORKS: 1-14, YADA-MINAMI 5, HIGASHI-KU, NAGOYA, JAPAN
Use templates to revolutionize your screen design style