
USC-Kuali Basics: Reference and Training Guide transaction tool in Kuali is called a document or...
60
Kuali Basics Reference and Training Guide • Kuali Financial System • Kuali Enterprise Workflow Belongs to: _____________________________________________________________________ Version 20180904
Transcript of USC-Kuali Basics: Reference and Training Guide transaction tool in Kuali is called a document or...

Kuali Basics Reference and Training Guide
• Kuali Financial System • Kuali Enterprise Workflow
Belongs to: _____________________________________________________________________ Version 20180904

i
Table of Contents eDoc Fundamentals .................................................................................................................................1
About eDoc Routing ............................................................................................................................................. 1 What is Ad Hoc Routing? .................................................................................................................................. 2
Logging In and Out...................................................................................................................................5 Logging In to Kuali ................................................................................................................................................ 5 Logging Out of Kuali ............................................................................................................................................. 6
On-Screen Menus and Controls .................................................................................................................7 Screen Layout of an eDoc .........................................................................................................................9
Document Header .............................................................................................................................................. 10 Expand All / Collapse All Buttons ....................................................................................................................... 10 Show/Hide Buttons ............................................................................................................................................ 11 Required Fields ................................................................................................................................................... 11 Date Fields .......................................................................................................................................................... 12 Action Buttons .................................................................................................................................................... 12 Standard Links and Icons .................................................................................................................................... 13
Help Icon ......................................................................................................................................................... 13 Field Lookup Icon ............................................................................................................................................ 13
Searching for Documents ....................................................................................................................... 15 Using Doc Search ................................................................................................................................................ 15
Sorting the Results of a Document Search ..................................................................................................... 17 Exporting the Results of a Document Search ................................................................................................. 17 Using Wildcard Characters When Searching .................................................................................................. 18
Custom Document Searches .............................................................................................................................. 18 Basic vs. Detailed Document Searches ........................................................................................................... 20 Using Document Search to Check the Current Status of an eDoc .................................................................. 21
Using the Action List .............................................................................................................................. 22 Commonly Requested Actions ........................................................................................................................... 23 Responding to an Action Request ...................................................................................................................... 23
Responding to an “Approve” Request ............................................................................................................ 23 Responding to an “Acknowledge” Request .................................................................................................... 24 Responding to an “FYI” Request ..................................................................................................................... 24
How to Acknowledge KFS and KEW eDocs with FYI Action Requests ........................................................ 24 Dealing with KC (TARA) eDocs that have FYI Action Requests ................................................................... 25
Responding to a “Complete” Request ............................................................................................................ 26 “Return to Initiator” and “Return to Previous” Buttons ................................................................................ 26 Deleting FINAL and CANCELLED eDocs that Remain in Your Action List ........................................................ 26
How to Delete Inactive eDocs from Your Action List .................................................................................. 27 Additional Action Buttons .................................................................................................................................. 28 Account Delegation (for DV and DVQE eDocs) .................................................................................................. 28 Action List Filter and Preferences ...................................................................................................................... 30
Action List Filter .............................................................................................................................................. 30 Clearing the Action List Filter ...................................................................................................................... 32
Workflow and Action List Preferences ........................................................................................................... 33

Kuali Basics: Reference and Training Guide
ii
Standard Tabs in eDocs .......................................................................................................................... 37 Document Overview Tab .................................................................................................................................... 37 Accounting Lines Tab .......................................................................................................................................... 39
Displaying Account Detail ............................................................................................................................... 39 Accounting Lines Action Buttons .................................................................................................................... 40 Import Lines .................................................................................................................................................... 40
Import Template Files ................................................................................................................................. 40 Accounting Line Error Messages .................................................................................................................... 42
Account Number Error Messages ............................................................................................................... 42 Object Code Error Messages ...................................................................................................................... 42 Dollar Amount Error Messages ................................................................................................................... 43 Clearing Accounting Line Error Messages................................................................................................... 43
Capital Edit Tab .................................................................................................................................................. 44 Retrieve Asset to be Updated......................................................................................................................... 45 Create New Assets .......................................................................................................................................... 45
General Ledger Pending Entries Tab .................................................................................................................. 46 Notes and Attachments Tab ............................................................................................................................... 47
Size and File Type Restrictions for Attachments ............................................................................................ 48 Completing the Notes and Attachments Tab ................................................................................................. 49
Ad Hoc Recipients Tab ........................................................................................................................................ 50 Completing the Ad Hoc Recipients Tab .......................................................................................................... 51
Ad Hoc Routing for “ENROUTE” eDocs ....................................................................................................... 52 Route Log Tab ..................................................................................................................................................... 53
Using the Route Log to Confirm Ad Hoc Routing Information ....................................................................... 55 Additional Information ........................................................................................................................... 57
Creating a New eDoc by Copying an Existing One ............................................................................................. 57

Kuali Basics: Reference and Training Guide
1
eDoc Fundamentals In the Kuali system, which includes the Kuali Financial System (KFS) and Kuali Enterprise Workflow (KEW), department personnel initiate a transaction using a request form displayed in their Web browser. This transaction tool in Kuali is called a document or electronic document, more commonly abbreviated as an “eDoc.” Anyone who initiates, reviews, or approves transactions in Kuali will interact with eDocs. The Kuali system automatically assigns a unique document number to each eDoc so that it can be tracked. Notes and attachments can be added to an eDoc by its initiator, or by a reviewer or an approver. It is useful to remember that an eDoc is a request for an action to be recorded within the system. The eDoc generally must be reviewed and approved before the requested action takes effect, regardless of whether it is a financial transaction to be recorded in the General Ledger, the creation of a new entry in the Chart of Accounts, a course schedule change, or some other action. The initiator of an eDoc receives immediate feedback on the validity of the document with respect to the appropriateness of data and compliance with USC business rules. Workflow rules are used to route a valid document to one or more designated approvers and/or reviewers based on the type and content of the transaction. See the following section, About eDoc Routing, for more on routing. When an eDoc is routed to a Kuali user, it will arrive in that user’s Action List (see Using the Action List on page 22) with one of the following action requests: Approve, Acknowledge, or FYI. As implied by its name, the Approve request calls for a formal approval of the transaction, whereas Acknowledge and FYI are requests for two distinct kinds of acknowledgment. These action requests are described in more detail in Commonly Requested Actions on page 23.
NOTE: When viewing or editing information on a Kuali page, if you want to return to the page you were viewing previously, do not use your browser’s Back button (or a Go Back command) if other options are available at the bottom of the page. In some instances, using the Back button could result in an error requiring you to exit your browser and start over. Instead, if you want to leave a Kuali page, click either the button to close the currently displayed page without saving any changes you have made there, or the button to close a page on which you have made no changes. If those buttons are not available, you can use the Back function in your browser.
About eDoc Routing Documents are routed by progressing through a series of route levels, also called “route nodes.” All eDocs support both predefined workflow routing and Ad Hoc routing. (See What is Ad Hoc Routing? on page 2 for more information.) Kuali maintains a Route Log for all eDocs, which is a workflow feature that enables you to follow the progress of a given document through its review and approval process. (For more information about the Route Log, see Route Log Tab on page 53.) The following table defines the various workflow routing status levels that an eDoc may have.
Table 1. eDoc Workflow Routing Status Levels
Route Status Description
Initiated The document has been started, but not yet saved or submitted. Closing an eDoc that has “Initiated” status has the same effect as canceling the eDoc.

Kuali Basics: Reference and Training Guide
2
Route Status Description
Saved The document has been created and saved within the system, but not yet submitted or routed. Saving an eDoc allows the initiator to preserve his or her data entries before closing the document, which can then be retrieved from the initiator’s action list for completion and submittal at a later time.
Enroute The document has been submitted and has pending Approve requests.
Processed The document has been routed and has no Approve requests pending, but still has one or more pending Acknowledge requests. Documents with “Processed” status are considered approved, so they will update their destination in the system (e.g., General Ledger, Chart of Accounts, etc.).
Final The document has been routed and has no Approve or Acknowledge requests pending. Documents with “Final” status are considered approved, so they will update their destination in the system (e.g., the General Ledger, Chart of Accounts, etc.). When a document has entered “Final” status, its details can no longer be edited, but the eDoc can be forwarded with an FYI action request to specific Kuali users or groups by means of Ad Hoc routing, with added notes or attachments in some instances.
Disapproved The document has been disapproved by an approver. Once an eDoc has been disapproved, it will not continue to be routed to other users for approval, but an Acknowledge or FYI action request will be sent to the eDoc’s prior approvers and its initiator.
Canceled This status is applied when an initiator clicks the cancel button at the bottom of the page for an eDoc that he/she has not yet submitted, or for an eDoc that has been returned to him/her with a request to modify or cancel it. After the cancel button is clicked, the document is denoted as void and should be disregarded. Canceled eDocs cannot be modified in any way, and will not be routed to other users for approval. However, a document with “Canceled” status can be copied to create a new eDoc containing the same information, which the user can then modify as needed.
Exception The document has been routed to an exception queue because workflow has encountered an error when trying to process its routing.
What is Ad Hoc Routing? In the Kuali system, workflow routing is utilized to ensure that upon being submitted, each type of eDoc is forwarded to the appropriate individuals for review and approval in the proper sequence. Defining an eDoc’s routing path to include specific individuals or groups is called “Ad Hoc routing.” The initiator of an eDoc can complete its Ad Hoc Recipients tab (see page 50) to customize the workflow route by adding specific individuals or groups in the Kuali system as reviewers or approvers. In addition, an individual who receives an eDoc for review or approval can likewise use the Ad Hoc Recipients tab to add other reviewers or approvers to the routing of that eDoc. When Ad Hoc routing is used to insert additional users into the workflow route as reviewers or approvers, it does not supersede the existing workflow routing of the document, but is used in addition to that routing.

Kuali Basics: Reference and Training Guide
3
It is important to note that, in cases where the eDoc has pre-defined, automatic workflow routing, the insertion of additional Ad Hoc approvers into the routing will interrupt the regular routing process. For example, suppose that an eDoc’s initiator, reviewer, or approver utilizes Ad Hoc routing to send an Approve request to another person in addition to the person designated as an approver in the normal automated workflow routing for eDocs of that type. The eDoc in question will be routed first to the Ad Hoc approver before being sent to the usual approver. Moreover, the eDoc cannot progress to “Final” status until all requested approvals have been obtained. By way of illustration, suppose that an eDoc is designated to go to Kuali users A and B for review, and then to user C for approval. When reviewer B receives the eDoc, he can use Ad Hoc routing to also send it to user G for approval before it goes to regular approver C. In this scenario, reviewer B has interrupted the original route by inserting an additional approver (see the following diagrams).
Original workflow route:
Workflow modified by Ad Hoc routing to include an additional Approval request:
By contrast, Ad Hoc routing of non-approval review requests (either Acknowledge or FYI) will not interrupt the regular routing process. Financial processing eDocs for which these types of Ad Hoc requests are still pending will post to the General Ledger as soon as all approvals are obtained. However, although the system does not put eDocs on hold while waiting for a response to an FYI or Acknowledge request, there is an important distinction between the two: If an eDoc is routed to someone with an FYI request, that eDoc will progress to “Final” status once it has received all needed approvals, regardless of whether the FYI request has been completed. By contrast, if an eDoc is routed to someone with an Acknowledge request, that eDoc cannot progress beyond “Processed” status if the acknowledgment has not been obtained, even if the eDoc has received all approvals. Therefore, it is usually preferable to send an FYI request and not an Acknowledge request. Referring again to our previous example, suppose that when creating the eDoc, the initiator uses Ad Hoc routing to send it to user M with an FYI request. As illustrated below, the Ad Hoc routing request will not interrupt the original route; the eDoc will progress to “Final” status once the required approval has been obtained from user C, whether or not reviewer M has cleared the FYI.
Workflow modified by Ad Hoc routing to include an FYI request:
For additional information about Approve, Acknowledge, and FYI action requests, please refer to Commonly Requested Actions on page 23.

Kuali Basics: Reference and Training Guide
4
There are some eDocs (e.g., Purchasing Documents Review and General Purpose Workflow) that depend entirely on Ad Hoc routing; in other words, they do not have pre-defined, automatic workflow routing, and therefore the initiator must always define the route path. In those cases, any Approve requests added to the eDoc by other approvers are simply added to the end of the reviewer queue and thus do not interrupt the route path that was previously designated by others.
NOTE: Because most eDocs do have predetermined routing, and the use of Ad Hoc routing to add an approver can prevent an eDoc from moving into “Final” status, general advice regarding the proper action requests to select can vary from one type of eDoc to another. For recommendations specific to the type of eDoc that you are working with, please refer to the documentation pertaining to those kinds of Kuali transactions.
For instructions on how to add an Ad Hoc recipient, please see Completing the Ad Hoc Recipients Tab on page 51 of this guide.

Kuali Basics: Reference and Training Guide
5
Logging In and Out
Logging In to Kuali To log in to the Kuali system, type www.usc.edu/kuali in the address field of your browser. When the “Kuali@USC” web page is displayed, click the Kuali Login link. (Alternatively, you can paste the following URL for KFS and KEW into your browser’s address field: https://kfs.usc.edu/kfs-prd.) The USCnet sign-in page will be displayed (see following example).
Figure 1 – USCnet sign-in screen
Enter your USC NetID user name and password, and click the Sign in button. Your USC NetID is the first part of your original, official USC e-mail address; the part preceding the “@” symbol. For example, if your USC email address was “[email protected]”, then ttrojan would be your USC NetID. Note that if you have changed your email address since you began working at the university, then your USC NetID would still be based on the email address that was originally assigned to you. If you do not know your USC NetID or password, call ITS Customer Support at 213-740-5555. After you have entered your credentials and clicked the Sign in button, your browser will display a screen asking you to confirm your identity using Duo Two-Factor Authentication, which is required for USC staff when accessing most protected systems and on-line services at USC. (For information on using Duo two-factor authentication, refer to this web page: https://itservices.usc.edu/duo/) The user authentication process first verifies your credentials, and then opens a Kuali window configured specifically for your assigned role(s) and permissions.
TIP: If your browser is set to block pop-up windows from appearing, it is recommended that you modify those settings to allow or enable pop-ups from the Web address of the Kuali system.

Kuali Basics: Reference and Training Guide
6
If your login is successful, the Kuali window should immediately open in your browser, with the Financial Main Menu tab displayed, as shown in Figure 2.
Figure 2 – Kuali Financial Main Menu
TIP: For convenience, it is recommended that you create a browser bookmark to the Financial Main Menu page for easy access to the Kuali system. When you later use that bookmark, you will be directed first to the “USCnet Login” page and then to the Financial Main Menu once you have logged in successfully.
Logging Out of Kuali To log out of Kuali, you must close all of the open windows of your Web browser using the standard window Close button. (On an Apple computer running the OS X operating system, you must also quit the browser.)

Kuali Basics: Reference and Training Guide
7
On-Screen Menus and Controls Menu Tabs – The various functions available in the Kuali system are grouped into labeled sections on the menu tabs that you can select along the top of the screen. The Financial Main Menu and Workflow Main Menu tabs display groups of transactions and functions that regular users are permitted to initiate. The Financial Maintenance, Workflow Maintenance, and Administration menu tabs display groups of functions that can only be performed by administrative and technical staff, who are authorized to maintain the system tables that provide functionality in all of the Kuali applications.
Figure 3 – Menu tabs along the top of the Kuali screen
NOTE: Not all of the options displayed on the various menu tabs are currently supported for use in USC’s implementation of the Kuali system. The “live” options are indicated by smiley-face icons. As more applications and functions are added, options on the menu tabs will be updated accordingly.
On-Screen Controls – Performing tasks in Kuali involves entering text, marking check-boxes, making choices using radio buttons, selecting from drop-down lists, clicking on action buttons, and using hyperlinks to navigate inside and outside the system. This section describes the on-screen elements used to perform these activities.
Table 2. Basic On-Screen Controls in Kuali
Element Kuali Reference / Description
Box (a/k/a edit box, text box, or entry field): A rectangular box in which you can type text. If the box already contains text, you can select that default text and delete it or replace it with new text. Use a keyboard to type text and numbers into the field, or you can paste in text and numbers that you have copied to the clipboard on your computer.
Check-box (a/k/a selection box): A square box that is selected or cleared to turn an option on or off. More than one check-box can be selected. Click within the box to place a check mark symbol to indicate the option is selected.
Option (a/k/a radio button, option button): A round button used to select one of a group of mutually exclusive options. Click within the circle that you want to select. The dot symbol indicates that the option is selected.
List (a/k/a drop-down menu, combo box, or list box): A box with an arrow indicating a list that drops (expands) downward for viewing (may expand upward to take advantage of available screen real estate). Click the down arrow icon to list the available options, and then click the desired item in the list to highlight and select that option.
Kuali Basics: Reference and Training Guide
8
Element Kuali Reference / Description
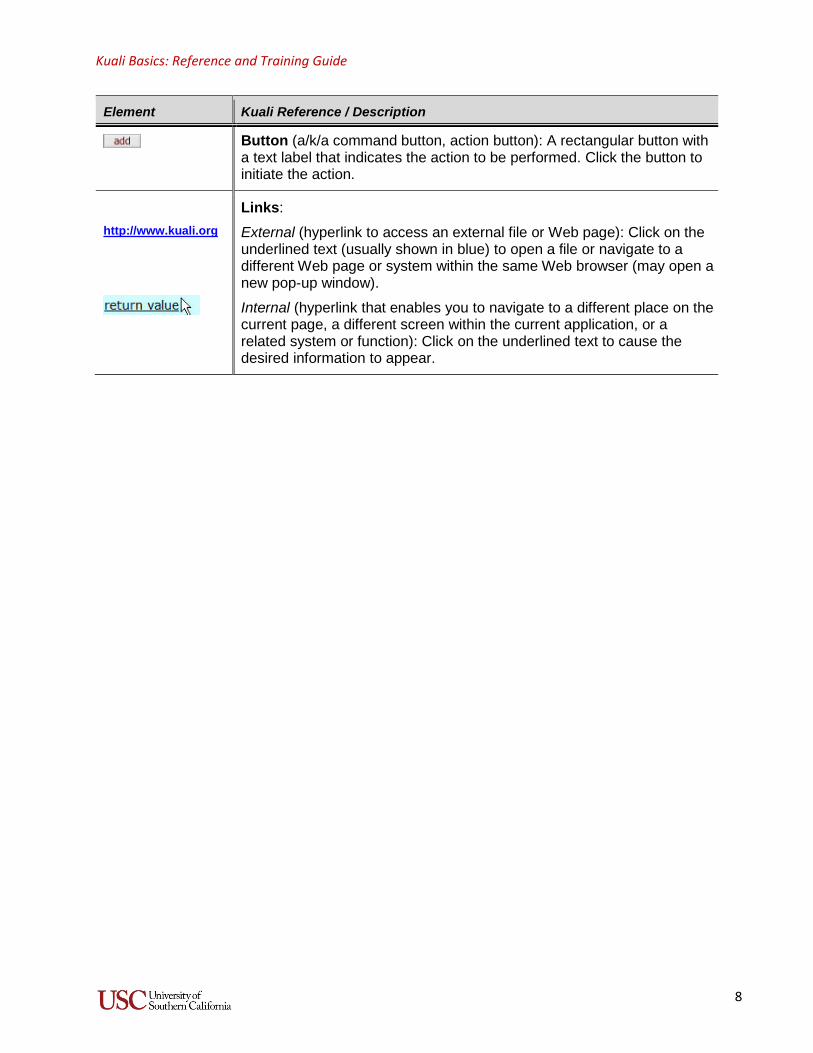
Button (a/k/a command button, action button): A rectangular button with a text label that indicates the action to be performed. Click the button to initiate the action.
http://www.kuali.org
Links: External (hyperlink to access an external file or Web page): Click on the underlined text (usually shown in blue) to open a file or navigate to a different Web page or system within the same Web browser (may open a new pop-up window). Internal (hyperlink that enables you to navigate to a different place on the current page, a different screen within the current application, or a related system or function): Click on the underlined text to cause the desired information to appear.

Kuali Basics: Reference and Training Guide
9
Screen Layout of an eDoc The screen example shown in Figure 4 identifies the various areas of an eDoc screen. An eDoc consists of a document header and a document body. The document header in the upper right corner of the screen displays system information about the document. Every document body is organized into sections that resemble a stack of folders with labeled tabs. Each eDoc displays tabs that are relevant to its function.
To expedite critical input, an initiated eDoc opens with required tabs open or “expanded,” and optional tabs closed or “collapsed.” An individual tab can be expanded or collapsed by clicking its show or hide button. (The label of the button changes depending on whether the tab is currently collapsed or expanded.) Action buttons appropriate to the logged-in user role are displayed at the bottom of the screen.
Figure 4 – Screen elements in an eDoc
NOTE: If you enter any information that requires the completion of another tab that is currently closed (i.e., collapsed), the eDoc page will be refreshed with that tab expanded for completion.
Help Document Header
Document Type Name
Tabs
Document Body Expands or
Collapses all tabs on the page
“show/hide” Buttons
Action Buttons

Kuali Basics: Reference and Training Guide
10
Document Header Table 3. Basic Information in the eDoc Header
Field Name Description
Document Number (Doc Nbr)
A unique auto-assigned number to identify each document. Kuali automatically assigns a number to each document when it is created. Numbering is sequential without regard to the document type.
Status Identifies the workflow status of the document.
Initiator The Kuali user name (also known as the “Kuali Principal Name”) of the document initiator.
Created Time and date of document creation.
Expand All / Collapse All Buttons You may expand or collapse all folder tabs on the currently displayed eDoc screen by clicking the expand all or collapse all buttons.
Click expand all to expand all of the tabs in the currently displayed eDoc.
Figure 5 – Expanded eDoc tabs
Kuali Basics: Reference and Training Guide
11
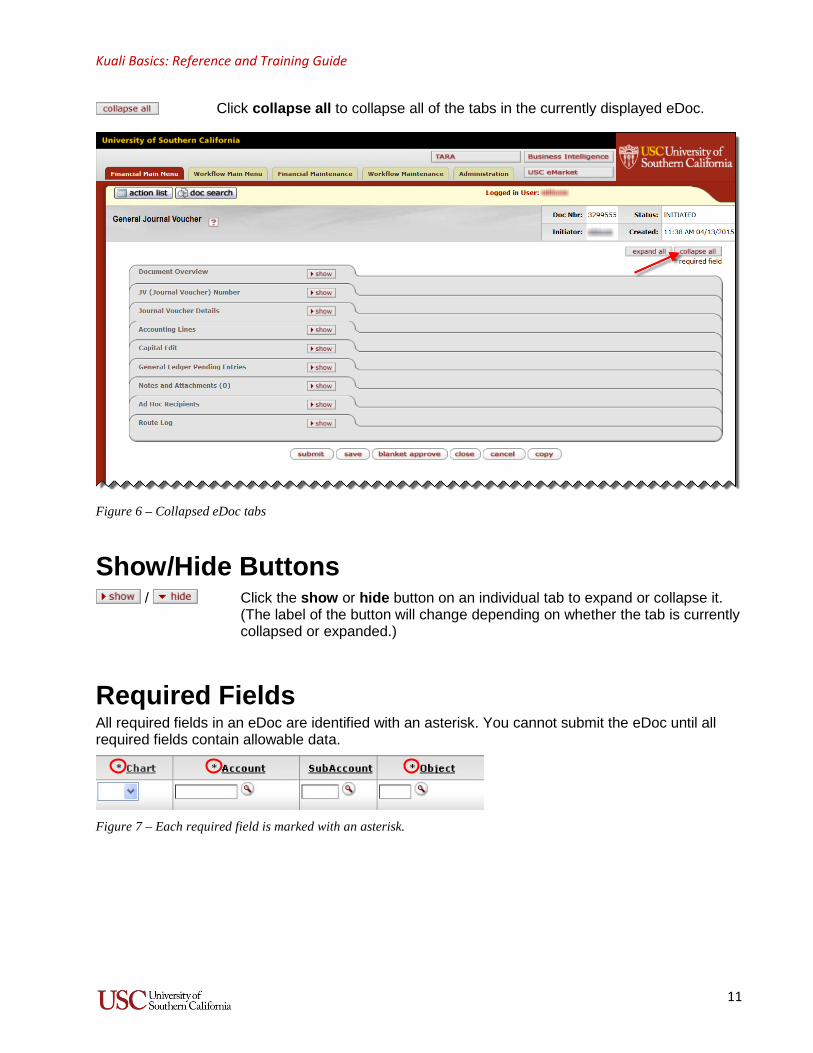
Click collapse all to collapse all of the tabs in the currently displayed eDoc.
Figure 6 – Collapsed eDoc tabs
Show/Hide Buttons / Click the show or hide button on an individual tab to expand or collapse it.
(The label of the button will change depending on whether the tab is currently collapsed or expanded.)
Required Fields All required fields in an eDoc are identified with an asterisk. You cannot submit the eDoc until all required fields contain allowable data.
Figure 7 – Each required field is marked with an asterisk.

Kuali Basics: Reference and Training Guide
12
Date Fields Dates must be specified in mm/dd/yyyy format. Alternatively, you may select a date by clicking the Calendar icon and selecting a date from the pop-up calendar. Be sure to select the correct month and year before selecting your entry.
Figure 8 – Click the desired number to select a date from the calendar.
Action Buttons Action buttons are displayed below the tabs on each page of your eDoc. Individual users will see only the action buttons that are allowed by their user profile and appropriate for the eDoc’s current routing status. The following are examples of action buttons:
In response to clicking many of the action buttons at the bottom of the page, Kuali refreshes the screen and shows a confirmation message in the upper left portion of the eDoc screen. The precise outcome of clicking an action button on any eDoc is explained in the action steps for using that eDoc. Examples:
• When you click , the confirmation message reads, “Document successfully submitted.”
• When you click , the confirmation message reads, “Document successfully reloaded.”
• When you click , the confirmation message reads, “Document successfully saved.”
Action Buttons that result in a Confirmation Prompt • When you click , Kuali will display a message asking you to confirm that you want to
close the current eDoc. (Note that when you close an eDoc, any data that you have input will not be preserved unless you saved the document after entering data.)
• When you click , Kuali will display a message asking you to confirm that you want to disapprove the current eDoc. The confirmation prompt also requires you to enter a reason for the disapproval.
• When you click , Kuali will display a message asking you to confirm that you want to cancel the eDoc. (Note that if you click yes, that eDoc’s status will change to “Canceled.”)
NOTE: Also see the section titled Responding to an Action Request on page 23.

Kuali Basics: Reference and Training Guide
13
Standard Links and Icons Because Kuali is a web-based application, hyperlinks and icons are used for navigation. Clicking hyperlinks and icons enables you to “drill down” into document details in order to obtain additional information.
Figure 9 – Examples of icons
Help Icon When you click the Help icon , the help screen displays information about the screen that you are viewing.
Field Lookup Icon The round magnifying glass or “lookup” icon enables you to look up reference table information for convenience and also to avoid data entry errors. After you click the lookup icon, the system displays a list of valid values for you to select from, or a lookup form that enables you to search for the value you need. (See the following example.) You can use wildcard characters in your search, as discussed in Using Wildcard Characters When Searching on page 18.
Figure 10 – Search form retrieved by clicking the Account lookup icon.
To look up valid values using this search form, follow these steps: 1. Fill in one or more search criteria, or leave all search criteria fields blank to retrieve all. 2. Click the button.
Your search returns a list of values matching the search criteria. If you do not enter any search criteria, Kuali returns all values.
Kuali Basics: Reference and Training Guide
14
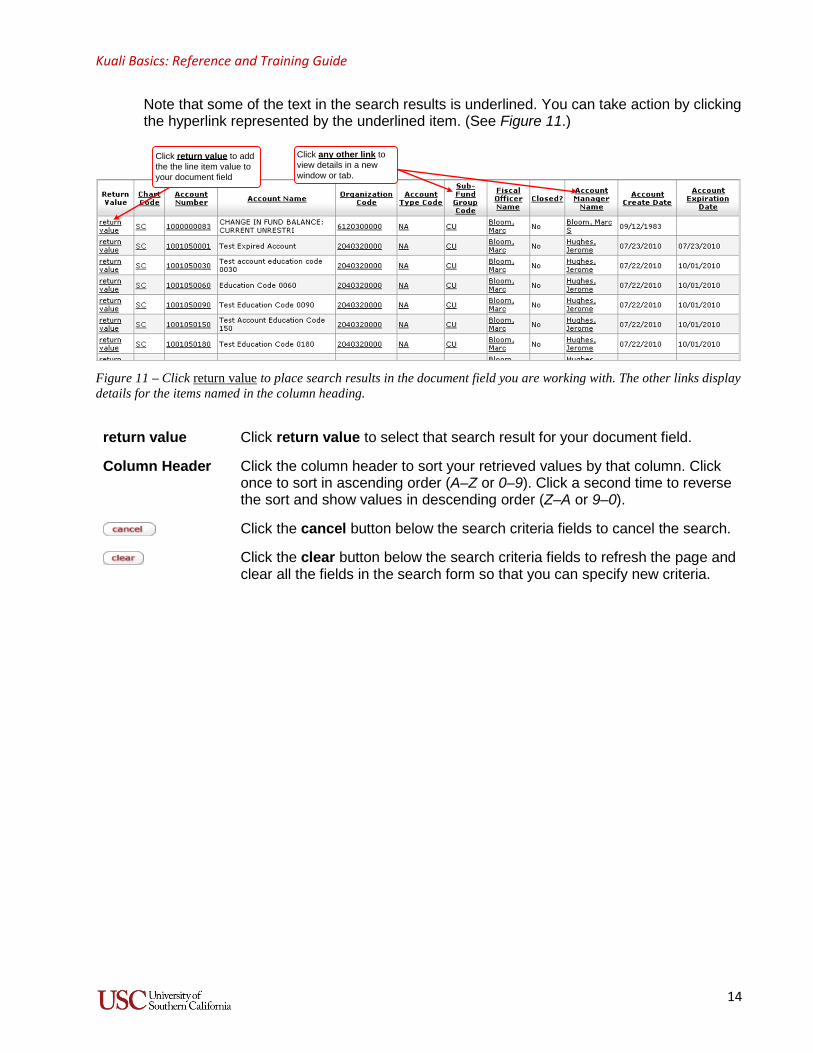
Note that some of the text in the search results is underlined. You can take action by clicking the hyperlink represented by the underlined item. (See Figure 11.)
Click return value to add the the line item value to your document field
Click any other link to view details in a new window or tab.
Figure 11 – Click return value to place search results in the document field you are working with. The other links display details for the items named in the column heading.
return value Click return value to select that search result for your document field.
Column Header Click the column header to sort your retrieved values by that column. Click once to sort in ascending order (A–Z or 0–9). Click a second time to reverse the sort and show values in descending order (Z–A or 9–0).
Click the cancel button below the search criteria fields to cancel the search.
Click the clear button below the search criteria fields to refresh the page and clear all the fields in the search form so that you can specify new criteria.

Kuali Basics: Reference and Training Guide
15
Searching for Documents
Using Doc Search The doc search button is located in the upper left-hand corner of the screen. Click this button to access the Document Lookup form, where you can enter criteria to search for an eDoc that you want to view or work with. Table 4 describes the Basic Search criteria fields in the Document Lookup form. There is also a Detailed Search option available. For a comparison of the two types of document searches, see Basic vs. Detailed Document Searches on page 20.
Table 4. Basic Search Criteria Fields in the Document Lookup Form
Field Name Description
Type Document type. Enter the document type or click to select it from the Document Type lookup page.
Initiator User ID of the document initiator. Enter the user ID or click to select it from the Person lookup page.
Document/Notification ID Enter the numeric document ID assigned by the system.
Date Created From/To Enter or select from the Calendar the range of document creation dates to search. You can select the From date only, the To date only, or both.
Name this search (optional) To save the search criteria for future use, enter a name for the search. All saved searches can be accessed via a list at the top of the document search screen.
Use the following procedure when you want to search for an eDoc.
1. Click the button. The Document Lookup form is displayed (see Figure 12).
Figure 12 – Basic Search criteria in the Document Lookup form

Kuali Basics: Reference and Training Guide
16
2. If you want to search for a particular type of eDoc, you must enter the complete name of the desired document type in the Type field, without any wildcard characters. Note that for some eDocs, the complete name of the document type is an abbreviation, such as CCR or PCDO. If you do not know the official name of the desired document type, you can use the following procedure to look it up: a. Click the icon next to the Type field to access the Document Type Lookup form. b. When the Document Type Lookup form is displayed, enter partial names and wildcard
characters in the Label field to search for the document type that you want, and click the button. (For information on how to use wildcard characters, see Using Wildcard
Characters When Searching on page 18.) c. When the lookup results are displayed at the bottom of the page, locate the desired
document type and click its return value link. d. The Document Lookup page will be displayed again with the correct document type name
now automatically entered in the Type field. Note that when the Document Lookup form reappears, it may be refreshed to include additional fields related to the document type you selected, or they may appear when you click elsewhere on the screen or press the TAB key to advance to the next field.
3. Enter any other desired search criteria, and then click the button at the bottom of the Document Lookup page. The page will be refreshed to include the search results in a grid format at the bottom of the page, as shown in the example depicted in Figure 13. Any underlined entries in the results grid are hyperlinks that you can click to “drill down” and see relevant details.
Figure 13 – Example of search results displayed on the Document Lookup page if no document type was specified.
Note that Figure 13 (above) shows the results of a document search in which the Type field was left empty, meaning that no document type was specified. By contrast, when you have specified a particular document type as one of your search criteria, the columns presented in the grid of search results will vary according to which document type you entered in the Type field. In all cases, the left-most column of the results grid will be labeled Document/Notification ID, and the eDoc ID numbers in that column will be underlined, indicating that they are hyperlinks. Click the eDoc ID link in any row of the grid to open that document. The right-most column will always be
Click an Initiator link to open a workflow user report.
Click a Route Log icon to view the workflow status. Click the Document/Notification ID
link to open the document.

Kuali Basics: Reference and Training Guide
17
labeled Route Log, and you can click the icon in that column to view workflow information for the eDoc that appears in that row of the grid. (For additional information, see Route Log Tab on page 53, and Using Document Search to Check the Current Status of an eDoc on page 21.) If the results grid for your document search includes an Initiator column like the one shown in Figure 13, you can click the name of an eDoc’s initiator to view contact information for that Kuali user.
Sorting the Results of a Document Search The results of a document search are displayed in a grid format that is usually sorted in reverse chronological order, so that the most recently created eDoc is listed first. You can re-sort the results according to the contents of any of the columns by clicking the header of that column. Click the column header once to sort all the results in ascending order (A–Z or 0–9), and click the same header again to sort all the results in descending order (Z–A or 9–0).
Exporting the Results of a Document Search Beneath the grid of search results (see Figure 14), you will see links at the bottom of the screen that you can click to export the results data in any of the following formats:
• .CSV (comma-separated values) file; a simple text-based format, in which each new line represents a database row, and the “fields” of data in that row are separated by commas; useful for importing and exporting data between databases.
• spreadsheet (an Excel .XLS worksheet)
• .XML (Extensible Markup Language); a format in which custom tags are used to define objects and their attributes; useful for programming or to make data transferable between applications.
Figure 14 – Export options for Document Search results

Kuali Basics: Reference and Training Guide
18
Using Wildcard Characters When Searching Wildcard characters (%) and (*) can be used when just a portion of your search criteria is known, such as the beginning letters of a name or the ending digits of an account number.
• Use the % wildcard to replace any single letter or number in a string of characters that you want to search for.
• Use the * wildcard to replace a string of letters or words. You can enter just the prefix, suffix, or root of a search term and replace the missing portion with an asterisk to find all forms of that word.
Example 1: Type *rich* in the Initiator field to locate all documents for which the initiator’s name includes the letter sequence r-i-c-h, regardless of how many characters precede or follow that string of letters. The search results will include all eDocs that match your other criteria and were initiated by individuals with user names such as Richardson, Richfield, Prichard, and so on.
Example 2: If you type 1102* in the Account number field, the search results will include all eDocs that match your other criteria and are associated with accounts that have account numbers starting with the numbers 1102.
NOTE: Do not use wildcard characters in the Type field on the Document Lookup screen. If you want to specify a document type as part of your search criteria, you need to enter the complete name of the document type in question. If you do not know the name, you can click the button next to the Type field to access the Document Type Lookup page, where you can enter partial names and wildcard characters in the Label field to search for the desired document type. When you locate the desired document type in the search results on the Document Type Lookup page, click its return value link, and the Document Lookup page will be displayed again with the correct document type name automatically entered in the Type field.
Custom Document Searches Custom document searches enable you to search for specific types of eDocs based on attributes of the transactions, primary key data elements, or both. Additional fields, specific to different Kuali modules, are available in custom document searches. Some examples of custom document searches are customer invoices, Contracts and Grants proposals, and requisitions. Special access may be required to work with some of the eDocs found through custom document searches.
NOTE: Most of the Custom Document Search options pertain to items that are not currently processed through the university’s Kuali system, such as invoices and payments. As the system is expanded to include additional processes, more of these Custom Document Search options will become available for use. The “live” search options are indicated by a smiley-face icon.
When you choose one of the search options listed in the Custom Document Searches section of the Financial Main Menu tab (see Figure 15), the system will display a Document Lookup form that contains a few added fields and other changes to accommodate the type of search you selected. When the results of your search are displayed, your assigned user role determines whether you have view-only permission to the listed documents or access rights that allow you to make changes or take other actions.

Kuali Basics: Reference and Training Guide
19
Figure 15 – Custom Document Searches section of the Kuali Financial Main Menu
As an alternative to Custom Document Searches, the Kuali system also enables you to choose between Basic and Detailed document searches. These two types of searches are compared in the next section of this guide, Basic vs. Detailed Document Searches.

Kuali Basics: Reference and Training Guide
20
Basic vs. Detailed Document Searches When you click the button, Kuali displays the Document Lookup screen with fields for basic search criteria, as shown in Figure 16.
Figure 16 – Basic Search fields on the Document Lookup screen
The Document Lookup screen also offers a detailed search option, which enables you to specify a greater amount of search criteria, as shown in Figure 17. This can be especially useful when a basic search is yielding an excessive number of results. The more search criteria you specify, the more you will filter the results.
Figure 17 – Detailed Search fields on the Document Lookup screen
To switch between the basic search and detailed search screens, look to the top-center of the Document Lookup screen and click the button or the button. The detailed

Kuali Basics: Reference and Training Guide
21
search button appears when the basic search fields are displayed. When you click that button, it is replaced by the basic search button while the detailed search fields are displayed.
NOTE: For both the Basic and Detailed search options, after you have entered a particular document type in the Type field, the Document Lookup form will be refreshed to include additional fields related to that document type when you click elsewhere on the screen or press the TAB key to advance to the next field. The refreshed search screen will usually offer the option of specifying whether you want to see results that consist of information contained in the eDoc (Document Specific Data) or information pertaining to the eDoc’s workflow status (Workflow Data).
The following are some of the potential advantages of choosing the Detailed Search option:
• You can search for eDocs created and/or approved during a specific range of dates. • You can specify a routing status level to search for eDocs at a particular route node. • You can search for eDocs that have a specific approver.
Using Document Search to Check the Current Status of an eDoc You can use a document search to check the current workflow status of an eDoc that you have submitted or approved, even if you do not recall the Document ID number.
• To search for a document that you submitted, enter your user name in the Initiator field when entering criteria for a document search. (If you are unsure of your user name, note that it is displayed after “Logged in User:” in the upper right-hand area of the Kuali window.) To narrow your results, use the date selector tools adjacent to the Date Created From/To fields to specify the date range during which you submitted the eDoc in question.
• To search for a document that you approved, perform a detailed document search (see page 20) and enter your user name in the Approver field when entering criteria. Use the date selector tools adjacent to the Date Approved From/To fields to specify the date range during which you approved the eDoc in question, and enter any other available search criteria to narrow your results.
When the results of your document search are displayed at the bottom of the page, identify the eDoc whose status you want to check, and click the document icon at the rightmost end of the same row, in the column labeled Route Log. The screen will change to display status information for the eDoc in question, so that you can see where it is in the approval process. (See Route Log Tab on page 53 for additional information about the Route Log.)
NOTE: All Kuali users can view the Route Log of any eDoc. However, a user will only be able to open an eDoc and view its contents if he/she has the necessary assigned user roles and account access privileges, or if that user is included in the eDoc’s route path.

Kuali Basics: Reference and Training Guide
22
Using the Action List The action list enables you to view and act on eDocs that require your completion by way of Acknowledge, Approve, and FYI action requests. There are two ways to access eDocs in your action list that require your attention:
• Log into Kuali to access your action list. When you log into the Kuali system in the standard way (see Logging In to Kuali on page 5), you can click the button in the upper left corner of the screen to view the Inbox of your action list (see Figure 18).
• Respond to system-generated email notifications. When an Action List Reminder email message is sent to you from the Kuali system, it will include a link to access your action list. When you click that link, your browser will present the “USCnet Login” page, and after you have logged in, your action list will be displayed. However, note that when your action list is accessed in this way, it is displayed alone, without the other on-screen elements (e.g., menu tabs, document search button, etc.) that constitute the full system screen shown in Figure 18. Your ability to interact with the Kuali system is therefore limited to viewing and acting on eDocs in the Inbox of your action list. Please also be aware that if you access your action list by clicking the link in an Action List Reminder email message pertaining to an eDoc that has already been approved, an error message may be displayed because the eDoc will have moved to the Outbox of your action list.
NOTE: It is generally advisable to always log into the Kuali system in the standard way when you want to view the action list because it provides fuller functionality, such as the ability to select a menu tab or to perform a document search.
Figure 18 – eDocs shown in a user’s action list

Kuali Basics: Reference and Training Guide
23
Commonly Requested Actions The following is a list of the actions you may be requested to take on an eDoc in your action list.
• Approve: The approver must open the eDoc in question, view the transaction details, and indicate whether they are acceptable by clicking or one of the other action buttons at the bottom of the eDoc form. An approved eDoc will continue routing to any additional approvers, or if fully approved, it will enter “Final” status and update its destination in the system (e.g., General Ledger, Chart of Accounts, etc.). A single eDoc may require approval from several users, at multiple route levels. An eDoc cannot proceed to “Final” status until it has received approval from all Kuali users to whom it was sent with an Approve request.
• Acknowledge: The user must open the eDoc in question and acknowledge that he/she has viewed the details of the transaction, although without the need for giving formal approval. To do this, the user has to either click the button at the bottom of the screen or choose one of the other action buttons. If an eDoc has no Approve requests pending, but still has an outstanding Acknowledge request, it cannot proceed to “Final” status; instead, the eDoc’s status will change to “Processed.” When an eDoc is disapproved, an Acknowledge action request may be sent to the document’s prior approvers and its initiator.
NOTE: Because an Acknowledge request requires the user to open and review the eDoc before it can continue through the workflow nodes, it is less commonly used than the FYI request.
• FYI: This is a courtesy notification that allows users to be notified about an eDoc without delaying it from proceeding to “Final” status after all Approve and Acknowledge requests have been acted upon. An FYI request is the only one of the action requests for which the recipient does not have to open the eDoc and view its details (see page 24).
• Complete: This type of action request is shown for any eDoc with a “Saved” status, which indicates that you have saved the document without yet submitting it. Click the Document ID number of the eDoc to open it and finish entering information as needed to submit it.
Responding to an Action Request This section discusses the primary action buttons that are used to respond to an eDoc in the Inbox of your action list, as well as the other action buttons that may also be available in some eDocs.
NOTE: Once your approval or acknowledgment for an eDoc in your action list has been recorded in the system, those action buttons are no longer shown when you open the eDoc. Moreover, that eDoc will no longer appear in the “Inbox” section of your action list because you have already taken the requested action. When you log in to the Kuali system and click the action list button, the Inbox portion of your action list is displayed by default, showing only items that currently require action from you. Items that you have already acted upon will appear in the “Outbox” section of your action list, which you can view by clicking the Outbox hyperlink in the upper left corner of the action list screen.
Responding to an “Approve” Request To enter an action appropriate to an Approve action request, you must open the eDoc from the Inbox of your action list, and then click one of the action buttons displayed at the bottom of the eDoc form. For an Approve request, the primary response options are , , , and
. (The latter two buttons are discussed below in the “Return to Initiator” and “Return to Previous” Buttons section.) If you are satisfied with the eDoc after reviewing its contents, click
and the eDoc will proceed to the next node in its route path. Note that if you click ,

Kuali Basics: Reference and Training Guide
24
the eDoc is terminated; it will not be routed to other users for approval, and will not proceed to its ultimate destination in the system (e.g., General Ledger, Chart of Accounts, etc.). However, an Acknowledge action request will be sent to the eDoc’s prior approvers and initiator.
Responding to an “Acknowledge” Request To respond to an Acknowledge action request, you must open the eDoc from the Inbox of your action list, and then click one of the action buttons shown at the bottom of the screen when the eDoc is opened. The primary response option for an Acknowledge request is .
Responding to an “FYI” Request The FYI action request is a courtesy notification that allows users to be notified about an eDoc without delaying it from proceeding to “Final” status after all Approve and Acknowledge requests have been acted upon. The most basic way to respond to an FYI action request is by clicking an
button within the eDoc itself. The following subsections of this guide explain the other ways in which you can respond when a Kuali eDoc has been routed to you with an FYI action request: For KFS and KEW eDocs, you can acknowledge the FYI request from your action list page; for a KC Proposal Development eDoc, you can delete FINAL and CANCELLED KC eDocs with FYI requests from your action list page. (The deletion option is not available for KFS and KEW eDocs.)
TIP: If you want to acknowledge FYI requests for eDocs on multiple pages in your action list, you may find it more efficient to temporarily increase the number of items listed per page. To do this, click the Preferences button at the top of your action list to access the Workflow Preferences page; enter a larger number in the Action List Page Size field; and then click the button at the bottom of that page to reload your action list with your new setting. (See Workflow and Action List Preferences on page 33.)
How to Acknowledge KFS and KEW eDocs with FYI Action Requests If a KFS or KEW eDoc has been routed to you with an FYI action request, you have two options for responding: either by opening the eDoc in question and clicking the button at the bottom of the eDoc page, OR by acknowledging the FYI request from a drop-down box in your action list without even having to open the eDoc. Acknowledge an FYI Action Request for a Single KFS or KEW eDoc from Your Action List
1. Open your action list. 2. Locate the KFS or KEW eDoc for which you want to acknowledge an FYI action request.
(The FYI action will be shown in the Action Requested column.) 3. In the Actions column, select FYI in the drop-down box in the same row as the eDoc you are
acknowledging. 4. Click the button at the bottom of the action list page. Note that if you have
made drop-down box selections in the Actions column for more than one eDoc, clicking this button will execute all of those selected actions for the eDocs on the current page.
5. If your action list includes multiple pages, repeat this same procedure on any other page that shows a KFS or KEW eDoc for which you want to acknowledge an FYI action request.
Acknowledge FYI Action Requests for Multiple KFS and KEW eDocs from Your Action List 1. Open your action list. 2. Navigate to the first page of your action list that shows KFS and KEW eDocs for which you
want to acknowledge an FYI action request.

Kuali Basics: Reference and Training Guide
25
3. Select FYI in the global action drop-down box in the upper right-hand corner of the action list page, and click the adjacent button.
4. In the Actions column on the currently displayed page, the FYI selection will now appear in the drop-down boxes next to all eDocs for which FYI is shown in the Action Requested column. Before proceeding, if there are any eDocs that you do not want to include in this mass FYI acknowledgment, change the drop-down selection for those individual items to NONE.
5. Click the button at the bottom of the action list page. This will execute all of the drop-down box actions selected for eDocs on the current page.
6. If your action list includes multiple pages, repeat this same procedure on any other page that shows KFS and KEW eDocs for which you want to acknowledge an FYI action request.
Dealing with KC (TARA) eDocs that have FYI Action Requests If a Kuali Coeus (TARA) eDoc has been routed to you with an FYI action request, you previously had to open the eDoc in question and click the button at the bottom of the Proposal Actions tab within the eDoc. TARA users now also have the option of deleting KC eDocs in FINAL or CANCELLED status with an FYI request from their action lists without having to acknowledge the FYI request or even open the eDoc. Delete a Single KC eDoc with an FYI Action Request from Your Action List
1. Open your action list. 2. Locate the KC eDoc that you want to delete from the list because it is in either FINAL or
CANCELLED status and has an FYI action request. (FYI will be shown in the Action Requested column.)
3. In the Actions column, select DELETE in the drop-down box in the same row as the eDoc you are removing.
4. Click the button at the bottom of the action list page. Note that if you have made drop-down box selections in the Actions column for more than one eDoc, clicking this button will execute all of those selected actions for the eDocs on the current page.
5. If your action list includes multiple pages, repeat this same procedure on any other page that shows an eDoc in FINAL or CANCELLED status that you want to delete from the list.
Delete Multiple KC eDocs with FYI Action Requests from Your Action List 1. Open your action list. 2. Navigate to the first page of your action list that shows eDocs in FINAL or CANCELLED
status with an FYI action request. 3. Select DELETE in the global action drop-down box in the upper right-hand corner of the
action list page, and click the adjacent button. 4. In the Actions column on the currently displayed page, the DELETE selection will now
appear in the drop-down boxes next to all FINAL and CANCELLED eDocs with FYI shown in the Action Requested column. Before proceeding, if there are any eDocs that you do not want to delete from your action list at this time, change the drop-down selection for those individual items to NONE.
5. Click the button at the bottom of the action list page. This will execute all of the drop-down box actions selected for eDocs on the current page.
6. If your action list includes multiple pages, repeat this same procedure on any other page that shows FINAL or CANCELLED eDocs that you want to delete from the list.

Kuali Basics: Reference and Training Guide
26
Responding to a “Complete” Request If an eDoc in the Inbox of your action list has a Complete action request, it is awaiting completion and submittal. To complete the eDoc, open it from your action list, finish entering all required information, and click . The eDoc’s status will change to “ENROUTE.” Note that if you choose the button instead, the status of the eDoc will change to “Canceled.”
“Return to Initiator” and “Return to Previous” Buttons Approvers may find that the action buttons at the bottom of the screen for some eDocs can include one or both of a pair of buttons labeled return to initiator and return to previous. When you click either of these action buttons, Kuali will refresh the screen to display a confirmation prompt that also requires you to enter a reason for sending the eDoc back.
• The button enables you to route the eDoc back to the person who initiated it. You would use this option if you want the initiator to make corrections or additions to the information in the eDoc, or if you want the initiator to cancel the eDoc entirely.
• The button enables you to route the eDoc back to the previous route node (i.e., the approver who preceded you in the workflow routing). You would use this option if you want the previous approver to make corrections or additions to the information in the eDoc. If you are the first or only approver in the eDoc’s route path, choosing this action will return the eDoc to its initiator.
CAUTION: There is a known issue where using the return to previous button may cause an eDoc to become stuck in an endless loop if the initiator or any approver used ad hoc routing to send that eDoc to an additional approver. To avoid this problem, always use the return to initiator button instead if you need to send an eDoc back for changes.
Deleting FINAL and CANCELLED eDocs that Remain in Your Action List When a Kuali eDoc enters FINAL or CANCELLED status, it is no longer active. System users can no longer take any action on that eDoc other than to acknowledge an FYI action request, if applicable. However, under certain circumstances, Kuali users may find one of these inactive eDocs in their action lists with an action request for them to Approve or Complete the eDoc, even though there is no way to take either of those actions. Prior to September 2018, the only way to remove these inactive eDocs from a person’s action list was to request that a special command be processed for each such eDoc by a database administrator. Your action list will present a drop-down box with a DELETE command for any eDocs in FINAL or CANCELLED status that are still listed with an eligible action request: Approve, Cancel, or Complete (or FYI for KC eDocs only). This functionality enables you to delete these eDocs from your action list without having to open them, but they will not be deleted from the Kuali system itself. You and other users can still look them up by using the Doc Search function. This functionality operates similarly to one of the two options that KFS and KEW users have for responding to an FYI action request: As an alternative to opening the eDoc in question and clicking an button there, they can acknowledge the FYI request from a drop-down box in their action list without having to open the eDoc. (For KC Proposal Development eDocs, the only way to acknowledge an FYI action request is by clicking an button at the bottom of the Proposal

Kuali Basics: Reference and Training Guide
27
Actions tab within the eDoc. However, TARA users now also have the option to delete FINAL and CANCELLED KC eDocs from their action lists.)
TIP: If you need to remove inactive eDocs from multiple pages in your action list, you may find it more efficient to temporarily increase the number of items listed per page. To do this, click the Preferences button at the top of your action list to access the Workflow Preferences page; enter a larger number in the Action List Page Size field; and then click the button at the bottom of that page to reload your action list with your new setting. (See Workflow and Action List Preferences on page 33.)
How to Delete Inactive eDocs from Your Action List If any eDocs with a status of FINAL or CANCELLED have been routed to you with an action request of Approve, Cancel, or Complete (plus FYI for KC eDocs), you can now use either of the following methods to delete those eDocs from your action list. (You cannot delete KFS and KEW eDocs with a requested action of FYI, but they will be removed from your action list when you acknowledge the FYI request.) Delete a Single eDoc in FINAL or CANCELLED Status from Your Action List
1. Open your action list. 2. Locate the eDoc that you want to delete from the list because it is in FINAL or CANCELLED
status and has one of the eligible action requests in the Action Requested column. 3. In the Actions column, select DELETE in the drop-down box in the same row as the eDoc
you are removing. 4. Click the button at the bottom of the action list page. Note that if you have
made drop-down box selections in the Actions column for more than one eDoc, clicking this button will execute all of those selected actions for the eDocs on the current page.
5. If your action list includes multiple pages, repeat this same procedure on any other page that shows an eDoc in FINAL or CANCELLED status that you want to delete from the list.
Delete Multiple eDocs in FINAL or CANCELLED Status from Your Action List 1. Open your action list. 2. Navigate to the first page of your action list that shows eDocs in FINAL or CANCELLED
status with one of the eligible action requests in the Action Requested column. 3. Select DELETE in the global action drop-down box in the upper right-hand corner of the
action list page, and click the adjacent button. 4. In the Actions column on the currently displayed page, the DELETE selection will now
appear in the drop-down boxes next to all FINAL and CANCELLED eDocs with one of the eligible action requests. Before proceeding, if there are any eDocs that you do not want to delete from your action list at this time, change the drop-down selection for those individual items to NONE.
5. Click the button at the bottom of the action list page. This will execute all of the drop-down box actions selected for eDocs on the current page.
6. If your action list includes multiple pages, repeat this same procedure on any other page that shows FINAL or CANCELLED eDocs you want to delete from the list.

Kuali Basics: Reference and Training Guide
28
Additional Action Buttons The following action buttons may also be available to you as options for responding to eDocs in your action list, depending on your user role and the eDoc’s document type and current status.
Routes the eDoc to the users or groups that you have specified in the Ad Hoc Recipients tab, with the requested action that you have selected.
Saves the eDoc as it currently appears, retaining any changes that you have entered. The saved eDoc will then wait in the Inbox of your action list for you to take further action on it. You should use the Save action if you need to leave your computer before you have completed an eDoc. You can later re-open it from your action list to resume entering data so that you can submit it.
Reloads the eDoc in its last saved form. Reloading is a method of undoing any modifications made on-screen since the most recent Save action.
Copies the eDoc as it currently appears, creating a new document containing the same information, but with a new Document ID number. Any unsaved changes shown on-screen when this button is clicked are included in the new document, but not saved in the old eDoc. Thus, this button enables you to use an existing eDoc as a template for creating similar new ones. (For instructions and important information about using this function, please see Creating a New eDoc by Copying an Existing One on page 57.)
Closes the eDoc without saving any changes. The document will remain in its most recent saved state, retaining no changes or additions that you may have made since then.
Account Delegation (for DV and DVQE eDocs) A Kuali system user who has been given the necessary access rights can be designated as an account delegate — someone who is authorized to act on behalf of an account’s Fiscal Officer in taking workflow actions on an eDoc. Within the Kuali system at USC, account delegation is specific to the Fiscal Officer’s responsibility for financial approval of Disbursement Voucher (DV) and Disbursement Voucher Quick Expense (DVQE) eDocs. Only one Fiscal Officer can be assigned per account, but the Fiscal Officer may assign one or more account delegates for a department, based on either organization codes and/or account numbers. The Delegator column in your action list will show whether you have received a particular action request because you are an account delegate. An authorized account delegate can perform almost any action that is available to a Fiscal Officer, such as approving or disapproving a transaction, or returning an eDoc to its initiator or to a previous approver for corrections, additional information, or cancelation. Some responsibilities of the Fiscal Officer cannot be delegated, such as exceptions that require SBO approval. Two types of delegates can be established: Primary and Secondary.
• Primary Delegate. The Fiscal Officer can assign only one Primary Delegate per account, based on account number or organization code. Note that DV and DVQE eDocs for accounts with a designated Primary Delegate are routed directly to the Primary Delegate’s action list. Those eDocs will not appear in the Fiscal Officer’s action list unless he/she applies a special action list filter (see the description of the Primary Delegate ID filter in Table 5 on page 31).

Kuali Basics: Reference and Training Guide
29
• Secondary Delegate. Secondary Delegates serve as backup approvers for the Fiscal Officer and (if applicable) the Primary Delegate. The Fiscal Officer can designate one or more Secondary Delegates per account number or organization code, regardless of whether a Primary Delegate has been assigned. DV and DVQE eDocs are not routed directly to the action lists of Secondary Delegates; they are routed to the Primary Delegate, if one has been assigned, or to the Fiscal Officer. Secondary Delegates must apply a special action list filter (see the description of the Secondary Delegator ID filter in Table 5 on page 31) if they want their action lists to display delegated eDocs requiring action.
The Fiscal Officer may designate Secondary Delegates without designating a Primary Delegate. In such situations, all action requests for affected eDocs are routed to the Fiscal Officer.
NOTE: An individual user who is the Fiscal Officer for certain accounts may also be designated as a Primary or Secondary Delegate for other accounts. However, the Fiscal Officer for a particular account should never be assigned a delegate role for that same account, as that is unnecessary duplication.

Kuali Basics: Reference and Training Guide
30
Action List Filter and Preferences
Action List Filter Setting a filter allows you to display a limited subset of items in your action list. (Also see Workflow and Action List Preferences on page 33.)
1. Click the button at the top of your action list to display the Action List Filter dialog box.
2. Specify any desired filtering criteria in the Action List Filter dialog box shown in Figure 19.
The filter parameters are described in Table 5 on the following page. Filter parameter options will vary according to each user’s assigned roles and permissions.
Figure 19 – Available action list filter parameters
3. Click the button at the bottom of the Action List Filter dialog box. The system will refresh the page and display a message in the upper left corner, confirming the filter you have applied and reporting the number of items found by applying that action list filter (see the example shown in Figure 20).
NOTE: You might not see a filter confirmation message when using the Primary Delegate ID or Secondary Delegator ID filter described in Table 5.

Kuali Basics: Reference and Training Guide
31
Figure 20 – Filter confirmation messages and result reports are displayed above the Document ID column.
Table 5. Action List Filter Parameters
Filter Parameter Description
Primary Delegate ID
Only displayed if you are a Fiscal Officer. Use this drop-down list to filter your action list if you want to view only DV and DVQE eDocs with action requests directed to you that were automatically routed to the Primary Delegates assigned to the accounts affected by those eDocs. (The system automatically routes DVs and DVQEs with action requests to the Primary Delegate rather than to the Fiscal Officer.) The drop-down list will present Primary Delegate names for only those items currently awaiting action. You can choose to view items that have been routed to one or all of your Primary Delegates.
Secondary Delegator ID
Only displayed if you are a Secondary Delegate. Use this drop-down list to filter your action list if you want to view only DV and DVQE eDocs that were routed to the Fiscal Officer or Primary Delegate with action requests where the account that will be affected is one for which you are designated as a Secondary Delegate. The drop-down list will present Fiscal Officer names for only those items currently awaiting action. You can choose to view items for one or all of those delegators.
Document Title If you want your action list to display only eDocs that have a particular title (document description), enter a partial or full character string that you are looking for. For example, enter Test to see all eDocs that contain “Test” in the document description. This field is case sensitive. Select the Exclude? check-box to exclude documents with the specified title from the list.

Kuali Basics: Reference and Training Guide
32
Filter Parameter Description
Document Route Status
You can select an option in this drop-down list if you want your action list to display only eDocs that currently have a particular route status. The choices in the list are All, Approved, Disapproved, ENROUTE, Exception, Processed, and Saved. Select the Exclude? check-box to exclude documents with the selected status from the list.
Action Requested Select an option in this drop-down list if you want your action list to display only eDocs that are currently awaiting a particular requested action. The choices in the list are Acknowledge, Approve, Complete, and FYI. Select the Exclude? check-box to exclude documents with the selected action from the list.
Action Requested Group
Select an option in this drop-down list if you want your action list to display only eDocs that are currently awaiting an action from a particular group.
Document Type If you want your action list to display only eDocs of a particular Document Type, click to select the desired document type from the Document Type lookup page. Select the Exclude? check-box to exclude eDocs of the selected type from the list.
Date Created Enter a date range or select dates from the calendar by clicking the Calendar to limit the eDocs displayed in your action list based on the date they were created. Select the Exclude? check-box to exclude eDocs that were created during the specified time range. The acceptable format is mm/dd/yyyy.
Date Last Assigned
Enter a date range or select dates from the calendar by clicking the Calendar to limit the eDocs displayed in your action list based on the date that each of these action items was generated. Select the Exclude? check-box to exclude eDocs that entered your action list during the specified time range. The acceptable format is mm/dd/yyyy.
Clearing the Action List Filter Click the button (shown below in Figure 21) to remove the current action list filter settings and view the entire list. This button is only visible when you have applied an action list filter to display a limited set of items in your action list.
Figure 21 – Click the Clear Filter button if you want to remove the action list filter currently in effect.

Kuali Basics: Reference and Training Guide
33
Workflow and Action List Preferences The system allows you to change the automatic refresh rate, action list page size, email notification frequency, and row colors that indicate the status of the document. Additionally, you can limit the set of documents displayed in your action list by setting filters. (Also see the settings discussed earlier in the Action List Filter section that starts on page 30.) To make any of these changes, click the preferences button located at the top of your action list (see Figure 22).
Figure 22 – Click the Preferences button in the action list to make changes in how your action list is displayed.
The Workflow Preferences screen is displayed, as shown in Figure 23 on the following page. The various preference options available on this screen are described in Table 6 (see page 34).

Kuali Basics: Reference and Training Guide
34
Figure 23 – The Workflow Preferences screen enables you to change the display of your action list.
Table 6. Workflow Preference Options
Preference Option Description
Automatic Refresh Rate Enter a number in whole minutes to specify how often your action list will be refreshed to show current information.
Action List Page Size Enter a number of rows to display per page in the action list.

Kuali Basics: Reference and Training Guide
35
Preference Option Description
Email Notification The option you select in this drop-down list determines how often the system will send you an email message to notify you that items requiring your attention have arrived in your action list. Choices are None, Daily, Weekly, or Immediate. (It is not recommended to select None, unless you make it a point to log in to Kuali frequently to check the Inbox of your action list.)
Receive Primary Delegate Emails
Applicable only if you are a Fiscal Officer. Select this check-box if you want to receive an email notification when an eDoc with an action request directed to you is routed to the user designated as the Primary Delegate for the relevant account. (DVs and DVQEs with action requests are automatically routed to the Primary Delegate rather than to the Fiscal Officer.)
Receive Secondary Delegate Emails
Applicable only if you are a Secondary Delegate. Select this check-box to receive an email notification when a DV or DVQE eDoc arrives in the action list of a Fiscal Officer or Primary Delegate for an account on which you have been designated as a Secondary Delegate. To view these items in your action list, use one of the delegator filters described next.
Delegator Filter Applicable only if you are a Secondary Delegate. The option that you choose in this drop-down list determines whether the Choose Secondary Delegation filter will appear next to the
button at the top of your action list page. That drop-down filter provides a convenient way to have your action list display items awaiting action that have been delegated to you by the Fiscal Officer for the relevant accounts. Those items will not appear in your action list unless you apply this special filter.
• Secondary Delegators only on Filter Page – If this option is selected, the Choose Secondary Delegation drop-down filter will not be displayed on your action list page. Whenever you want your action list to display items from one or all of your secondary delegators, you will have to use the Secondary Delegator ID drop-down filter on the Action List Filter dialog box (described in Table 5 on page 31).
• Secondary Delegators on Action List Page – If you select this option, the Choose Secondary Delegation drop-down filter will be displayed at the top of your action list page (as shown below) so that you can view a filtered set of items from one or all of your secondary delegators. (The Secondary Delegator ID drop-down filter on the Action List Filter dialog box is always available to you, as well.)

Kuali Basics: Reference and Training Guide
36
Preference Option Description
Primary Delegate Filter Applicable only if you are a Fiscal Officer. The option that you choose in this drop-down list determines whether the Choose Primary Delegate filter will appear next to the button at the top of your action list page. That drop-down filter provides a convenient way to have your action list display items with action requests that have been routed to a Primary Delegate. (The system automatically routes action requests for DV and DVQE eDocs directly to the Primary Delegate. Those items will not appear in your action list unless you apply this filter.)
• Primary Delegates only on Filter Page – If this option is selected, the Choose Primary Delegate drop-down filter will not be displayed on your action list page. Whenever you want your action list to display items that have been routed to one or all of your Primary Delegates, you will have to use the Primary Delegate ID drop-down filter on the Action List Filter dialog box (described in Table 5 on page 31).
• Primary Delegates on Action List Page – If you select this option, the Choose Primary Delegate drop-down filter will be displayed at the top of your action list page (as shown below) so that you can view a filtered set of items that have been routed to one or all of your Primary Delegates. (The Primary Delegate ID drop-down filter on the Action List Filter dialog box is always available to you, as well.)
Fields Displayed in Action List
Select or clear these check-boxes to specify which items will be included among the fields displayed in your action list.
Document Route Status Colors for Action List Entries
For each document route status, select the color option that will be used to identify rows in your action list containing eDocs that currently have that route status. (See Figure 20 on page 31 for an example.) Note that new color changes for the rows in your action list will not take effect until the next time that you log in to Kuali.
To save your preferences, click save.
To return to the default preferences, click reset.
To close the Workflow Preferences screen without saving any changes you have made, click cancel.
NOTE: Workflow preference options will vary according to each user’s assigned role and permissions.

Kuali Basics: Reference and Training Guide
37
Standard Tabs in eDocs Although the tabs contained in various eDocs may vary from one document type to another, a set of standard tabs is included in every eDoc. All eDocs contain the Document Overview, Notes and Attachments, Ad Hoc Recipients, and Route Log tabs. Additionally, financial transaction eDocs contain the Accounting Lines tab and the General Ledger Pending Entries tab. Another tab, Capital Edit, is included on many, but not all, financial transaction documents. These standard tabs are described in the following sections of this guide.
Document Overview Tab The Document Overview tab identifies the document and includes the following fields: Description, Explanation, and Organization Document Number. Financial transaction eDocs also include an additional field labeled Total Amount. All of these fields are shown in Figure 24.
Figure 24 – Document Overview tab
The Description field has a 40-character limit. It is a required field on every eDoc because it is used to identify the document and is included in document search results, action list entries, General Ledger inquiries (for financial transaction eDocs), and standard reports. The text that you enter here should function as a summary description that would be useful in identifying the contents of the eDoc. However, because the contents of this field will be viewable by all other users in document search results, be careful to never enter any sensitive or confidential information here.
Figure 25 – An eDoc’s description is displayed as the title in a user’s action list.
The Explanation field allows you to include additional information about the document. The Organization Document Number field is not used by USC at this time. The Total Amount field (included on financial transaction eDocs) is updated when the document is submitted successfully, as can be seen in the example shown in Figure 26.

Kuali Basics: Reference and Training Guide
38
Figure 26 – Total Amount is displayed when the document is submitted.
Table 7. Document Overview Tab Fields
Field Name Description
Description Required. Enter a short description for the document. The description appears in the G/L Inquiry, standard reports, action list, and document search as a primary identification of the document.
Explanation Optional. Enter a more detailed explanation of the document than the information supplied in the Description field.
Total Amount Display-only. Displays the total amount from the Accounting Lines tab when the document is submitted successfully.
Organization Document Number
Not currently in use at USC.

Kuali Basics: Reference and Training Guide
39
Accounting Lines Tab Accounting information for a financial transaction is entered in the Accounting Lines tab. This is where the accounting string data is entered. The required fields and the format of the tab vary slightly by document type. The Amount field may also look different, depending on the type of document you are creating.
Figure 27 – Accounting Lines tab
The standard Accounting Lines tab is shown in Figure 27 above. Every Procurement Card eDoc has an additional section on the Accounting Lines tab. In Figure 28 below, you can see transaction details (such as the credit card number, card holder’s name, transaction date, and vendor’s name) in the Transaction section just above the Accounting Lines section.
Displaying Account Detail Descriptive details for the accounting line data (like those circled in Figure 28) may be hidden or shown by clicking the hide detail and show detail buttons. Only one of these buttons is displayed at a given time. After you click whichever button is currently displayed, the system displays the alternate option.
Figure 28 – Account details showing on the Accounting Lines tab
Figure 29 – Account details hidden on the Accounting Lines tab

Kuali Basics: Reference and Training Guide
40
Accounting Lines Action Buttons The accounting lines action buttons offer the following options.
Click add to add an accounting line to the document. When you click add, Kuali validates the account number, expiration status, and business rules specific to the document type.
Click delete to delete the accounting line.
Not active at this time. Reserved for future use.
Import Lines If you have a number of accounting lines to enter, you can use a program such as Microsoft Excel to create a file in .CSV (comma-separated values) format containing several transactions, and then import the lines into the eDoc. The maximum number of line entries that you can import is 300.
When you click the import lines button, it is replaced by other controls (see following example) that enable you to import accounting lines from a .CSV file into your document. These other controls are described below.
Click Browse… to select the desired import file from your hard drive or network.
Click add to import the file that you have selected.
Click cancel import if you want to stop your import lines task. When the “import lines” task ends, the Accounting Lines section returns to its default state with only the import lines button displayed.
Import Template Files To simplify the creation of .CSV import files, you can download specially created Microsoft Excel worksheets that are designed to be used as templates for several specific eDoc types. The template files are organized from left to right, with column headings that correspond to the labeled fields on the Accounting Lines tab of each particular eDoc type. Links to all currently available import templates can be found on-line on the User Guides and Training page of the Kuali@USC website. The basic procedure for using any of the import template files is the same:

Kuali Basics: Reference and Training Guide
41
1. Open a copy of the template file designed for the type of eDoc into which you intend to import the data.
2. Starting in the first row below all the headings and instructions (usually row 3 or 4), enter data in the appropriate columns. Remember that there is a 40-character limit per entry in the optional Line Description column, and the maximum number of line entries allowed in the template is 300.
3. When you have finished entering data to be imported, you must delete the heading rows of the template file, which serve as a guide when entering your data. This step is necessary because the import function does not differentiate between column headings, instructions, and your data. Follow these steps to delete the first three rows:
a. Using your mouse, select the rows to be deleted. b. Right-click on the now-highlighted rows to display a drop-down list of commands. c. Select the Delete command.
4. Save a copy of your import file as a .CSV (comma delimited) file, by following these steps: a. Select File, then Save As. b. Click the Save as type drop-down menu. c. Select CSV (comma delimited) from the available choices. d. If a dialog box is displayed, asking whether you want to keep the CSV (Comma
delimited) format, click Yes. 5. Close the template file, and open the eDoc into which you will now import your data. 6. On the Accounting Lines tab, click the button.
The Accounting Lines tab will change to include additional controls, as shown in the following example.
7. Click the button to open a dialog box that will enable you to navigate to the location
of the .CSV import file you saved. 8. Select your import file and click the “Open” button. 9. When the name of the import file is displayed in the field next to the button on the
Accounting Lines tab of your eDoc, click the button to import the data. 10. After the line entries have been imported from your .CSV file, you can manually add other
lines or make any changes that may be needed in the imported lines.

Kuali Basics: Reference and Training Guide
42
Accounting Line Error Messages When an account number, Object Code, or other field entry is not found in the search tables, Kuali displays an error message. When you click elsewhere on the screen, press the TAB key, or place your cursor in another field, the error message displays in red, below the field in question.
When you click the add button, the error message appears above the line item you want to enter in the document.
The following are examples of some error messages that may be displayed in the Accounting Lines tab in various eDocs.
Account Number Error Messages account not found. * Account Expired Override SUMMER COLLEGE TUITION (expires: 2009-06-30)
Errors found in this Section: Account number is a required field. The specified Account Number does not exist. Account 1234567890 is closed. Account must not be closed. Account 1234567890 has expired. Please use the recommended continuation account
SC 1234567891 or use a different account.
Object Code Error Messages object not found.
Errors found in this Section: Object Code (Object) is a required field The specified Object does not exist. The specified Object is inactive.

Kuali Basics: Reference and Training Guide
43
Dollar Amount Error Messages Errors found in this Section: “$0.00” amounts and negative amounts are not allowed on an accounting line. ABCD is not a valid amount. Invalid value 1.234: at most 2 digits may follow the decimal point. You cannot enter an amount into both the “Credit” and “Debit” columns for a given
accounting line. You can only enter an amount into one or the other per accounting line.
Clearing Accounting Line Error Messages Correcting the error and resubmitting or saving the document will clear the error message. If the error message pertains to an accounting line entry, you may be able to clear the message by correcting that entry and clicking the add button again.

Kuali Basics: Reference and Training Guide
44
Capital Edit Tab The Capital Edit tab appears as a standard tab on many, but not all, financial transaction eDocs. (For instance, it is not currently in use on Procurement Card Reallocation eDocs or eStatements.) If one or more financial transactions detailed in the eDoc pertain to an existing or newly acquired capital asset — generally meaning movable equipment costing $5,000 or more — this tab enables users to update the asset database accordingly. This tab must be completed if a Capital Equipment Object Code is entered in the Object field of an entry on the Accounting Lines tab in the eDoc. When the eDoc is approved, any accounting line entries that include a Capital Equipment Object Code will be used to update the asset database by associating the payment information with the capital asset specified in the Capital Edit tab.
NOTE: Currently, the Capital Edit tab can only be used to associate one new or existing capital asset with transactions itemized in that eDoc. Therefore, financial transactions that pertain to separate assets must be submitted in separate eDocs. For example, the Accounting Lines tab in a Credit Card Receipt eDoc may contain entries for multiple transactions, but if two or more of those accounting lines include a Capital Equipment Object Code, they must pertain to the same individual capital asset or else the eDoc cannot be submitted.
Figure 30 – Capital Edit tab with both Retrieve Asset to be Updated and Create New Assets sections displayed
As can be seen in Figure 30, the Capital Edit tab includes two sections — Retrieve Asset to be Updated and Create New Assets — which are described next in this guide. Depending on the type of transactions detailed in the eDoc, one or both sections may be displayed. Both sections are displayed in JV eDocs, but just one section should be completed. Only the Retrieve Asset to be Updated section is displayed in Cashiering eDocs. For JV eDocs, if any of the accounting line entries include a Capital Equipment Object Code, then first-level Comptroller’s Office approvers will use Ad Hoc routing to send the JV eDoc to the university’s Equipment Management department with an FYI action request when necessary.
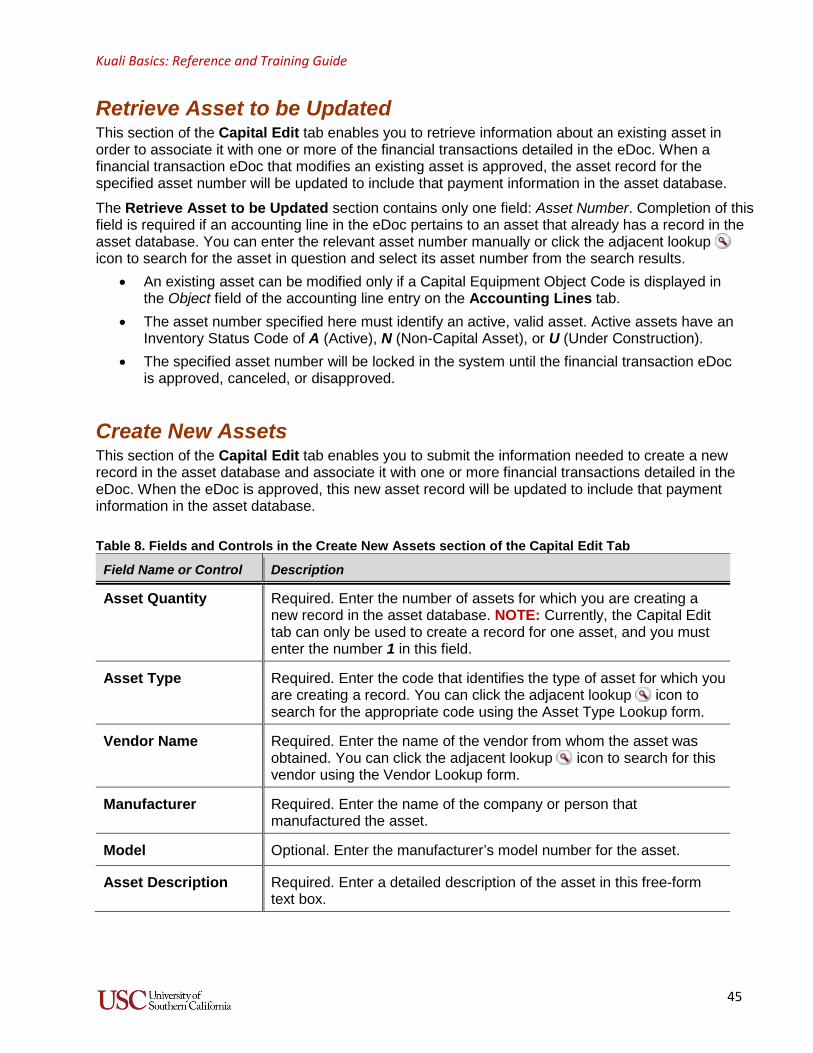
Kuali Basics: Reference and Training Guide
45
Retrieve Asset to be Updated This section of the Capital Edit tab enables you to retrieve information about an existing asset in order to associate it with one or more of the financial transactions detailed in the eDoc. When a financial transaction eDoc that modifies an existing asset is approved, the asset record for the specified asset number will be updated to include that payment information in the asset database. The Retrieve Asset to be Updated section contains only one field: Asset Number. Completion of this field is required if an accounting line in the eDoc pertains to an asset that already has a record in the asset database. You can enter the relevant asset number manually or click the adjacent lookup icon to search for the asset in question and select its asset number from the search results.
• An existing asset can be modified only if a Capital Equipment Object Code is displayed in the Object field of the accounting line entry on the Accounting Lines tab.
• The asset number specified here must identify an active, valid asset. Active assets have an Inventory Status Code of A (Active), N (Non-Capital Asset), or U (Under Construction).
• The specified asset number will be locked in the system until the financial transaction eDoc is approved, canceled, or disapproved.
Create New Assets This section of the Capital Edit tab enables you to submit the information needed to create a new record in the asset database and associate it with one or more financial transactions detailed in the eDoc. When the eDoc is approved, this new asset record will be updated to include that payment information in the asset database.
Table 8. Fields and Controls in the Create New Assets section of the Capital Edit Tab
Field Name or Control Description
Asset Quantity Required. Enter the number of assets for which you are creating a new record in the asset database. NOTE: Currently, the Capital Edit tab can only be used to create a record for one asset, and you must enter the number 1 in this field.
Asset Type Required. Enter the code that identifies the type of asset for which you are creating a record. You can click the adjacent lookup icon to search for the appropriate code using the Asset Type Lookup form.
Vendor Name Required. Enter the name of the vendor from whom the asset was obtained. You can click the adjacent lookup icon to search for this vendor using the Vendor Lookup form.
Manufacturer Required. Enter the name of the company or person that manufactured the asset.
Model Optional. Enter the manufacturer’s model number for the asset.
Asset Description Required. Enter a detailed description of the asset in this free-form text box.
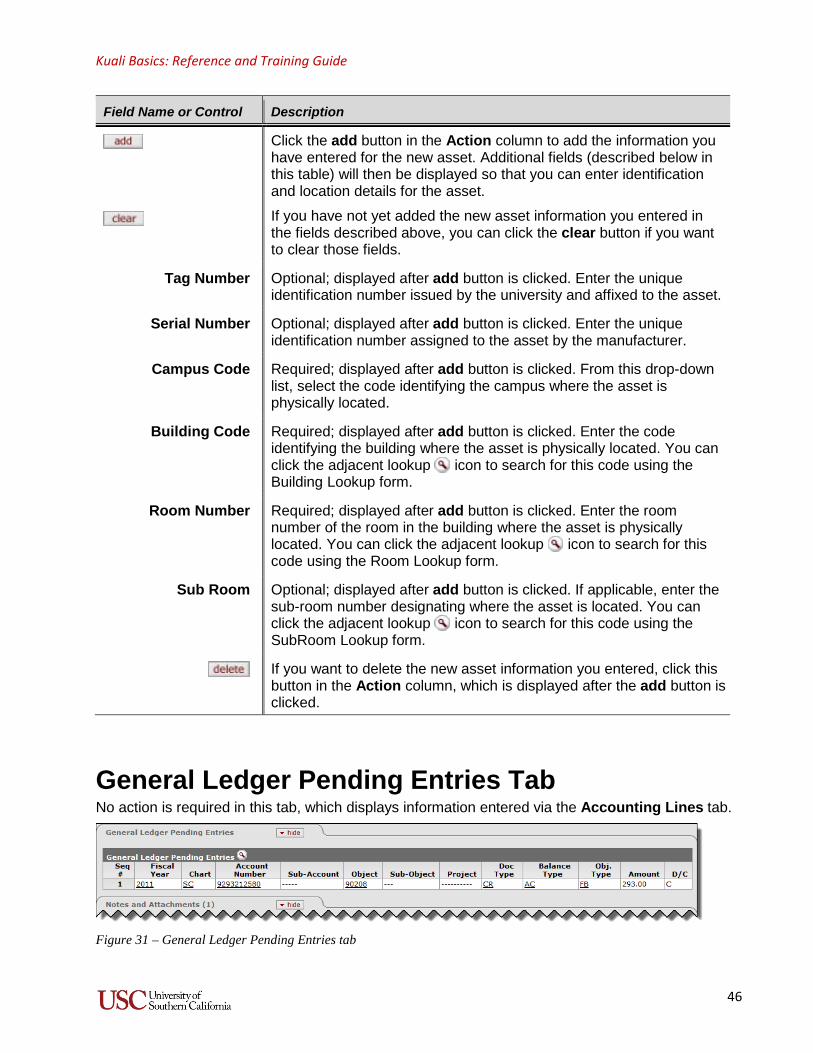
Kuali Basics: Reference and Training Guide
46
Field Name or Control Description
Click the add button in the Action column to add the information you have entered for the new asset. Additional fields (described below in this table) will then be displayed so that you can enter identification and location details for the asset. If you have not yet added the new asset information you entered in the fields described above, you can click the clear button if you want to clear those fields.
Tag Number Optional; displayed after add button is clicked. Enter the unique identification number issued by the university and affixed to the asset.
Serial Number Optional; displayed after add button is clicked. Enter the unique identification number assigned to the asset by the manufacturer.
Campus Code Required; displayed after add button is clicked. From this drop-down list, select the code identifying the campus where the asset is physically located.
Building Code Required; displayed after add button is clicked. Enter the code identifying the building where the asset is physically located. You can click the adjacent lookup icon to search for this code using the Building Lookup form.
Room Number Required; displayed after add button is clicked. Enter the room number of the room in the building where the asset is physically located. You can click the adjacent lookup icon to search for this code using the Room Lookup form.
Sub Room Optional; displayed after add button is clicked. If applicable, enter the sub-room number designating where the asset is located. You can click the adjacent lookup icon to search for this code using the SubRoom Lookup form.
If you want to delete the new asset information you entered, click this button in the Action column, which is displayed after the add button is clicked.
General Ledger Pending Entries Tab No action is required in this tab, which displays information entered via the Accounting Lines tab.
Figure 31 – General Ledger Pending Entries tab

Kuali Basics: Reference and Training Guide
47
Notes and Attachments Tab The Notes and Attachments tab displays user notes, attachments, or system-generated information about the document. The tab title (circled in Figure 32) is followed by a number in parentheses that represents the number of notes and/or attachments recorded. See page 48 for attachment size and file type restrictions, and page 49 for instructions on completing this tab.
Figure 32 – General Notes and Attachments tab
It should be noted that the Procurement Card eDoc and the Procurement Card eStatement both feature a special Transaction Notes and Attachments tab in addition to the standard Notes and Attachments tab. The Transaction Notes and Attachments tab (see the example in Figure 33) enables users to attach receipts to individual transactions included in the Procurement Card eDoc or the Procurement Card eStatement.
Figure 33 – Transaction Notes and Attachments tab
Table 9. Notes and Attachments Tab Fields and Controls
Field Name or Control Description
Posted Timestamp Display-only. Time and date when the attachment or note was posted.
Author Display-only. Full name of the user who added notes or attachments.
Note Text Required if you are attaching a file. Enter either notes or a description of the file that you are attaching to this eDoc.
Attached File Optional. Select the file to attach by clicking Browse and using the standard Choose File dialog box. Click Cancel if you want to clear the file name you have selected.
Click add to insert your notes and/or attachment.

Kuali Basics: Reference and Training Guide
48
Size and File Type Restrictions for Attachments Maximum file size for eDoc attachments: 40 MB Allowable file types for eDoc attachments: An error message will be displayed if a user attempts to attach a document that is not among the file types supported in the Kuali system. Table 10 lists all supported file types. However, bear in mind that when attaching files to specific kinds of eDocs, certain file types are preferred. For example, it is usually best to submit financial transaction eDocs with attachment files that cannot easily be changed (such as .pdf, .png, .jpg, .tif, or .gif).
NOTE: When scanning a document that you intend to attach to an eDoc, be sure to scan it in black & white with the resolution set to 300 dpi. Scanning documents in color and/or at a higher resolution will produce unnecessarily large files.
Table 10. File Types Supported for eDoc Attachments MIME Type File Name Extension
text/plain .txt, .text
application/pdf .pdf
application/msword .doc, .dot, .w6w, .wiz, .word
image/jpeg .jfif, .jfif-tbnl, .jpe, .jpeg, .jpg
image/pjpeg .jfif, .jpe, .jpeg, .jpg
image/gif .gif,
image/tiff .tif, .tiff
image/xtiff .tif, .tiff
application/mspowerpoint .pot
application/x-mspowerpoint .ppt
application/vnd.ms-powerpoint .pot, .ppa, .pps, .ppt, .pwz
application/vnd.oasis.opendocument.text .odt
application/x-vnd.oasis.opendocument.text .odt
application/excel .xl, .xla, .xlb, .xlc, .xld, .xlk, .xll, .xlm, .xls, .xlt, .xlv, .xlw
application/vnd.ms-excel .xlb, .xlc, .xll, .xlm, .xls, .xlw
application/x-excel .xla, .xlb, .xlc, .xld, .xlk, .xll, .xlm, .xls, .xlt, .xlv, .xlw
application/x-msexcel .xla, .xls, .xlw

Kuali Basics: Reference and Training Guide
49
Completing the Notes and Attachments Tab The following steps describe how to add notes or attachments on the Notes and Attachments tab.
1. Click the button to reveal the fields and controls used for adding comments and attaching related files.
2. Type your comments in the text box labeled Note Text. Even if you are just attaching a file, you must enter the file name or a brief description of the attachment. (Note Text is a required field. You will not be able to add the attached file if this field is left blank.)
3. If you want to attach any documentation relevant to the eDoc, click the button next to the Attached File field and navigate to the location of the file on your computer that you want to attach to the eDoc. The full path of the file that you have selected will appear in the Attached File field, but it is not yet attached.
If you want to change your selection to a different file, click the small button just below the Attached File field. When that field is empty again, click the button once more to locate the other file that you want to attach.
4. To save the notes you entered and the file that you have selected (if applicable), click the button located to the right of the Attached File field, in the Actions column. (This button
will not function if the Note Text field is empty.)

Kuali Basics: Reference and Training Guide
50
Ad Hoc Recipients Tab The Ad Hoc Recipients tab (see Figure 34) enables an eDoc’s initiator, reviewers, and approvers to customize the workflow routing of the eDoc by adding specific individuals or groups in the Kuali system as reviewers or approvers. Defining the routing path of an eDoc to include specific individuals or groups is called “Ad Hoc routing.” The use of Ad Hoc routing is described in greater detail earlier in this guide (see What is Ad Hoc Routing? on page 2). The Ad Hoc Recipients tab has two sections: Use the fields and controls in the Person Requests section when you want to route the eDoc to an individual so that he or she can approve or review it; use the fields and controls in the Ad Hoc Group Requests section when you want to route the eDoc to a group rather than to a particular user.
Figure 34 – Ad Hoc Recipients tab
Table 11. Ad Hoc Recipients Tab Fields and Controls
Field Name or Control Description
Action Requested
Required. Select the desired action from this drop-down list. The choices are APPROVE, ACKNOWLEDGE, and FYI.
Person Required when routing the eDoc to an individual. Enter a User ID or click to perform a UserID lookup.
Namespace Code
Name
Required when routing the eDoc to a group. Enter the desired group’s Namespace Code and Name, or click to perform a group lookup. If you perform a group lookup, you can click the Return Value link for the desired group when the search results are displayed on the Group Lookup page, and both the Namespace Code and Name fields will be populated automatically.
Click the add button in the Actions column to add the information you have specified in the current line.
After you have added a person or a group, the add button for that entry is replaced with a delete button in the Actions column. Click the delete button if you want to delete the current line.

Kuali Basics: Reference and Training Guide
51
Completing the Ad Hoc Recipients Tab The following steps describe how to add an ad hoc recipient in the Ad Hoc Recipients tab.
1. Select the desired option from the Action Requested drop-down list (see the example to the right). To route the eDoc and your action request to an individual, make your selection in the Person Requests section. To route the eDoc and your action request to a group, make your selection in the Ad Hoc Group Requests section. When selecting a requested action, be aware of the following factors:
• Approve – When you route an eDoc to someone with this action request, the recipient must open the eDoc and indicate whether it is acceptable by clicking the
button. Sending an Approve request will interrupt the regular workflow routing process because (a) the eDoc will be routed to any Ad Hoc approvers before being sent on to any approvers included in the predefined workflow, and (b) the eDoc cannot progress to “Final” status until all requested approvals have been obtained.
• Acknowledge – When you route an eDoc to someone with this action request, he or she must open the eDoc and confirm receiving it by clicking the button. The regular workflow routing process is not interrupted, but the eDoc cannot progress to “Final” status if the acknowledgment has not been obtained, even if the eDoc has received all needed approvals. Because of that routing restriction, it is usually wiser to select the FYI action request. You should only select the Acknowledge action request if you want to require the recipient to open the eDoc and review its details before it can continue through the workflow nodes.)
• FYI – This action request is a courtesy notification. When you route an eDoc to someone with an FYI request, the recipient can acknowledge it without even opening the eDoc in his or her action list. The regular workflow routing process is not interrupted, and the eDoc will progress to “Final” status once it has received all needed approvals and acknowledgments, regardless of whether the FYI request has been cleared.
NOTE: For some kinds of processes performed in Kuali, you may be required to select a particular action request (e.g., you should select only FYI for Ad Hoc routing of a Cashiering eDoc). Check with your supervisor if you are unsure about which type of action request to select.
2. If you are using Ad Hoc routing to send the eDoc to a person, type that individual’s User ID in the Person field in the Person Requests section, or click the lookup icon to search for the appropriate User ID.

Kuali Basics: Reference and Training Guide
52
3. If you are using Ad Hoc routing to send the eDoc to a group, type the appropriate information for the desired group in the Namespace Code and Name fields in the Ad Hoc Group Requests section, or click the lookup icon to search for the appropriate group name. (When you click the Return Value link for the desired group in the search results on the Group Lookup page, it will automatically populate both the Namespace Code and Name fields in the Ad Hoc Recipients tab.)
4. Click the button. The system will verify that the User ID (or Group Namespace Code and Name) that you have entered for routing are valid.
5. Click the button.
Although the Route Log tab is discussed in the next section of this guide (see page 53), it is important to note here that after an eDoc’s initiator (or an approver or reviewer) has completed the Ad Hoc Recipients section and submitted the eDoc, related changes will appear in the Route Log. If desired, you can use the information shown in the Route Log to confirm the Ad Hoc routing changes that you have made to the eDoc. For an explanation of how to do this, please see Using the Route Log to Confirm Ad Hoc Routing Information on page 55.
Ad Hoc Routing for “ENROUTE” eDocs When an eDoc has ENROUTE status, you can send Ad Hoc requests without taking a workflow action on the document. To do this, perform a document search to locate and open the desired eDoc, and then follow the steps listed in Completing the Ad Hoc Recipients Tab (page 51), with one exception: Use the button that appears in place of the button at the bottom of the screen when you open an eDoc that has already been submitted.

Kuali Basics: Reference and Training Guide
53
Route Log Tab Workflow routing information for each eDoc can be found in its Route Log. Most financial documents require one or more approvals before they impact the General Ledger. All Kuali users can view the Route Log of any eDoc. As shown in Figure 35 (below), the routing information is divided into four parts, on separate tabs:
• Document ID – Displays the eDoc’s system-assigned ID number plus basic information, such as the document’s name/description, document type, initiator, current status, creation date, and the dates when it was most recently modified, approved, and finalized. (See Table 12.)
• Actions Taken – Indicates past actions in the eDoc’s history, including the type of action, the name of the user who took the action (if the action was delegated on behalf of another user, the Delegator name is displayed), the time and date when the action was taken, and any routing annotation entered for the eDoc. (See Table 13.)
• Pending Action Requests – Indicates where the eDoc is currently located in the workflow by displaying the action requested, the user or users in whose Action List the eDoc awaits action, and the time and date when the eDoc went to their Action Lists, as well as any routing annotation entered by a user or the system itself. (See Table 14.)
• Future Action Requests – Indicates routing stops that the eDoc has yet to make. “Pending” means that the document is yet to be delivered to a user’s Action List. Thus, any user listed in the Requested Of column may not yet be aware of the eDoc. (See Table 15.)
Figure 35 – The Route Log tab displays the workflow status and actions taken.
NOTE: When you review the Route Log immediately after submitting an eDoc, you may not see the Pending Action Requests tab. This is because Kuali has not yet received the routing information. In this case, wait for a few seconds and click the button near the top of the Route Log tab to update the screen. You may need to repeat this process a few times until the information appears in the Pending Action Requests tab.

Kuali Basics: Reference and Training Guide
54
Table 12. Fields on the Document ID Tab of the Route Log Field Name Description
Title A combination of the eDoc’s document type and its name/description.
Type The eDoc’s document type.
Initiator Shows the creator of the eDoc. (KFS is shown for a system-created eDoc.)
Status The current routing status of the eDoc.
Node(s) The current route node (or “route level”) of the eDoc; that is, the current step that the document is on, on its route path.
Created The time and date when the eDoc was created.
Last Modified The time and date when the eDoc was most recently modified.
Last Approved The time and date of the most recent action taken on the eDoc.
Finalized The time and date when the eDoc reached “FINAL” status.
Table 13. Fields on the Actions Taken Tab of the Route Log Field Name Description
Action An action that has been taken on the eDoc.
Taken By The Kuali user who took the action.
For Delegator If the action was taken by one Kuali user acting on behalf of another user, this field shows the name of the user who delegated the responsibility for taking the action.
Time/Date The time and date when the action was taken.
Annotation This field shows any notes that have been added by the user or the system regarding the action that was taken.
Table 14. Fields on the Pending Action Requests Tab of the Route Log Field Name Description
Action Indicates that the eDoc is currently in a user’s or group’s action list, awaiting the specified action.
Requested Of The name of the user or group responsible for the pending action. The value in this field is based on the responsibility at the current route level. (If the eDoc has been routed to a role with more than five members, the name of

Kuali Basics: Reference and Training Guide
55
Field Name Description
the role will be displayed along with any qualifying values pertaining to the role assignees who received the action request.)
Time/Date The time and date when the action request was sent.
Annotation This field shows any notes that have been added by the user or the system regarding the action that was requested.
NOTE: The Pending Action Requests tab shows only action requests pending at the eDoc’s current route level. The system may add new requests when the eDoc proceeds to a new route level.
Table 15. Fields on the Future Action Requests Tab of the Route Log
Field Name Description
Action An action request that is slated to be sent once all currently requested actions (shown in the Pending Action Requests tab) have been taken. “Pending Approve” means that an approval will be requested, but that action request has not yet been sent to the specified user.
Requested Of The name of the user or group to whom the action request will be sent.
Time/Date The time and date when this action request was added by the system to the queue of planned future actions for this eDoc.
Annotation A system-generated note pertaining to the future action request.
NOTE: The Future Action Requests tab shows only scheduled action requests that have not yet been sent. As an eDoc proceeds along its route path and users take actions on it, the system will update the contents of this tab accordingly.
Using the Route Log to Confirm Ad Hoc Routing Information If Ad Hoc routing is used with an eDoc, the Route Log tab will be updated by the system accordingly. (The Ad Hoc Recipients tab is discussed in detail earlier in this guide, starting on page 50.) After an eDoc’s initiator, approver, or reviewer has submitted or approved that eDoc with routing information specified in the Ad Hoc Recipients tab, the Route Log can be used to confirm the new routing instructions. To do this, ensure that the Route Log tab on the eDoc is expanded. (Click the
button on the Route Log tab, if necessary.) • In the uppermost sub-tab of the Route Log, the Status value should now be “ENROUTE”. • The Node(s) value should be “Adhoc”. • The Pending Action Requests tab will show the User ID for each user to whom the eDoc has
been routed, as well as the action that was requested.
The Route Log items described above are shown in the circled portions of Figure 36.

Kuali Basics: Reference and Training Guide
56
Figure 36 – Changes in the Route Log after an eDoc is sent with Ad Hoc recipients.
If applicable, the Future Action Requests tab will show any additional users to whom the eDoc will be routed later.
NOTE: For instructions on how you can view the Route Log of an eDoc for which you do not recall the Document ID number, see Using Document Search to Check the Current Status of an eDoc on page 21.

Kuali Basics: Reference and Training Guide
57
Additional Information
Creating a New eDoc by Copying an Existing One The Kuali system permits authorized users to initiate a new eDoc based on a copy of one that already exists. This method of creating a new eDoc may be useful in those instances where an existing eDoc contains enough of the relevant data to be entered in the new eDoc that only a few minor changes or additions are needed. Copying an existing eDoc will create a new eDoc of the same document type, with its own new Document ID number, but otherwise reproducing most of the same data entry details and settings contained in the original eDoc. Note, however, that any attachments in the original eDoc will not be copied to the new eDoc, and some details from the original eDoc may not appear in the new copy.
NOTE: Some eDocs cannot be copied to create a new eDoc of the same type. In those instances, the action buttons displayed at the bottom of the eDoc form will not include the copy button.
To create a new eDoc by copying an existing one, use the following procedure: 1. Use the Doc Search function in Kuali to find the existing eDoc that you want to copy.
(See Using Doc Search on page 15 if you need instructions on searching for eDocs.) 2. In the list of search results, click the hyperlinked Document ID number of the desired eDoc.
Your browser will then display the eDoc that you selected. 3. At the bottom of the displayed eDoc, click the action button.
Your browser window will be refreshed to display a new eDoc of the same type as the original, with a new Document ID number in the document header in the upper right-hand corner of the eDoc screen. The document header will also contain a Copied From field that identifies the Document ID number of the original eDoc from which the new one was copied. (Additionally, a note identifying the original eDoc will appear in the Notes and Attachments folder tab.)
4. Just below the document header fields in the upper right-hand corner of the eDoc screen, click the button to expand all of the folder tabs in the eDoc form. NOTE: Most of the completed tabs from the original eDoc will be reproduced in the new eDoc, with the exclusion of any documents that were included as attachments in the original eDoc.
5. Carefully review all of the populated (i.e., not empty) tabs on the eDoc and remove any data in completed tabs that are not part of the new transaction request you are submitting.
6. Complete the tabs pertaining to the specific transaction request you want to submit. Be sure to change or delete any data or settings reproduced from the original eDoc that are not relevant to the new eDoc you are submitting. Because not all of the data from the original eDoc may have been reproduced in the copy, make certain that you have entered all of the details needed for the new transaction request.
7. When all relevant sections of the eDoc have been completed and you have deleted data from the original eDoc in all unrelated tabs, click the button at the bottom of the eDoc screen.