USAF Booster Paper Model Kit - papermodelingman.compapermodelingman.com/markc_titan/Titan IIIb Cover...
6
USAF Booster Paper Model Kit
Transcript of USAF Booster Paper Model Kit - papermodelingman.compapermodelingman.com/markc_titan/Titan IIIb Cover...

USAF BoosterPaper Model Kit

B2
B3
B1
A1
A17
A18
A5
A6A4
A3
A7
A7
A9A10
A20
A13
A19
A11 A12
A16
C7
A14
A14
A2
A15
A15
A8

C2
A1
D1
D3
D4
D5
B4
B5
B4 to B5 Connector
D4 to D5 Connector
C4
C3
Optional Interior Bulkhead
Optional Interior Bulkhead
Optional Interior Bulkhead
D1 to D2 Connector
D3 to D4 Connector

B8
D2
B6
C5 C6
D6 D7
B7
B8
B8
B8
Mount to Card stock
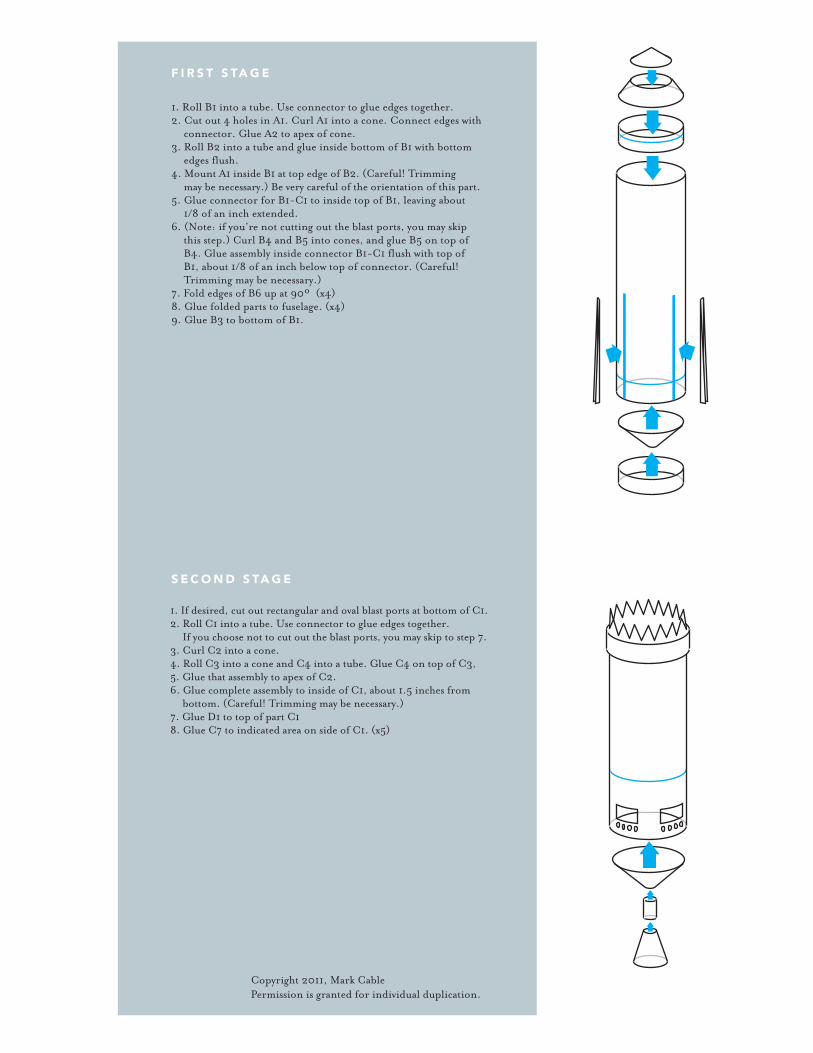
1. Roll B1 into a tube. Use connector to glue edges together.2. Cut out 4 holes in A1. Curl A1 into a cone. Connect edges with connector. Glue A2 to apex of cone.3. Roll B2 into a tube and glue inside bottom of B1 with bottom edges flush.4. Mount A1 inside B1 at top edge of B2. (Careful! Trimming may be necessary.) Be very careful of the orientation of this part. 5. Glue connector for B1-C1 to inside top of B1, leaving about 1/8 of an inch extended.6. (Note: if you’re not cutting out the blast ports, you may skip this step.) Curl B4 and B5 into cones, and glue B5 on top of B4. Glue assembly inside connector B1-C1 flush with top of B1, about 1/8 of an inch below top of connector. (Careful! Trimming may be necessary.)7. Fold edges of B6 up at 90º (x4)8. Glue folded parts to fuselage. (x4)9. Glue B3 to bottom of B1.
1. If desired, cut out rectangular and oval blast ports at bottom of C1.2. Roll C1 into a tube. Use connector to glue edges together. If you choose not to cut out the blast ports, you may skip to step 7.3. Curl C2 into a cone.4. Roll C3 into a cone and C4 into a tube. Glue C4 on top of C3,5. Glue that assembly to apex of C2.6. Glue complete assembly to inside of C1, about 1.5 inches from bottom. (Careful! Trimming may be necessary.)7. Glue D1 to top of part C18. Glue C7 to indicated area on side of C1. (x5)
F I R S T S TA G E
S E C O N D S TA G E
Copyright 2011, Mark CablePermission is granted for individual duplication.

1. Roll D1 into a truncated cone. Glue connector to inside of top of cone.2. Roll D2 into a cylinder. Glue connector to inside top of cylinder.3. Roll D3, D4 and D5 into truncated cones and glue. Glue connectors to inside, stack parts and glue together.4. Curve petals at top of D5 together to form a hemisphere.5. Glue nose assembly (step 3) to top of D2. Glue this assembly to the top of D1.6. Glue farings D6 and D7 to body.
1. On part A3, fold blue connector tabs up at 90º. Glue stiffener strips 2. A5 to inside of tab across length of part on each side.3. Glue A4 to top of stiffener strips.4. Glue A18 to blue tabs around the sides of the assembly. Trim end to fit.5. Fold A6 into a box, glue to location on A3.6. Roll A11 and A12 into tubes. glue to location on part A4. Looking at long edge of A3/4 assembly, part A12 (with rust top) goes on right side.7. Roll A8 and A9 into tube. Glue A10 around bottom of A9. Glue both finished parts to bottom of A6.8. Roll A13 into a tube, then glue A19 to top. (x2) Glue both parts to bottom of A6.9. Roll A7 into a tube, glue A20 to bottom (light grey stripe). Glue dark grey end to A3.10.Roll A14 and 15 into truncated cones, and glue A14 to top of A15.11.Glue finished nozzles to combustion chambers A20.12.Fold engine struts A17 into a truncated pyramid. Glue all 4 sides together, then fold blue tabs under assembly.13.Glue completed part A17 to part A4 inside of parts A11 and A12. Use blue tabs to attach parts.14.Attach entire engine assembly to first stage by first inserting parts A11 and A12 into holes in part A1, then attaching square base of A17 to part B3. Points of square should align with fuselage stiffeners, parts B6.15.Glue A16 to other A16 (ink on outside) and glue point to center of A2, legs to A4.
T H I R D S TA G E
1. Glue second stage to first. Glue third stage to second stage.2. Glue cable runners B6, B7, C5 and C6 to outside of first and second stages.
F I N A L A S S E M B LY
E N G I N E A S S E M B LY
Copyright 2011, Mark CablePermission is granted for individual duplication.