UPPER ARM INTRA -MUSCULAR INJECTION SIMULATION … · This simulation kit will help you practicing...
8
1 UPPER ARM INTRA-MUSCULAR INJECTION SIMULATION KIT USER MANUAL
Transcript of UPPER ARM INTRA -MUSCULAR INJECTION SIMULATION … · This simulation kit will help you practicing...
1
UPPER ARM INTRA-MUSCULAR INJECTION SIMULATION KIT
USER MANUAL

2
FOREWORD Thank you very much for buying from us the Upper Arm Intra-muscular Injection Simulation Kit. This simulation kit will help you practicing the upper arm intra-muscular injection skill and you are advised to take advantage of and operate this simulation kit as an auxiliary machine in medical education. FEATURES OF THE SIMULATION KIT . For practicing upper arm intra-muscular injection; . If the penetrating location of the needle is correct, an indicator (in Green) is lighted; and in case
of the penetration gets too deeper, an indicator (in Red) is lighted and a warning sound from a buzzer.
. Allows confirmation of touch sense of skin and acromion protrusion at the physical location. . The muscular part provides sense of resistance against the plunger of the syringe that
approximate a living body. . Prevents residual liquid injected in the muscular part. . KD constriction allows each and all parts to be removed to facilitate replacement and
maintenance. YOU MUST KNOW: The product relates to a model produced for medical lab training purpose. Never use this Simulation Kit for any other purpose. This Company will not be liable for any damage and/or accident arisen from operation of this Simulation Kit in any way other than that proposed in this Manual. Please read carefully Notices before operating this Simulation Kit. Extra care is needed since applying too much force than as required, or allowing the Simulation Kit drop on floor will cause damage to the Simulation Kit. Any problem found in operating the Simulation Kit, please contact the store you’ve bought from or Kyoto Science Company. (See the instructions of contact given on the inner cover page of this Manual. INTRODUCITON OF PRODUCT Specification • Material: specially formulated soft resin and hard resin
Size: same as the real one for adult
• Compositions: a. Body × 1 Supporting frame×1 Skin part × 1 Soft tissue part × 1 Muscular part (with built in sensor) × 1 Acromion protruding part × 1 Drainage sink × 1
Locating belt × 2 b. Display box × 1 c. AC adapter × 1 ※ Please confirm the contents soonest upon unpacking.

3
READY FOR LAB WORK TRAINING
(1) Mounting the Body of the Simulation Kit: Wind the locating belt (BLUE) found below the body of the Simulation Kit around an arm of a person or a dummy and secure in position with the magic tape.
(2) Then coil the locating belt (BLACK) found above the body of the Simulation Kit around the neck of the person or the dummy and buckle it up in position.
←Status upon completing the mounting
(3) Mounting the Display Box: plug one end of the connection cable extending from the display box into a socket provided on the body of the Simulation Kit.
! Note that the connection cable is mounted to the skeleton part inside the body of the body of the
Simulation Kit. Upon connecting, press on the acromion to prevent the skeleton breaking away from its fixed position.
(4) Connecting AC Adapter Cable: Connect the AC adapter cable to the display box and plug it into a domestic socket.
! Make sure that the AC adapter cable plug is fully inserted to the bottom of the display box.
Use a domestic socket (AC100V). (5) Prepare a container, e.g., a cup, to collect liquid expelled from the drainpipe.

4
NOTICES TO LABOR WORK TRAINING
(1) The water drained will get accumulated in the drainage sink below the body of the Simulation Kit. Small air port is provided to the drainage sink, Remove the cover for the drainpipe provided at the bottom of the body of the Simulation Kit before the water level in the drainage sink reaching the air port, and press the drainage sink with fingers to periodically drain water into a container, e.g., a cup.
※ Delayed in draining will cause water to flow out of the air port.
【Fig.】Air port ※ The drainage sink is made of
semi-transparent material so to facilitate observe the water level.
(2) Whereas the skin part could easily attract stain or contamination, never place any object containing ink, such as a printed matter or newspaper. The stain would permanently stay on the skin part. (3) Furthermore, ink from a marker or ball pen would be difficult to be erased. LAB WORK Palpation . Confirm the part by the sense of touch from the protruding part of the acromion. . Confirm the deltoid from genuine sense of muscular quality. Penetration . When penetrating into the correct injection are, the indicator (GRN) is on. . When the penetration gets too deep, the indicator (RED) is on and the buzzer sounds the
warning (the buzzer may be turned off as desired) . To confirm whether penetration into the muscular part is achieved, a sense of resistance
approaching the real one can be felt upon pulling up the plunger of the syringe. Injection . Inject the aqueous solution only seeing the green light is on.
※Do not inject when the indicator (RED) is on. . The aqueous solution injected will be accumulated in the drainage sink found at the bottom of
the body of the Simulation Kit.
● Alternative SW When pushed upward, the buzzer sounds; and pushed down, only the indicator functions, while the buzzer is kept mute. Operate this SW as preferred.
【Fig.】(from left to right) Indicator (GRN) Penetration at Correct Position Main Power On/Off Indicator (RED) Penetration too deep Buzzer

5
REMOVING PARTS FROM THE BODY OF SIMULATION KIT
Pull out the connection cable extending from the display box.
Pull out and remove the skin part from the supporting frame. While pulling out the skin part from the lower right, be careful not to damage the soft tissue part (gel form) in the skin part.
Remove the soft tissue part (gel form). Be extremely careful not to damage the soft tissue part since it is very delicate.
Remove the drainpipe of the muscular part (containing a built-in sensor) from the drainage sink. ! Hole and then pull out the drainpipe of the
muscular part. Hold the body of the muscular part may damage the muscular part.
Pull the socket part of the muscular part from the protruding part of the acromion.
Upon mounting, make sure of firmly inserting the socket extending from the muscular part into the protruding part of the acromion.
! Pull out the socket from the protruding part of the acromion by holding the socket. Never pull out the socket by holding the cable or causing damage including broken cable.
【Fig.】→Removed ←Inserted

6
(6) Align the hole provided on the inner side of the protruding part of the acromion at the needle of the supporting frame and insert the needle into the hole.
(7) Place the muscular part (with a built-in sensor) on the protruding part of the acromion and firmly insert the drainpipe into the drainage sink down to its root.
Fully inserted down to
the root Insertion not reaching
the root
(8) Cover the soft tissue part (gel form) with the shape of its inner side to compromise the shapes respectively of the muscular part (containing a built-in sensor) and the protruding part of the acromion.
【Fig.】
Soft tissue part (gel form) ※Gray part Protruding part of the acromion Muscular part (containing a built-in sensor)
(9) While taking care not to deflect the position of the soft tissue part (gel form), place the soft tissue part on the skin part without clamping any wiring or any other matter, and then carefully press the skin part into the supporting frame with the side of the drainage sink facing the front end. (If the operation prevents easy placement of the skin part, apply baby powder on the soft tissue part and the skin part.
(10) If the protruding part of the acromion breaks away from the needle on the supporting frame, adjust while pressing the skin part for the inlet position of the plug is aligned with the hole on the supporting frame.
7
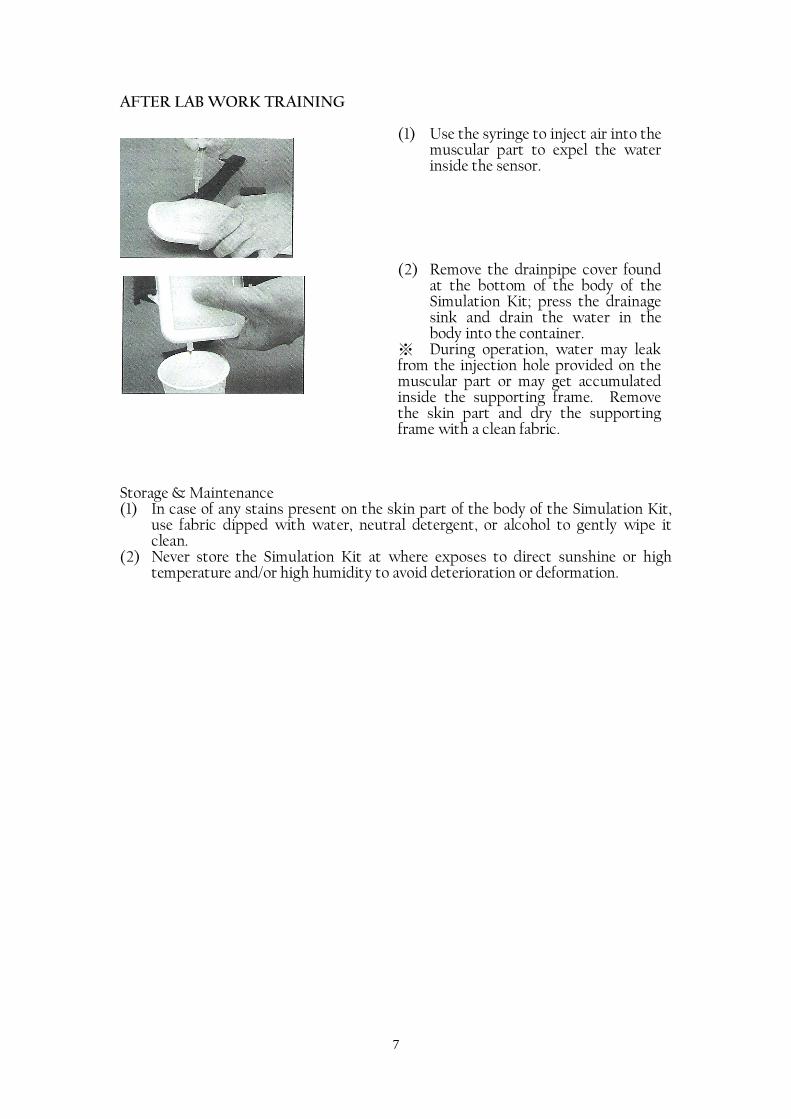
AFTER LAB WORK TRAINING
(1) Use the syringe to inject air into the muscular part to expel the water inside the sensor.
(2) Remove the drainpipe cover found at the bottom of the body of the Simulation Kit; press the drainage sink and drain the water in the body into the container.
※ During operation, water may leak from the injection hole provided on the muscular part or may get accumulated inside the supporting frame. Remove the skin part and dry the supporting frame with a clean fabric.
Storage & Maintenance (1) In case of any stains present on the skin part of the body of the Simulation Kit,
use fabric dipped with water, neutral detergent, or alcohol to gently wipe it clean.
(2) Never store the Simulation Kit at where exposes to direct sunshine or high temperature and/or high humidity to avoid deterioration or deformation.

8
CONSUMPTION ITEMS AT-A-GLANCE
Description Quantity Parts No. Remarks Muscular Part (with built-in sensor)
1 11297-210 Made of soft resin containing a sensor
Skin Part 1 11297-220 Made of soft resin Soft Tissue (gel form) 1 11297-230 Made of soft resin
Muscular part (with built-in sensor) Skin part Soft tissue part (gel form)
NOTICES: . The model used in the Simulation Kit is made of specially formulated soft resin.
Improper application of force or operation could cause damage to the model. . Never permanently attach any printed matter to the skin part of the model, or
write on the skin part with a ball pen or marker since it’s impossible to erase any ink left on the model.
. Use clean fabric to dip water or neutral detergent to remove stains on the surface of the model, leave it dry before applying baby powder.
. In use for longer time, soft and hard resin and pipes may be discolored, but it will not compromise the operation of the Simulation Kit.
. To store, keep away from where exposes to high temperature, high humidity, or direct sunshine.
. After use, make sure drain residual water in the model before storing. . If you have any doubt in this product or its operation, please contact the shop your bought this Simulation Kit from or the contact window shown below:


![A single intra-articular injection of 2.0% non-chemically ... · i.e., much longer than intra-articular corticosteroid injections [14–27]. Intra-articular HA even seems to offer](https://static.fdocuments.us/doc/165x107/5e6e7a63d7b9dc553774f316/a-single-intra-articular-injection-of-20-non-chemically-ie-much-longer.jpg)