Upgrading to 8.1 Guide - Success With CRM Consulting
64
Saleslogix Upgrading to Saleslogix version 8.1 Version 8.1 Developed by Saleslogix User Assistance
Transcript of Upgrading to 8.1 Guide - Success With CRM Consulting

Saleslogix
Upgrading to Saleslogix version 8.1
Version 8.1
Developed by Saleslogix User Assistance

Upgrading to Saleslogix version 8.1
DocumentationComments
This documentation was developed by Saleslogix User Assistance. For content revisions, questions, or comments, contact the Saleslogix writers at [email protected].
Address Saleslogix8800 North Gainey Center Drive, Suite 200Scottsdale, AZ 85258USA
Version Version 8.1 (121813)
Copyright Copyright © 1997-2013, SalesLogix, N.A, LLC. All rights reserved. This product and related documentation are protected by copyright and are distributed under licenses restricting their use, copying, distribution, and decompilation. No part of this product or related documentation may be reproduced in any form by any means without prior written authorization of Saleslogix and its licensors, if any.
Trademarks Swiftpage, Act!, SalesLogix and the Swiftpage product and service names mentioned herein are registered trademarks of Swiftpage ACT! LLC, or its affiliated entities. All other trademarks are the property of their respective owners.
Disclaimer Saleslogix has thoroughly reviewed this manual. All statements, technical information, and recommendations in this manual and in any guides or related documents are believed reliable, but the accuracy and completeness thereof are not guaranteed or warranted, and they are not intended to be, nor should they be understood to be, representations or warranties concerning the products described. Saleslogix assumes no responsibility or liability for errors or inaccuracies with respect to this publication or usage of information. Further, Saleslogix reserves the right to make changes to the information described in this manual at any time without notice and without obligation to notify any person of such changes.
Technical Support
Technical Support is available to Saleslogix customers with support contracts directly from Swiftpage, and to Certified Business Partners. Calls are answered during business hours, Monday through Friday, excluding holidays.
Partners with a valid technical support contract and a Web access code can request technical support electronically on the Saleslogix Partner Support Portal Web site: www.saleslogix.com/partners.
Customers with a valid technical support contract and a Web access code can request technical support electronically on the Saleslogix Customer Support Portal Web site: www.saleslogix.com/customers.
Revisions to this book are available through both Portal Web sites. Check regularly for updates to Saleslogix product documentation.

Contents
Chapter 1 Upgrade Workplan . . . . . . . . . . . . . . . . . . . . . . . . . . . . . . . . . . . . . . . . . . 1What’s New in this Release . . . . . . . . . . . . . . . . . . . . . . . . . . . . . . . . . . . . . . . . . . . . . . . . . . . . . . . . . . 1
Prerequisites . . . . . . . . . . . . . . . . . . . . . . . . . . . . . . . . . . . . . . . . . . . . . . . . . . . . . . . . . . . . . . . . . . . . . . 1
Prepare to Upgrade . . . . . . . . . . . . . . . . . . . . . . . . . . . . . . . . . . . . . . . . . . . . . . . . . . . . . . . . . . . . . . . . . 3
Protect Your Customizations . . . . . . . . . . . . . . . . . . . . . . . . . . . . . . . . . . . . . . . . . . . . . . . . . . . . . . . . . 5
Prepare Your Saleslogix Database . . . . . . . . . . . . . . . . . . . . . . . . . . . . . . . . . . . . . . . . . . . . . . . . . . . . 9
Upgrade your Main Office. . . . . . . . . . . . . . . . . . . . . . . . . . . . . . . . . . . . . . . . . . . . . . . . . . . . . . . . . . . 12
Install the Service Pack Bundle . . . . . . . . . . . . . . . . . . . . . . . . . . . . . . . . . . . . . . . . . . . . . . . . . . . . . . 14
Reapply your Network Customizations. . . . . . . . . . . . . . . . . . . . . . . . . . . . . . . . . . . . . . . . . . . . . . . . 15
Upgrade Synchronization . . . . . . . . . . . . . . . . . . . . . . . . . . . . . . . . . . . . . . . . . . . . . . . . . . . . . . . . . . . 15
Upgrade Network and Remote Users/Offices . . . . . . . . . . . . . . . . . . . . . . . . . . . . . . . . . . . . . . . . . . . 16
Upgrade Your Web Workspace . . . . . . . . . . . . . . . . . . . . . . . . . . . . . . . . . . . . . . . . . . . . . . . . . . . . . . 20
Reapply Your Web Customizations . . . . . . . . . . . . . . . . . . . . . . . . . . . . . . . . . . . . . . . . . . . . . . . . . . . 24
Build and Deploy your Web Portals. . . . . . . . . . . . . . . . . . . . . . . . . . . . . . . . . . . . . . . . . . . . . . . . . . . 27
Replacing Intellisync for SalesLogix with Outlook Sync. . . . . . . . . . . . . . . . . . . . . . . . . . . . . . . . . . 30
Perform Post-Upgrade Tasks . . . . . . . . . . . . . . . . . . . . . . . . . . . . . . . . . . . . . . . . . . . . . . . . . . . . . . . . 30
Chapter 2 Changes in this Release. . . . . . . . . . . . . . . . . . . . . . . . . . . . . . . . . . . . . 37Changes in Version 8.1 . . . . . . . . . . . . . . . . . . . . . . . . . . . . . . . . . . . . . . . . . . . . . . . . . . . . . . . . . . . . . 37Web Client Enhancements . . . . . . . . . . . . . . . . . . . . . . . . . . . . . . . . . . . . . . . . . . . . . . . . . . . . . . . . . . . 37Saleslogix Client Enhancements . . . . . . . . . . . . . . . . . . . . . . . . . . . . . . . . . . . . . . . . . . . . . . . . . . . . . . . 38Reporting Enhancements . . . . . . . . . . . . . . . . . . . . . . . . . . . . . . . . . . . . . . . . . . . . . . . . . . . . . . . . . . . . 38Application Architect Enhancements . . . . . . . . . . . . . . . . . . . . . . . . . . . . . . . . . . . . . . . . . . . . . . . . . . . . 38Saleslogix Mobile Enhancements . . . . . . . . . . . . . . . . . . . . . . . . . . . . . . . . . . . . . . . . . . . . . . . . . . . . . . 38Deprecated Components. . . . . . . . . . . . . . . . . . . . . . . . . . . . . . . . . . . . . . . . . . . . . . . . . . . . . . . . . . . . . 39
Changes in Version 8.0 . . . . . . . . . . . . . . . . . . . . . . . . . . . . . . . . . . . . . . . . . . . . . . . . . . . . . . . . . . . . . 39General Enhancements. . . . . . . . . . . . . . . . . . . . . . . . . . . . . . . . . . . . . . . . . . . . . . . . . . . . . . . . . . . . . . 39Web Client Enhancements . . . . . . . . . . . . . . . . . . . . . . . . . . . . . . . . . . . . . . . . . . . . . . . . . . . . . . . . . . . 39Application Architect Enhancements . . . . . . . . . . . . . . . . . . . . . . . . . . . . . . . . . . . . . . . . . . . . . . . . . . . . 40Saleslogix Mobile Enhancements . . . . . . . . . . . . . . . . . . . . . . . . . . . . . . . . . . . . . . . . . . . . . . . . . . . . . . 45
Chapter 3 Plugin Changes in this Release . . . . . . . . . . . . . . . . . . . . . . . . . . . . . . . 47Finding Script Changes . . . . . . . . . . . . . . . . . . . . . . . . . . . . . . . . . . . . . . . . . . . . . . . . . . . . . . . . . . . . 47
New Tables. . . . . . . . . . . . . . . . . . . . . . . . . . . . . . . . . . . . . . . . . . . . . . . . . . . . . . . . . . . . . . . . . . . . . . . 47
New Fields added to Existing Tables. . . . . . . . . . . . . . . . . . . . . . . . . . . . . . . . . . . . . . . . . . . . . . . . . . 48
New Forms . . . . . . . . . . . . . . . . . . . . . . . . . . . . . . . . . . . . . . . . . . . . . . . . . . . . . . . . . . . . . . . . . . . . . . . 52
New Groups . . . . . . . . . . . . . . . . . . . . . . . . . . . . . . . . . . . . . . . . . . . . . . . . . . . . . . . . . . . . . . . . . . . . . . 53
New Pick Lists . . . . . . . . . . . . . . . . . . . . . . . . . . . . . . . . . . . . . . . . . . . . . . . . . . . . . . . . . . . . . . . . . . . . 53
New Widgets . . . . . . . . . . . . . . . . . . . . . . . . . . . . . . . . . . . . . . . . . . . . . . . . . . . . . . . . . . . . . . . . . . . . . 53
Changes to Existing Forms . . . . . . . . . . . . . . . . . . . . . . . . . . . . . . . . . . . . . . . . . . . . . . . . . . . . . . . . . 54
Updated Global Scripts. . . . . . . . . . . . . . . . . . . . . . . . . . . . . . . . . . . . . . . . . . . . . . . . . . . . . . . . . . . . . 54
Updated VB Scripts . . . . . . . . . . . . . . . . . . . . . . . . . . . . . . . . . . . . . . . . . . . . . . . . . . . . . . . . . . . . . . . . 55
Changes to Existing Groups . . . . . . . . . . . . . . . . . . . . . . . . . . . . . . . . . . . . . . . . . . . . . . . . . . . . . . . . 55
Changes to Existing Menus and Toolbars . . . . . . . . . . . . . . . . . . . . . . . . . . . . . . . . . . . . . . . . . . . . . 56
Changes to Existing Reports . . . . . . . . . . . . . . . . . . . . . . . . . . . . . . . . . . . . . . . . . . . . . . . . . . . . . . . . 56
Changes to Existing Widgets . . . . . . . . . . . . . . . . . . . . . . . . . . . . . . . . . . . . . . . . . . . . . . . . . . . . . . . . 58
Changes to the Database Objects . . . . . . . . . . . . . . . . . . . . . . . . . . . . . . . . . . . . . . . . . . . . . . . . . . . . 59


1 |
Chapter Upgrade WorkplanThis document provides instructions for upgrading existing Saleslogix installations from version 7.5.4 or 8.0 to version 8.1. To install 8.1 or to add functionality to your current installation, refer to the Saleslogix Implementation Guide.
Version 8.1 will uninstall earlier versions of Saleslogix before installing version 8.1.
• If you are upgrading from Saleslogix version 7.5.4 or later, follow the steps in this guide.
• If you have never installed Saleslogix, do not use this guide. Refer to the instructions in the Saleslogix Implementation Guide document provided with this release.
• If you are upgrading from a version prior to version 7.5.4, you must first upgrade to version 7.5.4 (or 8.0) before upgrading to version 8.1. Use the upgrade instructions in the appropriate upgrade documents on the Saleslogix Support Portal Web site (http://customers.sagenorthamerica.com or http://partners.sagenorthamerica.com).
What’s New in this ReleaseThe key new features in this release are:
• New Outlook Sync functionality enables users to exchange activities and contacts with Microsoft Outlook. This replaces Intellisync for SalesLogix, which was built on Nokia’s discontinued Intellisync product.
• SLX Address Book in Microsoft Outlook, insert VCard in Microsoft Outlook, insert ContactCard in Microsoft Outlook, and Insert Library doc in Microsoft Outlook all require the SData portal. For LAN -only implementations to use these features, you must install the Web Host, and build and deploy the SData portal.
• Saleslogix Job Manager now has a user interface.
• The Web Reporting server is no longer required. Saleslogix Web Reporting now leverages the Job Server. If your environment includes the Job Server, and the documents logging folder has been created and shared as described in the Saleslogix Implementation Guide, there are no additional steps to install reporting.
• The Web Client has a new Reports main view and administrators can monitor and oversee jobs in the Job Manager main view.
• The Saleslogix Cache Server and Messaging service installation have been moved out of the Web Host installation and into the Admin Tools and Servers installation.
For more information about what’s new in this release, see Chapter 2: Changes in this Release.
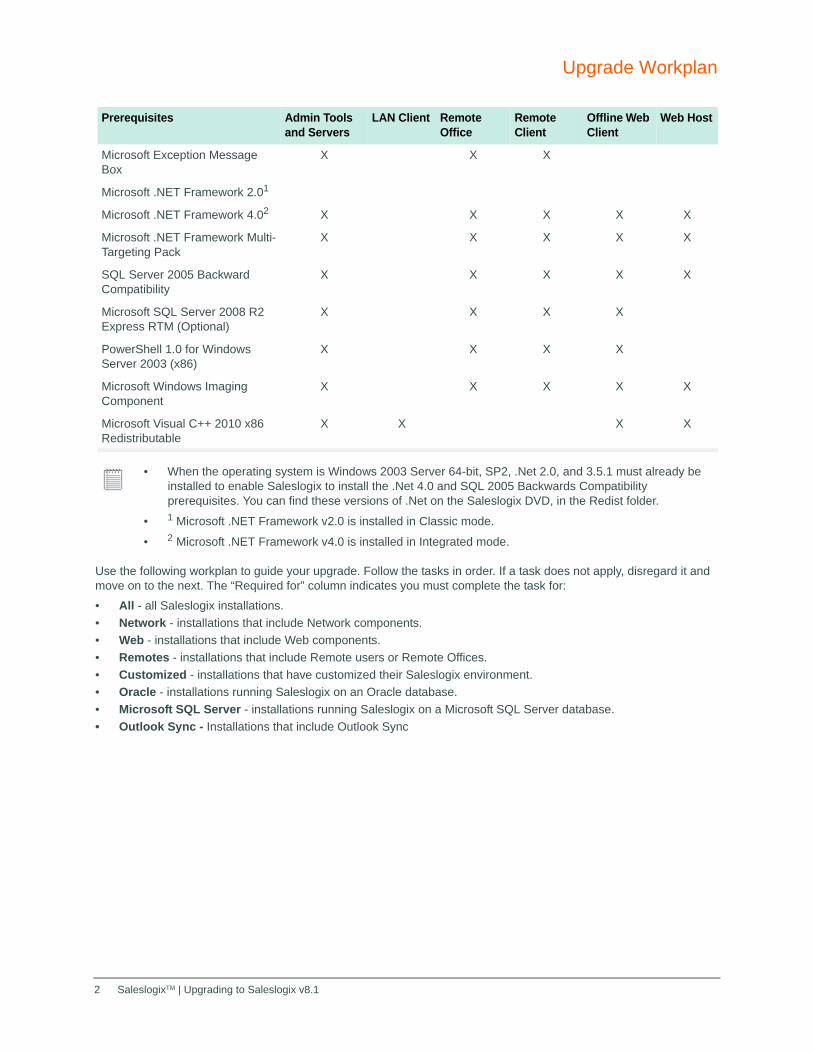
PrerequisitesThe following table shows software prerequisites that will automatically be installed on your computer if they are not already there. Installing these prerequisites may require your computer to restart. For additional prerequisites, see the
Compatibility Guide.
• DO NOT install this release on any Saleslogix version earlier than 7.5.4.
• Intellisync for SalesLogix is not supported with Saleslogix v8.1.
Performing upgrade installations using the install scripts do not install prerequisites. You must manually install prerequisites on each machine to be upgraded before running the install scripts
Prerequisites Admin Tools and Servers
LAN Client Remote Office
Remote Client
Offline Web Client
Web Host
Windows Installer 3.1 X X
Windows Installer 4.5 X X X X
1 SaleslogixTM | Upgrading to Saleslogix v8.1 1
Upgrade Workplan
Use the following workplan to guide your upgrade. Follow the tasks in order. If a task does not apply, disregard it and move on to the next. The “Required for” column indicates you must complete the task for:
• All - all Saleslogix installations.
• Network - installations that include Network components.
• Web - installations that include Web components.
• Remotes - installations that include Remote users or Remote Offices.
• Customized - installations that have customized their Saleslogix environment.
• Oracle - installations running Saleslogix on an Oracle database.
• Microsoft SQL Server - installations running Saleslogix on a Microsoft SQL Server database.
• Outlook Sync - Installations that include Outlook Sync
Microsoft Exception Message Box
X X X
Microsoft .NET Framework 2.01
Microsoft .NET Framework 4.02 X X X X X
Microsoft .NET Framework Multi-Targeting Pack
X X X X X
SQL Server 2005 Backward Compatibility
X X X X X
Microsoft SQL Server 2008 R2 Express RTM (Optional)
X X X X
PowerShell 1.0 for Windows Server 2003 (x86)
X X X X
Microsoft Windows Imaging Component
X X X X X
Microsoft Visual C++ 2010 x86 Redistributable
X X X X
• When the operating system is Windows 2003 Server 64-bit, SP2, .Net 2.0, and 3.5.1 must already be installed to enable Saleslogix to install the .Net 4.0 and SQL 2005 Backwards Compatibility prerequisites. You can find these versions of .Net on the Saleslogix DVD, in the Redist folder.
• 1 Microsoft .NET Framework v2.0 is installed in Classic mode.
• 2 Microsoft .NET Framework v4.0 is installed in Integrated mode.
Prerequisites Admin Tools and Servers
LAN Client Remote Office
Remote Client
Offline Web Client
Web Host
SaleslogixTM | Upgrading to Saleslogix v8.12

Upgrade Workplan
Required for Task Description
Prepare to Upgrade
All 1 Read all chapters in this document before proceeding. Understanding the content of the release and planning your upgrade are critical.• Chapter 1, “Upgrade Workplan” - contains upgrade tasks explaining how to:
• Save your existing customizations.
• Upgrade all Saleslogix components.
• Reapply customizations to your upgraded installation.
• Send changes to all users by releasing plugins, synchronizing changes, and/or deploying portals.
• Integrate any new features into your environment.
• Chapter 2, “Changes in this Release” - details the new features, functionality changes, and enhancements in this release. Any change that impacts customizations is identified as a [Breaking Change].
• Chapter 3, “Plugin Changes in this Release” - details the schema and plugin changes in this release.
Before upgrading, ensure that:• Any Web portals included in your installation are version 7.5.4 or later and have
deployed successfully.
• Your current Saleslogix version is 7.5.4 or later.
• You review the Compatibility Guide to understand the supported platforms, applications, and system requirements for this release.
The Compatibility Guide is available on the Saleslogix Support Portal Web site at www.saleslogix.com/customers and www.saleslogix.com/partners.
This task is required if ERPLink is installed.
2 Verify the Saleslogix installation path is correct.
If your installation includes ERPLink, the default Saleslogix installation location may have been changed. Before installing the upgrade, be sure to verify the default location to ensure files are being copied to the correct location.
To verify:1 On your desktop, click Start > Run.
2 In the Run window, type regedit and click OK.
3 In the Registry Editor window, expand HKEY_LOCAL_MACHINE > SOFTWARE > WOW6432Node.
4 Select SalesLogix.
5 Verify the Path key’s value:
• 64 bit operating systems - C:\Program Files (x86)\SalesLogix
• 32 bit operating systems - C:\Program Files\SalesLogix
6 If necessary, update the path:
a Right-click the Path key and select Modify.
b In the Edit String window, in the Value data: field, type the correct path from step 5.
c Click OK.
7 Close the Registry Editor.
SaleslogixTM | Upgrading to Saleslogix v8.1 3

Upgrade Workplan
This task is required if you are installing Outlook Sync
3 Review requirements for installing Outlook Sync.
If you will be implementing Outlook Sync ensure you understand the following installation requirements.• Your implementation must have access to the SLXClient Web Admin features, to
enable the Outlook Sync integration.
• An SData portal must be deployed.
If your installation is:
• Windows Network Client only: Install the Web Host. Open the Application Architect and build and deploy the SLXClient and SData portals.
• Remote Office and Offline Web Clients: Deploy the SData portal along with the SLXClient portal. The SData portal is part of the Core Portals deployment.
• Windows Remote Client: no extra actions required. The SData portal is deployed as part of the LAN Remote Client install.
After installing, notify your Web Client and Windows Client users that they must configure Outlook Sync on their machines using the Saleslogix Connector.
All 4 Install this release in a test environment before installing on your production database.
Create a test environment to review new features and for use after upgrading your production environment. If your installation includes customizations, you can use the test environment to compare your customizations with your upgraded production environment.
Refer to the Saleslogix Support Portal Web site for more information. Search for “creating a test environment” for information on using a copy of your production database in a test environment.Note Make sure you change your logging paths in the Administrator to access the test environment or errors will occur.
All 5 Grant admin rights to the person installing the upgrade.
Offline (disconnected) Web Client users can upgrade without admin rights on their machines. Other users require admin rights when installing Saleslogix.
All 6 Run the Saleslogix Component Finder utility.
The Saleslogix Component Finder utility compiles a list of the Saleslogix products installed on the machine.
To run utility:
1 In the Upgrades > FindProducts folder, double-click the FindSalesLogixProducts.exe.
2 In the Saleslogix Component Finder window, click the Find Saleslogix Products button.
Web 7 Open Windows Firewall and add an exclusion for port 11211.
The Saleslogix Cache Server requires access to this port. The Saleslogix Cache Server is used to speed processing of the Web Client by providing storage for cached information.
The Saleslogix Cache Server can be installed on any server, however, avoid installing it on a high-activity machine such as the SpeedSearch Server. Do not have multiple instances of the Cache Server installed in your environment.
Required for Task Description
SaleslogixTM | Upgrading to Saleslogix v8.14

Upgrade Workplan
Protect Your Customizations
Customized Network 8 Record your Network customizations and use the Architect to create a bundle of all customized plugins in your database. See the “Working with Bundles” topic in the Architect Help for instructions.Note Saleslogix does not overwrite your customized plugins. However, this bundle can be used as a backup of your customizations. Note Converting fields to Unicode is considered a customization for upgrade purposes because it is a change to the entity model; upgrades after you convert to Unicode may require that you bundle the Unicode model and merge it.
Customized Network 9 Review the Saleslogix plugin changes to determine if you have customized any plugins that are updated in this release.
Review Chapter 3, “Plugin Changes in this Release” for all plugin changes. After reviewing plugin changes, determine if you are going to add your customizations to the plugins in this release (recommended) or add the Saleslogix changes to your custom plugins.
Customized Network and Customized Web
10 Back up all custom assemblies to protect any changes. Custom assemblies may be overwritten or deleted during the installation.
Customized Web 11 Document or save any customizations made in the web.config files.
Before you upgrade, use the Application Architect to note customizations in all web.config files. Use the steps in task 62 to apply the changes after the upgrade.
Customized Web 12 Document any customizations made to Dashboards. Important Any custom Dashboards will need to be recreated after the upgrade. You will recreate the custom Dashboards in task 61.
This task is required if you are upgrading Saleslogix Mobile.
13 Save any customization made to Saleslogix Mobile.
Before deleting the existing Saleslogix Mobile portal, you must save any changes you have made directly in the portal SupportFiles to a bundle or onto your local file system.
This includes changes to out-of-the-box views or classes, any views or JavaScript files you have added, or any changes to configuration or content. Failure to save these changes will cause them to be lost when you delete the portal.
All 14 Delete the MergeConfiguration.xml file.Note If you customized this file, record your customizations before deleting them.
New configurations have been added to the MergeConfiguration file. You must delete and recreate the file to see the updates. The file is rebuilt when you convert a lead in the Web Client. After you recreate the file, you can add your customizations.
To delete
1 In the Application Architect, open the Virtual File System Explorer.
2 In the tree view expand Configuration and expand Global.
3 If necessary, save the MergeConfiguration.xml file to another location or record any customizations to the files.
4 Delete the file.
Required for Task Description
SaleslogixTM | Upgrading to Saleslogix v8.1 5

Upgrade Workplan
All 15 Delete the DeDupConfigurations.xml file.Note If you customized this file, record your customizations before deleting them.
New configurations have been added to the DeDupConfigurations.xml file. You must delete the file to see the updates. The file is rebuilt automatically as part of the upgrade. After the file is recreated, you can add your customizations.
To delete
1 In the Application Architect, open the Virtual File System Explorer.
2 In the tree view expand Configuration and expand Global.
3 If necessary, save the DeDupConfigurations.xml file to another location or record any customizations to the files.
4 Delete the file.
Customized Web with Hot Fixes and/or Accelerators
16 Identify customized forms on your system and create a bundle of your Web customizations. Create a new project workspace and add the hot fixes and/or Accelerators (including the Mobile 2011R1 Accelerator) currently installed on your system.Note If you have not customized your Web implementation or have an accurate record of your customizations, disregard this task and proceed to task 20. If you customized your Web implementation, but do not have any hot fixes or Accelerators installed, proceed to task 17.
To determine if a hot fix or Accelerator has been installed, view your system bundles:• For network bundles, open the Administrator, and then click Bundles.
• For Web bundles, open the Application Architect, open Project Explorer, expand the VFS project workspace, and then expand Bundle Model.
After creating a new project workspace, restore the project backup into the workspace, and apply your hot fixes and Accelerators.
To create
1 Create a new project workspace.
a On the Application Architect View menu, click Project Workspace Manager.
b Right-click in the Project Workspaces window, and then click Add.
c In the Name box, type a name for the project workspace.
d In the Working Path box, type or browse to the location where you want to save the new project workspace. The Source Path is automatically set to the working source location.
e In the Description box, type a description or additional information about the new project.
f Ensure the Export Files Upon Creation check box is not selected.
g Click Create.
Required for Task Description
SaleslogixTM | Upgrading to Saleslogix v8.16

Upgrade Workplan
Customized Web with Hot Fixes and/or Accelerators
Task 17 (cont.)
2 Restore the appropriate project backup to your project workspace.
a Locate the appropriate project backup file:
• Sage SalesLogix v7.5 SP4 Project.Backup.zip - when upgrading from v7.5.4.
• Sage SalesLogix v8.0 Project_Backup.zip - when upgrading from v8.0.
The project backup files are included in the service pack download files.
b Copy the zip file to a local folder on the Application Architect computer. Ensure the folder path is as short as possible.
c In the Application Architect Project Explorer, open the project workspace you created in step 1, right-click the project, and then click Restore Project.
d In the Select Project Backup File to Restore From dialog box, browse to the project backup on your local machine (step b).
3 Apply all Web hot fixes and Accelerators currently installed in your production environment to the new project.
4 Proceed to task 18.
Customized Web Without Hot Fixes or Accelerators
17 Prepare to create a bundle of your Web customizations. Note If you have not customized your Web implementation, disregard this task and proceed to task 20. If you customized your Web implementation and have hot fixes and/or Accelerators installed, proceed to task 18.
Saleslogix provides project backups that you can use to compare to your current database. A bundle is created from the differences.
To prepare
1 Locate the appropriate project backup file:
• Sage SalesLogix v7.5 SP4 Project.Backup.zip - when upgrading from v7.5.4.
• Sage SalesLogix v8.0 Project_Backup.zip - when upgrading from v8.0.
The project backup files are included in the service pack download files.
2 Copy the zip file to a local folder on the Application Architect computer. Ensure the folder path is as short as possible.
3 In the Application Architect Project Explorer, open your current project.
4 If necessary, open the Output Window to display progress when creating your customization bundle.
Note In the Project Explorer tree view do not expand nodes unnecessarily. Some nodes, such as the Portal Page Templates node, will autocreate items that may be included in your customization bundle.
5 Proceed to task 18.
Required for Task Description
SaleslogixTM | Upgrading to Saleslogix v8.1 7

Upgrade Workplan
Customized Web 18 Create a bundle of your Web customizations. Note If you have not customized your Web implementation, disregard this task and proceed to task 20.
To create
1 In Application Architect, open Project Explorer.
2 Right-click Bundle Model, and then click Create Manifest by Project Differences.
The Select a Project to Compare Against dialog box opens.
3 Choose one of the following:
• If your custom installation does not include hot fixes, select Project Backup and browse to the project backup you created in task 17.
• If your custom installation includes hot fixes and/or Accelerators, select Existing Project, and then select the project you created in task 18.
4 Clear the Include deleted items that were added to the current project check box.
Clearing this check box ensures that items in the project’s Recycle Bin are not included in the customization bundle as delete items.
5 Click OK.
The new manifest opens in the Application Architect.
6 On the New Manifest Properties tab, type a name in the Name box. For example, Customizations.
7 Save the manifest.
8 Expand Bundle Model, right-click the new manifest, and then click Create Bundle.
9 In the Save Bundle dialog box, browse to the location where you want to save the bundle, type a name, and then click Save.
Note The bundle cannot be saved to a network drive. Save the bundle to a local drive or map the drive and save without using a UNC path.
Customized Web 19 Run the BundleDiff utility using the “Common” parameter to preview how version 8.1 changes impact your Web customizations.
You can use Saleslogix differences bundles with the BundleDiff utility to find differences between two bundle manifests. Use this information to determine conflicts between your customizations and version 8.1 changes. Any files with conflicts must be merged into the upgraded environment to ensure it contains both your customizations and Saleslogix version 8.1 changes.
The differences bundles are located in the Project Differences folder. The BundleDiff utility is installed in the \\Program Files\SalesLogix folder. The utility writes output to the console. You can redirect the output to a log file where you can open and save in text form.
BundleDiff ParametersNote Utility parameters are case-sensitive.• AllItems - lists every item in both bundles. This is a flat list of bundle contents without
differencing. You can use this to see a complete list of what items changed in the release.
• Common - lists the bundle items that exist in both bundles. These are the items that you will have to act on (ignore or merge) when you apply your customization bundle.
• Bundle1OnlyItems - lists items that exist in bundle 1 but not in bundle 2.
• Bundle2OnlyItems - lists items that exist in bundle 2 but not in bundle 1.
• CommonAndExclusive - lists all items using the Common, Bundle1OnlyItems, and Bundle2OnlyItems parameters.
Required for Task Description
SaleslogixTM | Upgrading to Saleslogix v8.18

Upgrade Workplan
Customized Web Task 20 (cont.)
Example Parameter String
The following example compares two Saleslogix upgrade bundles, lists the items that are common in the two bundles, and outputs the information to a text file on the local drive.
"C:\Program Files\SalesLogix>bundlediff /B1:"c:\bundle754to80.zip" /B2:"c:\bundle80to80RC1.zip" /O:"common" > c:\commonout.txt".
Prepare Your Saleslogix Database
Microsoft SQL Server 20 If you are using Microsoft SQL Server and have published your database for replication, remove replication. Remember to reset replication after your upgrade is complete.Note Merge and Snapshot Replication are not compatible with Saleslogix.
All 21 Run the Integrity Checker on your database. Integrity Checker is run from the Tools menu in the Administrator.Note See the “Integrity Checker” topic in the Administrator Help for instructions.
If you are running the Integrity Checker on a database that is not located on the same network as the SalesLogix Library and attachments, clear the Attachment and Library tests before you Repair the database.
All 22 Make sure all users have logged off from Saleslogix.
Remotes 23 Instruct all Remote users and Offices to run a final synchronization cycle.Note Once the Main office is upgraded, remote users will still be able to synchronize changes to the host but will not be able to receive any changes.
Remotes 24 Execute a final cycle of all sync servers. The final sync cycle must run successfully and send out all pending transactions.
Remotes 25 Stop the Sync Service(s). If using a third-party scheduling package, deactivate the Synchronization Server tasks.
All 26 Close all Saleslogix applications and stop all applications and services that access the Saleslogix database using the Saleslogix OLE DB Provider.
All 27 Back up your production database. Verify the backup is successful and complete.
You may also want to create a backup at various points in the upgrade process. For example, after running the patch but before installing bundles. Then, if you need to revert your installation, you can choose a backup created during the upgrade without having to start from the beginning.
This task is required if you are upgrading a LAN only environment and use SLX Address Book with Microsoft Office.
28 Saleslogix implementations that are Windows Client-only (no Web) and use the SLX Address Book, Insert VCard, Insert Contact Card, and Insert Library Doc features in Microsoft Outllook must install the Web Host and build and deploy the SData portal and client to continue to use those features in v8.1. Refer to Chapter 5 Installing the Web Components in the Saleslogix Implementation Guide for instructions.
Required for Task Description
SaleslogixTM | Upgrading to Saleslogix v8.1 9

Upgrade Workplan
This task is required for all installations that included Intellisync for Saleslogix (host and Remote Office)
29 Delete the Intellisync portal from IIS and the folders from the file system before upgrading
Intellisync for SalesLogix has been replaced by Outlook Sync in v8.1. To install Outlook Sync, see step 76.Note Saleslogix does not recommend attempting to use Intellisync in an 8.1 environment.
To delete
1 Open IIS.
2 Expand the SalesLogix web site.
3 Right-click the SlxIntellisync portal and select Delete.
4 Close IIS.
5 Browse to C:\inetpub\wwwroot.
6 Right-click the Intellisync folder and select Delete.
7 Reset IIS.
This task is required for all installations that included Intellisync for Saleslogix (host and Remote Office)
30 Delete the Intellisync portal(s) from Application Architect.
To delete
1 On the Application Architect View menu, click Deployment Explorer.
2 Expand Deployments.
3 Right-click the Intellisync portal and then click Remove Selected.
4 Repeat steps 2 and 3 to delete the Remote Office Intellisync portal.
This task is required for all Saleslogix Clients (Network and Web) where Intellisync for Saleslogix had been installed.
31 Instruct all users to uninstall Intellisync.
Uninstall using the operating system Add/Remove programs feature.
Required for Task Description
SaleslogixTM | Upgrading to Saleslogix v8.110

Upgrade Workplan
All 32 Upgrade your main office computers using the Administrative Tools and Servers installation. This includes the Administrative Workstation, Synchronization Server, SpeedSearch Server, and Saleslogix Job Server. Note The installation creates folders and applies permissions necessary for Saleslogix to function. To avoid unexpected results, Saleslogix recommends contacting Saleslogix Professional Services Group or your Business Partner before changing default settings on these folders.
The Administrative Tools and Servers installation allows you to select one or multiple applications to install on the same computer. The installations remove only the applications with a prior version and then install ONLY the applications for the installation that you selected. For example, if you have the Administrator, Architect, and Saleslogix Client on your Administrative Workstation computer and you run the Administrative Tools and Servers install, only the Administrator and Architect will be removed and reinstalled. To upgrade the Sales Client, you must then run the Network Client install at which point only the Saleslogix Client will be removed and reinstalled.
Important:• Saleslogix Job Service is required for Web Client functionality.
• If you are a LAN-only installation and have been using the SLX Address Book and related features in Microsoft Outlook, see task 28.
To upgrade
1 Saleslogix DVD > Standard Server Installation > Required Administrative Tools and Servers.
The Express installation is for new implementations only and cannot be used to upgrade.
Note If the installation does not detect the necessary prerequisites, you will be prompted to install them. Click Install to allow Saleslogix to install the required components or Cancel to stop the installation.
2 In the Saleslogix Admin Tools and Servers message box, click Yes.
3 On the Welcome and License Agreement screens, read the information and accept the agreement, and then click Next.
4 On the Setup Type screen, select an installation type. The following components may be new to your installation:
• Saleslogix SData Synchronization Service - installs the service used for Integration functionality.
• Saleslogix Job Server - installs the service used for certain Web Client functionality.
• Saleslogix Messaging Event Server and Cache Server are now in the Admin Tools and Servers installation. They had previously been part of the Web Host installation.
The Saleslogix Cache Server can be installed on any server, however, avoid installing it on a high-activity machine such as the SpeedSearch Server.
5 Install only one instance of the Cache Server. Do not have multiple instances of the Cache Server installed in your environment.
6 Click Next.
7 Depending on your installation type, you may be prompted to enter some or all of the following information:
• SQL Server sa password - If you have a password set on the sa account on the SQL Server, type the sa password. The installation requires this password to install and attach the Saleslogix databases.
Required for Task Description
SaleslogixTM | Upgrading to Saleslogix v8.1 11

Upgrade Workplan
Upgrade your Main Office
All Task 32 - continued
• SQL Server sysdba password - Type your Microsoft SQL Server sysdba password. The installation must validate the password of the sysdba user to create a valid connection string for the Saleslogix database.
• Use Local System Account - Select this option if the local user account has the correct security permissions to install Saleslogix.If you clear this option, set the information for the Saleslogix Service user.
• Domain - Type the network domain where you created the Saleslogix Service user.
• User Name - Type the name of the Saleslogix Service user (for example, SLXService).
• Password and Confirm - Type the Saleslogix Service user’s password.
• Port Change button - Changes the port number used for communication between the Clients and Saleslogix Server. In most implementations, the default port number does not need to be changed. However, if you have another application or service using port 1706, you should change the port number to an unused port.
8 On the remaining screens, click Install and Finish to complete the installation.
Note The installation process removes prior versions before installing the new applications. During this process, you may see the message “Assembly not Found.” This is triggered between removing and replacing a service and does not indicate a problem with your installation. Click OK to continue the installation.
9 If prompted, restart your computer when the installation completes.
Web
This task is required if you are upgrading from v7.5.4.
This task is not required if you are upgrading from v8.0.
33 Change Log On user for Saleslogix Job Server.
The Saleslogix Job Server is installed with Admin Tools and Servers and requires the following:
The Saleslogix Job Server must be able to log on as a Saleslogix user, and that user must have access to SLX Application Entities (such as Leads and Opportunities) and Activities. By default, the user assigned to the Saleslogix Job Service is the Local System Account user. After installation, you must set the Job Service to log on as the WebDLL user after making sure the WebDLL user is mapped to the Saleslogix Admin user. If your implementation includes Remote Office(s), ensure there is a trust relationship between the domain at the Main office and the domain at the Remote office.
To change
1 Open the Administrator.
2 On the Navigation Bar, click Users.
3 In the Users view, double-click the Admin user name, and click the General tab.
4 In the Windows ID box, click the Find button.
The Please select a Windows user to match the Saleslogix user dialog box appears.
5 In the Add Name box, type your server name and user name, and then click OK.
For example, servername\WebDLL.
6 In the Import user data box, click No, and then click OK.
7 Set permissions to allow the WebDLL user to alter the DNS on the domain.
8 Open Windows Services and right-click the Saleslogix Job Service.
9 Click Properties.
10 In the Saleslogix Job Service properties dialog box, click the Log On tab and select the This account option button.
Required for Task Description
SaleslogixTM | Upgrading to Saleslogix v8.112

Upgrade Workplan
Task 30 (cont.)
11 Click Browse and specify the Location.
For example, the domain where you created the WebDLL user.
12 Type the name of the domain user credentials specified in step 5.
In this example, the WebDLL user.
13 Restart the Job Server and verify that it successfully started.
All 34 If the Saleslogix Client is installed on your Administrative Workstation, run the Saleslogix Network Client installation to install the Client application.
To upgrade
1 Saleslogix DVD > Install Saleslogix > Install Saleslogix Network Client.
Note If the installation does not detect the necessary prerequisites, you will be prompted to install them. Click Install to allow Saleslogix to install the required components or Cancel to stop the installation.
2 In the Saleslogix Network Client message box, click Yes.
3 On the Welcome and License Agreement screens, read the information and accept the agreement, and then click Next.
4 On the Setup Type screen, select an installation type, and then click Next.
• Click Complete to install the most common components.
• Click Custom to install only certain components or to change the installation location. Use the Custom Setup screen to enable or disable items for installation.
5 On the remaining screens, click Install and Finish to complete the installation.
Note The installation process removes prior versions before installing the new applications. During this process, you may see the message “Assembly not Found.” This is triggered between removing and replacing a service and does not indicate a problem with your installation. Click OK to continue the installation.
6 If prompted, restart your computer when the installation completes.
All 35 Start the Administrator.
All 36 Enter Saleslogix licenses.
Version 8.1 requires that you apply new versions of all Saleslogix licenses. If you have not received these licenses, contact your Saleslogix Business Partner or Saleslogix CAM for more information.
See the “Using the License Wizard to Add Licenses” topic in the Administrator Help for detailed steps.
All 37 Upgrade the saleslogix.sxc.
The saleslogix.sxc is a list of all the checks the Integrity Checker runs. The file has been updated for Saleslogix v8.1. The Integrity Checker, when opened, will create a new saleslogix.sxc if it cannot find one in the correct directory.
To update
1 Browse to C:\ProgramData\SalesLogix\Integrity Checker for Windows 2008 or C:\Documents and Settings\All Users\Application Data\SalesLogix\Integrity Checker for Windows 2003.
2 Rename or delete the saleslogix.sxc.
3 In the Administrator, click on Tools and select Integrity Checker.
Required for Task Description
SaleslogixTM | Upgrading to Saleslogix v8.1 13
Upgrade Workplan
Install the Service Pack Bundle
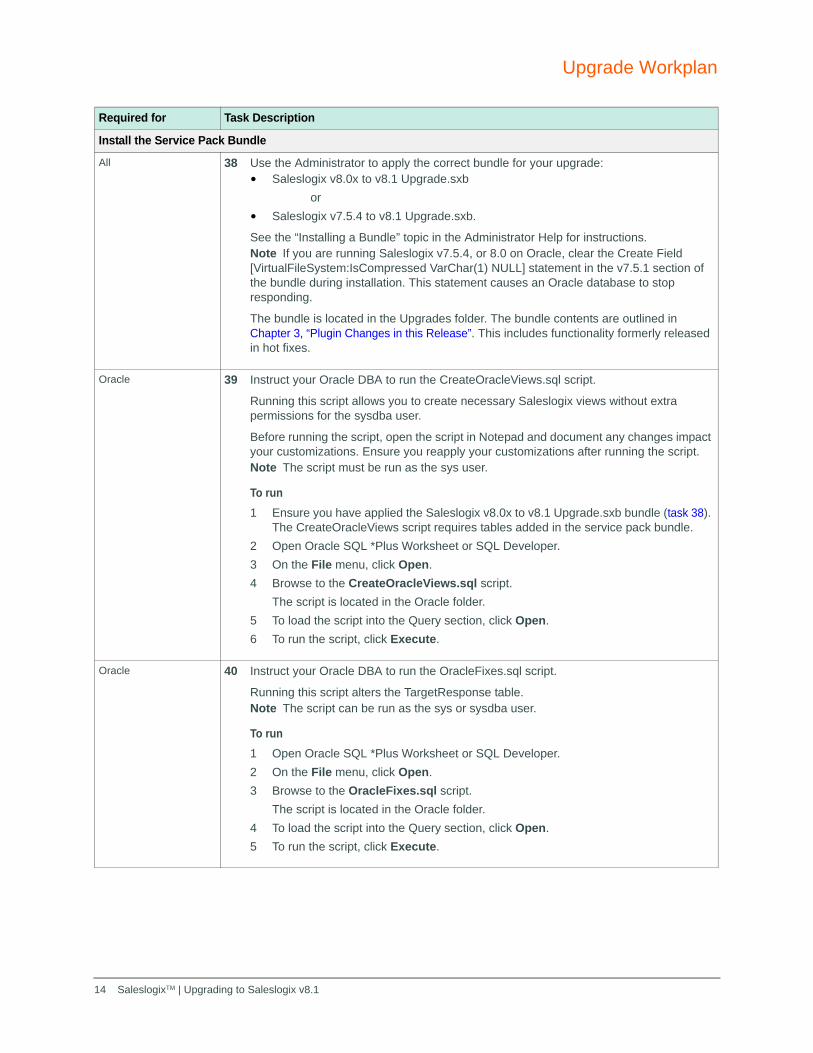
All 38 Use the Administrator to apply the correct bundle for your upgrade:• Saleslogix v8.0x to v8.1 Upgrade.sxb
or
• Saleslogix v7.5.4 to v8.1 Upgrade.sxb.
See the “Installing a Bundle” topic in the Administrator Help for instructions.Note If you are running Saleslogix v7.5.4, or 8.0 on Oracle, clear the Create Field [VirtualFileSystem:IsCompressed VarChar(1) NULL] statement in the v7.5.1 section of the bundle during installation. This statement causes an Oracle database to stop responding.
The bundle is located in the Upgrades folder. The bundle contents are outlined in Chapter 3, “Plugin Changes in this Release”. This includes functionality formerly released in hot fixes.
Oracle 39 Instruct your Oracle DBA to run the CreateOracleViews.sql script.
Running this script allows you to create necessary Saleslogix views without extra permissions for the sysdba user.
Before running the script, open the script in Notepad and document any changes impact your customizations. Ensure you reapply your customizations after running the script.Note The script must be run as the sys user.
To run
1 Ensure you have applied the Saleslogix v8.0x to v8.1 Upgrade.sxb bundle (task 38). The CreateOracleViews script requires tables added in the service pack bundle.
2 Open Oracle SQL *Plus Worksheet or SQL Developer.
3 On the File menu, click Open.
4 Browse to the CreateOracleViews.sql script.
The script is located in the Oracle folder.
5 To load the script into the Query section, click Open.
6 To run the script, click Execute.
Oracle 40 Instruct your Oracle DBA to run the OracleFixes.sql script.
Running this script alters the TargetResponse table.Note The script can be run as the sys or sysdba user.
To run
1 Open Oracle SQL *Plus Worksheet or SQL Developer.
2 On the File menu, click Open.
3 Browse to the OracleFixes.sql script.
The script is located in the Oracle folder.
4 To load the script into the Query section, click Open.
5 To run the script, click Execute.
Required for Task Description
SaleslogixTM | Upgrading to Saleslogix v8.114

Upgrade Workplan
All 41 Run the SLXConversionUtility.exe.
This utility supports integration by adding columns to the Saleslogix database to enable a 1:many relationship for phone numbers and email addresses in Accounts and Contacts. When an integration imports accounts or contacts with multiple phone numbers or email addresses, it will be possible to see them in the Saleslogix.
To Run
1 On the Administrative Workstation, browse to the SLXConversionUtility.exe and SLXConversionUtility.exe.config files.
2 By default, these are in . . .\Program Files\Saleslogix.
3 Open the SLXConversionUtility.exe.config using the text editor of your choice.
4 Scroll to the <connectionStrings> section and change the Initial Catalog value from SALESLOGIX_EVAL to your database alias.
For example:
<connectionStrings>
<clear/>
<add name="Default" connectionString="Provider=SLXOLEDB.1;Persist Security Info=True;Initial Catalog=MyDatabaseAlias;Data Source=localhost;Extended
Properties="PORT=1706;LOG=ON;CASEINSENSITIVEFIND=ON;AUTOINCBATCHSIZE=1;SVRCERT=12345;ACTIVITYSECURITY=OFF;TIMEZONE=NONE""/> </connectionStrings>
5 Double-click SLXConversionUtility.exe to open the utility.
6 Saleslogix recommends selecting all check boxes if your implementation will be synchronizing records, however you may choose to select records as follows:
• For Accounting Integration, select Account - Creates email and phone records and Contact - Assigns UUIDS and creates email and phones.
• For Outlook Sync integration, select the check boxes above and add Activity - Assigns UUIDs.
• If your implementation will not be synchronizing records, select only Create Calendar Favorites, and Create Activity Attendees. These are required to support the Multiple Contacts for Activities features.
7 Click Update.
8 Log on using the Saleslogix Admin username and password.
9 Click Close.
Reapply your Network Customizations
Customized Network 42 Apply the changes listed in Chapter 3, “Plugin Changes in this Release”. You can use one of the following strategies:• Add your customizations to the Saleslogix plugins (recommended).
• Add the Saleslogix changes to your custom plugins.
After applying plugin changes, release the appropriate plugins using Architect.Note See the “Release a Plugin for Use” topic in the Architect Help for information on releasing plugins.
Upgrade Synchronization
Remotes 43 Cycle your Synchronization Server(s) so that changes are sent to remotes. Use Custom Sync since it is not necessary to run subscription.Note See the “Creating a Custom Sync Cycle” topic in the Administrator Help for more information.
Required for Task Description
SaleslogixTM | Upgrading to Saleslogix v8.1 15

Upgrade Workplan
All 44 Restart the Sync Service(s).
Upgrade Network and Remote Users/Offices
All 45 Run the Saleslogix Network Client installation on each of your Network user’s computers. You can install the Saleslogix Client using one of the following methods. • Build an automated installation. Automated installations create an executable file
that allows users to install with no user intervention. Refer to the Saleslogix Implementation Guide for details on building automated installations.
• Run the Saleslogix Client installation. The Saleslogix Client can be installed on each user’s computer using the Client installation. If you plan to run a custom installation, you must install the Client using the standard installation. See task 34 for detailed steps.
Remotes 46 Distribute Client installations to your Remote users and Offices.
You can distribute a copy of the Saleslogix DVD, or the files and folders associated with an automated installation.
If you created an automated installation of the Saleslogix Client and the user is disconnected from the network, you must distribute the entire folder structure created during the automated installation to the remote computer. If the user has network access, copy the installation to a shared network drive.
Required for Task Description
SaleslogixTM | Upgrading to Saleslogix v8.116

Upgrade Workplan
Remotes 47 Direct each Remote Office to upgrade using the Remote Office installation.
To upgrade
1 Saleslogix DVD > Standard Server Installation > Remote Office Server.
Note If the installation does not detect the necessary prerequisites, you will be prompted to install them. Click Install to allow Saleslogix to install the required components or Cancel to stop the installation.
2 In the Saleslogix Admin Tools and Servers message box, click Yes.
3 On the Welcome and License Agreement screens, read the information and accept the agreement, and then click Next.
4 On the Setup Type screen, select an installation type, and then click Next.
5 Depending on your installation type, you will be prompted to enter some or all of the following information on the installation screens:
• Use Local System Account - Select this option if the local user account has the correct security permissions to install Saleslogix. If you do not select this option, set the information for the Saleslogix Service user.
• Domain - Type the network domain where you created the Saleslogix Service user.
• User Name - Type the name of the Saleslogix Service user (for example, SLXService).
• Password and Confirm - Type the Saleslogix Service user’s password.
• Port Change button - Changes the port number used for communication between the Clients and Saleslogix Server. In most implementations, the default port number does not need to be changed. However, if you have another application or service using port 1706, you should change the port number to an unused port.
• Configure Web Server - This option is available for Web Remote Office installations. Clear this option for non-Web Remote Offices.
6 On the remaining screens, click Install and Finish to complete the installation.
Note The installation process removes prior versions before installing the new applications. During this process, you may see the message “Assembly not Found.” This is triggered between removing and replacing a service and does not indicate a problem with your installation. Click OK to continue the installation.
7 If prompted, restart your computer when the installation completes.
Required for Task Description
SaleslogixTM | Upgrading to Saleslogix v8.1 17

Upgrade Workplan
Remotes 48 Direct Remote users to upgrade the Saleslogix Client.
Remotes should upgrade using the Saleslogix Remote Client installation on the Saleslogix DVD.
To upgrade
1 Saleslogix DVD > Install Saleslogix Client > Install Saleslogix Remote Client
Note If the installation does not detect the necessary prerequisites, you will be prompted to install them. Click Install to allow Saleslogix to install the required components or Cancel to stop the installation.
2 In the Saleslogix Admin Tools and Servers message box, click Yes.
3 On the Welcome and License Agreement screens, read the information and accept the agreement, and then click Next.
4 On the Setup Type screen, select an installation type, and then click Next.
• Select Complete to install all components on this computer.
• Select Custom to install only certain components or to change the installation location. Use the Custom Setup screen to enable or disable items for installation.
5 On the remaining screens, click Install and Finish to complete the installation.
Note The installation process removes prior versions before installing the new applications. During this process, you may see the message “Assembly not Found.” This is triggered between removing and replacing a service and does not indicate a problem with your installation. Click OK to continue the installation.
6 If prompted, restart your computer when the installation completes.
Web Remotes 49 Instruct Offline Web Client users to upgrade.
Users do not need administrator rights to install or run the Offline Web Client. However, the Offline Web Client installation installs third-party prerequisites if they are not detected on the user’s computer. Administrator rights are required to install the following:• Windows Installer 4.5
• Windows Powershell 1
• Microsoft SQL Server 2008 R2
• .Net Framework 4.0 or later
• Microsoft SQL 2005 Backwards Compatibility
• .Net AJAX Extensions
• Internet access to Microsoft.com
You can grant the user installing the Offline Web Client administrator rights or install all the required prerequisites before running the Saleslogix installation.
Installing Without Administrator Rights
To install the Offline Web Client without administrator rights, ensure you have installed all the prerequisites listed in the previous section. If the Offline Web Client installation does not detect the necessary prerequisites and the user running the installation does not have administrator rights, the Offline Web Client installation will not complete.
Required for Task Description
SaleslogixTM | Upgrading to Saleslogix v8.118

Upgrade Workplan
Web Remotes Task 49 - continued
Installing With Administrator Rights
To install the Offline Web Client and the required prerequisites, you must grant the user administrator rights for the computer on which you are installing Saleslogix. See your Microsoft documentation for instructions on granting administrator rights using one of the following options:• Add each user to the local machine’s Admin group for the duration of the
implementation.
• Use a domain user account that is a member of the domain admin group for the duration of the implementation.
To install
1 Saleslogix DVD > Install Saleslogix Client> Install Saleslogix Offline Web Client.
2 On the Welcome and License Agreement screens, read the information and accept the agreement, and then click Next.
3 On the remaining screens, click Install and Finish to complete the installation.
Remotes 50 Instruct Remote users and Offices to log on to the Synchronization Client and sync immediately after upgrading.Note Ensure Remote users and Offices enable “Apply Changes” during the synchronization cycle.
All Web 51 Upgrade the Web Host.Note To upgrade the Saleslogix Cache Server, see the Admin Tools and Servers installation.
To upgrade
1 You must log on as the local administrator to install the Web components on each machine.
2 On the Saleslogix Installation screen, click Standard Server Installation.
3 On the Standard Server Installation screen, click Web Host on IIS.
If the installation does not detect the necessary prerequisites, you will be prompted to install them. Click Install to allow Saleslogix to install the required components or Cancel to stop the installation.
4 In the Saleslogix Web Host message box, click Yes.
5 On the Welcome and License Agreement screens, read the information, accept the agreement, and then click Next.
6 On the Setup Type screen, select an installation type, and then click Next.
• Select Complete to install the Web Host.
• Select Custom to install only certain components or to change the installation location. Use the Custom Setup screen to enable or disable items for installation.
If you installed the Saleslogix Cache Server on a computer other than the Web Host, you must manually configure the web.config file to access the Saleslogix Cache Server computer. See the “Configuring the Saleslogix Cache Server” topic in the Application Architect help for details.
Required for Task Description
SaleslogixTM | Upgrading to Saleslogix v8.1 19

Upgrade Workplan
Upgrade Your Web Workspace
All Web Task 51 - continued
7 Depending on your installation type, you will be prompted to enter some or all of the following information on the installation screens:
• Use an existing web site - If you want the installation to use an existing Web site, click this button and select the Web site name. If you created an SData portal or Outlook sync in the Administrative Tools and Servers installation, you can select the existing Saleslogix Web site for the Web components.
• Create Web Site – Select this check box if you want the installation to automatically create a Web Site. Selecting this check box creates a Web site you can use to deploy the Web portals.
• Enter a Web site name – Type the name of the Web site that will appear in IIS. The default name is Saleslogix.
• Port – Enter the port number that the Saleslogix Web site will use. Note the port number for future reference. You must use port number 1025 or greater.
• Domain – Enter the network domain where you created the WebDLL user.
• User Account – Enter the name of the WebDLL user you created. The default value is WebDLL. If you used a different name, type it exactly as you did when you created it.
• Password and Confirm Password – Type the WebDLL user’s password.
• Configure Saleslogix Database - Clear this check box if you do not want to connect to the Saleslogix database, but still want to create a Web site. When you clear this check box, the other options on this screen are disabled.
• Saleslogix Server – Select or type the name of the computer on which you installed the Saleslogix Server.
• Saleslogix Database Alias – Select or enter the name of the connection to the Saleslogix database.
• Search for servers on port - Enter a port. By default, this is set to port number 1706.
• User Name – Enter a Saleslogix user name (such as Admin).
• Password – Enter the Saleslogix Server password for the Saleslogix user.
8 On the remaining screens, click Install and Finish to complete the installation.
Note The installation process removes prior versions before installing the new applications. During this process, you may see the message “Assembly not Found.” This is triggered between removing and replacing a service and does not indicate a problem with your installation. Click OK to continue the installation.
9 If prompted, restart your computer when the installation completes.
Required for Task Description
SaleslogixTM | Upgrading to Saleslogix v8.120

Upgrade Workplan
All Web 52 Open the Application Architect and update existing projects.
All existing projects that you open in the Application Architect must be updated to the new v8.1 structure. This only changes the format of the project.xml file and some of the XML components. You must still restore the Saleslogix v8.1.0 Project.Backup.zip in task 53. When opening a project created prior to version 8.1, you may be prompted to update the project format.
To update
1 Open the Application Architect.
2 The Application Architect automatically opens the last project you were working with and the Confirm Upgrade dialog box opens.
3 Click Yes.
If you do not want to update the format of this project, and you want to choose a different project, click No. Then, open the project you want to update.
4 After updating the project, information about the update can be found in the Output Window.
All Web 53 Restore the Saleslogix v8.1.0 project backup to the VFS workspace.
Saleslogix provides a project backup file that contains all Web changes for this release. You must add these changes to upgrade your Web installation. When upgrading with project backups, you do not need to apply Web upgrade bundles.
To guarantee that a client will always have access to the project model, deploy the client portal from a virtual file system-based project. It will always be accessible to the client because the VFS resides in the Saleslogix database. Remotes MUST be deployed from a VFS-based project, and it is recommended that production systems be deployed from a VFS-based project as well.
To restore
1 Locate the Saleslogix v8.1.0 Project.Backup.zip file.
Project backups are located in the Upgrades\Project Backups folder.
Note Additional project backups are available for use when creating a customization bundle (task 17). Use the Saleslogix v8.1.0 Project Backup file to receive all changes in this release. Disregard all other project backups when completing this task.
2 Copy the zip file to a local folder on the Application Architect computer. Ensure the folder path is as short as possible.
3 Open the Application Architect.
4 In the Project Workspaces window, select the VFS project workspace.
5 Right-click the project, and then click Restore Project.
6 In the Select Project Backup File to Restore From dialog box, browse to Saleslogix v8.1.0 Project.Backup.zip on your local machine (step 2).
7 Click OK.
Required for Task Description
SaleslogixTM | Upgrading to Saleslogix v8.1 21

Upgrade Workplan
SLX Job Server 54 Add Saleslogix JobServer target and SlxJobService portal.
The Saleslogix Job Server enables you to schedule single and recurring tasks for immediate or delayed execution, either manually or dynamically at run-time. It executes tasks out of process, releasing worker threads and memory for client sessions.
Saleslogix Web Client functionality that requires the Saleslogix Job Server includes:• Roll over incomplete activities
• Update remaining days for active contracts
• Update opportunities
• Update leads
• Delete leads
• Reporting
• Export to Excel
To add
1 In the Deployment Explorer, right-click Core Portals and select Edit Deployment.
2 Right-click Deployment Targets and select Add Target(s).
3 In the Select Target(s) window:
a In the Select Deployment Target(s) area, select the File System check box.
b In the Select Portal(s) area, select the SlxJobService check box.
c Click OK.
4 In the File System Target Settings area, browse to the location for the SlxJobService portal to be deployed to or enter the default path %ALLUSERSPROFILE%\Sage\Scheduling\Tenants. For example, C:\ProgramData\Sage\Scheduling\Tenants.
Note You can change the location path from the default setting, however you must also edit the Saleslogix.Scheduling.Server.exe.configedit to reflect the change. See An Introduction to Job Server in Saleslogix.pdf for information on how to complete this task.
Outlook Sync.55 If your implementation includes Outlook Sync, you must deploy portals. Take the following
actions for: • Windows Network Client only: Install the Web Host. Build and deploy the SData
portal.
• Remote Office and Offline Web Clients: Deploy the SData portal along with the SLXClient portal. The SData portal is part of the Core Portals deployment.
• Windows Remote Client: no action required. The SData portal is deployed as part of the LAN Remote Client install.
Required for Task Description
SaleslogixTM | Upgrading to Saleslogix v8.122
Upgrade Workplan
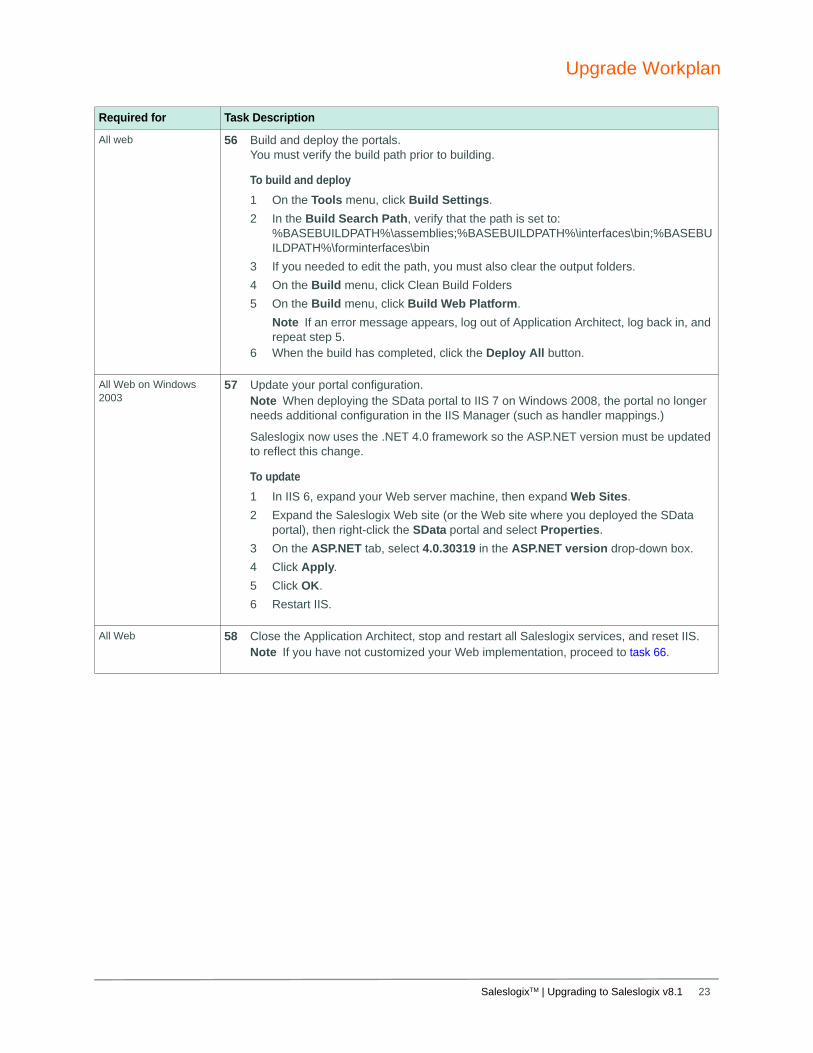
All web 56 Build and deploy the portals. You must verify the build path prior to building.
To build and deploy
1 On the Tools menu, click Build Settings.
2 In the Build Search Path, verify that the path is set to: %BASEBUILDPATH%\assemblies;%BASEBUILDPATH%\interfaces\bin;%BASEBUILDPATH%\forminterfaces\bin
3 If you needed to edit the path, you must also clear the output folders.
4 On the Build menu, click Clean Build Folders
5 On the Build menu, click Build Web Platform.
Note If an error message appears, log out of Application Architect, log back in, and repeat step 5.
6 When the build has completed, click the Deploy All button.
All Web on Windows 2003
57 Update your portal configuration. Note When deploying the SData portal to IIS 7 on Windows 2008, the portal no longer needs additional configuration in the IIS Manager (such as handler mappings.)
Saleslogix now uses the .NET 4.0 framework so the ASP.NET version must be updated to reflect this change.
To update
1 In IIS 6, expand your Web server machine, then expand Web Sites.
2 Expand the Saleslogix Web site (or the Web site where you deployed the SData portal), then right-click the SData portal and select Properties.
3 On the ASP.NET tab, select 4.0.30319 in the ASP.NET version drop-down box.
4 Click Apply.
5 Click OK.
6 Restart IIS.
All Web 58 Close the Application Architect, stop and restart all Saleslogix services, and reset IIS.Note If you have not customized your Web implementation, proceed to task 66.
Required for Task Description
SaleslogixTM | Upgrading to Saleslogix v8.1 23

Upgrade Workplan
Customized Web 59 Use the Application Architect to apply your custom bundle. Note If you have not customized your Web implementation, disregard this task.
Install the bundle you created of your customizations (task 18) to the new v8.1 project workspace.
During the bundle installation, you can merge your customizations with the Saleslogix changes. You can also validate the changes if there are duplicate items between the current project and the bundle you are installing.Note The default behavior is to overwrite the item in the target project (the 8.1 Saleslogix version of the item) with your customization (from the customization bundle).
After a merge, the modified file is the one that will be installed. It is not recommended to modify both files during a merge. However, if both files are modified, the file on the left is kept (unless your differencing tool specifies otherwise).
Upgrading Customizations Technical Preview
The QuickFormDiff utility is available as a technical preview in this release. (You can download this utility from the SLXToolsContrib repository at http://www.github.com/SageSalesLogix.) This utility provides a GUI interface that simplifies the process of merging your customizations with Saleslogix changes. If you follow the process documented in the QuickFormDiff Utility Readme.doc, you do not need to merge changes when applying your customization bundle as documented in this task. If you are using the QuickFormDiff Utility Readme with this Upgrade Workplan, install your customization bundle and overwrite all Saleslogix items.Note When you perform a multiple version upgrade (for example, from 7.5 to 8.1, you only need to merge customizations one time. This only applies to customizations, not other tasks.
To merge changes during bundle installation
1 In the Project Explorer, right-click your project folder, and then click Install Bundle.
The Select Bundle to Install dialog box opens.
2 Browse to and select the bundle you created in task 18 containing your customizations, and then click Open.
The Install Bundle dialog box appears.
3 Verify the Bundle Path information is correct, and then click Next.
The Optional Merged Content Path from a Previous Install option allows you to continue resolving conflicts from a prior bundle installation. If you have extensive customizations, you may have a large number of conflicts that must be resolved when applying your custom bundle.
If you use Preserve Merged Content (step 6), you can resolve conflicts over an extended period of time. For example, you may be installing a customization bundle with 50 conflicts and you have resolved only 25 of the conflicts. If you click the Preserve Merged Content button, cancel the installation, then apply the same bundle at a later time, use the Optional Merged Content Path to browse to the folder with merged content. Then, you can continue to resolve the remaining 25 conflicts from your customization bundle.
4 On the Select Items screen, ensure the Entity Model and Portals check boxes are selected.
This screen indicates the number of items that conflict with existing items in the current project.
Required for Task Description
SaleslogixTM | Upgrading to Saleslogix v8.124

Upgrade Workplan
Reapply Your Web Customizations
Customized Web Task 59 - continued
5 Review the Support Files Bin folder for each portal application in your bundle and clear any DLLs that begin with Saleslogix. You must select the item, and then clear the check box.
Assembly support files that are developed by Saleslogix may be included in your customization bundle. These files are not necessary for the merge process.
6 If you want to save changes made during the bundle installation, click the Preserve Merged Content button.
By default, all changes are saved to a temporary folder, and then deleted after the bundle installation is complete. When you preserve merged content, the folder containing merged customizations is not deleted. If you cannot resolve all conflicts at one time, click this button and use the Optional Merged Content Path from a Previous Install option when reapplying the bundle (step 3).
7 Clear the Only stop at items that require user intervention check box if you want to view only duplicate items in the bundle.
By default, when this check box is selected and you move through the items in the tree view, the cursor stops only on items that require user intervention (such as determining which item to keep or how to merge duplicate items). The behavior at install for the duplicate items is controlled by the selected install action.
8 Use the Next Dup and PrevDup buttons to select and resolve any duplicate items.
Items in red in the tree view indicate duplicates. These duplicates represent customized items in your bundle that are also in the project to which you are installing. A duplicate item with an install action set to DiffMerge requires the item to be merged before continuing the installation.
9 In the Install Action drop-down list, select DiffMerge.
DiffMerge allows you to use a third-party differencing tool to compare a customization in your bundle with the duplicate customization in your project, and to merge the differences between the two. If you do not have a third-party differencing tool configured, you are prompted to configure one.
10 After making your changes, click Merge Item.
The Merge Item button is enabled only when the DiffMerge install action is selected. If you clear a check box, the changes to that item will not be installed.
Note Some bundle items have multiple files (resource files). Your differencing tool will display them twice; once for the main file, and once for the resource (.resx) file. If there are no changes in the linked .resx file, it does not display.
11 (Optional) To modify an item in the Bundle Model tree view without having to use a differencing tool again, click an item in the tree view, and then click View Item.
The View Bundle Item text editor opens.
Note If you need to remove all changes you have made to an item, click Undo Changes. This removes all changes and reverts to the original state of the item in the bundle
12 Click Next.
13 Click Finish.
Required for Task Description
SaleslogixTM | Upgrading to Saleslogix v8.1 25

Upgrade Workplan
Customized Web 60 If necessary, apply your custom schema to the database.
If the database you are restoring the project to is the database where your customizations were created, custom schema is already included.
If you are applying a customization bundle that relies on custom schema to a new or different database than the database where the schema was developed, then you must also apply the bundle that contains your custom schema to the new database.
You need to apply your custom schema if you created your customization bundle on a different database than the one on which you are applying the customization bundle.
Customized Web 61 Recreate your Dashboard customizations with the customization you recorded in task 12.
Customized Web 62 Reapply customizations from the web.config file(s) to the web.config and appSettings.config file(s).
Application settings have been moved from the web.config file to the appSettings.config file. Customizations to the appSettings section must be merged into the appSettings.config file.
For more information see the “Editing Configuration Files” topic in the Application Architect help.
To update
1 In the Application Architect, open the web.config file.
2 Update the new web.config files with the customizations you recorded in task 11.
3 In the Application Architect, open the appSettings.config file.
4 Merge any customization made to the appSettings section of the web.config file to the appSettings.config file.
Required for Task Description
SaleslogixTM | Upgrading to Saleslogix v8.126

Upgrade Workplan
Customized Web 63 Update any custom quick forms where the Currency Control ExchangeRateType value is set to OpportunityRate or SalesOrderRate.
In earlier releases, the Currency Control ExchangeRateType contained four enum values (Opportunity Rate, Sales Order Rate, Base Rate, My Rate). In this release, ExchangeRateType contains three values (Base Rate, My Rate, Entity Rate) and two deprecated values (Sales Order Rate, Opportunity Rate). For custom forms where the ExchangeRateType value is set to either SalesOrderRate or OpportunityRate it is advisable to change to EntityRate.
To update
1 Open the xml file that contains the quick form configuration metadata.
The xml files will be listed in the build exception. For example, …\Model\Entity Model\SalesLogix Application Entities\SalesOrderItem\QuickForms\ EditSalesOrderItem.main.quickform.xml
2 Find the ExchangeRateType node inside the ControlDefinition node for the currency control and change the value of the ExchangeRateType property from SalesOrderRate OR OpportunityRate to EntityRate.
The following is an example of an updated ControlDefinition node:
• Before:
<SalesLogix:Currency runat="server" ID="curSubTotal" DisplayMode="AsText" ExchangeRateType="SalesOrderRate"DisplayCurrencyCode="true">
</SalesLogix:Currency>
• After:
<SalesLogix:Currency runat="server" ID="curSubTotal" DisplayMode="AsText" ExchangeRateType="EntityRate"DisplayCurrencyCode="true">
</SalesLogix:Currency>
Customizations using ExtJS
This task is required if you are upgrading from v7.5.4.
This task is not required if you are upgrading from v8.0.
64 [Breaking Change] Review your custom code (including Widgets) for the use of ExtJS. Saleslogix has replaced the ExtJS framework with the DoJo framework. You must either remove your use of ExtJS or else acquire an appropriate license from the third-party vendor.
Customized Web 65 If you have custom code, review the list of breaking changes to the Saleslogix API and change references to classes and members in your custom code as appropriate.
See the SDK Documentation area on SupportOnline for the API Change List for this and previous releases.
Optional 66 Users will need to reset their user options when they log into the Saleslogix Web Client. Instruct users to update their user options by clicking Tools > Options.
Required for Task Description
SaleslogixTM | Upgrading to Saleslogix v8.1 27

Upgrade Workplan
This task is required if you are upgrading Saleslogix Mobile
67 Convert your mobile customizations.1 Change all modules (files) to use AMD loading.
2 Change all Ext calls to Dojo equivalents.
3 Verify that all modules names are fixed to reflect the new folder structure.
4 Verify that any property name changes do not affect your views or customization's.
5 Verify that the changed function names/removal do not affect your views or customization's.
6 Consider the newly added properties and methods to enhance existing customization's.
Build and Deploy your Web Portals
This task is required for All Web
68 Use the Application Architect to build and deploy the appropriate Web portal(s). Use the Rebuild Web Platform option on the Build menu when upgrading existing portals. See the “Rebuilding the Web Platform” and “Deploying Portals” topics in the Application Architect Help for instructions.Note Offline Web Clients must be deployed using the Virtual File System (VFS). Deployments created from a local file system are not supported and will not function correctly.
All Web 69 Clear the web browser’s cache.
Before logging into the upgraded web client, instruct users to clear the cache of the web browser.
For detailed steps, please refer to your browser's help.
Required for Task Description
SaleslogixTM | Upgrading to Saleslogix v8.128

Upgrade Workplan
All Web 70 Run the Role Security utility to update roles and secured actions.Note If you modified the default roles by removing a role or removing a secured action from a role, note all your changes or create a backup of your roles before proceeding.
The Role Security utility must be run to upgrade Web Client roles. The utility modifies existing roles and secured actions using the following rules:• If you removed a default Saleslogix role, the utility adds the role.
• If you removed a secured action from a default Saleslogix role, the utility adds the secured action back to the role.
• If you added a secured action to a default Saleslogix role, the utility leaves the added actions in the role.
• If you created custom roles, the utility does not modify custom roles.
To run
1 On the Administrative Workstation, browse to the ...Program Files\SalesLogix folder.
The utility is installed with the Administrative Tools and Servers installation.
2 Right-click the RoleSecurityInstall.bat file, and then click Edit.
3 Modify the following values to match your environment:
• SLXServer
• Alias
• Port
• Password
4 Save your changes and close the .bat file.
5 Double-click the RoleSecurityInstall.bat file to run the utility.
Note For information on the arguments of this utility, type the utility name at a command line prompt in the Saleslogix install directory on the Administrative Workstation.
Required for Task Description
SaleslogixTM | Upgrading to Saleslogix v8.1 29

Upgrade Workplan
All Web on Windows 2003
71 Update your SData configuration. Note For IIS7 and above, the Application Architect automatically configures the necessary portal settings.
Saleslogix now uses the .NET 4.0 framework so the aspnet_isapi handler mapping must be updated to reflect this change.
To update
1 In IIS 6, expand your Web server machine, then expand Web Sites.
2 Expand the Saleslogix Web site (or the Web site where you deployed the SData portal), right-click the SData portal, then select Properties.
3 On the Virtual Directory tab, in the Application Settings section, click Configuration. The Application Configuration dialog box opens.
4 On the Mappings tab, under Application Extensions, select the .ashx extension, and then click Edit. The Add/Edit Application Extension Mapping dialog box opens.
5 Select the entire entry in the Executable box, right-click the Executable box, and then click Copy.
6 Select the All verbs option, and then click OK.
7 In the Wildcard Application Maps area, click Insert.
8 In the Add/Edit Application Extension Mapping dialog box, right-click the Executable box, and then click Paste.The file C:\WINDOWS\Microsoft.NET\Framework\v4.0.30319\aspnet_isapi.dll is pasted into the box.
9 Clear the Verify that file exists check box.
10 Click OK.
11 Click OK twice more.
12 Close IIS Manager.
Customized Web 72 Add your customizations to the MergeConfiguration.xml and PotentialMatchConfiguration.xml files.
Use the customizations recorded in task 16 to merge your customizations with the updated Saleslogix file.
To merge
1 In the Web Client, convert a lead.
Converting a lead automatically creates an updated MergeConfiguration.xml and PotentialMatchConfiguration.xml files.
2 In the Application Architect, open the Virtual File System Explorer.
3 In the tree view expand Configuration, and then expand Global.
4 Add your customizations to the updated MergeConfiguration.xml and PotentialMatchConfiguration.xml files.
Remotes 73 Cycle your Synchronization Server(s) so changes are sent to remotes. Use Custom Sync since it is not necessary to run subscription.Note See the “Creating a Custom Sync Cycle” topic in the Administrator Help for more information.
Required for Task Description
SaleslogixTM | Upgrading to Saleslogix v8.130

Upgrade Workplan
All Web 74 Import your upgraded project to the VFS.
After upgrading, you may want to import your upgraded project (stored locally) to the Virtual File System (containing the older project). This ensures the project in the VFS is the most recent version.
For detailed steps to import the project, see the “Importing from Another Project” topic in the Application Architect Help.
All Web 75 Instruct Web Client and Offline Web Client users to download the Desktop Integration Module.
Desktop Integration extends Saleslogix Web Client functionality by downloading client-side files for the following features:• Office Integration encompasses Mail Merge, Export to Excel, and Drag and Drop
functionality. Administrators can also drag-and-drop library files. In v8.1 Export to Excel is removed.
• Outlook Integration encompasses SendSLX and Record to History. In v8.1 it also includes SLX Address book, Insert Library item, Insert vCard, Insert Contact vCard, and Outlook Sync.
Before users install and configure these features, ensure you configured SData as detailed in tasks 71.Note Offline Web Client users must download the Desktop Integration Module to use Web Reporting.
To install and configure
1 Open the Web Client login screen.
• For Web Client users, open the Saleslogix Web site.
• For Offline Web Client users, in your System Tray, right-click Personal Web Server, point to SlxClient, and click Open Site.
2 Click Enhance Saleslogix.
You must be a Power User or Admin user to install Desktop Integration.
3 Click the associated Find out more link to open the “Installing and Using Saleslogix Desktop Integration” help topic for browser specific configuration information.
Replacing Intellisync for SalesLogix with Outlook Sync
Perform Post-Upgrade Tasks
Outlook Sync 76 Installing Outlook Sync
Intellisync for SalesLogix has been replaced by Outlook Sync in v8.1. Outlook Sync enables users to share Saleslogix activities and contacts with Microsoft Outlook.
Outlook Sync requires that an SData portal be deployed.
If your installation is:• Windows Network Client only: Install the Web Host. Open the Application Architect
and build and deploy the SLXClient and SData portals.
• Remote Office and Offline Web Clients: Deploy the SData portal along with the SLXClient portal. The SData portal is part of the Core Portals deployment.
• Windows Remote Client: no extra actions required. Deployed as part of the LAN Remote Client install.
Required for Task Description
SaleslogixTM | Upgrading to Saleslogix v8.1 31

Upgrade Workplan
Outlook Sync 77 Activate Outlook Sync.
To activate
1 Log on to the Saleslogix Web Client as Administrator.
2 In the Navigation bar, click SData Sync Configuration.
3 Set up the SData feed:
a Saleslogix Feed: This box auto-populates with the information you enter into the fields below.
b Use SSL: Select if your implementation uses SSL. Strongly recommended for security
c Port: Accept the default (80) unless you changed the port used for the SData portal.
d Data Portal: Auto-populates with SData. This is the default, unless the name was changed in Application Architect when deploying the portal.
e User Name; Admin
f Password: Password for the Administrator user.
g Display Name: Type a name to identify the Saleslogix Feed.
h Click Test Link. If the test fails, verify the information entered in steps a through g.
4 On the Integrations tab, locate OutlookSync and select the Enabled check box.
5 Click the Save icon.
Outlook Sync 78 Notify your users of the following:• Windows Client users: Outlook sync is installed with the Saleslogix client.
• Web Client users: On the Web Client Log On screen, users must click Install enhancements.
In both installation scenarios, the first time the user opens Microsoft Outlook after Saleslogix has been installed/upgraded, he or she will be invited to configure Outlook Sync.Note When installing Desktop Integration with Office 2007, users must be logged on with Administrative rights.
To configure
In the Saleslogix Connector Options window, set the following options:1 Connection
a On the Connections tab: accept the default server url unless prompted to enter a different URL by your system administrator.
b User name is the name you use to log on to Saleslogix
c Password is your Saleslogix password.
2 Sync
a The sync options enable you to specify what records sync (Contacts, Appointments, Tasks) and the direction in which they sync (one or two way
Required for Task Description
SaleslogixTM | Upgrading to Saleslogix v8.132

Upgrade Workplan
Task 78 (cont.)
b Sync interval determines how often the sync cycle recurs. The default setting is 5 minutes. Setting a more frequent cycle may impact performance.
Note The sync interval is the time between when the sync cycle ends and when it begins again. Consider the following scenario:Your sync cycle has begun and takes 10 minutes to complete. During that time, you add more records to be synced. Your new records will not begin to sync until 5 minutes after the current cycle ends.
3 Select any of the following for SendSLX and Record to History:
• Prompt for Duplicate Contacts - Prompts you when a duplicate contact or lead is detected.
• Prompt for Contacts - Prompts you to select which contacts or leads the history item should be associated with.
• Prompt for Unresolved Contacts - Prompts you when a contact or lead is not found in the database.
• Display History Details before saving - Prompts you with the Complete E-mail dialog box before an e-mail message is recorded to history.
• Select the Display Tray Notifications check box if you want to see pop-up messages that describe Desktop Manager activities as they occur.
• (Optional) set a minimum Image Attachment size to ignore. And specify types of files to ignore. For example, you may want to ignore the tiny images people use for their signatures. Default setting is 0. Type in the file type.
• Enable Record to history for appointments.
4 Address Book
a Set the contact name display options (first, last or last, first).
b Under When showing Address Book, select any of the following options:
• Show Groups as separate folders – In the Outlook Address Book dialog box, each of the Saleslogix groups appears under Saleslogix Address Book. If you select a group, such as Latest Contacts, all of the contacts in the group appear. If you do not select the option, only Ad Hoc groups appear under the Saleslogix Address Book.
• Show Accounts as Distribution Lists – In the Outlook Address Book dialog box, you can select Accounts under the Saleslogix Address Book. Each account appears as a distribution list. If you do not select this option, accounts are not available under the Saleslogix Address Book.
• Show Opportunities– In the Outlook Address Book dialog box, you can select Opportunities under the Saleslogix Address Book. Each opportunity appears as a distribution list. If you do not select this option, opportunities are not available under the Saleslogix Address Book.
5 Logging
• Enable logging only if there are issues and you want to troubleshoot.
6 All Options
• Named value pairs. Use to add custom properties to the Connector Options.
7 Sync tab
Use this window to specify how you want information to be exchanged between Saleslogix and Outlook. The options allow you to specify the Ad Hoc group to use to store the information that will be synced back and forth. The default name is SyncSaleslogix, but your administrator may have created the group under another name.
Required for Task Description
SaleslogixTM | Upgrading to Saleslogix v8.1 33

Upgrade Workplan
Optional 79 Enable HTTP Compression on IIS 7 with IIS 6 compatibility.Note IIS 6 compression is documented in the Saleslogix Implementation Guide.
If your Web site(s) use large amounts of bandwidth, or if you would like to more effectively use bandwidth, you may want to consider enabling HTTP compression. HTTP compression provides faster transmission time between compression-enabled browsers and IIS. Compression has no one-size-fits-all solution that enables all users to achieve the same results in different environments. However, there are some guidelines that may increase performance in terms of lighter network bandwidth at the expense of CPU and memory used by the IIS server.
You must be a member of the Administrators group on the local computer to enable compression.
By default, only static compression is enabled in IIS 7. Enabling dynamic compression will provide significantly smaller files over the network. In addition, there are a number of configuration elements that may be modified to provide more benefits. You may need to try different settings to achieve optimum results.
The following information can be used as a guide to implement compression in your Saleslogix implementation. To help evaluate and test your specific compression settings, you may want to use a third-party HTTP compression debugging tool.
To enable
1 Open IIS Manager, and select your Saleslogix Web site.
2 Under IIS, double-click Compression.
3 Select the Enable dynamic content compression check box.
If necessary, enable the dynamic content compression module in Server Manager (Roles) to enable the check box.
4 In the Actions pane, click Apply.
If necessary, modify the ApplicationHost.config file using the following example. This file is stored in %SystemRoot%\System32\inetsrv\config\ApplicationHost.config.
Required for Task Description
SaleslogixTM | Upgrading to Saleslogix v8.134

Upgrade Workplan
Optional Task 79 - continued
In IIS 7 the configuration file replaces the Metabase Explorer compression values used in IIS 6. For more information, see the Microsoft IIS Web site at http://www.iis.net/ConfigReference.
• Example Configuration Settings:
<httpCompression directory="%SystemDrive%\inetpub\temp\IIS Temporary Compressed Files" maxDiskSpaceUsage="500" noCompressionForHttp10="false" noCompressionForProxies="false" ><scheme name="gzip" dll="%Windir%\system32\inetsrv\gzip.dll" dynamicCompressionLevel="10" staticCompressionLevel="10"/><scheme name="deflate" dll="%Windir%\system32\inetsrv\gzip.dll" dynamicCompressionLevel="10" staticCompressionLevel="10" />
<staticTypes><add mimeType="text/*" enabled="true" /><add mimeType="message/*" enabled="true" /><add mimeType="application/*" enabled="true" /><add mimeType="*/*" enabled="false" />
</staticTypes><dynamicTypes><add mimeType="text/*" enabled="true" /><add mimeType="message/*" enabled="true" /><add mimeType="application/*" enabled="true" /><add mimeType="*/*" enabled="false" />
</dynamicTypes></httpCompression>
This task is required if you are upgrading from a Unicode enabled installation
This task is not required if you are upgrading from a non-Unicode installation
80 If your Saleslogix installation is Unicode enabled, manually update the Provider Extensions.
In some Unicode installations, users with multi-byte character user names cannot log on to Saleslogix. To fix this issue, complete the following configuration steps.
To configure
1 On the Saleslogix media, browse to the SDK Examples > Provider Extensions folder.
2 Copy the Provider Extensions folder to your Saleslogix Server (or to any computer that can connect to the Saleslogix Server).
3 From the Provider Extensions folder, open the test.udl file in the OLE DB Core Services application.
4 Set the following values in the test.udl file, test the connection, and then click OK.
• Saleslogix Server
• Database Name
• Saleslogix user name (generally admin)
• Saleslogix user name password
• Select the Allow Saving Password option
5 Open a command prompt and change the directory to the Provider Extensions folder.
6 At the command prompt run the following command: slxproviderplugin -m slxproviderextension\provider_extensions.xml -u test.udl -i -d
The “** SUCCESS: Plugin installed successfully” message displays when the plugin has been installed.
7 Restart all Saleslogix Servers.
Required for Task Description
SaleslogixTM | Upgrading to Saleslogix v8.1 35

Upgrade Workplan
You have completed your upgrade. See the “What’s New in this Release” topic in the online Help systems for an explanation of the new features.
All Web 81 Instruct Web Client users to set the Scrollbar Item setting to 17 or less.
The Scrollbar Item setting must be 17 or less on each Web Client computer or scrollbars may not display correctly. Verify the setting from the Control Panel.• (XP/2000/2003) The Scrollbar option is set in the Control Panel > Appearance and
Themes > Display properties Appearance tab > Advanced > Item drop-down menu.
• (Vista/7/2008) The Scrollbar option is set in the Control Panel > Personalization > Window Color > Window Color and Appearance > Item drop-down menu.
Required for Task Description
SaleslogixTM | Upgrading to Saleslogix v8.136

2 |
Chapter Changes in this ReleaseThis chapter lists all of the changes to Saleslogix since version 7.5.4. See the “What’s New in this Release” topic in the online Help systems for more information about the new features.
Changes in Version 8.1In addition to improved product stability due to defect fixes, v8.1 contains the following new functionality.
General Enhancements
• Saleslogix Network Client, Web Client, Customer Portal, and Application Architect interfaces are rebranded with the new Saleslogix name and Swiftpage corporate colors.
• Saleslogix documentation and help files are re-branded with the new Saleslogix name and Swiftpage corporate colors.
• The new Outlook Sync feature enables you to share your Saleslogix activities and contacts with Microsoft Outlook. This replaces Intellisync for Saleslogix, which had been built on Nokia’s discontinued Intellisync product.
Web Client Enhancements
• Three new widgets are available in the Saleslogix Web Client:
• The SData Widget enables Saleslogix Web Client users to display information from pre-defined data feeds on their dashboards.
• The Web Feed Widget enables users to list and access the RSS and/or Atom feeds of their choice from the Saleslogix Web Client dashboard.
• The Website Widget enables users to display the web site or microsite of their choice inside their Saleslogix dashboards.
• Saleslogix Web Client users can now associate multiple attendees per activity.
• Web Client reporting has been modified to use the new Saleslogix Job Manager.
• The Sync Job entity now has a New Sync History tab.
• The new Sync History List view allows users to review Integrations synchronization history, including Outlook Sync history.
• Web Admin now includes:
• OAuth support for integrations.
• Users with Administrator privileges will see Integrations List and Detail views. The Integration Detail view contains connection and synchronization information and may include tabs for scopes, links, resources, and options.
• The ability to associate a user with a contact.
• The ability to set up an SData feed to synchronize Saleslogix with integrated systems.
• Job Manager, a user interface for the Job Service.
Any change in the underlying architecture in the base product causing customizations to not function properly is identified as a [Breaking Change].
37 SaleslogixTM | Upgrading to Saleslogix v8.1 37

Changes in this Release
Saleslogix Client Enhancements
• Multiple attendees per activity functionality is not available in the Saleslogix Client. However, in installations where both Clients are in use, when the Activity is completed in the Web Client, history viewed in the Windows Client will show all of the attendees.
• [Breaking Change] SLX Address Book in Microsoft Outlook, insert VCard in Microsoft Outlook, insert ContactCard in Microsoft Outlook, and Insert Library doc in Microsoft Outlook all require the SData portal. For LAN -only implementations to use these features, you must install the Web Host, and build and deploy the SData portal.
Reporting Enhancements
• The Web Reporting server is no longer required. Saleslogix Web Reporting now leverages the Job Server. If your environment includes the Job Server, and the documents logging folder has been created and shared as described in the Saleslogix Implementation Guide, there are no additional steps to install reporting.
• [Breaking Change] Prior to v8.1, Saleslogix used the Crystal Reports ActiveX Designer Run Time Library 11.5.API when working with Crystal Reports documents (*.RPT), however, this COM library was deprecated in subsequent Crystal Reports versions. Saleslogix 8.1 installs “SAP Crystal Reports, developer version for Microsoft Visual Studio”. This is a .NET based runtime; the COM interface no longer exists.
• A new COM Library exposes reporting COM objects that are part of the API facade of portions of the original Crystal Reports COM API. This enables Saleslogix Network Client (including VBScript), Architect, Administrator, and so forth to work with the underlying .NET API.
• Saleslogix Windows Client continues to use Crystal Reports. For versions of the components being installed, see the Compatibility Guide.
• In implementations where Crystal Reports is installed for the Windows Client, it must be standalone. Saleslogix cannot integrate with the Crystal Reports Server. This is a contractual obligation with SAP.
Application Architect Enhancements
• SData attachments endpoint now supports dynamic schema updates.
• The Job Service API now provides a simple method to trigger and query jobs from an entity event or business rule.
Saleslogix Mobile Enhancements
• Updated logos and color scheme. Color scheme can now be customized.
• Key Performance Indicators (KPIs) are available for Opportunities, Tickets, Leads, Contacts, Accounts, and Notes\History.
• Improved filtering: List views have default search hashtags, such as #my-accounts, #my-contacts.
• A new right menu provides easy ‘contextual’ access to features depending on List type, such as:
• The lookup/search box (moved from the top of the list).
• All hashtags available for the list. Click the hashtag to insert that tag into the Search field, remove the tag, or
• replace it with a different one.
• Any KPIs available for a record type. Click a KPI to display or clear it from the top of the list.
• Improved usability:
• New List view card layouts provide more quick actions and updated quick action icons.
• A new attachment quick action enables adding an attachment from accounts, contacts, leads, tickets or
• opportunities.
• A mobile phone field is now available on the Lead list, Edit, and Detail views.
• A phone number field is now available on Activity Insert and Edit views. It is automatically populated with
• information from the Account or Contact record.
• The Activity List view displays dates in relative terms (3 hours ago, in 2 years, and so forth.).
SaleslogixTM | Upgrading to Saleslogix v8.138

Changes in this Release
• New “Lazy Load” list feature enables more records to become visible when you reach the
• bottom of a list.
• Icon access enables you to go to the Global menu from any Saleslogix Mobile Client page.
• New camera support enables you to capture and upload a picture to your Saleslogix attachments.
• New Attachments support enables adding an attachment to any record, finding an attachment using Lookups, searching through a list of attachments, and opening an attachment associated to a Sage SalesLogix record. The supported attachment types are PNG, BMP, TIF, GIF, and JPEG, but your ability to view will be determined by the viewers available on your device.
• My Activities enables seeing the activities in which you are a leader or member.
• Use My Activity Quick Actions to complete, accept, or decline an activity, and to make a call. You can also make notes after your call.
• Add, edit, and delete Opportunity Products through the Mobile Client.
• The SpeedSearch feature for locating records stored in Saleslogix is now available on the Mobile Client.
• The Mobile Client now supports multi-currency.
Deprecated Components
• Web Reporting server is no longer required. Web reporting now uses the Job Manager.
• Intellisync for Saleslogix, which had been built on Nokia’s discontinued Intellisync product, is not supported in v8.1. Saleslogix uses the new Outlook Sync feature to share your Saleslogix activities and contacts with Microsoft Outlook.
Changes in Version 8.0In addition to defect fixes, v8.0 contains the following new functionality:
General Enhancements
• [Breaking Change] Saleslogix has replaced the ExtJS framework with the DoJo framework. You must either remove your use of ExtJS or else acquire an appropriate license.
• Ability to set default Mail Merge templates for leads.
• Additional standard SpeedSearch indexes.
• Ability to secure a SpeedSearch index to limit the users that can retrieve data from that index during a SpeedSearch.
• New large icons toolbar in the Saleslogix Client.
• More applications and features support Unicode. For example, the Network Client can now read and write Unicode.
• A new Location field on the Activity, History, and Event views.
• Windows 7 support for thumbnail preview images for the Saleslogix Network Client.
• New options for synchronizing table data between the host and remote databases include:
• Sync table either direction, host to remote only, or remote to host only.
• Restrict data on remotes by deleting after x amount of days after successful sync.
• New field CreateSource has been added to several application tables to track which application inserted the record into the database.
Web Client Enhancements
• New look and feel of the Web Client with updated styles and colors.
• List view groups remember column width changes.
SaleslogixTM | Upgrading to Saleslogix v8.1 39

Changes in this Release
• Perform a Lookup from the left Navigation bar in order to look up any type of record.
• New Alerts feature tells you when there is an activity alarm or when you have a new unconfirmed activity notification. You can set Alerts options to customize your alerts.
• Improved Activities:
• The Availability tab allows you to view other user's calendars and determine availability for other user's and resources.
• A Location box allows you to enter a location for a phone call or meeting or automatically add the location if one is selected from the Availability tab.
• Activity confirmations now provide more information to help you determine whether to accept or decline an invitation.
• Updated Activity List view has new tabs, improved filters and Common Tasks. Use the My Activities tab to view activities where you are the leader or a member.
• You can view contact and account or lead information, like a phone number, by hovering over the name in the activity detail view or Alerts view.
• New and updated activity and calendar user options:
• New activity user options allow you to set defaults per activity type.
• New calendar user options allow you to determine what activity information to show on the calendar, the days of your work week, and your first day of the week. You can also set an option to remember the users whose calendars you selected to view.
• Options are now shared between the Saleslogix Client and Saleslogix Web Client. Some users may need to reset their options after upgrading to the latest version.
• Calendar has been updated and includes new features such as:
• Ability to customize which days comprise your work week.
• Ability to see up to three users on each calendar view.
• Move Contact and Duplicate Contact are now handled separately. The new methods allow you to determine what information is moved or reassigned.
• Increased functionality for Mail Merge:
• New Mail Merge templates for leads.
• Ability to share Mail Merge templates with other users.
• All Mail Merge tasks can be done through the Web Client.
• The Opportunity menu has been removed. Update Multiple Opportunities and Opportunity Statistics are now available on the Opportunity List view right-click menu and Common Tasks area.
• Features for Administrators and those with administrative rights:
• Ability to lock out Web Client users after failed logon attempts and reset locked out users.
• The Standard Role now grants view access to products and packages, instead of add, edit, or delete access.
• The Security Manager allows you to manage field-level access within security profiles.
• Resource management allows you to identify if a resource is a location.
• The Web Form Designer enables you to make simple changes to a view. For example, you can change captions, move things around, or add and hide information. For more information, refer to the “Form Designer - Working with Forms” topic in the Web Client help.
• Now fully supports Unicode.
• In general caching, cookies are no longer used. Client-side caching uses local storage for things such as pick lists and session storage for things such as user options. Only session ID and remembered logon use cookies now.
Application Architect Enhancements
General
• You can quickly find and open project items without expanding the Project Explorer or Deployment Explorer using the new Find Item command or Ctrl-T. Refer to the “Navigating and Opening Project Items” topic in Application Architect help for more information.
SaleslogixTM | Upgrading to Saleslogix v8.140

Changes in this Release
• The Select Project Backup File dialog box has been enhanced to include a Backup Date column and re-sizable columns.
• You can now bundle deletes of support files.
• To improve bundling performance, you can now select the portals that should be examined for differences. Refer to the “Creating a Manifest by Project Differences” topic in the Application Architect help for more information.
• Application Architect is configured to use the Saleslogix Cache server to improve performance of the VFS.
• Use the Saleslogix Job Server to schedule jobs. It enables you to execute tasks out of process, releasing worker threads and memory in the Web Host. Good candidates for this are resource intensive tasks and long running tasks. Refer to the “About the Saleslogix Job Server” topic in the Application Architect help for more information.
• Error logging has been enhanced with additional detail including user and system information for better debugging. Also, you can configure aspects of error handling such as the level of detail provided per user. Refer to comments in the appSettings.config file of the Saleslogix portal for more information.
• Client-side form validation has been added to the Web Client. Refer to “About Client-Side Form Validation” in the Application Architect help for more information.
• An image sprite is used to reduce the number of server requests for icons. Customizations can also use the global image sprite to reduce server requests. Refer to the “Using the Global CSS Image Sprite” topic in the Application Architect help for more information.
• The Move Contact process provides several opportunities for customization. Refer to the “Customizing the Move Contact Process” topic in the Application Architect help for more information.
• The OLE DB provider extension for history security has been de-coupled from the activities security extension so it can be enabled and disabled independently. Now it is enabled for all LAN, Web, and Mobile clients by default so history records are secured. Refer to the “OLE DB Provider Extensions” topic in the Application Architect help for more information.
• You can add MIME types for attachments. Refer to the “Adding File Types for Attachments” topic in the Application Architect help for more information.
• The work practice survey feature was removed.
• [Breaking Change] The task pane workspace update panel has been removed. If you have custom tasklets that reside in the task pane workspace and have server-side controls that rely on postback behavior, ensure they have their own update panels.
• [Breaking Change] All controls use the Dojo Javascript framework for their client-side code. If you extend the control, you must reapply your customizations.
• .NET forms and SData forms use the same client-side control code.
• Sales Library has been converted to Dojo and now consumes SData.
Quick Forms
• Dynamic customization - You can make changes to quick forms in Application Architect and see them real-time in the Web Client. Allows developers to rapidly lay out quick forms without repeated builds and deploys. Refer to the “About Dynamic Customization” topic in the Application Architect help for more information.
• The style of some controls has changed. For example, single-select pick lists use a down arrow while multi-select pick lists still have an ellipsis. Refer to the control topics in the Application Architect help for more information.
• C# Code Snippets are no longer labeled Obsolete. Because the code is embedded in the forms, the snippets are compatible with dynamic customization; when you make changes to the code, it will update live on the web site. Refer to the “About Dynamic Customization” topic in the Application Architect help for more information.
• A quick form editing capability was added to the Saleslogix Web Client. For information on how the Form Designer in the Web Client interacts with the Quick Form Designer in Application Architect, refer to the “Editing a Quick Form in the Web Client” topic in the Application Architect help.
• The Quick Form Designer has a new look and work flow. Refer to the “Editing a Quick Form” topic in the Application Architect help for information on the Quick Form Designer:
• Toolbar Editor - A graphical toolbar editor on the design surface lets you easily create standard Save and Delete buttons as well as business rule buttons and control buttons. Relocation of buttons between left, middle, and right is done through drag and drop instead of delete and recreate. Refer to the “Toolbar Editor” topic in the Application Architect help for more information.
SaleslogixTM | Upgrading to Saleslogix v8.1 41

Changes in this Release
• Control layout pane - The control layout pane features a reorganized context menu. Related controls are grouped on submenus and row and column commands are collected together. Refer to the “Editing the Control Layout” topic in the Application Architect help for more information.
• Data source/non-visual control well - The Non-Visual Controls area has a constant presence at the bottom.
• Resource editor - The Resource Editor is accessible from the design surface and has been changed to improve work flow. Refer to the “Working with Resources” topic in the Application Architect help for more information.
• Action Designer/Code Editor - A code tab lets you manage all actions and JavaScript properties from one place. It introduces a rich JavaScript editing experience. Refer to the “Editing Actions and JavaScript Properties” and “JavaScript Editor” topics in the Application Architect help for more information.
• Custom controls can be added to the Quick Form Designer insert menus. Refer to the “Hosting Custom Controls in the Quick Form Designer” topic in the Application Architect help for more information.
• Add New Property command - Allows you to quickly create a new dynamic entity property and a bound control with the Quick Form Designer. This eliminates the need to add a column to the database before using it on a quick form. Refer to the “Inserting a New Entity Property” topic in the Application Architect help for more information.
• Swap Controls command - Allows you to trade the position of two controls. Refer to "Move Controls" in the “Editing the Control Layout” topic in the Application Architect help for more information.
• The ability to host Silverlight controls has been added to quick forms. Refer to the “Silverlight Control Host” topic in the Application Architect help for more information.
• A Client Script Include property was added to reduce the need for master page manipulation. Refer to the “Including Client Scripts in Smart Parts” topic in the Application Architect help for more information.
• A Client Resource Keys form property was added to give the ability to make strings used in JavaScript localizable. Refer to the “Form Properties” topic in the Application Architect help for more information.
• An Extended Properties property was added to forms and controls. It allows you to define key/value pairs to pass into the smart part code generation process. Refer to the “Extending Control and Form Properties” topic in the Application Architect help for more information.
• A Sort Direction property was added to columns of grid controls for specification of default sort order. Refer to the “QFDataGridCol Collection Editor” topic in the Application Architect help for more information.
• Prefilter properties can be made visible in the Lookup By section of a lookup dialog box where users can then modify and remove them. Refer to the “LookupPreFilter Collection Editor” topic in the Application Architect help for more information.
• The Required property was added to more controls: Currency, DateTime Picker, Dependency Lookup, Numeric, Person Name, Radio Group, and Time Zone. Refer to the “Required” topic in the Application Architect help for more information.
• The Lookup, Owner, and User controls use SData to query the database which requires that the lookup entity have its SData feed turned on. Refer to the “Generating SData Feeds” topic in the Application Architect help for more Information.
• [Breaking Change] Most high-use quick forms that contain grids have been converted to use the Editable Grid control. However Sage SalesLogix 8.0 supports both versions of the grid control. You can continue to use any customized forms that use the old grid, or else reapply your customizations to the 8.0 versions of the forms.
• Editable Grid Control was enhanced:
• The Relate button of the Editable Grid control has a new property, Conditional Show, which allows you to specify a condition and message for when a message should be displayed instead of the lookup dialog box. Refer to Conditional Show in the “EditableGridToolDefinition Collection Editor” topic in the Application Architect help for more information.
• Preview Property was added to the Editable Grid control so you can configure a preview pane for the grid. Refer to the “Preview Property” topic in the Application Architect help for more information.
• Column types (Date/Time, Email, Phone, SLX User, and Pick List Formatter) and properties (Abbreviation Length, Custom Format Function, Sort Direction) were added to the Editable Grid control. Refer to the “QFDataGridCol Collection Editor” topic in the Application Architect help for more information.
• The IsEditable property was removed from the SLXUser column type.
• The default value of column Width=-1 was changed from auto to 10 em. Refer to the “QFDataGridCol Collection Editor” topic in the Application Architect help for more information.
• The ability to specify where toolbar icons merge with those on the smart part toolbar and the ability to hide icons in Insert rendering mode were added. For more information, refer to Merge Control Id, Merge Position,
SaleslogixTM | Upgrading to Saleslogix v8.142

Changes in this Release
and Display In Insert properties in the “EditableGridToolDefinition Collection Editor” topic in the Application Architect help.
• The Aggregate control displays as two buttons instead of a link. Refer to the “Aggregate Control” topic in the Application Architect help for more information.
• Removed Generate Member property from Web Browser, Aggregate, and Horizontal Separator controls.
• Deprecated Display Exchange Rate Code property in Currency control and columns. If the value is set, it is ignored. Now the exchange rate code always displays when multi-currency is enabled.
• Deprecated As Hyperlink option for Display Mode property of Currency control.
• Removed Multiselect property from Owner control.
• Detail views built with quick forms now implement a splitter bar between the main content and tab workspace which enables users to view both at once when space is limited.
• The Numeric control now does its formatting client-side but is not compatible with Data Type=Double together with Is Percentage=True. Refer to the “Numeric Control” topic in the Application Architect help for more information.
• The Popup Grid Columns collection of an Aggregate control now allows for the currency column type.
• String lookups can be configured to append results instead of replacing the existing string. Refer to the “Append String Values” topic in the Application Architect help for more information.
Portal Manager
• The user interface has been streamlined for the different purposes of the four portal types: UI Portal, Service Portal, ASP.NET Portal, and Mobile Portal. Refer to the “Using the Portal Manager” topic in the Application Architect help for more information.
• You can customize the Sage Mobile portal by adding custom modules. Refer to the “Adding a Custom Module to a Mobile Deployment” topic in the Application Architect help for more information.
• Portal types Mobile Portal Template and ASP.NET Portal Template were added to the New Portal Wizard. Refer to the “Using the New Portal Wizard” topic in the Application Architect help for more information.
• Portal - Advanced tab was renamed to the Services tab. The new Scope property allows you to set the scope of the service to Session or Application. Refer to the “Services Settings” topic in the Application Architect help for more information.
• Portal - The Group Tab Context Menu can be customized for list views. Refer to the “Adding a Context Menu Item” topic in the Application Architect help for more information.
• Portal - Context menus now have Applied Security property to get or set the name of a secured action. Refer to the “Navigation Group and Item Settings” topic in the Application Architect help for more information.
• Page - Two configurable properties were added to the Portal Page Advanced tab: Applied Security and Script Include. Refer to the “Configuring Application ASP.NET Page Properties” topic in the Application Architect help for more information.
• Page – The Base Page Type and Entity Type configurable properties and the Configure Base button have been moved from the Portal Page Advanced tab to the Page Information area.
• The new Sage Job Service portal added to Portal Manager. See “Understanding the Job Service Portal” topic in the Application Architect help.
• The Cache Service is an implementation of ICacheProvider that is available in the Services Collection. The ICacheProvider service supports in memory and out of process (memcached) providers. Out of process cached data survives process restarts and improves performance.
Deployments
• Saleslogix Web Portals now take advantage of the 4.0 .NET Framework.
• The Target Name property in deployment settings was added to identify deployment targets if you have multiple deployment targets of the same type.
• Application settings were externalized from the web.config file into an appSettings.config file. Refer to the “Editing Configuration Files” topic in the Application Architect help for more information.
• Deployment from the VFS-based Application Architect project is required for remotes and recommended for production deployments. Deployment from a local file system-based project is still a good option for development. Refer to the “Choosing a Project Storage Location - Virtual and Local File Systems” topic in the Application Architect help for more information.
SaleslogixTM | Upgrading to Saleslogix v8.1 43

Changes in this Release
• When deploying the SData portal to IIS 7 on Windows 2008, the portal no longer needs additional configuration in the IIS Manager such as handler mappings.
• Added a Cancel Deployment button to the Application Architect toolbar and moved the deployment messages to the output window.
• The Sage Job Server portal was added to the Core Portals. For upgrades, this must be added manually. Refer to the “Configuring Deployment Settings” topic in the Application Architect help for more information.
Entity Model
• Filter changes no longer require portal deployment. Filter information in the source project workspace/model is accessed directly by the portal. Refer to the “Deploying a Filter” topic in the Application Architect help for more information.
• Dynamic Entities, Properties, and Relationships can be created so they do not require a platform build. Refer to the “Understanding Static and Dynamic” topic in the Application Architect help for more information.
• Entity properties in the Web Client have been set to be audited to match Record to History settings in the Sage SalesLogix Network Client.
• Application Architect upgrades projects so that Manage Schema=True for entities in the SalesLogix Activity Support and SalesLogix Application Entities packages to enable dynamic customization of these entities. This change also enables the addition of properties to entities in these packages with Application Architect commands such as Modify Entity and Insert New Entity Property.
• A new entity data type of Url was added. When you drop an entity property of data type Url onto a form, a URL control is created.
• The NHibernate second level caching option was exposed on the Entity properties tab for potential performance improvements. Refer to Cache Usage in the “Entity Properties Window” topic in the Application Architect help for more information.
• Removed the legacy Application Support package.
• Query builder display names now come from the localizable entity and property names in the project model instead of fixed resources in the database.
• Date filter special values of todaystart, todayend, tomorrowstart, tomorrowend, yesterdaystart, and yesterdayend were added. Refer to the “Adding Custom Filters” topic in the Application Architect help for more information.
Security
• You can define new secured actions when you are configuring portal pages, navigation groups, menus, and context menus. Refer to the “Creating a Secured Action” topic in the Application Architect Help for more information.
• You can now override the default security implementation in the Sage SalesLogix OLEDB provider for individual users. Refer to the “Customizing Sage SalesLogix Security” topic in the Application Architect Help for more information.
Builds
• Build output and search path locations can be directly opened in Windows Explorer. Refer to the “Changing Build Output or Search Path Locations” topic in the Application Architect Help for more information.
• Clean Build Folders command added to Build menu. Refer to the “Cleaning Build Folders” topic in the Application Architect Help for more information.
Mashups
• Mashup changes no longer require portal deployment. The new compliant SData adapter uses the source project workspace/model. Refer to the “Deploying a Mashup” topic in the Application Architect Help for more information.
• The Query processor was renamed to HQL processor.
• A new processor type was added. The SQL processor executes a query on local or remote databases. Refer to the “SQL Processor Type” topic in the Application Architect help for more information.
• HQL/SQL Syntax Highlighted Editor - A new syntax highlighted editor has been created to make editing SQL and HQL a little more pleasant. It can be launched from the ellipsis on the respective Query properties in the property grid.
SaleslogixTM | Upgrading to Saleslogix v8.144

Changes in this Release
• Authenticated Feeds - User Name and Password properties have been added to the Feed processor so that feeds requiring authentication can be consumed. These properties behave in exactly the same way as those on the SData processor. They support inline expressions evaluated at runtime. Refer to the “Feed Processor Type” topic in the Application Architect help for more information.
• Most string properties support inline expressions evaluated at runtime. Refer to the “Inline expressions” topic in the Application Architect help for more information.
• A new help topic, “Creating a Custom Mashup Processor”, has been added.
Analytics
• [Breaking Change] Widgets use the Dojo framework. Remove ExtJS from any custom widget.
• Widgets are HTML5 compliant.
• Pie charts can be configured for any number of slices. Also, you can set the maximum number of items to appear in bar, column, and line charts that are based on distinct filters.
• “Understanding Dashboard Widgets” help topic was enhanced to explain how to add Entities, Dimensions, and Metrics used in the charting editors. How to control the order of items in a funnel chart was included.
SData
• SData 1.1 specification compliance: support for the language query argument was added, bringing SalesLogix SData to full implementation of section 3.14 of the specification. Refer to the “Sage SalesLogix Implementation of Sage Data (SData) 1.1” topic in the Application Architect Help for more information.
• Additional functions are supported in SData queries. Refer to the “SData - Supported Functions” topic in the Application Architect Help for more information.
• The library of SData endpoints continues to be expanded. For more information, refer to the white paper, SData Endpoints.
API
• Added methods for easier ad hoc SQL method calling. Usually you should go through the entity model, but there are times when it is more beneficial to go through SQL. See methods MySlx.Data.ExecuteSql and MySlx.Data.ExecuteWithReturn.
• The Dependency Lookup control now supports dynamic changes to filters. In code, clear existing filters, ensure the cache is cleared using the InvalidControlCache method, and add new filters.
Documentation
• The following new help topics were added:
• Adding a Custom Entity to a Merge Business Rule.
• Comparing Nulls in SData queries.
• Creating a Custom Mashup Processor.
• Loading Multiple Versions of jQuery.
• “Understanding Dashboard Widgets” topic was enhanced to explain how to add Entities, Dimensions, and Metrics used in the charting editors. How to control the order of items in a funnel chart was included.
• “About Filters” topic was enhanced.
Saleslogix Mobile Enhancements
• [Breaking Change] JavaScript has been converted from the ExtJS framework to the Dojo framework. You must convert customizations to Dojo. For more information, refer to “Upgrading 1.2 to 2.0” at sage.github.com/argos.
• Added an editable picklist for Activity Duration that allows you to enter duration with auto complete.
• Added Activity Location property to Activity entity to match Web Client.
• Activity User Options are used for defaults on alarm, duration, timeless and auto-rollover settings.
• Application Level Default Values – support for default values in customizations at application level as well as entity level.
• Customizations and upgrades are easier to deploy.
SaleslogixTM | Upgrading to Saleslogix v8.1 45

Changes in this Release
• Contextual Action Menu – quick actions available in list views based on entity and availability of data.
• Added the ability to create an activity for contact, opportunity or ticket without first selecting account.
• A configurable number of errors are saved to local storage and can be viewed under Settings.
• Addresses added to related items under Account and Contact views allowing users to view all related addresses.
• Address templates can be applied to detail views based on region.
• Opportunity Contacts can be added or removed from an Opportunity on mobile device.
• Recurring Activities can be scheduled and edited from mobile device.
• Sage SalesLogix Mobile uses the same role-based security as the Web Client.
• Views adjust to landscape views to optimize usability.
• Events can be scheduled from mobile device and are displayed on the Calendar.
• Ticket Activities can be created/displayed/edited as a related item for a Ticket.
• Toolbar Customizations - RegisterCustomization API facilitates adding toolbar items.
• View Address Quick Action opens Google Maps on a separate tab in desktop browser.
SaleslogixTM | Upgrading to Saleslogix v8.146

3 | P
Chapter lugin Changes in this ReleaseIn addition to the new functionality described in Chapter 2, “Changes in this Release”, Saleslogix v8.1 fixes product defects. This includes defects previously addressed in hot fixes.
Refer to the Fixed Issues List on the Saleslogix Support Portal Web site for all defects fixed in this service pack.
Plugin changes are listed in the following sections by category (new or existing), type (form, script, and so on), and then alphabetically by plugin name within the category and type.
Finding Script ChangesChanges to Saleslogix scripts, and scripts on forms, can be researched using a third-party comparison utility such as Beyond Compare or Microsoft Word. You can use the following example procedure to determine the Saleslogix script changes in this release. Then, use that information to either update your custom scripts with the Saleslogix changes, or add your customizations to the Saleslogix script.
To find script changes
1. Apply the upgrade bundle to a test environment.
2. Open the original version of the script or form you want to research in the Architect.
3. Do one of the following:
• For a form: Click the Script tab, right-click the script, and then click Select All.
• For a script: Right-click the script, and then click Select All.
4. Copy and paste the information to a text editor, such as WordPad.
5. Save the script with the version number in the name.
6. Repeat steps 2 - 5 for the same plugin updated in this release.
7. Open the original plugin version in Microsoft Word (saved in step 5).
8. On the Tools menu, click Compare and Merge Documents.
9. Browse to and select the updated plugin (saved in step 6) and click Merge.
10. View the code changes and determine how to merge the SalesLogix changes with your customizations.
New TablesUse the following to identify tables that were added in Saleslogix v8.0 or 8.1. See the Database Manager and the Database help system for information about the fields that are included in these tables.
Table Name Purpose 8.0
8.1
ACTIVITYATTENDEE Stores additional contacts and leads for Activities. Added for multiple attendees per activity functionality.
CONTACTUSER Associates a contact to a Saleslogix user. Added for multiple attendees per activity functionality.
DB_OBJECTDEFINITION Stores definitions of database-specific database objects such as Views and Triggers.
GLOBALCHANGETRACKING Stores the history for all changes made to specific tables by the triggers on those tables. Used by Outlook sync functionality to retrieve any changes (Inserts, Updates, or Deletes) that were made to Saleslogix.
47 SaleslogixTM | Upgrading to Saleslogix v8.1 47

Plugin Changes in this Release
New Fields added to Existing TablesThe following lists fields that were added to existing tables in either v8.0 or v8.1.
HISTORYATTENDEE Stores the history of the activity attendee table for completed activities and history of User_Activities. Added for multiple attendees per activity functionality.
INTEGRATION Maintains a list of third party applications that provide a means of synchronization with Saleslogix.
INTEGRATIONRESOURCE The list of resources available for synchronization with an integration. Example tradingAccounts, contacts, etc.
LEADSYNCTARGET
OAUTHPROVIDER Stores the set of OAuth providers available to the system and to users. Added for integration functionality.
OAUTHPROVIDERSCOPE Stored the set of permissions the provider needs to be asked for. Added for integration functionality.
QRTZ_BLOB_TRIGGERS Stores information used by the Saleslogix Job Service.
QRTZ_CALENDARS Stores information used by the Saleslogix Job Service.
QRTZ_CRON_TRIGGERS Stores information used by the Saleslogix Job Service.
QRTZ_FIRED_TRIGGERS Stores information used by the Saleslogix Job Service.
QRTZ_JOB_DETAILS Stores information used by the Saleslogix Job Service.
QRTZ_LOCKS Stores information used by the Saleslogix Job Service.
QRTZ_PAUSED_TRIGGER_GRPS
Stores information used by the Saleslogix Job Service.
QRTZ_SCHEDULER_STATE Stores information used by the Saleslogix Job Service.
QRTZ_SIMPLE_TRIGGERS Stores information used by the Saleslogix Job Service.
QRTZ_SIMPROP_TRIGGERS Stores information used by the Saleslogix Job Service.
QRTZ_TRIGGERS Stores information used by the Saleslogix Job Service.
REMOTEAUTOCLEANUP Tracks records on the remote that should be auto deleted after a successful synchronization from remote to host.
ü
REPORTHISTORY Stores the history for reporting job executions. ü
USER_OAUTHTOKEN Stores user authorization tokens for each OAuth provider for whom the user has approved access. Added for integration functionality.
ü
USERCALENDARFAVORITE Stores the list of favorite users that appear in the user calendar. ü
USERINTEGRATIONMAP Maintains a list of users which have authorized with a particular integration.
ü
Table Name Field Name Purpose 8.0
8.1
ACCOUNTPRODUCT CREATESOURCE Identifies the application that created the record.
Table Name Purpose 8.0
8.1
SaleslogixTM | Upgrading to Saleslogix v8.148

Plugin Changes in this Release
ACTIVITY APPID Stores the Foreign key that maps to a sync end point.
ACTIVITY ATTENDEECOUNT For a given activity, shows the number of total attendees. Added for multiple attendees per activity functionality.
ACTIVITY CHANGEKEY Stores the GUID representing the unique identifier for the change. This is used in conjunction with the GlobalChangeTracking table.
ACTIVITY CREATESOURCE Identifies the application that created the record.
ACTIVITY GLOBALSYNCID Stores a GUID to uniquely identify an item across different applications.
ACTIVITY LOCATION Stores the location assigned for an activity item.
ACTIVITY TICK Vector clock incrementor for Contract sync.
ADDRESS ADDRESSTYPE Identifies the type of the address i.e. (Billing, Shipping, Correspondence, Home, Office...)
ADDRESS CREATESOURCE Identifies the application that created the record.
ADDRESS PRIMARYADDRESS Identifies which address is the primary.
APPIDMAPPING ENABLEEMAILAUTH Flag indicating whether or not email authentication is supported.
APPIDMAPPING INTEGRATIONID Foreign key to the Integration table.
APPIDMAPPING ISSYSTEMENDPOINT Identifies the SalesLogix endpoint.
APPIDMAPPING ISUSERENDPOINT Flag indicating whether the endpoint is a user endpoint or an application endpoint.
APPIDMAPPING OAUTHPROVIDERID Foreign key to the OAuthProvider table for OAuth authentication.
APPIDMAPPING USERID Foreign key to the user. Required to retrieve user’s refresh token for OAuth authentication.
ATTACHMENT CREATESOURCE Identifies the application that created the record.
CAMPAIGN CREATESOURCE Identifies the application that created the record.
COMPETITOR CREATESOURCE Identifies the application that created the record.
CONTACT CHANGEKEY Guid used to track changes to individual records.
CONTACT CREATESOURCE Identifies the application that created the record.
CONTACT SLXUSERASSOCIATIONID
Added for multiple attendees per activity functionality, but not currently used.
DEFECT CREATESOURCE Identifies the application that created the record.
Table Name Field Name Purpose 8.0
8.1
SaleslogixTM | Upgrading to Saleslogix v8.1 49

Plugin Changes in this Release
ERPEMAILADDRESS CREATESOURCE Identifies the application that created the record.
ERPPHONENUMBER CREATESOURCE Identifies the application that created the record.
ERPTRADINGACCOUNT
REFERENCE1 A user entered reference to the TradingAccount.
ERPTRADINGACCOUNT
REFERENCE2 An additional reference for the TradingAccount.
EVENT CREATESOURCE Identifies the application that created the record.
EVENT LOCATION Stores the location assigned for an event item.
HISTORY APPID Stores the Foreign key that maps to a sync end point.
HISTORY CREATESOURCE Identifies the application that created the record.
HISTORY GLOBALSYNCID Stores a GUID that uniquely identifies an item across different applications.
HISTORY LOCATION Stores the location assigned for a history item.
HISTORY TICK Vector clock incrementor for Contract sync.
INDEXDEFINITION ISSECURE Instructs the SpeedSearch Service to build this index with SecCode security if available.
LEAD APPID Stores a Foreign key that maps to a sync end point.
LEAD CREATESOURCE Identifies the application that created the record.
LEAD GLOBALSYNCID Stores a GUID that uniquely identifies an item across different applications.
LEAD TICK Vector clock incrementor for Contract sync.
LEAD_ADDRESS APPID Foreign Key to the AppIdMapping Table. Used to track the endpoint that last modified this record.
LEAD_ADDRESS CREATESOURCE Identifies the application that created the record.
LEAD_ADDRESS GLOBALSYNCID A GUID to uniquely identify an item across different applications.
LEAD_ADDRESS TICK A Vector clock incrementor used to track changes.
LEADSOURCE CREATESOURCE Identifies the application that created the record.
LIBRARYDOCS CREATESOURCE Identifies the application that created the record.
OPPORTUNITY CREATESOURCE Identifies the application that created the record.
Table Name Field Name Purpose 8.0
8.1
SaleslogixTM | Upgrading to Saleslogix v8.150

Plugin Changes in this Release
OPPORTUNITY_CONTACT
CREATESOURCE Identifies the application that created the record.
OPPORTUNITY_PRODUCT
CREATESOURCE Identifies the application that created the record.
PRODUCT CREATESOURCE Identifies the application that created the record.
RESOURCELIST DESCRIPTION Stores the description of the resource.
RESOURCELIST ISLOCATION Stores the location of a resource.
RESYNCTABLEDEFS DELAYDAYS The number of days to retain data in a restricted table before it is deleted from the remote.
RESYNCTABLEDEFS RESTRICTDATA Marks a table for data restriction on a remote. This table will retain its data until it has been successfully synced to the host and number of days defined in DelayDays has expired. Only data that has successfully synced to the host will be deleted after the wait period defined in DelayDays.
RMA CREATESOURCE Identifies the application that created the record.
RMAADDRESS CREATESOURCE Identifies the application that created the record.
RMAADDRESS SALUTATION Identifies the salutation for each instance of an address.
SALESORDER CREATESOURCE Identifies the application that created the record.
SALESORDERADDRESS
CREATESOURCE Identifies the application that created the record.
SALESORDERADDRESS
SALUTATION Identifies the salutation for each instance of an address.
SALESORDERITEMS CREATESOURCE Identifies the application that created the record.
SYNCJOB INTEGRATIONID Stores a Foreign key to the Integration table.
SYNCJOB STATUS Stores the status of the job. For example, Succeeded, Failed, and so forth.
SYNCRESULT ENTITYID Stores the Foreign key representing the ID of the entity the entry is associated with.
SYNCRESULT ENTITYTYPE Represents the Saleslogix entity type represented with this entry.
SYNCRESULT ENTITYVALUE Represents the ToString value of the entity associated with this entry.
SYNCRESULT JOBID Stores the Foreign key to the SyncJob table.
SYNCRESULT SECCODEID Owner from the Entity the SyncResult represents if one exists. This allows for security to be applied to results across multiple entities.
Table Name Field Name Purpose 8.0
8.1
SaleslogixTM | Upgrading to Saleslogix v8.1 51

Plugin Changes in this Release
New Forms
SYNCRESULT SYNCFROMID Stores the Foreign key to the AppIdMapping table representing the endpoint from which this this item was sent.
SYNCRESULT USERID Stores the Foreign key to the User table.
SYSTEMINFO LOCKOUTTIMEOUT Stores a integer value for how long a user is locked out after entering incorrect password while attempting to log into Saleslogix.
SYSTEMINFO LOGINATTEMPTTHRESHOLD
Number of times a user can attempt to log into Saleslogix before being locked out.
TICKET CREATESOURCE Identifies the application that created the record.
TICKETACTIVITY CREATESOURCE Identifies the application that created the record.
UNITOFMEASURE CREATESOURCE Identifies the application that created the record.
USER_ACTIVITY APPID Stores a foreign key that maps to a sync end point.
USER_ACTIVITY CREATESOURCE Identifies the application that created the record.
USER_ACTIVITY GLOBALSYNCID A GUID to uniquely identify an item across different applications.
USER_ACTIVITY TICK A vector clock incrementor used to track changes.
USERNOTIFICATION CREATESOURCE Identifies the application that created the record.
USERSECURITY FAILEDATTEMPTDATE Stores Date/Time of last failed attempt for user to log into Saleslogix.
USERSECURITY LOGINATTEMPTS Stores number of failed attempts for user to log into Saleslogix. Resets to ‘0’ once user logs into Saleslogix.
Form Name
7.5.
17.
5.2
7.5.
37.
5.4
8.0
8.1
System: SLX Crystal Report Viewer
System: SLX Loading Dialog
System: SLX MoveContact
System: SLX Select Printer
Table Name Field Name Purpose 8.0
8.1
SaleslogixTM | Upgrading to Saleslogix v8.152

Plugin Changes in this Release
New Groups
New Pick Lists
New Widgets
Group Name 8.0
8.1
AREACATEGORYISSUE:All
DEFECTACTIVITYRATE:AllRates
INTEGRATION:AllIntegrations
OAUTHPROVIDER:AllProviders
SYNCRESULT:AllSyncResults
SYNCRESULT:Latest Sync Result
SYNCRESULT:My History
SYNCRESULT: Today
TICKETACTIVITYRATE:AllTicketActivityRates
TICKETAREAOWNER:All
USERSECURITY:Integrations
Pick List Name 8.0
8.1
Address Type
Attendee Role
Country V
Integration Auth Type
Integration Link Type
Integration OAuth Version
Integration Sync Direction
Integration Sync Method
Widget Name 8.0
8.1
Dashboard Page System:SData Feed
Dashboard Widget System:Web Feed
Dashboard Widget System:Web Site
SaleslogixTM | Upgrading to Saleslogix v8.1 53

Plugin Changes in this Release
Changes to Existing Forms
Updated Global ScriptsSee “Finding Script Changes” on page 47 for more information on finding script changes.
Form Name / Change 8.0
8.1
Campaign:Stages Tasks
Campaign:Targets
Contact:Details
Opportunity:Products
Sales Dashboard:Sales Dashboard Detail
System:Activity Preview
System: Account Detail
System:Add Campaign Products
System:Add Edit Campaign Stage
System:Add Edit Product
System:Add Edit Response
System:Add Edit Stage Task
System:Add New Contact Account
System:Add Opportunity Product
System:Convert Lead
System:History Details View
System:Import Leads
System:Import Leads Options
System:Insert Campaign
System:Insert New Ticket
System:Insert Opportunity
System:Lead Detail
System:Manage Customer Service Defaults
System:Manage Targets
System:MoveContact
System: SLX Crystal Report Viewer
System:SLX Report Manager View
System:Update Multiple Opportunities
System:Update Targets
Global Script Name 8.0
8.1
System:Global Campaign
SaleslogixTM | Upgrading to Saleslogix v8.154

Plugin Changes in this Release
Updated VB ScriptsSee “Finding Script Changes” on page 47 for more information on finding script changes.
Changes to Existing Groups
VB Script Name 8.0
8.1
Dashboard:Content Set Support
System:Attachment Support
System:Insert Opportunity Common
System:SLX Crystal Report
System:SLX_Export_Group_To_Excel
System:SLX Lead Mappings
System: SLX Lead Support
System: Notes History Common
System:SLX Report Condition Builder Controller
System:SLX Report Conditions
System:SLX Report Controller
System:SLX_Common
System:SP_SalesProcessFunctions
Group Name/Change 8.0
8.1
ACO ACCOUNT:PromotedAccounts ü
ACO Contact:Active Campaigns
ACO Contact:All Contacts
ACO Contact:Do Not Solicit
ACO Contact:Duplicate Emails
ACO Contact:Latest Contacts
ACO Contact:My Activities for Today
ACO Contact:My Contacts
ACO Contact:My History
ACO Contact:Status = Duplicate
ACO Contact:Status = Purge
ACO OPPORTUNITY:All Open
ACO OPPORTUNITY:My Closed Opportunities
ACO Opportunity:My Open Opportunities
ACO OPPORTUNITY:My Pipeline
ACO OPPORTUNITY:My Top Opportunities
HISTORY:All History
SaleslogixTM | Upgrading to Saleslogix v8.1 55

Plugin Changes in this Release
Changes to Existing Menus and Toolbars
Changes to Existing Reports
HISTORY:Completed Activities
HISTORY:My Completed Activities
HISTORY:My Notes
LITREQUEST:All Open
SYNCJOB:AllSyncJobs
Name / Change 8.0
8.1
Menus System:Standard Menus• (7.5.1) Added Create New Group item under the CampaignNavMenu > Groups item.• (8.0) Removed Marketing Services item under the Standard Menu > Tools > Manage item.• 8.1 how?
Name / Change 8.0
8.1
Account:Account Address Book - Sample
Account:Account Detail
Account:Account Summary - Sample
Account:Support Account
Account:Territoryrealign
Account:Account Phone List - Sample
Account:Support Account Product List - Sample
Activities:Literature Fulfillment Details - Sample
Activities:Literature Fulfillment Summary - Sample
Activities:Current Activity - Sample
Contact:Contacts By Account - Sample)
Contact:Contact Address Book - Sample
Contact:Contact Detail
Contact:Contact Phone Book - Sample
Contact:Contact Summary - Sample
Contract:Support Expired Contracts - Sample
Contract:Support Contract
Defect:Support Defect Activities - Sample
Defect:Support Defect Items - Sample
Group Name/Change 8.0
8.1
SaleslogixTM | Upgrading to Saleslogix v8.156

Plugin Changes in this Release
Defect:Support Defect
History:History by Account - Sample
History:History by Contact - Sample
History:History Summary - Sample
History:Support Call History - Sample
Labels:A4 Avery L7159 - Address
Labels:A4 Avery L7160 - Address
Labels:#10 Envelope
Labels:A4 Avery L7162 - Address
Labels:A4 Avery L7163 - Address
Labels:A4 Avery L7664 - 3 1/2"" Diskette
Labels:A4 Avery L7164 - Address
Labels:Avery 5196 - 3 1/2"" Diskette
Labels:Avery 5160
Labels:Avery 5161
Labels:Avery 5162
Labels:Avery 5163
Labels:Avery 5164
Labels:A4 Avery L7166 - Parcel
Leadsource:Contacts By Lead Source - Sample
Opportunity:Forecast by Account Manager
Opportunity:Competitor By Opportunity Status
Opportunity:Opportunity By Account
Opportunity:Opportunity Detail
Opportunity:Opportunity Summary - Sample
Opportunity:Quota Vs Actual Sales
Opportunity:Sales Process Stage Analysis
Opportunity:Sales Process Step Usage
Opportunity:Open Opportunities By Account
Opportunity:Open Opportunities Summary
Opportunity:Potential Sales Opportunities - Sample
RMA:Support Return Material Authorization
Sales Order:Sales Order Detai
Ticket:Support Billable Time Ticket - Sample
Ticket:Support Call Turn Around - Sample
Ticket:Support Escalated Tickets - Sample
Name / Change 8.0
8.1
SaleslogixTM | Upgrading to Saleslogix v8.1 57

Plugin Changes in this Release
Changes to Existing Widgets
Ticket:Support Follow-up - Sample
Ticket:Support Follow-up Statistics by Assigned - Sample
Ticket:Support Follow-up Statistics by Received - Sample
Ticket:Support Problem Analysis By Area - Sample
Ticket:Support Problem Analysis - Sample
Ticket:Support Ticket
Ticket:Support Tickets Closed By Assigned - Sample
Ticket:Support Tickets Closed By Received - Sample
Ticket:Support Ticket Knowledge Base Summary - Sample
Ticket:Support Ticket Status By Assigned - Sample
Ticket:Support Unresolved Tickets - Sample
Ticket:Support Weekly Recap - Sample
Ticket:Support Work Order - Sample
Widget Name 8.0
8.1
Dashboard Page System:My Dashboard
Dashboard Page System:Sales
Dashboard Widget System:Bar Chart
Dashboard Widget System:Column Chart
Dashboard Widget System:Default
Dashboard Widget System:Funnel Chart
Dashboard Widget System:Group List
Dashboard Widget System:Line Chart
Dashboard Widget System:Links
Dashboard Widget System:Pie Chart
Dashboard Widget System:Recently Viewed
Dashboard Widget System:Todays Activities
Dashboard Widget System:Welcome
Name / Change 8.0
8.1
SaleslogixTM | Upgrading to Saleslogix v8.158

Plugin Changes in this Release
Changes to the Database Objects
Creates the following database objects 8.0
8.1
Trigger : MSSQL : GLOBALCHANGETRACKING_IDENTITY
Trigger : MSSQL : CONTACT_INTEGRATION_CHANGES : MSSQL
Trigger : MSSQL : CONTACT_INTEGRATION_INSERT
Trigger : MSSQL : CONTACT_TOMBSTONE
Trigger : MSSQL : ADDRESS_INTEGRATION_CHANGE
Trigger : MSSQL : ADHOCGROUP_INTEGRATION_INSERT
Trigger : MSSQL : ADHOCGROUP_INTEGRATION_TOMBSTONE
Trigger : MSSQL : ACTIVITY_INTEGRATION_CHANGE
Trigger : MSSQL : ACTIVITY_TOMBSTONE
Trigger : MSSQL : USERACTIVITY_INTEGRATION_CHANGE
Trigger : MSSQL : USERACTIVITY_TOMBSTONE
Trigger : MSSQL : ACTIVITYATTENDEE_COUNT
Trigger : MSSQL : ACTIVITYATTENDEE_INTEGRATION_CHANGE
Trigger : MSSQL : ACCOUNT_INTEGRATION_CHANGE
Trigger : MSSQL : ACCOUNT_INTEGRATION_INSERT
Trigger : MSSQL : ACCOUNT_TOMBSTONE
Trigger : Oracle : GLOBALCHANGETRACKING_TICK_SEC
Trigger : Oracle : CHANGETRACKING_BEFORE_INS
Trigger : Oracle : CONTACT_BEFORE_CHANGES
Trigger : Oracle : CONTACT_AFTER_CHANGES
Trigger : Oracle : ADDRESS_BEFORE_CHANGES
Trigger : Oracle : CONTACT_AFTER_DELETE
Trigger : Oracle : ADDRESS_AFTER_CHANGES
Trigger : Oracle : ADHOCGROUP_AFTER_INSERT
Trigger : Oracle : ADHOCGROUP_AFTER_DELETE
Trigger : Oracle : ACCOUNT_BEFORE_CHANGES
Trigger : Oracle : ACCOUNT_AFTER_CHANGES
Trigger : Oracle : ACCOUNT_AFTER_DELETE
Trigger : Oracle : ACTATTENDEE_AFTER_DELETE
Trigger : Oracle : ACTATTENDEE_AFTER_INSERT
Trigger : Oracle : ACTATTENDEE_BEFORE_CHANGES
Trigger : Oracle : ACTATTENDEE_AFTER_CHANGES
Trigger : Oracle : ACTIVITY_BEFORE_CHANGES
Trigger : Oracle : ACTIVITY_AFTER_CHANGES
Trigger : Oracle : ACTIVITY_AFTER_DELETE
SaleslogixTM | Upgrading to Saleslogix v8.1 59

Plugin Changes in this Release
Trigger : Oracle : USERACTIVITY_BEFORE_CHANGES
Trigger : Oracle : USERACTIVITY_AFTER_CHANGES
Trigger : Oracle : USERACTIVITY_AFTER_DELETE
View : MSSQL :ACTIVITYRESOURCEVIEW
View : MSSQL : CALENDARFAVORITEUSERSVIEW
View : MSSQL : CALENDARHISTORYSYNCVIEW
View : MSSQL : CALENDARSYNCVIEW
View : MSSQL : CONTACTSYNCVIEW
View : MSSQL : LEADSYNCVIEW
View : MSSQL : SYNCSTATUS
View : MSSQL : TASKSYNCVIEW
Creates the following database objects 8.0
8.1
SaleslogixTM | Upgrading to Saleslogix v8.160