Unreal Engine 4 Survival Game Template User Guide Game Template User Guide ... When the player’s...
58
Unreal Engine 4 Survival Game Template User Guide By Michael ‘apoisonedgift’ Hutchesson http://www.dapperraptor.xyz [email protected]
Transcript of Unreal Engine 4 Survival Game Template User Guide Game Template User Guide ... When the player’s...

Unreal Engine 4
Survival Game Template
User Guide
By Michael ‘apoisonedgift’ Hutchesson
http://www.dapperraptor.xyz [email protected]

Contents Introduction 2 Feature Overview 4 Example Level 6 Basic Template Setup 7
Settings Breakdown 8 Day/Night System 11
Settings Breakdown 11 Altering Night Start/Finish Times 12 Connecting a Third Party Day/Night System 14
Health System 16 Settings Breakdown 16
Hunger System 18 Settings Breakdown 18
Thirst System 20 Settings Breakdown 20
Poison System 22 Settings Breakdown 22
Temperature System 24 Settings Breakdown 24 Temperature Switches 26
Oxygen System 27 Settings Breakdown 27
Blood System 29 Settings Breakdown 29
Stamina System 30 Settings Breakdown 30 Connecting Extra Actions to Stamina 30
Sprint System 33 Settings Breakdown 33
Flashlight/Torch 34 Settings Breakdown 34
Inventory 36 Settings Breakdown 36 Inventory Visual Settings 38 Visual Settings: Images 39 Visual Settings: Fonts 40 Visual Settings: Other 41 Customising Widgets Manually 41 Master Pickup Item 41 Creating a New Pickup 42 Default Item Types 43 Adding a New Item Type 46 Chests 50 Hotbar 51 Adding Loot to AI Characters 51
Unreal Engine 4 Survival Game Template Documentation Page 1

HUD 52 Settings Breakdown 52 Visual Settings 54
Visual Effects 56 Save/Load 57
Settings Breakdown 57
Unreal Engine 4 Survival Game Template Documentation Page 2

Introduction The Unreal Engine 4 Survival Game Template is a 100% blueprint powered game template intended for those who wish to create single player games with survival game elements and mechanics. Whilst intended for survival games particularly, the template could easily be applied to other game genres, such as RPGs, horror games, simulation games, and many more. It is entirely up to the end user to use this template how they see fit for the development of their game. This documentation will not explain, in specific detail, how the systems were created, but will instead deal with how they work and, most importantly, how users can configure them to suit their needs. Please note that the template is not a fully functional survival game. It is merely a framework intended to aid developers in creating their own game. All artwork and sounds are provided in aid of demonstration purposes only. With all things in the template, if you have a specific query or issue, please feel free to contact me via [email protected]
Unreal Engine 4 Survival Game Template Documentation Page 3

Feature Overview The Survival Game Template comes with an extensive list of features and mechanics, all aimed at adding challenging, engaging gameplay to any game utilising survival mechanics. This section is a brief overview of what each system does when implemented. Note that all systems are entirely optional, and it is possible, even without altering the blueprint logic, to completely change how the systems work. These descriptions are intended to demonstrate how the mechanics work in the environment for which they were designed by myself, but this does not mean they have to work this way. The template is intended to enhance a designer's ability to make the game they want, not force them into a particular set of goals. Day/Night Cycle:
The template comes with a reliable day/night systems that is used to power many other systems. The cycle can be used to generate a time of day, which can be displayed as a clock, and can even count the days that pass. The system is built around the standard Epic Games issued skysphere, but can easily be adapted to any day/night cycle system that is powered by a time of day value (such as the Ultra Dynamic Sky system available on the UE4 Marketplace).
Player Health: The player health system is a simple floatorientated system that controls the player’s health state. When the player’s health hits 0, they die. When a player is missing a vital resource (such as food or water for instance) then their health will be drained slowly. The health system also includes a momentum powered impact damage. This will cause damage to the player not only when they fall from heights, but also if they are thrown at high speeds into a wall, etc.
Hunger: The player must eat food regularly in order to stop their hunger reaching dangerous levels. At a configurable threshold level, visual and/or text warnings kick in to warn the player that they are starting to starve and must eat soon. If hunger hits maximum, then the player will lose a configurable amount of health.
Thirst: A clone system of the hunger system, except using separate variables make this system perfectly set up for player thirst, which would be controlled by their water intake. Has the same mechanics as the hunger system, but different warnings (visual and textbased) can be issued at different threshold values.
Poison: The poison system is a volumebased system wherein players are ‘poisoned’ when they enter special poison volumes, adding to their overall poison level. The more poisoned a player is, the more damage dealt over time. Poison is a cumulative stat that remains until the player uses special antidote items to lower their poison level. This could be used for many alternate systems, such as radiation.
Temperature: A dual effect system, temperature can be configured to be impacted by both the world temperature (which is altered based on time of day and designerset minimum and maximums), as well as by volumes (useful for things such as water, fire zones, etc). When a player’s body temperature is above or below certain thresholds, events are triggered to notify the player of this.
Oxygen: The oxygen system works in one of two ways. It can be a system that is off by default, and only triggered when players enter volumes to drain their oxygen (such as underwater zones in a mostly above ground world, vacuums inside a spaceship, etc.). Alternatively, the system can be always on,
Unreal Engine 4 Survival Game Template Documentation Page 4

forcing the player to always replenish oxygen (such as a game that takes place in space, or mostly underwater). As with other systems, when the player’s oxygen level reaches a configurable threshold value, configurable visual and textbased warnings activate. When the oxygen level reaches 0, players begin to lose health.
Blood: Every Time a player takes damage, based on the settings of this system, there is a chance that the player will begin to bleed. This is controlled by a chance multiplier as well as a minimum damage received amount (explained in greater detail in the section on this system). If a player is bleeding, they will continue to do so until they run out of blood, or they use an item that stops bleeding. The system also applies damage based on the player’s blood level.
Stamina: A fairly simple stamina system that can be set up to be consumed when the player is sprinting, and similarly limit the player’s ability to sprint and jump. Easily expandable for additional actions.
Sprint: Very basic sprint function that multiplies player movement speed and can be configured to drain stamina.
Flashlight/Torch: A player toggleable light that can be configured to be infinite or drain a battery. A configurable flicker effect can be enabled once battery levels get to a specified threshold value.
Inventory: The template includes a fully functional inventory system, complete with item stacking, dropping, destruction and so on. The inventory system is explained in much more detail in the section of this document about it. As with all parts of the template, most everything in the inventory is entirely customisable.
HUD: The HUD included with the template is used to display all the data from the various systems to the player, but also includes several debug features.
Visual Effects: As mentioned, most resourcebased systems have the ability to display visual effect warnings to the player at certain threshold values. Included in the template is six different visual effects to choose from. The logic used for generating these effects could easily be used to make more if the user so desired.
Save/Load: A detailed save and load system is included with the template, as well as the option to make it a timebased autosave system. Maps can also be set to autoload data from a savegame and only character data will be loaded. Save data includes not just character stats, but also item locations in the world, inventories for both players and chests, and more.
Unreal Engine 4 Survival Game Template Documentation Page 5

Example Level The template comes packaged with an example level to demonstrate the way that the systems included might be used. This level can be fired up by a designer to explore the way the systems and mechanics interact with one another, or for quick experimentation (through changing values and settings in the level to see what happens). The example level can be found in the Maps folder of the SGT_Content folder and is called “SGTExampleMap” (pictured below).
Unreal Engine 4 Survival Game Template Documentation Page 6

Basic Survival Template Setup The Survival Game Template is intended to be used as a template, not an addition to a preexisting project. Whilst it is entirely possible to add the template features to a preexisting project (see YouTube video: https://youtu.be/UdR6JA8vzo), it is a much easier task to use this template as a starting point to build your project from. To begin with, there are a number of settings you will want to set up to get the combination of features desired for your game. All of these settings are attached to the actor blueprint included in the template called “SGT_MasterSystems” (pictured below).
Simply drop this actor into your level and you are able to directly start working with the template systems. Every level you want to use the template in (most likely every level you make for your game) will require this actor to be placed in it. The benefit of this is that you can have areas of your game that have different rules than others. Examples where this is useful could be space or underwater zones (that would require alwaysdraining oxygen systems), or parts of your game that may require fixed timeofday, or necessitate that the time at the beginning of that level is always the same, regardless of what it was in the prior level. By having the actor in each level, a designer is given full control over each setting in each scenario. Once the actor has been placed in a level, it can be used to manipulate most every setting in the template through the actor details panel as displayed on the bottom right in the following screenshot:
Unreal Engine 4 Survival Game Template Documentation Page 7

Settings in this details panel are broken up by major mechanical systems, such as day/night cycle, hunger, thirst, etc. but before those are of any use, you will need to set up the correct settings in the section titled “Survival Game Settings”. Settings Breakdown
Unreal Engine 4 Survival Game Template Documentation Page 8
Cycle Length Default Value: 3600 Value Type: Integer Description: This value represents the total time, in realworld seconds, that a full ‘survival cycle’ takes to complete. A survival cycle is best explained as a complete day/night execution, however, the cycle is independent of the day/night cycle as it still runs when the day/night is turned off. This cycle is used to power all cyclic systems in the template, such as those that deplete player resources (hunger, thirst, etc.). For best results, it is recommended to use values of no larger than 86400 seconds (24 hours). Whilst higher values will work, there may be a few odd results. Use Day Night System Default Value: Enabled Value Type: Boolean Description: Enables/disables the day night system. Use HUD Default Value: Enabled Value Type: Boolean Description: Enables/disables the default HUD system included in the template. Use Thirst System Default Value: Enabled Value Type: Boolean Description: Enables/disables the thirst system included in the template. Use Hunger System Default Value: Enabled Value Type: Boolean Description: Enables/disables the hunger system included in the template. Use Poison System Default Value: Enabled Value Type: Boolean Description: Enables/disables the poison system included in the template. Use Temperature System Default Value: Enabled Value Type: Boolean Description: Enables/disables the temperature system included in the template. Use Oxygen System Default Value: Enabled Value Type: Boolean Description: Enables/disables the oxygen drain system included in the template. Use Blood System Default Value: Enabled Value Type: Boolean
Unreal Engine 4 Survival Game Template Documentation Page 9
Description: Enables/disables the player blood system included in the template. Use Inventory System Default Value: Text Value Type: Boolean Description: Enables/disables the default inventory system included in the template. Use Stamina System Default Value: Enabled Value Type: Boolean Description: Enables/disables the player stamina system. Enable Player Sprint Default Value: Enabled Value Type: Boolean Description: Enables/disables the player’s ability to sprint. Use Torch Default Value: Enabled Value Type: Boolean Description: Enables/disables the default torch/flashlight mechanic. Use Health System Default Value: Enabled Value Type: Boolean Description: Enables/disables the default health system included in the template. Use Save System Default Value: Enabled Value Type: Boolean Description: Enables/disables the save system included in the template.
Unreal Engine 4 Survival Game Template Documentation Page 10

Day Night System The included Day/Night cycle system in the Survival Game Template is based on the default Sky Sphere provided by Epic Games in the example content. Using a blueprint timeline, the sun’s position is animated based on the time of day, which can be displayed on the HUD as a clock. A designer can also elect to have the night time pass at a faster rate than the day, whilst maintaining the accurate times on the clock. The times used for sunrise and sunset are based on a worldwide average and can easily be altered if so desired. Settings Breakdown All the following settings can be found in the Day / Night Cycle category (pictured below) of the actor details for the SGT_MasterSystems actor.
DN Use Custom System Default Value: Disabled Value Type: Boolean Description: This setting can be used to disable the default day/night cycle system, but still use the time of day to power a third party system. It should be entirely compatible with any system that can be connected up to a timelinepowered float value. A full tutorial for connecting up a third party day/night cycle can be viewed here. DN Day Percent Default Value: 0.5 Value Type: Float Description: This value controls what percent of the survival cycle is day compared to night in terms of realworld time, whilst maintaining a constant rate of relative gameworld time. No matter what this setting is, day will always occupy the hours between 6am and 6pm (by default), and night between 6pm and 6am. However, using this value a designer can control the world so that time passes slower or faster during the day or night. As an example, if a designer were to set this value to 0.1, then the daytime hours of 6am6pm would pass at 9x the rate of the night time hours of 6pm6am. Likewise, if a designer was to set this value to 0.75, then the nighttime hours of 6pm6am would pass at a rate of 3x that of the daytime hours of 6am6pm.
Unreal Engine 4 Survival Game Template Documentation Page 11

DN Sun Light Default Value: None Value Type: DirectionalLight Actor Description: This setting is used to point to which DirectionalLight is used for the sun. DN Sky Sphere Default Value: None Value Type: BP_Sky_Sphere Description: This setting points to the instance of the sky sphere to use for the day night system. DN Show Clock on HUD Default Value: Enabled Value Type: Boolean Description: Use this to show/hide the clock on the default HUD (only works if the default HUD is enabled). DN Show Mins on HUD Default Value: Enabled Value Type: Boolean Description: Use this to enable minutes on the clock (only works if the default HUD is enabled AND the DN Show Clock on HUD setting is enabled). DN Starting Hour Default Value: 0 Value Type: Integer Description: This setting controls what time of the day (hour only) the system should start at on it’s first run. Values from 0 to 24 are used (24hour time). Changing Time Start/Finish Times By default, nighttime in the template occurs between 6pm and 6am. This is to give an even 12 hour split between day and night. With this, the sun is always moving at a constant speed around the game's ‘world’. If a shorter, or longer, night time is desired, and simply manipulating the Day Percent is not adequate (such as a situation where you might want day to be between 4am and 8pm) then edits to the sun rotation timeline are required. The timeline can be found in the components list of the SGT_MasterSystems blueprint (double click the blueprint in the content browser to open and edit it).
Unreal Engine 4 Survival Game Template Documentation Page 12

Editing of the top timeline track, titled “DN_SunPitch” is all that is required to achieve this different effect. By default, this track begins at 0 with a value of 90, and then cycles through the entire 360 degree cycle returning back to 90 by the end of the track. The timeline is configured to take place over 86400 seconds, as all systems in the template are, and the speed is simply multiplied based on the values used in the template settings. In order to get a different night time, changes are required to be made to this curve appropriately. As the track runs from 0 to 86400, every hour is worth 3600 game seconds. This means that if you wanted to have dawn at 4am, you would place a point at 14400 (4 x 3600). As we would want the sun rising at this point, the pitch of the sun is 180 degrees. Likewise, if you wanted dusk at 8pm, we would need to put the points for 360 and 0 degrees at the time of 72000 (though, in practice it is important to remember that both points cannot be on the same place, so you would place the 360 point at 71999 and the 0 point at 72000). This would mean the curve would look like the following image:
Unreal Engine 4 Survival Game Template Documentation Page 13

Connecting the Day Night System to a Third Party System Another easy way to enhance or customise the day night system is to combine the logic contained within the template with another day/night system available from other developers. This will allow the use of some stunning visual settings and much more variety in results than the standard Epic Games sky sphere allows. Whilst the process for this will vary slightly from system to system, it should be relatively easy for any system to hook up as long as it is possible to convert the time of day in the Survival Game Template to the time of day used by the other system. As an example, the Ultra Dynamic Sky system by Everett Gunther, available on the UE4 Marketplace, uses values between 0 and 2400 to represent the time of day. 0 is midnight, all 1200 is 12 o’clock, and so on. By contrast, the timeline track from the template outputs time as a decimal value, so 0 is 0.00, 12 is 12.00, etc. Using very basic maths, it’s a simple matter of hooking up this value to the third party system in the right place. In this case, we would find the Begin Play function of the Ultra_Dynamic_Sky_BP actor, and add in a variable reference to our SGT template actor as shown in the screenshot:
Once this is done, we can call upon the variable in the Event Tick function and use the value “DN_TimelineTime” to replace the logic already there (from the asset itself) with our own reference, multiplying by 100 to bring it into a value that the system understands. In this case, this would look like this:
Unreal Engine 4 Survival Game Template Documentation Page 14

For a more detailed explanation of this process, please check the relevant video on my YouTube channel.
Unreal Engine 4 Survival Game Template Documentation Page 15

Player Health System Working with a simple floatbased logic, the player health system is at the heart of a lot of other functionality of the template. As systems start to cause damage, such as the damage caused by the player starving, offset values in the health system are increased to ensure that all damage is dealt correctly. Settings Breakdown All the following settings can be found in the Health System category (pictured below) of the actor details for the SGT_MasterSystems actor.
He Player Death Sound Default Value: sgt_player_dying Value Type: Sound Description: This is the sound file played when a player dies. In order to have no sound played, simply leave this value blank. He Player Pain Sound Default Value: sgt_player_pain Value Type: Sound Description: This sound file is played when the player is receiving damage. To have no sound played, simply leave this value blank. He Pain Sound Frequency Default Value: 3.0 Value Type: Float Description: This value controls how often the player pain sound repeats (in seconds). By default, the value is set to 3.0, meaning the sound will play no more frequently than once every 3 seconds. He Enable Falling Damage Default Value: Enabled Value Type: Boolean Description: This boolean enables/disables the falling damage. He Safe Fall Distance Default Value: 500.00
Unreal Engine 4 Survival Game Template Documentation Page 16

Value Type: Float Description: This value is used to control how high a player can fall from before incurring falling damage. This will also determine the minimum force required in all directions upon the player to incur impact damage from all angles. He Falling Damage Cushion Default Value: 25.0 Value Type: Float Description: This is a value used to lower the fall damage amount. By default, the entire force of the impact is transferred to the player in damage. This value lowers it by dividing the damage amount by the cushion amount.
Unreal Engine 4 Survival Game Template Documentation Page 17

Hunger System The hunger system is a cyclebased system that decays a float value at a set rate until either the player hunger has reached a maximum, the player is dead,or some sort of item stops the decay. Items used that remove some of the player hunger will simply raise the float as it continues to decay. The amount of time it takes to decay from minimum to maximum hunger is expressed as a multiple of survival cycles (set in the basic survival template settings). Settings Breakdown All the following settings can be found in the Hunger System category (pictured below) of the actor details for the SGT_MasterSystems actor.
Hu Warning State Default Value: Both (default) Value Type: Enumerator Description: Using this setting, you can toggle what sort of warning the player will receive when the hunger resource crosses the threshold value. The options are “None” (no warning), “Text Only” (a text warning on screen), “Visual Only” (which will employ post processing effects set by other settings) or “Both” (which will do both text and visual warnings). Hu Threshold Default Value: 15 Value Type: Integer Description: This is the value at which warnings and visual effects will kick in, alerting the player that their hunger is reaching dangerous levels. Hu Visual Effect Default Value: Contrast Value Type: Enumerator Description: This is the visual effect used if the Warning State is set to visual or both.
Unreal Engine 4 Survival Game Template Documentation Page 18

Hu Effect Scale Default Value: 2.0 Value Type: Float Description: This value is the value for the final state of the visual effect once the warning is at full state. For example, by default the visual effect is Contrast, and the default value is 2.0, so the final value of contrast is 2.0. Hu Effect Time Default Value: 10.0 Value Type: Float Description: This float determines how long (in seconds) it takes for the warning to reach full state once it starts. Hu Warning Text Default Value: I’m getting hungry... Value Type: Text Description: This message is what is displayed when the player’s hunger value crosses the threshold value, as long as the warning state is set to either “Text only” or “Both”. Hu Depleted Damage Default Value: 1.0 Value Type: Float Description: This is the amount of damage dealt to the player’s health every second once the player’s hunger has fully depleted. Hu Limit Stamina Default Value: Enabled Value Type: Boolean Description: This boolean controls whether or not the player’s stamina is limited when the player reaches maximum hunger. Hu Drain Rate Default Value: 3.0 Value Type: Float Description: This value defines how long it takes to drain the player’s hunger resource from full to entirely. The value is expressed as a multiple of Survival Cycles. As an example, if the survival cycle is set to 3600 seconds (1 hour), and this value is set to 3.0, it will take 3 hours (which will also be 3 day/night cycles in the game) to deplete.
Unreal Engine 4 Survival Game Template Documentation Page 19
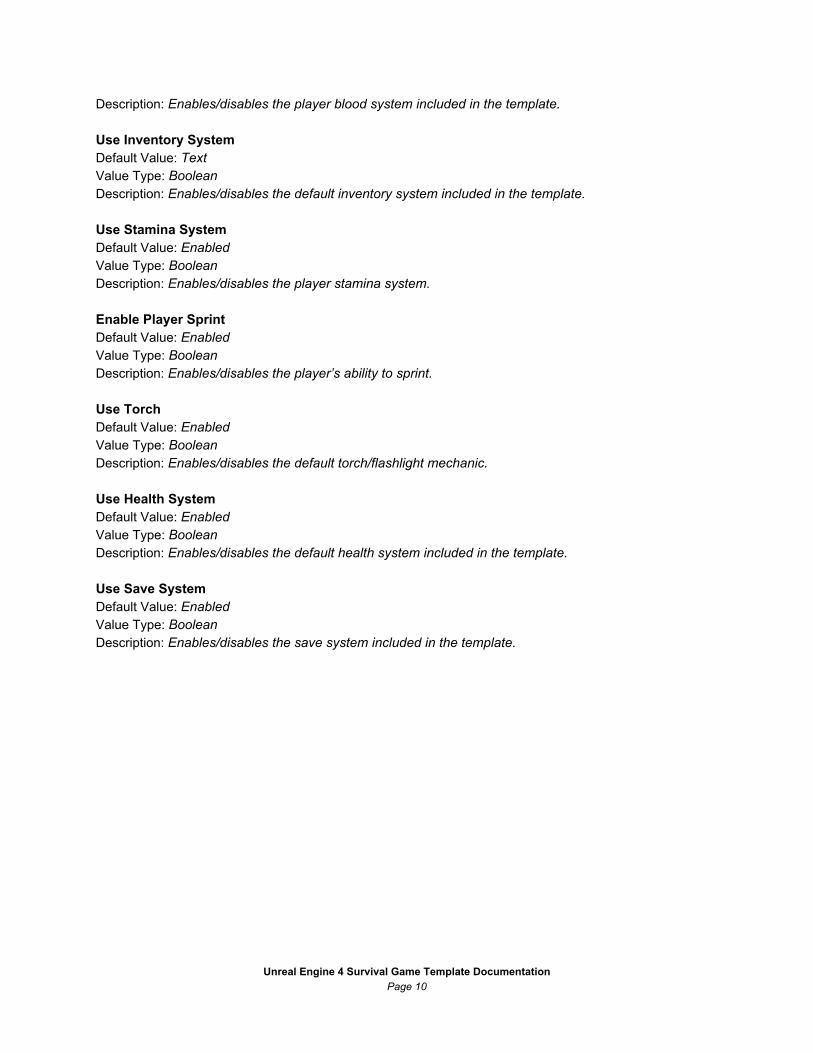
Thirst System The Thirst System included in the survival game template is almost identical to the hunger system, except for using separate values, allowing it to be running on a separate timeline, use separate resources, have different warnings, etc. Settings Breakdown All the following settings can be found in the Thirst System category (pictured below) of the actor details for the SGT_MasterSystems actor.
Th Warning State Default Value: Both (default) Value Type: Enumerator Description: Using this setting, you can toggle what sort of warning the player will receive when the thirst resource crosses the threshold value. The options are “None” (no warning), “Text Only” (a text warning on screen), “Visual Only” (which will employ post processing effects set by other settings) or “Both” (which will do both text and visual warnings). Th Threshold Default Value: 25 Value Type: Integer Description: This is the value at which warnings and visual effects will kick in, alerting the player that their thirst is reaching dangerous levels. Th Visual Effect Default Value: Fringe Intensity Value Type: Enumerator Description: This is the visual effect used if the Warning State is set to visual or both. Th Effect Scale Default Value: 5.0
Unreal Engine 4 Survival Game Template Documentation Page 20

Value Type: Float Description: This value is the value for the final state of the visual effect once the warning is at full state. For example, by default the visual effect is Fringe Intensity, and the default value is 5.0, so the final value of fringe intensity is 5.0. Th Effect Time Default Value: 10.0 Value Type: Float Description: This float determines how long (in seconds) it takes for the warning to reach full state once it starts. Th Warning Text Default Value: I’m getting dehydrated... Value Type: Text Description: This message is what is displayed when the player’s thirst value crosses the threshold value, as long as the warning state is set to either “Text only” or “Both”. Th Depleted Damage Default Value: 1.0 Value Type: Float Description: This is the amount of damage dealt to the player’s health every second once the player’s thirst has fully depleted. Th Limit Stamina Default Value: Enabled Value Type: Boolean Description: This boolean controls whether or not the player’s stamina is limited when the player reaches maximum thirst. Th Drain Rate Default Value: 1.5 Value Type: Float Description: This value defines how long it takes to drain the player’s thirst resource from full to entirely. The value is expressed as a multiple of Survival Cycles. As an example, if the survival cycle is set to 3600 seconds (1 hour), and this value is set to 1.5, it will take 1.5 hours (which will also be 3 day/night cycles in the game) to deplete.
Unreal Engine 4 Survival Game Template Documentation Page 21

Poison System The Poison System is a volume powered system that causes slow damage over time to the player, based on the amount of poison they have absorbed. This could be adopted to different mechanics such as radiation poisoning, gas poisoning, etc. Designers place volumes in the levels that cause the player’s poison level to raise. There are four stages of poisoning included in the template and each stage has it’s own warning as well as it’s own damage amount, allowing the designer more control. For details on setting up a poison volume, please see the section of documentation on the BP_SGT_MasterVolume. Settings Breakdown All the following settings can be found in the Poison System category (pictured below) of the actor details for the SGT_MasterSystems actor.
Po Use Warning Text Default Value: Enabled Value Type: Boolean Description: This boolean turns on and off the text warning for the player at each level of poisoning. Po Use Warning Visual Default Value: Enabled Value Type: Boolean Description: This boolean enabled/disables the vignette intensity effect based on the player’s poison level. The more they are poisoned, the more intense the vignette effect is. Po Level 1Damage Default Value: 0.25 Value Type: Float Description: The amount of damage dealt to the player every second when the player’s poisoned level reaches level 1 (25%)
Unreal Engine 4 Survival Game Template Documentation Page 22

Po Level 2Damage Default Value: 0.5 Value Type: Float Description: The amount of damage dealt to the player every second when the player’s poisoned level reaches level 2 (50%) Po Level 3Damage Default Value: 1.0 Value Type: Float Description: The amount of damage dealt to the player every second when the player’s poisoned level reaches level 3 (75%) Po Level 4Damage Default Value: 2.0 Value Type: Float Description: The amount of damage dealt to the player every second when the player’s poisoned level reaches level 4 (100%) Po Level 1Text Default Value: I am feeling a bit sick... Value Type: Text Description: This is the text warning displayed to the player when their poison level reaches level 1 (25%). Po Level 2Text Default Value: I am sick. I should find some medication... Value Type: Text Description: This is the text warning displayed to the player when their poison level reaches level 2 (50%). Po Level 3Text Default Value: I feel horrible. I need medication ASAP! Value Type: Text Description: This is the text warning displayed to the player when their poison level reaches level 3 (75%). Po Level 4Text Default Value: I'm completely sick. If I don't find medication soon I'm done for! Value Type: Text Description: This is the text warning displayed to the player when their poison level reaches level 4 (100%).
Unreal Engine 4 Survival Game Template Documentation Page 23
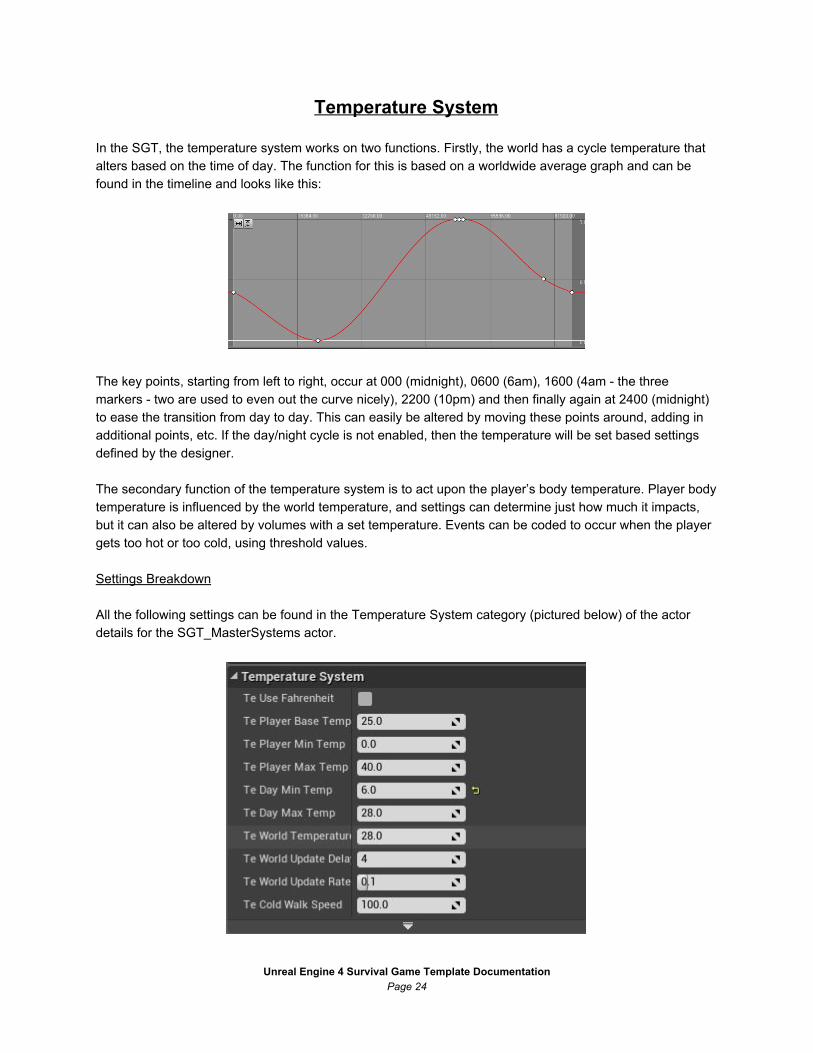
Temperature System In the SGT, the temperature system works on two functions. Firstly, the world has a cycle temperature that alters based on the time of day. The function for this is based on a worldwide average graph and can be found in the timeline and looks like this:
The key points, starting from left to right, occur at 000 (midnight), 0600 (6am), 1600 (4am the three markers two are used to even out the curve nicely), 2200 (10pm) and then finally again at 2400 (midnight) to ease the transition from day to day. This can easily be altered by moving these points around, adding in additional points, etc. If the day/night cycle is not enabled, then the temperature will be set based settings defined by the designer. The secondary function of the temperature system is to act upon the player’s body temperature. Player body temperature is influenced by the world temperature, and settings can determine just how much it impacts, but it can also be altered by volumes with a set temperature. Events can be coded to occur when the player gets too hot or too cold, using threshold values. Settings Breakdown All the following settings can be found in the Temperature System category (pictured below) of the actor details for the SGT_MasterSystems actor.
Unreal Engine 4 Survival Game Template Documentation Page 24

Te Use Fahrenheit Default Value: Disabled Value Type: Boolean Description: This boolean can be used to convert temperature values between Fahrenheit and Celsius. By default, all values are in Celsius. Clicking on the check will convert to Fahrenheit. Disabling the check will return values back to Celcius. Te Player Base Temp Default Value: 25.0 Value Type: Float Description: This is the temperature that the player starts at at the beginning of the game. Te Player Min Temp Default Value: 0.0 Value Type: Float Description: This is the minimum temperature for the player’s body before they start to experience effects of freezing. Te Player Max Temp Default Value: 40.0 Value Type: Float Description: This is the maximum temperature for the player’s body before they start to experience effects of overheating. Te Day Min Temp Default Value: 6.0 Value Type: Float Description: This value represents the coldest temperature in the day cycle for the world. Te Day Max Temp Default Value: 28.0 Value Type: Float Description: This value represents the hottest temperature in the day cycle for the world. Te World Temperature Default Value: 28.0 Value Type: Float Description: This override value is used when no active day/night cycle is in play. This is the constant temperature for the world void of such a cycle. Te World Update Delay Default Value: 4 Value Type: Integer Description: This setting determines how many seconds occur between updates of the world temperature. Te World Update Rate Default Value: 0.1 Value Type: Float
Unreal Engine 4 Survival Game Template Documentation Page 25

Description: This value is used to determine how much (represented as a fractional percentage) the world temperature updates between current temperature and desired temperature (defined by the timeline value) every update. In the default setting, it will update by 10% of the difference between the values every 4 seconds. This allows for a more natural gradual update process. Te Cold Walk Speed Default Value: 100.0 Value Type: Float Description: This value represents the speed at which a player can move when they are experiencing the effects of being frozen. TITLE Default Value: TEXT Value Type: TEXT Description: TEXT TITLE Default Value: TEXT Value Type: TEXT Description: TEXT TITLE Default Value: TEXT Value Type: TEXT Description: TEXT PLACEHOLDERS FOR MISSING CONTENT Temperature Switches If you click on the “show more” arrow at the bottom of the Temperature System Category, you will see an additional two settings.
Please note that, as their names would suggest, these settings are not to be touched. They are used in the conversion process for switching between Fahrenheit and Celsius. Messing with these will result in bad values being used in the settings and could require some work to get back to normal.
Unreal Engine 4 Survival Game Template Documentation Page 26

Oxygen System The oxygen system in the template works in one of two ways. Either a designer can elect to use the oxygen system using volumes to indicate oxygenfree zones (such as airlocks, enclosed vacuums, underwater areas, etc.), or they can elect to have the oxygen system switched to always drain (such as may be used in game set on the bottom of the ocean, or an exploded spaceship). In a volume based system, oxygen will return to the player whenever they are not within the oxygen free zones, whilst in the always drain system, players will need to utilise oxygen safehouses and items to stay alive. Settings Breakdown All the following settings can be found in the Oxygen System category (pictured below) of the actor details for the SGT_MasterSystems actor.
Ox Always Drain Default Value: Disabled Value Type: Boolean Description: This toggles the oxygen system between a contained volumeinfluenced one and a always drain based system. Ox Warning State Default Value: Both (default) Value Type: Enumerator Description: Using this setting, you can toggle what sort of warning the player will receive when the oxygen level crosses the threshold value. The options are “None” (no warning), “Text Only” (a text warning on screen), “Visual Only” (which will employ post processing effects set by other settings) or “Both” (which will do both text and visual warnings). Ox Threshold Default Value: 5 Value Type: Integer
Unreal Engine 4 Survival Game Template Documentation Page 27

Description: This is the value at which warnings and visual effects will kick in, alerting the player that their oxygen is reaching dangerous levels. Ox Visual Effect Default Value: Saturation Value Type: Enumerator Description: This is the visual effect used if the Warning State is set to visual or both. Ox Effect Scale Default Value: 0.0 Value Type: Float Description: This value is the value for the final state of the visual effect once the warning is at full state. For example, by default the visual effect is Saturation, and the default value is 0.0, so the final value of saturation is 0.0. Ox Fade Time Default Value: 10.0 Value Type: Float Description: This float determines how long (in seconds) it takes for the warning to reach full state once it starts. Ox Warning Text Default Value: Warning: Warning: Oxygen levels are getting low! Value Type: Text Description: This message is what is displayed when the player’s oxygen level crosses the threshold value, as long as the warning state is set to either “Text only” or “Both”. Ox Depleted Damage Default Value: 2.0 Value Type: Float Description: This is the amount of damage dealt to the player’s health every second once the player’s oxygen has fully depleted. Ox Limit Stamina Default Value: Enabled Value Type: Boolean Description: This boolean controls whether or not the player’s stamina is limited when the player reaches zero oxygen. Ox Drain Time Default Value: 120.0 Value Type: Float Description: This value determines how long, in seconds, it takes for the players oxygen to decay from 100% to 0% when the player is in a zero oxygen environment.
Unreal Engine 4 Survival Game Template Documentation Page 28

Blood System The blood system runs on the logic that every time a player receives damage, if it is above a certain threshold, there is a chance that the strike will cause the player to bleed. Once they are bleeding, they will lose blood at a steady rate until either they die or the wound is bandaged up with an item. The lower the amount of blood that a player has, the more damage they will take any time they are caused damage. Settings Breakdown All the following settings can be found in the Blood System category (pictured below) of the actor details for the SGT_MasterSystems actor.
Bl Damage Min Default Value: 15.0 Value Type: Float Description: This is the minimum amount of damage required for there to be a chance that a hit causes the player to start bleeding. Bl Bleed Chance Default Value: 0.5 Value Type: Float Description: This defines how likely it is a player will bleed when dealt damage equal to or greater than the Damage Min threshold. Bl Drain Time Default Value: 120.0 Value Type: Float Description: This value defines how long, in seconds, it will take a player to drain their blood from 100% to completely drained. Bl Max Multiplier Default Value: 3.0 Value Type: Float Description: This value defines the maximum amount that incoming damage can be multiplied by due to blood levels. Setting this will set a scale of reference for all values impacted by blood level to ensure even scaling from a blood level of 100% to 0.
Unreal Engine 4 Survival Game Template Documentation Page 29

Stamina System The stamina system is a multipurpose framework intended to be used to control any physical actions. This could include actions such as sprinting, jumping and so on, but might also include things such as melee attacks and so on. Settings Breakdown All the following settings can be found in the Stamina System category (pictured below) of the actor details for the SGT_MasterSystems actor.
St Recovery Delay Default Value: 2.5 Value Type: Float Description: This determines how long, in seconds, before stamina starts to regenerate after being used. As an example, if a player sprints and exhausts their stamina, it will take, by default, 2.5 seconds before their stamina begins to regenerate. During this time players will not be able to run or execute any other actions that require stamina. St Recovery Rate Default Value: 0.1 Value Type: Float Description: This value determines how long, in seconds, it will take to recover 1% of stamina. If this value was set to 1, then it would take 100 seconds to recover fully. Using the default setting of 0.1, it will take 10 seconds. St Depleted Sound Default Value: sgt_player_gasp Value Type: Sound Description: This is the sound played when a player has run out of stamina. To have no sound played, simply leave this setting blank. Connecting Extra Actions to Stamina Expanding the stamina system to include extra actions is quite easy and requires two main things: a check to ensure the player has enough stamina to perform an action, and ensuring that the appropriate amount is drained from the stamina variable.
Unreal Engine 4 Survival Game Template Documentation Page 30

For the example, we will use the jump function included in the template which can be found on the event graph of the character blueprint titled BP_SGT_Character (which can be found in the SGTContent/Blueprints/Systems folder). The function, by default, looks like this:
Part 1: Checking For Stamina In the case of jumping, we will need to decide an arbitrary amount of stamina that we define as the amount drained by a single jump action. For this example, we will use 15, meaning that everytime a player jumps their stamina will be lowered by 15%. As such, the check needed to be done is simply to ensure that the stamina value is currently equal to or greater than 15. As we already have a reference to the SGT Master Systems blueprint in the character variables, we can do this very easily as shown in the following image:
Placing a branch at the final stage just before calling the jump function, we are getting a reference to the stamina value, from the master settings blueprint, and checking if it is equal to or greater than 15. As long as this is true, we call the jump function. If it is not, we do nothing. Part 2: Draining Stamina Draining stamina methods will vary depending on the nature of the action you are working with. Some actions, such as sprinting, or holding back a bow and arrow, would be slow drains based on how long the user takes to do the action, whilst others such as jumping, or pulling up on a ledge, would be large single amounts of effort, and thus single large drains of stamina. As we have defined the amount of stamina to drain for a jump to be 15, all we need to do is add the following to the end of the jump function (after the “Jump” node):
Unreal Engine 4 Survival Game Template Documentation Page 31
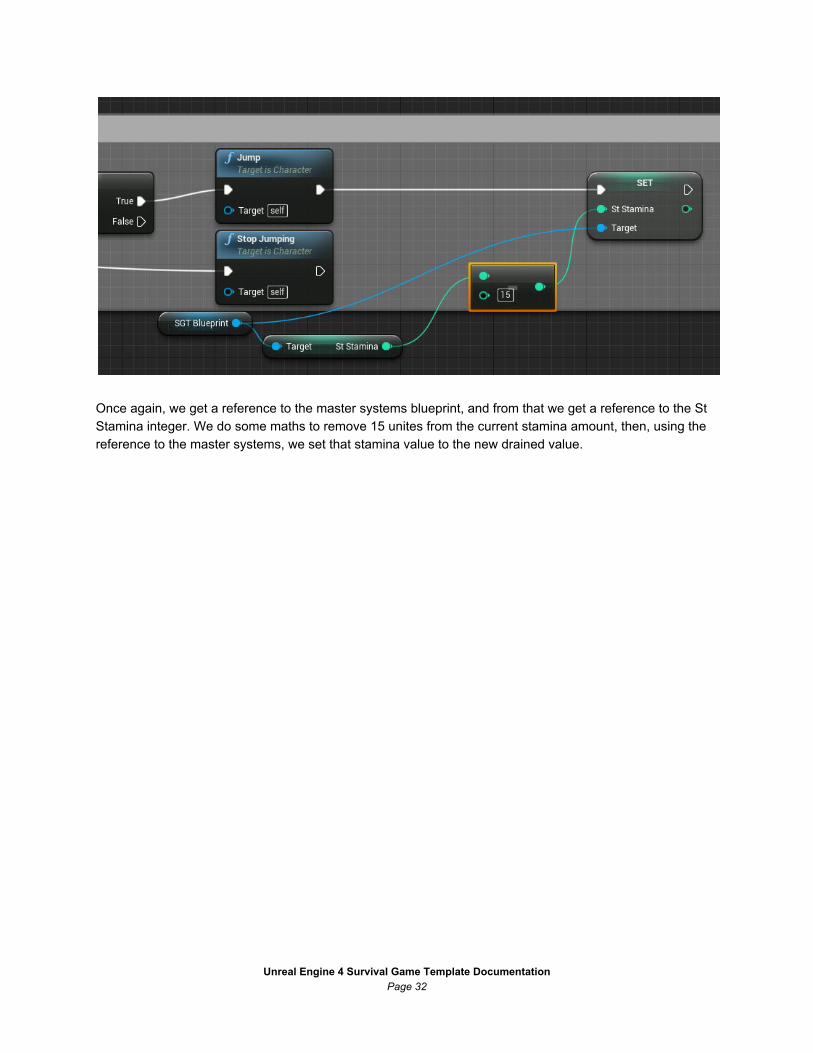
Once again, we get a reference to the master systems blueprint, and from that we get a reference to the St Stamina integer. We do some maths to remove 15 unites from the current stamina amount, then, using the reference to the master systems, we set that stamina value to the new drained value.
Unreal Engine 4 Survival Game Template Documentation Page 32
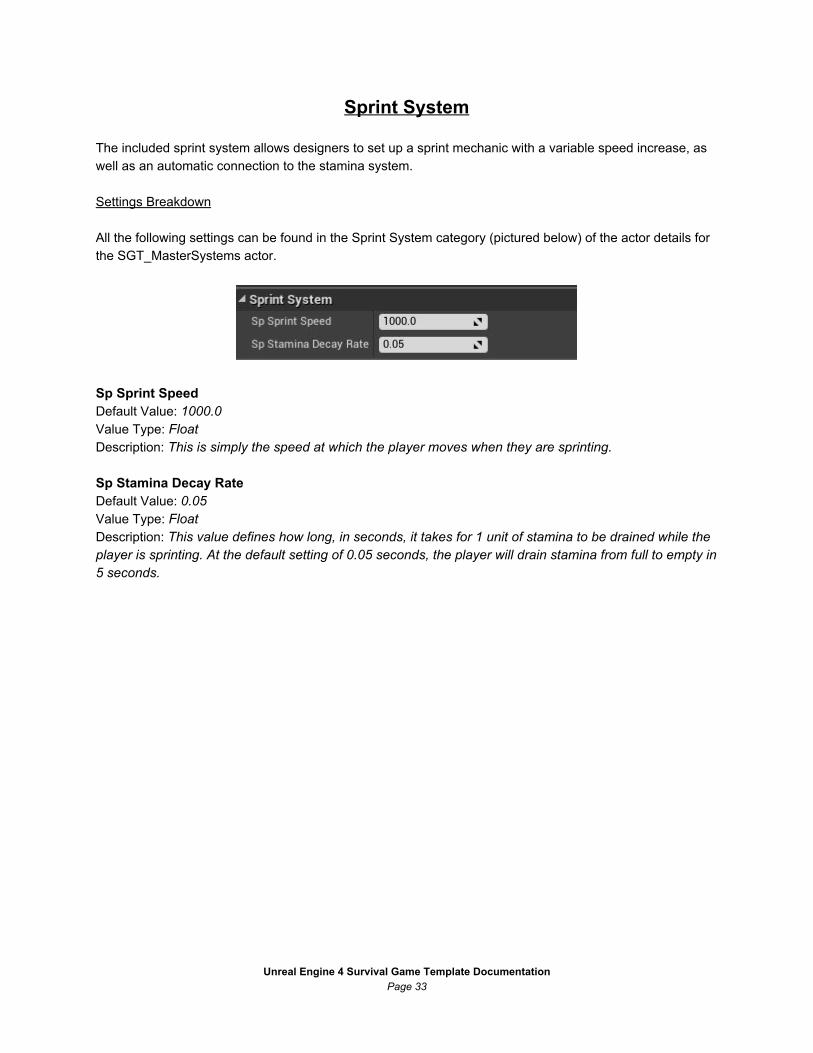
Sprint System The included sprint system allows designers to set up a sprint mechanic with a variable speed increase, as well as an automatic connection to the stamina system. Settings Breakdown All the following settings can be found in the Sprint System category (pictured below) of the actor details for the SGT_MasterSystems actor.
Sp Sprint Speed Default Value: 1000.0 Value Type: Float Description: This is simply the speed at which the player moves when they are sprinting. Sp Stamina Decay Rate Default Value: 0.05 Value Type: Float Description: This value defines how long, in seconds, it takes for 1 unit of stamina to be drained while the player is sprinting. At the default setting of 0.05 seconds, the player will drain stamina from full to empty in 5 seconds.
Unreal Engine 4 Survival Game Template Documentation Page 33

Flashlight/Torch Using a spotlight actor, the survival game template attaches this light to the player. When they press the appropriate key (by default: F), the light turns on. Pressing again with switch it off. Using the included settings, designers can set the torch to need battery power, and to flicker once battery levels get low (below a set threshold). Settings Breakdown All the following settings can be found in the Torch System category (pictured below) of the actor details for the SGT_MasterSystems actor.
To Offset Default Value: 50.0 Value Type: Float Description: This setting determines the physical offset of the light in front of the player. If using a held ‘flashlight’ item, this will need to be altered to get the right aesthetic effect. To Torch Colour Default Value: (R=0.666667,G=0.678431,B=1.000000,A=1.000000) Value Type: Linear Colour Description: This value defines the colour of the torch light. To Torch Outer Cone Angle Default Value: 40.0 Value Type: Float Description: This defines the angle of the outside rim of the torch light. To Torch Inner Cone Angle Default Value: 25.0 Value Type: Float
Unreal Engine 4 Survival Game Template Documentation Page 34

Description: This defines the angle of the inside rim of the torch light. To Torch Attenuation Radius Default Value: 1000.0 Value Type: Float Description: This value defines, in unreal units, how far away the torch light shines. Use this in conjunction with To Torch Intensity to get the right strength light for your project. To Torch Intensity Default Value: 3000.0 Value Type: Float Description: This value defines how bright the torch light is. Use this in conjunction with To Torch Attenuation Radius to get the right strength light for your project. To Drain Battery Default Value: Enabled Value Type: Boolean Description: Enable/disable the use of battery levels to control the torch. To Use Flicker Default Value: Enabled Value Type: Boolean Description: If this is enabled, whenever the battery levels are below the Flicker Threshold, the light will flicker on and off. To Flicker Threshold Default Value: 25 Value Type: Integer Description: This value defines the threshold that the battery level must cross in order for the flicker effect to activate. To Flicker Rate Default Value: 500 Value Type: Integer Description: The torch flicker is semirandom, and this value is used by several parts of the flicker function to power the rate at which flickers occur. Experiment with this value to find a setting you like.
Unreal Engine 4 Survival Game Template Documentation Page 35

Inventory The Survival Game Template inventory system is a fully featured multifaceted system that allows for the use of player inventories, loot drops on AI, chest items in the world and much more. Settings Breakdown All the following settings can be found in the Inventory System category (pictured below) of the actor details for the SGT_MasterSystems actor.
Please note that additional settings also reside in this category. These will be discussed in the section
titled “Inventory Visual Settings” as they deal with visual tweaks, not mechanics and systems. In Enable Hot Bar Default Value: Enabled Value Type: Boolean Description: This boolean toggles whether or not the player will have access to the included hotbar. If disabled, all hotbar functions are also disabled. In Auto Hot Bar Default Value: Enabled Value Type: Boolean Description: This boolean is used to control whether new items that are picked up are added to the hotbar automatically or not.
Unreal Engine 4 Survival Game Template Documentation Page 36

In Max Inventory Weight Default Value: 50.0 Value Type: Float Description: This value is used to control how much weight the player can carry before becoming over encumbered. Every item has it’s own weight value, and stacks are multiples of that value. Once inventory weight exceeds this value, the player will be over encumbered. In Animate Item Pickup Default Value: Enabled Value Type: Boolean Description: This boolean toggles the animation of the item flying towards the player upon pickup action. If this is disabled items are simply removed from the world and added to the inventory rather than animated. In Animated Pickup Time Default Value: 0.25 Value Type: Float Description: This value controls how long the animation takes to complete if In Animate Item Pickup is set to enabled. In Player Max Reach Default Value: 500.0 Value Type: Float Description: This value controls, in unreal units, how far a player can reach to interact with items. In Trace Visibility Default Value: None Value Type: Enumerator Description: This setting can be used to show the line traces executed on the pickup action. This can be useful for testing and debugging purposes. In Drop Items at Player Feet Default Value: Disabled Value Type: Boolean Description: This boolean controls whether items are dropped where the player is looking, or at their feet. Note that using particular physics/collision settings on pickup items can yield odd results with either setting. In Over Emcumbered Speed Default Value: 50.0 Value Type: Float Description: This value defines how fast a player can move when they are over encumbered. In Display Over Encumbered Warning Default Value: Disabled Value Type: Text Description: This boolean determines whether or not the player will receive a text warning on the HUD (external of the inventory) when they are over encumbered or not.
Unreal Engine 4 Survival Game Template Documentation Page 37

In Pickup Sound Default Value: sgt_world_pickup Value Type: Sound Description: This is the sound played when the player picks up an item. To have no sound played, simply leave this entry blank. In Drop Sound Default Value: sgt_world_drop Value Type: Sound Description: This is the sound played when the player drops an item. To have no sound played, simply leave this entry blank. In Destroy Sound Default Value: sgt_world_break Value Type: Sound Description: This is the sound played when the player destroys an item. To have no sound played, simply leave this entry blank. In Over Encumbered Warning Default Value: You are carrying too much weight! Value Type: Text Description: This is the text warning displayed to the player on the HUD if the inventory is full and In Display Over Encumbered Warning is set to enabled. In Change Visual Settings Default Value: Enabled Value Type: Boolean Description: This controls whether the inventory visual settings (see further section) impact the UI of the inventory or not. This is particularly useful if you are familiar with UMG and wish to make the UI yourself but still use the Inventory system (as you can turn off the settings) but is also useful for those who might not understand/want to learn UMG and still want to customise the setting from the default. Inventory Visual Settings The SGT inventory includes multiple widgets, all associated with their relevant pickups and items. Examples include the book widget (which allows players to read books), the sleep widget (used when a player interacts with a bed item to determine how long they will sleep for) and the stack split widget (used to determine how much of a stack a player will be taking/placing from/in to a container. As these are all tied to the inventory system, all of the relevant settings are included in the Inventory System category. These settings are pictured below:
Unreal Engine 4 Survival Game Template Documentation Page 38

Visual Settings: Images Note that the first 8 settings are all images that are used to give widgets their look. More detailed information about the images is as follows: Note: Whilst default image dimensions are listed here, all widgets are set to scale based on window size and as such will automatically adjust dimensions of images. Dimensions are included as a reference for best practices within the template. In Background Image This image is the background for the main inventory widget displayed when players click the Open Inventory button (default binding: I) Default Image: T_UI_PNGParchment_Light Default Image Dimensions: 1920x1080 pixels In Transfer Background Image This image is the background for the transfer widget, which is used by the player to transfer items between their own inventory and chest/container items in the world. Default Image: T_UI_Parchment_Panel Default Image Dimensions: 337x761 pixels
Unreal Engine 4 Survival Game Template Documentation Page 39
In Stack Transfer Background This image is the background for the stack transfer widget displayed for players to split stacks when transferring items between their own inventory and chest/container items. Default Image: T_UI_Parchment_Panel_Split Default Image Dimensions: 720x360 pixels In Sleep Widget Background This image is the background for the sleep widget which is displayed when the player interacts with a bed item in the world and is used to determine how many hours the player sleeps for. Default Image: T_UI_Parchment_Split Default Image Dimensions: 720x360 pixels In Book Background This image is the background for the book widget which opens when a player uses a book (so they can read it). Default Image: T_UI_Parchment_Split Default Image Dimensions: 720x360 pixels In Button Neutral Image This image is the background for the buttons (such as take, use, drop, etc.) in all inventory widgets in the neutral state. Default Image: T_UI_Button_Neutral Default Image Dimensions: 246x40 pixels In Button Hover Image This image is the background for the buttons (such as take, use, drop, etc.) in all inventory widgets in the hover state. Default Image: T_UI_Button_Hover Default Image Dimensions: 246x40 pixels In Button Pressed Image This image is the background for the buttons (such as take, use, drop, etc.) in all inventory widgets in the pressed state. Default Image: T_UI_Button_Pressed Default Image Dimensions: 246x40 pixels Visual Settings: Fonts Beyond these image settings, the 9 settings that follow are drop down structs with font settings that look like this when expanded:
Unreal Engine 4 Survival Game Template Documentation Page 40

For each struct, the settings can be broken down as such Font: This is the font to be used for the text FontColour: This is the colour of the text FontSize: This is the size of the text ShadowColour: This is the colour of the drop shadow that appears behind the text ShadowOffset: This is the values to define where the drop shadow appears broken down into a 2 Vector. Each set of font settings is named in such a way as to indicate what text it is associated with and as such does not need to be explicitly explained here. Visual Settings: Other The final two settings in the visual settings portion of the Inventory Category are used to define the colour of the progress bar that indicates the amount of the inventory that is filled. In Weight Bar Fill Colour is the colour used for the portion of the inventory that is full, whilst In Weight Bar Empty Colour is the colour used for the remainder of the inventory (ie. free space). Customising Widgets Manually Please note that, whilst the visual settings can be used to get a large variety of inventory looks, if you wish to change major visual settings, such as layouts and similar things, you will need to turn the In Change Visual Settings setting to disabled and manually edit the widgets themselves. It is important, when doing this, to maintain some elements of widgets in order for the system to keep working. Elements such as the InventoryScroll in the main inventory widget, which is used to display all the items in the player inventory, are referenced directly in the blueprint logic, and removing these items will most likely result in broken logic, errors and game crashes. As such, always be sure to backup widget blueprints before editing them, and heed warnings presented by Unreal Engine 4 when it notifies you that the item you are deleting is referenced elsewhere. Master Pickup Item Almost all inventory features require the use of pickups objects in the world, placed by a designer, for the player to pick up and use in one way or another. All items that are able to be added to the inventory of the player, an AI, a chest/container item, or anywhere else that need to interact with the inventory system must be based on the blueprint class MASTER_Pickup. This blueprint can be used to create child blueprints that carry their own information on what sort of pickup they are and how they are to be used. The MASTER_Pickup can be found in the Pickup folder, within the Blueprints folder of the SGTContent folder of your project.
Unreal Engine 4 Survival Game Template Documentation Page 41

Creating A New Pickup To create a new pickup, simply right click on the MASTER_Pickup in the content browser and select “Create Child Blueprint Class” as shown below:
Once the child has been created, give it a name and place it in the folder you wish to keep it in. When you are ready to start configuring the pickup, double click on the child blueprint you just created. You will be presented with the standard edit blueprint screen. All we are interested in is “InventoryData” struct in the details pane (you will need to expand it), which should look like this:
Unreal Engine 4 Survival Game Template Documentation Page 42

The settings displayed in this pane define what sort of pickup this is, what it looks like both in the inventory and in the game world, how it can be used and so on. PickupName: This is the name of the pickup as it appears in locations such as the player inventory. InventoryThumbnail: This is the image displayed to represent the item in the player inventory. PickupWeight: This is how much a single item of this type weighs. Type: This defines what type of item this pickup is. ItemData###: These are settings associated with each item type. For instance, an item that is of the type
“bag” will have settings that determine how much extra space it adds to the inventory, whilst an item that is of the type “resource” will have settings saying what sort of resource it is associated with (health, for instance) and how much it will restore when the player uses it. For more detail on these settings see the section titled “Default Item Types”.
IsTradable: This is a placeholder setting intended to be used to hook up a trade/merchant system with the template, allowing for some items to be traded and others to not.
Description: This is the description of the item displayed in locations such as the player inventory. IsDroppable: Determines whether or not the player can drop the item. IsDestroyable: Determines whether or not the player can destroy the item. StaticMesh: This is the mesh used to represent the item in the game world. StaticMeshScale: This value sets the universal scale of the static mesh on the item when it is in the game
world, allowing one mesh to be used in multiple instances of items if desired (such as to represent size of bags, amount of health, etc).
PickupClass: This setting does not need to be set by the designer as the pickups will automatically set this. It is simply a self referential variable used for spawning the pickup in the world.
EnableCollision: Toggles collision for the static mesh on and off. EnablePhysics: Toggles physics for the static mesh on and off. IsInactive: This setting does not need to be set by the designer and is used to determine items that are
currently set to cooldown and other similar states. To see a YouTube tutorial on making a pickup see this video: https://youtu.be/YWotEgKIST4 Default Item Types The SGT comes with five main item types by default: Bag, Book, Key, Resource and weapon. Bag Items These items are used to expand the player inventory size. Settings for these are as follows:
BagSize: Determines how much extra space the bag gives the player. Note that if a bag has a weight of 2, and BagSize of 4, it will only allow the player to carry an extra 2 spaces worth of items. Book Items Book items are simple books, and can be used to expand game lore, or give written instructison to the player. Settins for these are as follows:
Unreal Engine 4 Survival Game Template Documentation Page 43

Title: The title of the book, displayed in the Book widget when the book is opened. Author: The author of the book, displayed in the Book widget when the book is opened. Content: This is the body of book. The content is displayed int he Book widget when the book is opened and is defined by an array of text. For each paragraph, a new array entry should be added. For example, this array:
is used in the example content book called PI_Book. In the game world, when opened, the array is displayed as the text body of the book as follows:
Unreal Engine 4 Survival Game Template Documentation Page 44

Key Items Key items can be used to unlock chests and even expanded to unlock doorways and such. Each key is a single use only (it is consumed upon unlocked the lock it is tied to) and is connected with a single variable that can operate locks. This means that a single key can operate a unique lock, or it could be tied to several locks, but only be able to be used once. Settings for this item type are as follows:
DoorKey: This value is a unique identifier used to connect a key with a lock. For more information, see the section on Chests. Resource Items Resource items are those items that allow players to change their player state regarding particular stats and resources. Examples of this might be health potions, bandages, food and water items, gas masks, etc. The settings for this item type are as follows:
IsStackable: This boolean defines whether the item can be stacked or not. MaxStack: This value defines the maximum size a stack can be if the item is stackable.
Unreal Engine 4 Survival Game Template Documentation Page 45

AmountForPickup: This value defines the default amount of items to be picked up on an instance in the game world. This value can be altered for each instance allowing a single child blueprint to accommodate use in multiple scenarios.
IsConsumable: This setting defines if a single instance of the item will be removed after use or not. UseSound: This sound will be played when an item is used. For no sound, leave this value blank. UseCooldown: This option allows items to have a cooldown, limiting how often a player can use the item
type. For example, if you want a player to only be able to use a health once every 10 seconds, you can enable this option and give a CooldownTime of 10 to achieve this.
CooldownTime: This is the amount of time, in seconds, it takes for the cooldown to reset if UseCooldown is enabled.
Resource###: These values determine how much of each resource (health, blood, oxygen, etc.) this item will restore to the player on use.
StopsBleeding: This boolean can be used to make items stop the player from bleeding. Weapon Items By default, one weapon item is set up in the template, which is based ont he default weapon in the First Person Shooter Template. This is a gun and the Weapon item type is intended, by default, to be used for guns. Settings for this item type are as follows:
AttachMesh: This is the gun mesh that is attached to the player when the weapon is equipped. Projectile: This is the projectile blueprint used to power the weapon. FireSound: This is the sound played when the weapon is fired. These example item types are intended to be demonstrations of how to use the system and will most likely not cover all required needs. By looking through the logic associated with these item types, it should be reasonably easy to create a new item type. Adding a New Item Type In order to add a new item type, several tasks must be completed. Firstly, a new entry must be added to the enumerator associated with item types. To do this, find the Enumerator file called “ENUM_SGT_ItemType” in the Pickups folder where the MASTER_Pickup blueprint was. Open it up and you will be presented with the following screen:
Unreal Engine 4 Survival Game Template Documentation Page 46

To add a new entry, click on the “New” button and give your entry a title reflecting what type of item it is to be associated with. For example: Health Potion (please note that, using the default item types, health potions would be considered resource item types, but for this example we will be making a separate health potion item type). Once this is done, you can save and close the enumerator file. Then you will need to create a new blueprint structure to house the settings for this item type. In the template, all structures are located in SGTContent\Blueprints\Inventory\DataStructs. Create a new structure (Add New >> Blueprints >> Structure) and give it a name. Open it up and add the desired information. In the example of health potion, all we will be adding is the health value (as this is a simple example).
Save and close the structure, then find “STR_SGT_InventoryStruct” in that same folder mentioned above. This is the data that all pickup items use. We want to add a reference to the structure we just created, so click on New Variable, give it a name and in the variable type dropdown box, type the name of the structure you just created. Save and close this window. Open the MASTER_Pickup blueprint, click Compile and then save and close it. We should now be able to make a child blueprint of the MASTER_Pickup that has the information we just created.
Unreal Engine 4 Survival Game Template Documentation Page 47

Incorporating the item type into your game will vary depending on what the item does. As an example, bag item types alter the inventory size by simply being in the player inventory, so whilst they do not need to have any logic associated with a ‘use’ action on them, they have to be taken into account as part of the Update Inventory action. This is done in the function titled “UpdateInventorySize” which can be found in the main inventory widget. Items such as resource items, and our example health potion, however, require that the logic be associated with the ‘use item’ action. As such, for our example, you would need to open up the SGT_MasterSystems blueprint, navigate to the Inventory event graph, and find the event called “In_UseItem”, which will now look like this:
The easiest way to proceed from here is to make a unique event just for our new item type that we can call by right clicking on the event graph and typing “custom event”. Give the new event a name and add the logic you want to the event. For our example, the logic might look like this:
Unreal Engine 4 Survival Game Template Documentation Page 48

To breakdown the logic we added an input to the event that is of the type “STR_SGT_Inventory_Struct” by clicking on the event node and clicking the “New Input” button on the right panel. This allows us to get the information from the item we are using, pulling the pickup data, that then we can break the HealthItem data up from. We use this health value, in conjunction with the preexisting He_UseHealthItem function we have (from the health system) to add to the player’s health. The final stage is to hook up this event to the In_UseItem event like so:
All that was needed was to call the UseHealthPotion event we just made when the item type enumerator is “Health Potion” and to feed the “Potion Reference” data from the ‘ItemToUse” input on the event node.
Unreal Engine 4 Survival Game Template Documentation Page 49

Note that this example is very basic and more than likely would not be satisfactory for use in a game, as it does not deal with removing the health potion upon consumption, and is using logic that already exists. For a more detailed and complete example, please see the relevant youtube video tutorial. Chests The inventory system includes container items, which can function as chests, crates, lockers, etc. These items are placed in the world by the designer and can have set loot, or even be programmed to have randomly generated loot (included on example AI character see youtube tutorial for more information). The chest master blueprint, called “BP_SGT_InventoryContainer”, can be found in SGTContent\Blueprints\WorldItems. You can simply drag this actor into your level for a basic chest and then begin customising it based on the settings in the details pane.
Name: This is the name of the chest, used in the game world when the player hovers over the chest. Chest Static Mesh: This is the static mesh used to represent the chest in the game world. Chest Mesh Scale: This control allows you to change the mesh scale from the details pane. Play Sounds: This boolean controls whether the chest has open and close sounds played when the player
interacts with it. Sound on Open: This is the sound played when the player opens the chest. Sound on Close: This is the sound played when the player closes/exits the chest. Limit Item Count: This is used to limit the amount of items that can be added to the chest. This is useful for
limiting chest as players can place items into the chests. Inventory: This is the array that controls the contents of the chest. Please see below for more explaination
on this. Locked: This boolean controls whether or not the chest is locked. Key String: If the chest is locked, the player must have the key that matches this key string to unlock it.
Unreal Engine 4 Survival Game Template Documentation Page 50

To add items to the chest’s inventory, simply click the + sign next to the inventory array. This will add a new entry to the array which will allow you to select which child pickup blueprint you want to add, as well as the stack size.
If a chest has a item count limit and you add more items than the limit allows, the items will be taken from the first entries. For example, if you limit the chest to 5 items, and make 10 array entries, only the first 5 entries will ever be used. Hotbar The inventory system comes complete with a preconfigured hotbar system that allows players to quickly switch between items without the need to go into their inventory. By default, players can set up their hot bar by opening the inventory, selecting the desired item, then pressing the 10 keys to assign that item to a slot. Once out of the inventory, they then press the associated key again to equip and unequip said item. Adding Loot to AI Characters Using the inventory system, it is entirely possibly to set up AI characters that have loot the player can access upon the characters death. The simplest way to do this is to spawn a ‘chest’ item on the characters’ death. This could be disguised as a bag, or even as a cadavre if desired, and is by no means the only way to achieve an enemy loot system. Understanding this method will, however, enable you to find the best way to incorporate loot into your own project. By default, the template comes with a very basic enemy AI that has a chest drop system. When the AI character dies, a chest is spawned at the location of death. Contents of the chest can be set by the designer or randomly selected from a predefined list (allowing multiple ‘tiers’ of loot rewards based on the enemy killed). After a short period of time, the chest is removed from the world (preventing chests from being left everywhere). This AI character can be found in SGTContent\Blueprints\AI and is called “DumbZombie”. The logic for this system is reasonably simple and a detailed youtube tutorial on this subject is available on my YouTube channel.
Unreal Engine 4 Survival Game Template Documentation Page 51

HUD The template HUD included provides feedback to the player on all important systems, interactions and mechanics. Settings can be broken down into two categories, similar to the Inventory System, with the first group being mechanical settings, and the second group being visual settings. Settings Breakdown All the following settings can be found in the HUDValues category (pictured below) of the actor details for the SGT_MasterSystems actor.
HUD Feedback Lifetime Default Value: 3.0 Value Type: Float Description: This value controls how long, in seconds, text feedback remains on screen for the player to read. HUD Fade in on Startup Default Value: Enabled Value Type: Boolean Description: If enabled, whenever the player starts the game, the HUD will fade in from black. HUD Fade Time Default Value: 2.0 Value Type: Float Description: This value controls how long, in seconds, the fade from black takes to complete.
Unreal Engine 4 Survival Game Template Documentation Page 52

HUD Use Compass Default Value: Enabled Value Type: Boolean Description: This controls whether or not the onscreen compass is enabled, allowing players to see what direction they are facing and moving. HUD Compass Colour Default Value: (R=0.405000,G=0.405000,B=0.405000,A=1.000000) Value Type: Linear Color Description: This controls the colour overlay for the compass. By default the compass image is plain white, allowing this setting to change the colour of the compass to suit a designer’s needs. HUD Use Interactive Prompt Default Value: Enabled Value Type: Boolean Description: If enabled, the player will recieve an onscreen prompt (either via text, object outline, or both) whenever they are both inreach (defined by the Player Reach setting in the Inventory System category) and looking at any of the items in the HUD Interactive Actors Array. HUD Interactive Actors Default Value: BP_SGT_InventoryContainer, MASTER_Pickup, BP_SGT_Bed Value Type: Actor Array Description: This array lists all items that should be considered for the interactive prompt. By default, all chests, pickups and beds are covered. It is possible to add new actors to this array, but for full integration they will also need to be incorporated into the function titled “HUD_InteractivePrompt” which can be found in the SGT_MasterSystems blueprint. For a more detailed explanation of how to add new actors to this for full integration, check out the relevant video available on my YouTube channel. HUD Display Text on Prompt Default Value: Enabled Value Type: Boolean Description: Controls whether text should be displayed (usually in the form of the actor name) as part of the interactive prompt. HUD Display Interactive Item Outline Default Value: Enabled Value Type: Boolean Description: Enables/disabled the object outline as part of the interactive prompt. HUD Outline Line Width Default Value: 2.0 Value Type: Float Description: Controls the width, in pixels, of the interactive prompt object outline. HUD Outline Colour Default Value: (R=0.780000,G=0.840001,B=1.000000,A=1.000000) Value Type: Linear Color Description: Conrtols the colour of the interactive prompt object outline.
Unreal Engine 4 Survival Game Template Documentation Page 53

HUD Change Visual Settings Default Value: Enabled Value Type: Boolean Description: Controls whether or not visual settings (see next section) control the HUD visuals. Useful for those who do not know how, or do not want to, manually edit the HUD aesthetics. If manually editing the widget, disable this setting. HUD Visual Settings The visual settings that can be controlled via the details pane can be broken down into two main groups and look as follows:
The boolean values are used to control what HUD elements are visible on screen. As an example, HUD Show Health controls if the health progress bar, used to represent the player’s health levels, is visible on the HUD or not. These controls are named based on their usage and should be selfexplanatory.
Unreal Engine 4 Survival Game Template Documentation Page 54

Likewise, the accompanying settings represent the colour used for the associated HUD element. HUD Colour Health, for instance, controls the colour of the health progress bar. These settings will only take effect if HUD Change Visual Settings is set to enabled.
Unreal Engine 4 Survival Game Template Documentation Page 55

Visual Effects As discussed in parts of this documentation, the template comes with several visual effects that can be used to convey particular states of danger to the player. These are intended to be tied to resource values, such as health, hunger, etc. but could easily be used for other things. At time of release, there are seven included visual effects. These are detailed below, including links to the documentation by Epic Games (where available) for the associated effect. Temperature: This effect changes the overall mood of colours in the scene. Saturation: This effect alters the colour saturation. Turning it down will result in a grayscale image, turning it up will result in super intense/vibrant colours. Contrast: This effect simply alters the contrast of the scene. Fringe Intensity:This effect increases the shift in colours on the edge of images in the game world. For more information: https://docs.unrealengine.com/latest/INT/Engine/Rendering/PostProcessEffects/SceneFringe/index.html Vignette Intensity: This effect darkens screen corners. For more information, see: https://docs.unrealengine.com/latest/INT/Engine/Rendering/PostProcessEffects/Vignette/index.html Grain Intensity: This effect causes a film grain like effect. Scale: This effect is based on the camera Depth of Field and manipulates the scale factor for blurring the DoF. More info can be found here: https://docs.unrealengine.com/latest/INT/Engine/Rendering/PostProcessEffects/DepthOfField/index.html
Unreal Engine 4 Survival Game Template Documentation Page 56

Save/Load There’s a lot of data attached to the player, the world, the inventory, and chests. In order to make it useful in a multisession or multilevel project, it all needs to be saved and loaded at various times. The included save system achieves this using the UE4 savegame system, making a save game file for all this data that can be loaded every time the game starts up, a player enters a new area, or at any point desired. There is also an included timebased autosave system that can save the data at an interval set by the designer. Settings Breakdown All the following settings can be found in the Save System category (pictured below) of the actor details for the SGT_MasterSystems actor.
Sa Enable Autosave Default Value: Enabled Value Type: Boolean Description: Controls whether or not the autosave system is enabled. Sa Autosave Frequency Default Value: 60 Value Type: Integer Description: Controls how long, in seconds, between autosaves. Sa Savegame File Name Default Value: default Value Type: String Description: Controls the name of the default savegame file name. Sa Auto Load Default Value: Disabled Value Type: Boolean Description: Enabling this will force the savegame load, if there is a savegame, on the startup of the current level. This is used to enforce loading data between levels for instance.
Unreal Engine 4 Survival Game Template Documentation Page 57


![Beginning iOS3D Unreal - GBV · Beginning iOS 3D unreal games development : [3D game development for the iOS platform using the Unreal UDK and UnrealScript] Subject: New York, NY,](https://static.fdocuments.us/doc/165x107/5f92783f8e7a716c666ef788/beginning-ios3d-unreal-beginning-ios-3d-unreal-games-development-3d-game-development.jpg)