
Unlock the value of big data with the DX2000 from NEC · Apache Spark—the analytics tool we used...
23
Unlock the value of big data with the DX2000 from NEC July 2016 Unlock the value of big data with the DX2000 from NEC With speedy analysis in a highly scalable solution, powered by Intel Effective, accurate data analysis is a must. The big data your business examines today is a building block for the sales and business initiatives of tomorrow. Finding connections in data, no matter what the form or size, leads to better insights into your business. Starting with the right infrastructure means your analytical capabilities can expand easily to fulfill the growing needs of your company. The Scalable Modular Server DX2000 from NEC can deliver quick analytical insight, scaling as your analytics workloads evolve. Building on our previous discoveries, 1 we evaluated how well the new Scalable Modular Server DX2000 from NEC, powered by the Intel ® Xeon ® processor D product family, could scale as your data analysis needs grow. We configured a Red Hat ® Enterprise Linux ® OpenStack ® cloud environment with Apache Spark™, an industry-leading big- data analytics engine. We evaluated a single DX2000 enclosure with 33 four-core server nodes and then with 44 four-core server nodes. Finally, we scaled out to a second enclosure containing 22 eight- core server nodes. The eight-core nodes allowed us to run 85 executors of our Apache Spark™ workload on the 66 server nodes. As we added server nodes, the solution analyzed a big data sample set quicker and more efficiently, and most importantly, in a predictable, scalable fashion. Get answers even faster by adding server nodes 33 nodes 44 nodes 244 seconds 74 seconds 66 nodes 46 seconds 46 seconds Discover connections in 100GB of data in A Principled Technologies report: Hands-on testing. Real-world results.
Transcript of Unlock the value of big data with the DX2000 from NEC · Apache Spark—the analytics tool we used...

Unlock the value of big data with the DX2000 from NEC July 2016
Unlock the value of big data with the DX2000 from NECWith speedy analysis in a highly scalable solution, powered by Intel
Effective, accurate data analysis is a must. The big data your business examines today is a building block for the sales and business initiatives of tomorrow. Finding connections in data, no matter what the form or size, leads to better insights into your business.
Starting with the right infrastructure means your analytical capabilities can expand easily to fulfill the growing needs of your company. The Scalable Modular Server DX2000 from NEC can deliver quick analytical insight, scaling as your analytics workloads evolve.
Building on our previous discoveries,1 we evaluated how well the new Scalable Modular Server DX2000 from NEC, powered by the Intel® Xeon® processor D product family, could scale as your data analysis needs grow. We configured a Red Hat® Enterprise Linux® OpenStack® cloud environment with Apache Spark™, an industry-leading big-data analytics engine. We evaluated a single DX2000 enclosure with 33 four-core server nodes and then with 44 four-core server nodes. Finally, we scaled out to a second enclosure containing 22 eight-core server nodes. The eight-core nodes allowed us to run 85 executors of our Apache Spark™ workload on the 66 server nodes.
As we added server nodes, the solution analyzed a big data sample set quicker and more efficiently, and most importantly, in a predictable, scalable fashion.
Get answers even faster by adding server nodes
33nodes
44nodes
244seconds
74seconds
66nodes
46seconds
46seconds
Discoverconnections in
100GB of data in
A Principled Technologies report: Hands-on testing. Real-world results.
Unlock the value of big data with the DX2000 from NEC July 2016 | 2
Build data analysis upon a solid foundationA good foundation supports and stabilizes structures as they develop. This applies to your business, too. Existing big data initiatives in your business need dependable hardware resources to keep pace with often rapidly growing data. Your business can continue to gain valuable insights quickly when resource growth meets demand.
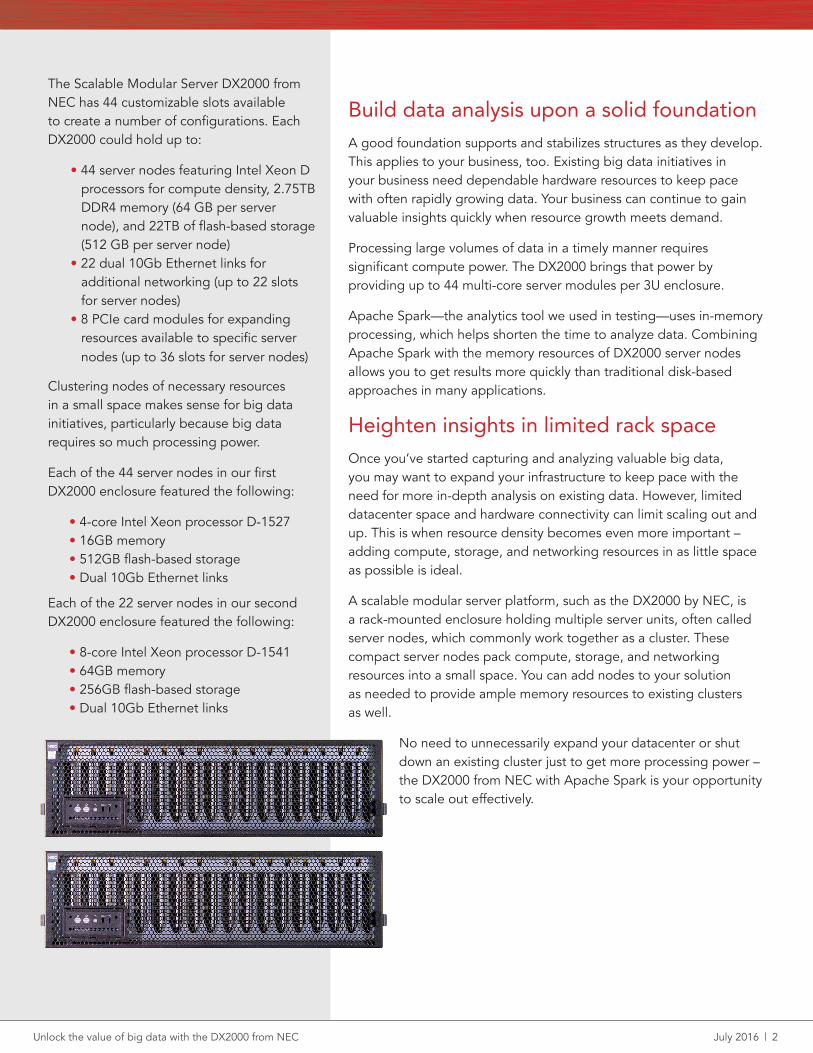
Processing large volumes of data in a timely manner requires significant compute power. The DX2000 brings that power by providing up to 44 multi-core server modules per 3U enclosure.
Apache Spark—the analytics tool we used in testing—uses in-memory processing, which helps shorten the time to analyze data. Combining Apache Spark with the memory resources of DX2000 server nodes allows you to get results more quickly than traditional disk-based approaches in many applications.
Heighten insights in limited rack spaceOnce you’ve started capturing and analyzing valuable big data, you may want to expand your infrastructure to keep pace with the need for more in-depth analysis on existing data. However, limited datacenter space and hardware connectivity can limit scaling out and up. This is when resource density becomes even more important – adding compute, storage, and networking resources in as little space as possible is ideal.
A scalable modular server platform, such as the DX2000 by NEC, is a rack-mounted enclosure holding multiple server units, often called server nodes, which commonly work together as a cluster. These compact server nodes pack compute, storage, and networking resources into a small space. You can add nodes to your solution as needed to provide ample memory resources to existing clusters as well.
No need to unnecessarily expand your datacenter or shut down an existing cluster just to get more processing power – the DX2000 from NEC with Apache Spark is your opportunity to scale out effectively.
The Scalable Modular Server DX2000 from NEC has 44 customizable slots available to create a number of configurations. Each DX2000 could hold up to:
• 44 server nodes featuring Intel Xeon D processors for compute density, 2.75TB DDR4 memory (64 GB per server node), and 22TB of flash-based storage (512 GB per server node)
• 22 dual 10Gb Ethernet links for additional networking (up to 22 slots for server nodes)
• 8 PCIe card modules for expanding resources available to specific server nodes (up to 36 slots for server nodes)
Clustering nodes of necessary resources in a small space makes sense for big data initiatives, particularly because big data requires so much processing power.
Each of the 44 server nodes in our first DX2000 enclosure featured the following:
• 4-core Intel Xeon processor D-1527• 16GB memory• 512GB flash-based storage• Dual 10Gb Ethernet links
Each of the 22 server nodes in our second DX2000 enclosure featured the following:
• 8-core Intel Xeon processor D-1541• 64GB memory• 256GB flash-based storage• Dual 10Gb Ethernet links

Unlock the value of big data with the DX2000 from NEC July 2016 | 3
How can big data improve business?When a business can analyze big data quickly, multiple departments have the ability to reap benefits. Consider the following scenarios:
Stay ahead of the competition
Dimitri is a retail fashion buyer for a major national chain of stores. He guarantees that his store has the merchandise his customer base wants, in their sizes, when they need it. He uses predictive analysis to determine his customer’s preferences as well as financial forecasts
to guide the advertising and marketing teams in their promotional endeavors. The faster the company’s servers analyze the incoming data he relies on, the sooner Dimitri gets the reports he needs to predict sales patterns and plan his gross margin goals. The Scalable Modular Server DX2000 from NEC and Apache Spark provide a powerful platform for his analysis and forecast requirements, which helps him make informed purchase and marketing decisions.
Drive business strategy
Anna, a logistics and distribution manager for a regional superstore chain, supervises the movement of goods to and from warehouses across the country. Anna and her team save the company money by using data analytics to organize the warehouses in a way that streamlines the storage and retrieval
of goods. Her team also works closely with the purchasing department and operations managers to facilitate smooth shipping and receiving strategies.
Apache Spark and the Scalable Modular Server DX2000 from NEC can help Anna and her team predict and implement warehouse layout
changes that keep the most popular items easily accessible.
Tap into the power of big data with Apache Spark
Apache Spark is an industry-standard framework that processes big data
in-memory. In-memory processing keeps data in RAM to shorten response
times. Companies like Amazon, eBay, NASA Jet Propulsion Laboratories, TripAdvisor,
and Yahoo use this tool to help them get real-time bid optimization, machine learning-
based user data modeling, forecasting, and other predictive analytics.2
Your business can use robust hardware platforms like the DX2000 from NEC in conjunction with
machine learning functionality – among other valuable kinds of data processing
in Apache Spark – to make better use of your growing data and achieve fast
analysis turnaround times.
Access meaningful analytics
In our datacenter, we used the clustering algorithm k-means. k-means takes large data sets and identifies patterns in them. Companies often use it in predictive analysis for cost modeling, market research, price forecasting, and customer-retention applications.

Unlock the value of big data with the DX2000 from NEC July 2016 | 4
Boost your sales
Priyanka is a sales strategist for a national transportation services firm. Her CEO just authorized an increase in department funding to aggressively grow sales and marketing activity. She needs to create a cohesive prospecting strategy to figure out the best way to do that. Using the Scalable Modular Server DX2000 from NEC and Apache Spark for her data analysis means Priyanka can quickly gather the valuable information that identifies new revenue targets and directly affects the company’s bottom line.
What we learned
Discover connections in your dataWe put the one- and two-enclosure DX2000 solutions through their paces with a k-means data cluster analysis test from the HiBench benchmark suite. We used this tool because it measures algorithms that may be similar to those used by companies in their data analysis. When all 63 available compute nodes in our two-chasis configuration were running the k-means analysis, the NEC solution took 56 seconds to process approximately 100 GB of data. The eight-core server modules had additional resources to offer, so we created 22 more Spark executors to total 85. The 85-executor solution took 46 seconds to process the same data. Even though the data set we used is small by some big data standards, a hundred gigabytes is representative of some publicly available applications and use cases, and it could reflect scenarios that you can relate to. For example, 100 GB is large enough to store demographic data for the world’s population in 2009 or three months of Wikipedia’s page traffic statistics.3,4
Get answers even fasterWe also compared throughput, a measure of how quickly a system can process data, as we increased the number of nodes first in a single enclosure and then scaled out to two enclosures. We did this to demonstrate how increasing the number of server nodes can increase the throughput capabilities of the DX2000, thus cutting down on processing time required for big data analysis. We began our scaling comparison with 33 server nodes in a single enclosure. We determined that due to the application design, data set footprint, and available memory resources, the fewest four-core nodes needed to run a data set this size was 33. Ultimately, a mix of 66 four-core and eight-core server nodes delivered more than double the throughput of 33, dropping analysis time of our 100 GB data set dramatically compared to our initial 33-server-node count. Our 44-server-node configuration showed more than three times the throughput of the 33-server-node configuration. In all three configurations, we used three server nodes for management services and the remaining nodes for data processing. Based on the results we got from 33 to 44 to 66 nodes, we expect your big data throughput could scale as your business grows.
100 million people
We chose a sample data set big enough to store demographic data for 6.75 billion people.3
=

Unlock the value of big data with the DX2000 from NEC July 2016 | 5
Big data analytics with private cloud flexibility We deployed and tested a Red Hat OpenStack Platform environment in the Principled Technologies datacenter. In this OpenStack environment, we used three OpenStack controller servers for high availability, one server for management
tasks, one server for Red Hat OpenStack Platform Director services, and up to two DX2000 enclosures from NEC with up to 66 server nodes. This deployment provided the flexible private cloud
environment we needed for our Apache Spark VMs.
When you use Red Hat Enterprise Linux OpenStack Platform 8 in conjunction with Apache Spark and the DX2000 environment, your team can dedicate
as much or as little space to big data analysis as you need. The flexibility of this platform means you can spin up application instances to meet changing IT demands.
Cloud platforms such as Red Hat Enterprise Linux OpenStack Platform help increase your flexibility by adapting your hardware environment without having to rebuild your infrastructure from the ground up. For more information, please visit Red Hat’s website.5
ConclusionAs data continues to pile up and departments find new ways to look at it, your datacenter needs a dense, powerful solution that can analyze this data quickly and scale resources as needed.
The Scalable Modular Server DX2000 from NEC processed big data quickly as we added server nodes and a second enclosure. In our k-means data cluster analysis test, a two-enclosure DX2000 solution running 85 Apache Spark executors and Red Hat Enterprise Linux OpenStack Platform processed 100 GB in just 46 seconds.
If you’re looking to expand your business through data analysis, the Scalable Modular Server DX2000 from NEC powered by Intel and running Apache Spark can help you unlock key big data insights.
Red Hat Enterprise Linux OpenStack Platform 8
is an Infrastructure-as-a-Service (IaaS) private cloud solution. It allows you to build a cloud platform on your hardware and use resources efficiently.
1 http://facts.pt/p7bReD
2 https://cwiki.apache.org/confluence/display/SPARK/Powered+By+Spark
3 Basic demographic data refers to age, sex, income, ethnicity, language, religion, housing status, and location. Read a more de-tailed explanation and review at http://dl.acm.org/citation.cfm?id=1536632.
4 https://aws.amazon.com/datasets/wikipedia-page-traffic-statistic-v3/
5 https://access.redhat.com/documentation/en/red-hat-enterprise-linux-openstack-platform/version-7/red-hat-enterprise-linux-openstack-platform-7-architecture-guide/preface

Unlock the value of big data with the DX2000 from NEC July 2016 | 6
Server configuration information Server node type A Server node type B
Number of server nodes 44 22
BIOS name and version MM60-B30, BIOS 5.0.2011 MM60-B30, BIOS 5.0.0005
Non-default BIOS settings Changed from UEFI to Legacy BIOS Changed from UEFI to Legacy BIOS
Operating system name and version/build number Red Hat Enterprise Linux 7.2 3.10.0-327.13.1.el7.x86_64
Red Hat Enterprise Linux 7.2 3.10.0-327.13.1.el7.x86_64
Date of last OS updates/patches applied 06/09/2016 06/09/2016
Power management policy Default Default
Processor
Number of processors 1 1
Vendor and model Intel Xeon CPU D-1527 Intel Xeon CPU D-1541
Core count (per processor) 4 8
Core frequency (GHz) 2.20 2.10
Stepping V2 V2
Memory module(s)
Total memory in system (GB) 16 64
Number of memory modules 1 4
Vendor and model Hynix HMA82GS7MFR8N-TF Hynix HMA82GS7MFR8N-TF
Size (GB) 16 16
Type PC4-17000 PC4-17000
Speed (MHz) 2133 2133
Speed running in the server (MHz) 2133 2133
Storage controller
Vendor and model Intel 82801JI Intel 82801JI
Cache size N/A N/A
Driver version 2.13 2.13
On June 9, 2016, we finalized the hardware and software configurations we tested. Updates for current and recently released hardware and software appear often, so unavoidably these configurations may not represent the latest versions available when this report appears. We concluded hands-on testing on June 15, 2016.
Appendix A – Inside the server we tested Figure 1 provides detailed configuration information for each of the 66 server nodes we tested.

Unlock the value of big data with the DX2000 from NEC July 2016 | 7
Server enclosure configuration information NEC Scalable Modular Server DX2000
Number of management modules 2
Management module firmware revision 00.19
I/O module
Vendor and model number NEC Micro Modular Server DX2000 LAN Switch
I/O module firmware revision ZebOS-XP version 1.2.0.5
Number of modules 2
Occupied bay(s) 1, 2
Power supplies
Vendor and model number Delta Electronics DPS-1600FB
Number of power supplies 3
Wattage of each (W) 1600
Cooling fans
Dimensions in millimeters 80x80x30
Number of fans 8
Figure 2 provides detailed configuration information for the two server enclosures we used in our tests.
Server configuration information Server node type A Server node type B
Local storage
Number of drives 1 1
Drive vendor and model Toshiba THNSNJ256G8NU Toshiba THNSNJ256G8NU
Drive size (GB) 512 256
Drive information (speed, interface, type) 6Gb/s, M.2, SSD 6Gb/s, M.2, SSD
Network adapter
Vendor and model Intel X552 Intel X552
Number and type of ports 2 x 10GbE 2 x 10GbE
Driver version 4.0.1-k-rh7.2 4.3.15
Figure 1: Detailed configuration information for each of the 66 server nodes we tested.
Figure 2: Configuration information for the server enclosures.

Unlock the value of big data with the DX2000 from NEC July 2016 | 8
Appendix B – Inside our testingDetailed information on the results of our testingFigure 3 shows our median throughput results from 33 server nodes with 30 executors to 66 nodes with 85 executors.
Figure 4: k-means median time.
Figure 3: k-means median throughput.
Solution configuration
Solution configuration
0
50
100
150
200
250
66x modules (44x 4c modules + 22x 8c modules), 85 executors
66x modules (44x 4c modules + 22x 8c modules), 63 executors
44x 4c modules, 41 executors
33x 4c modules, 30 executors
66x modules (44x 4c modules + 22x 8c modules), 85 executors
66x modules (44x 4c modules + 22x 8c modules), 63 executors
44x 4c modules, 41 executors
33x 4c modules, 30 executors
0.0
0.5
1.0
1.5
2.0
2.5
Solution configuration
Solution configuration
0
50
100
150
200
250
66x modules (44x 4c modules + 22x 8c modules), 85 executors
66x modules (44x 4c modules + 22x 8c modules), 63 executors
44x 4c modules, 41 executors
33x 4c modules, 30 executors
66x modules (44x 4c modules + 22x 8c modules), 85 executors
66x modules (44x 4c modules + 22x 8c modules), 63 executors
44x 4c modules, 41 executors
33x 4c modules, 30 executors
0.0
0.5
1.0
1.5
2.0
2.5
Configuration Throughput (GB/s)
33x 4c modules, 30 executors 0.41
44x 4c modules, 41 exectuors 1.35
66x modules (44x 4c modules + 22x
8c modules), 63 executors1.79
66x modules (44x 4c modules + 22x
8c modules), 85 executors2.18
Configuration Seconds
33x 4c modules, 30 executors 244
44x 4c modules, 41 executors 74
66x modules (44x 4c modules + 22x
8c modules), 63 executors56
66x modules (44x 4c modules + 22x
8c modules), 85 executors46
Figure 4 shows the median times to process the sample data set from 33 server nodes with 30 executors to 66 nodes with 85 executors.
Unlock the value of big data with the DX2000 from NEC July 2016 | 9
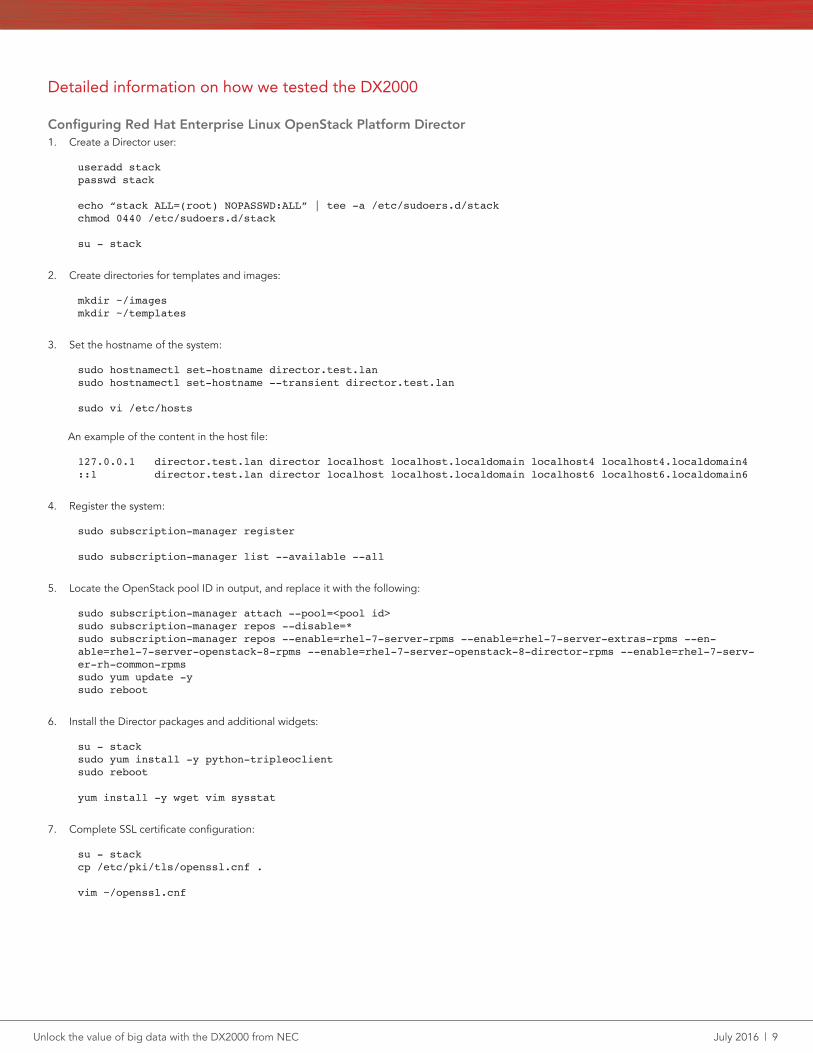
Detailed information on how we tested the DX2000
Configuring Red Hat Enterprise Linux OpenStack Platform Director1. Create a Director user:
useradd stackpasswd stack
echo “stack ALL=(root) NOPASSWD:ALL” | tee -a /etc/sudoers.d/stackchmod 0440 /etc/sudoers.d/stack
su - stack
2. Create directories for templates and images:
mkdir ~/imagesmkdir ~/templates
3. Set the hostname of the system:
sudo hostnamectl set-hostname director.test.lansudo hostnamectl set-hostname --transient director.test.lan
sudo vi /etc/hosts
An example of the content in the host file:
127.0.0.1 director.test.lan director localhost localhost.localdomain localhost4 localhost4.localdomain4::1 director.test.lan director localhost localhost.localdomain localhost6 localhost6.localdomain6
4. Register the system:
sudo subscription-manager register
sudo subscription-manager list --available --all
5. Locate the OpenStack pool ID in output, and replace it with the following:
sudo subscription-manager attach --pool=<pool id>sudo subscription-manager repos --disable=*sudo subscription-manager repos --enable=rhel-7-server-rpms --enable=rhel-7-server-extras-rpms --en-able=rhel-7-server-openstack-8-rpms --enable=rhel-7-server-openstack-8-director-rpms --enable=rhel-7-serv-er-rh-common-rpmssudo yum update -ysudo reboot
6. Install the Director packages and additional widgets:
su - stacksudo yum install -y python-tripleoclientsudo reboot
yum install -y wget vim sysstat
7. Complete SSL certificate configuration:
su - stackcp /etc/pki/tls/openssl.cnf .
vim ~/openssl.cnf

Unlock the value of big data with the DX2000 from NEC July 2016 | 10
a. Modify the following lines in the SSL certificate:
[ req_distinguished_name ]countryName_default = USstateOrProvinceName_default = Default StatelocalityName_default = Default CityorganizationalUnitName_default = TestOrgcommonName_default = 192.0.2.2
[ v3_req ]basicConstraints = CA:FALSEkeyUsage = nonRepudiation, digitalSignature, keyEnciphermentsubjectAltName = IP:192.0.2.2
openssl genrsa -out privkey.pem 2048openssl req -new -x509 -key privkey.pem -out cacert.pem -days 365 -config ~/openssl.cnfcat cacert.pem privkey.pem > undercloud.pem
sudo mkdir /etc/pki/instack-certssudo cp ~/undercloud.pem /etc/pki/instack-certs/.sudo semanage fcontext -a -t etc_t “/etc/pki/instack-certs(/.*)?”sudo restorecon -R /etc/pki/instack-certs
8. To configure the Director file, modify the dchp_end and discovery_iprange as indicated below, and leave the remaining default options:
cp /usr/share/instack-undercloud/undercloud.conf.sample ~/undercloud.confvim ~/undercloud.conf[DEFAULT]image_path = .local_ip = 192.0.2.1/24undercloud_public_vip = 192.0.2.2undercloud_admin_vip = 192.0.2.3undercloud_service_certificate = /etc/pki/instack-certs/undercloud.pemlocal_interface = ens2masquerade_network = 192.0.2.0/24dhcp_start = 192.0.2.5dhcp_end = 192.0.2.99network_cidr = 192.0.2.0/24network_gateway = 192.0.2.1inspection_interface = br-ctlplaneinspection_iprange = 192.0.2.100,192.0.2.249inspection_extras = trueinspection_runbench = falseenable_tempest = falseipxe_deploy = truestore_events = falsescheduler_max_attempts = 30undercloud_debug = true
[auth]
9. Complete installation of the Undercloud:
openstack undercloud install
source ~/stackrc
10. Log into the Red Hat Network, and get the most recent URLs from the Red Hat OpenStack documentation for images of the Overcloud nodes:
sudo yum install -y rhosp-director-images rhosp-director-images-ipacp /usr/share/rhosp-director-images/overcloud-full-latest-8.0.tar ~/images/.cp /usr/share/rhosp-director-images/ironic-python-agent-latest-8.0.tar ~/images/.cd ~/imagesfor tarfile in *.tar*; do tar -xf $tarfile; doneopenstack overcloud image upload --image-path /home/stack/images/openstack image list

Unlock the value of big data with the DX2000 from NEC July 2016 | 11
Sample output:
+--------------------------------------+------------------------+| ID | Name |+--------------------------------------+------------------------+| b10a15d7-d558-4d39-89a1-824e2e39c5f3 | bm-deploy-kernel || 214f9cbf-a935-4d40-84fe-22e1d3764a51 | bm-deploy-ramdisk || 7529fd44-84d4-4db2-8d82-36997d570a0e | overcloud-full || b429415d-15d3-4911-a326-73c2cdf1c16d | overcloud-full-initrd || dced3b92-fbae-4bd6-a0bb-795971b7ce77 | overcloud-full-vmlinuz |+--------------------------------------+------------------------+
11. Enter a nameserver for the Overcloud:
neutron subnet-list
Sample output:
+--------------------------------------+------+--------------+---------------------------------------------+| id | name | cidr | allocation_pools |+--------------------------------------+------+--------------+---------------------------------------------+| 58cb5657-53a6-45c9-aedc-5f04a6bd6793 | | 192.0.2.0/24 | {“start”: “192.0.2.5”, “end”: “192.0.2.99”} |+--------------------------------------+------+--------------+---------------------------------------------+
neutron subnet-update 58cb5657-53a6-45c9-aedc-5f04a6bd6793 --dns-nameserver 192.0.2.254Updated subnet: 58cb5657-53a6-45c9-aedc-5f04a6bd6793
neutron subnet-show 58cb5657-53a6-45c9-aedc-5f04a6bd6793+-------------------+---------------------------------------------------------------+| Field | Value |+-------------------+---------------------------------------------------------------+| allocation_pools | {“start”: “192.0.2.5”, “end”: “192.0.2.99”} || cidr | 192.0.2.0/24 || dns_nameservers | 192.0.2.254 || enable_dhcp | True || gateway_ip | 192.0.2.1 || host_routes | {“destination”: “169.254.169.254/32”, “nexthop”: “192.0.2.1”} || id | 58cb5657-53a6-45c9-aedc-5f04a6bd6793 || ip_version | 4 || ipv6_address_mode | || ipv6_ra_mode | || name | || network_id | 660174c5-5300-4efd-a6ca-227effbd7b2b || subnetpool_id | || tenant_id | 9a658b9fea5641c38a5a052e4e0d5a3d |+-------------------+---------------------------------------------------------------+
12. Install the Overcloud:
source ~/stackrc
openstack baremetal import --json ~/controllers.json openstack baremetal import --json ~/chassis1.json openstack baremetal import --json ~/chassis2.json openstack baremetal configure boot
ironic node-list | awk ‘/None/{print $2}’ > nodes.txthead -n `grep ‘”mac”’ controllers.json | wc -l` nodes.txt > controller_nodes.txttail -n `grep ‘”mac”’ chassis2.json | wc -l` nodes.txt > chassis2_nodes.txthead -n-`cat chassis2_nodes.txt | wc -l` nodes.txt | tail -n `grep ‘”mac”’ chassis1.json | wc -l` > chassis1_nodes.txt
openstack baremetal introspection bulk start
sudo journalctl -l -u openstack-ironic-discoverd -u openstack-ironic-discoverd-dnsmasq -u openstack-iron-ic-conductor -f
watch -n 60 -d ‘openstack baremetal list | grep -v COMPLETE’

Unlock the value of big data with the DX2000 from NEC July 2016 | 12
for node in `cat controller_nodes.txt`; do ironic node-update $node add properties/capabilities=’profile:con-trol,boot_option:local’ ; donefor node in `cat chassis1_nodes.txt chassis2_nodes.txt `; do ironic node-update $node add properties/capabili-ties=’profile:compute,boot_option:local’ ; done
cp -r /usr/share/openstack-tripleo-heat-templates/network/config/bond-with-vlans ~/templates/nic-configscp /usr/share/openstack-tripleo-heat-templates/environments/net-bond-with-vlans.yaml /home/stack/templates/network-environment.yamlcp /usr/share/openstack-tripleo-heat-templates/environments/storage-environment.yaml ~/templates/.
vim ~/templates/timezone.yamlparameter_defaults: TimeZone: ‘EST5EDT’
sudo openstack-config --set /etc/heat/heat.conf DEFAULT max_resources_per_stack -1sudo openstack-config --set /etc/heat/heat.conf DEFAULT max_stacks_per_tenant 1000sudo openstack-config --set /etc/heat/heat.conf DEFAULT stack_action_timeout 14400sudo openstack-config --set /etc/heat/heat.conf DEFAULT rpc_response_timeout 14400sudo openstack-config --set /etc/heat/heat.conf DEFAULT action_retry_limit 100sudo openstack-config --set /etc/nova/nova.conf DEFAULT scheduler_max_attempts 30sudo openstack-config --set /usr/lib/systemd/system/mariadb.service Service LimitNOFILE 16384
sudo vim /etc/security/limits.d/mysql-server.confmysql soft nofile 16384 mysql hard nofile 16384
sudo vim /etc/sysconfig/network-scripts/ifcfg-vlan1200DEVICE=vlan1200ONBOOT=yesHOTPLUG=noNM_CONTROLLED=noPEERDNS=noDEVICETYPE=ovsTYPE=OVSIntPortOVS_BRIDGE=br-ctlplaneOVS_OPTIONS=”tag=1200”IPADDR=10.1.1.5PREFIX=24
sudo vim /etc/sysconfig/network-scripts/ifcfg-vlan1201DEVICE=vlan1201ONBOOT=yesHOTPLUG=noNM_CONTROLLED=noPEERDNS=noDEVICETYPE=ovsTYPE=OVSIntPortOVS_BRIDGE=br-ctlplaneOVS_OPTIONS=”tag=1201”IPADDR=172.16.0.201PREFIX=24
sudo ifup vlan1200sudo ifup vlan1201
sudo reboot
13. Edit control-scale and compute-scale to match the environment:
openstack overcloud deploy --templates -e /usr/share/openstack-tripleo-heat-templates/environments/net-work-isolation.yaml -e ~/templates/network-environment.yaml -e ~/templates/storage-environment.yaml --con-trol-scale 3 --compute-scale 66 --control-flavor control --compute-flavor compute --ntp-server 192.0.2.254 --neutron-network-type vxlan --neutron-tunnel-types vxlan
heat stack-list --show-nested | grep -v COMPLETEwatch -n 60 -d ‘heat stack-list --show-nested | grep -v COMPLETE’

Unlock the value of big data with the DX2000 from NEC July 2016 | 13
14. Reboot the controller nodes one at a time:
nova listnova reboot NODE_INSTANCE_ID
15. Use the command line interface (CLI) to set up cluster fencing using STONITH (Shoot-The-Other-Node-In-The-Head) on the controller nodes:
Replace XX with the IP address of a controller node. Note: ipaddr is the IP address of your controller servers’ IPMI interface.
sudo pcs stonith create my-ipmilan-for-controller01 fence_ipmilan pcmk_host_list=overcloud-controller-0 ipad-dr=192.168.0.251 login=Administrator passwd=Administrator lanplus=1 cipher=1 op monitor interval=60ssudo pcs constraint location my-ipmilan-for-controller01 avoids overcloud-controller-0
sudo pcs stonith create my-ipmilan-for-controller02 fence_ipmilan pcmk_host_list=overcloud-controller-1 ipad-dr=192.168.0.252 login=Administrator passwd=Administrator lanplus=1 cipher=1 op monitor interval=60ssudo pcs constraint location my-ipmilan-for-controller02 avoids overcloud-controller-1
sudo pcs stonith create my-ipmilan-for-controller03 fence_ipmilan pcmk_host_list=overcloud-controller-2 ipad-dr=192.168.0.253 login=Administrator passwd=Administrator lanplus=1 cipher=1 op monitor interval=60ssudo pcs constraint location my-ipmilan-for-controller03 avoids overcloud-controller-2
sudo pcs stonith showsudo pcs property set stonith-enabled=truesudo pcs property showsudo pcs status
16. Create the Overcloud tenant network:
source ~/overcloudrcneutron net-create default neutron subnet-create --name default --gateway 172.20.1.1 default 172.20.0.0/16neutron net-list
17. Create the Overcloud external network (using a non-native VLAN):
source ~/overcloudrcneutron net-create nova --router:external --provider:network_type vlan --provider:physical_network datacentre --provider:segmentation_id 1200neutron subnet-create --name nova --enable_dhcp=False --allocation-pool=start=10.1.1.51,end=10.1.1.250 --gateway=10.1.1.1 nova 10.1.1.0/24
18. Configure the router:
neutron router-create default-routerneutron router-interface-add default-router defaultneutron router-gateway-set default-router nova
19. Run the following commands on both controller nodes to complete the DHCP/DNSMASQ fix for DSN forwarding:
sudo openstack-config --set /etc/neutron/dhcp_agent.ini DEFAULT dnsmasq_dns_servers 10.1.1.1sudo systemctl restart neutron-dhcp-agent

Unlock the value of big data with the DX2000 from NEC July 2016 | 14
Configuring Red Hat Enterprise Linux OpenStack Platform Manager
1. Install Red Hat Enterprise Linux 7.2 Server with GUI, DNS Server, and all virtualization groups:
setenforce 0sed -i ‘s/SELINUX=enforcing/SELINUX=disabled/’ /etc/selinux/configfirewall-cmd --permanent --direct --add-rule ipv4 nat POSTROUTING 0 -o enp3s0f0 -j MASQUERADEfirewall-cmd --permanent --direct --add-rule ipv4 filter FORWARD 0 -i br1 -o enp3s0f0 -j ACCEPTfirewall-cmd --permanent --direct --add-rule ipv4 filter FORWARD 0 -i enp3s0f0 -o br1 -m state --state RELAT-ED,ESTABLISHED -j ACCEPTfirewall-cmd --permanent --direct --add-rule ipv4 filter FORWARD 0 -i br2 -o enp3s0f0 -j ACCEPTfirewall-cmd --permanent --direct --add-rule ipv4 filter FORWARD 0 -i enp3s0f0 -o br2 -m state --state RELAT-ED,ESTABLISHED -j ACCEPTfirewall-cmd --permanent --direct --add-rule ipv4 filter FORWARD 0 -i br3 -o enp3s0f0 -j ACCEPTfirewall-cmd --permanent --direct --add-rule ipv4 filter FORWARD 0 -i enp3s0f0 -o br3 -m state --state RELAT-ED,ESTABLISHED -j ACCEPTfirewall-cmd --reloadhostnamectl set-hostname manager.test.lanhostnamectl set-hostname --transient manager.test.lan
sudo subscription-manager registersudo subscription-manager list --available –all
2. Locate the OpenStack pool_id in output, and replace it with the following ID in the next command:
sudo subscription-manager attach --pool=<pool_id>sudo subscription-manager repos --disable=*sudo subscription-manager repos --enable=rhel-7-server-rpms --enable=rhel-7-server-optional-rpms --en-able=rhel-7-server-extras-rpms
yum update -yreboot
3. Install Tiger VNC server:
yum install -y tigervnc-server
cp /usr/lib/systemd/system/[email protected] /etc/systemd/system/[email protected] /etc/systemd/system/[email protected]
4. Modify the following lines from USER to root:
ExecStart=/usr/sbin/runuser -l root -c “/usr/bin/vncserver %i”PIDFile=/root/.vnc/%H%i.pid
systemctl daemon-reloadsu - rootvncpasswd
firewall-cmd --permanent --add-port=5901/tcpfirewall-cmd --reload
systemctl start vncserver@:1.servicesystemctl enable vncserver@:1.service
5. Use Virtual Machine Manager to create two bridge interfaces:
br1: enp3s0f1: 192.168.0.1/24br2: ens1: 192.0.2.254/24

Unlock the value of big data with the DX2000 from NEC July 2016 | 15
6. Configure the DHCP server:
yum install -y dhcpvim /etc/dhcp/dhcpd.confsubnet 192.168.0.0 netmask 255.255.255.0 { option routers 192.168.0.1; option subnet-mask 255.255.255.0; option domain-search “test.lan”; option domain-name-servers 192.168.0.1; option time-offset -18000; # Eastern Standard Time range 192.168.0.51 192.168.0.99;
include “/etc/dhcp/mms-static.conf”;}
echo > /etc/dhcp/mms-static.confsystemctl enable dhcpdsystemctl start dhcpd
7. Configure DNS:
yum install -y bindfirewall-cmd --permanent --add-service=dnsfirewall-cmd --reloadvim /etc/named.conf
a. Modify the following entries:
listen-on port 53 { 127.0.0.1; }; allow-query { localhost; }; dnssec-validation yes;
listen-on port 53 { any; }; allow-query { any; }; dnssec-validation no;
b. Append these lines to the end of the file:
zone “test.lan” { type master; file “test.lan.zone”; allow-update { none; };};
zone “0.168.192.in-addr.arpa” { type master; file “external.zone”; allow-update { none; };};
zone “2.0.192.in-addr.arpa” { type master; file “deployment.zone”; allow-update { none; };};
8. Configure the NTP time server:
yum install -y ntpsed -i ‘/^server [^ ]* iburst/d’ /etc/ntp.confecho “server 10.41.0.5 iburst” >> /etc/ntp.confsystemctl start ntpdsystemctl enable ntpd

Unlock the value of big data with the DX2000 from NEC July 2016 | 16
9. Configure the DX2000 Management tool:
yum install -y ipmitool OpenIPMIsystemctl enable ipmisystemctl enable ipmievdsystemctl start ipmisystemctl start ipmievd
cd /opt/mng/./mng_util
Sample output:
mng_util version 01.03
> search 192.168.0.51-192.168.0.99
Sample output:
Chassis serial : GFH9PA312A0006Board ManagementLAN MAC IP DataLAN1 MAC DataLAN2 MAC----------- ----------------- --------------- ----------------- -----------------CSC 40:8d:5c:17:3c:71 192.168.0.51 LAN-SW1 40:8d:5c:57:94:a0 192.168.0.53 LAN-SW2 40:8d:5c:57:a2:10 192.168.0.52 CPU Board1 40:8d:5c:5e:ad:9a 192.168.0.69 40:8d:5c:5e:ad:98 40:8d:5c:5e:ad:99CPU Board3 40:8d:5c:5e:ae:0c 192.168.0.63 40:8d:5c:5e:ae:0a 40:8d:5c:5e:ae:0bCPU Board5 40:8d:5c:5e:ae:cc 192.168.0.72 40:8d:5c:5e:ae:ca 40:8d:5c:5e:ae:cbCPU Board7 40:8d:5c:5e:af:4a 192.168.0.66 40:8d:5c:5e:af:48 40:8d:5c:5e:af:49CPU Board9 40:8d:5c:5e:ac:ce 192.168.0.73 40:8d:5c:5e:ac:cc 40:8d:5c:5e:ac:cdCPU Board11 40:8d:5c:5e:ab:e1 192.168.0.64 40:8d:5c:5e:ab:df 40:8d:5c:5e:ab:e0CPU Board13 40:8d:5c:5e:ae:77 192.168.0.68 40:8d:5c:5e:ae:75 40:8d:5c:5e:ae:76CPU Board15 40:8d:5c:5e:ad:b5 192.168.0.61 40:8d:5c:5e:ad:b3 40:8d:5c:5e:ad:b4CPU Board17 40:8d:5c:5e:ab:b4 192.168.0.55 40:8d:5c:5e:ab:b2 40:8d:5c:5e:ab:b3CPU Board19 40:8d:5c:5e:af:4d 192.168.0.74 40:8d:5c:5e:af:4b 40:8d:5c:5e:af:4cCPU Board20 40:8d:5c:5e:ac:c5 192.168.0.62 40:8d:5c:5e:ac:c3 40:8d:5c:5e:ac:c4CPU Board21 40:8d:5c:5e:ac:26 192.168.0.57 40:8d:5c:5e:ac:24 40:8d:5c:5e:ac:25CPU Board22 40:8d:5c:5e:ab:78 192.168.0.59 40:8d:5c:5e:ab:76 40:8d:5c:5e:ab:77CPU Board23 40:8d:5c:5e:ad:c1 192.168.0.75 40:8d:5c:5e:ad:bf 40:8d:5c:5e:ad:c0CPU Board24 40:8d:5c:5e:ab:fc 192.168.0.60 40:8d:5c:5e:ab:fa 40:8d:5c:5e:ab:fbCPU Board25 40:8d:5c:5e:ad:a0 192.168.0.56 40:8d:5c:5e:ad:9e 40:8d:5c:5e:ad:9fCPU Board26 40:8d:5c:5e:ae:3f 192.168.0.67 40:8d:5c:5e:ae:3d 40:8d:5c:5e:ae:3eCPU Board27 40:8d:5c:5e:ac:a4 192.168.0.58 40:8d:5c:5e:ac:a2 40:8d:5c:5e:ac:a3CPU Board29 40:8d:5c:5e:ac:7a 192.168.0.71 40:8d:5c:5e:ac:78 40:8d:5c:5e:ac:79CPU Board31 40:8d:5c:5e:af:41 192.168.0.70 40:8d:5c:5e:af:3f 40:8d:5c:5e:af:40CPU Board33 40:8d:5c:5e:ab:d8 192.168.0.65 40:8d:5c:5e:ab:d6 40:8d:5c:5e:ab:d7CPU Board35 40:8d:5c:5e:ae:3c 192.168.0.54 40:8d:5c:5e:ae:3a 40:8d:5c:5e:ae:3b
> savelist -I all -f /root/maclist.csv > quit
cat /root/maclist.csv | awk -F’,’ ‘/CSC|LAN-|CPU/{print $2”,”$3”,”$5”,”$6}’ | sed -e ‘s/CPU Board/srv/’ -e ‘s/LAN-SW/switch/’ -e ‘s/CSC/csc/’ > /root/mms1.csvMMS=1; cat /root/mms${MMS}.csv | awk -F’,’ ‘{printf “host mms-%s { hardware ethernet %s; fixed-address 192.168.0.%d; }\n”,$1,$2,$1}’ | sed -e “s/mms-/mms${MMS}-/” -e “s/\.csc/.${MMS}0/” -e “s/\.switch/.${MMS}/” -e “s/\.srv/.${MMS}/” > /etc/dhcp/mms-static.conf
Unlock the value of big data with the DX2000 from NEC July 2016 | 17
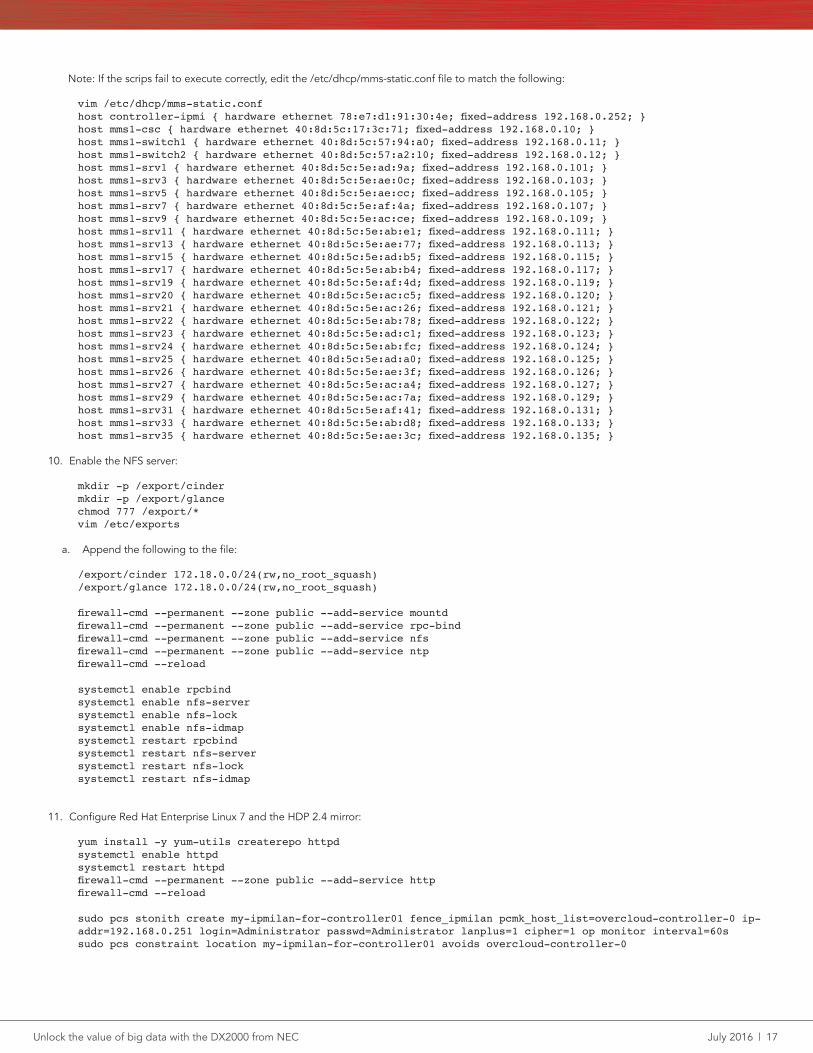
Note: If the scrips fail to execute correctly, edit the /etc/dhcp/mms-static.conf file to match the following:
vim /etc/dhcp/mms-static.confhost controller-ipmi { hardware ethernet 78:e7:d1:91:30:4e; fixed-address 192.168.0.252; }host mms1-csc { hardware ethernet 40:8d:5c:17:3c:71; fixed-address 192.168.0.10; }host mms1-switch1 { hardware ethernet 40:8d:5c:57:94:a0; fixed-address 192.168.0.11; }host mms1-switch2 { hardware ethernet 40:8d:5c:57:a2:10; fixed-address 192.168.0.12; }host mms1-srv1 { hardware ethernet 40:8d:5c:5e:ad:9a; fixed-address 192.168.0.101; }host mms1-srv3 { hardware ethernet 40:8d:5c:5e:ae:0c; fixed-address 192.168.0.103; }host mms1-srv5 { hardware ethernet 40:8d:5c:5e:ae:cc; fixed-address 192.168.0.105; }host mms1-srv7 { hardware ethernet 40:8d:5c:5e:af:4a; fixed-address 192.168.0.107; }host mms1-srv9 { hardware ethernet 40:8d:5c:5e:ac:ce; fixed-address 192.168.0.109; }host mms1-srv11 { hardware ethernet 40:8d:5c:5e:ab:e1; fixed-address 192.168.0.111; }host mms1-srv13 { hardware ethernet 40:8d:5c:5e:ae:77; fixed-address 192.168.0.113; }host mms1-srv15 { hardware ethernet 40:8d:5c:5e:ad:b5; fixed-address 192.168.0.115; }host mms1-srv17 { hardware ethernet 40:8d:5c:5e:ab:b4; fixed-address 192.168.0.117; }host mms1-srv19 { hardware ethernet 40:8d:5c:5e:af:4d; fixed-address 192.168.0.119; }host mms1-srv20 { hardware ethernet 40:8d:5c:5e:ac:c5; fixed-address 192.168.0.120; }host mms1-srv21 { hardware ethernet 40:8d:5c:5e:ac:26; fixed-address 192.168.0.121; }host mms1-srv22 { hardware ethernet 40:8d:5c:5e:ab:78; fixed-address 192.168.0.122; }host mms1-srv23 { hardware ethernet 40:8d:5c:5e:ad:c1; fixed-address 192.168.0.123; }host mms1-srv24 { hardware ethernet 40:8d:5c:5e:ab:fc; fixed-address 192.168.0.124; }host mms1-srv25 { hardware ethernet 40:8d:5c:5e:ad:a0; fixed-address 192.168.0.125; }host mms1-srv26 { hardware ethernet 40:8d:5c:5e:ae:3f; fixed-address 192.168.0.126; }host mms1-srv27 { hardware ethernet 40:8d:5c:5e:ac:a4; fixed-address 192.168.0.127; }host mms1-srv29 { hardware ethernet 40:8d:5c:5e:ac:7a; fixed-address 192.168.0.129; }host mms1-srv31 { hardware ethernet 40:8d:5c:5e:af:41; fixed-address 192.168.0.131; }host mms1-srv33 { hardware ethernet 40:8d:5c:5e:ab:d8; fixed-address 192.168.0.133; }host mms1-srv35 { hardware ethernet 40:8d:5c:5e:ae:3c; fixed-address 192.168.0.135; }
10. Enable the NFS server:
mkdir -p /export/cindermkdir -p /export/glancechmod 777 /export/*vim /etc/exports
a. Append the following to the file:
/export/cinder 172.18.0.0/24(rw,no_root_squash)/export/glance 172.18.0.0/24(rw,no_root_squash)
firewall-cmd --permanent --zone public --add-service mountdfirewall-cmd --permanent --zone public --add-service rpc-bindfirewall-cmd --permanent --zone public --add-service nfsfirewall-cmd --permanent --zone public --add-service ntpfirewall-cmd --reload
systemctl enable rpcbindsystemctl enable nfs-serversystemctl enable nfs-locksystemctl enable nfs-idmapsystemctl restart rpcbindsystemctl restart nfs-serversystemctl restart nfs-locksystemctl restart nfs-idmap
11. Configure Red Hat Enterprise Linux 7 and the HDP 2.4 mirror:
yum install -y yum-utils createrepo httpdsystemctl enable httpdsystemctl restart httpdfirewall-cmd --permanent --zone public --add-service httpfirewall-cmd --reload
sudo pcs stonith create my-ipmilan-for-controller01 fence_ipmilan pcmk_host_list=overcloud-controller-0 ip-addr=192.168.0.251 login=Administrator passwd=Administrator lanplus=1 cipher=1 op monitor interval=60ssudo pcs constraint location my-ipmilan-for-controller01 avoids overcloud-controller-0

Unlock the value of big data with the DX2000 from NEC July 2016 | 18
sudo pcs stonith create my-ipmilan-for-controller02 fence_ipmilan pcmk_host_list=overcloud-controller-1 ip-addr=192.168.0.252 login=Administrator passwd=Administrator lanplus=1 cipher=1 op monitor interval=60ssudo pcs constraint location my-ipmilan-for-controller02 avoids overcloud-controller-1
sudo pcs stonith create my-ipmilan-for-controller03 fence_ipmilan pcmk_host_list=overcloud-controller-2 ip-addr=192.168.0.253 login=Administrator passwd=Administrator lanplus=1 cipher=1 op monitor interval=60ssudo pcs constraint location my-ipmilan-for-controller03 avoids overcloud-controller-2
mkdir -p /var/www/html/reposcd /var/www/html/reposreposync -lfor repo in `ls`; do createrepo $repo ; donewget http://public-repo-1.hortonworks.com/ambari/centos7/RPM-GPG-KEY/RPM-GPG-KEY-Jenkins
12. Edit the Red Hat Enterprise Linux guest KVM image:
cd /var/lib/libvirt/imagesmkdir /mnt/guestguestmount --rw -i -a rhel-guest-image-7.2-20160302.0.x86_64_hdp.img /mnt/guestcd /mnt/guest
a. Disable SELinux in the guest KVM image:
sed -i ‘s/SELINUX=enforcing/SELINUX=disabled/’ /mnt/guest/etc/selinux/config
b. Update the repository in guest image to point to the local repository:
vi /mnt/guest/etc/yum.repos.d/rh.repo
[rhel-7-server-rpms]baseurl = http://10.1.1.1/repos/rhel-7-server-rpmsui_repoid_vars = releasever basearchname = Red Hat Enterprise Linux 7 Server (RPMs)gpgkey = file:///etc/pki/rpm-gpg/RPM-GPG-KEY-redhat-releaseenabled = 1gpgcheck = 1
[rhel-7-server-extras-rpms]baseurl = http://10.1.1.1/repos/rhel-7-server-extras-rpmsui_repoid_vars = basearchname = Red Hat Enterprise Linux 7 Server - Extras (RPMs)gpgkey = file:///etc/pki/rpm-gpg/RPM-GPG-KEY-redhat-releaseenabled = 1gpgcheck = 1
[rhel-7-server-optional-rpms]baseurl = http://10.1.1.1/repos/rhel-7-server-optional-rpmsui_repoid_vars = releasever basearchname = Red Hat Enterprise Linux 7 Server - Optional (RPMs)gpgkey = file:///etc/pki/rpm-gpg/RPM-GPG-KEY-redhat-releaseenabled = 1gpgcheck = 1
[rhel-7-server-rh-common-rpms]baseurl = http://10.1.1.1/repos/rhel-7-server-rh-common-rpmsui_repoid_vars = releasever basearchname = Red Hat Enterprise Linux 7 Server - RH Common (RPMs)gpgkey = file:///etc/pki/rpm-gpg/RPM-GPG-KEY-redhat-releaseenabled = 1gpgcheck = 1
13. Install the priorities plugin on the image, and enable it:
yum --installroot=/mnt/guest install -y yum-plugin-prioritiesvi /mnt/guest/etc/yum/pluginconf.d/priorities.conf[main]enabled = 1gpgcheck = 0

Unlock the value of big data with the DX2000 from NEC July 2016 | 19
vi /etc/yum/pluginconf.d/priorities.conf[main]enabled = 1gpgcheck = 0
14. Install updates:
yum --installroot=/mnt/guest update -y
15. Install Ambari required packages, and remove chrony:
yum --installroot=/mnt/guest remove -y chronyyum --installroot=/mnt/guest install -y openssh-clients curl unzip tar wget openssl python ntp sysstat numpy blas64 lapack64
16. Clean up installers in the guest image:
yum --installroot=/mnt/guest clean all
17. Enable NTP in guest:
ln -s /usr/lib/systemd/system/ntpd.service /mnt/guest/etc/systemd/system/multi-user.target.wants/ntpd.ser-vicesed -i ‘/^server [^ ]* iburst/d’ /mnt/guest/etc/ntp.confecho “server 10.1.1.1 iburst” >> /mnt/guest/etc/ntp.conf
18. Zero fill the guest image, convert the file, and compress it:
dd if=/dev/zero of=/mnt/guest/tmp.bin bs=1M ; sync ; sleep 1 ; sync ; rm -f /mnt/guest/tmp.bin ; synccd /var/lib/libvirt/imagesumount /mnt/guestqemu-img convert -c -O qcow2 rhel-guest-image-7.2-20160302.0.x86_64_hdp.img rhel-guest-image-7.2-20160302.0.x86_64_hdp.qcow
19. Install Ambari server:
ssh -i hdpkey [email protected] suvi /etc/yum.repos.d/ambari.repo
#VERSION_NUMBER=2.2.2.0-460[Updates-ambari-2.2.2.0]name=ambari-2.2.2.0 - Updatesbaseurl=http://10.1.1.1/repos/Updates-ambari-2.2.2.0gpgcheck=1gpgkey=http://10.1.1.1/repos/RPM-GPG-KEY-Jenkinsenabled=1priority=1
vi /etc/yum.repos.d/hdp.repo
#VERSION_NUMBER=2.4.2.0-258[HDP-2.4.2.0]name=HDP Version - HDP-2.4.2.0baseurl=http://10.1.1.1/repos/HDP-2.4.2.0gpgcheck=1gpgkey=http://10.1.1.1/repos/RPM-GPG-KEY-Jenkinsenabled=1priority=1
[HDP-UTILS-1.1.0.20]name=HDP Utils Version - HDP-UTILS-1.1.0.20baseurl=http://10.1.1.1/repos/HDP-UTILS-1.1.0.20gpgcheck=1gpgkey=http://10.1.1.1/repos/RPM-GPG-KEY-Jenkinsenabled=1priority=1

Unlock the value of big data with the DX2000 from NEC July 2016 | 20
yum install -y ambari-server
ambari-server setup
Sample output:
Using python /usr/bin/pythonSetup ambari-serverChecking SELinux...SELinux status is ‘disabled’Customize user account for ambari-server daemon [y/n] (n)? Adjusting ambari-server permissions and ownership...Checking firewall status...Redirecting to /bin/systemctl status iptables.service
Checking JDK...[1] Oracle JDK 1.8 + Java Cryptography Extension (JCE) Policy Files 8[2] Oracle JDK 1.7 + Java Cryptography Extension (JCE) Policy Files 7[3] Custom JDK==============================================================================Enter choice (1): JDK already exists, using /var/lib/ambari-server/resources/jdk-8u60-linux-x64.tar.gzInstalling JDK to /usr/jdk64/Successfully installed JDK to /usr/jdk64/JCE Policy archive already exists, using /var/lib/ambari-server/resources/jce_policy-8.zipInstalling JCE policy...Completing setup...Configuring database...Enter advanced database configuration [y/n] (n)? Configuring database...Default properties detected. Using built-in database.Configuring ambari database...Checking PostgreSQL...Running initdb: This may take upto a minute.Initializing database ... OK
About to start PostgreSQLConfiguring local database...Connecting to local database...done.Configuring PostgreSQL...Restarting PostgreSQLExtracting system views...ambari-admin-2.2.2.0.460.jar......Adjusting ambari-server permissions and ownership...Ambari Server ‘setup’ completed successfully.
ambari-server start
Sample output:
Using python /usr/bin/pythonStarting ambari-serverAmbari Server running with administrator privileges.Organizing resource files at /var/lib/ambari-server/resources...Server PID at: /var/run/ambari-server/ambari-server.pidServer out at: /var/log/ambari-server/ambari-server.outServer log at: /var/log/ambari-server/ambari-server.logWaiting for server start....................Ambari Server ‘start’ completed successfully.
ambari-server status

Unlock the value of big data with the DX2000 from NEC July 2016 | 21
Sample output:
http://10.1.1.185:8080admin/admin
20. To complete Ambari web setup, open the URL from the server setup in step 19, log in with the appropriate credentials, and create a cluster:
a. Type cluster1 for the cluster name.
b. Type host-172-21-0-[11-78].openstacklocal for the target host information. Browse to hdpkey SSH key, and type cloud-user for the SSH User Account.
c. Uncheck the following options:
SqoopOozieFalconFlumeAccumuloAtlasKnoxSliderSmartSense
d. Distribute all services across the first three nodes or your three master instances with the exception of Metric Collector, which should be assigned to a client.
e. Type Password1 for the Hive database password.
f. Set a password on the Hive database: Password1
g. Accept defaults and continue.
h. Accept defaults and continue.
i. Complete web setup.
Configuring the HiBench client instanceFrom the Ambari GUI, add another client instance, add the Apache Kafka broker role, and complete the following steps:
1. Set the maximum number of client connections to 60:
maxClientCnxns=60
2. Install HiBench.
a. Add a floating IP to the client instance:
ssh -i hdpkey [email protected] su - hdfshdfs dfs -mkdir /HiBenchhdfs dfs -chown -R cloud-user:hadoop /HiBenchhdfs dfs -mkdir /home/cloud-userhdfs dfs -chown cloud-user /user/cloud-userexityum install -y maven git vim numpy blas64 lapack64git clone https://github.com/intel-hadoop/HiBench.gitcd HiBench/src

Unlock the value of big data with the DX2000 from NEC July 2016 | 22
b. Open the datagen pom XML file. Replace the following:
vim streambench/datagen/pom.xml
<dependency> <groupId>org.apache.kafka</groupId> <artifactId>kafka-clients</artifactId> <version>0.8.1</version> <scope>system</scope> <systemPath>${basedir}/lib/kafka-clients-0.8.1.jar</systemPath> </dependency>
<dependency> <groupId>org.apache.kafka</groupId> <artifactId>kafka-clients</artifactId> <version>0.8.1</version> </dependency>
c. Open the following XML file, and replace the following:
vim streambench/sparkbench/pom.xml
<exclusion> <groupId>org.sonatype.sisu.inject</groupId> <artifactId>*</artifactId> </exclusion> <exclusion> <groupId>org.xerial.snappy</groupId> <artifactId>*</artifactId> </exclusion>
<exclusion> <groupId>org.sonatype.sisu</groupId> <artifactId>inject</artifactId> </exclusion> <exclusion> <groupId>org.xerial</groupId> <artifactId>snappy</artifactId> </exclusion>
d. Complete the HiBench installation:
mvn install:install-file -Dfile=streambench/datagen/lib/kafka-clients-0.8.1.jar -DgroupId=org.apache.kafka -DartifactId=kafka-clients -Dversion=0.8.1 -Dpackaging=jarmvn clean package -D spark1.6 -D MR2cd ..
cp conf/99-user_defined_properties.conf.template conf/99-user_defined_properties.conf
grep -v “^#” conf/99-user_defined_properties.conf | grep -v “^$”
Sample output:
hibench.hadoop.home /usr/hdp/current/hadoop-clienthibench.spark.home /usr/hdp/current/spark-clienthibench.hadoop.mapreduce.home /usr/hdp/current/hadoop-mapreduce-clienthibench.hdfs.master hdfs://host-172-21-0-66.openstacklocal:8020hibench.spark.master yarn-clienthibench.hadoop.release hdphibench.hadoop.version hadoop2hibench.spark.version spark1.6hibench.default.map.parallelism 252hibench.default.shuffle.parallelism 252hibench.yarn.executor.num 85hibench.yarn.executor.cores 4spark.executor.memory 9G spark.driver.memory 2Gspark.rdd.compress falsespark.shuffle.compress false

Unlock the value of big data with the DX2000 from NEC July 2016 | 23
Principled Technologies is a registered trademark of Principled Technologies, Inc.All other product names are the trademarks of their respective owners.
DISCLAIMER OF WARRANTIES; LIMITATION OF LIABILITY:Principled Technologies, Inc. has made reasonable efforts to ensure the accuracy and validity of its testing, however, Principled Technologies, Inc. specifically disclaims any warranty, expressed or implied, relating to the test results and analysis, their accuracy, completeness or quality, including any implied warranty of fitness for any particular purpose. All persons or entities relying on the results of any testing do so at their own risk, and agree that Principled Technologies, Inc., its employees and its subcontractors shall have no liability whatsoever from any claim of loss or damage on account of any alleged error or defect in any testing procedure or result.
In no event shall Principled Technologies, Inc. be liable for indirect, special, incidental, or consequential damages in connection with its testing, even if advised of the possibility of such damages. In no event shall Principled Technologies, Inc.’s liability, including for direct damages, exceed the amounts paid in connection with Principled Technologies, Inc.’s testing. Customer’s sole and exclusive remedies are as set forth herein.
This project was commissioned by NEC Corp.
PrincipledTechnologies®
Facts matter.®PrincipledTechnologies®
Facts matter.®
spark.broadcast.compress falsespark.io.compression.codec org.apache.spark.io.SnappyCompressionCodec spark.akka.frameSize 1000spark.akka.timeout 600spark.kryoserializer.buffer 2000mbhibench.scale.profile census hibench.compress.profile disablehibench.compress.codec.profile snappyhibench.streamingbench.benchname identityhibench.streamingbench.scale.profile ${hibench.scale.profile}hibench.streamingbench.zookeeper.host host-172-21-0-11.openstacklocal:2181hibench.streamingbench.brokerList host-172-21-0-78.openstacklocal:9021hibench.streamingbench.storm.home /usr/hdp/current/storm-clienthibench.streamingbench.kafka.home /usr/hdp/current/kafka-brokerhibench.streamingbench.storm.nimbus host-172-21-0-66.openstacklocalhibench.streamingbench.partitions 1