University of Texas at El Pasoresearch.utep.edu/Portals/99/iacuc/docs/IACUC Forms/Rat...
29
Laboratory Rat Handling & Biomethodology Workshop University of Texas at El Paso IACUC Office (915) 747-7913 Laboratory Animal Resources Center (915) 747-6823 LARC LABORATORY ANIMAL RESOURCES CENTER
-
Upload
nguyendiep -
Category
Documents
-
view
217 -
download
2
Transcript of University of Texas at El Pasoresearch.utep.edu/Portals/99/iacuc/docs/IACUC Forms/Rat...

Laboratory Rat
Handling & Biomethodology Workshop
University of Texas at El Paso
IACUC Office
(915) 747-7913
Laboratory Animal Resources Center (915) 747-6823
LARC LABORATORY ANIMAL RESOURCES CENTER

2
Laboratory Rat Handling & Biomethodology Workshop
Table of Contents Page
Workshop Objectives 3 Standard Laboratory Practices 3 Rat Behavior 3 Rat Health Status 4
Malocclusions 4 Basic Handling & Manual Restraint 5
Four-finger hold 6 Scruffing 6 Two-finger hold 7 Three-finger Hold 7
Restraint Devices 8 Injections 9
Basic Considerations 9 Basic Injection Procedure 9
Needle Placement Verification 10 Injection Volume Guidelines 10
Subcutaneous (SC) Injection 11 Intraperitoneal (IP) Injection 11-12 Intramuscular (IM) Injection 12 Intravenous (IV) Injection 13-14
Oral Gavage 14-15 Blood Collection 15
Basic Considerations 15 Un-anesthetized techniques (tail vein, lateral saphenous) 16 Anesthetized (jugular vein, cardiac) 17-18
Anesthesia 19 Basic Considerations 19-20 Inhaled Anesthesia (Isoflurane) 19
o Precision Vaporizer Delivery Method 19 o Open Drop Delivery Method 20
Injectable (Parenteral) Anesthesia (Commonly Used Drug Combinations) 20 Calculation Table 21 Assessment of Anesthetic Depth and Recovery 22-23
Identification 24 Euthanasia 24 Miscellaneous Data 25
Internal Anatomy 25 Hematological Data 26 Plasma Clinical Chemistry Data 26 Urine Clinical Chemistry Data 27 Organ Weights 27 Physiologic Parameters 27 Rate of Growth 28
Acknowledgements 29
3
Workshop Objectives Learning Objectives of the Hands-on Workshop are:
1. Safe and humane handling/restraint methods
2. Aseptic injection procedures
3. Basic blood sampling techniques
4. Basic concepts of anesthesia and use of injectable anesthetic
5. Proper method of euthanasia
Standard Laboratory Practices It is important to use safe and established laboratory practices in order to prevent zoonoses (i.e., diseases that are passed from animals to humans and/or humans to animals). Rat bites or scratches can result in infection if not treated properly, and very rarely, may cause a serious illness known as rat bite fever. Far more likely is the development of an allergy to proteins found in rat fur, urine or dander. The following practices will help minimize the chances of this occurring:
1. Always wear a clean lab coat and exam gloves. You should refer to your approved animal use protocol to determine if there are any other special clothing requirements. If allergies are a concern, please contact an occupational health nurse for advice in regards to protective masks and additional apparel. 2. Wash hands with soap before and after handling rats. This practice helps ensure your own sanitary protection and helps prevent the spread of infectious disease from one cage to another.
3. If you are bitten:
a. return the rat to its cage (don’t punish it!) b. wash the bite with antibacterial soap and water c. notify your immediate supervisor who is then required to submit a report of injury to the
Office of Environmental Health and Safety d. decide whether or not to seek immediate medical attention
If unusual symptoms develop (headache, fever, etc.), go to the University Hospital’s Urgent Care Center or, after hours, to the University Hospital Emergency Room. Remember to tell them about your rat bite so they can assess your condition thoroughly.
Rat Behavior Rats are normally docile and curious. However, if they become frightened or distressed,
they may bite. Rats usually respond positively to quiet, gentle handling.
Rats are creatures of habit and routine events will not usually excite them. They will rarely
become agitated or attempt to bite if they are conditioned to being handled. You will find that rats handled on a regular basis, in a consistent manner, are usually much easier to work with.
Unfamiliar odors and noises may cause rats to become agitated and more difficult to
handle. Excitement in your rats can be minimized by working quietly among them and by trying to avoid performing procedures within the animal housing room.

4
Rat Health Status A healthy rat will appear alert and bright-eyed with a smooth, glossy coat. They are generally
active when they are awake and they can be observed commonly moving around in their cage and grooming themselves. Rats are nocturnal, and if left undisturbed, will usually sleep during the day.
Figure 1. Sick rat on left, healthy rat on right.
The following physical characteristics may be observed in a rat with health problems:
o large amounts of reddish discharge (porphyrin*) around the eyes or nose *Porphyrin is naturally secreted by the Harderian gland and appears around the rat's eyes. This red substance looks like red tears or blood, and can be startling to those who are unfamiliar with rats. Small amounts of porphyrin staining are normal.
o hunched posture with minimal activity o ruffled fur or generally un-groomed appearance o rasping or wheezing while breathing o diarrhea o weight loss / thin appearance*
*Malocclusion of the teeth is sometimes the cause of weight loss. The rat’s mouth should be examined immediately at the first sign of unexplained weight loss.
Figure 2. Example of a Malocclusion.
o history of not eating or drinking ("tenting" of the rat's skin when gently pulled may indicate dehydration)

5
Basic Handling
Most rats are docile and handled easily if they are approached in a firm but gentle manner. In order to avoid startling the rat, first place your hand within the cage so the animal is aware of your presence and then begin approaching the animal with your hand.
1. Remove the rat from its cage by grasping the base of its tail (i.e., the portion near the rat’s body) and then lifting (Fig. 3). The tail can easily be broken or stripped of skin if the animal is lifted by the tip of its tail. 2. Transfer the rat to the wire-bar lid of the cage or onto a non-smooth surface on which its feet can get a grip (e.g., bench paper). Alternatively, place the rat onto your forearm before proceeding with other manipulations as this helps the animal (and the handler) to relax.
Figure 3. Tail pick-up.
Manual Restraint Rats must be able to expand their chest in order to breath. Take care with how much pressure
you place on the rat’s chest during manual restraint in order not to interfere with respiration. Be aware of gasping, blue color, bulging of the eyes, or porphyrin from the nose.
Some people feel more comfortable handling rats when they are wearing exam gloves in combination with a heavier type of glove. Leather, cloth, or mesh gloves greatly diminish your finger sensitivity which increases the chance of injuring the rat. Heavy gloves also make it more difficult to perform delicate procedures and rats can often bite through them anyway.
Some older protocols may suggest swinging the rat to calm it. This technique is stressful to the
animal and should not be used. If you drop a rat, try to regain control immediately using a tail pick-up (Fig. 3) or some method of
containment (e.g., carefully place a box over the rat without harming it). Escaped rats are difficult to recover once they are under counters, behind furniture, etc.
For inexperienced and/or nervous handlers, a Koken, CurVet or other rat model may first be
used to practice the following holding and restraining techniques:

6
Four-finger hold (Fig. 4) This is the most common holding technique. It is well suited to be used for a variety of procedures including oral gavage. 1. With your dominant hand, grasp rat by the base of its tail on a non-slip surface and gently pull backwards. The rat will tend to pull away from you and will be constantly on the move. 2. Slide your other hand forward, placing the rat’s head between your index and third finger. These fingers immobilize the rat’s head to prevent biting. Your thumb and fourth finger will support the chest. 3. It is important not to squeeze too tightly if the rat struggles. Excessive pressure can block the chest and prevent breathing. 4. If the rat is large (>200 g) or very active, it helps to support its hindquarters with your other hand. This support also allows easy restraint so that an assistant may perform an injection. 5. If you need to hold a large rat with one hand, the hindquarters can be immobilized by tucking the tail between the fourth and fifth fingers (Fig. 5).
Figure 4. Four-finger hold. Figure 5. Hindquarter immobilization
using the four-finger hold.
Scruffing (Fig. 6) This technique is excellent to use when giving S.C. injections. It may be strongly resented by some rats until they become accustomed to the procedure. A modified version of this restraining technique is also well-suited for oral gavage (see fig 23 on page 14) administration of fluids. 1. With your dominant hand, grasp the rat by the base of the tail and place the palm of your other hand on the rat’s back. 2. Using the side of your thumb and the tips of your fingers, firmly gather the loose skin of the back and neck. By gathering skin at the neck area, directly behind the ears, the rat’s head will be immobilized.
Figure 6. Scruffing hold.

7
Two-finger (shoulder) hold (Fig. 7) This technique is often preferred by handlers who prefer to keep their fingers away from the neck area of the animal. 1. With your dominant hand, grasp the tail and gently pull the rat backwards. 2. Slide your thumb and index finger of the other hand up on either side of and behind the shoulders, forcing them upwards until the forelegs are crossed. 3. Backwards tension must be maintained on the tail, which gently stretches the rat to maintain the upward lift of the shoulders. In this position, the rat will be unable to bite the handler as the shoulders prevent the rat from turning its head.
Figure 7. Two-finger (shoulder) hold.
Three-finger hold (Fig. 8) This is a combination of the two-finger and four-finger holds. 1. With your dominant hand, grasp the tail and, while exerting gentle backwards tension, slide your non-dominant hand forward along the rat’s body. 2. Place your thumb up under the leg and shoulder on one side and your index finger on top of the shoulder and alongside the neck on the other side. 3. Your middle finger is placed under the foreleg and your index finger is gently resting above.
Figure 8. Three-finger hold.

8
Restraint Devices Restraint devices may be useful if the rat is difficult to handle or if you don’t have an assistant. Many of these devices are available commercially. Restrainers should be safe for the animal and handler, and easy to disinfect. A number of restraint devices are available including:
1. Small towel (Fig. 9) – rat may be wrapped in a small towel and that part of the body required for the procedure (e.g., tail, hind limb, etc.) is left sticking out. Make sure the rat is able to breathe comfortably when this restraint technique is used. 2. Polyethylene cone restrainer (Fig 10) – these can be used while performing a variety of procedures including S.C. and I.P. injections. Disposable after several uses. May eliminate the need for an assistant. 3. Hard plastic or metal tube restrainer (Fig. 11) – tube length should be such that the rat just fits inside with its tail outside. Usually designed so that S.C., I.P. and tail vein injections can be performed.
Figure 9. Small towel restraint procedure.
Figure 10. Polyethylene cone restrainer.
Figure 11. Hard plastic tube restrainer.

9
Injections Basic Considerations Always use aseptic technique. Non-sterile needles, syringes, or injection fluid should
never be used. Use as small a gauge needle as possible to minimize discomfort.
Basic Injection Procedure
1. Clean the bottle’s septum with alcohol before withdrawing a dose. This should be done every time you withdraw from the bottle.
2. Insert needle with syringe attached and slowly withdraw the dose. 3. While securing the syringe, tap the air bubbles out of the syringe. 4. Leave the needle attached to the syringe stuck through the bottle’s septum until ready to
inject. 5. Properly restrain the rat. If you’re not using a restraining device, use your non-dominant
hand to restrain the rat and your dominant hand to administer the injection. 6. Insert the needle into the body with the bevel up. Figure 12 shows the proper way to hold
the syringe during needle insertion.
Figure 12. Holding a syringe for injection Close-up of bevel
7. Pull back on the plunger to check for correct needle placement. 8. Move your thumb to the plunger and inject. Injecting too quickly may be painful to the rat.
However, injecting too slowly can cause the rat to struggle, resulting in the need to repeat the procedure.
9. Remove the needle. If blood appears on the skin surface, press on the injection site with your finger until a clot has had time to form (usually ~5-10 seconds).
10. It is important to note: 3 mL/cc syringes are calibrated in tenths 1 ml/cc and TB syringes are calibrated in hundredths 5, 6, 10, and 12 mL/cc syringes are calibrated in fifths (two-tenths) Syringes larger than 12 mL/cc are often calibrated in full mL/cc measures All syringe calibrations must be read from the top, or front, ring of the plunger’s
suction tip. For additional and illustrated information, please see:
http://www.wadsworthmedia.com/marketing/sample_chapters/1401831222_ch07.pdf

10
Needle Placement Verification
Type of Injection Indication of proper needle placement
Indication of improper needle placement
How to Address Improper Needle Placement
Subcutaneous (S.C.) Intramuscular (I.M.)
Air pocket in hub of needle/syringe
Flash of blood in hub of needle/syringe
Redirect needle
Intraperitoneal (I.P.) Air pocket in hub of needle/syringe
G. I. contents, blood or urine in hub of needle/syringe
Discard needle and syringe. Start over.
Intravenous (I.V.) Intracardiac (I.C.)
Flash of blood in hub of needle/syringe
Air pocket in hub of needle/syringe
Redirect needle
Injection Volume Guidelines
The volume of substances injected is dependent on the size and condition of the animal as well as the specific properties of the substance to be injected. The table below shows volume guidelines, not absolute values. Please contact the LARC staff if you are unsure of the appropriate volume to inject.
Route Maximum Total Volume Notes Subcutaneous (S.C.)
5-10 mL/kg body weight Example: 1.25-2.5mL/250 gram rat
1-4 injection sites per animal
Intramuscular (I.M.) 0.05ml-0.1 ml/site 3-4 injection sites per animal Intraperitoneal (I.P.) 5-10 mL/kg body weight
Example: 1.25-2.5mL/250 gram rat
1 site per animal
Intravenous (I.V.)
5-10 mL/kg body weight Example: 1.25-2.5 mL/250 gram rat Continuous infusion rate is 2-4 mL/kg/Hr Example: 0.5-1.0 mL/250gram rat/Hour
The larger the volume given, the more slowly it should be administered.
Oral (P.O.) 10-20 mL/kg body weight Example: 2.5-5.0 mL/250 gram rat
Care should be taken never to introduce air into the stomach.

11
Subcutaneous (S.C.) Injection This technique is easily performed using the scruffing restraint technique or with the use of a restraint device or the aid of an assistant. Injections are usually made under the skin on the animal’s back or side areas.
1) Gently pull skin away from the body to form a “tent” of skin. 2) Insert needle into the “door” of the tent. 3) Pull back on plunger to ensure proper placement. 4) Inject.
Figure 14. S.C. injection by 2 people. Figure 15. S.C. injection by 1 person, using a scruffing hold.
Intraperitoneal (I.P.) Injection Easily performed by two people (Fig. 16). For one person to give this injection, use of a polyethylene restraining cone, towel or other restraining device is recommended. Using a 3/4” or 5/8“ needle length helps prevent organ puncture. *Injection volume should be no greater than 5-10mL/kg body weight for isotonic solutions. .
Figure 16. I.P. injection by 2 people. Figure 17. I.P. injection by 1 person using a scruffing hold.

12
An I.P. injection may be given on either side of the rat’s abdomen, but the left side is preferred. The injection should be made into the lower quadrant.
1) Restrain the rat so that the abdomen is accessible. The tail and the rear leg on the side of injection site should be restrained.
2) Tilt the rat head-down so that its intestines fall forward. 3) Insert the needle into the lower quadrant, slightly off the midline, being careful to
avoid the urinary bladder. 4) Aspirate, by pulling back on the plunger, to check needle placement. 5) Assuming an air pocket appears in the needle hub, inject the solution. 6) If needle hub shows contamination by urine, blood or G.I contents, you must discard
the needle, syringe and solution and start over. Intramuscular (I.M.) Injection Intramuscular injections are usually not recommended in rats because of the animal’s small muscle mass. Intramuscular injections require volumes ≤0.1 ml per injection site. Larger volumes disrupt muscle fibers and cause pain. Easily performed with two people (Fig. 18) or using a restraining device.
1) Palpate the thigh for the quadriceps or caudal thigh muscles. 2) Insert the needle and aspirate. 3) If an air pocket appears in the needle hub, inject the solution.
Figure 18. I.M. injection. Red oval shows improper area for IM injections. Needle placement should be into the indicated quadricep or caudal thigh muscle areas.

13
Lateral tail vein injection Accessible tail veins run laterally on both sides of a rat’s tail. An artery runs vertically (bottom
side) of a rat’s tail. The tail’s dorsal (top side) vein is more difficult to access.
Maximum injection volume into a tail vein is 5-10ml/kg body weight administered over a 1-2 minute time period.
Initial attempts should be made about half way down the tail. Working upwards, towards the body, if additional attempts are needed.
This technique can be easily mastered with practice and by keeping the animal and its tail warm to aid in vessel dilation.
Immersing the tail in warm water (40 o
C) for 1-2 minutes is one option. Placing the entire rat in a warming box (37
o
C) for 10-15 minutes prior to the injection works well as long as the rat is monitored to ensure is does not overheat.
A tail vein injection can be performed on an anesthetized animal (Fig. 20) or on an un-anesthetized rat placed in a solid restraining device.
Use a 23-25G needle and perform the injection as follows:
1) After warming the tail or under a warming lamp, lay the anesthetized animal in its side. If animal is awake, place in a stable restraining device with the tail exposed. The entire restrainer may be moved / tilted to allow easy access to tail vein.
2) Visualize the tail vein immediately beneath the skin. 3) Clean the tail with rubbing alcohol. 4) Stabilize the tail with your non-dominate hand. Some prefer to slightly bend the tail over the
index finger. Another method is to stabilize the tail against the table.
Figure 19. Simplified diagram of a transverse sectional view of a rat tail showing the dorsal vein (DV), lateral veins (LV), and ventral artery (VA). (Modified image reprinted from The Laboratory Rat, G.J. Krinke (Ed.), pp. 491, Copyright 2000)
Figure 20. Lateral tail vein injection in an anesthetized rat.

14
5) With your dominant hand, insert the needle, with the bevel up, into the vein at a very shallow angle, almost parallel to the vein. The vein lies immediately under the skin of the tail.
6) Aspirate gently. Blood should appear in the needle’s hub. 7) Slowly push in the syringe’s plunger to inject. You should notice the vessel blanch as the
fluid passes up the vein and into the body. 8) Remove needle and ensure hemostasis by applying pressure to the injection site.
Oral Gavage
Figure 21. Gavage needles. Figure 22. Estimating the depth Figure 23. Scruff restraint of needle placement. technique for gavage.
Weight Gauge Length Ball Diameter Shape 50 – 75 grams 20 1”, 1 ½” 2 ¼ mm Straight 75 – 120 grams 18 1”, 1 ½” 2 1/4" mm Straight or
Curved 100 – 200 grams
18
16
2”, 3”
2”
2 ¼ mm
3 mm
Curved
Straight or Curved
150 - 300 grams
16 3”, 4” 3 mm Curved
200 – 350 grams
14
13
3”
3”
4 mm
4 mm
Curved
Straight Oral gavage is performed on conscious animals using a blunt, ball-ended feeding needle (Fig. 21). Animals must be conscious so the swallowing reflex is maintained. Estimate the distance that the needle needs to be inserted into the rat (Fig. 22) (usually from the nose to the first rib).

15
1) Ensure that the loaded syringe and dosing needle do not contain any pockets of air. 2) Restrain the rat with the rat’s head and body extended in a straight line to facilitate introduction of the gavage needle. 3) Introduce the needle in the space between the incisors and molars, and gently direct it caudally toward the back of the throat. The rat usually swallows as the feeding tube approaches the pharynx, facilitating entry into the esophagus. If the needle stops advancing to the measured distance or the animal appears to be in respiratory difficulty: withdraw the needle into the mouth and begin again. 4) Once the desired depth is attained, inject the material and withdraw the syringe. Monitor the animal after the procedure to ensure that there are no adverse effects. Blood Collection Basic Considerations – according to guidelines: Protocol approval is required to withdrawal blood samples in excess of 10% of the total blood volume during a survival procedure
Adult rats have a blood volume of 70 ml/kg body weight which is the equivalent of 7% of their gram body weight.
o Examples: A 200 gram rat would have 14 mL Total Blood Volume.
A 300 gram rat would have 21 mL Total Blood Volume.
Up to 10% of this volume may be withdrawn every two weeks (14 days) without causing significant effects. Administration of supplemental fluids should be considered.
o Example: A 200 gram rat could have up to 1.4 mL of blood safely collected.
A 300 gram rat could have up to 2.1 mL of blood safely collected.
Only 7.5% of the Total Blood Volume can be collected weekly (every 7 days).
o Example: A 200 gram rat could have up to 1.0 mL of blood safely collected ea. week A 300 gram rat could have up to 1.6 mL of blood safely collected ea. week
Un-anesthetized Blood Collection Tail vein or artery
Figure 24. Accessible tail veins run laterally on both sides of a rat’s tail. An accessible artery runs vertically (bottom side) of a rat’s tail. The circumference of these vessels remains about the same from the base of the tail to about halfway down the tail. At that point, they begin to gradually taper. Blood samples can be taken from either of these vessels using techniques similar to the I.V. tail injection technique. Initial attempts should be made about half way down the tail, working upwards, towards the body, if additional attempts are needed.

16
Use a 23-27 gauge needle and perform the technique as follows: Note: for arterial blood collection, a plain needle or altered butterfly catheter can be used
(Fig. 24). The blood pressure should cause the blood to drip out of the end of the needle and directly into a tube.
1) Place the rat in a restraining device with its tail exposed. 2) After warming the tail or working under a warming lamp, visualize the vessel immediately beneath
the skin. 3) Clean the tail with rubbing alcohol. 4) Stabilize the tail with your non-dominate hand. Some prefer to slightly bend the tail over the index
finger. Another method is to stabilize the tail, flat, against the table. 5) With your dominant hand, insert the needle with the bevel up, into the vessel at a very shallow
angle, almost parallel to the tail. 6) Aspirate gently. Blood should appear in the needle’s hub. 7) Slowly pull plunger back to withdrawal the blood. 8) Remove needle and ensure hemostasis by applying pressure to the injection site.
Saphenous Vein blood collection
Saphenous Vein blood collection Technique
1) Restrain the rat using a small towel or decapicone. 2) Gently extend and shave the rat’s outer and back “calf “area of its leg. 3) The most challenging step in this technique is holding the leg in a manner that allows it to be
extended and held securely while not overly restraining the leg tissues. You must be able to visualize the vein. However, too much restraint will prevent the blood from flowing into the vessel.
4) Visualize the vein. Do not clean/wet the site with alcohol or other solutions. Surface tension needs to be maintained in order for blood droplets to form and be collected from the skin surface.
5) With a 23-25 gauge needle held parallel to the skin surface, puncture the vein. 6) Collect the sample with a hematocrit tube or let the blood drip directly into a blood collection
tube. 7) When finished, remove the needle from the vessel and apply light pressure to stop the bleeding. 8) If the needle doesn’t enter the vein successfully, completely withdraw the needle and try again.
Figure 25. The saphenous vein runs along the lateral surface of each hind limb (i.e., along the “outer calf” of the rat) and these are easily visualized after clipping the hair from this region. Small, inexpensive clippers (i.e. mustache trimmers or canine foot grooming clippers) work well. This technique is much easier in an un-anesthetized rat due to the normal or increased blood pressure. Photo: U.S. National Institutes for Health, http://www.theodra.com/rodent_laboratory/blood_collection.html Copyright © 1995‐2008

17
Anesthetized Blood Collection Jugular Vein
1) Place the anesthetized rat on a warming water blanket or under a heat lamp, dorsally with its head towards you.
2) Shave the right side of the rat’s neck with clippers and then wipe with 70% rubbing alcohol. 3) With the hub of the needle placed gently against the right jaw and using the pulse site of the
carotid artery as a landmark, insert a 23-25G needle (attached to a one or 3 cc syringe) into the
V-angle of the neck. Insert the needle slowly, at a very shallow angle (≤30o) from the horizontal
plane of the throat. While the needle is being pushed in (≤0.5”), the syringe plunger should be slightly withdrawn until a show of blood in the needle hub or syringe indicates puncture of the vein. Stop advancing the needle.
4) Pull back on the plunger and collect the sample slowly. 5) Remove the needle from the vessel and apply digital pressure to the puncture site for at least 1
minute to assist in hemostasis. 6) If the needle doesn’t enter the vein successfully, pull the needle back to just under the skin’s
surface and gently redirect. Do not hap-hazardly poke or “fish around” for the vessel as the needle tip can cut and cause damage to vessels and tissue.
Cardiac Puncture (terminal) This is the recommended method for exsanguination of an anesthetized rat. A larger needle (20G) may be used because the technique is terminal. Cardiac puncture may be done with the rat lying on its back (i.e., ventral or lateral approach, respectively); each technique is described below. Ventral Approach
1) Place the anesthetized rat on its back. 2) Place your left thumb and index finger on either side of the thorax. The heart beat should be
able to be felt between your fingers and will give you a good sense of the location of the heart. 3) If unfamiliar with the technique, you can externally pre-evaluate to determine distance from
needle insertion to heart. (Fig. 27 ) 4) Insert the needle (attached to a syringe) just left of the rat’s xiphoid cartilage, at the base of the
rib cage. The syringe should be at about a 30 degree angle to the abdomen. The needle will pass through the diaphragm and into the chest cavity.
5) Pull the plunger back slightly after the needle penetrates the skin. 6) Maintain slight negative pressure in the syringe as you slowly push the needle forward at an
angle about 30o to the horizontal plane of the abdomen.
7) Continue forward until a small amount of blood appears in the syringe. When you see blood in the syringe, immediately stop advancing the needle forward.
8) Collect as much blood as needed. It is usually necessary to aspirate the blood by pulling the
Figure 26. Blood collection from the jugular vein of an anesthetized rat.

18
plunger back slightly as the syringe fills. Keep the bloodline in the syringe close to the moving plunger. If you pull the plunger too fast, the vacuum created may collapse the heart wall onto the needle bevel and stop flow. Excessive vacuum in the syringe can also hemolysis the collected blood cells.
9) If you get a stoppage of flow, release the plunger and wait a few seconds. The heart will refill and you may then resume blood withdrawal. Gently re-positioning the needle may also help restore blood flow if the bevel has become vacuumed to the ventricle wall.
10) When finished, withdraw the needle and euthanize the unconscious rat using bilateral thoracotomy or cervical dislocation.
A B C
Figure 27. A: location of xiphoid cartilage. B: point of needle entry. C: location of heart
Lateral Approach (Fig. 28) 1) Place the anesthetized rat on its back. 2) Palpate the heartbeat with your forefinger and thumb placed on either side of the rat’s chest,
just posterior to the rat’s elbow. 3) Introduce the needle into the left side of the rat’s chest, perpendicular to the chest wall,
immediately over the area in which the heartbeat is most easily palpable. 4) Gentle suction should be applied with the syringe and the needle advanced slowly until blood
appears in the syringe barrel. Stop moving the needle forward immediately when you see a flash of blood in the syringe’s hub.
5) Follow Steps 8, 9 and 10 listed above.
Figure 28. Cardiac puncture using lateral approach.

19
Anesthesia
Basic Considerations
Body temperature must be supported in anesthetized rats because they lose heat rapidly and are susceptible to hypothermia. Use of a circulating water pad or heating lamps is recommended. Placing a towel between the recovery cage and metal table is helpful. Electric heating pads should never be used as they may cause skin burns.
Proper hydration before the procedure will reduce anesthetic mortality and will enhance recovery. Warmed, sterile fluids (e.g., physiological saline; lactated Ringer’s solution) may be given I.P. or S.C. after the rat has been anesthetized. Contact the LARC veterinarian to determine the volume and type of fluids to be given.
Withholding food and water for anesthetic purposes is not usually necessary because rats do not have regurgitation reflex.
Select an anesthetic protocol that interferes as little as possible with your experiment and is in the best interest of the animal. Carefully assess the alternatives to eliminate or minimize interaction between the anesthetic agents and your animal model. Usually, anesthesia is administered by inhalation or injection. The LARC veterinarian is available for advice and guidance in choosing an appropriate anesthetic protocol.
Record Keeping: All animals that undergo anesthesia must have documentation of the event that includes the drug and dosage given, time of administration, protocol # and recovery observations.
STANDARD POLICY ON POST SURGICAL/ANESTHETIC MONITORING Documentation of the anesthetic recovery process and the post surgical care is required using the current method (orange anesthetic / surgical record card) as provided by LARC.
Inhalation Anesthesia
Inhalation anesthetics have rapid induction and recovery, and they allow easy control of the depth of anesthesia (if utilizing a precision vaporizer unit. Inhalants are easy to administer assuming the correct equipment is available. This should include an induction chamber (to induce anesthesia), a vaporizer (to control administration of the anesthetic), and a scavenging or ventilation system (to protect personnel from inhaling escaped anesthetic gas).
Isoflurane is the most commonly used inhalation agent. It produces rapid induction and recovery and has no effect on liver enzymes of rats. Cardiovascular/respiratory depression is to be expected during use. Most rats should be induced at a rate of 4 to 5%. Maintenance level is based on anesthetic depth assessment and is generally administered at 1.5 to 2.5%.
Vaporizer
Use of a precision vaporizer unit calibrated for the anesthetic used will allow the greatest control of anesthetic delivery, in addition to delivery of supportive oxygen. THIS IS THE PREFERRED METHOD OF FOR DELIVERY OF VOLATILE (INHALED) ANESTHETICS. Any other delivery method will require more in-depth consideration for approval by the LARC veterinarian and must be specifically described in an approved IACU protocol prior to use. All units (unless specifically noted by manufacturer) are to be calibrated annually.

20
Open Drop Method
If the open drop method of volatile anesthetic delivery is believed to be appropriate for research needs, it must first be discussed with the LARC veterinarian and specifically described in an approved IACU protocol prior to implementation. While this method has its advantages, it is less commonly used due to the inherent lack of precise control and the potential for morbidity and mortality if performed incorrectly. Briefly, the common guidelines for use of this method are as follows:
Animals must never come into contact with liquid anesthetic, only the fumes it produces In order to approximate the desired percentage for induction or maintenance:
o The volume of liquid anesthetic must be measured and absorbed into gauze or cotton type material
o The volume of the chamber holding the animal and absorbent material with isoflurane must be known
Must be performed within a chemical fume hood due to lack of active scavenging system
Must only be used for very brief procedures (such as quick injections or tail biopsy) Should not be repeated on the same animal as a method of maintenance anesthesia Must be approved by the LARC veterinarian and described in detail in protocol
Injectable (Parenteral) Anesthesia
Injectable anesthetics are usually administered to rats I.P. or S.C. as a single dose. Injection anesthesia is disadvantageous in that absorption of the drug is slower, residual drug effects persist for a long period, and full recovery can be quite prolonged in comparison to inhalation methods. The duration and quality of anesthesia produced by different agents varies considerably and these factors should be considered when choosing an injectable anesthetic. There is a wide range of injectable anesthetics available for use in rats in addition to those listed below. Consult a LARC veterinarian about other drugs or drug combinations.
Ketamine (90 mg/kg) + Xylazine (10 mg/kg) I.P. (can be combined in same syringe) -results in medium planes of surgical anesthesia for 20-30 min; immobility may last 2-4 hours. Requires recovery support of body temperature and hydration status. Recovery time can be shortened by administration of atipamezole (1 mg/kg I.P.) This is the most widely used ketamine combination.
Ketamine (60 mg/kg) I.P. + Pentobarbital (20 mg/kg ) I.P. (separate injections) -produces 45-60 minutes of anesthesia; immobility may last 2-4 hours. Supplemental doses may be required as I.P. injections of pentobarbital produce unpredictable responses. Body temperature support is required during recovery. It should be noted that pentobarbital has a very narrow safety margin and is associated with high mortality rates; Please contact a LARC veterinarian for dosage guidelines.

21
Calculating Drug Dosages and Determining Values
Example: Calculate a 90 mg/kg dose of Ketamine + 10mg/kg dose of Xylazine for a 250 gram rat
Step 1) 250 grams X 90 mg ketamine X 1 kg X 1ml = 0.23 mL Ketamine Rat kg body weight 1000 grams 100 mg ketamine (Body weight) X (Dosage of drug) X (Conversion factor) X (Concentration of ketamine) = Volume ****************************************************************************************** Step 2) 250 grams X 10 mg Xylazine X 1 kg X 1ml = 0.13 mL Xylazine Rat kg body weight 1000 grams 20 mg Xylazine (Body weight) X (Dosage of drug) X (Conversion factor) X (Concentration of Xylazine) = Volume ****************************************************************************************** Step 3) 0.23 mL + 0.13ml = 0.4mL Volume of Ketamine + Volume of Xylazine = Total Volume ****************************************************************************************** Sterile dilutions of stock drugs can be made in order for injection volumes to be more manageable and accurate. Example: 9 mL of sterile saline can be added to 1 ml of 20mg/mL Xylazine. The adjusted concentration of the Xylazine is then 2mg/mL. NOTES:

22
Assessment of Anesthetic Depth Stages of Anesthesia: Stage 1: (Induction, voluntary excitement) Excitement and increased movement about the
cage/induction chamber are common. Usually accompanied by a rise in respiratory rate and heart rate.
Stage 2: (delirium, involuntary excitement) Voluntary centers and loss of consciousness begin. Rat moves in an unsteady manner. Exaggerated reflexive responses to stimuli are common (paddling). Breath holding may occur. Common hazard: self-injury.
Stage 3: (General Anesthesia) Plane 1—Light anesthesia. Most reflexes (pedal) are still present. Plane 2—Medium anesthesia. Most surgeries are conducted at this level. Muscles are
relaxed. Pedal/toe pinch reflexes are absent. Plane 3—Deep anesthesia. Ribcage muscles are relaxed; breathing is slow and shallow. Plane 4—Too Deep. All muscles, including diaphragm & chest muscles, are paralyzed. Breathing has stopped.
Stage 4: (Irreversible Anesthesia) Breathing has stopped, the heart is not beating. Color change in pupils of eyes. Death occurs within seconds to minutes.
Stages of Anesthetic Recovery: Recovery Stage 4: Animal is unconscious or semi-conscious. Some reflexes are still
diminished or absent.
Recovery Stage 3: Animal is conscious and pedal/toe pinch reflexes are present, but may not be able to control its body position. Animal attempts to move about.
Recovery Stage 2: Animal can either maintain itself in a sternal position, or can stand and move about, but may still show some sedation.
Recovery Stage 1: All functions are normal, unless altered directly by the experimental procedure.

23
Stages of Recovery Examination
Frequency
Surgical Record Notation
May Include:
Other Supplemental
Care
Stage 4
Unconscious; intubated
Not less than once every
5 minutes
Respiratory rates
Jaw tone
Toe pinch response
Time of extubation
Skin color
turn laterally –recumbent animals side‐to‐side frequently
maintain dry
provide supplemental heat and inject fluids as necessary
Stage 4
Unconscious
Not less than once every
15 minutes
same as above
record post operative analgesics
same as above
administer post‐operative analgesics
Stage 4
Semi‐conscious; Not
sternally recumbent
Not less than once every
hour
same as above
evidence of pain
maintain dry
adjust ambient temperature, fluids as necessary
Stage 3
Conscious; sternally
recumbent; May sit, but
cannot stand
Not less than once every
6 hours
skin color
respiratory rate
condition of incision site
evidence of pain
maintain dry
adjust ambient temperature as necessary
consider additional analgesics
Stage 2
Standing and moving
about; Not eating/drinking
normally
Twice Daily degree of alertness and activity
food/water consumption
condition of incision
site
examine for abnormalities
consider additional analgesics
consult veterinary staff
Stage 1
Active and alert; Eating and
drinking normally; Skin
sutures still in place
Daily Notation of surgical site care until suture removal
Record medications administered
Remove sutures or staples as indicated post‐surgery
Stage 1
Animal normal; Skin
sutures removed
Observe and record for 1 day if non‐surgical procedure
Observe and record for 5+ days if minor or major surgical procedure

24
Identification Individual rats can be identified using ear punches, ear tags, tattoos, fur dyes and indelible mark on the tail or microchips. A combination of marks made by an ear punch can be used to identify rodents.
Rats should always be clearly identified on cage cards indicating protocol number, strain (using standard nomenclature), sex, date of birth, and PI.
Euthanasia There are a number of acceptable methods for euthanatizing rodents as stated in the most recent Report of the AVMA Panel on Euthanasia and these are listed below. It is important that euthanasia be carried out humanely with a minimum amount of anxiety and pain to the animal. Regardless of the method utilized, UTEP’s IACUC Protocol Application Form states that a secondary method must be used. After euthanasia is performed, death should be assured by bilateral pneumothorax, aortic transection, cervical dislocation, or some other certain physical means, as appropriate.
Method Ease of Use Personnel Safety Efficacy
Anesthetic Overdose Restraint necessary; IV injection is necessary for best results and this requires skilled personnel; IP injections may be used in situations when IV injections would be distressful. Intracardiac injections may only be used if the animal is heavily sedated, unconscious, or anesthetized
Safe; DEA-controlled substance with human abuse potential
Highly effective when given appropriately; may be administered intravenously, intraperitoneal, or intracardiac
CO2 (compressed gas only) Must be used in a closed container
Minimal hazard Effective; however, prolonged exposure time is required in neonates and immature rats
Cervical Dislocation
IACUC Protocol Approval Required
Requires personnel that are technically proficient in the procedure. If not performed under surgical plane or greater anesthesia, this must be approved in protocol.
Safe to personnel but may be aesthetically unpleasing
Effective when performed by technically competent personnel. Conditionally acceptable and should only be used when required by experimental design and approved by the IACUC
Decapitation
IACUC Protocol Approval Required
Requires guillotine designed for the procedure in adult rats (or sharp blade in neonates) and skilled personnel; handling and restraint required to perform this procedure; may be distressful to animals. If not performed under surgical plane or greater anesthesia, this must be approved in protocol.
Personnel should realize the inherent danger of the guillotine and take precautions to avoid personal injury; may be aesthetically unpleasing to personnel
Effective when performed by technically competent personnel; Equipment used to perform technique should be maintained in good working order; plastic cones used for restraint may reduce distress from handling and risks to personnel; this technique is conditionally acceptable and should only be used when required by experimental design and approved by the IACUC

25
Miscellaneous Data Internal Anatomy of the Rat
Figure courtesy of Texas A&M University-College Station

26
Hematological Data Total blood volume (ml/100 g body weight)………….………..…........... 7 Plasma volume (ml/100 g body weight)………………........................ 3.5 Hematocrit (packed cell volume in ml per 100 ml)………………......... 47 Hemoglobin (g/100 ml)……………………………………………….... 15.7 Erythrocyte sedimentation rate (mm/h)…………………………………1.6 (male); 0.7 (female) Osmolality (mmol/kg)…………………………………………….......... 321 Coagulation time (min)………………………………………….………. 2.5 Clot retraction time (minutes to completion)…………………….......... 60 Red blood cells (x 106/mm3)…………………………………………... 8.9 White blood cells (x 103/mm3)……………………………………..…....9.9 Neutrophils (x 103/mm3)……………………………………………...... 2.4 Lymphocytes (x 103/mm3)…………………………………………........ 7.5 Monocytes (x 103/mm3)………………………………………………... 0.02 Basophils (x 103/mm3)……………………………………………........ 0.02 Eosinophils (x 103/mm3)…………………………………………......... 0.03 Platelets (x 103/mm3)………………………………………………….... 340 pH (whole blood)………………………………………..……………...... 7.36 Specific gravity (whole blood)…………………………..…………..….. 1.05 Plasma Clinical Chemistry Data Total protein (g/l)……………………………………………………...... 63 Albumin (g/l)……………………………………………………………...28 Alpha 1 globulins (g/l)………………………………………………….. 4.6 Alpha 2 globulins (g/l)………………………………………………..... 3.5 Beta globulins (g/l)……………………………………………………...... 5 Gamma globulins (g/l)………………………………………………..... 4.4 Urea (mmol/l)………………………………………………………….... 6.9 Ureate (mmol/l)……………………………………………………….... 0.6 Glucose (mmol/l)…………………………………………………....... 10.1 Creatinine (μmol/l)………………………………………………….....42.5 Creatinine clearance (ml/min)……………………………………….... 1.2 Total lipids (g/l)…………………………………………………………. 2.3 Phospholipid (g/l)………………………………………………… ...... 0.05 Cholesterol (mmol/l)………………………………………………….... 1.9 Neutral fat (g/l)………………………………………………………..... 0.8 Bilirubin (μmol/l)………………………………………………………..... 2 Aspartate aminotransferase (i.u./l)…………………………………..... 82 Creatine kinase (i.u./l)……………………………………………….… 368 Gamma-glutamyl transpeptidase (i.u./l)………………………….…… 10 Alpha-hydroxybutyrate dehydrogenase (i.u./l)…………………......... 71 Alkaline phosphatase (i.u./l at 37oC)……………………………….... 200 Iron binding capacity (μmol/l)………………………………………. . 101 Fe3+ (μmol/l)………………………………………………………….......28 Na+ (mmol/l)………………………………………………………………135 K+ (mmol/l)………………………………………………………........... 4.9 Ca2+ (mmol/l)……………………………………………….................. 2.6 Cu+ (μmol/l)………………………………………………………… .... 17.8 Mg2+ (mmol/l)………………………………………………………....... 1.3 Li+ (μmol/l)…………………………………………………………….<0.07 Cl- (mmol/l)……………………………………………………………... 100 PO4 3- (mmol/l)…………………………………………………………... 2.3 Colloid osmotic pressure (cm water)…………………………………. 26 Specific gravity (cm water)…………………………………………... 1.21

27
Urine Clinical Chemistry Data Volume (ml/24 h)…………………………………………………..... 15-30 Protein (mg/24 h)………………………………………………… ....... <20 Urea (mmol/l)………………………………………………………... 442.5 Ureate (mmol/l)…………………………………………………………. 1.7 Creatinine (μmol/l)……………………………………………………... 6.2 Na+ (mmol/l)………………………………………………………… .... 229 K+ (mmol/l)………………………………………………………….... 149.5 Ca2+ (mmol/l)………………………………………………………….... 0.7 PO4 3- (mmol/l)……………………………………………………........ 27.1 Osmolality (mmol/l)………………………………………………….. 3044 pH……………………………………………………………………...... 6.2 Specific gravity………………………………………………………….... 8 Organ Weights (wet weight in g/100 g body weight) Heart…………………………………………………………………...... 0.4 Lungs…………………………………………………………………..... 0.6 Brain……………………………………………………………………….. 1 Liver………………………………………………………………………... 3 Spleen………………………………………………………………… ... 0.2 Kidney (single)……………………………………………………......... 0.4 Adrenal (single)……………………………………………………….. 0.02 Testis (single)………………………………………………………....... 0.5 Ovary (single)………………………………………………………..... 0.05 Pituitary……………………………………………………………..... 0.005 Pineal……………………………………………………………….... 0.001 Stomach and intestines……………………………………………...... 2.3 Thyroid……………………………………………………………...... 0.005 Lymph node (popliteal)……………………………………………... 0.002 Thymus……………………………………………………………… ... 0.07 Prostate………………………………………………………………... 0.16 Seminal vesicles (semen removed)……………………………… ..... 0.3 Physiologic Parameters Body temperature (oC)…………………………………………… ..... 38.1 Heart rate (beats/min)……………………………………………….... 328 Respiration rate (breaths/min)……………………………………….... 97 Systolic blood pressure (mmHg)……………………………… ..116-180 Diastolic blood pressure (mmHg)……………………………………... 90 Lethal X- or γ-irradiation dose (Grays)…………………………….... 10 pH of gastric secretion (6 h collection)………………………...... 1.3-2.6 pH of gastric contents (collected by lavage)…………………..... 2.5-4.0 Chromosome number…………………………………………….......... 42 Life span (laboratory conditions; years)……………………………... 2-4 Daily food intake (g/100 g body wt)…………………………………….. 5 Daily water intake (ml/100 g body wt)………………………………… 10
28
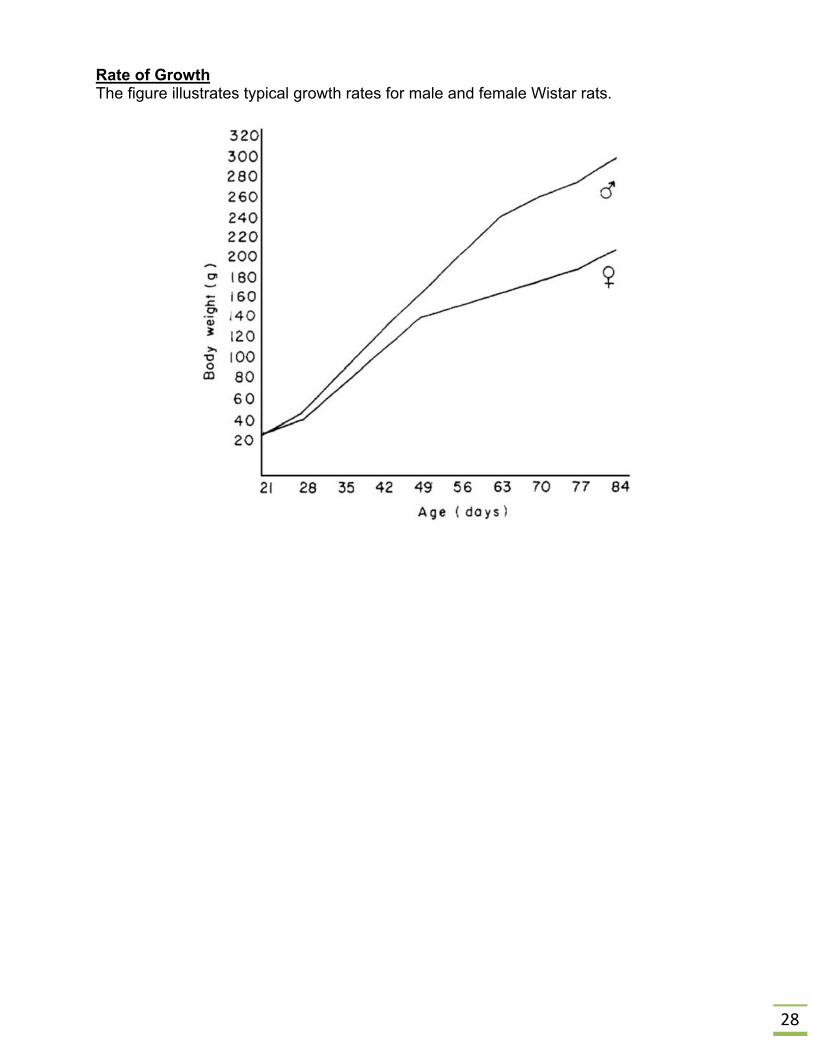
Rate of Growth The figure illustrates typical growth rates for male and female Wistar rats.

29
Acknowledgements
Some of the information in this manual was obtained from the following sources:
Experimental and Surgical Technique in the Rat, 2nd
ed., Waynforth, H.B. and Flecknell, P. A. Academic Press, 1992.
The Laboratory Rat, 2nd edition. American College of Laboratory Animal Medicine Series, Suckow, Weisbroth, Franklin. 2006
Poppers and sons, Inc., Biomedical division, 2007. http://cadenceinc.com/catalog/categories/view/animal_feeding_needles
John Hopkins University Animal Care and Use Committee http://web.jhu.edu/animalcare/index.html
University of Connecticut Health Center for Comparative Medicine http://ccm.uchc.edu/veterinary/tail.html
Laboratory Animal Research Center- University of Texas at San Antonio http://research.utsa.edu/files/larc/Ratbiomethodologyhandouts.pdf
Hypodermic Syringe Measurement http://www.wadsworthmedia.com/marketing/sample_chapters/1401831222_ch07.pdf
Institute for Laboratory Animal Research http://dels.nas.edu/ilar/
6/2016