University of Sunderland Oracle i-Procurement Purchase Guide · 1 | P a g e I-Procurement...
48
1 | Page I-Procurement University of Sunderland Oracle i-Procurement Purchase Guide A Guide on how to purchase from i-Procurement
-
Upload
truongduong -
Category
Documents
-
view
219 -
download
3
Transcript of University of Sunderland Oracle i-Procurement Purchase Guide · 1 | P a g e I-Procurement...
1 | P a g e I-Procurement
University of Sunderland
Oracle i-Procurement
Purchase Guide
A Guide on how to purchase from i-Procurement
2 | P a g e I-Procurement
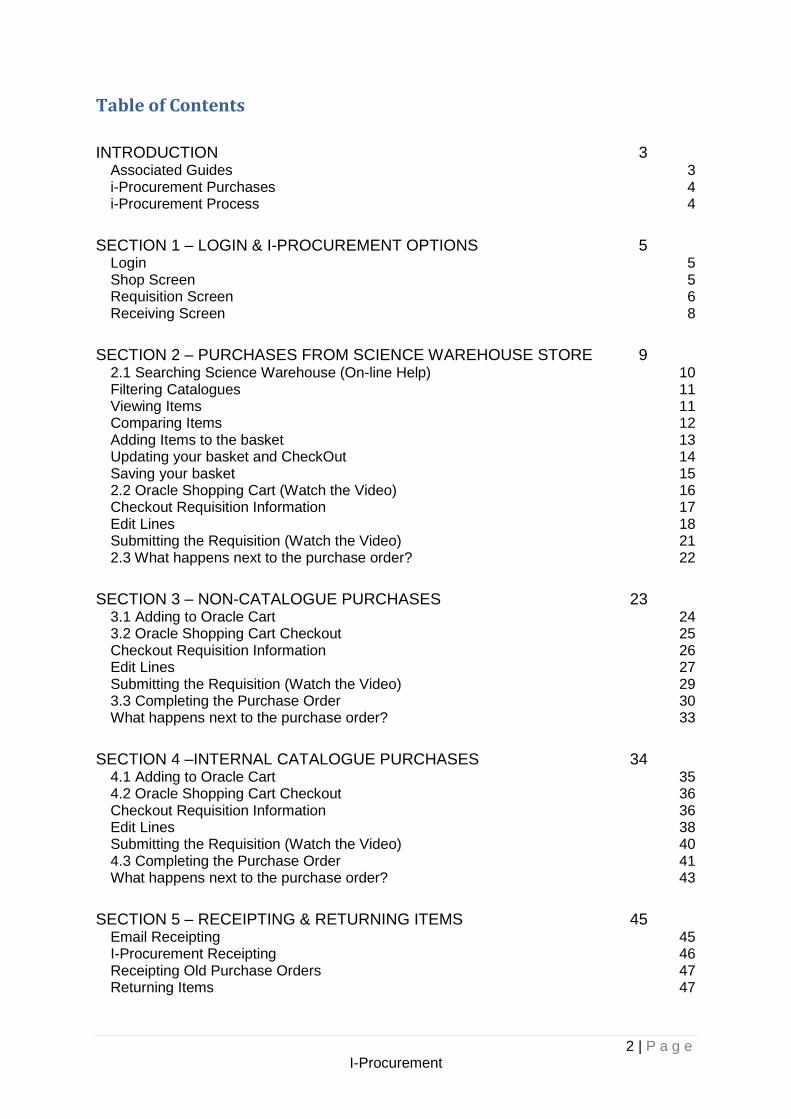
Table of Contents
INTRODUCTION 3 Associated Guides 3 i-Procurement Purchases 4 i-Procurement Process 4
SECTION 1 – LOGIN & I-PROCUREMENT OPTIONS 5 Login 5 Shop Screen 5 Requisition Screen 6 Receiving Screen 8
SECTION 2 – PURCHASES FROM SCIENCE WAREHOUSE STORE 9 2.1 Searching Science Warehouse (On-line Help) 10 Filtering Catalogues 11 Viewing Items 11 Comparing Items 12 Adding Items to the basket 13 Updating your basket and CheckOut 14 Saving your basket 15 2.2 Oracle Shopping Cart (Watch the Video) 16 Checkout Requisition Information 17 Edit Lines 18 Submitting the Requisition (Watch the Video) 21 2.3 What happens next to the purchase order? 22
SECTION 3 – NON-CATALOGUE PURCHASES 23 3.1 Adding to Oracle Cart 24 3.2 Oracle Shopping Cart Checkout 25 Checkout Requisition Information 26 Edit Lines 27 Submitting the Requisition (Watch the Video) 29 3.3 Completing the Purchase Order 30 What happens next to the purchase order? 33
SECTION 4 –INTERNAL CATALOGUE PURCHASES 34 4.1 Adding to Oracle Cart 35 4.2 Oracle Shopping Cart Checkout 36 Checkout Requisition Information 36 Edit Lines 38 Submitting the Requisition (Watch the Video) 40 4.3 Completing the Purchase Order 41 What happens next to the purchase order? 43
SECTION 5 – RECEIPTING & RETURNING ITEMS 45 Email Receipting 45 I-Procurement Receipting 46 Receipting Old Purchase Orders 47 Returning Items 47
3 | P a g e I-Procurement
Introduction
This guide outlines the new procurement processes within Oracle Finacials. These
processes replace the current processes. The changes have been made to streamline the
procurement processes and provide access to on-line catalogues to enable buyers to make
more informed choices.
It is advised that you read the Purchase Order Regulations before you decide how you will
purchase items.
You must remember that all prices must be entered at Net price i.e. exclusive of VAT.
If you purchase from Science Warehouse you cannot have mixed Tax Codes on one
purchase. If the goods you wish to purchase require different tax codes fill the basket with
those items all requiring the same tax code, checkout, then follow the process to complete
the purchase. Then go back to Science Warehouse and fill basket with the other items
requiring the same tax code, checkout,then follow the process to complete the purchase.
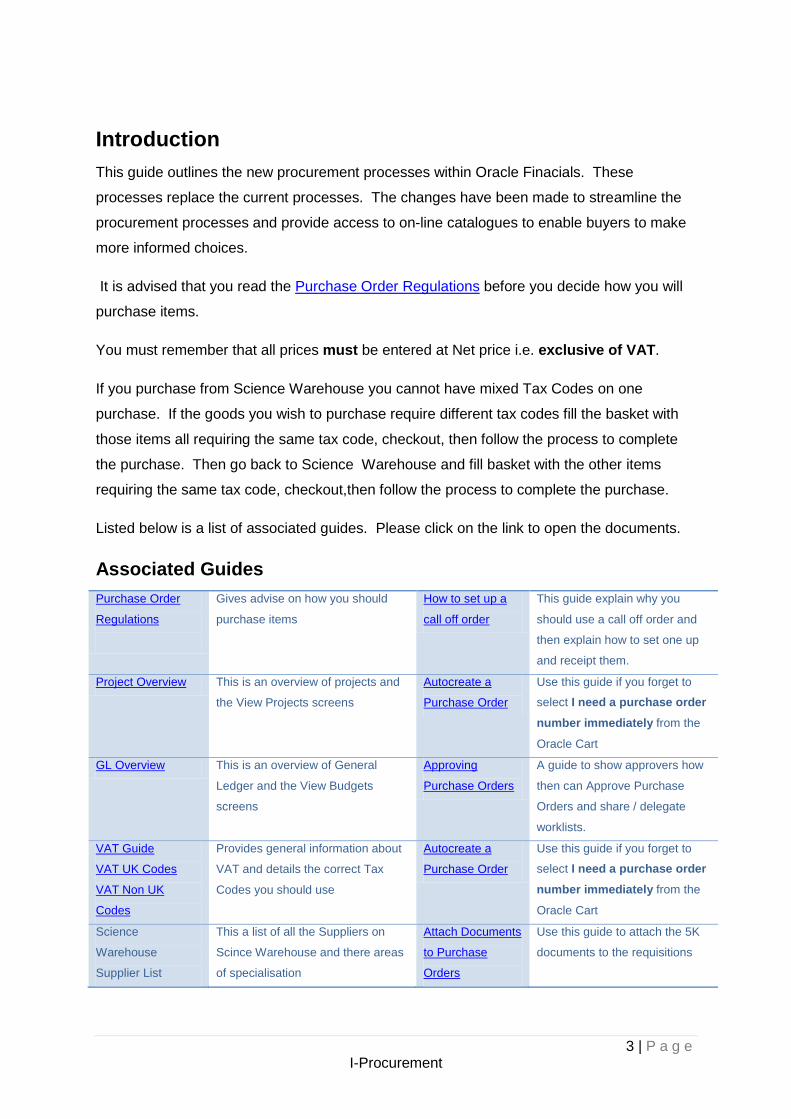
Listed below is a list of associated guides. Please click on the link to open the documents.
Associated Guides
Purchase Order
Regulations
Gives advise on how you should
purchase items
How to set up a
call off order
This guide explain why you
should use a call off order and
then explain how to set one up
and receipt them.
Project Overview This is an overview of projects and
the View Projects screens
Autocreate a
Purchase Order
Use this guide if you forget to
select I need a purchase order
number immediately from the
Oracle Cart
GL Overview This is an overview of General
Ledger and the View Budgets
screens
Approving
Purchase Orders
A guide to show approvers how
then can Approve Purchase
Orders and share / delegate
worklists.
VAT Guide
VAT UK Codes
VAT Non UK
Codes
Provides general information about
VAT and details the correct Tax
Codes you should use
Autocreate a
Purchase Order
Use this guide if you forget to
select I need a purchase order
number immediately from the
Oracle Cart
Science
Warehouse
Supplier List
This a list of all the Suppliers on
Scince Warehouse and there areas
of specialisation
Attach Documents
to Purchase
Orders
Use this guide to attach the 5K
documents to the requisitions

4 | P a g e I-Procurement
i-Procurement Purchases
i-Procurement is the place where all Oracle purchasing is processed.
There are 3 ways to Purchase from i-Procurement
1. Science Warehouse (On-line Catalogues, currently 12 catalogues but will increase,
please use for benchmarking)
2. Internal Catalogues (Catalogues set up by Planning & Finance, Suppliers we buy a lot
from)
3. Non-Catalogue Purchases (All other Oracle Purchase Orders. This replaces the
Purchase Order screen as the place where you enter Purchase Orders into Oracle.)
i-Procurement Process
Add to Cart
•Science Warehouse
•Internal Catalogue
•Non Catalogue
Create Requisition
•add Cost Centres, Projects, Tax Codes
•Add Attachments
Requisition Approval
•If IT or Telephony Dave Hartis to Approve
•Otherwise automatically Approved
Purchase Order
•Science Warehouse is automatically completed
•Otherwise manually complete.
Purchase Order Approval
•Over 5k will go procurement, then forwarded to department
•Science Warehouse will default Approver otherwise you can select Approver
Supplier
•Science Warehouse is sent electronically instantly
•Otherwise Faxed electronically overnight
Receipt
•Receipt items on arrival
Finally Close
•Finally Close Purchase Orders when requested
5 | P a g e I-Procurement
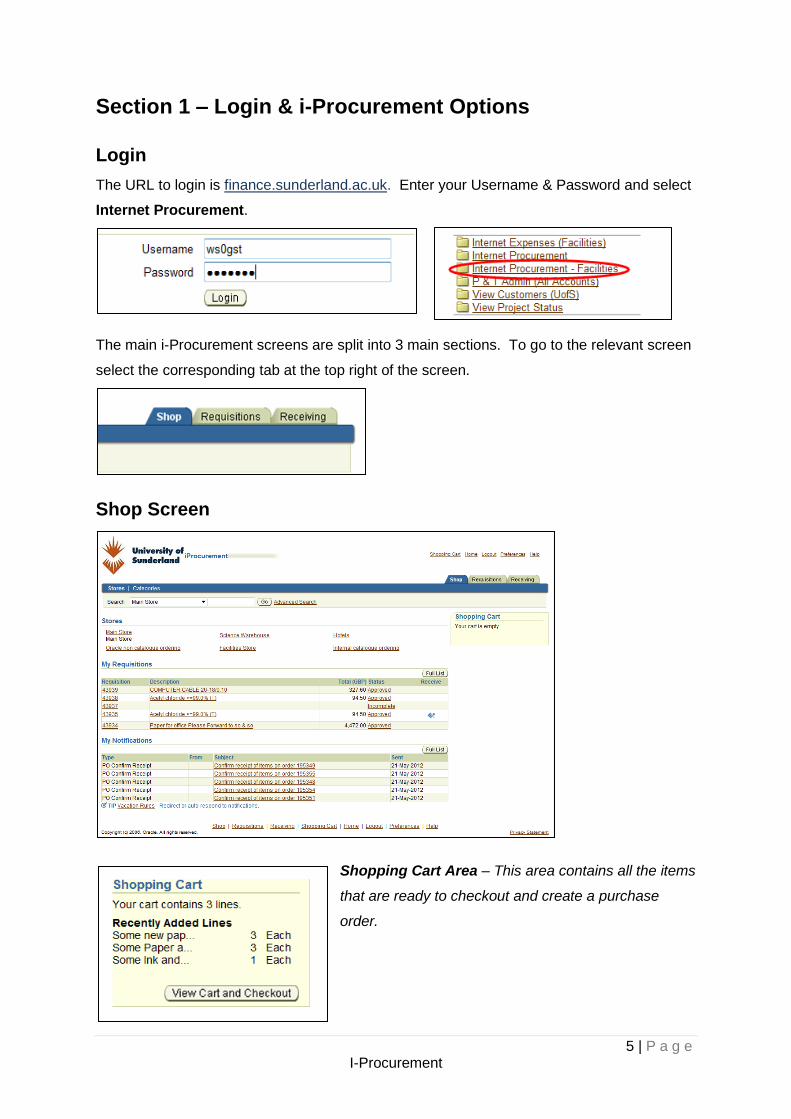
Section 1 – Login & i-Procurement Options
Login
The URL to login is finance.sunderland.ac.uk. Enter your Username & Password and select
Internet Procurement.
The main i-Procurement screens are split into 3 main sections. To go to the relevant screen
select the corresponding tab at the top right of the screen.
Shop Screen
Shopping Cart Area – This area contains all the items
that are ready to checkout and create a purchase
order.
6 | P a g e I-Procurement
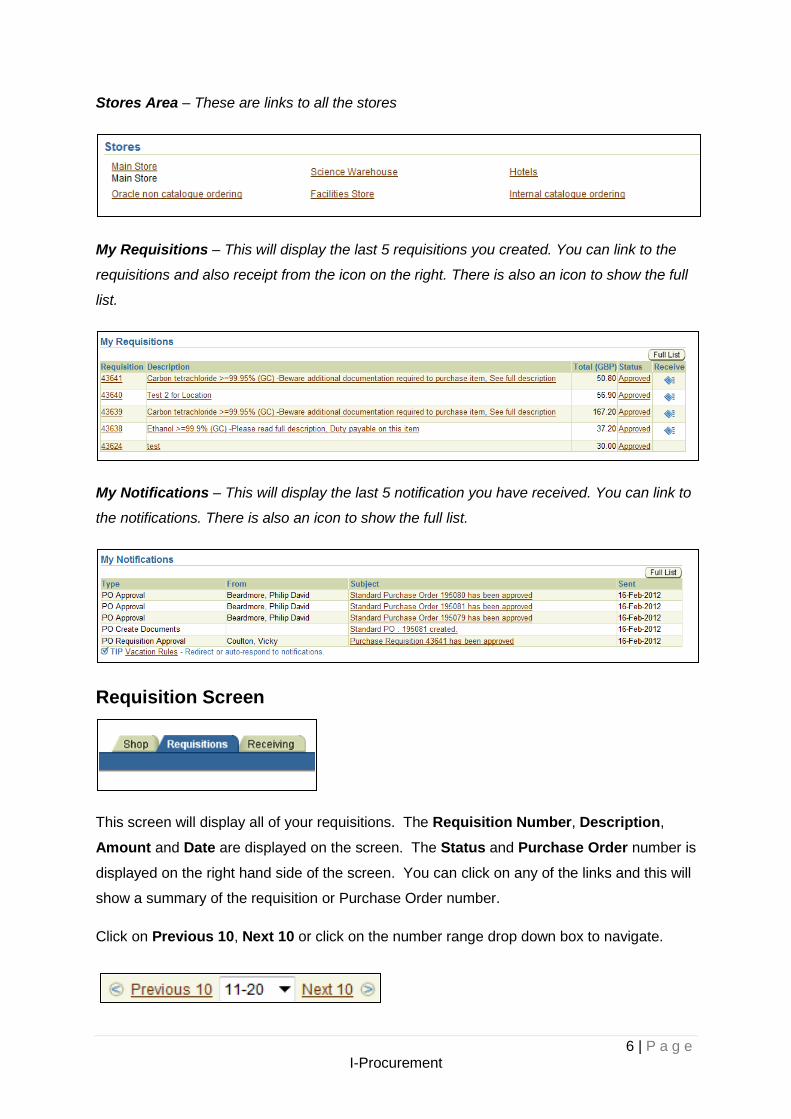
Stores Area – These are links to all the stores
My Requisitions – This will display the last 5 requisitions you created. You can link to the
requisitions and also receipt from the icon on the right. There is also an icon to show the full
list.
My Notifications – This will display the last 5 notification you have received. You can link to
the notifications. There is also an icon to show the full list.
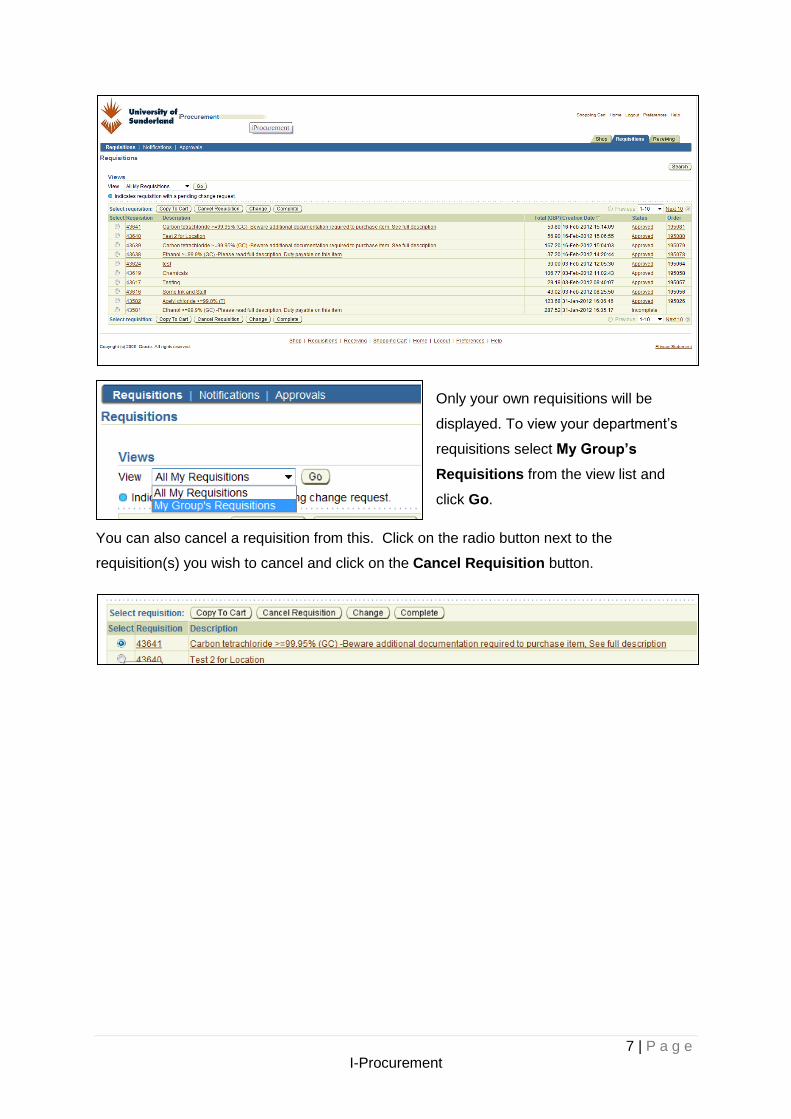
Requisition Screen
This screen will display all of your requisitions. The Requisition Number, Description,
Amount and Date are displayed on the screen. The Status and Purchase Order number is
displayed on the right hand side of the screen. You can click on any of the links and this will
show a summary of the requisition or Purchase Order number.
Click on Previous 10, Next 10 or click on the number range drop down box to navigate.
7 | P a g e I-Procurement
Only your own requisitions will be
displayed. To view your department’s
requisitions select My Group’s
Requisitions from the view list and
click Go.
You can also cancel a requisition from this. Click on the radio button next to the
requisition(s) you wish to cancel and click on the Cancel Requisition button.
8 | P a g e I-Procurement
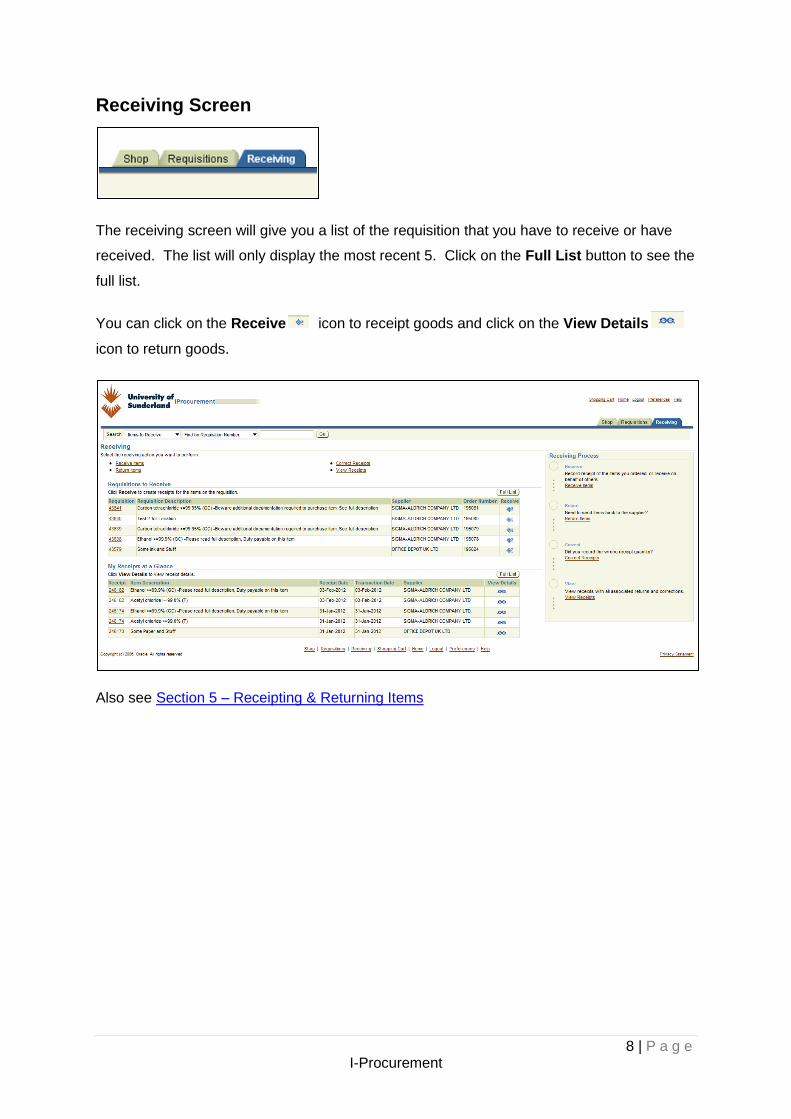
Receiving Screen
The receiving screen will give you a list of the requisition that you have to receive or have
received. The list will only display the most recent 5. Click on the Full List button to see the
full list.
You can click on the Receive icon to receipt goods and click on the View Details
icon to return goods.
Also see Section 5 – Receipting & Returning Items
9 | P a g e I-Procurement
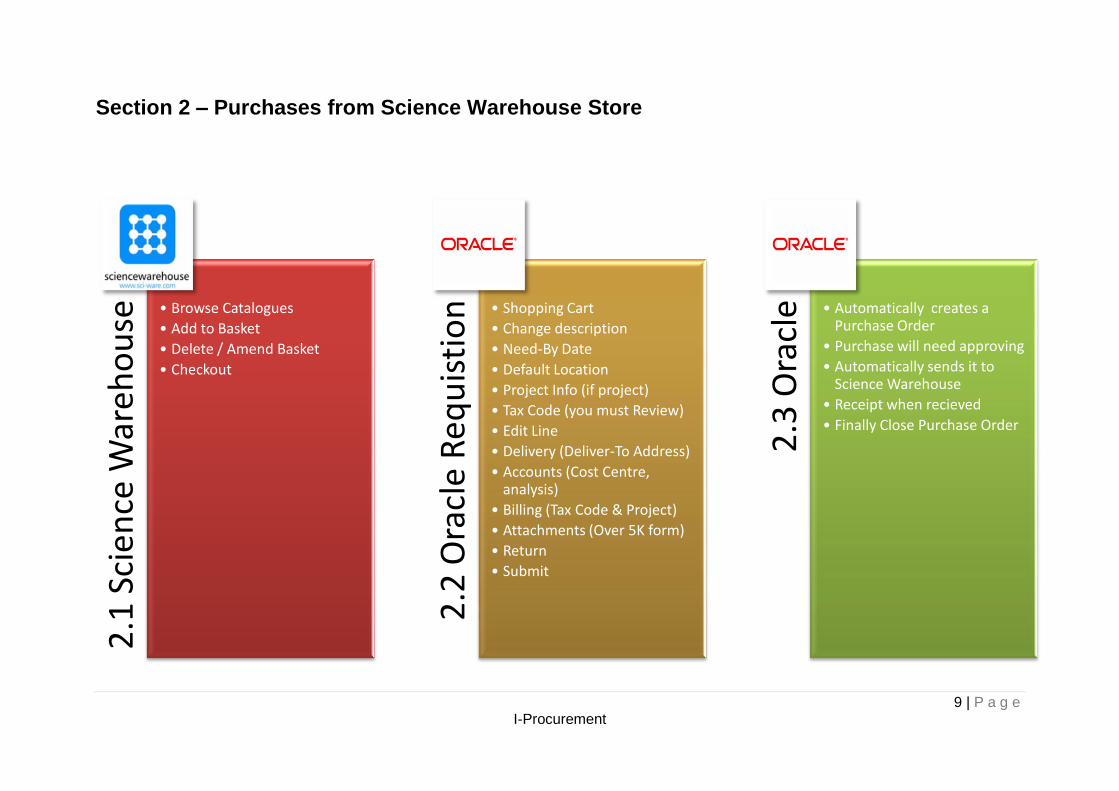
Section 2 – Purchases from Science Warehouse Store
2
.1 S
cien
ce W
areh
ou
se
• Browse Catalogues
• Add to Basket
• Delete / Amend Basket
• Checkout
2.2
Ora
cle
Req
uis
tio
n
• Shopping Cart
• Change description
• Need-By Date
• Default Location
• Project Info (if project)
• Tax Code (you must Review)
• Edit Line
• Delivery (Deliver-To Address)
• Accounts (Cost Centre, analysis)
• Billing (Tax Code & Project)
• Attachments (Over 5K form)
• Return
• Submit
2.3
Ora
cle • Automatically creates a
Purchase Order
• Purchase will need approving
• Automatically sends it to Science Warehouse
• Receipt when recieved
• Finally Close Purchase Order
10 | P a g e I-Procurement
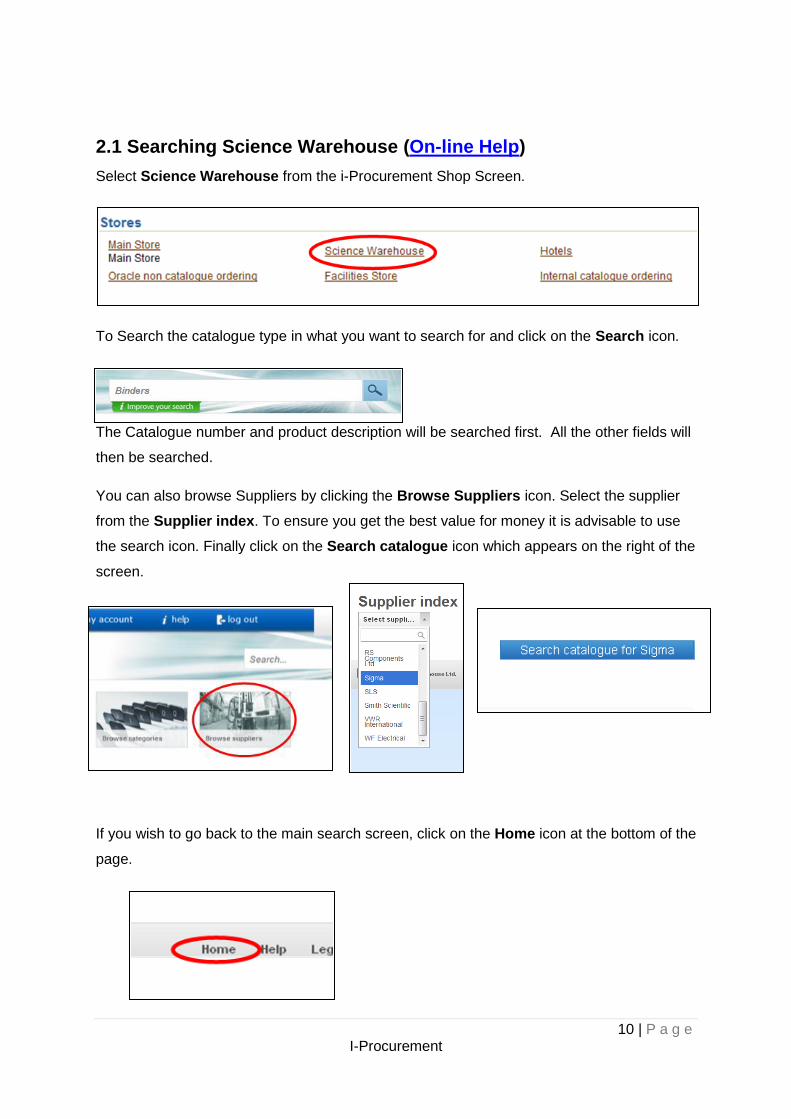
2.1 Searching Science Warehouse (On-line Help)
Select Science Warehouse from the i-Procurement Shop Screen.
To Search the catalogue type in what you want to search for and click on the Search icon.
The Catalogue number and product description will be searched first. All the other fields will
then be searched.
You can also browse Suppliers by clicking the Browse Suppliers icon. Select the supplier
from the Supplier index. To ensure you get the best value for money it is advisable to use
the search icon. Finally click on the Search catalogue icon which appears on the right of the
screen.
If you wish to go back to the main search screen, click on the Home icon at the bottom of the
page.
11 | P a g e I-Procurement
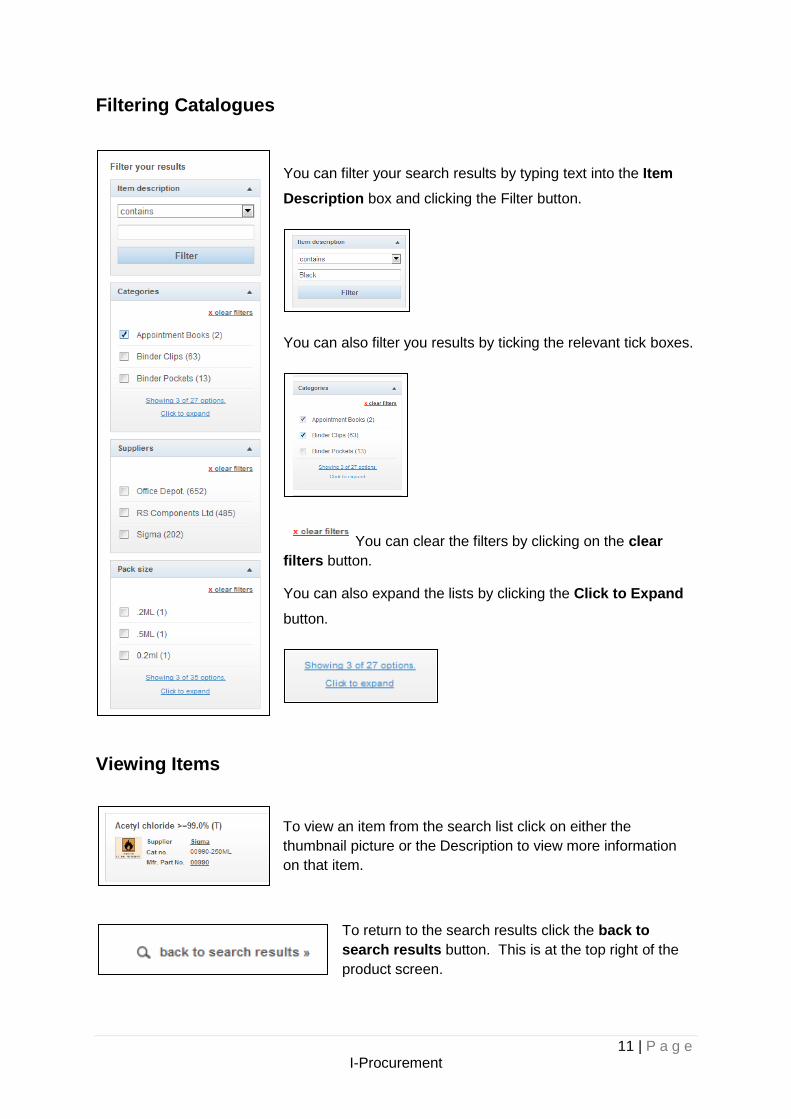
Filtering Catalogues
You can filter your search results by typing text into the Item
Description box and clicking the Filter button.
You can also filter you results by ticking the relevant tick boxes.
You can clear the filters by clicking on the clear
filters button.
You can also expand the lists by clicking the Click to Expand
button.
Viewing Items
To view an item from the search list click on either the
thumbnail picture or the Description to view more information
on that item.
To return to the search results click the back to
search results button. This is at the top right of the
product screen.
12 | P a g e I-Procurement
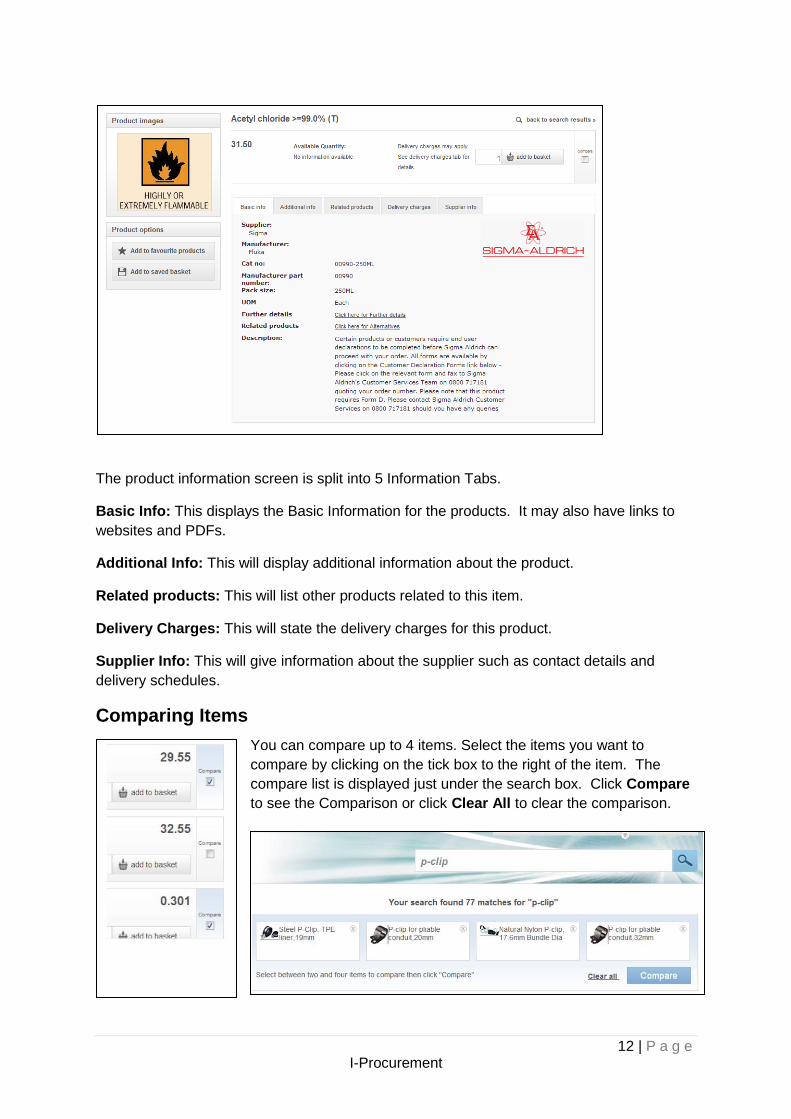
The product information screen is split into 5 Information Tabs.
Basic Info: This displays the Basic Information for the products. It may also have links to
websites and PDFs.
Additional Info: This will display additional information about the product.
Related products: This will list other products related to this item.
Delivery Charges: This will state the delivery charges for this product.
Supplier Info: This will give information about the supplier such as contact details and
delivery schedules.
Comparing Items
You can compare up to 4 items. Select the items you want to
compare by clicking on the tick box to the right of the item. The
compare list is displayed just under the search box. Click Compare
to see the Comparison or click Clear All to clear the comparison.
13 | P a g e I-Procurement
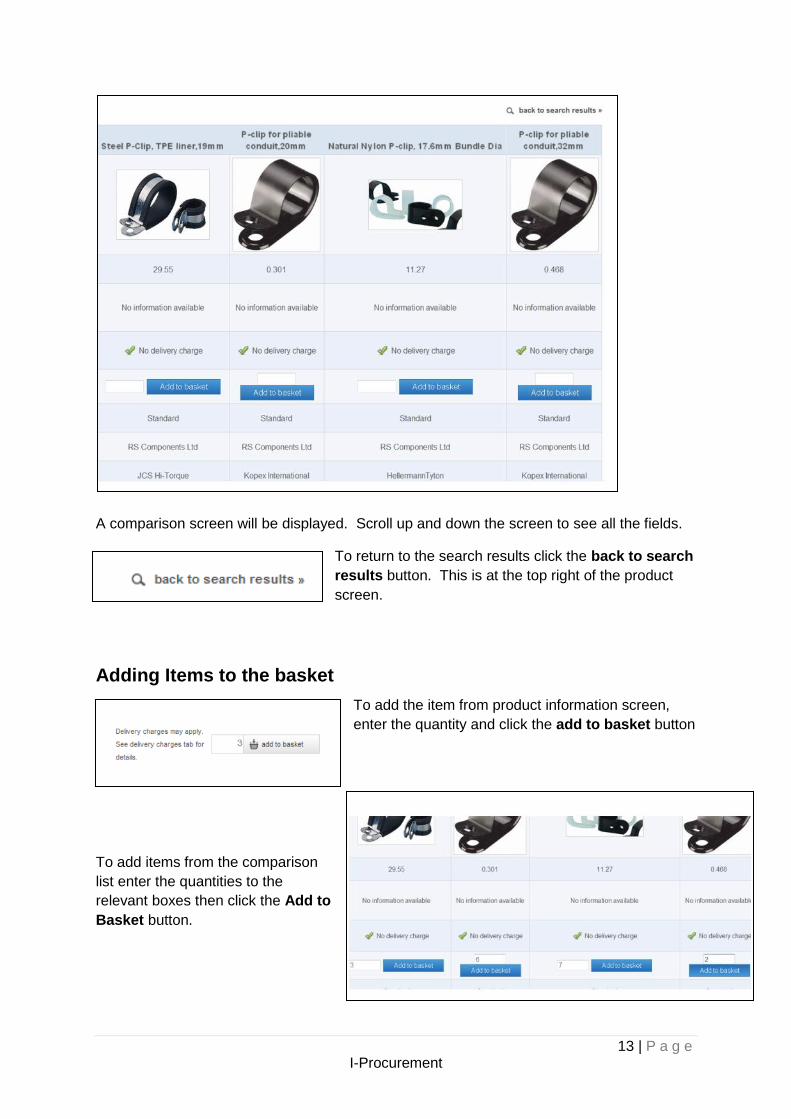
A comparison screen will be displayed. Scroll up and down the screen to see all the fields.
To return to the search results click the back to search
results button. This is at the top right of the product
screen.
Adding Items to the basket
To add the item from product information screen,
enter the quantity and click the add to basket button
To add items from the comparison
list enter the quantities to the
relevant boxes then click the Add to
Basket button.
14 | P a g e I-Procurement
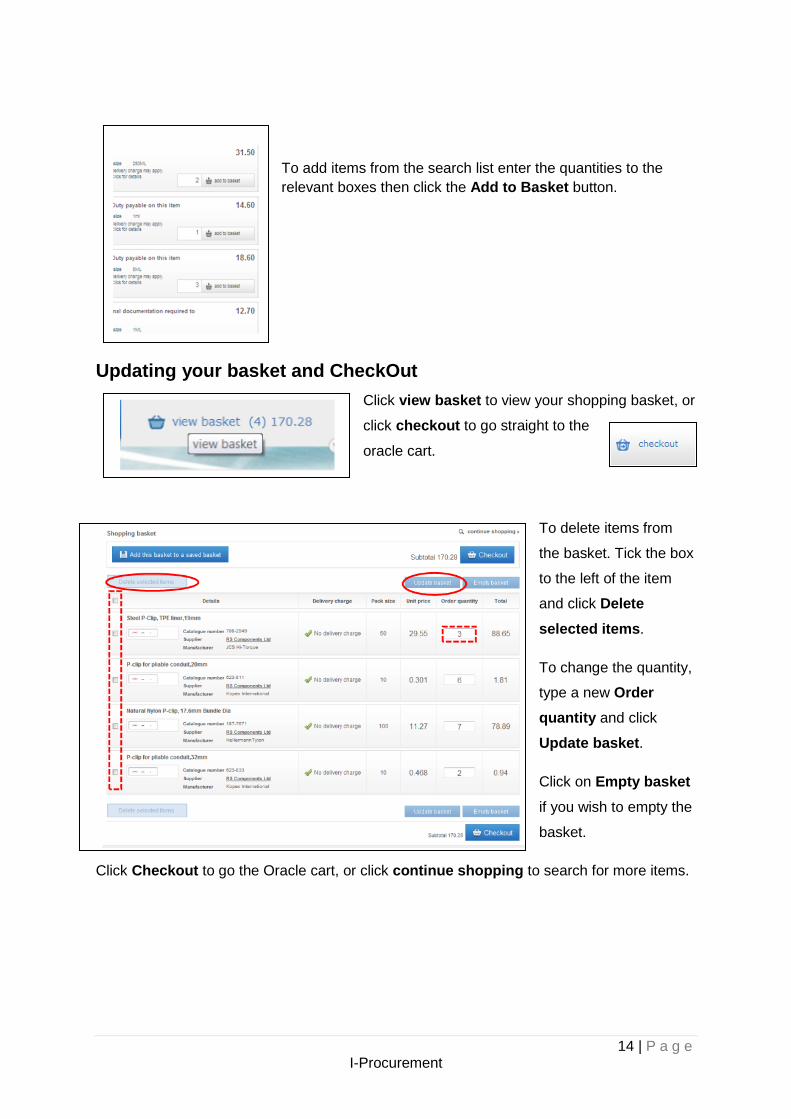
To add items from the search list enter the quantities to the
relevant boxes then click the Add to Basket button.
Updating your basket and CheckOut
Click view basket to view your shopping basket, or
click checkout to go straight to the
oracle cart.
To delete items from
the basket. Tick the box
to the left of the item
and click Delete
selected items.
To change the quantity,
type a new Order
quantity and click
Update basket.
Click on Empty basket
if you wish to empty the
basket.
Click Checkout to go the Oracle cart, or click continue shopping to search for more items.
15 | P a g e I-Procurement
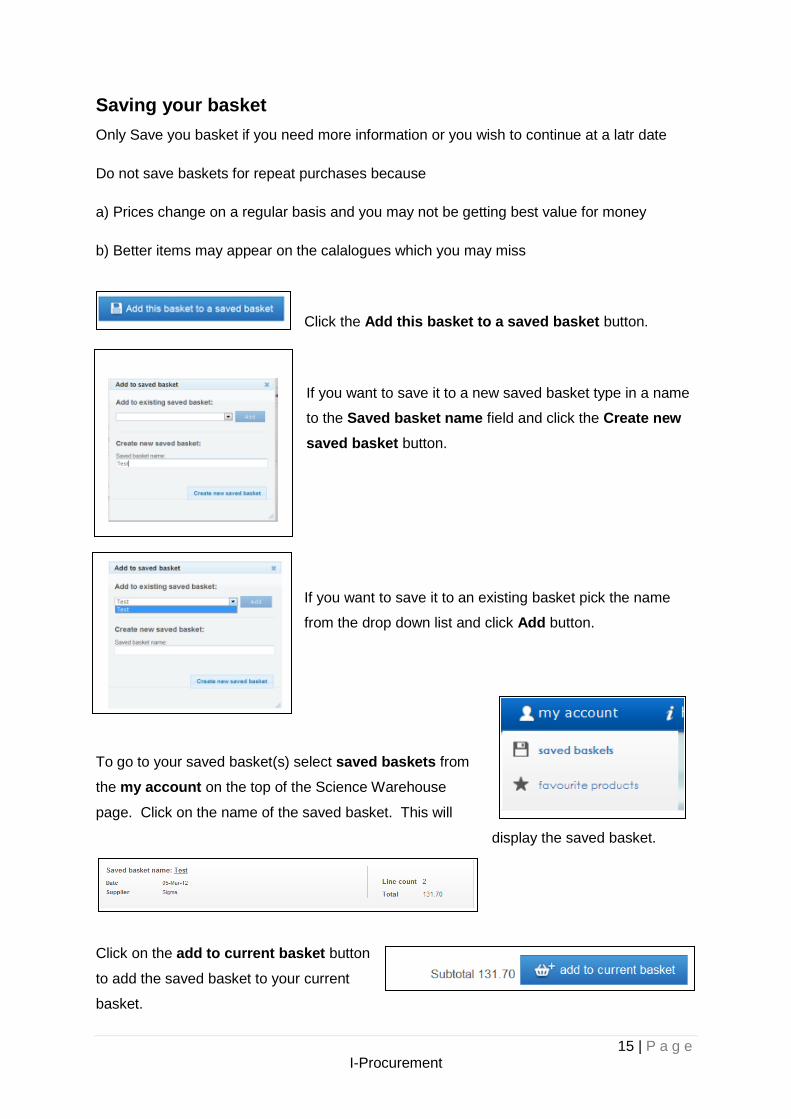
Saving your basket
Only Save you basket if you need more information or you wish to continue at a latr date
Do not save baskets for repeat purchases because
a) Prices change on a regular basis and you may not be getting best value for money
b) Better items may appear on the calalogues which you may miss
Click the Add this basket to a saved basket button.
If you want to save it to a new saved basket type in a name
to the Saved basket name field and click the Create new
saved basket button.
If you want to save it to an existing basket pick the name
from the drop down list and click Add button.
To go to your saved basket(s) select saved baskets from
the my account on the top of the Science Warehouse
page. Click on the name of the saved basket. This will
display the saved basket.
Click on the add to current basket button
to add the saved basket to your current
basket.
16 | P a g e I-Procurement
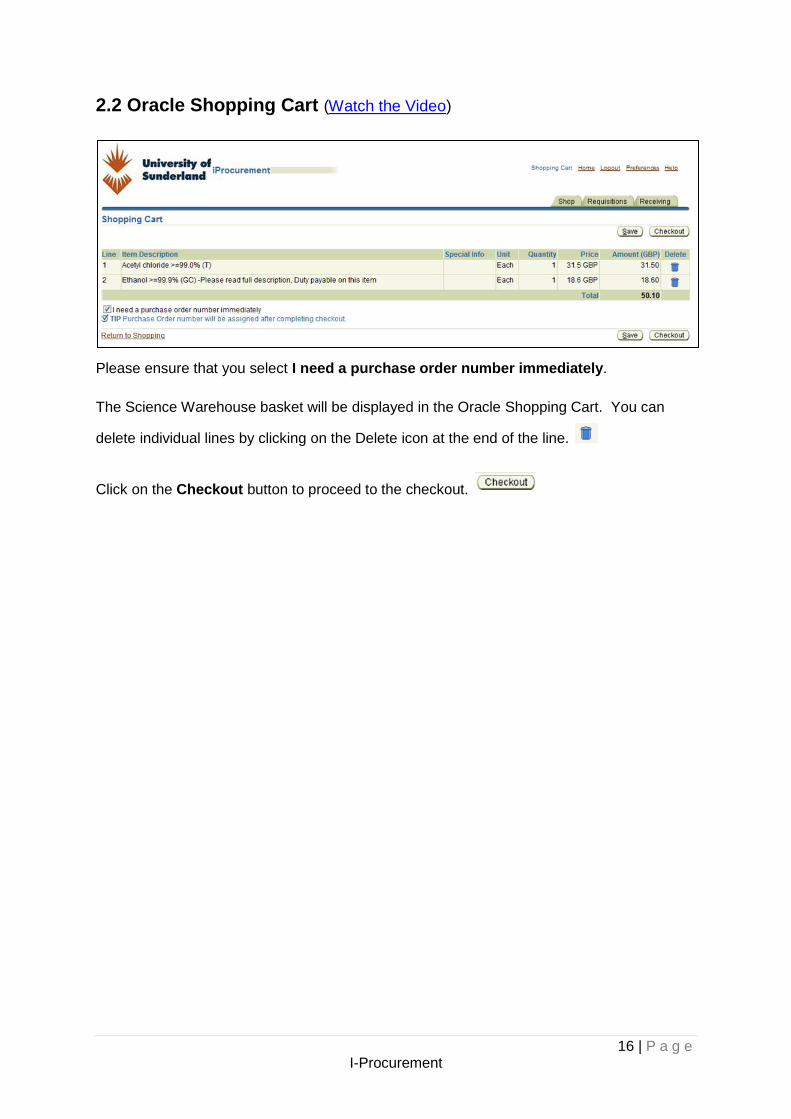
2.2 Oracle Shopping Cart (Watch the Video)
Please ensure that you select I need a purchase order number immediately.
The Science Warehouse basket will be displayed in the Oracle Shopping Cart. You can
delete individual lines by clicking on the Delete icon at the end of the line.
Click on the Checkout button to proceed to the checkout.

17 | P a g e I-Procurement
Checkout Requisition Information
Please enter the following details
Field Description
Requisition
Description
Enter a Description, this should be as descriptive as possible stating
the person’s name requesting the purchase as well as the purpose of
the Purchase. Note. This description is for use in the Finance
System only and is visible on the Purchase Order.
Need-By Date Select a Need-By Date, this will not only sent the date to the supplier
but send you an email to receipt. Click the calendar icon to select a
date. The email will be sent the morning after the date and will allow
you to receipt goods via email when they have been delivered. See
Email Receipting.
Delivered-to location Select the correct Delivered-to location for your facility or
service. There may be multiple locations for your faculty or
Service so select the one you wish the goods to be delivered to.
Use the torch icon to pick from a drop down list.
Buyer Enter a Buyer, you can copy and paste the name from the
Requester field.
Tax Code Enter the correct Tax Code. Please click the link below to see the
up to date tax code list. Warning: Science Warehouse will not
allow mixed Tax Codes.
Please read VAT Guide, VAT UK Codes, VAT Non UK Codes
18 | P a g e I-Procurement
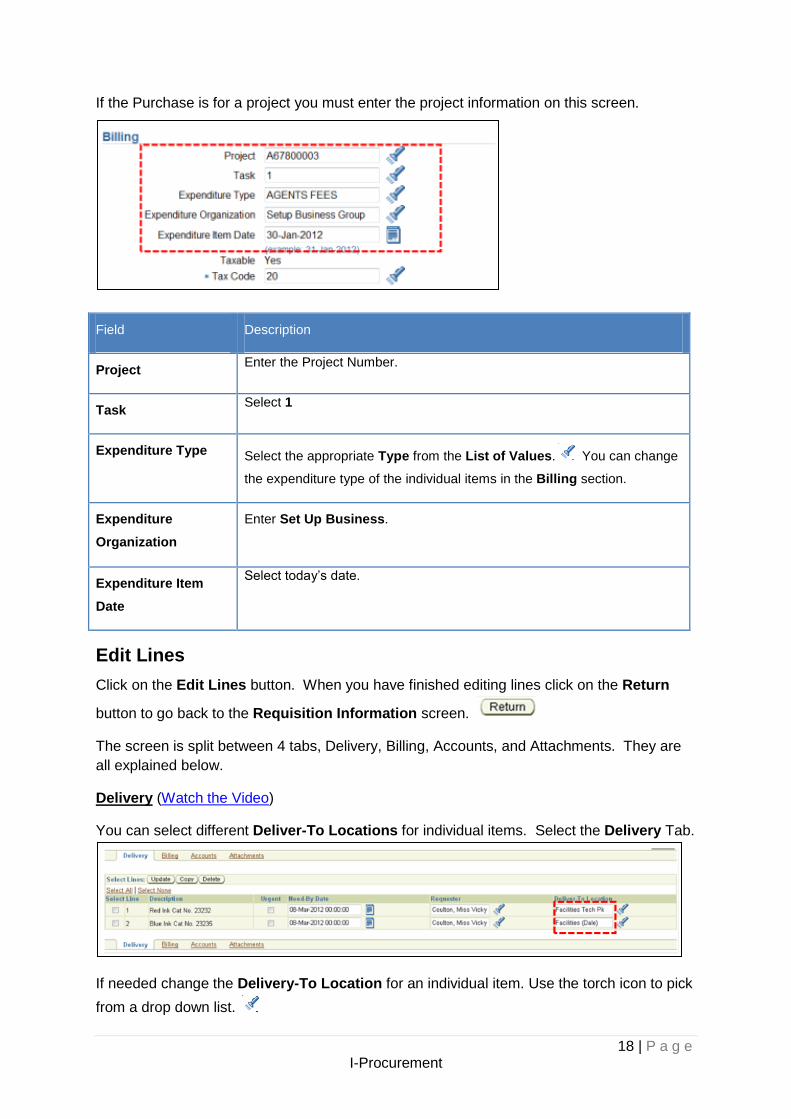
If the Purchase is for a project you must enter the project information on this screen.
Field Description
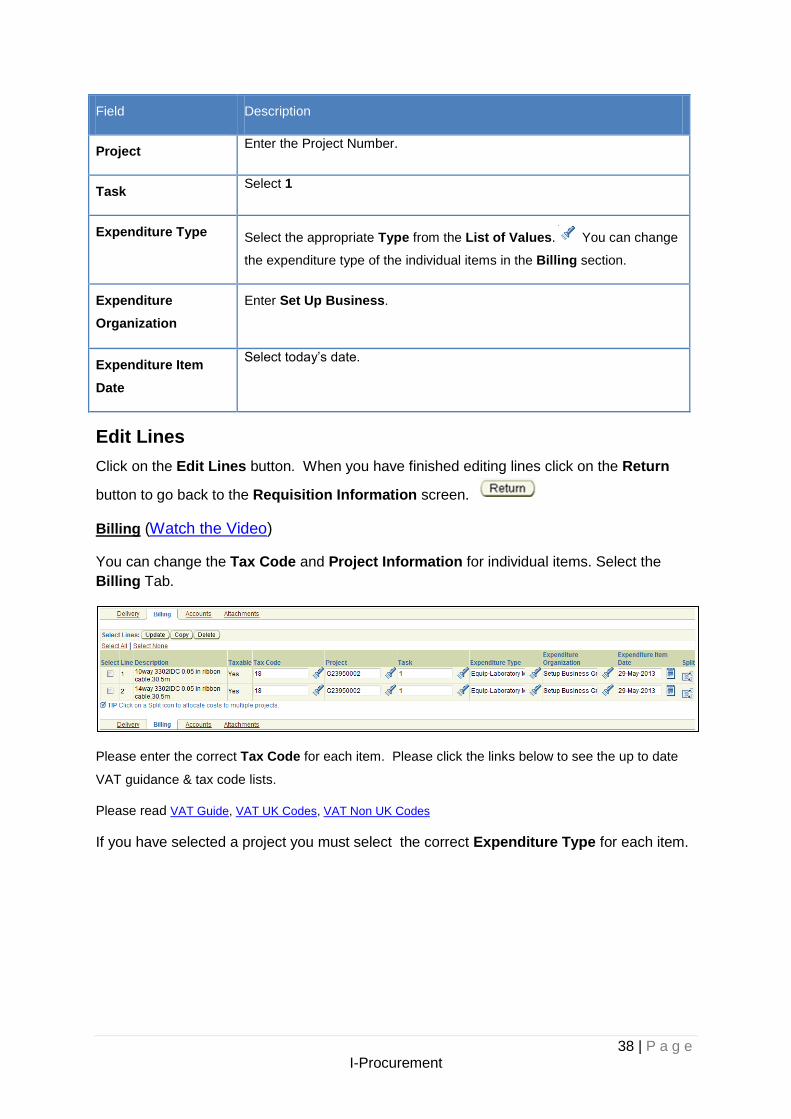
Project Enter the Project Number.
Task Select 1
Expenditure Type Select the appropriate Type from the List of Values. You can change
the expenditure type of the individual items in the Billing section.
Expenditure
Organization
Enter Set Up Business.
Expenditure Item
Date
Select today’s date.
Edit Lines
Click on the Edit Lines button. When you have finished editing lines click on the Return
button to go back to the Requisition Information screen.
The screen is split between 4 tabs, Delivery, Billing, Accounts, and Attachments. They are
all explained below.
Delivery (Watch the Video)
You can select different Deliver-To Locations for individual items. Select the Delivery Tab.
If needed change the Delivery-To Location for an individual item. Use the torch icon to pick
from a drop down list.
19 | P a g e I-Procurement
Billing (Watch the Video)
You can change the Tax Code and Project Information for individual items. Select the
Billing Tab.
Please enter the correct Tax Code for each item. Please click the link belows to see the up to date
VAT Guidance & tax code lists. Warning: Science Warehouse will not allow mixed Tax Codes.
If the goods you wish to purchase require different tax codes fill the basket with those items
all requiring the same tax code, checkout, then follow the process to complete the purchase.
Then go back to Science Warehouse and fill basket with the other items requiring the same
tax code, checkout,then follow the process to complete the purchase.
Please read VAT Guide, VAT UK Codes, VAT Non UK Codes
If you have selected a project you must select the correct Expenditure Type for each item.
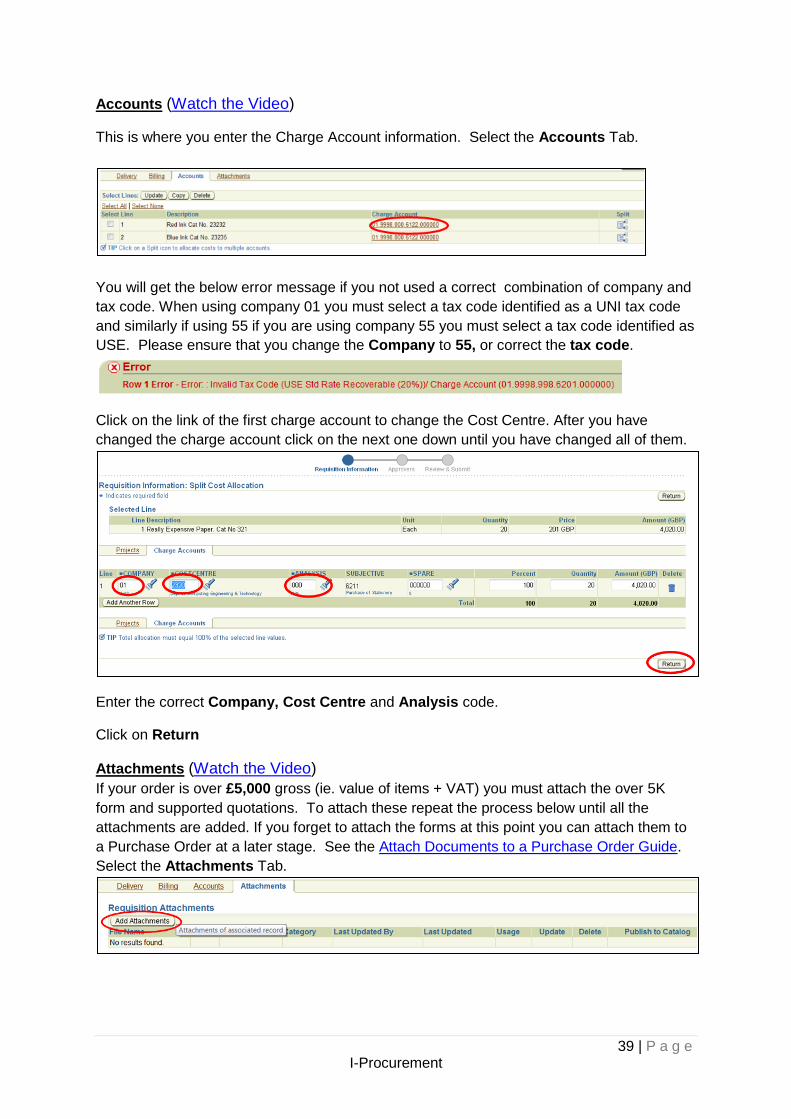
Accounts (Watch the Video)
This is where you enter the Charge Account information. Select the Accounts Tab.
You will get the below error message if you not used a correct combination of company and
tax code. When using company 01 you must select a tax code identified as a UNI tax code
and similarly if using 55 if you are using company 55 you must select a tax code identified as
USE. Please ensure that you change the Company to 55, or correct the tax code.
Click on the link of the first charge account to change the Cost Centre. After you have
changed the charge account click on the next one down until you have changed all of them.
20 | P a g e I-Procurement
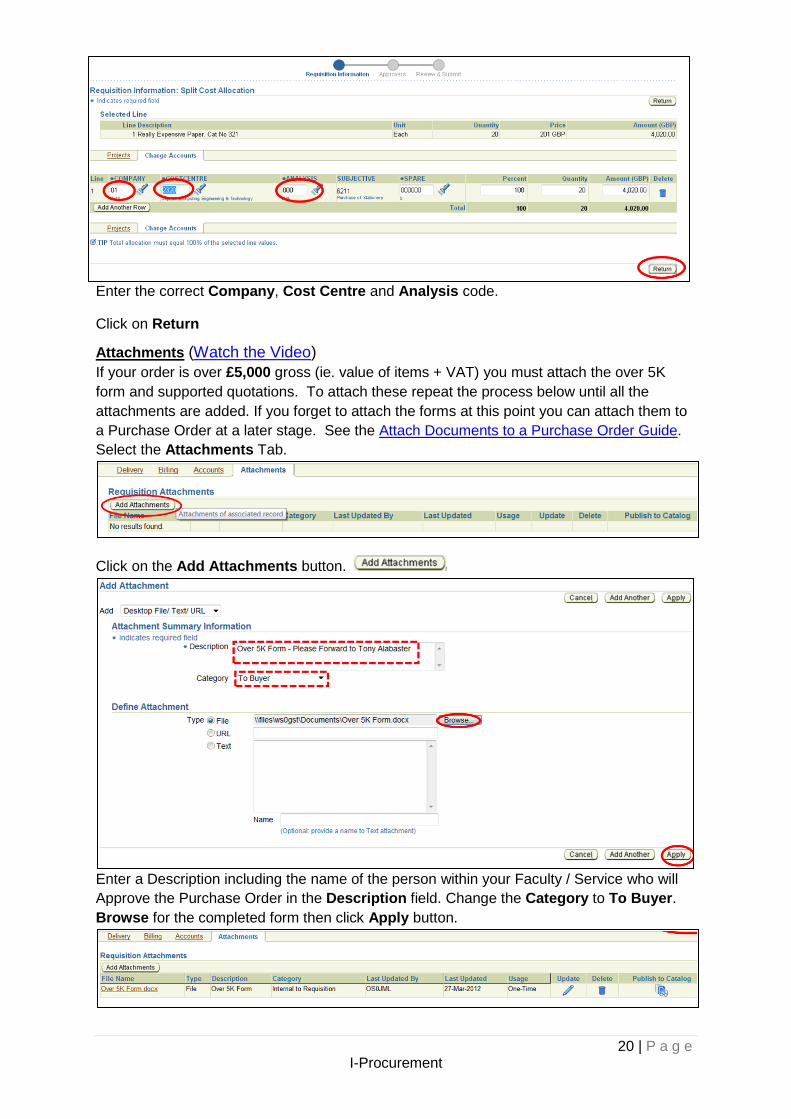
Enter the correct Company, Cost Centre and Analysis code.
Click on Return
Attachments (Watch the Video)
If your order is over £5,000 gross (ie. value of items + VAT) you must attach the over 5K
form and supported quotations. To attach these repeat the process below until all the
attachments are added. If you forget to attach the forms at this point you can attach them to
a Purchase Order at a later stage. See the Attach Documents to a Purchase Order Guide.
Select the Attachments Tab.
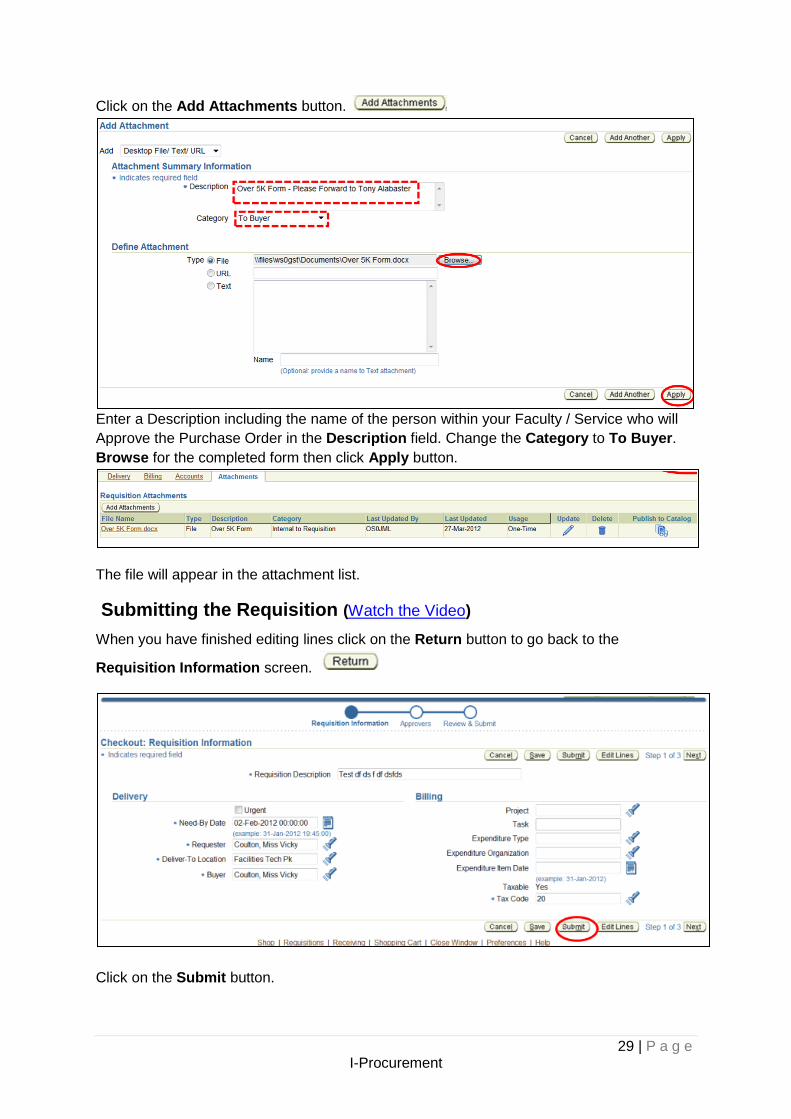
Click on the Add Attachments button.
Enter a Description including the name of the person within your Faculty / Service who will
Approve the Purchase Order in the Description field. Change the Category to To Buyer.
Browse for the completed form then click Apply button.
21 | P a g e I-Procurement
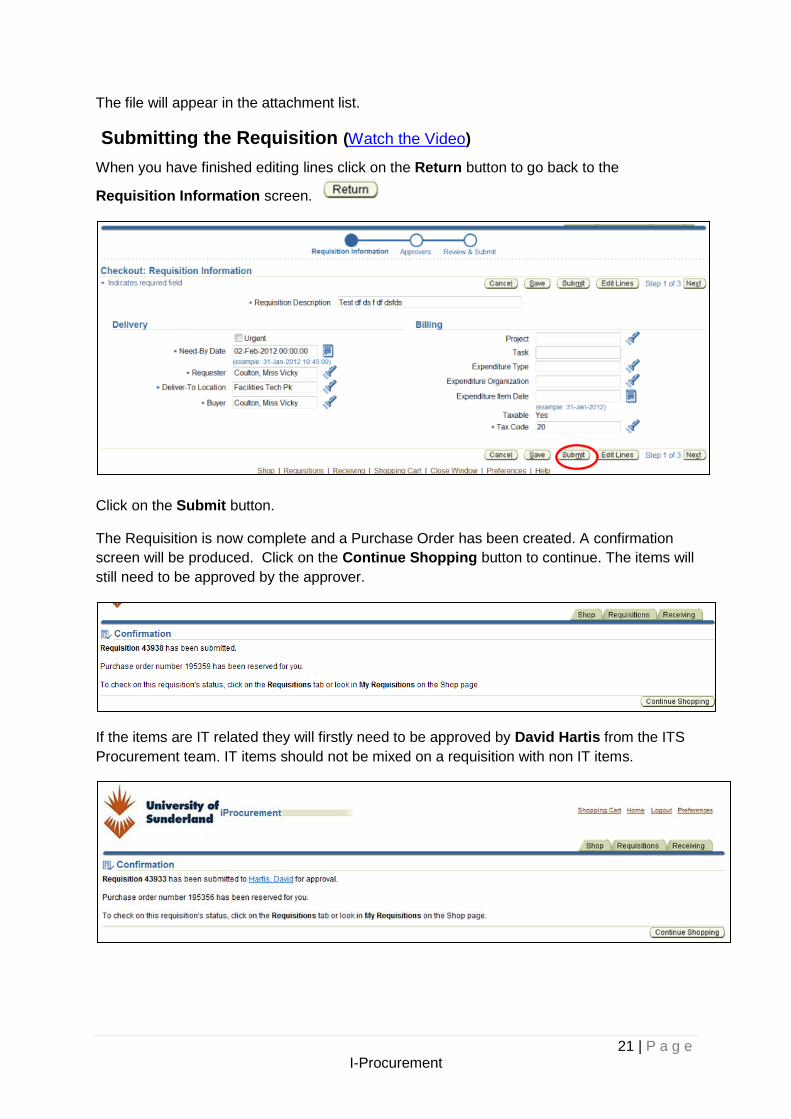
The file will appear in the attachment list.
Submitting the Requisition (Watch the Video)
When you have finished editing lines click on the Return button to go back to the
Requisition Information screen.
Click on the Submit button.
The Requisition is now complete and a Purchase Order has been created. A confirmation
screen will be produced. Click on the Continue Shopping button to continue. The items will
still need to be approved by the approver.
If the items are IT related they will firstly need to be approved by David Hartis from the ITS
Procurement team. IT items should not be mixed on a requisition with non IT items.
22 | P a g e I-Procurement
2.3 What happens next to the purchase order?
The Purchase Order will be forwarded to the line manager or budget holder for approval.
After approval the finance system will immediately send the purchase order to the supplier
via Science Warehouse. Note if your order is for £5000 (inc VAT) or over it will be
retained by Purchasing (pending approval), until a completed ‘Over £5000 Form and
relevant quotes’ are electronically attached, or the supplier is on the approved
dispensation list for your Faculty/Service. Purchasing will then check the over £5000
order and relevant paperwork, and either reject / return the order to buyer for further
information, or if fully approved will be then forwarded on by Purchasing to the relevant
approver, once approved it will be sent out by Science Warehouse.
If you need to change the supplier the purchase order will need to be cancelled. To cancel a
purchase order contact :[email protected]
23 | P a g e I-Procurement
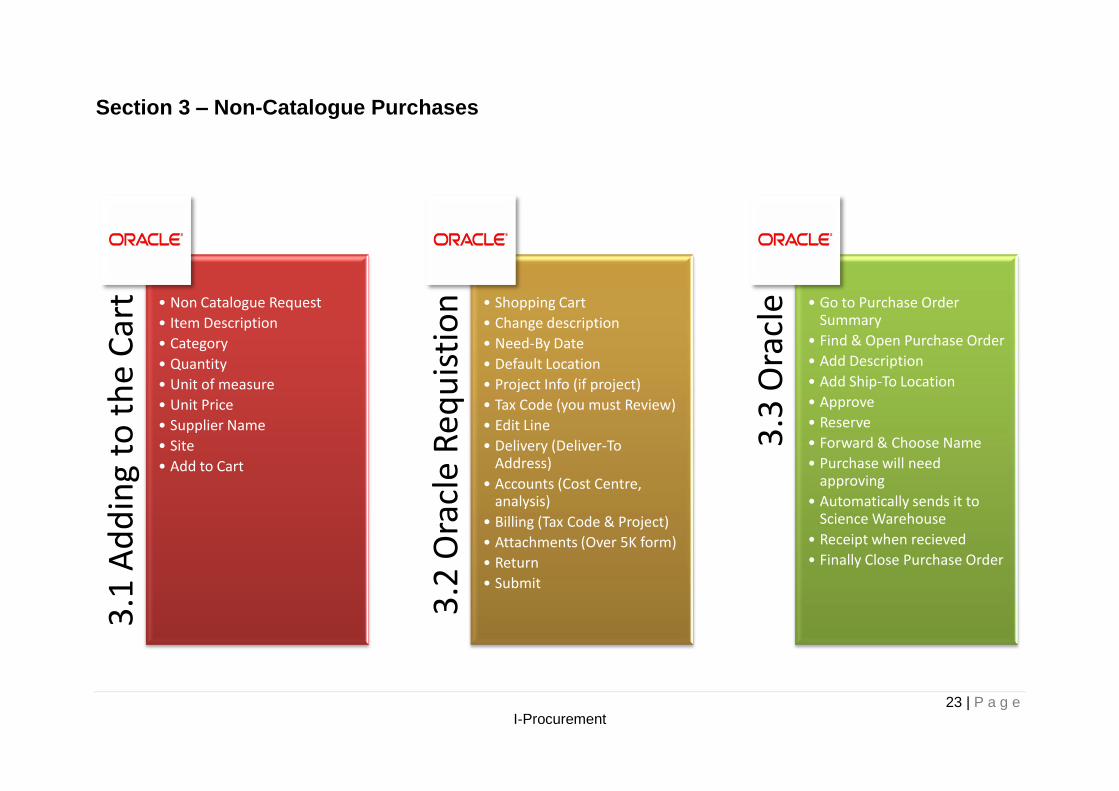
Section 3 – Non-Catalogue Purchases
3.1
Ad
din
g to
th
e C
art • Non Catalogue Request
• Item Description
• Category
• Quantity
• Unit of measure
• Unit Price
• Supplier Name
• Site
• Add to Cart 3
.2 O
racl
e R
equ
isti
on
• Shopping Cart
• Change description
• Need-By Date
• Default Location
• Project Info (if project)
• Tax Code (you must Review)
• Edit Line
• Delivery (Deliver-To Address)
• Accounts (Cost Centre, analysis)
• Billing (Tax Code & Project)
• Attachments (Over 5K form)
• Return
• Submit
3.3
Ora
cle • Go to Purchase Order
Summary
• Find & Open Purchase Order
• Add Description
• Add Ship-To Location
• Approve
• Reserve
• Forward & Choose Name
• Purchase will need approving
• Automatically sends it to Science Warehouse
• Receipt when recieved
• Finally Close Purchase Order
24 | P a g e I-Procurement
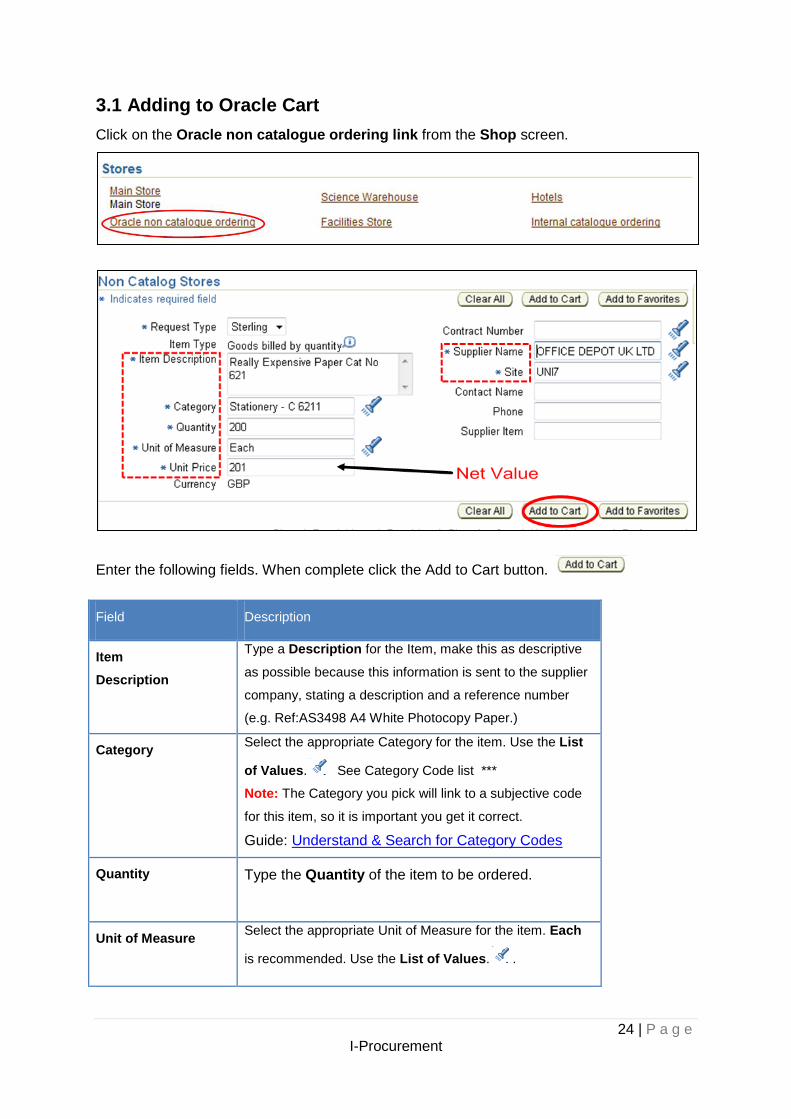
3.1 Adding to Oracle Cart
Click on the Oracle non catalogue ordering link from the Shop screen.
Enter the following fields. When complete click the Add to Cart button.
Field Description
Item
Description
Type a Description for the Item, make this as descriptive
as possible because this information is sent to the supplier
company, stating a description and a reference number
(e.g. Ref:AS3498 A4 White Photocopy Paper.)
Category Select the appropriate Category for the item. Use the List
of Values. See Category Code list ***
Note: The Category you pick will link to a subjective code
for this item, so it is important you get it correct.
Guide: Understand & Search for Category Codes
Quantity Type the Quantity of the item to be ordered.
Unit of Measure Select the appropriate Unit of Measure for the item. Each
is recommended. Use the List of Values. .

25 | P a g e I-Procurement
Unit Price Type in the unit price for the item.
Note: The price must be net VAT
Supplier / Site Select the correct Suppler & Site for the item. Use the List
of Values. Warning: Please ensure that you pick the
correct Site. If it is a purchase for UNI pick the UNI site, if
it is for USE pick the USE site
When complete click the Add to Cart button.
The item will be added to the Shopping Cart on the right
hand side of the screen. The last Item you typed in will
stay on the screen. You can either amend the details or
click on the Clear All button to empty the screen.
When you have put all your items into the Cart, click on the View Cart and Checkout button
in the Shopping Cart.
3.2 Oracle Shopping Cart Checkout
Please ensure that you select I need a purchase order number immediately. If you forget
to select this you will need to Autocreate a Purchase Order .
The Oracle Shopping Cart will be displayed. You can amend the Quantity values and
delete individual lines by clicking on the Delete icon at the end of the line.
Click on the Checkout button to proceed to the checkout.
26 | P a g e I-Procurement
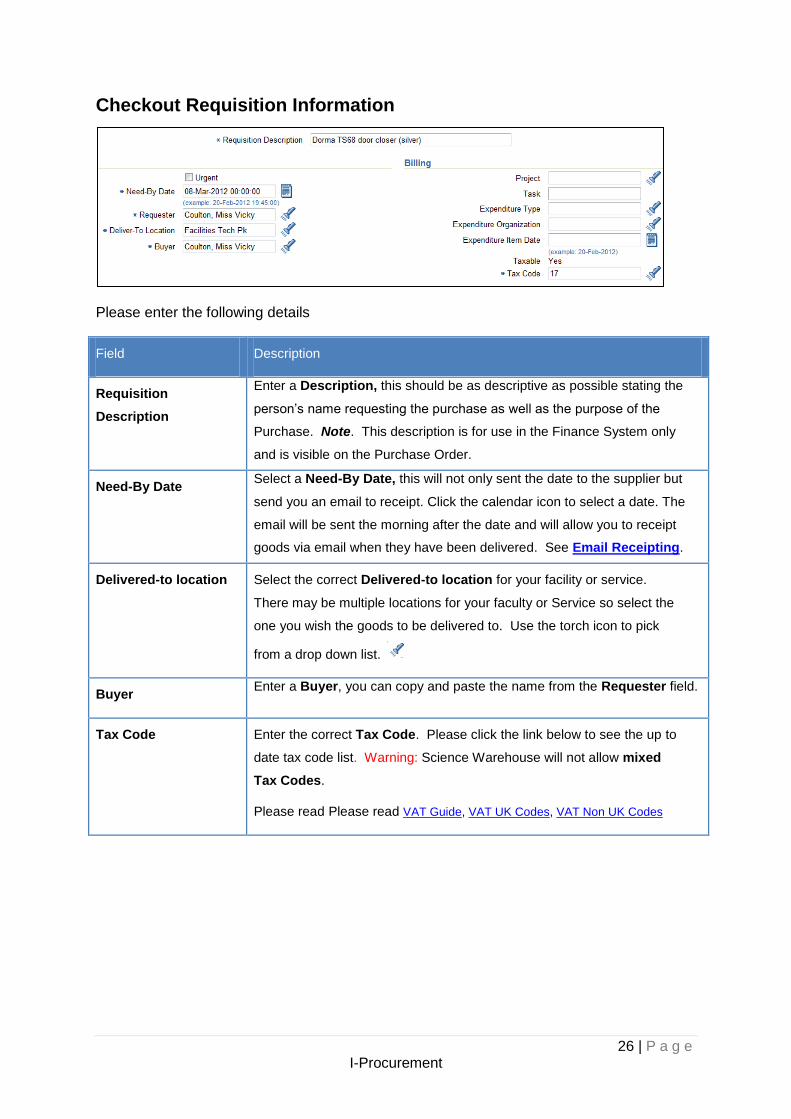
Checkout Requisition Information
Please enter the following details
Field Description
Requisition
Description
Enter a Description, this should be as descriptive as possible stating the
person’s name requesting the purchase as well as the purpose of the
Purchase. Note. This description is for use in the Finance System only
and is visible on the Purchase Order.
Need-By Date Select a Need-By Date, this will not only sent the date to the supplier but
send you an email to receipt. Click the calendar icon to select a date. The
email will be sent the morning after the date and will allow you to receipt
goods via email when they have been delivered. See Email Receipting.
Delivered-to location Select the correct Delivered-to location for your facility or service.
There may be multiple locations for your faculty or Service so select the
one you wish the goods to be delivered to. Use the torch icon to pick
from a drop down list.
Buyer Enter a Buyer, you can copy and paste the name from the Requester field.
Tax Code Enter the correct Tax Code. Please click the link below to see the up to
date tax code list. Warning: Science Warehouse will not allow mixed
Tax Codes.
Please read Please read VAT Guide, VAT UK Codes, VAT Non UK Codes
27 | P a g e I-Procurement
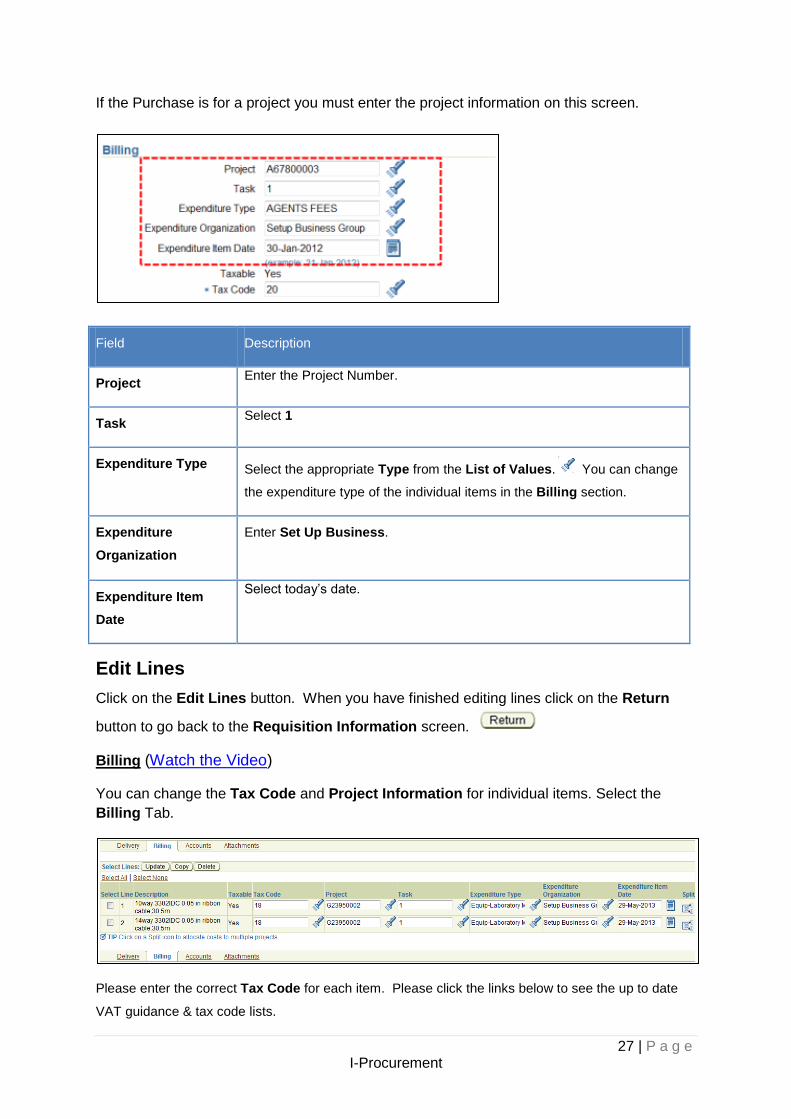
If the Purchase is for a project you must enter the project information on this screen.
Field Description
Project Enter the Project Number.
Task Select 1
Expenditure Type Select the appropriate Type from the List of Values. You can change
the expenditure type of the individual items in the Billing section.
Expenditure
Organization
Enter Set Up Business.
Expenditure Item
Date
Select today’s date.
Edit Lines
Click on the Edit Lines button. When you have finished editing lines click on the Return
button to go back to the Requisition Information screen.
Billing (Watch the Video)
You can change the Tax Code and Project Information for individual items. Select the
Billing Tab.
Please enter the correct Tax Code for each item. Please click the links below to see the up to date
VAT guidance & tax code lists.
28 | P a g e I-Procurement
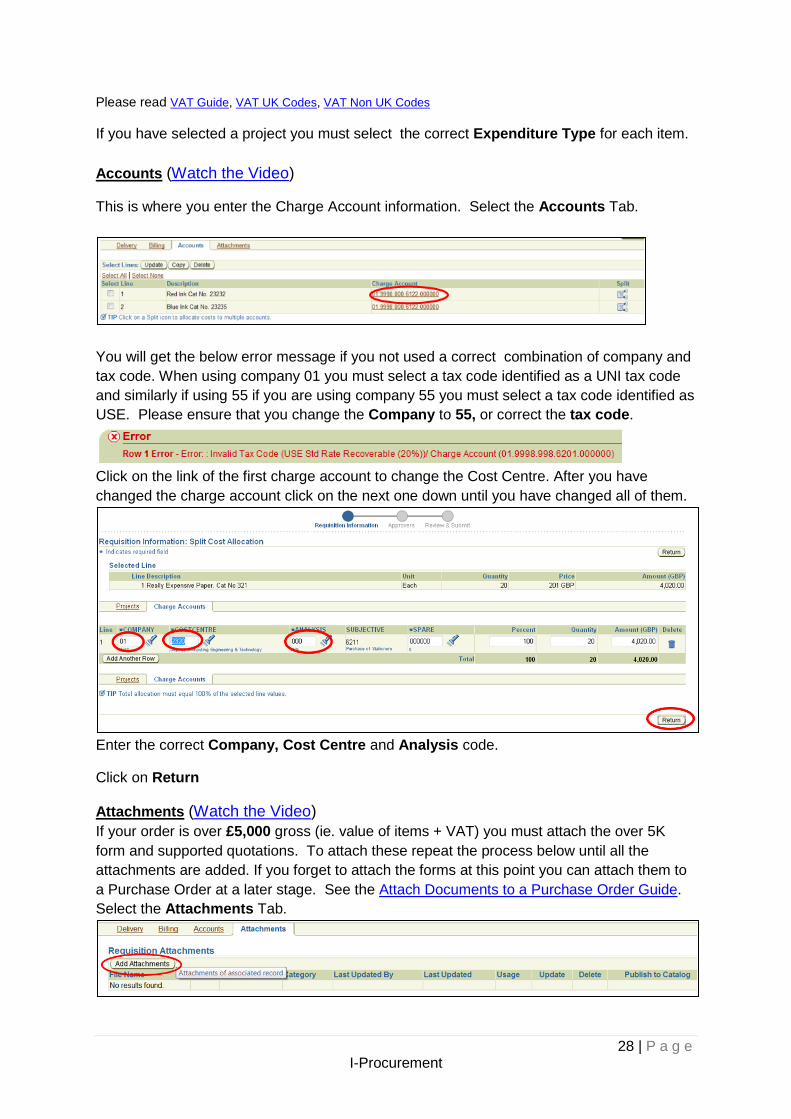
Please read VAT Guide, VAT UK Codes, VAT Non UK Codes
If you have selected a project you must select the correct Expenditure Type for each item.
Accounts (Watch the Video)
This is where you enter the Charge Account information. Select the Accounts Tab.
You will get the below error message if you not used a correct combination of company and
tax code. When using company 01 you must select a tax code identified as a UNI tax code
and similarly if using 55 if you are using company 55 you must select a tax code identified as
USE. Please ensure that you change the Company to 55, or correct the tax code.
Click on the link of the first charge account to change the Cost Centre. After you have
changed the charge account click on the next one down until you have changed all of them.
Enter the correct Company, Cost Centre and Analysis code.
Click on Return
Attachments (Watch the Video)
If your order is over £5,000 gross (ie. value of items + VAT) you must attach the over 5K
form and supported quotations. To attach these repeat the process below until all the
attachments are added. If you forget to attach the forms at this point you can attach them to
a Purchase Order at a later stage. See the Attach Documents to a Purchase Order Guide.
Select the Attachments Tab.
29 | P a g e I-Procurement
Click on the Add Attachments button.
Enter a Description including the name of the person within your Faculty / Service who will
Approve the Purchase Order in the Description field. Change the Category to To Buyer.
Browse for the completed form then click Apply button.
The file will appear in the attachment list.
Submitting the Requisition (Watch the Video)
When you have finished editing lines click on the Return button to go back to the
Requisition Information screen.
Click on the Submit button.

30 | P a g e I-Procurement
The Requisition is now complete and a Purchase Order has been created. A confirmation
screen will be produced. Click on the Continue Shopping button to continue. The items will
still need to be approved by the approver.
If the items are IT related they will firstly need to be approved by David Hartis from the ITS
Procurement team. IT items should not be mixed on a requisition with non IT items.
3.3 Completing the Purchase Order
You need to complete the Purchase Order, you can do this via the Purchase Order
Summary screen.
If you forgot to select I need a purchase order number immediately earlier you will need
to Autocreate a Purchase Order.
To go the Shop screen and click on the Home
link on the top right of the page.
Then select Purchase Order
Summary from the P & T Admin
menu.
31 | P a g e I-Procurement
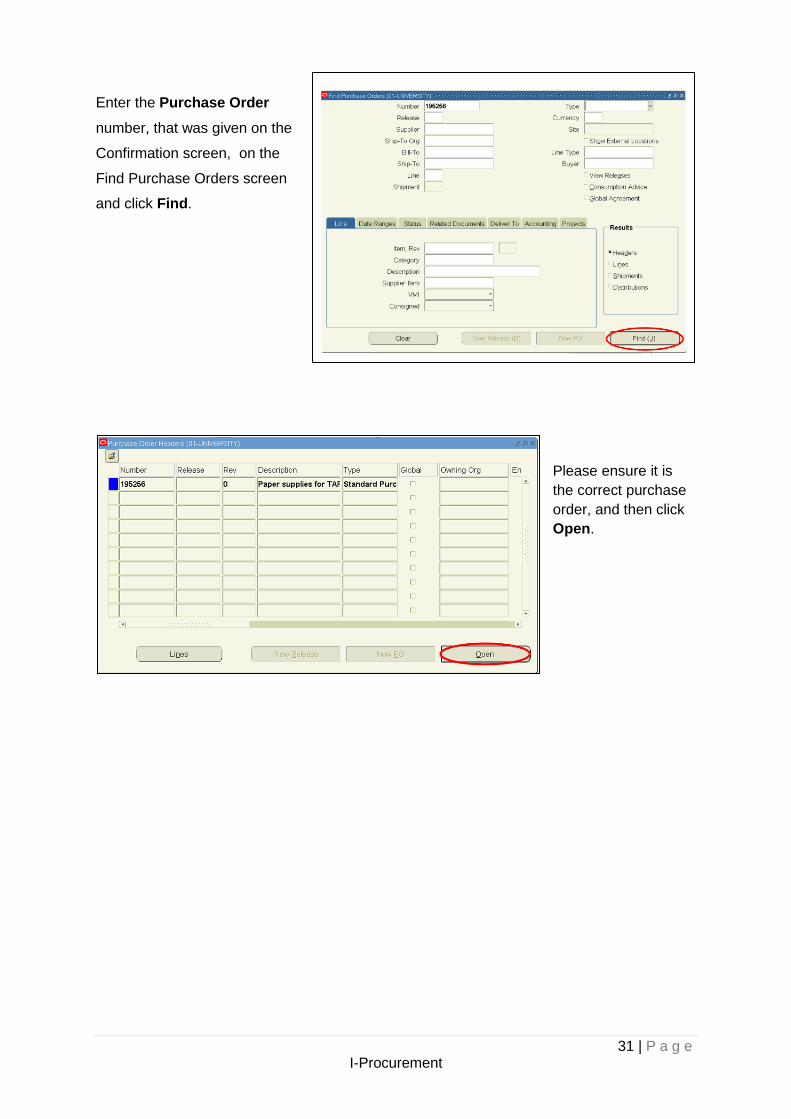
Enter the Purchase Order
number, that was given on the
Confirmation screen, on the
Find Purchase Orders screen
and click Find.
Please ensure it is
the correct purchase
order, and then click
Open.
32 | P a g e I-Procurement
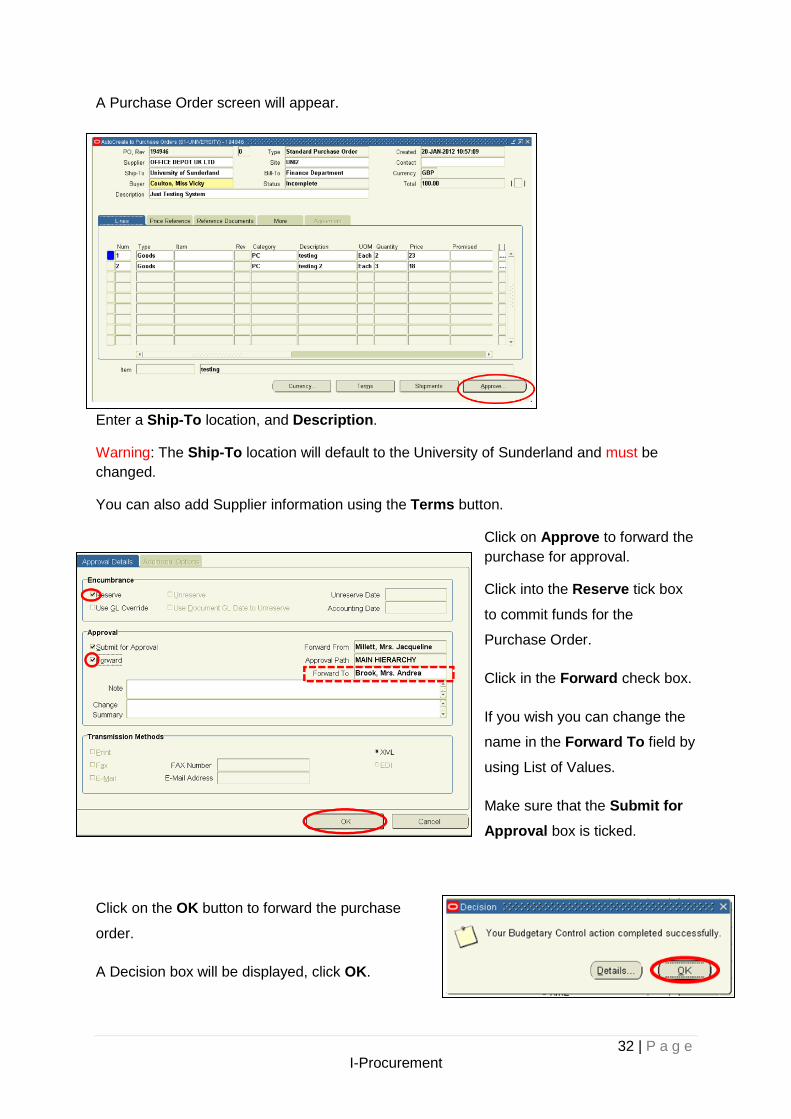
A Purchase Order screen will appear.
Enter a Ship-To location, and Description.
Warning: The Ship-To location will default to the University of Sunderland and must be
changed.
You can also add Supplier information using the Terms button.
Click on Approve to forward the
purchase for approval.
Click into the Reserve tick box
to commit funds for the
Purchase Order.
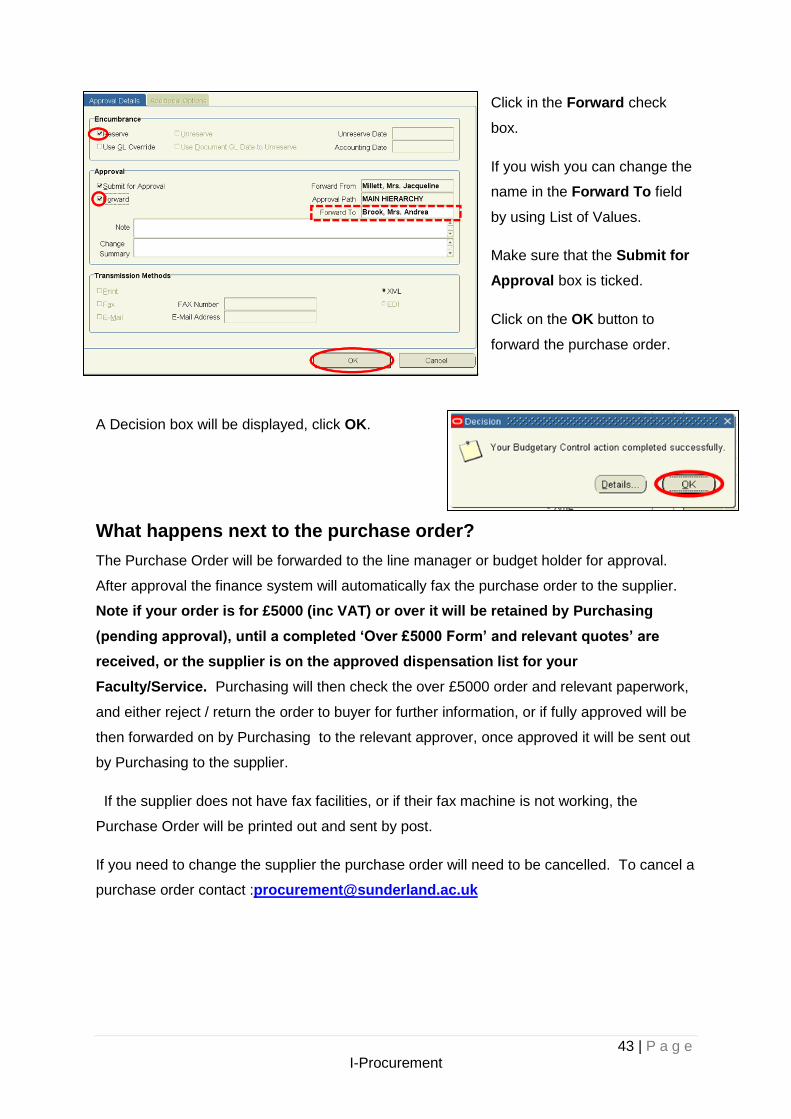
Click in the Forward check box.
If you wish you can change the
name in the Forward To field by
using List of Values.
Make sure that the Submit for
Approval box is ticked.
Click on the OK button to forward the purchase
order.
A Decision box will be displayed, click OK.
33 | P a g e I-Procurement
What happens next to the purchase order?
The Purchase Order will be forwarded to the line manager or budget holder for approval.
After approval the finance system will automatically fax the purchase order to the supplier.
Note if your order is for £5000 (inc VAT) or over it will be retained by Purchasing
(pending approval), until a completed ‘Over £5000 Form’ and relevant quotes’ are
received, or the supplier is on the approved dispensation list for your
Faculty/Service. Purchasing will then check the over £5000 order and relevant paperwork,
and either reject / return the order to buyer for further information, or if fully approved will be
then forwarded on by Purchasing to the relevant approver, once approved it will be sent out
by Purchasing to the supplier.
If the supplier does not have fax facilities, or if their fax machine is not working, the
Purchase Order will be printed out and sent by post.
If you need to change the supplier the purchase order will need to be cancelled. To cancel a
purchase order contact :[email protected]
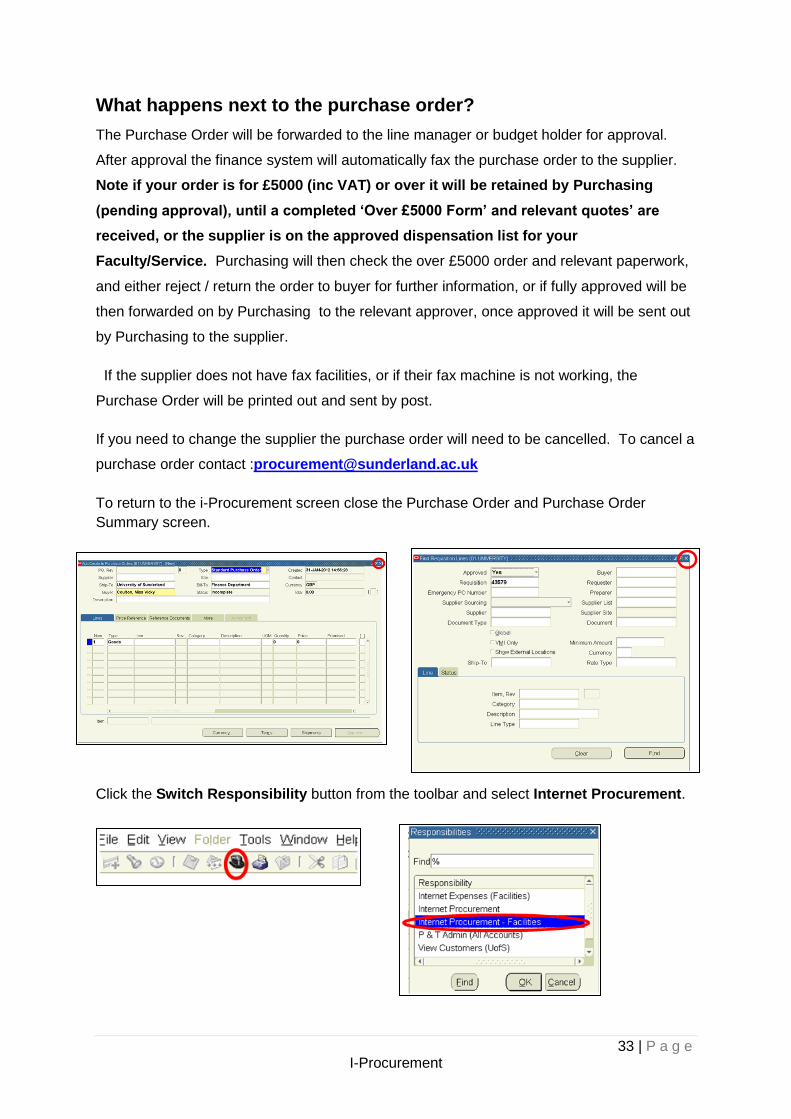
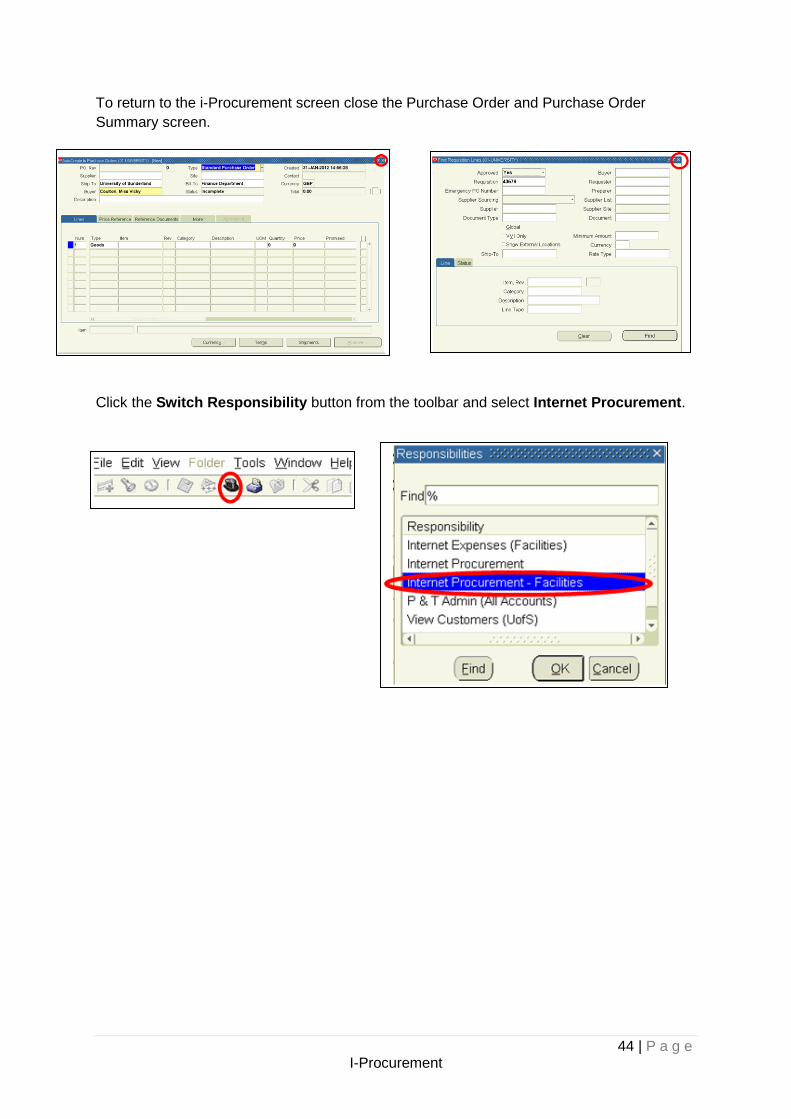
To return to the i-Procurement screen close the Purchase Order and Purchase Order
Summary screen.
Click the Switch Responsibility button from the toolbar and select Internet Procurement.
34 | P a g e I-Procurement
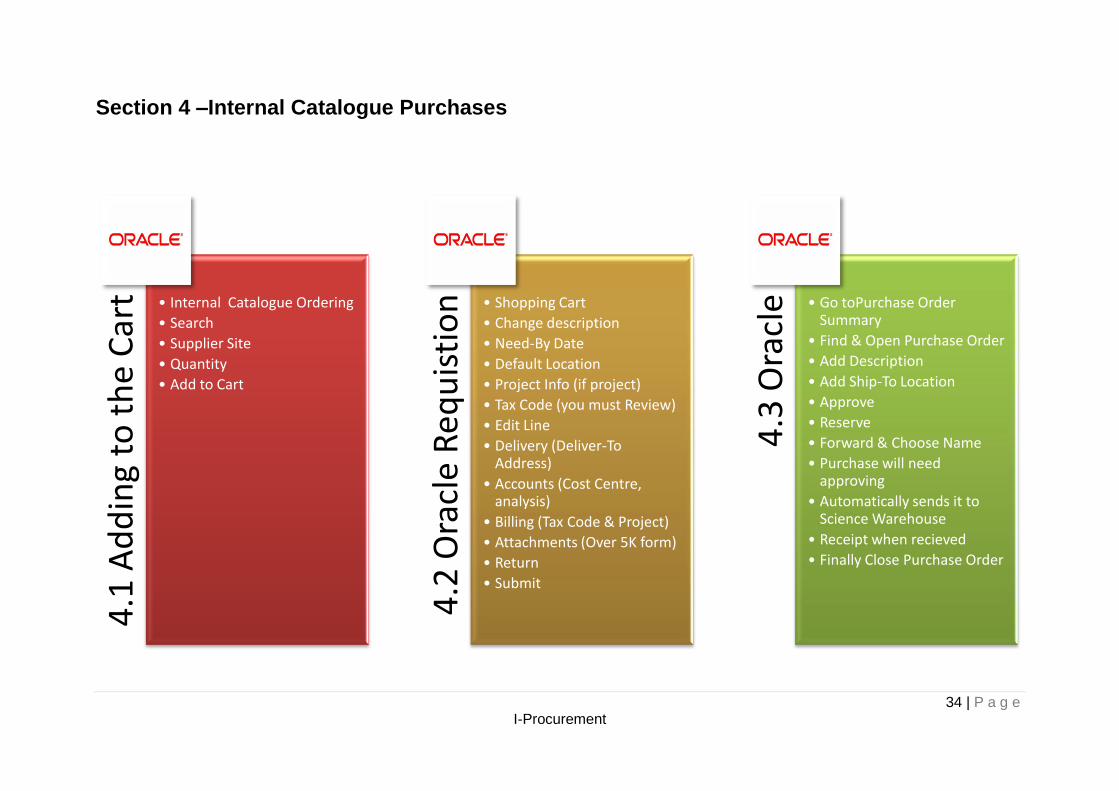
Section 4 –Internal Catalogue Purchases
4.1
Ad
din
g to
th
e C
art • Internal Catalogue Ordering
• Search
• Supplier Site
• Quantity
• Add to Cart
4.2
Ora
cle
Req
uis
tio
n
• Shopping Cart
• Change description
• Need-By Date
• Default Location
• Project Info (if project)
• Tax Code (you must Review)
• Edit Line
• Delivery (Deliver-To Address)
• Accounts (Cost Centre, analysis)
• Billing (Tax Code & Project)
• Attachments (Over 5K form)
• Return
• Submit
4.3
Ora
cle • Go toPurchase Order
Summary
• Find & Open Purchase Order
• Add Description
• Add Ship-To Location
• Approve
• Reserve
• Forward & Choose Name
• Purchase will need approving
• Automatically sends it to Science Warehouse
• Receipt when recieved
• Finally Close Purchase Order
35 | P a g e I-Procurement
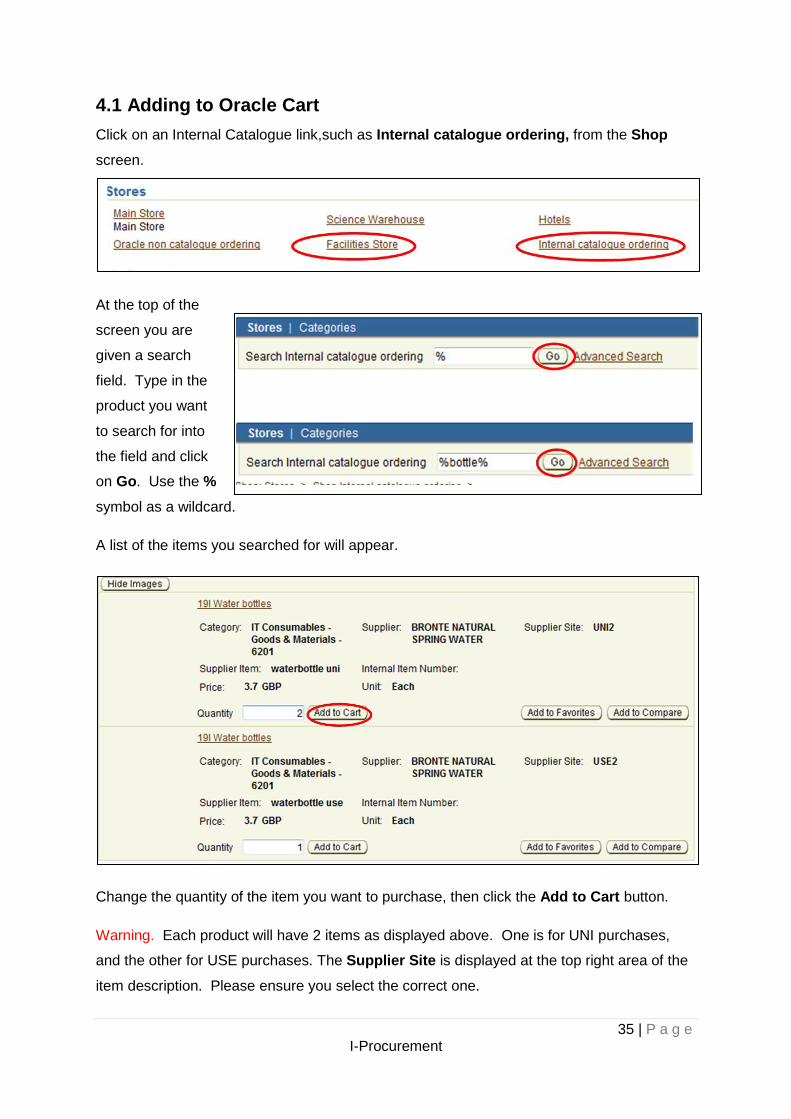
4.1 Adding to Oracle Cart
Click on an Internal Catalogue link,such as Internal catalogue ordering, from the Shop
screen.
At the top of the
screen you are
given a search
field. Type in the
product you want
to search for into
the field and click
on Go. Use the %
symbol as a wildcard.
A list of the items you searched for will appear.
Change the quantity of the item you want to purchase, then click the Add to Cart button.
Warning. Each product will have 2 items as displayed above. One is for UNI purchases,
and the other for USE purchases. The Supplier Site is displayed at the top right area of the
item description. Please ensure you select the correct one.
36 | P a g e I-Procurement
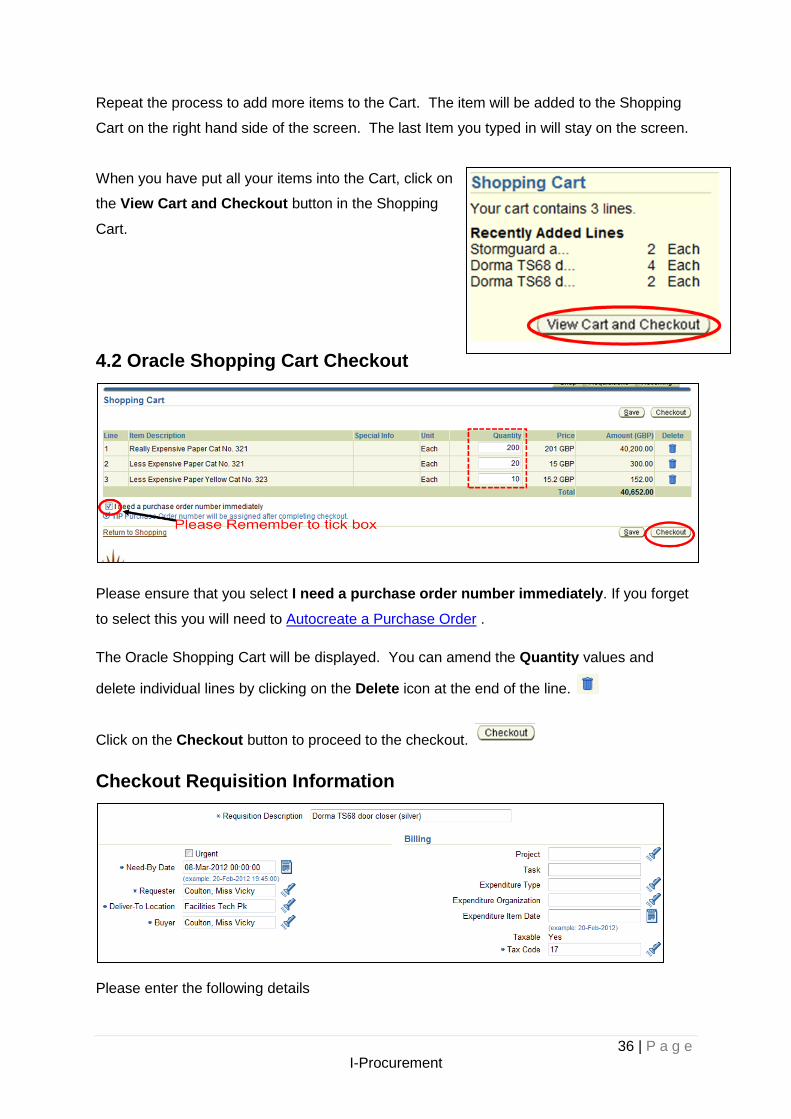
Repeat the process to add more items to the Cart. The item will be added to the Shopping
Cart on the right hand side of the screen. The last Item you typed in will stay on the screen.
When you have put all your items into the Cart, click on
the View Cart and Checkout button in the Shopping
Cart.
4.2 Oracle Shopping Cart Checkout
Please ensure that you select I need a purchase order number immediately. If you forget
to select this you will need to Autocreate a Purchase Order .
The Oracle Shopping Cart will be displayed. You can amend the Quantity values and
delete individual lines by clicking on the Delete icon at the end of the line.
Click on the Checkout button to proceed to the checkout.
Checkout Requisition Information
Please enter the following details
37 | P a g e I-Procurement
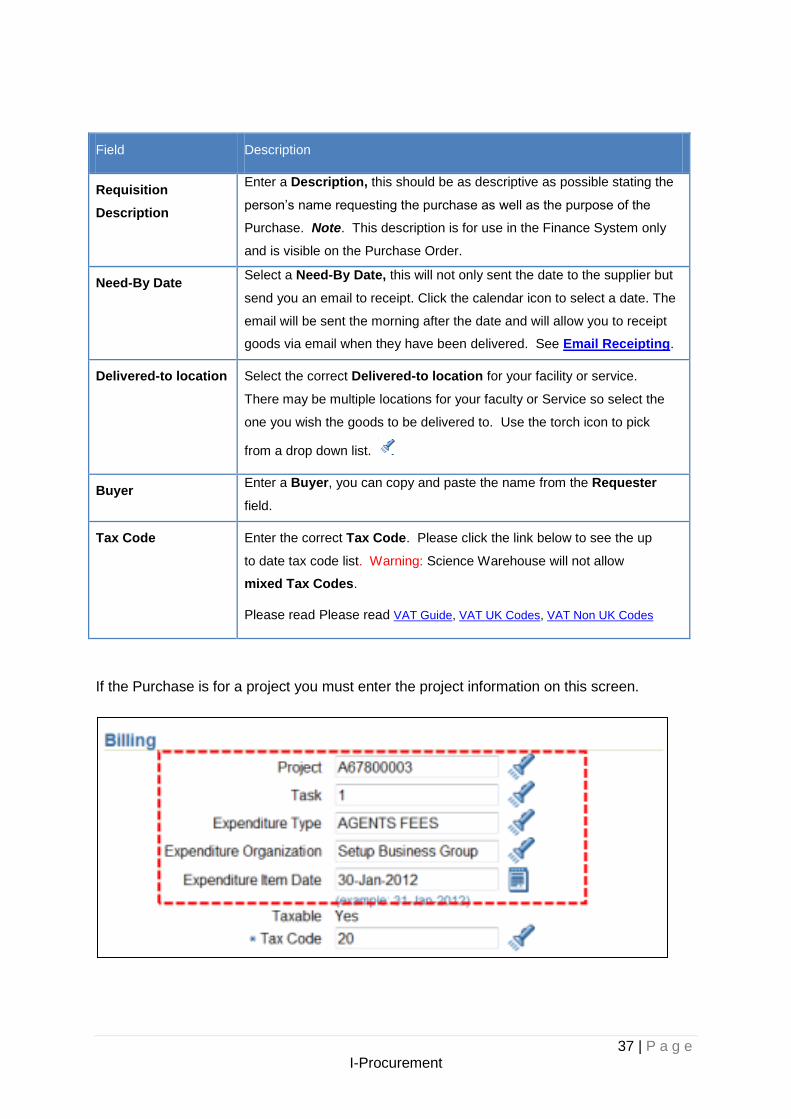
Field Description
Requisition
Description
Enter a Description, this should be as descriptive as possible stating the
person’s name requesting the purchase as well as the purpose of the
Purchase. Note. This description is for use in the Finance System only
and is visible on the Purchase Order.
Need-By Date Select a Need-By Date, this will not only sent the date to the supplier but
send you an email to receipt. Click the calendar icon to select a date. The
email will be sent the morning after the date and will allow you to receipt
goods via email when they have been delivered. See Email Receipting.
Delivered-to location Select the correct Delivered-to location for your facility or service.
There may be multiple locations for your faculty or Service so select the
one you wish the goods to be delivered to. Use the torch icon to pick
from a drop down list.
Buyer Enter a Buyer, you can copy and paste the name from the Requester
field.
Tax Code Enter the correct Tax Code. Please click the link below to see the up
to date tax code list. Warning: Science Warehouse will not allow
mixed Tax Codes.
Please read Please read VAT Guide, VAT UK Codes, VAT Non UK Codes
If the Purchase is for a project you must enter the project information on this screen.
38 | P a g e I-Procurement
Field Description
Project Enter the Project Number.
Task Select 1
Expenditure Type Select the appropriate Type from the List of Values. You can change
the expenditure type of the individual items in the Billing section.
Expenditure
Organization
Enter Set Up Business.
Expenditure Item
Date
Select today’s date.
Edit Lines
Click on the Edit Lines button. When you have finished editing lines click on the Return
button to go back to the Requisition Information screen.
Billing (Watch the Video)
You can change the Tax Code and Project Information for individual items. Select the
Billing Tab.
Please enter the correct Tax Code for each item. Please click the links below to see the up to date
VAT guidance & tax code lists.
Please read VAT Guide, VAT UK Codes, VAT Non UK Codes
If you have selected a project you must select the correct Expenditure Type for each item.
39 | P a g e I-Procurement
Accounts (Watch the Video)
This is where you enter the Charge Account information. Select the Accounts Tab.
You will get the below error message if you not used a correct combination of company and
tax code. When using company 01 you must select a tax code identified as a UNI tax code
and similarly if using 55 if you are using company 55 you must select a tax code identified as
USE. Please ensure that you change the Company to 55, or correct the tax code.
Click on the link of the first charge account to change the Cost Centre. After you have
changed the charge account click on the next one down until you have changed all of them.
Enter the correct Company, Cost Centre and Analysis code.
Click on Return
Attachments (Watch the Video)
If your order is over £5,000 gross (ie. value of items + VAT) you must attach the over 5K
form and supported quotations. To attach these repeat the process below until all the
attachments are added. If you forget to attach the forms at this point you can attach them to
a Purchase Order at a later stage. See the Attach Documents to a Purchase Order Guide.
Select the Attachments Tab.

40 | P a g e I-Procurement
Click on the Add Attachments button.
Enter a Description including the name of the person within your Faculty / Service who will
Approve the Purchase Order in the Description field. Change the Category to To Buyer.
Browse for the completed form then click Apply button.
The file will appear in the attachment list.
Submitting the Requisition (Watch the Video)
When you have finished editing lines click on the Return button to go back to the
Requisition Information screen.
Click on the Submit button.

41 | P a g e I-Procurement
The Requisition is now complete and a Purchase Order has been created. A confirmation
screen will be produced. Click on the Continue Shopping button to continue. The items will
still need to be approved by the approver.
If the items are IT related they will firstly need to be approved by David Hartis from the ITS
Procurement team. IT items should not be mixed on a requisition with non IT items.
4.3 Completing the Purchase Order
You need to complete the Purchase Order, you can do this via the Purchase Order
Summary screen.
If you forgot to select I need a purchase order number immediately earlier you will need
to Autocreate a Purchase Order.
To go the Shop screen and click on the Home
link on the top right of the page.
Then select Purchase Order
Summary from the P & T Admin
menu.

42 | P a g e I-Procurement
Enter the Purchase Order number,
that was given on the Confirmation
screen, on the Find Purchase
Orders screen and click Find.
Please ensure it is
the correct purchase
order, and then click
Open.
A Purchase Order screen will appear.
Enter a Ship-To location, and
Description.
Warning: The Ship-To location
will default to the University of
Sunderland and must be
changed.
You can also add Supplier
information using the Terms
button.
Click on Approve to forward the purchase for approval.
Click into the Reserve tick box to commit funds for the Purchase Order.
43 | P a g e I-Procurement
Click in the Forward check
box.
If you wish you can change the
name in the Forward To field
by using List of Values.
Make sure that the Submit for
Approval box is ticked.
Click on the OK button to
forward the purchase order.
A Decision box will be displayed, click OK.
What happens next to the purchase order?
The Purchase Order will be forwarded to the line manager or budget holder for approval.
After approval the finance system will automatically fax the purchase order to the supplier.
Note if your order is for £5000 (inc VAT) or over it will be retained by Purchasing
(pending approval), until a completed ‘Over £5000 Form’ and relevant quotes’ are
received, or the supplier is on the approved dispensation list for your
Faculty/Service. Purchasing will then check the over £5000 order and relevant paperwork,
and either reject / return the order to buyer for further information, or if fully approved will be
then forwarded on by Purchasing to the relevant approver, once approved it will be sent out
by Purchasing to the supplier.
If the supplier does not have fax facilities, or if their fax machine is not working, the
Purchase Order will be printed out and sent by post.
If you need to change the supplier the purchase order will need to be cancelled. To cancel a
purchase order contact :[email protected]
44 | P a g e I-Procurement
To return to the i-Procurement screen close the Purchase Order and Purchase Order
Summary screen.
Click the Switch Responsibility button from the toolbar and select Internet Procurement.
45 | P a g e I-Procurement
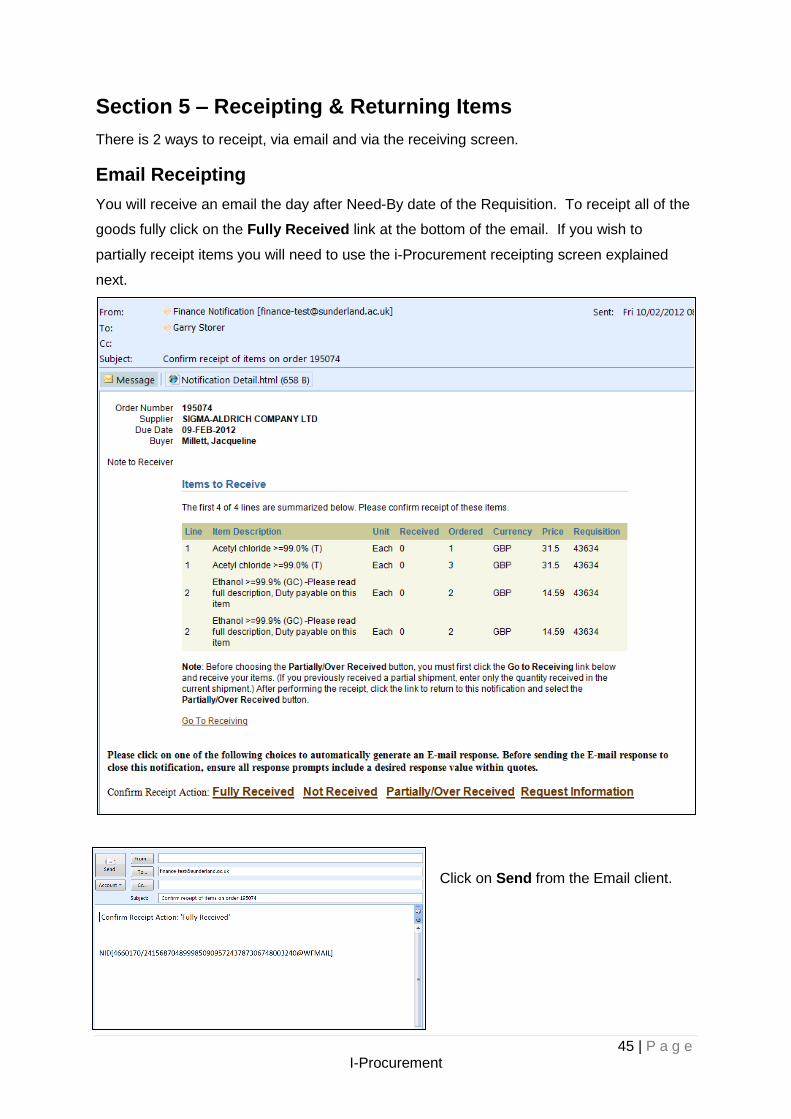
Section 5 – Receipting & Returning Items
There is 2 ways to receipt, via email and via the receiving screen.
Email Receipting
You will receive an email the day after Need-By date of the Requisition. To receipt all of the
goods fully click on the Fully Received link at the bottom of the email. If you wish to
partially receipt items you will need to use the i-Procurement receipting screen explained
next.
Click on Send from the Email client.
46 | P a g e I-Procurement
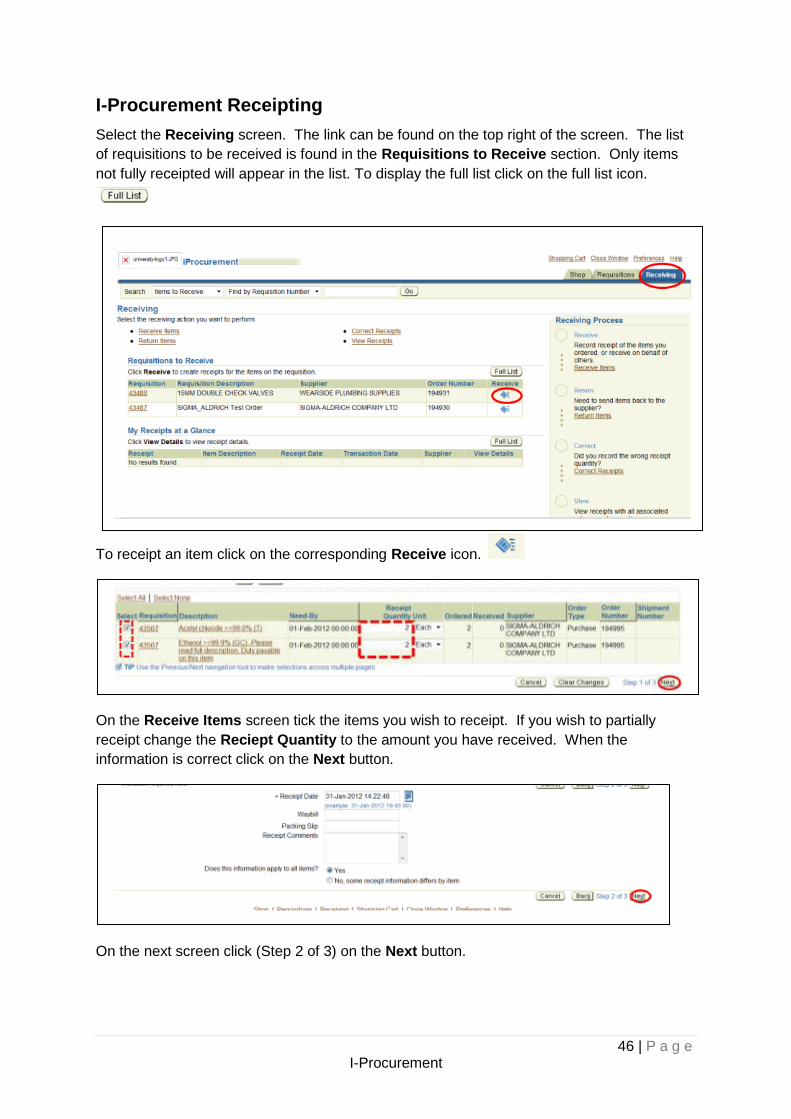
I-Procurement Receipting
Select the Receiving screen. The link can be found on the top right of the screen. The list
of requisitions to be received is found in the Requisitions to Receive section. Only items
not fully receipted will appear in the list. To display the full list click on the full list icon.
To receipt an item click on the corresponding Receive icon.
On the Receive Items screen tick the items you wish to receipt. If you wish to partially
receipt change the Reciept Quantity to the amount you have received. When the
information is correct click on the Next button.
On the next screen click (Step 2 of 3) on the Next button.
47 | P a g e I-Procurement
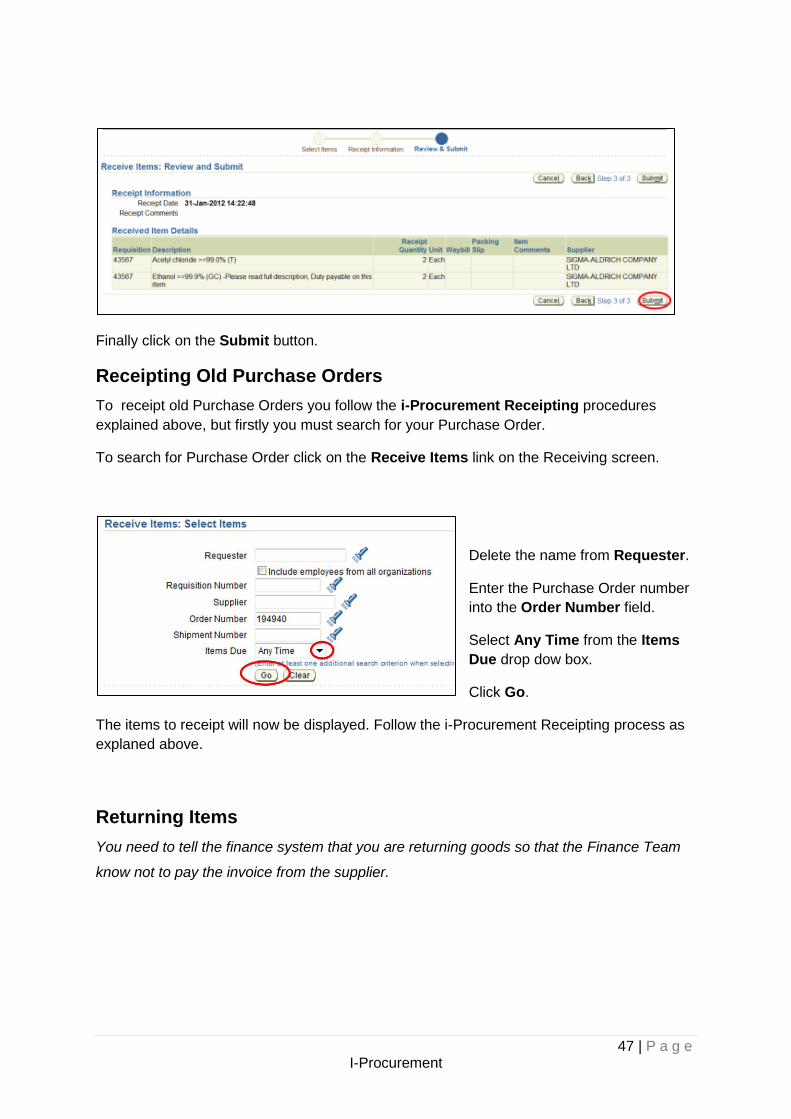
Finally click on the Submit button.
Receipting Old Purchase Orders
To receipt old Purchase Orders you follow the i-Procurement Receipting procedures
explained above, but firstly you must search for your Purchase Order.
To search for Purchase Order click on the Receive Items link on the Receiving screen.
Delete the name from Requester.
Enter the Purchase Order number
into the Order Number field.
Select Any Time from the Items
Due drop dow box.
Click Go.
The items to receipt will now be displayed. Follow the i-Procurement Receipting process as
explaned above.
Returning Items
You need to tell the finance system that you are returning goods so that the Finance Team
know not to pay the invoice from the supplier.
48 | P a g e I-Procurement
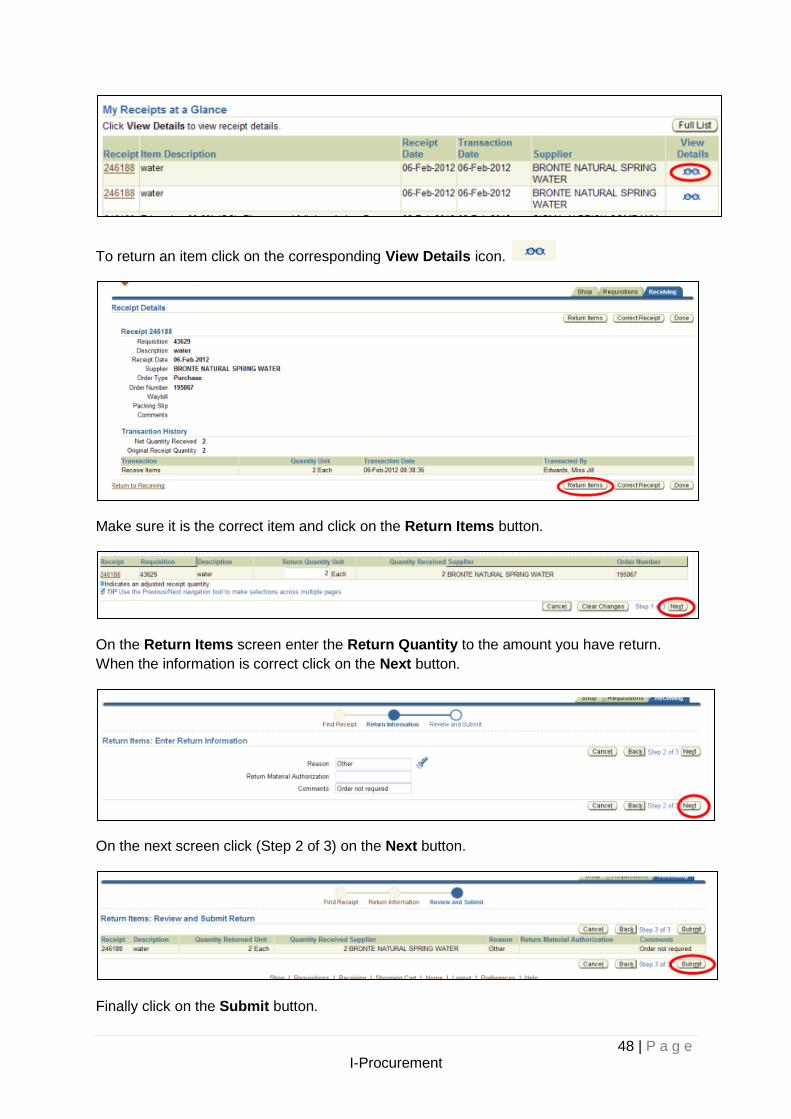
To return an item click on the corresponding View Details icon.
Make sure it is the correct item and click on the Return Items button.
On the Return Items screen enter the Return Quantity to the amount you have return.
When the information is correct click on the Next button.
On the next screen click (Step 2 of 3) on the Next button.
Finally click on the Submit button.


![AutoKrew - Purchase/Procurement [For Automotive Dealerships]](https://static.fdocuments.us/doc/165x107/5a66449b7f8b9a47688b4d13/autokrew-purchaseprocurement-for-automotive-dealerships.jpg)