
Establishment of a Universal Size Conversion Chart for Men ...

!
UNIVERSAL EBIKE CONVERSION KIT INSTALLATION

1
TABLE OF CONTENTS
Part detail....................................................................2
Installation steps.........................................................3
System usage description.........................................20
Instructions for the use of a charger..........................26
Things you must know before use.............................27

STEP 1:
2 3
Remove the L/R pedals and L/R cranks.
8. Right crank arm.........................x1 9. Velcro bend................................x1 10. Battery..........................................x1 11. Battery holder bolt...................x2 12. Battery holder............................x113. Display..........................................x114. Electronic shifter.......................x115. Speed sensor..............................x1
1. L/R crank arm fixing bolt.........x2 2. Left crank arm..............................x1 3. Bottom bracket cap....................x1 4. Lock ring........................................x1 5. Motor..............................................x16. Chainwheel...................................x17. Chainwheel lock cap..................x1
1
9 10 11 12 13 14 15
2 3 4 5 6 7 8 1

4 5
STEP 3:
STEP 2:
Type 2: (Three pieces crank).
Type 1 ( Integrated crank ).
Type 1: (Integrated crank)1. Remove the front derailleur on frame and shifter on handlebar.2. Loosening the fixing bolt on the L crank arm and remove the arm. 3. Remove the crank set from ride side.4. Remove the L/R bottom bracket cap on frame.
Type 2: (3-Piece crank)1. Remove the front derailleur on frame and shifter on handlebar.2. Remove the chainwheel3. Loosening the L/R cap on the frame.4. Remove the axle spindle.
Clean up the burrs and oil stains from the bottom bracket first, then use GOSPADE special 33.5mm grinder or reamer to process the correct roundness for the bottom bracket if necessary.

6 7
STEP 5:STEP 4:Use Gospade special tighten tool to install the lock ring into left side of bottom bracket Turn clockwise to tighten the lock ring. The correct torque should be 40~45N.m.
Install the motor into the bottom bracket from right side of the frame. The motor angle will be secured by lock ring on the left side of bottom bracket. There are 24 angle positions on the lock ring. Each position is 15 degree angle. Install the motor angle close to the down-tube, but can not be touched to the down-tube.
Gospade special tighten tool

8 9
STEP 7:STEP 6:Turn counter-clockwise to tighten the cap to secure the motor on the left side of bottom bracket. The correct torque should be 40~45N.m.
Install the chainwheel into the motor square axle.
10 11
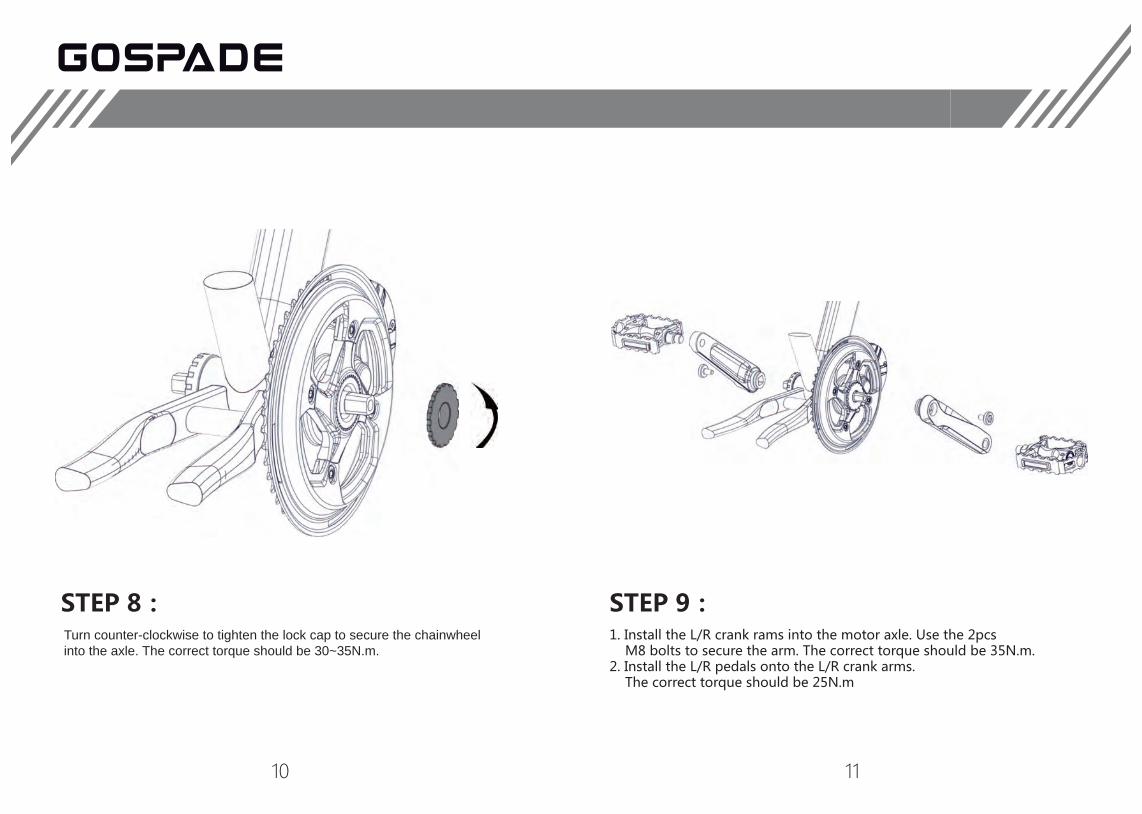
STEP 9:STEP 8:Turn counter-clockwise to tighten the lock cap to secure the chainwheel into the axle. The correct torque should be 30~35N.m.
1. Install the L/R crank rams into the motor axle. Use the 2pcs M8 bolts to secure the arm. The correct torque should be 35N.m.2. Install the L/R pedals onto the L/R crank arms. The correct torque should be 25N.m

STEP 11:STEP 10:Use 2pcs M5 battery holder bolts to secure the battery holder onto water cage holes. The correct torque should be 12N.m
12 13
1. Place the bottom of battery on battery holder.2. Move the battery from left to right to secure the battery on the top of battery holder.
1
2

STEP 13:STEP 12:We suggest to use the velcro bend to fix the battery on the down-tube to prevent any damages from any circumstances.
14 15
1
Use the 2pcs short zip ties to fix the speed sensor on the inner left chain-stay on the frame. Do not tighten the zip ties yet.
(1)

STEP 15:STEP 14:1. Install the magnet (2) on the spoke and position it parallel with the end of speed sensor. Tighten the M5 bolt (3) to secure the magnet. The correct torque should be 15N.m.2. Tighten the 2pcs speed sensor zip ties.
The distance between speed sensor and magnet should be 10-15mm.
16 17
13
2
10MM-15MM

STEP 17:STEP 16:1. Install the display and electronic shifter on the left side of handlebar. 2. Install the left grip and left brake on handlebar.
1. Connect power cable (Metal connector)2. Connect speed sensor cable (Orange connector)3. Connect display & shifter cable (Green connector)4. Replace the chain back to the chainwheel
18 19
1 2 3

20 21
Battery Indicator Light Instruction:Battery Intruction Manual:There are 2 different indicator lights on the top of battery for 9 and 10.5Ah battery. The blue lights indicates current battery power capacity status.The green lights indicates current power output level.
1. Power on: Long press the power switch for 3 seconds.2. Shut down: Long press power switch for another 3 seconds.3. Power levels: Press one seconds to switch different power levels.
Battery powerPower output levels
0-20%
80%-100%
3
1

22 23

24 25
General Setting MenuHold both and + buttion for 2 seconds the general setting menu Capture of menu setting“Reset Trip””WD setting””Motor Gear””Unit Setting””Exit”Press the + and - button to select the content.press the to comfirm the corresponding setting.
Parallel table of setup menu

26 27
Charging Your BatteryFully charging your battery before your first fide and then after and after any operation,
especially after long disstance riding.
1.Shut down the power at the bottom of battery and pull out waterproof rubber piug;
charge couple of the chatge can be perferably connected with battery charge interface
end to end.
2.Then,battery socket of the charger is inserted into an electrical connector receptacle
of 110 AC chamber.
3.After the battery is fully charged,please unplug the charger from commercial power point
firstly and then unplug the charger interface from the battery and put the waterproof rubber
plugback.
4.During charging,please do not use motor system for the avoidance of accidents.
Notes of signal light: if the chanrger is connected to the commercial prower,green light flickers
or is normoally on inthe case of onbattery;in the case of battery connection,red light normally on
indicates that the bicycle is being charged while the green light normally on indicates charging
completed.
Thank you for your purchasing on GOSPADE electric bike. Your electric bike is legally
a vehicle. It can be ridden on roads mixing with other traffic. For your safety and for
the safety of others, we recommend that you obey all road regulations and wear a
protective helmet. For optimal, safe and enjoyable use of the e-bike, make sure you
thoroughly read this user guide before you first use it . Use the e-bike according to
the user guide, or it may shorten the life cycle.
YOU SHOULD READ THIS MANUAL
THINGS YOU MUST KNOW BEFORE USEPlease read this manual carefully before operating your e-bike in order to familiarize
yourself with the bike and its different functions.
Please learn and observe all the road rules while riding your e-bike on public roads,
including ALWAYS wearing an approved helmet.
The helmet should:� Be comfortable to the rider
� Be of lightweight
� Have good ventilation for the head
� Fit snugly
� Cover the forehead
It is your responsibility to familiarize yourself with the laws of the state where you
ride and to comply with bicycle laws.
Young children, pregnant women and any persons with vision, balance, or other
problems that would prevent them from riding a bicycle should not use the e-bike.
The e-bikes are not designed for two riders. Please ensure only one person at a
time is riding the e-bike.
Do not operate your electric bike after consuming any amount of alcohol or taking
any drugs.
All photos are for general reference only and may differ slightly for each model of
e-bike.
Safety Instructions:1. Recommendations for safe riding - use of a bicycle helmet,regular checks on
brakes, tyres, steering,rims and caution concerning possible increased braking
distances in wet weather.
2. Inflation of front and rear tires should be moderate as excessive inflation can
incur severe bumping and too little inflation has an adverse influence on cycling
speed otherwise; in addition, not only can the outer tube be damaged, but tire
tube ruptures giving rise to blow-by.
3. After you have ridden the new bicycle for a period, please inspect and adjust it
in a comprehensive manner to make sure that all fasteners are effectively locked.
In addition, please keep all transmissions flexible. Recommended tightening of
fasteners related to the handlebar, handlebar-stem, saddle, seat-pillar, and wheels,
with torque values for threaded fasteners. Please use the correct approved light
and reflector according to the standard in different country.
4. Please apply lubricating oil onto all transmissions moderately; and it cannot be
used continuously under the circumstance of oil shortage.
28 29
5. The bicycle should be placed where is dry and ventilated and prevented from
contacting any corrosive gas or liquid. Lithium battery of it is strictly prohibited to
get close to fire.
6. Although the bicycle can go through rain or snow, water immersion or long-term
exposure to the sun is not allowed.
7. Chargers and other accessories that are not particularly designed by the
company for this product are forbidden. For any accident caused by it, the
company shall not take any responsibility.
8. The bicycle shall not be dismantled or refitted arbitrarily and the company does
not bear losses incurred by it. In addition, you may also lose the warranty
commitment. In the case that breakdown takes place internally, please contact
local dealer or the designated service center.
9. For children, pregnant women and the elderly, the electric power assisted
bicycle shall not be used.
WARNING: As with all mechanical components,the bicycle is subjected to wear
and high stresses.Different materials and components may react to wear or stress
fatigue in different ways.If the design life of a component has been exceeded,it may
suddenly fail possibly causing injuries to the rider.Any form of crack,scratchesor
change of colouring in highly stressed areas indicate that the life of the component
has been reached and it should be replaced.
The company reserves all the right for final explanation to all terms and matters mentioned in this Instruction.

30 31
Some instructions on battery maintenance
and charging
1. Please charge the battery for 4-6 hours after its energy is consumed for
50%-70% of its total energy , in this way, the battery life will be longer. If you leave
the battery pack in your stock in less energy condition, it will sleep to die easy.
So please charge the battery pack full after each long distance ride. Do not
charge the battery for a long time (that is “exceeds 10 hours”) in summer; in case
that the battery will be calorifacient and broken.
2. Recharging battery once a month during the period of storage.
3. Charging temperature:0-45℃
4. Battery pack might not been fully charged when temperature is over low or
over high.When the battery is charged, its temperature may become a little higher,
it is normal under the temperature of 50℃.If the charger indicator is useless when
the battery is full charged or the battery is very hot (that exceeds 50℃), please
come to the seller to find maintenance at once.
5. Do not make the charger jolty in the rear box if there is one box attached; and
the charger should be far away from water. The impact and shake should be at the
lowest degree when the battery is moved.
6. Each special designed charger is provided for each battery pack. Do not use
other type of charger for fear of burning out battery and causing danger.
7. Battery storage conditions: cleanliness, coolness, dryness and airiness,
temperature 0℃~45℃。No solarization, fire, water-logging and mixing the
battery together with corrosive substance during battery shipping and storage.
9. Please sure that there is no short-circuit in your wall socket for fear of burning
out battery and causing danger.
BATTERY DISPOSAL
W A R N I N G !NEVER throw batteries away in the trash. Take the exhausted battery to a federally
or state-approved battery recycle center. Call your waste collection service to find
out if they offer disposal of batteries.

Product information
model
Machine Code
Dealer
Sales Date
Warranty card* *
*The starting date of the warranty is the invoice date of the purchasing*


