UNIVERGE Soft Client SP350 - NECmobility.nec.com.au/NECDrive/SP350/SP350 R6 Operation and... · II...
168
UNIVERGE Soft Client SP350 Regular mode Thin Client Operations and Maintenance Manual (Software Version 6) NWA-085052-001 Issue 1.0 September 2013
-
Upload
vuongtuong -
Category
Documents
-
view
224 -
download
0
Transcript of UNIVERGE Soft Client SP350 - NECmobility.nec.com.au/NECDrive/SP350/SP350 R6 Operation and... · II...
UNIVERGE Soft Client SP350 Regular mode
Thin Client
Operations and Maintenance Manual
(Software Version 6)
NWA-085052-001
Issue 1.0
September 2013


I
Notes:
(1) The content of this manual may not be reprinted in part or whole without permission.
(2) The content of this manual is subject to change without notice.
(3) Great care has been taken in the creation of this manual; however, should any questionable points,
errors, or omissions be apparent, please contact us.
(4) Notwithstanding Item (3), this company will not be responsible for any impact deemed to be the result of
operating this product.
Trademarks of other companies are included in the names of companies and products mentioned on this
document.
Microsoft and Windows are registered trademarks of U.S. Microsoft® Corporation in U.S.A and/or other
countries.
Windows® 2000 Professional is an abbreviation for Microsoft® Windows® 2000 Professional operating
system.
Windows® XP is an abbreviation for Microsoft® Windows® XP Professional operating system or
Microsoft® Windows® XP Home Edition operating system.
Windows® Vista is an abbreviation for Microsoft® Windows® Vista Ultimate operating system or
Microsoft® Windows® Vista Business operating system.
Windows® 7 is an abbreviation for Microsoft® Windows® 7 Ultimate operating system or Microsoft®
Windows® 7 Enterprise operating system.
Windows® 8 is an abbreviation for Microsoft® Windows® 8 Enterprise operating system or Microsoft®
Windows® 8 Pro operating system.
This document describes Windows® 2000 Professional as Windows 2000.
This document describes Windows® XP Professional and Windows® XP Home Edition as Windows XP.
This document describes Windows® Vista as Windows Vista.
This document describes Windows® 7 as Windows 7.
This document describes Windows® 8 as Windows 8.
The screenshots are used in accordance with the Microsoft Corporation guideline.
Pentium is a registered trademark of Intel® Corporation.
"Adobe® Flash® Player. Copyright © 1996 - 2008. Adobe Systems Incorporated. All Rights Reserved.
Patents pending in the United States and other countries. Adobe and Flash are either trademarks or
registered trademarks in the United States and/or other countries."
Citrix is registered trademarks of Citrix Systems, Inc. in the United States and/or other countries.
XenDesktop is trademarks of Citrix Systems, Inc. in the United States and/or other countries.

II
SOFTWARE LICENSE AGREEMENT
NEC Corporation (hereinafter called “NEC”) grants certain license to you pursuant to the terms and conditions
of this Software License Agreement (hereinafter called the “Agreement”) to use the software (hereinafter
called the “Software”) and related documents (hereinafter called the “Documents”) (the Software and the
Documents collectively called the “Licensed Products”). As using the Licensed Products indicates your
acceptance of the following terms and conditions of this Agreement, please read them carefully before your
commencement of using or installing the Licensed Products. Once start using the Software, you are deemed
that you have agreed on the terms and conditions of the Agreement. If you do not accept terms and conditions
set forth in the Agreement, please do not use the Software and you shall return all the unused material
provided for the Software in the original shipping container with the receipt of payment to the place of
purchase for full refund.
1. License
(1) Subject to the terms and conditions set forth herein, NEC grants to you the non-transferable,
non-exclusive and limited license to install the Software on your computer(s) connected to NEC’s
UNIVERGE series (hereinafter called the “PC”) and to use the Software in accordance with the
Documents simultaneously up to the number of client licenses you purchased. The PC also includes
virtual PC(s) for thin client system.
(2) Except as otherwise expressly stated herein, you shall not (i) copy, modify, translate, quote or create
any derivative work of all or any part of the Licensed Products, (ii) sell, rent, lease, distribute,
sublicense or otherwise transfer all or any part of the Licensed Products except as set forth in
Section 1(4) below, (iii) reverse engineer, decompile, reverse assemble or otherwise attempt to gain
access to the source code of all or any part of the Software, (iv) remove, alter, cover or obfuscate
any copyright notices, trademark notices or other proprietary rights notices placed or embedded on
or in the Licensed Products, (v) use all or any part of the Software other than on the PC,
(vi) unbundle any part of the Software, (vii) use the Licensed Products for the development of any
application program for commercial use, (viii) use the Licensed Products in life support systems,
human implantation, nuclear facilities or systems or any other application where failure could lead to
a loss of life or catastrophic property damage, or (ix) cause or permit any third party to do any of the
foregoing.
(3) Upon giving prior written notice to you, NEC shall have the right to audit your use, deployment, and
exploitation of the Licensed Products for the purpose of confirming whether you comply with the
terms and conditions of this Agreement. Such audit shall be conducted during regular business
hours at your site and in such a manner as not to interfere unreasonably with your normal business
activities.
(4) You may transfer your rights and obligations under the terms and conditions of this Agreement to a
third party, provided, however, that the following conditions shall be fulfilled; (i) such third party
agrees to be bound by all the terms and conditions of this Agreement, and (ii) you transfer all the
Licensed Products to such third party and destroy all the copies of the Licensed Products.
2. Intellectual Property Rights
Nothing in this Agreement shall be construed as transferring any or all intellectual property rights in, and to,
the Licensed Products and all the update versions thereof, whether or not provided by NEC. You agree that
NEC or its suppliers shall retain such all the intellectual property rights, whether or not any part thereof is or
may be copyrighted or patented.

III
3. No Warranty
(1) NEC hereby disclaims all warranties of any kind whatsoever, expressly or impliedly, regarding the
Licensed Products.
(2) In the event that NEC makes the update version, bug-fix version, function added version or
modification of the Licensed Products or program to be such (hereinafter collectively called the
“Updated Program”), NEC may, at its sole discretion, provide you with the Updated Program or the
information related to the Updated Program in accordance with the Software Support Agreement
separately entered into between NEC and you.
4. Termination
(1) You may terminate this Agreement by giving NEC a thirty (30) days prior written notice.
(2) In the event that you fail to comply with any provision of this Agreement, NEC may, at any time,
terminate this Agreement.
(3) Upon any termination of this Agreement, you shall not use the Licensed Products for any purpose
and shall immediately destroy all the Licensed Products. Sections 1(2), 1(3), 2, 3, 5, 6, 7 and 8 shall
survive any termination of this Agreement.
5. Export Control
You shall not export directly or indirectly all or any part of the Licensed Products to any foreign countries
without any necessary approval of each government agency according to the applicable laws, regulations and
administrative guidance of each country having competent jurisdiction and the United States of America.
6. Limitation of Liability
IN NO EVENT SHALL NEC AND ITS DISTRIBUTORS BE LIABLE TO YOU FOR ANY INDIRECT, SPECIAL,
INCIDENTAL, CONSEQUENTIAL OR PUNITIVE DAMAGES (INCLUDING LOSS OF PROFITS AND
PROCUREMENT COSTS FOR ANY SUBSTITUTE) ON ACCOUNT OF OR ARISING OUT OF USE OF THE
LICENSED PRODUCTS OR IMPOSSIBILITY THEREOF, EVEN IF ADVISED OF THE POSSIBILITY OF
SUCH DAMAGES. THE MAXIMUM AGGREGATE LIABILITY OF NEC AND ITS DISTRIBUTORS,
WHETHER IN TORT, CONTRACT OR ANY OTHER LEGAL THEORY, SHALL NOT EXCEED ONE
HUNDRED PERCENT (100%) OF THE PRICE ACTUALLY PAID FOR PURCHASING THE LICENSED
PRODUCTS BY YOU.
7. Third Party Software
(1) The Software includes third party software components, which shall be granted under GNU General
Public License (hereinafter called “GPL”) and/or GNU Lesser General Public License (hereinafter
called “LGPL”) by GNU, and PCRE License. Such software is not subject to the terms and conditions
of this Agreement but those of the applicable license.
Please visit the following GNU website for GPL and LGPL.
GPL: http://www.gnu.org/licenses/gpl.html LGPL: http://www.gnu.org/licenses/lgpl.html
PRCE License, granting software under terms of the “BSD” license, requests to insert following
statement.
THE “BSD” LICENCE Redistribution and use in source and binary forms, with or without
modification, are permitted provided that the following conditions are met: * Redistributions of source
code must retain the above copyright notice, this list of conditions and the following disclaimer. *
Redistributions in binary form must reproduce the above copyright notice, this list of conditions and
the following disclaimer in the documentation and/or other materials provided with the distribution. *
Neither the name of the University of Cambridge nor the name of Google Inc. nor the names of their
contributors may be used to endorse or promote products derived from this software without specific
prior written permission.
IV
THIS SOFTWARE IS PROVIDED BY THE COPYRIGHT HOLDERS AND CONTRIBUTORS “AS IS”
AND ANY EXPRESS OR IMPLIED WARRANTIES, INCLUDING, BUT NOT LIMITED TO, THE
IMPLIED WARRANTIES OF MERCHANTABILITY AND FITNESS FOR A PARTICULAR PURPOSE
ARE DISCLAIMED. IN NO EVENT SHALL THE COPYRIGHT OWNER OR CONTRIBUTORS BE
LIABLE FOR ANY DIRECT, INDIRECT, INCIDENTAL, SPECIAL, EXEMPLARY, OR
CONSEQUENTIAL DAMAGES (INCLUDING, BUT NOT LIMITED TO, PROCUREMENT OF
SUBSTITUTE GOODS OR SERVICES; LOSS OF USE, DATA, OR PROFITS; OR BUSINESS
INTERRUPTION) HOWEVER CAUSED AND ON ANY THEORY OF LIABILITY, WHETHER IN
CONTRACT, STRICT LIABILITY, OR TORT (INCLUDING NEGLIGENCE OR OTHERWISE)
ARISING IN ANY WAY OUT OF THE USE OF THIS SOFTWARE, EVEN IF ADVISED OF THE
POSSIBILITY OF SUCH DAMAGE.
(2) The Software includes other software components granted by OpenSSL Project and patents granted
by MPEG LA, L.L.C.. They are intended third party beneficiaries of this Agreement. The terms and
conditions herein are made expressly for the benefit of and are also enforceable by them, even
though they are not in any contractual relationship with you.
OpenSSL Project requests to insert following statement. “This product includes software developed
by the OpenSSL Project for use in the OpenSSL Toolkit (http://www.openssl.org/).”
MPEG LA, L.L.C. requests to insert following statement. “THIS PRODUCT IS LICENSED UNDER
THE MPEG-4 VISUAL PATENT PORTFOLIO LICENSE FOR THE PERSONAL AND
NON-COMMERCIAL USE OF A CONSUMER FOR (i) ENCODING VIDEO IN COMPLIANCE WITH
THE MPEG-4 VISUAL STANDARD (“MPEG-4 VIDEO”) AND/OR (ii) DECODING MPEG-4 VIDEO
THAT WAS ENCODED BY A CONSUMER ENGAGED IN A PERSONAL AND NON-COMMERCIAL
ACTIVITY AND/OR WAS OBTAINED FROM A VIDEO PROVIDER LICENSED BY MPEG LA TO
PROVIDE MPEG-4 VIDEO. NO LICENSE IS GRANTED OR SHALL BE IMPLIED FOR ANY OTHER
USE. ADDITIONAL INFORMATION INCLUDING THAT RELATING TO PROMOTIONAL,
INTERNAL AND COMMERCIAL USES AND LICENSING MAY BE OBTAINED FORM MPEG LA,
LLC. SEE HTTP://WWW.MPEGLA.COM.”
(3) The Software includes other software components granted by SKYCOM Corporation (“SkyPDF Pro
for Softphone”) and the company prohibits you from using SkyPDF Pro for Softphone for any other
purpose than using it in connection with the Software.
(4) The Software includes other software components granted by RSA Data Security, Inc. Such software
is not subject to the terms and conditions of this Agreement but those of the license below. RSA
Data Security, Inc. also requests to insert following statement.
“The Software includes the software of RSA Data Security, Inc. MD5 Message-Digest Algorithm"
Copyright (C) 1991-2, RSA Data Security, Inc. Created 1991. All rights reserved.
License to copy and use this software is granted provided that it is identified as the "RSA Data
Security, Inc. MD5 Message-Digest Algorithm" in all material mentioning or referencing this software
or this function.
License is also granted to make and use derivative works provided that such works are identified as
"derived from the RSA Data Security, Inc. MD5 Message-Digest Algorithm" in all material mentioning
or referencing the derived work.
RSA Data Security, Inc. makes no representations concerning either the merchantability of this
software or the suitability of this software for any particular purpose. It is provided "as is" without
express or implied warranty of any kind.

V
These notices must be retained in any copies of any part of this documentation and/or software.
(5) The Software includes other software components granted by the University of California, Berkeley.
Such software is not subject to the terms and conditions of this Agreement but those of the license
below. The University of California, Berkeley also requests to insert following statement.
“This product includes software developed by the University of California, Berkeley and its contributors.”
Copyright (c) 1992, 1993 The Regents of the University of California. All rights reserved.
Redistribution and use in source and binary forms, with or without modification, are permitted provided that the following conditions are met:
1. Redistributions of source code must retain the above copyright notice, this list of conditions and
the following disclaimer.
2. Redistributions in binary form must reproduce the above copyright notice, this list of conditions
and the following disclaimer in the documentation and/or other materials provided with the
distribution.
3. All advertising materials mentioning features or use of this software must display the following
acknowledgement:
This product includes software developed by the University of California, Berkeley and its
contributors.
4. Neither the name of the University nor the names of its contributors may be used to endorse or
promote products derived from this software without specific prior written permission.
THIS SOFTWARE IS PROVIDED BY THE REGENTS AND CONTRIBUTORS ``AS IS'' AND ANY
EXPRESS OR IMPLIED WARRANTIES, INCLUDING, BUT NOT LIMITED TO, THE IMPLIED
WARRANTIES OF MERCHANTABILITY AND FITNESS FOR A PARTICULAR PURPOSE ARE
DISCLAIMED. IN NO EVENT SHALL THE REGENTS OR CONTRIBUTORS BE LIABLE FOR ANY
DIRECT, INDIRECT, INCIDENTAL, SPECIAL, EXEMPLARY, OR CONSEQUENTIAL DAMAGES
(INCLUDING, BUT NOT LIMITED TO, PROCUREMENT OF SUBSTITUTE GOODS OR SERVICES;
LOSS OF USE, DATA, OR PROFITS; OR BUSINESS INTERRUPTION) HOWEVER CAUSED AND
ON ANY THEORY OF LIABILITY, WHETHER IN CONTRACT, STRICT LIABILITY, OR TORT
(INCLUDING NEGLIGENCE OR OTHERWISE) ARISING IN ANY WAY OUT OF THE USE OF THIS
SOFTWARE, EVEN IF ADVISED OF THE POSSIBILITY OF SUCH DAMAGE.
@(#)random.c 8.1 (Berkeley) 6/10/93 $Id: RANDOM.C 3790 2004-08-13 09:54:10Z obata $
8. General Provisions
(1) This Agreement shall be governed by and interpreted in accordance with the laws of Japan.
(2) All disputes related to this Agreement shall be governed by the Tokyo District Court as the exclusive
jurisdictional court of the first trial.
(3) Except as expressly set forth in the Section 1(4), the Licensee shall not transfer, assign or delegate
this Agreement or any rights or obligations hereunder for any reason, without the prior written
consent of NEC.
(4) This Agreement constitutes the entire agreement between the Licensee and NEC and supersedes
any and all oral or written agreements previously existing between the Licensee and NEC with
respect to the subject matter hereof.
(5) The Software is a “commercial item” as that term is defined in 48 C.F.R. 2.101, consisting of

VI
“commercial computer software” and “commercial computer software documentation” as such terms
are used in 48 C.F.R. 12.212. Consistent with 48 C.F.R. 12.212 and 48 C.F.R. 227.7202-1 through
227.7202-4, NEC provides the Software to U.S. Government End Users only pursuant to the terms
and conditions therein.
9. Notice
NEC Corporation, Enterprise Networks Division
7-1 Shiba 5-chome Minato-ku Tokyo 108-8001, Japan
Telephone: +81-3-6405-0740

VII
Preface
Thank you for choosing our PC-based telephony application "UNIVERGE Soft Client SP350" (hereinafter
called "SP350").
SP350 is an application that realizes phone functions on your PC. All phone operations can be performed
just by clicking buttons on PC screens with the mouse, so you can make timely responses to incoming calls
received while you are using other applications.
This manual describes configuration procedures required for using SP350 Regular mode or Thin Client. If you
use Microsoft Office Communicator mode, or IBM Sametime mode, refer to the Operational Management
Manual for Softphone Plug-In mode.
Please read through this manual before use for your understanding and proper use of SP350.
Thin Client is supported Virtual PC Center (It an abbreviation VPCC) of NEC and XenDesktop (It an
abbreviation Citrix) of Citrix.
If it is not notes same as VPCC and Citrix.
Manual Organization
Chapter 1 SP350 Setup Procedure
This section describes the SP350 setup procedure.
Chapter 2 SP350 Maintenance Settings
This section describes the SP350 maintenance configuration and PC configuration.
Chapter 3 Starting or Ending SP350
This section describes how to start or end SP350.
Chapter 4 Setting of directory service in information search
This section describes the Setting of directory service in information search
Appendix Procedure for hiding the NEC Logos on the Panels

VIII
Restrictions/Use Conditions on SP350 (common to all servers)
■ Restrictions/Use Conditions According to Operating Environment (such as PC, or OS)
(1) When using Windows XP service pack 1
About Firewall in Windows XP Service Pack1 or earlier
In Windows XP Service Pack1, Softphone cannot normally be used when the Windows firewall
function is enabled. In this case, refer to "3.5 About the firewall in Windows XP Service Pack 1 or
earlier".
When Windows XP Service Pack2 is applied
When Windows Service Pack2 is applied, Softphone may not normally be used. In this case, refer
to “3.4 Windows XP Service Pack2”.
(2) When using Windows Vista/Windows 7/Windows 8
About Restrictions on ToS
Only four levels of ToS of SP350 are supported in Windows Vista, Windows 7 and Windows 8.
Because of this, the relationships between the ToS settings of the Communication server and ToS
of SP350 are as shown below.
(3) About Network
About address acquisition from DHCP server
The IP Telephony Server address cannot be acquired from the DHCP server.
When using SP350 Regular mode in a VPN (Virtual Private Network)
Basically the proper NIC (Network Interface) and IP address are selected for SP350, but this
selection may not normally be done depending on the PC environment.
To address this problem, select the following information in "Devices" through "User Settings":
NIC (Network Interface): Name of an NIC installed as hardware
IP address: IP address through which data can be exchanged with the server
[ToS Value Correspondence Table in Windows Vista, Windows 7 and Windows 8]
ToS Settings of Communication Server ToS of SP350
IP PRECEDENCE *1 DIFFSERV
No registration No registration 0xA0 / 0xE0 *2
0 to 1 0 to 15 0x00
2 to 3 16 to 31 0x20
4 to 5 32 to 47 0xA0
6 to 7 48 to 63 0xE0
*1: Each bit of low delay, wide band, high reliability and low cast cannot be used
during IP PRECEDENCE selection.
*2: These are the default values of voice/control.

IX
When using SP350 Thin Client in VPN (Virtual Private Network) When using SP350 in a VPN (Virtual Private Network), basically, appropriate NIC (Network Interface Card)/IP address are selected for SP350. However, they may not be selected normally depending on the combination of the thin client terminal type and the VPN type. For more information, please refer to the restrictions on each terminal. Depending on the types of VPN and thin client terminal, the processing load of VPN encryption performed on the terminal may be high, causing voice quality to deteriorate. Especially, when screen refresh is performed, apparent voice gap may occur. For more information, please refer to the restrictions on each terminal.
When use SP350 is Thin Client A network using NAT that does not supported. Wireless LAN does not support. Multiple NIC feature does not supported.
(4) About display of characters
When the font size for display is set to other than "Normal", characters for Softphone may not be
displayed normally. Windows DPI is required to be set to normal size (96DPI).
To confirm or change DPI setting, right-click on an empty area on your Windows desktop, and go to
[Properties] [Display Properties] or [Personalize]. The procedures for each Windows version are
described below.
- For Windows 8
Click [Personalize] [Display]. Select [Smaller - 100%].
- For Windows 7
Click [Personalize] [Display]. Select [Smaller-100%].
- For Windows Vista
Click [Personalization] [Adjust font size (DPI)]. Select [Default scale (96DPI)].
- For Windows XP
Go to [Display Properties] [Settings] [Advanced] [General]. In DPI setting, select [Normal
size (96DPI)].
- For Windows 2000
Go to [Display Properties][Settings][Advanced][General]. In font size setting, select [Smaller
font]. DPI.
(5) Restrictions applied during a virus scan or downloading
When a virus scan or downloading is executed on a PC in which SP350 is installed, the ringtone or
voice in a call may break up due to a decrease in OS processing time.
(6) About collaboration with external applications
SP350 cannot be used for collaboration with 64-bit applications, such as 64-bit Outlook2010.
Because the COM interface of SP350 does not support 64-bit applications.

X
■ Restrictions/Use Conditions on Communication Server
(1) General Conditions
The MAC authentication is not supported.
"Speaker" needs to be registered to a function key when changes are made to the default function key assignment.
(2) About line data registration
Except when another handset for collaboration is used and when SP350 is registered as the ACD terminal, the prime line needs to be the same as "My Line".
When another handset for collaboration is used, the line of that handset needs to be set as the prime line, and when SP350 is registered as the ACD terminal, the ACD line needs to be set as the prime line.
(3) About registration as ACD terminal
Another handset for collaboration cannot be used.
“Release” needs to be assigned to a function key.

XI
■ Restrictions/Use Conditions on SP350
(1) Note on migration (upgrade) from DtermSP30
The Dterm SP30 Regular mode is automatically upgraded to the SP350 Regular mode, and the
Dterm SP30 Thin Client is automatically upgraded to SP350 Thin Client.
(2) Notes on version migration (upgrade) The switchover of the SP350 Regular mode and the SP350 Softphone Plug-In mode requires
uninstallation of SP350 application and setting environment. Then SP350 application and environment settings are reinstalling.
The switchover of the SP350 Regular mode and the SP350 Thin Client requires uninstallation of
SP350 application and setting environment. Then SP350 application and environment settings are reinstalling.
The switchover of the SP350 SV8500 mode (including Thin Client) and the SP350 SV8300 mode
(including Thin Client) requires reinstallation of the software. To migrate to the SV8300 mode (including Thin Client) in the environment where the SV8500 mode (including Thin Client) is installed, uninstall the software and then reinstall it as the SV8300 mode.
(3) Restrictions on use of 1-/2-digit extension numbers in the system
The following two services cannot be used:
-Incoming/ Outgoing Log -Caller Information Panel
(4) When using the Hold service
A call on hold may be disconnected during the hold cancellation operation depending on the timing. To place a call on exclusive hold, right-click the [Hold] button on the [Action] screen and select
[Exclusive Hold] while you are on the phone.
(5) When using the IM function To send an IM to an ACD terminal, specify the My Line as the destination. For other than ACD
terminal, specify the prime line.
(6) When using Chat function If the other party of the chat is an ACD terminal, specify the My Line as the other party number. For
other than ACD terminal, specify the prime line. When using Data Conference between multiple offices, set the numbering plan correctly (Local
office code/The maximum number of digits for extension number (within local office)) in SP350 maintenance setting. For a local office code, register the data with an access code included.
Up to 10 chats (2-Party Chat and Conference Chat in which you are invited) can be performed at
the same time. Conference Chat in which you are an organizer is not included in this number. You can always initiate one Conference Chat.
(7) About "Online" status display (Presence display) When referencing "Online" status, the Presence server is accessed with the prime line number. Do not set the same prime line number in two or more SP350 implementations.

XII
(8) About incoming/outgoing log
In a transfer operation, the call history screen of the terminal to which a call is transferred does not display the number of the terminal from which a call is transferred. In this case, SP350 may fail to redial recently dialed numbers.
(9) About call recording in PCs Depending on the other party, call recording may be unavailable with the "Recording" button disabled. Depending on the other party, the hold tone output when the other party has placed the call on hold may be recorded.
(10) About mail collaboration function The MS-Outlook mail collaboration function does not work on Microsoft Outlook 2000.
(11) When using a USB handset When off-hook and on-hook operations are repeated on the handset consecutively, the handset
may go on-hook and SP350 may go off-hook. In this case, take the handset off-hook slowly again, and then put it on-hook.
(12) When using Thin Client
The voice mail function cannot be used. To use PC recording, a thin client terminal that supports PC recording is required. For availability of
PC recording, please refer to the specification/restrictions of each terminal. The codec type that can be used for PC recording differs according to the thin client terminal. For
available codec types, please refer to the specification/restrictions of each terminal. In PC recording, there is a slight delay until recording is actually started because a recording start
instruction is issued from Softphone to the thin client terminal via network. Therefore, the beginning of a talk may be cut off when recording is started. The delay generated is generally “{network delay between terminal and virtual PC} x 2 + several tens of ms.”
The RTP of PC recording is sending to Virtual PC then it does not recording if the communication
broken by firewall between Thin Client and Virtual PC.
RTP from the think client terminal to the virtual PC used for PC recording is excluded from SIP encryption. Even if SIP encryption is enabled, voice recorded on the PC will be transmitted from the terminal to the virtual PC without encryption.
Whether or not a USB handset can be used on the thin client terminal differs according to the terminal type. For availability of USB handsets, please refer to the specification/restrictions of each terminal.
The hot swap of a USB handset may not be supported depending on the operating system installed
on the thin client terminal. For availability of the hot swap of USB handsets, please refer to the specification/restrictions of each terminal.
If Thin Client terminal is power off (excluding use phone collaboration) the conversation is cut off.
And no report recorded RTP Information Output for dropped call.
When it operating Talking, Incoming or Listening Tone (excluded use Phone co-operation function) using Thin Client Terminal US100 or US110, in this case it does not playing other Application voice or playing tone (such as Music or Alarm Tone) on OS.

XIII
(13) About voice codec
The voice quality of G.722 and AMR-WB is effective when a wideband-compliant audio device is
used. UTR-1W-1(BK), and HW251N+DA45 are recommended.
(14) When using a terminal for collaboration with Softphone A sound device having playback and recording functions is also required when utilizing a handset
for collaboration with Softphone. When you switch the handset for collaboration with Softphone to the one connected to the PC and
use the handset for collaboration for a call, the following services are not available: - Services during a call, such as hold and forwarding using SP350
While you are in a call using the handset for collaboration, if you end the SP350 only, "call duration"
is not displayed in SP350 Incoming Log/Outgoing Log.
(15) When using a Data Conference When using Data Conference between multiple offices, set the numbering plan correctly (Local office code/The maximum number of digits for extension number (within local office)) in SP350 maintenance setting. For a local office code, register the data with an access code included.

XIV
Operating Environment for Communication Server (SV8500) The following constraints are applied when implementing SP350 on UNIVERGE SV8500, or UNIVERGE SV7000. ■ Restrictions/ Use Conditions According to Operating Environment (such as PC, or OS)
(1) Coexistence with other application SP350 cannot be used with Windows MAT.
■ Restrictions/ Use Conditions and Office Data Registration on IP Telephony Server
(1) Required version of IP telephony server
UNIVERGE SV8500, UNIVERGE SV7000 (R24 or later) or UNIVERGE NEAX2400 IPX with
SIP-BOX(R24 or later) is required to use SP350.
(2) Mandatory configuration
Set the following office data: ADKS LKP=3 (“32 Line/ Function keys”) AKYD FKY 142: Logout
(3) About interface language change
To display characters in English except for data and time, the multi-language display function of the
IP telephony server needs to select English for SP350.
(4) When using the caller number ringtone identification function
To use the caller number ringtone identification function by setting “Incoming Sound Patterns” on
SP350 contact, configure the office data so that the ringtone sounds upon incoming call to the prime line. AKYD RG (Ringing information on each of multiple lines)
(5) Use of the Call Forwarding Panel
To use Call Forwarding Panel, the following function keys need to be registered:
AKYD FKY 1: Call Forwarding-Busy 2: Call Forwarding-All Calls 22: Call Forwarding-Don’t answer 148: Call Forwarding –Logout
(6) When using "Collaboration when unavailable" during use of Presence display
To set "Collaboration when unavailable (DND (Do Not Disturb)/ Call Forwarding-All Calls)" through
"User Settings" on SP350, the following function keys need to be registered: AKYD FKY 50: DND (Do Not Disturb) 2: Call Forwarding-All Calls

XV
(7) When using Answer Preset
To use Answer Preset, the following function key needs to be registered: (when changes are made
to the default function key assignment) AKYD FKY 28: Answer
(8) When using data conferences
Set the following office data:
Set bit 2 of ASYDL SYS1 INDEX:863 to "1" (to enable the other-party information read function).
Data conference service is not available when SP350 is operated under SR-MGC.
(9) When using Voice Mail system (UMS)
Set the following office data: Set bit 5 of ASYD SYS1 INDEX: 435 to "1" (not to display the line lamp for message waiting). * Since the default setting is "0", be sure to change this setting when using UMS.
To enable the "Recording" button on an extension, the following three function keys need to be
registered: AKYD FKY 66: Recording 69: End 73: Listening
To enable the functions displayed by right-clicking the "Recording" key on SP350, the following
function keys need to be registered: AKYD FKY 67: After Recording 71: Cancel
(10) When using Name Display
Set the following office data:
Set the bit 1 of ASYD SYS1 INDEX: 241 to "1" (16-digit display). * Since the default setting is "0", be sure to change this setting.
(11) Use in a Fusion environment
Use of SP350 is supported in a Fusion environment. However, if extensions have logical numbers
of nine (9) or more digits, the incoming/outgoing log from/to those extensions may not be displayed correctly.
Display of nine (9) or more digits is enabled by setting bit 0 of ASYDL SYS1 INDEX: 672 to "1"
(middle display position of logical number); however, 8-digit display is applied to extensions for which Name Display is set.
In an environment where ping message reception is disabled, the "Visitor Display" button will not
blink even when the home node of the FCCS cluster is restored.
(12) About ringtone
Even if the ringtone pattern is changed from the standard pattern by the office data, the change is not effective for SP350. (Only standard ringtone pattern is provided to SP350).

XVI
(13) About SP350 registration as ACD terminal
It is required to set ACD line to a prime line.
“Release” is required to be assigned to a function key.
In order to acquire calling party information of incoming call to ACD (for accurate incoming logs), it
is required to set the received ANI number to be displayed first as ACD incoming call identification that is displayed on the agent terminal when receiving or answering an incoming call to ACD
(14) About Call Forward Line Lamp Indication
If Call Forward Line Lamp Indication enabled, SP350 cannot performing Outgoing call. Please refer
to Communication Server manual to setting enable/disable based on System configuration. ■ Restrictions/Use Conditions on SP350
(1) Operation upon change of key data on IP Telephony Server
When a change is made to key data settings on the side of IP Telephony Server during SP350
operation, a reset operation is applied to the SP350.
(2) When using hold service
When the group holding call is picked up by using the USB hand set, it is necessary to press the
corresponding group hold button after taking the handset off-hook.
(3) Multi Party Conference
A conference system (VS-32 or 8-party Conference Trunk) is required to support SP350 data
conference (up to 8-party). Without a VS-32 or 8-party Conference Trunk, the number of participants supported in a data conference will depend on the PBX:- - Up to 2-party data conference can be supported in a pure IP system. - Up to 3-party data conference can be supported in a Hybrid (IP and TDM) system.
(4) Automatic Idle Return
SP350 cannot automatically be placed in on-hook state upon origination or forwarding if the other
party is restricted or the busy tone is heard.
(5) When using HandsetConfig
For the keys set by HandsetConfig, the corresponding function keys also need to be registered on
the side of IP Telephony Server except Mute, Volume adjustment (large), and Volume adjustment (small).
(6) About speech coding system (Regular mode)
This version supports the following payload types
G.711-law, G.711A-law, G.729a, G.722, AMR-NB (*1), AMR-WB (*1), G.711-law redundant, G.711A-law redundant, G.729a redundant, G.722 redundant, AMR-NB redundant (*1), AMR-WB redundant (*1) (*1) This version does not support both automatic and manual bit rate change to AMR-NB/AMR-WB codec.
This version supports payload sizes of 20 msec and 40 msec.

XVII
(7) About speech coding system (Thin Client)
This version supports the following payload types
G.711-law, G.711A-law, G.729a
When it is use “SP350 SV LICENSE for VPCC“ or “SP350 SV LICENSE for THINCL” that is support
to G.722. This version supports payload sizes of 20 msec and 40 msec.
(8) Using SP350 as ACD terminal
To use the silent monitoring function, UNIVERGE SV8500 (S5 or later) is required. Call origination using the following functions is possible after capturing a line for ordinal call.
Outgoing/Incoming call history, redial, list of Input histories, phone book presence display panel, drag and drop from other applications, selecting phone number to call on other applications, right-click menu of text on I.E, and search results.
The function key “selecting handset” and “selecting headset” icons cannot be used. To perform the automatic answer function, “Speaker” key is required to be enabled (lit in red). On
SP350, the “Speaker key” automatically becomes enabled when “Automatic/Manual” key is lit. In order to acquire calling party information of incoming call to ACD (for accurate incoming logs), it
is required to set the received ANI number to be displayed first as ACD incoming call identification that is displayed on the agent terminal when receiving or answering an incoming call to ACD.
To use the presence function on ACD terminal, OW5000 (R5-Ph2 or later) is required as a presence
server. When using ACD presence, all SP350 in the system is required to be R5 or later. On the terminal which ACD presence is set to enable (presentity side), the presence icon on the
status notification area is not displayed. On the terminal which ACD presence is set to enable (presentity side), the following functions
related to the presence cannot be used. Collaboration function when leaving seat (DND setting/Call Forwarding-All Calls) Setting of reason for leaving seat Automatic leaving seat
When the terminals other than SP350 views the status of the SP350 on which ACD presence is set
to enable, detail information for each ACD call and ordinary call cannot be confirmed. Only the main status can be confirmed.
When a PC recording is performed, the beep sound is normally provided in accordance with SP350
setting, but, when it is performed during ACD monitoring, the beep sound is not provided. However, when a PC monitoring is performed while monitoring against the call in the legacy Fusion system, the beep sound is provided only to the SP350 of the supervisor. (The agent and the customer don’t hear the beep sound). And the voice of the supervisor is recorded in PC recording on the supervisor’s terminal but the agent and the customer don’t hear the voice.
Popup Numberpad is provided when pressing the OAI keys. It is displayed regardless of the lamp
status. It is displayed by clicking the OAI keys on the SP350 screen only, and not displayed by other operations, such as using handset.
When the SP350 of the supervisor operates hold/release hold during ACD monitoring, a new
outgoing log may be created in the Call History of the supervisor.

XVIII
(9) Using Data Conference
When using Data Conference in Thin Client, Video sending is not supported.
(10) About Camp-On
When setting Camp-on via DTI Netfusing-CCIS over IP from SP350, the indication lamp for
incoming call blinks but ringtone is not provided on Camp-On call.
(11) About using Presence Server
Even if Communication Server or SP350 is enabling encryption but signal between Communication Server and SP350 is not encryption.
(12) Using Thin Client
IP Location ID is recognized by Virtual PC Server IP Address. Then when Thin Client and Virtual PC server is not belong as same IP Location ID, it might be effective frequency control, TOS Setting and Payload Setting for determined by IP Location ID.

XIX
Operating Environment for Communication Server (SV8300) There are the following restrictions on the implementation of SP350 in UNIVERGE SV8300.
■ Restrictions/Use Conditions and Office Data Registration on IP Telephony Server
(1) Required version of IP telephony server
UNIVERGE SV8300 (R4 or later) is required to use SP350.
(2) Mandatory configuration Set the following office data: CM12YY=24 2nd data 0 (24 variable function buttons + 8 one-tough buttons) CM90 Data F0B39: DtermIP station logout
(3) About the ringtone If the Ring tone identification pattern is changed from the standard pattern in office data settings, it will
become impossible to use the function to change the ring tone in user settings.
(4) When using the caller number ringtone identification function To use the caller number ringtone identification function by setting “Incoming Sound Patterns” on
SP350 contact, configure the office data so that the ringtone sounds upon incoming call to the prime line. CM90 YY=01: 1 (Sound the ringer)
If this function is used, the specified Wav file will be replayed after normal short incoming sound is
generated.
(5) Simplified subline answering To answer by going off hook when using the recommended handset, it is necessary to set up
ringing pickup. CM12YY=07, X-XXXXXXXX, XX, CM15YYY=082, XX, 2nd (permit) CM90YY=01, 1st, 2nd (ring)
(6) Using the Call forwarding panel
To use Call forwarding Panel, the following function keys need to be registered:
CM90 data F0010: Call Forwarding-All Calls F0012: Call Forwarding-Don’t answer/Busy F0016: Call Forwarding-Don’t answer If “F0012: Call Forwarding-Don’t answer/Busy” is set, “F0016: Call Forwarding –Don’t answer.” must not be set. If “F0012: Call Forwarding-Don’t answer/Busy” is registered, setting and clearing are performed by Call Forwarding- Busy. Call Forwarding-Logout cannot be used.

XX
(7) When using "Collaboration when unavailable" during use of Presence display To set "Collaboration when unavailable (DND (Do Not Disturb)/ Call Forwarding-All Calls)" through
"User Settings" on SP350, the following function keys need to be registered: CM90 data F0022: DND Set/Reset F0010: Call Forwarding-All Calls
(8) To use UM8000 as voice mail Set the following office data:
Set CM08>140 to “1” (Do not display message arrival on a variable function button of a multi-function phone) (Do not use as a message arrival indicator lamp)).
* The default is “1.” To enable the “Recording” button on an extension that uses UM8000, it is necessary to register all
of the following three function keys. CM90 data YY=00 F1091: Start recording F1094: Finish recording F1098: VM access
■ Restriction/ Use Conditions on SP350
(1) Thin Client The Thin Client cannot be used in UNIVERGE SV8300.
(2) Operation upon change of key data on Communication Server If key data settings are changed on the communication server side while running SP350, manually
restart SP350 to accept the changes. If not restarted, key data will not take effect.
(3) Softkey service function Because SP350 does not have softkeys, the following service functions provided only with the
softkeys of SV8300 cannot be used. [1] Referencing the electronic phonebook (scroll directory) on the communication server. [2] Referencing/deleting call origination/termination history and registering to the phonebook saved
on the communication server. [3] The following softkey functions during call recording when using UM8000.
1) Suspend/Restart Function to temporarily stop recording and resume recording 2) Re-record Function to erase the currently recording message and start new message
recording 3) Erase Function to erase the currently recording message without hanging up 4) Quick Function to designate the currently recording message as an urgent message or
restore it to a regular message by pressing again 5) After call recording 6) Pocket bell calling 7) Calling
Note: Start recording, stop recording, change destination box and others not listed above can be used by function key operation.
XXI
(4) Multi Party Conference To conduct multi party conference (including data conference), it is necessary to set up multi-party
conference call in the built-in conference trunk. For more details, please refer to the page of multi-party conference call in the SV8300 Reference Manual.
(5) About Automatic Idle Return setting on SP350
SP350 cannot automatically be placed in on-hook state upon origination or forwarding if the other
party is restricted or the busy tone is heard. The automatic idle return function does not work during PS collaboration.
(6) When using a terminal for collaboration with Softphone Only PS phones can be used as linked phones. While talking on linked PS phones, the following functions cannot be used. Services while on a call, such as disconnecting, holding and forwarding (including voice mail
service) via Softphone operation
(7) About speech coding system This version supports the following payload types G.711-law, G.711A-law, G.729a, G.722 This version supports payload sizes of 20 msec and 40 msec.
(8) Using SP350 as ACD terminal SP350 cannot be used as an ACD terminal in SV8300.
(9) SV8300 does not support encryption.


- i -
UNIVERGE Soft Client SP350 Regular mode
Thin Client
Contents
Chapter 1 SP350 Setup Procedure ........................................................................ 1
1.1 PC operating environment .....................................................................................2
1.1.1 Regular mode .....................................................................................................2
1.1.2 Thin Client ..........................................................................................................4
1.2 Peripheral equipment (voice communication devices) ........................................7
1.2.1 Regular mode .....................................................................................................7
1.2.2 VPCC mode (When using US110/US100/US60) ................................................8
1.2.3 VPCC mode (When using RDC Terminal/US40c/US300c) ...............................9
1.3 Peripheral equipment (video camera) .................................................................10
1.4 Network environment ...........................................................................................10
1.4.1 Regular mode ...................................................................................................10
1.4.2 Thin Client ........................................................................................................11
1.5 Methods of SP350 installation .............................................................................12
1.5.1 Environment settings performed by a maintenance person .........................13
1.5.1.1 Work flow before use ................................................................................13
1.5.1.2 Operations by maintenance person .........................................................13
1.5.1.3 Operations by user ....................................................................................13
1.5.2 Environment settings using configuration file ...............................................14
1.5.2.1 Work flow before use ................................................................................14
1.5.2.2 Operations by maintenance person .........................................................15
1.5.2.3 Operations by user ....................................................................................15
1.5.3 Automatic environment and data conference settings using installation file
16
1.5.3.1 Work flow before use ................................................................................16
1.5.3.2 Data to be distributed for automation ......................................................17
1.5.3.3 Operations by maintenance person .........................................................18
1.5.3.4 Operations by user ....................................................................................27
1.6 Installation .............................................................................................................28
1.7 New installation ....................................................................................................29
1.8 Program file update ..............................................................................................37
1.8.1 Update using installation file ...........................................................................37
1.8.2 Update using FTP .............................................................................................42
1.8.2.1 Update by maintenance person................................................................42
1.8.2.2 Update by Softphone user ........................................................................44

- ii -
1.8.3 Update from Softphone....................................................................................45
1.8.4 Update from the Start menu ............................................................................49
1.9 Uninstallation ........................................................................................................54
Chapter 2 SP350 Maintenance Settings .............................................................. 59
2.1 SP350 [Maintenance] screen ................................................................................60
2.1.1 Category Display area ......................................................................................61
2.1.2 Setting Item Display area .................................................................................61
2.1.3 Concise Description Display area ...................................................................61
2.1.4 Control Key Display area .................................................................................61
2.2 Starting or Ending SP350 Maintenance Setting function ...................................62
2.2.1 Starting SP350 Maintenance Setting function ................................................62
2.2.1.1 Password ...................................................................................................63
2.2.2 Ending SP350 Maintenance setting function .................................................64
2.2.3 Switching displayed content in Setting Item Display area ............................64
2.2.4 Restoring settings to default values ...............................................................65
2.2.5 Saving settings .................................................................................................65
2.3 Method of SP350 maintenance settings ..............................................................66
2.3.1 Network Setting ................................................................................................67
2.3.1.1 IP Telephony Server ..................................................................................67
2.3.1.2 User Presence ...........................................................................................69
2.3.1.3 Data Conference ........................................................................................70
2.3.1.4 Software Update ........................................................................................71
2.3.1.5 Directory Service .......................................................................................72
2.3.2 System Setting .................................................................................................74
2.3.2.1 ACD Setting ...............................................................................................77
2.3.2.2 OAI Key Setting .........................................................................................78
2.3.3 Security .............................................................................................................79
2.3.4 Audio Setting ....................................................................................................81
2.3.5 Import/Export ....................................................................................................82
2.3.5.1 Import .........................................................................................................83
2.3.5.2 Export .........................................................................................................86
2.4 Setting the time .....................................................................................................89
2.5 Setting the sound device (Regular mode only) ..................................................92
2.6 About DirectX version ........................................................................................ 102
2.7 About using Core Audio ..................................................................................... 103
Chapter 3 Starting or Ending SP350 ...................................................................105
3.1 Starting SP350 .................................................................................................... 106
3.2 Ending SP350 ...................................................................................................... 107
3.3 How to confirm the version and the operation mode of SP350 ....................... 108
3.4 About Windows XP Service Pack 2 supports ................................................... 109

- iii -
3.4.1 Execute the tool to disable the SP350 firewall ............................................. 109
3.4.2 Disable the firewall upon starting SP350 after Windows XP Service Pack 2 is
applied ............................................................................................................ 110
3.4.3 Disable the firewall manually in advance ..................................................... 111
3.5 About the firewall in Windows XP Service Pack 1 or earlier ............................ 113
3.5.1 Disable the Internet connection firewall ....................................................... 113
Chapter 4 Configuring Directory Search Service in Information Search.........115
4.1 Outline of service ................................................................................................ 116
4.2 Configuration Flow ............................................................................................. 116
4.2.1 Installation of the Directory Search Rule File and the Phone Number
Normalization Rule File .................................................................................. 116
4.2.1.1 Method by Automating the Installation Files ......................................... 117
4.2.1.2 Procedure of Automation........................................................................ 117
4.2.1.3 Method by Manually Copying Files ........................................................ 121
4.2.1.4 About Update ........................................................................................... 121
4.2.2 Directory Service Configuration of Maintenance Settings .......................... 122
4.2.2.1 Correspondence of LDAP Attribute Values in Maintenance Settings .. 122
4.2.3 Phonebook Settings in User Configurations ................................................ 124
4.3 Directory Search Rule File ................................................................................. 125
4.3.1 Overview ......................................................................................................... 125
4.3.2 Content of a Directory Search Rule .............................................................. 125
4.3.3 Basic Structure of the Configuration File ..................................................... 126
4.3.4 System variables ............................................................................................ 126
4.3.5 Pattern recognition ........................................................................................ 127
4.3.6 Replacement Character String ...................................................................... 127
4.3.6.1 Usable Variables ...................................................................................... 127
4.3.6.2 LDAP filter escape rule prefix ................................................................. 128
4.3.6.3 Default Part Matching Rule Specification Prefixes ............................... 128
4.3.6.4 Special character strings ........................................................................ 128
4.3.6.5 Special Options of Replacement Character Strings ............................. 129
4.3.7 About Debugging of the Configuration File ................................................. 129
4.4 Phone Number Normalization Rule Configuration File .................................... 130
4.4.1 Overview ......................................................................................................... 130
4.4.2 Content of the Configuration File .................................................................. 130
4.4.3 Basic Structure of the Configuration File ..................................................... 131
4.4.4 System Variables ........................................................................................... 131
4.4.5 Pattern Recognition ....................................................................................... 131
4.4.6 Replacement Character String ...................................................................... 132
4.4.6.1 Usable Variables ...................................................................................... 132
4.4.6.2 Special Character Strings ....................................................................... 132
4.4.7 About Debugging of the Configuration File ................................................. 132

- iv -
Chapter 5 Use Invisible mode .............................................................................133
5.1 Service general description ............................................................................... 133
5.2 Setting ................................................................................................................. 133
5.3 Service Condition ............................................................................................... 133
5.4 Use Invisible mode ............................................................................................. 133
5.4.1 User setting .................................................................................................... 133
5.4.2 Version Information dialog ............................................................................ 133
5.4.3 A Toolbar panel for maintenance .................................................................. 134
Appendix Procedure for Hiding the NEC Logos on the Panels .......................135

- v -


Chapter 1 SP350 Setup Procedure
- 1 -
Chapter 1 SP350 Setup Procedure
This chapter describes the SP350 setup procedure.
PC operating environment
Peripheral equipment (voice communication devices)
Peripheral equipment (video camera)
Network environment
SP350 installation method

Chapter 1 SP350 Setup Procedure
- 2 -
1.1 PC operating environment
1.1.1 Regular mode
To install SP350 regular mode, the following operating environments are required.
On the PC other than normal one, OS (such as Linux, MAC or OS), or special edition (Embedded)
that does not fulfill the conditions described in the table below, SP350 cannot be used.
Item Operating environment
PC NEC PC98-NX series or IBM-PC/AT compatible
OS Windows 8 (64bit)(32bit) Enterprise, Pro (Note 1) (Note 2)
Windows 7 SP1 (64bit)(32bit) Ultimate, Enterprise, Professional (Note 2)
Windows Vista SP2 (32bit) (Note 2)
Windows XP SP3 (Note 2) (Note 3) / 2000 SP4 (Note 2) (Note 7)
* DirectX version 8.1 or later is required.
Memory (Note 4)
Windows 8
Installation space: 1 GB or more (32bit), 2 GB or more (64bit)
Free space: 128 MB or more (Note 5)
Windows 7
Installation space: 1 GB or more (32bit), 2 GB or more (64bit)
Free space: 128 MB or more (Note 5)
Windows Vista
Installation space: 512 MB or more (Recommended: 1 GB or more)
Free space: 128 MB or more (Note 5)
Windows XP/2000
Installation space: 256 MB or more (Recommended: 512 MB or more)
Free space: 128 MB or more (Note 5)
When using in a data conference:
Installation space: 512 MB or more (Recommended: 1 GB or more)
Free space (without video conference): 256 MB or more (Note 5)
Free space (with video conference): 384 MB or more (Note 5)
CPU Windows 7/Windows 8
Pentium III 1 GHz or more
Windows XP/2000/Vista
Pentium III 800 MHz or more
(Recommended: Pentium III 1 GHz or more)
When using in a data conference:
Desktop PC: Pentium4 2 GHz or more
Laptop PC: Pentium 1 GHz or more
HDD Free space: 150 MB or more (Note 6)
Notes:
(1) Windows 8 unmarked edition is not supported on SP350.
(2) The Administrator authority is required when installing or upgrading the software.
The operation on the native mode (Windows XP Mode/ Windows Virtual PC) or compatible
mode is not guaranteed.
When Windows7/Windows 8 64 bit is used, SP350 runs on WOW64.
(3) Windows XP Professional x64 Edition cannot be used.
(4) Save memory space recommended by Microsoft per OS.
(5) Memory free space is the difference between "total commit charge" and "total physical
memory" in the task manager.

Chapter 1 SP350 Setup Procedure
- 3 -
(6) Spaces for phone recording/voicemail are not included in the spaces shown above.
When using the phone recording or voice mail function, the recorded voice is saved as a sound
file (.wav format). The file size for phone recording would be approximately 960 KB per minute
for a PCM format (sound quality: PCM16 bit/8 kHz monaural), or approximately 95 KB per
minute for a GSM6.1 format (sound quality: GSM6.1 8 kHz monaural). Prepare your hard disk
considering spaces to save those voice recording files.
(7) Windows 2000 is already finished Microsoft support service by 07/30/2010.
The following software is required to be installed to PC.
Software name Version Remarks
DirectX Ver9.0c or later In the case of unapplied PC:
Installation is required (included in the SP350 main program)
Microsoft XML Ver4.0 or later (This software is installed at the same time of SP350 main program installation.)
Microsoft.Net Framework
Ver2.0 or 3.0
or 3.5 or 4.0 (Note 1)
(This software is installed at the same time of SP350 main program installation.(Note 2) )
VC Runtime VC7.0/8.0/9.0/10.0 (This software is installed at the same time of SP350 main program installation.)
SkyPDF for SoftPhone
Ver1.0 or later (This software is installed at the same time of SP350 main program installation.)
Adobe Flash Player Ver9.0 or later Please obtain a copy of Adobe Flash Player for Microsoft Internet Explorer from Adobe Systems web site or other download location which posts Adobe Flash Player.
Installation of the application should be done after the SP350 has been completed.
Note 1: Ver 4.0 is only for Windows 7.
Note 2: Windows 8 has to enable “.Net Framework 3.5 (Include .Net 2.0 and 3.0)” for [Control
Panel] -> [Program and Feature] -> [Windows Feature Enable or Disable].
Note: To share or save documents in a data conference, Microsoft Office (2000/XP/2003/2007
/2010/2013) is required to be installed to your PC.
The following Microsoft Office software is required depending on the file format of
documents to be shared.
Text : Word
PowerPoint : PowerPoint
Excel : Excel
Word : Word

Chapter 1 SP350 Setup Procedure
- 4 -
1.1.2 Thin Client
The Thin Client cannot be used in UNIVERGE SV8300.
To install SP350 Thin Client, the following operating environments are required.
On the PC other than normal one, OS (such as Linux, MAC or OS), or special edition (Embedded)
which does not fulfill the conditions described in the table below, SP350 cannot be used.
[VPCC mode]
Operating environment
Thin client terminal US100, US110 or US60 (Note 1)
Remote Desktop Connection (64bit) (32bit) terminal (hereinafter written as RDC terminal) (Note 2)
Virtual PC server Express 5800/VPCC Virtual PC server (My virtual PC type)
OS
(Virtual PC server)
Windows 8 (64bit) (32bit) Enterprise, Pro (Note 3) (Note 5)
Windows 7 SP1 (64bit) (32bit) Ultimate, Enterprise, Professional (Note 3)
Windows Vista SP2 (32bit) (Note 3)
Windows XP Professional SP3 (Note 3) (Note 4)
* DirectX version 8.1 or later is required.
Memory (Note 6)
(Virtual PC server)
When US100, US110 or US60 is used
Windows 7/Windows 8
Installation space: 1 GB or more (32bit), 2 GB or more (64bit)
Free space: 128 MB or more (Note 7)
Windows Vista
Installation space: 512 MB or more
(Recommended: 1 GB or more)
Free space: 128 MB or more (Note 7)
Windows XP
Installation space: 256 MB or more
(Recommended: 512 MB or more)
Free space: 128 MB or more (Note 7)
When using in a data conference:
Installation space: 1 GB or more (Recommended: 1 GB or more)
Free space (without video conference): 256 MB or more (Note 7)
Free space (with video conference): 384 MB or more (Note 7)
HDD
(Virtual PC server)
Free space: 150MB or more (Note 8)
Note:
(1) In US100/US110, the firmware corresponding to the telephone call is necessary.
US60 cannot support the voice call in the hand set.
(2) On Remote Desktop Connection terminal, the dedicated license software SP350 SV LICENSE
for VPCC is required to be installed.
(3) The Administrator authority is required when installing or upgrading the software.
The operation on the native mode (Windows XP Mode/ Windows Virtual PC) or compatible
mode is not guaranteed. When Windows 7/Windows 8 64 bit is used, SP350 runs on WOW64.
(4) Windows XP Professional x64 Edition cannot be used
(5) Save memory space recommended by Microsoft per OS.
(6) Windows 8 unmarked edition is not support by SP350.
(7) Memory free space is the difference between "total commit charge" and "total physical
memory" in the task manager.

Chapter 1 SP350 Setup Procedure
- 5 -
(8) Spaces for phone recording/voicemail are not included in the spaces shown above.
When using the phone recording or voice mail function, the recorded voice is saved as a sound
file (.wav format). The file size for phone recording would be approximately 480 KB per minute
for a PCM format (G.711/8 kHz monaural), or approximately 95 KB per minute for a GSM6.1
format (sound quality: GSM6.1 8 kHz monaural).
Prepare your hard disk considering spaces to save those voice recording files.
[Citrix]
Operating environment
Thin client terminal US40c, US110c or US300c (Note 1) (Note 2)
Remote Desktop Connection (64bit) (32bit) terminal (hereinafter written as RDC terminal) (Note 2)
Virtual PC server XenDesktop 5.5
OS
(Virtual PC server)
Windows 7 (64bit) (32bit) (Note 3)
Windows Vista SP2 (64bit) (32bit) (Note 3)
Windows XP SP2 (64bit)
Windows XP SP3 (32bit)
Memory (Note 6)
(Virtual PC server)
When US40c, US110c or US300c is used
Windows 7
Installation space: 1 GB or more
Free space: 128 MB or more (Note 7)
Windows Vista
Installation space: 512 MB or more
(Recommended: 1 GB or more)
Free space: 128 MB or more (Note 7)
Windows XP
Installation space: 256 MB or more
(Recommended: 512 MB or more)
Free space: 128 MB or more (Note 7)
When using in a data conference:
Installation space: 1 GB or more (Recommended: 1 GB or more)
Free space (without video conference): 256 MB or more (Note 7)
Free space (with video conference): 384 MB or more (Note 7)
HDD
(Virtual PC server)
Free space: 150MB or more (Note 8)
Note:
(1) In US110c cannot support the voice call in the handset either headset.
Only it can be use voice call for phone collaboration feature is available.
(2) On the except US110c terminals, the dedicated license SP350 SV LICENSE for THINCL is
required.
(3) The Administrator privilege is required when installing or upgrading the software.
The operation on the native mode (Windows XP Mode/ Windows Virtual PC) or compatible
mode is not guaranteed. When Windows 7/Windows 8 64 bit is used, SP350 runs on WOW64.

Chapter 1 SP350 Setup Procedure
- 6 -
(6) Save memory space recommended by Microsoft per OS.
(7) Memory free space is the difference between "total commit charge" and "total physical
memory" in the task manager.
(8) Spaces for phone recording/voicemail are not included in the spaces shown above.
When using the phone recording or voice mail function, the recorded voice is saved as a sound
file (.wav format). The file size for phone recording would be approximately 480 KB per minute
for a PCM format (G.711/8 kHz monaural), or approximately 95 KB per minute for a GSM6.1
format (sound quality: GSM6.1 8 kHz monaural).
Prepare your hard disk considering spaces to save those voice recording files.
The following software is required to be installed to PC (Virtual PC/ Virtual PC server).
Software name Version Remarks
DirectX Ver9.0c or later When this software is not installed:
Installation is required (included in the SP350 main program)
About install method, refer to “2.6 About Direx version”.
Microsoft XML Ver4.0 or later (This software is installed at the same time of SP350 main program installation.)
Microsoft .Net
Framework
Ver2.0 or 3.0 or
3.5or 4.0(Note 1
)
(This software is installed at the same time of SP350 main program installation. (Note 2))
VC Runtime VC7.0/8.0/ 9.0/10/0
(This software is installed at the same time of SP350 main program installation.)
SkyPDF for SoftPhone Ver1.0 or later (This software is installed at the same time of SP350 main program installation.)
Adobe Flash Player Ver9.0 or later
Please obtain a copy of Adobe Flash Player for
Microsoft Internet Explorer from Adobe Systems
web site or other download location which posts
Adobe Flash Player.
Installation of the application should be done after
the SP350 has been completed.
Note 1: Ver 4.0 is only for Windows 7.
Note 2: Windows 8 has to enable “.Net Framework 3.5 (Include .Net 2.0 and 3.0)” for [Control
Panel] -> [Program and Feature] -> [Windows Feature Enable or Disable].

Chapter 1 SP350 Setup Procedure
- 7 -
1.2 Peripheral equipment (voice communication devices)
1.2.1 Regular mode
A USB handset, headset or collaborated terminal is required for voice communications.
Note that one unused USB port is required on the PC to use the USB handset or USB headset.
Connect the USB handset or USB headset directly to this port. Do not connect via
USB-HUB.
Note: When using the USB handset or USB headset in combination with a USB camera,
connecting the USB port close to that of USB camera may impact the voice sounds.
In such a case, connect those devices with a distance as far as possible between USB
ports.
Equipment Item Name Off-hook
detection
Support OS
Windows 8
(Note 8)
Windows 7
(Note 8)
Windows
Vista
Windows
XP
USB
Handset
UTR-1W-1(BK) (NOTE1)
FW version 5.0 or later
Available
x x x x
UTR-1W-1(BK) (NOTE1)
Before FW version 5.0
x
(Note 3)
x
(Note 3) x x
UTR-1-1RS(BK)
(NOTE1) (NOTE2) - - x x
UTR-1-1(BK)
(NOTE1) (NOTE2) - - x x
USB
Headset
・Voyager510-USB
N/A
(Note 5)
x x x x
・VoyagerPro-UC x x x x
・SAVI-GO x x x x
・HW251N+DA45R
USB HEADSET
-
x x x x
・HW251N+DA45
USB HEADSET x x x x
・HW251N+DA40R
USB HEADSET x x x x
・H251N+DA40
USB HEADSET x x x x
・DSP400 HEADSET-NE
(NOTE 3) - - x x
Mobile
Phone - (NOTE 6) - x x x x
Fixed
Phone - (NOTE 7) - x x x x

Chapter 1 SP350 Setup Procedure
- 8 -
Note:
(1) The device that can be connected to the headset connector is HW251N-U10P.
(2) Upgrade from SP30 is supported.
(3) A firmware upgrade is required.
(4) The USB Bluetooth adaptor is necessary.
(5) The call control button of the headset cannot be used.
(6) The SV8300 only supports PS (PHS/PCS) for collaboration.
(7) The SV8300 does not support Fixed phone collaboration.
(8) This is common to 32bit and 64bit.
1.2.2 VPCC mode (When using US110/US100/US60)
Either the handset or the headset is necessary as the equipment for the call.
They don’t depend on the OS on virtual PC.
Equipment Item Name Off-hook
detection
Thin Client Terminals
US110 US100 US60
Handset USHST A-A N/A x x -
Headset P251N-U10P
HW251N-A10 N/A x x -
USB
Handset UTR-1W-1(BK) Available x - -
Mobile
Phone - - x x x
Fixed
Phone - - x x x
You can get the latest information at the following Web site.
http://www.nec.co.jp/apex/sp350/
Described in "Specification/Operating conditions" in "About SP350"

Chapter 1 SP350 Setup Procedure
- 9 -
1.2.3 VPCC mode (When using RDC Terminal/US40c/US300c)
Either the handset or the headset is necessary as the equipment for the call.
They don’t depend on the OS on virtual PC.
Equipment Item Name Off-hook
detection
Thin Client Terminals
Windows 8
(Note 1)
Windows 7
(Note 1)
Windows
Vista
Windows
XP
USB
Handset UTR-1W-1(BK) Available x x x x
USB
Headset
Voyager510-USB N/A
(Note 2)
x x x x
VoyagerPro-UC x x x x
SAVI-GO x x x x
HW251N+DA45R
-
x x x x
HW251N+DA45 x x x x
H251N+DA40 - - x x
Mobile
Phone - - x x x x
Fixed
Phone - - x x x x
Note:
(1) This is common to 32bit and 64bit.
(2) The call control button of the headset cannot be used.
You can get the latest information at the following Web site.
http://www.nec.co.jp/apex/sp350/
Described in "Specification/Operating conditions" in "About SP350"

Chapter 1 SP350 Setup Procedure
- 10 -
1.3 Peripheral equipment (video camera)
The information is described in "Specification/Operating conditions" in "About SP350".
Note: In the case of Thin Client, Video transmission is not available.
1.4 Network environment
1.4.1 Regular mode
The IP telephony server UNIVERGE SV8500, UNIVERGE SV7000 (R24 or later), UNIVERGE
NEAX 2400 IPX with SIP BOX (R24 or later) or UNIVERGE SV8300 (R4 or later) is required for
using SP350.
If you use a firewall on currently using network, set IP address and unblock the port in advance to
enable voice communication and applications in accordance with the following table.
[Ports to be unblocked for use through firewall]
SP350 Unblock direction The other equipment
Port item Protocol
Port number for call control UDP Bidirectional SV8500/SV7000 /SV8300(VoIP server)
Presence server
Port number for voice data (RTP)
UDP Bidirectional
IP-PAD
Bidirectional
IP terminal
Port number for voice data +1 (RTCP)
UDP Bidirectional
IP-PAD
Bidirectional
IP terminal
Application
Port number for collaboration control
Video port number
UDP Bidirectional SP350
Port number for control (for data conference)
TCP Bidirectional SP350
Notes:
(1) For IP address of UNIVERGE SV8500 (or UNIVERGE SV7000/UNIVERGE NEAX 2400
IPX/SV8300), contact the installation technician.
(2) VoIP server is the IP telephony server.

Chapter 1 SP350 Setup Procedure
- 11 -
1.4.2 Thin Client
If a firewall is used on the network you are using, set up the IP address and port release in advance
according to the table below so that voice communication and applications can be used.
[Firewall Port Number Release Table]
SP350 Direction of
Release Counterpart Device
Device Port Item Protocol
VPC side
Port number for call control
UDP
Bidirectional SV8500/SV7000/IPX
(VoIP server)
presence server
Port number for call control
UDP
Bidirectional US100, US110,
US60
Port for PC recording (* )
UDP
Receiving
direction
US110
Port number for application
collaboration control
Video port number
UDP
Bidirectional SP350
Port number for control (Data
conference) TCP
Bidirectional SP350
US100/
US110/
US60/
US40c/
US300c/
RDC
terminal
side
Port number for call control
UDP
Bidirectional VPC
Port number for voice data
(RTP)
UDP
Bidirectional IP-PAD
Bidirectional Each IP terminal
Port number for voice data+1
(RTCP)
UDP
Bidirectional IP-PAD
Bidirectional Each IP terminal
Port for PC recording (RTP)
(* )
UDP
Sending
direction
VPC that is running
SP350
* The same port number for call control may be selected on the VPC side and the
US100/S110/US60/US40c/US300c/RDC terminal side.
* Regarding the IP addresses of UNIVERGE SV8500, UNIVERGE SV7000 or IP-PAD, please inquire
the person in charge of construction.
* The VoIP server denotes the Communication server.
* The port for PC recording is acquired within the range of port numbers for voice data on both the VPC
side and US110 side.

Chapter 1 SP350 Setup Procedure
- 12 -
1.5 Methods of SP350 installation
There are three ways to set the SP350 environment as shown below.
The following part describes the operations for maintenance person and the operations for user in each
method.
When a maintenance person performs the environment settings (issued Setup.exe is used without
change).
Refer to "1.5.1 Environment settings performed by a maintenance person" in Chapter 1.
To perform the environment settings using configuration file (issued Setup.exe is used without
change).
Refer to "1.5.2 Environment settings using configuration file" in Chapter 1.
To perform environment settings automatically using installation file (the installation file is created by
a maintenance person).
Refer to "1.5.3 Automatic environment settings using installation file" in Chapter 1.
[Environment setting method and workload]
Environment setting method Workload of
maintenance person Workload of user
Environment settings by user Light
Heavy
Heavy
Light
Environment settings by configuration file
Automatic environment settings at installation

Chapter 1 SP350 Setup Procedure
- 13 -
Operations by maintenance person
[1] Prepare the installation file
[4] Start SP350
[2] Distribute the installation file to users
Operations by user
[1] Obtain the installation file
[2] Execute the installation file
[3] Perform the environment settings
Distribution
1.5.1 Environment settings performed by a maintenance person
1.5.1.1 Work flow before use
Work flow before using SP350 is shown below.
1.5.1.2 Operations by maintenance person
The procedure to the point of an installation file distribution to user by maintenance person is described
below.
Step1. Prepare the installation file (Setup.exe) under the CD’s root directory.
Step2. Distribute the installation file obtained in Step1 (Setup.exe) to user.
1.5.1.3 Operations by user
The following describes user’s work operations required to start SP350.
Step1. Obtain the installation file (Setup.exe) from the maintenance person.
Step2. Execute the installation file.
For the installation procedure, refer to "1.7 New Installation" in Chapter 1.
Step3. Activate the SP350 maintenance setting function to perform the environment settings.
For the use of the maintenance setting function, refer to "Chapter 2 SP350 Maintenance
Settings".
Step4. Start SP350.
For the starting procedure and use of SP350, refer to the User Guide (*).
(*) Start from [Start]>[All Programs]>[ UNIVERGE Soft Client SP350]>[SP350 User
Guide]. For Windows 8, right-click on start Screen then [All apps] > [UNIVERGE Soft
Client SP350] > [SP350 User Guide].

Chapter 1 SP350 Setup Procedure
- 14 -
1.5.2 Environment settings using configuration file
1.5.2.1 Work flow before use
The following describes the work flow before use.
Operations by maintenance person
[1] Prepare the installation file
[2] Execute the installation file
Operations by user
[1] Obtain the installation file [5] Distribute the installation file to users
[6] Distribute the configuration file
[4] Output the configuration file
[3] Perform the environment settings
[2] Obtain the configuration file
[3] Execute the installation file
[4] Read the configuration file
[5] Start SP350
Distribution
Distribution

Chapter 1 SP350 Setup Procedure
- 15 -
1.5.2.2 Operations by maintenance person
The following describes the work flow before distributing an installation file to user.
Step1. Prepare the installation file (Setup.exe) under the CD’s root directory.
Step2. Execute the installation file to install SP350 to the maintenance person’s PC.
For the installation procedure, refer to "1.7 New Installation" in Chapter 1.
Step3. Activate the SP350 maintenance setting function to perform the environment settings.
For the use of the maintenance setting function, refer to "Chapter 2 SP350 Maintenance
Settings".
Step4. Output the configuration file (the setting information, which has been set in Step3 using
the maintenance setting function, to a file).
For the file output procedure of the setting information, refer to "Chapter 2 SP350
Maintenance Settings".
Step5. Distribute the installation file obtained in Step1 (Setup.exe) to user.
Step6. Distribute the configuration file which has been output in Step4 to user.
1.5.2.3 Operations by user
The following describes user’s work operations required to start SP350.
Step1. Obtain an installation file (Setup.exe) from the maintenance person.
Step2. Obtain the configuration file from the maintenance person.
Step3. Execute the installation file to perform the installation.
For the installation procedure, refer to "1.7 New Installation" in Chapter 1.
Step4. Using the maintenance setting function, read the configuration file obtained from the
maintenance person.
For the use of the maintenance setting function and how to read the file, refer to "Chapter
2 SP350 Maintenance Settings".
Step5. Start SP350.
For the starting procedure and use of SP350, refer to the User Guide (*).
(*) Start from [Start]>[All Programs]>[ UNIVERGE Soft Client SP350]>
[SP350 User Guide]

Chapter 1 SP350 Setup Procedure
- 16 -
1.5.3 Automatic environment and data conference settings using installation
file
1.5.3.1 Work flow before use
The following three patterns are available for automatic environment and data conference settings
using installation file.
I : Both "environment settings" and "data conference settings" are automated using installation
file.
II : Only "environment settings" are automated using installation file.
III : Only "data conference settings" are automated using installation file.
The work flow before use varies depending on the work for I to III by maintenance person.
Work flow before using SP350 is shown below.
Operations by maintenance person
[1] Prepare the installation file (I, II, and III)
[2] Execute the installation file (I, II, and III)
Operations by user
[5] Perform the data conference settings (I and III)
[6] Output the configuration file (I and III)
[4] Output the configuration file (I and II)
[3] Perform the environment settings (I and II)
[1] Obtain the installation file
[2] Execute the installation file
[3] Start SP350
Distribution
[7] Compress the installation file (I, II, and III)
[8] Distribute the installation file to users
(I, II, and III)
(Note)
(Note)
Note: This work is required when data conference settings are customized. It can be omitted if they
are not customized.

Chapter 1 SP350 Setup Procedure
- 17 -
1.5.3.2 Data to be distributed for automation
When environment settings and data conference settings are automated using installation file, data that
can be distributed are as follows.
Automation Target
Data to be Distributed
Environment settings
Data to be set by the maintenance setting
Network setting
System setting
Security setting
Audio setting
Data conference settings
Data to be set by the "Tool" menu (Note 1)
Data to be set by the "View" menu (Note 1)
Data conference screen data
Screen Coordinate on the upper left corner
(Note 2)
Width (Note 2)
Height (Note 2)
Status
Proportion of the pane
Horizontal direction
Vertical direction
Chat screen Position (Note 2)
Width (Note 2)
Height (Note 2)
Status
(Note 1) The following functions are not distributed.
Automatic save destination path for the communication board
Automatic save destination path for the chat
(Note 2) These items may not be reflected depending on the resolution.

Chapter 1 SP350 Setup Procedure
- 18 -
1.5.3.3 Operations by maintenance person
The procedure to the point of an installation file distribution to user by maintenance person is described
below.
Perform the work according to the installation patterns I to III.
Step1. Prepare the installation file. (I, II, and III)
Prepare the following 10 files for installation under the "install" directory in the CD.
data1.cab
data1.hdr
data2.cab
ISSetup.dll
layout.bin
setup.exe
setup.ini
setup.inx
Ver.dat
_Setup.dll
Step2. Execute the installation file. (I, II, and III)
Execute "Setup.exe", which is one of the obtained 10 files for installation, to install SP350
to the maintenance person’s PC.
Step3. Activate the SP350 maintenance setting function (environment setting tool) to perform the
environment settings. (I and II)
For the use of the maintenance setting function, refer to "Chapter 2 SP350 Maintenance
Settings". Also, after SP350 starts, set information regarding the SP350 operation on the
user setting screen.
Step4. Output the configuration file for environment settings. (I and II)
Output the information, which has been set using the maintenance setting function in
Step3, to a file. Save this information with the file name of "SP350AutoConf.ini".
Otherwise, the environment setting cannot be performed automatically. For the procedure
of outputting the setting information, refer to "2.3.5.2 Export" in Chapter 2.
Step5. Activate the data conference to perform the data conference settings by following "How to
Use a Data Conference" - "Starting a Data Conference" in the UNIVERGE Soft Client
SP350 User Guide. (I and III)
For how to set the data conference settings, refer to "How to Use a Data Conference" -
"How to Use Various Settings" in the UNIVERGE Soft Client SP350 User Guide.
Chapter 1 SP350 Setup Procedure
- 19 -
Step6. Output the configuration file for data conference settings. (I and III)
After setting various types of information for the data conference, output the information,
which has been set in Step5 to a file using the import/export function. Save this
information with the file name of "SP350DataMeetingAutoConf.xml". Otherwise, the data
conference setting cannot be performed automatically. For the procedure of outputting
the setting information, refer to "Import/Export" - "Using Import" in the UNIVERGE Soft
Client SP350 User Guide.
Step7. Create the installation file with the environment or data conference settings. (I, II, and
III)
Create an installation file to distribute to user (Setup.exe).
The following sub-steps describe how to compress the file using "IExpress" which is
included in Windows.
Sub-Step7-1. Click [Start Search] in the [Start] menu. (Note)
Note: In case of Windows 8, right-click on Start screen and [All apps] -> [Windows
System tool] -> [Run…].
Sub-Step7-2. Enter "IExpress" in the [Start Search] field and press the Enter key to start
IExpress Wizard.
The following screen appears.

Chapter 1 SP350 Setup Procedure
- 20 -
Sub-Step7-3. Click [Next] in the "Welcome to IExpress 2.0" screen until the "Package title"
screen appears.
Sub-Step7-4. Enter "SP350" and click [Next] until the following screen appears.
Sub-Step7-5. Click [Add] on the "Package files" screen.
The following screen appears.

Chapter 1 SP350 Setup Procedure
- 21 -
Sub-Step7-6. Select all the installation files (10 files) prepared in Step1 and click [Open].
The following screen appears.
Sub-Step7-7. Confirm that all 10 files are listed, and click [Add] again.
The following screen appears.

Chapter 1 SP350 Setup Procedure
- 22 -
Sub-Step7-8. Select the configuration file for environment settings or for data conference
settings output in Step4 or Step6 and click [Open].
Notes:
(1) The configuration file for environment settings (ini format) exported with the
maintenance setting function or the configuration file for data conference
settings (xml format) exported with the import/export function can be used for
the simple installation.
(2) The relationship between the files to be added in this step and the installation
patterns are as follows.
I : Configuration file for environment settings and configuration
file for data conference settings
II : Only configuration file for environment settings
III : Only configuration file for data conference settings
The following screen appears.

Chapter 1 SP350 Setup Procedure
- 23 -
Sub-Step7-9. Confirm that all the file names selected in Sub-Step7-6 and Sub-Step7-8 are
listed. Click [Next] until the "Installation Program to Launch" screen appears.
Note: File names to be displayed in the list box are as follows.
data1.cab
data1.hdr
data2.cab
ISSetup.dll
layout.bin
setup.exe
setup.ini
setup.inx
Ver.dat
_Setup.dll
SP350AutoConf.ini
(added in the case of I and II)
SP350DataMeetingAutoConf.xml
(added in the case of I and III)
Sub-Step7-10. Select "Setup.exe" in [Install Program]. ([Post Install Command] should be "None"
(default).) Then click [Next] until the "Package Name and Options" screen
appears.
Installation files
Configuration file configuration
file for environment settings
Configuration file configuration
files for data conference settings

Chapter 1 SP350 Setup Procedure
- 24 -
Sub-Step7-11. Enter "Setup.exe" and check the "Store files using Long File Name inside
Package".
Note: The destination of the compressed installation program to output varies
depending on the specification in the input field.
When entering only "Setup.exe":
c:\Users\<login name for windows> (Windows Vista, Windows 7 or
Windows 8)
c:\Documents and Setting\<login name for windows> (Other than
Windows Vista, Windows 7 or Windows 8)
When clicking [Browse] to specify a destination folder, or entering a file
name with full-qualified path:
Under the specified folder (folder under the input path)
The following screen appears.
Sub-Step7-12. Click [Yes] on the confirmation dialog. Then, click [Next] until the "Save Self
Extraction Directive" screen appears.

Chapter 1 SP350 Setup Procedure
- 25 -
Sub-Step7-13. Select "Don’t save". Then click [Next] until the "Create package" screen appears.
Indicating the command prompt screen starts compressing the installation
program.
Sub-Step7-14. Wait until the following screen appears.
Sub-Step7-15. Click [Finish].
Note: The destination of the compressed installation program to output varies
depending on the specification in the input field on Sub-Step7-11.
When entering only "Setup.exe":
c:\Users\<login name for windows> (Windows Vista, Windows 7 or
Windows 8)
c:\Documents and Setting\<login name for windows> (Other than
Windows Vista, Windows 7 or Windows 8)
When clicking [Browse] to specify a destination folder, or entering a file
name with full-qualified path:
Under the specified folder (folder under the input path).

Chapter 1 SP350 Setup Procedure
- 26 -
Step8. Distribution of the installation file (Setup.exe) to user. (I, II, and III)
Distribute the file created in Step7 to user.
Step9. Output the configuration file for environment settings. (III and when the environment
settings are performed by the configuration file for environment settings)
Activate the maintenance setting function to output the configuration file for environment
settings.
For the procedure of outputting the setting information, refer to "Chapter 2 SP350
Maintenance Settings".
Step10. Distribution of the configuration file for environment settings to user. (III and when the
environment settings are performed by the configuration file for environment settings)
Distribute the configuration file for environment settings output in Step9 to user.

Chapter 1 SP350 Setup Procedure
- 27 -
1.5.3.4 Operations by user
The operations to be performed by user to start SP350 are described below.
For the installation pattern I or II
Step1. Obtain the installation file (Setup.exe) from the maintenance person.
Step2. Execute the installation file
Perform the installation using the obtained installation file (Setup.exe). For the installation
procedure, refer to "1.7 New Installation" in Chapter 1.
Step3. Start SP350.
For the starting procedure and use of SP350, refer to the User Guide (*).
(*) Start from [Start]>[All Programs]>[ UNIVERGE Soft Client SP350]>
[SP350 User Guide]
For the installation pattern III
When the environment settings are performed by a user
Refer to "1.5.1.3 Operations by User".
When the environment settings are performed using the configuration file for environment settings
Refer to "1.5.2.3 Operations by User".
Chapter 1 SP350 Setup Procedure
- 28 -
1.6 Installation
To install SP350, perform the following procedure.
Perform the installation with the Administrator authority.
Note that the Domain Administrator authority is required in a domain environment.
Note: If the screen operation stops during the installation, another screen may be hidden behind
the screen. In such a case, press the Windows key to check the taskbar.

Chapter 1 SP350 Setup Procedure
- 29 -
1.7 New installation
To install SP350, perform the following procedure. For the new installation, you can download an
installation file for SP350 in your hard disk first and then install the program.
Step1. Download the SP350 installation file (Setup.exe) to your hard disk, or prepare the
CD-ROM containing the installation file for SP350.
Step2. Start the installation file for SP350 (Setup.exe).
A dialog appears to indicate the wizard is been prepared.
Note: If you use Windows Vista or Windows 7, the user account controlling screen
appears after SP350 installation file (Setup.exe) starts. Clicking [continue] shows a
dialog indicating that the wizard is been prepared.
Step3. When the wizard preparation is completed, a screen to select an interface language for
Softphone operations appears.

Chapter 1 SP350 Setup Procedure
- 30 -
Step4. Select "English" and click [OK].
The wizard startup dialog appears.
Step5. Click [Next].
The "License Agreement" screen appears.
Please read the Software License Agreement.
If you accept all items, select "I accept the terms of the license agreement" and Click
[Next].

Chapter 1 SP350 Setup Procedure
- 31 -
Step6. The "VoIP server type selection" screen appears.
Select your VoIP server type and click [Next].
Step7. If you select "UNIVERGE SV8500/SV7000", the "System requirements selection" screen
appears.
Select an operating environment that meets your usage.
If you select "UNIVERGE SV8300", skip to Step8.
Select your system requirements and click [Next].

Chapter 1 SP350 Setup Procedure
- 32 -
Step8. Click [Next].
The "Choose Destination Location" screen appears.
To change the folder which has been already selected, click [Browse] to specify another
directory.
Step9. Click [Next] on the "Choose Destination Location" screen. The Select Plug-in Function
screen appears. Do not check the [Enable Plug-in for MOC/IBM Sametime] checkbox and
click [Next].
Note: If UNIVERGE SV8300 is selected on the VoIP server selection screen is selected
when selecting an operating environment, the selection screen for the Softphone
Plug-in Coordinate function is not displayed.
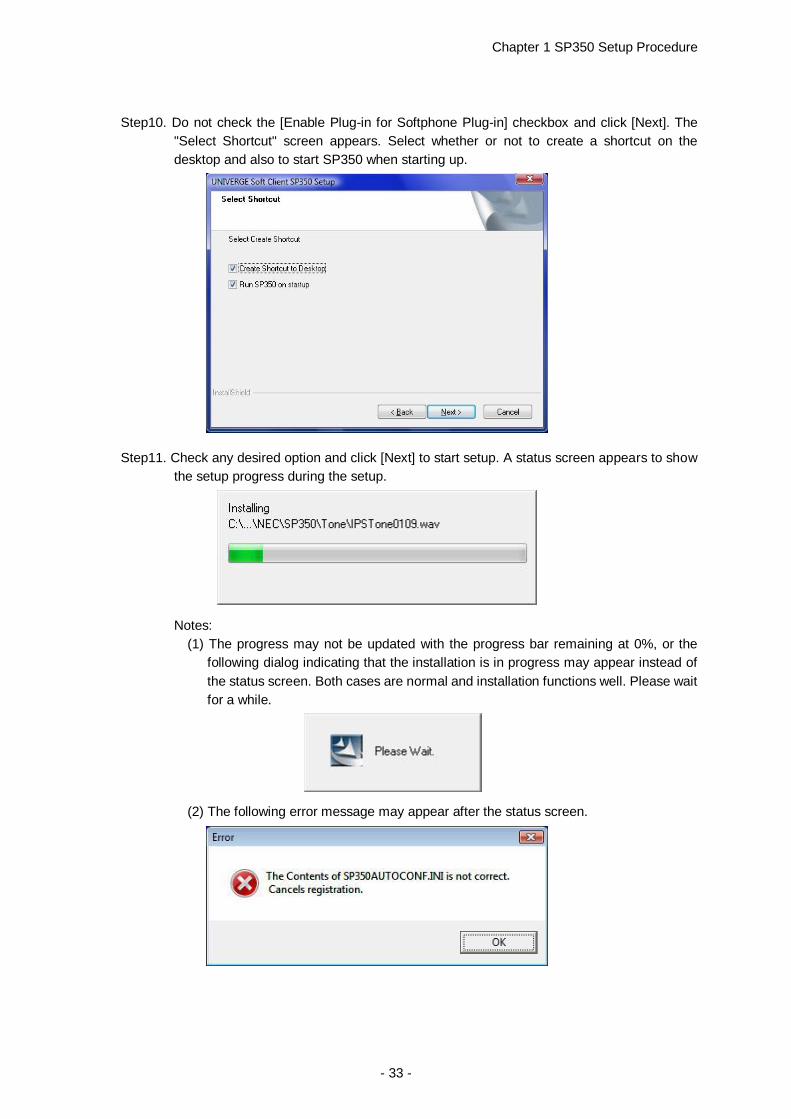
Chapter 1 SP350 Setup Procedure
- 33 -
Step10. Do not check the [Enable Plug-in for Softphone Plug-in] checkbox and click [Next]. The
"Select Shortcut" screen appears. Select whether or not to create a shortcut on the
desktop and also to start SP350 when starting up.
Step11. Check any desired option and click [Next] to start setup. A status screen appears to show
the setup progress during the setup.
Notes:
(1) The progress may not be updated with the progress bar remaining at 0%, or the
following dialog indicating that the installation is in progress may appear instead of
the status screen. Both cases are normal and installation functions well. Please wait
for a while.
(2) The following error message may appear after the status screen.

Chapter 1 SP350 Setup Procedure
- 34 -
A file available for the simple installation is only the ini file applying "Export" on
"Maintenance Setting". If another file such as a file which has been saved by
"SP350" -> "Export" -> "Environment setting" has been included, the information
cannot be set to a registry. Wait for a while even in such a case because the
installation is normally in progress.
Step12. Microsoft.NET Framework 2.0 is installed automatically.
Note that this installation is omitted if .Net Framework 2.0 has already been installed on
your PC.
Step13. The "Skin Selector" screen appears after the status screen.
Note: The "Skin Selector" screen may get behind another screen. In such a case, press
the Windows key and click "Skin Selector" on the taskbar to show the screen.
Step14. Select a screen to be used by SP350 (Standard Panel/Toolbar Panel) and Click [Next] on
the "Skin Selector" screen.
Note: The skin can be modified from the "User configurations" screen even after the
installation is completed.
Note: If Invisible Mode is selected, any panel does not displayed then it cannot be normal
operation except special operation. The Invisible Mode only need to be use with
application.
And Service condition and detail usage for Invisible Mode, please refer to “Capture
5 Use Invisible Mode”.
Also if Maintenance person set to Invisible Mode for Simple Installation then the
Panel design screen will not appear.

Chapter 1 SP350 Setup Procedure
- 35 -
Step15. The registration and start process of the services are performed.
Step16. After the registration and start process of the services are completed, SkyPDF Pro for
Softphone is installed automatically.
Step17. Click [OK].
The following screen appears.

Chapter 1 SP350 Setup Procedure
- 36 -
Caution: When you click the [OK] button on the Install Complete window of SWFTools, the
following warning message may appear. In such a case, please download Adobe®
Flash® Player from Adobe Systems Web site or other applicable Web site, and install
Adobe® Flash® Player.
In order to use Data Meeting, the installation of Adobe® Flash® Player is required.
Please install Adobe® Flash® Player for Microsoft® Internet Explorer.
Data Meeting may not work with Adobe® Flash® Player plug-ins for other browsers.
Warning Message
Step21. After completing installation, select "Yes, I want to restart my computer now." and click
[Finish] to restart your PC.
This is the end of the installation of the following.
SP350 (Softphone main program)
Maintenance settings (Maintenance configuration setting application)
Automatic startup setting (SP350 startup setting tool)
File update
Handset setting
After the new installation completes, you need to start the maintenance configuration setting application
(maintenance setting function) to perform the environment settings (for the environment settings, refer
to "Chapter 2 SP350 Maintenance Settings").
Note: In the case of a simple installation, the environment setting by the maintenance setting function is
not required.
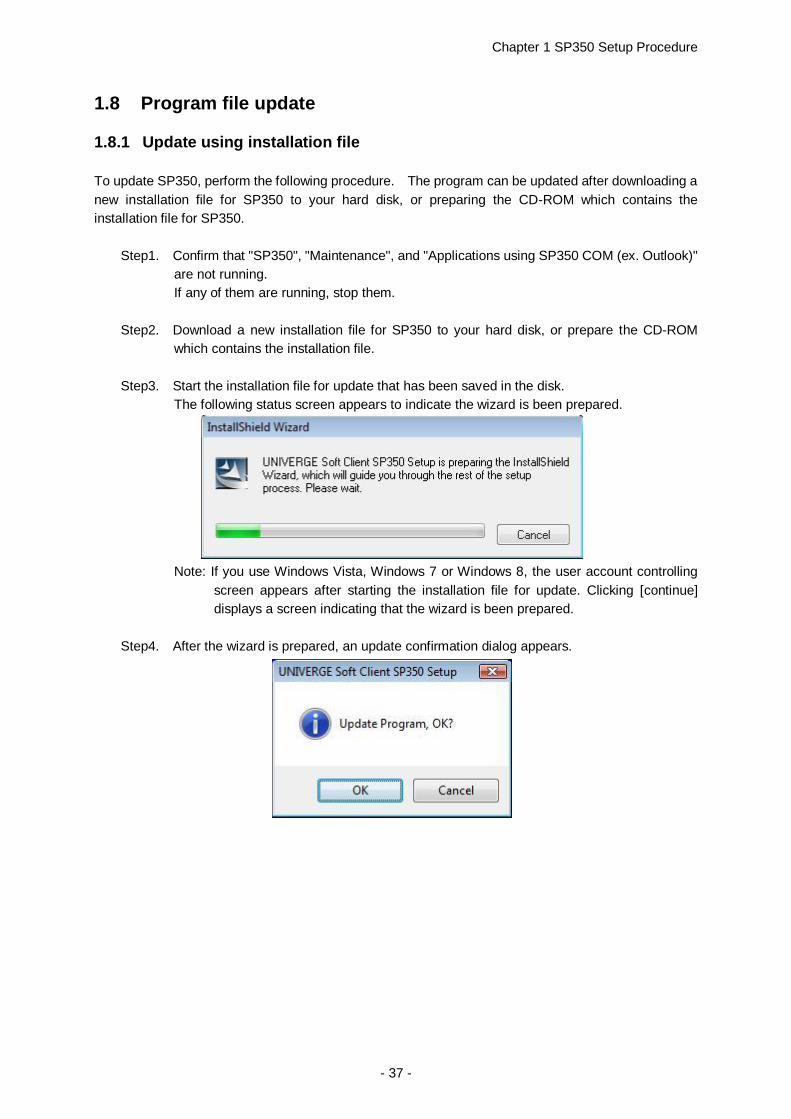
Chapter 1 SP350 Setup Procedure
- 37 -
1.8 Program file update
1.8.1 Update using installation file
To update SP350, perform the following procedure. The program can be updated after downloading a
new installation file for SP350 to your hard disk, or preparing the CD-ROM which contains the
installation file for SP350.
Step1. Confirm that "SP350", "Maintenance", and "Applications using SP350 COM (ex. Outlook)"
are not running.
If any of them are running, stop them.
Step2. Download a new installation file for SP350 to your hard disk, or prepare the CD-ROM
which contains the installation file.
Step3. Start the installation file for update that has been saved in the disk.
The following status screen appears to indicate the wizard is been prepared.
Note: If you use Windows Vista, Windows 7 or Windows 8, the user account controlling
screen appears after starting the installation file for update. Clicking [continue]
displays a screen indicating that the wizard is been prepared.
Step4. After the wizard is prepared, an update confirmation dialog appears.

Chapter 1 SP350 Setup Procedure
- 38 -
Note: If the following error message appears, Click [OK] and return to step 1.
Step5. Click [OK].
If The "License Agreement" screen appears, please read the Software License
Agreement. If you accept all items, select "I accept the terms of the license agreement"
and Click [Next].
Step6. A status screen appears to show the setup progress during the setup.

Chapter 1 SP350 Setup Procedure
- 39 -
Note: The progress may not be updated with the progress bar remaining at 0%, or the
following dialog indicating that the installation is in progress may appear instead of
the status screen. Both cases are normal and installation functions well.
Please wait for a while.
Step7. Microsoft.NET Framework 2.0 is installed automatically.
Note that this installation is omitted if .NET Framework 2.0 has already been installed on
your PC.
Step8. The "Skin Selector" screen appears only when the update from the software version
(1.x.x.x) is performed.
In this case, select a screen to be used by SP350 (Standard Panel/Toolbar Panel) and
click [Next].
Notes:
(1) This screen does not appear if the update is performed from the software version
other than 1.x.x.x.
(2) The "Skin Selector" screen may get behind another screen. In such a case, press
the Windows key and click "Skin Selector" on the taskbar to show the screen.
(3) The skin can be modified from the "User configurations" screen even after the
installation is completed.
(4) If Invisible Mode is selected, any panel does not displayed then it cannot be normal
operation except special operation. The Invisible Mode only need to be use with

Chapter 1 SP350 Setup Procedure
- 40 -
application.
And Service condition and detail usage for Invisible Mode, please refer to “Capture
5 Use Invisible Mode”.
Also if Maintenance person set to Invisible Mode for Simple Installation then the
Panel design screen will not appear.
Step9. The registration and start process of the services are performed.
Step10. After the registration and start process of the services are completed, SkyPDF Pro for
Softphone is installed automatically.
StepStep11. Click [OK].
The following message notifies that the update has been normally completed.

Chapter 1 SP350 Setup Procedure
- 41 -
Caution: When you click the [OK] button on the Install Complete window of SWFTools, the
following warning message may appear. In such a case, please download Adobe®
Flash® Player from Adobe Systems Web site or other applicable Web site, and install
Adobe® Flash® Player.
In order to use Data Meeting, the installation of Adobe® Flash® Player is required.
Please install Adobe® Flash® Player for Microsoft® Internet Explorer.
Data Meeting may not work with Adobe® Flash® Player plug-ins for other browsers.
Warning Message
In some cases, the screen indicating the InstallShield Wizard has been completed
appears. In such a case, select "Yes, I want to restart my computer now." and click
[Finish] to restart your PC.
Step12. Click [Finish].
This is the end of the update operation.

Chapter 1 SP350 Setup Procedure
- 42 -
1.8.2 Update using FTP
SP350 can also be updated using FTP, in addition to the method of using update installation files.
When using FTP, prepare an FTP server separately. This section describes the respective procedures
to be performed by the maintenance person and Softphone user for updating SP350 through FTP.
Note: Only the operation of Microsoft Internet Information Service (IIS) has been verified as an FTP
server.
1.8.2.1 Update by maintenance person
The maintenance person should perform the following preparation work for Softphone users to update
SP350 through FTP.
Step1. Prepare an FTP server, and create a user account which has the right to download files
from this server ("anonymous" account is also available).
The user account created in this step will be used by Softphone users.
Step2. Prepare the CD-ROM containing the SP350 update installation files.
Step3. Create the "SP350" directory under the root directory of the user account created in
Step1.
Step4. Copy all files in the "Install" folder of the CD-ROM into the "SP350" directory created in
Step3.
SP350
SP350
Root directory
SP350 CD-ROM
- data1.cab
- data1.hdr
- data2.cab
- ISSetup.dll
- layout.bin
- setup.exe
- setup.ini
- setup.inx
- Ver.dat
- _Setup.dll FTP server
In the "Install" folder

Chapter 1 SP350 Setup Procedure
- 43 -
Ver.dat
VERSION = X.X.X.X
START = 1
FTPMODE = 1
X.X.X.X: Version information (X: number)
Change this setting.
To upgrade the version,
set "FTPMODE=1".
Step5. Using an editor, open the "Ver.dat" file, one of the files copied into the FTP server in
Step4, and set "FTPMODE=1" in the file as shown below.
When using an FTP-based simple installation function, proceed to Step6. (When not
using this function, skip Step6 and proceed to Step7.)
When upgrading the version: FTPMODE=1
Step6. When using an FTP-based simple installation function, copy a setting file (*Note) used for
simple installation into the "SP350" directory created in Step3.
Note: For the simple installation of the environment settings, the file name must be
"SP350AutoConf.ini". For the simple installation of the data conference settings,
the file name must be "SP350DataMeetingAutoConf.xml". If a different file name is
used, the FTP-based simple installation function cannot be utilized.
Refer to Step1 to Step6 in "1.5.3.2 Operations by maintenance person".
- data1.cab
- data1.hdr
- data2.cab
- ISSetup.dll
- layout.bin
- setup.exe
- setup.ini
- setup.inx
- Ver.dat
- _Setup.dll
Environment setting file
/Data conference setting file
- SP350AutoConf.ini
- SP350DataMeetingAutoConf.xml

Chapter 1 SP350 Setup Procedure
- 44 -
1.8.2.2 Update by Softphone user
The Softphone user needs to perform the following procedure to update SP350 through FTP.
Notes:
(1) When update is executed from the Start menu, only file update is performed and SP350 is not
started.
(2) Free space of 150MB or more is required in the HD in which SP350 is installed.
(3) This SP350 user account should have the right to install programs.

Chapter 1 SP350 Setup Procedure
- 45 -
1.8.3 Update from Softphone
Step1. Configure the required maintenance setting to enable this function.
Refer to "File Update FTP Server Setting" in "2.3.1.4 Software Update".
Step2. Start SP350.
Step3. When a file whose version is different from the current version of SP350 used by the user
exists in the FTP server, the following dialog to confirm the update appears.
Step4. Click [OK].
The downloading of the installer is started.
Step5. When the downloading is completed, the dialog indicating that the wizard is been
prepared appears.

Chapter 1 SP350 Setup Procedure
- 46 -
Note: If the following error message appears, Click [OK] and return to Step1.
Step6. Click [OK].
If The "License Agreement" screen appears, please read the Software License
Agreement. If you accept all items, select "I accept the terms of the license agreement"
and Click [Next].
Step7. When the wizard is prepared, the setup is started.
A status dialog appears to show the setup progress during the setup.
Note: The progress may not be updated with the progress bar remaining at 0%, or the
following dialog indicating that the installation is in progress may appear instead of
the status screen. Both cases are normal and installation functions well.
Please wait for a while.

Chapter 1 SP350 Setup Procedure
- 47 -
Step8. Microsoft .NET Framework 2.0 is installed automatically.
Note that this installation is omitted if .NET Framework 2.0 has already been installed on
your PC.
Step9. The "Skin Selector" screen appears only when the update from the software version
(1.x.x.x) is performed.
In this case, select a screen to be used by SP350 (Standard Panel/Toolbar Panel) and
click [Next].
Notes:
(1) This screen does not appear if the update is performed from the software version
other than 1.x.x.x.
(2) The "Skin Selector" screen may get behind another screen. In such a case, press the
Windows key and click "Skin Selector" on the taskbar to show the screen.
(3) The skin can be modified from the "User configurations" screen even after the
installation is completed.
(4) If Invisible Mode is selected, any panel does not displayed then it cannot be normal
operation except special operation. The Invisible Mode only need to be use with
application.
And Service condition and detail usage for Invisible Mode, please refer to “Capture 5
Use Invisible Mode”.
Also if Maintenance person set to Invisible Mode for Simple Installation then the Panel
design screen will not appear.

Chapter 1 SP350 Setup Procedure
- 48 -
Step10. The registration and start process of the services are performed.
Step11. After the registration and start process of the services are completed, SkyPDF Pro for
Softphone is installed automatically.
Step12. Click [OK].
After updating, the newly upgraded SP350 starts.
Note: If the version upgrade is failed due to some reason such as a download failure of
the installer or out of hard disk space, SP350 will starts with the version which has
been already installed after an error message appears.
Caution: When you click the [OK] button on the Install Complete window of SWFTools, the
following warning message may appear. In such a case, please download Adobe®
Flash® Player from Adobe Systems Web site or other applicable Web site, and install
Adobe® Flash® Player.
In order to use Data Meeting, the installation of Adobe® Flash® Player is required.
Please install Adobe® Flash® Player for Microsoft® Internet Explorer.
Data Meeting may not work with Adobe® Flash® Player plug-ins for other browsers.
Warning Message

Chapter 1 SP350 Setup Procedure
- 49 -
1.8.4 Update from the Start menu
Step1. Confirm that "SP350", "Maintenance", and "Applications using SP350 COM (ex. Outlook)"
are not running.
If any of them are running, stop them.
Step2. Select [Programs] -> [UNIVERGE Soft Client SP350] -> [File Update] from the [Start]
menu. In case of Windows 8, right-click on Start screen and [All apps] -> [UNIVERGE Soft
Client SP350] -> [File Update].
The server setting screen appears.
Step3. Enter items in the required field and click [OK].
When a file whose version is different from the current version of SP350 used by the user
exists in the FTP server, the following confirmation dialog appears.
Step4. Click [OK].
The downloading of the installer is started.

Chapter 1 SP350 Setup Procedure
- 50 -
Step5. When the downloading is completed, a dialog appears to indicate the wizard is been
prepared.
Note: If the following error message appears, Click [OK] and return to Step1.
Step6. Click [OK].
If The "License Agreement" screen appears, please read the Software License
Agreement. If you accept all items, select "I accept the terms of the license agreement"
and Click [Next]..

Chapter 1 SP350 Setup Procedure
- 51 -
Step7. When the wizard preparation is completed, the setup is started.
A status screen appears to show the setup progress during the setup.
Note: The progress may not be updated with the progress bar remaining at 0%, or the
following dialog indicating that the installation is in progress may appear instead of
the status screen. Both cases are normal and installation functions well. Please
wait for a while.
Step8. Microsoft .NET Framework 2.0 is installed automatically.
Note that this installation is omitted if .NET Framework 2.0 has already been installed on
your PC.

Chapter 1 SP350 Setup Procedure
- 52 -
Step9. The "Skin Selector" screen appears only when the update from the software version
(1.x.x.x) is performed.
In this case, select a screen to be used by SP350 (Standard Panel/Toolbar Panel) and
click [Next].
Notes:
(1) This screen does not appear if the update is performed from the software version
other than 1.x.x.x.
(2) The "Skin Selector" screen may get behind another screen. In such a case, press
the Windows key and click "Skin Selector" on the taskbar to show the screen.
(3) The skin can be modified from the "User configurations" screen even after the
installation is completed.
(4) If Invisible Mode is selected, any panel does not displayed then it cannot be normal
operation except special operation. The Invisible Mode only need to be use with
application.
And Service condition and detail usage for Invisible Mode, please refer to “Capture 5
Use Invisible Mode”.
Also if Maintenance person set to Invisible Mode for Simple Installation then the Panel
design screen will not appear.
Step10. The registration and start process of the services are performed.

Chapter 1 SP350 Setup Procedure
- 53 -
Step11. After the registration and start process of the services are completed, SkyPDF Pro for
Softphone is installed automatically.
Step12. Click [OK].
After updating, the following confirmation dialog appears.
Step13. Click [Yes].
This is the end of the update operation.
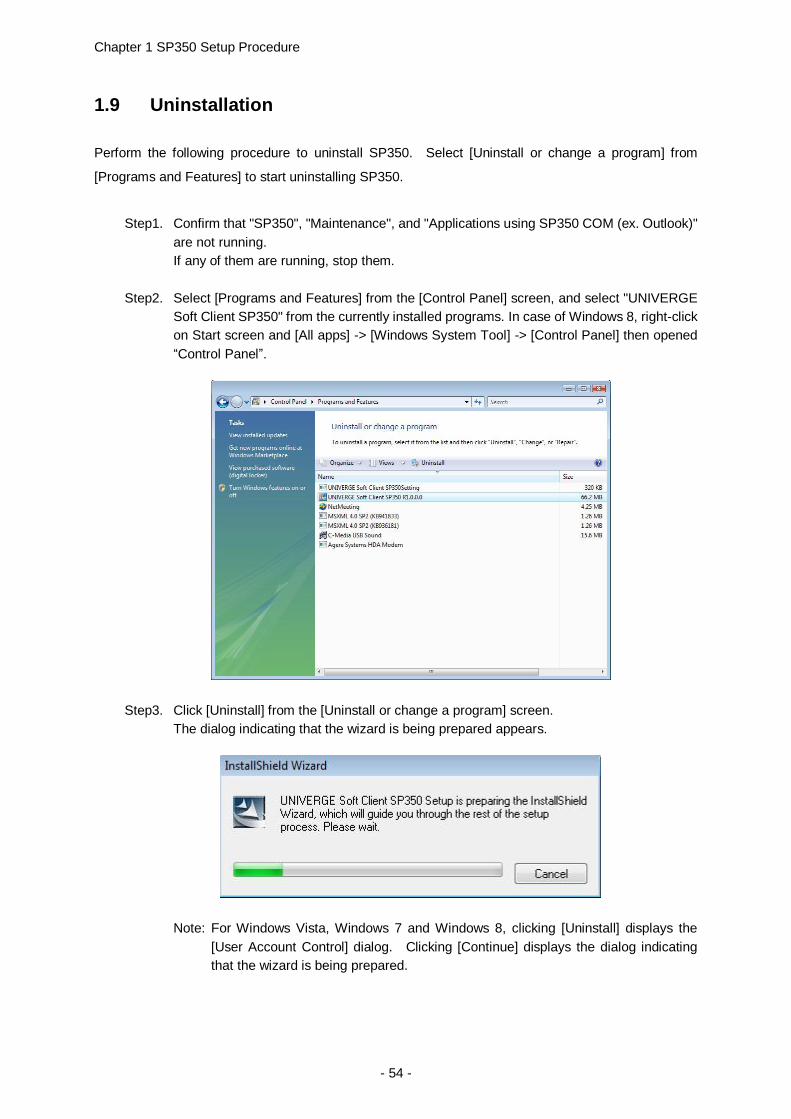
Chapter 1 SP350 Setup Procedure
- 54 -
1.9 Uninstallation
Perform the following procedure to uninstall SP350. Select [Uninstall or change a program] from
[Programs and Features] to start uninstalling SP350.
Step1. Confirm that "SP350", "Maintenance", and "Applications using SP350 COM (ex. Outlook)"
are not running.
If any of them are running, stop them.
Step2. Select [Programs and Features] from the [Control Panel] screen, and select "UNIVERGE
Soft Client SP350" from the currently installed programs. In case of Windows 8, right-click
on Start screen and [All apps] -> [Windows System Tool] -> [Control Panel] then opened
“Control Panel”.
Step3. Click [Uninstall] from the [Uninstall or change a program] screen.
The dialog indicating that the wizard is being prepared appears.
Note: For Windows Vista, Windows 7 and Windows 8, clicking [Uninstall] displays the
[User Account Control] dialog. Clicking [Continue] displays the dialog indicating
that the wizard is being prepared.

Chapter 1 SP350 Setup Procedure
- 55 -
Step4 When the wizard preparation is completed, the dialog to confirm the uninstallation
appears.
Note: If the following error message appears, Click [OK] and return to step 1
Step5. Click [OK].
The removal of the files is started. During the removal, the status screen to notify the
status of the setup appears.

Chapter 1 SP350 Setup Procedure
- 56 -
Step6 After the removal, the following completion screen appears to notify that the removal is
ended normally.
Note: In some cases, the following completion screen of InstallShield Wizard may appear
after the removal is completed.
In this case, select "Yes, I want to restart my computer now.", and click [Finish] to
restart the PC.
Step7. Click [Finish].
The uninstallation is completed.

Chapter 1 SP350 Setup Procedure
- 57 -
Next, delete the registry data created by each Windows user account and the directories
automatically created by SP350. ("xxxx" indicates a Windows user account.)
The deletion needs to be done for each user account using SP350.
Step8. Select [Programs and Features] from the [Control Panel] screen, and select "UNIVERGE
Soft Client SP350Setting" from the currently installed programs. In case of Windows 8,
right-click on Start screen and [All apps] -> [Windows System Tool] -> [Control Panel]
then opened “Control Panel”.
Step9. Click [Uninstall/Change] from the [Uninstall or change a program] screen.
The dialog to confirm the uninstallation appears.
Step10. Click [OK].

Chapter 1 SP350 Setup Procedure
- 58 -

Chapter 2 SP350 Maintenance Settings
- 59 -
Chapter 2 SP350 Maintenance Settings
The Maintenance Setting function of SP350 is a tool to set/save the environment required for
introduction of SP350. Maintenance settings in SP350 and PC configuration are explained in the
following topics.
SP350 [Maintenance] screen
Starting or ending SP350 Maintenance Setting function
Content of SP350 maintenance settings
Time setting
Sound device setting

Chapter 2 SP350 Maintenance Settings
- 60 -
2.1 SP350 [Maintenance] screen
The following sections describe the [Maintenance] screen of SP350.
Category Display area ························[1]
Setting Item Display area ····················[2]
Concise Description Display area ··········[3]
Control Key Display area·····················[4]
[1]
[2]
[3]
[4]
Chapter 2 SP350 Maintenance Settings
- 61 -
2.1.1 Category Display area
By highlighting an item displayed in this area, the displayed content in the Setting Item Display area can
be switched.
2.1.2 Setting Item Display area
In this area, each of current settings is displayed and can be modified.
2.1.3 Concise Description Display area
A concise description about the item highlighted in the Setting Item Display area is displayed in this
area. This area remains blank when any item in the Category Display area or the Control Key Display
area is highlighted.
2.1.4 Control Key Display area
The buttons for the following functions are displayed in this area:
Reflect setting modifications in the Setting Item Display area on the registry
Restore the settings displayed in the Setting Item Display area to the default values
Terminate the User Setting function
For details, refer to the following items:
[OK] and [Cancel]: 2.2.2 "Ending SP350 maintenance setting function"
[Apply]: 2.2.5 "Saving settings"
[Default]: 2.2.4 "Restoring settings to default values"

Chapter 2 SP350 Maintenance Settings
- 62 -
2.2 Starting or Ending SP350 Maintenance Setting function
The following sections describe start/stop of the Maintenance Setting function of SP350.
2.2.1 Starting SP350 Maintenance Setting function
The Maintenance Setting function of SP350 can be started by the following procedure.
Select [Programs] [UNIVERGE Soft Client SP350] [Maintenance] from the [Start] menu to open
the [Password] screen. Enter the correct password and click [Login] to start the Maintenance Setting
function.
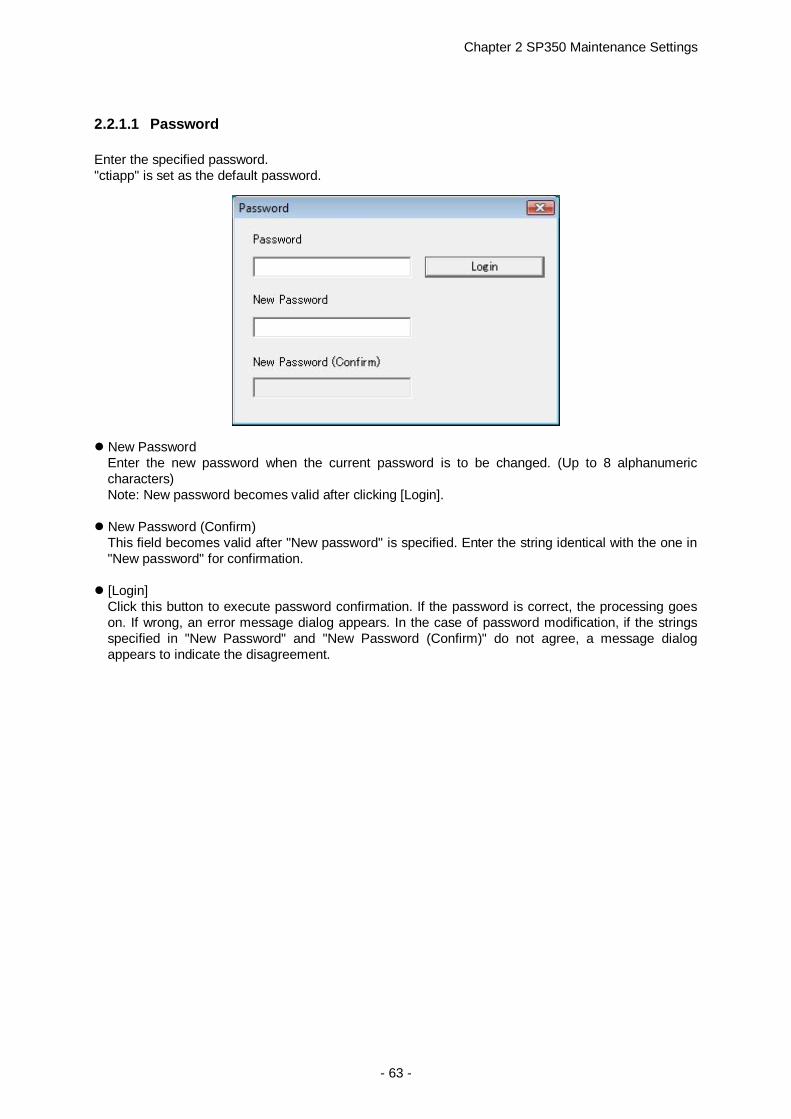
Chapter 2 SP350 Maintenance Settings
- 63 -
2.2.1.1 Password
Enter the specified password.
"ctiapp" is set as the default password.
New Password
Enter the new password when the current password is to be changed. (Up to 8 alphanumeric
characters)
Note: New password becomes valid after clicking [Login].
New Password (Confirm)
This field becomes valid after "New password" is specified. Enter the string identical with the one in
"New password" for confirmation.
[Login]
Click this button to execute password confirmation. If the password is correct, the processing goes
on. If wrong, an error message dialog appears. In the case of password modification, if the strings
specified in "New Password" and "New Password (Confirm)" do not agree, a message dialog
appears to indicate the disagreement.

Chapter 2 SP350 Maintenance Settings
- 64 -
2.2.2 Ending SP350 Maintenance setting function
The Maintenance Setting function of SP350 can be ended by the following procedure.
Click [Cancel] (or, click [x] on the upper right corner of the screen).
When the [Apply] button is valid, a confirmation dialog appears as shown below. Clicking [OK] makes
modified information invalid and ends the Maintenance Setting function. Clicking [Cancel] continues
setting operations without ending the function. When [Apply] is invalid, the Maintenance Setting
function is ended without any confirmation dialog.
Click [OK].
Modified information is reflected to the registry.
2.2.3 Switching displayed content in Setting Item Display area
Displayed content in the Setting Item Display area can be switched by the following procedure.
Highlighting an item in the Category Display area
Information relevant to the item highlighted in the Category Display area is displayed in the Setting
Item Display area.
Note: When highlighting another item in the Category Display area, if any entered value is wrong or
any mandatory item is left blank, an error message dialog appears and the displayed content
in the Setting Item Display area cannot be switched. In this case, enter the correct value for
the item which caused the error and switch the display again. Or, click [Cancel] to end the
Maintenance Setting function. Then, restart the function and set the items again.

Chapter 2 SP350 Maintenance Settings
- 65 -
2.2.4 Restoring settings to default values
Current settings displayed in the Setting Item Display area can be restored to the default values by the
following procedure.
Click [Default].
A confirmation dialog (about the category displayed in the Setting Item Display area) is displayed as
follows. Clicking [OK] in this dialog restores the information of the items displayed in the Setting Item
Display area to the default values. Clicking [Cancel] in this dialog retains the current settings without
restoring them.
2.2.5 Saving settings
Modified information of the items displayed in the Setting Item Display area can be saved by the
following procedure. Note that this function is available only when [Apply] is valid.
Click [Apply].
A confirmation dialog is displayed as follows. Clicking [OK] reflects the setting values of the items set
with the Maintenance Setting function to the registry. Clicking [Cancel] retains the current settings
without reflecting them to the registry.
Chapter 2 SP350 Maintenance Settings
- 66 -
2.3 Method of SP350 maintenance settings
The following items describe the method to set/save the information with the Maintenance Setting
function of SP350.
Network settings
IP telephony server
Presence
Data conference
Software update
Directory Software update
System setting
ACD setting
Security
Audio setting
Import/export
Import
Export
Notes: No information other than maintenance settings can be saved.

Chapter 2 SP350 Maintenance Settings
- 67 -
2.3.1 Network Setting
2.3.1.1 IP Telephony Server
Set the parameters relevant to connection with the IP telephony server.
Chapter 2 SP350 Maintenance Settings
- 68 -
VoIP Server Setting (Note 1)
Specify the host name (or the IP address) of the IP telephony server and the destination port number
(UDP).
For these settings, contact the installation technician.
Server 1 Server Name: Mandatory (default: blank).
Server 2 Server Name
Server 3 Server Name
Server 4 Server Name
Server 1 Port Number: Mandatory (default SV8500/SV7000: 5060, SV8300:5080).
Server 2 Port Number
Server 3 Port Number
Server 4 Port Number
One of the following default port numbers is set by the server selected in “VoIP Server Selection”
when SP350 was installed.
When “UNIVERGE SV8500/SV7000” is selected (5060)
When “UNIVERGE SV8300” is selected (5080)
The specifiable range is 1024 to 65535.
Verify whether or not the port number is correctly set according to the system to be used.
Call Control Port Number (Note 2)
Specify the range of the source port number (TCP/UDP) used for call control. The port which is
available and has the smaller number within the specified range is searched and used at the startup
(default: 5060 to 5187). Specify values within 1024 to 65535. Also, the number of the ports within the
specified range should be 128 or more (recommended).
This item is mandatory.
Sound Port Number (Note 3)
Specify the range of the source port number (UDP) used for sound data communication. The port
which is available and has the smaller number within the specified range is searched and used at the
startup (default: 60000 to 60008). Specify values within 1024 to 65535. Also, the number of the ports
within the specified range should be 9 or more (recommended).
This item is mandatory.
In the case of Thin Client, the port for PC recording will also be searched within this range and then
used.
Notes:
(1) When an octet in the specified IP address is under 3 digits, do not pad it with "0".
Example of correct setting: 10.43.0.6
Example of wrong setting: 010.043.000.006
(2) The specified value must differ from the value for Sound Port Number.
(3) The specified value must differ from the value for Call Control Port Number.

Chapter 2 SP350 Maintenance Settings
- 69 -
2.3.1.2 User Presence
Use Presence
Specify whether the Presence function is to be enabled or disabled (default: unchecked). When this
function is enabled, the host name (or the IP address) of the presence server and the destination port
number (UDP) also must be specified.
Also, set whether the local office number (access code + the local office code) is to be prefixed when
connecting to the presence server. For these settings, contact the installation technician.
Presence Host Name: Mandatory (default: blank).
Presence Port Number: Mandatory (default: 6060).
Specify a value within 1024 to 65535.
Presence Domain Name: (default: blank).
When connecting Presence Server, prefix (access code + local office code) with extension number.
When checked, the local office number (refer to 2.3.2 "System setting") and the prime line number is
informed when connecting to the presence server.
(In the cases such as open-numbered accommodation per location)

Chapter 2 SP350 Maintenance Settings
- 70 -
2.3.1.3 Data Conference
Call Control Port Number
Call Control Port Number range
Specify the range of the source port number (TCP) used for the Data Conference/File Transfer
functions. The port which is available and has the smaller number within the specified range is
searched and used at the startup [default: 60010 (start) to 60137 (end)].
Specify values within 1024 to 65535. Also, the number of the ports within the specified range
should be 128 or more (recommended). This value must differ from the other specified values
excepting the video port number of the Data Conference function.
Video Port Number
A video port number range
Specify the range of the source port number (UDP) used for the video communication function.
The port which is available and has the smaller number within the specified range is searched and
used at the startup [default: 60010 (start) to 60019 (end)].
Specify values within 1024 to 65535. Also, the number of the ports within the specified range
should be 10 or more (recommended). This value must differ from the other specified values
excepting the call control port number of the Data Conference function.

Chapter 2 SP350 Maintenance Settings
- 71 -
Video TOS Value
Specify the TOS value used for video communication (default: 0).
Specify values within 0 to 255.
Note that when Windows Vista, Windows 7 or Windows 8 is used as the OS, this value becomes
below.
00:0-63
20:64-127
A0:128-191
E0:192-255
2.3.1.4 Software Update
File Update FTP Server Setting
Specify whether the Software Update function with FTP used when SP350 is started is to be enabled
or disabled (default: unchecked). When this function is enabled, the host name (ore the IP address)
of the FTP server, user name and password also must be specified. For these settings, contact the
installation technician.
FTP Server Host Name: Mandatory (default: blank).
FTP User Name: Mandatory (default: blank).
Password: (default: blank)

Chapter 2 SP350 Maintenance Settings
- 72 -
Check for Updates
Select when the Software Update check function with FTP is to be executed.
None: The function is not executed when starting up SP350 (default).
Every startup: The function is executed when starting up SP350.
Every week: The function is executed when 1 week has passed from the last execution.
(The function is not executed when starting up SP350 first after installing it.)
2.3.1.5 Directory Service
Set up the directory server to be used for information search. The information acquired from the
directory server is used to display directory search results from the search entry box and the
information of call counterpart in call log.

Chapter 2 SP350 Maintenance Settings
- 73 -
Allow Directory search in search window
Allow Directory search in Search Window. “Directory Search” will appear in drop down menu on
window.
Allow Directory search in Caller Information lookup
If information retrieving software is set, SP350 will also search Caller information from Directory.
Directory Server Setting
Set directory server for Information Retrieval.
Search Place
Search Place requires the following format
HostName[:PortNumber][/DistingushedName]
Search Filter
Search Filter enables to you to define search criteria and provide more efficiently and effective
searches. The search filters as defined in RFC2254.
Encrypted connection
Set if using an SSL connection
Attributes of Telephone
Set attributes on telephone for information retrieval.
One or more attributes can be described by using as delimiter.
Attributes Setting
Set directory server for Information Retrieval.
Name
Corporation
Department
Mail address

Chapter 2 SP350 Maintenance Settings
- 74 -
2.3.2 System Setting

Chapter 2 SP350 Maintenance Settings
- 75 -
Numbering Plan
Specify the local office number (access code + the local office code) to delete it from the number
registered in the address book for origination from the address book, transfer, destination
modification, status (presence table) indication and ending an instant message.
Also, in the case when the Data Conference function is used between multiple offices, or when the
Chat function is used between multiple offices, if the local office number is to be attached so that the
originator information can be found by searching origination numbers in the address book at the
termination, specify number of the digits of the originator number to be attached.
This setting is required to connect the presence server, depending on the environment.
Access code + the local office code
Specify the local office number (default: blank).
Specify the local office number with the access code included.
Maximum of Station Number
Specify the maximum number of digits for the originating number that is associated with the office
number (default: 0).
Use Terminal Cooperation
Specify whether the Terminal Cooperation function is to be enabled or disabled (default: unchecked).
Terminals which can be used for this function depend on the IP telephony server to be connected.
For details, contact the installation technician.
DTMF Tone
Select one of the following options about DTMF playback during a call (default: Follow Server).
Follow Server: Follows the indication from the IP telephony server per call.
Disabled whenever no indication is received from the server.
Always enabled: Enabled regardless of indications from IP telephony server.
Always disabled: Disabled regardless of indications from IP telephony server.
RTPLoss Alarm
Select one of the following options about RTPLoss alarm during a call (default: Follow Server).
Follow Server: Follows the indication from the IP telephony server per call.
Disabled whenever no indication is received from the server.
Always enabled: Enabled regardless of indications from IP telephony server.
Always disabled: Disabled regardless of indications from IP telephony server.
Use Beep Tone(s) when Recording a Call
Specify whether the indication tone of call recording on PC sent to the caller and the callee is to be
enabled or disabled (default: unchecked).
To enable this function, check the checkbox.
When checked, select either of [Send multiple Beep Tones (only when starting)] or [Send multiple
Beep Tones (at regular intervals)]. Also, when selecting [Send multiple Beep Tones (at regular
intervals)], set the interval of the tone within the range from 5 seconds to 120 seconds. (default:
blank).
Live recording File Format (Regular mode)
Specify the file format for call recording on PC (default: PCM).
PCM: Recorded with the PCM format (960KB per 1 minute).
GSM6.1: Recorded with the GSM6.1 format (96KB per 1 minute).
File Format During PC Recording (in the case of Thin Client)
Specify the file format for PC recording (default: G.711).
G.711: Records in the G.711 format (approximately 480KB in recording for 1 min).
GSM6.1: Records in the GSM6.1 format (approximately 96KB in recording for 1 min) (*).

Chapter 2 SP350 Maintenance Settings
- 76 -
(*) It may not be possible to use GSM6.1 depending on the thin client terminal type. In such a case,
even if GSM6.1 is specified, recording will be done in G.711. For more information, refer to the
restrictions on each terminal.
Voice mail Address Change Key
Specify the key used to indicate the end of modified number entered; This function is used when the
destination number is modified with operations by using address book or member keys during call
recording on UnifiedStar series.
Specify "#" when "UNIVERGE SV8500/SV7000" is selected in the "VoIP server type selection"
screen during installation.
Specify blank (nothing is specified) when "UNIVERGE SV8300" is selected in the "VoIP server type
selection" screen during installation.
Area (Tone)
When selecting an option other than [Auto], the tone pattern assigned to the specified area (nation) is
applied regardless of indications from the IP telephony server. Note that if the specified area has not
been registered in the server, the tone pattern assigned to Japan is applied.
Also, if the server indicates an area other than the options below, the tone pattern assigned to Japan
is applied.
(Default: Auto)
Auto
Japan
U.S
Australia
Other overseas
Hong Kong (Note1)
Malaysia (Note1)
Singapore (Note1)
UK (Note1)
Mexico (Note1)
Taiwan (Note1)
New Zealand
South Korea (Note1)
Brazil (Note1)
China (Note1)
Thailand (Note1)
Thailand (EGAT) (Note1)
Sri Lanka (Note1)
Germany
Italy Netherlands (Dutch) Denmark
Sweden
Spain Austria Belgium
UK (United Kingdom) (for NECU) Greece
Swiss
South Africa
Brazil (for NECU) (Note1)
(Note1) They can be selected when SP350 is used with SV8500/SV7000, and they are not
displayed in the list when SP350 is used with SV8300.

Chapter 2 SP350 Maintenance Settings
- 77 -
2.3.2.1 ACD Setting
When using the ACD feature in UNIVERGE SV8500 or UNIVERGE SV7000, the following settings are
required.
In the case of using SP350 in UNIVERGE SV8300, OAI Key Setting screen is not displayed.
Use as ACD Terminal Check this option if SP350 is used as the ACD terminal. (Default: unchecked)
OAI Key Setting Open the setting screen for OAI key that is used by the ACD terminal. This button becomes active only when [Use as ACD terminal] is checked. For setting items of OAI key, refer to the next page.
Use ACD Presence Cooperation Check this option if ACD presence is used. (Default: unchecked) You can select this option only when [Use as ACD Terminal] is checked.
Enable recording when ACD Monitor is used Specify if PC recording while ACD monitor is in progress is to be enabled or disabled. (Default:
unchecked) You can select this option only when [Use as ACD Terminal] is checked.
Note that when PC recording is used while ACD monitor is enabled, the indication tone of call
recording on PC cannot be sent to the other party.

Chapter 2 SP350 Maintenance Settings
- 78 -
2.3.2.2 OAI Key Setting
OP-CODE Enter the feature numbers assigned to OAI keys that are used for ACD feature. The default value for each key is shown in the figure above. If you want to assign the number other than the default, follow the instruction of the installation
technician.
Function Name When OP-CODE is entered the corresponding function name will be automatically displayed. These
names cannot be manually edited.
Popup Numberpad Specify whether to display the Numberpad automatically when pressing the OAI keys. The OAI keys
that are checked as default are Night, Tally, Log on/off, and Monitor/Barge.

Chapter 2 SP350 Maintenance Settings
- 79 -
2.3.3 Security
Display Maintenance Setting items in User Setting
Specify whether the display of maintenance setting items in the [User Settings] screen is to be
enabled or disabled (default: checked).
Use Encryption
Specify whether the Encryption function is to be enabled or disabled (default: unchecked).
Note: This checkbox must be checked even if either of the Encryption function or the Location Diversity
function is used. This option is grayed out and cannot be checked when "UNIVERGE SV8300" is selected in the
"VoIP server type selection" screen during installation.

Chapter 2 SP350 Maintenance Settings
- 80 -
Use Data Conference
Specify whether the functions provided by the Data Conference function (Video, Communication
Boards, File Transfer and Chat) are to be enabled or disabled (* The setting of the organizer is
reflected).
Use Video (default: checked)
Check when the Video function is to be enabled.
Use Communication Board (default: checked)
Check when the Communication Board function is to be enabled.
Use File Transfer (default: checked)
Check when the File Transfer function is to be enabled.
Use Chat (default: checked)
Check when the Chat function is to be enabled.
Note: In the case of Thin Client, only receiving is provided for Video
Access Information for User Setting
Specify whether the restriction using password is to be enabled or disabled when opening the [User
Settings] screen of SP350 (default: unchecked).
To modify the password, enter the current password in [Password]. Also, enter the modified (new)
password in both [New Password] and [New Password (Confirm)] identically.
Note: The default value of the password is "ctiappconfig".
Use IM
Specify whether to use IM (default: checked).
Use Chat
Specify whether to use Chat (default: checked).

Chapter 2 SP350 Maintenance Settings
- 81 -
2.3.4 Audio Setting
Audio Level: 1 - 100(%)
Specify whether the manual adjustments of sound volumes of microphones and speakers are to be
enabled or disabled when starting up SP350 with the checkbox (default: unchecked).
When enabling this function, specify the sound volume for microphones and the one for speakers
respectively.
When the recommended USB handset/headset is used, SP350 identify the type of the device and
optimizes the sound volume. However, the sound volume also can be changed when this function
is enabled.
Note: When this function (manual adjustment of sound volume) is enabled, the sound volume
settings of microphones and speakers in the device used when starting up SP350 are
changed to the values specified here. Note that the sound volume settings of the
devices on the OS (Windows) are also changed to the values specified here. For
necessity of this setting and the parameters to be specified, contact the installation
technician.
Use Echo Canceller (Regular mode only)
Specify whether the Echo Canceller function is to be enabled or disabled with the checkbox (default:
unchecked).
Use the Core Audio as an audio processing engine. (Regular mode, Only Windows 8/7/Vista)
Select use Core Audio for Voice.
Check On: audio processing is provided by Windows change to Core Audio.
Using Core Audio is prohibiting delayed voice and chopped voce.
Note: If Core Audio is use, then it need to voice equipment and configuration. So, this setting is need
or not and please asks to technical administrator. Also refer to “2.7 Use Core Audio”.
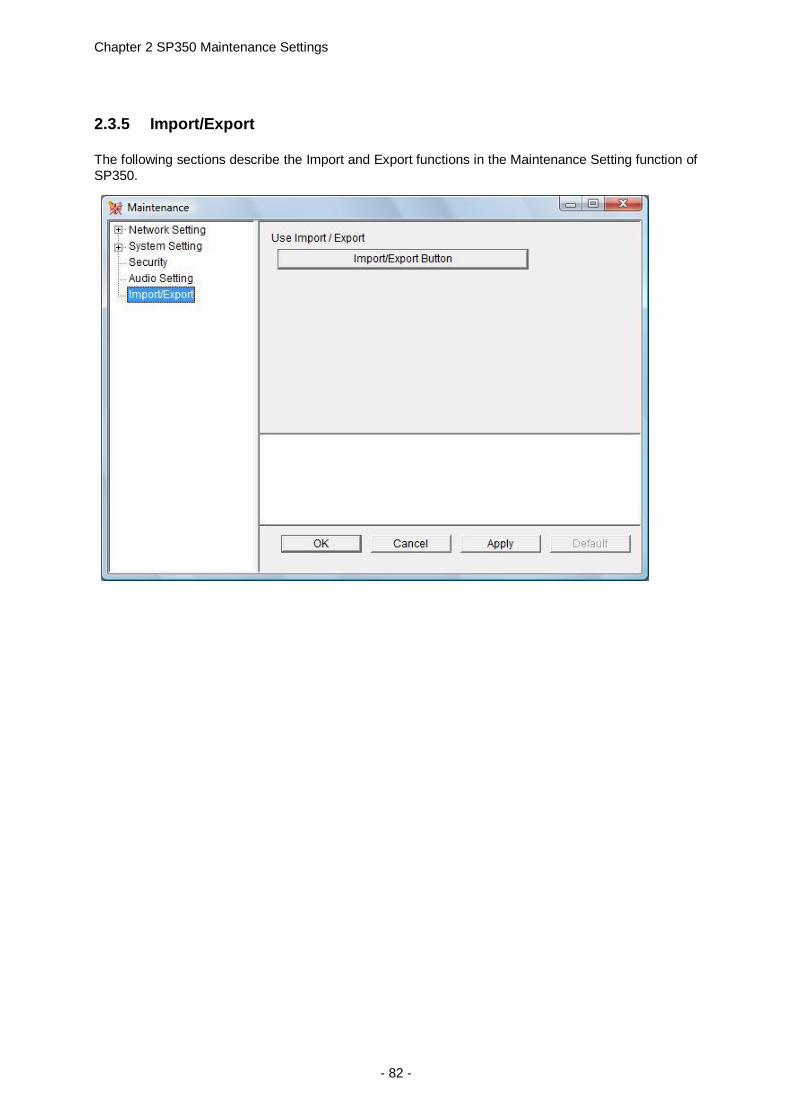
Chapter 2 SP350 Maintenance Settings
- 82 -
2.3.5 Import/Export
The following sections describe the Import and Export functions in the Maintenance Setting function of
SP350.
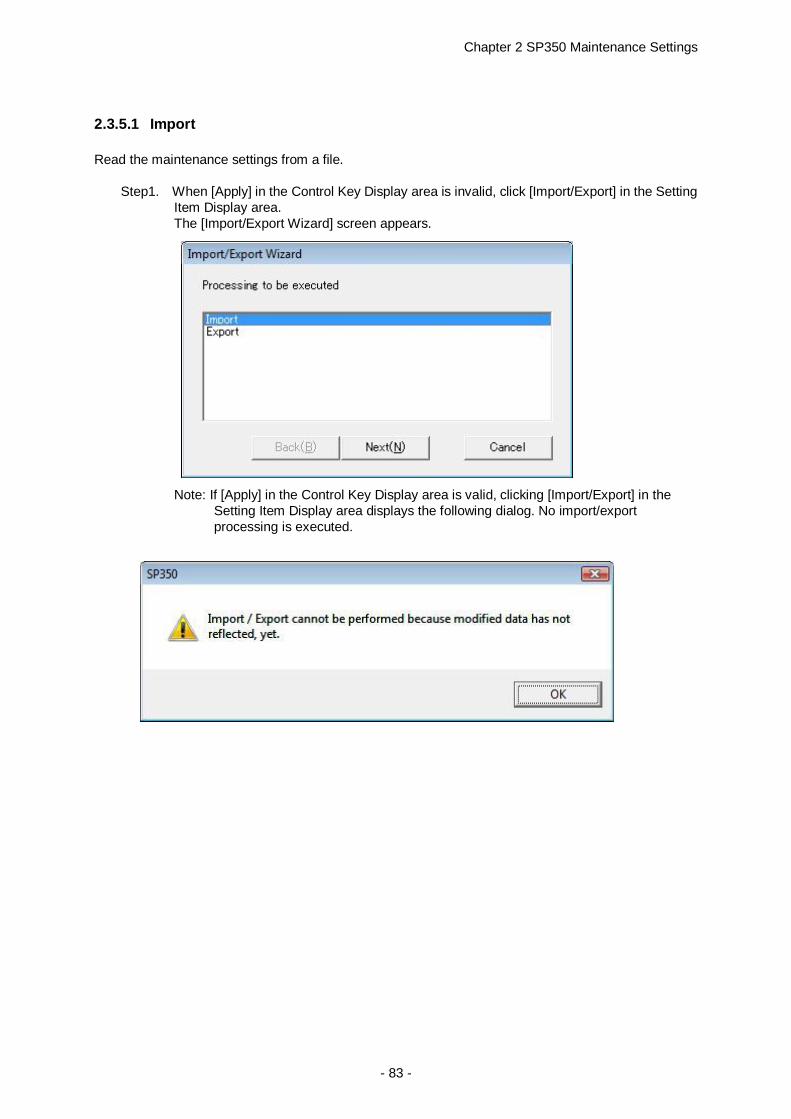
Chapter 2 SP350 Maintenance Settings
- 83 -
2.3.5.1 Import
Read the maintenance settings from a file.
Step1. When [Apply] in the Control Key Display area is invalid, click [Import/Export] in the Setting
Item Display area.
The [Import/Export Wizard] screen appears.
Note: If [Apply] in the Control Key Display area is valid, clicking [Import/Export] in the
Setting Item Display area displays the following dialog. No import/export
processing is executed.

Chapter 2 SP350 Maintenance Settings
- 84 -
Step2. Select [Import] and click [Next] on the [Import/Export Wizard] screen.
The [Import of file] screen appears.
Step3. Enter the path and name of the target file directly into the [File Path] field. Alternatively,
click the button on the [Import of file] screen to open the following [Open] screen.
Select [ini file (*.ini)] in the [Files of type] field and highlight the name of the target file.
Then, click [Open] to close the [Open] screen.

Chapter 2 SP350 Maintenance Settings
- 85 -
The [Import of file] screen containing the entered file path should look like the following.
Step4. Click [Next].
The [Import of file] screen shows the addition method.
Step5. Confirm that [Replacement] is highlighted on the [Import of file] screen and click [OK]. The
following dialog appears.
Step6. Click [OK] to complete the import operation.

Chapter 2 SP350 Maintenance Settings
- 86 -
2.3.5.2 Export
Save the maintenance settings into a file
Step1. When [Apply] in the Control Key Display area is invalid, click [Import/Export] in the Setting
Item Display area.
The [Import/Export Wizard] screen appears.
Note: If [Apply] in the Control Key Display area is valid, clicking [Import/Export] in the
Setting Item Display area displays the following dialog. No import/export
processing is executed.

Chapter 2 SP350 Maintenance Settings
- 87 -
Step2. Select [Export] and click [Next] on the [Import/Export Wizard] screen.
The [Export of file] screen appears.
Step3. Confirm that [Configuration Setting] is highlighted on the screen, and click [Next].
The [Export of file] screen provides the [File Path] field.

Chapter 2 SP350 Maintenance Settings
- 88 -
Step4. Enter the save path and name of the target file directly into the [File Path] field.
Alternatively, click the button on the [Export of file] screen to open the following
[Save as] screen. Select the save directory and file name (file extension: "ini"). Then, click
[Save] to close the [Save as] screen.
The [Export of file] screen containing the entered file path should look like the following.
Step5. Click [OK] to save the settings.
The following dialog appears.
Step6. Click [OK] to complete the export operation.

Chapter 2 SP350 Maintenance Settings
- 89 -
2.4 Setting the time
SP350 uses the personal computer's clock for the functions such as Fault Information, Time Display
and Incoming/Outgoing Log. Therefore, the clock must be exact to operate these functions correctly.
The following methods enable automatic clock setting, instead of manual ways.
(1) In the case of Windows 2000
Step1. Log in as Administrator and adjust the clock with appropriate means by using the
"Windows Time" service attached to the OS.
Step2. Execute the following command in the [Command Prompt] screen.
c:/net time/setsntp:xxx.xxx.xxx.xxx
* The string "xxx.xxx.xxx.xxx" must be replaced with the IP address of the NTP server
(For the value of the IP address, contact the system administrator).
Step3. Start the "Windows Time" service from [Administration Tool] -> [Service] and set its
startup to [Auto].

Chapter 2 SP350 Maintenance Settings
- 90 -
(2) In the case of Windows XP
Step1. Click and open the [Internet Time] tab on the [Date and Time Properties] screen.
Step2. Check the [Automatically synchronize with an Internet time server] checkbox.
Step3. Click [Update Now].
Chapter 2 SP350 Maintenance Settings
- 91 -
(3) In the case of Windows Vista, Windows 7 or Windows 8
Step1. Click and open the [Internet Time] tab on the [Date and Time] screen.
Step2. Click [Change settings...].
The [Internet Time Settings] screen appears.
Step3. Click [Update now].

Chapter 2 SP350 Maintenance Settings
- 92 -
2.5 Setting the sound device (Regular mode only)
If other than the USB handset/headset is set in your PC, be sure to set the following.
Otherwise, the speaker of the USB handset/headset outputs the Windows starting noise, error sound,
etc.
(1) In the case of Windows 2000
Step1. Connect the USB handset/headset. Then, select [Control Panel] [Sounds and
Multimedia] from the [Start] menu to open the [Sounds and Multimedia Properties]
screen. Select the [Audio] tab to change the [Preferred device] fields in [Sound Playback]
and [Sound Recording] to other than [USB Audio Device] (select the device name
provided for your PC).
Select the device provided
for your PC

Chapter 2 SP350 Maintenance Settings
- 93 -
Step2. Check the [Use only preferred devices] checkbox.
Step3. Click [OK].
If this check box is
checked, the devices
cannot be changed.

Chapter 2 SP350 Maintenance Settings
- 94 -
(2) In the case of Windows XP
Step1. Connect the USB handset/headset. Then, select [Control Panel] [Sounds and
Multimedia] from the [Start] menu to open the [Sounds and Audio Devices Properties]
screen. Select the [Audio] tab to change the [Default device] fields in [Sound playback]
and [Sound recording] to other than [Handset for VoIP] (when a handset is used) or
[Plantronics Headset] (when a USB headset is used) (select the device name provided for
your PC).
Select the device provided
for your PC

Chapter 2 SP350 Maintenance Settings
- 95 -
Step2. Check the [Use only default devices] checkbox.
Step3. Click [OK].
If this check box is
checked, the devices
cannot be changed.

Chapter 2 SP350 Maintenance Settings
- 96 -
(3) In the case of Windows Vista
Setting speakers
Step1. Connect the USB handset/headset. Then, select [Control Panel] [Sound] from the
[Start] menu to open the [Sound] screen and select the [Playback] tab.
Step2. Select the device name provided for your PC.
Step3. Click [Set Default].
Step4. Click [OK].

Chapter 2 SP350 Maintenance Settings
- 97 -
Setting microphone
Step1. Connect the USB handset. Then, select [Control Panel] [Sound] from the [Start] menu
to open the [Sound] screen and select the [Recording] tab.
Step2. Select the device name provided for your PC.
Step3. Click [Set Default].
Step4. Click [OK].

Chapter 2 SP350 Maintenance Settings
- 98 -
(4) In the case of Windows 7
Setting speakers
Step1. Connect the USB handset/headset. Then, select [Control Panel] [Sound] from the
[Start] menu to open the [Sound] screen and select the [Playback] tab.
Step2. Select the device name provided for your PC.
Step3. Click [Set Default].
Step4. Click [OK].

Chapter 2 SP350 Maintenance Settings
- 99 -
Setting microphone
Step1. Connect the USB handset. Then, select [Control Panel] [Sound] from the [Start] menu
to open the [Sound] screen and select the [Recording] tab.
Step2. Select the device name provided for your PC.
Step3. Click [Set Default].
Step4. Click [OK].

Chapter 2 SP350 Maintenance Settings
- 100 -
(5) In the case of Windows 8
Setting speakers
Step1. Connect the USB handset/headset. Then, select [Control Panel] -> [Sound] from the
[Start] menu to open the [Sound] screen and select the [Playback] tab.
Step2. Select the device name provided for your PC.
Step3. Click [Set Default].
Step4. Click [OK].
Chapter 2 SP350 Maintenance Settings
- 101 -
Setting microphone
Step1. Connect the USB handset. Then, select [Control Panel] -> [Sound] from the [Start] menu
to open the [Sound] screen and select the [Recording] tab.
Step2. Select the device name provided for your PC.
2. ご利用になるPCに、標準で装備されているデバイス名を選択してください。
Step3. Click [Set Default].
Step4. Click [OK].

Chapter 2 SP350 Maintenance Settings
- 102 -
2.6 About DirectX version
To use SP350, DirectX version 9.0c or later is required. If DirectX has not been installed or the installed
version is earlier than 9.0c, a warning dialog appears at the SP350 start.
To check the DirectX version, perform the following procedure.
Step1. Select [Run...] from the [Start] menu.
For Windows 8, right-click on Start Screen select [All apps] -> [Windows System tool] ->
[Run...].
Step2. Enter "dxdiag" and click [OK].
The [DirectX Diagnostic Tool] screen appears if installed.
Note: If the screen shown above does not appear, DirectX has not been installed.
Step3. Check the version shown in the [DirectX Version] field on the [System] tab (boxed
information on the screen).
This is the end of the procedure if the version is 9.0c or later.
Go to Step4 if the version is earlier than 9.0c.
Step4. Install DirectX in either of the following ways.
To install DirectX included in the SP350 installation CD-ROM:
Double-click "Microsoft/ENG/DirectX9.0c/dxsetup.exe" in the CD-ROM.
To install by downloading the latest DirectX from Microsoft® web site:
Download the latest DirectX from the following URL to install.
http://www.gamesforwindows.com/en-US/AboutGFW/Pages/DirectX10.aspx
Note: The URL is subject to change without notice.

Chapter 2 SP350 Maintenance Settings
- 103 -
2.7 About using Core Audio
If it is select Core Audio for Voice processing then it may display following screen when SP350 is
start up.
In this case, it might be wrong setting on play sound or recording device. Please change setting
according following procedure and restart SP350. Even if it changed setting and it still shown above
screen then it may not be support Core Audio using Audio device and please ask to technical support
engineer.
1) Open Sound Properties for [Control Panel] -> [Sound].

Chapter 2 SP350 Maintenance Settings
- 104 -
2) Open Speaker Properties using SP350 and open detail tab.
Follow above figure to change sample rate and depth for fault style and restart SP350.
(Note) Please change to recording side it is not only playing side.
Chapter 3 Starting or Ending SP350
- 105 -
Chapter 3 Starting or Ending SP350
This chapter describes how to start or end SP350.
Starting SP350
Ending SP350
How to confirm the version and the operation mode of SP350
About Windows XP Service Pack 2 support
About the firewall in Windows XP Service Pack 1 or earlier

Chapter 3 Starting or Ending SP350
- 106 -
3.1 Starting SP350
Start SP350 in any of the following ways.
Select [Programs] [UNIVERGE Soft Client SP350] [SP350] from the [Start] menu of Windows.
If [Create Shortcut to Desktop] is selected on the shortcut selection screen at the installation, the
following shortcut icon is created. Double-click the shortcut icon.
In case of Windows 8, right-click on Start Screen -> [All apps] -> [UNIVERGE Soft Client SP350] ->
[SP350].
If [Run SP350 on startup] is selected on the shortcut selection screen at the installation, the SP350
application starts when Microsoft Windows starts.
When SP350 starts, the following message is displayed until the application completes the connection
to the IP telephony server. Wait until this message disappears.
The following [Login] screen appears. Enter the login name and the password and click [OK].
Field Description
Login Enter your station number.
Password Enter your assigned PBX station password.
Note: When collaboration with another phone is used, the login name and the password are the station
number (Myline) of SP350, not the station number of the terminal for collaboration. For details,
contact the installation technician.

Chapter 3 Starting or Ending SP350
- 107 -
3.2 Ending SP350
End SP350 in any of the following ways.
Right-click the icon on the task tray and select [Exit] from the pop-up menu.
Right-click the icon on the taskbar and select [Close] from the pop-up menu.
Click [x] on the upper right side of the SP350 screen.
When the above operation is performed, the exit confirmation dialog appears.
Click [OK] on the dialog to end SP350.

Chapter 3 Starting or Ending SP350
- 108 -
3.3 How to confirm the version and the operation mode of SP350
Follow the procedure below to confirm the version and the operation mode of SP350.
Right-click the SP350 icon on the task tray and select [Version] while SP350 is in operation.
The [SP350 Version Information] screen appears.
- When the Communication Server is UNIVERGE SV8500 or UNIVERGE SV7000
- When the Communication Server is UNIVERGE SV8300
X.X.X.X
X.X.X.X: Version number

Chapter 3 Starting or Ending SP350
- 109 -
3.4 About Windows XP Service Pack 2 supports
When Windows XP Service Pack 2 is applied, Softphone may not function normally due to the
Windows firewall function which is newly provided. If any problem occurs which is considered to be
caused by this function, unblock this function for Softphone in any of the following ways.
3.4.1 Execute the tool to disable the SP350 firewall
This tool can disable the firewall only for SP350 and the data conference application.
Step1. Execute "FWConfig.exe" in the SP350 installation folder.
Note: Be sure to execute it after ending SP350.
When successfully completed:
The following dialog appears.
When failed (Windows XP Service Pack 2 is not applied):
The following dialog appears.

Chapter 3 Starting or Ending SP350
- 110 -
3.4.2 Disable the firewall upon starting SP350 after Windows XP Service Pack
2 is applied
If Windows XP Service Pack 2 is applied after SP350 is installed, the Windows firewall displays the
following setting confirmation screen when SP350 is started.
Click [Unblock] on this screen to disable the firewall. SP350 will function normally.
Similarly, when the data conference application is started, the Windows firewall displays the following
setting confirmation screens.
Click [Unblock] on these screens to disable the firewall. The application collaboration will function
normally.

Chapter 3 Starting or Ending SP350
- 111 -
Note: If the [Keep blocking] is clicked, "3.4.1 SP350 Execute the tool to disable the SP350 firewall" or
"3.4.3 Disable the firewall manually in advance" must be performed.
3.4.3 Disable the firewall manually in advance
When Windows XP Service Pack 2 is applied, [Windows Firewall] is added to the [Control Panel]
screen. The SP350 firewall can be disabled using this.
Step1. Select [Control Panel] [Security Center] [Windows Firewall] from the [Start] menu
and click [Exceptions] tab.
The following screen appears.

Chapter 3 Starting or Ending SP350
- 112 -
Step2. Click [Add program] to add SP350 and the data conference application.
Specify the executable file of SP350 (when installation destination is not changed,
"C:\ProgramFiles\NEC\SP350\ClientPhone32.exe") in the [Path] field and click [OK] to
add SP350.
Similarly, specify "C:\Program Files\NEC\SP350\DataMeeting\DataMeeting.exe" and
"C:\Program Files\NEC\SP350\DataMeeting\RtcSvGm.exe" to add the data conference
application.
Note: The above description assumes that the installation destination of Windows is Drive
C.
Step3. Confirm that "SP350", "DateMeeting.exe" and "RtcSvGm.exe" are displayed in the list of
programs and services in the [Exceptions] tab.
The screen display changes as follows.
Step4. Click [OK].
The firewall is disabled.

Chapter 3 Starting or Ending SP350
- 113 -
3.5 About the firewall in Windows XP Service Pack 1 or earlier
If the Windows firewall (Internet connection firewall) function is enable in Windows XP Service Pack 1
or earlier, Softphone may not function normally. If any problem occurs which is considered to be
caused by this function, disable the firewall in the following way.
Note: Be sure to contact the network administrator before the firewall is disabled.
3.5.1 Disable the Internet connection firewall
Step1. Select [Control Panel] [Network and Internet Connections] [Network Connections]
from the [Start] menu.
Step2. Right-click the network to be used, select [Properties], and click [Advanced] tab.
The following screen appears.
Step3. Uncheck the [Protect my computer and network by limiting or preventing access to this
computer from the Internet] checkbox.
Step4. Click [OK].
The Internet connection firewall function is disabled.

Chapter 3 Starting or Ending SP350
- 114 -

Chapter 4 Configuring Directory Search Service in Information Search
- 115 -
Chapter 4 Configuring Directory Search Service in
Information Search
This section describes the following items that are required for the directory search service in
information search.
Configuration of directory service in maintenance settings
Directory search rule file
Phone number normalization rule file
Phonebook setup by user definition
To understand the contents described in this section requires the basic knowledge of LDAP, regular
expression library and phone number planning.
Overview of service
Flow of configuration
Contents of maintenance settings and user definitions
About the description format of the directory search rule file
About the description format of the phone number normalization rule file
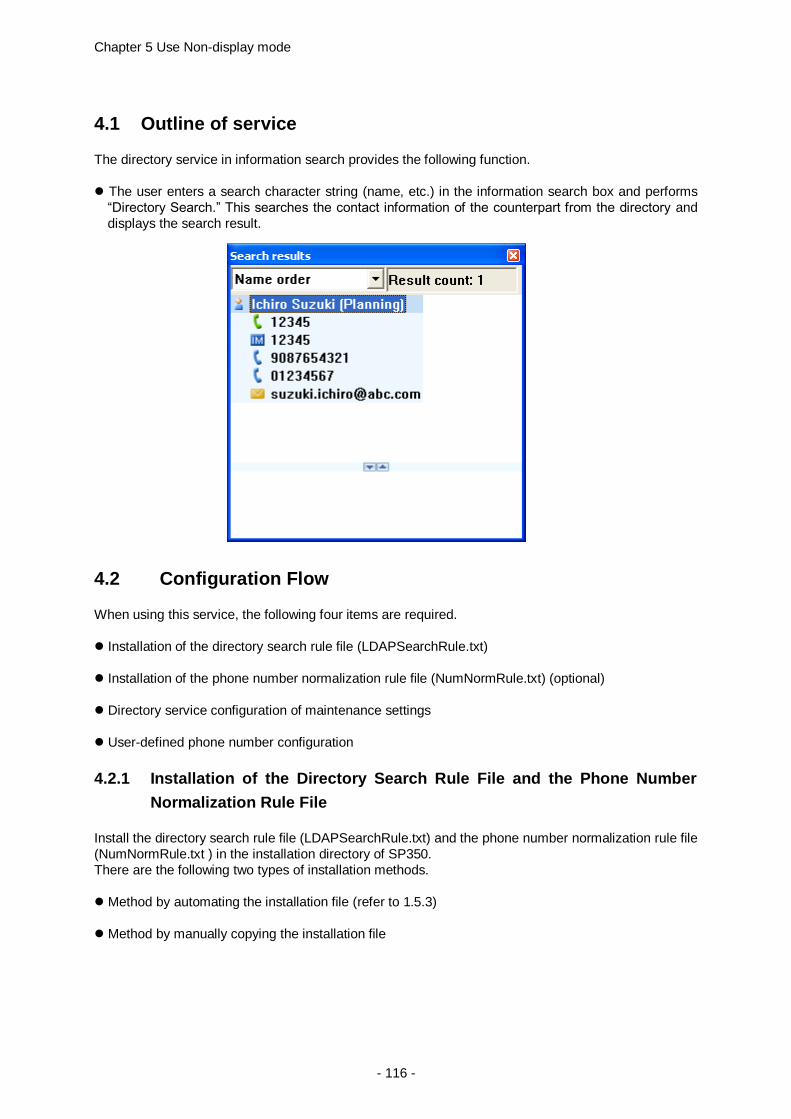
Chapter 5 Use Non-display mode
- 116 -
4.1 Outline of service
The directory service in information search provides the following function.
The user enters a search character string (name, etc.) in the information search box and performs
“Directory Search.” This searches the contact information of the counterpart from the directory and
displays the search result.
4.2 Configuration Flow
When using this service, the following four items are required.
Installation of the directory search rule file (LDAPSearchRule.txt)
Installation of the phone number normalization rule file (NumNormRule.txt) (optional)
Directory service configuration of maintenance settings
User-defined phone number configuration
4.2.1 Installation of the Directory Search Rule File and the Phone Number
Normalization Rule File
Install the directory search rule file (LDAPSearchRule.txt) and the phone number normalization rule file
(NumNormRule.txt ) in the installation directory of SP350.
There are the following two types of installation methods.
Method by automating the installation file (refer to 1.5.3)
Method by manually copying the installation file

Chapter 4 Configuring Directory Search Service in Information Search
- 117 -
4.2.1.1 Method by Automating the Installation Files
With the method by automating the installation file, a setup file packaged with a configuration file is
created using the method in accordance with 1.5.3, “Automatic environment and data conference
settings using installation file”. However, the IExpress.exe used as described in 1.5.3 has insufficient
functions, it is necessary to use a different tool.
Here, we will introduce a method that uses free software 7-zip. The following explains the procedure
using 7-zip version 4.65. The screens and display text may be different depending on the version of
7-zip and how it is obtained. Other tools can also be used as long as they satisfy the procedure of
automation described later.
Note: In order to use free software including 7-zip, the customer has the responsibility for strictly
following the licensing conditions of the corresponding software. NEC shall not be responsible
for any damage the customer may incur as a result of using the corresponding free software.
Also, NEC does not approve the distribution of SP350 software to the third party by the
customer. Please be aware that this is also applicable when SP350 software is embedded into
an installer created by using free software such as 7-zip.
The customer shall be responsible for damage NEC may incur when the customer distributes
SP350 software to the third party.
4.2.1.2 Procedure of Automation
Similar to 1.5.3, “Automatic environment and data conference settings using installation file,” create a
self-extract setup file to which LDAPSearchRule.txt and NumNormRule.txt have been added, in
addition to SP350AutoConf.ini described in 1.5.3, to the installer file group before compression.
At that time, store LDAPSearchRule.txt and NumNormRule.txt in a folder named “Enhance” and
execute Setup.exe by specifying the “/Enhance” option. When this option is specified, the SP350
installer copies the files under the Enhance folder to the SP installation folder by overwriting at the end
of installation.
Step1. Install 7-zip software. Download 7-zip from the URL http://www.7-zip.org/. Also, download
a self-extract installer creation kit called 7z_extra.
Step2. Prepare the setup file of SP350. Prepare the group of setup files provided on the
installation media, create LDAPSearchRule.txt and NumNormRule.txt, as well as
SP350AutoConf.ini if necessary, and prepare the files in the following folder structure.
Note: Please be aware that LDAPSearchRule.txt and NumNormRule.txt must be created
under the Enhance folder, and SP350AutoConf.ini in the same folder as the setup
file group.
Enhance\LDAPSearchRule.txt
Enhance\NumNormRule.txt (option)
SP350AutoConf.ini (option)
_Setup.dll
data1.cab
data1.hdr
data2.cab
install_flash_player_10_active_x.exe
ISSetup.dll
layout.bin
setup.exe
setup.ini
setup.inx
Ver.dat

Chapter 5 Use Non-display mode
- 118 -
Step3. Compress the setup files. Using 7-zip software, compress the above files into one file.
Note: Name the compressed file “archive.7z”. When compressing, select “7z” for “Archive
format”. Select “Normal” for “Compression Level”, and “LZMA” for “Compression
Method”. Also, do not make the file a self-extract file at this point.

Chapter 4 Configuring Directory Search Service in Information Search
- 119 -
Note: Open the compressed file you created in 7-zip, and verify whether or not the
extracted files are stored as shown in Step2 in 4.2.1.2.
Make sure that an unnecessary folder has not been created above Setup.exe.

Chapter 5 Use Non-display mode
- 120 -
Step4. Create the configuration file of the self-extract installer, and save it by naming “config.txt”.
The configuration file is as shown below.
Note: Title and BeginPrompt set the title and message content of the confirmation dialog
box respectively when starting the self-extract installer. Specify contents suitable
for usage. Note that they must be enclosed with double quotation marks (“ “).
Do not change the content of the RunProgram line.
Create the configuration file using Notepad.exe, and save it in UTF-8 format.
Step5. Create a self-extract installer.
Prepare the 7zSD.sfx file contained in 7z_extra, archive.7z created in Step 3, and
config.txt created in Step4, and place them in the same directory.
Open a command prompt, move these three files into the folder you prepared, and then
execute the following command.
This creates the setup file Setup.exe packaged with environmental setting.
Step6. Start the self-extract installer you created, and perform the following installation tests.
1. When Setup.exe is started, will the extraction of the compressed file be started and will
SP350 Setup start?
If SP350 Setup does not start in 1, the following reasons may be considered; it has
been forgotten to specify the “/b” option in the copy command in Step5, the files
prepared in Step2 were wrong, or compressed files were stored in an unnecessary
folder in Step3, for instance.
2. When Setup.exe is executed, will a confirmation dialog box having the content you set
be displayed?
If a dialog box does not appear in 2, config.txt created in Step4 may be incorrect.
Check to see if it has been saved in UTF-8 and there is no misspelling including the
;!@Install@!UTF-8! Line.
;!@Install@!UTF-8!
Title="SP350"
BeginPrompt=" "Install SP350?"
RunProgram="setup.exe /Enhance"
;!@InstallEnd@!
C:\folder> copy /b 7zSD.sfx+config.txt+archive.7z Setup.exe

Chapter 4 Configuring Directory Search Service in Information Search
- 121 -
3. After installation, will LDAPSearchRule.txt and NumNormRule.txt be installed in the
SP350 installation folder?
If files have not been copied in 3, there may be a possibility that
Enhance\LDAPSearchRule.txt and Enhance\NumNormRule.txt were not added in
Steps 2 and 3, or the RunProgram line is not as shown in Step3 in 4.2.1.2.
4. If the Preferences SP350AutoConf.ini is also packaged, has its content been set?
If “4. Preferences” are not automatically set up, there may be a possibility that
SP350AutoConf.ini was not added in Steps 2 and 3, or SP350AutoConf.ini has not
been correctly created.
4.2.1.3 Method by Manually Copying Files
If you are copying files manually, copy the files into the installation directory of SP350 (the directory
containing ClientPhone32.exe; if the installation destination has not been changed, “C:\Program
Files\NEC\SP350”).
When copying, make sure that the user who will actually use SP350 can load these files. If the files are
copied onto the desktop first, file security to allow only the person who has copied the files to load the
files may be applied.
4.2.1.4 About Update
If there is no change in the contents of LDAPSearchRule.txt and NumNormRule.txt, the succeeding
SP350 update can be performed by using Standard Setup provided with the installation media.
If the update of LDAPSearchRule.txt and NumNormRule.txt is also necessary, use the “Method by
automating the installation files” or the “Method by manually copying files”.

Chapter 5 Use Non-display mode
- 122 -
4.2.2 Directory Service Configuration of Maintenance Settings
It is necessary to check [Allow Directory search in Search Window] in [Network settings - Directory
Service] under Maintenance Settings, and set [Search Place], [Encrypted connection], [Attributes of
Telephone] and [Attributes Setting] (the SIP address is required for MOC version only) under Directory
Server Settings.
[Search Filter] is not used in this service. (The search condition is used for search from the caller’s
number.)
The default setting values are the standard setting values for coordinating with theActiveDirectory
server of MS. It is necessary to change the setting values if the attribute name for storing the name has
been customized, for example.
4.2.2.1 Correspondence of LDAP Attribute Values in Maintenance Settings
The attribute names set in Maintenance Settings are used as search results with the correspondence
shown in the figure below.
Note that, for IM, the phone number (head) is used for regular version, and the SIP address is used for
MOC version.
The regular version does not have the input box for the SIP address,

Chapter 4 Configuring Directory Search Service in Information Search
- 123 -
(* ) The phone number for regular version, the SIP address for MOC version
The standard settings assume the use of MS ActiveDirectory, and each item corresponds to the
following properties that can be checked with [ActiveDirectory User and Computer] management
snap-in. Because which attribute names are being used for operation differ depending on the
environment, determine the attribute names to be set upon adjusting with the LDAP server operation
administrator.
Mail address
Phone #1
Phone #2, #3
Name
Phone #2, #3
Mail address
Name
Phone #1
Department

Chapter 5 Use Non-display mode
- 124 -
4.2.3 Phonebook Settings in User Configurations
Open the [User Configurations] screen and check [Use directory search] in [Phonebook].
If the LDAP server to be used requires login, also check [You are required to set login ID and password
for using MOC cooperation]; the settings of the user name and password are required. Regarding
whether or not the LDAP server requires login, please check with the LDAP server operation
administrator.
The user name and password must be set by the end user, because of their characteristics; they
cannot be set on the maintenance side in advance. Upon examining the advantages and
disadvantages in operation, regarding whether to require login, or whether to permit access using an
alias and existing user names, please consult with the LDAP server operation administrator.
Company
Department

Chapter 4 Configuring Directory Search Service in Information Search
- 125 -
4.3 Directory Search Rule File
4.3.1 Overview
Place the directory search rule configuration file with the file name of “LDAPSearchRule.txt.” In this
configuration file, describe the rule for generating LDAP search filers required to search directories. In
creating a configuration file, knowledge on regular expression (PCRE compliant) for describing LDAP
search filters and patterns is required.
The sample configuration file for ActiveDirectory is found in \ConfigSample\DirectorySearch\ EN on the
CD-ROM.
Note: In creating a directory search rule, adjust with the directory server operation administrator. If an
inappropriate LDAP search filer is generated, there is a possibility that it may give excessive
load to the server.
In most cases, it is necessary to request the server administrator to create a full text search
index for attributes that will be search targets, due to performance issue.
In this configuration file, it is possible to create a search rule totally different from the search rule
provided as standard for MS ActiveDirectory. However, because the manual has been created
with the assumption that it will be provided as standard, please give consideration not to
adversary affect the user’s convenience.
This file must be created in UTF-8.
4.3.2 Content of a Directory Search Rule
The following items are set in the configuration file.
Set the following items in the configuration file.
CheckBox1 LDAP attribute name to be acquired and other environments
The LDAP attribute name to be acquired as a search result can be set as system variable definition.
All LDAP attributes including [Name]. [Phone number] and [Mail] can be specified in the configuration
file.
Basically, they can be set in Maintenance Settings; however, the settings are given precedence over
those in Maintenance Settings in this configuration file.
Search filter generation rule
Describe the rule as to what kind of LDAP search filter will be generated for the search key entered
by the user. It consists of a pattern recognition line entered by the user and the corresponding filter
generation pattern.
An example of description is as follows.
If the user enters “sip:suzuki@x” under this rule, the following will be generated as an
LDAP filter.
$commonfilter (objectClass=user)
^sip:
(msRTCSIP-PrimaryUserAddress=sip:$f<)
(&(objectClass=user)(msRTCSIP-PrimaryUserAddress=sip:suzuki@x*))
Chapter 5 Use Non-display mode
- 126 -
4.3.3 Basic Structure of the Configuration File
Lines and blank lines starting with ; are ignored as comments.
A line starting with $ is a substitute into a system variable. Delimit variable names
and setting values with a space or tab.
If no setting value is placed after a variable name, that system variable will be set as
a null character string.
The line that starts excluding ";", "$", "Space", and the “tab” becomes a line for which
the input pattern recognition is specified by the regular expression.
Lines starting with other than ;, $, ’ ‘ or tab are lines that specify input pattern recognition
in regular expression. SP350 performs pattern matching in regular expression
sequentially from the beginning of the file for user entry, and substitutes the specified
replacement character string after a matched pattern.
Lines staring with ‘ ‘ or tab are replacement character strings. Multiple input pattern
recognitions can be specified for one replacement character string.
SP350 combines replacement character strings generated from the above pattern
recognition of the configuration file with AND condition, and ultimately generates an
LDAP filter of (& $commonfilter {replacement character string 1} {replacement character
string 2}…).
4.3.4 System variables
$debug When 1 is set, log output is placed in debug mode.
$ldapserver Specify the address of the directory server.
If not specified, it will follow Maintenance Settings.
$commonfilter Specify the search condition always contained in an LDAP search filter.
If not specified, (objectClass=user) (objectCategory=person) will be set.
If a null character string is set, the common search condition will not be included
in an LDAP filter to be generated.
$name Specify the attribute name corresponding to “Name” to be acquired during
directory search.
If not specified, it will follow Maintenance Settings. The default in Maintenance
Settings is “name.”
If a null character string is set, “name” will not be acquired.
; Comment
$sip msRTCSIP-PrimaryUserAddress
^sip:
(msRTCSIP-PrimaryUserAddress=sip:$f<)

Chapter 4 Configuring Directory Search Service in Information Search
- 127 -
$company “Company name” The default in Maintenance Settings is “company”
$department “Department name” The default in Maintenance Settings is “department”
$phone “Phone number 1” The default in Maintenance Settings is “telphoneNumber”
$phone2 “Phone number 2” The default in Maintenance Settings is “mobile”
$phone3 “Phone number 3” The default in Maintenance Settings is “homePhone”
$phone4 “Phone number 4” The default in Maintenance Settings is “null”
$mail “Mail” The default in Maintenance Settings is “mail”
$mail2 “Mail” The default in Maintenance Settings is “null”
$mail3 “Mail” The default in Maintenance Settings is “null”
$mail4 “Mail” The default in Maintenance Settings is “null”
$sip “SIP address” The default in Maintenance Settings is
“mSRTCSIP-PrimaryUserAddress”
Similar to $name, the above specifies each of attribute names.
Note that these settings take precedence over Maintenance Settings.
Please be aware that misspelled system variables will not generate errors.
System variables cannot be referenced by pattern recognition or within a replacement character string.
4.3.5 Pattern recognition
A character string entered by the user is disassembled into multiple words with ‘ ‘, and pattern is
recognized for each word.
Example: Suzuki Ichiro “Suzuki” + “Ichiro”
Describe pattern recognition in regular expression (PCRE compliant). An explanation of regular
expression is omitted in this manual.
As a special description, there is a line containing only ‘*’; this is handled that all input matches (same
as ".*”).
4.3.6 Replacement Character String
A replacement character string performs variable replacement starting with $, which is then expanded
into an LDAP search filter. The following variables can be used from matching results in regular
expression.
4.3.6.1 Usable Variables
$@ Exactly replaced with a word entered.
$0 Matched part (all): Replaced with the matched whole in regular expression.
$1…${32} Correspond to the capture in regular expression. Up to 32 can be used.
If the number part consists of 2 digits (10 or larger), enclose it with { } such as
{10}. { } is not required for a single digit.
$< Replace with the character string following the matched part (all).
Example: When “sip:suzuki@x” is given to “^sip:,” $0=”sip:” $<=”suzuki@x.”

Chapter 5 Use Non-display mode
- 128 -
4.3.6.2 LDAP filter escape rule prefix
The following prefixes can be added to replacement variables.
LDAP filter escape rule prefixes
r Does not perform LDAP filter escape.
t Performs escape for \() (default).
n Performs escape for \*().
Example: For entry “(\01*)”
$r0 (\01*)
$t0 \28\5c01*\29
$n0 \28\5c01\2a\29
4.3.6.3 Default Part Matching Rule Specification Prefixes
When '*' is not included in the original character string, specify whether or not to add '*' to
before and after the character string.
Nothing will be done if '*' has been included in $?. Also, decision on adding * will be made
after escape processing.
This is the rule for expanding words entered by the user into partial matching by default.
f {character string}* forward matching specification
b *{character string} backward matching specification
e {character string} not added (default)
s *{character string}* partial matching
Example: For entry “suzuki”
$0 -> Suzuki
$e0 -> Suzuki
$f0 -> Suzuki*
$b0 -> * Suzuki
$s0 -> * Suzuki*
On the other hand, for “Suzuki*” which contains *, “Suzuki*” will be returned as is
regardless of prefix. Because the presence of * is determined after escape processing, If
there is an n prefix, it will be processing for “Suzuki\2a”; * will be added according to the
above rule, resulting in “Suzuki\2a*” for example.
4.3.6.4 Special character strings
$$ Replaced with ‘$’.
%? Handled as $n? (%0 -> $n0).
It is considered to be used in phone numbers.
%% Replaced with ‘%’.

Chapter 4 Configuring Directory Search Service in Information Search
- 129 -
4.3.6.5 Special Options of Replacement Character Strings
If a replacement character string starts with ':', it is regarded as option specification until
there is a space.
Example: :n (title=$@)
The following options are defined.
:e Generates an error without generating a replacement character string for a matched
character string in pattern recognition. At this time, Softphone does not perform directory
search.
The :e option is intended to reject vague search conditions such as (name=*a*)’.
:n Disables individual specification for a generated replacement character string. If an
LDAP filter consisting of only a replacement character string in which :n is specified is
generated, Softphone rejects LDAP search.
The :n option is intended to reject individually inappropriate search conditions such as
(!(name=Suzuki)).
:a Enables individual specification for a generated replacement character string.
Differently from :n, search is enabled if there are two or more replacement character
strings with :a attribute.
The :a option is the same as the :n option, but is a less severe rejection condition.
Be sure to set a rule that matches with all (“*”) and replacement character strings at the
end of a file.
If an entry does not match with any rule, that entry will be discarded.
4.3.7 About Debugging of the Configuration File
The configuration file can be updated anytime during the execution of Softphone. When Sofiphone
detects that the timestamp of the configuration file has been updated, the configuration file is reloaded
at the next LDAP search.
Loading errors of generated LDAP search files and the configuration file are saved in the UILog0.log
located in the log directory of Softphone with “{time} [LDAPSEARCH]” added.
Try searching and check whether or not an intended LDAP search filter can be generated.
Example:
01/22 18:14:37:369 [LDAPSEARCH] input=Ichiro Suzuki suzuki@x generated
filter=(&(objectClass=user)(|(sn=Ichiro*)(givenName=Ichiro*))(|(sn=Suzuki*)(givenName=
Suzuki*))(mail=suzuki@x*))
Chapter 5 Use Non-display mode
- 130 -
4.4 Phone Number Normalization Rule Configuration File
4.4.1 Overview
Place the configuration file of the rule that normalizes phone numbers acquired as a result of directory
search with the name “NumNormRule.txt” in the installation directory of SP350. Phone numbers
registered in the directory server are often incomplete numbers that cannot be originated as they are.
Phone number normalization performs processing that make these incomplete phone numbers usable
for call origination by adding appropriate modifications.
Because this configuration file describes the rule for normalizing incomplete phone numbers (such as
extension numbers only), detailed knowledge on phone number planning and regular expression
(PCRE compliant) for pattern description is required for configuration.
Note that this configuration file is optional; so it is not necessary to install it if phone number
normalization is not required.
A sample configuration file that does not have specific functions is found in
\ConfigSample\DirectorySearch\EN of CD-ROM.
Note: When creating phone number normalization rule configuration, please make adjustments
between the person in charge of directory server operation and the person in charge of phone
system operation. It is necessary to check phone number planning and in what rule phone
numbers are registered in the directory. If an inappropriate rule is created, calls may be
originated to unintended phone numbers by the end user. It is necessary to save this file in
UTF-8.
4.4.2 Content of the Configuration File
The phone number normalization rule is applied to the following items acquired from the LDAP server.
Phone number 1, Phone number 2, Phone number 3, Phone number 4
In the configuration file, configure the following item.
Tule for normalizing phone numbers acquired from the LDAP server
An example of description is as follows.
This rule normalizes 03-(1234)-4567 to 0-03-1234-4567.
; Rule for a 2-digit area code
^(0[0-9])-?\(?([0-9]{4})\)?-?([0-9]{4}) 0-$1-$2-$3

Chapter 4 Configuring Directory Search Service in Information Search
- 131 -
4.4.3 Basic Structure of the Configuration File
The basic syntax is the same as the directory search rule file.
Lines and blank lines starting with ; are ignored as comments.
A line starting with $ is a substitute into a system variable. Delimit variable
names and setting values with a space or tab.
If no setting value is placed after a variable name, that system variable will
be set as a null character string.
Lines starting with other than ;, $, ’ ‘ or tab are lines that specify input
pattern recognition in regular expression. SP350 performs pattern matching
in regular expression sequentially from the beginning of the file for user
entry, and substitutes the specified replacement character string after a
matched pattern.
Lines staring with ‘ ‘ or tab are replacement character strings. Multiple input
pattern recognitions can be specified for one replacement character string.
4.4.4 System Variables
$debug When 1 is set, log output is placed in debug mode.
4.4.5 Pattern Recognition
Describe the pattern recognition rule in regular expression (PCRE compliant) for phone numbers
acquired in directory search. An explanation of regular expression is omitted in this manual.
Because double byte characters in entered phone numbers are converted into single byte characters in
advance, it is not necessary to handle double byte characters.
As a special description, there is a line containing only ‘*’; this is handled that all input matches (same
as ".*”).
; comment
^(0[0-9])-?\(?([0-9]{4})\)?-?([0-9]{4})
0-$1-$2-$3
$debug 1

Chapter 5 Use Non-display mode
- 132 -
4.4.6 Replacement Character String
A replacement character string performs variable replacement starting with $ and is then expanded.
The following variables can be used from matching results in regular expression.
Similar to the directory search rule, each variable accepts a prefix. However, do not use prefixes
because they are not useful in phone number normalization.
4.4.6.1 Usable Variables
$@ Exactly replaced with a word entered.
$0 Matched part (all): Replaced with the matched whole in regular expression.
$1…${32} Correspond to the capture in regular expression. Up to 32 can be used.
If the number part consists of 2 digits (10 or larger), enclose it with { } such
as {10}. { } is not required for a single digit.
$< Replace with the character string following the matched part (all).
Example: If “03-1234-5678 ext:1234” is given to “^[0-9()-]+,”
$0=”03-1234-5678” $<=”ext:1234” are set.
4.4.6.2 Special Character Strings
$$ Replaced with ‘$.’
%? Do not use this because the escape rule will be applied, as shown in the
LDAP search configuration file. This has no effective use for phone number
normalization.
%% Replaced with ‘%.’
If an entered phone number does not match with any of the recognition patterns, SP350
does not perform phone number normalization and displays the numbers as they are.
4.4.7 About Debugging of the Configuration File
The configuration file can be updated anytime during the execution of Softphone. When Sofiphone
detects that the timestamp of the configuration file has been updated, the configuration file is reloaded
at the next LDAP search.
Loading errors of the configuration file are saved in the UILog0.log located in the log directory of
Softphone with “{time} [NUMNORMRULE]” added.

Chapter 5 Use Non-display mode
- 133 -
Chapter 5 Use Invisible mode
This section describes how to use invisible mode on SP350.
5.1 Service general description
When SP350 is controlled by 3rd vender application then in this case SP350 panel is not need to use
and it can be invisible mode on SP350 standard panel and toolbar.
5.2 Setting
When SP350 installing then it can be select to Invisible mode.
However, if using simple installation to select invisible mode then it cannot indicate skin selector
screen.
5.3 Service Condition
Enable Outlook add-in.
The panel design is invisible mode by User Setting.
If it wants to change from invisible mode to standard panel mode then you should uninstall SP350
and reinstall SP350.
Display to Task Try icon.
During incoming call Task Try icon does not change incoming indication.
Even if right-click to Task Try icon it does not display User Guide.
5.4 Use Invisible mode
5.4.1 User setting
When right-click menu on User Setting along Task try icon then display User Setting screen.
5.4.2 Version Information dialog
The right-click menu of icon on task tray then selects [Version] and it can confirm non-display mode on
SP350 Version Information dialog.

Chapter 5 Use Non-display mode
- 134 -
5.4.3 A Toolbar panel for maintenance
If the Shift+Ctrl+Alt key pressing left-click then Toolbar panel appear.
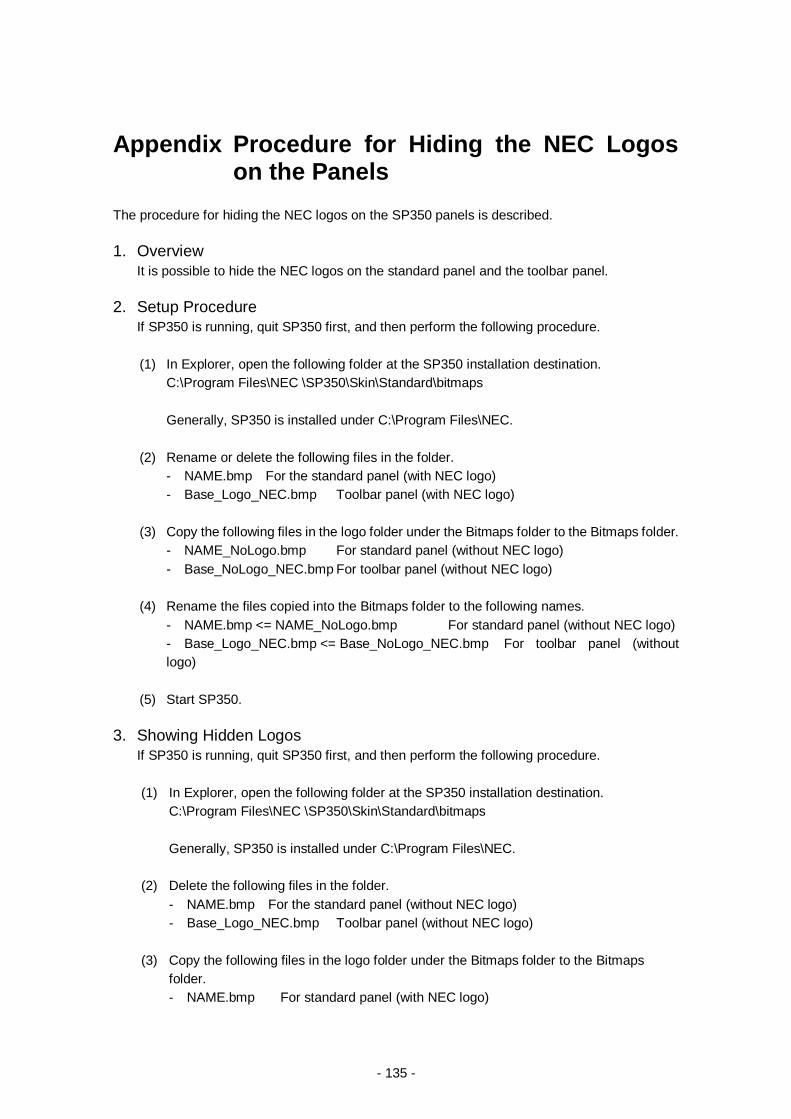
- 135 -
Appendix Procedure for Hiding the NEC Logos on the Panels
The procedure for hiding the NEC logos on the SP350 panels is described.
1. Overview
It is possible to hide the NEC logos on the standard panel and the toolbar panel.
2. Setup Procedure
If SP350 is running, quit SP350 first, and then perform the following procedure.
(1) In Explorer, open the following folder at the SP350 installation destination.
C:\Program Files\NEC \SP350\Skin\Standard\bitmaps
Generally, SP350 is installed under C:\Program Files\NEC.
(2) Rename or delete the following files in the folder.
- NAME.bmp For the standard panel (with NEC logo)
- Base_Logo_NEC.bmp Toolbar panel (with NEC logo)
(3) Copy the following files in the logo folder under the Bitmaps folder to the Bitmaps folder.
- NAME_NoLogo.bmp For standard panel (without NEC logo)
- Base_NoLogo_NEC.bmp For toolbar panel (without NEC logo)
(4) Rename the files copied into the Bitmaps folder to the following names.
- NAME.bmp <= NAME_NoLogo.bmp For standard panel (without NEC logo)
- Base_Logo_NEC.bmp <= Base_NoLogo_NEC.bmp For toolbar panel (without
logo)
(5) Start SP350.
3. Showing Hidden Logos
If SP350 is running, quit SP350 first, and then perform the following procedure.
(1) In Explorer, open the following folder at the SP350 installation destination.
C:\Program Files\NEC \SP350\Skin\Standard\bitmaps
Generally, SP350 is installed under C:\Program Files\NEC.
(2) Delete the following files in the folder.
- NAME.bmp For the standard panel (without NEC logo)
- Base_Logo_NEC.bmp Toolbar panel (without NEC logo)
(3) Copy the following files in the logo folder under the Bitmaps folder to the Bitmaps
folder.
- NAME.bmp For standard panel (with NEC logo)

- 136 -
- Base_Logo_NEC.bmp For toolbar panel (with NEC logo)
(4) Start SP350.

- 137 -
4. Restrictions
If software is re-installed or updated, even if NEC logos were hidden according to the
procedure described previously, NEC logos will be displayed again.
To hide the logos, please do so by performing “2, Setup Procedure” again.

- 138 -
UNIVERGE Soft Client SP350 Regular mode, Thin Client
Operations and Maintenance Manual (Software Version 6) NWA-085052-001
Issue 1.0, September 2013
Publisher: NEC Corporation
© 2009-2013 NEC Corporation
Notes:
(1) No part of this publication may be reproduced without prior written permission of the
publisher.
(2) Contents of this publication are subject to change without prior notice.