Unity Reception Getting Started Guide - MasergyUSER GUIDE UNITY RECEPTION Option Description Never...
10
USER GUIDE | UNITY RECEPTION Unity Reception Getting Started Guide Document Version 1.0 July 2019
Transcript of Unity Reception Getting Started Guide - MasergyUSER GUIDE UNITY RECEPTION Option Description Never...

U S E R G U I D E | U N I T Y R E C E P T I O N
Unity Reception Getting Started Guide
Document Version 1.0July 2019
2
U S E R G U I D E | U N I T Y R E C E P T I O N
Contents
1 INITIAL SETUP 3
2 THE INTERFACE 3
3 CALL CONTROL 4
Transferring a Call 5
Starting a Conference Call 5
Ending a Conference Call 5
Managing Multiple Calls 5
Call Recording 5
4 BUSY LAMP FIELD 6
User Status Views 6
Monitored User States 6
Drag and Drop Calling and IM 7
Call Pickup 7
Options for a Busy User 7
Options for an Available User 7
5 INSTANT MESSAGING (IM) 8
6 MY STATUS 8
3
U S E R G U I D E | U N I T Y R E C E P T I O N
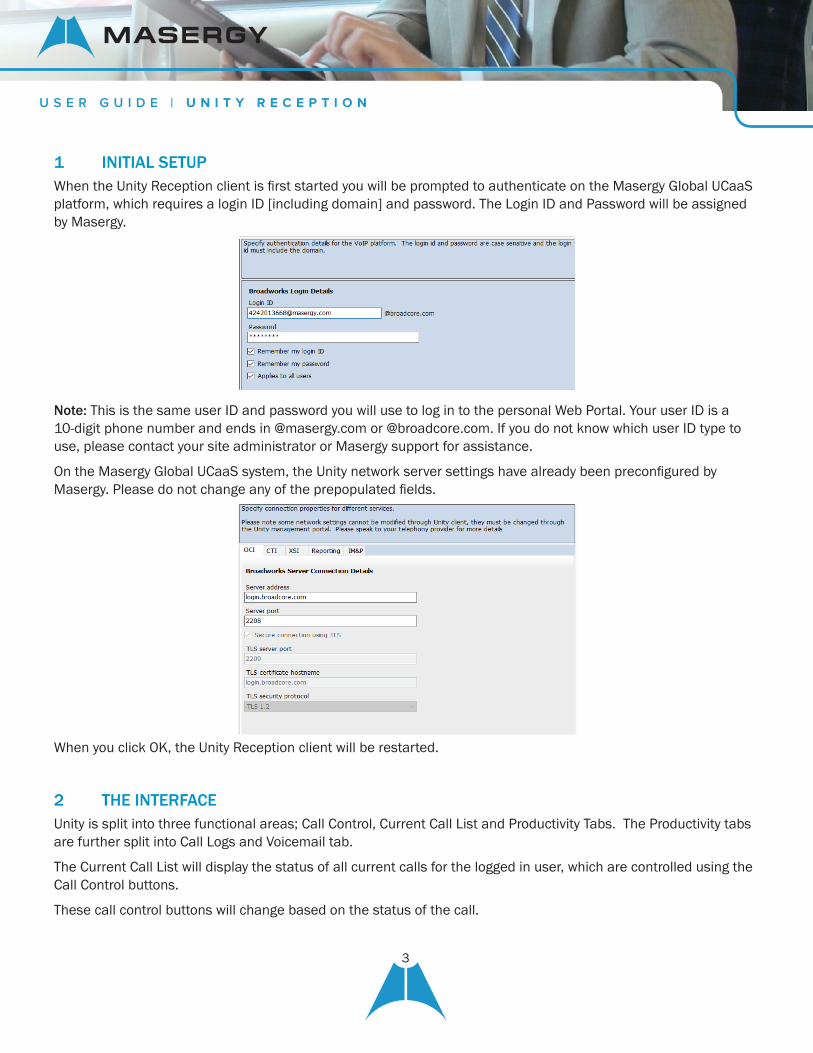
1 INITIAL SETUPWhen the Unity Reception client is first started you will be prompted to authenticate on the Masergy Global UCaaS platform, which requires a login ID [including domain] and password. The Login ID and Password will be assigned by Masergy.
Note: This is the same user ID and password you will use to log in to the personal Web Portal. Your user ID is a 10-digit phone number and ends in @masergy.com or @broadcore.com. If you do not know which user ID type to use, please contact your site administrator or Masergy support for assistance.
On the Masergy Global UCaaS system, the Unity network server settings have already been preconfigured by Masergy. Please do not change any of the prepopulated fields.
When you click OK, the Unity Reception client will be restarted.
2 THE INTERFACEUnity is split into three functional areas; Call Control, Current Call List and Productivity Tabs. The Productivity tabs are further split into Call Logs and Voicemail tab.
The Current Call List will display the status of all current calls for the logged in user, which are controlled using the Call Control buttons.
These call control buttons will change based on the status of the call.

4
U S E R G U I D E | U N I T Y R E C E P T I O N
When Unity first starts it will automatically populate the Busy Lamp Field with 50 random users in your group or enterprise.
3 CALL CONTROL
ICON FUNCTION DESCRIPTION
Dial Click this to dial a number and make a call. Right click it to redial from the last 10 numbers called.
Answer This button will appear when a call is ringing.
Release/End call This button will appear once you have a call active. Click to end the call. If you have multiple calls, click the call you want to end first.
Hold This button will appear during a call. Click to hold the call. If you have multiple calls, click the call you want to put on hold first.
Retrieve This button will appear if you have a caller on hold. Click the button to take the caller off hold.
Voicemail Click the voicemail button to send an incoming call to voicemail. Click the button when you don’t have a call and it will call your voicemail box.
Transfer Click this button to transfer a current call to a certain number. Drag and drop the call over a contact to transfer them without entering their number.
Conference Select two or more calls then click the conference button to start a conference with those callers.
Recording Click to start, pause or resume recording.
5
U S E R G U I D E | U N I T Y R E C E P T I O N
Transferring a Call• Announced Transfer: Answer an inbound call then make a new call to the desired number, this will place the
first caller on hold and initiate a new call. Once the new party answers, click transfer and transfer the two calls together.
• Blind Transfer: While on an active call, dial a number or drag to/right click the recipient then select transfer, this will send the caller directly to the destination number and disappear from your call list.
• Warm Transfer: Right click the user you want to transfer the call to and select “warm transfer”. This will then put the original caller on hold while you talk to the other user, when ready, click the transfer button.
(You can also transfer a call to someone’s voicemail or mobile by right clicking their icon and selecting the option.)
Starting a Conference Call• Establish the first call.• Call a second person.• Click the conference button to create a new conference for all three of you.• To add more people to the conference simply dial or start another call then click the conference button.
Ending a Conference Call • To end the conference call but continue speaking to one of the callers, simply select the call you want to end and
click the Release button. • To end the conference call and disconnect both parties, simply hang up the phone or select both calls and select
Release. • To leave the conference but allow the other callers to continue speaking to each other, perform an announced
transfer between the two calls.
Managing Multiple Calls• To manage a particular call, first select it by clicking it in the Active Call Window. If there is only one call in the list
it will be selected automatically. You can then use the call control buttons to perform different actions on the call.
Call RecordingCall Recording options are:
Option Description
Always Calls are automatically recorded from the beginning of the call. There is no option to pause or stop recording.
On DemandCalls are not automatically recorded from the start, but recording can be started at any time during the call in which case the entire call will be recorded. Stop and pause are not available with this option.

6
U S E R G U I D E | U N I T Y R E C E P T I O N
Option DescriptionNever Calls are never recorded and recording cannot be started while a call is in progress.
Always with Pause/Resume
All calls are automatically recorded from the beginning of the call, but recording can be paused and resumed, which is especially important when taking credit card details over the phone [that need to be omitted]. This will still result in a single recording for the call, regardless of how many times it was paused and resumed.
On Demand with User Initiated Start
Calls are not automatically recorded from the start, but recording can be started at any time. However, any conversation before the recording was started will not be included in the recording. Recording can be paused and resumed, which will result in different recordings being created for a single call.
Hold Call and Link to User• When you have a live caller that wishes to be transferred to an engaged extension, right click that user’s icon and
select Hold call and link to user.
• The call is now placed on hold and the Reception user can continue taking other calls. The Notes field displays “Waiting for Peter Law” in red to indicate that he is still engaged.
• The notes will turn green when he is available.
• Depending on your settings, Unity will indicate that Paul is now available, prompt to transfer the call or automatically transfer it.
• The hold duration and behaviour of Hold Call & Link To User can be configured in Settings>Current Calls, as shown below.

7
U S E R G U I D E | U N I T Y R E C E P T I O N
Add Note to a Call• Right click in the notes section when you have a call in the Active Call Window to add a note about that call.• Once transferred the note will go with the call to inform the new recipient what the call is about.
4 BUSY LAMP FIELD
User Status Views• Monitor up to 50 users per contact group.• Add multiple contact groups, e.g. sales and IT by right clicking a user and selecting the option to create a new
contact group. • Right-click anywhere in the list to change the view of the users, e.g. list, icons etc.• To modify the list of users currently being monitored, right-click and select Manage user list. Select the users you
want to add or remove by using the arrows. Your monitored users are on the right.

8
U S E R G U I D E | U N I T Y R E C E P T I O N
Monitored User StatesA monitored user will always be displayed in one of four states:
User State Description User Status ImageAvailable: In Office I am in the office and available to receive calls. Available: Out Of Office I am not in the office but am available to take calls Busy I am currently busy (short term) Unavailable I am currently unavailable (longer term) None No call routing plan is in use
Drag and Drop Calling and IM• Hold down and drag a user’s icon to the docked IM panel to start instant messaging• Drag a user to the Active Call Window to call them• Drag an active call to another user to transfer/show available transfer options
Call PickupThis feature allows the logged in user to answer an incoming call on behalf of a monitored user. Simply right click a ringing user and pick up the call.

9
U S E R G U I D E | U N I T Y R E C E P T I O N
Options for a Busy User
Options for an Available User
5 INSTANT MESSAGING (IM)If a user has a small blue dot then they are available for instant messaging. Send an instant message by:
• Right clicking their user icon and selecting instant message• Drag and drop the user to the docked panel on the right (this can be set up in the settings tab)• Click messaging at the top of Unity and select start conversation. Then add the people you want to instant
message• Multiple users can be selected to start an IM conversation [by holding down the CTRL key while selecting users],
but they must all be online.

CONTACT US: USA +1 (866) 588.5885 | UK +44 (0) 207 173 6900 | [email protected]
U S E R G U I D E | U N I T Y R E C E P T I O N
6 MY STATUS• To activate your status, Available, Busy, Do Not Disturb etc, click on the My Status link and click the menu option.• To activate call forwarding, select the option “Call forward always”, then configure the number. All incoming calls
to the pre-defined phone number, meaning the user’s phone will not ring.• To active and deactivate call forwarding, simply hover over “Call forward always” and select the option.
7 SHOW CALENDAR• The Busy Lamp Field will display Outlook Calendar events for today for the selected user.• Simply right click on the user and if they share their calendar permissions the user’s Outlook Calendar will display
as a pop-over panel.• In Settings > Outlook Integration > Shared Calendar – the behaviour of this feature can be configured.


![[Paris Unity meetup] - Unity 3D en entreprise](https://static.fdocuments.us/doc/165x107/55a64ec51a28ab123f8b45ab/paris-unity-meetup-unity-3d-en-entreprise.jpg)