Unit1 1 10 - Tufts Universitysites.tufts.edu/.../files/2013/06/Introduction-to-Robotics.pdf · Unit...
118
Unit 1: Intro to Engineering and Robotics ________________________________________________________________________ Unit 1 Intro to Robotics in Engineering Description: This unit is intended to be used within a 6-week period for grades 4 – 6. Students work through each challenge in groups of two. Each lesson should take 1 to 1.5 class periods. Materials Required: LEGO Mindstorms NXT robotic set with NXT 2.0 software
Transcript of Unit1 1 10 - Tufts Universitysites.tufts.edu/.../files/2013/06/Introduction-to-Robotics.pdf · Unit...

Unit 1: Intro to Engineering and Robotics
________________________________________________________________________
Unit 1 Intro to Robotics in Engineering
Description:
This unit is intended to be used within a 6-week period for grades 4 – 6. Students work through each challenge in groups of two. Each lesson should take 1 to 1.5 class periods.
Materials Required:
LEGO Mindstorms NXT robotic set with NXT 2.0 software
Unit 1: Intro to Engineering and Robotics
i
Unit 1 ________________________________________________________________
Table of Contents Section Unit 1 Outline
Lesson 1
Building Activity
Lesson 2
Lesson 3
Lesson 4
End Appendix
Section 1: Engineering Design Process Section 2: LEGO Building Tips and Tricks Section 3: LEGO Engineering Skills Glossary
Worksheets
Unit 1: Intro to Engineering and Robotics
ii
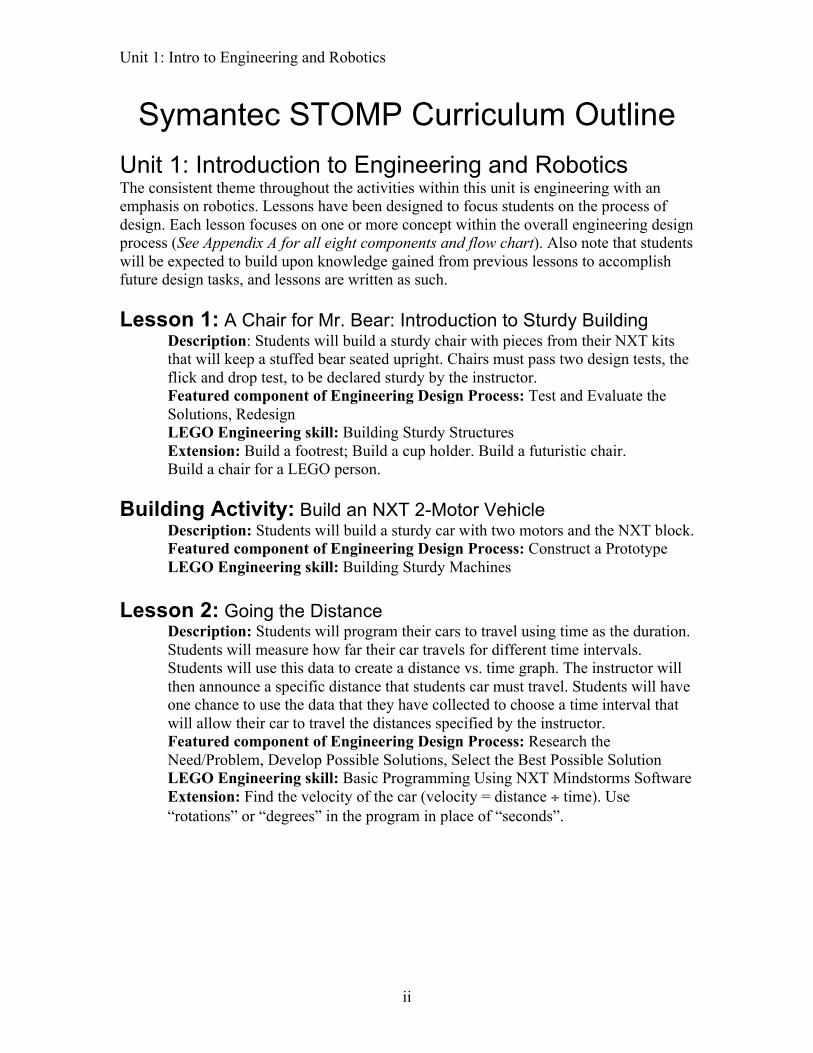
Symantec STOMP Curriculum Outline Unit 1: Introduction to Engineering and Robotics The consistent theme throughout the activities within this unit is engineering with an emphasis on robotics. Lessons have been designed to focus students on the process of design. Each lesson focuses on one or more concept within the overall engineering design process (See Appendix A for all eight components and flow chart). Also note that students will be expected to build upon knowledge gained from previous lessons to accomplish future design tasks, and lessons are written as such. Lesson 1: A Chair for Mr. Bear: Introduction to Sturdy Building
Description: Students will build a sturdy chair with pieces from their NXT kits that will keep a stuffed bear seated upright. Chairs must pass two design tests, the flick and drop test, to be declared sturdy by the instructor. Featured component of Engineering Design Process: Test and Evaluate the Solutions, Redesign LEGO Engineering skill: Building Sturdy Structures Extension: Build a footrest; Build a cup holder. Build a futuristic chair. Build a chair for a LEGO person.
Building Activity: Build an NXT 2-Motor Vehicle
Description: Students will build a sturdy car with two motors and the NXT block. Featured component of Engineering Design Process: Construct a Prototype LEGO Engineering skill: Building Sturdy Machines
Lesson 2: Going the Distance
Description: Students will program their cars to travel using time as the duration. Students will measure how far their car travels for different time intervals. Students will use this data to create a distance vs. time graph. The instructor will then announce a specific distance that students car must travel. Students will have one chance to use the data that they have collected to choose a time interval that will allow their car to travel the distances specified by the instructor. Featured component of Engineering Design Process: Research the Need/Problem, Develop Possible Solutions, Select the Best Possible Solution LEGO Engineering skill: Basic Programming Using NXT Mindstorms Software Extension: Find the velocity of the car (velocity = distance ÷ time). Use “rotations” or “degrees” in the program in place of “seconds”.

Unit 1: Intro to Engineering and Robotics
iii
Lesson 3: Harry Potter Reaches Platform 9 ¾ Description: Students will be introduced to the light and touch sensors as inputs that sense changes in the environment. Students will then use the input from these sensors to program their car to stop at a particular spot marked by a physical object and a tape line that contrasts the color of the floor. Featured component of Engineering Design Process: Develop Possible Solution(s), Select the Best Possible Solution(s). LEGO Engineering skill: NXT Inputs, NXT Outputs, Input Calibration Extension: Use sound or ultrasound sensors. Go to platform 9 ¾ then return. Try different calibrations.
Lesson 4: Fan-tas-tic:
Description: Students will design and build a fan using their NXT kits. Students will attach a touch sensor to their fan and program their fan to operate at three speeds, which can be changed by pressing the touch sensor. An optional add on activity is using gears to make the fan blades spin faster. This gives studnets the opportunity to explore gear ratios. Featured component of Engineering Design Process: Research the Need/Problem, Test and Evaluate the Solution(s), Redesign. LEGO Engineering skill: NXT Modifiers, Complex LEGO Building. Extension: Students will program their fan to increase speed more gradually using more programming blocks. Students will program their fan to repeat actions using the loop programming block. Add more blades to the fan.

Unit 1: Intro to Engineering and Robotics
1-1
Unit 1: Lesson 1 ________________________________________________________________________
A Chair for Mr. Bear Building Sturdy Structures
Overview Using LEGO pieces, students will build a chair that will keep a stuffed bear seated upright. They will need to think about the components of a chair as well as how to build a sturdy structure. This lesson emphasizes sturdy building as an important engineering skill, highlight step 6 (test and evaluate solutions) and step 8 (redesign) of the engineering design process (See End Appendix):
Bear chair made from piece found in the NXT Mindstorms kit
Goals Expectations Evidence Students will understand: • How to use basic
LEGO building pieces.
• What makes a structure sturdy.
• Why engineers test, redesign and rebuild.
Students should be able to: • Brainstorm ideas for their
chair. • Use research to help
design their chair. • Identify and use sturdy
shapes in their designs. • Redesign and rebuild after
a failed test.
Evidence of learning found in: • Project Worksheets. • A Chair that passes both the
drop and flick tests. • Student’s explanations of
design decisions as well as reasons for redesign.

Unit 1: Intro to Engineering and Robotics
1-2
Lesson 1
A Chair for Mr. Bear
Suggested Time 60 – 90 minutes Vocabulary (See Glossary)
Axle Beam Bushing Constraints “Drop Test” Engineering Design Process “Flick Test” Peg Sturdy
Materials For each student: • Project Worksheet
(See Appendix) For each student pair: • LEGO
MINDSTORMS Kit • Stuffed Animal Preparation
• Build a sturdy chair
example. • Build examples of
sturdy shapes (triangles, braced squares).
• Arrange students in pairs.
• Distribute “bears”. • Distribute Project
Worksheets.
Background The Engineering Design Process is an 8-step guideline that engineers follow to ensure that their product is designed efficiently and effectively. (See End Appendix)
Sturdiness is critical when building any type of structure; otherwise the structure will fail. Sturdiness is determined by the amount of force that can be applied before the structure fails. To make a sturdy structure, students will need to (See Appendix for building tips):
• Overlap beams • Use connector pegs • Use sturdy shapes (triangles, braced squares, etc)
Instructions PART I: Introduction to Sturdy Building 10 minutes 1. Introduce the pieces from the top tray in the LEGO
MINDSTORMS kits (beams, pegs, axles, bushings). 2. Discuss what makes a structure sturdy. Ask students why you might
want to build a structure using overlapping beams, like shown below, rather than just stacking beams on top of each other (look at the bricks in the wall of your classroom).
3. Show how to connect LEGO beams using pegs, axles and bushings. Explain that using two pegs to connect two beams is sturdier than using just one peg (because pieces rotate), like shown below:
4. Demonstrate to the class what a sturdy shape is with examples built
out of LEGO pieces. Ask students to explain why a triangle is sturdier than a rectangle and how to make the rectangle sturdy.
See the Appendix for other LEGO building tips and tricks
Unit 1: Intro to Engineering and Robotics
1-3
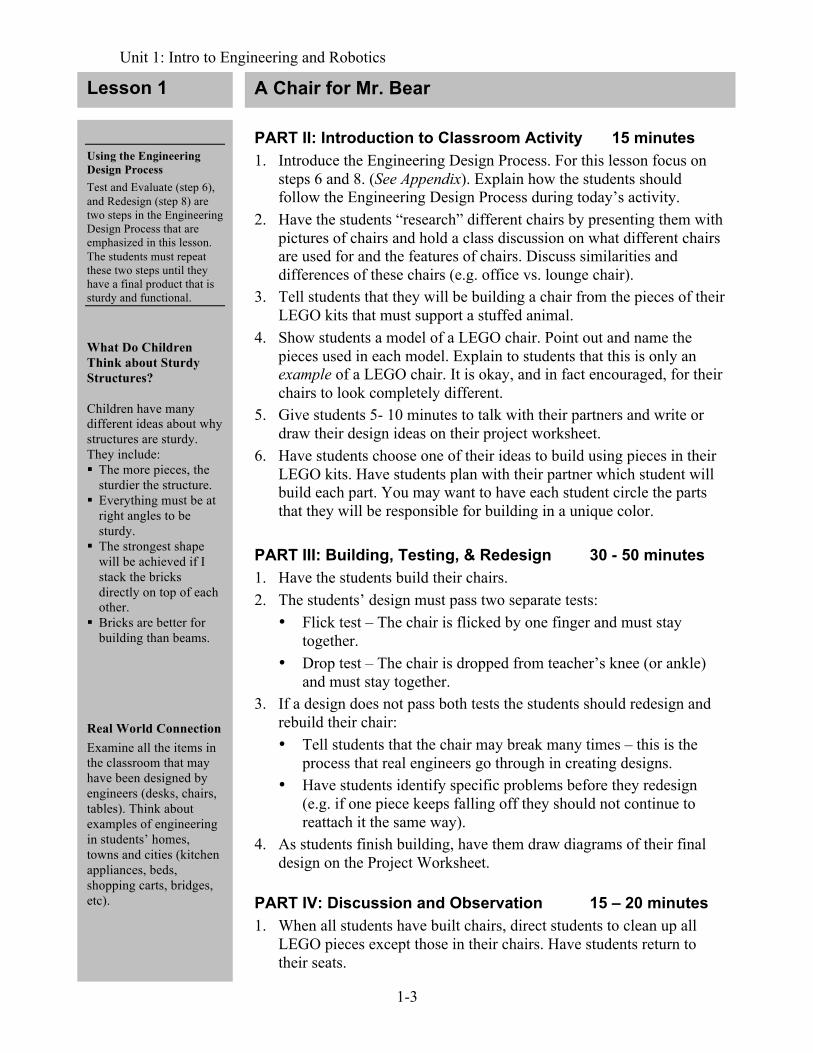
A Chair for Mr. Bear PART II: Introduction to Classroom Activity 15 minutes 1. Introduce the Engineering Design Process. For this lesson focus on
steps 6 and 8. (See Appendix). Explain how the students should follow the Engineering Design Process during today’s activity.
2. Have the students “research” different chairs by presenting them with pictures of chairs and hold a class discussion on what different chairs are used for and the features of chairs. Discuss similarities and differences of these chairs (e.g. office vs. lounge chair).
3. Tell students that they will be building a chair from the pieces of their LEGO kits that must support a stuffed animal.
4. Show students a model of a LEGO chair. Point out and name the pieces used in each model. Explain to students that this is only an example of a LEGO chair. It is okay, and in fact encouraged, for their chairs to look completely different.
5. Give students 5- 10 minutes to talk with their partners and write or draw their design ideas on their project worksheet.
6. Have students choose one of their ideas to build using pieces in their LEGO kits. Have students plan with their partner which student will build each part. You may want to have each student circle the parts that they will be responsible for building in a unique color.
PART III: Building, Testing, & Redesign 30 - 50 minutes 1. Have the students build their chairs. 2. The students’ design must pass two separate tests:
• Flick test – The chair is flicked by one finger and must stay together.
• Drop test – The chair is dropped from teacher’s knee (or ankle) and must stay together.
3. If a design does not pass both tests the students should redesign and rebuild their chair: • Tell students that the chair may break many times – this is the
process that real engineers go through in creating designs. • Have students identify specific problems before they redesign
(e.g. if one piece keeps falling off they should not continue to reattach it the same way).
4. As students finish building, have them draw diagrams of their final design on the Project Worksheet.
PART IV: Discussion and Observation 15 – 20 minutes 1. When all students have built chairs, direct students to clean up all
LEGO pieces except those in their chairs. Have students return to their seats.
Using the Engineering Design Process Test and Evaluate (step 6), and Redesign (step 8) are two steps in the Engineering Design Process that are emphasized in this lesson. The students must repeat these two steps until they have a final product that is sturdy and functional.
What Do Children Think about Sturdy Structures? Children have many different ideas about why structures are sturdy. They include: The more pieces, the
sturdier the structure. Everything must be at
right angles to be sturdy.
The strongest shape will be achieved if I stack the bricks directly on top of each other.
Bricks are better for building than beams.
Real World Connection Examine all the items in the classroom that may have been designed by engineers (desks, chairs, tables). Think about examples of engineering in students’ homes, towns and cities (kitchen appliances, beds, shopping carts, bridges, etc).
Lesson 1

Unit 1: Intro to Engineering and Robotics
1-4
Lesson 1 A Chair for Mr. Bear
Note: If students have trouble making observations, suggest that they explore how their chair is different from their neighbor’s chair. What different constraints did each of them have? Were the bears different sizes or weights? What Questions Might Students Ask During this Lesson? Why won’t my partner
let me build anything? You need to take turns putting pieces on your chair. After you add one piece, pass the chair and the LEGO kit to your partner for his or her turn.
Why does my chair keep falling over? You need to make sure that the center of gravity (the weight of your chair) is as close to the ground as possible.
Why do the beams slide in all different directions? You need to make sure that beams are connected by 2 or more pegs to keep it from spinning around the point of contact.
When do I stop redesigning? When your chair passes both tests.
2. Have the students present, one at a time, their chair design. Ask the students to answer: • How is your final design different from your original design? • What difficulties did you encounter in building your chair? • Describe how you found problems and fixed them. • What is your favorite feature of your chair?
3. Ask the students if they have other ideas for methods of testing their chairs for sturdiness or how they would test a real chair for sturdiness.
Extensions and Modification 1. Build a footrest for Mr. Bear. 2. Build a cup holder for Mr. Bear (provide students with mini cups). 3. Build an easel for Mr. Bear (provide students with mini post-it notes). 4. Build a sturdy bridge that can hold up weights in the middle and cross
a span of 10 inches. Sample Projects and Photos Sample Bear chair made with beams, bushings, pegs, and axles:
Sample Bear Chair that holds a stuffed animal:
Unit 1: Intro to Engineering and Robotics
Building Activity - 1
Building Activity ________________________________________________________________________
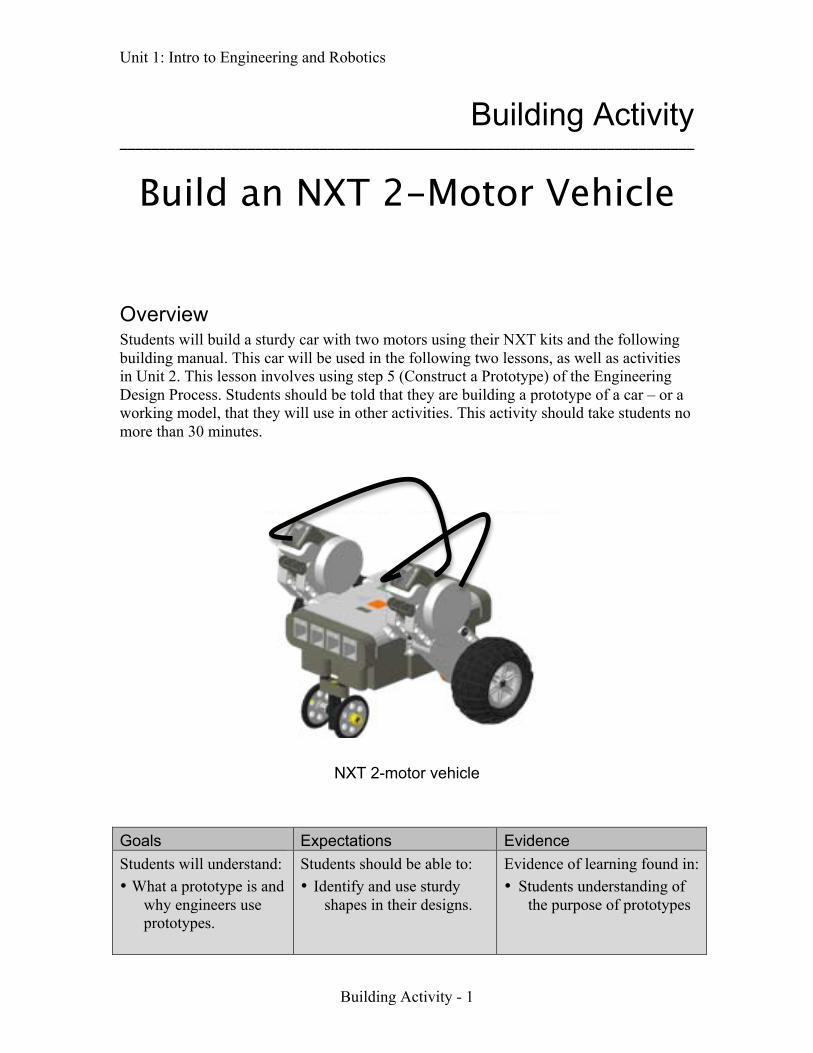
Build an NXT 2-Motor Vehicle Overview Students will build a sturdy car with two motors using their NXT kits and the following building manual. This car will be used in the following two lessons, as well as activities in Unit 2. This lesson involves using step 5 (Construct a Prototype) of the Engineering Design Process. Students should be told that they are building a prototype of a car – or a working model, that they will use in other activities. This activity should take students no more than 30 minutes.
NXT 2-motor vehicle Goals Expectations Evidence Students will understand: • What a prototype is and
why engineers use prototypes.
Students should be able to: • Identify and use sturdy
shapes in their designs.
Evidence of learning found in: • Students understanding of
the purpose of prototypes

Unit 1: Intro to Engineering and Robotics
Building Activity - 2
Step 1: Attach Motors
Step 2: Add Stabilization Bar
Step 3: Add Wheels
NXT 2-Motor Vehicle Building Guide

Unit 1: Intro to Engineering and Robotics
Building Activity - 3
Step 4: Add front Wheel
The final car should look similar to the one shown below. To complete the car, add wires from the ports on the motor to ports A, B, or C:
You have now created a prototype of a working vehicle!
Building Guide NXT 2-Motor Vehicle

Unit 1: Intro to Engineering and Robotics
2-1
Unit 1: Lesson 2 ________________________________________________________________________
Going the Distance Overview Students will learn to program their NXT cars using NXT 2.0 software. Students will program their cars to travel for different amounts of time, and record how far their car travels for each time interval. Students will create a distance vs. time graph. The teacher will give the students one chance to travel a given distance. Students must use their distance vs. time graph to determine how long to program their car to drive so that their car will stop after traveling that exact distance. This lesson teaches students basic programming and features step 4 of the engineering design process - select the best possible solution. (See End Appendix).
Move Block Configuration Panel
Goals Expectations Evidence Students will understand: • The NXT software
program interface. • Basic software
programming (move, download, power, duration).
• How to collect data and analyze trends.
Students should be able to: • Program their cars using
NXT MINDSTORMS software.
• Collect data. • Graph collected data. • Make a prediction.
Evidence of learning found in: • Going the Distance
Worksheets. • Data collection sheets and
graphs. • Accuracy in predictions of
distance.
Unit 1: Intro to Engineering and Robotics
2-2
Lesson 2
Going the Distance
Suggested Time 60 - 90 minutes Vocabulary (See Glossary)
Download Duration Motor NXT Prediction Program Program Icon Run
Materials For each student: • Going the Distance
Worksheet For each student pair: • LEGO
MINDSTORMS kit • LEGO NXT car • Graph paper • Ruler For the class: • Tape to mark distance Preparation • Mark off distance units
on classroom floor (feet, tiles, meters, etc.).
• Distribute LEGO NXT cars.
• Arrange students in pairs.
• Distribute Worksheets.
Background This lesson will focus on step 4 of the Engineering Design Process (See Unit 1 Appendix). Students will be required to conduct tests in order to make an accurate prediction of how their vehicle will behave. A well constructed distance-time graph will generate the best solution.
Engineers use predictions to determine how a final product will behave in certain conditions. Experiments can be performed to identify trends. To make a good prediction in this lesson, students will:
• Collect data for many different time intervals. • Test time intervals more than once. • Compile data in a graph. • Identify a trend in their graphs.
Instructions PART I: Introduction to Programming 10 minutes 1. Introduce the goal of the lesson in broad terms. E.g. “In this lesson,
your goal is to accurately predict how much time it will take your car to travel a certain distance and stop at a specified spot.”
2. Tell students that they will use programming to solve this problem. 3. Explain that the NXT brick is like the brain of the car that controls
the motors. 4. Tell students that they will give their robots a set of instructions.
This set of instructions is called a program and tells the NXT how to control the actions of the motors.
5. Explain that students will write a program on the computer and then transfer this program to the NXT brain by downloading it through the USB wire (show students the wire and how to connect it to both the computer and the NXT brick).
PART II: Introduction to NXT 2.0 Software 10 minutes 1. Show students how to open NXT 2.0 software and how to navigate
to a new, blank program. 2. Introduce NXT 2.0 interface as well as the move programming
block that students will be using in this lesson. 3. Show students how to add a move block to a program. Write an
example program for this lesson. The move block can be modified by changing components in the configuration panel. (See next page)

Unit 1: Intro to Engineering and Robotics
2-3
Going the Distance
The move block configuration panel shown below will move motors B and C at a power of 75 for 2.5 seconds:
4. Students should make sure that a wire connects their motors to an
NXT output port (A, B, or C) and that this matches the configuration panel for the move block.
PART III: Programming/Testing/Data Collection 45 minutes 1. Have students program their cars to travel for a time between 0 – 10
seconds at any power setting they want using the move block. 2. When students have completed their program, have them download
the program to their NXT. 3. Show students how to run the program on their NXT. 4. After students have run their programs, tell them to measure how far
the car traveled (you may want to tape one or two measuring tapes to the floor for all the students to use).
5. Have students record that value in the chart on their worksheet:
6. Repeat steps 1 - 5 for different time intervals.
• Tell students to leave the power level unchanged or else they will get inaccurate results.
• Simple time intervals (1,2,3…; ½,1,1½…) work best because they are easiest for students to graph.
• Students may test each time interval more than once to achieve the most accurate distance values.
7. When students have completed their charts, bring the class together for a discussion on how to graph the information in their charts.
8. Have them plot the points on a distance versus time graph.
9. Show students how to mark a trend line in their graph
What Questions Might Students Ask During This Lesson? Why won’t my car
drive straight? You need to make sure that your car is as close to being symmetrical about its center as possible. Also, check the connection of the wheel to the axle and the axle to the frame. Be sure that pieces are not rubbing together and causing too much friction.
Note: Make sure students use the drop down menu to change their duration to seconds instead of degrees, rotations, or unlimited. Note: Remind students that the independent variable, time, should be on the horizontal axis and distance should be on the vertical axis. Using the Engineering Design Process Making a prediction based on research is an important step in the Engineering Design Process called Selecting the Best Possible Solution.
Lesson 2
Unit 1: Intro to Engineering and Robotics
2-4
Lesson 2 Going the Distance
What Conflicts Might Arise During This Lesson? My car is better than
yours! Because of the competitive nature of this lesson, some students might let their competitive spirit come out in a negative manner. Be sure to grant cars that do not come closest to the final distance with awards such as “best looking,” “most sturdy,” etc. and remind competitive students that every design has its advantages and disadvantages.
My partner won’t listen to me! Engineering is a collaborative process and steps 4 and 5 of the engineering design process call for developing, discussing, and agreeing on the best solution.
Note: If students have trouble making observations, suggest that they explore the differences and similarities between cars in the class, specifically the different power settings, wheel sizes etc.
PART IV: Competition 10 minutes 1. When all groups have completed their graphs, announce a distance
that the students’ cars must travel for the competition. 2. Tell students they will get one chance to program their cars for this
distance. Tell students that they should make a guess as to how much time to program using the graphs they have created.
3. Have students reprogram their cars to travel the given distance. Remind students that all of their cars and data are different, so using another group’s graph will not help.
4. Set up a start and a finish line with the distance you specified between them. Have students line up their NXT cars and run their program at the same time. See who gets their car the closest to the finish line without going over.
5. Consider getting creative for marking the ending distance: Lining up LEGO figures creates a fun, more meaningful consequence for overshooting the specified distance.
PART V: Discussion and Observation 15 minutes 1. Have students return to their seats with their cars. 2. Discuss the results of the activity:
• What difficulties did you have in this lesson? • How many trials did you do? • Describe a problem you had and how you fixed it. • Who overshot the distance? Who undershot it? Why do you think
this is? • Compare cars and charts within the class. Were faster cars more
accurate or less accurate? Why do you think this is? 3. Discuss the importance of collecting accurate data, and step six of the
Engineering Design Process: testing and evaluating. 4. Conclude by emphasizing how programming is a valuable tool to
help solve problems.
Extensions and Modifications 1. Have students repeat the activity using a different power setting to
compare results. Ask students which power setting is more accurate.
Unit 1: Intro to Engineering and Robotics
2-5
Lesson 2
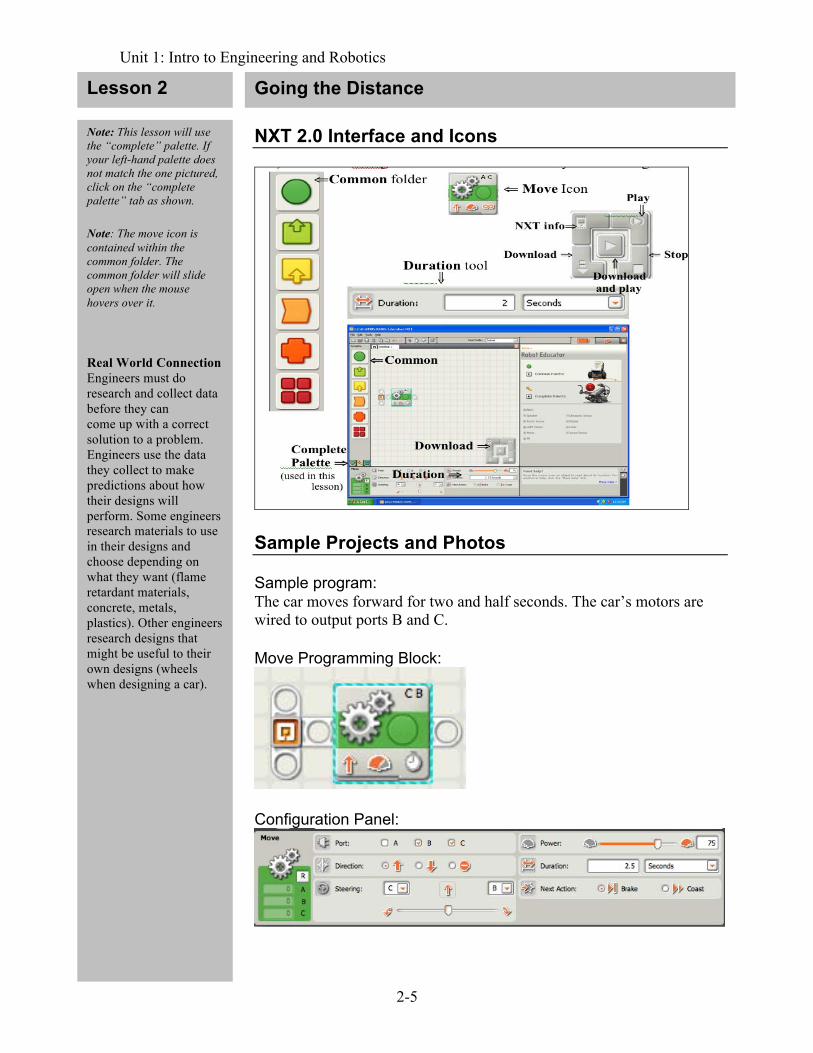
Note: This lesson will use the “complete” palette. If your left-hand palette does not match the one pictured, click on the “complete palette” tab as shown. Note: The move icon is contained within the common folder. The common folder will slide open when the mouse hovers over it. Real World Connection Engineers must do research and collect data before they can come up with a correct solution to a problem. Engineers use the data they collect to make predictions about how their designs will perform. Some engineers research materials to use in their designs and choose depending on what they want (flame retardant materials, concrete, metals, plastics). Other engineers research designs that might be useful to their own designs (wheels when designing a car).
Going the Distance NXT 2.0 Interface and Icons
Sample Projects and Photos Sample program: The car moves forward for two and half seconds. The car’s motors are wired to output ports B and C. Move Programming Block:
Configuration Panel:

Unit 1: Intro to Engineering and Robotics
3-1
Unit 1: Lesson 3 ________________________________________________________________________
Harry Potter Reaches Platform 9 ¾
Overview Students will program their NXT cars to travel to platform 9¾ using NXT 2.0 Software and two NXT sensors. In order to make it to Hogwarts, their cars must stop exactly at the platform. Otherwise, they will be stuck in the world of Muggles. Students will be introduced to touch sensors and light sensors, which can be used in different ways to solve the same problem.
NXT Touch Sensor NXT Light Sensor
Goals Expectations Evidence Students will understand: • NXT inputs and
outputs. • How to build with the
NXT sensors. • The difference between
the touch and light sensors.
Students should be able to: • Identify and use wait for
programming block. • Use and program touch
and light sensors. • Test designs and redesign
after a failed test.
Evidence of learning found in: • Programs that are
successful in accomplishing goals.
• Class discussion on the use of the touch and light sensors.
Unit 1: Intro to Engineering and Robotics
3-2
Lesson 3
Harry Potter Reaches Platform 9 ¾ Suggested Time
60 – 90 minutes Vocabulary (See Glossary)
Calibrate Input Output Port Threshold Wait For Wire
Materials For each student pair: • LEGO
MINDSTORMS kit • LEGO NXT car For the Class • Tape and an object to
mark platform 9 ¾ Preparation • Mark off platform 9 ¾
and starting location with tape.
• Mark off platform location with physical object.
• Make a demo car with light and touch sensors.
• Distribute NXT cars. • Arrange students in
pairs.
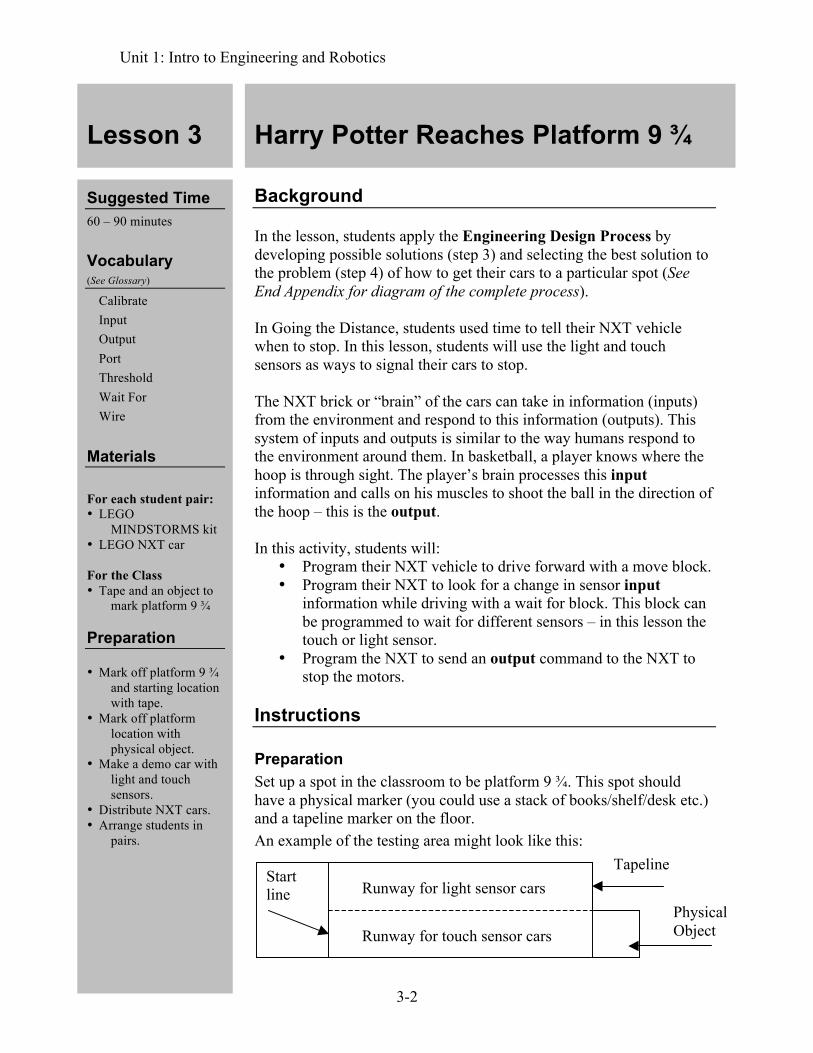
Background In the lesson, students apply the Engineering Design Process by developing possible solutions (step 3) and selecting the best solution to the problem (step 4) of how to get their cars to a particular spot (See End Appendix for diagram of the complete process). In Going the Distance, students used time to tell their NXT vehicle when to stop. In this lesson, students will use the light and touch sensors as ways to signal their cars to stop. The NXT brick or “brain” of the cars can take in information (inputs) from the environment and respond to this information (outputs). This system of inputs and outputs is similar to the way humans respond to the environment around them. In basketball, a player knows where the hoop is through sight. The player’s brain processes this input information and calls on his muscles to shoot the ball in the direction of the hoop – this is the output. In this activity, students will:
• Program their NXT vehicle to drive forward with a move block. • Program their NXT to look for a change in sensor input
information while driving with a wait for block. This block can be programmed to wait for different sensors – in this lesson the touch or light sensor.
• Program the NXT to send an output command to the NXT to stop the motors.
Instructions Preparation Set up a spot in the classroom to be platform 9 ¾. This spot should have a physical marker (you could use a stack of books/shelf/desk etc.) and a tapeline marker on the floor. An example of the testing area might look like this:
Start line Runway for light sensor cars
Runway for touch sensor cars
Tapeline
Physical Object

Unit 1: Intro to Engineering and Robotics
3-3
Part I: Introduction to Sensors and Input 10 minutes 1. Remind students of the programming concepts from Going the
Distance. Review the move command and how to configure the power level, direction, ports, etc. Talk about the move command as an output command that the NXT “brain” sends to its motors.
2. Relate the output function of the NXT “brain” to the human brain. Some common output commands our brains send include: • In writing: how hard to press and what direction to move your
hand. • In basketball: how hard to shoot and in what direction. • In kickball: where to kick and when.
3. Ask for a student volunteer to come to the front of the room. Ask the student to walk towards a wall, but to stop before they run into it. • Ask the student how they knew when to stop? • Tell the student to sit down. Ask the class how this student could
know when to stop before they ran into the wall if they were blind?
• Explain to students that our senses (ask students if they know what their five senses are - sight, hearing, smell, touch, taste) take in information from the environment that allows us to modify our actions.
4. Explain that what we sense is called input information. This information tells our brain about our surrounding environment.
5. Introduce the sensors that will be used in this activity (touch and light) and establish that they work similar to our own senses. Just as information travels from our senses to our brain, information travels over the wire from the sensor to the NXT brick.
6. The NXT can respond to the environment through its outputs (motors), like the student walking towards the wall. Unlike a human, the NXT cannot think for itself and must be programmed.
Part II: Introduction to the Activity 5 minutes 1. For those who don’t know, platform 9 ¾ is where Harry Potter took
the train “The Hogwarts Express” to school from London. In order to get to platform 9¾, Harry had to walk through a barrier between platform 9 and platform 10 at exactly the right point.
2. Tell students that the goal of this lesson is for the students to write a program that will get their NXT cars to stop exactly at “platform 9 ¾” by using NXT sensors.
3. Introduce the sensors: Light Touch:
Harry Potter Reaches Platform 9 ¾
What Questions Might Students Ask During This Lesson? Why does my car keep driving past the platform? The faster your car is going, the harder it will be to make it stop! Think about it- When you are running at full speed, it takes a good while for you to stop, whereas when you are walking, you can do it almost immediately. Try running your output motors at lower power levels so the inertia of the car stays under control. Why can’t I get the light sensor to work? The light sensor is dependent on an accurate threshold value to wait for. Set the threshold too dark, the car might not notice when it drives over the platform. Set the threshold too light, and the car might stop prematurely or not start altogether. When calibrating sensors, it’s very important to concentrate steps 6-8 of the engineering design process, testing, communicating, and redesigning. Why won’t my car run? Make sure that your motors are correctly wired to the NXT “brain” into the same ports as are indicated in the NXT software program.
Lesson 3

Unit 1: Intro to Engineering and Robotics
3-4
Harry Potter Reaches Platform 9 ¾ 4. Explain that sensors connect to one of the four input ports labeled 1,
2, 3, and 4 on the NXT via a wire (shown below).
5. Discuss the sensors that students will use in this lesson:
• Touch sensors work by reacting when the button is depressed or released. In this lesson, the touch sensor should be attached to the NXT so that it is the first thing to come in contact with a physical object in front of the vehicle.
• Light sensors can detect ambient light levels from the surrounding environment or reflected light levels from a small bulb built into the light sensor that generates light. In this lesson, the light sensor should be pointed at the floor to detect changes in reflected light levels. The reflected light level will change as the light sensor moves from a light (more reflective) to a dark (less reflective) material. To measure reflected light, the “generate light” option should be checked in the light sensor configuration panel.
6. Show students how to calibrate and use their light sensor. • The light sensor can read the light levels from the environment on
a scale from 0 – 100. • For this lesson you should program your light sensor to generate
light to collect reflected light levels from the floor. The color of the floor will reflect a different light level than the color of the tape.
• You can view the light level of the floor and the tape by navigating through the menu on the NXT: Scroll through the menu using the grey arrow buttons and select “View” with the orange button, scroll to and select “Reflected Light”, scroll to and select the port that your sensor is wired to and a light level reading should appear.
• Have students measure the light levels of the floor and tape and use this information in the light sensor configuration panel.
7. Introduce the programming blocks that will be used in this lesson:
Note: Remember, all sensors can only connect to ports with numbers and all motors can only connect to ports with letters. Note: This program is telling the car to move forward and wait until the touch sensor is pressed. However, the program will not do anything when the sensor is pressed because there is no follow up action after the wait block.
Lesson 3

Unit 1: Intro to Engineering and Robotics
3-5
Lesson 3 Harry Potter Reaches Platform 9 ¾
. Note: The wait for block action section indicates that the NXT is waiting for the touch sensor to be “pressed” (pictured in figure on right). Note: Sensors should be mounted in a manner that’s appropriate to their purpose and the environment. For example, the touch sensor should be the first object to greet anything that the NXT might bump into. The light sensor should be pointing down to best read the light sensor readings. Note: Steps 2 and 3 will require different classroom set-ups (see page 2 of this activity). Note: Students must select the light sensor from the menu that does not include an asterisk because these are two different types of light sensors.
8. Introduce students to the wait for block. Explain that this block does not tell the robot to do an action, rather it tells the robot what environmental conditions to wait for.
PART III: Programming/Testing 20 minutes 1. Have students attach a touch sensor to their cars and program their
cars to move forward and stop when the touch sensor has been pressed. Students’ programs should include: • An initial move block (forward, for unlimited time). • A touch sensor wait for block, set to wait for a touch sensor in the
appropriate port to be pressed. • Another move icon with the “stop” option selected:
2. Once a group reaches platform 9¾ with the touch sensor, have them
repeat this task using a light sensor. The program will remain the same except that the wait for block must be configured for a light sensor. • If the tape is darker than the floor, the configuration panel should
be set to wait for a darker. The less than symbol (<) indicates wait for darker. Lower light sensor values (0 – 50) indicate darker environments.
• If the tape is lighter than the floor, the configuration panel should be set to wait for lighter. The greater than symbol (>) indicates wait for lighter. High light sensor values (50 – 100) indicate lighter environments.
• Students can use the “View” feature to get light sensor readings. • Configuration panel set to for wait for darker light reading:
PART IV: Discussion and Observation 10 minutes 1. Have students return to their seats with their cars.

Unit 1: Intro to Engineering and Robotics
3-6
2. Discuss the results of the activity and any observations: a. What were the methods you used to reach platform 9 ¾? b. What were the pros and cons of each approach? c. Which method do you believe is the best approach? d. Describe a problem you had and how you fixed it.
3. Discuss the importance of steps three and four of the Engineering Design Process: developing and selecting from possible solutions. How did you use these steps in this lesson?
Extensions and Modifications 1. Travel to platform 9¾ using a sound or ultrasonic sensor. 2. Experiment with different calibrations. Sample Projects and Photos Sample touch sensor car and program:
Sample light sensor car and program:
Note: Children will have to calibrate the light sensor threshold by sliding the slider left and right in order to make it work in their specific environment. This will require trial and error. Note: The wait until “less than” (<) should be used for dark tape on a light floor. The wait until “greater than” (>) should be used for light tape on a dark floor. ----------------------------------Using the Engineering Design Process Students have used three different methods of reaching the platform; going the distance, using a touch sensor, and using a light sensor. This is an example of Step 3 of the Engineering Design Process: Developing Possible Solution(s). In discussion students should try to Select the Best Possible Solution(s), the fourth step in the Engineering Design Process. ------------------------------
Harry Potter Reaches Platform 9 ¾
Lesson 3
Touch Sensor
Light Sensor

Unit 1: Intro to Engineering and Robotics
4-1
Unit 1: Lesson 4 ________________________________________________________________________
Fan-tas-tic Overview Students will apply their building and programming abilities to an open-ended project. They will design, build and program an NXT fan that can operate at three speeds. Students will use a touch sensor to change speeds. Students will learn about modifications that can be made to programming blocks to better control the output of their NXT well as strengthening their grasp on the flow of programming in NXT software.
Sample NXT Fan
Goals Expectations Evidence Students will understand: • How to build a sturdy
fan. • The geometry of a fan
and how it moves air. • The purpose of testing,
redesigning and rebuilding.
Students should be able to: • Construct a fan. • Modify programming
blocks to control the output of the NXT motors.
• Apply programming skills to non-transportation products.
Evidence of learning found in: • Project Worksheet. • A working fan that spins at
three speeds changed through a touch sensor.
• Class discussion about difficulties that were encountered during the lesson and how they were solved.
Unit 1: Intro to Engineering and Robotics
4-2
Lesson 4
Fan-tas-tic
Suggested Time 90 - 120 minutes Vocabulary (See Glossary)
Engineering Design Process Input Output Wait For
Materials For each student: • Project Worksheet For each student pair: • LEGO
MINDSTORMS Kit For the class: • Pictures of real fans Preparation • Build an example fan. • Arrange students in
pairs. • Distribute Project
Worksheets. Note: Researching fans will help students understand how fans are designed to create airflow. This also reinforces the Research the Need/Problem component of the Engineering Design Process.
Background In this lesson, students will review the entire Engineering Design Process, an 8-step guideline that engineers follow to ensure that their product is designed efficiently and effectively. (See End Appendix)
Engineers don’t only work on cars, trains, buildings, and bridges. They design a lot of small products as well. Pencils, water bottles, paper clips, televisions, and shoes are examples of some smaller, everyday objects that engineers develop. Engineers who create marketable household objects need to consider who will be using their product as well as how the product must perform. In order for the students to make useful fans, they will need to make sure that:
• Their fans move air at three different speeds • The user can operate the button without being in danger of
hitting the spinning blade. Instructions PART I: Engineering Household Objects 10 minutes 1. Give students examples of engineered devices and what type of
engineer designed them. Students may also think of examples: • Software– computer engineering • Device with moving parts – mechanical engineering • Buildings, bridges – civil engineering • Circuits, electrical devices - electrical engineering • Perfumes, sunscreens, fireworks– chemical engineering
2. Introduce the activity to the class. Tell them that they will be building a three-speed fan with the NXT brick and LEGO pieces.
3. Review how to use the Engineering Design Process to solve this design problem: Step 1. Identify the need/problem? Make the air move to keep
someone cool. Step 2. Research the need/problem: Have the students
research different fans or present them with research you have done (pictures of different fans, fan parts, etc.)
Step 3. Develop Possible Solution(s): Students will talk with their partners and then write or draw their design ideas on the Project Worksheet.

Unit 1: Intro to Engineering and Robotics
4-3
Fan-tas-tic
Step 4. Select the best possible Solution(s): Students will choose one of the ideas to build and plan who will build each part.
Step 5. Construct a Prototype: Students will build their fan. Step 6. Test and Evaluate Solution(s): Fans must pass the Flick
test – Fan cannot break when flicked by a finger. Step 7. Communicate Solution(s): Students will present their
designs. Step 8. Redesign: Students will rebuild and reprogram.
4. Note that the Engineering Design Process can be done in a different order. For example, one might go back and do further research after they have had a failed test, redesign before they communicate solutions, etc.
PART II: Building and Programming 60 minutes 1. Have students plan their designs with their partner. When an
instructor has approved the design, allow students to begin building. 2. Encourage groups to exchange ideas with other groups if they are
having difficulties building the fan. 3. The programming of a three-speed fan is similar to the touch sensor
car in platform 9¾, with a few exceptions. • Students can use the motor icon, found in the action menu,
instead of the move icon to control just one motor at a time.
• Students will use a wait for touch sensor programming block to
signal the fan to change speeds. • After the wait for block, students will use another programming
block to tell the motor run at a different speed. • Students will modify the speed of their motor using the
configuration panel shown below:
Note: Building the fan might be difficult for some students and take a little more time than usual. Note: Requiring students to pass two design tests even before programming reinforces the Test and Evaluate Solution(s) component of the Engineering Design Process. Failed tests will show student the necessity for the Redesign component of the Engineering Design Process. What Questions Might Students Ask During This Lesson? How can I make my fan blow air? In order for your fan to blow air forward, you need to make sure that your fan blades are slanted in the right direction. Blades work like wedges when they are powered by pushing air perpendicular to the motion of the blades in the direction that the trailing edge is slanted. Observe what a real fan’s blades look like How can I make the change in blade speed noticeable? Blade speed is determined by motor power, so make sure that there is a large difference in motor power in each icon.
Lesson 4
action motor

Unit 1: Intro to Engineering and Robotics
4-4
\\\
Lesson 4 Fan-tas-tic
Real World Connection Engineers, especially mechanical engineers, often have to build small products containing moving parts, such as household items. Items that require programming or electricity are, in part, designed by electrical or computer engineers. Teams of engineers design many household items (fans, computers, blenders, doorknobs, faucets, air-conditioning units, microwaves, etc.).
4. Students can stop their fans by ending the program or programming their fan to stop when the touch sensor is pressed after the highest speed.
5. Have students draw their final fan designs in their Project Worksheet. PART Iii: Discussion and Observation 20 minutes 1. When all students have completed their fans, have students clean up
all extra LEGO pieces except those on their fans. 2. Have each student pair give a short presentation on their fan. Ask the
students to answer: • What difficulties did you encounter today with the fans as a
structure and how did you fix them? • What difficulties did you have in programming and how did you
fix them. • What is your favorite feature of your fan?
Part IV: Optional Gearing Exploration 45 – 60 minutes 1. Begin by holding up a gear from the NXT kit. Ask students if they
know what you are holding up. Tell students that this is a gear. 2. Have students build a “gear wall” using a beam, two different sized
gears, two axles, and two bushings found in their kits. • Attach a gear to the end of each axle. • Thread the axles through the beam so that the gear teeth are
intertwined. • Attach a bushing to the back of the axles to hold them in place.
3. As a class, experiment with your gear wall:
• Tell students that the gear that you are turning is called the drive gear and the other gear is the follower.
• Turn the smaller gear. How fast is the follower gear moving compared to the drive gear?
• Turn the large gear. How fast is the follower turning compared to the drive gear?
• What direction is the follower gear turning compared to the drive gear?
• Calculate the gear ratio (# of teeth on driver: # teeth on follower) 4. Explain that when the driver gear has more teeth than the follower,
the follower is moving faster than the drive gear. When the drive gear is smaller the follower is moving slower. The gear ratio tells us how much bigger or smaller the follower gear is from the drive gear.

Unit 1: Intro to Engineering and Robotics
4-5
Fan-tas-tic
Real World Connection Engineers, especially mechanical engineers, often have to build small products containing moving parts, such as household items. Items that require programming or electricity are, in part, designed by electrical or computer engineers. Teams of engineers design many household items (fans, computers, blenders, doorknobs, faucets, air-conditioning units, microwaves, etc.).
Lesson 4
5. Tell students that their new challenge is to modify their fan so that it turns faster without reprogramming.
6. Ask students if they can think of a way to use gears to accomplish this task: • Which should be larger, the drive gear or follower gear? • Will this change the direction of your fan?
7. Have students try and modify their fans with gears. If they have trouble help walk the through the following steps: • Have students remove their fans by taking the axle that holds the
blades on out of the motor. • Have students attach beams to their motor so that they can add
gears. The students should place a gear on the motor using an axel.
• The students should then attach gear on the axle behind the fan blade. Students should then reattach their fan to the beam that was added to the motor so that the two gears connect.
8. Allow students to show off their redesigned fans. Extensions and Modifications 1. Add more than three alternating move and wait for touch sensor
icons for a more gradual increase in speed. 2. Add more blades to your fan, make a not of how this affects airflow. Sample Projects and Photos Sample Fans:
Unit 1: Intro to Engineering and Robotics
4-6
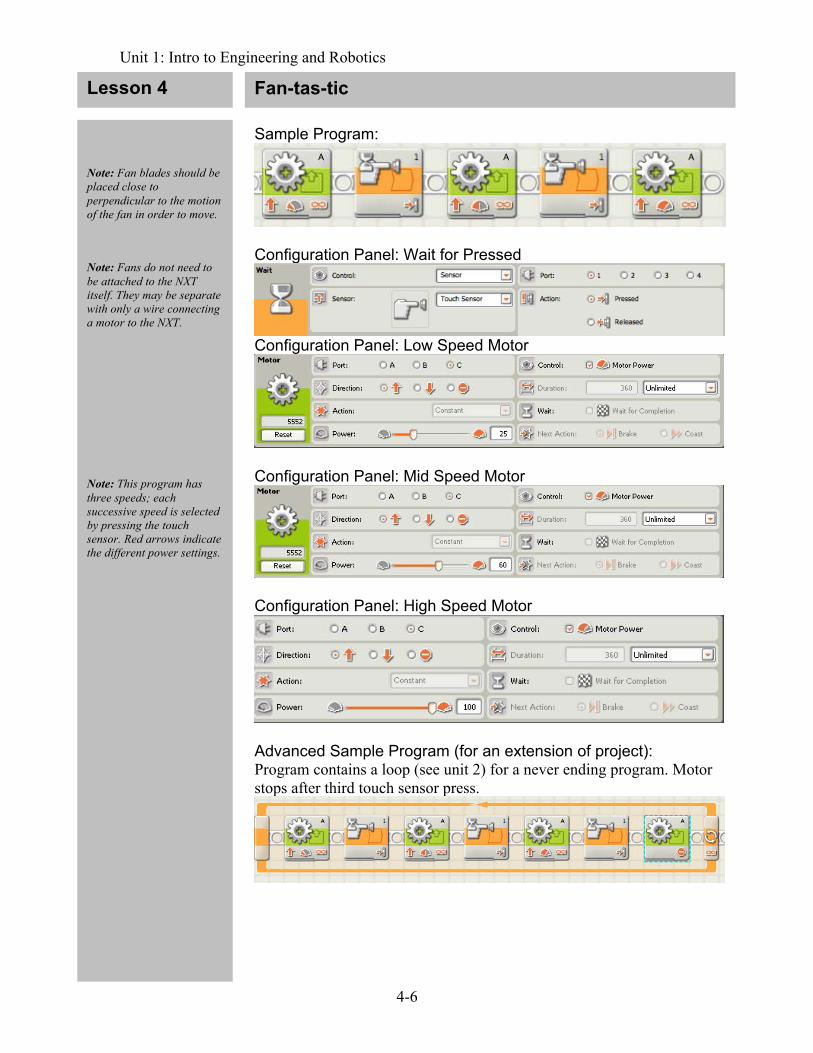
Note: Fan blades should be placed close to perpendicular to the motion of the fan in order to move. Note: Fans do not need to be attached to the NXT itself. They may be separate with only a wire connecting a motor to the NXT. Note: This program has three speeds; each successive speed is selected by pressing the touch sensor. Red arrows indicate the different power settings.
Lesson 4
Sample Program:
Configuration Panel: Wait for Pressed
Configuration Panel: Low Speed Motor
Configuration Panel: Mid Speed Motor
Configuration Panel: High Speed Motor
Advanced Sample Program (for an extension of project): Program contains a loop (see unit 2) for a never ending program. Motor stops after third touch sensor press.
Fan-tas-tic

Unit 1: Intro to Engineering and Robotics
Unit 1: Appendix
End Appendix
Section 1: Engineering Design Process and Programming Skills
Section 2: LEGO Building Tips and Tricks Section 3: LEGO Engineering Skills
Unit 1: Intro to Engineering and Robotics
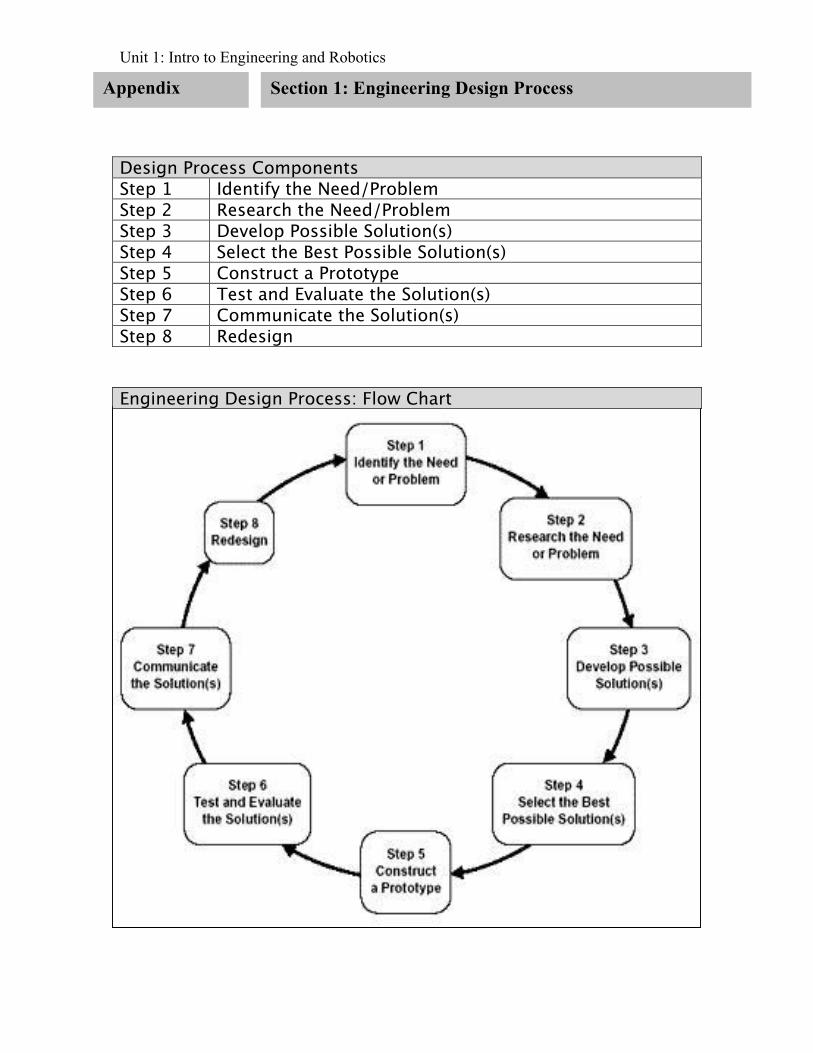
Design Process Components Step 1 Identify the Need/Problem Step 2 Research the Need/Problem Step 3 Develop Possible Solution(s) Step 4 Select the Best Possible Solution(s) Step 5 Construct a Prototype Step 6 Test and Evaluate the Solution(s) Step 7 Communicate the Solution(s) Step 8 Redesign Engineering Design Process: Flow Chart
Appendix Section 1: Engineering Design Process
Unit 1: Intro to Engineering and Robotics
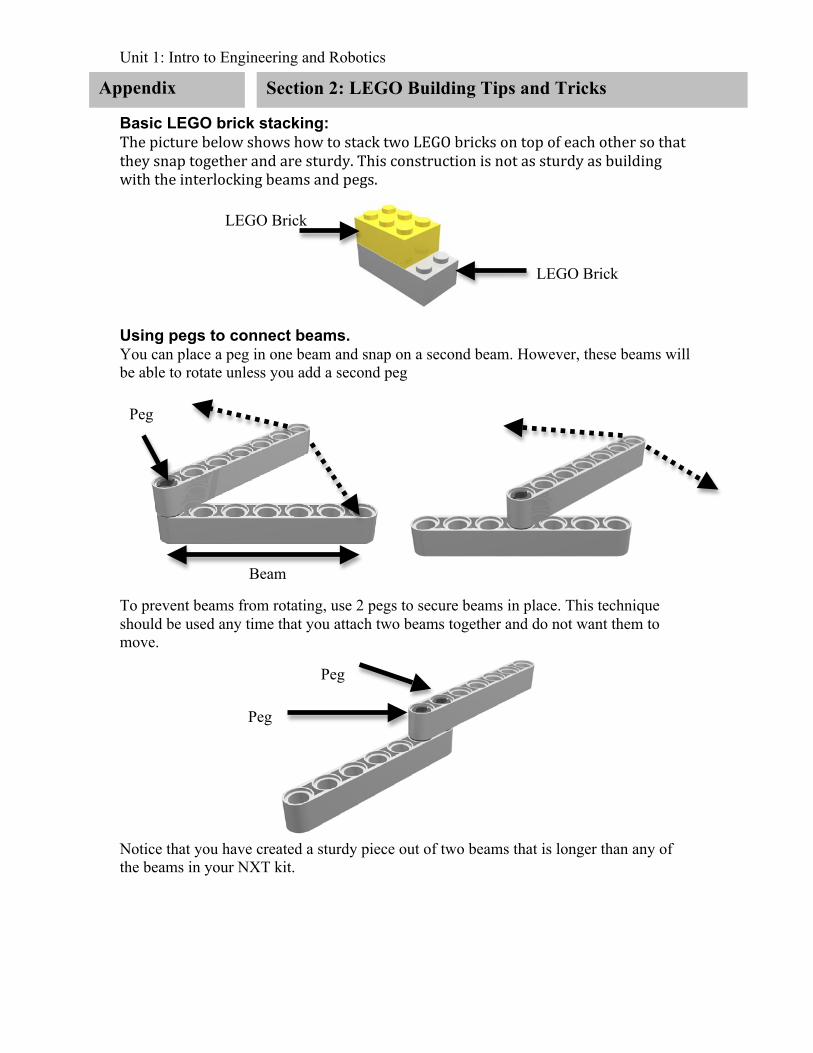
Basic LEGO brick stacking: ThepicturebelowshowshowtostacktwoLEGObricksontopofeachothersothattheysnaptogetherandaresturdy.Thisconstructionisnotassturdyasbuildingwiththeinterlockingbeamsandpegs.
Using pegs to connect beams. You can place a peg in one beam and snap on a second beam. However, these beams will be able to rotate unless you add a second peg
To prevent beams from rotating, use 2 pegs to secure beams in place. This technique should be used any time that you attach two beams together and do not want them to move.
Notice that you have created a sturdy piece out of two beams that is longer than any of the beams in your NXT kit.
Peg
Peg
Peg
Beam
LEGO Brick
LEGO Brick
Section 2: LEGO Building Tips and Tricks
Appendix
Unit 1: Intro to Engineering and Robotics
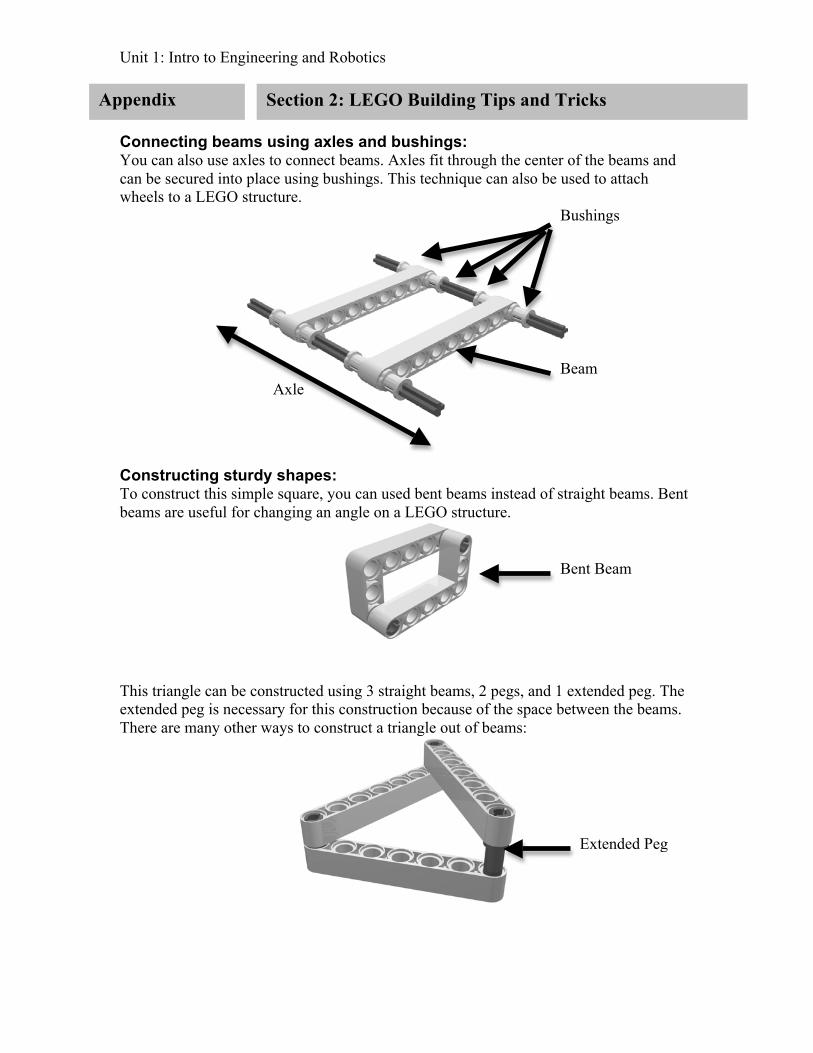
Connecting beams using axles and bushings: You can also use axles to connect beams. Axles fit through the center of the beams and can be secured into place using bushings. This technique can also be used to attach wheels to a LEGO structure.
Constructing sturdy shapes: To construct this simple square, you can used bent beams instead of straight beams. Bent beams are useful for changing an angle on a LEGO structure.
This triangle can be constructed using 3 straight beams, 2 pegs, and 1 extended peg. The extended peg is necessary for this construction because of the space between the beams. There are many other ways to construct a triangle out of beams:
Axle
Bushings
Beam
Extended Peg
Bent Beam
Section 2: LEGO Building Tips and Tricks
Appendix

Unit 1: Intro to Engineering and Robotics
Attaching a wheel to a motor so that the wheel turns: The orange part of the motor is the part of the motor that can be programmed to turn. Therefore, the wheel should be attached to the orange piece using an axle. This will ensure that your wheel turn when the motor is running.
Attaching motors to your NXT: ThereareseveralwaystoattachthemotorstotheNXT.ThepicturesbelowgiveafewideasofhowyoumaywanttoorientandattachthemotorstotheNXTbrick. Angled motor assembly #1:
Part of the motor that turns
Wheel
Axle
Appendix Section 2: LEGO Building Tips and Tricks

Unit 1: Intro to Engineering and Robotics
Vertical motor assembly:
Ideas for Attaching a Front Support
Section 2: LEGO Building Tips and Tricks
Appendix
Unit 1: Intro to Engineering and Robotics
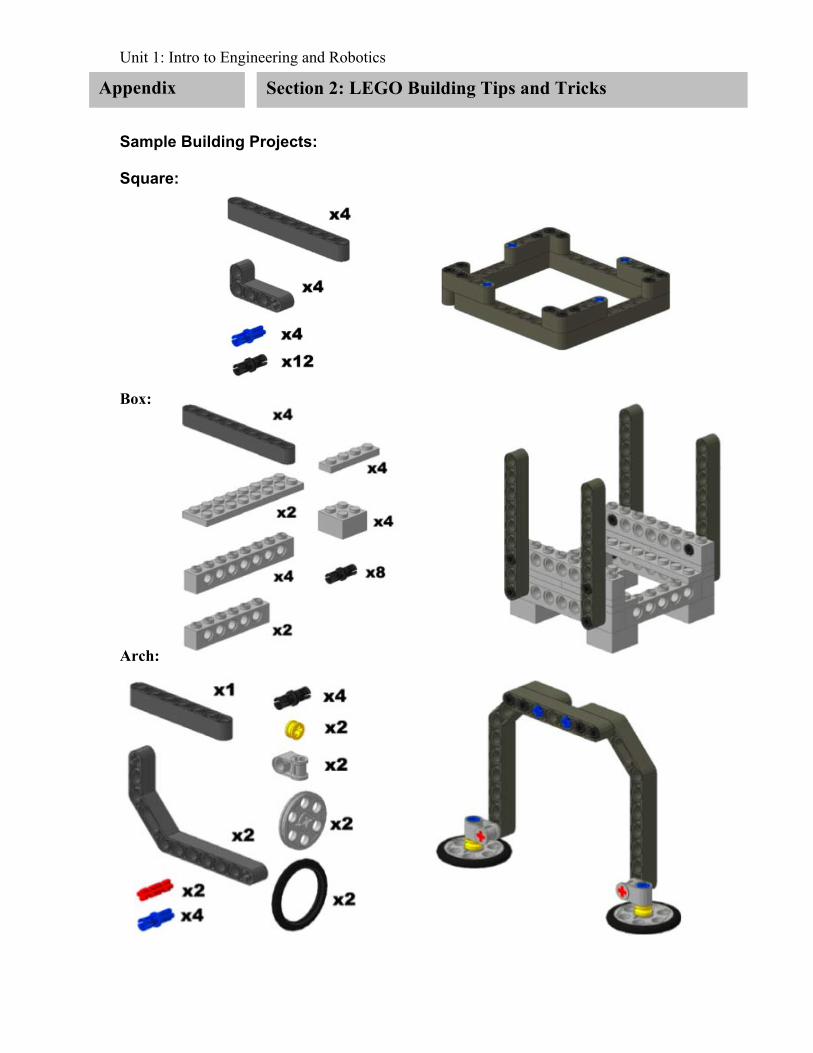
Sample Building Projects: Square: Box: Arch:
Section 2: LEGO Building Tips and Tricks
Appendix

Unit 1: Intro to Engineering and Robotics
Skill Description Building Sturdy Structures
Building a structure that does not fall apart, break or deform when tests are applied to it.
Building Sturdy Machines
Building a machine using motors, NXT, and wires that does not fall apart, break, or deform when tests are applied to it.
Complex LEGO Building
Using the pieces in the NXT MINDSTORMS kit to create a structure that is sturdy and contains moving parts.
Basic Programming Using NXT MINDSTORMS Software
Using NXT MINDSTORMS software to program and calibrate simple actions such as move, stop and turn.
Complex Programming Using NXT MINDSTORMS Software
Using the NXT MINDSTORMS software to get input from sensors, collect and calculate data, transfer data to the display, and use wiring to connect programming blocks.
NXT Outputs
Programming basic NXT programs that tell a motor to do an action through ports A, B, and C.
Input Calibration
Programming threshold levels that an input reads onto the NXT.
NXT Modifiers
Making partial or minor changes to a program in NXT software.
LEGO Engineering Skills Word Bank
Appendix Section 3: LEGO Engineering Skills

Unit 1: Intro to Engineering and Robotics
Unit 1
Glossary
Unit 1: Intro to Engineering and Robotics
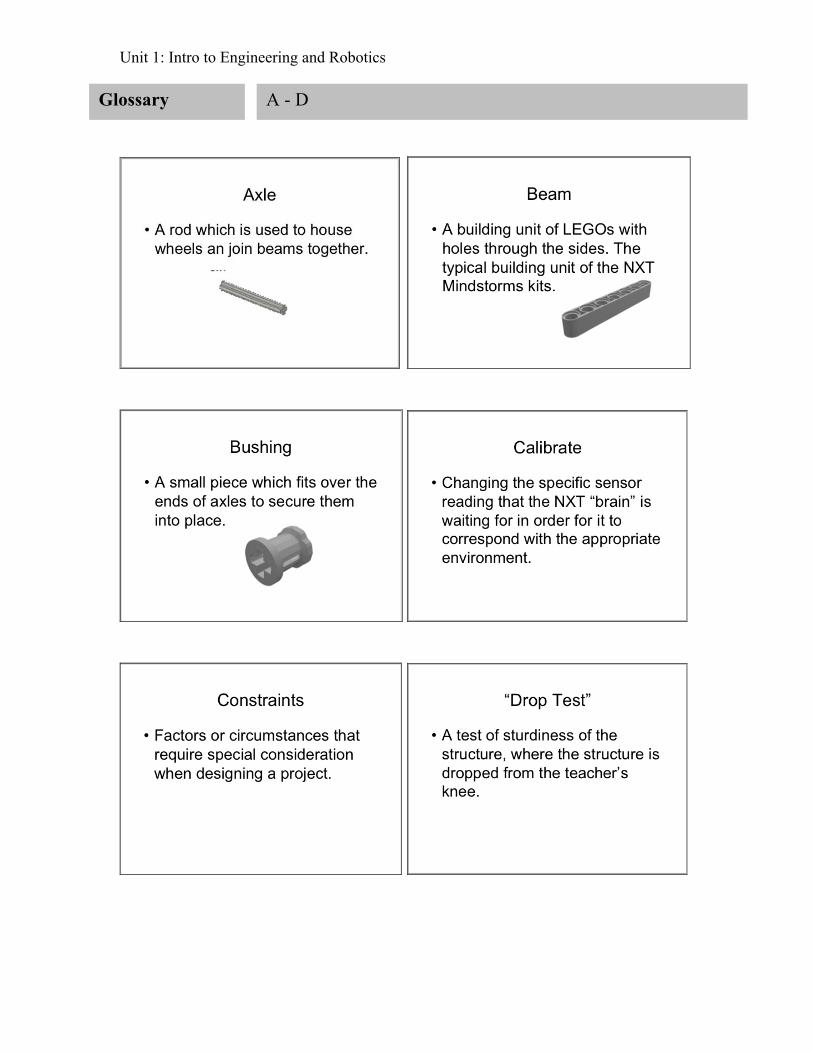
Glossary A - D

Unit 1: Intro to Engineering and Robotics
Glossary D - M
Gear/Gear Ratio • A device that is used to make work
easier. A wheel-like device with teeth that can interlock with other gears.
• Gear ratio – the number of teeth on one gear compared to the gear it is interlocked with.

Unit 1: Intro to Engineering and Robotics
Glossary N - P
Unit 1: Intro to Engineering and Robotics
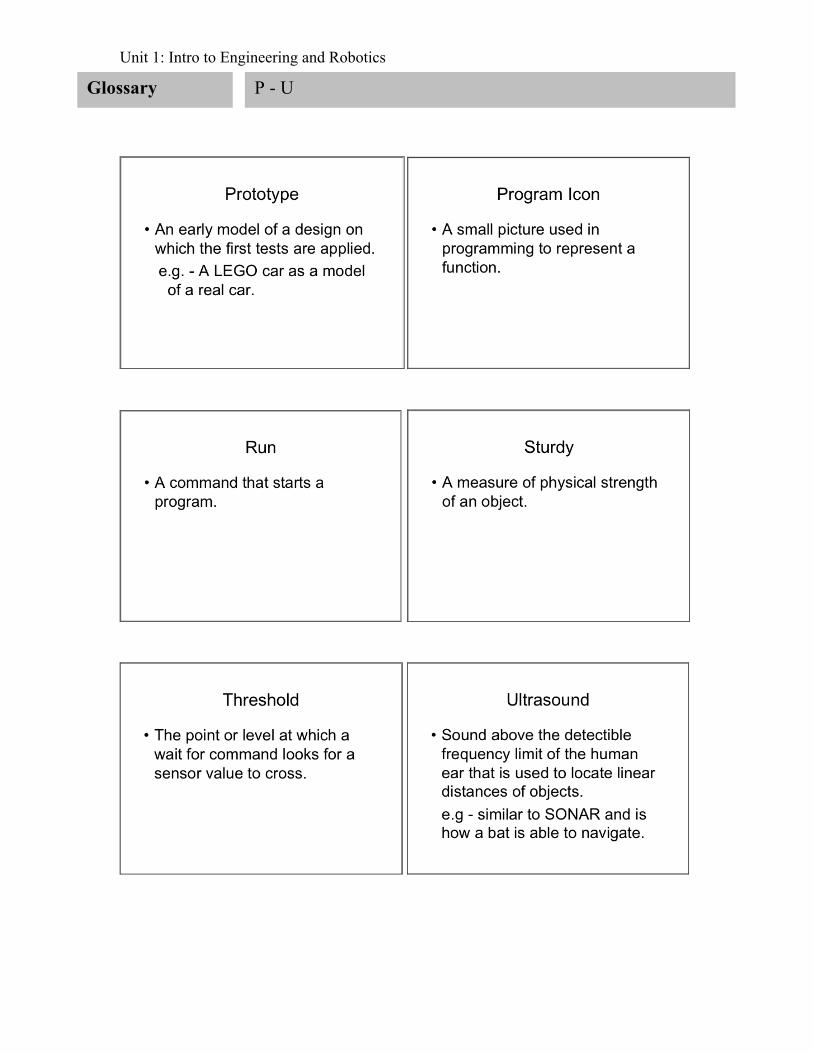
Glossary P - U

Unit 1: Intro to Engineering and Robotics
Glossary W

Unit 1: Intro to Engineering and Robotics
Unit 1
Unit 1 Worksheets

Unit 1: Intro to Engineering and Robotics
Project Worksheet: Building Design Engineer:_______________________ Date:___________ Partner(s):_____________________________________
1. Brainstorm your design (label important features) 2. Write a short paragraph on the important features of your design __________________________________________________
__________________________________________________
__________________________________________________
__________________________________________________
__________________________________________________
__________________________________________________
__________________________________________________

Unit 1: Intro to Engineering and Robotics
Project Worksheet: Final Design Engineer:_______________________ Date:___________ Partner(s):_____________________________________
3. Draw your final design (label important features) 4. Write a short paragraph about important features of your design __________________________________________________
__________________________________________________
__________________________________________________
__________________________________________________
__________________________________________________
__________________________________________________
__________________________________________________

Unit 1: Intro to Engineering and Robotics
5. Write down 2 difficulties you had during this activity
a. ____________________________________________
____________________________________________
b. ____________________________________________
____________________________________________
6. Write down 2 changes that you made to your design to improve it
a. ____________________________________________
____________________________________________
b. ____________________________________________
____________________________________________
7. Write down what you are most proud of in your design
__________________________________________________
__________________________________________________
__________________________________________________
8. Write down a skill you can improve on in the future
__________________________________________________
9. What steps of the Engineering Design Process did you focus on in
this lesson
__________________________________________________
10. How was your design different from other groups’ designs?

Unit 1: Intro to Engineering and Robotics
Going the Distance Worksheet Name:__________________________________
Time (s) Distance

Unit 1: Intro to Engineering and Robotics
Graph your results:
What is the mystery distance? ______________________ Make a Prediction: Based on your graph, How many seconds do think it will take to travel this distance?___________________
Distance
Time (seconds)

Unit 1: Intro to Engineering and Robotics
________________________________________________________________________
Unit 2 Intro to Computer Science Using LEGO Engineering
Description:
This Unit is intended to follow Unit 1. It consists of 6 lessons to be used within a 8 – 10 week period for grades 4 – 6. Students work through each challenge in groups of 2. Each lesson should take 1 – 1.5 class periods.
Materials Required:
LEGO Mindstorms NXT robotics set with NXT 2.0 software.
Unit 2: Intro to Computer Science
1-1 Copyright 2009 Tufts University Center for Engineering Education and Outreach
Unit 2 ________________________________________________________________
Table of Contents Section Unit 2 Outline
Lesson 1 Appendix 1 Lesson 2 Appendix 2 Lesson 3 Appendix 3 Lesson 4 Appendix 4 Lesson 5 Appendix 5 Lesson 6 Appendix 6 End Appendix Section 1: Engineering Design Process Section 2: Directions for Wiring Glossary

Unit 2: Intro to Computer Science
1-2 Copyright 2009 Tufts University Center for Engineering Education and Outreach
STOMP Curriculum Outline Unit 2: Introduction to Computer Science The consistent theme found in all activities within this unit is engineering with an emphasis on computer science. Each activity introduces new programming skills (Program Blocks, Program Logic and Featured Sensors) -- (See End Appendix for complete list). There is also a focus on a concepts related to the Engineering Design Process (See End Appendix for all eight components and flow chart) Also note that these activities assume students have a basic familiarity with motor and wait for blocks from Unit 1. Programming and data logging skills introduced in these activities may be reused in later activities, as the curriculum was designed as such. Only the new skills introduced in a lesson are listed to avoid repetition. Lesson 1: Stay on the Table
Description: Students will use sound and ultrasound sensors and write a program to keep their car from falling off the edge of the table. Program Blocks: Move Block and Wait for Block Featured Sensors: Ultrasonic and Sound Sensors. Extension: Use light or touch sensors to drive to the edge of the table without falling off.
Lesson 2: Velociraptor
Description: Students program an NXT vehicle to navigate out of a three-sided square. Program Blocks: Loop Block Program Logic: Loops Featured Sensors: Light – Response Extension: Write a program to make the NXT vehicle enter into a three-sided square.
Lesson 3: Voting Booth
Description: Students will ask their piers a question and will create a device, using touch sensors, that their classmates can use to vote on. Students will use NXT DATA LOGGING to collect and store information from their NXT, which they can later evaluate and draw conclusions from in NXTg. Program Block: Experiment Configuration Program Logic: Data logging Featured Sensors: Touch – Data logging Extension: Students can use more than 2 touch sensors to ask a multiple-choice question.

Unit 2: Intro to Computer Science
1-3 Copyright 2009 Tufts University Center for Engineering Education and Outreach
Lesson 4: Short Cut
Description: Students will write an experiment to collect rotation sensor data. Students will use their experiment to determine how many rotations their measuring device makes in a specified distance. Students will use this experiment to determine a conversion value to change rotations into a conventional unit of meausure, to measure lines of different lengths. Program Block: Math Block, Rotation Sensor Block, Text to Number Block, Display Block. Program Logic: Loops, Datalogging. Featured Sensors: Rotation Sensor. Extension: Have students convert rotations into different units.
Lesson 5: Do the Robot!
Description: Students will write a program using Boolean operations (if/then statements) to make a robot act in one of two ways depending on the light levels surrounding the robot. Program Block: Switch Block Program Logic: Boolean Operations Featured Sensor: Light – Response Extension: Write the program that incorporates two different sensors, which requires the use of nested switch blocks (3 in total).
Lesson 6: Relay Race
Description: Students will use what they have learned throughout this unit to work together in groups of up to 4 teams in a relay race. Each NXT will ‘tag’ the next NXT in line to complete the race course. Program Block: Any programming block used in the unit thus far. Program Logic: Combination of all programming logic used in the unit thus far. Featured Sensor: Any Extension: Require the students to use more than one sensor, or make the race course more challenging.

Unit 2: Intro to Computer Science
1-1 Copyright 2009 Tufts University Center for Engineering Education and Outreach
Unit 2: Lesson 1 ________________________________________________________________________
Stay on the Table Overview Students will program their NXT cars to stop before the car drives off the edge of the table. They will accomplish this by using two new external sensors: an ultrasonic distance sensor and a sound sensor. Students will apply what they have learned in this lesson to write more complex programs further on in this unit.
Goals Expectations Evidence Students will understand:
• How the sound and ultrasonic sensor works.
• How to program using NXTg MINDSTORMS.
Students should be able to:
• Use NXT programming to employ the ultrasonic sensors.
• Identify the environmental changes that the ultrasonic sensor detects.
Evidence of learning found in:
• A car that does not fall off the table because of effective programming.
• Class discussion about challenges encountered during the lesson.
Unit 2: Intro to Computer Science
1-2 Copyright 2009 Tufts University Center for Engineering Education and Outreach
Lesson 1
Stay on the Table
Suggested Time One 60-minute session Vocabulary (See Glossary)
Calibrate Input Output Threshold Ultrasound Wait For
Materials For each student pair: • LEGO
MINDSTORMS Kit • NXT car • Computer running
NXTg software • Download Cable For the class: • Cleared off tables Preparation • Arrange students in
pairs. • Distribute LEGO NXT
cars. • Set up computers
running NXTg software
Note: it’s easier to attach the sensor to the NXT via beams and pegs before connecting the wires.
Background We all make mistakes. Sometimes engineers need to design safety devices to protect the people that are using their products in case they make a mistake. Examples of this include:
• Airbags in cars. • Space heaters that turn off when tipped over. • Treadmills that turn off when runners trip or slow down.
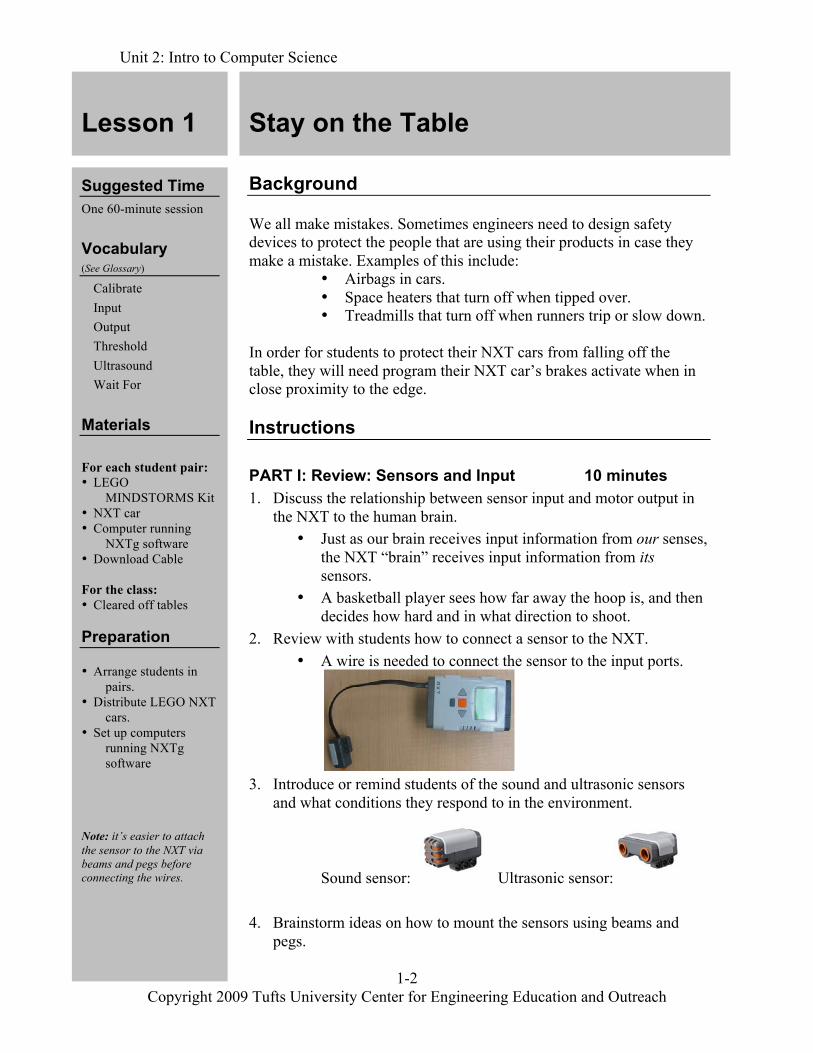
In order for students to protect their NXT cars from falling off the table, they will need program their NXT car’s brakes activate when in close proximity to the edge. Instructions PART I: Review: Sensors and Input 10 minutes 1. Discuss the relationship between sensor input and motor output in
the NXT to the human brain. • Just as our brain receives input information from our senses,
the NXT “brain” receives input information from its sensors.
• A basketball player sees how far away the hoop is, and then decides how hard and in what direction to shoot.
2. Review with students how to connect a sensor to the NXT. • A wire is needed to connect the sensor to the input ports.
3. Introduce or remind students of the sound and ultrasonic sensors
and what conditions they respond to in the environment.
Sound sensor: Ultrasonic sensor:
4. Brainstorm ideas on how to mount the sensors using beams and pegs.

Unit 2: Intro to Computer Science
1-3 Copyright 2009 Tufts University Center for Engineering Education and Outreach
Stay on the Table
5. Go over the programming blocks and tools that students used in the previous unit such as the move block and wait for block.
6. Introduce the goal of today’s lesson.
• Demo a car that drives towards the edge of the table; catch it as it falls off.
• Tell the students that they will have to program their car to stop before it falls off the table and breaks.
• Another way to present this activity and get students excited is to introduce the goal as “protecting your passengers.” For example: “A young family of LEGO people took their NXT car to the grand canyon. Allow them to get a good view, but make sure they don’t fall off the edge!
PART II: Programming/Testing 20 minutes 1. Have students program their NXT cars to travel to the table edge and
stop using a sound sensor. Students’ programs should include: • A move icon, set to travel for an unlimited amount of time.
What Questions Might Students Have During The Lesson? Why can’t I get the distance sensor to work? The distance (ultrasonic) sensor needs an accurate threshold value to wait for. Set the threshold too long, the car might not notice when it drives over the table edge. Set the threshold too short, and the car might stop prematurely or not start altogether. When calibrating sensors, it’s very important to concentrate steps 6-8 of the engineering design process, testing, and redesigning. Consider using a ruler to help figure out your threshold value. What happens if my car drives off the edge? The NXT brick is designed to take a beating, but like all electronics, it is not a smart idea to allow it to fall to the floor. Make sure you or your partner is ready to catch the car in case things go wrong. Note: Reviewing real world examples of why a program might include inputs and outputs (safety, etc.) is part of Identifying the Need/Problem in the Engineering Design Process.
Lesson 1

Unit 2: Intro to Computer Science
1-4 Copyright 2009 Tufts University Center for Engineering Education and Outreach
Lesson 1 Stay on the Table
Using the Engineering Design Process Using the Sound and Ultrasound sensors to both accomplish the same task is an example of the Developing Possible Solutions component of the Engineering Design Process.
- Note: All sensors are used to measure a change in the surrounding environment. The sensor is always measuring the environment and the program is used to respond to an environmental change. Note: Although the block to the left is a move block, it actually is programmed to stop the car by applying the breaks to the motors. Real World Connection Safety is a very important aspect of an Engineer’s job. We rely on engineers to build safe designs that we trust. Bridges must stay standing every time we drive over them. Buildings must stay standing, even in small earthquakes or high winds. Seatbelts must always keep us restrained in an ascendant. It would be scary if every time we drove over a bridge or walked into a building we would have to worry about it falling down. The inputs and outputs that the students program in this lesson keep their LEGO car from crashing off the edge of the table.
• A wait for icon, set to wait for a louder sound sensor in the appropriate port. A sound sensor can also be programmed to wait for quieter, but this is less useful in this lesson.
• Another move icon with the “stop” option selected.
2. Have students test their program by clapping or hitting the table in
order to make the car stop before it reaches the table edge. A sudden increase in loudness is a change that the sensor can identify.
3. Next, have students program their cars to use an ultrasonic distance sensor to detect the drop off at the edge of the table. Students’ programs should include:
• A move icon, set to travel for an unlimited amount of time. • A wait for icon, set to wait for a further distance (mountain
icon) sensor reading (in the appropriate port).
• Another move icon with the “stop” option selected.
4. As students finish the activity, have them to draw diagrams of their chairs in their Engineer’s Journal.
PART IV: Discussion and Observation 10 minutes 1. When all students have completed the activity, have them return to
their seats with their cars and let each pair give a brief demo. 2. Discuss the results of the activity and ask students to make
observations: • What difficulties did you encounter today and how you fixed
them? • Who had trouble calibrating a sensor? What threshold value
worked well? • What are the pros and cons of the different sensors?
Unit 2: Intro to Computer Science
1-5 Copyright 2009 Tufts University Center for Engineering Education and Outreach
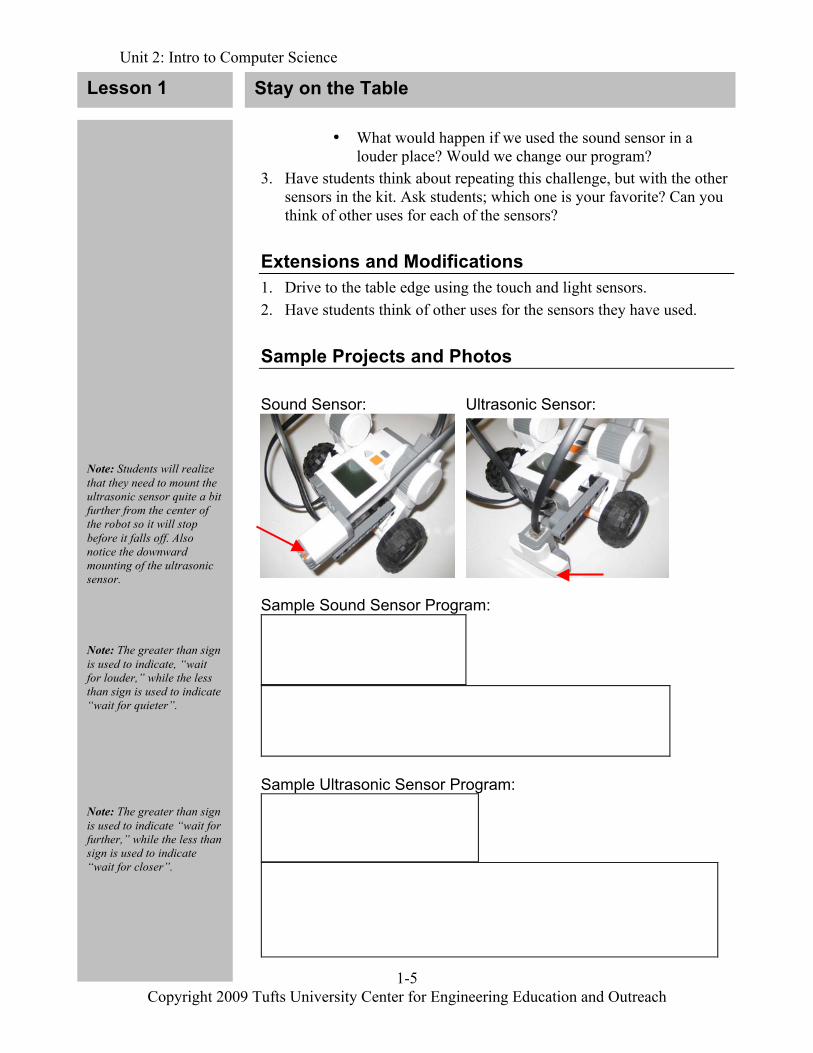
Lesson 1
Note: Students will realize that they need to mount the ultrasonic sensor quite a bit further from the center of the robot so it will stop before it falls off. Also notice the downward mounting of the ultrasonic sensor. Note: The greater than sign is used to indicate, “wait for louder,” while the less than sign is used to indicate “wait for quieter”. Note: The greater than sign is used to indicate “wait for further,” while the less than sign is used to indicate “wait for closer”.
• What would happen if we used the sound sensor in a louder place? Would we change our program?
3. Have students think about repeating this challenge, but with the other sensors in the kit. Ask students; which one is your favorite? Can you think of other uses for each of the sensors?
Extensions and Modifications 1. Drive to the table edge using the touch and light sensors. 2. Have students think of other uses for the sensors they have used. Sample Projects and Photos Sound Sensor: Ultrasonic Sensor:
Sample Sound Sensor Program:
Sample Ultrasonic Sensor Program:
Stay on the Table
Unit 2: Intro to Computer Science
1A - 1 Copyright 2009 Tufts University Center for Engineering Education and Outreach
Unit 2: Lesson 1 Stay on the Table
Appendix 1
Section 1: Programming Block Locations Section 2: Configuration Panel
Unit 2: Intro to Computer Science
1A - 2 Copyright 2009 Tufts University Center for Engineering Education and Outreach
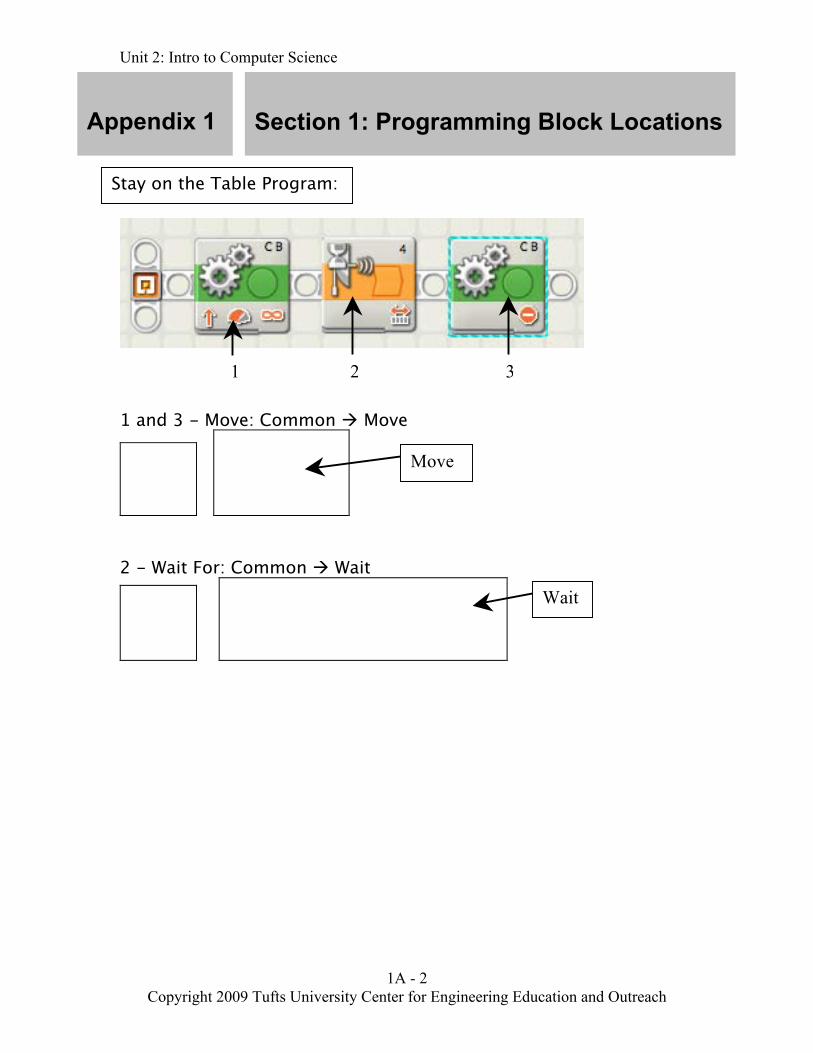
1 and 3 - Move: Common Move
2 - Wait For: Common Wait
1 2 3
Move
Wait
Appendix 1
Section 1: Programming Block Locations
Stay on the Table Program:

Unit 2: Intro to Computer Science
1A - 3 Copyright 2009 Tufts University Center for Engineering Education and Outreach
1. Move Car Forward: The vehicle moves forward at power of 75.
2. Wait For Ultrasonic Sensor: NXT will detect when the distance between the sensor and the floor is greater than 20 centemeters:
OR Wait for Sound Sensor: NXT will detect a change in sound levels. When sound increases the NXT will respond.
3. Stop Movement: Car will break after wait for block
Appendix 1
Section 2: Configuration Panel
Stay on the Table Program:
1 2 3

Unit 2: Intro to Computer Science
2 - 1 Copyright 2009 Tufts University Center for Engineering Education and Outreach
Unit 2: Lesson 2 ________________________________________________________________
Velociraptor Overview In the previous activity, Stay on the Table, students used a basic computer program to keep their NXT vehicle on the table. In this lesson, students will transfer their experience into writing more complex programs in NXTg MINDSTORMS. The goal of this lesson will be to write a program that will direct a robotic NXT vehicle to escape from 3-sided box. Students will program their NXT vehicles to respond to reflected light levels on the ground using an NXT light sensor. In addition, students will learn about an important programming block/concept – the loop block – to continually repeat an action.
Goals Expectations Evidence Students will understand: • How to create and
implement a NXT MINDSTORMS software program.
• How and when to use the Loop command.
Students should be able to: • Explain the basic steps
involved in writing a program to make their robotic vehicle escape.
• Describe a Loop command and how it can be useful in creating a program.
Evidence of learning found in: • Programs that successfully
navigate an NXT vehicle out of 3-sided box.
• Class discussion about successes and difficulties.

Unit 2: Intro to Computer Science
2 - 2 Copyright 2009 Tufts University Center for Engineering Education and Outreach
Lesson 2
Velociraptor
Suggested Time One 60-minute session Vocabulary (See Glossary)
Light Sensor Loop Program
Materials For each student pair: • NXT Vehicle with
light sensor • Computer with NXTg
MINDSTORMS software
• NXT download cable For the class: • 3 squares marked with
tape on the floor Preparation • Mark off square with
tape on the floor (see figure to right).
• Check that computer program is running properly.
• Arrange students in pairs.
Background A loop command is used in programming to cause all or part of a program to run multiple times. Loop commands are used to shorten programs and to save programmers the time of writing the same lines of code (program blocks) over and over again. A loop command can run for a period of time or stops when certain conditions occur (e.g. sensor reading a particular value). Complex programs can contain multiple loops, and/or can have loops within loops. Instructions Part I: Preparation 5 Minutes Obtain some tape that contrasts the color of the floor (e.g. black electrical tape for light-colored floors), lay out three (3) squares that match the shape indicated below where the robots will be tested. Each side of the square should be 3 feet long and the opening should be approximately 1 foot wide.
Part II: Activity Hook 5 Minutes 1. Review the main concepts from the previous lesson, Stay on the
Table. Including the following ideas: • Commands for basic movements (forward, backward, stop,
etc.) • Linking simple commands together to produce complex
action. • Using duration in a program. • Keeping programs simple and as short as possible.
2. Tell the students that you are going to act like a robot from the RoboButler activity and the students will write a new program that will make you walk in a perfect square.
3. Have students call out commands as you write the program on the board.
3 Feet

Unit 2: Intro to Computer Science
2 - 3 Copyright 2009 Tufts University Center for Engineering Education and Outreach
Velociraptor 4. In general, the program should look something like this:
Forward for 1 second Turn-Clockwise for 0.5 seconds Forward for 1 second Turn-Clockwise for 0.5 seconds Forward for 1 second Turn-Clockwise for 0.5 seconds Forward for 1 second Turn-Clockwise for 0.5 seconds
5. Walk through the program. Describe how programmers sometimes need to repeat a process many times. A command that repeats a process is called a loop.
6. Ask students to suggest ways to rewrite the program on the board using the new loop command.
7. As a class, rewrite the program using loops. The program might look like the following:
8. Reenact the program again to show that it has the same results. Show
how, by using loops, the class has shortened at 8-step program into a 3-step program.
9. Tell students that the activity they will do today will require the use of loops.
Part II: Setting up team activities 15 Minutes 1. In this lesson, the students will be writing a program that will instruct
an NXT robot to escape through the opening of a square marked with tape on the floor.
2. Show the students the tape box. Tell them that the robot will be placed in a random location within the square and will use the program that is stored in the NXT to navigate out of the box.
3. Identify the requirements for this challenge: • The NXT robot must work independently (i.e. The NXT
vehicle cannot be touched once the program is started). • The NXT vehicle must use a light sensor.
Note: It maybe helpful for students to have the short and long version of the “walk in a square” program side by side for comparison.
Using the Engineering Design Process The process where the students write a mock program on the board is an example of using the Construct a Prototype component of the Engineering Design Process.
Real World Connection The Roomba, a robotic vacuum, works much like the robot that the students program for this activity. The benefits of the Roomba vacuum is that it can get under and around most furniture in ways a regular vacuum cannot. The Roomba is also a great time-saver for its users. Its sensors take in information about the surroundings so that the robot does not run into walls or fall down stairs. The sensors tell the vacuum to turn or move accordingly just like in this lesson.
Lesson 2
Or: Loop 4 times Forward for 1 second Turn-Clockwise for ¼ a second

Unit 2: Intro to Computer Science
2 - 4 Copyright 2009 Tufts University Center for Engineering Education and Outreach
Lesson 2 Velociraptor
Note: All engineering problems have requirements and constraints. These can be from clients’ desires, money available, materials available, time and human capabilities. Note: The title of this lesson comes from the idea behind the movie Jurassic Park. The movie is about a group of scientists that manage to clone dinosaurs. The living dinosaurs will be part of an amusement park. The dinosaurs manage to escape their confines and the scientists have to escape from the dinosaurs.
Using the Engineering Design Process Teachers should emphasize that the students make modifications to the robot depending on the results of preliminary tests in the square because this is the Test and Evaluate the Solution(s) component of the Engineering Design Process.
• The NXT program must include a loop block. • The NXT program cannot include more than a total of 5
programming blocks. 4. Have students break into small groups to plan possible solutions to
the activity. If students are struggling, discuss the following: • Making use of the light sensor:
How can the light sensor be used to identify the edge of the square? How can the light sensor trigger the robot to behave differently when it detects the edge of the square?
• Making use of the loop block: What action might the students want to repeat? How does the loop block keep the total number of programming blocks to 5?
• The motion of the robot: Have the students draw out the motion of the robot on a piece of paper, or act it out in the tape square.
5. Gather the class together and discuss different teams’ ideas. 6. After gathering student ideas, walk through a sample program in
which you, or a student, are a robot and you are trying to avoid walking into a wall, using your eyes as sensors. For example:
Walk forward When you see the wall stop Back up for a second Turn for a fraction of a second. Repeat/loop
7. Before programming, give the students a few pointers: • You want the robot to move forward continuously unless it
detects a change of reflected light with the light sensor. • You want the robot to back up slightly to give it room to turn. • You may want to test and change how much your robot turns.
Part III: Activity Setup 5 Minutes 1. Have students form teams of two. Remind them that they should
write their own program but can share ideas with other teams. 2. Tell student that they will be able to test their program at any time
and may need to modify their program after they see it in action. 3. Suggest that students use what the class did together on the board to
help them in writing their own program.
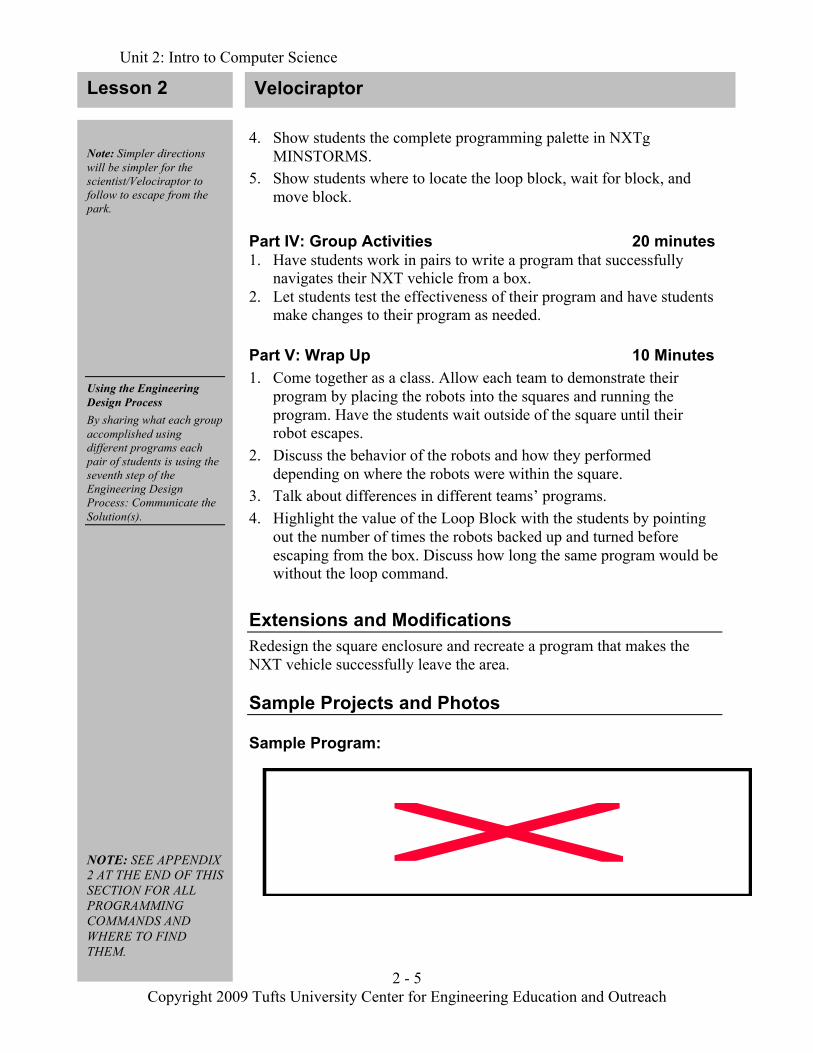
Unit 2: Intro to Computer Science
2 - 5 Copyright 2009 Tufts University Center for Engineering Education and Outreach
Note: Simpler directions will be simpler for the scientist/Velociraptor to follow to escape from the park.
Using the Engineering Design Process By sharing what each group accomplished using different programs each pair of students is using the seventh step of the Engineering Design Process: Communicate the Solution(s).
NOTE: SEE APPENDIX 2 AT THE END OF THIS SECTION FOR ALL PROGRAMMING COMMANDS AND WHERE TO FIND THEM.
Lesson 2 Velociraptor
4. Show students the complete programming palette in NXTg MINSTORMS.
5. Show students where to locate the loop block, wait for block, and move block.
Part IV: Group Activities 20 minutes 1. Have students work in pairs to write a program that successfully
navigates their NXT vehicle from a box. 2. Let students test the effectiveness of their program and have students
make changes to their program as needed. Part V: Wrap Up 10 Minutes 1. Come together as a class. Allow each team to demonstrate their
program by placing the robots into the squares and running the program. Have the students wait outside of the square until their robot escapes.
2. Discuss the behavior of the robots and how they performed depending on where the robots were within the square.
3. Talk about differences in different teams’ programs. 4. Highlight the value of the Loop Block with the students by pointing
out the number of times the robots backed up and turned before escaping from the box. Discuss how long the same program would be without the loop command.
Extensions and Modifications Redesign the square enclosure and recreate a program that makes the NXT vehicle successfully leave the area. Sample Projects and Photos Sample Program:
Unit 2: Intro to Computer Science
2A - 1 Copyright 2009 Tufts University Center for Engineering Education and Outreach
Unit 2: Lesson 2 Velociraptor
Appendix 2
Section 1: Programming Block Locations Section 2: Configuration Panel
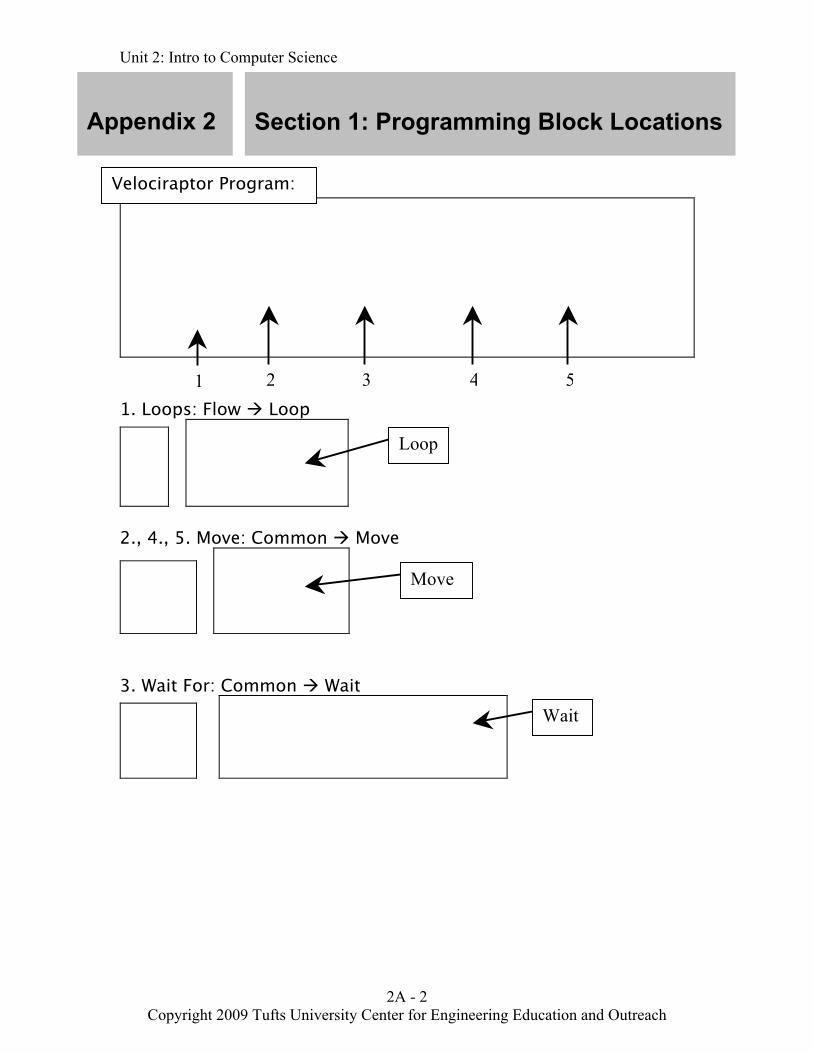
Unit 2: Intro to Computer Science
2A - 2 Copyright 2009 Tufts University Center for Engineering Education and Outreach
1. Loops: Flow Loop
2., 4., 5. Move: Common Move
3. Wait For: Common Wait
1 2 3 4 5
Loop
Move
Wait
Appendix 2
Section 1: Programming Block Locations
Velociraptor Program:
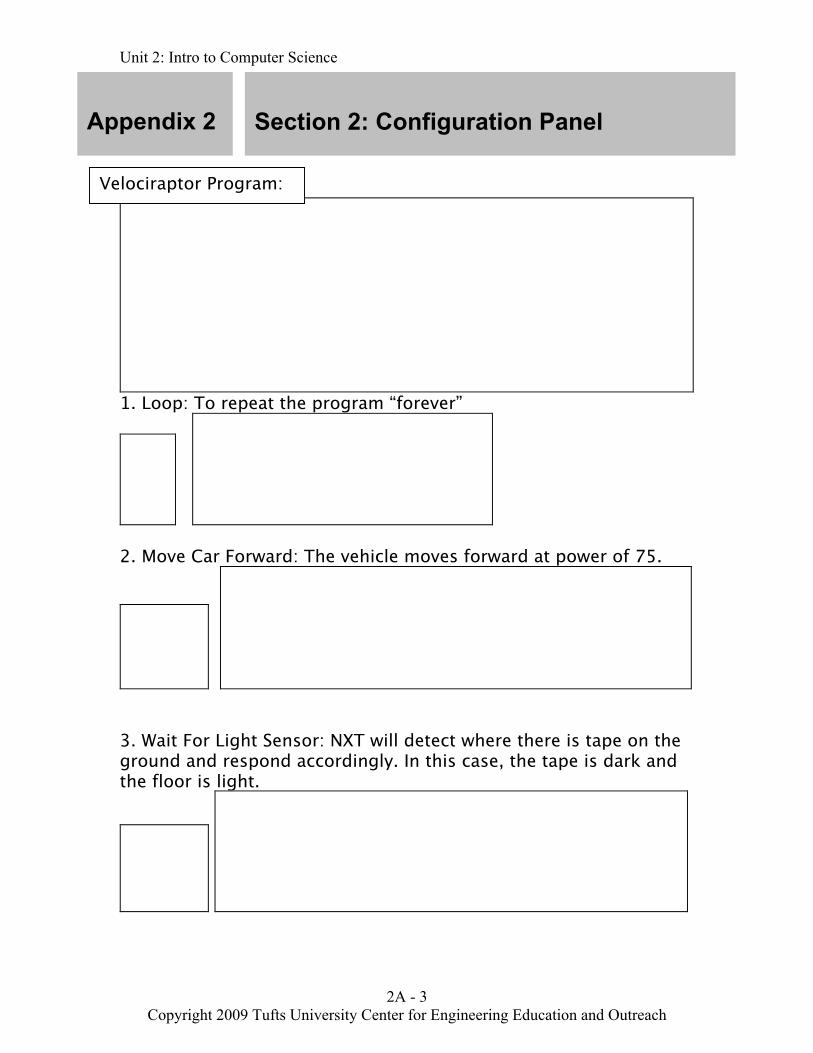
Unit 2: Intro to Computer Science
2A - 3 Copyright 2009 Tufts University Center for Engineering Education and Outreach
1. Loop: To repeat the program “forever”
2. Move Car Forward: The vehicle moves forward at power of 75.
3. Wait For Light Sensor: NXT will detect where there is tape on the ground and respond accordingly. In this case, the tape is dark and the floor is light.
Appendix 2
Section 2: Configuration Panel
Velociraptor Program:
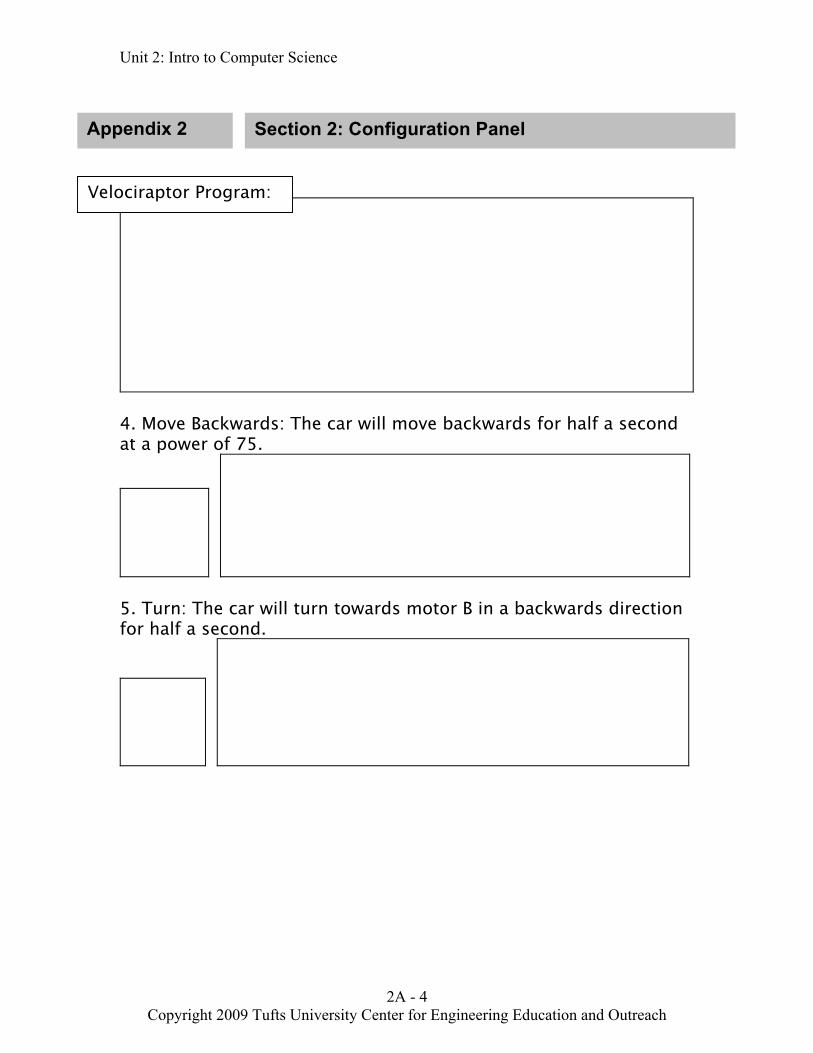
Unit 2: Intro to Computer Science
2A - 4 Copyright 2009 Tufts University Center for Engineering Education and Outreach
4. Move Backwards: The car will move backwards for half a second at a power of 75.
5. Turn: The car will turn towards motor B in a backwards direction for half a second.
Appendix 2 Section 2: Configuration Panel
Velociraptor Program:
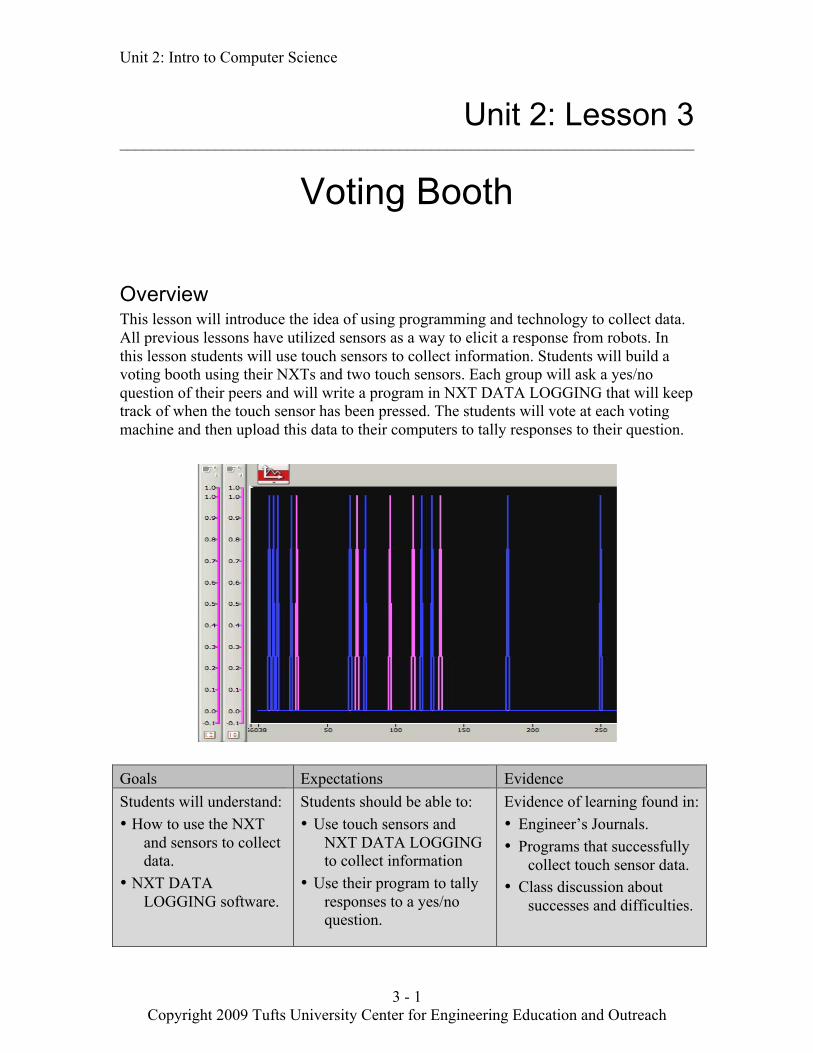
Unit 2: Intro to Computer Science
3 - 1 Copyright 2009 Tufts University Center for Engineering Education and Outreach
Unit 2: Lesson 3 ________________________________________________________________________
Voting Booth Overview This lesson will introduce the idea of using programming and technology to collect data. All previous lessons have utilized sensors as a way to elicit a response from robots. In this lesson students will use touch sensors to collect information. Students will build a voting booth using their NXTs and two touch sensors. Each group will ask a yes/no question of their peers and will write a program in NXT DATA LOGGING that will keep track of when the touch sensor has been pressed. The students will vote at each voting machine and then upload this data to their computers to tally responses to their question.
Goals Expectations Evidence Students will understand: • How to use the NXT
and sensors to collect data.
• NXT DATA LOGGING software.
Students should be able to: • Use touch sensors and
NXT DATA LOGGING to collect information
• Use their program to tally responses to a yes/no question.
Evidence of learning found in: • Engineer’s Journals. • Programs that successfully
collect touch sensor data. • Class discussion about
successes and difficulties.

Unit 2: Intro to Computer Science
3 - 2 Copyright 2009 Tufts University Center for Engineering Education and Outreach
Lesson 3
Voting Booth
Suggested Time One 60-minute session Vocabulary (See Glossary)
Data Logging Download Touch Sensor Upload
Materials For each student pair: • NXT brick • Two touch sensors and
wires • Computer with NXTg
MINDSTORMS software
• NXT download cable • Index card • Masking tape Preparation • Check that software is
running properly. • Distribute NXT bricks,
sensors and wires • Arrange student pairs.
Background Data logging is another feature of NXT MINDSTORMS. NXT DATA LOGGING is a useful way to examine information collected by sensors and stored in the NXT. Data logging can be used to see when a touch sensor has been pushed, how many rotations a motor has made, the light levels in the environment, etc. Students can use the NXT DATA LOGGING feature to create graphs and visualize what is happening in the environment around their robots. One application of this is to create a voting booth. Voters often prefer to vote in privacy so that they can voice their opinion anonymously. Voting can be made more anonymous by using technology. For example, by using technology people cannot be identified by their hand writing, what pen they used, etc. Technology also helps store data and reduces human error in keeping track of votes. There are also many problems that can be encountered when using technology. For example, how do you keep someone from voting more than once? How do you make the technology easy to use? Instructions Part I: Activity Hook 5 - 10 Minutes 1. Discuss as a class the process of voting or taking surveys. Ask
students how technology could be used to improve the voting process.
2. Discuss how tallying votes with computers is much easier than doing it by hand, and that machines can make voting more private.
3. Explain to students that their NXTs are able to collect and store information from the environment through sensors.
4. Explain that the NXT uses sensors to collect information and that this information can be uploaded to a computer so that you can analyze it.
5. Give students examples of how their NXT can measure activity in the surrounding environment; such as, how light levels change when you turn out the light, or how many times your touch sensor is bumped. This feature of NXTg is called data logging.
Part II: Setting up team activities 5 Minutes 1. Ask students if they can think of a way to make a voting machine
using sensors and the data logging feature.
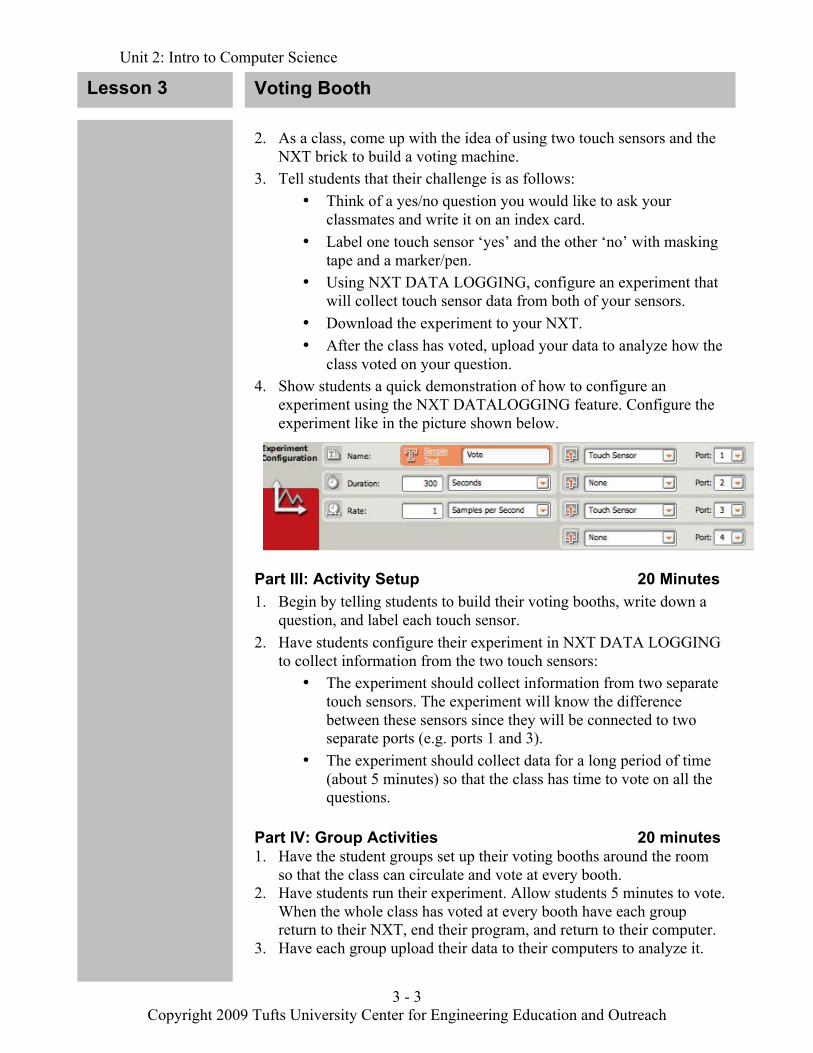
Unit 2: Intro to Computer Science
3 - 3 Copyright 2009 Tufts University Center for Engineering Education and Outreach
Voting Booth 2. As a class, come up with the idea of using two touch sensors and the
NXT brick to build a voting machine. 3. Tell students that their challenge is as follows:
• Think of a yes/no question you would like to ask your classmates and write it on an index card.
• Label one touch sensor ‘yes’ and the other ‘no’ with masking tape and a marker/pen.
• Using NXT DATA LOGGING, configure an experiment that will collect touch sensor data from both of your sensors.
• Download the experiment to your NXT. • After the class has voted, upload your data to analyze how the
class voted on your question. 4. Show students a quick demonstration of how to configure an
experiment using the NXT DATALOGGING feature. Configure the experiment like in the picture shown below.
Part III: Activity Setup 20 Minutes 1. Begin by telling students to build their voting booths, write down a
question, and label each touch sensor. 2. Have students configure their experiment in NXT DATA LOGGING
to collect information from the two touch sensors: • The experiment should collect information from two separate
touch sensors. The experiment will know the difference between these sensors since they will be connected to two separate ports (e.g. ports 1 and 3).
• The experiment should collect data for a long period of time (about 5 minutes) so that the class has time to vote on all the questions.
Part IV: Group Activities 20 minutes 1. Have the student groups set up their voting booths around the room
so that the class can circulate and vote at every booth. 2. Have students run their experiment. Allow students 5 minutes to vote.
When the whole class has voted at every booth have each group return to their NXT, end their program, and return to their computer.
3. Have each group upload their data to their computers to analyze it.
Lesson 3

Unit 2: Intro to Computer Science
3 - 4 Copyright 2009 Tufts University Center for Engineering Education and Outreach
Lesson 3 Voting Booth 4. Have the students change the color of the two graphs (one for each
sensor) to be separate colors so that they are easy to read. 5. A value of 1.0 on a graph will indicate that a touch sensor was
pressed. Each peak on the graph at 1.0 denotes one vote. 6. Students should tally the number of yes and no votes to their question
by counting the number of peaks on each graph.
Part V: Wrap Up 10 Minutes 1. Gather the class together to discuss the activity. 2. Ask each group to share their question and the results with the rest of
the class. 3. Ask students if they encountered any difficulties in this lesson and to
describe what they did to overcome these difficulties. 4. Discuss the pros and cons of using technology in voting. What are
some problems people might encounter? What are some benefits of using technology to vote?
5. Write down some ideas for a real-life voting booth on the board. What features should this voting booth include and why?
Extensions and Modifications 1. Have students graph their results on a bar graph or pie chart. 2. Give each group up to 4 touch sensors and allow them to ask
multiple choice questions of their classmates.

Unit 2: Intro to Computer Science
3 - 5 Copyright 2009 Tufts University Center for Engineering Education and Outreach
NOTE: SEE APPENDIX X FOR INFORMATION ON DATALOGGING
Sample Programs and Photos Sample Graph: One graph is colored pink, and the second graph is colored blue to differentiate between graphs. A peak on a graph indicates one vote. The data table below the graph also contains information on touch sensor presses.
Voting Booth
Lesson 3

Unit 2: Intro to Computer Science
4 - 1 Copyright 2009 Tufts University Center for Engineering Education and Outreach
Unit 2: Lesson 3 Voting Booth
Appendix 3
Section 1: Experiment Configuration Section 2: Data Analysis

Unit 2: Intro to Computer Science
4 - 2 Copyright 2009 Tufts University Center for Engineering Education and Outreach
1. To access the NXT Data Logging menu, click on the button at the top of the NXT Programming menu.
2. NXT DATA LOGGING menu shown below:
3. Type the name of your experiment into the NXT Data Logging menu in the Start New Experiment title box.
4. The Experiment Configuration panel should appear. Configure your experiment as shown below:
Appendix 3
Section 1: Experiment Configuration
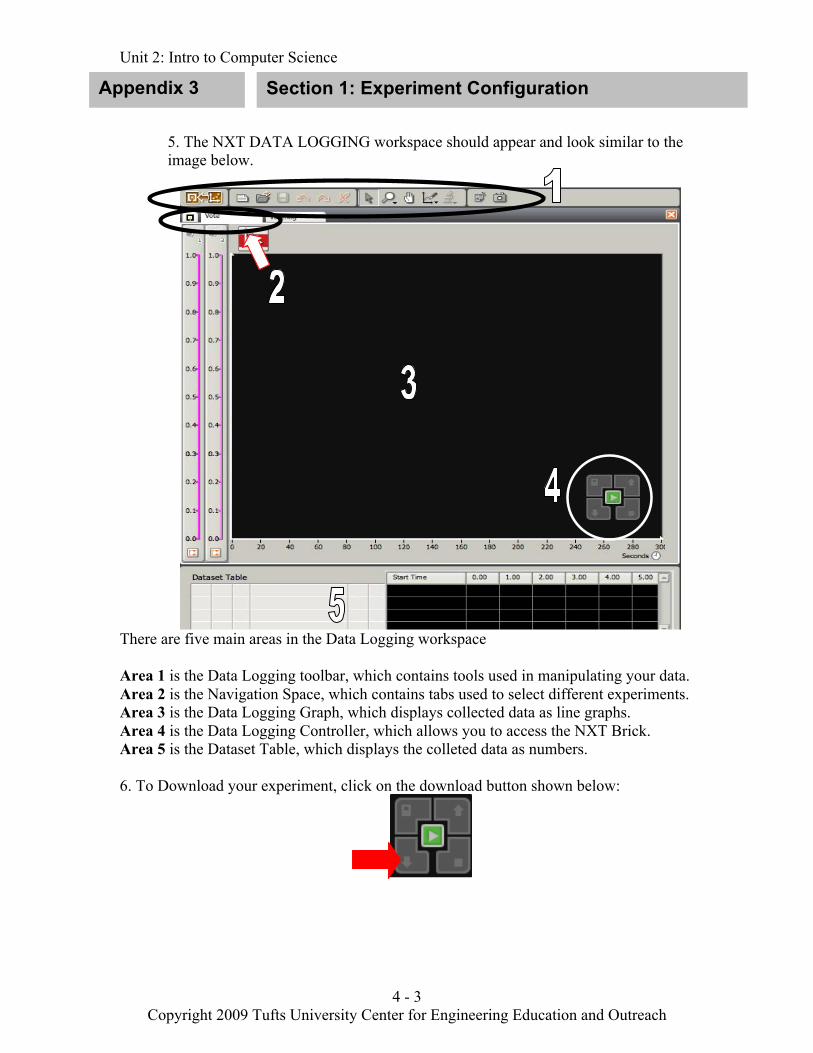
Unit 2: Intro to Computer Science
4 - 3 Copyright 2009 Tufts University Center for Engineering Education and Outreach
5. The NXT DATA LOGGING workspace should appear and look similar to the image below.
There are five main areas in the Data Logging workspace
Area 1 is the Data Logging toolbar, which contains tools used in manipulating your data. Area 2 is the Navigation Space, which contains tabs used to select different experiments. Area 3 is the Data Logging Graph, which displays collected data as line graphs. Area 4 is the Data Logging Controller, which allows you to access the NXT Brick. Area 5 is the Dataset Table, which displays the colleted data as numbers. 6. To Download your experiment, click on the download button shown below:
Appendix 3 Section 1: Experiment Configuration
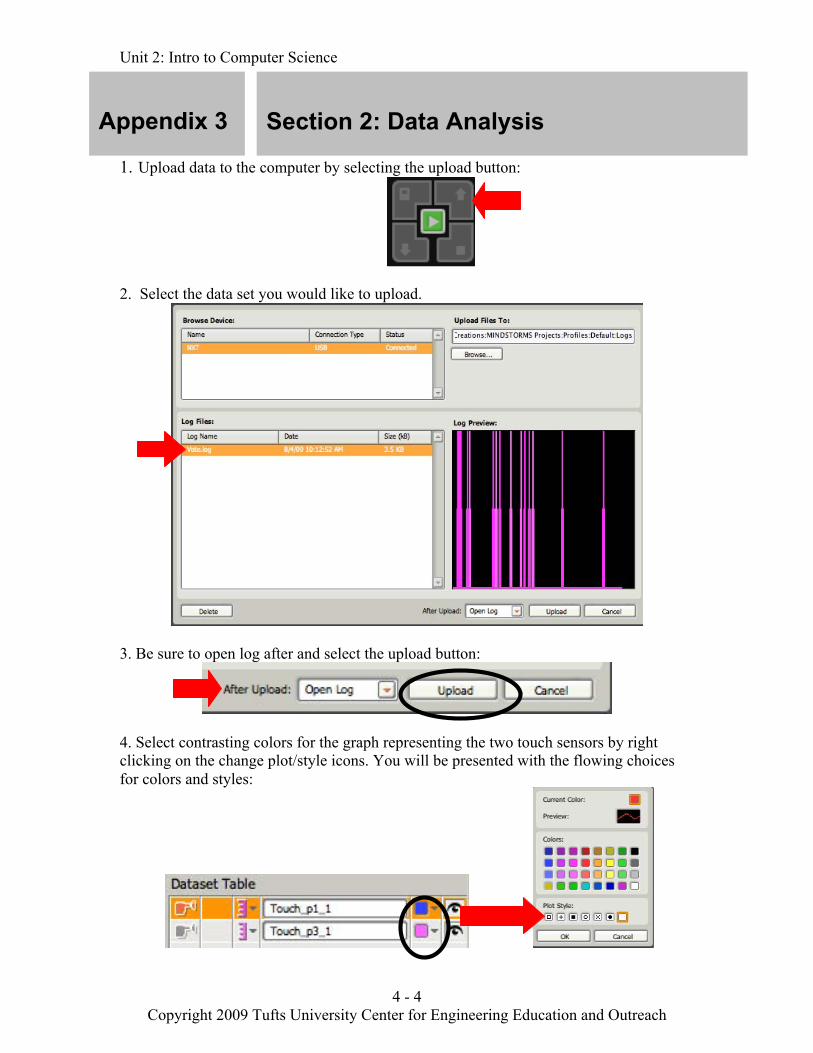
Unit 2: Intro to Computer Science
4 - 4 Copyright 2009 Tufts University Center for Engineering Education and Outreach
1. Upload data to the computer by selecting the upload button:
2. Select the data set you would like to upload.
3. Be sure to open log after and select the upload button:
4. Select contrasting colors for the graph representing the two touch sensors by right clicking on the change plot/style icons. You will be presented with the flowing choices for colors and styles:
Appendix 3
Section 2: Data Analysis

Unit 2: Intro to Computer Science
4 - 5 Copyright 2009 Tufts University Center for Engineering Education and Outreach
Sample Graph:
5. Click on the eye icon to hide or show a graph.
6. The data table can also be used to analyze data
Appendix 3 Section 2: Data Analysis

Unit 2: Intro to Computer Science
4 - 1 Copyright 2009 Tufts University Center for Engineering Education and Outreach
Unit 2: Lesson 4 ________________________________________________________________________
Short Cut Overview In the previous lesson, Voting Booth, students learned about the importance of collecting and analyzing information. In this lesson, students will learn to use and manipulate data obtained from NXT sensors in a program. Students will determine a conversion value that will transform the number of rotations a motor makes into linear distance. The students will then use the conversion value in their program to create a measuring device. They will review the loop block and use new command blocks to write a program for their measuring device so that it displays information on the NXT screen.
Goals Expectations Evidence Students will understand: • How to translate
rotational distance to linear distance.
• How to determine and use conversion values.
Students should be able to: • Use data logging to collect
information from sensors.
• Use their program to measure and display a distance.
Evidence of learning found in: • Formulation of a
conversion value. • Successful programs that
can accurately measure a linear distance.
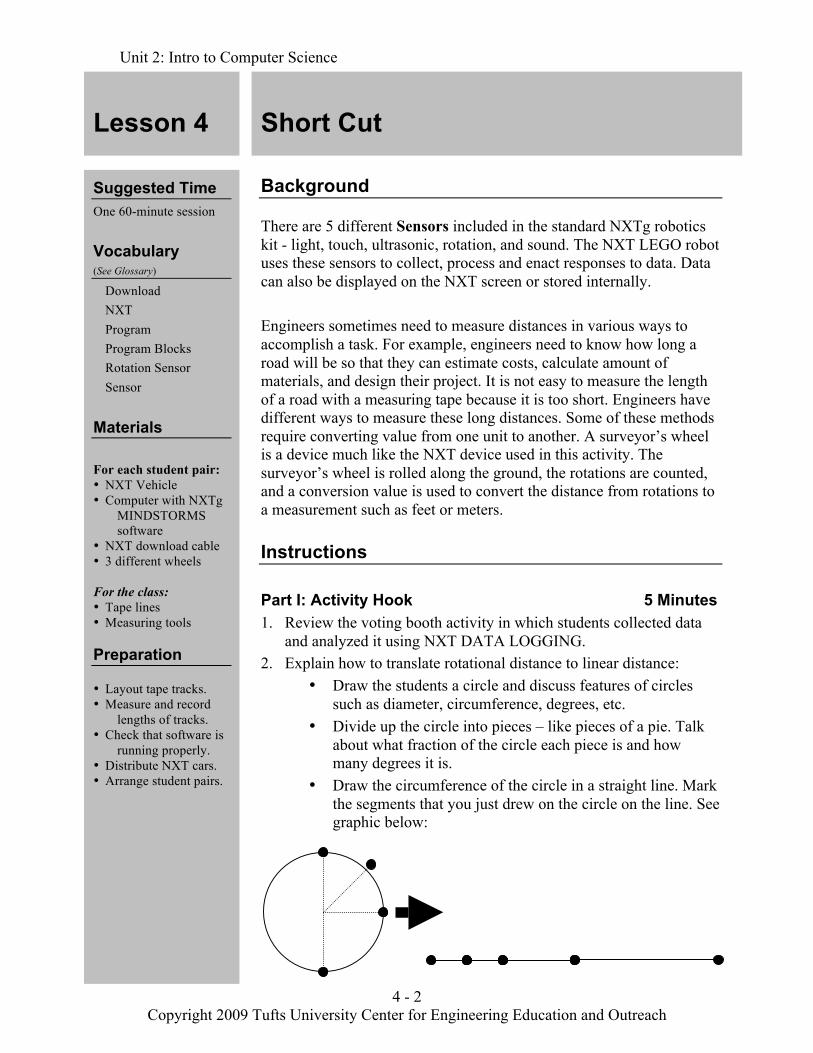
Unit 2: Intro to Computer Science
4 - 2 Copyright 2009 Tufts University Center for Engineering Education and Outreach
Lesson 4
Short Cut
Suggested Time One 60-minute session
Vocabulary (See Glossary)
Download NXT Program Program Blocks Rotation Sensor Sensor
Materials For each student pair: • NXT Vehicle • Computer with NXTg
MINDSTORMS software
• NXT download cable • 3 different wheels For the class: • Tape lines • Measuring tools Preparation • Layout tape tracks. • Measure and record
lengths of tracks. • Check that software is
running properly. • Distribute NXT cars. • Arrange student pairs.
Background
There are 5 different Sensors included in the standard NXTg robotics kit - light, touch, ultrasonic, rotation, and sound. The NXT LEGO robot uses these sensors to collect, process and enact responses to data. Data can also be displayed on the NXT screen or stored internally. Engineers sometimes need to measure distances in various ways to accomplish a task. For example, engineers need to know how long a road will be so that they can estimate costs, calculate amount of materials, and design their project. It is not easy to measure the length of a road with a measuring tape because it is too short. Engineers have different ways to measure these long distances. Some of these methods require converting value from one unit to another. A surveyor’s wheel is a device much like the NXT device used in this activity. The surveyor’s wheel is rolled along the ground, the rotations are counted, and a conversion value is used to convert the distance from rotations to a measurement such as feet or meters.
Instructions Part I: Activity Hook 5 Minutes 1. Review the voting booth activity in which students collected data
and analyzed it using NXT DATA LOGGING. 2. Explain how to translate rotational distance to linear distance:
• Draw the students a circle and discuss features of circles such as diameter, circumference, degrees, etc.
• Divide up the circle into pieces – like pieces of a pie. Talk about what fraction of the circle each piece is and how many degrees it is.
• Draw the circumference of the circle in a straight line. Mark the segments that you just drew on the circle on the line. See graphic below:

Unit 2: Intro to Computer Science
4 - 3 Copyright 2009 Tufts University Center for Engineering Education and Outreach
Short Cut
• Discuss how the circumference of the circle looks laid out in a straight line. Remark that it looks like a ruler.
3. Next, introduce the idea of measuring linear distance with a wheel rather than a measuring stick or tape measure. Give the example of a real-life measuring wheel.
4. Show the students an example of an NXT measuring wheel that they will be programming and using to measure distance.
• Place a piece of colored tape or post-it note on one point on the tire.
• Ask students to watch as you roll the wheel along the ground for one rotation. How far does the wheel travel?
• Next, show the students how far the wheel travels as you roll it for two rotations.
• Continue to roll the wheel along the ground and mark how far the wheel travels after each rotation.
• Talk about how one rotation does not equal a measurable unit like a foot or an inch. Tell students that in order to measure the total distance traveled you would have to figure out how far you go along the ground in one rotation
• Tell students that a conversion value translates rotations to a conventional measurement such as feet, inches, meters, or centimeters.
5. Discuss how you can use different increments to measure distance. Talk about how we have developed conventional systems so that people can understand each other when talking about amount. E.g: which one would you understand best?
6. Go over as a class how to formulate a conversion value so that you
can convert number of rotations to a unit system that people understand:
Note: The NXTg MINDSTORMS software features three different programming palettes – common, complete, and custom. The Complete Palette contains all the programming blocks in the Common palette, along with additional advanced blocks that are rarely needed by beginner programmers.
Using the Engineering Design Process By collecting information about the distance their measuring wheel travels in a specified distance, students are Researching the Problem, step 2 of the Engineering Design Process.
Lesson 4
Conversion value = Actual distance traveled Number of rotations
1 Foot
3 Ball Bounces
200 Ladybug Steps

Unit 2: Intro to Computer Science
4 - 4 Copyright 2009 Tufts University Center for Engineering Education and Outreach
Lesson 4
Note: There are other ways to determine conversion values. See if the class can come up with this value: • Measure the
circumference of the tire that is attached to the rotation sensor.
• A tires diameter is directly related to circumference and distance traveled in a rotation. (i.e. Diameter * pi = conversion factor)
Part II: Setting up team activities 15 Minutes 1. Explain to students that their challenge will be to determine which of
three paths between two points is the shortest using an NXT measuring wheel that they will build and program.
2. Tell students that they will write two programs. One will be an experiment in NXT DATA LOGGING to collect rotation sensor data and the second to convert rotations to a conventional unit of measure and display the measurement on the screen of the NXT.
3. Review NXT DATA LOGGING with the class and discuss the experiment that students will configure to collect rotation sensor data:
• The rotation sensor is located within the NXT motor. • The experiment will collect rotation sensor data • The experiment will keep track of the number of rotations that
the motor makes. • The data can be uploaded to NXT DATA LOGGING on the
computer to determine the total number of rotations the motor made over the time it was collecting data.
4. Next, the students will determine a conversion factor:
• Students will use their NXT measuring wheel, which has been programmed to collect rotation sensor data, to measure a specific distance (like 3 feet, or 100 centimeters).
• Students will upload their rotation sensor experiment to NXTg MINDSTORMS.
• Students will use the number of rotations that their wheel made and the actual distance the wheel traveled to calculate a conversion value. Use the following formula:
5. Students will use their conversion values to write a program that will
display the distance traveled in conventional units such as feet, meters, centimeters, inches, etc.
6. Suggest possible ways to solve the programming problem. • The students should realize that the NXT needs to gather
information from the rotation sensor – there needs to be a programming block that counts rotations.
Short Cut
Conversion Value = Distance Traveled from ruler/tape measure Number of Rotations from DATA LOGGING

Unit 2: Intro to Computer Science
4 - 5 Copyright 2009 Tufts University Center for Engineering Education and Outreach
Lesson 4 Short Cut
Equation for Wheels: Dactual = CV × DNXT
Or
CV = Dactual ÷ DNXT
Note: After a value has been converted into text, you can no longer do calculations on that value. The conversion factor should be placed before the Number to Text Block.
• The program will require a block that converts the rotation sensor value (rotations) into a conventional measurement unit. To do this students will pass a rotation value into the math block and multiply it by their conversion value to convert this data to conventional units
• The NXT is only able to display text data on the NXT screen. Therefore, the program must convert the number data to text data. To convert number values to text the use of the text to number block.
• The text data should then be passed to a display block so that it will show up on the NXT screen when the program is run.
• Data is passed between blocks using wire. Each programming block has a dropdown menu that can be accessed by clicking on the lower left corner of the block. In this program, the rotation sensor block will pass data to the math block, which converts the value to conventional units. The math block passes this data to the number to text block, which converts the data to text and passes it to the display block.
• When the program is run it will go through all the blocks almost instantaneously. By putting a loop block around the other blocks data can be displayed as the wheel is rolled along the ground for an undefined amount of time.
Part III: Activity Setup 15 Minutes 1. Have students build their measuring wheels. 2. Choose a unit of measure for the students to use in their programs.
Lay out a meter/yard stick, or a piece of tape marked with increments in the chosen unit of measure.
3. Set up three paths along the ground using tape for students to measure. Each path should move between two points of equal distance, but not be linear. Example:
Dacutal = actual distance
DNXT = rotation or degrees the NXT travels
CV = conversion value

Unit 2: Intro to Computer Science
4 - 6 Copyright 2009 Tufts University Center for Engineering Education and Outreach
NOTE: SEE END APPENDIX SECTION 2 FOR DIRECTIONS ON WIRING. NOTE: SEE APPENDIX 3 AT THE END OF THIS SECTION FOR ALL PROGRAMMING COMMANDS AND WHERE TO FIND THEM.
Lesson 4 Short Cut Part IV: Group Activities 20 minutes 1. Ask students to guess which path is the shortest, and which path is
the longest. Ask students to guess how long each path is. Write these guesses on the board.
2. Tell students that they will figure out exactly how long each path is and which path is the shortest by building a measuring device with their NXTs.
3. Have students break into their groups and write an experiment using NXT DATA LOGGING to collect rotation sensor data.
4. Have the students download their data logging experiments to their NXT bricks. Students will run the experiment and roll their measuring wheel along the yard stick or tape measure.
5. Have students upload their rotation sensor data. 6. Next, have students calculate a conversion value by dividing the
length that they measured by the number of rotations that their measuring wheel made.
7. When students have successfully calculated their conversion value, have students write the program that will display distance on the screen of their NXT measuring wheels.
8. Have students test their measuring wheels on the three test paths. Have each group record which path is the longest, shortest, and the length of each path.
Part V: Wrap Up 15 Minutes 1. Gather the class together to examine each teams results:
• Discuss the programming techniques and tricks that were used in this activity.
• Discuss reasons for differences in data. • Discuss ways to make the measuring device more accurate. • Discuss different ways that you could measure the lines. What
are the pros and cons of using a measuring wheel? Extensions and Modifications Estimate conversion factors for wheels of other diameters; Write a program to accurately measure the distance around the classroom.
Start Finish

Unit 2: Intro to Computer Science
4 - 7 Copyright 2009 Tufts University Center for Engineering Education and Outreach
Lesson 4 Short Cut
Sample Programs and Photos Sample Program:
1. Sample Configuration Panel: Rotation Sensor Block
2. Sample Configuration Panel: Math Block
3. Sample Configuration Panel: Display Block
1 2 3
Wire to transfer data from one block to another
This number comes from the rotation sensor block. Data transferred via the wire
Text comes from rotation sensor data via wire from number to text block

Unit 2: Intro to Computer Science
4A - 1
Copyright 2009 Tufts University Center for Engineering Education and Outreach
Unit 2: Lesson 4 Short Cut
Appendix 4
Section 1: Experiment Configuration Section 2: Programming Block Locations Section 3: Configuration Panel

Unit 2: Intro to Computer Science
4A - 2
Copyright 2009 Tufts University Center for Engineering Education and Outreach
1. Open up NXT DATA LOGGING and configure experiment as shown below:
2. Download your rotation sensor experiment, collect data and upload the data to the main data logging window. 3. To find how many rotations your wheel made, use the point analysis tool:
4. Find the number of rotations your wheel made on the graph with the point analysis tool:
Appendix 4
Section 1: Experiment Configuration
Number of Rotations

Unit 2: Intro to Computer Science
4A - 3
Copyright 2009 Tufts University Center for Engineering Education and Outreach
1. Loop: Flow Loop
2. Rotation Sensor: Sensors Rotation Sensor
3. Math: Data Math
4. Number to Text: Advanced Number to Text
Loop
Rotation Sensor
Math
Number to Text
Appendix 4
Section 2: Programming Block Locations
Short Cut Program:

Unit 2: Intro to Computer Science
4A - 4
Copyright 2009 Tufts University Center for Engineering Education and Outreach
5. Display: Action Display
Display
Appendix 4 Section 2: Programming Block Location
Short Cut Program:
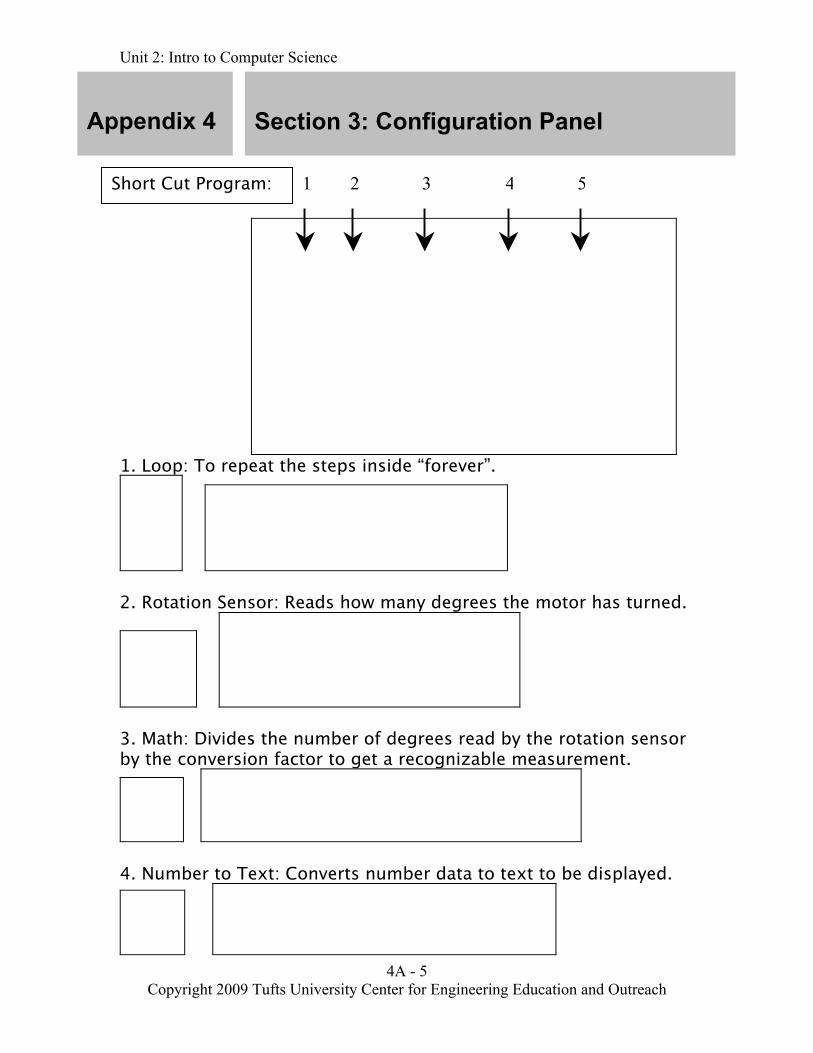
Unit 2: Intro to Computer Science
4A - 5
Copyright 2009 Tufts University Center for Engineering Education and Outreach
Short Cut Program:
1. Loop: To repeat the steps inside “forever”.
2. Rotation Sensor: Reads how many degrees the motor has turned.
3. Math: Divides the number of degrees read by the rotation sensor by the conversion factor to get a recognizable measurement.
4. Number to Text: Converts number data to text to be displayed.
1 3 4 5 2
Appendix 4
Section 3: Configuration Panel
Short Cut Program:

Unit 2: Intro to Computer Science
4A - 6
Copyright 2009 Tufts University Center for Engineering Education and Outreach
5. Display: Displays the text data converted from number data in step 4.
Connecting the Wires
From 2 3 Rotation Sensor outputs Degrees/Rotations to the Math Block. From 3 4 Math Block outputs a Number(#) to the Number to Text Block. From 4 5 Number to Text Block outputs Text (T) to Display Block.
Appendix 4 Section 3: Configuration Panel
Short Cut Program:
Short Cut Program:
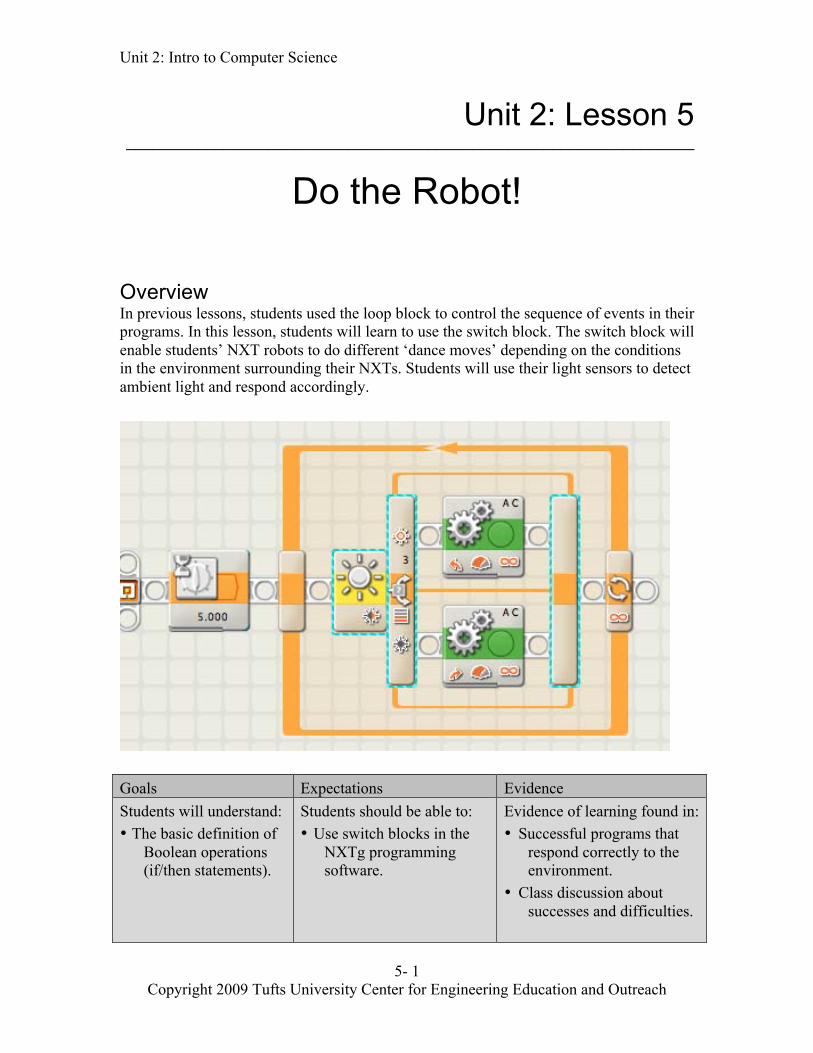
Unit 2: Intro to Computer Science
5- 1
Copyright 2009 Tufts University Center for Engineering Education and Outreach
Unit 2: Lesson 5 ________________________________________________________________
Do the Robot! Overview In previous lessons, students used the loop block to control the sequence of events in their programs. In this lesson, students will learn to use the switch block. The switch block will enable students’ NXT robots to do different ‘dance moves’ depending on the conditions in the environment surrounding their NXTs. Students will use their light sensors to detect ambient light and respond accordingly.
Goals Expectations Evidence Students will understand: • The basic definition of
Boolean operations (if/then statements).
Students should be able to: • Use switch blocks in the
NXTg programming software.
Evidence of learning found in: • Successful programs that
respond correctly to the environment.
• Class discussion about successes and difficulties.
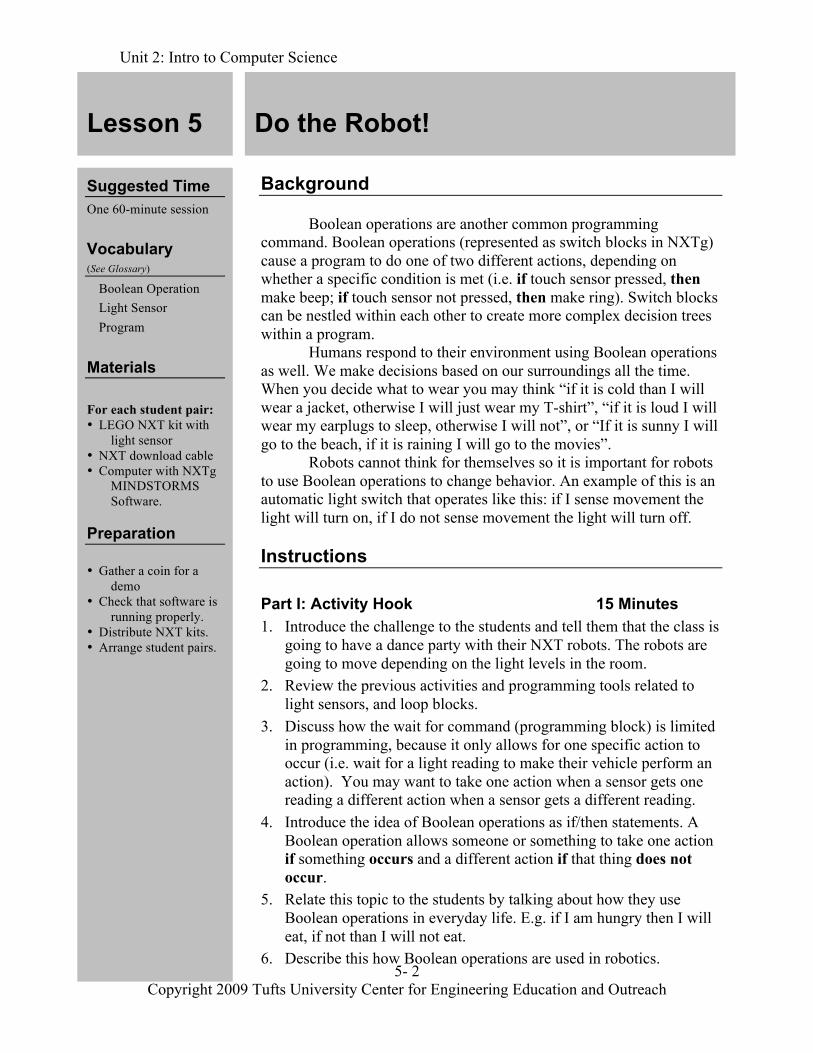
Unit 2: Intro to Computer Science
5- 2
Copyright 2009 Tufts University Center for Engineering Education and Outreach
Lesson 5
Do the Robot!
Suggested Time One 60-minute session Vocabulary (See Glossary)
Boolean Operation Light Sensor Program
Materials For each student pair: • LEGO NXT kit with
light sensor • NXT download cable • Computer with NXTg
MINDSTORMS Software.
Preparation • Gather a coin for a
demo • Check that software is
running properly. • Distribute NXT kits. • Arrange student pairs.
Background
Boolean operations are another common programming command. Boolean operations (represented as switch blocks in NXTg) cause a program to do one of two different actions, depending on whether a specific condition is met (i.e. if touch sensor pressed, then make beep; if touch sensor not pressed, then make ring). Switch blocks can be nestled within each other to create more complex decision trees within a program.
Humans respond to their environment using Boolean operations as well. We make decisions based on our surroundings all the time. When you decide what to wear you may think “if it is cold than I will wear a jacket, otherwise I will just wear my T-shirt”, “if it is loud I will wear my earplugs to sleep, otherwise I will not”, or “If it is sunny I will go to the beach, if it is raining I will go to the movies”.
Robots cannot think for themselves so it is important for robots to use Boolean operations to change behavior. An example of this is an automatic light switch that operates like this: if I sense movement the light will turn on, if I do not sense movement the light will turn off. Instructions Part I: Activity Hook 15 Minutes 1. Introduce the challenge to the students and tell them that the class is
going to have a dance party with their NXT robots. The robots are going to move depending on the light levels in the room.
2. Review the previous activities and programming tools related to light sensors, and loop blocks.
3. Discuss how the wait for command (programming block) is limited in programming, because it only allows for one specific action to occur (i.e. wait for a light reading to make their vehicle perform an action). You may want to take one action when a sensor gets one reading a different action when a sensor gets a different reading.
4. Introduce the idea of Boolean operations as if/then statements. A Boolean operation allows someone or something to take one action if something occurs and a different action if that thing does not occur.
5. Relate this topic to the students by talking about how they use Boolean operations in everyday life. E.g. if I am hungry then I will eat, if not than I will not eat.
6. Describe this how Boolean operations are used in robotics.

Unit 2: Intro to Computer Science
5- 3
Copyright 2009 Tufts University Center for Engineering Education and Outreach
Do the Robot!
• Write the following on the board: Heads = Thumbs Up Tails = Thumbs Down
• In class, flip a quarter and dime and have the students indicate put their thumbs up or down depending on the result of the coin flip. How is this activity a Boolean operation?
Part II: Setting up team activities 15 Minutes 1. Tell students that they will be building and programming a robot to
do one action when the classroom light is turned off and a different action when the light is turned on.
2. Tell students that to do this they will be using a switch block. Describe the switch block to the students as a programming block that signals the NXT to do one of two different actions depending on information from a sensor. For example. The robot can make a noise if the touch sensor is pressed, or be quiet if the touch sensor is not pressed.
3. Identify the program specifications for this challenge:
• The robot must dance based on the ambient light. • There must have a 5-second delay before the switch block. • The program must include a switch block.
Part III: Activity Setup 5 Minutes 1. Have students work together to plan of how the program should work
on the board. 2. Have each group plan out how they want to build their robot and
what they want their robot to do. 3. Have each group write down a program in their Engineer’s Journals
using the classes’ program as an example. 4. Make sure that each group’s plan is simple enough to complete
within the time allotted.
Part IV: Group Activities 20 minutes 1. Have students work in teams of two to build and program their robots
to dance. 2. Allow students to test, redesign, and reprogram their robots as
needed.
Student Connection A simple example of a Boolean Operation might be flipping a coin – heads: Do this task, not heads (tails): Do other task. Dice rolling might be another (though more complex) example of Boolean operations – If 1: Do this, If 2: Do that If 3: . . .
Lesson 5

Unit 2: Intro to Computer Science
5- 4
Copyright 2009 Tufts University Center for Engineering Education and Outreach
Lesson 5 Do the Robot!
Note: Students should determine that, by having all the robots do the same dance steps, it will be easy to determine whether the program is running properly or not – if someone is beeping while everyone else is spinning, there is a problem. NOTE: SEE APPENDIX 5 FOR ALL PROGRAMMING COMMANDS AND WHERE TO FIND THEM.
Part V: Wrap Up 10 minutes 1. Allow each group to demonstrate their robot and it’s response to
light. 2. When final testing is complete, have students come together and
discuss successes and difficulties encountered in this activity 3. Discuss the importance of Boolean operations and how they are
different from loops and other programming blocks that they have used thus far.
Extensions and Modifications 1. Use a touch, sound, or ultrasonic sensor to cause a response in the
robot. 2. Write the program to include a second sensor and two more switch
blocks. Sample Projects and Photos Sample Program:
Wait 5 seconds before starting program so that students can step away from robots
If it is light in the surrounding environment the robot will turn to the left
If it is light in the surrounding environment the robot will turn to the right
Unit 2: Intro to Computer Science
5A - 1 Copyright 2009 Tufts University Center for Engineering Education and Outreach
Unit 2: Lesson 5 Do the Robot!
Appendix 5
Section 1: Programming Block Locations Section 2: Configuration Panel

Unit 2: Intro to Computer Science
5A - 2 Copyright 2009 Tufts University Center for Engineering Education and Outreach
Do the Robot! Program:
1. Wait: Flow Wait
2. Switch: Flow Switch
3. Move: Common Move
4. Loop: Flow Loop
Wait
Switch
Move
Loop
1 2 3
4
Appendix 5
Section 1: Programming Block Locations
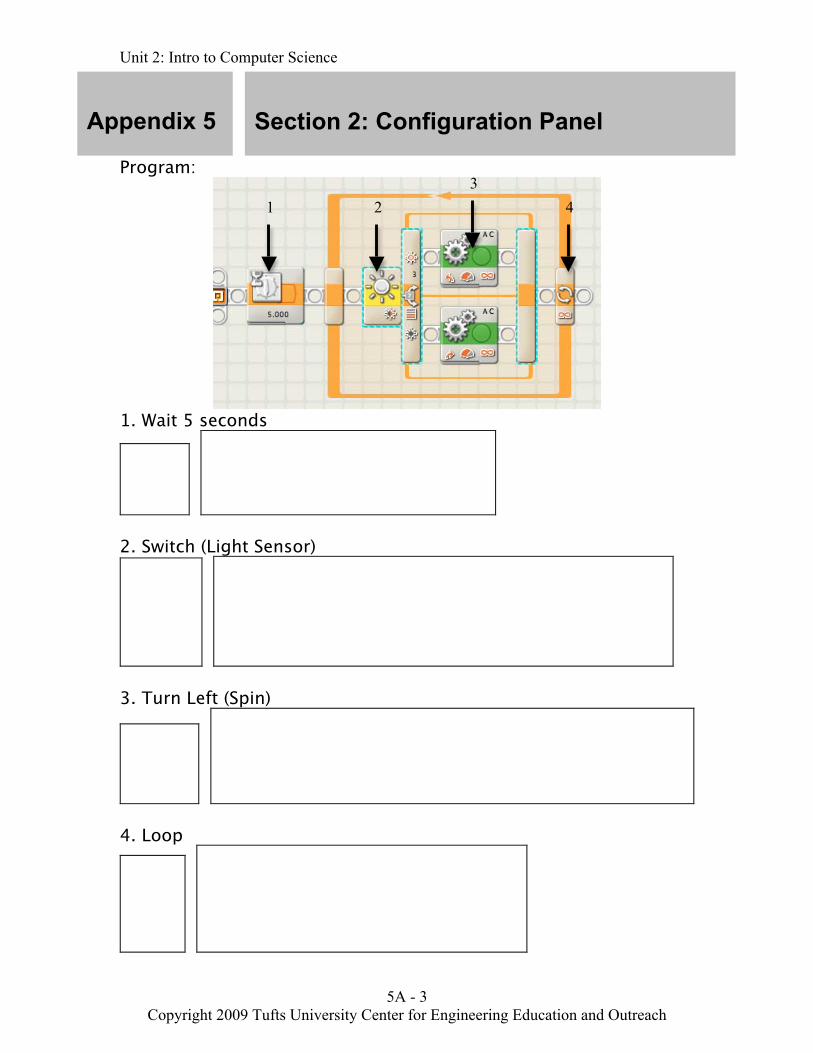
Unit 2: Intro to Computer Science
5A - 3 Copyright 2009 Tufts University Center for Engineering Education and Outreach
Program:
1. Wait 5 seconds
2. Switch (Light Sensor)
3. Turn Left (Spin)
4. Loop
1 2 3
4
Section 2: Configuration Panel
Appendix 5
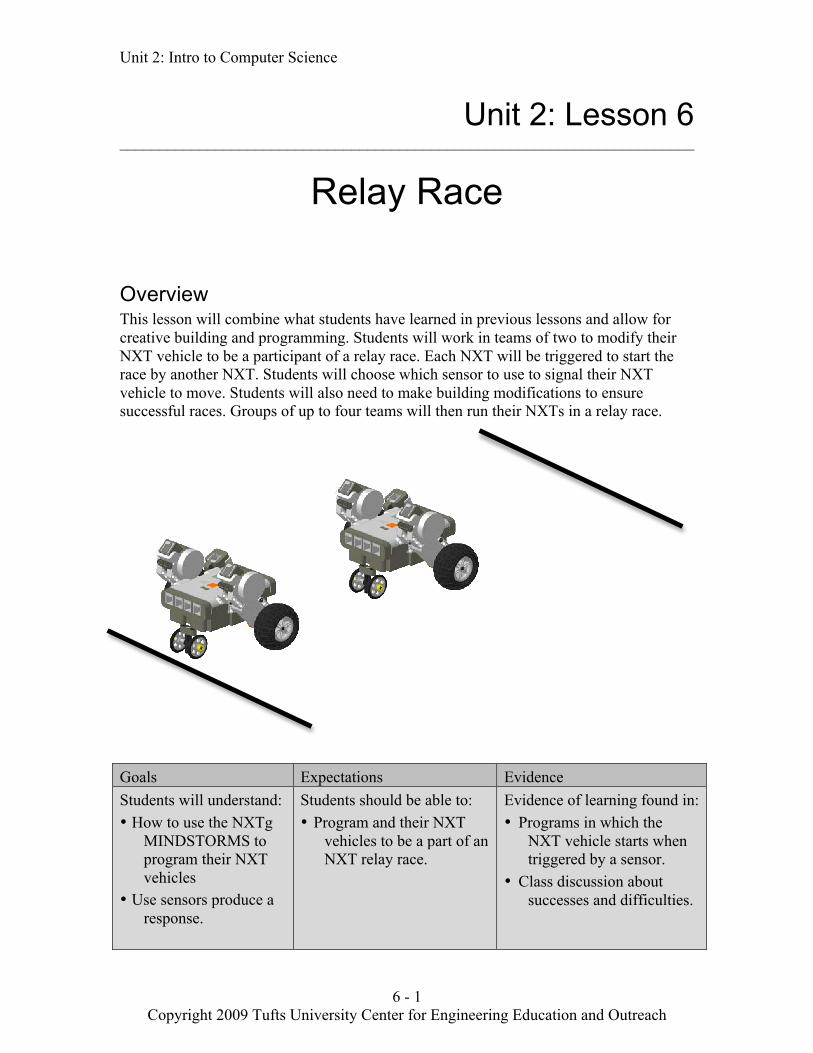
Unit 2: Intro to Computer Science
6 - 1 Copyright 2009 Tufts University Center for Engineering Education and Outreach
Unit 2: Lesson 6 ________________________________________________________________________
Relay Race Overview This lesson will combine what students have learned in previous lessons and allow for creative building and programming. Students will work in teams of two to modify their NXT vehicle to be a participant of a relay race. Each NXT will be triggered to start the race by another NXT. Students will choose which sensor to use to signal their NXT vehicle to move. Students will also need to make building modifications to ensure successful races. Groups of up to four teams will then run their NXTs in a relay race.
Goals Expectations Evidence Students will understand: • How to use the NXTg
MINDSTORMS to program their NXT vehicles
• Use sensors produce a response.
Students should be able to: • Program and their NXT
vehicles to be a part of an NXT relay race.
Evidence of learning found in: • Programs in which the
NXT vehicle starts when triggered by a sensor.
• Class discussion about successes and difficulties.

Unit 2: Intro to Computer Science
6 - 2 Copyright 2009 Tufts University Center for Engineering Education and Outreach
Lesson 6
Relay Race
Suggested Time One to Two 60-minute sessions
Vocabulary (See Glossary)
Program Sensor
Materials For each student: • Engineer’s Journal For each student pair: • NXT vehicle • NXT MINDSTORMS
kit with sensors • Computer with NXTg
MINDSTORMS software
• NXT download cable For the class: • Tape that contrasts the
color of the floor Preparation • Check that software is
running properly. • Distribute NXT kits
and vehicles. • Set up a relay course
using tape marks on the floor.
Background
A relay race is a race in which a group works together to finish a course. In this lesson, teams of two will work with other teams to accomplish a design and programming task. Each team will work on only one component of this final task.
Each teams NXT vehicle that will work with other groups’ NXT vehicles to accomplish a task. Each team will create a unique program and vehicle that will start when ‘tagged’ by the previous NXT (or a human if it is the first NXT in a group). NXT vehicles will have to be physically modified for their specific role on the relay team. Instructions Part I: Activity Hook 5 - 10 Minutes 1. Ask students if they have ever seen or heard of a relay race. Talk to
students about what a relay race is – a team of people who work together to get to the finish line.
2. Tell students that they will be working with a partner to build an NXT vehicle that will be a part of a relay race team.
3. Review what students have learned about programming. Review specific blocks and what they are used for (loop block, wait for block, move block, switch block, etc.).
Part II: Setting up team activities 10 - 20 Minutes 1. Break students into teams of 2 and then make groups of up to 4
teams as relay groups. 2. Have each relay group discuss the order of NXTs for the relay race
and which sensor each team will use to trigger their NXT to drive. A person will trigger the first group’s NXT to drive.
3. Have each team of 2 separate from the group and plan how they will program their NXT to do their part of the relay race.
4. Have each team of 2 draw out their plans for how they will physically modify their NXT vehicle.
5. When all the teams have finished planning, have them return to their larger relay groups to share their plans.
Part III: Group Activities 30 - 60 minutes 1. Have students break into their individual teams to begin their
project.
Unit 2: Intro to Computer Science
6 - 3 Copyright 2009 Tufts University Center for Engineering Education and Outreach
Relay Race 2. Allow teams to work independently, using what they have learned in
this unit to build and program their NXT for the relay race. 3. If students need help, assist them in programming their NXT, but
encourage them to use what they have learned in previous lessons. Remind them of previous activities, the programs that they wrote, and the purpose of each programming block.
4. Have teams test their vehicles on their own before getting together with the rest of their relay group.
5. When all teams in a relay group have tested their vehicle, allow groups to test their vehicles as a relay team.
Part V: Wrap Up 20 - 30 Minutes 1. Have each relay group demonstrate their relay. Let each group
explain which sensor triggers their NXT vehicle to move. Have each group explain which programming blocks they used to make their NXT work.
2. If you would like, just for fun, have all the relay teams race each other. Try to avoid making the race too competitive.
3. Have the students clean up and come together for a group discussion. 4. Review what the students have learned over the course of the
semester and in this activity. Write down all the lessons from Unit 2 on the board and discuss the following:
• Ask students what they have learned about programming and how computer programs work by stringing together simple commands to produce more complex action.
• Ask students which blocks are used to perform an actions (i.e. motor, move)
• Ask students which blocks are use to detect changes in the environment (i.e. sensor, wait for blocks)
• Ask students which programming blocks you can use to change the flow of a program (i.e. loop blocks, switch blocks)
• Remind students of the voting booth activity. Ask students why they think that data logging is useful.
Extensions and Modifications 1. Have this activity be a competition. Have students work in smaller
relay groups to see which group can perform the task the fastest. 2. Make the challenge more complicated. Require the use of two
sensors. E.g. Require that each car start when it is triggered by a person or other car and stop when it reaches the next car/finish line. Require the use of more than one sensor, etc.
Lesson 6
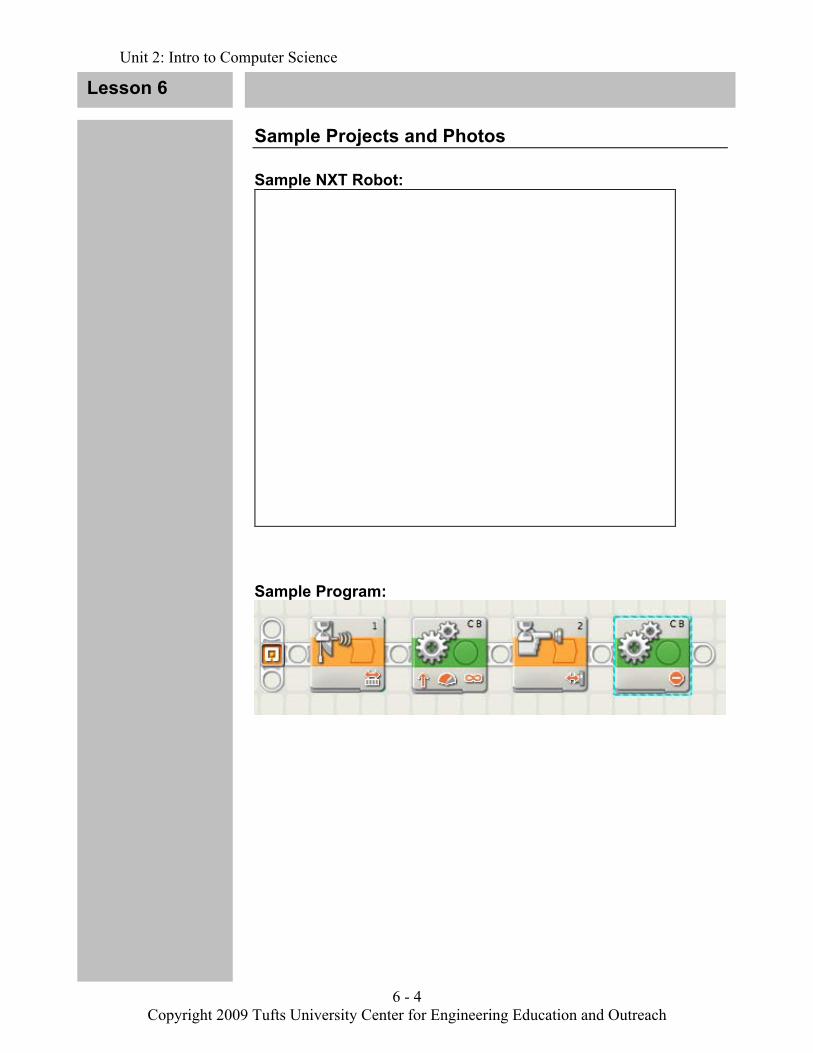
Unit 2: Intro to Computer Science
6 - 4 Copyright 2009 Tufts University Center for Engineering Education and Outreach
Lesson 6
Sample Projects and Photos Sample NXT Robot:
Sample Program:

Unit 2: Intro to Computer Science
6A - 1 Copyright 2009 Tufts University Center for Engineering Education and Outreach
Unit 2: Lesson 6 Relay Race
Appendix 6
Engineer’s Journal
Unit 2: Intro to Computer Science
6A - 2 Copyright 2009 Tufts University Center for Engineering Education and Outreach
Building Design Sheet Engineer:_______________________ Date:___________ Partner(s):_____________________________________
1. Brainstorm your design (label important features) 2. Write a short paragraph on the important features of your design __________________________________________________
__________________________________________________
__________________________________________________
__________________________________________________
__________________________________________________
__________________________________________________
__________________________________________________

Unit 2: Intro to Computer Science
6A - 3 Copyright 2009 Tufts University Center for Engineering Education and Outreach
Final Design Sheet Engineer:_______________________ Date:___________ Partner(s):_____________________________________
3. Draw your final design (label important features) 4. Write a short paragraph about important features of your design __________________________________________________
__________________________________________________
__________________________________________________
__________________________________________________
__________________________________________________
__________________________________________________
__________________________________________________
Unit 2: Intro to Computer Science
6A - 4 Copyright 2009 Tufts University Center for Engineering Education and Outreach
5. Write down 2 difficulties you are had during this activity
a. ____________________________________________
____________________________________________
b. ____________________________________________
____________________________________________
6. Write down 2 changes that you made to your design to improve it
a. ____________________________________________
____________________________________________
b. ____________________________________________
____________________________________________
7. Write down what you are most proud of in your design
__________________________________________________
__________________________________________________
__________________________________________________
8. Write down a skill you can improve on in the future
__________________________________________________
9. What steps of the Engineering Design Process did you focus on in
this lesson
__________________________________________________

Unit 2: Intro to Computer Science
Copyright 2009 Tufts University Center for Engineering Education and Outreach
Unit 2: End Appendix
End Appendix
Section 1: Engineering Design Process Section 2: Directions for Wiring Glossary
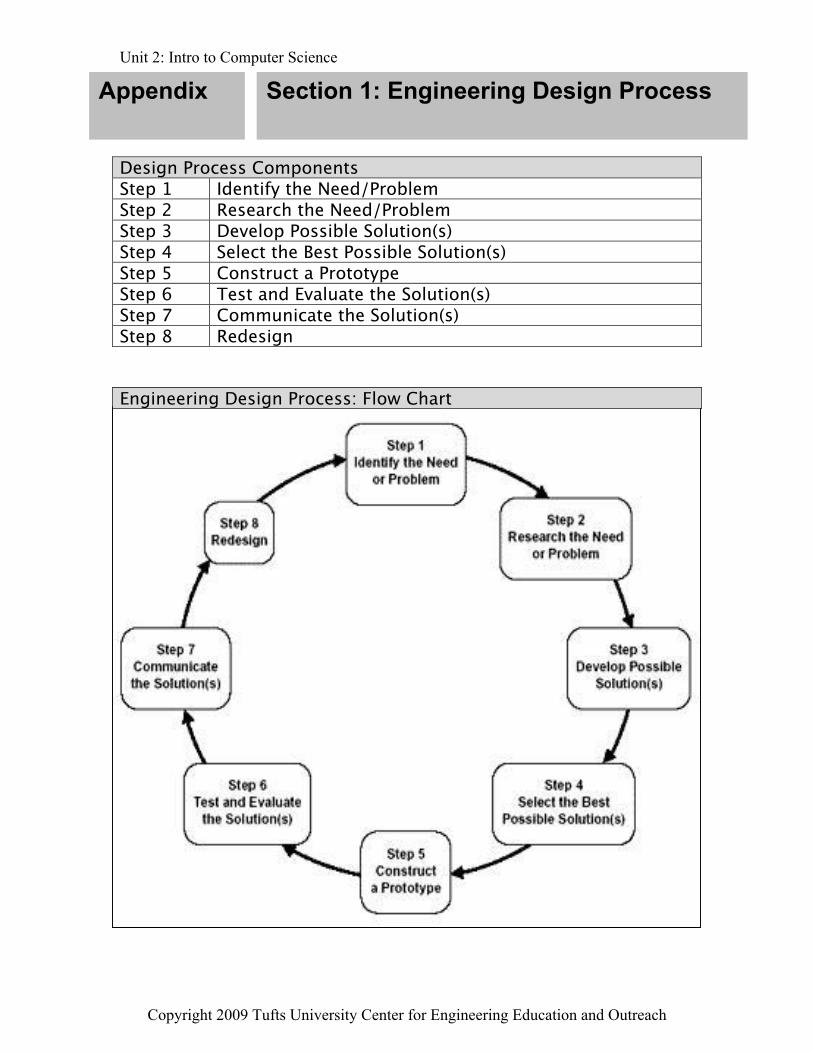
Unit 2: Intro to Computer Science
Copyright 2009 Tufts University Center for Engineering Education and Outreach
Appendix Design Process Components Step 1 Identify the Need/Problem Step 2 Research the Need/Problem Step 3 Develop Possible Solution(s) Step 4 Select the Best Possible Solution(s) Step 5 Construct a Prototype Step 6 Test and Evaluate the Solution(s) Step 7 Communicate the Solution(s) Step 8 Redesign Engineering Design Process: Flow Chart
Appendix Section 1: Engineering Design Process

Unit 2: Intro to Computer Science
Copyright 2009 Tufts University Center for Engineering Education and Outreach
Program Logic Description Understanding Programming
Students have a basic understanding of the purpose of programming and how to go about creating a progråm.
Using LOOPs Using LOOPs to repeat a section of a program in order to accomplish a task.
Using Custom Programming Blocks
Creating programming blocks that condense a group of commands into one block that can be reused when needed in a complete program.
Using Switch Blocks (Boolean Operations)
Using if/then statements to create different pathways in a program that result in different actions depending on environmental inputs.
Bluetooth Using Bluetooth on the NXTs to communicate with other NXTs. Bluetooth has many useful real world applications and examples can be found everywhere.
Programming Skills Word Bank
Appendix Section 1: Engineering and Programming Skills
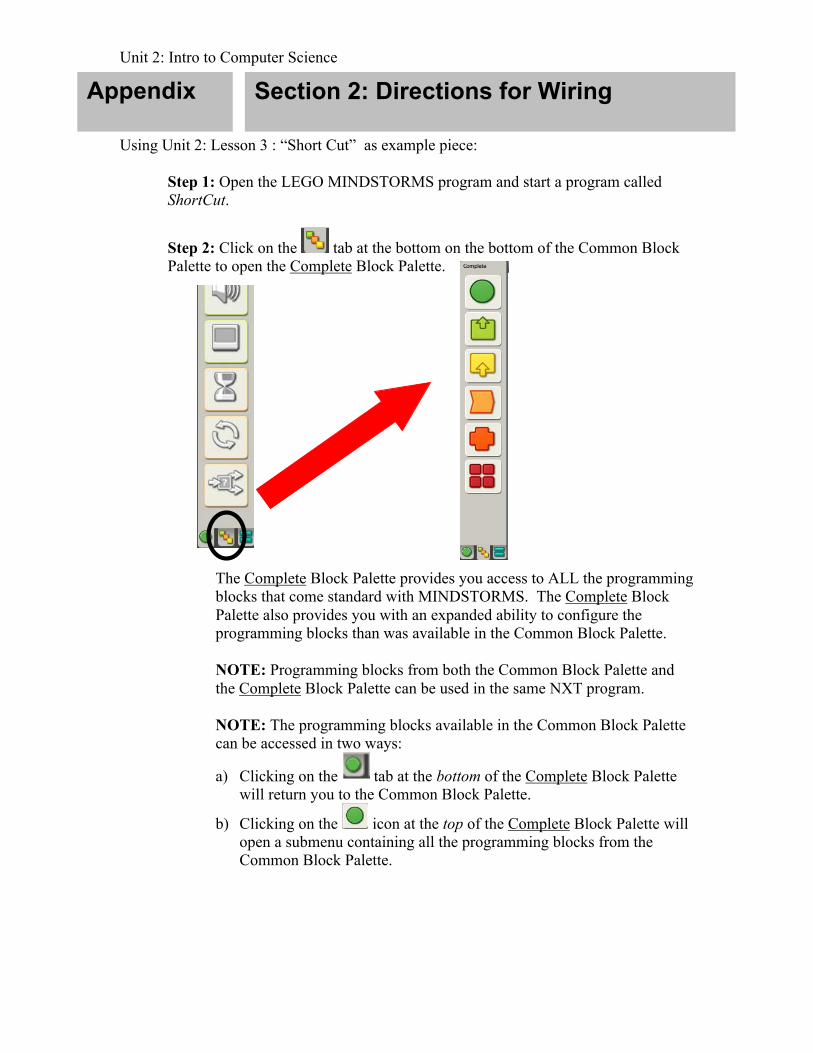
Unit 2: Intro to Computer Science
Using Unit 2: Lesson 3 : “Short Cut” as example piece:
Step 1: Open the LEGO MINDSTORMS program and start a program called ShortCut.
Step 2: Click on the tab at the bottom on the bottom of the Common Block Palette to open the Complete Block Palette.
The Complete Block Palette provides you access to ALL the programming blocks that come standard with MINDSTORMS. The Complete Block Palette also provides you with an expanded ability to configure the programming blocks than was available in the Common Block Palette.
NOTE: Programming blocks from both the Common Block Palette and the Complete Block Palette can be used in the same NXT program.
NOTE: The programming blocks available in the Common Block Palette can be accessed in two ways:
a) Clicking on the tab at the bottom of the Complete Block Palette will return you to the Common Block Palette.
b) Clicking on the icon at the top of the Complete Block Palette will open a submenu containing all the programming blocks from the Common Block Palette.
Appendix Section 2: Directions for Wiring
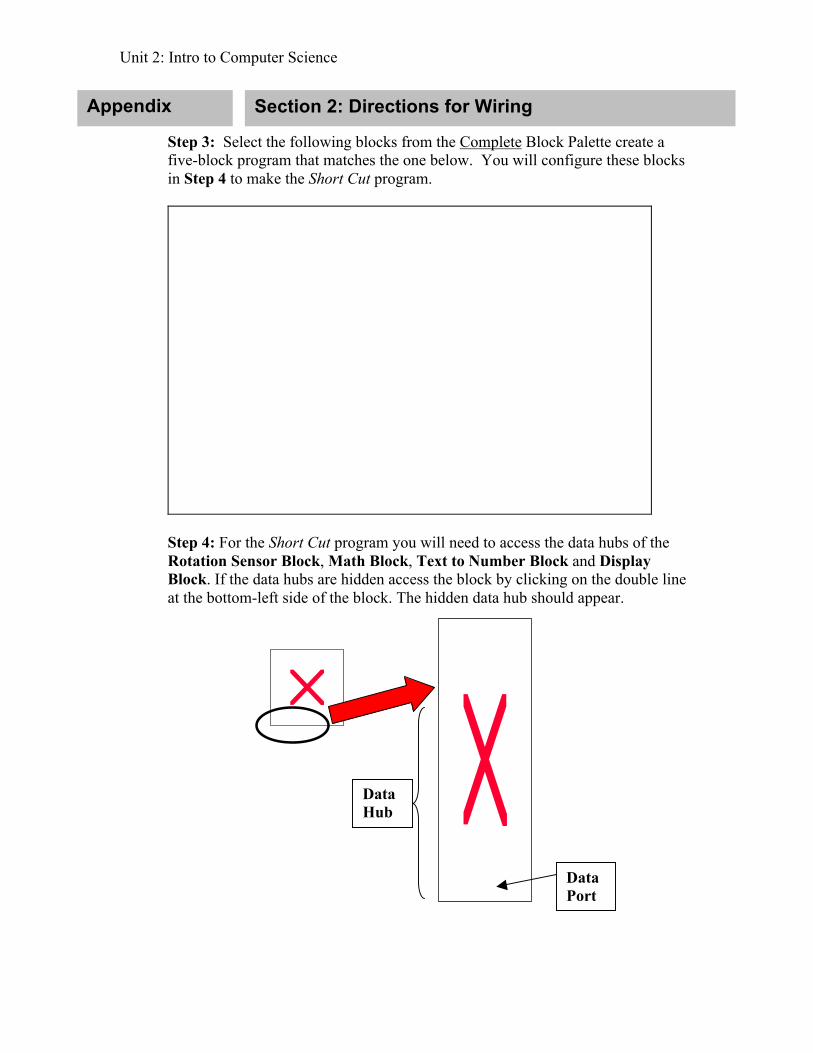
Unit 2: Intro to Computer Science
Step 3: Select the following blocks from the Complete Block Palette create a five-block program that matches the one below. You will configure these blocks in Step 4 to make the Short Cut program.
Step 4: For the Short Cut program you will need to access the data hubs of the Rotation Sensor Block, Math Block, Text to Number Block and Display Block. If the data hubs are hidden access the block by clicking on the double line at the bottom-left side of the block. The hidden data hub should appear.
Data Hub
Data Port
Section 2: Directions for Wiring
Appendix
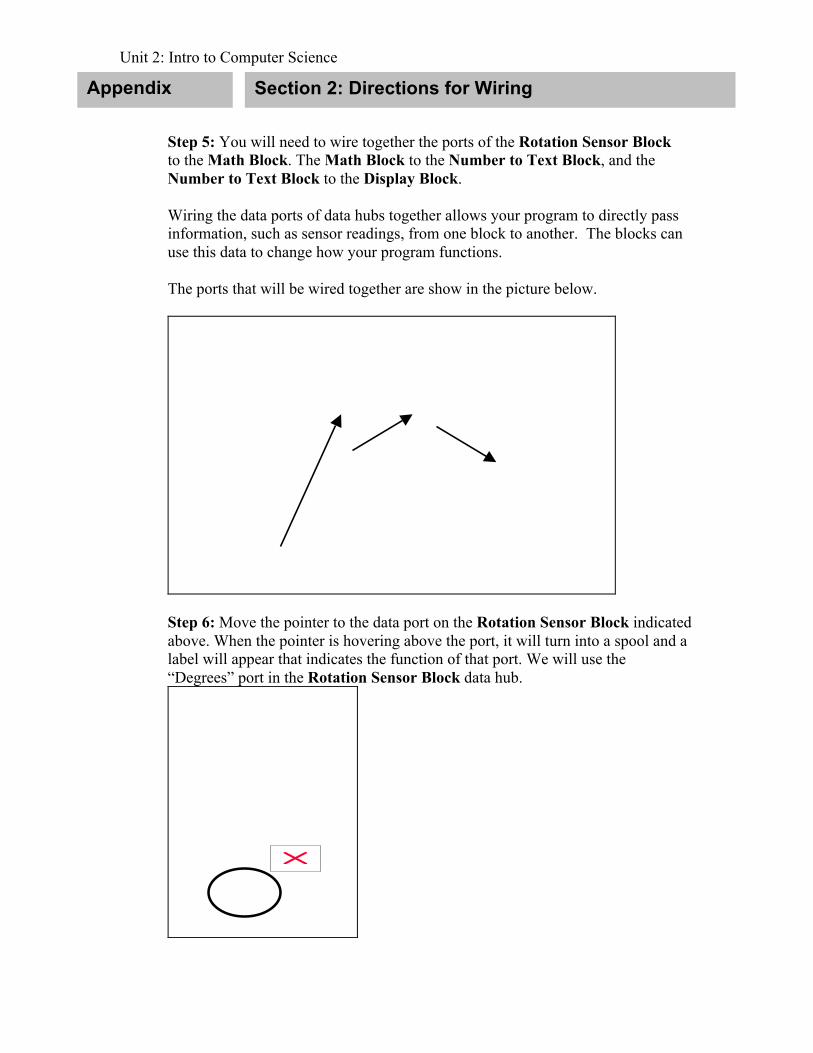
Unit 2: Intro to Computer Science
Step 5: You will need to wire together the ports of the Rotation Sensor Block to the Math Block. The Math Block to the Number to Text Block, and the Number to Text Block to the Display Block.
Wiring the data ports of data hubs together allows your program to directly pass information, such as sensor readings, from one block to another. The blocks can use this data to change how your program functions. The ports that will be wired together are show in the picture below.
Step 6: Move the pointer to the data port on the Rotation Sensor Block indicated above. When the pointer is hovering above the port, it will turn into a spool and a label will appear that indicates the function of that port. We will use the “Degrees” port in the Rotation Sensor Block data hub.
Appendix Section 2: Directions for Wiring

Unit 2: Intro to Computer Science
Step 7: With the pointer now in the shape of a spool, click and hold down the mouse button. The spool will turn into an arrow, and if you move the pointer (while still keeping the mouse button), an orange data wire will follow the pointer. Drag the pointer, with the data wire in tow, to the data port that you would like the wire to attach to (In this case from the “Degrees” port in the Rotation Sensor Block to the “A” port on the Math Block). When you have reached the next data port release the wire. The wire should remain on the screen connecting the two data ports.
The final program should look similar to the program pictured below:
Appendix Section 2: Directions for Wiring

Unit 2: Intro to Computer Science
Unit 2
Glossary

Unit 2: Intro to Computer Science
Glossary B - E

Unit 2: Intro to Computer Science
Glossary L - R
Unit 2: Intro to Computer Science
Glossary S - W