![[Basic HTML/CSS] 2. html - list tags](https://static.fdocuments.us/doc/165x107/58ce75c41a28abdc578b67d9/basic-htmlcss-2-html-list-tags.jpg)
Unit-I HTML COMMON TAGS - SRECWarangal
164
Web Technologies Unit-I CSE - 1 - Unit-I HTML COMMON TAGS What is an HTML File? HTML stands for Hyper Text Markup Language An HTML file is a text file containing small markup tags The markup tags tell the Web browser how to display the page An HTML file must have an htm or html file extension An HTML file can be created using a simple text editor Type in the following text in “NOTEPAD”: <html> <head> <title>Title of page</title> </head> <body> Hello World! This is my first homepage. <b>This text is bold</b> </body> </html> Save the file as "mypage.html". Start your Internet browser. Select "Open" (or "Open Page") in the File menu of your browser. A dialog box will appear. Select "Browse" (or "Choose File") and locate the HTML file you just created - "mypage.html" - select it and click "Open". Now you should see an address in the dialog box, for example "C:\MyDocuments\webdesign\mypage.html". Click OK, and the browser will display the page. Example Explained The first tag in your HTML document is <html>. This tag tells your browser that this is the start of an HTML document. The last tag in your document is </html>. This tag tells your browser that this is the end of the HTML document. The text between the <head> tag and the </head> tag is header information. Header information is not displayed in the browser window. The text between the <title> tags is the title of your document. The title is displayed in your browser's caption. The text between the <body> tags is the text that will be displayed in your browser. The text between the <b> and </b> tags will be displayed in a bold font.
Transcript of Unit-I HTML COMMON TAGS - SRECWarangal

Web Technologies Unit-I
CSE - 1 -
Unit-I
HTML COMMON TAGS
What is an HTML File?
HTML stands for Hyper Text Markup Language
An HTML file is a text file containing small markup tags
The markup tags tell the Web browser how to display the page
An HTML file must have an htm or html file extension
An HTML file can be created using a simple text editor
Type in the following text in “NOTEPAD”:
<html>
<head>
<title>Title of page</title>
</head>
<body>
Hello World! This is my first homepage. <b>This text is bold</b>
</body>
</html>
Save the file as "mypage.html".
Start your Internet browser. Select "Open" (or "Open Page") in the File menu of your
browser. A dialog box will appear. Select "Browse" (or "Choose File") and locate the HTML file
you just created - "mypage.html" - select it and click "Open". Now you should see an address in
the dialog box, for example "C:\MyDocuments\webdesign\mypage.html". Click OK, and the
browser will display the page.
Example Explained
The first tag in your HTML document is <html>. This tag tells your browser that this is
the start of an HTML document. The last tag in your document is </html>. This tag tells your
browser that this is the end of the HTML document.
The text between the <head> tag and the </head> tag is header information. Header
information is not displayed in the browser window. The text between the <title> tags is the title
of your document. The title is displayed in your browser's caption. The text between the <body>
tags is the text that will be displayed in your browser. The text between the <b> and </b> tags
will be displayed in a bold font.

Web Technologies Unit-I
CSE - 2 -
HTML ELEMENTS
HTML documents are text files made up of HTML elements. HTML elements are
defined using HTML tags.
HTML Tags
HTML tags are used to mark-up HTML elements
HTML tags are surrounded by the two characters < and >
The surrounding characters are called angle brackets
HTML tags normally come in pairs like <b> and </b>
The first tag in a pair is the start tag, the second tag is the end tag
The text between the start and end tags is the element content
HTML tags are not case sensitive, <b> means the same as <B>
<b>This text is bold</b>
The purpose of the <b> tag is to define an HTML element that should be displayed as bold.
Tag Attributes
Tags can have attributes. Attributes can provide additional information about the HTML
elements on your page.
This tag defines the body element of your HTML page: <body>. With an added bgcolor
attribute, you can tell the browser that the background color of your page should be red, like this:
<body bgcolor="red">
This tag defines an HTML table: <table>. With an added border attribute, you can tell the
browser that the table should have no borders: <table border="0">. Attributes always come in
name/value pairs like this: name="value". Attributes are always added to the start tag of an
HTML element.
1. HEADINGS
Headings are defined with the <h1> to <h6> tags. <h1> defines the largest heading. <h6>
defines the smallest heading.
<h1>This is a heading</h1>
<h2>This is a heading</h2>
<h3>This is a heading</h3>
<h4>This is a heading</h4>
<h5>This is a heading</h5>
<h6>This is a heading</h6>

Web Technologies Unit-I
CSE - 3 -
HTML automatically adds an extra blank line before and after a heading.
2. PARAGRAPHS
Paragraphs are defined with the <p> tag.
<p>This is a paragraph</p>
<p>This is another paragraph</p>
HTML automatically adds an extra blank line before and after a paragraph.
3. LINE BREAKS
The <br> tag is used when you want to end a line, but don't want to start a new paragraph. The
<br> tag forces a line break wherever you place it.
<p>This <br> is a para<br>graph with line breaks</p>
The <br> tag is an empty tag. It has no closing tag.
4. Comments in HTML
The comment tag is used to insert a comment in the HTML source code. A comment will be
ignored by the browser. You can use comments to explain your code, which can help you when
you edit the source code at a later date.
<!-- This is a comment -->
Note that you need an exclamation point after the opening bracket, but not before the closing
bracket.
HTML TEXT FORMATTING
HTML defines a lot of elements for formatting output, like bold or italic text. How to View
HTML Source? To find out, click the VIEW option in your browser's toolbar and select
SOURCE or PAGE SOURCE. This will open a window that shows you the HTML code of the
page.
1. Text Formatting Tags
Tag Description
<i> Defines italic text. Recommend using <em>
<b> Defines bold text. Recommend using <strong>
<em> Defines emphasized text. Renders as italic text.
<strong> Defines strong text. Renders as bold text.
Web Technologies Unit-I
CSE - 4 -
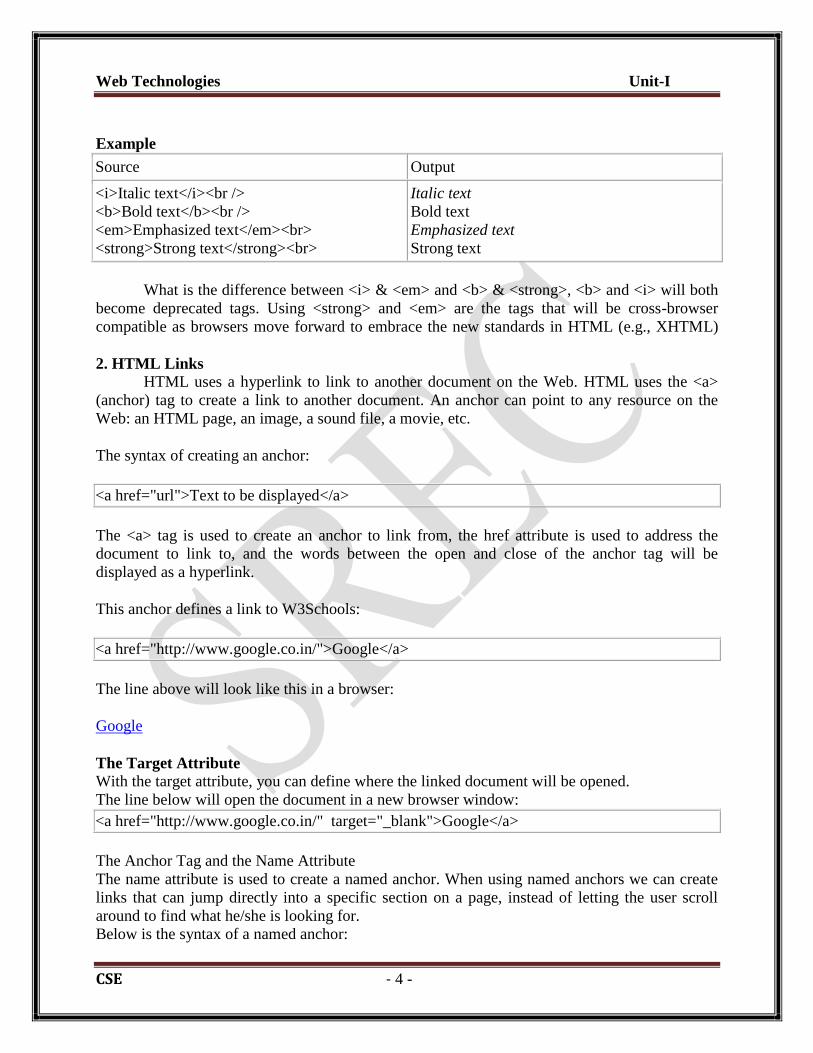
Example
Source Output
<i>Italic text</i><br />
<b>Bold text</b><br />
<em>Emphasized text</em><br>
<strong>Strong text</strong><br>
Italic text
Bold text
Emphasized text
Strong text
What is the difference between <i> & <em> and <b> & <strong>, <b> and <i> will both
become deprecated tags. Using <strong> and <em> are the tags that will be cross-browser
compatible as browsers move forward to embrace the new standards in HTML (e.g., XHTML)
2. HTML Links HTML uses a hyperlink to link to another document on the Web. HTML uses the <a>
(anchor) tag to create a link to another document. An anchor can point to any resource on the
Web: an HTML page, an image, a sound file, a movie, etc.
The syntax of creating an anchor:
<a href="url">Text to be displayed</a>
The <a> tag is used to create an anchor to link from, the href attribute is used to address the
document to link to, and the words between the open and close of the anchor tag will be
displayed as a hyperlink.
This anchor defines a link to W3Schools:
<a href="http://www.google.co.in/">Google</a>
The line above will look like this in a browser:
The Target Attribute
With the target attribute, you can define where the linked document will be opened.
The line below will open the document in a new browser window:
<a href="http://www.google.co.in/" target="_blank">Google</a>
The Anchor Tag and the Name Attribute
The name attribute is used to create a named anchor. When using named anchors we can create
links that can jump directly into a specific section on a page, instead of letting the user scroll
around to find what he/she is looking for.
Below is the syntax of a named anchor:

Web Technologies Unit-I
CSE - 5 -
<a name="label">Text to be displayed</a>
The name attribute is used to create a named anchor. The name of the anchor can be any text you
care to use.
The line below defines a named anchor:
<a name="tips">Useful Tips Section</a>
You should notice that a named anchor is not displayed in a special way. To link directly to the
"tips" section, add a # sign and the name of the anchor to the end of a URL, like this:
<a href="http://www.amyschan.com/mypage.html#tips">
Jump to the Useful Tips Section</a>
HTML LISTS
HTML supports ordered, unordered and definition lists.
1. Unordered Lists
An unordered list is a list of items. The list items are marked with bullets (typically small
black circles).
An unordered list starts with the <ul> tag. Each list item starts with the <li> tag.
<ul>
<li>Coffee</li>
<li>Milk</li>
</ul>
Here is how it looks in a browser:
Coffee
Milk
Inside a list item you can put paragraphs, line breaks, images, links, other lists, etc.
2. Ordered Lists
An ordered list is also a list of items. The list items are marked with numbers.
An ordered list starts with the <ol> tag. Each list item starts with the <li> tag.
<ol>
<li>Coffee</li>
<li>Milk</li>
</ol>
Here is how it looks in a browser:
1. Coffee
2. Milk
Inside a list item you can put paragraphs, line breaks, images, links, other lists, etc.

Web Technologies Unit-I
CSE - 6 -
HTML TABLE
Tables are defined with the <table> tag.
A table is divided into rows (with the <tr> tag), and each row is divided into data cells (with the
<td> tag). td stands for "table data," and holds the content of a data cell. A <td> tag can contain
text, links, images, lists, forms, other tables, etc.
Table Example
<table border="1">
<tr>
<td>row 1, cell 1</td>
<td>row 1, cell 2</td>
</tr>
<tr>
<td>row 2, cell 1</td>
<td>row 2, cell 2</td>
</tr>
</table>
How the HTML code above looks in a browser:
row 1, cell 1 row 1, cell 2
row 2, cell 1 row 2, cell 2
HTML Tables and the Border Attribute
If you do not specify a border attribute, the table will be displayed without borders. Sometimes
this can be useful, but most of the time, we want the borders to show.
To display a table with borders, specify the border attribute:
<table border="1">
<tr>
<td>Row 1, cell 1</td>
<td>Row 1, cell 2</td>
</tr>
</table>
Web Technologies Unit-I
CSE - 7 -
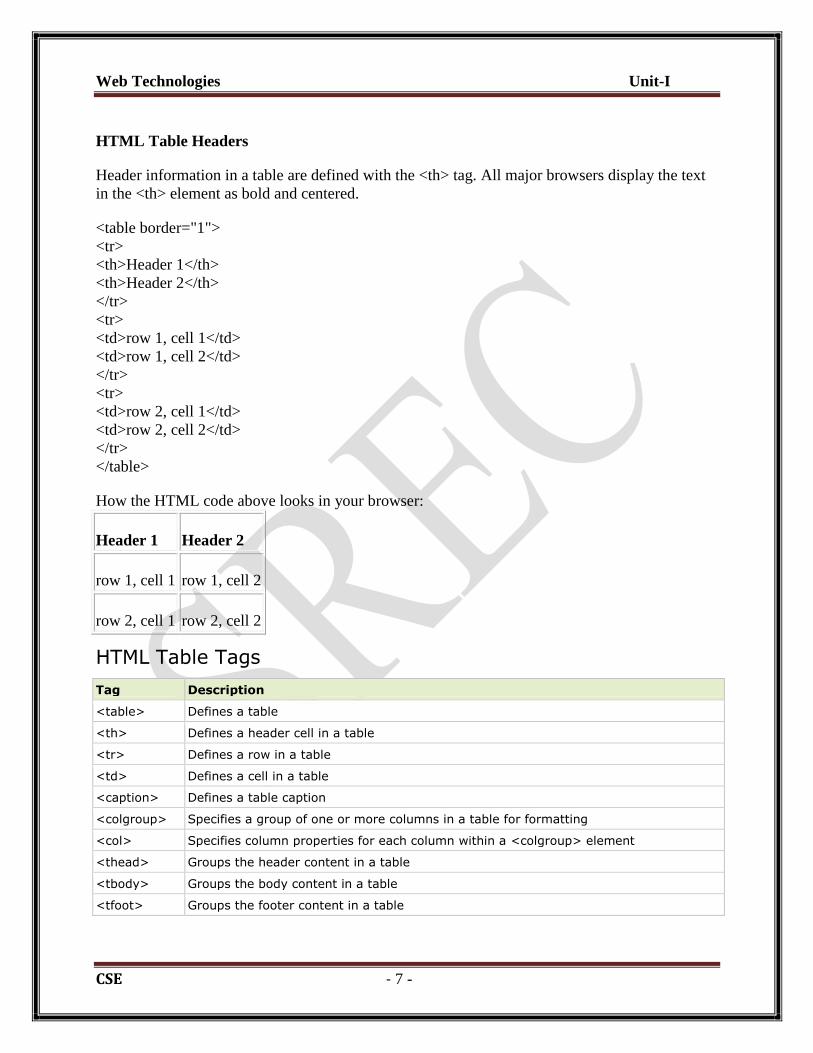
HTML Table Headers
Header information in a table are defined with the <th> tag. All major browsers display the text
in the <th> element as bold and centered.
<table border="1">
<tr>
<th>Header 1</th>
<th>Header 2</th>
</tr>
<tr>
<td>row 1, cell 1</td>
<td>row 1, cell 2</td>
</tr>
<tr>
<td>row 2, cell 1</td>
<td>row 2, cell 2</td>
</tr>
</table>
How the HTML code above looks in your browser:
Header 1 Header 2
row 1, cell 1 row 1, cell 2
row 2, cell 1 row 2, cell 2
HTML Table Tags
Tag Description
<table> Defines a table
<th> Defines a header cell in a table
<tr> Defines a row in a table
<td> Defines a cell in a table
<caption> Defines a table caption
<colgroup> Specifies a group of one or more columns in a table for formatting
<col> Specifies column properties for each column within a <colgroup> element
<thead> Groups the header content in a table
<tbody> Groups the body content in a table
<tfoot> Groups the footer content in a table

Web Technologies Unit-I
CSE - 8 -
HTML <table> Tag
Definition and Usage
The <table> tag defines an HTML table. An HTML table consists of the <table> element and
one or more <tr>, <th>, and <td> elements. The <tr> element defines a table row, the <th>
element defines a table header, and the <td> element defines a table cell. A more complex
HTML table may also include <caption>, <col>, <colgroup>, <thead>, <tfoot>, and <tbody>
elements.
Attributes
Attribute Value Description
align left center
right
Not supported in HTML5. Deprecated in HTML 4.01.Specifies the alignment of a table according to
surrounding text
bgcolor rgb(x,x,x) #xxxxxx
colorname
Not supported in HTML5. Deprecated in HTML 4.01.Specifies the background color for a table
border “1” Specifies whether the table cells should have borders or
not
Cellpadding pixels Not supported in HTML5. Specifies the space between the cell wall and the cell content
Cellspacing pixels Not supported in HTML5. Specifies the space between cells
frame void
above below hsides
lhs rhs vsides
box border
Not supported in HTML5. Specifies which parts of the
outside borders that should be visible
rules none groups rows cols all
Not supported in HTML5. Specifies which parts of the inside borders that should be visible
summary text Not supported in HTML5. Specifies a summary of the content of a table
width pixels
%
Not supported in HTML5. Specifies the width of a table
Example
<table border="1">
<tr>
<th>Month</th>
<th>Savings</th>
</tr>
<tr>

Web Technologies Unit-I
CSE - 9 -
<td>January</td>
<td>$100</td>
</tr>
</table>
HTML IMAGES
With HTML you can display images in a document.
The Image Tag and the src Attribute
In HTML, images are defined with the <img> tag. To display an image on a page, you
need to use the src attribute. Src stands for "source". The value of the src attribute is the URL of
the image you want to display on your page.
The syntax of defining an image: <img src="url">
The URL points to the location where the image is stored. An image named "boat.gif"
located in the directory "images" on "www.w3schools.com" has the URL:
http://www.w3schools.com/images/boat.gif. The browser puts the image where the image tag
occurs in the document. If you put an image tag between two paragraphs, the browser shows the
first paragraph, then the image, and then the second paragraph.
The Alt Attribute
The alt attribute is used to define an "alternate text" for an image. The value of the alt attribute is
an author-defined text:
<img src="images/logo.jpg” alt="Google logo">
The "alt" attribute tells the reader what he or she is missing on a page if the browser can't load
images. The browser will then display the alternate text instead of the image. It is a good practice
to include the "alt" attribute for each image on a page, to improve the display and usefulness of
your document for people who have text-only browsers.
HTML BACKGROUNDS
A good background can make a Web site look really great.
Backgrounds
The <body> tag has two attributes where you can specify backgrounds. The background can be a
color or an image.
1. Bgcolor
The bgcolor attribute specifies a background-color for an HTML page. The value of this attribute
can be a hexadecimal number, an RGB value, or a color name:
<body bgcolor="#000000">
<body bgcolor="rgb(0,0,0)">
<body bgcolor="black">

Web Technologies Unit-I
CSE - 10 -
The lines above all set the background-color to black.
2. Background
The background attribute specifies a background-image for an HTML page. The value of this
attribute is the URL of the image you want to use. If the image is smaller than the browser
window, the image will repeat itself until it fills the entire browser window.
<body background="images/cloudswirl.jpg">
<body background="http://www.amyschan.com/images/cloudswirl.jpg">
FORMS Forms can be used to collect information. Sophisticated forms may be linked to a
database to store the information, but this is beyond the scope of the article. This article will
show you how to create a form that emails you the information.
Here is a very basic email form:
<form action="mailto:[email protected]" method="post">
Name:<br>
<input type="text" name="name" size="20"><br>
Email:<br>
<input type="text" name="email" size="20"><br>
Comment:<br>
<textarea cols="20" rows="5"></textarea><br>
<input type="submit" value="Submit"> <input type="reset" value="Reset">
</form>
And here's what it looks like:
Name:
Email:
Comment:
Submit Reset
Notice that the "input" tag was used for the text fields as well as the buttons! The "input" tag is
the tag you will use most often in forms. Here are different forms of the input tag:
type="text"
type="password" (asterisks when you type)
type="checkbox"
type="radio"
type="submit" Submit Query
(You can change the text on the button.)

Web Technologies Unit-I
CSE - 11 -
type="reset" Reset
(You can change the text on the button.)
type="hidden" (You can't see this because it's hidden! This allows you to send additional
variables that your user can't see.)
type="button" (You can change the text on the button.
Below you will find a table of the various form elements and how you can use them.
FORM – attributes
action
="[url]"
This attribute usually has a link to a web page that contains code which
processes the form. In our example above, we use "mailto" to tell the form to
send the information as an email.
method
="get"
="post"
This attribute specifies how the information is sent. With the "get" method, all
the information is sent in one long URL string. With the "post" method, all the
information is sent but is "invisible" to the user.
name
="[name of
form]"
When creating complex forms and using scripting, you may need to specify the
name of the form. The name should be unique - that is, you shouldn't have other
forms on the page with the same form name.
INPUT – attributes
type
="text"
="password"
="checkbox"
="radio"
="submit"
="reset"
="hidden"
="button"
The "type" attribute allows you to specify what type of form element you want
to use. As you can see, the "input" element can have many different forms - see
above for examples.
checked This attribute does not have any values. When you put this attribute into the tag
for "radio" or "checkbox," they will be selected.
src
="[url]"
Use this attribute when you have an "image" to specify the location of the image.
TEXTAREA - attributes
This form element is the multi-line text box that you often seen for "comments." The opening
and closing tag surround the text that will be initially displayed.
name
="[referring
name]"
This attribute must be set to a unique name so you know how to refer to the form
element.
rows
="[number]"
This attribute allows you to set the number of rows for the text area.
cols
="[number]"
This attribute allows you to set the number of columns for the text area.

Web Technologies Unit-I
CSE - 12 -
SELECT - attributes The SELECT tag allows you to create "select boxes" or "drop down menus." It is the "outer"
element, used with the OPTION tag. (See the example link below)
name
="[referring
name]"
This attribute must be set to a unique name so you know how to refer to the form
element.
size
="[number]"
This attribute allows you to set how many rows are visible.
multiple This attribute does not have any "values." When you set this attribute, it allows
the user to select more than one option.
OPTION - attributes The OPTION tag is used with the SELECT tag to define the different options in the select
box or dropdown menu. The opening and closing tag surround the text that will be displayed.
value
="[value]"
This attribute must be set to a unique name so you know how to refer to the form
element. It will probably be an abbreviated version of the text that is displayed.
selected This attribute does not have any "values." When you set this attribute, it marks
this option as being "preselected."
Putting it all together...
Here's a sample page using this code below:
<form>
Enter your Name: <input type="text" width="20" size="20">
<p>Favorite Color:<br>
<input type="checkbox" checked value="red" name="colors"> Red<br>
<input type="checkbox" value="blue" name="colors"> Blue</p>
<p>Gender:<br>
<input type="radio" checked value="male" name="gender">Male<br>
<input type="radio" value="female" name="gender">Female</p>
<p>Address:<br>
<textarea rows="5" cols="20">Please enter your permanent address
here.</textarea></p>
Country:<br>
<select name="country">
<option value="usa" selected>USA</option>
<option value="uk">United Kingdom</option>
<option value="canada">Canada</option>
</select>
</form>

Web Technologies Unit-I
CSE - 13 -
CSS
Introduction to CSS:
CSS stands for Cascading Style Sheets. CSS describes how HTML elements are to be
displayed on screen, paper, or in other media. CSS saves a lot of work. It can control the layout
of multiple web pages all at once. External style sheets are stored in “.css” files. CSS is used to
define styles for your web pages, including the design, layout and variations in display for
different devices and screen sizes.
Types of CSS:
There are three types of CSS available. They are:
1) Inline CSS
2) Internal CSS
3) External CSS
1. Inline CSS:
If the styles are mentioned along with the tag then this type of CSS is known as inline CSS.
Example:
<p style=”text-align: justify; background-color: red”>Hi this is the Inline CSS. </p>
2. Internal CSS:
For internal CSS, we write all the desired “styles” for the “selectors” along with the
properties and values in the “head” section. And in the body section then newly defied
selector tags are used with the actual contents.
Example:
3. External CSS:
Sometimes we need to apply particular style to more than one web page; in such cases
external CSS can be used. The main idea in this type of CSS is that the desired styles can be
written in one “.css” file. And this file can be called in our web pages to apply the styles.
<html>
<head>
<style type= “text/css”>
p
{
text-align: justify;
background-color: red;
}
</style>
</head>
<body>
<p>This is Internal CSS.</p>
</body>
</html>

Web Technologies Unit-I
CSE - 14 -
Example:
CSS Selectors:
CSS selectors are used to "find" (or select) HTML elements based on their element name,
id, class, attribute, and more.
The element Selector:
The element selector selects elements based on the element name. You can select all <p>
elements on a page like this (in this case, all <p> elements will be center-aligned, with a red text
color):
Example:
p {
text-align: center;
color: red;
}
The id Selector:
The id selector uses the id attribute of an HTML element to select a specific element. The id of
an element should be unique within a page, so the id selector is used to select one unique
element! To select an element with a specific id, write a hash (#) character, followed by the id of
the element. The style rule below will be applied to the HTML element with id="para1":
Example:
#para1 {
text-align: center;
color: red;
}
<html>
<head>
<link rel = “stylesheet” type = “text/css” href = “external.css”> </head>
<body>
<p>This is Internal CSS.</p>
</body>
</html>
external.css:
p
{
text-align: justify;
background-color: red;
}

Web Technologies Unit-I
CSE - 15 -
The class Selector:
The class selector selects elements with a specific class attribute. To select elements with a
specific class, write a period (.) character, followed by the name of the class. In the example
below, all HTML elements with class="center" will be red and center-aligned:
Example:
.center {
text-align: center;
color: red;
}
You can also specify that only specific HTML elements should be affected by a class. In the
example below, only <p> elements with class="center" will be center-aligned:
Example:
p.center {
text-align: center;
color: red;
}
HTML elements can also refer to more than one class. In the example below, the <p> element
will be styled according to class="center" and to class="large":
Example:
<p class="center large">This paragraph refers to two classes.</p>
Controlling Page Layout:
By default, HTML <div> sections will fill 100% of the web page width, and stack up one on top
of the other. It is highly unlikely that this is how we want our page elements to be arranged;
chances are we want some sections arranged side by side, and using various widths. For example
we might want to have a main content area with a menu down the left-hand side. Thankfully CSS
makes this a simple task. The first step is to understand the float property.
The CSS float Property:
The float property tells HTML elements how to arrange themselves in relation to the other divs
around them. We can specify one of two values for the float property - left or right. If we tell a
<div> to float to the left, then it will shift itself as far left on the line as it can go before bumping
into another <div> section. If we tell an element to float to the right it will shift as far right as it
can? Let's take a look at a working example; this will give us a good visualization of how
floating works. We'll begin by defining three areas for our web page: <div id="header">This is the page header</div>
<div id="menu">Menu links goes in here</div>
<div id="content">And finally the page content in here</div>
Now, what we want to do is to have the header take up the whole of the top row, with the menu
and content underneath, arranged side by side. To do this we would use the following CSS (the
header section doesn't require any CSS):
#menu {
float: left;
}

Web Technologies Unit-I
CSE - 16 -
#content {
float: left;
}
Using CSS to set HTML element widths:
One problem with arranging our HTML in this way is that the <div> sections will size
themselves automatically to fit the text contained within them. This means that for a standard
menu bar, where we have lots of text that we want to contain in a narrow area, we will end up
with a very wide bar which will either squeeze the content section into a small space, or ever
push it onto another line. We can fix this by specifying widths for our sections:
Example:
#menu {
float: left;
width: 10em;
}
Widths can be specified in pixels, ems or as a percentage of the total page width.
The CSS clear property
We have seen how we can position HTML elements next to each other using CSS, but
sometimes we might want an element to appear beneath other elements. We can easily force an
element to sit below another using the clear property. When using clear, we can tell an element
to either clear those elements which are floated left, those which are floated right, or both:
Example: #divname {
clear: left / right / both;
}
Changing Background:
The CSS background properties are used to define the background effects for elements.
CSS background properties:
background-color
background-image
background-repeat
background-attachment
background-position
Background Color
The background-color property specifies the background color of an element. The
background color of a page is set like this:
Example
body {
background-color: lightblue;
}
With CSS, a color is most often specified by:
A valid color name - like "red"
A HEX value - like "#ff0000"
An RGB value - like "rgb(255,0,0)"

Web Technologies Unit-I
CSE - 17 -
Background Image:
The background-image property specifies an image to use as the background of an
element. By default, the image is repeated so it covers the entire element. The background image
for a page can be set like this:
Example:
body {
background-image: url("paper.gif");
}
Background Image - Repeat Horizontally or Vertically:
By default, the background-image property repeats an image both horizontally and
vertically. Some images should be repeated only horizontally or vertically, or they will look
strange, like this:
Example:
body {
background-image: url("gradient_bg.png");
}
If the image above is repeated only horizontally (background-repeat: repeat-x;), the
background will look better:
body {
background-image: url("gradient_bg.png");
background-repeat: repeat-x;
}
Tip: To repeat an image vertically, set background-repeat: repeat-y;
Background Image - Set position and no-repeat:
Showing the background image only once is also specified by the background-repeat
property:
Example:
body {
background-image: url("img_tree.png");
background-repeat: no-repeat;
}
In the example above, the background image is shown in the same place as the text. We
want to change the position of the image, so that it does not disturb the text too much. The
position of the image is specified by the background-position property:
Example:
body {
background-image: url("img_tree.png");
background-repeat: no-repeat;
background-position: right top;
}
Web Technologies Unit-I
CSE - 18 -
Background Image - Fixed position
To specify that the background image should be fixed (will not scroll with the rest of the
page), use the background-attachment property:
Example:
body {
background-image: url("img_tree.png");
background-repeat: no-repeat;
background-position: right top;
background-attachment: fixed;
}
Controlling borders of the HTML elements using CSS:
The CSS border properties allow you to specify the style, width, and color of an element's
border. The border-style property specifies what kind of border to display.
The following values are allowed:
dotted - Defines a dotted border
dashed - Defines a dashed border
solid - Defines a solid border
double - Defines a double border
groove - Defines a 3D grooved border. The effect depends on the border-color value
ridge - Defines a 3D ridged border. The effect depends on the border-color value
inset - Defines a 3D inset border. The effect depends on the border-color value
outset - Defines a 3D outset border. The effect depends on the border-color value
none - Defines no border
hidden - Defines a hidden border
The border-style property can have from one to four values (for the top border, right border,
bottom border, and the left border).
Example:
p.dotted {border-style: dotted;}
p.dashed {border-style: dashed;}
p.solid {border-style: solid;}
p.double {border-style: double;}
p.groove {border-style: groove;}
p.ridge {border-style: ridge;}
p.inset {border-style: inset;}
p.outset {border-style: outset;}
p.none {border-style: none;}
p.hidden {border-style: hidden;}
p.mix {border-style: dotted dashed solid double;}
The border-width property specifies the width of the four borders. The width can be set as a
specific size (in px, pt, cm, em, etc) or by using one of the three pre-defined values: thin,
medium, or thick. The border-width property can have from one to four values (for the top
border, right border, bottom border, and the left border).

Web Technologies Unit-I
CSE - 19 -
Example
p.one {
border-style: solid;
border-width: 5px;
}
p.two {
border-style: solid;
border-width: medium;
}
p.three {
border-style: solid;
border-width: 2px 10px 4px 20px;
}
The border-color property is used to set the color of the four borders. The color can be set by:
name - specify a color name, like "red"
Hex - specify a hex value, like "#ff0000"
RGB - specify a RGB value, like "rgb(255,0,0)"
transparent
The border-color property can have from one to four values (for the top border, right border,
bottom border, and the left border). If border-color is not set, it inherits the color of the
element.
Example
p.one {
border-style: solid;
border-color: red;
}
p.two {
border-style: solid;
border-color: green;
}
p.three {
border-style: solid;
border-color: red green blue yellow;
}

Web Technologies Unit-I
CSE - 20 -
XML WHAT IS XML?
XML stands for extensible markup language. XML is a markup language much like
HTML. XML was designed to carry data, not to display data. XML tags are not predefined. You
must define your own tags. XML is designed to be self-descriptive. XML is a w3c
recommendation.
THE DIFFERENCE BETWEEN XML AND HTML:
XML is not a replacement for HTML. XML and HTML were designed with different
goals. XML was designed to transport and store data, with focus on what data is. HTML was
designed to display data, with focus on how data looks. HTML is about displaying information,
while XML is about carrying information.
XML does not do anything: May be it is a little hard to understand, but XML does not do
anything. XML was created to structure, store, and transport information. The following example
is a note to chythu, from ravi, stored as XML:
<note>
<to> chythu </to>
<from> ravi </from>
<heading>reminder</heading>
<body>don't forget me this weekend!</body>
</note>
The note above is quite self-descriptive. It has sender and receiver information, it also has
a heading and a message body. But still, this XML document does not do anything. It is just
information wrapped in tags. Someone must write a piece of software to send, receive or display
it.
With XML you invent your own tags: The tags in the example above (like <to> and <from>)
are not defined in any XML standard. These tags are "invented" by the author of the XML
document. That is because the XML language has no predefined tags. The tags used in HTML
are predefined. HTML documents can only use tags defined in the HTML standard (like <p>,
<h1>, etc.). XML allows the author to define his/her own tags and his/her own document
structure. XML is not a replacement for HTML; XML is a complement to HTML. It is important
to understand that XML is not a replacement for HTML. In most web applications, XML is used
to transport data, while HTML is used to format and display the data.
My best description of XML is this: XML is a software- and hardware-independent tool for
carrying information. XML is a W3C recommendation. XML became a W3C recommendation
February 10, 1998. XML is everywhere. XML is now as important for the web as HTML was to
the foundation of the web. XML is the most common tool for data transmissions between all
sorts of applications.
XML separates data from HTML: If you need to display dynamic data in your HTML
document, it will take a lot of work to edit the HTML each time the data changes. With XML,
data can be stored in separate XML files. This way you can concentrate on using HTML for
layout and display, and be sure that changes in the underlying data will not require any changes
to the HTML. With a few lines of JavaScript code, you can read an external XML file and update
the data content of your web page.
Unique Features of XML: a) Sharing of data: In the real world, computer systems and databases contain data in
incompatible formats. XML data is stored in plain text format. This provides a software-

Web Technologies Unit-I
CSE - 21 -
and hardware-independent way of storing data. This makes it much easier to create data
that can be shared by different applications.
b) Transporting data: One of the most time-consuming challenges for developers is to
exchange data between incompatible systems over the internet. Exchanging data as XML
greatly reduces this complexity, since the data can be read by different incompatible
applications.
c) Change of platform: Upgrading to new systems (hardware or software platforms), is
always time consuming. Large amounts of data must be converted and incompatible data
is often lost. XML data is stored in text format. This makes it easier to expand or upgrade
to new operating systems, new applications, or new browsers, without losing data.
d) Availability of data: Different applications can access your data, not only in HTML
pages, but also from XML data sources. With XML, your data can be available to all
kinds of "reading machines" (handheld computers, voice machines, news feeds, etc), and
make it more available for blind people, or people with other disabilities.
Structure of XML: XML documents form a tree structure that starts at "the root" and branches to "the
leaves". An example of XML document is shown below. XML documents use a self-describing
and simple syntax:
<?XML version="1.0" encoding="iso-8859-1"?>
<note>
<to> Chythu </to>
<from> Ravi </from>
<heading>Reminder</heading>
<body>Don't forget me this weekend!</body>
</note>
The first line is the XML declaration. It defines the XML version (1.0) and the encoding used
(ISO-8859-1 = latin-1/west European character set). The next line describes the root element of
the document (like saying: "This document is a note"):
<note>
The next 4 lines describe 4 child elements of the root (to, from, heading, and body):
<to>Tove</to>
<from>Jani</from>
<heading>Reminder</heading>
<body>Don't forget me this weekend!</body>
And finally the last line defines the end of the root element:
</note>
You can assume, from this example, that the XML document contains a note to Tove from Jani.
Don't you agree that XML is pretty self-descriptive? XML documents form a tree structure XML
documents must contain a root element. This element is "the parent" of all other elements. The
elements in an XML document form a document tree. The tree starts at the root and branches to
the lowest level of the tree. All elements can have sub elements (child elements):
<root>
<child>
<subchild>.....</subchild>
</child>
Web Technologies Unit-I
CSE - 22 -
</root>
The terms parent, child, and sibling are used to describe the relationships between elements.
Parent elements have children. Children on the same level are called siblings (brothers or sisters).
All elements can have text content and attributes (just like in html).
Example:
<bookstore>
<book category="cooking">
<title lang="en">Everyday Italian</title>
<author>giada de laurentiis</author>
<year>2005</year>
<price>30.00</price>
</book>
<book category="children">
<title lang="en">harry potter</title>
<author>j k. rowling</author>
<year>2005</year>
<price>29.99</price>
</book>
<book category="web">
<title lang="en">learning XML</title>
<author>erik t. ray</author>
<year>2003</year>
<price>39.95</price>
</book>
</bookstore>
The root element in the example is <bookstore>. All <book> elements in the document
are contained within <bookstore>. The <book> element has 4 children: <title>, <author>,
<year>, and <price>.
XML syntax rules:
The syntax rules of XML are very simple and logical. The rules are easy to learn, and easy to
use. All XML elements must have a closing tag. In HTML, Elements do not have to have a
closing tag:
<p>this is a paragraph
<p>this is another paragraph
In XML, it is illegal to omit the closing tag. All elements must have a closing tag:
<p>this is a paragraph</p>
<p>this is another paragraph</p>
Note: You might have noticed from the previous example that the XML declaration did not have
a closing tag. This is not an error. The declaration is not a part of the XML document itself, and
it has no closing tag.
XML tags are case sensitive: The tag <letter> is different from the tag <LETTER>. Opening
and closing tags must be written with the same case:
<Message>This is incorrect</MESSAGE>
<Message>This is correct</Message>
Note: "Opening and closing tags" are often referred to as "start and end tags". Use whatever you
prefer. It is exactly the same thing.

Web Technologies Unit-I
CSE - 23 -
XML elements must be properly nested: In html, you might see improperly nested elements:
<b><i>this text is bold and italic</b></i> <!--This is wrong-->
In XML, all elements must be properly nested within each other:
<b><i>this text is bold and italic</i></b>
In the example above, "properly nested" simply means that since the <i> element is opened
inside the <b> element, it must be closed inside the <b> element.
XML documents must have a root element: XML documents must contain one element that is
the parent of all other elements. This element is called the root element.
<root>
<child>
<subchild>.....</subchild>
</child>
</root>
XML attribute values must be quoted: XML elements can have attributes in name/value pairs
just like in html. In XML, the attribute values must always be quoted. Study the two XML
documents below. The first one is incorrect, the second is correct:
<note date=12/11/2007>
<to>tove</to>
<from>jani</from>
</note>
<note date="12/11/2007">
<to>tove</to>
<from>jani</from>
</note>
The error in the first document is that the date attribute in the note element is not quoted.
Entity References: Some characters have a special meaning in XML. If you place a character
like "<" inside an XML element, it will generate an error because the parser interprets it as the
start of a new element. This will generate an XML error:
<message>if salary < 1000 then</message>
To avoid this error, replace the "<" character with an entity reference:
<message>if salary < 1000 then</message>
There are 5 predefined entity references in XML:
< < less than
> > greater than
& & ampersand
' ' apostrophe
" " quotation mark
Note: only the characters "<" and "&" are strictly illegal in XML. the greater than character is
legal, but it is a good habit to replace it.
Comments in XML: The syntax for writing comments in XML is similar to that of html.
<!-- this is a comment -->
white-space is preserved in XML
HTML truncates multiple white-space characters to one single white-space:
HTML: hello tove
Output: hello tove
With XML, the white-space in a document is not truncated.

Web Technologies Unit-I
CSE - 24 -
XML stores new line as lf in windows applications, a new line is normally stored as a pair of
characters: carriage return (cr) and line feed (lf). In UNIX applications, a new line is normally
stored as an lf character. Macintosh applications also use an lf to store a new line. XML stores a
new line as lf.
Basic Building Blocks of XML Documents: All XML documents are made up the following four building blocks:
i. Elements/Tags
ii. Attributes
iii. Entities
iv. Character Data
a. Parsed Character Data (PCDATA)
b. Unparsed Character Data (CDATA)
i) XML Elements/Tags:
An XML element is everything from (including) the element's start tag to (including) the
element's end tag. An element can contain: other elements text, attributes or a mix of all of the
above.
<bookstore>
<book category="children">
<title>harry potter</title>
<author>j k. rowling</author>
<year>2005</year>
<price>29.99</price>
</book>
<book category="web">
<title>learning XML</title>
<author>erik t. ray</author>
<year>2003</year>
<price>39.95</price>
</book>
</bookstore>
In the example above, <bookstore> and <book> have element contents, because they
contain other elements. <book> also has an attribute (category="children"). <title>, <author>,
<year>, and <price> have text content because they contain text.
XML Naming Rules:
XML elements must follow these naming rules:
Names can contain letters, numbers, and other characters
Names cannot start with a number or punctuation character
Names cannot start with the letters XML (or XML, or XML, etc)
Names cannot contain spaces
Any name can be used, no words are reserved.
Best Naming Practices:

Web Technologies Unit-I
CSE - 25 -
Make names descriptive. Names with an underscore separator are nice: <first_name>,
<last_name>.
Names should be short and simple, like this: <book_title> not like this:
<the_title_of_the_book>.
Avoid "-" characters. If you name something "first-name," some software may think you
want to subtract name from first.
Avoid "." characters. If you name something "first.name," some software may think that
"name" is a property of the object "first."
Avoid ":" characters. Colons are reserved to be used for something called namespaces
(more later).
XML documents often have a corresponding database. a good practice is to use the
naming rules of your database for the elements in the XML documents.
Non-english letters like éòá are perfectly legal in XML, but watch out for problems if
your software vendor doesn't support them.
XML Elements are Extensible:
XML elements can be extended to carry more information. look at the following XML
example:
<note>
<to>Chythu</to>
<from>Ravi</from>
<body>Don't forget me this weekend!</body>
</note>
Let‟s imagine that we created an application that extracted the <to>, <from>, and <body>
elements from the XML document to produce this output:
Message
to: Chythu
from: Ravi
Don't forget me this weekend!
Imagine that the author of the XML document added some extra information to it:
<note>
<date>2008-01-10</date>
<to>Chythu</to>
<from>Ravi</from>
<heading>reminder</heading>
<body>don't forget me this weekend!</body>
</note>
Should the application break or crash?
No, the application should still be able to find the <to>, <from>, and <body> elements in the
XML document and produce the same output. One of the beauties of XML is that it can be
extended without breaking applications.
ii) XML Attributes:
XML elements can have attributes, just like html. Attributes provide additional
information about an element. In html, attributes provide additional information about elements:

Web Technologies Unit-I
CSE - 26 -
<img src="computer.gif">
<a href="demo.asp">
Attributes often provide information that is not a part of the data. In the example below,
the file type is irrelevant to the data, but can be important to the software that wants to
manipulate the element:
<file type="gif">computer.gif</file>
XML attributes must be quoted: Attribute values must always be quoted. Either single or
double quotes can be used. For a person's sex, the person element can be written like this:
<person sex="female">
or like this:
<person sex='female'>
If the attribute value itself contains double quotes you can use single quotes, like in this example:
<gangster name='george "shotgun" ziegler'>
or you can use character entities:
<gangster name="george "shotgun" ziegler">
XML Elements v/s Attributes:
Take a look at these examples:
<person gender="male">
<firstname>Ravi</firstname>
<lastname>Chythanya</lastname>
</person>
<person>
<gender>male</gender>
<firstname>Ravi</firstname>
<lastname>Chythanya</lastname>
</person>
In the first example gender is an attribute. In the next, gender is an element. Both examples
provide the same information. There are no rules about when to use attributes or when to use
elements. Attributes are handy in html. In XML my advice is to avoid them. Use elements
instead.
My favorite way:
The following three XML documents contain exactly the same information:
1) A date attribute is used in the first example:
<note date="10/01/2008">
<to>tove</to>
<from>jani</from>
<heading>reminder</heading>
<body>don't forget me this weekend!</body>
</note>
2) A date element is used in the second example:
<note>
<date>10/01/2008</date>
<to>tove</to>
<from>jani</from>

Web Technologies Unit-I
CSE - 27 -
<heading>reminder</heading>
<body>don't forget me this weekend!</body>
</note>
3) An expanded date element is used in the third: (this is my favorite):
<note>
<date>
<day>10</day>
<month>01</month>
<year>2008</year>
</date>
<to>tove</to>
<from>jani</from>
<heading>reminder</heading>
<body>don't forget me this weekend!</body>
</note>
Avoid XML attributes?
Some of the problems with using attributes are:
Attributes cannot contain multiple values (elements can)
Attributes cannot contain tree structures (elements can)
Attributes are not easily expandable (for future changes)
Attributes are difficult to read and maintain. use elements for data. use attributes for
information that is not relevant to the data.
Don't end up like this:
<note day="10" month="01" year="2008" to="tove" from="jani" heading="reminder"
body="don't forget me this weekend!"> </note>
XML attributes for metadata:
Sometimes ID references are assigned to elements. These IDs can be used to identify
XML elements in much the same way as the id attribute in html. This example demonstrates this:
<messages>
<note id="501">
<to>tove</to>
<from>jani</from>
<heading>reminder</heading>
<body>don't forget me this weekend!</body>
</note>
<note id="502">
<to>jani</to>
<from>tove</from>
<heading>re: reminder</heading>
<body>i will not</body>
</note>
</messages>

Web Technologies Unit-I
CSE - 28 -
The ID attributes above are for identifying the different notes. It is not a part of the note
itself. What I'm trying to say here is that metadata (data about data) should be stored as
attributes, and the data itself should be stored as elements.
iii) XML Entities:
An entity is the symbolic representation of some information. It references the data that
look like an abbreviation or can be found at an external location. Entities reduce the redundant
information and also allow for easier editing. The entities can be internal or external. For
example, the entity „&‟ will replace as „&‟, where ever it is found in the XML document.
iv) PCDATA:
PCDATA stands for Parsed Character Data. The text enclosed between starting and
ending tag is known as Character Data. The parser parses the PCDATA and identifies the entities
as well as markup. Markups include the tags inside the text and entities are expanded. In the case
of Parsed Character Data, the symbols „&‟, „<‟, „>‟ are represented using entities.
v) CDATA:
CDATA stands for Character Data and it is not parsed by the parser. The tags inside the
text are not considered as markup and the entities are not expanded.
Validation of XML:
There are two levels of correctness of an XML document:
1) XML with correct syntax is Well Formed XML.
2) XML validated against a DTD is Valid XML.
A Well Formed XML document is a document that conforms to the XML syntax rules like:
XML documents must have a root element.
XML elements must have a closing tag.
XML tags are case sensitive.
XML elements must be properly nested.
XML attribute values must be quoted
Example:
<?XML version="1.0" encoding="iso-8859-1"?>
<note>
<to>tove</to>
<from>jani</from>
<heading>reminder</heading>
<body>don't forget me this weekend!</body>
</note>
A Valid XML document is a “well formed” XML document, which conforms to the rules of a
document type definition (DTD).
Document Type Definition (DTD): The purpose of a DTD is to define the structure of an XML document. It defines the
structure with a list of legal elements:
DTD Syntax:
<!DOCTYPE DOCUMENT [
<!ELEMENT ELEMENT_NAME1 (Attribute Names) Appearance of attributes>
<!ELEMENT ELEMENT_NAME2>
Web Technologies Unit-I
CSE - 29 -
<!ELEMENT ELEMENT_NAME3>
.
.
.
<!ELEMENT ELEMENT_NAMEn>
<!ATTLIST Element_name Attribute_name Attribute_type Default_value>
]>
A DTD can be declared inline inside an XML document, or as an external reference.
Internal DTD Declaration:
If the DTD is declared inside the XML file, it should be wrapped in DOCTYPE definition as in
the following example:
<!DOCTYPE note[
<!ELEMENT note (to,from,heading,body)>
<!ELEMENT to (#PCDATA)>
<!ELEMENT from (#PCDATA)>
<!ELEMENT heading (#PCDATA)>
<!ELEMENT body (#CDATA)>
]>
<note>
<to>Ravi</to>
<from>Chythanya</from>
<heading>Message</heading>
<body>Welcome to the XML with DTD</body>
</note>
The DTD above is interpreted like this:
!DOCTYPE note defines that the root element of this document is note.
!ELEMENT note defines that the note element contains four elements “to, from, heading,
body”.
!ELEMENT to defines that to element to be of the type #PCDATA.
!ELEMENT from defines that from element to be of the type #PCDATA.
!ELEMENT heading defines that heading element to be of the type #PCDATA.
!ELEMENT body defines that body element to be of the type #CDATA.
External DTD Declaration:
If the DTD is declared in an external file, it should be wrapped in a DOCTYPE definition with
the following syntax:
<!DOCTYPE DOCUMENT SYSTEM “File_Name.dtd”>
Example: emailDTD.xml:
<?xml version=”1.0”?>
<!DOCTYPE note SYSTEM “emailDTD.dtd”>
<note>
<to>Ravi</to>
<from>Chythanya</from>
<heading>Message</heading>

Web Technologies Unit-I
CSE - 30 -
<body>Welcome to the XML with DTD</body>
</note>
emailDTD.dtd:
<!ELEMENT note (to,from,heading,body)>
<!ELEMENT to (#PCDATA)>
<!ELEMENT from (#PCDATA)>
<!ELEMENT heading (#PCDATA)>
<!ELEMENT body (#CDATA)>
XML Schema: W3C supports an XML-based alternative to DTD, called XML schema:
1) The XML schema is used to represent the structure of XML document. The goal or
purpose of XML schema is to define the building blocks of an XML document. These
can be used as an alternative to XML DTD. The XML schema language is called as XML
Schema Definition (XSD) language. The XML schema became the World Wide Web
Consortium (W3C) recommendation in 2001.
2) XML schema defines elements, attributes, elements having child elements, order of child
elements. It also defines fixed and default values of elements and attributes.
3) XML schema also allows the developers to use data types.
4) File extension of XML schema is “.xsd” i.e., Filename.xsd
Ex:
StudentSchema.xsd:
<?XML version=”1.0”?>
<xs:schema XMLns:xs=“http://www.w3.org/2001/XMLschema”>
<xs:element name="student">
<xs:complextype>
<xs:sequence>
<xs:element name="name" type="xs:string"/>
<xs:element name="address" type="xs:string"/>
<xs:element name="std" type="xs:string"/>
<xs:element name="marks" type="xs:string"/>
</xs:sequence>
</xs:complextype>
</xs:element>
</xs:schema>
XML Document (myschema.XML): <?xml version="1.0" encoding="iso-8859-1" ?>
<student XMLns:xsi = "http://www.w3.org/2001/XMLschema-instance"
xsi:nonamespaceschemalocation = "studentschema.xsd">
<name>anand</name>
<address>knr</address>
<std>second</std>
<marks>70percent</marks>
</student>
Data Types in XML:

Web Technologies Unit-I
CSE - 31 -
Various data types are that can be used to specify the data types of an elements are:
String
Date
Time
Numeric
Boolean
1. String Data Type:
The string data type can be used to define the elements containing the characters lines, tabs,
white spaces, or special characters.
Example:
XML Schema [stringType.xsd]:
<?xml version= “1.0” ?>
<xs:schema xmlns:xs=“ http://www.w3.org/2001/XMLschema”>
<xs:element name= “StudentName” type=“xs:string”>
</xs:schema>
XML Document[stringTypeDemo.xml]:
<?xml version="1.0" encoding="iso-8859-1" ?>
<StudentName XMLns:xsi = "http://www.w3.org/2001/XMLschema-instance"
xsi:nonamespaceschemalocation = "stringType.xsd">
Ravi Chythanya
</StudentName>
2. Date Data Type:
For specifying the date we use date data type. The format of date is yyyy-mm-dd, where yyyy
denotes the Year, mm denotes the month and dd specifies the day.
Example:
XML Schema [dateType.xsd]:
<?xml version= “1.0” ?>
<xs:schema xmlns:xs=“ http://www.w3.org/2001/XMLschema”>
<xs:element name= “DOB” type=“xs:date”>
</xs:schema>
XML Document[dateTypeDemo.xml]:
<?xml version="1.0" encoding="iso-8859-1" ?>
<DOB XMLns:xsi = "http://www.w3.org/2001/XMLschema-instance"
xsi:nonamespaceschemalocation = "dateType.xsd">
1988-03-01
</DOB>
3. Time Data Type:
For specifying the time we use time data type. The format of date is hh:mm:ss, where hh denotes
the Hour, mm denote the minutes and ss specify the seconds.
Example:
XML Schema [timeType.xsd]:
<?xml version= “1.0” ?>

Web Technologies Unit-I
CSE - 32 -
<xs:schema xmlns:xs=“ http://www.w3.org/2001/XMLschema”>
<xs:element name= “MyTime” type=“xs:time”>
</xs:schema>
XML Document[timeTypeDemo.xml]:
<?xml version="1.0" encoding="iso-8859-1" ?>
<MyTime XMLns:xsi = "http://www.w3.org/2001/XMLschema-instance"
xsi:nonamespaceschemalocation = "timeType.xsd">
01:57:03
</MyTime>
4. Numeric Data Type:
If we want to use numeric value for some element then we can use the data types as either
“decimal” or “integer”.
Example:
XML Schema [decimalType.xsd]:
<?xml version= “1.0” ?>
<xs:schema xmlns:xs=“ http://www.w3.org/2001/XMLschema”>
<xs:element name= “Percentage” type=“xs:decimal”>
</xs:schema>
XML Document[decimalTypeDemo.xml]:
<?xml version="1.0" encoding="iso-8859-1" ?>
<Percentage XMLns:xsi = "http://www.w3.org/2001/XMLschema-instance"
xsi:nonamespaceschemalocation = "decimalType.xsd">
99.99
</Percentage>
XML Schema [integerType.xsd]:
<?xml version= “1.0” ?>
<xs:schema xmlns:xs=“ http://www.w3.org/2001/XMLschema”>
<xs:element name= “Age” type=“xs:integer”>
</xs:schema>
XML Document[integerTypeDemo.xml]:
<?xml version="1.0" encoding="iso-8859-1" ?>
<Age XMLns:xsi = "http://www.w3.org/2001/XMLschema-instance"
xsi:nonamespaceschemalocation = "integerType.xsd">
30
</Age>
5. Boolean Data Type:
For specifying either true or false values we must use the Boolean data type.
Example:
XML Schema [booleanType.xsd]:
<?xml version= “1.0” ?>
<xs:schema xmlns:xs=“ http://www.w3.org/2001/XMLschema”>

Web Technologies Unit-I
CSE - 33 -
<xs:element name= “Flag” type=“xs:boolean”>
</xs:schema>
XML Document[booleanTypeDemo.xml]:
<?xml version="1.0" encoding="iso-8859-1" ?>
<Flag XMLns:xsi = "http://www.w3.org/2001/XMLschema-instance"
xsi:nonamespaceschemalocation = "booleanType.xsd">
true
</Flag>
Simple Types:
XML defines the simple type which contains only text and does not contain any other element or
attributes. But the text appears for element comes along with some type. The syntax is:
<xs:element name= “element_name” type= “data_type”>
Here the type can be any built in data type:
xs:string
xs:date
xs:time
xs:integer
xs:decimal
xs:Boolean
Restrictions on Simple Types:
For an XML document, it is possible to put certain restrictions on its contents. These
restrictions are called as facets.
XML Schema [Month.xsd]:
<?xml version= “1.0” ?>
<xs:schema xmlns:xs=“ http://www.w3.org/2001/XMLschema”>
<xs:element name= “Month”>
<xs:simpleType>
<xs:restriction base= “xs:integer”>
<xs:minInclusive value= “1”>
<xs:maxInclusive value= “12”>
</xs:restriction>
</xs:simpleType>
</xs:element>
</xs:schema>
XML Document[MonthDemo.xml]:
<?xml version="1.0" encoding="iso-8859-1" ?>
<Age xmlns:xsi = "http://www.w3.org/2001/XMLschema-instance"
xsi:nonamespaceschemalocation = "Month.xsd">
12
</Month>
Various facets that can be applied are:
length – Specifies exact number of characters.
Web Technologies Unit-I
CSE - 34 -
minLength – Specifies the minimum number of characters allowed.
maxLength – Specifies the minimum number of characters allowed.
minInclusive – Specifies lower bound for numeric values.
minExclusive – Specifies lower bound for numeric values.
maxInclusive – Specifies upper bound for numeric values.
maxExclusive – Specifies upper bound for numeric values.
enumeration – A list of acceptable values can be defined.
pattern – specifies exact sequence of characters that are acceptable.
totalDigits – Specifies the exact number of digits.
fractionDigits – Specifies maximum number of decimal places allowed.
whiteSpace – Specifies how to handle white spaces. The white spaces can be spaces, tags,
line feed, or carriage return.
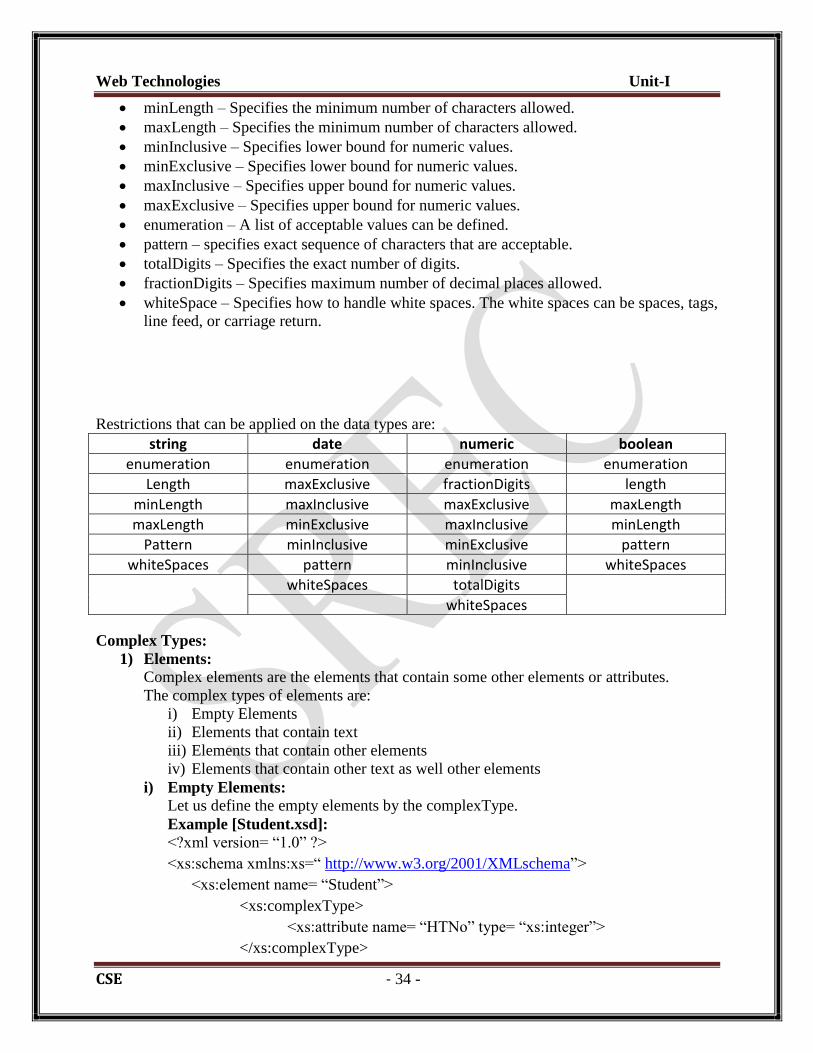
Restrictions that can be applied on the data types are:
string date numeric boolean
enumeration enumeration enumeration enumeration
Length maxExclusive fractionDigits length
minLength maxInclusive maxExclusive maxLength
maxLength minExclusive maxInclusive minLength
Pattern minInclusive minExclusive pattern
whiteSpaces pattern minInclusive whiteSpaces
whiteSpaces totalDigits
whiteSpaces
Complex Types:
1) Elements:
Complex elements are the elements that contain some other elements or attributes.
The complex types of elements are:
i) Empty Elements
ii) Elements that contain text
iii) Elements that contain other elements
iv) Elements that contain other text as well other elements
i) Empty Elements:
Let us define the empty elements by the complexType.
Example [Student.xsd]:
<?xml version= “1.0” ?>
<xs:schema xmlns:xs=“ http://www.w3.org/2001/XMLschema”>
<xs:element name= “Student”>
<xs:complexType>
<xs:attribute name= “HTNo” type= “xs:integer”>
</xs:complexType>

Web Technologies Unit-I
CSE - 35 -
</xs:element>
</xs:schema>
XML Document[Student.xml]:
<?xml version="1.0" encoding="iso-8859-1" ?>
<Student xmlns:xsi = "http://www.w3.org/2001/XMLschema-instance"
xsi:nonamespaceschemalocation = "Student.xsd" HTNo="1343">
</Student>
ii) Elements that contain text only:
We have the elements that contain simple contents such as text and attributes.
Hence we must add the type as simpleContent in the schema definition. This
simpleContent element must have either extension or restriction.
Example [Student.xsd]:
<?xml version= “1.0” ?>
<xs:schema xmlns:xs=“ http://www.w3.org/2001/XMLschema”>
<xs:element name= “Student”>
<xs:complexType>
<xs:simpleContent>
<xs:extension base= “xs:integer”>
<xs:attribute name= “HTNo” type= “xs:integer”>
</xs:extension>
</xs:simpleContent>
</xs:complexType>
</xs:element>
</xs:schema>
XML Document[Student.xml]:
<?xml version="1.0" encoding="iso-8859-1" ?>
<Student xmlns:xsi = "http://www.w3.org/2001/XMLschema-instance"
xsi:nonamespaceschemalocation = "Student.xsd" HTNo="1343">
100
</Student>
iii) Elements that contain other elements only:
Example [Student.xsd]:
<?xml version= “1.0” ?>
<xs:schema xmlns:xs=“ http://www.w3.org/2001/XMLschema”>
<xs:element name= “Student”>
<xs:complexType>
<xs:sequence>
<xs:element name= “firstName” type= “xs:string”>
<xs:element name= “lastName” type= “xs:string”>
</xs:sequence>
</xs:complexType>
</xs:element>
Web Technologies Unit-I
CSE - 36 -
</xs:schema>
XML Document[Student.xml]:
<?xml version="1.0" encoding="iso-8859-1" ?>
<Student xmlns:xsi = "http://www.w3.org/2001/XMLschema-instance"
xsi:nonamespaceschemalocation = "Student.xsd">
<firstName>Ravi</firstName>
<lastName>Chythanya</lastName>
</Student>
iv) Elements that contain text as well as other elements:
Example [Student.xsd]:
<?xml version= “1.0” ?>
<xs:schema xmlns:xs=“ http://www.w3.org/2001/XMLschema”>
<xs:element name= “Student”>
<xs:complexType mixed= “true”>
<xs:sequence>
<xs:element name= “Name” type= “xs:string”>
<xs:element name= “HTNo” type= “xs:integer”>
</xs:sequence>
</xs:complexType>
</xs:element>
</xs:schema>
XML Document[Student.xml]:
<?xml version="1.0" encoding="iso-8859-1" ?>
<Student xmlns:xsi = "http://www.w3.org/2001/XMLschema-instance"
xsi:nonamespaceschemalocation = "Student.xsd">
My Dear Student <Name>Ravi</Name>
With Hall Ticket Number <HTNo>0536</HTNo>
</Student>
2) Indicators:
Indicators allow us to define the elements in the manner we want. Following are some
indicators that are available in XML Schema.
i) all
ii) choice
iii) sequence
iv) maxOccurs
v) minOccurs
Web Technologies Unit-II
CSE -37-
UNIT-II
JAVASCRIPT AND JQUERY
INTRODUCTION: JavaScript is the most popular scripting language on the internet, and works in all major
browsers, such as Internet Explorer, Fire fox, Chrome, Opera, and Safari.
What is JavaScript?
JavaScript was designed to add interactivity to HTML pages
JavaScript is a scripting language
A scripting language is a lightweight programming language
JavaScript is usually embedded directly into HTML pages
JavaScript is an interpreted language (means that scripts execute without preliminary
compilation)
Everyone can use JavaScript without purchasing a license
What can a JavaScript do?
JavaScript gives HTML designers a programming tool - HTML authors are normally
not programmers, but JavaScript is a scripting language with a very simple syntax!
Almost anyone can put small "snippets" of code into their HTML pages
JavaScript can put dynamic text into an HTML page - A JavaScript statement like
this: document.write("<h1>" + name + "</h1>") can write a variable text into an HTML
page
JavaScript can react to events - A JavaScript can be set to execute when something
happens, like when a page has finished loading or when a user clicks on an HTML
element
JavaScript can read and write HTML elements - A JavaScript can read and change the
content of an HTML element
JavaScript can be used to validate data - A JavaScript can be used to validate form
data before it is submitted to a server. This saves the server from extra processing
JavaScript can be used to detect the visitor's browser - A JavaScript can be used to
detect the visitor's browser, and - depending on the browser - load another page
specifically designed for that browser
JavaScript can be used to create cookies - A JavaScript can be used to store and
retrieve information on the visitor's computer
JavaScript is Case Sensitive:
A function named "myfunction" is not the same as "myFunction" and a variable named
"myVar" is not the same as "myvar". JavaScript is case sensitive - therefore watch your
capitalization closely when you create or call variables, objects and functions.
WHITE SPACE
JavaScript ignores extra spaces. You can add white space to your script to make it more
readable. The following lines are equivalent: name="Hege";
name = "Hege";

Web Technologies Unit-II
CSE -38-
OPERATORS USED IN JAVASCRIPT:
1) JAVASCRIPT ARITHMETIC OPERATORS
Arithmetic operators are used to perform arithmetic between variables and/or values.
Given that y=5, the table below explains the arithmetic operators:
Operator Description Example Result
+ Addition x=y+2 x=7
- Subtraction x=y-2 x=3
* Multiplication x=y*2 x=10
/ Division x=y/2 x=2.5
% Modulus (division remainder) x=y%2 x=1
++ Increment x=y++ x=6
-- Decrement x=y++ x=4
2) JAVASCRIPT ASSIGNMENT OPERATORS:
Assignment operators are used to assign values to JavaScript variables. Given that
x=10 and y=5, the table below explains the assignment operators:
Operator Example Same As Result
= x=y x=5
+= x+=y x=x+y x=15
-= x-=y x=x-y x=5
*= x*=y x=x*y x=50
/= x/=y x=x/y x=2
%= x%=y x=x%y x=0
The + Operator Used on Strings:
To add two or more string variables together, use the + operator.
txt1="What a very";
txt2="nice day"; txt3=txt1+txt2;
After the execution of the statements above, the variable txt3 contains "What a verynice
day".
To add a space between the two strings, insert a space into one of the strings:
txt1="What a very ";
txt2="nice day";
txt3=txt1+txt2;
or insert a space into the expression:
txt1="What a very";
txt2="nice day";
txt3=txt1+" "+txt2;
After the execution of the statements above, the variable txt3 contains:
"What a very nice day"
The rule is: If you add a number and a string, the result will be a string!

Web Technologies Unit-II
CSE -39-
3) COMPARISON OPERATORS:
Comparison operators are used in logical statements to determine equality or
difference between variables or values. Given that x=5, the table below explains the
comparison operators:
Operator Description Example
== is equal to x==8 is false
=== is exactly equal to (value and type) x===5 is true
x==="5" is false
!= is not equal x!=8 is true
> is greater than x>8 is false
< is less than x<8 is true
>= is greater than or equal to x>=8 is false
<= is less than or equal to x<=8 is true
4) LOGICAL OPERATORS:
Logical operators are used to determine the logic between variables or values. Given
that x=6 and y=3.
Operator Description Example
&& And (x < 10 && y > 1) is true
|| Or (x==5 || y==5) is false
! not !(x==y) is true
5) CONDITIONAL OPERATORS:
JavaScript also contains a conditional operator that assigns a value to a variable based
on some condition.
Syntax:
variablename=(condition)?value1:value2
Example:
greeting=(visitor=="PRES")?"Dear President ":"Dear ";
If the variable visitor has the value of "PRES", then the variable greeting will be assigned
the value "Dear President" else it will be assigned "Dear".

Web Technologies Unit-II
CSE -40-
CONDITIONAL STATEMENTS
Very often when you write code, you want to perform different actions for different
decisions. You can use conditional statements in your code to do this.
In JavaScript we have the following conditional statements:
i) if statement - use this statement to execute some code only if a specified condition is true
ii) if...else statement - use this statement to execute some code if the condition is true and
another code if the condition is false
iii) if...else if....else statement - use this statement to select one of many blocks of code to be
executed
iv) switch statement - use this statement to select one of many blocks of code to be executed
i) IF STATEMENT
Syntax:
if (condition)
{
code to be executed if condition is true
}
Example:
<script type="text/javascript">
//Write a "Good morning" greeting if //the time is less than 10
var d=new Date();
var time=d.getHours();
if (time<10)
{
document.write("<b>Good morning</b>");
}
</script>
ii) IF...ELSE STATEMENT
Use the If...else statement to execute some code if a condition is true and another
code if the condition is not true.
Syntax:
if (condition)
{
code to be executed if condition is true
}
else
{
code to be executed if condition is not true
}
Web Technologies Unit-II
CSE -41-
Example:
<script type="text/javascript">
//If the time is less than 10, you will get a "Good morning" greeting.
//Otherwise you will get a "Good day" greeting.
var d = new Date();
var time = d.getHours();
if (time < 10)
{
document.write("Good morning!");
}
else
{
document.write("Good day!");
}
</script>
iii) IF...ELSE IF...ELSE STATEMENT:
Syntax:
if (condition1)
{
code to be executed if condition1 is true
}
else if (condition2)
{
code to be executed if condition2 is true
}
else
{
code to be executed if condition1 and condition2 are not true
}
Example:
<script type="text/javascript">
var d = new Date()
var time = d.getHours()
if (time<10)
document.write("<b>Good morning</b>");
else if (time>10 && time<16)
document.write("<b>Good day</b>");
else
document.write("<b>Hello World!</b>");
</script>

Web Technologies Unit-II
CSE -42-
iv) SWITCH STATEMENT:
Syntax:
switch(n)
{
case 1: execute code block 1; break;
case 2: execute code block 2; break;
default:
code to be executed if n is different from case 1 and 2
}
Example:
<script type="text/javascript">
//You will receive a different greeting based
//on what day it is. Note that Sunday=0,
//Monday=1, Tuesday=2, etc.
var d=new Date();
theDay=d.getDay();
switch (theDay)
{
case 5: document.write("Finally Friday");
break;
case 6: document.write("Super Saturday");
break;
case 0: document.write("Sleepy Sunday");
break;
default: document.write("I'm looking forward to this weekend!");
}
</script>

Web Technologies Unit-II
CSE -43-
JAVASCRIPT POPUP BOXES:
JavaScript has three kinds of popup boxes:
i) Alert Box
ii) Confirm Box or Message Box, and
iii) Prompt Box.
i) ALERT BOX:
An alert box is often used if you want to make sure information comes through to
the user. When an alert box pops up, the user will have to click "OK" to proceed.
Syntax:
alert("sometext");
Example: <html>
<head>
<script type="text/javascript">
function show_alert()
{
alert("You are Clicked Me ");
}
</script>
</head>
<body>
<input type="button" onClick="show_alert()" value="Click Me " />
</body>
</html>
ii) CONFIRM BOX OR MESSAGE BOX:
A confirm box is often used if you want the user to verify or accept something.
The user will have to click either "OK" or "Cancel" to proceed. If the user clicks "OK",
the box returns true. If the user clicks "Cancel", the box returns false.
Syntax:
confirm("sometext");
Example:
<html>
<head>
<script type="text/javascript">
function show_confirm()
{
var r=confirm("Press a button");
if (r==true)
Web Technologies Unit-II
CSE -44-
{
alert("You pressed OK!");
}
else
{
alert("You pressed Cancel!");
}
}
</script>
</head>
<body>
<input type="submit" onClick="show_confirm()" value="Clicked Me " />
</body>
</html>
iii) PROMPT BOX
A prompt box is often used if you want the user to input a value before entering a
page. When a prompt box pops up, the user will have to click either "OK" or "Cancel" to
proceed after entering an input value. If the user clicks "OK" the box returns the input
value. If the user clicks "Cancel" the box returns null.
Syntax:
prompt("sometext","defaultvalue");
Example:
<html>
<head>
<script type="text/javascript">
function show_prompt()
{
var name=prompt("Please enter your name","Harry Potter");
if (name!=null && name!="")
{
document.write("Hello " + name + "! How are you today?");
}
}
</script>
</head>
<body>
<input type="button" onclick="show_prompt()" value="Show prompt box" />
</body>
</html>

Web Technologies Unit-II
CSE -45-
JAVASCRIPT FUNCTIONS
To keep the browser from executing a script when the page loads, you can put your script
into a function. A function contains code that will be executed by an event or by a call to the
function. You may call a function from anywhere within a page (or even from other pages if the
function is embedded in an external .js file). Functions can be defined both in the <head> and in
the <body> section of a document. However, to assure that a function is read/loaded by the
browser before it is called, it could be wise to put functions in the <head> section.
How to Define a Function
Syntax:
function function-name(var1,var2,...,varX)
{
some code;
}
The parameters var1, var2, etc. are variables or values passed into the function. The { and
the } defines the start and end of the function.
Note: A function with no parameters must include the parentheses () after the function name.
Note: Do not forget about the importance of capitals in JavaScript! The word function must be
written in lowercase letters, otherwise a JavaScript error occurs! Also note that you must call a
function with the exact same capitals as in the function name.
Example:
<html>
<head>
<script type="text/javascript">
function displaymessage()
{
alert("Hello World!");
}
</script>
</head>
<body>
<form>
<input type="button" value="Click me" onClick="displaymessage()" />
</form>
</body>
</html>
If the line: alert("Hello world!!") in the example above had not been put within a
function, it would have been executed as soon as the page was loaded. Now, the script is not
executed before a user hits the input button. The function displaymessage() will be executed if
the input button is clicked.

Web Technologies Unit-II
CSE -46-
THE RETURN STATEMENT:
The return statement is used to specify the value that is returned from the function. So,
functions that are going to return a value must use the return statement. The example below
returns the product of two numbers (a and b):
Example:
<html>
<head>
<script type="text/javascript">
function product(a,b)
{
return a*b;
}
</script>
</head>
<body>
<script type="text/javascript">
document.write(product(4,3));
</script>
</body>
</html>
THE LIFETIME OF JAVASCRIPT VARIABLES:
If you declare a variable within a function, the variable can only be accessed within that
function. When you exit the function, the variable is destroyed. These variables are called local
variables. You can have local variables with the same name in different functions, because each
is recognized only by the function in which it is declared. If you declare a variable outside a
function, all the functions on your page can access it. The lifetime of these variables starts when
they are declared, and ends when the page is closed.
JAVASCRIPT LOOPS
Often when you write code, you want the same block of code to run over and over again
in a row. Instead of adding several almost equal lines in a script we can use loops to perform a
task like this. In JavaScript, there are two different kinds of loops:
i) for - loops through a block of code a specified number of times
ii) while - loops through a block of code while a specified condition is true
i) FOR LOOP
Syntax:
for (var=startvalue;var<=endvalue;var=var+increment)
{
code to be executed
}

Web Technologies Unit-II
CSE -47-
Example:
The example below defines a loop that starts with i=0. The loop will continue to
run as long as i is less than, or equal to 5. i will increase by 1 each time the loop runs.
Note: The increment parameter could also be negative, and the <= could be any
comparing statement.
<html>
<body>
<script type="text/javascript">
var i=0;
for (i=0;i<=5;i++)
{
document.write("The number is " + i);
document.write("<br />");
}
</script>
</body>
</html>
ii) WHILE LOOP
The while loop loops through a block of code while a specified condition is true.
Syntax:
while (var<=endvalue)
{
code to be executed
}
Note: The <= could be any comparing operator.
Example:
The example below defines a loop that starts with i=0. The loop will continue to
run as long as i is less than, or equal to 5. i will increase by 1 each time the loop runs:
<html>
<body>
<script type="text/javascript">
var i=0;
while (i<=5)
{
document.write("The number is " + i);
document.write("<br />");
i++;
}
</script> </body></html>

Web Technologies Unit-II
CSE -48-
iii) DO...WHILE LOOP
The do...while loop is a variant of the while loop. This loop will execute the block
of code ONCE, and then it will repeat the loop as long as the specified condition is true.
Syntax:
do
{
code to be executed
} while (var<=endvalue);
Example:
The example below uses a do...while loop. The do...while loop will always be
executed at least once, even if the condition is false, because the statements are executed
before the condition is tested:
<html>
<body>
<script type="text/javascript">
var i=0;
do
{
document.write("The number is " + i);
document.write("<br />");
i++;
}
while (i<=5);
</script>
</body>
</html>
iv) THE BREAK STATEMENT
The break statement will break the loop and continue executing the code that
follows after the loop (if any).
Example:
<html>
<body> <script type="text/javascript">
var i=0;
for (i=0;i<=10;i++)
{
if (i==3)
break;
document.write("The number is " + i);
document.write("<br />");
}
</script>
</body></html>

Web Technologies Unit-II
CSE -49-
v) THE CONTINUE STATEMENT
The continue statement will break the current loop and continue with the next value.
Example:
<html>
<body>
<script type="text/javascript">
var i=0
for (i=0;i<=10;i++)
{
if (i==3)
{
continue;
}
document.write("The number is " + i);
document.write("<br />");
}
</script>
</body>
</html> vi) JAVASCRIPT FOR...IN STATEMENT
The for...in statement loops through the elements of an array or through the
properties of an object.
Syntax:
for (variable in object)
{
code to be executed
}
Note: The code in the body of the for...in loop is executed once for each
element/property.
Note: The variable argument can be a named variable, an array element, or a property of
an object.
Example:
Use the for...in statement to loop through an array:
<html>
<body>
<script type="text/javascript">
var x;
var mycars = new Array();
mycars[0] = "Saab";
mycars[1] = "Volvo";
mycars[2] = "BMW";

Web Technologies Unit-II
CSE -50-
for (x in mycars)
{
document.write(mycars[x] + "<br />");
}
</script>
</body>
</html>
JAVASCRIPT EVENTS:
By using JavaScript, we have the ability to create dynamic web pages. Events are actions
that can be detected by JavaScript. Every element on a web page has certain events which can
trigger a JavaScript. For example, we can use the onClick event of a button element to indicate
that a function will run when a user clicks on the button. We define the events in the HTML tags.
Examples of events:
A mouse click
A web page or an image loading
Mousing over a hot spot on the web page
Selecting an input field in an HTML form
Submitting an HTML form
A keystroke
Note: Events are normally used in combination with functions, and the function will not be
executed before the event occurs!
ONLOAD AND ONUNLOAD:
The onLoad and onUnload events are triggered when the user enters or leaves the page.
The onLoad event is often used to check the visitor's browser type and browser version, and load
the proper version of the web page based on the information. Both the onLoad and onUnload
events are also often used to deal with cookies that should be set when a user enters or leaves a
page. For example, you could have a popup asking for the user's name upon his first arrival to
your page. The name is then stored in a cookie. Next time the visitor arrives at your page, you
could have another popup saying something like: "Welcome John Doe!".
ONFOCUS, ONBLUR AND ONCHANGE:
The onFocus, onBlur and onChange events are often used in combination with validation
of form fields. Below is an example of how to use the onChange event. The checkEmail()
function will be called whenever the user changes the content of the field:
<input type="text" size="30" id="email" onChange="checkEmail()">
ONSUBMIT:
The onSubmit event is used to validate ALL form fields before submitting it. Below is an
example of how to use the onSubmit event. The checkForm() function will be called when the
user clicks the submit button in the form. If the field values are not accepted, the submit should

Web Technologies Unit-II
CSE -51-
be cancelled. The function checkForm() returns either true or false. If it returns true the form will
be submitted, otherwise the submit will be cancelled:
<form method="post" action="xxx.htm" onsubmit="return checkForm()">
ONMOUSEOVER AND ONMOUSEOUT:
onMouseOver and onMouseOut are often used to create "animated" buttons. Below is an
example of an onMouseOver event. An alert box appears when an onMouseOver event is
detected:
<a href="http://www.w3schools.com" onmouseover="alert('An onMouseOver event');return
false"><img src="w3s.gif" alt="W3Schools" /></a>
JAVASCRIPT TRY...CATCH STATEMENT
The try...catch statement allows you to test a block of code for errors. The try block
contains the code to be run, and the catch block contains the code to be executed if an error
occurs.
Syntax:
try
{
//Run some code here
}
catch(err)
{
//Handle errors here
}
Note that try...catch is written in lowercase letters. Using uppercase letters will generate a
JavaScript error!
Examples:
The example below is supposed to alert "Welcome guest!" when the button is clicked.
However, there's a typo in the message() function. alert() is misspelled as adddlert(). A
JavaScript error occurs. The catch block catches the error and executes a custom code to handle
it. The code displays a custom error message informing the user what happened:
<html>
<head>
<script type="text/javascript">
var txt="";
function message()
{
try
{
adddlert("Welcome guest!");
}

Web Technologies Unit-II
CSE -52-
catch(err)
{
txt="There was an error on this page.\n\n";
txt+="Error description: " + err.description + "\n\n";
txt+="Click OK to continue.\n\n";
alert(txt);
}
}
</script>
</head>
<body>
<input type="button" value="View message" onclick="message()" />
</body>
</html>
The next example uses a confirm box to display a custom message telling users they can
click OK to continue viewing the page or click Cancel to go to the homepage. If the confirm
method returns false, the user clicked Cancel, and the code redirects the user. If the confirm
method returns true, the code does nothing:
Example:
<html>
<head>
<script type="text/javascript">
var txt="";
function message()
{
try {
adddlert("Welcome guest!");
}
catch(err) {
txt="There was an error on this page.\n\n";
txt+="Click OK to continue viewing this page,\n";
txt+="or Cancel to return to the home page.\n\n";
if(!confirm(txt))
{
document.location.href="http://www.w3schools.com/";
}
}
}
</script>
</head>
<body>
<input type="button" value="View message" onclick="message()" />
</body>
</html>

Web Technologies Unit-II
CSE -53-
THE THROW STATEMENT
The throw statement allows you to create an exception. If you use this statement together
with the try...catch statement, you can control program flow and generate accurate error
messages.
Syntax
Throw(exception)
The exception can be a string, integer, Boolean or an object. Note that throw is written in
lowercase letters. Using uppercase letters will generate a JavaScript error!
Example:
The example below determines the value of a variable called x. If the value of x is higher
than 10, lower than 0, or not a number, we are going to throw an error. The error is then caught
by the catch argument and the proper error message is displayed:
<html>
<body>
<script type="text/javascript">
var x=prompt("Enter a number between 0 and 10:","");
try
{
if(x>10)
{
throw "Err1";
}
else if(x<0)
{
throw "Err2";
}
else if(isNaN(x))
{
throw "Err3"; } }
catch(er)
{
if(er=="Err1")
{
alert("Error! The value is too high");
}
if(er=="Err2")
{
alert("Error! The value is too low");
}
if(er=="Err3")
{
alert("Error! The value is not a number");
Web Technologies Unit-II
CSE -54-
}
}
</script>
</body>
</html>
JAVASCRIPT SPECIAL CHARACTERS
The backslash (\) is used to insert apostrophes, new lines, quotes, and other special
characters into a text string.
Look at the following JavaScript code:
var txt="We are the so-called "Vikings" from the north.";
document.write(txt);
In JavaScript, a string is started and stopped with either single or double quotes. This
means that the string above will be chopped to: We are the so-called
To solve this problem, you must place a backslash (\) before each double quote in
"Viking". This turns each double quote into a string literal:
var txt="We are the so-called \"Vikings\" from the north.";
document.write(txt);
JavaScript will now output the proper text string: We are the so-called "Vikings" from the
north. Here is another example:
document.write ("You \& I are singing!");
The example above will produce the following output:
You & I are singing!
The table below lists other special characters that can be added to a text string with the
backslash sign:
Code Outputs
\' single quote
\" double quote
\& ampersand
\\ backslash
\n new line
\r carriage return
\t Tab
\b backspace
\f form feed

Web Technologies Unit-II
CSE -55-
JAVASCRIPT OBJECTS INTRODUCTION:
JavaScript is an Object Oriented Programming (OOP) language. An OOP language
allows you to define your own objects and make your own variable types.
OBJECT ORIENTED PROGRAMMING:
JavaScript is an Object Oriented Programming (OOP) language. An OOP language
allows you to define your own objects and make your own variable types. However, creating
your own objects will be explained later, in the Advanced JavaScript section. We will start by
looking at the built-in JavaScript objects, and how they are used. The next pages will explain
each built-in JavaScript object in detail. Note that an object is just a special kind of data. An
object has properties and methods.
Properties:
Properties are the values associated with an object. In the following example we are using
the length property of the String object to return the number of characters in a string:
<script type="text/javascript">
var txt="Hello World!";
document.write(txt.length);
</script>
The output of the code above will be: 12
Methods:
Methods are the actions that can be performed on objects. In the following example we
are using the toUpperCase() method of the String object to display a text in uppercase letters: <script type="text/javascript">
var str="Hello world!";
document.write(str.toUpperCase());
</script>
The output of the code above will be: HELLO WORLD!
STRING OBJECT:
The String object is used to manipulate a stored piece of text.
Examples of use:
The following example uses the length property of the String object to find the length of a string:
var txt="Hello world!";
document.write(txt.length);

Web Technologies Unit-II
CSE -56-
The code above will result in the following output: 12
The following example uses the toUpperCase() method of the String object to convert a
string to uppercase letters:
var txt="Hello world!";
document.write(txt.toUpperCase());
The code above will result in the following output: HELLO WORLD!
String Object Examples:
1. Return The Length of A String
<html>
<body>
<script type="text/javascript">
var txt = "Hello World!";
document.write(txt.length);
</script>
</body>
</html>
Output: 12
2. Style Strings
<html>
<body>
<script type="text/javascript">
var txt = "Hello World!";
document.write("<p>Big: " + txt.big() + "</p>");
document.write("<p>Small: " + txt.small() + "</p>");
document.write("<p>Bold: " + txt.bold() + "</p>");
document.write("<p>Italic: " + txt.italics() + "</p>");
document.write("<p>Fixed: " + txt.fixed() + "</p>");
document.write("<p>Strike: " + txt.strike() + "</p>"); document.write("<p>Fontcolor: " + txt.fontcolor("green") + "</p>");
document.write("<p>Fontsize: " + txt.fontsize(6) + "</p>");
document.write("<p>Subscript: " + txt.sub() + "</p>");
document.write("<p>Superscript: " + txt.sup() + "</p>");
document.write("<p>Link: " + txt.link("http://www.w3schools.com") + "</p>");
document.write("<p>Blink: " + txt.blink() + " (does not work in IE, Chrome, or
Safari)</p>");
</script>
</body>
</html>
Output:
Big: Hello World!
Small: Hello World!
Bold: Hello World!

Web Technologies Unit-II
CSE -57-
Italic: Hello World!
Fixed: Hello World!
Strike: Hello World!
Fontcolor: Hello World!
Fontsize: Hello World!
Subscript: Hello World!
Superscript: Hello World!
Link: Hello World!
Blink: Hello World! (does not work in IE, Chrome, or Safari)
3. Return the Position of the First Occurrence of A Text in A String - indexof():
<html>
<body>
<script type="text/javascript">
var str="Hello world!";
document.write(str.indexOf("d") + "<br />");
document.write(str.indexOf("WORLD") + "<br />");
document.write(str.indexOf("world"));
</script>
</body>
</html>
Output: 10 -1 6
4. Search for A Text in A String and Return the Text If Found - Match():
<html>
<body>
<script type="text/javascript">
var str="Hello world!";
document.write(str.match("world") + "<br />");
document.write(str.match("World") + "<br />");
document.write(str.match("worlld") + "<br />");
document.write(str.match("world!"));
</script>
</body>
</html>
Output: world null null world!
5. Replace Characters in A String - Replace() :
<html>
<body>
<script type="text/javascript">
var str="Visit Microsoft!";
document.write(str.replace("Microsoft","W3Schools"));

Web Technologies Unit-II
CSE -58-
</script>
</body>
</html>
Output: Visit W3Schools!
6. Convert a String to Lowercase Letters:
<html>
<body>
<script type="text/javascript">
var str="Hello World!";
document.write(str.toLowerCase());
</script>
</body>
</html>
Output: hello world!
JAVASCRIPT DATE OBJECT
The Date object is used to work with dates and times.
Create a Date Object
The Date object is used to work with dates and times. Date objects are created with the
Date() constructor. There are four ways of instantiating a date:
New Date() // current date and time
new Date(milliseconds) //milliseconds since 1970/01/01
new Date(dateString)
new Date(year, month, day, hours, minutes, seconds, milliseconds)
Most parameters above are optional. Not specifying causes 0 to be passed in. Once a Date
object is created, a number of methods allow you to operate on it. Most methods allow you to get
and set the year, month, day, hour, minute, second, and milliseconds of the object, using either
local time or UTC (universal, or GMT) time. All dates are calculated in milliseconds from 01
January, 1970 00:00:00 Universal Time (UTC) with a day containing 86,400,000 milliseconds.
Some examples of instantiating a date:
today = new Date()
d1 = new Date("October 13, 1975 11:13:00")
d2 = new Date(79,5,24)
d3 = new Date(79,5,24,11,33,0)
Set Dates
We can easily manipulate the date by using the methods available for the Date object. In
the example below we set a Date object to a specific date (14th January 2010):

Web Technologies Unit-II
CSE -59-
var myDate=new Date();
myDate.setFullYear(2010,0,14);
And in the following example we set a Date object to be 5 days into the future:
var myDate=new Date();
myDate.setDate(myDate.getDate()+5);
Note: If adding five days to a date shifts the month or year, the changes are handled
automatically by the Date object itself!
Compare Two Dates
The Date object is also used to compare two dates. The following example compares today's date
with the 14th January 2010:
var myDate=new Date();
myDate.setFullYear(2010,0,14);
var today = new Date();
if (myDate>today)
{
alert("Today is before 14th January 2010");
}
else
{
alert("Today is after 14th January 2010");
}
DATE OBJECT EXAMPLES: 1. Use Date() to Return Today's Date And Time
<html>
<body>
<script type="text/javascript">
var d=new Date();
document.write(d);
</script>
</body>
</html>
Output: Wed Jan 12 2011 14:38:08 GMT+0530 (India Standard Time)
2. Use getTime() to Calculate the Years Since 1970 <html>
<body>
<script type="text/javascript">
var d=new Date();
document.write(d.getTime() + " milliseconds since 1970/01/01");
</script>
Web Technologies Unit-II
CSE -60-
</body>
</html>
Output: 1294823298285 milliseconds since 1970/01/01
3. Use setFullYear() to Set a Specific Date <html>
<body>
<script type="text/javascript">
var d = new Date();
d.setFullYear(1992,10,3);
document.write(d);
</script>
</body>
</html>
Output: Tue Nov 03 1992 14:40:15 GMT+0530 (India Standard Time)
4. Use toUTCString() to Convert Today's Date (according to UTC) to A String <html>
<body>
<script type="text/javascript">
var d=new Date();
document.write("Original form: ");
document.write(d + "<br />");
document.write("To string (universal time): ");
document.write(d.toUTCString());
</script>
</body>
</html>
Output: Original form: Wed Jan 12 2011 14:38:17 GMT+0530 (India Standard
Time)
To string (universal time): Wed, 12 Jan 2011 09:08:17 GMT
5. Use getDay() and An Array to Write a Weekday, and Not Just A Number
<html>
<body>
<script type="text/javascript">
var d=new Date();
var weekday=new Array(7);
weekday[0]="Sunday";
weekday[1]="Monday";
weekday[2]="Tuesday";
weekday[3]="Wednesday";
weekday[4]="Thursday";
weekday[5]="Friday";

Web Technologies Unit-II
CSE -61-
weekday[6]="Saturday";
document.write("Today is " + weekday[d.getDay()]);
</script>
</body>
</html>
Output: Today is Wednesday
6. Display a Clock
<html>
<head>
<script type="text/javascript">
function startTime()
{
var today=new Date();
var h=today.getHours();
var m=today.getMinutes();
var s=today.getSeconds();
// add a zero in front of numbers<10
m=checkTime(m);
s=checkTime(s);
document.getElementById('txt').innerHTML=h+":"+m+":"+s;
t=setTimeout('startTime()',500);
}
function checkTime(i)
{
if (i<10)
{
i="0" + i;
}
return i;
}
</script>
</head>
<body onload="startTime()">
<div id="txt"></div>
</body>
</html>
Output: 14:42:13

Web Technologies Unit-II
CSE -62-
JAVASCRIPT ARRAY OBJECT
The Array object is used to store multiple values in a single variable. An array is a special
variable, which can hold more than one value, at a time. If you have a list of items (a list of car
names, for example), storing the cars in single variables could look like this:
cars1="Saab";
cars2="Volvo";
cars3="BMW";
However, what if you want to loop through the cars and find a specific one? And what if
you had not 3 cars, but 300?
The best solution here is to use an array! An array can hold all your variable values under
a single name. And you can access the values by referring to the array name. Each element in the
array has its own ID so that it can be easily accessed.
Create an Array
An array can be defined in three ways. The following code creates an Array object called
myCars:
1st Method:
var myCars=new Array(); // regular array (add an optional integer
myCars[0]="Saab"; // argument to control array's size)
myCars[1]="Volvo";
myCars[2]="BMW";
2nd
Method:
var myCars=new Array("Saab","Volvo","BMW"); // condensed array
3rd
Method:
var myCars=["Saab","Volvo","BMW"]; // literal array
Note: If you specify numbers or true/false values inside the array then the variable type will be
Number or Boolean, instead of String.
Access an Array
You can refer to a particular element in an array by referring to the name of the array and the
index number. The index number starts at 0. The following code line:
document.write(myCars[0]);
will result in the following output:
Saab
Web Technologies Unit-II
CSE -63-
Modify Values in an Array
To modify a value in an existing array, just add a new value to the array with a specified index
number:
myCars[0]="Opel";
Now, the following code line:
document.write(myCars[0]);
will result in the following output: Opel
Array Object Examples:
1. Program for array concatenation
<html>
<body>
<script type="text/javascript">
var parents = ["Jani", "Tove"];
var children = ["Cecilie", "Lone"];
var family = parents.concat(children);
document.write(family);
</script>
</body>
</html>
2. Program for array concatenation with multiple arrays. <html>
<body>
<script type="text/javascript">
var parents = ["Jani", "Tove"];
var brothers = ["Stale", "Kai Jim", "Borge"];
var children = ["Cecilie", "Lone"];
var family = parents.concat(brothers, children);
document.write(family);
</script>
</body>
</html>
3. Program for array join operation. <html>
<body>
<script type="text/javascript">
var fruits = ["Banana", "Orange", "Apple", "Mango"];
document.write(fruits.join() + "<br />");
document.write(fruits.join("+") + "<br />");
document.write(fruits.join(" and "));
</script>
</body> </html>

Web Technologies Unit-II
CSE -64-
4. Program for array pop. <html>
<body>
<script type="text/javascript">
var fruits = ["Banana", "Orange", "Apple", "Mango"];
document.write(fruits.pop() + "<br />");
document.write(fruits + "<br />");
document.write(fruits.pop() + "<br />");
document.write(fruits);
</script>
</body>
</html>
5. Program for array push. <html>
<body>
<script type="text/javascript">
var fruits = ["Banana", "Orange", "Apple", "Mango"];
document.write(fruits.push("Kiwi") + "<br />");
document.write(fruits.push("Lemon","Pineapple") + "<br />");
document.write(fruits);
</script>
</body>
</html>
6. Program for array reverse. <html>
<body>
<script type="text/javascript">
var fruits = ["Banana", "Orange", "Apple", "Mango"];
document.write(fruits.reverse());
</script>
</body>
</html>
7. Program for array shift. <html>
<body>
<script type="text/javascript">
var fruits = ["Banana", "Orange", "Apple", "Mango"];
document.write(fruits.shift() + "<br />");
document.write(fruits + "<br />");
document.write(fruits.shift() + "<br />");
document.write(fruits);
</script>
</body>
</html>

Web Technologies Unit-II
CSE -65-
8. Program for array slice. <html>
<body>
<script type="text/javascript">
var fruits = ["Banana", "Orange", "Apple", "Mango"];
document.write(fruits.slice(0,1) + "<br />");
document.write(fruits.slice(1) + "<br />");
document.write(fruits.slice(-2) + "<br />");
document.write(fruits);
</script>
</body>
</html>
9. Program for array sort(). <html>
<body>
<script type="text/javascript">
var fruits = ["Banana", "Orange", "Apple", "Mango"];
document.write(fruits.sort());
</script>
</body>
</html>
10. Program for array toString(). <html>
<body>
<script type="text/javascript">
var fruits = ["Banana", "Orange", "Apple", "Mango"];
document.write(fruits.toString());
</script>
</body>
</html>
JAVASCRIPT MATH OBJECT
The Math object allows you to perform mathematical tasks. The Math object includes
several mathematical constants and methods.
Syntax for using properties/methods of Math:
var pi_value=Math.PI;
var sqrt_value=Math.sqrt(16);
Note: Math is not a constructor. All properties and methods of Math can be called by using Math
as an object without creating it.

Web Technologies Unit-II
CSE -66-
Mathematical Constants:
JavaScript provides eight mathematical constants that can be accessed from the Math
object. These are: E, PI, square root of 2, square root of 1/2, natural log of 2, natural log of 10,
base-2 log of E, and base-10 log of E. You may reference these constants from your JavaScript
like this:
Math.E
Math.PI
Math.SQRT2
Math.SQRT1_2
Math.LN2
Math.LN10
Math.LOG2E
Math.LOG10E
Mathematical Methods:
In addition to the mathematical constants that can be accessed from the Math object there
are also several methods available. The following example uses the round() method of the Math
object to round a number to the nearest integer:
document.write(Math.round(4.7));
Output: 5
The following example uses the random() method of the Math object to return a random
number between 0 and 1:
document.write(Math.random());
Output: 0.9306157949324372
The following example uses the floor() and random() methods of the Math object to
return a random number between 0 and 10:
document.write(Math.floor(Math.random()*11));
Output: 6
MATH OBJECT EXAMPLES
1. Use round() to Round a Number:
<html>
<body>
<script type="text/javascript">
document.write(Math.round(0.60) + "<br />");
document.write(Math.round(0.50) + "<br />");
document.write(Math.round(0.49) + "<br />");
document.write(Math.round(-4.40) + "<br />");
document.write(Math.round(-4.60));
</script>
</body>

Web Technologies Unit-II
CSE -67-
</html>
2. Use random() to Return a Random Number Between 0 and 1:
<html>
<body>
<script type="text/javascript">
//return a random number between 0 and 1
document.write(Math.random() + "<br />");
//return a random integer between 0 and 10
document.write(Math.floor(Math.random()*11));
</script>
</body>
</html>
3. Use max() to return the Number With the Highest Value of Two Specified Numbers:
<html>
<body>
<script type="text/javascript">
document.write(Math.max(5,10) + "<br />");
document.write(Math.max(0,150,30,20,38) + "<br />");
document.write(Math.max(-5,10) + "<br />");
document.write(Math.max(-5,-10) + "<br />");
document.write(Math.max(1.5,2.5));
</script>
</body>
</html>
4. Use min() to Return the Number With the Lowest Value of Two Specified Numbers:
<html>
<body>
<script type="text/javascript">
document.write(Math.min(5,10) + "<br />");
document.write(Math.min(0,150,30,20,38) + "<br />");
document.write(Math.min(-5,10) + "<br />");
document.write(Math.min(-5,-10) + "<br />");
document.write(Math.min(1.5,2.5));
</script>
</body>
</html>
5. Convert Celsius to Fahrenheit:
<html>
<head>
<script type="text/javascript">
function convert(degree)

Web Technologies Unit-II
CSE -68-
{
if (degree=="C")
{
F=document.getElementById("c").value * 9 / 5 + 32;
document.getElementById("f").value=Math.round(F);
}
else
{
C=(document.getElementById("f").value -32) * 5 / 9;
document.getElementById("c").value=Math.round(C);
}
}
</script>
</head>
<body>
<p></p><b>Insert a number into one of the input fields
below:</b></p>
<form>
<input id="c" name="c" onkeyup="convert('C')"> degrees
Celsius<br />
equals<br />
<input id="f" name="f" onkeyup="convert('F')"> degrees
Fahrenheit
</form>
<p>Note that the <b>Math.round()</b> method is used, so that the
result will be returned as an integer.</p>
</body>
</html>
JAVASCRIPT BOOLEAN OBJECT:
The Boolean object is used to convert a non-Boolean value to a Boolean value (true or false).
Boolean Object Methods
Method Description
toString() Converts a Boolean value to a string, and returns the result
valueOf() Returns the primitive value of a Boolean object
JAVASCRIPT WINDOW OBJECT:
The window object represents an open window in a browser.
Note: There is no public standard that applies to the Window object, but all major browsers
support it.

Web Technologies Unit-II
CSE -69-
Window Object Properties:
Property Description
closed Returns a Boolean value indicating whether a window has been closed or not
defaultStatus Sets or returns the default text in the statusbar of a window
document Returns the Document object for the window
frames Returns an array of all the frames (including iframes) in the current window
history Returns the History object for the window
innerHeight Sets or returns the the inner height of a window's content area
innerWidth Sets or returns the the inner width of a window's content area
length Returns the number of frames (including iframes) in a window
location Returns the Location object for the window
name Sets or returns the name of a window
navigator Returns the Navigator object for the window
opener Returns a reference to the window that created the window
outerHeight Sets or returns the outer height of a window, including toolbars/scrollbars
outerWidth Sets or returns the outer width of a window, including toolbars/scrollbars
pageXOffset Returns the pixels the current document has been scrolled (horizontally) from
the upper left corner of the window
pageYOffset Returns the pixels the current document has been scrolled (vertically) from
the upper left corner of the window
parent Returns the parent window of the current window
screen Returns the Screen object for the window
screenLeft Returns the x coordinate of the window relative to the screen
screenTop Returns the y coordinate of the window relative to the screen
screenX Returns the x coordinate of the window relative to the screen
screenY Returns the y coordinate of the window relative to the screen
self Returns the current window
status Sets the text in the statusbar of a window
top Returns the topmost browser window
Window Object Methods:
Method Description
alert() Displays an alert box with a message and an OK button
blur() Removes focus from the current window
close() Closes the current window
confirm() Displays a dialog box with a message and an OK and a Cancel button
createPopup() Creates a pop-up window
focus() Sets focus to the current window
open() Opens a new browser window
print() Prints the content of the current window
Web Technologies Unit-II
CSE -70-
prompt() Displays a dialog box that prompts the visitor for input
resizeBy() Resizes the window by the specified pixels
resizeTo() Resizes the window to the specified width and height
Window Object Examples
1. Display an alert box:
<html>
<head>
<script type="text/javascript">
function show_alert()
{
alert("Hello! I am an alert box!");
}
</script>
</head>
<body>
<input type="button" onclick="show_alert()" value="Show alert box" />
</body>
</html>
2. Display a prompt box:
<html>
<head>
<script type="text/javascript">
function show_prompt()
{
var name=prompt("Please enter your name","Harry Potter");
if (name!=null && name!="")
{
document.write("Hello " + name + "! How are you today?");
}
}
</script>
</head>
<body>
<input type="button" onclick="show_prompt()" value="Show prompt
box" />
</body>
</html>
3. Display a confirm box, and alert what the visitor clicked:
<html>
<head>

Web Technologies Unit-II
CSE -71-
<script type="text/javascript">
function show_confirm()
{
var r=confirm("Press a button!");
if (r==true)
{
alert("You pressed OK!");
}
else
{
alert("You pressed Cancel!");
}
}
</script>
</head>
<body>
<input type="button" onclick="show_confirm()" value="Show a confirm
box" />
</body>
</html>
4. Create a pop-up window Open a new window when clicking on a button:
<html>
<head>
<script type="text/javascript">
function open_win()
{
window.open("http://kishor.ucoz.com");
}
</script>
</head>
<body>
<form>
<input type=button value="Open Window" onclick="open_win()">
</form>
</body>
</html>
5. Open a new window and control its appearance:
<html>
<head>
<script type="text/javascript">
function open_win()
{

Web Technologies Unit-II
CSE -72-
window.open("http://www.w3schools.com","_blank","toolbar=yes,
location=yes, directories=no, status=no, menubar=yes, scrollbars=yes,
resizable=no, copyhistory=yes, width=400, height=400");
}
</script>
</head>
<body>
<form>
<input type="button" value="Open Window" onclick="open_win()">
</form>
</body>
</html>
6. Open multiple new windows:
<html>
<head>
<script type="text/javascript">
function open_win()
{
window.open("http://www.microsoft.com/");
window.open("http://kishor.ucoz.com");
}
</script>
</head>
<body>
<form>
<input type=button value="Open Windows" onclick="open_win()">
</form>
</body>
</html>
7. Close the new window:
<html>
<head>
<script type="text/javascript">
function openWin()
{
myWindow=window.open("","","width=200,height=100");
myWindow.document.write("<p>This is 'myWindow'</p>");
}
function closeWin()
{
myWindow.close();
}
</script> </head>
<body>

Web Technologies Unit-II
CSE -73-
<input type="button" value="Open 'myWindow'" onclick="openWin()" />
<input type="button" value="Close 'myWindow'" onclick="closeWin()"/>
</body>
</html>
8. Print the current page:
<html>
<head>
<script type="text/javascript">
function printpage()
{
window.print();
}
</script>
</head>
<body>
<input type="button" value="Print this page" onclick="printpage()" />
</body>
</html>
9. A simple timing:
<html>
<head>
<script type="text/javascript">
function timeText()
{
var t1=setTimeout("document.getElementById('txt').value='2
seconds!'",2000);
var t2=setTimeout("document.getElementById('txt').value='4
seconds!'",4000);
var t3=setTimeout("document.getElementById('txt').value='6
seconds!'",6000);
}
</script>
</head>
<body>
<form>
<input type="button" value="Display timed text!" onclick="timeText()"/>
<input type="text" id="txt" />
</form>
<p>Click the button above. The input field will tell you when two, four,
and six seconds have passed…..</p>
</body>
</html>

Web Technologies Unit-II
CSE -74-
JQUERY INTRODUCTION: jQuery is a fast and concise JavaScript Library created by John Resig in 2006 with a nice motto:
Write less, do more. jQuery simplifies HTML document traversing, event handling, animating,
and Ajax interactions for rapid web development. jQuery is a JavaScript toolkit designed to
simplify various tasks by writing less code. Here is the list of important core features supported
by jQuery:
DOM manipulation: The jQuery made it easy to select DOM elements, negotiate them
and modifying their content by using cross-browser open source selector engine called
Sizzle.
Event handling: The jQuery offers an elegant way to capture a wide variety of events,
such as a user clicking on a link, without the need to clutter the HTML code itself with
event handlers.
AJAX Support: The jQuery helps you a lot to develop a responsive and feature-rich site
using AJAX technology.
Animations: The jQuery comes with plenty of built-in animation effects which you can
use in your websites.
Lightweight: The jQuery is very lightweight library - about 19KB in size (Minified and
gzipped).
Cross Browser Support: The jQuery has cross-browser support, and works well in IE
6.0+, FF 2.0+, Safari 3.0+, Chrome and Opera 9.0+
Latest Technology: The jQuery supports CSS3 selectors and basic XPath syntax.
Installation of jQuery: There are two ways to use jQuery.
Local Installation − You can download jQuery library on your local machine and
include it in your HTML code.
CDN Based Version − You can include jQuery library into your HTML code directly
from Content Delivery Network (CDN).
Local Installation:
Go to the https://jquery.com/download/ to download the latest version available.
Now, insert downloaded jquery-2.1.3.min.js file in a directory of your website, e.g.
C:/your-website-directory/jquery/jquery-2.1.3.min.js.
Example:
Now, you can include jQuery library in your HTML file as follows: <html>
<head> <title>The jQuery Example</title> <script type="text/javascript" src="/jquery/jquery-2.1.3.min.js"></script> <script type="text/javascript"> $(document).ready(function()
{
Web Technologies Unit-II
CSE -75-
document.write("Hello, World!"); });
</script> </head> <body>
<h1>Hello</h1> </body>
</html> This will produce the following result –
Hello, World!
CDN Based Version:
You can include jQuery library into your HTML code directly from Content Delivery Network
(CDN). Google and Microsoft provides content deliver for the latest version. We are using
Google CDN version of the library.
Example:
Now, you can include jQuery library in your HTML file as follows: <html>
<head> <title>The jQuery Example</title> <script type="text/javascript" src= "http://ajax.googleapis.com/ajax/libs/jquery/2.1.3/jquery.min.js"> </script> <script type="text/javascript"> $(document).ready(function({
document.write("Hello, World!"); });
</script> </head> <body>
<h1>Hello</h1> </body>
</html> This will produce the following result –
Hello, World!
Calling jQuery Library Functions:
If you want to an event work on your page, you should call it inside the $(document).ready()
function. Everything inside it will load as soon as the DOM is loaded and before the page
contents are loaded.
To do this, we register a ready event for the document as follows:
$(document).ready(function() {
//write the stuff when DOM is ready
});
To call upon any jQuery library function, use HTML script tags as shown below:

Web Technologies Unit-II
CSE -76-
<html> <head>
<title>The jQuery Example</title> <script type="text/javascript" src="/jquery/jquery 1.3.2.min.js"></script> <script type="text/javascript" language="javascript">
$(document).ready(function({ $("div").click(function() {
Alert("Hello world!"); });
}); </script>
</head> <body>
<div id="newdiv"> Click on this to see a dialogue box.
</div> </body> </html> Creating and Executing Custom Scripts:
It is better to write our custom code in custom JavaScript file: custom.js, as follows:
/* Filename: custom.js */ $(document).ready(function() {
$("div").click(function() { alert("Hello world!");
}); }); Now we can include custom.js file in our HTML file as follows:
<html> <head> <title>The jQuery Example</title> <script type="text/javascript" src="/jquery/jquery-
1.3.2.min.js"></script> <script type="text/javascript" src="/jquery/custom.js"></script> </head> <body> <div id="newdiv"> Click on this to see a dialogue box. </div> </body>
</html> This will produce the following result:
Click on this to see a dialogue box.

Web Technologies Unit-II
CSE -77-
jQuery Selectors: The jQuery library binds the power of Cascading Style Sheets (CSS) selectors to let us
quickly and easily access elements or groups of elements in the Document Object Model
(DOM).
A jQuery Selector is a function which makes use of expressions to find out matching
elements from a DOM based on the given criteria.
The $() Factory Function:
All type of selectors available in jQuery, always start with the dollar sign and
parentheses: $(). The factory function $() makes use of the following three building blocks while
selecting elements in a given document:
Selector Description Tag Name Represents a tag name available in the DOM. For example $('p') selects all
paragraphs <p> in the document.
Tag ID Represents a tag available with the given ID in the DOM. For example
$('#some- id') selects the single element in the document that has an ID of
some-id.
Tag Class Represents a tag available with the given class in the DOM. For example
$('.some-class') selects all elements in the document that have a class of some-
class.
All the above items can be used either on their own or in combination with other selectors. All
the jQuery selectors are based on the same principle except some tweaking.
NOTE: The factory function $() is a synonym of jQuery() function. So in case you are using any
other JavaScript library where $ sign is conflicting with something else then you can replace $
sign by jQuery name and you can use function jQuery() instead of $().
Example:
Following is a simple example which makes use of Tag Selector. This would select all the
elements with a tag name p.
<html> <head>
<title>the title</title>
<script type="text/javascript" src="/jquery/jquery-1.3.2.min.js"></script> <script type="text/javascript" language="javascript"> $(document).ready(function() {
var pars = $("p"); for( i=0; i<pars.length; i++ ){
alert("Found paragraph: " + pars[i].innerHTML); }
}); </script>
</head> <body>

Web Technologies Unit-II
CSE -78-
<div> <p class="myclass">This is a paragraph.</p> <p id="myid">This is second paragraph.</p> <p>This is third paragraph.</p>
</div> </body>
</html> This will produce the the following result:
Using of Selectors:
The selectors are very useful and would be required at every step while using jQuery. They get
the exact element that you want from your HTML document.
Following table lists down few basic selectors and explains them with examples.
Selector Description Name Selects all elements which match with the given element Name.
#ID Selects a single element which matches with the given ID.
.Class Selects all elements which matches with the given Class.
Universal (*) Selects all elements available in a DOM.
Multiple Elements
E, F,G
Selects the combined results of all the specified selectors E, F or G.
jQuery – Element Name Selector:
The element selector selects all the elements that have a tag name of T.
Syntax:
Here is the simple syntax to use this selector − $('tagname')
Parameters:
Here is the description of all the parameters used by this selector –
tagname − Any standard HTML tag name like div, p, em, img, li etc.
Returns:
Like any other jQuery selector, this selector also returns an array filled with the found elements.
Example:
$('p') − Selects all elements with a tag name of p in the document.
$('div') − Selects all elements with a tag name of div in the document.
Following example would select all the divisions and will apply yellow color to their background

Web Technologies Unit-II
CSE -79-
<html> <head>
<title>The Selecter Example</title> <script type="text/javascript"
src="http://ajax.googleapis.com/ajax/libs/jquery/2.1.3/jquery.min.js">
</script> <script type="text/javascript" language="javascript"> $(document).ready(function() {
/* This would select all the divisions */ $("div").css("background-color", "yellow");
}); </script>
</head> <body>
<div class="big" id="div1"> <p>This is first division of the DOM.</p> </div>
<div class="medium" id="div2"> <p>This is second division of the DOM.</p> </div>
<div class="small" id="div3"> <p>This is third division of the DOM</p>
</div> </body>
</html> This will produce the following result: This is first division of the DOM.
This is second division of the DOM.
This is third division of the DOM
jQuery – Element ID Selector:
Description:
The element ID selector selects a single element with the given id attribute.
Syntax:
Here is the simple syntax to use this selector −
Parameters:
Here is the description of all the parameters used by this selector –
Elementid: This would be an element ID. If the id contains any special characters like
periods or colons you have to escape those characters with backslashes.
Returns:
Like any other jQuery selector, this selector also returns an array filled with the found element.
Web Technologies Unit-II
CSE -80-
Example:
$('#myid') − Selects a single element with the given id myid.
$('div#yourid') − Selects a single division with the given id yourid.
Following example would select second division and will apply yellow color to its background
as below:
<html> <head>
<title>The Selecter Example</title> <script type="text/javascript"
src="http://ajax.googleapis.com/ajax/libs/jquery/2.1.3/jquery.min.js">
</script> <script type="text/javascript" language="javascript"> $(document).ready(function() {
/* This would select second division only*/ $("#div2").css("background-color", "yellow");
}); </script>
</head> <body>
<div class="big" id="div1"> <p>This is first division of the DOM.</p>
</div> <div class="medium" id="div2">
<p>This is second division of the DOM.</p> </div> <div class="small" id="div3">
<p>This is third division of the DOM.</p> </div> </body>
</html> This will produce the following result:
This is first division of the DOM. This is second division of the DOM.
This is third division of the DOM.
jQuery - Element Class Selector:
Description:
The element class selector selects all the elements which match with the given class of the
elements.
Syntax:
Here is the simple syntax to use this selector:
$('.classid')

Web Technologies Unit-II
CSE -81-
Parameters:
Here is the description of all the parameters used by this selector –
classid − This is class ID available in the document.
Returns:
Like any other jQuery selector, this selector also returns an array filled with the found elements.
Example:
$('.big') − Selects all the elements with the given class ID big.
$('p.small') − Selects all the paragraphs with the given class ID small.
$('.big.small') − Selects all the elements with a class of big and small.
Following example would select all divisions with class .big and will apply yellow color to its
background.
<html> <head>
<title>The Selecter Example</title> <script type="text/javascript"
src="http://ajax.googleapis.com/ajax/libs/jquery/2.1.3/jquery.min.js">
</script> <script type="text/javascript" language="javascript">
$(document).ready(function() { /* This would select second division only*/ $(".big").css("background-color", "yellow");
}); </script>
</head> <body>
<div class="big" id="div1"> <p>This is first division of the DOM.</p> </div>
<div class="medium" id="div2"> <p>This is second division of the DOM.</p> </div>
<div class="small" id="div3"> <p>This is third division of the DOM</p> </div>
</body> </html> This will produce the following result:
This is first division of the DOM.
This is second division of the DOM.
This is third division of the DOM
jQuery - Universal Selector:
Description:
The universal selector selects all the elements available in the document.

Web Technologies Unit-II
CSE -82-
Syntax:
Here is the simple syntax to use this selector − $('*')
Parameters:
Here is the description of all the parameters used by this selector
* − A symbolic star.
Returns:
Like any other jQuery selector, this selector also returns an array filled with the found elements.
Example:
$('*') selects all the elements available in the document.
Following example would select all the elements and will apply yellow color to their
background. Try to understand that this selector will select every element including head, body
etc.
<html> <head>
<title>The Selecter Example</title> <script type="text/javascript"
src="http://ajax.googleapis.com/ajax/libs/jquery/2.1.3/jquery.min.js">
</script> <script type="text/javascript" language="javascript">
$(document).ready(function() { /* This would select all the elements */ $("*").css("background-color", "yellow");
}); </script>
</head> <body>
<div class="big" id="div1"> <p>This is first division of the DOM.</p> </div>
<div class="medium" id="div2"> <p>This is second division of the DOM.</p>
</div> <div class="small" id="div3">
<p>This is third division of the DOM</p> </div> </body>
</html> This will produce the following result: This is first division of the DOM.
This is second division of the DOM.
This is third division of the DOM

Web Technologies Unit-II
CSE -83-
jQuery – Multiple Elements Selector:
Description:
This Multiple Elements selector selects the combined results of all the specified selectors E, F or G. You can specify
any number of selectors to combine into a single result. Here order of the DOM elements in the jQuery object aren't
necessarily identical.
Syntax:
Here is the simple syntax to use this selector −
$('E, F, G,....')
Parameters:
Here is the description of all the parameters used by this selector –
E − Any valid selector
F − Any valid selector
G − Any valid selector
Returns:
Like any other jQuery selector, this selector also returns an array filled with the found elements.
Example:
$('div, p') − selects all the elements matched by div or p.
$('p strong, .myclass') − selects all elements matched by strong that are descendants of an
element matched by p as well as all elements that have a class of myclass.
$('p strong, #myid') − selects a single element matched by strong that is descendant of an
element matched by p as well as element whose id is myid.
Following example would select elements with class ID big and element with ID div3 and will apply yellow
color to its background –
<html> <head>
<title>The Selecter Example</title> <script type="text/javascript"
src="http://ajax.googleapis.com/ajax/libs/jquery/2.1.3/jquery.min.js">
</script> <script type="text/javascript" language="javascript">
$(document).ready(function() { $(".big, #div3").css("background-color", "yellow");
}); </script>
</head> <body>
<div class="big" id="div1"> <p>This is first division of the DOM.</p> </div>
<div class="medium" id="div2"> <p>This is second division of the
DOM.</p> </div>
<div class="small" id="div3"> <p>This is third division of the DOM</p> </div>

Web Technologies Unit-II
CSE -84-
</body> </html>
This will produce the following result:
This is first division of the DOM.
This is second division of the DOM.
This is third division of the DOM
jQuery Selector Examples:
Syntax Description
$(this) Selects the current HTML element
$("p.intro") Selects all <p> elements with class="intro"
$("p:first") Selects the first <p> element
$("ul li:first") Selects the first <li> element of the first <ul>
$("ul li:first-child") Selects the first <li> element of every <ul>
$("[href]") Selects all elements with an href attribute
$("a[target='_blank']") Selects all <a> elements with a target attribute value equal to "_blank"
$("a[target!='_blank']") Selects all <a> elements with a target attribute value NOT equal to
"_blank"
$(":button") Selects all <button> elements and <input> elements of type="button"
$("tr:even") Selects all even <tr> elements
$("tr:odd") Selects all odd <tr> elements
jQuery DOM:
JQuery provides methods to manipulate DOM in efficient way. You do not need to write big
code to modify the value of any element's attribute or to extract HTML code from a paragraph or
division.
JQuery provides methods such as .attr(), .html(), and .val() which act as getters, retrieving
information from DOM elements for later use.
Content Manipulation:
The html( ) method gets the html contents (innerHTML) of the first matched element.
Here is the syntax for the method −
selector.html( )
Example: <html>
<head>
<title>The jQuery Example</title>
<script type = "text/javascript"
src =
"https://ajax.googleapis.com/ajax/libs/jquery/3.3.1/jquery.min.js">
</script>

Web Technologies Unit-II
CSE -85-
<script type = "text/javascript" language = "javascript">
$(document).ready(function() {
$("div").click(function () {
var content = $(this).html();
$("#result").text( content );
});
});
</script>
<style>
#division{ margin:10px;padding:12px; border:2px solid #666;
width:60px;}
</style>
</head>
<body>
<p>Click on the square below:</p>
<span id = "result"> </span>
<div id = "division" style = "background-color:blue;">
This is Blue Square!!
</div>
</body>
</html>
text( val):
The text( val ) method sets the combined text contents of all matched elements.
Syntax: selector.text( val )
Example: <html>
<head>
<title>The jQuery Example</title>
<script type = "text/javascript"
src =
"https://ajax.googleapis.com/ajax/libs/jquery/2.1.3/jquery.min.js">
</script>
<script type = "text/javascript" language = "javascript">
$(document).ready(function() {
$("div").click(function () {
$(this).text( "<h1>Click another square</h1>");
});
});
</script>
<style>
.div{ margin:10px;padding:12px; border:2px solid #666; width:60px;}
</style>
</head>
<body>
<p>Click on any square below to see the result:</p>
<div class = "div" style = "background-color:blue;"></div>

Web Technologies Unit-II
CSE -86-
<div class = "div" style = "background-color:green;"></div>
<div class = "div" style = "background-color:red;"></div>
</body>
</html>
jQuery Events:
jQuery is tailor-made to respond to events in an HTML page. All the different visitors' actions
that a web page can respond to are called events. An event represents the precise moment when
something happens.
Examples:
moving a mouse over an element
selecting a radio button
clicking on an element
Here are some common DOM events:
Mouse Events Keyboard Events Form Events Document/Window Events
Click keypress submit load
dblclick keydown change resize
mouseenter keyup focus scroll
mouseleave blur unload
Syntax:
In jQuery, most DOM events have an equivalent jQuery method. To assign a click event to all
paragraphs on a page, you can do this:
$(selector).click();
Sometime you need to define what should happen when the event fires, then you must pass a
function to the event:
$(selector).click(function(){
// action goes here!!
});
Commonly used jQuery Events:
$(document).ready():
The $(document).ready() method allows us to execute a function when the document is fully
loaded.
Example:
$(document).ready(function(){
alert(“Hello World!”);
});
click():
The click() method attaches an event handler function to an HTML element. The function is
executed when the user clicks on the HTML element.
Web Technologies Unit-II
CSE -87-
Example:
$("p").click(function(){
$(this).hide();
});
jQuery Attributes:
Some of the most basic components we can manipulate when it comes to DOM elements are the
properties and attributes assigned to those elements.
Most of these attributes are available through JavaScript as DOM node properties. Some of the
more common properties are −
className
tagName
id
href
title
rel
src
Consider the following HTML markup for an image element –
<img id = "imageid" src = "image.gif" alt = "Image" class = "myclass" title = "This is an
image"/>
In this element's markup, the tag name is img, and the markup for id, src, alt, class, and title
represents the element's attributes, each of which consists of a name and a value. jQuery gives us
the means to easily manipulate an element's attributes and gives us access to the element so that
we can also change its properties.
Get Attribute Value:
The attr() method can be used to either fetch the value of an attribute from the first element in
the matched set or set attribute values onto all matched elements.
Example: <html>
<head>
<title>The jQuery Example</title>
<script type = "text/javascript"
src =
"https://ajax.googleapis.com/ajax/libs/jquery/2.1.3/jquery.min.js">
</script>
<script type = "text/javascript" language = "javascript">
$(document).ready(function() {
var title = $("em").attr("title");
$("#divid").text(title);
});
</script>
</head>
<body>
<div>
<em title = "Bold and Brave">This is first paragraph.</em>
<p id = "myid">This is second paragraph.</p>
<div id = "divid"></div>
</div>
</body>
</html>

Web Technologies Unit-II
CSE -88-
This will produce following result –
This is first paragraph.
This is second paragraph.
Bold and Brave
Set Attribute Value:
The attr(name, value) method can be used to set the named attribute onto all elements in the
wrapped set using the passed value.
Example: <html>
<head>
<title>The jQuery Example</title>
<base href="https://www.tutorialspoint.com" />
<script type = "text/javascript"
src =
"https://ajax.googleapis.com/ajax/libs/jquery/2.1.3/jquery.min.js">
</script>
<script type = "text/javascript" language = "javascript">
$(document).ready(function() {
$("#myimg").attr("src", "/jquery/images/jquery.jpg");
});
</script>
</head>
<body>
<div>
<img id = "myimg" src = "/images/jquery.jpg" alt = "Sample image" />
</div>
</body>
</html>

Web Technologies Unit-III
CSE -89-
UNIT-III
AJAX AND ANGULAR JS
INTRODUCTION TO AJAX: AJAX stands for Asynchronous JavaScript and XML. AJAX is a new technique for creating
better, faster, and more interactive web applications with the help of XML, HTML, CSS, and
Java Script.
Ajax uses XHTML for content, CSS for presentation, along with Document Object
Model and JavaScript for dynamic content display.
Conventional web applications transmit information to and from the sever using
synchronous requests. It means you fill out a form, hit submit, and get directed to a new
page with new information from the server.
With AJAX, when you hit submit, JavaScript will make a request to the server, interpret
the results, and update the current screen. In the purest sense, the user would never know
that anything was even transmitted to the server.
XML is commonly used as the format for receiving server data, although any format,
including plain text, can be used.
AJAX is a web browser technology independent of web server software.
A user can continue to use the application while the client program requests information
from the server in the background.
Intuitive and natural user interaction. Clicking is not required, mouse movement is a
sufficient event trigger.
Data-driven as opposed to page-driven.
AJAX is based on the following open standards −
Browser-based presentation using HTML and Cascading Style Sheets (CSS).
Data is stored in XML format and fetched from the server.
Behind-the-scenes data fetches using XMLHttpRequest objects in the browser.
JavaScript to make everything happen.
AJAX cannot work independently. It is used in combination with other technologies to create
interactive webpages.
JavaScript:
Loosely typed scripting language.
JavaScript function is called when an event occurs in a page.
Glue for the whole AJAX operation.
DOM:
API for accessing and manipulating structured documents.
Represents the structure of XML and HTML documents.
CSS:
Allows for a clear separation of the presentation style from the content and may be
changed programmatically by JavaScript
XMLHttpRequest:
JavaScript object that performs asynchronous interaction with the server.
Web Technologies Unit-III
CSE -90-
AJAX Browser Support: All the available browsers cannot support AJAX. Here is a list of major browsers that support
AJAX.
Mozilla Firefox 1.0 and above.
Netscape version 7.1 and above.
Apple Safari 1.2 and above.
Microsoft Internet Explorer 5 and above.
Konqueror.
Opera 7.6 and above.
When you write your next application, do consider the browsers that do not support AJAX.
NOTE − When we say that a browser does not support AJAX, it simply means that the browser
does not support the creation of Javascript object – XMLHttpRequest object.
Writing Browser Specific Code:
The simplest way to make your source code compatible with a browser is to use try…catch
blocks in your JavaScript.
<html>
<body>
<script language = “javascript” type = “text/javascript”>
<!–
//Browser Support Code
function ajaxFunction() {
var ajaxRequest; // The variable that makes Ajax possible!
Try {
// Opera 8.0+, Firefox, Safari
ajaxRequest = new XMLHttpRequest();
} catch (e) {
// Internet Explorer Browsers
try {
ajaxRequest = new ActiveXObject(“Msxml2.XMLHTTP”);
} catch (e) {
try {
ajaxRequest = new ActiveXObject(“Microsoft.XMLHTTP”);
} catch (e) {
// Something went wrong
alert(“Your browser broke!”);
return false;
}
}
}
}
</script>

Web Technologies Unit-III
CSE -91-
<form name = „myForm‟>
Name: <input type = „text‟ name = „username‟ /> <br />
Time: <input type = „text‟ name = „time‟ />
</form>
</body>
</html>
In the above JavaScript code, we try three times to make our XMLHttpRequest object. Our first
attempt –
ajaxRequest = new XMLHttpRequest();
It is for Opera 8.0+, Firefox, and Safari browsers. If it fails, we try two more times to make the
correct object for an Internet Explorer browser with –
ajaxRequest = new ActiveXObject(“Msxml2.XMLHTTP”);
ajaxRequest = new ActiveXObject(“Microsoft.XMLHTTP”);
If it doesn‟t work, then we can use a very outdated browser that doesn‟t support
XMLHttpRequest, which also means it doesn‟t support AJAX.
Most likely though, our variable ajaxRequest will now be set to whatever XMLHttpRequest
standard the browser uses and we can start sending data to the server.
AJAX Working Flow:
The following steps are included when you run an AJAX Program:
Step-1: A client event occurs.
Step-2: An XMLHttpRequest object is created.
Step-3: The XMLHttpRequest object is configured.
Step-4: The XMLHttpRequest object makes an asynchronous request to the Webserver.
Step-5: The Webserver returns the result containing XML document.
Step-6: The XMLHttpRequest object calls the callback() function and processes the result.
Step-7: The HTML DOM is updated.
Let us look at these steps one by one.
Web Technologies Unit-III
CSE -92-
Step-1: A Client Event Occurs
A JavaScript function is called as the result of an event.
Example − validateUserId() JavaScript function is mapped as an event handler to an
onkeyup event on input form field whose id is set to "userid"
<input type = "text" size = "20" id = "userid" name = "id" onkeyup =
"validateUserId();">.
Step-2: The XMLHttpRequest Object is Created
var ajaxRequest; // The variable that makes Ajax possible!
function ajaxFunction() {
try {
// Opera 8.0+, Firefox, Safari
ajaxRequest = new XMLHttpRequest();
} catch (e) {
// Internet Explorer Browsers
try {
ajaxRequest = new ActiveXObject("Msxml2.XMLHTTP");
} catch (e) {
try {
ajaxRequest = new ActiveXObject("Microsoft.XMLHTTP");
} catch (e) {
// Something went wrong
alert("Your browser broke!");
return false;
}
}
}
}
Configuration of the XMLHttpRequest Object:
In this step, we will write a function that will be triggered by the client event and a callback
function processRequest() will be registered.
function validateUserId() {
ajaxFunction();
// Here processRequest() is the callback function.
ajaxRequest.onreadystatechange = processRequest;
if (!target) target = document.getElementById("userid");
var url = "validate?id=" + escape(target.value);
ajaxRequest.open("GET", url, true);
ajaxRequest.send(null);
}
Making Asynchronous Request to the Webserver:
Source code is available in the above piece of code. Code written in bold typeface is responsible
to make a request to the webserver. This is all being done using the XMLHttpRequest object
ajaxRequest.

Web Technologies Unit-III
CSE -93-
function validateUserId() {
ajaxFunction();
// Here processRequest() is the callback function.
ajaxRequest.onreadystatechange = processRequest;
if (!target) target = document.getElementById("userid");
var url = "validate?id = " + escape(target.value);
ajaxRequest.open("GET", url, true);
ajaxRequest.send(null); }
Assume you enter Zara in the userid box, then in the above request, the URL is set to
"validate?id = Zara".
Webserver Returns the Result Containing XML Document:
You can implement your server-side script in any language; however its logic should be as
follows.
Get a request from the client.
Parse the input from the client.
Do required processing.
Send the output to the client.
If we assume that you are going to write a servlet, then here is the piece of code.
public void doGet(HttpServletRequest request,
HttpServletResponse response) throws IOException, ServletException {
String targetId = request.getParameter("id");
if ((targetId != null) && !accounts.containsKey(targetId.trim())) {
response.setContentType("text/xml");
response.setHeader("Cache-Control", "no-cache");
response.getWriter().write("<valid>true</valid>");
} else {
response.setContentType("text/xml");
response.setHeader("Cache-Control", "no-cache");
response.getWriter().write("<valid>false</valid>");
}
}
Callback Function processRequest() is Called:
The XMLHttpRequest object was configured to call the processRequest() function when there is
a state change to the readyState of the XMLHttpRequest object. Now this function will receive
the result from the server and will do the required processing. As in the following example, it
sets a variable message on true or false based on the returned value from the Webserver.
function processRequest() {
if (req.readyState == 4) {
if (req.status == 200) {
var message = ...;
...
}

Web Technologies Unit-III
CSE -94-
Updating the HTML DOM:
This is the final step and in this step, your HTML page will be updated. It happens in the
following way −
JavaScript gets a reference to any element in a page using DOM API.
The recommended way to gain a reference to an element is to call.
document.getElementById("userIdMessage"),
// where "userIdMessage" is the ID attribute
// of an element appearing in the HTML document
JavaScript may now be used to modify the element's attributes; modify the element's style
properties; or add, remove, or modify the child elements. Here is an example −
<script type = "text/javascript">
<!--
function setMessageUsingDOM(message) {
var userMessageElement = document.getElementById("userIdMessage");
var messageText;
if (message == "false") {
userMessageElement.style.color = "red";
messageText = "Invalid User Id";
} else {
userMessageElement.style.color = "green";
messageText = "Valid User Id";
}
var messageBody = document.createTextNode(messageText);
// if the messageBody element has been created simple
// replace it otherwise append the new element
if (userMessageElement.childNodes[0]) {
userMessageElement.replaceChild(messageBody, userMessageElement.childNodes[0]);
} else {
userMessageElement.appendChild(messageBody);
}
}
-->
</script>
<body>
<div id = "userIdMessage"><div>
</body>
If you have understood the above-mentioned seven steps, then you are almost done with AJAX.
Creating an XMLHttpRequest Object:
The XMLHttpRequest object is the key to AJAX. It has been available ever since Internet
Explorer 5.5 was released in July 2000, but was not fully discovered until AJAX and Web 2.0 in
2005 became popular.
XMLHttpRequest (XHR) is an API that can be used by JavaScript, JScript, VBScript, and other
web browser scripting languages to transfer and manipulate XML data to and from a webserver
using HTTP, establishing an independent connection channel between a webpage's Client-Side
and Server-Side.

Web Technologies Unit-III
CSE -95-
The data returned from XMLHttpRequest calls will often be provided by back-end databases.
Besides XML, XMLHttpRequest can be used to fetch data in other formats, e.g. JSON or even
plain text.
You already have seen a couple of examples on how to create an XMLHttpRequest object.
Listed below are some of the methods and properties that you have to get familiar with.
XMLHttpRequest Methods
Method Name Description
abort( ) Cancels the current request.
getAllResponseHeaders() Returns the complete set of HTTP headers as a
string.
getResponseHeader( headerName ) Returns the value of the specified HTTP header.
open( method, URL )
open( method, URL, async )
open( method, URL, async, userName )
open( method, URL, async, userName,
password )
Specifies the method, URL, and other optional
attributes of a request.
The method parameter can have a value of "GET", "POST", or "HEAD". Other HTTP methods
such as "PUT" and "DELETE" (primarily used in REST applications) may be possible.
The "async" parameter specifies whether the request should be handled asynchronously or not.
"true" means that the script processing carries on after the send() method without waiting for a
response, and "false" means that the script waits for a response before continuing script
processing.
Method Name Description
send(content) Sends the request.
setRequestHeader( label, value ) Adds a label/value pair to the HTTP header to be sent.
XMLHttpRequest Properties:
Property Name Description
onreadystatechange An event handler for an event that fires at every state change.
readyState The readyState property defines the current state of the
XMLHttpRequest object.
responseText Returns the response as a string.
responseXML Returns the response as XML. This property returns an XML
document object, which can be examined and parsed using the W3C
DOM node tree methods and properties.
status Returns the status as a number (e.g., 404 for "Not Found" and 200 for
"OK").
statusText Returns the status as a string (e.g., "Not Found" or "OK").

Web Technologies Unit-III
CSE -96-
The following table provides a list of the possible values for the readyState property −
State Description
0 The request is not initialized.
1 The request has been set up.
2 The request has been sent.
3 The request is in process.
4 The request is completed.
readyState = 0: After you have created the XMLHttpRequest object, but before you
have called the open() method.
readyState = 1: After you have called the open() method, but before you have called
send().
readyState = 2: After you have called send().
readyState = 3: After the browser has established a communication with the server, but
before the server has completed the response.
readyState = 4: After the request has been completed, and the response data has been
completely received from the server.
Handling XML Data with AJAX:
The following example shows how we handle the XML data with the help of the AJAX.
AJAXHtml.HTML: <html>
<head> <title>Handling XML Data with AJAX</title>
<style> table,th,td {
border : 1px solid black;
border-collapse: collapse; }
th,td { padding: 5px;
}
</style> </head>
<body> <h1>The XMLHttpRequest Object</h1> <button type="button" onclick="loadDoc()">Get my CD collection</button>
<br><br> <table id="demo">
</table> <script>
function loadDoc() { var xhttp = new XMLHttpRequest(); xhttp.onreadystatechange = function() {
if (this.readyState == 4 && this.status == 200) { myFunction(this);
}

Web Technologies Unit-III
CSE -97-
}; xhttp.open("GET", "cd_catalog.xml", true);
xhttp.send(); }
function myFunction(xml) { var i; var xmlDoc = xml.responseXML;
var table="<tr><th>Artist</th><th>Title</th></tr>"; var x = xmlDoc.getElementsByTagName("CD");
for (i = 0; i <x.length; i++) { table += "<tr><td>" + x[i].getElementsByTagName("ARTIST")[0].childNodes[0].nodeValue +
"</td><td>" + x[i].getElementsByTagName("TITLE")[0].childNodes[0].nodeValue +
"</td></tr>"; } document.getElementById("demo").innerHTML = table;
} </script>
</body> </html>
cd_catalog.xml: <CATALOG>
<CD>
<TITLE>EMPIRE BURLESQUE</TITLE> <ARTIST>BOB DYLAN</ARTIST>
<COUNTRY>USA</COUNTRY> <COMPANY>COLUMBIA</COMPANY> <PRICE>10.90</PRICE>
<YEAR>1985</YEAR> </CD>
<CD> <TITLE>HIDE YOUR HEART</TITLE> <ARTIST>BONNIE TYLER</ARTIST>
<COUNTRY>UK</COUNTRY> <COMPANY>CBS RECORDS</COMPANY>
<PRICE>9.90</PRICE> <YEAR>1988</YEAR>
</CD>
<CD> <TITLE>GREATEST HITS</TITLE>
<ARTIST>DOLLY PARTON</ARTIST> <COUNTRY>USA</COUNTRY> <COMPANY>RCA</COMPANY>
<PRICE>9.90</PRICE> <YEAR>1982</YEAR>
</CD> <CD>

Web Technologies Unit-III
CSE -98-
<TITLE>STILL GOT THE BLUES</TITLE> <ARTIST>GARY MOORE</ARTIST>
<COUNTRY>UK</COUNTRY> <COMPANY>VIRGIN RECORDS</COMPANY>
<PRICE>10.20</PRICE> <YEAR>1990</YEAR>
</CD>
</CATALOG> When a user clicks on the "Get CD info" button above, the loadDoc() function is executed. The
loadDoc() function creates an XMLHttpRequest object, adds the function to be executed when
the server response is ready, and sends the request off to the server. When the server response is
ready, an HTML table is built, nodes (elements) are extracted from the XML file, and it finally
updates the element "demo" with the HTML table filled with XML data.
Handling JSON with AJAX:
According to the AJAX model, web applications can send and retrieve data from a server
asynchronously without interfering with the display and the behavior of the existing page.
Many developers use JSON to pass AJAX updates between the client and the server. Websites
updating live sports scores can be considered as an example of AJAX. If these scores have to be
updated on the website, then they must be stored on the server so that the webpage can retrieve
the score when it is required. This is where we can make use of JSON formatted data.
Any data that is updated using AJAX can be stored using the JSON format on the web server.
AJAX is used so that javascript can retrieve these JSON files when necessary, parse them, and
perform one of the following operations −
Store the parsed values in the variables for further processing before displaying them on
the webpage.
It directly assigns the data to the DOM elements in the webpage, so that they are
displayed on the website.
Example
The following code shows JSON with AJAX. Save it as ajax.html file. Here the loading
function loadJSON() is used asynchronously to upload JSON data.
Ajax.html:
<html>
<head>
<meta content = "text/html; charset = ISO-8859-1" http-equiv = "content-type">
<script type = "application/javascript">
function loadJSON(){
var data_file = "http://www.tutorialspoint.com/json/data.json";
var http_request = new XMLHttpRequest();
try{
// Opera 8.0+, Firefox, Chrome, Safari
http_request = new XMLHttpRequest();
}catch (e){
// Internet Explorer Browsers
try{
http_request = new ActiveXObject("Msxml2.XMLHTTP");

Web Technologies Unit-III
CSE -99-
}catch (e) {
try{
http_request = new ActiveXObject("Microsoft.XMLHTTP");
}catch (e){
// Something went wrong
alert("Your browser broke!");
return false;
}
}
}
http_request.onreadystatechange = function(){
if (http_request.readyState == 4 ){
// Javascript function JSON.parse to parse JSON data
var jsonObj = JSON.parse(http_request.responseText);
// jsonObj variable now contains the data structure and can
// be accessed as jsonObj.name and jsonObj.country.
document.getElementById("Name").innerHTML = jsonObj.name;
document.getElementById("Country").innerHTML = jsonObj.country;
}
}
http_request.open("GET", data_file, true);
http_request.send();
}
</script>
<title>tutorialspoint.com JSON</title>
</head>
<body>
<h1>Cricketer Details</h1>
<table class = "src">
<tr>
<th>Name</th>
<th>Country</th>
</tr>
<tr>
<td>
<div id = "Name">Sachin</div>
</td>
<td>
<div id = "Country">India</div>
</td>
</tr>
</table>
<div class = “central”>
<button type = “button” onclick = “loadJSON()”>Update Details </button>
</div>
</body>

Web Technologies Unit-III
CSE -100-
</html>
Given below is the input file data.json, having data in JSON format which will be uploaded
asynchronously when we click the Update Detail button.
data.json: {“name”: “Brett”, “country”: “Australia”}
Introduction to Angular JS: Angular JS is an open source web application framework. It was originally developed in 2009 by
Misko Hevery and Adam Abrons. It is now maintained by Google. Its latest version is 1.4.3.
Definition of Angular JS as put by its official documentation is as follows −
Angular JS is a structural framework for dynamic web apps. It lets you use HTML as your
template language and lets you extend HTML's syntax to express your application's components
clearly and succinctly. Angular's data binding and dependency injection eliminate much of the
code you currently have to write. And it all happens within the browser, making it an ideal
partner with any server technology.
Angular JS is a powerful JavaScript based development framework to create RICH
Internet Application (RIA).
Angular JS provides developers options to write client side application (using JavaScript)
in a clean MVC (Model View Controller) way.
Application written in Angular JS is cross-browser compliant. Angular JS automatically
handles JavaScript code suitable for each browser.
Angular JS is open source, completely free, and used by thousands of developers around
the world. It is licensed under the Apache License version 2.0.
Following are most important core features of Angular JS −
Data-binding − It is the automatic synchronization of data between model and view
components.
Scope − These are objects that refer to the model. They act as glue between controller
and view.
Controller − These are JavaScript functions that are bound to a particular scope.
Services – Angular JS come with several built-in services for example $https: to make
XMLHttpRequests. These are singleton objects which are instantiated only once in app.
Filters − These select a subset of items from an array and returns a new array.
Directives − Directives are markers on DOM elements (such as elements, attributes,
CSS, and more). These can be used to create custom HTML tags that serve as new,
custom widgets. Angular JS has built-in directives (ngBind, ngModel...)
Templates − These are the rendered view with information from the controller and
model. These can be a single file (like index.html) or multiple views in one page using
"partials".
Routing − It is concept of switching views.
Model View Whatever − MVC is a design pattern for dividing an application into
different parts (called Model, View and Controller), each with distinct responsibilities.
AngularJS does not implement MVC in the traditional sense, but rather something closer

Web Technologies Unit-III
CSE -101-
to MVVM (Model-View-ViewModel). The Angular JS team refers it humorously as
Model View Whatever.
Deep Linking − Deep linking allows you to encode the state of application in the URL
so that it can be bookmarked. The application can then be restored from the URL to the
same state.
Dependency Injection − AngularJS has a built-in dependency injection subsystem that
helps the developer by making the application easier to develop, understand, and test.
Advantages of Angular JS:
Angular JS provides capability to create Single Page Application in a very clean and
maintainable way.
Angular JS provides data binding capability to HTML thus giving user a rich and
responsive experience
Angular JS code is unit testable.
Angular JS uses dependency injection and make use of separation of concerns.
Angular JS provides reusable components.
With Angular JS, developer can write less code and get more functionality.
In Angular JS, views are pure html pages, and controllers written in JavaScript do the
business processing.
On top of everything, Angular JS applications can run on all major browsers and smart phones
including Android and iOS based phones/tablets.
Disadvantages of Angular JS:
Though Angular JS comes with lots of plus points but same time we should consider the
following points −
Not Secure − Being JavaScript only framework, application written in AngularJS are not
safe. Server side authentication and authorization is must to keep an application secure.
Not degradable − If your application user disables JavaScript then user will just see the
basic page and nothing more.
The Angular JS Components:
The Angular JS framework can be divided into following three major parts −
ng-app − This directive defines and links an AngularJS application to HTML.
ng-model − This directive binds the values of AngularJS application data to HTML input
controls.
ng-bind − This directive binds the AngularJS Application data to HTML tags.
Angular JS Expressions to Bind Data to HTML:
Expressions are used to bind application data to html. Expressions are written inside double
braces like {{ expression}}. Angular JS application expressions are pure JavaScript expressions
and outputs the data where they are used.
Using numbers:
<p>Expense on Books : {{cost * quantity}} Rs</p>
Using strings:
<p>Hello {{student.firstname + " " + student.lastname}}!</p>

Web Technologies Unit-III
CSE -102-
Using object:
<p>Roll No: {{student.rollno}}</p>
Using array
<p>Marks(Math): {{marks[3]}}</p>
Example:
Following example will showcase all the above mentioned expressions.
testAngularJS.html <html>
<head>
<title>AngularJS Expressions</title>
</head>
<body>
<h1>Sample Application</h1>
<div ng-app = "" ng-init = "quantity = 1;cost = 30; student =
{firstname:'Mahesh',lastname:'Parashar',rollno:101};marks =
[80,90,75,73,60]">
<p>Hello {{student.firstname + " " + student.lastname}}!</p>
<p>Expense on Books : {{cost * quantity}} Rs</p>
<p>Roll No: {{student.rollno}}</p>
<p>Marks(Math): {{marks[3]}}</p>
</div>
<script src =
"https://ajax.googleapis.com/ajax/libs/angularjs/1.3.14/angular.min.js
"></script>
</body>
</html>
Angular JS Directives to Bind Data to HTML:
AngularJS directives are used to extend HTML. These are special attributes starting with ng-
prefix. We're going to discuss following directives −
ng-app − This directive starts an AngularJS Application.
ng-init − This directive initializes application data.
ng-model − This directive binds the values of AngularJS application data to HTML input
controls.
ng-repeat − This directive repeats html elements for each item in a collection.
ng-app directive:
ng-app directive starts an AngularJS Application. It defines the root element. It automatically
initializes or bootstraps the application when web page containing AngularJS Application is
loaded. It is also used to load various AngularJS modules in AngularJS Application. In following
example, we've defined a default AngularJS application using ng-app attribute of a div element. <div ng-app = "">
...
</div>
Web Technologies Unit-III
CSE -103-
ng-init directive: ng-init directive initializes an AngularJS Application data. It is used to put values to the variables
to be used in the application. In following example, we'll initialize an array of countries. We're
using JSON syntax to define array of countries. <div ng-app = "" ng-init = "countries = [{locale:'en-US',name:'United
States'}, {locale:'en-GB',name:'United Kingdom'}, {locale:'en-
FR',name:'France'}]">
...
</div>
ng-model directive: This directive binds the values of AngularJS application data to HTML input controls. In
following example, we've defined a model named "name". <div ng-app = "">
...
<p>Enter your Name: <input type = "text" ng-model = "name"></p>
</div>
ng-repeat directive:
ng-repeat directive repeats html elements for each item in a collection. In following example,
we've iterated over array of countries. <div ng-app = "">
...
<p>List of Countries with locale:</p>
<ol>
<li ng-repeat = "country in countries">
{{ 'Country: ' + country.name + ', Locale: ' + country.locale }}
</li>
</ol>
</div>
Example:
Following example will showcase all the above mentioned directives.
testAngularJS.html: <html>
<head>
<title>AngularJS Directives</title>
</head>
<body>
<h1>Sample Application</h1>
<div ng-app = "" ng-init = "countries = [{locale:'en-US',name:'United
States'}, {locale:'en-GB',name:'United Kingdom'}, {locale:'en-
FR',name:'France'}]">
<p>Enter your Name: <input type = "text" ng-model = "name"></p>
<p>Hello <span ng-bind = "name"></span>!</p>
<p>List of Countries with local: </p>
<ol>
<li ng-repeat = "country in countries">
{{ 'Country: ' + country.name + ', Locale: ' + country.locale
}}
</li>
</ol>
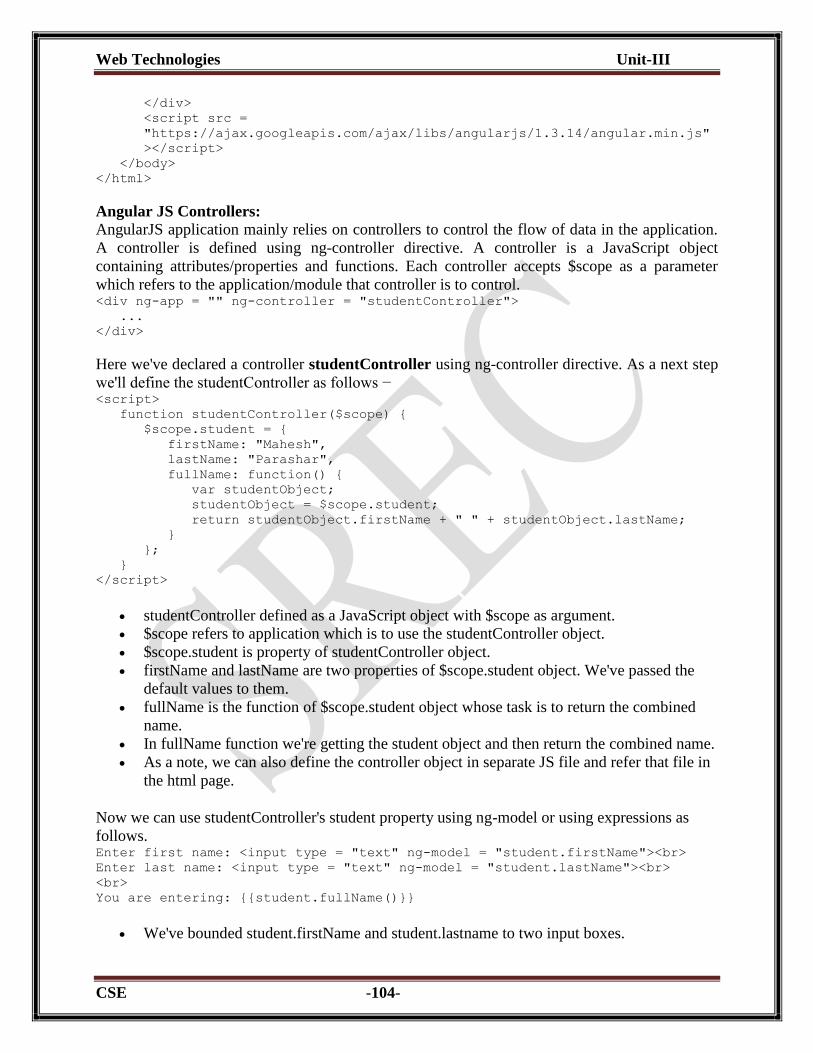
Web Technologies Unit-III
CSE -104-
</div>
<script src =
"https://ajax.googleapis.com/ajax/libs/angularjs/1.3.14/angular.min.js"
></script>
</body>
</html>
Angular JS Controllers:
AngularJS application mainly relies on controllers to control the flow of data in the application.
A controller is defined using ng-controller directive. A controller is a JavaScript object
containing attributes/properties and functions. Each controller accepts $scope as a parameter
which refers to the application/module that controller is to control. <div ng-app = "" ng-controller = "studentController">
...
</div>
Here we've declared a controller studentController using ng-controller directive. As a next step
we'll define the studentController as follows − <script>
function studentController($scope) {
$scope.student = {
firstName: "Mahesh",
lastName: "Parashar",
fullName: function() {
var studentObject;
studentObject = $scope.student;
return studentObject.firstName + " " + studentObject.lastName;
}
};
}
</script>
studentController defined as a JavaScript object with $scope as argument.
$scope refers to application which is to use the studentController object.
$scope.student is property of studentController object.
firstName and lastName are two properties of $scope.student object. We've passed the
default values to them.
fullName is the function of $scope.student object whose task is to return the combined
name.
In fullName function we're getting the student object and then return the combined name.
As a note, we can also define the controller object in separate JS file and refer that file in
the html page.
Now we can use studentController's student property using ng-model or using expressions as
follows. Enter first name: <input type = "text" ng-model = "student.firstName"><br>
Enter last name: <input type = "text" ng-model = "student.lastName"><br>
<br>
You are entering: {{student.fullName()}}
We've bounded student.firstName and student.lastname to two input boxes.

Web Technologies Unit-III
CSE -105-
We've bounded student.fullName() to HTML.
Now whenever you type anything in first name and last name input boxes, you can see
the full name getting updated automatically.
Example:
Following example will showcase use of controller.
testAngularJS.html: <html>
<head>
<title>Angular JS Controller</title>
<script src =
"https://ajax.googleapis.com/ajax/libs/angularjs/1.3.14/angular.min.js"></scr
ipt>
</head>
<body>
<h2>AngularJS Sample Application</h2>
<div ng-app = "mainApp" ng-controller = "studentController">
Enter first name: <input type = "text" ng-model =
"student.firstName"><br><br>
Enter last name: <input type = "text" ng-model =
"student.lastName"><br>
<br>
You are entering: {{student.fullName()}}
</div>
<script>
var mainApp = angular.module("mainApp", []);
mainApp.controller('studentController', function($scope) {
$scope.student = {
firstName: "Mahesh",
lastName: "Parashar",
fullName: function() {
var studentObject;
studentObject = $scope.student;
return studentObject.firstName + " " +
studentObject.lastName;
}
};
});
</script>
</body>
</html>
Angular JS Forms:
AngularJS enriches form filling and validation. We can use ng-click to handle AngularJS click
on button and use $dirty and $invalid flags to do the validations in seemless way. Use novalidate
with a form declaration to disable any browser specific validation. Forms controls makes heavy
use of Angular events. Let's have a quick look on events first.

Web Technologies Unit-III
CSE -106-
Events:
AngularJS provides multiple events which can be associated with the HTML controls. For
example ng-click is normally associated with button. Following are supported events in Angular
JS.
ng-click
ng-dbl-click
ng-mousedown
ng-mouseup
ng-mouseenter
ng-mouseleave
ng-mousemove
ng-mouseover
ng-keydown
ng-keyup
ng-keypress
ng-change
ng-click:
Reset data of a form using on-click directive of a button. <input name = "firstname" type = "text" ng-model = "firstName" required>
<input name = "lastname" type = "text" ng-model = "lastName" required>
<input name = "email" type = "email" ng-model = "email" required>
<button ng-click = "reset()">Reset</button>
<script>
function studentController($scope) {
$scope.reset = function(){
$scope.firstName = "Mahesh";
$scope.lastName = "Parashar";
$scope.email = "[email protected]";
}
$scope.reset();
}
</script>
Validate data:
Following can be used to track error.
$dirty − states that value has been changed.
$invalid − states that value entered is invalid.
$error − states the exact error.
Example:
Following example will showcase all the above mentioned directives.
testAngularJS.html: <html>
<head>
<title>Angular JS Forms</title>
<script src =
"https://ajax.googleapis.com/ajax/libs/angularjs/1.3.14/angular.min.js"></scr
ipt>
<style>
table, th , td {
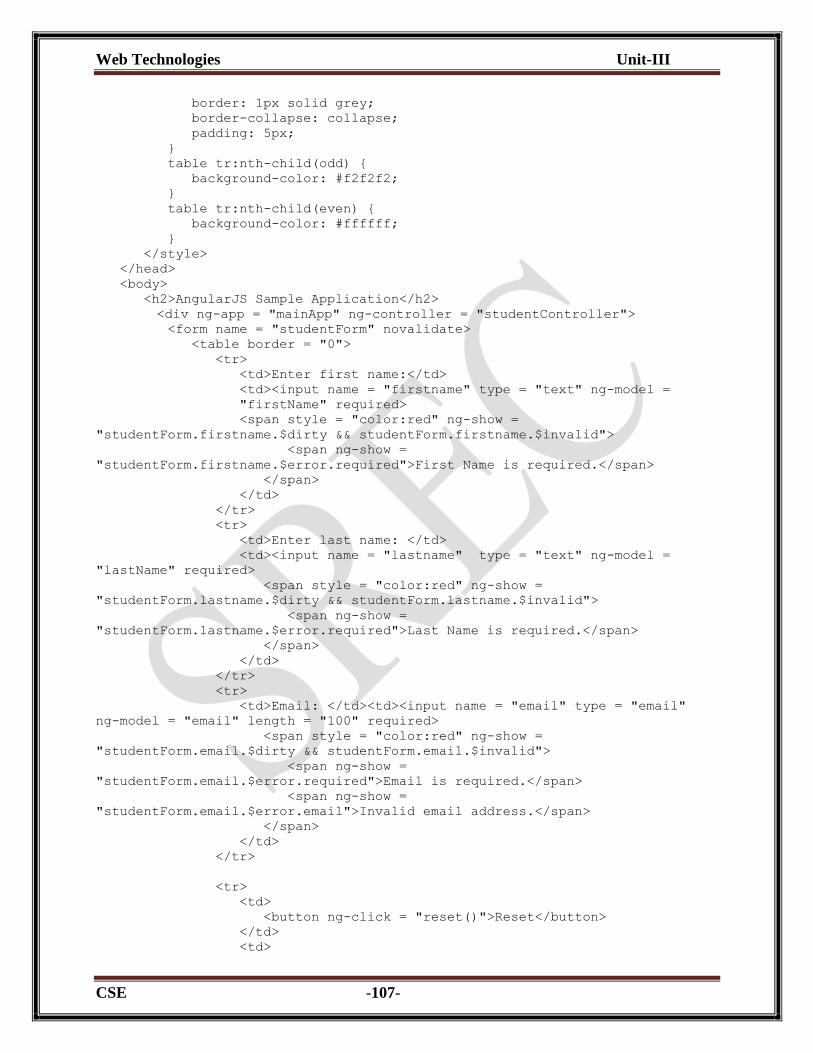
Web Technologies Unit-III
CSE -107-
border: 1px solid grey;
border-collapse: collapse;
padding: 5px;
}
table tr:nth-child(odd) {
background-color: #f2f2f2;
}
table tr:nth-child(even) {
background-color: #ffffff;
}
</style>
</head>
<body>
<h2>AngularJS Sample Application</h2>
<div ng-app = "mainApp" ng-controller = "studentController">
<form name = "studentForm" novalidate>
<table border = "0">
<tr>
<td>Enter first name:</td>
<td><input name = "firstname" type = "text" ng-model =
"firstName" required>
<span style = "color:red" ng-show =
"studentForm.firstname.$dirty && studentForm.firstname.$invalid">
<span ng-show =
"studentForm.firstname.$error.required">First Name is required.</span>
</span>
</td>
</tr>
<tr>
<td>Enter last name: </td>
<td><input name = "lastname" type = "text" ng-model =
"lastName" required>
<span style = "color:red" ng-show =
"studentForm.lastname.$dirty && studentForm.lastname.$invalid">
<span ng-show =
"studentForm.lastname.$error.required">Last Name is required.</span>
</span>
</td>
</tr>
<tr>
<td>Email: </td><td><input name = "email" type = "email"
ng-model = "email" length = "100" required>
<span style = "color:red" ng-show =
"studentForm.email.$dirty && studentForm.email.$invalid">
<span ng-show =
"studentForm.email.$error.required">Email is required.</span>
<span ng-show =
"studentForm.email.$error.email">Invalid email address.</span>
</span>
</td>
</tr>
<tr>
<td>
<button ng-click = "reset()">Reset</button>
</td>
<td>
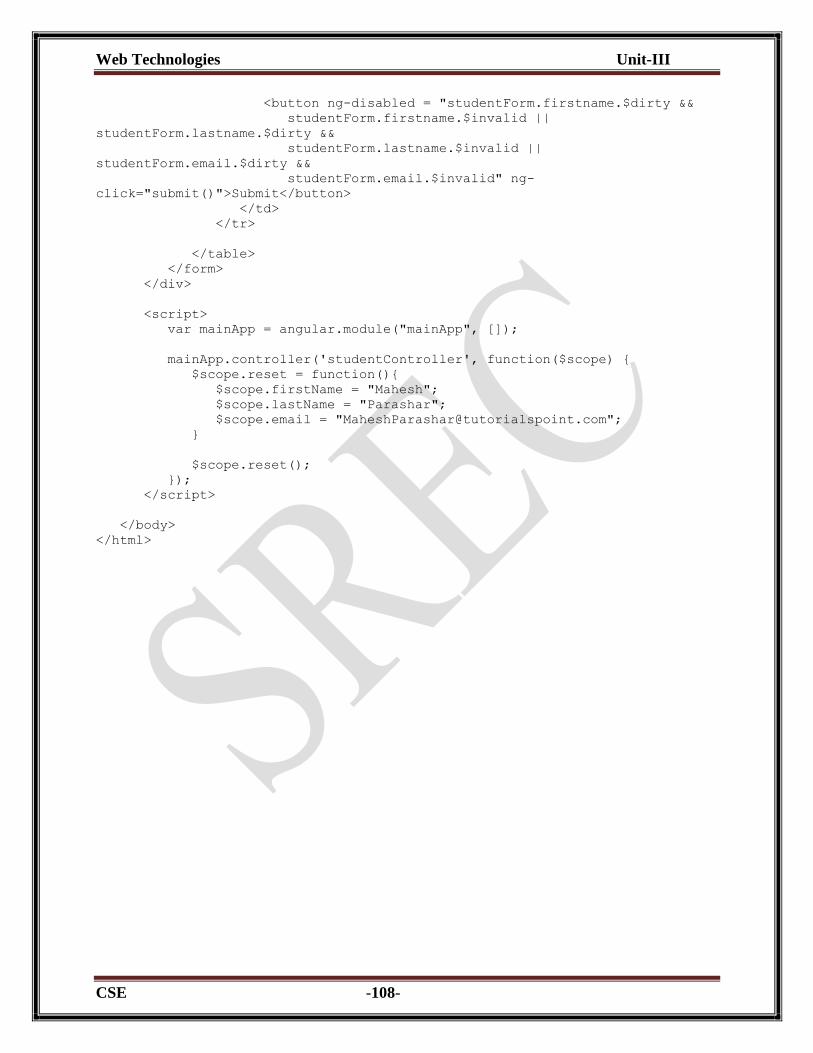
Web Technologies Unit-III
CSE -108-
<button ng-disabled = "studentForm.firstname.$dirty &&
studentForm.firstname.$invalid ||
studentForm.lastname.$dirty &&
studentForm.lastname.$invalid ||
studentForm.email.$dirty &&
studentForm.email.$invalid" ng-
click="submit()">Submit</button>
</td>
</tr>
</table>
</form>
</div>
<script>
var mainApp = angular.module("mainApp", []);
mainApp.controller('studentController', function($scope) {
$scope.reset = function(){
$scope.firstName = "Mahesh";
$scope.lastName = "Parashar";
$scope.email = "[email protected]";
}
$scope.reset();
});
</script>
</body>
</html>

Web Technologies Unit-IV
CSE -109-
UNIT-IV
JDBC AND SERVLETS
Introduction to Servlets: Servlets are server side components that provide a powerful mechanism for developing
server side programs. Servlets provide component-based, platform-independent methods for
building Web-based applications. Using Servlets web developers can create fast and efficient
server side application which can run on any Servlet enabled web server. Servlets can access the
entire family of Java APIs, including the JDBC API to access enterprise databases. Servlets can
also access a library of HTTP-specific calls; receive all the benefits of the mature java language
including portability, performance, reusability, and crash protection. Today Servlets are the
popular choice for building interactive web applications. Servlet containers are usually the
components of web and application servers, such as BEA Weblogic Application Server, IBM
Web Sphere, Sun Java System Web Server, Sun Java System Application Server and others.
Servlets are not designed for a specific protocol. It is different thing that they are most
commonly used with the HTTP protocols Servlets uses the classes in the java packages
javax.servlet and javax.servlet.http. Servlets provides a way of creating the sophisticated server
side extensions in a server as they follow the standard framework and use the highly portable
java language.
HTTP Servlets Typically Used To: Provide dynamic content like getting the results of a database query and returning to the
client.
Process and/or store the data submitted by the HTML.
Manage information about the state of a stateless HTTP. e.g. an online shopping car
manages request for multiple concurrent customers.
Methods of Servlets: A Generic Servlet contains the following five methods:
init(): public void init(ServletConfig config) throws ServletException
The init () method is called only once by the servlet container throughout the life of a
Servlet. By this init () method the Servlet get to know that it has been placed into service.
The Servlet cannot be put into the service if
The init () method does not return within a fix time set by the web server.
It throws a ServletException
Parameters - The init () method takes a ServletConfig object that contains the
initialization parameters and Servlet's configuration and throws a ServletException if an
exception has occurred.
service(): public void service(ServletRequest req, ServletResponse res) throws ServletException,
IOException
Once the Servlet starts getting the requests, the service() method is called by the Servlet
container to respond. The Servlet services the client's request with the help of two
objects. These two objects are javax.servlet.ServletRequest and javax.servlet. Servlet
Response are passed by the Servlet container. The status code of the response always

Web Technologies Unit-IV
CSE -110-
should be set for a Servlet that throws or sends an error. Parameters - The service ()
method takes the ServletRequest object that contains the client's request and the object
ServletResponse contains the Servlet's response. The service() method throws
ServletException and IOException exception.
getServletConfig(): public ServletConfig getServletConfig()
This method contains parameters for initialization and startup of the Servlet and returns a
ServletConfig object. This object is then passed to the init method. When this interface is
implemented then it stores the ServletConfig object in order to return it. It is done by the
generic class which implements this interface.
Returns - the ServletConfig object
getServletInfo(): public String getServletInfo ()
The information about the Servlet is returned by this method like version, author etc. This
method returns a string which should be in the form of plain text and not any kind of
markup.
Returns - a string that contains the information about the Servlet
destroy(): public void destroy()
This method is called when we need to close the Servlet. That is before removing a
Servlet instance from service, the Servlet container calls the destroy() method. Once the
Servlet container calls the destroy() method, no service methods will be then called . That
is after the exit of all the threads running in the Servlet, the destroy() method is called.
Hence, the Servlet gets a chance to clean up all the resources like memory, threads etc
which are being held.
Life cycle of Servlet: The life cycle of a Servlet can be categorized into four parts:
1. Loading and Instantiation: The Servlet container loads the Servlet during startup or
when the first request is made. The loading of the Servlet depends on the attribute <load-
on-startup> of web.xml file. If the attribute <load-on-startup> has a positive value then
the Servlet is load with loading of the container otherwise it load when the first request
comes for service. After loading of the Servlet, the container creates the instances of the
Servlet.
2. Initialization: After creating the instances, the Servlet container calls the init() method
and passes the Servlet initialization parameters to the init() method. The init() must be
called by the Servlet container before the Servlet can service any request. The
initialization parameters persist until the Servlet is destroyed. The init() method is called
only once throughout the life cycle of the Servlet. The Servlet will be available for
service if it is loaded successfully otherwise the Servlet container unloads the Servlet.
3. Servicing the Request: After successfully completing the initialization process, the
Servlet will be available for service. Servlet creates separate threads for each request. The
Servlet container calls the service() method for servicing any request. The service()
method determines the kind of request and calls the appropriate method (doGet () or
doPost ()) for handling the request and sends response to the client using the methods of
the response object.

Web Technologies Unit-IV
CSE -111-
4. Destroying the Servlet: If the Servlet is no longer needed for servicing any request, the
Servlet container calls the destroy() method . Like the init() method this method is also
called only once throughout the life cycle of the Servlet. Calling the destroy() method
indicates to the Servlet container not to sent the any request for service and the Servlet
releases all the resources associated with it. Java Virtual Machine claims for the memory
associated with the resources for garbage collection.
The Advantages of Servlets: 1. Portability
2. Powerful
3. Efficiency
4. Safety
5. Integration
6. Extensibilty
7. Inexpensive
Each of the points is defined below:
1. Portability: As we know that the Servlets are written in java and follow well known
standardized APIs so they are highly portable across operating systems and server
implementations. We can develop a Servlet on Windows machine running the tomcat
server or any other server and later we can deploy that Servlet effortlessly on any other
operating system like UNIX server running on the iPlanet/Netscape Application server.
So Servlets are Write Once, Run Anywhere (WORA) program.
2. Powerful: We can do several things with the Servlets which were difficult or even
impossible to do with CGI, for example the Servlets can talk directly to the web server
while the CGI programs can't do. Servlets can share data among each other, they even
make the database connection pools easy to implement. They can maintain the session by
using the session tracking mechanism which helps them to maintain information from
request to request. It can do many other things which are difficult to implement in the
CGI programs.
3. Efficiency: As compared to CGI the Servlets invocation is highly efficient. When the
Servlet get loaded in the server, it remains in the server's memory as a single object
instance. However with Servlets there are N threads but only a single copy of the Servlet

Web Technologies Unit-IV
CSE -112-
class. Multiple concurrent requests are handled by separate threads so we can say that the
Servlets are highly scalable.
4. Safety: As Servlets are written in java, Servlets inherit the strong type safety of java
language. Java's automatic garbage collection and a lack of pointers mean that Servlets
are generally safe from memory management problems. In Servlets we can easily handle
the errors due to Java's exception handling mechanism. If any exception occurs then it
will throw an exception.
5. Integration: Servlets are tightly integrated with the server. Servlet can use the server to
translate the file paths, perform logging, check authorization, and MIME type mapping
etc.
6. Extensibility: The Servlet API is designed in such a way that it can be easily extensible.
As it stands today, the Servlet API support Http Servlets, but in later date it can be
extended for another type of Servlets.
7. Inexpensive: There are number of free web servers available for personal use or for
commercial purpose. Web servers are relatively expensive. So by using the free available
web servers you can add Servlet support to it.
DEPLOYING A SERVLET ON WEB SERVER: Step 1: First of all you need to install the Apache Tomcat Server and JDK.
As mentioned earlier, Apache’s Tomcat Server is free software available for download @
www.apache.org. You have to download the Tomcat Server 6.0. This Server supports
Java Servlets 2.5 and Java Server Pages (JSPs) 2.1 specifications. Important software
required for running this server is Sun’s JDK (Java Development Kit) and JRE (Java
Runtime Environment). The current version of JDK is 1.8. Like Tomcat, JDK is also free
and is available for download at www.java.sun.com.
Step 2: Next configure the Tomcat server and JDK by setting up the environment
variables for JAVA_HOME variable - You have to set this variable which points to the
base installation directory of JDK installation. (e.g. C:\Program Files\Java\jdk1.8.xx\bin).
And CATALINA_HOME variable – you have to set this variable which points to the
base installation directory of Tomcat installation. (e.g. C:\Program Files\Apache Software
Foundation\Tomcatx.x\bin\.
Step 3:Write Your Servlet:
Here is simple servlet program which can be written in Notepad or EditPlus and saved
using .java extension.
PROGRAM:
import javax.servlet.*;
import javax.servlet.http.*;
import java.io.*;
public class LifeCycle extends GenericServlet
{
public void init(ServletConfig config)throws ServletException
{
System.out.println("init");
}
public void service(ServletRequest req,ServletResponse res)throws
ServletException,IOException

Web Technologies Unit-IV
CSE -113-
{
System.out.println("from service");
PrintWriter out=res.getWriter();
out.println("LifeCycle\n");
out.println("III CSE Students");
}
public void destroy()
{
System.out.println("destroy");
}
}
Step 4: Then set the classpath of the servlet-api.jar file in the variable CLASSPATH
inside the environment variable as “C:\Program Files\Apache Tomcat
Foundation\Tomcat x.x\lib\servlet-api.jar”. Then compile your servlet by using javac
LifeCycle.java.
Step 5: The next step is to create your web application folder. The name of the folder can
be any valid and logical name that represents your application (e.g. bank_apps,
airline_tickets_booking, shopping_cart,etc). But the most important criterion is that this
folder should be created under webapps folder. The path would be similar or close to this
- C:\Program Files\Apache Software Foundation\Tomcat 6.0\webapps. For demo
purpose, let us create a folder called example programs under the webapps folder.
Step 6: Next create the WEB-INF folder in C:\Program Files\Apache Software
Foundation\Tomcat 6.0\webapps\Example Programs folder.
Step 7: Then create the web.xml file and the classes folder. Ensure that the web.xml and
classes folder are created under the WEB-INF folder. The web.xml file contains the
following information.
The servlet information
The mapping information from the server to our web application.
Step 8: Then copy the Servlet class file to the classes folder in order to run the Servlet
that we created. All you need to do is copy the Servlet class file (the file we obtained
from Step 4) to this folder.
Step 9: Edit web.xml to include Servlet’s name and URL pattern. This step involves two
actions viz. including the Servlet’s name and then mentioning the url- pattern. Let us first
see as how to include the Servlet’s name in the web.xml file.
<web-app>
<servlet>
<servlet-name>MyServ</servlet-name>
<servlet-class>LifeCycle</servlet-class>
</servlet>
<servlet-mapping>
<servlet-name>MyServ</servlet-name>
<url-pattern>/lc</url-pattern>
</servlet-mapping>
</web-app>

Web Technologies Unit-IV
CSE -114-
Note – The Servlet-name need not be the same as that of the class name. You can give a
different name (or alias) to the actual Servlet. This is one of the main reasons as why this
tag is used for. Next, include the url pattern using the <servlet-mapping> </servlet-
mapping> tag. The url pattern defines as how a user can access the Servlet from the
browser.
Step 10: Run Tomcat server and then execute your Servlet by opening any one of your
web browser and enter the URL as specified in the web.xml file. The complete URL that
needs to be entered in the browser is: http://localhost:8080/scce/lc
Invoking Servlet using HTML:
It is a common practice to invoke servlet using HTML form. This will be achieved by the
action attribute of the form tag in HTML. To understand this, we have to create a web page
which will invoke above created servlet. In the above method, we have seen that the servlet is
invoked from the URL, but here in this example the same servlet will be invoked by clicking the
button in the web page.
HTML Program:
<html>
<head><title> Life Cycle of Servlet </title>
</head>
<body>
<form name="form1" action="lc">
<b> My Life Class</b>
<input type="submit" value="Go to My Life Cycle">
</form>
</body>
</html>
For getting the output:
1. Compile the servlet program using javac compiler.
2. Copy the generated class file into your web application’s classes folder.
3. Enter the http://localhost:8080/Example%20Programs/mylifecycle.html
The Servlet API: Two packages contain the classes and interfaces that are required to build servlets. These
are javax.servlet and javax.servlet.http. They constitute the Servlet API. These packages are not
part of the java core packages. Instead, they are standard extensions provided by the Tomcat.
The javax.servlet Package:
The javax.servlet package contains a number of interfaces and classes that establish the
framework in which servlets operate. The following table summarizes the core interfaces that are
provided in this package. The most significant of these is Servlet. All servlets must implement
this interface or extend a class that implements the interface. The ServletRequest and
ServletResponse interfaces are also very important.
Interface Description
Servlet Declares life cycle methods for a servlet.
ServletConfig Allows servlets to get initialization parameters.
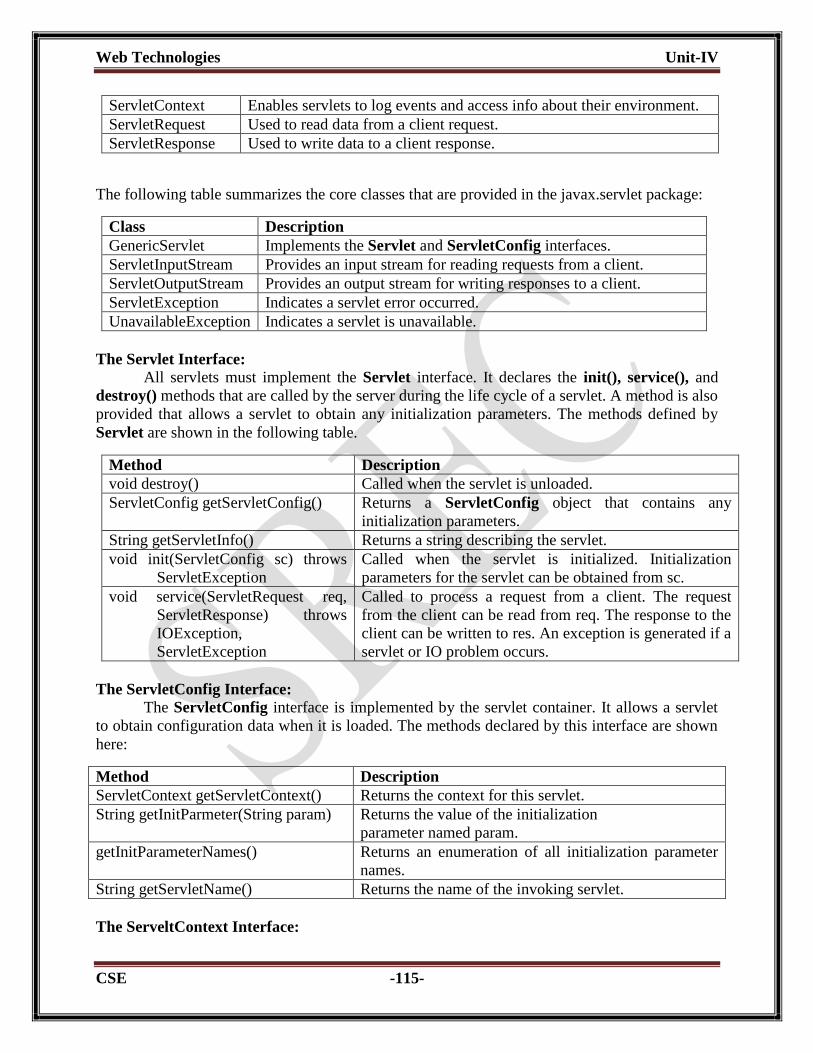
Web Technologies Unit-IV
CSE -115-
ServletContext Enables servlets to log events and access info about their environment.
ServletRequest Used to read data from a client request.
ServletResponse Used to write data to a client response.
The following table summarizes the core classes that are provided in the javax.servlet package:
Class Description
GenericServlet Implements the Servlet and ServletConfig interfaces.
ServletInputStream Provides an input stream for reading requests from a client.
ServletOutputStream Provides an output stream for writing responses to a client.
ServletException Indicates a servlet error occurred.
UnavailableException Indicates a servlet is unavailable.
The Servlet Interface:
All servlets must implement the Servlet interface. It declares the init(), service(), and
destroy() methods that are called by the server during the life cycle of a servlet. A method is also
provided that allows a servlet to obtain any initialization parameters. The methods defined by
Servlet are shown in the following table.
Method Description
void destroy() Called when the servlet is unloaded.
ServletConfig getServletConfig() Returns a ServletConfig object that contains any
initialization parameters.
String getServletInfo() Returns a string describing the servlet.
void init(ServletConfig sc) throws
ServletException
Called when the servlet is initialized. Initialization
parameters for the servlet can be obtained from sc.
void service(ServletRequest req,
ServletResponse) throws
IOException,
ServletException
Called to process a request from a client. The request
from the client can be read from req. The response to the
client can be written to res. An exception is generated if a
servlet or IO problem occurs.
The ServletConfig Interface:
The ServletConfig interface is implemented by the servlet container. It allows a servlet
to obtain configuration data when it is loaded. The methods declared by this interface are shown
here:
Method Description
ServletContext getServletContext() Returns the context for this servlet.
String getInitParmeter(String param)
Returns the value of the initialization
parameter named param.
getInitParameterNames() Returns an enumeration of all initialization parameter
names.
String getServletName() Returns the name of the invoking servlet.
The ServeltContext Interface:

Web Technologies Unit-IV
CSE -116-
The ServletContext interface is implemented by the servlet container. It enables servlets
to obtain information about the environment. The methods of this interface are summarized
below:
Method Description
Object getAttribute(String attr) Returns the values of the server attribute named attr.
String getServerInfo() Returns the information about the server.
void setAttributes(String attr, Object val) Sets the attribute specified by attr to the value passed in
val.
void log(String s) Writes s to the servlet log.
The ServletRequest Interface:
The ServletRequest interface is implemented by the servlet container. It enables a servlet
to obtain information about a client request. Some of its methods are shown in the following
table:
Method Description
String getParameter(String pname) Returns the value of the parameter named pname.
Enumeration getParameterNames() Returns an enumeration of the parameter names
for this request.
String[] getParameterValues(String pname) Returns an array containing values associated with
the parameter specified by pname.
String getProtocol() Returns a description of the protocol.
String getContentType() Returns the type of the request. A null value is
returned if the type cannot be determined.
BufferedReader getReader() throws
IOException
Returns a buffered reader that can be used to read
text from the request. An IllegalStateException is
thrown if getInputStrream() has already been
invoked for this request.
int getServerPort Returns the port number.
String getRemoteHost() Returns the client’s host name.
The ServletResponse Interface:
The ServletResponse interface is implemented by the servlet container. It enables a
servlet to formulate a response for a client. Its methods are summarized below:
Method Description
PrintWriter getWriter() throws IOException Returns a PrintWriter that can be used to
write character data to the response. An
IllegalStateException is thrown if
getOutputStream() has already been invoked
for this request.
ServletOutputStream getOutputStream()
throws IOException
Returns a ServletOutputStream that can be
used to write binary data to the response. An
IllegalStateException is thrown if
getWriter() has already been invoked for this
request.

Web Technologies Unit-IV
CSE -117-
void setContentSize(int size) Sets the content length for the response to size.
void setContentType(String type) Sets the content type for the response to type.
The following are the classes of the javax.servlet package:
The GenericServlet Class:
The GenericServlet class provides implementations of the basic life cycle methods for a
servlet. GenericServlet implements the Servlet and ServletConfig interfaces. In addition, a
method to append a string to the server log file is available. The signatures of this method are
shown below:
void log(String s)
void log(String s, throwable e)
Here, s is the string to be appended to the log, and e is an exception that occurred.
The ServletInputStream Class:
The ServletInputStream class extends InputStream. It is implemented by the servlet
container and provides an input stream that a servlet developer can use to read the data from a
client request. It defines the default constructor. In addition, a method is provided to read bytes
from the stream. Its signature is shown here:
int readLine(byte[] buffer, int offset, int size) throws IOException
Here, buffer is the array into which size bytes are placed starting at offset. The method returns the
actual number of bytes read or -1 if an end-if-stream condition is encountered.
The ServletOutputStream Class:
The ServletOutputStream class extends OutputStream. It is implemented by the servlet
container and provides an output stream that a servlet developer can use to write data to a client
response. a default constructor is defined. It also defines the print() and println() methods,
which output data to the stream.
The Servlet Exception Classes:
javax.servlet defines two exceptions. The first is ServeltException, which indicates that
a servlet problem has occurred. The second is UnavailableException, which extends
ServletException. It indicates that a servlet is unavailable.
The javax.servlet.http Package:
The javax.servlet.http package contains a number of interfaces and classes that are
commonly used by the servlet developers. Its functionality makes it easy to build servlets that
work with HTTP requests and responses. The following table summarizes the core interfaces that
are available in this package:
Interface Description
HttpServletRequest Enables servlets to read data from an HTTP request.
HttpServletResponse Enables servlets to write data to an HTTP response.
HttpSession Allows session data to be read and written.
Web Technologies Unit-IV
CSE -118-
HttpSessionBindingListener Informs an object that it is bound to or unbound from a session.
The following table summarizes the core classes that are provided in this package. The
most important of these is HttpServlet. Servlet developers typically extend this class in order to
process HTTP requests.
Class Description
Cookie Allows state information to be stored on a client machine.
HttpServlet Provides methods to handle HTTP requests and responses.
HttpSessionEvent Encapsulates a session-changed event.
HttpSessionBindingEvent Indicates when a listener is bound to or unbound from a session
value, or that a session attribute changed.
The HttpServletRequest Interface:
The HttpServletRequest interface is implemented by the servlet container. It enables a
servlet to obtain information about a client request. The following table summarizes the methods
implemented by this interface.
Method Description
Cookie[] getCookies() Returns an array of the cookies in this request.
String getMethod() Returns the HTTP method for this request.
String getQueryString() Returns any query string in the URL.
String getRemoteUser() Returns the name of the user who issued this request.
String getRequestedSeesionId() Returns the ID of the session.
String gerServletPath() Returns the part of the URL that indicates the servlet.
The HttpServeltResponse Interface:
The HttpServletResponse interface is implemented the servlet container. It enables a
servlet to formulate an HTTP response to a client. Servlet constants are defined. These
correspond to the different status codes that can be assigned to an HTTP response. Several
important methods of this interface are summarized in the following table:
Method Description
void addCookie() Adds cookie to the HttpResponse.
void sendError(int c) throws IOException Sends the error code c to the client.
void sendError(int c, String s) throws
IOException
Sends the error code c and message s to the client.
void sendRedirect(String url) throws
IOException
Redirects the client to the given URL.
void setStatus(int code) Sets the status code for this response to code.
void setHeader(String field, String mesg) Adds field to the header with value equal to mesg.
The HttpSession Interface:
The HttpSession interface is implemented by the servlet container. It enables a servlet to
read and write the state information that is associated with an HTTP session. The following table

Web Technologies Unit-IV
CSE -119-
summarizes the several methods of this class. All of these methods throw an
IllegalStateException if the session has already been invalidated.
Method Descrption
Object getAttribute(String attr) Returns the value associated with the name passed in
attr. Returns null if attr is not found.
long getCreationTime() Returns the time (in milliseconds since midnight,
January 1, 1970, GMT) when this session was created.
String getId() Returns the session ID.
void invalidate() Invalidates this session and removes it from the context.
void setAttribute(String s, Object val) Associates the value passed in val with the attribute
name passed in attr.
The Cookie Class:
The Cookie class encapsulates a cookie. A cookie is stored on a client and contains state
information. Cookies are valuable for tracking user activities. For example, assumes that a user
visits an online store. A cookie can save the user’s name, address, and other information. The
user does not need to enter this data each time he or she visits the store. A servlet can write a
cookie to a user’s machine via the addCookie() method of the HttpServletResponse interface.
The names and values of cookies are stored on the user’s machine. Some of the information that
is saved for each cookie includes the following:
The name of the cookie
The value of the cookie
The expiration date of the cookie
The domain and the path of the cookie.
The following table summarizes the several important methods of the Cookie class:
String getComment() Returns the comment
String getDomain() Returns the domain
Int getMaxAge() Returns the age
String getName() Returns the name
String getPath() Returns the path
Boolean getSecure() Returns true if the cookie is secure
Int getVersion() Returns the version
Void setComment(String c) Sets the comment to c
Void setDomain(String d) Sets the domain to d
Void setPath(String p) Sets the path to p
Void setSecure(boolean
secure)
Sets the security flag to secure
The HttpServlet Class:
The HttpServlet class extends GenericServlet. It is commonly used when developing
servlets that receive and process HTTP requests. Following are the methods used by HttpServlet
class:

Web Technologies Unit-IV
CSE -120-
Method Description
void doDelete(HttpServletRequest req,
HttpServletResponse res) throws
IOException, ServletExcpetion
Handles an HTTP DELETE.
void doGet(HttpServletRequest req,
HttpServletResponse res) throws
IOException, ServletExcpetion
Handles an HTTP GET.
void doPost(HttpServletRequest req,
HttpServletResponse res) throws
IOException, ServletExcpetion
Handles an HTTP POST.
void doPut(HttpServletRequest req,
HttpServletResponse res) throws
IOException, ServletExcpetion
Handles an HTTP PUT.
void doTrace(HttpServletRequest req,
HttpServletResponse res) throws
IOException, ServletExcpetion
Handles an HTTP TRACE.
void service(HttpServletRequest req,
HttpServletResponse res) throws
IOException, ServletExcpetion
Called by the server when an HTTP request for
this servlet. The arguments provide access to
the HTTP request and response, respectively.
Reading Parameters: The parameters for the servlets can be read in one of the two ways. They are:
1) Initialized Parameters
2) Servlet Parameters
Reading Initialized Parameters:
The initialized parameters are the parameters which are initialized in the web.xml file and
they are not changeable in the entire servlet. These parameters are first written into the web.xml
file by using <init-param> tag. This tag contains two more sub tags: first, <param-name>, which
indicates the name of the parameter. Second tag is <param-value>, which contains the value for
the name given. The following example shows how the initialized parameters can be set and get
through servlets.
web.xml:
<web-app>
<servlet>
<servlet-name>InitParam</servlet-name>
<servlet-class> InitParamDemo</servlet-class>
<init-param>
<param-name>name</param-name>
<param-value>Ravi</param-value>
</init-param>
<init-param>
<param-name>class</param-name>
<param-value>ParamReadingDemo</param-value>
</init-param>

Web Technologies Unit-IV
CSE -121-
</servlet>
<servlet-mapping>
<servlet-name> InitParam</servlet-name>
<url-pattern>/</url-pattern>
</servlet-mapping>
</web-app>
InitParamDemo.java:
import java.io.*;
import javax.servlet.*;
import javax.servlet.http.*;
public class InitParamDemo extends HttpServlet
{
public void service(HttpServletRequest req, HttpServletResponse res) throws
IOException, ServletException
{
ServletConfig sc=getServletConfig();
res.setContentType("text/html");
PrintWriter out=res.getWriter();
out.println("Name: "+sc.getInitParameter("name")+"\n");
out.println("Class: "+sc.getInitParameter("class"));
}
}
Ouput:
Reading Servlet Parameters:
The ServletRequest interface includes methods that allow us to read the names and
values of the parameters that are included in a client request. These requests are usually come
from a HTML page. The following example illustrates the usage of servlet parameters. The
example contains two files. One is a web page, which sends the data to the server. And other one
is a servlet which is defined for handling of the parameters sent by the client.
LoginPage.html:
<html>
<head>
<title>Login Form</title>
<style type="text/css">
Web Technologies Unit-IV
CSE -122-
body
{
text-align:center;
}
</style>
<body>
<form name="form1" action="LoginServlet" method="get">
<h1>Login Form</h1>
<table>
<tr>
<td>User Name:</td>
<td><input type="text" name="uname">
</td>
</tr>
<tr>
<td>Password:</td>
<td><input type="password" name="pwd">
</td>
</tr>
<tr>
<td><input type="submit" value="Login"></td>
<td><input type="reset" value="Clear"></td>
</tr>
</table>
</form>
</body>
</html>
LoginServlet.java: import java.io.*;
import javax.servlet.*;
import javax.servlet.http.*;
public class LoginServlet extends HttpServlet
{
public void doGet(HttpServletRequest req,HttpServletResponse res) throws IOException,
ServletException
{
String name=req.getParameter("uname");
String pwd=req.getParameter("pwd");
res.setContentType("text/html");
PrintWriter out=res.getWriter();
if(name.equals("Chythu")&&pwd.equals("chythu536"))
{
out.println("Login Successfully Completed");
out.println("<b><br>");
out.println("Welcome Mr. "+name);
out.println("</b>");
Web Technologies Unit-IV
CSE -123-
}
else
out.println("Login Failed");
out.close();
}
}
web.xml:
<web-app>
<servlet>
<servlet-name>LoginServ</servlet-name>
<servlet-class>LoginServlet</servlet-class>
</servlet>
<servlet-mapping>
<servlet-name> LoginServ </servlet-name>
<url-pattern>/LoginServlet</url-pattern>
</servlet-mapping>
</web-app>
Handling HTTP Requests and Responses: The HttpServlet class provides specialized methods that handle the various types of
HTTP requests. A servlet developer typically overrides one of these methods. These methods are
doDelete( ), doGet( ), doHead( ), doOptions( ), doPost( ), doPut( ), and doTrace( ).
Handling HTTP GET Request:
The GET requests from the form submitted by the user are handled by the servlet with
the help of doGet() method which is provided by the HttpServlet class. Here we will develop a
servlet that handles an HTTP GET request. The servlet is invoked when a form on a web page is
submitted. The example contains two files. A web page is defined in GetFruit.html, and a
servlet is defined in FruitServlet.java. The HTML page defines a form that contains a select
element and a submit button.
GetFruit.html:
<html>
<head>
<title> Do Get Demo</title>
</head>
<body>
<form name="form1" action="Myserv1" method="get">
<b> Fruit</b>
<select name="fruit" >
<option value="banana"> Banana</option>
<option value="mango"> Mango</option>
<option value="orange"> Orange</option>
<option value="apple"> Apple</option>

Web Technologies Unit-IV
CSE -124-
</select>
<input type="submit" value="submit">
</form>
</body>
</html>
The source code for FruitServlet.java is shown below. The doGet() method is
overridden to process any HTTP GET requests that are sent to this servlet. It uses the
getParameter() method of HttpServletRequest to obtain the selection that was made by the user.
A response is then formulated.
FruitServlet.java:
import java.io.*;
import javax.servlet.*;
import javax.servlet.http.*;
public class FruitServlet extends HttpServlet
{
public void doGet(HttpServletRequest req,HttpServletResponse res) throws IOException,
ServletException
{
String Fruit=req.getParameter("fruit");
res.setContentType("text/html");
PrintWriter out=res.getWriter();
out.println("you have selected fruit :" +Fruit);
out.close();
}
}
Compile the servlet. Next, copy the .class file the web application’s classes folder and
update the web.xml file. Then perform these steps to run this servlet.
1. Start Tomcat, if it is not already running.
2. Display the web page in a browser.
3. Select a fruit.
4. Submit the web page.

Web Technologies Unit-IV
CSE -125-
Handling HTTP POST Requests:
The POST requests from the form submitted by the user are handled by the servlet with
the help of doPost() method which is provided by the HttpServlet class. Here we will develop a
servlet that handles an HTTP POST request. The servlet is invoked when a form on a web page
is submitted. The example contains two files. A web page is defined in PostFruit.html, and a
servlet is defined in FruitServlet.java. The HTML page defines a form that contains a select
element and a submit button.
PostFruit.html: <html>
<head>
<title> Do Post Demo</title>
</head>
<body>
<form name="form1" action="Myserv1" method="post">
<b> Fruit</b>
<select name="fruit" >
<option value="banana"> Banana</option>
<option value="mango"> Mango</option>
<option value="orange"> Orange</option>
<option value="apple"> Apple</option>
</select>
<input type="submit" value="submit">
</form>
</body>
</html>
The source code for FruitServlet.java is shown below. The doPost() method is
overridden to process any HTTP POST requests that are sent to this servlet. It uses the

Web Technologies Unit-IV
CSE -126-
getParameter() method of HttpServletRequest to obtain the selection that was made by the user.
A response is then formulated.
FruitServlet.java:
import java.io.*;
import javax.servlet.*;
import javax.servlet.http.*;
public class FruitServlet extends HttpServlet
{
public void doPost(HttpServletRequest req,HttpServletResponse res) throws
IOException, ServletException
{
String Fruit=req.getParameter("fruit");
res.setContentType("text/html");
PrintWriter out=res.getWriter();
out.println("you have selected fruit :" +Fruit);
out.close();
}
}
Compile the servlet. Next, copy the .class file the web application’s classes folder and
update the web.xml file. Then perform these steps to run this servlet.
1. Start Tomcat, if it is not already running.
2. Display the web page in a browser.
3. Select a fruit.
4. Submit the web page.
Using Cookies:
A cookie is small amount information stored on a client machine and contains state
information. Cookies are valuable for tracking user activities. This example contains two files as
below:

Web Technologies Unit-IV
CSE -127-
CookieDemo.html Allows a user to specify a value for the cookie named MyCookie.
CookieDemo.java Processes the submission of the CookieDemo.html.
CookieDemo.html:
<html>
<body>
<form name=”form1” method="post" action="CookieDemo">
<b>Enter the value for cookie</b>
<input type=text name="txt_data" size=30 value="">
<input type=submit value="Add Cookie”>
</form>
</body>
</html>
CookieDemo.java:
import java.io.*;
import javax.servlet.*;
import javax.servlet.http.*;
public class CookieDemo extends HttpServlet
{
public void doPost(HttpServletRequest req,HttpServletResponse res)throws
ServletException, IOException
{
String data=req.getParameter("txt_data");
Cookie cookie=new Cookie("Mycookie",data);
res.addCookie(cookie);
res.setContentType("text/html");
PrintWriter out=res.getWriter();
out.println("my cookie has been set to: ");
out.println(data);
out.println("<br>");
out.println("this page shows that cookie has been added");
out.close();
}
}
Compile the servlet. Next, copy the .class file the web application’s classes folder and
update the web.xml file. Then perform these steps to run this servlet.
1. Start Tomcat, if it is not already running.
2. Display the CookieDemo.html in a browser.
3. Enter a value for MyCookie.
4. Submit the web page.

Web Technologies Unit-IV
CSE -128-
Session Tracking:
HTTP is a stateless protocol. Each request is independent of the previous one. However,
in some applications it is necessary to save state information so that information can be collected
from several interactions between a browser and a server. Sessions provide such a mechanism. A
session can be created via the getSession( ) method of the HttpServletRequest. An HttpSession
object is returned. This object can store a set of bindings that associate names with objects.
The setAttribute( ), getAttribute( ). getAttributeNames( ), and removeAttribute( )
methods of HttpSession manage these bindings. The following example illustrates how to use
session state. The getSession( ) method gets the current session. A new session is created if one
does not already exist. The getAttribute( ) method is called to obtain the object that is bound to
the name “cnt”.
Sessions.html:
<html>
<head>
<title>Session Demo</title>
</head>
<body>
<form name="form1" action="serv3" >
<b> Session Demo</b><br>
<input type="submit" value="Go to My Session Demo">
</form>
</body>
</html>
SessionDemo.java: import java.io.*;
import javax.servlet.*;
import java.util.*;
import javax.servlet.http.*;
public class SessionDemo extends HttpServlet
{

Web Technologies Unit-IV
CSE -129-
public void doGet(HttpServletRequest req, HttpServletResponse res)throws
IOException,ServletException
{
res.setContentType("text/html");
HttpSession session=req.getSession();
String heading;
Integer cnt=(Integer)session.getAttribute("cnt");
if(cnt==null)
{
cnt=new Integer(0);
heading="Welcome for the first time";
}
else
{
heading="Welcome once again";
cnt=new Integer(cnt.intValue()+1);
}
session.setAttribute("cnt",cnt);
PrintWriter out=res.getWriter();
out.println("<html>");
out.println("<body>");
out.println("<h1>"+heading);
out.println("The number of previous accesses: "+cnt);
out.println("</body>");
out.println("</html>");
}
}

Web Technologies Unit-IV
CSE -130-
Connecting to the Database using JDBC: JDBC stands for Java Database Connectivity, which is a standard Java API for database
independent connectivity between the Java programming language, and a wide range of
databases. The JDBC library includes APIs for each of the tasks mentioned below that are
commonly associated with database usage.
Making a connection to a database.
Creating SQL or MySQL statements.
Executing SQL or MySQL queries in the database.
Viewing & Modifying the resulting records.
Fundamentally, JDBC is a specification that provides a complete set of interfaces that
allows for portable access to an underlying database. Java can be used to write different types of
executables, such as:
Java Applications
Java Applets
Java Servlets
Java ServerPages (JSPs)
Enterprise JavaBeans (EJBs).
All of these different executables are able to use a JDBC driver to access a database, and
take advantage of the stored data. JDBC provides the same capabilities as ODBC, allowing Java
programs to contain database-independent code.
JDBC Architecture:
The JDBC API supports both two-tier and three-tier processing models for database
access but in general, JDBC Architecture consists of two layers:
JDBC API: This provides the application-to-JDBC Manager connection.
JDBC Driver API: This supports the JDBC Manager-to-Driver Connection.
Above figure is the architectural diagram, which shows the location of the driver manager
with respect to the JDBC drivers and the Java application:

Web Technologies Unit-IV
CSE -131-
The JDBC API uses a driver manager and database-specific drivers to provide transparent
connectivity to heterogeneous databases. The JDBC driver manager ensures that the correct
driver is used to access each data source. The driver manager is capable of supporting multiple
concurrent drivers connected to multiple heterogeneous databases.
What is JDBC Driver?
The JDBC drivers implement the defined interfaces in the JDBC API, for interacting with
your database server. For example, using JDBC drivers enable you to open database connections
and to interact with it by sending SQL or database commands then receiving results with Java.
The java.sql package that ships with JDK contains various classes with their behavior defined
and their actual implementations are done in third-party drivers. Third party vendors implement
the java.sql.Driver interface in their database driver.
JDBC Drivers Types:
The JDBC driver implementations vary because of the wide variety of operating systems
and hardware platforms in which Java operates. Sun has divided the implementation types into
four categories, Types 1, 2, 3, and 4, which are listed below:
1) Type-1: JDBC-ODBC Bridge Driver
2) Type-2: JDBC Native API
3) Type-3: JDBC-Net Pure Java
4) Type-4: 100% Pure Java
1) Type-1: JDBC-ODBC Bridge Driver:
In a Type 1 driver, a JDBC bridge is used to access ODBC drivers installed on each client
machine. Using ODBC requires configuring on your system a Data Source Name (DSN) that
represents the target database.
When Java first came out, this was a useful driver because most databases only supported
ODBC access but now this type of driver is recommended only for experimental use or when no
other alternative is available.
2) Type-2: JDBC Native API:
In a Type 2 driver, JDBC API calls are converted into native C/C++ API calls, which are
unique to the database. These drivers are typically provided by the database vendors and used in
the same manner as the JDBC-ODBC Bridge. The vendor-specific driver must be installed on
each client machine.
If we change the Database, we have to change the native API, as it is specific to a
database and they are mostly obsolete now, but you may realize some speed increase with a Type
2 driver, because it eliminates ODBC's overhead.
3) Type-3: JDBC-Net Pure Java:
In a Type 3 driver, a three-tier approach is used to access databases. The JDBC clients
use standard network sockets to communicate with a middleware application server. The socket
information is then translated by the middleware application server into the call format required
by the DBMS, and forwarded to the database server.
This kind of driver is extremely flexible, since it requires no code installed on the client
and a single driver can actually provide access to multiple databases.

Web Technologies Unit-IV
CSE -132-
4) Type-4: 100%Pure Java:
In a Type 4 driver, a pure Java-based driver communicates directly with the vendor's
database through socket connection. This is the highest performance driver available for the
database and is usually provided by the vendor itself.
This kind of driver is extremely flexible, you don't need to install special software on the
client or server. Further, these drivers can be downloaded dynamically.
Which Driver should be used?
If you are accessing one type of database, such as Oracle, Sybase, or IBM, the preferred
driver type is 4.
If your Java application is accessing multiple types of databases at the same time, type 3
is the preferred driver.
Type 2 drivers are useful in situations, where a type 3 or type 4 driver is not available yet
for your database.
The type 1 driver is not considered a deployment-level driver, and is typically used for
development and testing purposes only.
Common JDBC Components:
The JDBC API provides the following interfaces and classes:
DriverManager: This class manages a list of database drivers. Matches connection
requests from the java application with the proper database driver using communication
sub protocol. The first driver that recognizes a certain sub protocol under JDBC will be
used to establish a database Connection.
Driver: This interface handles the communications with the database server. You will
interact directly with Driver objects very rarely. Instead, you use DriverManager objects,
which manage objects of this type. It also abstracts the details associated with working
with Driver objects.
Connection: This interface with all methods for contacting a database. The connection
object represents communication context, i.e., all communication with database is
through connection object only.
Statement: You use objects created from this interface to submit the SQL statements to
the database. Some derived interfaces accept parameters in addition to executing stored
procedures.
ResultSet: These objects hold data retrieved from a database after you execute an SQL
query using Statement objects. It acts as an iterator to allow you to move through its data.
SQLException: This class handles any errors that occur in a database application.
The Basic Steps to Connect to a Database Using Servlet:
There are 5 basic steps to be followed to connect to a database using servlets. They are as
follows:
1) Establish a Connection
2) Create JDBC Statements
3) Execute SQL Statements
4) GET ResultSet
5) Close connections

Web Technologies Unit-IV
CSE -133-
Example:
Login.html:
<html>
<head>
<title>Login Form</title>
</head>
<body>
<center>
<h1>Login Form</h1>
<form action="login" method="post">
<table>
<tr>
<td>User name:</td>
<td><input type="text" name="uname"/></td>
</tr>
<tr>
<td>Password:</td>
<td><input type="password" name="pwd"/></td>
</tr>
<tr>
<td><input type="submit" value="Login"></td>
<td><input type="reset" value="Clear"/></td>
</tr>
</table>
</form>
</center>
</body>
</html>
LoginSrv.java:
import java.io.*;
import java.util.*;
import javax.servlet.*;
import javax.servlet.http.*;
import java.sql.*;
public class LoginSrv extends HttpServlet
{
public void doPost(HttpServletRequest request, HttpServletResponse response) throws
ServletException, IOException
{
try
{
response.setContentType("text/html");
PrintWriter out=response.getWriter();
String un=request.getParameter("uname");
String pwd=request.getParameter("pwd");
out.println("<head><title>SCCE</title></head>");
Web Technologies Unit-IV
CSE -134-
Class.forName("com.mysql.jdbc.Driver");
Connection con=DriverManager.getConnection("jdbc:mysql://localhost:3306/scce", "root", "");
Statement stmt=con.createStatement();
ResultSet rs=stmt.executeQuery("select * from Login where uname='"+un+"' and
pwd='"+pwd+"'");
if(rs.next())
out.println("<h1>Welcome "+rs.getString(1)+", You are logged in successfully</h1>");
else
out.println("<h1>Login Failed</h1>");
}
catch(Exception se)
{
se.printStackTrace();
}
}
web.xml:
<web-app>
<servlet>
<servlet-name>LoginSrv</servlet-name>
<servlet-class>LoginSrv</servlet-class>
</servlet>
<servlet-mapping>
<servlet-name>LoginSrv</servlet-name>
<url-pattern>/login</url-pattern>
</servlet-mapping>
</web-app>

Web Technologies Unit-V
CSE 135
UNIT-V
JAVA SERVER PAGES AND BEANS
The Problem with the Servlets:
In one and only one class, the servlet alone has to do various tasks such as,
Acceptance of request
Processing of request
Handling of business logic
Generation of response.
Hence there are some problems that are associated with the servlets-
1. For developing a servlet based application, knowledge of Java as well as HTML code is
necessary.
2. While developing any web based application, if a look and feel of the web based
application needs to be changed then the entire source code to be changed and recompiled.
3. There are some web page development tools available using which the developer can
develop the web based applications. But the servlets do not support such tools. Even if such
tools are used for a servlet, we need to change the embedded HTML code manually, which
is a time consuming, error prone and complicated process.
What is Java Server Pages? The problems that are associated with servlets are due to one and only one reason and that
is servlet has to handle all the tasks of request processing. Java Server Pages (JSP) is one
technology that came up to overcome these problems. JSP is a technology in which request
processing, business logic and presentations are separated out. JSP is a technology for developing
web pages that support dynamic content which helps developers insert java code in HTML pages
by making use of special JSP tags, most of which start with <% and end with %>. A Java Server
Pages component is a type of Java servlet that is designed to fulfill the role of a user interface for a
Java web application. Web developers write JSPs as text files that combine HTML or XHTML
code, XML elements, and embedded JSP actions and commands. Using JSP, you can collect input
from users through web page forms, present records from a database or another source, and create
web pages dynamically. JSP tags can be used for a variety of purposes, such as retrieving
information from a database or registering user preferences, accessing JavaBeans components,
passing control between pages and sharing information between requests, pages etc.
Advantages of JSP:
Following is the list of other advantages of using JSP over other technologies:
1. Active Server Pages (ASP): The advantages of JSP are twofold. First, the dynamic part is
written in Java, not Visual Basic or other MS specific language, so it is more powerful and
easier to use. Second, it is portable to other operating systems and non-Microsoft Web
servers.
2. Pure Servlets: It is more convenient to write (and to modify!) regular HTML than to have
plenty of println statements that generate the HTML.
3. Server-Side Includes (SSI): SSI is really only intended for simple inclusions, not for
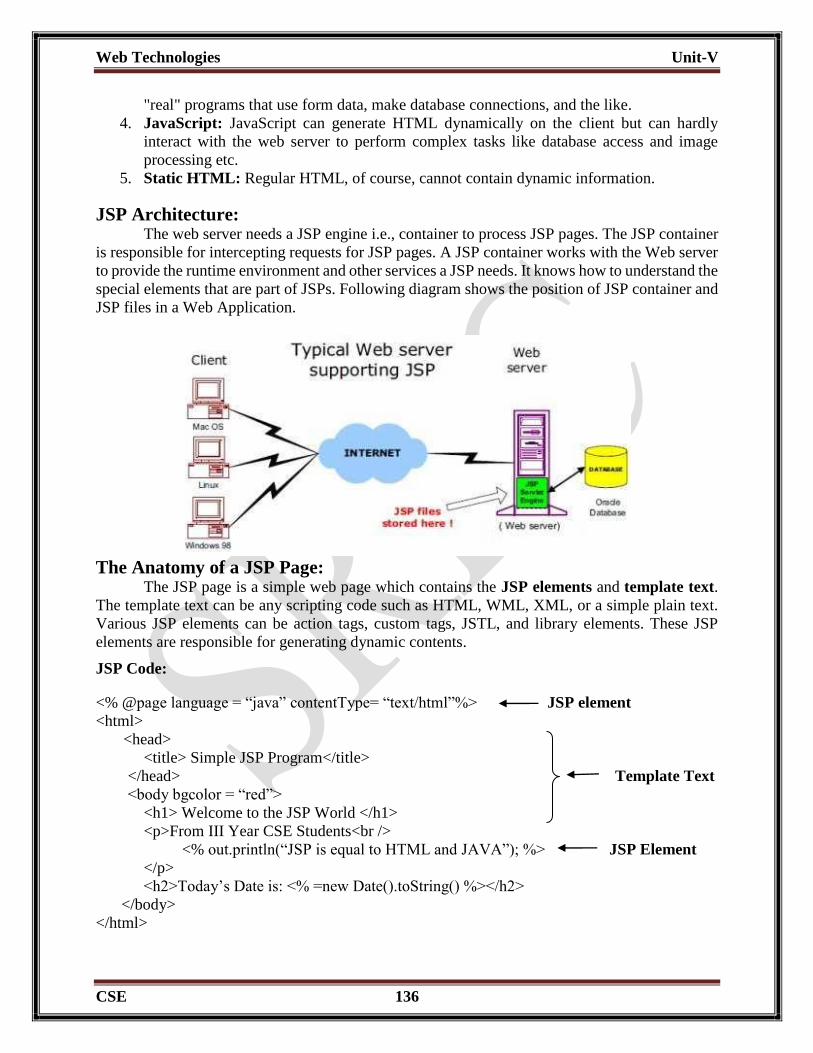
Web Technologies Unit-V
CSE 136
"real" programs that use form data, make database connections, and the like.
4. JavaScript: JavaScript can generate HTML dynamically on the client but can hardly
interact with the web server to perform complex tasks like database access and image
processing etc.
5. Static HTML: Regular HTML, of course, cannot contain dynamic information.
JSP Architecture: The web server needs a JSP engine i.e., container to process JSP pages. The JSP container
is responsible for intercepting requests for JSP pages. A JSP container works with the Web server
to provide the runtime environment and other services a JSP needs. It knows how to understand the
special elements that are part of JSPs. Following diagram shows the position of JSP container and
JSP files in a Web Application.
The Anatomy of a JSP Page:
The JSP page is a simple web page which contains the JSP elements and template text.
The template text can be any scripting code such as HTML, WML, XML, or a simple plain text.
Various JSP elements can be action tags, custom tags, JSTL, and library elements. These JSP
elements are responsible for generating dynamic contents.
JSP Code:
<% @page language = “java” contentType= “text/html”%> JSP element
<html>
<head>
<title> Simple JSP Program</title>
</head>
<body bgcolor = “red”>
<h1> Welcome to the JSP World </h1>
<p>From III Year CSE Students<br />
<% out.println(“JSP is equal to HTML and JAVA”); %> JSP Element
</p>
<h2>Today’s Date is: <% =new Date().toString() %></h2>
</body>
</html>
Template Text

Web Technologies Unit-V
CSE 137
JSP Processing:
The following steps explain how the web server creates the web page using JSP:
1. As with a normal page, your browser sends an HTTP request to the web server. The web
server recognizes that the HTTP request is for a JSP page and forwards it to a JSP engine.
This is done by using the URL or JSP page which ends with .jsp instead of .html.
2. The JSP engine loads the JSP page from disk and converts it into servlet content. This
conversion is very simple in which all template text is converted to println( ) statements
and all JSP elements are converted to Java code that implements the corresponding
dynamic behavior of the page.
3. The JSP engine compiles the servlet into an executable class and forwards the original
request to a servlet engine.
4. A part of the web server called the servlet engine loads the Servlet class and executes it.
During execution, the servlet produces an output in HTML format, which the servlet
engine passes to the web server inside an HTTP response.
5. The web server forwards the HTTP response to your browser in terms of static HTML
content.
6. Finally web browser handles the dynamically generated HTML page inside the HTTP
response exactly as if it were a static page.
Typically, the JSP engine checks whether a servlet for a JSP file already exists and whether
the modification date on the JSP is older than the servlet. If the JSP is older than its generated
servlet, the JSP container assumes that the JSP hasn't changed and that the generated servlet still
matches the JSP's contents. This makes the process more efficient than with other scripting
languages (such as PHP) and therefore faster. So in a way, a JSP page is really just another way to
write a servlet without having to be a Java programming wiz. Except for the translation phase, a
JSP page is handled exactly like a regular servlet. All the above mentioned steps can be shown
below in the following diagram:
JSP Life Cycle:
The key to understanding the low-level functionality of JSP is to understand the simple life
cycle they follow. A JSP life cycle can be defined as the entire process from its creation till the
destruction which is similar to a servlet life cycle with an additional step which is required to
compile a JSP into servlet.

Web Technologies Unit-V
CSE 138
The following are the paths followed by a JSP
1. Compilation
2. Initialization
3. Execution
4. Destroying
The three major phases of JSP life cycle are very similar to Servlet Life Cycle and they are as
follows:
1. JSP Compilation: When a browser asks for a JSP, the JSP engine first checks to see whether it needs to
compile the page. If the page has never been compiled, or if the JSP has been modified since it was
last compiled, the JSP engine compiles the page. The compilation process involves three steps:
1. Parsing the JSP.
2. Turning the JSP into a servlet.
3. Compiling the servlet.
2. JSP Initialization: When a container loads a JSP it invokes the jspInit() method before servicing any requests.
If you need to perform JSP-specific initialization, override the jspInit() method:
public void jspInit() {
// Initialization code...
}
Typically initialization is performed only once and as with the servlet init method, you generally
initialize database connections, open files, and create lookup tables in the jspInit method.
3. JSP Execution: This phase of the JSP life cycle represents all interactions with requests until the JSP is
destroyed. Whenever a browser requests a JSP and the page has been loaded and initialized, the
JSP engine invokes the _jspService() method in the JSP. The _jspService() method takes an
HttpServletRequest and an HttpServletResponse as its parameters as follows:
void _jspService(HttpServletRequest request, HttpServletResponse response)
{
// Service handling code...
}

Web Technologies Unit-V
CSE 139
The _jspService() method of a JSP is invoked once per a request and is responsible for generating
the response for that request and this method is also responsible for generating responses to all
seven of the HTTP methods ie. GET, POST, DELETE etc.
4. JSP Cleanup: The destruction phase of the JSP life cycle represents when a JSP is being removed from use by a
container. The jspDestroy() method is the JSP equivalent of the destroy method for servlets.
Override jspDestroy when you need to perform any cleanup, such as releasing database
connections or closing open files. The jspDestroy() method has the following form:
public void jspDestroy()
{
// Your cleanup code goes here.
}
JSP Application Design with MVC: The design model of JSP application is called MVC model. The MVC stands for
Model-View-Controller. The basic idea in MVC design model is to separate out design logic into
three parts – modeling, viewing, and controlling. Any server application is classified into three
parts such as business logic, presentation, and request processing.
The business logic means the coding logic applied for manipulation of application data.
The presentation refers to the code written for look and feel of the web page. For example:
background color, font style, font size, placing of controls such as text boxes, command buttons
and so on. The request processing is nothing but a combination of business logic and presentation.
The request processing is always done in order to generate the response. According to the MVC
design model, the Model corresponds to business logic, View corresponds to presentation and
Controller corresponds to request processing.
Advantages of using MVC design Model:
The use of MVC architecture allows the developer to keep the separation between business
logic, presentation and request processing. Due to this separation it becomes easy to make changes
in presentation without disturbing the business logic. The changes in presentation are often
required for accommodating the new presentation interfaces.
JSP Elements: Java Server Page is facilitated with three types of elements. They are as follows:
i) JSP Directives
ii) JSP Actions
iii) JSP Scripting Elements
1) JSP Directives:
JSP directives provide directions and instructions to the container, telling it how to handle
certain aspects of JSP processing. It usually has the following form:
<%@ directive attribute="value" %>
There are three types of directive tag are available in JSP:

Web Technologies Unit-V
CSE 140
Directive Description
<%@ page ... %> Defines page-dependent attributes, such as scripting language,
error page, and buffering requirements.
<%@ include ... %> Includes a file during the translation phase.
<%@ taglib ... %> Declares a tag library, containing custom actions, used in the page.
i) The page Directive:
The page directive is used to provide instructions to the container that pertain to the current
JSP page. You may code page directives anywhere in your JSP page. By convention, page
directives are coded at the top of the JSP page.
Following is the basic syntax of page directive:
<%@ page attribute="value" %>
You can write XML equivalent of the above syntax as follows:
<jsp:page attribute="value" />
Attributes: Following is the list of attributes associated with page directive:
Attribute Purpose
buffer Specifies a buffering model for the output stream.
autoFlush Controls the behavior of the servlet output buffer.
contentType Defines the character encoding scheme.
errorPage Defines the URL of another JSP that reports on Java unchecked
runtime exceptions.
isErrorPage Indicates if this JSP page is a URL specified by another JSP
page's errorPage attribute.
extends Specifies a superclass that the generated servlet must extend
import Specifies a list of packages or classes for use in the JSP as the
Java import statement does for Java classes.
info Defines a string that can be accessed with the servlet's
getServletInfo() method.
language Defines the programming language used in the JSP page.
session Specifies whether or not the JSP page participates in HTTP
sessions
isScriptingEnabled Determines if scripting elements are allowed for use.
Example:
<%@ page import=“java.io.*” %>
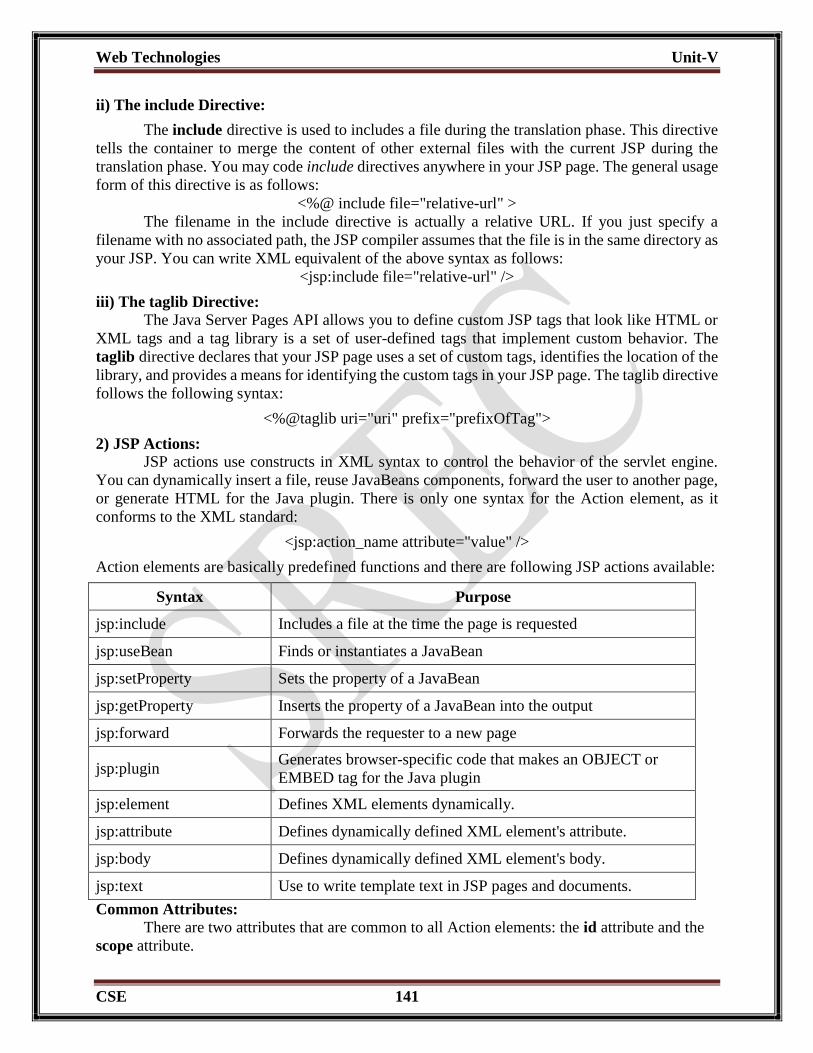
Web Technologies Unit-V
CSE 141
ii) The include Directive:
The include directive is used to includes a file during the translation phase. This directive
tells the container to merge the content of other external files with the current JSP during the
translation phase. You may code include directives anywhere in your JSP page. The general usage
form of this directive is as follows:
<%@ include file="relative-url" >
The filename in the include directive is actually a relative URL. If you just specify a
filename with no associated path, the JSP compiler assumes that the file is in the same directory as
your JSP. You can write XML equivalent of the above syntax as follows:
<jsp:include file="relative-url" />
iii) The taglib Directive: The Java Server Pages API allows you to define custom JSP tags that look like HTML or
XML tags and a tag library is a set of user-defined tags that implement custom behavior. The
taglib directive declares that your JSP page uses a set of custom tags, identifies the location of the
library, and provides a means for identifying the custom tags in your JSP page. The taglib directive
follows the following syntax:
<%@taglib uri="uri" prefix="prefixOfTag">
2) JSP Actions: JSP actions use constructs in XML syntax to control the behavior of the servlet engine.
You can dynamically insert a file, reuse JavaBeans components, forward the user to another page,
or generate HTML for the Java plugin. There is only one syntax for the Action element, as it
conforms to the XML standard:
<jsp:action_name attribute="value" />
Action elements are basically predefined functions and there are following JSP actions available:
Syntax Purpose
jsp:include Includes a file at the time the page is requested
jsp:useBean Finds or instantiates a JavaBean
jsp:setProperty Sets the property of a JavaBean
jsp:getProperty Inserts the property of a JavaBean into the output
jsp:forward Forwards the requester to a new page
jsp:plugin Generates browser-specific code that makes an OBJECT or
EMBED tag for the Java plugin
jsp:element Defines XML elements dynamically.
jsp:attribute Defines dynamically defined XML element's attribute.
jsp:body Defines dynamically defined XML element's body.
jsp:text Use to write template text in JSP pages and documents.
Common Attributes:
There are two attributes that are common to all Action elements: the id attribute and the
scope attribute.

Web Technologies Unit-V
CSE 142
Id attribute: The id attribute uniquely identifies the Action element, and allows the action
to be referenced inside the JSP page. If the Action creates an instance of an object the id
value can be used to reference it through the implicit object PageContext
Scope attribute: This attribute identifies the lifecycle of the Action element. The id
attribute and the scope attribute are directly related, as the scope attribute determines the
lifespan of the object associated with the id. The scope attribute has four possible values:
a) page
b) request
c) session, and
d) application
i) The <jsp:include> Action This action lets you insert files into the page being generated. The syntax looks like this:
<jsp:include page="relative URL" flush="true" />
Unlike the include directive, which inserts the file at the time the JSP page is translated
into a servlet, this action inserts the file at the time the page is requested. Following is the list of
attributes associated with include action:
Attribute Description
Page The relative URL of the page to be included.
Flush The boolean attribute determines whether the included
resource has its buffer flushed before it is included.
Example: Let us define following two files: date.jsp and main.jsp as follows:
date.jsp:
<p>
Today's date: <%= (new java.util.Date()).toLocaleString()%>
</p>
main.jsp: <html>
<head>
<title>The include Action Example</title>
</head>
<body>
<center>
<h2>The include action Example</h2>
<jsp:include page="date.jsp" flush="true" />
</center>
</body>
</html>
Now let us keep all these files in root directory and try to access main.jsp. This would
display result something like this:
The include action Example
Today's date: 12-Sep-2010 14:54:22

Web Technologies Unit-V
CSE 143
ii) The <jsp:useBean>Action:
The useBean action is quite versatile. It first searches for an existing object utilizing the id
and scope variables. If an object is not found, it then tries to create the specified object.
The simplest way to load a bean is as follows:
<jsp:useBean id="name" class="package.class" />
Once a bean class is loaded, you can use jsp:setProperty and jsp:getProperty actions to
modify and retrieve bean properties. Following is the list of attributes associated with useBean
action:
Attribute Description
Class Designates the full package name of the bean.
Type Specifies the type of the variable that will refer to the
object.
beanName Gives the name of the bean as specified by the instantiate ()
method of the java.beans.Beans class.
Let us discuss about jsp:setProperty and jsp:getProperty actions before giving a valid
example related to these actions.
iii) The <jsp:setProperty> Action:
The setProperty action sets the properties of a Bean. The Bean must have been
previously defined before this action. There are two basic ways to use the setProperty action:
You can use jsp:setProperty after, but outside of, a jsp:useBean element, as below:
<jsp:useBean id="myName" ... />
...
<jsp:setProperty name="myName" property="someProperty" .../>
In this case, the jsp:setProperty is executed regardless of whether a new bean was instantiated or an
existing bean was found.
A second context in which jsp:setProperty can appear is inside the body of a jsp:useBean
element, as below:
<jsp:useBean id="myName" ... >
...
<jsp:setProperty name="myName" property="someProperty" .../>
</jsp:useBean>
Here, the jsp:setProperty is executed only if a new object was instantiated, not if an existing
one was found. Following is the list of attributes associated with setProperty action:
Following is the list of required attributes associated with setProperty action:
Attribute Description
Name The name of the Bean that has a property to be retrieved. The
Bean must have been previously defined.
property The property attribute is the name of the Bean property to be
retrieved.

Web Technologies Unit-V
CSE 144
iv) The <jsp:getProperty> Action:
The getProperty action is used to retrieve the value of a given property and converts it to a
string, and finally inserts it into the output. The getProperty action has only two attributes, both of
which are required ans simple syntax is as follows:
Attribute Description
Name Designates the bean whose property will be set. The Bean must have been
previously defined.
Property
Indicates the property you want to set. A value of "*" means that all
request parameters whose names match bean property names will be
passed to the appropriate setter methods.
Value
The value that is to be assigned to the given property. The the parameter's
value is null, or the parameter does not exist, the setProperty action in
ignored.
Param
The param attribute is the name of the request parameter whose value the
property is to receive. You can’t use both value and param, but it is
permissible to use neither.
<jsp:useBean id="myName" ... />
...
<jsp:getProperty name="myName" property="someProperty" .../>
Example: Let us define a test bean which we will use in our example:
TestBean.java:
package action;
public class TestBean
{
private String message = "No message specified";
public String getMessage()
{
return(message);
}
public void setMessage(String message)
{
this.message = message;
}
}
Compile above code to generated TestBean.class file and make sure that you copied
TestBean.class in C:\apache-tomcat-7.0.2\webapps\WEB-INF\classes\action folder and
CLASSPATH variable should also be set to this folder:
main.jsp:
<html>
<head>
<title>Using JavaBeans in JSP</title>
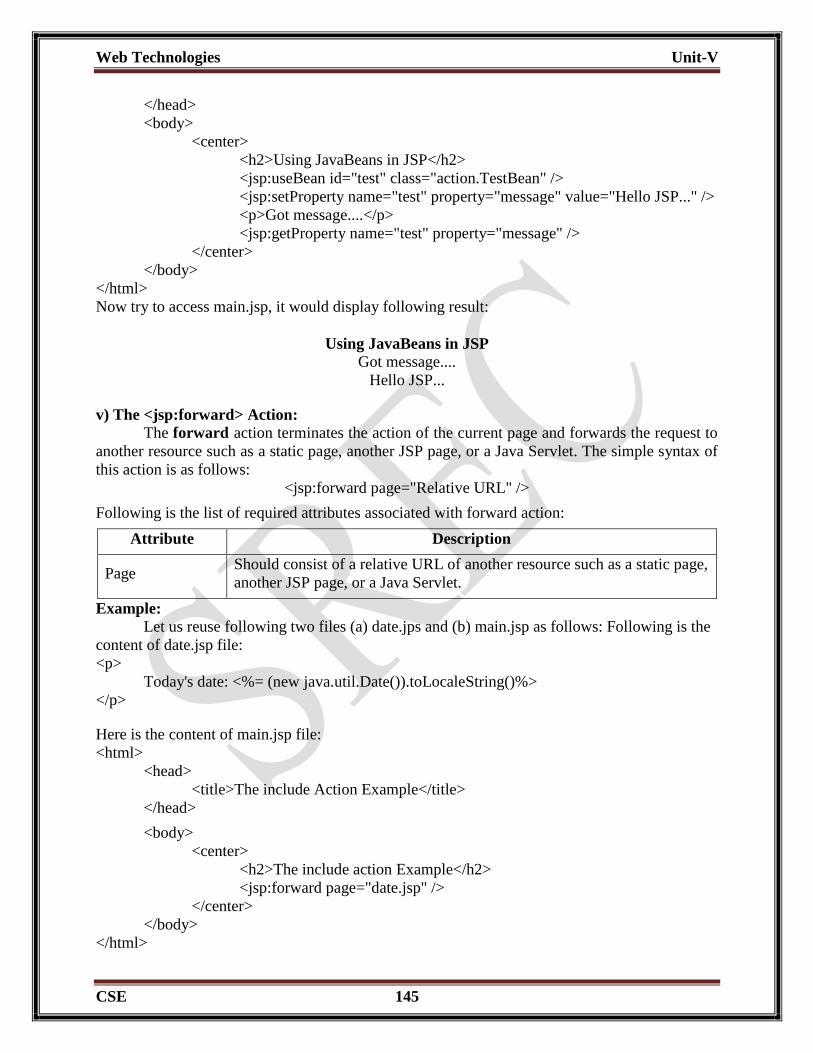
Web Technologies Unit-V
CSE 145
</head>
<body>
<center>
<h2>Using JavaBeans in JSP</h2>
<jsp:useBean id="test" class="action.TestBean" />
<jsp:setProperty name="test" property="message" value="Hello JSP..." />
<p>Got message....</p>
<jsp:getProperty name="test" property="message" />
</center>
</body>
</html>
Now try to access main.jsp, it would display following result:
Using JavaBeans in JSP Got message....
Hello JSP...
v) The <jsp:forward> Action:
The forward action terminates the action of the current page and forwards the request to
another resource such as a static page, another JSP page, or a Java Servlet. The simple syntax of
this action is as follows:
<jsp:forward page="Relative URL" />
Following is the list of required attributes associated with forward action:
Attribute Description
Page Should consist of a relative URL of another resource such as a static page,
another JSP page, or a Java Servlet.
Example:
Let us reuse following two files (a) date.jps and (b) main.jsp as follows: Following is the
content of date.jsp file:
<p>
Today's date: <%= (new java.util.Date()).toLocaleString()%>
</p>
Here is the content of main.jsp file:
<html>
<head>
<title>The include Action Example</title>
</head>
<body>
<center>
<h2>The include action Example</h2>
<jsp:forward page="date.jsp" />
</center>
</body>
</html>

Web Technologies (A60512) Unit-V
CSE 146
Now let us keep all these files in root directory and try to access main.jsp. This would
display result something like as below. Here it discarded content from main page and displayed
content from forwarded page only.
Today's date: 12-Sep-2010 14:54:22
vi) The <jsp:plugin> Action:
The plugin action is used to insert Java components into a JSP page. It determines the type
of browser and inserts the <object> or <embed> tags as needed. If the needed plugin is not present,
it downloads the plugin and then executes the Java component. The Java component can be either
an Applet or a JavaBean. The plugin action has several attributes that correspond to common
HTML tags used to format Java components. The <param> element can also be used to send
parameters to the Applet or Bean. Following is the typical syntax of using plugin action:
<jsp:plugin type="applet" codebase="dirname" code="MyApplet.class" width="60"
height="80">
<jsp:param name="fontcolor" value="red" />
<jsp:param name="background" value="black" />
<jsp:fallback>
Unable to initialize Java Plugin
</jsp:fallback>
</jsp:plugin>
You can try this action using some applet if you are interested. A new element, the
<fallback> element, can be used to specify an error string to be sent to the user in case the
component fails.
3) JSP Scripting Elements:
JSP scripting elements can be used to embed the Java code into the JSP file, declare
variables and also attach the results to the HTML content. There are four types of scripting
elements are available. They are:
i) Scriptlets
ii) Declarations
iii) Expressions
iv) Comments
i) The Scriptlet: A scriptlet can contain any number of JAVA language statements, variable or method
declarations, or expressions that are valid in the java server page scripting language. Following is
the syntax of Scriptlet:
<% code fragment %>
Any text, HTML tags, or JSP elements you write must be outside the scriptlet. Following is
the simple example for JSP:
<html>
<body>
<%
out.println("Your IP address is " + request.getRemoteAddr());
%>
</body>
</html>

Web Technologies (A60512) Unit-V
CSE 147
ii) Declarations: A declaration declares one or more variables or methods that you can use in Java code later
in the JSP file. You must declare the variable or method before you use it in the JSP file.
Following is the syntax of JSP Declarations:
<%! declaration; [ declaration; ] ... %>
Following is the simple example for JSP Comments:
<%! int i = 0; %>
<%! int a, b, c; %>
<%! Circle a = new Circle(2.0); %>
iii) Expressions: A JSP expression element contains a scripting language expression that is evaluated,
converted to a String, and inserted where the expression appears in the JSP file. Because the value
of an expression is converted to a String, you can use an expression within a line of text, whether or
not it is tagged with HTML, in a JSP file. The expression element can contain any expression that
is valid according to the Java Language Specification but you cannot use a semicolon to end an
expression. Following is the syntax of JSP Expression:
<%= expression %>
Following is the simple example for JSP Expression:
<html>
<head>
<title>JSP Expressions</title>
</head>
<body>
<p>
Today's date: <%= (new java.util.Date()).toLocaleString()%>
</p>
</body>
</html>
This would generate following result: Today's date: 10-Jan-2018 21:24:25
iv) Comments:
JSP comment marks text or statements that the JSP container should ignore. A JSP
comment is useful when you want to hide or "comment out" part of your JSP page.
Following is the syntax of JSP comments:
<%--This is JSP comment --%>
Following is the simple example for JSP Comments:
<html>
<head>
<title>A Comment Test</title>
</head>
<body>
<h2>A Test of Comments</h2>
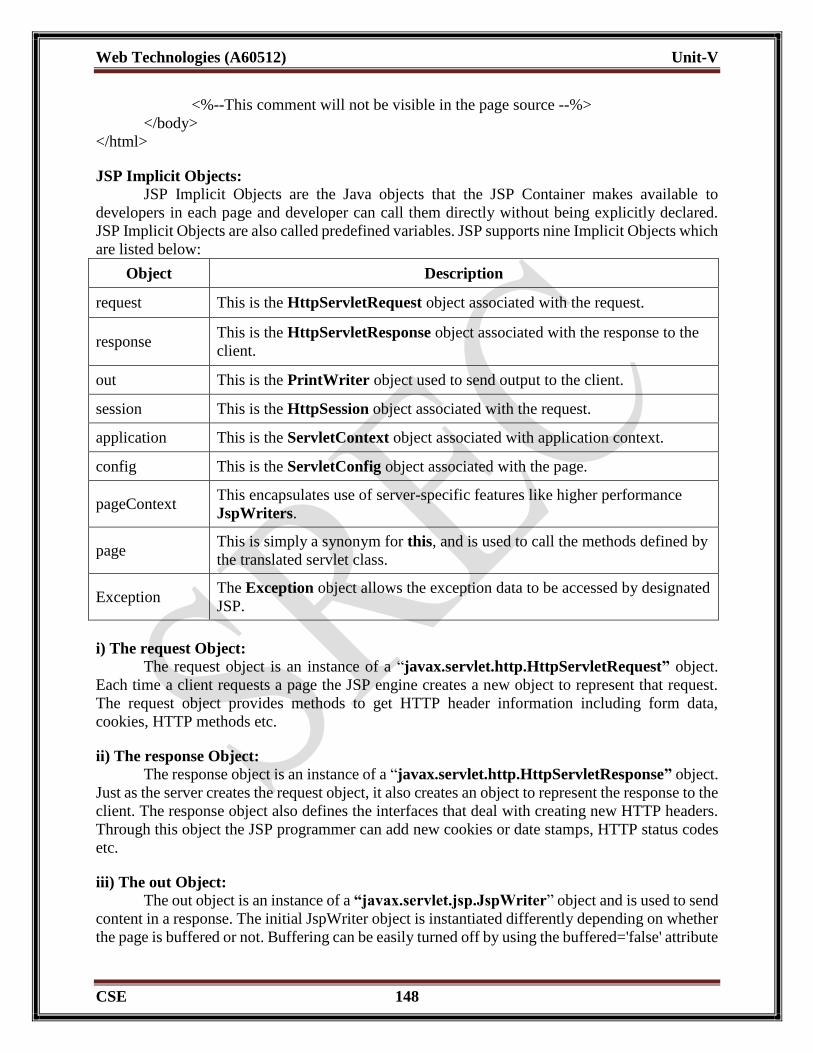
Web Technologies (A60512) Unit-V
CSE 148
<%--This comment will not be visible in the page source --%>
</body>
</html>
JSP Implicit Objects:
JSP Implicit Objects are the Java objects that the JSP Container makes available to
developers in each page and developer can call them directly without being explicitly declared.
JSP Implicit Objects are also called predefined variables. JSP supports nine Implicit Objects which
are listed below:
Object Description
request This is the HttpServletRequest object associated with the request.
response This is the HttpServletResponse object associated with the response to the
client.
out This is the PrintWriter object used to send output to the client.
session This is the HttpSession object associated with the request.
application This is the ServletContext object associated with application context.
config This is the ServletConfig object associated with the page.
pageContext This encapsulates use of server-specific features like higher performance
JspWriters.
page This is simply a synonym for this, and is used to call the methods defined by
the translated servlet class.
Exception The Exception object allows the exception data to be accessed by designated
JSP.
i) The request Object:
The request object is an instance of a “javax.servlet.http.HttpServletRequest” object.
Each time a client requests a page the JSP engine creates a new object to represent that request.
The request object provides methods to get HTTP header information including form data,
cookies, HTTP methods etc.
ii) The response Object:
The response object is an instance of a “javax.servlet.http.HttpServletResponse” object.
Just as the server creates the request object, it also creates an object to represent the response to the
client. The response object also defines the interfaces that deal with creating new HTTP headers.
Through this object the JSP programmer can add new cookies or date stamps, HTTP status codes
etc.
iii) The out Object:
The out object is an instance of a “javax.servlet.jsp.JspWriter” object and is used to send
content in a response. The initial JspWriter object is instantiated differently depending on whether
the page is buffered or not. Buffering can be easily turned off by using the buffered='false' attribute

Web Technologies (A60512) Unit-V
CSE 149
of the page directive. The JspWriter object contains most of the same methods as the
java.io.PrintWriter class. However, JspWriter has some additional methods designed to deal with
buffering. Unlike the PrintWriter object, JspWriter throws IOExceptions. Following are the
important methods which we would use to write boolean char, int, double, object, String etc.
Method Description
out.print(dataType dt) Print a data type value
out.println(dataType dt) Print a data type value then terminate the line with new line
character.
out.flush() Flush the stream.
iv) The session Object: The session object is an instance of “javax.servlet.http.HttpSession” and behaves exactly
the same way that session objects behave under Java Servlets. The session object is used to track
client session between client requests.
v) The application Object:
The application object is direct wrapper around the ServletContext object for the generated
Servlet and in reality an instance of a “javax.servlet.ServletContext” object. This object is a
representation of the JSP page through its entire lifecycle. This object is created when the JSP page
is initialized and will be removed when the JSP page is removed by the jspDestroy() method. By
adding an attribute to application, you can ensure that all JSP files that make up your web
application have access to it.
vi) The config Object:
The config object is an instantiation of “javax.servlet.ServletConfig” and is a direct
wrapper around the ServletConfig object for the generated servlet. This object allows the JSP
programmer access to the Servlet or JSP engine initialization parameters such as the paths or file
locations etc. The following config method is the only one you might ever use, and its usage is
trivial: config.getServletName();
This returns the servlet name, which is the string contained in the <servlet-name> element
defined in the WEB-INF\web.xml file.
vii) The pageContext Object:
The pageContext object is an instance of a “javax.servlet.jsp.PageContext” object. The
pageContext object is used to represent the entire JSP page.
pageContext.removeAttribute("attrName", PAGE_SCOPE);
viii) The page Object:
This object is an actual reference to the instance of the page. It can be thought of as an
object that represents the entire JSP page. The page object is really a direct synonym for the “this”
object.
ix) The exception Object: The exception object is a wrapper containing the exception thrown from the previous page.
It is typically used to generate an appropriate response to the error condition.
Web Technologies (A60512) Unit-V
CSE 150
Using Beans in JSP:
Java beans are reusable Java components. We can use simple Java bean in the JSP. This
can help us in keeping the business logic separate from presentation logic. Beans are used in the
JSP pages as the instance of class. We must specify the scope of the bean in the JSP page. Here
scope of the bean means the range time span of the bean for its existence in JSP. When bean is
present in particular scope its id also available in that scope. There are various scopes using which
the bean can be used in JSP page.
1. Page scope: The bean object gets disappeared as soon as the current page is discarded. The
default scope for a bean in JSP page is page scope.
2. Request scope: The bean object remains in existence as long as the request object is
present.
3. Session scope: A session can be defined as the specific period of a time the user spends
browsing the site.
4. Application scope: During application scope the bean will get stored to ServletContext.
Hence particular bean is available to all the servlets in the same web application.
Example:
CounterDemo.java:
public class CounterDemo
{
public int cnt;
public CounterDemo()
{
cnt=0;
}
public int getCnt( )
{
return cnt;
}
public void setCnt(int cnt)
{
this.cnt=cnt;
}
}
beanJSP.jsp:
<html>
<head>
<title>Using beans in JSP</title>
</head>
<body>
<jsp:useBean id=“bean1” class=“CounterDemo” scope=“session” />
<%
bean1.setCnt(bean1.getCnt( )+1);
%>
Your count is: <%=bean1.getCnt( )%>
</body>
</html>

Web Technologies (A60512) Unit-V
CSE 151
Using Cookies: Cookies are text files stored on the client computer and they are kept for various
information tracking purposes. JSP transparently supports HTTP cookies using underlying servlet
technology.
There are three steps involved in identifying returning users:
Server script sends a set of cookies to the browser. For example name, age, or identification
number etc.
Browser stores this information on local machine for future use.
When next time browser sends any request to web server then it sends those cookies
information to the server and server uses that information to identify the user or may be for
some other purpose as well.
Servlet Cookies Methods: Following is the list of useful methods associated with Cookie object which you can use
while manipulating cookies in JSP:
S.N. Method & Description
1 public void setDomain(String pattern) This method sets the domain to which cookie
applies, for example tutorialspoint.com.
2 public String getDomain() This method gets the domain to which cookie applies, for
example tutorialspoint.com.
3 public void setMaxAge(int expiry) This method sets how much time (in seconds)
should elapse before the cookie expires. If you don't set this, the cookie will last only
for the current session.
4 public int getMaxAge()This method returns the maximum age of the cookie,
specified in seconds, By default, -1 indicating the cookie will persist until browser
shutdown.
5 public String getName() This method returns the name of the cookie. The name
cannot be changed after creation.
6 public void setValue(String newValue) This method sets the value associated with
the cookie.
7 public String getValue() This method gets the value associated with the cookie.
8 public void setPath(String uri) This method sets the path to which this cookie
applies. If you don't specify a path, the cookie is returned for all URLs in the same
directory as the current page as well as all subdirectories.
9 public String getPath() This method gets the path to which this cookie applies.
10 public void setSecure(boolean flag) This method sets the boolean value indicating
whether the cookie should only be sent over encrypted (i.e. SSL) connections.
11 public void setComment(String purpose) This method specifies a comment that
describes a cookie's purpose. The comment is useful if the browser presents the cookie

Web Technologies (A60512) Unit-V
CSE 152
to the user.
12 public String getComment()This method returns the comment describing the
purpose of this cookie, or null if the cookie has no comment.
Example:
The following example illustrates how to create cookies and how to use them for processing. This
example contains three files:
CookieDemo.html – This file allow us to enter name and value for cookie we want to create.
CookieDemo.jsp – This file process the input from the CookieDemo.html file.
CookieDisp.jsp – This file displays the created cookies.
CookieDemo.html:
<html>
<head>
<title>Cookie Demo</title>
</head>
<body><br>
<center>
<h1>Cookie Demo</h1>
<form action="CookieDemo.jsp" method="get">
<table>
<tr>
<td>Enter Cookie Name:</td>
<td><input type="text" name="cname"></td>
</tr>
<tr>
<td>Enter Cookie Value:</td>
<td><input type="text" name="cvalue"></td>
</tr>
<tr>
<td align="center"><input type="submit" value="Submit"
name="submit"></td>
</tr>
</table>
</form>
</center>
</body>
</html>

Web Technologies (A60512) Unit-V
CSE 153
CookieDemo.jsp:
<%@page contentType="text/html" pageEncoding="UTF-8"%>
<!DOCTYPE html>
<html>
<head>
<meta http-equiv="Content-Type" content="text/html; charset=UTF-8">
<title>Cookie Demo</title>
</head>
<body>
<center>
<%
String cn=request.getParameter("cname");
String cv=request.getParameter("cvalue");
Cookie c=new Cookie (cn,cv);
response.addCookie(c);
c.setMaxAge(50*50);
%>
<h1>Cookie Added</h1>
<form method="get" action="CookieDisp.jsp">
<input type="submit" value="List Cookies">
</form>
</center>
</body>
</html>
CookieDisp.html:
<%@page contentType="text/html" pageEncoding="UTF-8"%>
<!DOCTYPE html>
<html>
<head>
<meta http-equiv="Content-Type" content="text/html; charset=UTF-8">
<title>Cookie Display</title>
</head>
<body>
<center>
<h1>Cookies List</h1>
<%
Cookie[] c=request.getCookies();
%>
<table border=1>
<tr>
Web Technologies (A60512) Unit-V
CSE 154
<%
out.println("<td><b> Cookie Name </td> <td> <b>Cookie value</b>
</td>");
for(int i=0;i<c.length;i++)
{
out.println("<h2> <tr> <td>
"+c[i].getName()+"</td><td>"+c[i].getValue()+"</td></tr>");
}
%>
</tr>
</table>
</center>
</body>
</html>
Using Sessions: JSP makes use of servlet provided HttpSession Interface which provides a way to identify a
user across more than one page request or visit to a Web site and to store information about that
user. By default, JSPs have session tracking enabled and a new HttpSession object is instantiated
for each new client automatically. Disabling session tracking requires explicitly turning it off by
setting the page directive session attribute to false as follows:
<%@ page session="false" %>
The JSP engine exposes the HttpSession object to the JSP author through the implicit
session object. Since session object is already provided to the JSP programmer, the programmer
can immediately begin storing and retrieving data from the object without any initialization or
getSession(). Here is a summary of important methods available through session object:
S.N. Method & Description
1
public Object getAttribute(String name) This method returns the object bound
with the specified name in this session, or null if no object is bound under the
name.
2 public Enumeration getAttributeNames() This method returns an Enumeration
of String objects containing the names of all the objects bound to this session.
3 public long getCreationTime() This method returns the time when this session
was created, measured in milliseconds since midnight January 1, 1970 GMT.
4 public String getId() This method returns a string containing the unique
identifier assigned to this session.

Web Technologies (A60512) Unit-V
CSE 155
5
public long getLastAccessedTime() This method returns the last time the client
sent a request associated with this session, as the number of milliseconds since
midnight January 1, 1970 GMT.
6
public int getMaxInactiveInterval() This method returns the maximum time
interval, in seconds, that the servlet container will keep this session open between
client accesses.
7 public void invalidate() This method invalidates this session and unbinds any
objects bound to it.
8 public boolean isNew( This method returns true if the client does not yet know
about the session or if the client chooses not to join the session.
9 public void removeAttribute(String name) This method removes the object
bound with the specified name from this session.
10 public void setAttribute(String name, Object value) This method binds an
object to this session, using the name specified.
11
public void setMaxInactiveInterval(int interval) This method specifies the
time, in seconds, between client requests before the servlet container will
invalidate this session.
Example:
The following example illustrates how to use session state. A new session is created if one
does not already exist. The getAttribute( ) method is called to obtain the object that is bound to the
name “cnt”.
Sessions.html:
<html>
<head>
<title>Session Demo</title>
</head>
<body>
<form name="form1" action="SessionDemo.jsp" >
<b> Session Demo</b><br>
<input type="submit" value="Go to My Session Demo">
</form>
</body>
</html>
SessionDemo.jsp:
<%@ page import = “java.util.*” %>
<%
String heading;
Integer cnt=(Integer)session.getAttribute("cnt");
if(cnt==null)
{

Web Technologies (A60512) Unit-V
CSE 156
cnt=new Integer(0);
heading="Welcome for the first time";
}
else
{
heading="Welcome once again";
cnt=new Integer(cnt.intValue()+1);
}
session.setAttribute("cnt",cnt);
out.println("<html>");
out.println("<body>");
out.println("<h1>"+heading);
out.println("The number of previous accesses: "+cnt);
out.println("</body>");
out.println("</html>");
%>
Connecting to Database in JSP: Example: The following example contains two files:
i) Login.html: It allows us to enter user name and password to authenticate the user by
checking the values are available in Database or not.
ii) Login.jsp: It processes the entered username and password and displays the message
accordingly.
Login.html:
<html>
<head>
<title>Login Page</title>
<meta charset="UTF-8">
<meta name="viewport" content="width=device-width, initial-scale=1.0">
</head>
<body>
<center>
<h1>Login Form</h1>
<form action="Login.jsp" method="post">
<table>
<tr>
<td>User name:</td>
<td><input type="text" name="uname"/></td>
</tr>
<tr>
<td>Password:</td>
<td><input type="password" name="pwd"/></td>
</tr>
<tr>
<td><input type="submit" value="Login"></td>
<td><input type="reset" value="Clear"/></td>
Web Technologies (A60512) Unit-V
CSE 157
</tr>
</table>
</form>
</center>
</body>
</html>
Login.jsp:
<%@page language="java" import="java.sql.*" %>
<%
String un=request.getParameter("uname");
String pwd=request.getParameter("pwd");
Class.forName("com.mysql.jdbc.Driver");
Connection con=DriverManager.getConnection("jdbc:mysql://localhost:3306/scce", "root",
"");
Statement stmt=con.createStatement();
out.println("<head><title>Login Page</title></head>");
ResultSet rs=stmt.executeQuery("select * from Login where uname='"+un+"' and
pwd='"+pwd+"'");
if(rs.next())
out.println("<h1>Welcome "+rs.getString(1)+", You are logged in successfully</h1>");
else
out.println("<h1>Login Failed</h1>");
%>
INTRODUCTION:
Software components are self-contained software units developed according to the motto
“Developed them once, run and reused them everywhere”. Or in other words, reusability is the
main concern behind the component model. A software component is a reusable object that can be
plugged into any target software application. You can develop software components using various
programming languages, such as C, C++, Java, and Visual Basic.
A “Bean” is a reusable software component model based on sun’s java bean specification
that can be manipulated visually in a builder tool.
The term software component model describe how to create and use reusable software
components to build an application
Builder tool is nothing but an application development tool which lets you both to create
new beans or use existing beans to create an application.
To enrich the software systems by adopting component technology JAVA came up with
the concept called Java Beans.
Java provides the facility of creating some user defined components by means of Bean
programming.
We create simple components using java beans.
We can directly embed these beans into the software.
ADVANTAGES OF JAVA BEANS:
The java beans posses the property of “Write once and run anywhere”.
Beans can work in different local platforms.
Beans have the capability of capturing the events sent by other objects and vice versa

Web Technologies (A60512) Unit-V
CSE 158
enabling object communication.
The properties, events and methods of the bean can be controlled by the application
developer. (ex. Add new properties)
Beans can be configured with the help of auxiliary software during design time.(no hassle
at runtime)
The configuration setting can be made persistent.(reused)
Configuration setting of a bean can be saved in persistent storage and restored later.
WHAT CAN WE DO/CREATE BY USING JAVABEANS:
There is no restriction on the capability of a Bean.
It may perform a simple function, such as checking the spelling of a document, or a
complex function, such as forecasting the performance of a stock portfolio. A Bean may be
visible to an end user. One example of this is a button on a graphical user interface.
Software to generate a pie chart from a set of data points is an example of a Bean that can
execute locally.
Bean that provides real-time price information from a stock or commodities exchange.
DEFINITION OF A BUILDER TOOL:
Builder tools allow a developer to work with JavaBeans in a convenient way. By examining a
JavaBean by a process known as Introspection, a builder tool exposes the discovered features of
the JavaBean for visual manipulation. A builder tool maintains a list of all JavaBeans available. It
allows you to compose the Bean into applets, application, servlets and composite components (e.g.
a JFrame), customize its behavior and appearance by modifying its properties and connect other
components to the event of the Bean or vice versa.
JAVABEANS BASIC RULES:
A JavaBean should:
be public
implement the Serializable interface
have a no-argument constructor
be derived from javax.swing.JComponent or java.awt.Component if it is visual
The classes and interfaces defined in the JavaBeans package enable you to create JavaBeans. The
Java Bean components can exist in one of the following three phases of development:
Construction phase
Build phase
Execution phase
It supports the standard component architecture features of
Properties
Events
Methods
Persistence
Introspection (Allows Automatic Analysis of a java beans)
Customization (To make it easy to configure a java beans component)
ELEMENTS OF A JAVABEAN:
i) Properties
It is similar to instance variables. A bean property is a named attribute of a bean that can affect its
behavior or appearance. Examples of bean properties include color, label, font, font size, and

Web Technologies (A60512) Unit-V
CSE 159
display size.
ii) Methods
Same as normal Java methods.
Every property should have accessor (get) and mutator (set) method.
All Public methods can be identified by the introspection mechanism.
There is no specific naming standard for these methods.
iii) Events:
It is similar to Swing/AWT event handling.
THE JAVABEAN COMPONENT SPECIFICATION:
i) Customization: It is the ability of JavaBean to allow its properties to be changed in build and execution phase.
ii) Persistence:
It is the ability of JavaBean to save its state to disk or storage device and restore the saved state
when the JavaBean is reloaded.
iii) Communication:
It is the ability of JavaBean to notify change in its properties to other JavaBeans or the container.
iv) Introspection:
It is the ability of a JavaBean to allow an external application to query the properties, methods, and
events supported by it.
SERVICES OF JAVABEAN COMPONENTS:
i) Builder support:
It enables you to create and group multiple JavaBeans in an application.
ii) Layout:
It allows multiple JavaBeans to be arranged in a development environment.
iii) Interface publishing: It enables multiple JavaBeans in an application to communicate with each other.
iv) Event handling:
It refers to firing and handling of events associated with a JavaBean.
v) Persistence:
It enables you to save the last state of JavaBean.
FEATURES OF A JAVABEAN:
Support for “introspection” so that a builder tool can analyze how a bean works.
Support for “customization” to allow the customization of the appearance and behavior of
a bean.
Support for “events” as a simple communication metaphor than can be used to connect up
beans.
Support for “properties”, both for customization and for programmatic use.
Support for “persistence”, so that a bean can save and restore its customized state.

Web Technologies (A60512) Unit-V
CSE 160
BEANS DEVELOPMENT KIT (BDK): It is a development environment to create, configure,
and test JavaBeans.
The features of BDK environment are:
Provides a GUI to create, configure, and test JavaBeans.
Enables you to modify JavaBean properties and link multiple JavaBeans in an application
using BDK.
Provides a set of sample JavaBeans.
Enables you to associate pre-defined events with sample JavaBeans.
Identifying BDK Components
Execute the run.bat file of BDK to start the BDK development environment.
The components of BDK development environment are:
o Tool Box
o BeanBox
o Properties-BeanBox
o Method Tracer
i) Tool Box Window: Lists the sample JavaBeans of BDK.
The following figure shows the Tool Box window:

Web Technologies (A60512) Unit-V
CSE 161
ii) BeanBox Window: It is a workspace for creating the layout of JavaBean application.
The following figure shows the BeanBox window:
iii) Properties Window: It displays all the exposed properties of a JavaBean. You can
modify JavaBean properties in the properties window.
The following figure shows the Properties window:

Web Technologies (A60512) Unit-V
CSE 162
iv) Method Tracer window: It displays the debugging messages and method calls for a
JavaBean application.
The following figure shows the Method Tracer window:
STEPS TO DEVELOP A USER-DEFINED JAVABEAN:
1. Create a directory for the new bean
2. Create the java bean source file(s)
3. Compile the source file(s)
4. Create a manifest file
5. Generate a JAR file
6. Start BDK
7. Load Jar file
8. Test
1. Create a directory for the new bean
Create a directory/folder like C:\Beans
2. Create bean source file - MyBean.java
import java.awt.*;
public class MyBean extends Canvas
{
public MyBean()
{
setSize(70,50);
Web Technologies (A60512) Unit-V
CSE 163
setBackground(Color.green);
}
}
3. Compile the source file(s)
C:\Beans >Javac MyBean.java
4. Create a manifest file
The manifest file for a JavaBean application contains a list of all the class files that make
up a JavaBean.
The entry in the manifest file enables the target application to recognize the JavaBean
classes for an application.
For example, the entry for the MyBean JavaBean in the manifest file is as shown:
Note: write that 2 lines code in the notepad and save that file as MyBean.mft
The rules to create a manifest file are:
Press the Enter key after typing each line in the manifest file.
Leave a space after the colon.
Type a hyphen between Java and Bean.
No blank line between the Name and the Java-Bean entry.
5. Generate a JAR file
Syntax for creating jar file using manifest file
C:\Beans >jar cfm MyBean.jar MyBean.mf MyBean.class
JAR file:
JAR file allows you to efficiently deploy a set of classes and their associated resources.
JAR file makes it much easier to deliver, install, and download. It is compressed.
Java Archive File
The files of a JavaBean application are compressed and grouped as JAR files to reduce the
size and the download time of the files.
The syntax to create a JAR file from the command prompt is:
jar <options> <file_names>
The file_names is a list of files for a JavaBean application that are stored in the JAR file.
The various options that you can specify while creating a JAR file are:
c: Indicates the new JAR file is created.
f: Indicates that the first file in the file_names list is the name of the JAR file.
m: Indicates that the second file in the file_names list is the name of the manifest file.
t: Indicates that all the files and resources in the JAR file are to be displayed in a tabular
format.
v: Indicates that the JAR file should generate a verbose output.
x: Indicates that the files and resources of a JAR file are to be extracted.
o: Indicates that the JAR file should not be compressed.
m: Indicates that the manifest file is not created.
6. Start BDK
Manifest-Version: 1.0 Name: MyBean.class Java-Bean: True

Web Technologies (A60512) Unit-V
CSE 164
Go to->
C:\bdk1_1\beans\beanbox
Click on run.bat file. When we click on run.bat file the BDK software automatically started.
7. Load Jar file
Go to
Beanbox->File->Load jar. Here we have to select our created jar file when we click on ok, our
bean (user-defined) MyBean appear in the ToolBox.
8. Test our created user defined bean
Select the MyBean from the ToolBox when we select that bean one + simple appear then drag that
Bean in to the Beanbox. If you want to apply events for that bean, now we apply the events for that
Bean.
INTRODUCTION TO STRUTS FRAMEWORK:
The struts framework is used to develop MVC-based web application. The struts framework
was initially created by Craig McClanahan and donated to Apache Foundation in May, 2000 and
Struts 1.0 was released in June 2001.
Struts Architecture and Flow:
When you use Struts, the framework provides you with a controller servlet,
ActionServlet, which is defined in the Struts libraries that are included in the IDE, and which is
automatically registered in the web.xml deployment descriptor as shown below. The controller
servlet uses a struts-config.xml file to map incoming requests to Struts Action objects, and
instantiate any ActionForm objects associated with the action to temporarily store form data. The
Action object processes requests using its execute method, while making use of any data stored
in the form bean. Once the Action object processes a request, it stores any new data (i.e., in the
form bean, or in a separate result bean), and forwards the results to the appropriate view.
Developing a Struts application is similar to developing any other kind of web application
in NetBeans IDE. However, you complement your web development toolkit by taking advantage
of the Struts support provided by the IDE. For example, you use templates in the IDE to create
Struts Action objects and ActionForm beans. Upon creation, the IDE automatically registers
these classes in the struts-config.xml file and lets you extend this file very easily using menu
items in the Source Editor's right-click menu. Because many web applications use JSP pages for
the view, Struts also provides custom tag libraries which facilitate interaction with HTML forms.
Within the IDE's Source Editor, you can invoke code completion and Javadoc support that helps
you to work efficiently with these libraries.


![[Basic HTML/CSS] 1. html - basic tags](https://static.fdocuments.us/doc/165x107/58ce75c41a28abdc578b67db/basic-htmlcss-1-html-basic-tags.jpg)

![[Basic HTML/CSS] 3. html - table tags](https://static.fdocuments.us/doc/165x107/58ed3bb51a28ab7a278b4589/basic-htmlcss-3-html-table-tags.jpg)

