UNIT 1 : Photoshop Timeline Tools
18
UNIT 1 : Photoshop Timeline Tools Hello everyone, and welcome to Unit 1 of Digital Drawing ! This being our first week, I'd like you all to get familiar with Photoshop's interface and just learning the basics about some of it’s layout and tools to help you begin navigating around. Click the Photoshop icon on your desktop and start Photoshop CC 2019 or 2020 ) 1. The first thing you will notice, is Photoshop will open clearly and on the left hand side you will will see a CREATE NEW button, please click it, and then a new window will appear. You will see a few options to go through in this menu. On the left, you will see default photoshop and recent templates of what your page will look like, including the most recent file formats you worked in. On the right, is custom options that you can change or alter.
Transcript of UNIT 1 : Photoshop Timeline Tools
UNIT 1 : Photoshop Timeline Tools
Hello everyone, and welcome to Unit 1 of Digital Drawing ! This being our first week, I'd like you all to get familiar with Photoshop's interface and just learning the basics about some of
it’s layout and tools to help you begin navigating around.
Click the Photoshop icon on your desktop and start Photoshop CC 2019 or 2020 )
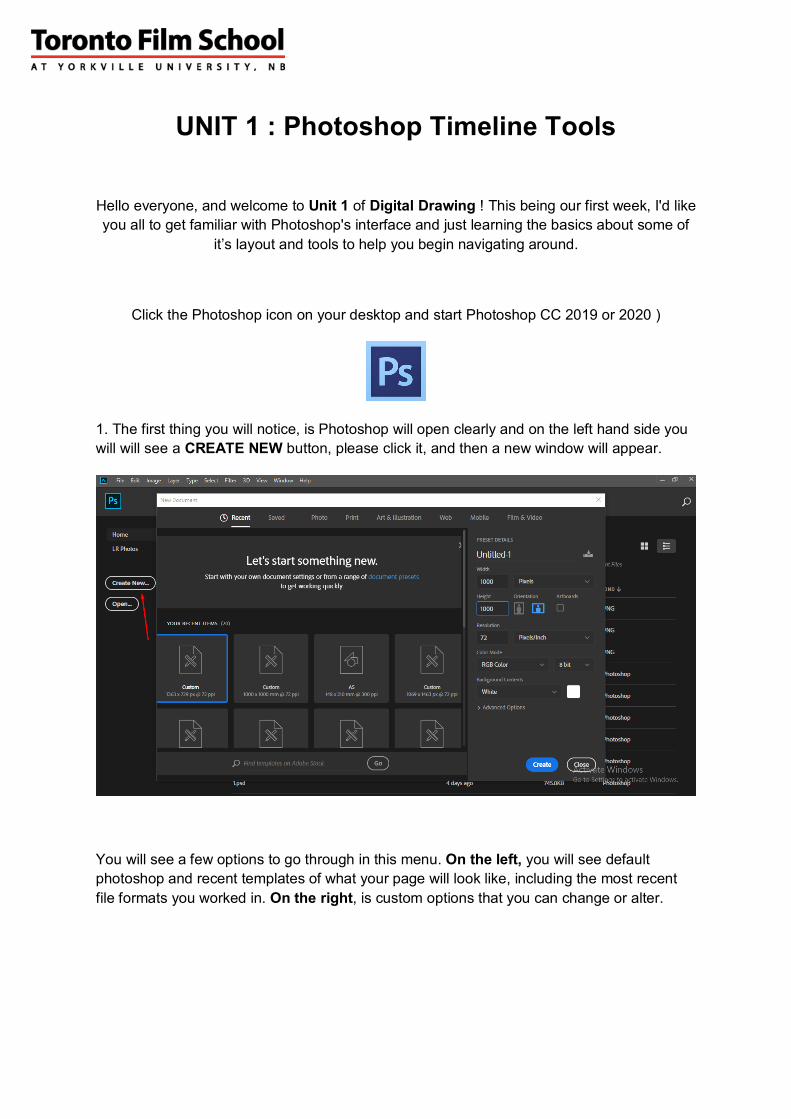
1. The first thing you will notice, is Photoshop will open clearly and on the left hand side you will will see a CREATE NEW button, please click it, and then a new window will appear.
You will see a few options to go through in this menu. On the left, you will see default photoshop and recent templates of what your page will look like, including the most recent file formats you worked in. On the right, is custom options that you can change or alter.
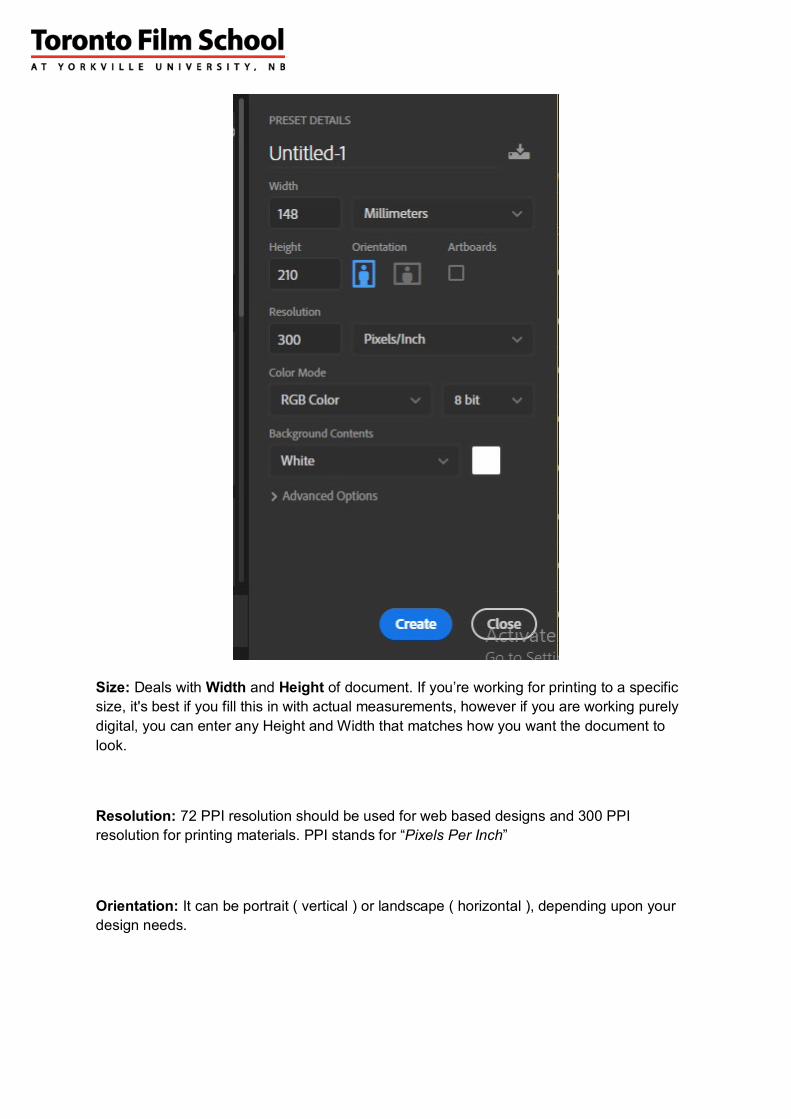
Size: Deals with Width and Height of document. If you’re working for printing to a specific size, it's best if you fill this in with actual measurements, however if you are working purely digital, you can enter any Height and Width that matches how you want the document to look.
Resolution: 72 PPI resolution should be used for web based designs and 300 PPI resolution for printing materials. PPI stands for “Pixels Per Inch”
Orientation: It can be portrait ( vertical ) or landscape ( horizontal ), depending upon your design needs.

Color mode: This is the color type of your document. I suggest you leave it as RGB color for now and keep it as 8 bit.
Background: Background can be chosen according to the design requirement. The basic background color is White.
The Photoshop document and the Photoshop interface will appear after clicking on the CREATE button and this is what you should see when creating your first document.
1. Menu bar: This will include all the functions and effects that can be used on the designs/pictures.
2. Tools: All the work to be done on canvas will be done by using the tools on the left side.
3. Canvas: Canvas is the area where the design/picture will appear.
4. Layers: Layers is the most important section in Photoshop. All the pictures, text, and shapes will appear in this section.
Let's take a look at the LAYERS section of Photoshop. It's important that we look at Layers because it will be the foundation about how we work in this example.
CREATING LAYERS
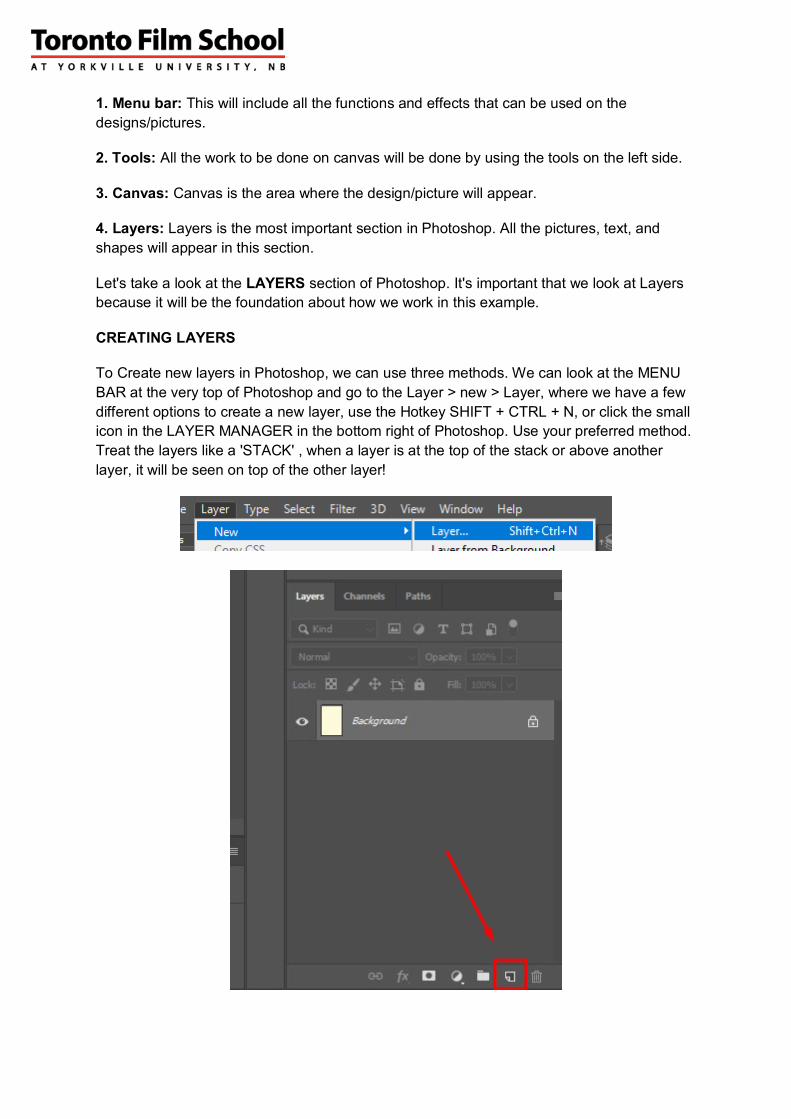
To Create new layers in Photoshop, we can use three methods. We can look at the MENU BAR at the very top of Photoshop and go to the Layer > new > Layer, where we have a few different options to create a new layer, use the Hotkey SHIFT + CTRL + N, or click the small icon in the LAYER MANAGER in the bottom right of Photoshop. Use your preferred method. Treat the layers like a 'STACK' , when a layer is at the top of the stack or above another layer, it will be seen on top of the other layer!

You will notice the first layer ( background ) is the default base that photoshop creates, you can delete and modify this layer to your liking as the default background layer has limited options. To rename the NEW layers, simple double click on the layer name and you can change it.
LAYER GROUPS
HERE IS THE EXAMPLE FILE TO WORK WITH :
https://www.dropbox.com/s/b1r8rmqm7wc843z/photoshop-reduce-chaos-layer-groups.zip?dl=0
Layer groups can help you organize a document in Adobe Photoshop CC so it’s easier to find text and other design elements as you create. Layer groups also make it easier to work with several layers at once. For this example, we’ll use different techniques to group layers that make up different parts of a poster.
Open the Layers panel
Choose Window > Layers to open the Layers panel. Notice each layer displays a thumbnail indicating the type of content on the layer — such as a T for a type layer, or a thumbnail for an image layer.
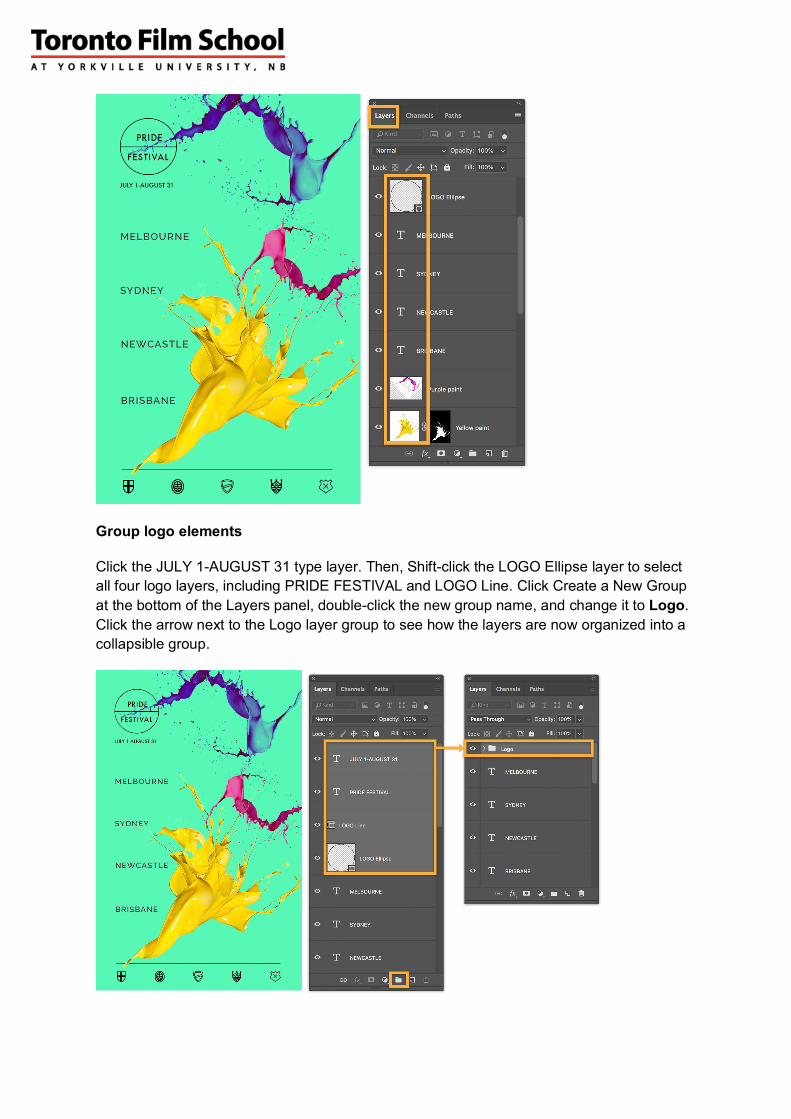
Group logo elements
Click the JULY 1-AUGUST 31 type layer. Then, Shift-click the LOGO Ellipse layer to select all four logo layers, including PRIDE FESTIVAL and LOGO Line. Click Create a New Group at the bottom of the Layers panel, double-click the new group name, and change it to Logo. Click the arrow next to the Logo layer group to see how the layers are now organized into a collapsible group.
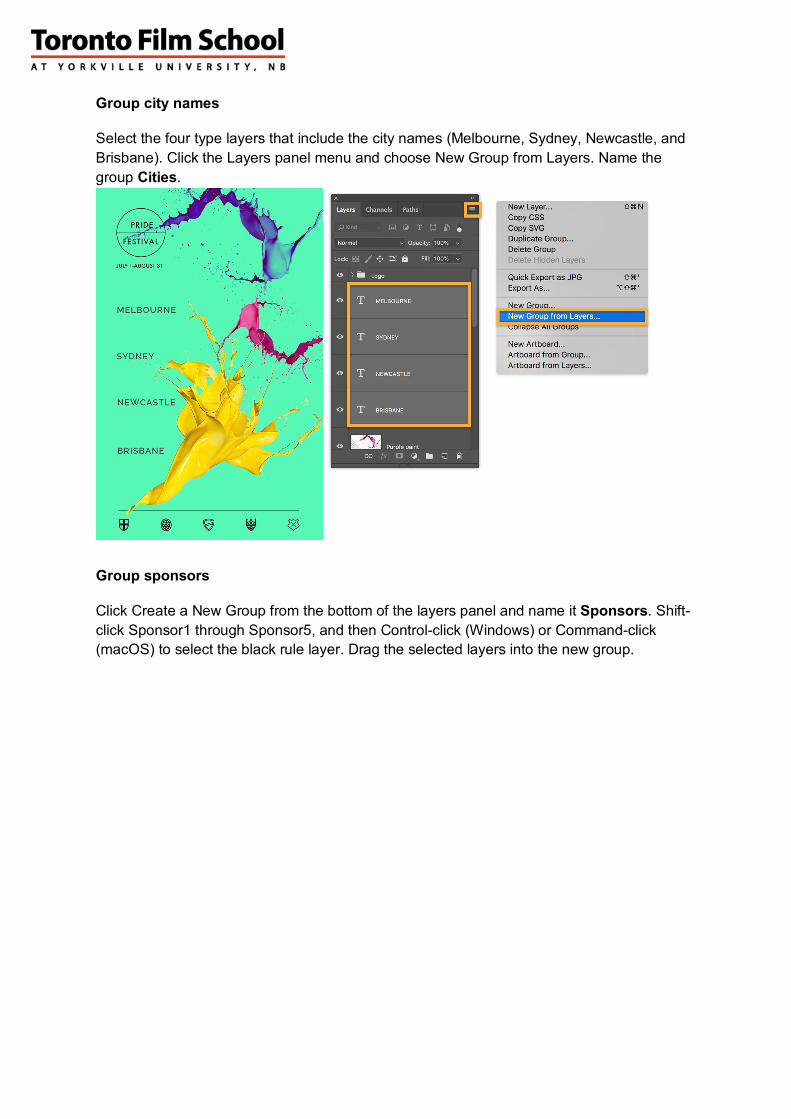
Group city names
Select the four type layers that include the city names (Melbourne, Sydney, Newcastle, and Brisbane). Click the Layers panel menu and choose New Group from Layers. Name the group Cities.
Group sponsors
Click Create a New Group from the bottom of the layers panel and name it Sponsors. Shift-click Sponsor1 through Sponsor5, and then Control-click (Windows) or Command-click (macOS) to select the black rule layer. Drag the selected layers into the new group.
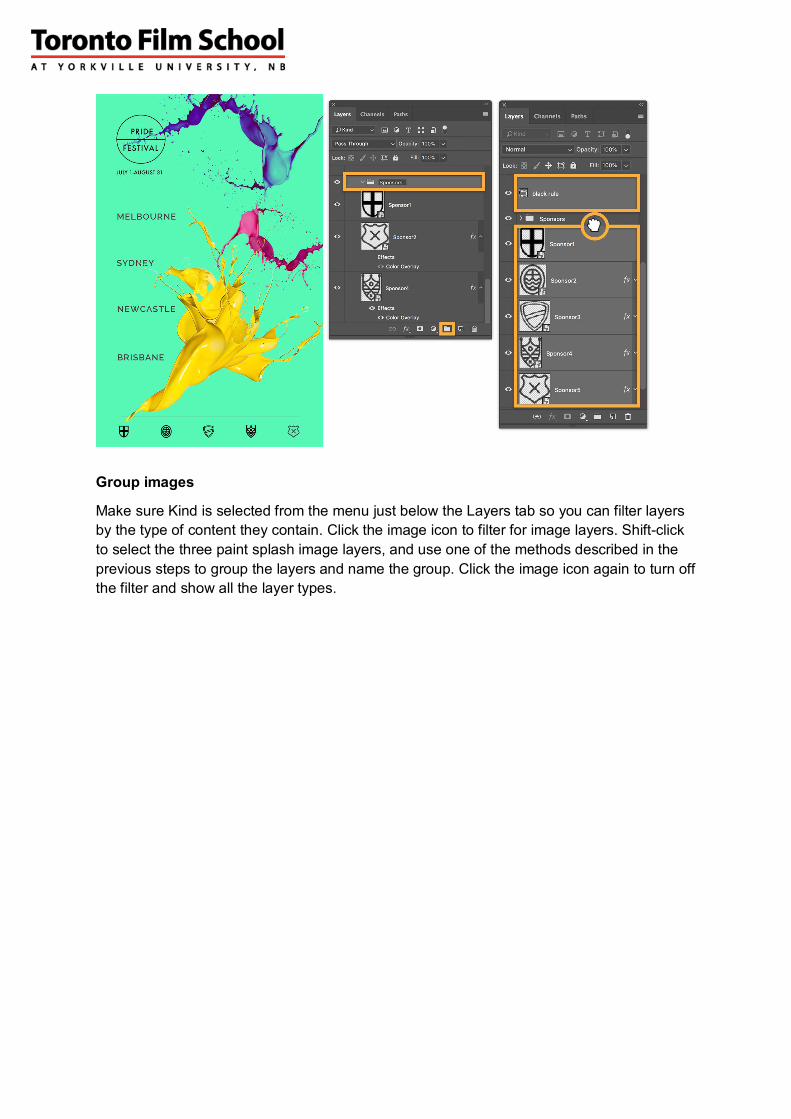
Group images
Make sure Kind is selected from the menu just below the Layers tab so you can filter layers by the type of content they contain. Click the image icon to filter for image layers. Shift-click to select the three paint splash image layers, and use one of the methods described in the previous steps to group the layers and name the group. Click the image icon again to turn off the filter and show all the layer types.

Work with grouped layers
Choose the Move tool from the toolbar and make sure the Auto-Select option is not checked. Then click the Logo group in the Layers panel. Move the logo from one side of the poster to the center. Layer groups make it easier for you to work with multiple layers at once. For example, you can change the Opacity or set the Blend mode for all the layers in a group.
WORKING WITH BRUSHES
Now that you understand a bit about LAYERS and LAYER GROUPS, it's time to draw using different layers. So let's take a quick look at the BRUSH and ERASER TOOLS
You can access the brush and eraser tools on the toolbar on the left of Photoshop or by pushing two hotkeys : B ( Brush ) or E ( for Eraser )
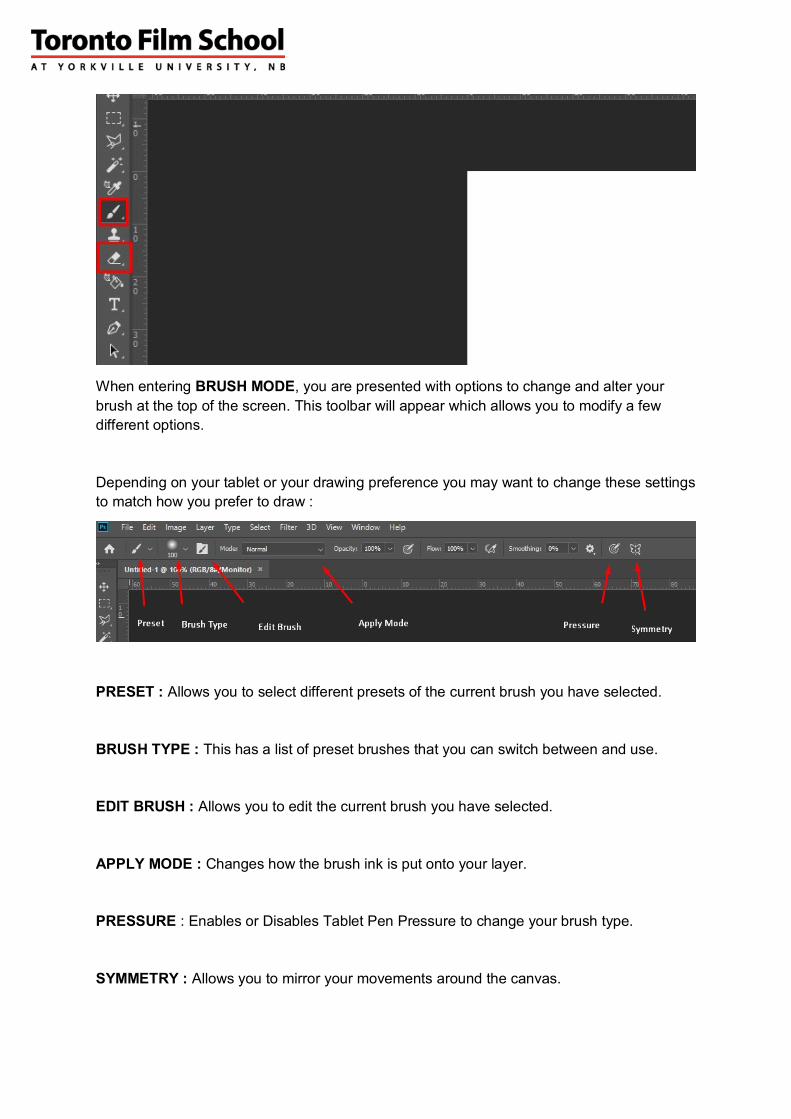
When entering BRUSH MODE, you are presented with options to change and alter your brush at the top of the screen. This toolbar will appear which allows you to modify a few different options.
Depending on your tablet or your drawing preference you may want to change these settings to match how you prefer to draw :
PRESET : Allows you to select different presets of the current brush you have selected.
BRUSH TYPE : This has a list of preset brushes that you can switch between and use.
EDIT BRUSH : Allows you to edit the current brush you have selected.
APPLY MODE : Changes how the brush ink is put onto your layer.
PRESSURE : Enables or Disables Tablet Pen Pressure to change your brush type.
SYMMETRY : Allows you to mirror your movements around the canvas.

With the LAYERS and BRUSH TOOLS now in your pocket, you are able to draw freely in photoshop. Some key things to remember :
1. Learning Hotkeys such as CTRL+Z ( Undo ) B and E ( For Brush and Eraser ) allow you to work faster. Setting them as hotkeys on your tablets is very handy.
2. Layers work as a stack, if a layer is on top , it will hide anything underneath it currently.
3. Layer organization is important, name your layers and try to keep them organized!
Now that you've played around with the brush tool and are getting more comfortable with layers. Let's look at a couple more tools and use some real images.
Here are the project images :
Subject url: https://bit.ly/2m0lAJB
Background url: https://bit.ly/2mv9isT I suggest using unsplash.com to download royalty free images. They have an awesome collection that you can use for practice for this project and for your Assignment.
Go to File > Open or press Ctrl/cmd + O to open an existing image in Photoshop.
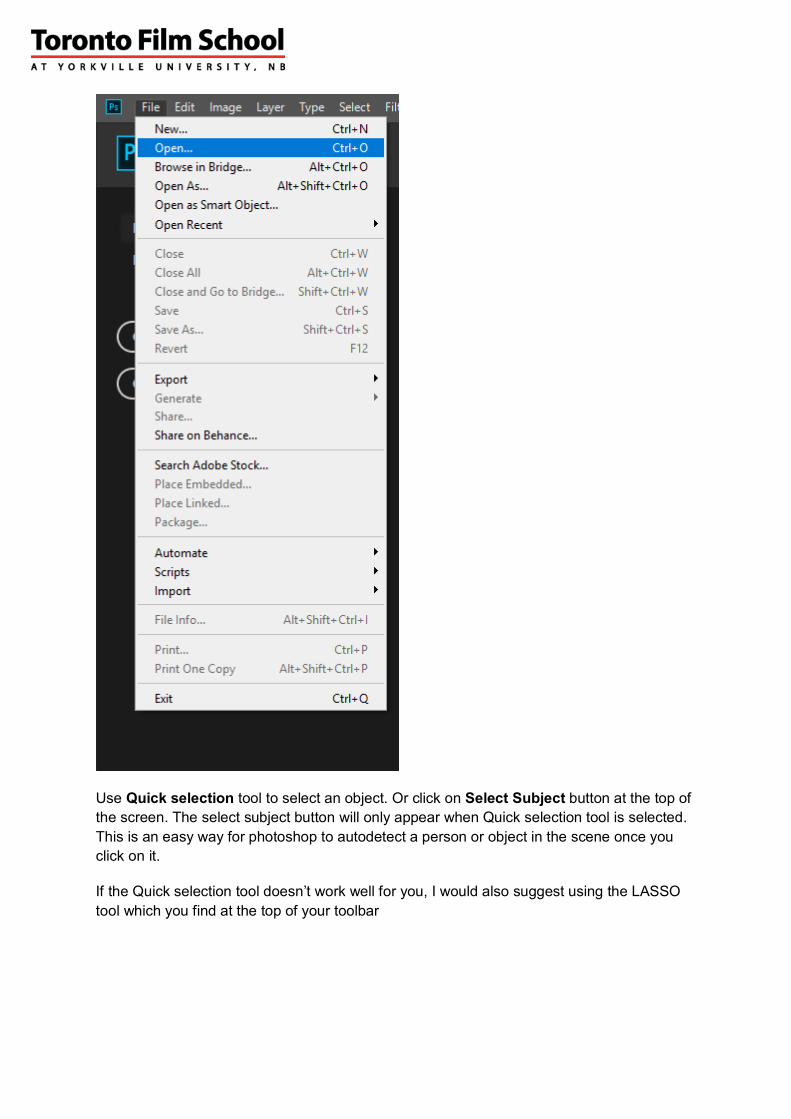
Use Quick selection tool to select an object. Or click on Select Subject button at the top of the screen. The select subject button will only appear when Quick selection tool is selected. This is an easy way for photoshop to autodetect a person or object in the scene once you click on it.
If the Quick selection tool doesn’t work well for you, I would also suggest using the LASSO tool which you find at the top of your toolbar

With the LASSO selected, you can just left click and hold as if you were drawing around your character to select a part of your image. If you need to draw your selection multiple times, Hold SHIFT and use the LASSO tool some more to add more to your selection, or hold ALT and use the LASSO tool to take away from your current selection.
Now that you are looking at larger canvas sizes, you will need to know a few things to change your view of the canvas. PAN Canvas : Hold SPACEBAR, then left click and drag your mouse MOVE Canvas : Scrollwheel Up / Down ZOOM Canvas : ALT + Scrollwheel ROTATE Canvas : Hold R + Then Left click and drag ( hold shift for perfect angles ) If some students are having difficulty with their canvases, I suggest to have the NAVIGATOR WINDOW open, you can access this by going to your top menu bar and going to WINDOW > Navigator.
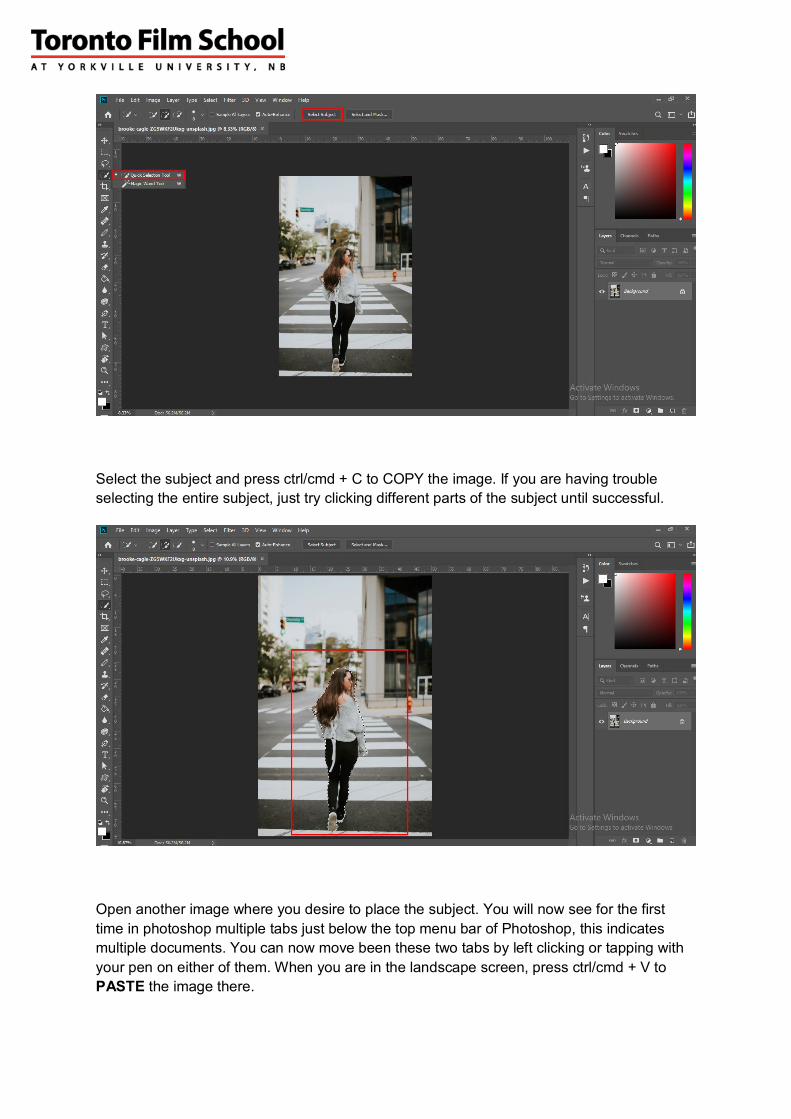
Select the subject and press ctrl/cmd + C to COPY the image. If you are having trouble selecting the entire subject, just try clicking different parts of the subject until successful.
Open another image where you desire to place the subject. You will now see for the first time in photoshop multiple tabs just below the top menu bar of Photoshop, this indicates multiple documents. You can now move been these two tabs by left clicking or tapping with your pen on either of them. When you are in the landscape screen, press ctrl/cmd + V to PASTE the image there.

A new layer of pasted image will appear on the right side of Photoshop.
If the pasted subject is too large or small , and you want to adjust the size of it.Press ctrl/cmd + T to TRANSFORM your image. CTRL+T Is the shortcut to transform all the pixels that exist on a layer.
Now you can adjust and rotate. If you click the little boxes on the outside of the transformation you can scale in different directions, hold shift and the little boxes to scale ( non-uniform ) or click outside the box to rotate! Once you are complete with your transformation, hit ENTER on your keyboard to complete the transformation and exit transformation mode.
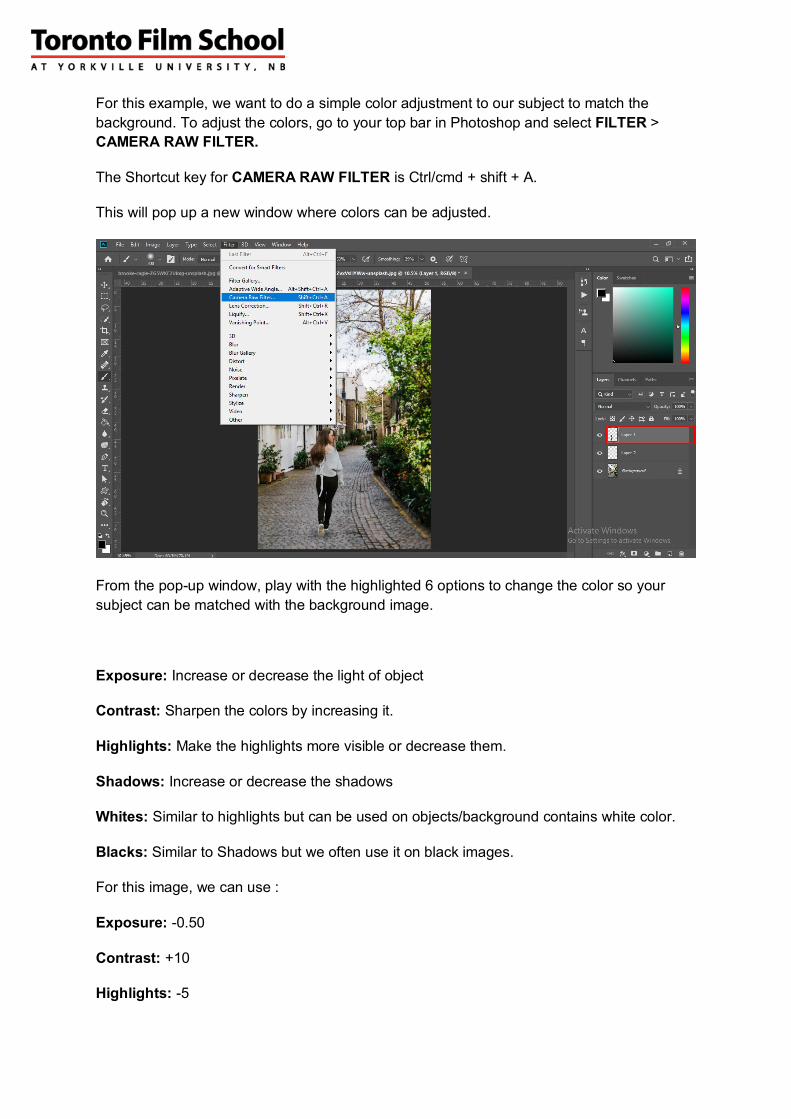
For this example, we want to do a simple color adjustment to our subject to match the background. To adjust the colors, go to your top bar in Photoshop and select FILTER > CAMERA RAW FILTER.
The Shortcut key for CAMERA RAW FILTER is Ctrl/cmd + shift + A.
This will pop up a new window where colors can be adjusted.
From the pop-up window, play with the highlighted 6 options to change the color so your subject can be matched with the background image.
Exposure: Increase or decrease the light of object
Contrast: Sharpen the colors by increasing it.
Highlights: Make the highlights more visible or decrease them.
Shadows: Increase or decrease the shadows
Whites: Similar to highlights but can be used on objects/background contains white color.
Blacks: Similar to Shadows but we often use it on black images.
For this image, we can use :
Exposure: -0.50
Contrast: +10
Highlights: -5

Shadows: -5
Here is the final result of manipulated and edited image.
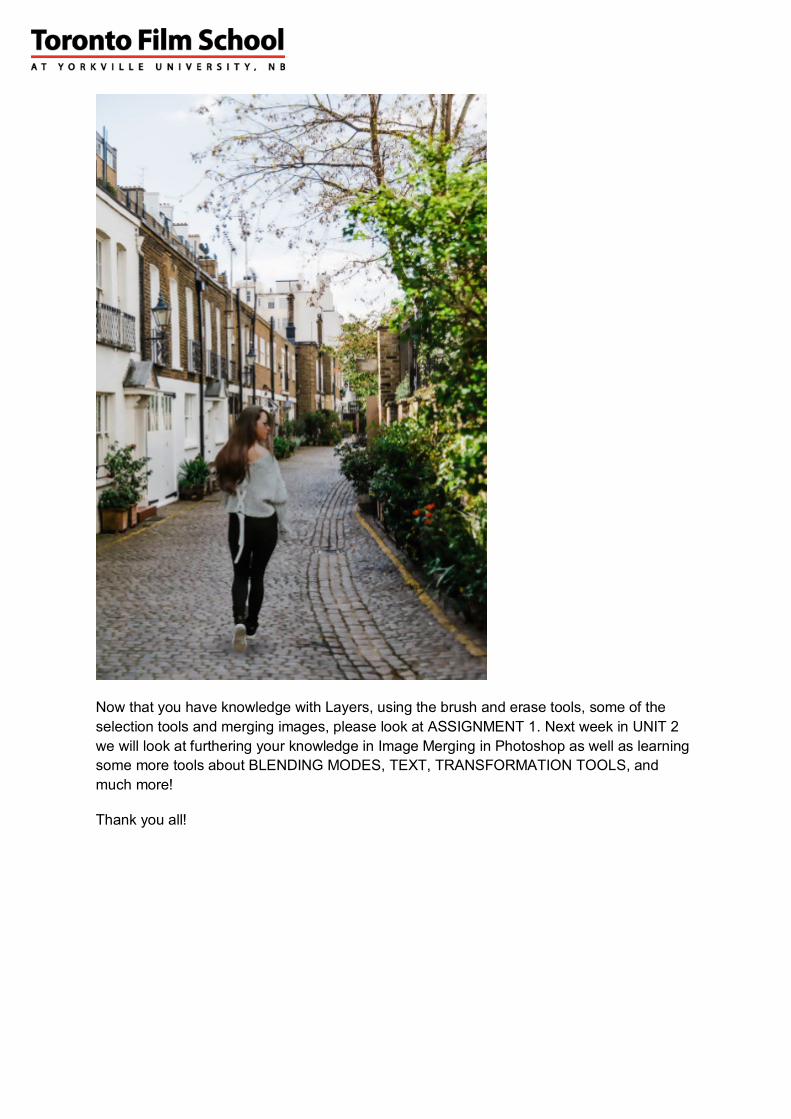
Now that you have knowledge with Layers, using the brush and erase tools, some of the selection tools and merging images, please look at ASSIGNMENT 1. Next week in UNIT 2 we will look at furthering your knowledge in Image Merging in Photoshop as well as learning some more tools about BLENDING MODES, TEXT, TRANSFORMATION TOOLS, and much more!
Thank you all!