Understanding JSP -Servlets
34
JSP - Servlets: A servlet example -Gagandeep Singh
-
Upload
gagandeep-singh -
Category
Technology
-
view
102 -
download
1
Transcript of Understanding JSP -Servlets

JSP - Servlets: A servlet example
-Gagandeep Singh

This section is going to show you a step by step to implement a simple servlet example and run it. The example is going to:
Ask the user for a color in a JSP - in our example it will be "Home.jsp"
Display "Hello World" in the chosen color using a servlet - in our example it will be "helloWorld.java"
Create a new project
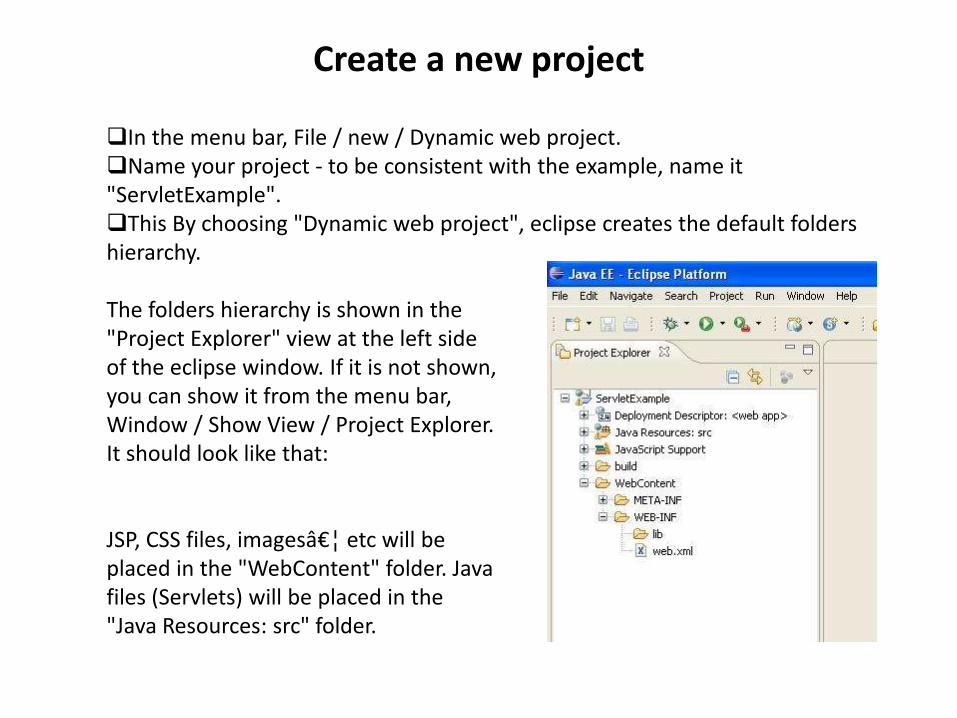
In the menu bar, File / new / Dynamic web project. Name your project - to be consistent with the example, name it "ServletExample". This By choosing "Dynamic web project", eclipse creates the default folders hierarchy.
The folders hierarchy is shown in the "Project Explorer" view at the left side of the eclipse window. If it is not shown, you can show it from the menu bar, Window / Show View / Project Explorer. It should look like that:
JSP, CSS files, images… etc will be placed in the "WebContent" folder. Java files (Servlets) will be placed in the "Java Resources: src" folder.

Create the JSP file
In the "Project Explorer" view, R-click "WebContent" / New / JSP. Name your JSP - to be consistent with the example, name it "Home.jsp" Place the JSP the following code:
<%@ page language="java" contentType="text/html; charset=ISO-8859-1" pageEncoding="ISO-8859-1"%>
<!DOCTYPE html PUBLIC "-//W3C//DTD HTML 4.01 Transitional//EN" "http://www.w3.org/TR/html4/loose.dtd">
<html> <head> <meta http-equiv="Content-Type" content="text/html; charset=ISO-8859-1"> <title> My first JSP </title>
</head> <body> <form action="HelloServlet">
Please enter a color <br> <input type="text" name="color"size="20px"> <input type="submit" value="submit">
</form> </body> </html>

Create the Servlet
In the "Project Explorer" view, R-click "Java Resources: src" / New / Class Name your class - to be consistent with the example, name it "HelloWorld" place the following code in the class:
import java.io.IOException; import javax.servlet.ServletException; import javax.servlet.http.HttpServlet; import javax.servlet.http.HttpServletRequest; import javax.servlet.http.HttpServletResponse; import java.io.PrintWriter;
public class HelloWorld extends HttpServlet { protected void doGet(HttpServletRequest request, HttpServletResponse
response) throws ServletException, IOException { // reading the user input String color= request.getParameter("color"); PrintWriter out = response.getWriter(); out.println (

"<!DOCTYPE html PUBLIC \"-//W3C//DTD HTML 4.01 Transitional//EN\" \"http://www.w3.org/TR/html4/loose.dtd\">\n" + "<html> \n" + “<head> \n" +
"<meta http-equiv=\"Content-Type\" content=\"text/html; charset=ISO-8859-1\"> \n" +
"<title> My first jsp </title> \n" + "</head> \n" + "<body> \n" +
"<font size=\"12px\" color=\"" + color + "\">" + "Hello World" + "</font> \n" + "</body> \n" + "</html>"
); } }

Define your servlet in "web.xml"
Open web.xml from the "Project Explorer" view, WebContent / Web-INF / R-click web.xml / Open With / Text Editor Replace its content by the following code:
<?xml version="1.0" encoding="UTF-8"?> <web-app id="WebApp_ID" version="2.4"
xmlns="http://java.sun.com/xml/ns/j2ee" xmlns:xsi="http://www.w3.org/2001/XMLSchema-instance" xsi:schemaLocation="http://java.sun.com/xml/ns/j2ee http://java.sun.com/xml/ns/j2ee/web-app_2_4.xsd"> <servlet> <servlet-name>Hello</servlet-name> <servlet-class>HelloWorld</servlet-class> </servlet> <servlet-mapping> <servlet-name>Hello</servlet-name> <url-pattern>/HelloServlet</url-pattern> </servlet-mapping>
</web-app>

Add your project to Tomcat
R-click the Tomcat server record / Add and Remove Projects; add your project
Open the "Servers" view by clicking the "Servers" tab at the bottom of eclipse window. If the "Servers" tab is not shown, you can show it from the menu bar, Window / Show View/ Servers. Or Window / Show View / Other… / Server / Servers.
In the "Servers" view, R-click Tomcat-server record / Add and Remove Projects (If Tomcat-server record is not there, please check Steps 5-6 in the Configurations section by clicking next from here)
Add your project

Start "Tomcat": In the "Servers" view, R-click Tomcat-server record / Start

Test your project
In your web browser (Internet Explorer or Firefox) :•If the port is set to 80: Type http://localhost/YourProjectName - In ourexample the URL is http://localhost/ServletExample•If the port is set to 8080: Type http://localhost:8080/YourProjectName - Inour example the URL is http://localhost:8080/ServletExample
Please note that Tomcat's default port is 8080, but the version refer to in theDownloads section (the pre-configured version), has its port set to 80. We willproceed in this tutorial assuming that the port is set to 80. (You can check yourversion's port from Tomcat-Installation-Directory / conf / server.xml)

Click your JSP file name shown in the directory listing - in our example it isHome.jsp

This should be the result

Set your project's welcome file (let the server open "Home.jsp" once you open the project) Open "web.xml" (WebContent / Web-INF / R-click web.xml / Open With / Text Editor) Set the "welcome-file-list" to be your home page - In our example it is Home.jsp. The code in "web.xml" should look like that:
<?xml version="1.0" encoding="UTF-8"?> <web-app id="WebApp_ID" version="2.4" xmlns="http://java.sun.com/xml/ns/j2ee"
xmlns:xsi="http://www.w3.org/2001/XMLSchema-instance" xsi:schemaLocation="http://java.sun.com/xml/ns/j2ee http://java.sun.com/xml/ns/j2ee/web-app_2_4.xsd">
<servlet> <servlet-name>Hello</servlet-name> <servlet-class>HelloWorld</servlet-class> </servlet> <servlet-mapping> <servlet-name>Hello</servlet-name> <url-pattern>/HelloServlet</url-pattern> </servlet-mapping> <welcome-file-list> <welcome-file>Home.jsp</welcome-file> </welcome-file-list> </web-app>

Restart the server and test your project again using http://localhost/yourProjectName - in our example, the URL will be http://localhost/ServletExample/.
Note that the server does not recognize changes in "web.xml" except if you restarted, or started, the server.
If you have passed these steps successfully; so Congratulations for running your servlet !!! To know how the process went in this example, click next.

Understanding JSP - Servlets: A servlet example
In this section, you are going to know how Servlets work by understanding the code of our previous ServletExample and knowing how it works, from the time the user requests the home page - in our previous example, it was Home.jsp - to displaying "Hello World" in the color the user chose

Here is a brief on how the process goes:
1. The client requests the home page. In our example, it was "Home.jsp", and the server replies with the HTML code of the requested page.
2. The client submits the form and the servlet's request is sent to the server (In our example, the servlet was "HelloWorld")
3. The server locates the servlet
4. The servlet writes the appropriate HTML code to the response message
5. The response message is sent to the client
Now let's get a deeper insight into each of the previous five steps.

The Client's Request
The client requests the home page (http://localhost/ServletExample) and the server replies with the HTML code of the requested page.
Once the client requests to view a certain page by writing its URL (in our example the URL is http://localhost/ServletExample) , the server replies to this request by sending the corresponding HTML data which is displayed by the client's browser.

<%@ page language="java" contentType="text/html; charset=ISO-8859-1" pageEncoding="ISO-8859-1"%> <!DOCTYPE html PUBLIC "-//W3C//DTD HTML 4.01 Transitional//EN"
"http://www.w3.org/TR/html4/loose.dtd"> <html>
<head> <meta http-equiv="Content-Type" content="text/html; charset=ISO-8859-1"> <title> My first JSP </title>
</head> <body>
<form action="Hello"> Please enter a color <br> <input type="text" name="color" size="20px"> <input type="submit" value="submit">
</form> </body>
</html>

Note that this URL, http://localhost/ServletExample does not refer to a certain file, it refers to the project "ServletExample"; In this case, the server looks for a "Welcome-file" in "web.xml" and replies to the request using this file. In case the server did not find a "Welcome-file", it displays the so called "Directory-Listing" that shows links to the HTML and JSP pages of your project.
The user starts to interact with the page by entering the required fields - in our example we have only one field which is "color" - and then clicking the submit button.

Client's Submit
The client submits the form and the servlet's request is sent to the server. Once the user clicks the submit button; a request message is created and sent to the server. This request message contains the following:
1. A request line That is the call for a URL, referring to a certain page or a servlet.
A typical Request example:
GET /path/to/file/index.html?parameter=value HTTP/1.0 | | | | | | Method -----------path------------ ---query string--- HTTP version
This Request Line is formulated from Method: The value of the method attribute embedded in the form tag (Default: GET) URL
Path: The value of the action attribute also placed in the form tag Query String (Optional)
In our example: the form tag is as follows: < form action="HelloServlet" method="GET" >

2. Header lines, those are lines providing information about the request. For example, the language accepted by the client "Accept-Language: en". Read about request headers at http://www.w3.org/Protocols/HTTP/HTRQ_Headers.html
3. Message body, this message body is optional. It contains the data entered or files uploaded by the user to be sent to the server.

Sending Parameters in the Request message:Parameters can be sent in
The Request Line When using the method GET, parameters' names and values are concatenated
in a “Query String― that is of the form [?parameter1=value1parameter2=value2] And, as mentioned before, this Query String is appended to the path to form the URL
The Message Body When using the method POST, parameters are sent in the message body.
In our example, we are using the method GET. So parameters will be sent in the URL in the form of a Query String.
We have only one parameter corresponding to one input field:
<input type="text" name="color" size="20px">
So this is how the Query String will look like:
?color=red

The Server
After the request is successfully formulated and submitted to the server, the server starts creating a response to this request. This response is a message that contains:
1. An initial Response line: AKA Status Line, which shows the state of the requested page. For example:
HTTP/1.0 200 OK, if page was found. TTP/1.0 404 Not Found, if page was not found
2. Header lines: Those are lines providing information about the response. For example, the content type of the message body Content-Type: text/html. Read about Response headers at http://www.w3.org/Protocols/rfc2616/rfc2616-sec14.html#sec14.17
3. The Message body: This is, for us, the most important part of the response. It is the HTML representation of the page requested by the client. This HTML representation is either:
Pre-constructed; in case of Static WebPages, and Client-Side scripted Dynamic WebPages as each page has its code prewritten, and is sent to the client once it is requested, or Constructed on request; in case of Server-Side scripted Dynamic WebPages, as the HTML code of the page is generated by the server after the page is requested.

A response message example and its corresponding web page when displayed by the browser (the message body of this response is what we are trying to achieve) is as follows:

Read more about request and response from jmarshall and,Wikipedia. Also see Wikipedia for a response sample athttp://en.wikipedia.org/wiki/File:Http_request_telnet_ubuntu.png.
As said before, JSP – Servlets is a technology developing DynamicWebPages; so now let's see how the server constructs suchWebPage on request (Steps [3] and [4]).

Server Locating the Servlet
To start processing the request, the server reads the request line - in our example, it is GET HelloServlet, The server will: Locate the servlet by following these steps:
Extract the url-pattern from the request line -In our example, the URL is HelloServlet Search in the "web.xml" file (located under WebContent / WEB-INF ) for the servlet-name corresponding to this url-pattern - In our example, the servlet-name "Hello" corresponds to the url-pattern HelloServlet Get the corresponding servlet-class - In our example, the servlet-class is "HelloWorld"
<servlet> <servlet-name>Hello</servlet-name> <servlet-class>HelloWorld</servlet-class>
</servlet> <servlet-mapping>
<servlet-name>Hello</servlet-name> <url-pattern>/HelloServlet</url-pattern>
</servlet-mapping>

Note than in eclipse, you can create a new Servlet in two ways:
1. R-Click src / New / Class , and then do the servlet mapping in the web.xml (like we did in our example)
2. R-Click src / New / Servlet, and the mapping, in the web.xml, is done automatically by eclipse. The automatic mapping done by eclipse gives the servlet-name and the url-pattern the same value of the servlet-class.Forexample if we used this second way to create our servlet, the mapping in the web.xml would look this way:
<servlet> <servlet-name> HelloWorld </servlet-name> <servlet-class>HelloWorld </servlet-class>
</servlet> <servlet-mapping>
<servlet-name> HelloWorld </servlet-name> <url-pattern>/HelloWorld </url-pattern>
</servlet-mapping>

So do not be confused, "A url-pattern is a URL used to invoke a certain servlet", it does not have to be of the same name of the servlet class.
You can always use the New-Servlet-way to create your servlets; in our example we used New-Class-way just for a better understanding
Find the .class file corresponding to the "servlet-class" mapped in "web.xml". The server searches for the servlet's .class file in its specified directory.
Every web server has a directory where the .class files have to be saved in; In our example, we are using the server "Tomcat" and its classes directory is located under the URL YourWorkspaceFolder / YourProjectName / build / classes; when we create our servlets and save them under the src folder, Eclipse compiles our java code and saves its .class file in this directory. In our example, the server will search for "HelloWorld.class" at C: / Workspace / ServletExample / build / classes

Call the appropriate do method by: Extracting the method from the request line - In our example, it is GET
Calling the corresponding do method - In our example, it is doGet - and passing the request and response messages as arguments to the method

The Servletimport java.io.IOException; import javax.servlet.ServletException; import javax.servlet.http.HttpServlet; import javax.servlet.http.HttpServletRequest; import javax.servlet.http.HttpServletResponse; import java.io.PrintWriter; public class HelloWorld extends HttpServlet { protected void doGet(HttpServletRequestrequest, HttpServletResponse response) throws ServletException, IOException { // reading the user input
String color= request.getParameter("color"); PrintWriter out = response.getWriter(); out.println ( "<!DOCTYPE html PUBLIC \"-//W3C//DTD HTML 4.01
Transitional//EN\" \"http://www.w3.org/TR/html4/loose.dtd\">\n" + "<html> \n" +

"<head> \n" + "<meta http-equiv=\"Content-Type\" content=\"text/html; charset=ISO-8859-1\"> \n" + "<title> My first jsp </title> \n" + "</head> \n" +
"<body> \n" + "<font size=\"12px\" color=\"" + color + "\">" +
"Hello World" + "</font> \n" + "</body> \n" + "</html>"
); }
}

The Servlet Response
The servlet writes the appropriate HTML code to the response message. In our example, this writing takes place when executing the doGet method. To execute the doGet method, the servlet will:1. Extract the value of the parameter "color" from the request message - In our example, the value of the parameter "color" is "red" - using request.getParameter("color") and save it into a new variable named "color" (the variable is of type "String").
2. Get the writer of the response, so as to be able to edit the body of the response message, using response.getWriter(); and save it to a variable named "out" (the variable is of type "PrintWriter"). Go back to the response body explanation.
3. Write to the response using the println method of the response writer object. In our example, the response writer is saved to the variable "out", so the method used to write to the response body will be out.println().

The final code written to the response body, representing the result page, will look like that:
<!DOCTYPE html PUBLIC "-//W3C//DTD HTML 4.01 Transitional//EN" "http://www.w3.org/TR/html4/loose.dtd">
<html> <head>
<meta http-equiv="Content-Type" content="text/html;charset=ISO-8859-1">
<title> My first jsp </title> </head>
<body> <font size="12px" color="red"> Hello World </font>
</body> </html>

Response to Client
Finally, the response message is sent to the client, and the client's browser displays the corresponding web page.
To be sure that this is the HTML code sent to the client via the response message, view the result page's source. Go to http://localhost/ServletExample/HelloWorld?color=red. In the Menu Bar, View/source.