
Una nueva manera de explicar cómo tejer los modelos de ... · Con sólo saber tejer los puntos...
22
Una nueva manera de explicar cómo tejer los modelos de esta revista CLARO, FÁCIL y DIVERTIDO. In this magazine you will find a CLEAR, EASY and ENTERTAINING new way of explaining how to knit the models. Con sólo saber tejer los puntos más básicos podrás hacer cualquiera de los modelos que te explicamos de forma muy fácil y sencilla. Además, con los códigos QR, podrás tejer algunos de estos modelos siguiendo nuestros vídeos paso a paso. ¡Atrévete! Los patrones son muy fáciles, los modelos muy atractivos. You just need to know the most basic stitches to knit any of the models with these easy and clearly explained instructions. And with the QR codes, you’ll be able to knit some of the patterns following our step by step videos. Give it a try! Beautiful models with easy instructions. ht Copyrig Copyrig g yright yrig yrig g yrig Copyr Copyr Copyr Copyr os patron You just with Q © o a p nes FIL mos de drás tejer a aso. ATIA TIA, TIA TIA KATI ATI ATI K s. más básicos orma S.A. e es d ENTER
Transcript of Una nueva manera de explicar cómo tejer los modelos de ... · Con sólo saber tejer los puntos...
Una nueva manera de explicar cómo tejer los modelos de esta revista
CLARO, FÁCIL y DIVERTIDO.
In this magazine you will fi nd a CLEAR, EASY and ENTERTAINING
new way of explaining how to knit the models.
Con sólo saber tejer los puntos más básicos podrás hacer cualquiera de
los modelos que te explicamos de forma muy fácil y sencilla. Además,
con los códigos QR, podrás tejer algunos de estos modelos siguiendo
nuestros vídeos paso a paso.
¡Atrévete! Los patrones son muy fáciles, los modelos muy atractivos.
You just need to know the most basic stitches to knit any of the models with these easy and clearly explained instructions. And with the QR codes, you’ll be able to knit some of the patterns following our step by step videos. Give it a try! Beautiful models with easy instructions.
Copyri
ght
Copyri
ght
Copyri
ght
Copyri
ght
Copyri
ght
Copyri
ght
Copyri
ght
Copyri
ght
Copyri
ght
Copyri
ght
Copyri
ght
Copyri
ght
Copyri
ght Los patrones son muy fáciles, los modelos muy atractivos.
Copyri
ght Los patrones son muy fáciles, los modelos muy atractivos.
You just need to know the most basic stitches to knit any of the models
Copyri
ght
You just need to know the most basic stitches to knit any of the models with these easy and clearly explained instructions. And with the Cop
yrigh
t
with these easy and clearly explained instructions. And with the QR codes,Cop
yrigh
t
QR codes,
© nuestros vídeos paso a paso.
© nuestros vídeos paso a paso.
Los patrones son muy fáciles, los modelos muy atractivos.© Los patrones son muy fáciles, los modelos muy atractivos.
FIL los modelos que te explicamos de forma muy fácil y sencilla. Además,
FIL los modelos que te explicamos de forma muy fácil y sencilla. Además,
, podrás tejer algunos de estos modelos siguiendo FIL , podrás tejer algunos de estos modelos siguiendo
nuestros vídeos paso a paso.FIL nuestros vídeos paso a paso.
KATIA,
KATIA,
KATIA,
KATIA,
KATIA,
KATIA,
KATIA,
KATIA, new way of explaining how to knit the models.
KATIA, new way of explaining how to knit the models.
Con sólo saber tejer los puntos más básicos podrás hacer cualquiera de KATIA,
Con sólo saber tejer los puntos más básicos podrás hacer cualquiera de
los modelos que te explicamos de forma muy fácil y sencilla. Además, KATIA,
los modelos que te explicamos de forma muy fácil y sencilla. Además,
S.A.Una nueva manera de explicar cómo tejer los modelos de esta revista
S.A.Una nueva manera de explicar cómo tejer los modelos de esta revista
CLEAR, EASY and ENTERTAININGS.A.
CLEAR, EASY and ENTERTAINING
2
I
N
S
T
R
U
C
C
I
O
N
E
S
I
N
S
T
R
U
C
T
I
O
N
S
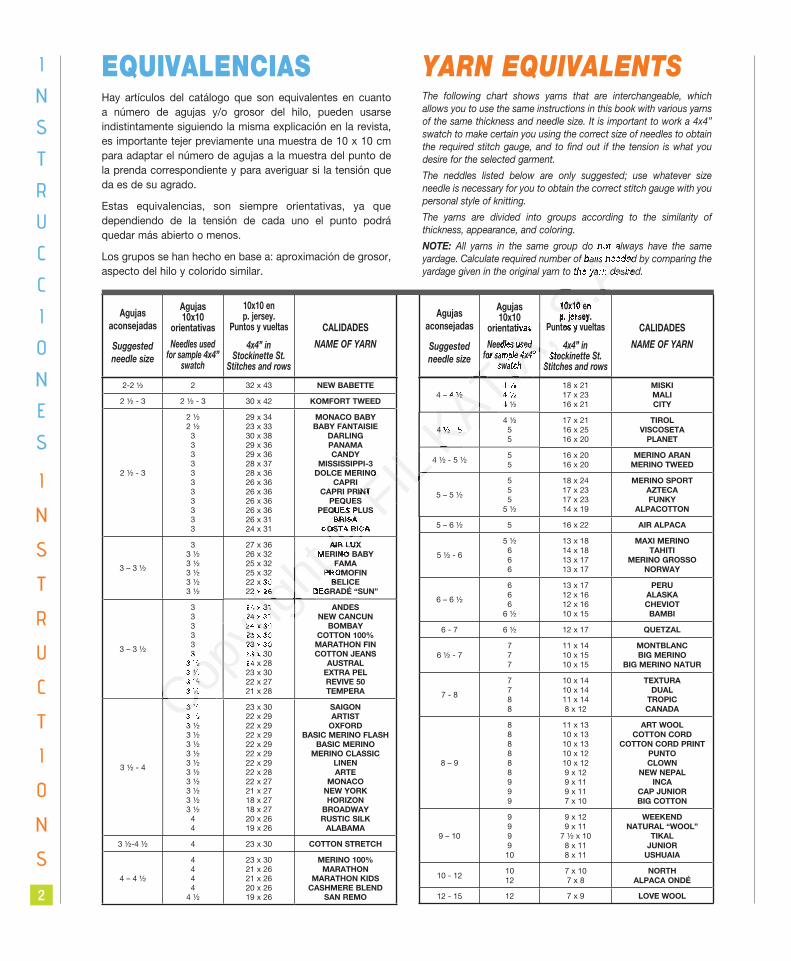
EQUIVALENCIAS Hay artículos del catálogo que son equivalentes en cuanto a número de agujas y/o grosor del hilo, pueden usarse indistintamente siguiendo la misma explicación en la revista, es importante tejer previamente una muestra de 10 x 10 cm para adaptar el número de agujas a la muestra del punto de la prenda correspondiente y para averiguar si la tensión que da es de su agrado.
Estas equivalencias, son siempre orientativas, ya que dependiendo de la tensión de cada uno el punto podrá quedar más abierto o menos.
Los grupos se han hecho en base a: aproximación de grosor, aspecto del hilo y colorido similar.
YARN EQUIVALENTSThe following chart shows yarns that are interchangeable, which allows you to use the same instructions in this book with various yarns of the same thickness and needle size. It is important to work a 4x4” swatch to make certain you using the correct size of needles to obtain the required stitch gauge, and to find out if the tension is what you desire for the selected garment.
The neddles listed below are only suggested; use whatever size needle is necessary for you to obtain the correct stitch gauge with you personal style of knitting.
The yarns are divided into groups according to the similarity of thickness, appearance, and coloring.
NOTE: All yarns in the same group do not always have the same yardage. Calculate required number of balls needed by comparing the yardage given in the original yarn to the yarn desired.
Agujas
aconsejadas
Suggested
needle size
Agujas 10x10
orientativas
Needles used for sample 4x4”
swatch
10x10 en p. jersey.
Puntos y vueltas
4x4” in Stockinette St.
Stitches and rows
CALIDADES
NAME OF YARN
Agujas
aconsejadas
Suggested
needle size
Agujas 10x10
orientativas
Needles used for sample 4x4”
swatch
10x10 en p. jersey.
Puntos y vueltas
4x4” in Stockinette St.
Stitches and rows
CALIDADES
NAME OF YARN
2-2 ½ 2 32 x 43 NEW BABETTE
2 ½ - 3 2 ½ - 3 30 x 42 KOMFORT TWEED
2 ½ - 3
2 ½2 ½
333333 33333
29 x 3423 x 3330 x 3829 x 3629 x 3628 x 3728 x 3626 x 3626 x 3626 x 3626 x 3626 x 3124 x 31
MONACO BABY
BABY FANTAISIE
DARLING
PANAMA
CANDY
MISSISSIPPI-3
DOLCE MERINO
CAPRI
CAPRI PRINT
PEQUES
PEQUES PLUS
BRISA
COSTA RICA
3 – 3 ½
33 ½ 3 ½ 3 ½ 3 ½ 3 ½
27 x 3626 x 3225 x 3225 x 3222 x 3022 x 26
AIR LUX
MERINO BABY
FAMA
PROMOFIN
BELICE
DEGRADÉ “SUN”
3 – 3 ½
333333
3 ½ 3 ½3 ½ 3 ½
24 x 3124 x 3124 x 3023 x 3023 x 3023 x 3024 x 2823 x 3022 x 2721 x 28
ANDES
NEW CANCUN
BOMBAY
COTTON 100%
MARATHON FIN
COTTON JEANS
AUSTRAL
EXTRA PEL
REVIVE 50
TEMPERA
3 ½ - 4
3 ½ 3 ½ 3 ½ 3 ½ 3 ½ 3 ½ 3 ½3 ½3 ½ 3 ½ 3 ½ 3 ½
44
23 x 3022 x 2922 x 2922 x 2922 x 2922 x 2922 x 2922 x 2822 x 2721 x 2718 x 2718 x 2720 x 2619 x 26
SAIGON
ARTIST
OXFORD
BASIC MERINO FLASH
BASIC MERINO
MERINO CLASSIC
LINEN
ARTE
MONACO
NEW YORK
HORIZON
BROADWAY
RUSTIC SILK
ALABAMA
3 ½-4 ½ 4 23 x 30 COTTON STRETCH
4 – 4 ½
4444
4 ½
23 x 3021 x 2621 x 2620 x 2619 x 26
MERINO 100%
MARATHON
MARATHON KIDS
CASHMERE BLEND
SAN REMO
4 – 4 ½4 ½4 ½ 4 ½
18 x 21 17 x 2316 x 21
MISKI
MALI
CITY
4 ½ - 54 ½
5 5
17 x 2116 x 2516 x 20
TIROL
VISCOSETA
PLANET
4 ½ - 5 ½55
16 x 2016 x 20
MERINO ARAN
MERINO TWEED
5 – 5 ½
555
5 ½
18 x 2417 x 2317 x 2314 x 19
MERINO SPORT
AZTECA
FUNKY
ALPACOTTON
5 – 6 ½ 5 16 x 22 AIR ALPACA
5 ½ - 6
5 ½ 666
13 x 1814 x 1813 x 1713 x 17
MAXI MERINO
TAHITI
MERINO GROSSO
NORWAY
6 – 6 ½
666
6 ½
13 x 1712 x 1612 x 1610 x 15
PERU
ALASKA
CHEVIOT
BAMBI
6 - 7 6 ½ 12 x 17 QUETZAL
6 ½ - 7777
11 x 1410 x 1510 x 15
MONTBLANC
BIG MERINO
BIG MERINO NATUR
7 - 8
7788
10 x 1410 x 1411 x 148 x 12
TEXTURA
DUAL
TROPIC
CANADA
8 – 9
888888999
11 x 1310 x 1310 x 1310 x 1210 x 129 x 129 x 119 x 117 x 10
ART WOOL
COTTON CORD
COTTON CORD PRINT
PUNTO
CLOWN
NEW NEPAL
INCA
CAP JUNIOR
BIG COTTON
9 – 10
999910
9 x 129 x 11
7 ½ x 108 x 118 x 11
WEEKEND
NATURAL “WOOL”
TIKAL
JUNIOR
USHUAIA
10 - 121012
7 x 107 x 8
NORTH
ALPACA ONDÉ
12 - 15 12 7 x 9 LOVE WOOL
Copyri
ght
Copyri
ght
Copyri
ght
Copyri
ght
Copyri
ght
Copyri
ght
Copyri
ght
Copyri
ght
Copyri
ght
Copyri
ght
Copyri
ght
Copyri
ght
Copyri
ght
Copyri
ght
Copyri
ght
Copyri
ght
Copyri
ght
Copyri
ght
Copyri
ght
Copyri
ght
Copyri
ght
Copyri
ght 25 x 32
Copyri
ght 25 x 3225 x 32
22 x 30
Copyri
ght
22 x 3022 x 3022 x 26
Copyri
ght
22 x 2622 x 26
MERINO BABY
Copyri
ght MERINO BABYMERINO BABY
FAMA
Copyri
ght FAMAFAMA
PROMOFIN
Copyri
ght PROMOFINPROMOFIN
BELICE
Copyri
ght
BELICE BELICE
DEGRADÉ “SUN”
Copyri
ght
DEGRADÉ “SUN”DEGRADÉ “SUN”
3
Copyri
ght
333 ½
Copyri
ght
3 ½ 3 ½ 3 ½
Copyri
ght
3 ½3 ½3 ½
Copyri
ght
3 ½ 3 ½ 3 ½Cop
yrigh
t
3 ½3 ½
24 x 31
Copyri
ght
24 x 3124 x 3124 x 31
Copyri
ght
24 x 3124 x 3124 x 30
Copyri
ght
24 x 3024 x 3023 x 30
Copyri
ght
23 x 3023 x 3023 x 30
Copyri
ght
23 x 3023 x 3023 x 30
Copyri
ght
23 x 3023 x 3024 x 28
Copyri
ght
24 x 2824 x 28
3 ½ Copyri
ght
3 ½ 3 ½ 3 ½ Cop
yrigh
t
3 ½ 3 ½ 3 ½ Cop
yrigh
t
3 ½ 3 ½
© © © © PEQUES
© PEQUESPEQUES
PEQUES PLUS
© PEQUES PLUSPEQUES PLUS
BRISA© BRISABRISA
COSTA RICA© COSTA RICACOSTA RICA
AIR LUX© AIR LUXAIR LUX
MERINO BABY© MERINO BABYMERINO BABY
FIL FIL FIL FIL DOLCE MERINO
FIL DOLCE MERINODOLCE MERINO
CAPRI PRINT FIL CAPRI PRINTCAPRI PRINT FIL FIL FIL FIL FIL FIL FIL FIL FIL FIL FIL FIL KATIA
,
KATIA,
KATIA,
KATIA,
KATIA,
KATIA, orientativas
KATIA, orientativasorientativas
Needles used
KATIA, Needles used Needles used
for sample
KATIA,
for sample for sample 4x4”
KATIA,
4x4”4x4”swatch
KATIA,
swatchswatch
Puntos y vueltas
KATIA, Puntos y vueltasPuntos y vueltas
4x4” in
KATIA, 4x4” in 4x4” in Stockinette St.
KATIA, Stockinette St. Stockinette St.
Stitches and rows
KATIA,
Stitches and rowsStitches and rows
KATIA,
KATIA,
KATIA,
KATIA,
KATIA,
KATIA,
KATIA,
KATIA,
KATIA,
KATIA,
KATIA,
KATIA,
KATIA,
KATIA,
KATIA,
KATIA,
KATIA,
KATIA,
KATIA,
KATIA,
KATIA,
KATIA,
KATIA,
KATIA,
KATIA,
KATIA,
4 – 4 ½
KATIA,
4 – 4 ½4 – 4 ½4 ½
KATIA,
4 ½4 ½4 ½
KATIA,
4 ½ 4 ½ 4 ½
KATIA,
4 ½4 ½
4 ½ - 5KATIA,
4 ½ - 54 ½ - 5
4 ½ - 5 ½KATIA
,
4 ½ - 5 ½4 ½ - 5 ½
S.A.
S.A. All yarns in the same group do not always have the same
S.A. All yarns in the same group do not always have the same All yarns in the same group do not always have the same
yardage. Calculate required number of balls needed by comparing the
S.A.yardage. Calculate required number of balls needed by comparing the yardage. Calculate required number of balls needed by comparing the
yardage given in the original yarn to the yarn desired.
S.A.yardage given in the original yarn to the yarn desired.yardage given in the original yarn to the yarn desired.
10x10 S.A.
10x10 10x10 en S.A.
en en p. jersey.S.A
.p. jersey.p. jersey.
Puntos y vueltasS.A.
Puntos y vueltasPuntos y vueltasS.A.

3
I
N
S
T
R
U
C
C
I
O
N
E
S
I
N
S
T
R
U
C
T
I
O
N
S
1 ESCOGER EL MODELO
2 LOCALIZAR LA TALLATodos los modelos están explicados en 4 tallas, diferenciadas por colores. Busca tu color y sigue las instrucciones. Recuerda que el color negro sirve para todas las tallas.
3 HACER LA PRUEBAAntes de empezar haz una muestra del punto y cambia de agujas hasta conseguir el 10x10 de la explicación para que la prenda te salga de las medidas del patrón.
4 EMPEZAR A TEJEREste nuevo sistema de explicaciones, está pensado para que todo resulte más FACIL y CLARO de seguir. Toda la información sobre puntos y centímetros están en el patrón, a tamaño mas grande de lo habitual, con una lista de signifi cados de los símbolos junto a cada uno, así, todo está en la misma página y te será más cómodo a la hora de seguir la explicación. Los detalles específi cos en cuanto a vueltas y confección están en el texto. Explicados de una manera mucho mas clara y sencilla.
5 DUDASCualquier duda que pueda surgirte en el momento de la realización ya sea, como hacer un aumento, un menguado o como coser la prenda, lo encontrarás, como siempre, muy detallado e ilustrado con imágenes en las páginas de puntos básicos, al inicio de la revista.
1 CHOOSE THE MODEL YOU WANT
2 LOCATE THE SIZEThe instructions for all the models are given in 4 sizes which are shown in different colors. Look for your color and follow the instructions. Remember that the color black is used for all sizes.
3 MAKE A SAMPLE SWATCHBefore beginning, make a sample swatch and change needles until your swatch measures 4x4”, so that the garment will be knitted to the measurements given in the pattern.
4 BEGIN KNITTINGThis new system of instructions is designed to make everything CLEARER and EASIER to follow. All the information about stitches and centimeters is on the pattern, in a larger size than usual, with a list of the meanings of the symbols next to each one. Therefore, everything is on the same page and it will be easier for you to follow the instructions. Specifi c details as regards rows and fi nishing are given in the text and are explained in a much clearer, simpler way.
5 DOUBTSAny doubts that can arise when making the garment, whether they are about how to increase or decrease or how to sew the garment, you will fi nd explained, as always, in detail and with illustrations, on the pages of basic instructions at the beginning of the magazine.
¡IMPORTANTE!
¡IMPORTANT!
Copyri
ght
Copyri
ght 1 CHOOSE THE MODEL YOU WANT
Copyri
ght 1 CHOOSE THE MODEL YOU WANT 1 CHOOSE THE MODEL YOU WANT
Copyri
ght
Copyri
ght
The instructions for all the models are given in 4 sizes which are shown in different colors.
Copyri
ght
The instructions for all the models are given in 4 sizes which are shown in different colors. The instructions for all the models are given in 4 sizes which are shown in different colors. Look for your color and follow the instructions. Remember that the color black is used for all sizes.
Copyri
ght
Look for your color and follow the instructions. Remember that the color black is used for all sizes.Look for your color and follow the instructions. Remember that the color black is used for all sizes.
3 MAKE A SAMPLE SWATCH
Copyri
ght
3 MAKE A SAMPLE SWATCH 3 MAKE A SAMPLE SWATCHBefore beginning, make a sample swatch and change needles until your swatch measures 4x4”,
Copyri
ght
Before beginning, make a sample swatch and change needles until your swatch measures 4x4”, Before beginning, make a sample swatch and change needles until your swatch measures 4x4”,
Copyri
ght
Copyri
ght
so that the garment will be knitted to the measurements given in the pattern.Copyri
ght
so that the garment will be knitted to the measurements given in the pattern.so that the garment will be knitted to the measurements given in the pattern.
4 BEGIN KNITTINGCopyri
ght
4 BEGIN KNITTING 4 BEGIN KNITTINGCopyri
ght ©
© © FIL FIL FIL FIL FIL KATIA
,
KATIA,
la información sobre puntos y centímetros están en el patrón, a tamaño mas grande de lo habitual, con
KATIA,
la información sobre puntos y centímetros están en el patrón, a tamaño mas grande de lo habitual, con la información sobre puntos y centímetros están en el patrón, a tamaño mas grande de lo habitual, con una lista de signifi cados de los símbolos junto a cada uno, así, todo está en la misma página y te será más
KATIA, una lista de signifi cados de los símbolos junto a cada uno, así, todo está en la misma página y te será más una lista de signifi cados de los símbolos junto a cada uno, así, todo está en la misma página y te será más
cómodo a la hora de seguir la explicación. Los detalles específi cos en cuanto a vueltas y confección están en
KATIA, cómodo a la hora de seguir la explicación. Los detalles específi cos en cuanto a vueltas y confección están en cómodo a la hora de seguir la explicación. Los detalles específi cos en cuanto a vueltas y confección están en
Cualquier duda que pueda surgirte en el momento de la realización ya sea, como hacer un aumento, un
KATIA,
Cualquier duda que pueda surgirte en el momento de la realización ya sea, como hacer un aumento, un Cualquier duda que pueda surgirte en el momento de la realización ya sea, como hacer un aumento, un menguado o como coser la prenda, lo encontrarás, como siempre, muy detallado e ilustrado con imágenes KATIA
, menguado o como coser la prenda, lo encontrarás, como siempre, muy detallado e ilustrado con imágenes menguado o como coser la prenda, lo encontrarás, como siempre, muy detallado e ilustrado con imágenes
S.A.
S.A.
Antes de empezar haz una muestra del punto y cambia de agujas hasta conseguir el 10x10 de la explicación para
S.A.
Antes de empezar haz una muestra del punto y cambia de agujas hasta conseguir el 10x10 de la explicación para Antes de empezar haz una muestra del punto y cambia de agujas hasta conseguir el 10x10 de la explicación para
Este nuevo sistema de explicaciones, está pensado para que todo resulte más FACIL y CLARO de seguir. Toda S.A.
Este nuevo sistema de explicaciones, está pensado para que todo resulte más FACIL y CLARO de seguir. Toda Este nuevo sistema de explicaciones, está pensado para que todo resulte más FACIL y CLARO de seguir. Toda la información sobre puntos y centímetros están en el patrón, a tamaño mas grande de lo habitual, con S.A
.la información sobre puntos y centímetros están en el patrón, a tamaño mas grande de lo habitual, con la información sobre puntos y centímetros están en el patrón, a tamaño mas grande de lo habitual, con una lista de signifi cados de los símbolos junto a cada uno, así, todo está en la misma página y te será más S.A
.una lista de signifi cados de los símbolos junto a cada uno, así, todo está en la misma página y te será más una lista de signifi cados de los símbolos junto a cada uno, así, todo está en la misma página y te será más

I
N
S
T
R
U
C
C
I
O
N
E
S
4
ÍNDICE
Bases para aprender a tejer
INICIACIÓN AL PUNTO DE MEDIA .................. 6
FORMAS DE EMPEZAR .................................... 6
Montado simple .................................................. 6
Montado Tubular ................................................. 6
BASES PARA EL PUNTO DE MEDIA ............... 7
Punto derecho ..................................................... 7
Punto revés ......................................................... 7
Hebra o Baga ...................................................... 7
Punto sin hacer o Punto alargado ...................... 8
Dos puntos juntos derecho ................................. 8
Punto retorcido ................................................... 8
Menguado simple ................................................ 9
Menguado doble ................................................. 9
Dos puntos trabajados en un mismo punto ....... 10
Dejar puntos en espera ....................................... 10
Vuelta o pasada .................................................. 10
Punto de orillo ..................................................... 10
MUESTRA DEL PUNTO ..................................... 11
PUNTOS BASICOS MÁS UTILIZADOS ............ 11
Punto Jersey derecho ......................................... 11
Punto jersey revés ............................................... 11
Punto Bobo ......................................................... 11
Punto elástico 1x1 ............................................... 12
Punto elástico 2x2 ............................................... 12
Punto jacquard .................................................... 12
Bases para aprender a realizar una prenda
AUMENTOS DISMINUCIONES
Y/O MENGUADOS ..................................................... 13
Disminuciones al principio de la vta ................... 13
Disminuciones en ambos lados
de la misma vta. .................................................. 13
Aumentos al principio de la vta. ......................... 14
Aumentos en ambos lados de la misma vta....... 14
FORMAS DE CERRAR....................................... 15
Cerrado Simple ................................................... 15
Cerrado en tubular .............................................. 15
ACABADOS ........................................................ 16
Ojales redondos .................................................. 16
Ojales horizontales .............................................. 16
Recoger puntos ................................................... 16
COSTURAS ........................................................ 17
Pespunte ............................................................. 17
Grafting ................................................................ 17
Punto de lado ...................................................... 17
ADORNOS .......................................................... 18
Flecos ................................................................. 18
Pompones ........................................................... 18
INICIACIÓN AL GANCHILLO ............................ 19
Punto Cadeneta .................................................. 20
Punto Enano ........................................................ 20
Punto Bajo ........................................................... 20
Punto Alto ............................................................ 21
Punto Bodoque ................................................... 22
Punto Cangrejo ................................................... 22
Punto Peluche ..................................................... 22
Ganchillo
Copyri
ght
Copyri
ght ..................................................... 13
Copyri
ght ..................................................... 13 ..................................................... 13
Copyri
ght
Copyri
ght Disminuciones al principio de la vta ................... 13
Copyri
ght Disminuciones al principio de la vta ................... 13Disminuciones al principio de la vta ................... 13
Disminuciones en ambos lados
Copyri
ght
Disminuciones en ambos lados Disminuciones en ambos lados
de la misma vta. .................................................. 13
Copyri
ght
de la misma vta. .................................................. 13de la misma vta. .................................................. 13
Aumentos al principio de la vta. ......................... 14
Copyri
ght
Aumentos al principio de la vta. ......................... 14Aumentos al principio de la vta. ......................... 14
Copyri
ght
Copyri
ght
Aumentos en ambos lados de la misma vta....... 14
Copyri
ght
Aumentos en ambos lados de la misma vta....... 14Aumentos en ambos lados de la misma vta....... 14
FORMAS DE CERRARCopyri
ght
FORMAS DE CERRARFORMAS DE CERRAR
Cerrado Simple ................................................... 15Copyri
ght
Cerrado Simple ................................................... 15Cerrado Simple ................................................... 15
© © ..................................................... 13© ..................................................... 13 ..................................................... 13
FIL FIL FIL Bases para aprender a realizar una prendaFIL Bases para aprender a realizar una prenda
KATIA,
KATIA, PUNTOS BASICOS MÁS UTILIZADOS
KATIA, PUNTOS BASICOS MÁS UTILIZADOSPUNTOS BASICOS MÁS UTILIZADOS
Punto Jersey derecho ......................................... 11
KATIA, Punto Jersey derecho ......................................... 11Punto Jersey derecho ......................................... 11
Punto jersey revés ............................................... 11
KATIA, Punto jersey revés ............................................... 11Punto jersey revés ............................................... 11
Punto Bobo ......................................................... 11
KATIA,
Punto Bobo ......................................................... 11Punto Bobo ......................................................... 11
Punto elástico 1x1
KATIA,
Punto elástico 1x1 Punto elástico 1x1
Punto elástico 2x2
KATIA,
Punto elástico 2x2 Punto elástico 2x2
Punto jacquard .................................................... 12KATIA,
Punto jacquard .................................................... 12Punto jacquard .................................................... 12
S.A.
S.A.Vuelta o pasada .................................................. 10
S.A.Vuelta o pasada .................................................. 10Vuelta o pasada .................................................. 10
Punto de orillo ..................................................... 10
S.A.Punto de orillo ..................................................... 10Punto de orillo ..................................................... 10
..................................... 11
S.A.
..................................... 11..................................... 11
PUNTOS BASICOS MÁS UTILIZADOSS.A.
PUNTOS BASICOS MÁS UTILIZADOSPUNTOS BASICOS MÁS UTILIZADOS
Punto Jersey derecho ......................................... 11S.A
.Punto Jersey derecho ......................................... 11Punto Jersey derecho ......................................... 11

I
N
S
T
R
U
C
T
I
O
N
S
5
INDEX
Learning the basic stitches
INTRODUCTION TO KNITTING ........................ 6
HOW TO BEGIN ................................................. 6
Simple cast on ..................................................... 6
Tubular cast on .................................................... 6
BASIC KNITTING STITCHES ............................ 7
Knit ...................................................................... 7
Purl ...................................................................... 7
Yarn over ............................................................. 7
Slip st................................................................... 8
Knit two together ................................................. 8
Knit into back loop .............................................. 8
Single decrease ................................................... 9
Double decrease ................................................. 9
Two stitches worked in the same st. ................... 10
Slipping stitches to holder .................................. 10
Turn ..................................................................... 10
Edge stitches ....................................................... 10
GAUGE ................................................................ 11
USING THE BASIC STITCHES .......................... 11
Stockinette stitch ................................................. 11
Reverse stockinette stitch ................................... 11
Garter stitch ......................................................... 11
1x1 ribbing ........................................................... 12
2x2 ribbing ........................................................... 12
Jacquard knitting ................................................. 12
Learning how to use the stitches
INCREASING
AND DECREASING .................................................... 13
Decreasing at beginning of row .......................... 13
Decreasing at both edges
on same row ........................................................ 13
Increasing at beginning of row ............................ 14
Increasing at both edges on same row ............... 14
BINDING OFF ..................................................... 15
Simple bind off .................................................... 15
Tubular bind off ................................................... 15
BUTTONHOLES ................................................. 16
Round buttonholes .............................................. 16
Horizontal buttonholes ........................................ 16
Picking up stitches .............................................. 16
SEAMS ................................................................ 17
Blind stitch........................................................... 17
Grafting ................................................................ 17
Sewing a flat seam .............................................. 17
DECORATIONS .................................................. 18
Fringe ................................................................. 18
Pompons ............................................................. 18
INTRODUCTION TO CROCHET ....................... 19
Chain st: (ch) ....................................................... 20
Slip st: (sl st) ........................................................ 20
Single crochet: (sc) .............................................. 20
Double Crochet: (dc) .......................................... 21
Bead st ................................................................ 22
Backwards crochet .............................................. 22
Loop stitch .......................................................... 22
Crochet
Copyri
ght
Copyri
ght .................................................... 13
Copyri
ght .................................................... 13 .................................................... 13
Copyri
ght
Copyri
ght Decreasing at beginning of row .......................... 13
Copyri
ght Decreasing at beginning of row .......................... 13Decreasing at beginning of row .......................... 13
on same row ........................................................ 13
Copyri
ght
on same row ........................................................ 13on same row ........................................................ 13
Increasing at beginning of row ............................ 14
Copyri
ght
Increasing at beginning of row ............................ 14Increasing at beginning of row ............................ 14
Increasing at both edges on same row ............... 14
Copyri
ght
Increasing at both edges on same row ............... 14Increasing at both edges on same row ............... 14
BINDING OFF Copyri
ght
BINDING OFFBINDING OFF ..................................................... 15Copyri
ght
..................................................... 15 ..................................................... 15BINDING OFF ..................................................... 15BINDING OFF Copyri
ght
BINDING OFFBINDING OFF ..................................................... 15BINDING OFF
Simple bind off .................................................... 15Copyri
ght
Simple bind off .................................................... 15Simple bind off .................................................... 15
© © .................................................... 13© .................................................... 13 .................................................... 13
FIL FIL FIL KATIA
,
KATIA, USING THE BASIC STITCHES
KATIA, USING THE BASIC STITCHESUSING THE BASIC STITCHES
................................................. 11
KATIA, ................................................. 11................................................. 11
Reverse stockinette stitch ................................... 11
KATIA, Reverse stockinette stitch ................................... 11Reverse stockinette stitch ................................... 11
Garter stitch ......................................................... 11
KATIA,
Garter stitch ......................................................... 11Garter stitch ......................................................... 11
1x1 ribbing
KATIA,
1x1 ribbing 1x1 ribbing ........................................................... 12
KATIA,
........................................................... 12........................................................... 12
2x2 ribbing
KATIA,
2x2 ribbing 2x2 ribbing ........................................................... 12
KATIA,
........................................................... 12........................................................... 12
Jacquard knitting ................................................. 12KATIA,
Jacquard knitting ................................................. 12Jacquard knitting ................................................. 12
S.A.
S.A.Turn ..................................................................... 10
S.A.Turn ..................................................................... 10Turn ..................................................................... 10
Edge stitches ....................................................... 10
S.A.Edge stitches ....................................................... 10Edge stitches ....................................................... 10
................................................................ 11
S.A.
................................................................ 11................................................................ 11
USING THE BASIC STITCHESS.A.
USING THE BASIC STITCHESUSING THE BASIC STITCHES.......................... 11S.A.
.......................... 11.......................... 11
................................................. 11S.A
.................................................. 11................................................. 11

6
I
N
S
T
R
U
C
C
I
O
N
E
S
I
N
S
T
R
U
C
T
I
O
N
S
Bases para aprender a tejerLearning the basic stitches
FORMAS DE EMPEZAR / CASTING ON
Montado Simple Simple cast onDel ovillo sacar la cantidad de hilo corres-pondiente a 3 veces la medida del ancho que debe medir la prenda que vaya a tejer, hacer un nudo sobre la aguja como indica el dibujo, con ambas manos estirar de cada hilo para que quede una anilla alrededor de la aguja, ésta anilla será el primer punto.
Pull out a length of yarn 3 times the width of the piece you are going to make. Tie a slip knot, and place this knot on the needle to form the first stitch. Hold needle in the right hand.
Queda un hilo a cada lado de la aguja, el que sale del ovillo se sujeta con la mano derecha y el otro en la mano izquierda, con la mano izquierda formar una anilla y clavar la aguja en el centro.
The two strands coming from the slip knot will form an upside down V. With the loose end of the yarn toward you and the yarn coming from the ball away from you, separate the two strands with the thumb and first finger of your left hand, then gather the ends of the yarn with the remaining fingers of your left hand.
Con la mano derecha coger el hilo y pasarlo por encima de la aguja, sin soltar la anilla formada con la mano izquierda.
Insert the tip of the right hand needle under the yarn around the thumb.
Con la mano izquierda, pasar la anilla por encima de la punta de la aguja, manteniendo el otro hilo sujeto con la mano derecha.
Take needle over the yarn around the first finger and pull this strand of yarn through the loop on the needle
Estirar cada hilo con la mano correspondiente para ajustar el nuevo punto a la aguja. Repetir desde el segundo paso.
Drop yarn from thumb, then make another loop around thumb to tighten the stitch on the right hand needle. Repeat these 5 steps for the number of stitches required.
Montado Tubular Tubular Cast On
Con un hilo de distinto color, montar la mitad del número de puntos necesarios, más uno.Con el hilo de tejer la prenda
1ª vta: * 1 p. derecho, 1 hebra *, repetir de * a *, terminar con 1 p. derecho.2ª vta: * Poner el hilo delante de la labor, pasar a la ag. derecha 1 p. sin hacer clavando la ag. para tejer al revés (de derecha a izquierda), trabajar la hebra al derecho * repetir de * a *, terminar con pasar 1 p. al revés sin hacer.3ª vta: * 1 p. derecho, poner el hilo delante de la labor, pasar 1 p. al revés sin hacer *, repetir de * a *, terminar con 1 p. derecho.4ª vta: * 1p. rev sin hacer, poner el hilo detrás de la labor, 1 p. der. * terminat con 1 p. rev sin hacer.Repetir 3ª y 4ª vtas 1 o 2 veces dependiendo del grueso del hilo, si el hilo es fino trabajar 2 v. más.Al terminar, cortar la lana de distinto color y proseguir con el punto indicado.
Using a contrasting color of yarn the same weight as your main yarn, cast on the designated number of stitches, plus one.
Row 1: Using the main yarn, * K1, YO, *; rep from * to *, ending with K1.
Row 2: With yarn in front, slip 1st st, * with yarn in back, knit into the yarn over, with yarn in front, slip the next st, *; rep from * to *.
Row 3: *With yarn in back, knit 1, with yarn in front, slip next st, *; rep from * to *, ending K1.
Row 4: With yarn in front, slip 1st st, * with yarn in back , knit next st; with yarn in front, slip next st, *; rep from * to *.
Repeat rows 3 and 4 one or two times, depending on the weight of the yarn and the desired length of the edge.
Cut off the contrasting color, carefully unraveling it from the first row of stitches.
INICIACIÓN AL PUNTO DE MEDIA / INTRODUCTION TO KNITTING
Copyri
ght
Copyri
ght
Copyri
ght
Copyri
ght
Estirar cada hilo con la mano correspondiente
Copyri
ght
Estirar cada hilo con la mano correspondiente Estirar cada hilo con la mano correspondiente para ajustar el nuevo punto a la aguja.
Copyri
ght
para ajustar el nuevo punto a la aguja. para ajustar el nuevo punto a la aguja. Repetir desde el segundo paso.
Copyri
ght
Repetir desde el segundo paso.Repetir desde el segundo paso.
Copyri
ght
Copyri
ght
Copyri
ght
Montado Tubular
Copyri
ght
Montado Tubular
Con un hilo de distinto color, montar la mitad del número de Copyri
ght
Con un hilo de distinto color, montar la mitad del número de Con un hilo de distinto color, montar la mitad del número de puntos necesarios, más uno.Cop
yrigh
t
puntos necesarios, más uno.puntos necesarios, más uno.Con el hilo de tejer la prendaCop
yrigh
t
Con el hilo de tejer la prendaCon el hilo de tejer la prenda
* 1 p. derecho, 1 hebra *, repetir de * a *, terminar con Cop
yrigh
t
* 1 p. derecho, 1 hebra *, repetir de * a *, terminar con * 1 p. derecho, 1 hebra *, repetir de * a *, terminar con
© © © © © © FIL FIL FIL FIL FIL FIL FIL FIL FIL FIL FIL FIL FIL FIL FIL FIL FIL FIL FIL FIL FIL FIL FIL FIL FIL FIL FIL FIL FIL FIL FIL FIL FIL FIL FIL FIL FIL FIL FIL FIL FIL FIL FIL FIL FIL FIL FIL FIL FIL FIL FIL FIL FIL FIL FIL FIL FIL FIL FIL FIL FIL FIL FIL FIL FIL FIL FIL FIL FIL FIL FIL FIL FIL FIL FIL FIL FIL FIL FIL FIL FIL FIL FIL FIL FIL FIL FIL FIL FIL FIL FIL FIL FIL FIL FIL FIL FIL FIL FIL FIL FIL FIL FIL FIL FIL FIL FIL FIL FIL FIL FIL FIL FIL FIL FIL FIL FIL FIL FIL FIL FIL FIL FIL FIL FIL FIL FIL FIL FIL FIL FIL FIL FIL FIL FIL FIL FIL FIL FIL FIL FIL FIL FIL FIL FIL FIL FIL FIL KATIA
,
KATIA,
KATIA,
KATIA, form an upside down V. With the loose end
KATIA, form an upside down V. With the loose end form an upside down V. With the loose end
of the yarn toward you and the yarn coming
KATIA, of the yarn toward you and the yarn coming of the yarn toward you and the yarn coming
from the ball away from you, separate the two
KATIA, from the ball away from you, separate the two from the ball away from you, separate the two
strands with the thumb and first finger of your
KATIA,
strands with the thumb and first finger of your strands with the thumb and first finger of your left hand, then gather the ends of the yarn
KATIA,
left hand, then gather the ends of the yarn left hand, then gather the ends of the yarn with the remaining fingers of your left hand.
KATIA,
with the remaining fingers of your left hand. with the remaining fingers of your left hand.
KATIA,
KATIA,
KATIA,
KATIA,
KATIA,
KATIA,
KATIA,
KATIA,
KATIA,
KATIA,
KATIA,
KATIA,
KATIA,
KATIA,
KATIA,
KATIA,
KATIA,
KATIA,
KATIA,
KATIA,
KATIA,
KATIA,
KATIA,
KATIA,
KATIA,
KATIA,
KATIA,
KATIA,
KATIA,
KATIA,
KATIA,
KATIA,
KATIA,
KATIA,
KATIA,
KATIA,
KATIA,
KATIA,
KATIA,
KATIA,
KATIA,
KATIA,
KATIA,
KATIA, S
.A.
S.A.Pull out a length of yarn 3 times the width of
S.A.Pull out a length of yarn 3 times the width of Pull out a length of yarn 3 times the width of
the piece you are going to make. Tie a slip
S.A.the piece you are going to make. Tie a slip the piece you are going to make. Tie a slip
knot, and place this knot on the needle to form
S.A.knot, and place this knot on the needle to form knot, and place this knot on the needle to form
the first stitch. Hold needle in the right hand.
S.A.
the first stitch. Hold needle in the right hand.the first stitch. Hold needle in the right hand.
The two strands coming from the slip knot will S.A.
The two strands coming from the slip knot will The two strands coming from the slip knot will form an upside down V. With the loose end S.A
.form an upside down V. With the loose end form an upside down V. With the loose end of the yarn toward you and the yarn coming S.A
.of the yarn toward you and the yarn coming of the yarn toward you and the yarn coming

7
I
N
S
T
R
U
C
C
I
O
N
E
S
I
N
S
T
R
U
C
T
I
O
N
S
BASES PARA EL PUNTO DE MEDIA / HOW TO WORK THE STITCHES
Con el hilo detrás de la labor. Clavar la aguja derecha en el centro del primer punto de la ag. izquierda, pasando la ag. por delante del punto.
Holding yarn with the right hand, in back of the needles, slip point of right hand (RH) needle from front to back into the front of first stitch on left hand (LH) needle.
Con la mano derecha pasar el hilo por enci-ma de la ag. derecha y sujetarlo para que no se suelte (queda un bucle sobre la ag.). Retirar la ag. derecha hacia atrás, haciendo pasar el bucle por el interior del punto de la ag. izquierda.
Bring yarn under and around RH needle (counter clockwise when looking at point of RH needle).
Una vez pasado el bucle soltar el punto de la aguja izquierda, queda formado un nuevo punto en la ag. derecha.
Keeping loop on RH needle, slip needle and loop to front, making 1 stitch on RH needle; drop used loop from LH needle.
Punto Derecho Knit Stitch
Con el hilo por delante de la labor. Clavar la aguja derecha en el centro del primer punto de la ag. izquierda, pasando la ag. por detrás del punto.
Holding yarn with the right hand, in front of needles, slip point of RH needle from back to front into the front of first stitch on LH needle
Con la mano derecha pasar el hilo por encima de la ag. derecha, mantenerlo hacia arriba y sujetarlo para que no se suelte (queda un bucle sobre la ag.). Retirar la ag. derecha hacia atrás, haciendo pasar el bucle por el interior del punto de la ag. izquierda.
Bring yarn up, over and around RH needle (counter clockwise when looking at point of RH needle.
Una vez pasado el bucle soltar el punto de la aguja izquierda, queda formado un nuevo punto en la ag. derecha.
Keeping loop on RH needle, slip needle and loop to back, making 1 stitch on RH needle; drop used loop from LH needle.
Punto Revés Purl Stitch
Poner el hilo delante de la labor, pasarlo por encima de la aguja derecha.
To make a YO between two knit stitches, bring yarn between needles, then over the RH needle. To make a YO between two purl stitches, take yarn over RH needle then between needles to front.
Hebra o Baga Yarn OverEs añadir puntos para formar calados. Yarn overs (YO), make an open hole, used to increase 1 stitch
or to form openwork patterns.
Copyri
ght
Copyri
ght
Copyri
ght
Copyri
ght
Copyri
ght
Copyri
ght
Copyri
ght
Copyri
ght
Copyri
ght Con la mano derecha pasar el hilo por
Copyri
ght Con la mano derecha pasar el hilo por Con la mano derecha pasar el hilo por
encima de la ag. derecha, mantenerlo hacia
Copyri
ght
encima de la ag. derecha, mantenerlo hacia encima de la ag. derecha, mantenerlo hacia arriba y sujetarlo para que no se suelte
Copyri
ght
arriba y sujetarlo para que no se suelte arriba y sujetarlo para que no se suelte (queda un bucle sobre la ag.). Retirar la ag.
Copyri
ght
(queda un bucle sobre la ag.). Retirar la ag. (queda un bucle sobre la ag.). Retirar la ag.
Copyri
ght
Copyri
ght
derecha hacia atrás, haciendo pasar el bucle
Copyri
ght
derecha hacia atrás, haciendo pasar el bucle derecha hacia atrás, haciendo pasar el bucle por el interior del punto de la ag. izquierda.
Copyri
ght
por el interior del punto de la ag. izquierda.por el interior del punto de la ag. izquierda.
Una vez pasado el bucle soltar el punto de Copyri
ght
Una vez pasado el bucle soltar el punto de Una vez pasado el bucle soltar el punto de la aguja izquierda, queda formado un nuevo Cop
yrigh
t
la aguja izquierda, queda formado un nuevo la aguja izquierda, queda formado un nuevo punto en la ag. derecha.Cop
yrigh
t
punto en la ag. derecha.punto en la ag. derecha.
© © © © © © © © © © FIL FIL FIL FIL FIL FIL FIL KATIA
,
KATIA,
KATIA,
KATIA,
Keeping loop on RH needle, slip needle and
KATIA,
Keeping loop on RH needle, slip needle and Keeping loop on RH needle, slip needle and loop to front, making 1 stitch on RH needle;
KATIA,
loop to front, making 1 stitch on RH needle; loop to front, making 1 stitch on RH needle; drop used loop from LH needle.
KATIA,
drop used loop from LH needle. drop used loop from LH needle.
KATIA,
KATIA,
KATIA,
KATIA,
KATIA,
Purl StitchKATIA,
Purl Stitch
S.A.
S.A.Bring yarn under and around RH needle
S.A.Bring yarn under and around RH needle Bring yarn under and around RH needle
(counter clockwise when looking at point of
S.A.(counter clockwise when looking at point of (counter clockwise when looking at point of

8
I
N
S
T
R
U
C
C
I
O
N
E
S
I
N
S
T
R
U
C
T
I
O
N
S
Trabajar el siguiente punto de la aguja izquierda. La hebra o baga queda como un punto más en la aguja, pero en la base de la hebra o baga queda formado un hueco (calado).
After working the next stitch on LH needle, the YO is a loop over the RH needle.
En la siguiente vta trabajar la hebra o baga igual que los otros puntos de la aguja, de esta forma se ha aumentado 1 p.
On the next row, purl or knit the YO, as indi-cated in the instructions. The YO will be an increased stitch, unless a stitch is decreased to maintain the same number of stitches.
Poner el hilo por detrás de la labor, clavar la aguja derecha en el siguiente punto de derecha hacia izquierda (como si se fuera a tejer al revés). Pasar este punto sin tejer a la aguja derecha y continuar normal.
Holding LH needle and RH needle point to point, slip stitche from LH needle to RH. If instructions say to slip a stitch as if to knit it, hold both needle side by side and slip st to RH needle, as if you would be knitting it. (Slipped stitch will look twisted.)
Punto sin hacer o Punto Alargado Slip Stitch
Al no haber tejido este punto, queda más largo que los demás y por el revés queda una hebra de hilo. En la pasada del revés, tejer este punto al revés.
Since the slipped stitch was not worked, it will appear to be larger on the reverse side row.
Clavar la aguja derecha en los 2 primeros p. de la ag. izquierda para trabajar al derecho (de izquierda a derecha).
Going into the 2nd stitch on LH needle first, slip two stitches on RH needle instead on one stitch.
Dos puntos juntos derecho Knitting two stitches together
Poner hilo sobre la aguja derecha y pasar a través de los 2 p.
Work the two stitches together, as if they were one stitch.
Tener en cuenta que al trabajar 2 p. juntos derecho, quedará 1 p. menos en el número total de puntos.
Working two stitches together will decrease 1 st in the total number of stitches.
Clavar la aguja por detrás del punto a tejer y trab. al der. Work the stitch through the back loop instead of through the front loop.
Punto Retorcido Twisting a stitch
Copyri
ght
Copyri
ght
Copyri
ght
Copyri
ght Clavar la aguja derecha en los 2 primeros p.
Copyri
ght Clavar la aguja derecha en los 2 primeros p. Clavar la aguja derecha en los 2 primeros p.
de la ag. izquierda para trabajar al derecho
Copyri
ght
de la ag. izquierda para trabajar al derecho de la ag. izquierda para trabajar al derecho
Poner hilo sobre la aguja derecha y pasar a
Copyri
ght
Poner hilo sobre la aguja derecha y pasar a Poner hilo sobre la aguja derecha y pasar a través de los 2 p.Cop
yrigh
t
través de los 2 p.través de los 2 p.
© © © © © © FIL FIL FIL FIL FIL FIL KATIA
,
KATIA,
KATIA,
KATIA, point, slip stitche from LH needle to RH. If
KATIA, point, slip stitche from LH needle to RH. If point, slip stitche from LH needle to RH. If
instructions say to slip a stitch as if to knit
KATIA, instructions say to slip a stitch as if to knit instructions say to slip a stitch as if to knit
it, hold both needle side by side and slip st
KATIA, it, hold both needle side by side and slip st it, hold both needle side by side and slip st
to RH needle, as if you would be knitting it.
KATIA,
to RH needle, as if you would be knitting it. to RH needle, as if you would be knitting it. (Slipped stitch will look twisted.)
KATIA,
(Slipped stitch will look twisted.) (Slipped stitch will look twisted.)
KATIA,
KATIA,
KATIA, S
.A.
S.A.
Holding LH needle and RH needle point to S.A.
Holding LH needle and RH needle point to Holding LH needle and RH needle point to point, slip stitche from LH needle to RH. If S.A
.point, slip stitche from LH needle to RH. If point, slip stitche from LH needle to RH. If S.A
.Slip Stitch
S.A.Slip Stitch

9
I
N
S
T
R
U
C
C
I
O
N
E
S
I
N
S
T
R
U
C
T
I
O
N
S
Pasar 1 p. sin hacer clavando la ag. derecha como si se fuera a tejer al revés.
Slip 1 stitch from LH needle to RH needle as if to knit the stitch.
Trabajar el siguiente p. al derecho. Knit the next stitch on LH needle.
Con la ag. izquierda tomar el p. sin hacer de la ag. derecha y pasarlo por encima del p. derecho (último p. de la ag. derecha).
Use the tip of LH needle to pick up the slipped stitch and pass it over the knitted stitch and off the tip of the RH needle (= pass slipped stitch over = PSSO).
Tener en cuenta que quedará 1 p. menos en el número total de puntos.
This will decrease 1 stitch in the total number of stitches.
Menguado simple Simple decrease
Pasar 1 p. sin hacer clavando la ag. derecha como si se fuera a tejer al revés.
Slip 1 stitch from LH needle to RH needle, as if to purl it.
Trabajar los 2 siguientes puntos juntos al derecho.
Knit 2 stitches together.
Con la ag. izquierda tomar el p. sin hacer de la ag. derecha y pasarlo por encima de los 2 p. juntos derecho (último p. de la ag. derecha).
Use the tip of LH needle to pick up the slipped stitch and pass it over the two knitted stitches and off the tip of the RH needle (= pass slipped stitch over = PSSO).
Tener en cuenta que quedarán 2 p. menos en el número total de puntos.
This results in two stitches decreased from the total number of stitches.
Menguado Doble Double decrease
Copyri
ght
Copyri
ght
Copyri
ght
Copyri
ght
Copyri
ght
Copyri
ght
Copyri
ght Pasar 1 p. sin hacer clavando la ag. derecha
Copyri
ght Pasar 1 p. sin hacer clavando la ag. derecha Pasar 1 p. sin hacer clavando la ag. derecha
Trabajar los 2 siguientes puntos juntos al
Copyri
ght
Trabajar los 2 siguientes puntos juntos al Trabajar los 2 siguientes puntos juntos al
© © © © © © FIL FIL FIL FIL FIL FIL KATIA
,
KATIA, slipped stitch and pass it over the knitted
KATIA, slipped stitch and pass it over the knitted slipped stitch and pass it over the knitted
stitch and off the tip of the RH needle (= pass
KATIA, stitch and off the tip of the RH needle (= pass stitch and off the tip of the RH needle (= pass
slipped stitch over = PSSO).
KATIA, slipped stitch over = PSSO).slipped stitch over = PSSO).
KATIA,
KATIA,
KATIA,
This will decrease 1 stitch in the total number
KATIA,
This will decrease 1 stitch in the total number This will decrease 1 stitch in the total number of stitches.KATIA
,
of stitches.of stitches.
S.A.
S.A.
Use the tip of LH needle to pick up the S.A.
Use the tip of LH needle to pick up the Use the tip of LH needle to pick up the slipped stitch and pass it over the knitted S.A
.slipped stitch and pass it over the knitted slipped stitch and pass it over the knitted stitch and off the tip of the RH needle (= pass S.A
.stitch and off the tip of the RH needle (= pass stitch and off the tip of the RH needle (= pass

10
I
N
S
T
R
U
C
C
I
O
N
E
S
I
N
S
T
R
U
C
T
I
O
N
S
Hay distintas formas de trabajar 2 p. en un mismo p. Clavar la ag. en el p. que queda debajo del p. a tejer y trabajar al derecho.
Work 1 stitch into the purl nub on the purl side of the first stitch on the LH needle.
Trabajar el p. de la aguja izquierda al derecho.Work 1 stitch into the first stitch on the LH needle.
Tener en cuenta que quedará 1 p. más en el número total de puntos. Hay otro sistema que es trabajar 1 p. derecho y sin soltarlo de la ag. izquierda clavar de nuevo la ag. derecha en el mismo p. pero por detrás y trabajar de nuevo al derecho.
This will result in an increase of 1 stitch on the total number of stitches. Another way to increase is to knit (or purl) into the first stitch on the LH needle and without removing that stitch from the LH needle, knit (or purl) into the back loop of the same stitch, then remove the stitch from the LH needle.
Dos puntos trabajados en un mismo punto Two stitches worked in the same stitch
Se utiliza mucho para trabajar trenzas. Trenzar a la izquierda: Pasar los p. de la ag. izquierda a una ag. auxiliar delante de la labor, después trabajar los p. que se indique para cada trenza, poner de nuevo los p. de la ag. auxiliar en la ag. izquierda y trabajar éstos p.
A long stitch holder can be used to store stitches to be used later. For cables, use a cable needle (cn) to transfer the stitches into a different place on the row. For a cable that turns to the left, slip the designated number of stitches to a cn, hold cn in front of work, work designated number of stitches, either slip sts from cn back to LH needle, or work stitches off the other end of the cn.
Trenzar a la derecha: Repetir el proceso anterior pero situar la aguja auxiliar detrás de la labor.
For a cable that turns to the right, hold the cable needle in back instead of front.
Dejar puntos en espera Putting stitches on a holder
Una vuelta o pasada, es tejer de derecha a izquierda todos los puntos de la aguja.Cuando en la explicación indicamos aumentar, disminuir o menguar cada 2 vtas. Se cuenta de la siguiente manera:Vuelta en la que se aumenta, disminuye o mengua al inicio y final de la vta., derecho de la labor.La siguiente vuelta, que es el revés de la labor, se cuenta cómo la primera vuelta.La siguiente vuelta, que es el derecho de la labor, es la segunda vuelta y es dónde se vuelve a aumentar, disminuir o menguar.
One turn, (or pass) means to work all the stitches from the LH needle to the RH needle.When the instructions say to increase or decrease every two rows, if only one stitch is involved, it is usually increased or decreased at the beginning and/or at the end of the right side row; then the wrong side row (second row) is worked before the next increase or decrease is made. Increasing and decreasing more than one stitch involves casting on or binding off, which is done only at the beginning of a row so the yarn is not left hanging away from the next stitches to be worked. Increasing every 4, 6, etc rows, means that entire rows are worked between each increase or decrease.
Vuelta o Pasada Turn, or pass
Es el punto de los extremos (es el que queda en el interior cuando se cose la prenda). Para que quede pulido se tra-baja el primer punto de cada pasada al contrario de lo que se presenta.
To maintain a tighter edge, the first stitch of every row can be worked contrary to the adjoining stitch.
Punto Orillo Edge Stitch
Copyri
ght
Copyri
ght
Copyri
ght
Copyri
ght
Trenzar a la derecha: Repetir el proceso
Copyri
ght
Trenzar a la derecha: Repetir el proceso Trenzar a la derecha: Repetir el proceso anterior pero situar la aguja auxiliar detrás
Copyri
ght anterior pero situar la aguja auxiliar detrás anterior pero situar la aguja auxiliar detrás
Copyri
ght
Copyri
ght
Copyri
ght
Una vuelta o pasada, es tejer de derecha a izquierda
Copyri
ght
Una vuelta o pasada, es tejer de derecha a izquierda todos los puntos de la aguja.
Copyri
ght
todos los puntos de la aguja.Cuando en la explicación indicamos aumentar,
Copyri
ght
Cuando en la explicación indicamos aumentar,
Copyri
ght
disminuir o menguar cada 2 vtas. Copyri
ght
disminuir o menguar cada 2 vtas. Se cuenta de la siguiente manera:Cop
yrigh
t
Se cuenta de la siguiente manera:Vuelta en la que se aumenta, disminuye o mengua al Cop
yrigh
t
Vuelta en la que se aumenta, disminuye o mengua al inicio y final de la vta., derecho de la labor.
Copyri
ght
inicio y final de la vta., derecho de la labor.Cop
yrigh
t © © © © ©
Trenzar a la derecha: Repetir el proceso © Trenzar a la derecha: Repetir el proceso Trenzar a la derecha: Repetir el proceso
FIL FIL FIL FIL FIL FIL FIL FIL KATIA
,
KATIA,
KATIA,
KATIA, on the LH needle and without removing that
KATIA, on the LH needle and without removing that on the LH needle and without removing that
stitch from the LH needle, knit (or purl) into
KATIA, stitch from the LH needle, knit (or purl) into stitch from the LH needle, knit (or purl) into
the back loop of the same stitch, then remove
KATIA, the back loop of the same stitch, then remove the back loop of the same stitch, then remove
the stitch from the LH needle.
KATIA,
the stitch from the LH needle.the stitch from the LH needle.
KATIA,
KATIA,
KATIA,
A long stitch holder can be used to store stitches
KATIA,
A long stitch holder can be used to store stitches A long stitch holder can be used to store stitches
KATIA,
Putting stitches on a holder
KATIA,
Putting stitches on a holder
S.A.
S.A.
This will result in an increase of 1 stitch on
S.A.
This will result in an increase of 1 stitch on This will result in an increase of 1 stitch on the total number of stitches. Another way to S.A
.the total number of stitches. Another way to the total number of stitches. Another way to increase is to knit (or purl) into the first stitch S.A
.increase is to knit (or purl) into the first stitch increase is to knit (or purl) into the first stitch on the LH needle and without removing that S.A
.on the LH needle and without removing that on the LH needle and without removing that stitch from the LH needle, knit (or purl) into S.A
.stitch from the LH needle, knit (or purl) into stitch from the LH needle, knit (or purl) into

11
I
N
S
T
R
U
C
C
I
O
N
E
S
I
N
S
T
R
U
C
T
I
O
N
S
MUESTRA DEL PUNTO GAUGE
Antes de empezar una prenda es muy importante hacer una muestra de 10 x 10 cm. en el mismo punto en el que se va a realizar la prenda y comprobar que se ajusta a la muestra indicada en la revista, sino no coincidirán las medidas con las de la revista. Si tienes un número menor de puntos y vueltas, deberás repetir la muestra con agujas más gruesas, si por el contrario tienes un número mayor de puntos y vueltas deberás usar agujas más finas. El número de agujas que figura en la revista es el número que utilizó la persona que realizó la prenda pero cada persona tiene un sistema de trabajo distinto. Lo importante no es el número de agujas que se utiliza sino que la muestra de 10 x 10 coincida exactamente con la de la revista, de esta manera nos aseguramos de que la prenda tenga las medidas indicadas en el patrón.
This is the most important information in any pattern. It insures that the finished garment will be the same size and shape as given in the instructions. The needle size given in the printed gauge is only a suggestion. Since no two people will knit exactly the same way, you should work up a 4x4” swatch using the designated yarn and pattern stitch. If you have too many stitches and rows in your swatch, try again with a smaller needle. With too less stitches and rows, work another swatch with a larger needle. It does not matter what size needle you use as long as you obtain the correct gauge. Sometimes you may have to work with two sizes of needles; one for the right side and the other for the wrong side. If you cannot obtain the correct gauge, some alterations in the instructions will have to be made.
PUNTOS BASICOS MÁS UTILIZADOS / USING THE BASIC STITCHES
NOTA IMPORTANTE
En la explicación o gráfico de cualquier punto, la 1ª vta siempre corresponde al derecho de la labor; de no ser así, ya se indica en el texto.
También es muy importante tener en cuenta que en los gráficos se muestra como deben trabajarse los p. vta. por vta., (osea, derecho de la labor y revés de la labor), no tal como se ven en la foto.
IMPORTANT NOTE: Graphs show only the right side of your work. Unless noted in the instructions, the first row will be worked from the right edge of the graph to the left edge; the second row is worked from the left edge of the graph to the right edge.
Symbols represent the stitch you will be working, not how the stitch will look on finished product. If only uneven numbered rows are shown on the graph, instructions will be given as how to work the reverse side rows.
1ª vta: al derecho2ª vta: al revés
Row 1: (right side) KnitRow 2: (Wrong side) Purl
Punto Jersey Derecho Stockinette Stitch
1ª vta: al revés2ª vta: al derecho
Row 1: (right side) PurlRow 2: (wrong side) Knit
Punto Jersey Revés Reverse Stockinette Stitch
Todos los p. y todas las vtas al derecho. Knit every row.
Punto Bobo Garter Stitch
Copyri
ght
Copyri
ght
Copyri
ght por vta., (osea, derecho de la labor y revés de la labor),
Copyri
ght por vta., (osea, derecho de la labor y revés de la labor),
Copyri
ght
Copyri
ght
Copyri
ght
Punto Jersey Derecho
Copyri
ght
Punto Jersey Derecho
© © © También es muy importante tener en cuenta que en los © También es muy importante tener en cuenta que en los gráficos se muestra como deben trabajarse los p. vta. © gráficos se muestra como deben trabajarse los p. vta. por vta., (osea, derecho de la labor y revés de la labor), © por vta., (osea, derecho de la labor y revés de la labor),
FIL FIL FIL FIL FIL FIL siempre corresponde al derecho de la labor; de no ser FIL siempre corresponde al derecho de la labor; de no ser
IMPORTANT NOTE:
FIL IMPORTANT NOTE: Graphs show only the right side of your work. Unless
FIL Graphs show only the right side of your work. Unless noted in the instructions, the first row will be worked
FIL noted in the instructions, the first row will be worked from the right edge of the graph to the left edge; the FIL from the right edge of the graph to the left edge; the second row is worked from the left edge of the graph to FIL second row is worked from the left edge of the graph to FIL
KATIA,
KATIA,
KATIA,
KATIA,
USING THE BASIC STITCHES
KATIA,
USING THE BASIC STITCHESUSING THE BASIC STITCHES
KATIA,
IMPORTANT NOTE: KATIA,
IMPORTANT NOTE: Graphs show only the right side of your work. Unless KATIA
,
Graphs show only the right side of your work. Unless
S.A.needle. It does not matter what
S.A.needle. It does not matter what
size needle you use as long as you obtain the correct
S.A.size needle you use as long as you obtain the correct
gauge. Sometimes you may have to work with two
S.A.gauge. Sometimes you may have to work with two
sizes of needles; one for the right side and the other
S.A.
sizes of needles; one for the right side and the other for the wrong side. If you cannot obtain the correct
S.A.
for the wrong side. If you cannot obtain the correct gauge, some alterations in the instructions will have S.A
.gauge, some alterations in the instructions will have
12
I
N
S
T
R
U
C
C
I
O
N
E
S
I
N
S
T
R
U
C
T
I
O
N
S
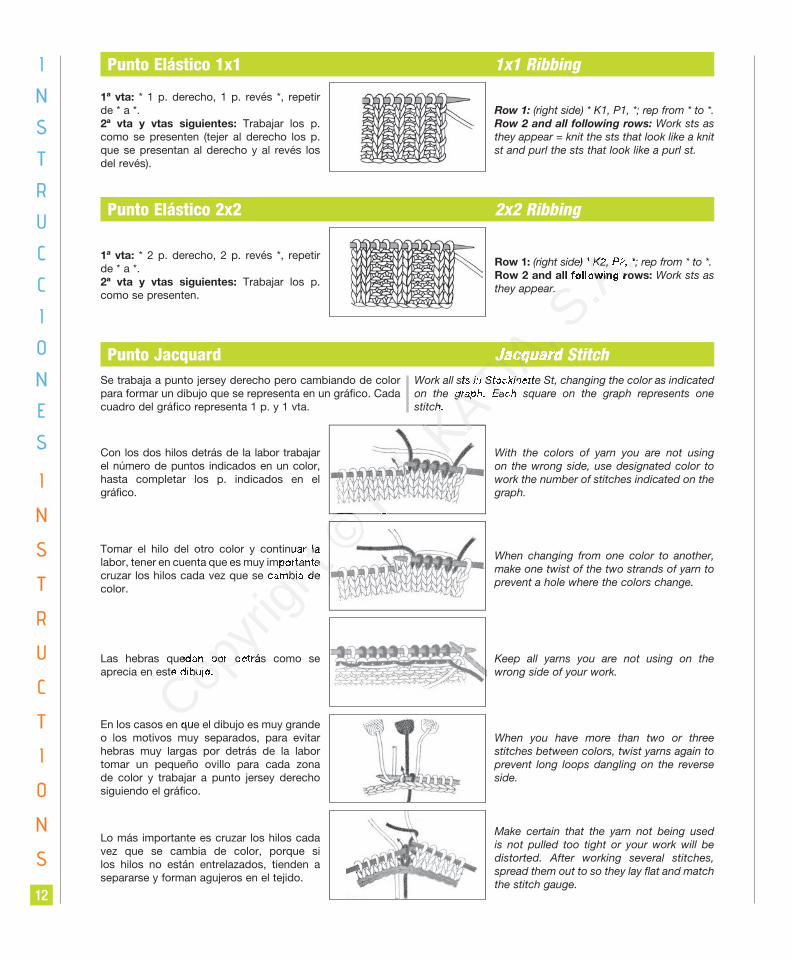
1ª vta: * 2 p. derecho, 2 p. revés *, repetir de * a *.2ª vta y vtas siguientes: Trabajar los p. como se presenten.
Row 1: (right side) * K2, P2, *; rep from * to *.Row 2 and all following rows: Work sts as they appear.
Punto Elástico 2x2 2x2 Ribbing
Con los dos hilos detrás de la labor trabajar el número de puntos indicados en un color, hasta completar los p. indicados en el gráfico.
With the colors of yarn you are not using on the wrong side, use designated color to work the number of stitches indicated on the graph.
Tomar el hilo del otro color y continuar la labor, tener en cuenta que es muy importante cruzar los hilos cada vez que se cambia de color.
When changing from one color to another, make one twist of the two strands of yarn to prevent a hole where the colors change.
Las hebras quedan por detrás como se aprecia en este dibujo.
Keep all yarns you are not using on the wrong side of your work.
En los casos en que el dibujo es muy grande o los motivos muy separados, para evitar hebras muy largas por detrás de la labor tomar un pequeño ovillo para cada zona de color y trabajar a punto jersey derecho siguiendo el gráfico.
When you have more than two or three stitches between colors, twist yarns again to prevent long loops dangling on the reverse side.
Lo más importante es cruzar los hilos cada vez que se cambia de color, porque si los hilos no están entrelazados, tienden a separarse y forman agujeros en el tejido.
Make certain that the yarn not being used is not pulled too tight or your work will be distorted. After working several stitches, spread them out to so they lay flat and match the stitch gauge.
Punto Jacquard Jacquard StitchSe trabaja a punto jersey derecho pero cambiando de color para formar un dibujo que se representa en un gráfico. Cada cuadro del gráfico representa 1 p. y 1 vta.
Work all sts in Stockinette St, changing the color as indicated on the graph. Each square on the graph represents one stitch.
1ª vta: * 1 p. derecho, 1 p. revés *, repetir de * a *.2ª vta y vtas siguientes: Trabajar los p. como se presenten (tejer al derecho los p. que se presentan al derecho y al revés los del revés).
Row 1: (right side) * K1, P1, *; rep from * to *.Row 2 and all following rows: Work sts as they appear = knit the sts that look like a knit st and purl the sts that look like a purl st.
Punto Elástico 1x1 1x1 Ribbing
Copyri
ght
Copyri
ght
Copyri
ght
Copyri
ght
Copyri
ght Tomar el hilo del otro color y continuar la
Copyri
ght Tomar el hilo del otro color y continuar la Tomar el hilo del otro color y continuar la
labor, tener en cuenta que es muy importante
Copyri
ght labor, tener en cuenta que es muy importante labor, tener en cuenta que es muy importante
cruzar los hilos cada vez que se cambia de
Copyri
ght cruzar los hilos cada vez que se cambia de cruzar los hilos cada vez que se cambia de
Las hebras quedan por detrás como se
Copyri
ght
Las hebras quedan por detrás como se Las hebras quedan por detrás como se aprecia en este dibujo.
Copyri
ght
aprecia en este dibujo.aprecia en este dibujo.
En los casos en que el dibujo es muy grande Cop
yrigh
t
En los casos en que el dibujo es muy grande En los casos en que el dibujo es muy grande
© © © © © © © © FIL FIL FIL FIL FIL KATIA
,
KATIA,
KATIA, Jacquard Stitch
KATIA, Jacquard Stitch
KATIA,
KATIA,
KATIA,
KATIA,
KATIA,
KATIA,
Work all sts in Stockinette St, changing the color as indicated
KATIA,
Work all sts in Stockinette St, changing the color as indicated Work all sts in Stockinette St, changing the color as indicated on the graph. Each square on the graph represents one
KATIA,
on the graph. Each square on the graph represents one on the graph. Each square on the graph represents one stitch.
KATIA,
stitch.stitch.
S.A.
S.A. (right side) * K2, P2, *; rep from * to *.
S.A. (right side) * K2, P2, *; rep from * to *. (right side) * K2, P2, *; rep from * to *.
Row 2 and all following rows:
S.A.
Row 2 and all following rows:Row 2 and all following rows:
they appear.
S.A.
they appear.they appear.

13
I
N
S
T
R
U
C
C
I
O
N
E
S
I
N
S
T
R
U
C
T
I
O
N
S
Bases para aprender a realizar una prendaLearning how to use the stitches
En ésta segunda parte os damos las nociones básicas que se necesitan para poder realizar una prenda.
In this second part are the necessary basics for completing an entire garment.
AUMENTOS - DISMINUCIONES Y/O MENGUADOS
INCREASING - DECREASING AND/OR BINDING OFF
Pasar 1 p. sin hacer clavando la ag. derecha como si se fuera a tejer al revés. trabajar el siguiente p. al derecho y pasar el p. sin hacer por encima de este punto.
Slip 1 stitch to RH needle as if to purl it, knit next stitch on LH needle, with the tip of LH needle, pass the slipped st over the knitted stitch.
Tejer 1 p. al derecho y pasar el punto de la aguja derecha por encima de éste punto, repetir este paso hasta tener cerrados el número de puntos indicados, al principio de la siguiente vta, revés de la labor, cerrar los p. igual pero trabajados al revés.
Knit 1 stitch, pass the second stitch on RH needle over the new stitch. Repeat for the required number of stitches to be bound off, making certain that the bound off stitches are the same tension as the row of stitches below. On the reverse side of Stockinette Stitch, purl all stitches.
Al empezar la siguiente vta. cerrar de nuevo los p. que indique la revista, de esta manera se consigue la forma redondeada que tienen sisas y escotes.
Follow the written instructions for the follow-ing rows until the shaping is completed.
Disminuciones al principio de la vta Decreasing at the beginning of a rowCuando se cierran puntos para formar una sisa o un escote, se cierran al principio de la vta.
When forming an armhole or neckline shaping, binding off is done at the beginning of the row.
Al Inicio de la vta, siempre por el derecho de la labor, trab. 3 p. der. pasar 1 p. de la aguja izquierda sin hacer en la aguja der., trab. 1 p. al der., y pasar el p. sin hacer por encima de este p. al der.
Unless otherwise noted, the decreasing is done on a right side row. At the beginning of a right side row, K3, slip 1 st, K1 st, PSSO.
Disminuciones en ambos lados de la misma vta. Decreasing at both ends of the same rowSe usan para las sisas vistas y para hacer la manga renglan.
Son las disminuciones en las que se ven los p. de la orilla incli-nados, se trabajan normalmente por el derecho de la labor.
Las disminuciones se hacen siempre a x puntos de los extremos. Ponemos un ejemplo a 3 p. de orillo.
Usually done on right side rows for Raglan sleeves.
Decreases can be worked at the beginning of the row, or two or three stitches from the outside edge.
Copyri
ght
Copyri
ght
Copyri
ght
Copyri
ght
Copyri
ght
Copyri
ght
Copyri
ght
Copyri
ght
Copyri
ght
Al empezar la siguiente vta. cerrar de nuevo
Copyri
ght
Al empezar la siguiente vta. cerrar de nuevo Al empezar la siguiente vta. cerrar de nuevo los p. que indique la revista, de esta manera
Copyri
ght
los p. que indique la revista, de esta manera los p. que indique la revista, de esta manera se consigue la forma redondeada que tienen
Copyri
ght
se consigue la forma redondeada que tienen se consigue la forma redondeada que tienen
Copyri
ght
Copyri
ght
Copyri
ght
Copyri
ght
Disminuciones en ambos lados de la misma vta. Copyri
ght
Disminuciones en ambos lados de la misma vta.
© FIL FIL FIL FIL FIL FIL FIL FIL KATIA
,
KATIA,
KATIA,
KATIA,
KATIA,
Slip 1 stitch to RH needle as if to purl it, knit
KATIA,
Slip 1 stitch to RH needle as if to purl it, knit Slip 1 stitch to RH needle as if to purl it, knit next stitch on LH needle, with the tip of LH KATIA
, next stitch on LH needle, with the tip of LH next stitch on LH needle, with the tip of LH needle, pass the slipped st over the knitted KATIA
,
needle, pass the slipped st over the knitted needle, pass the slipped st over the knitted KATIA, Decreasing at the beginning of a row
KATIA, Decreasing at the beginning of a row
When forming an armhole or neckline shaping, binding off is
KATIA, When forming an armhole or neckline shaping, binding off is When forming an armhole or neckline shaping, binding off is
done at the beginning of the row.
KATIA,
done at the beginning of the row.done at the beginning of the row.
S.A.
S.A.
S.A.INCREASING - DECREASING
S.A.INCREASING - DECREASING INCREASING - DECREASING
AND/OR BINDING OFF
S.A.
AND/OR BINDING OFFAND/OR BINDING OFF
S.A.
Decreasing at the beginning of a rowS.A.
Decreasing at the beginning of a row
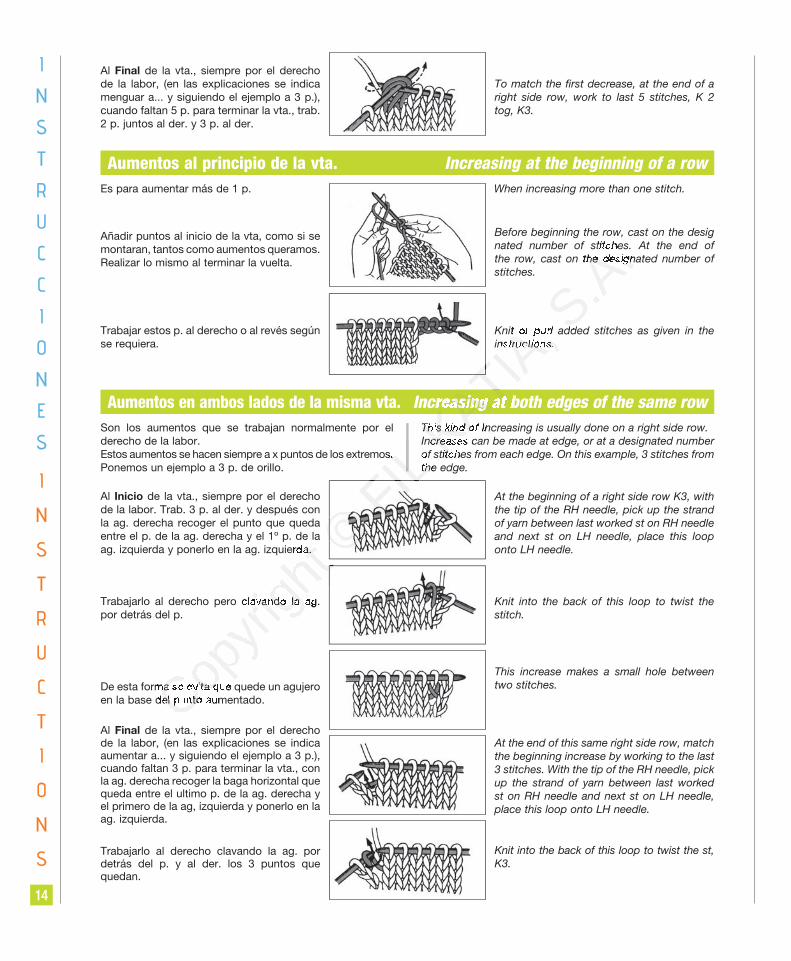
14
I
N
S
T
R
U
C
C
I
O
N
E
S
I
N
S
T
R
U
C
T
I
O
N
S
Al Final de la vta., siempre por el derecho de la labor, (en las explicaciones se indica menguar a... y siguiendo el ejemplo a 3 p.), cuando faltan 5 p. para terminar la vta., trab. 2 p. juntos al der. y 3 p. al der.
To match the first decrease, at the end of a right side row, work to last 5 stitches, K 2 tog, K3.
Añadir puntos al inicio de la vta, como si se montaran, tantos como aumentos queramos. Realizar lo mismo al terminar la vuelta.
Before beginning the row, cast on the desig nated number of stitches. At the end of the row, cast on the designated number of stitches.
Trabajar estos p. al derecho o al revés según se requiera.
Knit or purl added stitches as given in the instructions.
Aumentos al principio de la vta. Increasing at the beginning of a rowEs para aumentar más de 1 p. When increasing more than one stitch.
Al Inicio de la vta., siempre por el derecho de la labor. Trab. 3 p. al der. y después con la ag. derecha recoger el punto que queda entre el p. de la ag. derecha y el 1º p. de la ag. izquierda y ponerlo en la ag. izquierda.
At the beginning of a right side row K3, with the tip of the RH needle, pick up the strand of yarn between last worked st on RH needle and next st on LH needle, place this loop onto LH needle.
Trabajarlo al derecho pero clavando la ag. por detrás del p.
Knit into the back of this loop to twist the stitch.
De esta forma se evita que quede un agujero en la base del punto aumentado.
This increase makes a small hole between two stitches.
Al Final de la vta., siempre por el derecho de la labor, (en las explicaciones se indica aumentar a... y siguiendo el ejemplo a 3 p.), cuando faltan 3 p. para terminar la vta., con la ag. derecha recoger la baga horizontal que queda entre el ultimo p. de la ag. derecha y el primero de la ag, izquierda y ponerlo en la ag. izquierda.
At the end of this same right side row, match the beginning increase by working to the last 3 stitches. With the tip of the RH needle, pick up the strand of yarn between last worked st on RH needle and next st on LH needle, place this loop onto LH needle.
Trabajarlo al derecho clavando la ag. por detrás del p. y al der. los 3 puntos que quedan.
Knit into the back of this loop to twist the st, K3.
Aumentos en ambos lados de la misma vta. Increasing at both edges of the same rowSon los aumentos que se trabajan normalmente por el derecho de la labor. Estos aumentos se hacen siempre a x puntos de los extremos. Ponemos un ejemplo a 3 p. de orillo.
This kind of Increasing is usually done on a right side row.Increases can be made at edge, or at a designated number of stitches from each edge. On this example, 3 stitches from the edge.
Copyri
ght
entre el p. de la ag. derecha y el 1º p. de la
Copyri
ght
entre el p. de la ag. derecha y el 1º p. de la entre el p. de la ag. derecha y el 1º p. de la ag. izquierda y ponerlo en la ag. izquierda.
Copyri
ght ag. izquierda y ponerlo en la ag. izquierda.ag. izquierda y ponerlo en la ag. izquierda.
Copyri
ght
Copyri
ght
Trabajarlo al derecho pero clavando la ag.
Copyri
ght
Trabajarlo al derecho pero clavando la ag. Trabajarlo al derecho pero clavando la ag.
De esta forma se evita que quede un agujero Copyri
ght
De esta forma se evita que quede un agujero De esta forma se evita que quede un agujero en la base del punto aumentado.Cop
yrigh
t
en la base del punto aumentado.en la base del punto aumentado.
de la vta., siempre por el derecho Cop
yrigh
t
de la vta., siempre por el derecho de la vta., siempre por el derecho
© © © © © la ag. derecha recoger el punto que queda © la ag. derecha recoger el punto que queda la ag. derecha recoger el punto que queda FIL FIL FIL FIL FIL
Estos aumentos se hacen siempre a x puntos de los extremos.
FIL Estos aumentos se hacen siempre a x puntos de los extremos. Estos aumentos se hacen siempre a x puntos de los extremos. of stitches from each edge. On this example, 3 stitches from
FIL of stitches from each edge. On this example, 3 stitches from of stitches from each edge. On this example, 3 stitches from the edge.
FIL the edge.the edge.
FIL KATIA
,
KATIA,
KATIA,
KATIA,
KATIA, Knit or purl added stitches as given in the
KATIA, Knit or purl added stitches as given in the Knit or purl added stitches as given in the
instructions.
KATIA, instructions.instructions.
KATIA,
Increasing at both edges of the same row
KATIA,
Increasing at both edges of the same rowThis kind of Increasing is usually done on a right side row.KATIA
,
This kind of Increasing is usually done on a right side row.This kind of Increasing is usually done on a right side row.KATIA,
KATIA,
Increases can be made at edge, or at a designated number KATIA,
Increases can be made at edge, or at a designated number Increases can be made at edge, or at a designated number of stitches from each edge. On this example, 3 stitches from KATIA
,
of stitches from each edge. On this example, 3 stitches from of stitches from each edge. On this example, 3 stitches from
S.A.
S.A.nated number of stitches. At the end of
S.A.nated number of stitches. At the end of nated number of stitches. At the end of
the row, cast on the designated number of
S.A.the row, cast on the designated number of the row, cast on the designated number of
Knit or purl added stitches as given in the S.A.
Knit or purl added stitches as given in the Knit or purl added stitches as given in the

15
I
N
S
T
R
U
C
C
I
O
N
E
S
I
N
S
T
R
U
C
T
I
O
N
S
FORMAS DE CERRAR BINDING OFF
Pasar el primer p. sin hacer y trabajar el siguiente al derecho.
Slip 1 stitch to RH needle as if to purl it., knit next stitch on LH needle
Cerrado Simple Simple Bind Off
Con la ag. izquierda tomar el p. sin hacer de la ag. derecha y pasarlo por encima del p. derecho.
Using tip of LH needle, pass the second stitch on RH needle over the new stitch.
Tejer otro p. al derecho, con la ag. izquierda tomar el 1º p. de la ag. derecha y pasar por el p. derecho, de esta forma en la ag. derecha sólo queda 1 p.
Knit next st on LH needle, pass the second stitch on RH needle over the new stitch. Repeat this process until no stitches remain on LH needle, and only one stitch is on RH needle.
Una vez cerrados todos los p. cortar el hilo, pasarlo por el último p. y tirar para que quede fijado y no se suelte.
After all stitches have been bound off, cut yarn and pass end of yarn through the remaining stitch on the RH needle before slipping it off.
Una vez terminada la labor, cortar el hilo dejando una hebra de aproximadamente el doble de la medida que vayamos a cerrar. Enhebrar una ag. lanera y clavar en los dos primeros puntos.
After completing the knitting, stitches remain on the needle. Leaving a length of yarn which equals twice the length of the edge you are finishing, cut yarn. Thread yarn onto a yarn needle and sew through the stitches.
Cerrado Tubular Tubular Bind Off - (Finished Edge Bind Off)
Clavarla de nuevo en el primer p. y después en el tercero.
Insert needle through the first st, then through the third st.
Pasar del 2º p. al 4º.Go back to the second stitch, then into the fourth st.
Se usa normalmente después de tejer el elástico, para conseguir un tipo de cerrado con más elasticidad.
Used when an elastic edge is needed.
Copyri
ght
Copyri
ght
Una vez terminada la labor, cortar el hilo
Copyri
ght
Una vez terminada la labor, cortar el hilo Una vez terminada la labor, cortar el hilo dejando una hebra de aproximadamente el
Copyri
ght
dejando una hebra de aproximadamente el dejando una hebra de aproximadamente el doble de la medida que vayamos a cerrar.
Copyri
ght
doble de la medida que vayamos a cerrar. doble de la medida que vayamos a cerrar. Enhebrar una ag. lanera y clavar en los dos
Copyri
ght
Enhebrar una ag. lanera y clavar en los dos Enhebrar una ag. lanera y clavar en los dos primeros puntos. Cop
yrigh
t
primeros puntos.primeros puntos. Copyri
ght
Se usa normalmente después de tejer el elástico, para
Copyri
ght
Se usa normalmente después de tejer el elástico, para Se usa normalmente después de tejer el elástico, para conseguir un tipo de cerrado con más elasticidad.
Copyri
ght
conseguir un tipo de cerrado con más elasticidad.conseguir un tipo de cerrado con más elasticidad.
© © © © © © © FIL FIL FIL FIL FIL FIL KATIA
,
KATIA,
KATIA,
KATIA, Knit next st on LH needle, pass the second
KATIA, Knit next st on LH needle, pass the second Knit next st on LH needle, pass the second
stitch on RH needle over the new stitch.
KATIA,
stitch on RH needle over the new stitch. stitch on RH needle over the new stitch. Repeat this process until no stitches remain
KATIA,
Repeat this process until no stitches remain Repeat this process until no stitches remain on LH needle, and only one stitch is on RH
KATIA,
on LH needle, and only one stitch is on RH on LH needle, and only one stitch is on RH needle.
KATIA,
needle.needle.
KATIA,
KATIA,
KATIA,
KATIA, S
.A.
S.A.Using tip of LH needle, pass the second
S.A.Using tip of LH needle, pass the second Using tip of LH needle, pass the second
stitch on RH needle over the new stitch.
S.A.
stitch on RH needle over the new stitch.stitch on RH needle over the new stitch.

16
I
N
S
T
R
U
C
C
I
O
N
E
S
I
N
S
T
R
U
C
T
I
O
N
S
ACABADOS BUTTONHOLES
Añadir una hebra o baga y hacer dos puntos juntos al derecho.
Use a YO (yarn over) and work 2 stitches together.
Ojales redondos Round Buttonholes
A partir de la siguiente vta trabajar los p. y la hebra o baga como corresponda.
On the following row, work the YO to correspond with the adjoining stitches.
A continuación del 3º al 5º y así sucesiva-mente.
Go back to the third st, then into the fifth st.
Una vez llegado al último p. clavar la aguja de nuevo desde el penúltimo al último, rematar y cortar el hilo.
When all stitches have been worked, cut off remaining yarn.
Cuando el botón que queremos poner es pequeño o estamos trabajando una lana muy gruesa, es recomendable hacer un ojal pequeño.
If the button you are using is very small, or if the yarn is very large, a round buttonhole is recommended.
Una vez terminadas las piezas de una prenda para hacer el cuello o las tapetas de los delanteros, se recogen los p. clavando la aguja en la orilla.
Stitches can be picked up along the edge of a knitted gar-ment too add a collar or front bands. This is usually done with the right side of garment facing you.
Cerrar tantos p. como indique la revista (por ejemplo: ojal de 3 p.), en la siguiente vta montar en la ag. los mismos p. que se cerraron.
The designated number of stitches are bound off, and on the following row, the same number of stitches are cast on.
Ojales horizontales Horizontal Buttonholes
Cuando se recogen los p. en el mismo sen-tido que la labor, clavar la aguja en el centro de cada p. de la última vta. y tejer como corresponda.
When picking up stitches along a bound off, or a cast on edge, insert needle into center of each stitch on the last row.
Recoger puntos Picking Up StitchesCop
yrigh
t
Copyri
ght
Copyri
ght
Copyri
ght
Copyri
ght
Copyri
ght
Cerrar tantos p. como indique la revista
Copyri
ght
Cerrar tantos p. como indique la revista Cerrar tantos p. como indique la revista (por ejemplo: ojal de 3 p.), en la siguiente
Copyri
ght
(por ejemplo: ojal de 3 p.), en la siguiente (por ejemplo: ojal de 3 p.), en la siguiente vta montar en la ag. los mismos p. que se
Copyri
ght
vta montar en la ag. los mismos p. que se vta montar en la ag. los mismos p. que se
Copyri
ght
Ojales horizontales
Copyri
ght
Ojales horizontales
© © © © © A partir de la siguiente vta trabajar los p. y la © A partir de la siguiente vta trabajar los p. y la A partir de la siguiente vta trabajar los p. y la FIL FIL FIL FIL FIL FIL FIL FIL
KATIA,
KATIA,
KATIA, Round Buttonholes
KATIA, Round Buttonholes
KATIA,
KATIA,
KATIA,
KATIA,
KATIA,
KATIA, If the button you are using is very small, or if the yarn is very
KATIA, If the button you are using is very small, or if the yarn is very If the button you are using is very small, or if the yarn is very
large, a round buttonhole is recommended.
KATIA,
large, a round buttonhole is recommended.large, a round buttonhole is recommended.
S.A.
S.A.
S.A.BUTTONHOLES
S.A.BUTTONHOLESBUTTONHOLES
S.A.
Round ButtonholesS.A.
Round Buttonholes
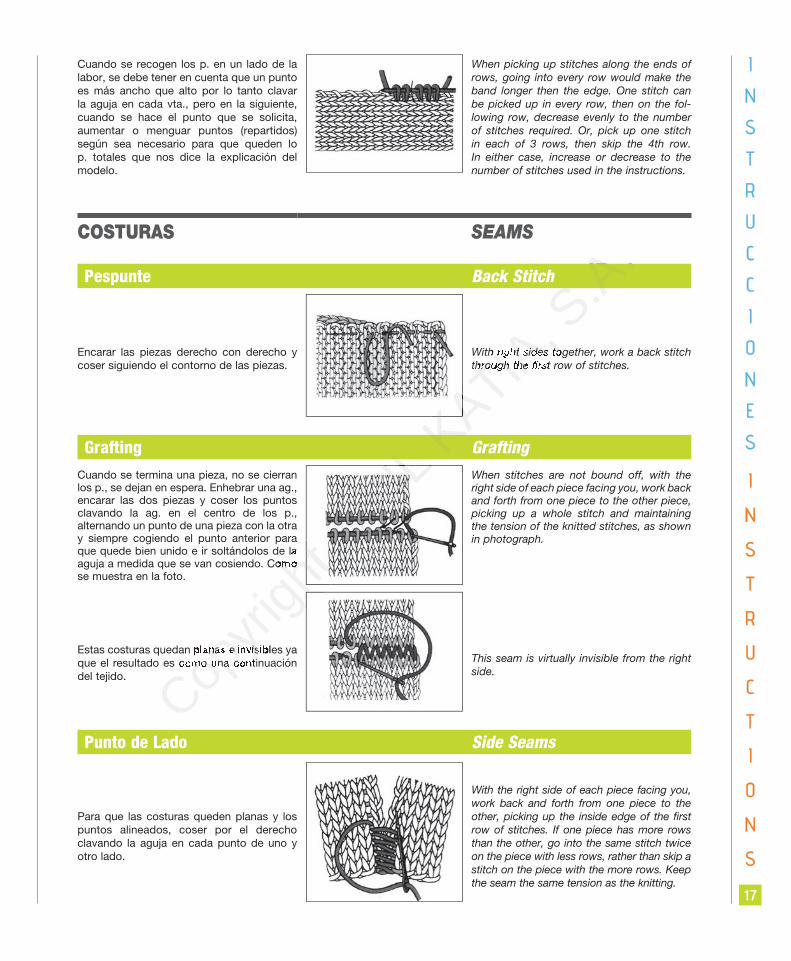
17
I
N
S
T
R
U
C
C
I
O
N
E
S
I
N
S
T
R
U
C
T
I
O
N
S
Cuando se recogen los p. en un lado de la labor, se debe tener en cuenta que un punto es más ancho que alto por lo tanto clavar la aguja en cada vta., pero en la siguiente, cuando se hace el punto que se solicita, aumentar o menguar puntos (repartidos) según sea necesario para que queden lo p. totales que nos dice la explicación del modelo.
When picking up stitches along the ends of rows, going into every row would make the band longer then the edge. One stitch can be picked up in every row, then on the fol-lowing row, decrease evenly to the number of stitches required. Or, pick up one stitch in each of 3 rows, then skip the 4th row. In either case, increase or decrease to the number of stitches used in the instructions.
COSTURAS SEAMS
Encarar las piezas derecho con derecho y coser siguiendo el contorno de las piezas.
With right sides together, work a back stitch through the first row of stitches.
Pespunte Back Stitch
Para que las costuras queden planas y los puntos alineados, coser por el derecho clavando la aguja en cada punto de uno y otro lado.
With the right side of each piece facing you, work back and forth from one piece to the other, picking up the inside edge of the first row of stitches. If one piece has more rows than the other, go into the same stitch twice on the piece with less rows, rather than skip a stitch on the piece with the more rows. Keep the seam the same tension as the knitting.
Punto de Lado Side Seams
Cuando se termina una pieza, no se cierran los p., se dejan en espera. Enhebrar una ag., encarar las dos piezas y coser los puntos clavando la ag. en el centro de los p., alternando un punto de una pieza con la otra y siempre cogiendo el punto anterior para que quede bien unido e ir soltándolos de la aguja a medida que se van cosiendo. Como se muestra en la foto.
When stitches are not bound off, with the right side of each piece facing you, work back and forth from one piece to the other piece, picking up a whole stitch and maintaining the tension of the knitted stitches, as shown in photograph.
Grafting Grafting
Estas costuras quedan planas e invisibles ya que el resultado es como una continuación del tejido.
This seam is virtually invisible from the right side.
Copyri
ght
Copyri
ght que quede bien unido e ir soltándolos de la
Copyri
ght que quede bien unido e ir soltándolos de la que quede bien unido e ir soltándolos de la
aguja a medida que se van cosiendo. Como
Copyri
ght aguja a medida que se van cosiendo. Como aguja a medida que se van cosiendo. Como
Copyri
ght
Copyri
ght
Copyri
ght
Copyri
ght
Copyri
ght
Copyri
ght
Copyri
ght
Estas costuras quedan planas e invisibles ya
Copyri
ght
Estas costuras quedan planas e invisibles ya Estas costuras quedan planas e invisibles ya que el resultado es como una continuación
Copyri
ght
que el resultado es como una continuación que el resultado es como una continuación
© FIL FIL FIL FIL FIL FIL KATIA
,
KATIA,
KATIA,
KATIA,
KATIA, With right sides together, work a back stitch
KATIA, With right sides together, work a back stitch With right sides together, work a back stitch
through the first row of stitches.
KATIA,
through the first row of stitches.through the first row of stitches.
KATIA, S
.A.
S.A.
S.A.

18
I
N
S
T
R
U
C
C
I
O
N
E
S
I
N
S
T
R
U
C
T
I
O
N
S
ADORNOS DECORATIONS
Agrupar los hilos necesarios para un fleco y doblar por la mitad. Clavar el ganchillo en la orilla del tejido, tomar los hilo por el lado doblado y hacerlo pasar hacia el revés de la labor, después anudar el fleco siguiendo el dibujo.
Count the number of strands needed for each group, fold in the center, and using a crochet hook, pull the entire group through the knitted piece, leaving the loop of strands on the hook. Wrap the strands around the hook and pull the loose ends through the loop on the hook. Remove hook and pull the group tight to fasten it to the knitted piece.
Flecos FringeCortar un rectángulo de cartón de la medida que queramos el fleco. Enrollar el hilo alrededor del cartón (procurar que los hilos queden uno al lado del otro y no encima). Cuando el cartón esté lleno con las tijeras cortar los hilo por un lado.
Cut a piece of cardboard half the width you want the fringe to be. Wrap the yarn in a single layer around the cardboard. When you have the correct number of pieces, or when the cardboard is full, cut the yarn along one edge of the cardboard.
En cartón cortar dos círculos del tamaño que queramos el pompón y hacer un agujero en el centro.
Use a pompon maker, or cut two circles of cardboard, the diameter of the finished pompon. Cut out a circle inside of each piece of cardboard.
Juntar los dos círculos y enrollar hilo alrededor de ellos hasta que estén completamente cubiertos.
Holding the two pieces of cardboard together, wrap the yarn around the outside edges until you have covered the cardboard.
Poner las tijeras entre los círculos y cortar todos los hilos.
Cut the outside edge of all the strands.
Separar los círculos anudar por el centro y al sacar los círculos queda formado el pompón.
Separate the two pieces of cardboard so you can tie a strand of yarn between them around the center of the strands, forming a pompon. After fluffing the strands, cut off any long ends.
Pompones Pompons
Copyri
ght
Copyri
ght
Copyri
ght
Copyri
ght
Copyri
ght
Copyri
ght
Copyri
ght
Copyri
ght Juntar los dos círculos y enrollar hilo alrededor
Copyri
ght Juntar los dos círculos y enrollar hilo alrededor Juntar los dos círculos y enrollar hilo alrededor
de ellos hasta que estén completamente
Copyri
ght de ellos hasta que estén completamente de ellos hasta que estén completamente
Poner las tijeras entre los círculos y cortar Copyri
ght
Poner las tijeras entre los círculos y cortar Poner las tijeras entre los círculos y cortar todos los hilos.Cop
yrigh
t
todos los hilos.todos los hilos.
© © © © © © FIL FIL FIL FIL FIL FIL FIL KATIA
,
KATIA,
KATIA,
KATIA,
KATIA,
Use a pompon maker, or cut two circles
KATIA,
Use a pompon maker, or cut two circles Use a pompon maker, or cut two circles
KATIA, Pompons
KATIA, PomponsS.A
.S.A
.crochet hook, pull the entire group through
S.A.crochet hook, pull the entire group through crochet hook, pull the entire group through
the knitted piece, leaving the loop of strands
S.A.the knitted piece, leaving the loop of strands the knitted piece, leaving the loop of strands
on the hook. Wrap the strands around the
S.A.on the hook. Wrap the strands around the on the hook. Wrap the strands around the
hook and pull the loose ends through the
S.A.
hook and pull the loose ends through the hook and pull the loose ends through the loop on the hook. Remove hook and pull the S.A
.loop on the hook. Remove hook and pull the loop on the hook. Remove hook and pull the group tight to fasten it to the knitted piece.S.A
.group tight to fasten it to the knitted piece.group tight to fasten it to the knitted piece.

19
I
N
S
T
R
U
C
C
I
O
N
E
S
I
N
S
T
R
U
C
T
I
O
N
S
INICIACIÓN AL GANCHILLOKatia ha desarrollado paso a paso y con detalle las bases y explicaciones para quien quiera iniciarse en el punto a ganchillo. Léelas detenidamente y si aun le surge alguna duda KATIA se pone a su disposición para cualquier consulta.
Con el ganchillo se pueden hacer infinidad de labores fácilmente y con resultados extraordinarios.
El Punto a Ganchillo se compone básicamente de 4 puntos:
9 P. Cadeneta l P. Bajo
8 P. Enano 1 P. Alto
Combinando estos puntos se pueden hacer toda clase de labores, desde las más simples a las más laboriosas, con efectos sorprendentes.
Existen varias medidas de ganchillo que se utilizan según el grosor de la lana.
Todas las labores se explican con gráficos, más adelante daremos las instrucciones de cómo seguir una explicación.
Seguidamente pasamos a explicar en detalle y con dibujos los puntos básicos y algunas de sus combinaciones, acabados
etc. En la explicación de cada punto figura el signo que encontrará en los gráficos.
INTRODUCTION TO CROCHETKatia has developed step by step detailed instructions for learning how to crochet. After reading through the instructions, if you have any questions they can be answered through the Katia website.
In crochet, you can make many items easily and with extraordinary results.
Crochet has four basic stitches:
9 Chain st l Single crochet
8 Slip st 1 Double crochet
Combining these stitches you can work simple or more difficult patterns with surprising effects.
Many different combinations can be made in crochet using fine thread to bulky yarns.
All models contain necessary graphs, diagrams and complete easy-to- read instructions.
The instructions explain the stitches in detail, how they are combined, and how to finish your project. Symbols that are used in the graphs are fully explained.
GanchilloCrochet
Copyri
ght
Copyri
ght
Copyri
ght
INTRODUCTION TO CROCHET
Copyri
ght
INTRODUCTION TO CROCHETINTRODUCTION TO CROCHET
Copyri
ght
Copyri
ght
Katia has developed step by step detailed instructions for learning how to crochet. After reading through the instructions,
Copyri
ght
Katia has developed step by step detailed instructions for learning how to crochet. After reading through the instructions, Katia has developed step by step detailed instructions for learning how to crochet. After reading through the instructions, if you have any questions they can be answered through the Katia website.
Copyri
ght
if you have any questions they can be answered through the Katia website.if you have any questions they can be answered through the Katia website.
In crochet, you can make many items easily and with extraordinary results.
Copyri
ght
In crochet, you can make many items easily and with extraordinary results.In crochet, you can make many items easily and with extraordinary results.
Crochet has four basic stitches:Copyri
ght
Crochet has four basic stitches:Crochet has four basic stitches:
© © FIL FIL Todas las labores se explican con gráficos, más adelante daremos las instrucciones de cómo seguir una explicación.
FIL Todas las labores se explican con gráficos, más adelante daremos las instrucciones de cómo seguir una explicación.Todas las labores se explican con gráficos, más adelante daremos las instrucciones de cómo seguir una explicación.
Seguidamente pasamos a explicar en detalle y con dibujos los puntos básicos y algunas de sus combinaciones, acabados
FIL Seguidamente pasamos a explicar en detalle y con dibujos los puntos básicos y algunas de sus combinaciones, acabados Seguidamente pasamos a explicar en detalle y con dibujos los puntos básicos y algunas de sus combinaciones, acabados
etc. En la explicación de cada punto figura el signo que encontrará en los gráficos.FIL etc. En la explicación de cada punto figura el signo que encontrará en los gráficos.etc. En la explicación de cada punto figura el signo que encontrará en los gráficos.
KATIA,
KATIA,
Combinando estos puntos se pueden hacer toda clase de labores, desde las más simples a las más laboriosas, con
KATIA,
Combinando estos puntos se pueden hacer toda clase de labores, desde las más simples a las más laboriosas, con Combinando estos puntos se pueden hacer toda clase de labores, desde las más simples a las más laboriosas, con
Existen varias medidas de ganchillo que se utilizan según el grosor de la lana.KATIA,
Existen varias medidas de ganchillo que se utilizan según el grosor de la lana.Existen varias medidas de ganchillo que se utilizan según el grosor de la lana.
Todas las labores se explican con gráficos, más adelante daremos las instrucciones de cómo seguir una explicación.KATIA,
Todas las labores se explican con gráficos, más adelante daremos las instrucciones de cómo seguir una explicación.Todas las labores se explican con gráficos, más adelante daremos las instrucciones de cómo seguir una explicación.
S.A.
S.A.

20
I
N
S
T
R
U
C
C
I
O
N
E
S
I
N
S
T
R
U
C
T
I
O
N
S
9 Punto cadeneta 9 Chain st: (ch)
8 Punto Enano 8 Slip st: (sl st)
PUNTOS BÁSICOS BASIC STITCHES
Es la base de inicio de todas las labores. Casi todas las labores empiezan con puntos de cadeneta. Si está usted entrando por primera vez en el mundo del ganchillo, le aconsejamos hacer las cadenetas de inicio con un ganchillo un nº más grueso que el que se va a utilizar para desarrollar el modelo. La primera vuelta de la labor resulta ser la más complicada por no tener base, para sujetar la labor será mejor que los puntos de cadeneta sean más flojos para clavar el ganchillo con mayor comodidad.
Chain st is the base for most stitches. Since every stitch must be fastened to another stitch, a chain is usually the first row in most designs, and must be made loosely so the row will not be distorted when the following row is added. Chains are also used to connect more complicated stitches in openwork patterns.
Sujetar el extremo del hilo entre los dedos pulgar e índice de la mano izquierda, pasar el hilo por encima del índice y entre el meñi-que y el anular.Sujetar el ganchillo como si fuera un lápiz con los dedos pulgar e índice de la mano derecha.
Hold hook in right hand, with end of yarn. Have strand of yarn come over first finger of left hand. Yarn can be wrapped around little finger of left hand to provide the correct tension.
Formar una anilla con el hilo, poner hilo sobre el ganchillo y sujetándolo con el gan-cho, tirar del ganchillo hacia atrás pasando el hilo a través de la anilla, se ha formado un punto de cadeneta.
Make a reversed loop of yarn on hook, pick up strand of yarn with hook and pull through the crossed loop to form a slip stitch, as shown in figure 3.
Repetir siempre esta operación hasta tener el número de puntos de cadeneta nece-sarios. Casi todos los trabajos a ganchillo empiezan con una tira o un anillo a punto de cadeneta.
Wrap yarn over the hook and pull through the loop already on the hook to make 1 chain st. Repeat this process for each chain st, as shown in figure 5. NOTE: When counting number of chains made, do not count loop that is still on hook. Each ch is a complete st.
Clavar el ganchillo en el 2º p. de cadeneta a partir del ganchillo.
Insert hook into 2nd ch from hook (or desig-nated st).
Poner hilo en el ganchillo y pasar a través de las 2 anillas del ganchillo, se ha formado 1 p. enano.
Wrap yarn over hook and draw through the two loops on hook = 1 sl st.
Hacer una tira a punto de cadeneta, clavar el ganchillo en la 2ª cadeneta a partir del ganchillo.
After making a chain of several sts, insert hook into 2nd ch from hook.
Poner hilo sobre el ganchillo y pasar a través del p. de cadeneta, quedan 2 anillas en el ganchillo, poner de nuevo hilo en el ganchillo y pasar a través de las 2 anillas.
Wrap yarn over hook and draw through one loop on hook = 2 loops remain on hook: yarn over hook again and draw through the two loops on hook.
l Punto Bajo l Single crochet: (sc)Cop
yrigh
t
Copyri
ght
Copyri
ght
Copyri
ght
Copyri
ght
Clavar el ganchillo en el 2º p. de cadeneta a
Copyri
ght
Clavar el ganchillo en el 2º p. de cadeneta a Clavar el ganchillo en el 2º p. de cadeneta a
Copyri
ght
Copyri
ght
Copyri
ght
Copyri
ght
Copyri
ght
Copyri
ght
Copyri
ght
Copyri
ght
Poner hilo en el ganchillo y pasar a través
Copyri
ght
Poner hilo en el ganchillo y pasar a través Poner hilo en el ganchillo y pasar a través de las 2 anillas del ganchillo, se ha formado
Copyri
ght
de las 2 anillas del ganchillo, se ha formado de las 2 anillas del ganchillo, se ha formado 1 p. enano. Cop
yrigh
t
1 p. enano.1 p. enano. Copyri
ght ©
© © © © © © © © FIL FIL FIL FIL FIL FIL FIL KATIA
,
KATIA, tension.
KATIA, tension. tension.
KATIA,
KATIA,
KATIA,
KATIA,
KATIA,
Make a reversed loop of yarn on hook, pick
KATIA,
Make a reversed loop of yarn on hook, pick Make a reversed loop of yarn on hook, pick up strand of yarn with hook and pull through
KATIA,
up strand of yarn with hook and pull through up strand of yarn with hook and pull through the crossed loop to form a slip stitch, as
KATIA,
the crossed loop to form a slip stitch, as the crossed loop to form a slip stitch, as shown in figure 3.
KATIA,
shown in figure 3.shown in figure 3.
KATIA,
KATIA,
KATIA,
KATIA,
KATIA,
KATIA, S
.A.
S.A.Hold hook in right hand, with end of yarn.
S.A.Hold hook in right hand, with end of yarn. Hold hook in right hand, with end of yarn.
Have strand of yarn come over first finger
S.A.
Have strand of yarn come over first finger Have strand of yarn come over first finger of left hand. Yarn can be wrapped around S.A
.of left hand. Yarn can be wrapped around of left hand. Yarn can be wrapped around little finger of left hand to provide the correct S.A
.little finger of left hand to provide the correct little finger of left hand to provide the correct

21
I
N
S
T
R
U
C
C
I
O
N
E
S
I
N
S
T
R
U
C
T
I
O
N
S
Se ha formado un punto bajo, para hacer otro punto clavar el ganchillo en el siguiente p. de cadeneta y repetir la operación del 2º paso.
To make next sc, insert hook into next ch and repeat instruction #2.
Trabajar 1 p. bajo en cada p. de cadeneta, al terminar todos los p. dar la vuelta a la labor, de manera que el tejido quede de nuevo a la izquierda.
To continue in single crochet, insert hook in each of the next chains, and after making last sc, ch 1 and turn work to begin next row.
Empezar la siguiente v. con un punto de cadeneta y continuar trabajando 1 p. bajo sobre cada uno de los p. bajos de la vta anterior.
Insert hook underneath the two top loops of the last sc made and work figure 1, drawing yarn through two threads instead of 1. NOTE: If instructions call for working through front loops only or back loops only, insert hook only through the front loop or only through the back loop, then work figure 1.
Trabajar el último p. sobre la cadeneta de inicio de la vta anterior.
Last stitch is worked through the ch 1 you made before turning to work this row.
Punto Alto Double crochet: (dc) 1 1
Poner 1 vuelta de hilo en el ganchillo. Clavar el ganchillo en el 4º p. de cadeneta desde el ganchillo.
After working basic ch, wrap yarn over hook, then insert hook into 3rd complete ch from hook.
Poner hilo en el ganchillo y pasar a través de la primera anilla del ganchillo, quedan 3 anillas.
Wrap yarn over hook and draw through one loop = 3 loops remain on hook.
Poner de nuevo hilo y pasar a través de 2 anillas, quedan 2 anillas.
Wrap yarn over hook and draw through 2 loops = 2 loops remain on hook.
Poner de nuevo hilo y pasar a través de las 2 anillas que quedan en el ganchillo.
Wrap yarn over hook and draw through 2 loops.
Poner hilo en el ganchillo y clavar en el siguiente p. de cadeneta.
To continue in dc, wrap yarn over hook and insert hook into next ch, then repeat 2 through 4.
Una vez terminada la vuelta, dar la vuelta a la labor y empezar la vuelta siguiente con 3 p. de cadeneta.
Last dc is worked through the top st of turning ch, and to continue, ch 3, turn and insert hook into both top loops of last worked dc.
Copyri
ght
Copyri
ght
Copyri
ght
Copyri
ght
Copyri
ght
Copyri
ght
Copyri
ght
Copyri
ght
Poner de nuevo hilo y pasar a través de 2
Copyri
ght
Poner de nuevo hilo y pasar a través de 2 Poner de nuevo hilo y pasar a través de 2
Copyri
ght
Copyri
ght
Copyri
ght
Copyri
ght
Copyri
ght
Copyri
ght
Copyri
ght
Copyri
ght
Poner de nuevo hilo y pasar a través de las 2
Copyri
ght
Poner de nuevo hilo y pasar a través de las 2 Poner de nuevo hilo y pasar a través de las 2 anillas que quedan en el ganchillo.Cop
yrigh
t
anillas que quedan en el ganchillo.anillas que quedan en el ganchillo.
© FIL FIL FIL FIL FIL FIL FIL FIL FIL FIL FIL FIL FIL KATIA
,
KATIA, Last stitch is worked through the ch 1 you
KATIA, Last stitch is worked through the ch 1 you Last stitch is worked through the ch 1 you
made before turning to work this row.
KATIA, made before turning to work this row.made before turning to work this row.
KATIA,
Double crochet: (dc)
KATIA,
Double crochet: (dc)
KATIA,
1
KATIA,
1
KATIA,
KATIA,
KATIA,
KATIA,
KATIA,
KATIA,
KATIA,
KATIA,
KATIA,
KATIA, S
.A.
S.A.If instructions call for working through front
S.A.If instructions call for working through front If instructions call for working through front
loops only or back loops only, insert hook only
S.A.loops only or back loops only, insert hook only loops only or back loops only, insert hook only
through the front loop or only through the back
S.A.through the front loop or only through the back through the front loop or only through the back
loop, then work figure 1.
S.A.
loop, then work figure 1.loop, then work figure 1.
Last stitch is worked through the ch 1 you S.A.
Last stitch is worked through the ch 1 you Last stitch is worked through the ch 1 you made before turning to work this row.S.A
.made before turning to work this row.made before turning to work this row.
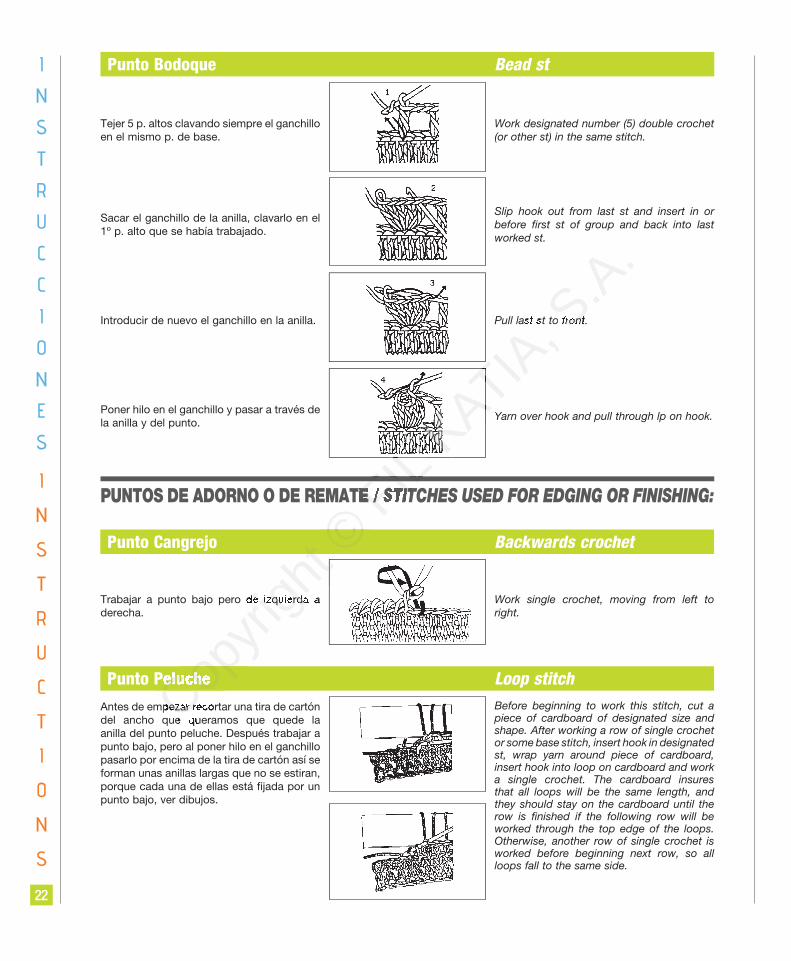
22
I
N
S
T
R
U
C
C
I
O
N
E
S
I
N
S
T
R
U
C
T
I
O
N
S
Punto Bodoque Bead st
Tejer 5 p. altos clavando siempre el ganchillo en el mismo p. de base.
Work designated number (5) double crochet (or other st) in the same stitch.
Sacar el ganchillo de la anilla, clavarlo en el 1º p. alto que se había trabajado.
Slip hook out from last st and insert in or before first st of group and back into last worked st.
Introducir de nuevo el ganchillo en la anilla. Pull last st to front.
Poner hilo en el ganchillo y pasar a través de la anilla y del punto.
Yarn over hook and pull through lp on hook.
PUNTOS DE ADORNO O DE REMATE / STITCHES USED FOR EDGING OR FINISHING:
Trabajar a punto bajo pero de izquierda a derecha.
Work single crochet, moving from left to right.
Punto Cangrejo Backwards crochet
Antes de empezar recortar una tira de cartón del ancho que queramos que quede la anilla del punto peluche. Después trabajar a punto bajo, pero al poner hilo en el ganchillo pasarlo por encima de la tira de cartón así se forman unas anillas largas que no se estiran, porque cada una de ellas está fijada por un punto bajo, ver dibujos.
Before beginning to work this stitch, cut a piece of cardboard of designated size and shape. After working a row of single crochet or some base stitch, insert hook in designated st, wrap yarn around piece of cardboard, insert hook into loop on cardboard and work a single crochet. The cardboard insures that all loops will be the same length, and they should stay on the cardboard until the row is finished if the following row will be worked through the top edge of the loops. Otherwise, another row of single crochet is worked before beginning next row, so all loops fall to the same side.
Punto Peluche Loop stitch
Copyri
ght
Copyri
ght
Trabajar a punto bajo pero de izquierda a
Copyri
ght
Trabajar a punto bajo pero de izquierda a Trabajar a punto bajo pero de izquierda a
Copyri
ght
Copyri
ght
Copyri
ght
Copyri
ght
Copyri
ght
Antes de empezar recortar una tira de cartón Copyri
ght
Antes de empezar recortar una tira de cartón Antes de empezar recortar una tira de cartón del ancho que queramos que quede la Cop
yrigh
t
del ancho que queramos que quede la del ancho que queramos que quede la Copyri
ght
Punto Peluche
Copyri
ght
Punto Peluche
© © PUNTOS DE ADORNO O DE REMATE /
© PUNTOS DE ADORNO O DE REMATE / PUNTOS DE ADORNO O DE REMATE /
© © © FIL FIL FIL FIL FIL FIL FIL FIL FIL FIL FIL PUNTOS DE ADORNO O DE REMATE / FIL PUNTOS DE ADORNO O DE REMATE / PUNTOS DE ADORNO O DE REMATE / STITCHES USED FOR EDGING OR FINISHING:FIL STITCHES USED FOR EDGING OR FINISHING:STITCHES USED FOR EDGING OR FINISHING:
KATIA,
KATIA, Pull last st to front.
KATIA, Pull last st to front.Pull last st to front.
KATIA,
KATIA,
KATIA,
KATIA,
KATIA,
Yarn over hook and pull through lp on hook.
KATIA,
Yarn over hook and pull through lp on hook.Yarn over hook and pull through lp on hook.
S.A.
S.A.
Pull last st to front.S.A.
Pull last st to front.Pull last st to front.