ULTRA HIGH EFFICIENCY POWER VENT / POWER DIRECT · PDF fileWiring Diagram ... Blank...
54
PRINTED 0308 198148-000 COMMERCIAL / RESIDENTIAL GAS WATER HEATERS FOR MODELS: • SHE50-100 NE • SHE50-100 PE • GP650 YTPDT • GP650 HTPDT SERVICE HANDBOOK ULTRA HIGH EFFICIENCY POWER VENT / POWER DIRECT VENT
Transcript of ULTRA HIGH EFFICIENCY POWER VENT / POWER DIRECT · PDF fileWiring Diagram ... Blank...

1PRINTED 0308 198148-000
COMMERCIAL / RESIDENTIAL GAS WATER HEATERS
FOR MODELS:
• SHE50-100NE •SHE50-100PE •GP650YTPDT •GP650HTPDT
SERVICE HANDBOOKULTRAHIGHEFFICIENCY
POWERVENT/POWERDIRECTVENT

ULTRA HIGH EFFICIENCY POWER VENT/POWER DIRECT VENT
SERVICE MANUALTechnical Literature Department ©2008
TABLE OF CONTENTSINTRODUCTION ............................................................ 2
Qualifications ............................................................ 2Service Warning ....................................................... 2Important Service Reminder..................................... 2Instruction Manual .................................................... 3Tools Required.......................................................... 3
INSTALLATION CONSIDERATIONS ............................. 4Closed Water Systems ............................................. 4Thermal Expansion................................................... 4Air Requirements...................................................... 5Contaminated Air ...................................................... 5Venting...................................................................... 6Electrical Requirements............................................ 8
OPERATION & SERVICE............................................... 9How it works ............................................................. 9Blower..................................................................... 10Burner......................................................................11Venturi .................................................................... 14Gas Valve ............................................................... 15Gas Pressure Testing ............................................. 16Air Pressure Switches ............................................ 18Air Pressure Switch Operation ............................... 20Air Pressure Switch Testing.................................... 21Flame Sensing Test ................................................ 24Igniter Current Test ................................................. 25
CONTROL SYSTEM..................................................... 26Introduction............................................................. 26UIM ......................................................................... 27
Discreet Menu - Contact Information ............... 28Operating Set Point Adjustment ............................. 32Control System Menus ........................................... 33CCB ........................................................................ 35
Socket Identification ......................................... 36Wiring Diagram....................................................... 39Sequence of Operation........................................... 40
TROUBLESHOOTING...................................................41Rough Start - Rough Operation ............13 and 41Heater Status Menu ..........................................33Things to Check Before Servicing ....................41Reset Procedure...............................................41
Control System Unresponsive.................................42Blank Display ....................................................42UIM Inoperable .................................................42
Fault Messages.......................................................43AC Reversed ....................................................43Upper Probe Open............................................43Upper Probe Short............................................44Flame Probe Short............................................44Flame Detect Error ...........................................45Energy Cut Out (ECO)......................................45Blocked Inlet .....................................................46Blocked Exhaust Vent.......................................47Blower Prover Failure .......................................47Blower Prover Open - Blower Not Running ......48Blower Prover Open - Blower Is Running .........48Low Igniter Current ...........................................49Ignition Failure ..................................................50Gas Valve Failure .............................................52Communication Failure.....................................52

ULTRA HIGH EFFICIENCY POWER VENT/POWER DIRECT VENT - SERVICE MANUAL
INTRODUCTIONThis Service Manual is designed to be an aid in servicing and troubleshooting the 96% thermally efficient, 50 gallon, 100,000 Btu/hr residential and light duty commercial power vent - power direct vent model water heaters listed on the cover of this manual.The instructions, illustrations and procedures contained in this manual are used to verify proper operation and to diagnose and repair common service problems.
This manual does not replace or supersede the Instruction Manual that came with the water heater. Always refer to the Instruction Manual that came with the water heater for complete installation instructions. If the Instruction Manual is not available copies can be obtained from the manufacturers web site or by calling the technical support phone number shown on the water heater labeling.
QUALIFICATIONS - QUALIFIED SERVICE AGENTServicing the products referenced in this manual requires the ability (in the field involved) equivalent to that of a Qualified Service Agent as defined by the American National Standards Institute (ANSI) below. Installation skills such as plumbing, air supply, venting, gas supply, electrical supply are required in addition to diagnostic and electrical testing skills.
ANSI Z223.1 2006 Sec. 3.3.83: “Qualified Agency” - “Any individual, firm, corporation or company that either in person or through a representative is engaged in and is responsible for (a) the installation, testing or replacement of gas piping or (b) the connection, installation, testing, repair or servicing of appliances and equipment; that is experienced in such work; that is familiar with all precautions required; and that has complied with all the requirements of the authority having jurisdiction.”
SERVICE WARNINGIf you are not qualified (as defined by ANSI above) and licensed or certified as required by the authority having jurisdiction to perform a given task do not attempt to perform any of the service or installation procedures described in this manual. If you do not understand the instructions given in this manual or do not feel confident in your abilities to perform a given task do not attempt to perform any procedures outlined in this manual.
IMPORTANT SERVICE REMINDERWhen performing any troubleshooting step outlined in this Service Manual always consider the wiring and connectors between components. Perform a close visual inspection of all wiring and connectors to and from a given component before replacement. Ensure wires were stripped before being crimped in a wire connector, ensure wires are crimped tightly in their connectors, ensure connection pins in sockets and plugs are not damaged or worn, ensure plugs and sockets are mating properly and providing good contact.
Failure to perform this critical step or failing to perform this step thoroughly often results in needless down time, unnecessary parts replacement, and customer dissatisfaction.
Technical Literature Department 2 of 52 Ashland City, TN © 2008Servicing should only be performed by a Qualified Service Agent

ULTRA HIGH EFFICIENCY POWER VENT/POWER DIRECT VENT - SERVICE MANUAL
INSTRUCTION MANUALHave a copy of the Instruction Manual that came with the water heater on hand for the correct model water heater you are working with before servicing.
Installation information given in this Service Manual is not a complete installation instruction. Installation information covered in this Service Manual has a limited focus as it applies to servicing. This Service Manual does not replace or supersede the Instruction Manual that came with the water heater. Always refer to the Instruction Manual that came with the water heater for complete installation instructions.
If the Instruction Manual is not on hand copies can be obtained from the manufacturers web site or by calling the technical support phone number shown on the water heater labeling.
TOOLS REQUIRED• Instruction Manual that came with the water heater.
• All tools common to installation and service of commercial water heaters such as hand tools, torch, pipe wrenches etc.
• Long (8-10”) T handle SAE hex (allen key) wrenches including 5/32”, 1/8” and 1/4” - for blower, burner, and gas valve removal and installation.
• Two digital manometers range -20.00 to +20.00" W.C., resolution - 0.01" W.C. Recommend UEI model EM200 or equivalent. Required to test performance of air pressure switches. Also used to measure low pressure supply gas and manifold gas pressure.
• Digital Multi Meter DMM; recommend Fieldpiece HS36, Fluke 187, UEI DL289 or equivalent capable of measuring:
• AC/DC Voltage
• AC Frequency (Hz)
• Ohms
• DC micro amps µA (flame sensing current)
• AC amp meter- recommend UEI model DL289 or equivalent.
• 120 VAC household outlet tester (see Service Notes Electrical page 8)
Technical Literature Department 3 of 52 Ashland City, TN © 2008Servicing should only be performed by a Qualified Service Agent

ULTRA HIGH EFFICIENCY POWER VENT/POWER DIRECT VENT - SERVICE MANUAL
INSTALLATION CONSIDERATIONSINSTRUCTION MANUAL
Installation information given in this Service Manual is not a complete installation instruction. Installation information covered in this Service Manual has a limited focus as it applies to servicing. This Service Manual does not replace or supersede the Instruction Manual that came with the water heater. Always refer to the Instruction Manual that came with the water heater for complete installation instructions.
If the instruction Manual that came with the water heater is not on hand copies can be obtained from the manufacturers web site or by calling the technical support phone number shown on the water heater labeling.
CLOSED WATER SYSTEMSWater supply systems may, because of code requirements or such conditions as high line pressure, among others, have installed devices such as pressure reducing valves, check valves, and back flow preventers. Devices such as these cause the water system to be a closed system.
Virtually all commercial and most residential water supply systems are closed systems today. Closed water systems will experience thermal expansion which, if not controlled with a properly installed and sized thermal expansion tank, can cause premature failure (leakage) of the water heater. Water heater failure (leakage) on closed systems where there is not a thermal expansion tank installed is not covered under the limited warranty.
THERMAL EXPANSIONAs water is heated, it expands (thermal expansion). In a closed system the volume of water will grow when it is heated. As the volume of water grows there will be a corresponding increase in water pressure due to thermal expansion. Thermal expansion can cause premature tank failure (leakage). This type of failure is not covered under the limited warranty. Thermal expansion can also cause intermittent temperature-pressure relief valve operation: water discharged from the valve due to excessive pressure build up. This condition is not covered under the limited warranty. The temperature-pressure relief valve is not intended for the constant relief of thermal expansion.
A properly sized thermal expansion tank should be installed on all closed systems to control the harmful effects of thermal expansion.
Technical Literature Department 4 of 52 Ashland City, TN © 2008Servicing should only be performed by a Qualified Service Agent
ULTRA HIGH EFFICIENCY POWER VENT/POWER DIRECT VENT - SERVICE MANUAL
AIR REQUIREMENTSCarefully review the requirements for combustion and ventilation air in the Instruction Manual that came with the water heater. Failure to meet these requirements when the water heater is installed or overlooking their importance when servicing the water heater often results in needless down time, unnecessary parts replacement, and customer dissatisfaction. If the Instruction Manual is not on hand copies can be obtained from the manufacturers web site or by calling the technical support phone number shown on the water heater labeling.
An inadequate supply of air for combustion and ventilation often causes operational problems. A lack of combustion and ventilation air can create a negative ambient air pressure in the installed space which can lead to improper combustion and operational problems with air pressure switches.
CONTAMINATED AIRCombustion air that is contaminated can greatly diminish the life span of the water heater and water heater components such as hot surface igniters and burners. Propellants of aerosol sprays, beauty shop supplies, water softener chemicals and chemicals used in dry cleaning processes that are present in the combustion, ventilation or ambient air can cause such damage.
Vapors from volatile compounds such as solvents, cleaners, chlorine based chemicals and refrigerants in addition to being highly flammable in many cases, can also react to form highly corrosive substances such as hydrochloric acid inside the water heater’s combustion chamber. The results can be hazardous and cause product failure.
If this water heater will be installed in beauty shops, barber shops or laundries with dry cleaning equipment, it is imperative the water heater be installed as a Direct Vent appliance so that air for combustion is derived directly from the outside atmosphere through a sealed intake air pipe. See the Installation of Vent System section in the Instruction Manual that came with the water heater for more information on Direct Vent installations.
Technical Literature Department 5 of 52 Ashland City, TN © 2008Servicing should only be performed by a Qualified Service Agent

ULTRA HIGH EFFICIENCY POWER VENT/POWER DIRECT VENT - SERVICE MANUAL
VENTINGThe venting information presented in this Service Manual is not a complete venting installation instruction. Refer to the Instruction Manual that came with the water heater for complete installation instructions.
The water heater covered in this Service Manual may be installed as a conventionally vented water heater or as a direct vent water heater. Conventional vent installations use room air for combustion. There will be one “vent” pipe installed on a conventional vent installation. Direct vent installations derive all air for combustion from the outdoor atmosphere through a second “intake air” pipe. There will be two pipes (vent and intake air) installed on a direct vent installation.
The vent and intake air piping (direct vent installations) may not be combined with any other appliances under any conditions.
Maximum Equivalent Length RequirementsThe vent and intake air pipe (direct vent installations) for the water heater covered in this Service Manual can be installed using 2, 3, or 4 inch pipe depending on the overall “equivalent” length of each pipe; see Table 1 on page 7.
The vent and intake air terminations do not factor into the overall equivalent feet calculations.
The vent and intake air connection fittings on the water heater do not factor into the overall equivalent feet calculations.
Additional 2 or 3 inch 90° elbows installed are equivalent to 5 linear feet of pipe. Additional 4 inch 90° elbows are equivalent to 8 linear feet of pipe. 45° elbows will count for half the equivalent length a 90° elbow does.
Overall equivalent lengths are determined by adding the total length of pipe installed to the accumulated total equivalent length of all the additional elbows factored in.
The maximum equivalent lengths given in the Instruction Manual that came with the water heater and shown in Table 1 (page 7) are for the vent pipe AND for the intake air pipe. IE: A 2 inch vent pipe can be up to 20 equivalent feet with one 90° elbow. On a direct vent installation the 2 inch intake air pipe can also be up to 20 equivalent feet with one 90° elbow.
Carefully review the venting installation instructions and maximum equivalent length requirements for the vent and intake air piping. Ensure the vent system has been installed per Instruction Manual requirements.
2”
3”
4”
= 5 linear feet of pipe
= 5 linear feet of pipe
= 8 linear feet of pipe
Technical Literature Department 6 of 52 Ashland City, TN © 2008Servicing should only be performed by a Qualified Service Agent

ULTRA HIGH EFFICIENCY POWER VENT/POWER DIRECT VENT - SERVICE MANUAL
VENTING (CONT)Pipe Size Requirements
Ensure the correct size pipe has been used for the overall equivalent length of the vent and intake air piping installed. Longer equivalent lengths require larger pipe sizes, see Table 1.
Maximum Elbow RequirementsThree and four inch vent and intake air pipe installations allow a maximum of 6 - 90° elbows in the vent pipe AND a maximum 6 - 90°elbows in the intake air pipe. Two inch installations allow a maximum of 3 - 90° elbows in the vent pipe AND a maximum 3 - 90° elbows the intake air pipe.
Table 1
Service Notes - VentingRemove all plastic debris from the edges of intake air pipe sections after cutting on direct vent installations. Plastic debris left on intake air pipe sections can collect inside and clog the burner and lead to rough operation and/or ignition failure. See Service Notes page 11.
Using a smaller pipe size than required for a given length or installing more elbows on the vent pipe can cause the water heater’s control system to declare a fault condition, lock out and display the “Blocked Exhaust” fault message on the UIM display (see page 27).
Overlooking the same requirements for the intake air pipe on direct vent installations or failing to remove the screen from the intake air connection when direct venting can cause the water heater’s control system to declare a fault condition, lock out and display the “Blocked Inlet” fault message on the UIM display (see page 27).
NUMBER90° ELBOWS
2” MAXIMUM PIPELENGTH FEET (METERS)
3” MAXIMUM PIPELENGTH FEET (METERS)
4” MAXIMUM PIPELENGTH FEET (METERS)
1 20 (6.1) 60 (18.3) 120 (36.6)2 15 (4.6) 55 (16.8) 112 (34.1)3 10 (3.0) 50 (15.2) 104 (31.7)
4 4 elbows not allowed in 2” pipe(use larger pipe size) 45 (13.7) 96 (29.3)
5 5 elbows not allowed in 2” pipe(use larger pipe size) 40 (12.2) 88 (26.8)
6 6 elbows not allowed in 2” pipe(use larger pipe size) 35 (10.7) 80 (24.3)
The screen inside the intake air connection is meant to keeplarger debris from entering the blower when the water heater isinstalled conventionally; using room air for combustion.
When the water heater is installed in a direct vent configurationthe screen inside the intake air connection on the water heatermust be removed. If left in place it will become clogged over timeand lead to “Blocked Inlet” lock out conditions.
The screen on the intake air termination will keep larger debrisfrom entering the blower on direct vent installations.
Remove This ScreenFor Direct VentInstallations
Technical Literature Department 7 of 52 Ashland City, TN © 2008Servicing should only be performed by a Qualified Service Agent

ULTRA HIGH EFFICIENCY POWER VENT/POWER DIRECT VENT - SERVICE MANUAL
ELECTRICAL REQUIREMENTSThe water heater covered by this Service Manual must be grounded in accordance with the local codes, or in the absence of local codes: the National Electrical Code (NFPA 70) or the Canadian Electrical Code (C22.1).
The water heater covered by this Service Manual requires a 120 VAC 1Ø (single phase) power supply. It is factory equipped with a standard 3 prong appliance cord that plugs into a standard 120 VAC wall outlet. 5.2 FLA (full load amps) approximate.
As shown in the illustration below there should be 120 VAC present between the power supply hot and ground wires. 120 VAC should also present between the hot and neutral wires. There should be 0 VAC present between the neutral and ground wires.
Correct wiring for a standard 120 VAC wall outlet is also shown in the Illustration below. Note the orientation of the ground connect is at the bottom. Reversed polarity is when the hot and neutral wires are connected opposite from what is shown here.
Service Notes - ElectricalThis water heater is a polarity sensitive appliance and will not operate if the power supply polarity is reversed. If the polarity of the power supply is reversed the water heater’s control system will declare a fault condition and display “AC Reversed” on the UIM display.
The water heater’s burner must be grounded for flame sensing current to be established and verify ignition. If the burner is not grounded the water heater’s control system will declare a fault condition and display “Ignition Failure” on the UIM display after 3 failed ignition trials.
Also shown is an outlet tester that will quickly determine if the plug is wired correctly. These testers will also diagnose reversed polarity, open ground and open neutral wire problems. Outlet testers are inexpensive and simple to use. They are available at most hardware stores and home centers.
120 volts
120 volts
0 volts
HOT NEUTRAL GROUND
HotNeutral
Ground
120 VAC 1ØWall Outlet
Correctly Wired Outlet120 VAC 1Ø Power Supply
Outlet Tester
Technical Literature Department 8 of 52 Ashland City, TN © 2008Servicing should only be performed by a Qualified Service Agent

ULTRA HIGH EFFICIENCY POWER VENT/POWER DIRECT VENT - SERVICE MANUAL
OPERATION & SERVICEHOW IT WORKS
This section of the Service Manual will cover operation, common service procedures and water heater construction. The water heater covered in this Service Manual has a helical coil shaped heat exchanger that is submerged in the storage tank. The water heater uses a top mounted down fired radial burner. This is a forced draft burner; hot burning gases are forced through the heat exchanger under pressure and exit through the exhaust/vent connection located at the bottom of the water heater.
COMBUSTIONAIR INTAKECONNECTION
EXHAUST/VENTCONNECTION
INTERNAL VIEW
EXTERNAL VIEW
Starting at the top combustion air and fuel gas are drawn in by the blower (page 10) and Venturi (page 14). The hot burning gases exit the radial burner (page 11) and are forced through the coil shaped heat exchanger. Flue gases spiral through the heat exchanger and exit the water heater through the exhaust/vent connection at the bottom.
HELICALSHAPED HEAT EXHNGER
BLOWER/BURNERGAS VALVEASSEMBLY
COMBUSTIONAIR INTAKECONNECTION
EXHAUST/VENTCONNECTION
Technical Literature Department 9 of 52 Ashland City, TN © 2008Servicing should only be performed by a Qualified Service Agent
ULTRA HIGH EFFICIENCY POWER VENT/POWER DIRECT VENT - SERVICE MANUAL
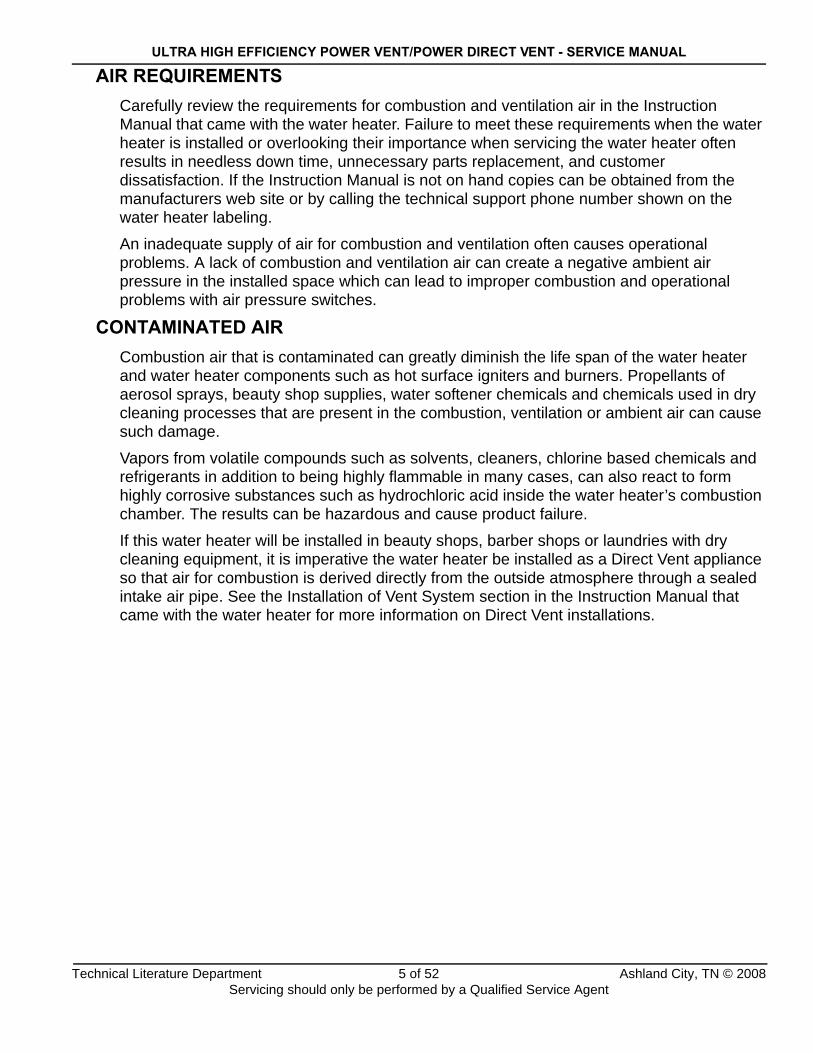
BLOWERThe blower is an assembly consisting of the blower housing, motor and an integrated VFD (variable frequency drive). Blower operation is controlled by the CCB (central control board - page 35). The CCB sends 120 VAC to the Blower/VFD assembly high voltage 3 pin socket. The CCB also sends a PWM (pulse width modulation) signal to the Blower/VFD assembly low voltage 5 pin socket.
The PWM signal is a digital instruction sent to the VFD instructing it to start, stop, and control blower speed. The VFD powers the blower motor directly. The VFD also varies the frequency (Hz) of the power it sends to the blower motor which in turn controls blower speed. Higher frequency = faster blower speed, lower frequency = slower blower speed.
Service Notes - BlowerThe PWM signal plug MUST remain plugged in to the 5 pin socket on the blower assembly at all times. Removing this plug will cause the blower to accelerate and the Btu/hr input of the water heater to increase to a much higher rate. This may cause damage to the water heater.
Blower Motor / VFD Assembly
Blower Housing
High Voltage 120 VAC 3 Pin Socket
Low Voltage PWM 5 Pin Socket
Technical Literature Department 10 of 52 Ashland City, TN © 2008Servicing should only be performed by a Qualified Service Agent

ULTRA HIGH EFFICIENCY POWER VENT/POWER DIRECT VENT - SERVICE MANUAL
BURNERThe images below show a complete blower/burner assembly removed along with a top view of the water heater with the blower removed.
Service Notes - Burner (Flame Sensor)The burner installed in the water heater is a radial fire burner. Radial fire burners can trap debris that enter the blower. Be sure to thoroughly clean the edges of intake air pipe sections after cutting during the installation. If this is not done plastic shavings can collect inside the burner and lead to rough operation and/or ignition failure.
The burner should be removed and inspected whenever servicing for rough operation or ignition failure problems. Burner removal requires removal of the blower. Blower removal requires 8-10” long T handle 1/8” hex (allen) wrench.
The flame sensor will accumulate corrosion (rust etc) over time. This will reduce flame sensing current. This is the most common cause of “Ignition Failure” lock outs. The flame sensor should cleaned when servicing due to ignition failure and as a routine maintenance procedure. Fine grade steel wool is recommended for cleaning the flame sensor; do not use coarse abrasives such as sand paper.
Radial Fire Burner
Igniter
Blower VFDFlame Sensor
Top View Water Heater - Blower Removed
Blower removal requires 8 -10” long T handle 1/8” hex (allen) wrench.
Burner must be grounded for flame sensing current to be established. See Service Notes - Electrical page 8
Burner Ground Wire Blower Adapter
Assembly
Burner View Port
Blower Adapter
Technical Literature Department 11 of 52 Ashland City, TN © 2008Servicing should only be performed by a Qualified Service Agent

ULTRA HIGH EFFICIENCY POWER VENT/POWER DIRECT VENT - SERVICE MANUAL
BURNER (CONT)Burner & Blower Removal
The burner should be removed and inspected whenever service is being performed for rough operation or ignition failure. Radial fire burners like the one used on this water heater can trap debris, see Service Notes - Venting on page 7.
The following images illustrate the burner removal procedure. Long T handle hex wrenches (8-10”) will save considerable time when removing/installing the burner & blower.
BLOWER/BURNER REMOVAL PROCEDURE1 Ensure power to the water heater is turned off.2 The blower assembly must be removed first.3 Disconnect the two wiring plugs from the blower
assembly sockets (see Service Notes - Blower page 10).
4 Disconnect the Blower Prover air pressure switch sensing tube.
5 Remove 4 blower flange mounting screws - 1/8” hex. Using long T handle hex wrench will save considerable time.Do not over tighten when reinstalling - torque should not exceed 40 inch lbs.
6 Remove the blower assembly from the blower adapter.
7 Remove the blower flange gasket. Gasket may be reused if not damaged or showing signs of excessive wear.
8 Remove the flame sensor - 1 Phillips head screw.CONTINUED ON NEXT PAGE
Blower Flange
Blower Adapter
1/8” Hex Machine Screws Blower Flange
Blower Flange Gasket
Flame Sensor
Blower Prover Sensing Tube
Technical Literature Department 12 of 52 Ashland City, TN © 2008Servicing should only be performed by a Qualified Service Agent

ULTRA HIGH EFFICIENCY POWER VENT/POWER DIRECT VENT - SERVICE MANUAL
BURNER (CONT)Burner/Blower Removal (cont)
Service Notes - Blower Flange & Blower Adapter Gaskets.Whenever the blower or burner is removed for service DO NOT overtighten the machine screws that hold the blower flange to the blower adapter (page 12) or the blower adapter to the water heater tank (above). Torque on these screws should not exceed 40 inch lbs.
If these mounting screws are overtightened the gaskets will be squeezed and deformed from their natural shape. This can partially block the flow of the fuel air mixture and cause rough starting, rough operation and ignition failure.
If these gaskets are deformed from overtightening the mounting screws it can also lead to gasket leakage. Hot flue gases leaking from these points can burn up wiring, igniters, and other components.
Blower Adapter
BLOWER/BURNER REMOVAL PROCEDURE(CONT)
9 Remove 4 blower adapter 1/4” hex machine screws. Do not over tighten when reinstalling - torque should not exceed 40 inch lbs.
10 Remove the blower adapter.11 Be extremely careful when handling the Sight
Glass inside the Burner View Port (page 11) this can easily be dropped and lost - and the water heater must have the sight glass in place to operate safely.
12 Remove the hot surface igniter - 2 Phillips head screws.
13 Remove the blower adapter gasket. Gasket may be reused if not damaged or showing signs of excessive wear.
14 Lift the burner up and out.
1/4” Hex Machine Screws
Hot Surface Igniter
Burner
Blower Adapter Gasket
Sight Glass insideBurner View Port
Technical Literature Department 13 of 52 Ashland City, TN © 2008Servicing should only be performed by a Qualified Service Agent

ULTRA HIGH EFFICIENCY POWER VENT/POWER DIRECT VENT - SERVICE MANUAL
VENTURIA Venturi is connected to the inlet of the blower. All combustion air flows through the Venturi. The outlet of the 24 VAC gas valve connects directly to the side of the Venturi. Fuel gas flows from the outlet of the gas valve into the side of the Venturi directly.
Inside the Venturi there is a cone shaped restrictor that constricts the air passage to the blower inlet. As air enters the constriction point it’s velocity increases. A pressure drop occurs at this point and creates a negative pressure in the cavity between the cone shaped restrictor and the Venturi housing. This negative pressure “pulls” gas from the outlet of the gas valve into the blower where it is mixed with combustion air and then supplied to the burner. See the images below.
GA
SVA
LVE
Velocity IncreasesAt Constriction Point
Pressure Drops
Negative Pressure
Negative Pressure
Combustion Air
Venturi Inlet
24 VAC Gas Valve
Gas Inlet
Supply Gas
Blower
Blower
Burner
Venturi
Technical Literature Department 14 of 52 Ashland City, TN © 2008Servicing should only be performed by a Qualified Service Agent
ULTRA HIGH EFFICIENCY POWER VENT/POWER DIRECT VENT - SERVICE MANUAL
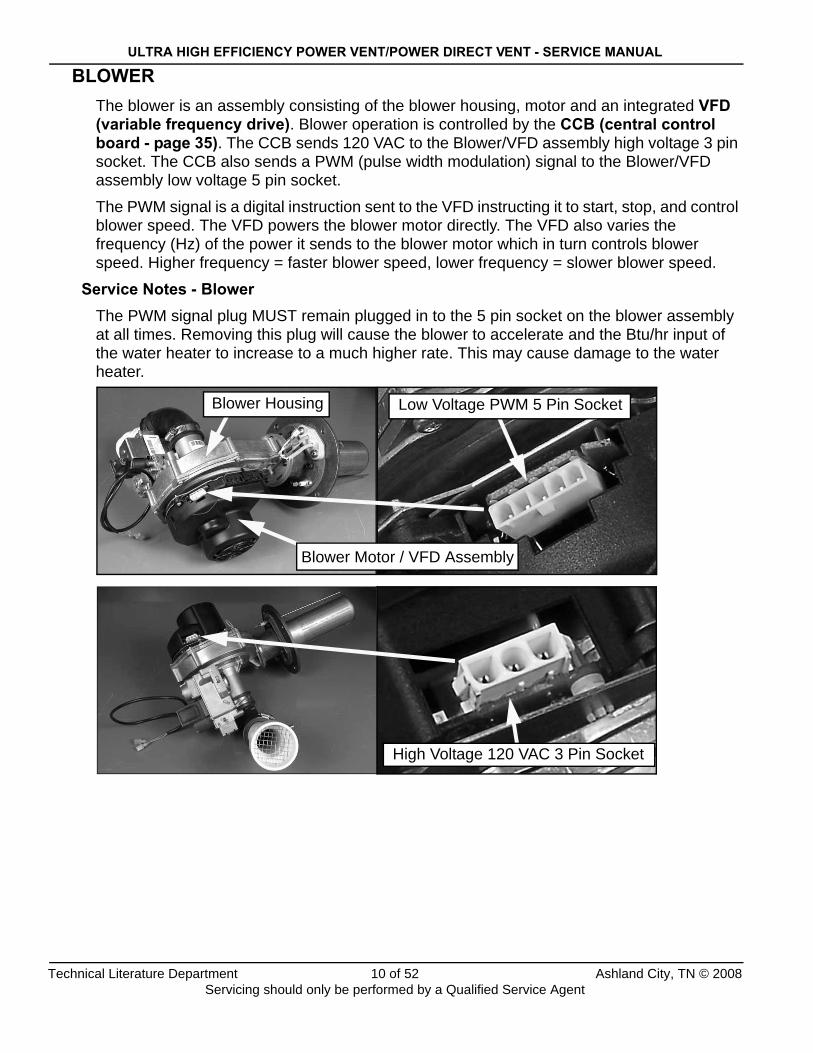
GAS VALVEThe outlet of the gas valve is connected by flange directly to the side of the Venturi (page 14). There is no manifold gas line on the water heater. A gas orifice with gasket is fitted into the gas valve’s outlet flange. See the images below.
Gas Valve RemovalThe gas valve must be removed to inspect the gas orifice. There are 3 - 5/32” hex head screws that secure the gas valve to the Venturi. Long T handle hex wrenches (8-10”) will save considerable time when removing/installing the gas valve, blower and burner.
5/32” hex wrench
Gasket Orifice
Natural Gas Orifice 0.191”Propane Gas Orifice 0.162”
Venturi
Gas Orifice & Gasket
24 VAC Gas Valve
Gas Orifice & Gasket
GAS VALVE REMOVAL PROCEDURE1 Ensure power to the water heater is turned off.2 Turn off the supply gas shut off valve.3 Disconnect supply gas line to water heater.4 Remove 3 gas valve mounting screws - 5/32” hex
head machine screws. Support gas valve body when removing last screw. Long T handle hex wrenches (8-10”) will save considerable time when removing/installing the gas valve.
5 Carefully lift gas valve body off of flange connection on Venturi.
6 Gas orifice and gasket are now accessible.Venturi
24 VAC Gas Valve
Technical Literature Department 15 of 52 Ashland City, TN © 2008Servicing should only be performed by a Qualified Service Agent

ULTRA HIGH EFFICIENCY POWER VENT/POWER DIRECT VENT - SERVICE MANUAL
GAS PRESSURE TESTINGThe water heater covered in this Service Manual is rated at 100,000 Btu/hr input. It is certified for elevations up to 10,100 feet (3079 meters) without adjustment. Call the technical support phone number shown on the water heater labeling before operating the water heater at higher elevations.
Service Notes - Checking Gas PressuresManifold and supply gas pressure can be measured at two test ports on the water heater’s gas valve. The manifold test port is closest to the blower housing and the supply test port is furthest. The valve in each test port is opened/closed with a small slotted screwdriver.
Manifold gas pressure will run at 0.00” W.C. or lower, in a negative pressure, depending on the operating state or mode the control system is currently in (see Venturi on page 14). Manifold gas pressure will be considerably lower, -6.50” to -7.50” W.C. during the pre/post purge modes when the blower is running and the gas valve is closed. When the gas valve opens (energized) gas entering the Venturi will cause a rise in manifold gas pressure. Manifold gas pressure will vary depending on vent/intake air pipe lengths. Manifold gas pressure will typically be 0.00” W.C. to +0.05” W.C. during the heating mode.There may also be a drop in supply gas pressure noticed when the water heater’s gas valve opens. Seeing a rise in manifold pressure and a corresponding drop in supply gas pressure confirms the gas valve is opening and gas is flowing to the burner. The procedure for checking manifold and supply gas pressures is shown in the illustrations that follow.
CHECKING GAS PRESSURES1 Ensure power to the water heater is turned off.2 Turn off the supply gas shut off valve.3 Open the manifold and supply gas pressure test
ports on the gas valve. Turn the needle valve slotted heads 1/2 to 1 full turn counterclockwise with a small slotted screwdriver.
4 Attach sensing tube from 2 digital manometers (see tool requirements page 3) to each gas pressure test port on the gas valve as shown.
CONTINUED ON NEXT PAGESupply GasTest Port
Manifold GasTest Port
Manifold GasTest Port
Supply GasTest Port
Turn test port needle valves counter-clockwiseto open and clockwise to close. Always closetest ports when finished and check for leaks
Sensing TubesFrom Manometers
Technical Literature Department 16 of 52 Ashland City, TN © 2008Servicing should only be performed by a Qualified Service Agent

ULTRA HIGH EFFICIENCY POWER VENT/POWER DIRECT VENT - SERVICE MANUAL
GAS PRESSURES (CONT)
Service Notes - Gas Pressure AdjustmentManifold gas pressure is factory set and should not be adjusted in the field. If manifold gas pressure differs greatly from the pressures in Table 2 consider the calibration of the manometer being used - try a different manometer. Call the technical support phone number on the water heater label for further assistance if pressures are considerably different.
Table 2 - Gas PressuresFUEL TYPE †MINIMUM SUPPLY
†. Minimum supply gas pressures must be maintained under both load and no load conditions.
MAXIMUM SUPPLY MANIFOLD
Natural Gas 3.5” W.C. (0.87 kPa) 14.0” W.C. (3.48 kPa) 0.00” to +0.05” W.C.(0.00 to +0.012 kPa)
Propane Gas 8.0” W.C. (1.99 kPa) 14.0” W.C. (3.48 kPa) 0.00” to +0.05” W.C.(0.00 to +0.012 kPa)
CHECKING GAS PRESSURES (CONT)5 Open the supply gas shut off valve - restore
power - start a heating cycle.6 The rise in manifold pressure and corresponding
drop in supply gas pressure confirms the water heater’s gas valve is opening and gas is flowing to the burner.
7 Record the supply and manifold gas pressures with the water heater firing.
8 Supply gas pressure should not drop below minimum given in Table 2 below.
9 Manifold gas pressure should be within the range shown in Table 2 below.
10 Look through the burner view port (page 11) burner flame should be blue.
11 Shut off power and gas supply - disconnect manometers - close test port needle valves.
12 Restore power and gas supply. Check for gas
ManifoldGas
SupplyGas
ManifoldGas
SupplyGas
ManifoldGas
SupplyGas
1 BLOWER OFF / GAS VALVE OFFManifold 0.00” W.C. Supply +9.70” W.C.
2 BLOWER ON / GAS VALVE OFFManifold -6.86” W.C. Supply +9.70” W.C.
3 BLOWER ON / GAS VALVE ONManifold +0.05” W.C. Supply +7.04” W.C.
Typical manifold and supply gas pressures during:
1 Standby Mode2 Pre-Purge Mode3 Heating Mode
Technical Literature Department 17 of 52 Ashland City, TN © 2008Servicing should only be performed by a Qualified Service Agent

ULTRA HIGH EFFICIENCY POWER VENT/POWER DIRECT VENT - SERVICE MANUAL
AIR PRESSURE SWITCHESAir pressure switch technical bulletins TB-A023-06 and TB-S023-06 explain air pressure switch construction and test procedures in detail. These technical bulletins are available on the manufacturers web site or by calling the technical support phone number shown on the water heater labeling. Construction and types of air pressure switches used on the water heater covered in this Service Manual are shown below.
Vent Port
Sensing PortFlexible Diaphragm
Wiring TerminalsSwitch Contacts
Normal State(open switch contacts)
Activated State(closed switch contacts)
Internal Linkage
Normal State Activated State
Blower Prover Air Pressure Switch
Normally open contacts,close on a rise in pressure.
Blocked ExhaustAir Pressure Switch
Normally closed contacts, open on a rise in pressure.
Blocked Intake Air Pressure Switch
Normally closed contacts,open on a fall in pressure.
Construction
Application & Type
Technical Literature Department 18 of 52 Ashland City, TN © 2008Servicing should only be performed by a Qualified Service Agent

ULTRA HIGH EFFICIENCY POWER VENT/POWER DIRECT VENT - SERVICE MANUAL
AIR PRESSURE SWITCHES (CONT)The water heater covered in this Service Manual is factory equipped with three air pressure switches. These switches are used to provide verification or prove electrically that the blower is running and that the vent and intake air pipes are not blocked or restricted. The switches are located on the top of the water heater as shown in the illustration below.
These switches monitor air pressure through plastic sensing tubes from three different sensing ports on the water heater. The Blower Prover switch monitors pressure from the blower’s outlet flange. The Blocked Intake switch monitors pressure from the blower’s intake air connection fitting. The Blocked Exhaust switch monitors pressure from the exhaust/vent connection elbow on the bottom of the water heater. See the images below.
TOP VIEWFRONT
• BLOWER PROVER SWITCHnormally open contacts - close on a rise in pressure
• BLOCKED INTAKE SWITCHnormally closed contacts - open on a fall in pressure
• BLOCKED EXHAUST SWITCHnormally closed contacts - open on a rise in pressure
All switches have SPST(single pole single throw) contacts.
Blocked Intake Switch
Blocked Exhaust Switch Blocked Exhaust Switch Sensing Port
Blower Prover Switch
Technical Literature Department 19 of 52 Ashland City, TN © 2008Servicing should only be performed by a Qualified Service Agent

ULTRA HIGH EFFICIENCY POWER VENT/POWER DIRECT VENT - SERVICE MANUAL
AIR PRESSURE SWITCH OPERATIONThe control system monitors the “state” of the air pressure switches individually through three separate circuits (see wiring on diagram page 39). The “state” of the switch refers to whether the switch contacts are open or closed. See the construction drawings on page 18.
Before each call for heat begins, before the blower starts, the control system performs a diagnostic test. During this test the control system checks the air pressure switches. The switches must be in their correct normal state at this point.
The Blower Prover is a normally open switch and the Blocked Intake/Exhaust switches are normally closed. If the Blower Prover is not verified open or the Blocked Intake/Exhaust switches are not verified closed during this test; the control system would lock out and display a fault message indicating which pressure switch had caused the fault condition. IE: “Blower Prover Failure.”After the blower starts the Blower Prover switch contacts must activate (close) for the water heater to continue in the Sequence of Operation (see page 40). If the Blower Prover switch contacts do not close after the blower starts, the control system would lock out and display a fault message; IE: “Blower Prover Open.”
The Blocked Intake and Blocked Exhaust switches must remain closed at all times. If the control system senses the contacts of either of these switches are open it will lock out and display a fault message; IE “Blocked Inlet” or “Blocked Exhaust Vent”
Normal State Activated StateBlower Prover Air Pressure Switch
Normally open contacts,close on a rise in pressure.
(contacts open - before blower starts) (contacts closed - after blower starts)
Technical Literature Department 20 of 52 Ashland City, TN © 2008Servicing should only be performed by a Qualified Service Agent

ULTRA HIGH EFFICIENCY POWER VENT/POWER DIRECT VENT - SERVICE MANUAL
AIR PRESSURE SWITCH TESTINGAir pressure switch testing involves three procedures:
• Normal State Test
• Operational State Test
• Pressure Test
Normal State TestTurn off power and disconnect the wires to the pressure switches. Wrap electrical tape around the wire ends to prevent shorts. A continuity test is performed, using an ohm meter, between the wiring terminals of the switch. The Blower Prover switch has normally open contacts. The Blocked Intake and Blocked Exhaust switches have normally closed contacts.
If this test confirms the Blower Prover switch contacts are open and the Blocked Intake/Exhaust switch contacts are closed - the switches have passed the test. If test results indicate the Blower Prover switch contacts are closed - the switch must be replaced. If either the Blocked Intake or Exhaust switch contacts are open - the switch must be replaced.
Operational State TestThe operational test is also a continuity test performed with an ohm meter between the pressure switch wiring terminals. However, this test is performed while the blower is running during the pre-purge mode. Ensure the wires to the air pressure switches are disconnected and that electrical tape is wrapped around the wire ends to prevent shorts. Perform a continuity test between the wiring terminals on the air pressure switches with the blower running (water heater in pre-purge mode).
During this test the normally open contacts of the Blower Prover switch should close. The Blower Prover switch “activates” (closes its contacts) during normal operation to verify or “prove” that the blower is running. If the contacts remain open during this test the third test, the pressure test, must be performed to determine if the pressure switch is defective. During this test the Blocked Intake and the Blocked Exhaust switch contacts should remain closed, if the contacts open during this test the third test, the pressure test, must be performed to determine if the pressure switch is defective.
Technical Literature Department 21 of 52 Ashland City, TN © 2008Servicing should only be performed by a Qualified Service Agent

ULTRA HIGH EFFICIENCY POWER VENT/POWER DIRECT VENT - SERVICE MANUAL
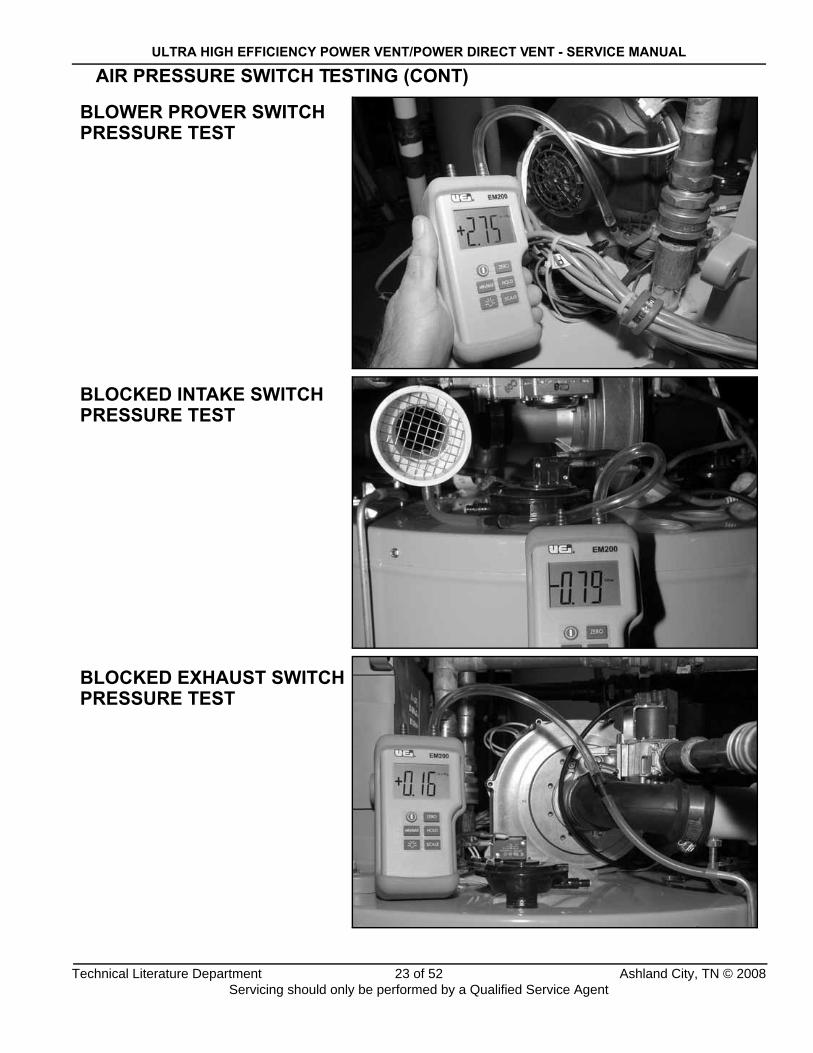
AIR PRESSURE SWITCH TESTING (CONT)Pressure Test
The Pressure Test is necessary when the air pressure switch in question has passed the Normal State Test but failed the Operational State Test (see page 21). This test requires a digital manometer (see Tool Requirements page 3 and the images on page 23).
Before performing this test examine the sensing tube connections on the water heater’s sensing ports and on the pressure switch (see page 19). Check for wear, leaks, kinks, or any kind of debris or condensate in the sensing tubes, repair/replace as necessary.
To determine if an air pressure switch is operating properly you must know the “pressure activation” point for the switch and whether it activates on a rise or a fall in pressure. This information is provided in Table 3 below.
Procedure: Disconnect the pressure sensing tube from the sensing port on the switch being tested, leave the other end connected. Connect a digital manometer to the sensing tube. Turn the power on and start a call for heat. When the blower comes up to full speed, record the pressure reading. Repeat this at all three air pressure switches as necessary. Compare the pressure readings taken to the activation pressures in Table 3 below. See page 23.
Blower Prover Switch: If the pressure reading taken at the Blower Prover switch sensing tube is at or above the activation pressure shown in Table 3 and the switch contacts did not close in the Operational Test - the switch is defective and must be replaced. If the pressure reading taken does not reach or rise above the activation pressure in Table 3 the pressure switch IS NOT defective and should not be replaced - call the technical support phone number shown on the water heater labeling for assistance.
Blocked Intake Switch: Note these are negative pressures. If the pressure reading taken at the Blocked Intake switch sensing tube does not reach or drop lower than the pressure shown in Table 3 and the switch contacts were opening during the Operational Test - the switch is defective and must be replaced. If the pressure reading taken reaches or drops lower than the pressure shown in Table 3 and the switch contacts were opening during the Operational Test - the switch IS NOT defective and should not be replaced. Check for restrictions, too many equivalent feet, or too many elbows in the intake air piping.
Blocked Exhaust Switch: If the pressure reading taken at the Blocked Exhaust switch sensing tube does not reach or rise above the activation pressure given in Table 3 and the switch contacts were opening during the Operational Test - the switch is defective and must be replaced. If the pressure reading taken reaches or exceeds the pressure shown in Table 3 and the switch contacts were opening during the Operational Test - the switch IS NOT defective and should not be replaced. Ensure the condensate tube connected to the exhaust elbow on the water heater is not clogged and is draining freely. Check for restrictions, too many equivalent feet, or too many elbows in the vent pipe.
Table 3 - Air Pressure Switch ParametersBLOWER PROVER
Normally Open ContactsClose on a rise in pressure
BLOCKED INTAKENormally Closed ContactsOpen on a fall in pressure
BLOCKED EXHAUSTNormally Closed ContactsOpen on a rise in pressure
+1.00” W.C.(± 0.05” W.C) -2.00” W.C. (± 0.05” W.C) +2.00” W.C. (+0.05” W.C)
Technical Literature Department 22 of 52 Ashland City, TN © 2008Servicing should only be performed by a Qualified Service Agent
ULTRA HIGH EFFICIENCY POWER VENT/POWER DIRECT VENT - SERVICE MANUAL
AIR PRESSURE SWITCH TESTING (CONT)
BLOWER PROVER SWITCHPRESSURE TEST
BLOCKED INTAKE SWITCHPRESSURE TEST
BLOCKED EXHAUST SWITCHPRESSURE TEST
Technical Literature Department 23 of 52 Ashland City, TN © 2008Servicing should only be performed by a Qualified Service Agent

ULTRA HIGH EFFICIENCY POWER VENT/POWER DIRECT VENT - SERVICE MANUAL
FLAME SENSING TESTTo prove burner flame during ignition the control system monitors flame sensing current through the flame sensor. It is a DC micro amp (µA) current that flows through the flame sensor. The control system must sense a minimum level of current to “prove” flame. The minimum flame sensing current is approximately 1.0 µA. If flame sensing current remains lower than 1.0 µA the control system would lock out after 3 failed trials for ignition and display “Ignition Failure.” Flame sensing current typically runs much higher than minimum when the flame sensor is clean; between 8.0 µA to 12.0 µA.
The most common cause of “Ignition Failure” lock out is a contaminated or corroded flame sensor. Rust/corrosion will accumulate on the flame sensor over time. Cleaning the flame sensor is a common maintenance procedure that should be performed anytime the water heater is being serviced. Clean the flame sensor with ultra fine steel wool or an ultra fine Scotch-Brite pad. DO NOT use a coarse abrasive material such as sand paper.
The burner not being grounded can also cause ignition failure - see page 8.
Measuring Flame Sensing CurrentMeasuring flame sensing current requires a multi meter with DC micro amp functionality. See tool requirements on page 3. The meter’s selector is set to DC micro amps. The flame sensor wire is disconnected and one of the meter probes is inserted in the wire connector. The other meter probe touches the flame sensor terminal. There must be constant contact at both points to measure current. Start the water heater - when ignition occurs the meter will read flame sensing current in real time. See the image below.
If flame sensing current is lower than 8.0 µA, remove the flame sensor and clean it with ultra fine steel wool. Perform a close visual inspection of the flame sensor. If the sensor appears to be damaged or shows signs of excessive wear, replace the flame sensor. If the ceramic insulator on the flame sensor has any visible cracks, replace the flame sensor. When finished inspecting and cleaning the flame sensor, reinstall it and measure flame sensing current again.
Flame Sensor
Technical Literature Department 24 of 52 Ashland City, TN © 2008Servicing should only be performed by a Qualified Service Agent
ULTRA HIGH EFFICIENCY POWER VENT/POWER DIRECT VENT - SERVICE MANUAL
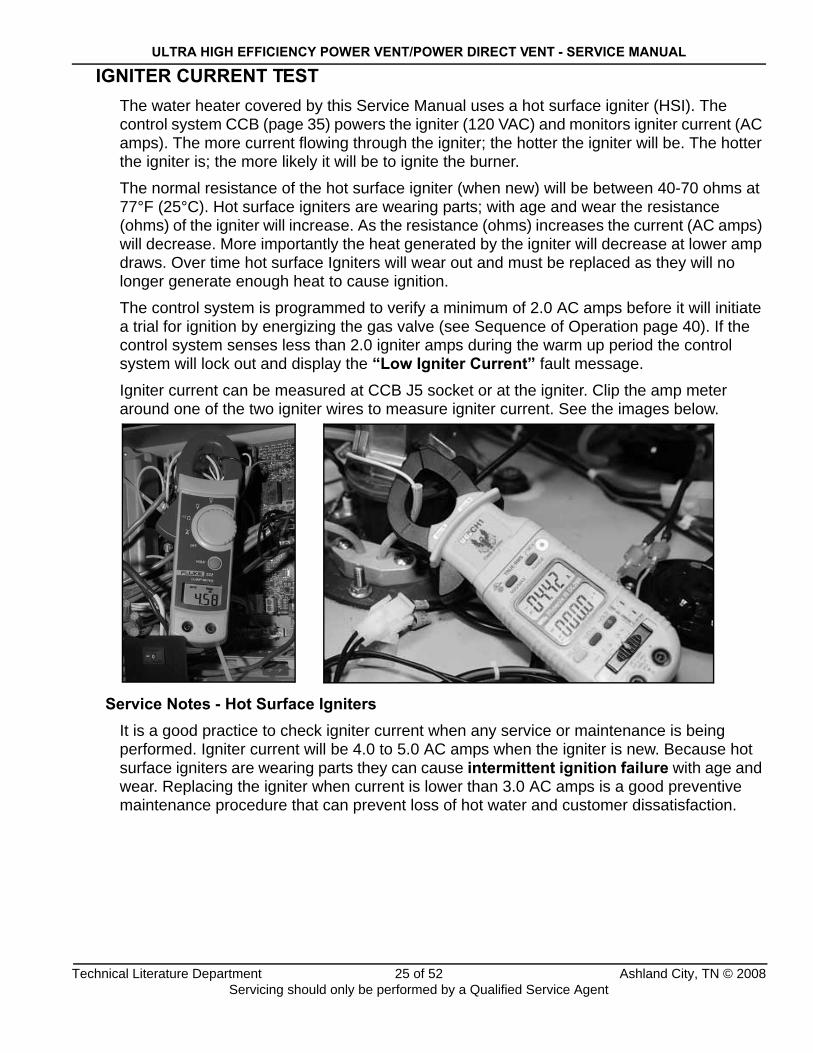
IGNITER CURRENT TESTThe water heater covered by this Service Manual uses a hot surface igniter (HSI). The control system CCB (page 35) powers the igniter (120 VAC) and monitors igniter current (AC amps). The more current flowing through the igniter; the hotter the igniter will be. The hotter the igniter is; the more likely it will be to ignite the burner.
The normal resistance of the hot surface igniter (when new) will be between 40-70 ohms at 77°F (25°C). Hot surface igniters are wearing parts; with age and wear the resistance (ohms) of the igniter will increase. As the resistance (ohms) increases the current (AC amps) will decrease. More importantly the heat generated by the igniter will decrease at lower amp draws. Over time hot surface Igniters will wear out and must be replaced as they will no longer generate enough heat to cause ignition.
The control system is programmed to verify a minimum of 2.0 AC amps before it will initiate a trial for ignition by energizing the gas valve (see Sequence of Operation page 40). If the control system senses less than 2.0 igniter amps during the warm up period the control system will lock out and display the “Low Igniter Current” fault message.
Igniter current can be measured at CCB J5 socket or at the igniter. Clip the amp meter around one of the two igniter wires to measure igniter current. See the images below.
Service Notes - Hot Surface IgnitersIt is a good practice to check igniter current when any service or maintenance is being performed. Igniter current will be 4.0 to 5.0 AC amps when the igniter is new. Because hot surface igniters are wearing parts they can cause intermittent ignition failure with age and wear. Replacing the igniter when current is lower than 3.0 AC amps is a good preventive maintenance procedure that can prevent loss of hot water and customer dissatisfaction.
Technical Literature Department 25 of 52 Ashland City, TN © 2008Servicing should only be performed by a Qualified Service Agent

ULTRA HIGH EFFICIENCY POWER VENT/POWER DIRECT VENT - SERVICE MANUAL
CONTROL SYSTEMINTRODUCTION
This portion of the service manual will cover the control system. The control system includes several components: a UIM (User Interface Module), a CCB (Central Control Board), and an Overlay/Button Pad. More information on these components will be given in the pages that follow.
Control System FeaturesAdvanced Diagnostics: Plain english text based diagnostic information (fault messages) on board to help equipment owners accurately describe the reason for a given lock out condition and service technicians quickly and accurately service the water heater.
Fault History Screen: Will retain a 9 event history of fault messages with a time stamp. This will help diagnose load and/or environmental conditions that may be contributing to a problem with operation or a lock-out.
Fault Occurrence Screen: Will keep a running total of how many times each lock out/fault condition has occurred since the water heater was first installed. This is valuable information for a service technician when trying to determine root causes for service problems.
Help Screens: Text based operational information to help the user understand how to change settings, navigate the menu screens and what the various icons and displayed items mean.
EMI / RFI Filtering: Built into all control system circuit boards. (EMI = Electro Magnetic Interference, RFI = Radio Frequency Interference) Helps prevent or eliminate erratic operation caused by EMI/RFI.
Technical Literature Department 26 of 52 Ashland City, TN © 2008Servicing should only be performed by a Qualified Service Agent

ULTRA HIGH EFFICIENCY POWER VENT/POWER DIRECT VENT - SERVICE MANUAL
UIMThe UIM (User Interface Module) is the display on the front of the water heater. The UIM’s major components include a Circuit Board with LCD display and a Button Pad Overlay which contains the five user input buttons.
Service Notes - Button Pad Ribbon CableThe Ribbon Cable that connects the Button Pad Overlay to the UIM Circuit Board must be plugged in exactly as shown in the images below; with the metal crimp connections visible on the plug end and the UIM Circuit Board back facing out. There are six pins on this Ribbon cable socket, Ensure all six pins are inserted into the Ribbon Cable plug whenever removing or installing the UIM or Button Pad Overlay.
Failure to connect this Ribbon cable exactly as shown when servicing will render the User Input Buttons inoperable. This should be checked whenever the nature of the service complaint is an inoperable or unresponsive controller or UIM.
Button Pad Overlay
J2 Socket - CCBCommunication
UIM Circuit Board Back
J3 Socket - Button PadCommunication
Ribbon Cable ToButton PadEnsure Ribbon Cable Plug
is inserted exactly as shown.
UIM Circuit Board FrontLCDScreen
Technical Literature Department 27 of 52 Ashland City, TN © 2008Servicing should only be performed by a Qualified Service Agent

ULTRA HIGH EFFICIENCY POWER VENT/POWER DIRECT VENT - SERVICE MANUAL
UIM (CONT)User input buttons on the UIM include an Up, a Down, and three Operational buttons.
The Up and Down buttons are used to navigate through the various menus and screens displayed and to adjust or change user settings such as the Operating Set Point.
The three Operational buttons are multifunctional. Their function is defined by the text that appears above each button on the UIM display. The Operational button’s function will change depending on what menu or screen is currently displayed.
Commercial & Residential Product DifferencesThe illustration below shows the control system’s “Desktop” screen. This is the control system’s default screen. If there are no active fault messages and no user input for approximately 10 minutes the control system will return to this screen automatically.
The water heater covered by this Service Manual is available in commercial and residential models. The “Tank Temperature” data shown on the desktop screen below will not be visible on residential models. Tank Temperature will be displayed on the commercial models only.
The maximum Operating Set Point for a residential model will be 160°F (71°C). Maximum Operating Set Point on commercial models will be 180°F (82°C).
Discreet Menu - Contact InformationWhile viewing the Desktop screen (above). Press and hold down the middle Operational button for 30 seconds and then release it. This will launch a discreet menu with a provision for entering personalized contact information. Installing contractors and/or service technicians can enter their company name and telephone number. This contact information would be displayed with all fault messages whenever the control system was in a lock out condition.
UIM - User Interface Module Display
Up & DownButtons
OperationalButtons
Technical Literature Department 28 of 52 Ashland City, TN © 2008Servicing should only be performed by a Qualified Service Agent

ULTRA HIGH EFFICIENCY POWER VENT/POWER DIRECT VENT - SERVICE MANUAL
UIM (CONT)Desktop Screen
The Desktop screen is the default screen. If there are no active fault messages the display will return to this screen with no user input after approximately 10 minutes. The Desktop screen displays text and icons that provide operational and diagnostic information.
The first line of text on the Desktop screen is the temperature of the water inside the tank. Tank Temperature data will only be visible on commercial models.
The second line of text on the Desktop screen is the Operating Set Point. The Operating Set Point is a user setting that can be adjusted in the Temperatures Menu. The Operating Set Point is the temperature at which the water heater will maintain the water inside the tank.
The third line of text on the Desktop screen shows the current Status of the control system. The current Operational State of the water heater’s control system is displayed in real time. Operational States are explained on page 31.
Service Note - Sequence of Operation DisplayThe Desktop screen displays the Sequence of Operation in real time using animated “Status Icons.” This is valuable information when servicing the water heater that can help correctly diagnose service problems more quickly.
Review the Sequence of Operation on page 40 and the Status Icons explanation in Table 4 on page 30. Learn to use this visual display of the Sequence of Operation when troubleshooting the water heater. IE: if the Igniter Status Icon comes on but the Check Mark Status Icon does not appear next to it within 5 seconds the control system has not sensed minimum igniter current of 2.0 AC amps.
Note: Tank Temperature will only be visible on commercial models.
CONTROL SYSTEM DESKTOP SCREEN
Discreet Menu - Contact Information
While viewing the Desktop screen (left). Press and hold down the middle Operational button for 30 seconds then release it. This will launch a discreet menu that contains a provision for adding personalized contact information that will be displayed on all fault message screens. The installing contractor or service agent can enter their company name and phone number to help the home or business owner contact them for service.
Technical Literature Department 29 of 52 Ashland City, TN © 2008Servicing should only be performed by a Qualified Service Agent

ULTRA HIGH EFFICIENCY POWER VENT/POWER DIRECT VENT - SERVICE MANUAL
UIM (CONT)Table 4 - Status Icons
STATUS ICON DESCRIPTIONThe temperature of the water in the tank has fallen and the water heater will now initialize a new heating cycle.
The temperature of the water in the tank has reached the Operating Set Point.
The control is unable to initiate any further heating cycles. This is usually caused by a fault condition detected by the control.
The blower is being energized.
The Blower Prover Air Pressure Switch contacts have closed. Check Mark Icon is visual confirmation of contact closure.
The igniter has been energized.
The igniter has been energized and the control system has sensed minimum (2.0 AC amps).Check Mark Icon is visual confirmation of minimum igniter current.
The gas valve has been energized.
The control system has sensed minimum (1.0 µA) DC micro amps.Flame Icon is visual confirmation of minimum flame sensing current.
The control has detected a fault condition.
The control has detected a warning condition. These conditions will not cause the control system to lock out (discontinue water heater operation), but does merit attention.
Technical Literature Department 30 of 52 Ashland City, TN © 2008Servicing should only be performed by a Qualified Service Agent
ULTRA HIGH EFFICIENCY POWER VENT/POWER DIRECT VENT - SERVICE MANUAL
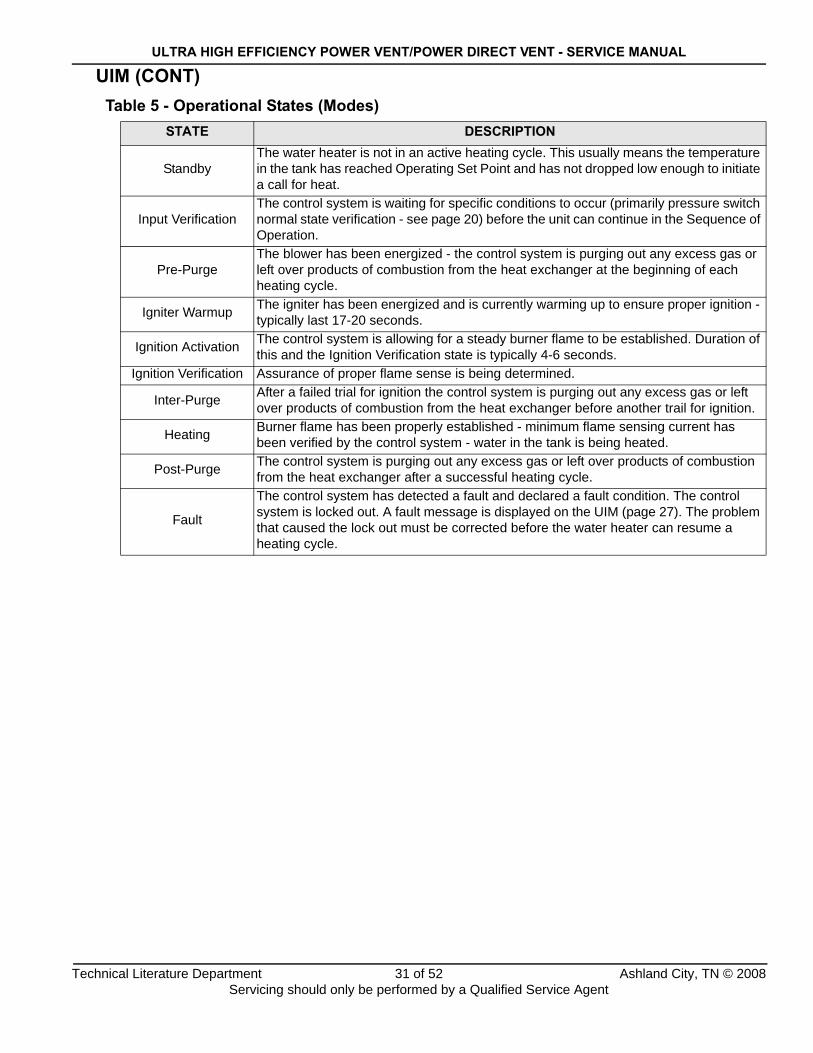
UIM (CONT)Table 5 - Operational States (Modes)
STATE DESCRIPTION
StandbyThe water heater is not in an active heating cycle. This usually means the temperature in the tank has reached Operating Set Point and has not dropped low enough to initiate a call for heat.
Input VerificationThe control system is waiting for specific conditions to occur (primarily pressure switch normal state verification - see page 20) before the unit can continue in the Sequence of Operation.
Pre-PurgeThe blower has been energized - the control system is purging out any excess gas or left over products of combustion from the heat exchanger at the beginning of each heating cycle.
Igniter Warmup The igniter has been energized and is currently warming up to ensure proper ignition - typically last 17-20 seconds.
Ignition Activation The control system is allowing for a steady burner flame to be established. Duration of this and the Ignition Verification state is typically 4-6 seconds.
Ignition Verification Assurance of proper flame sense is being determined.
Inter-Purge After a failed trial for ignition the control system is purging out any excess gas or left over products of combustion from the heat exchanger before another trail for ignition.
Heating Burner flame has been properly established - minimum flame sensing current has been verified by the control system - water in the tank is being heated.
Post-Purge The control system is purging out any excess gas or left over products of combustion from the heat exchanger after a successful heating cycle.
Fault
The control system has detected a fault and declared a fault condition. The control system is locked out. A fault message is displayed on the UIM (page 27). The problem that caused the lock out must be corrected before the water heater can resume a heating cycle.
Technical Literature Department 31 of 52 Ashland City, TN © 2008Servicing should only be performed by a Qualified Service Agent

ULTRA HIGH EFFICIENCY POWER VENT/POWER DIRECT VENT - SERVICE MANUAL
OPERATING SET POINT ADJUSTMENTWhen the temperature sensed by the control system at the Temperature Probe (top of the water heater) reaches the Operating Set Point the control system will end the heating cycle. A call for heat will be activated again when the tank temperature drops below the Operating Set Point minus the Differential setting plus one degree.
Example: Operating Set Point is 120°, Differential setting is 2° (factory default). A call for heat will be activated when tank temperature drops to 117°. 120 - (2+1) = 117.
The Operating Set Point and the Differential setting is adjusted or changed in the Temperatures menu. The following illustrations and instructions will explain how to adjust these user settings and navigate the control system menus.
ACTION DISPLAYFrom the desktop screen, press MENU.
NOTE: Notice how the text on the UIM display above the Operational Buttons changes as you navigate through the various menus and screens.
With Temperatures selected (highlighted in black) in the Main Menu, press the Operational Button underneath “SELECT” to enter the Temperatures Menu.
If Temperatures is not selected use the Up and Down buttons to select this menu item.
With the Operating Set Point selected in the Temperatures Menu, press the Operational Button underneath “CHANGE” to activate the adjustment mode for this menu item.
NOTE: The Upper Probe Offset can be used to override the control system’s calculated tank temperature by 5° above or below current reading. Adjustable range is -5°F to +5°F.Press the UP and DOWN buttons to adjust the Operating Set Point to the desired setting.
Press the Operational Button underneath “UPDATE” to confirm the new setting or “CANCEL” to discard the new setting and retain the previous setting.
NOTE: This same procedure can also be used to adjust the Differential and the Upper Probe Offset user settings.
Technical Literature Department 32 of 52 Ashland City, TN © 2008Servicing should only be performed by a Qualified Service Agent

ULTRA HIGH EFFICIENCY POWER VENT/POWER DIRECT VENT - SERVICE MANUAL
CONTROL SYSTEM MENUSDesktop: This is the default screen for the control system. If there are no active faults or warnings the display will return to this screen with no user input after approximately 10 minutes. Information/settings available:
• Tank Temperature (commercial models only)• Operating Set Point• Operating States • Status (Graphical) Icons
Temperatures: This menu contains the user settings and temperature information. Information/settings available:
• Operating Set Point - adjustable (90-180°F commercial models, 90-160°F residential models)• Differential - adjustable (2-20° factory setting is 2°)• Upper Temperature (commercial models only)• (Heater Regulated to Upper) configuration information• Upper Probe Offset - adjustable -5°F to +5°F. overrides the perceived tank temp by this setting.
Heater Status: This menu shows the current operating state of the water heater, Blower, Igniter, Gas Valve and the state of the contacts (open/closed) for the air pressure switches and the ECO along with the state of the CCB S1 dip switches. Information shown in this menu is in real time. Information/settings available:
• Status - operating state (see page 31)• ECO Contact - open or closed• Blocked Inlet PS - air pressure switch contacts open or closed• Blocked Outlet PS - air pressure switch contacts open or closed• Blower Prover PS - air pressure switch contacts open or closed• Blower Low On - blower is running at low speed yes/no (N/A models equipped w/ 2 speed blowers)• Blower High On - blower is running at high speed yes/no• Igniter On - is currently energized yes/no (yes = energized; no = not energized)• Igniter Current - igniter current is above minimum 2.0 AC amps yes/no• Gas Valve On - is currently energized yes/no (yes = energized; no = not energized)• Flame Detected - flame sensing current is above minimum 1.0 µA yes/no• External Input Enabled - external control enable/disable circuit activated yes/no• Ignition Trials - maximum number of retries for ignition 1 or 3 S1 dip switch setting (see page 38)
Display Settings: This menu contains user settings for the UIM display contrast, back light and temperature units. Information/settings available:
• Temperature Units - adjustable Celsius or or Fahrenheit• Backlight Delay - adjustable - seconds to continuous• Contrast - adjustable
Technical Literature Department 33 of 52 Ashland City, TN © 2008Servicing should only be performed by a Qualified Service Agent

ULTRA HIGH EFFICIENCY POWER VENT/POWER DIRECT VENT - SERVICE MANUAL
CONTROL SYSTEM MENUS (CONT)Heater Information: This menu contains historic operational and configuration information. Information/settings available:
• Elapsed Time - hrs & mins - how long the water heater has been powered on• Burner On Time - hrs & mins - burner run time cumulative• Cycle Count - total number of heating cycles • Ignition Failure Count - total number of ignition failures• Flame Loss Count - total number of lost flame events• CCB Version - software revision of the control systems CCB circuit board• UIM Version -software revision of the control systems UIM circuit board• Configuration - manufacturer and model number configuration
Current Fault: This menu will only contain information when the water heater is in a lock out condition. It will contain the current fault message/condition.
Fault History: This menu contains a history of fault occurrences with a time stamp. The time stamp associated with the fault condition can be subtracted from the “Elapsed Time” in the “Heater Information” menu to determine when or how long ago the given event occurred. The control system will keep the last 9 events in history. When a new event occurs the oldest event will be lost.
Fault Occurrence: This menu contains a running total (cumulative) for all fault conditions declared by the control system. This information can be useful in determining root causes for service problems. Information/settings available:
• Ignition Failure• ECO• Blocked Inlet• Blocked Outlet• Thermostat Input 4• Blower Prover• Flame Detect Error• Flame Probe• External Output Relay• Gas Valve• Igniter Fail• Power Supply Fail• CCB Hardware• Model Faults• CCB Communications
Restore Factory Defaults: This menu allows the end user to restore all settings to their factory defaults.
Help Menu: This menu contains information to help users use the control system, menu items include; Operating Instructions, Status Icon Legend, Operating States, Adjust Operating Set Point, Change Display Units, Restore Factory Defaults, Contact Information.
Technical Literature Department 34 of 52 Ashland City, TN © 2008Servicing should only be performed by a Qualified Service Agent

ULTRA HIGH EFFICIENCY POWER VENT/POWER DIRECT VENT - SERVICE MANUAL
CCBThe CCB circuit board is the main control. All instructions for ignition and temperature control originate from this circuit board. Diagnostic and operational messages are generated by the CCB and sent to the UIM (page 27). Most of the water heater’s components, such as the igniter, blower, gas valve, and temperature probe are directly connected to one of the CCB’s socket connectors.
Service Notes - CCB ReplacementIf the CCB fails and needs to be replaced the replacement board will be shipped with the gray plastic enclosure and a new 24 VAC transformer. There is no need to remove the circuit board from the enclosure when the CCB is being replaced.
Transformer
CCB Circuit Board
Enclosure With Front Removed
120V x 24V50 VA
Technical Literature Department 35 of 52 Ashland City, TN © 2008Servicing should only be performed by a Qualified Service Agent

ULTRA HIGH EFFICIENCY POWER VENT/POWER DIRECT VENT - SERVICE MANUAL
CCB (CONT)Socket Identification
All wiring connections and sockets will be identified in the following pages. The Troubleshooting section of this Service Manual will refer back to this illustration and information.
3
2
1
6
5
4
9
8
7
12
11
10
15
14
13
J6
J7 3 24 1
1
2
J15
84
5
6
7
1
2
3
J13
3
4
1
2
J10
1
3
5
2
4
J1
1
3
4
2
J2
1
4
2 1
2
J3 J5J4
S1
J16
J9
J11
OP
EN
1 2 3 4
Technical Literature Department 36 of 52 Ashland City, TN © 2008Servicing should only be performed by a Qualified Service Agent

ULTRA HIGH EFFICIENCY POWER VENT/POWER DIRECT VENT - SERVICE MANUAL
CCB (CONT)J1 Socket - Transformer
J2 Socket - 120 VAC To Blower
J3 Socket - 120 VAC Power Supply
J4 Flame Sensor - Male Spade ConnectorJ5 Socket - Igniter 120 VAC HSI (hot surface igniter - Silicon Carbide)
J6 Socket - Gas Valve, Pressure Switches, Enable/Disable Circuit
PIN # DESCRIPTION1 120 VAC hot to transformer2 Not used3 120 VAC neutral to transformer4 24 VAC out from transformer5 24 VAC out from transformer
PIN # DESCRIPTION1 120 VAC hot to blower2 120 VAC neutral to blower3 Not used4 Not used
PIN # DESCRIPTION1 120 VAC hot2 Earth Ground3 120 VAC neutral
PIN # DESCRIPTION1 120 VAC hot2 120 VAC neutral
PIN # DESCRIPTION1 Not used2 Gas valve - 24 VAC3 Not used4 Blocked Intake air pressure switch5 Blocked Exhaust air pressure switch6 Blower Prover air pressure switch7 Blower Prover air pressure switch8 Enable/disable external control circuit - jumper installed from factory9 Not used10 Blocked Exhaust air pressure switch11 Enable/disable external control circuit - jumper installed from factory12 Not used13 Not used14 Blocked Intake air pressure switch15 Gas valve - 24 VAC
Technical Literature Department 37 of 52 Ashland City, TN © 2008Servicing should only be performed by a Qualified Service Agent

ULTRA HIGH EFFICIENCY POWER VENT/POWER DIRECT VENT - SERVICE MANUAL
CCB (CONT)J7 Socket - Temperature Probe/ECO (immersion probe - top of the water heater)
J9 Port - Communication Port - Not UsedJ10 Socket - Not UsedJ11 Port - Communication Port - Not UsedJ13 Socket - Blower Speed Control (VFD)
J15 Socket - Not UsedJ16 Port - Communication Port - UIM Display (user interface module)S1 Dip Switch
The S1 dip switches are configured from the factory and should not be changed. The illustration below shows the 4 dip switches with labeling. Dip switches are toggle type micro switches. Flipping a dip switch towards “Open” would be the same as “Off.” Flipping a dip switch the other way (towards the switch numbers) is the same as “On.”
Dip switch #1 is used to configure the water heater to declare a fault condition and lock out after one or three failed trials for ignition. The factory setting is “on” for three trials.
Dip switches #2 and #3 are used when this control system is installed on other products. The factory setting for these two dip switches is “on.”
Dip switch #4 is a spare, configuration does not matter.
PIN # DESCRIPTION1 ECO (energy cut out) 24 VAC out (red wire)2 Upper temperature probe (thermistor) +5.0 VDC (black wire)3 Upper temperature probe (thermistor) -5.0 VDC (black wire)4 ECO (energy cut out) 24 VAC return (red wire)
PIN # DESCRIPTION1 Not used2 Not used3 To Blower low voltage PWM plug (see page 10) - pin #5 (white w/grn stripe)4 Not used5 Not used6 Not used7 To Blower low voltage PWM plug (see page 10) - pin #4 (white w/blue stripe)8 To Blower low voltage PWM plug (see page 10) - pin #1 (white w/brn stripe)
OPEN
1 2 3 4
1 Retry
Use Yes
Type Tstat
Spare
ExtInput
3Retries
No
Vent
Spare
ONCLOSED
OFFOPEN
Technical Literature Department 38 of 52 Ashland City, TN © 2008Servicing should only be performed by a Qualified Service Agent
ULTRA HIGH EFFICIENCY POWER VENT/POWER DIRECT VENT - SERVICE MANUAL
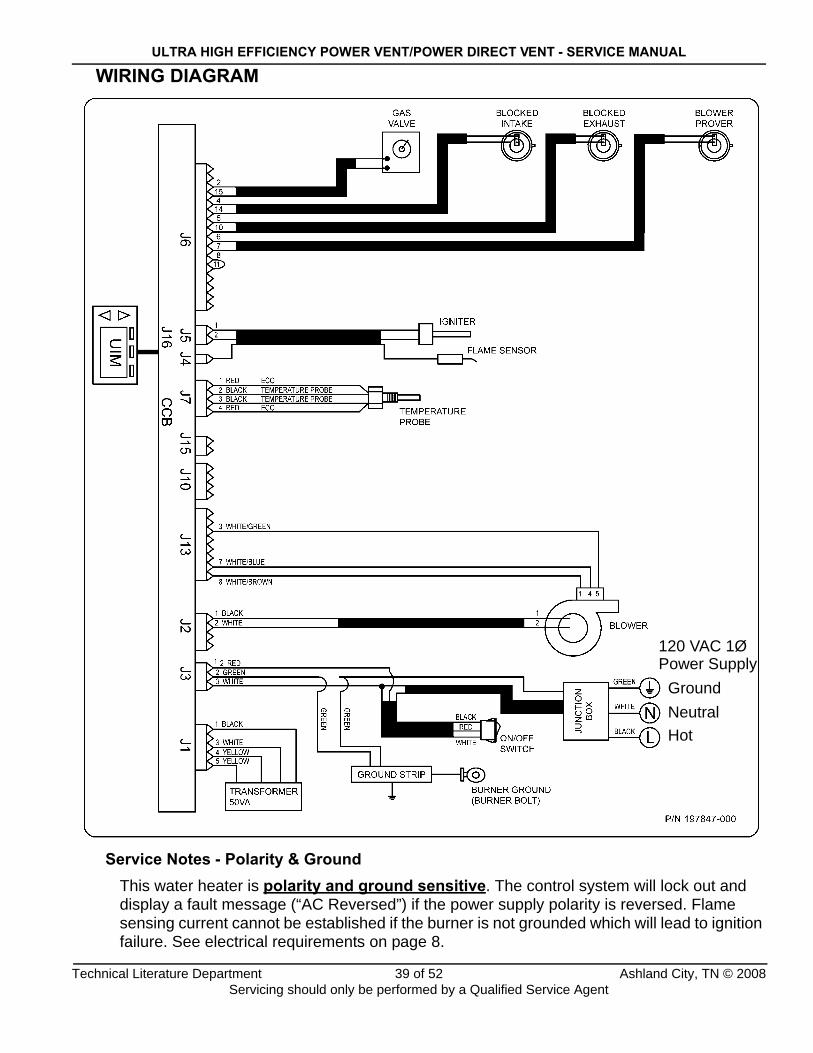
WIRING DIAGRAM
Service Notes - Polarity & GroundThis water heater is polarity and ground sensitive. The control system will lock out and display a fault message (“AC Reversed”) if the power supply polarity is reversed. Flame sensing current cannot be established if the burner is not grounded which will lead to ignition failure. See electrical requirements on page 8.
HotNeutralGround
120 VAC 1ØPower Supply
Technical Literature Department 39 of 52 Ashland City, TN © 2008Servicing should only be performed by a Qualified Service Agent

ULTRA HIGH EFFICIENCY POWER VENT/POWER DIRECT VENT - SERVICE MANUAL
SEQUENCE OF OPERATIONCall for heat initiated
Air Pressure Switch Test Is PerformedBlower Prover Switch is verified open
Blocked Intake and Blocked Exhaust Switches are verified closed
Blower Prover Switch is verified closed
Igniter is energized for warm up period(approx 17 seconds)
YES
Gas Valve Is EnergizedGas Flows To Burner
Control System (CCB) Verifies FlameSensing Current at 1.0µA DC Micro Amps Minimum
Control System Declares Fault Condition - Locks Out
One of the followingFault Messages Displayed:
“Blower Prover Failure” “Blocked Inlet” “Blocked Exhaust Vent”
NO
Blower Motor is energizedPre-purge State
YES
Control System (CCB) Verifies IgniterCurrent at 2.0 AC Amps Minimum
YES
Control System Declares Fault Condition - Locks Out
“Blower Prover Open”Fault Message Displayed
NO
Control System Declares Fault Condition - Locks Out
“Low Igniter Current”Fault Message Displayed
NO
YES NO
Water Is Heated To Operating Set Point
Gas Valve IsDe-energized
Inter-Purge State30 Sec Approx
Gas Valve IsDe-energized
Retries Up To3 Times
Post-Purge State30 Sec Approx
Control System Declares Fault Condition - Locks Out
“Ignition Failure”Fault Message Displayed
Control System Goes IntoStandby State/Mode
Technical Literature Department 40 of 52 Ashland City, TN © 2008Servicing should only be performed by a Qualified Service Agent

ULTRA HIGH EFFICIENCY POWER VENT/POWER DIRECT VENT - SERVICE MANUAL
TROUBLESHOOTINGThe control system performs exhaustive self diagnostics and displays detected fault conditions in plain english fault messages on the UIM (page 27) when there is a problem. When the control system declares a fault condition it will “lock out” and disable heating.
Troubleshooting procedures for the most common error messages are covered in this manual. In the tables that follow the first column shows the fault message as displayed by the UIM along with an explanation. The second column details things to check or repair.
Rough Starting - Rough Operation Note:If the water heater is experiencing rough operation or rough starting review the Service Notes - Blower Flange & Blower Adapter Gaskets on page 13. Remove and inspect the burner for debris or damage - see pages 11 - 13.
Heater Status MenuThis menu (page 33) shows the current operating state (energized/de-energized) of the Blower, Igniter and Gas Valve. The state (open/closed) of the contacts for the Blower Prover, Blocked Intake and Blocked Exhaust Switches. This information and more is shown in real time. Use this menu when troubleshooting the water heater to quickly and accurately diagnose operational problems.
Things to check before servicing• Using the Instruction Manual that came with the water heater as reference, verify the
water piping, gas line, venting and electrical have all been properly installed.
• Ensure 120 VAC is supplied to the water heater and that the polarity is correct per the electrical requirements on page 8.
• Ensure the water heater is properly grounded (page 8). Flame sensing current cannot be established unless the burner is grounded. This can cause ignition failure, after three failed trials for ignition the UIM would display the “Ignition Failure” fault message.
• Ensure supply gas pressure is within the minimum and maximum requirements (page 17).
Resetting the control systemTo reset the control system from a lock out condition; turn the power supply off for approximately 20 seconds and then back on. Keep in mind if the condition that caused the fault has not been corrected the control system will continue to lock out.
Important Service ReminderWhen performing any troubleshooting step outlined in this Service Manual always consider the wiring and connectors between components. Perform a close visual inspection of all wiring and connectors to and from a given component before replacement. Ensure wires were stripped before being crimped in a wire connector, ensure wires are crimped tightly in their connectors, ensure connection pins in sockets and plugs are not damaged or worn, ensure plugs and sockets are mating properly and providing good contact.
Failure to perform this critical step or failing to perform this step thoroughly often results in needless down time, unnecessary parts replacement, and customer dissatisfaction.
Technical Literature Department 41 of 52 Ashland City, TN © 2008Servicing should only be performed by a Qualified Service Agent

ULTRA HIGH EFFICIENCY POWER VENT/POWER DIRECT VENT - SERVICE MANUAL
CONTROL SYSTEM UNRESPONSIVE
DISPLAYED MESSAGECONDITION/INDICATES CHECK/REPAIR
UIM Display Is Blank
On/Off is turned offWater heater is not plugged inTripped Breaker - Blown Fuses120 VAC power supply problems24 VAC power supply problemsDefective transformerWiring or plug/socket connection problemsUIM communication cable problems
Important Service Reminder:
When performing any troubleshooting steps outlined in this service manual always consider the wiring and connectors between components. Perform a close visual inspection of all wiring and connectors to a given component before replacement.
Ensure wires were stripped before being crimped in a wire connector, ensure wires are crimped tightly in their connectors, ensure connection pins in sockets and plugs are not damaged or worn, ensure plugs and sockets are mating properly and providing good contact.
Failure to perform this critical step or failing to perform this step thoroughly often results in needless down time, unnecessary parts replacement, and customer dissatisfaction.
• Ensure the on/off switch is on and working - replace switch if defective.
• Check communication cable connections at UIM’s J2 Socket (page 27) and the CCB’s J16 Socket (page 36). Secure power and install a new comm cable. (standard Cat 5 network cable).
• Closely inspect communication ports on CCB and UIM for damage or wear.
• Ensure 120 VAC power is properly connected in the junction box on the back of the water heater.
• Ensure 120 VAC is supplied to CCB’s J3 Socket pins 1 & 3. Hot wire to pin 1, neutral wire to pin 3 (page 36).
• Check 120 VAC to transformer primary winding at CCB’s J1 socket pins 1 & 3 (page 36) with J1 plug removed, power on.
• Check J1 plug and J1 socket on the CCB for wear or damage. Ensure plugs and sockets are mating properly and providing good contact.
• Check for 24 VAC from transformer secondary winding at CCB’s J1 socket pins 4 & 5 with J1 plug inserted, power on. If 24 VAC is not present AND the two checks above were performed and the results were successful - replace the trans-former. Check all wiring for shorts before power-ing up the new transformer.
• Call the technical support phone number shown on the water heater labeling for further assis-tance if the problem has not been corrected after performing the procedures outlined here.
UIM is Inoperable
UIM does not respond to any user input using the operational and/or Up and Down buttons.
Water heater may be maintaining water temperature at the last saved setting or may not be operating at all.
• Ensure Ribbon Cable from the Button overlay is inserted correctly in UIM J3 Socket (page 27).
• Call the technical support phone number shown on the water heater labeling for further assis-tance if the problem has not been corrected after performing the procedures outlined here.
Technical Literature Department 42 of 52 Ashland City, TN © 2008Servicing should only be performed by a Qualified Service Agent

ULTRA HIGH EFFICIENCY POWER VENT/POWER DIRECT VENT - SERVICE MANUAL
FAULT MESSAGES
DISPLAYED MESSAGECONDITION/INDICATES CHECK/REPAIR
“AC Reversed”
The control system has detected the power supply polarity is reversed.
• Check incoming power supply wiring to the water heater in the junction box - ensure that the hot wire is connected to the water heater’s black wire and the neutral wire is connected to the water heater’s white wire inside the junction box. See electrical requirements on page 8.
• Check for 120 VAC at CCB’s J3 Socket (page 36) pins 1 & 3 with J3 plug inserted, power on.
Check for AC voltage between pin 1 and ground - should indicate 120 VAC.
Check for AC voltage between pin 3 and ground - should indicate 0 VAC.
• Call the technical support phone number shown on the water heater labeling for further assis-tance if the problem has not been corrected after performing the procedures outlined here.
“Upper Probe Open”
The control system has detected over 56,000 ohms from the Temperature Probe on top of the water heater.
• Check Temperature Probe plug and socket con-nection at CCB’s J7 Socket (page 36). Perform close visual inspection of the pins inside the plug and socket - ensure plugs and sockets are mating properly and providing good contact.
• Check all wiring between the Temperature Probe and the J7 Socket on the CCB. Repair/replace anything worn or damaged.
• Unplug J7 plug from CCB, check resistance between the two black wires in the plug end with an ohm meter. If resistance is above 56,000 ohms - replace the Temperature Probe.
• Call the technical support phone number shown on the water heater labeling for further assis-tance if the problem has not been corrected after performing the procedures outlined here.
Technical Literature Department 43 of 52 Ashland City, TN © 2008Servicing should only be performed by a Qualified Service Agent

ULTRA HIGH EFFICIENCY POWER VENT/POWER DIRECT VENT - SERVICE MANUAL
FAULT MESSAGES (CONT)
DISPLAYED MESSAGECONDITION/INDICATES CHECK/REPAIR
“Upper Probe Short”
The control system has detected less than 390 ohms from the Temperature Probe on top of the water heater.
• Check all wiring between the Temperature Probe and the J7 Socket on the CCB (page 36). Repair/replace anything worn or damaged.
• Unplug J7 plug from CCB, check resistance between the two black wires in the plug end with an ohm meter. If resistance is at or below 390 ohms - replace the Temperature Probe.
• Call the technical support phone number shown on the water heater labeling for further assis-tance if the problem has not been corrected after performing the procedures outlined here.
“Flame Probe Short”
The control system has detected that the flame sensor is grounded.
• Disconnect the wire from the flame sensor (see pages 12 and 24). Check for continuity between flame sensor and ground with an ohm meter. There should be no continuity - infinite resis-tance.
• If above test indicates there is continuity between the flame sensor and ground - remove the flame sensor (see pages 12 and 24). Ensure the flame sensor is not bent and touching the burner.
• Check all flame sensor wiring between the flame sensor and the J4 male spade connector on the CCB (page 36). Ensure there are not any pinched wires or shorts - repair/replace anything worn or damaged.
• Replace the flame sensor.
• Call the technical support phone number shown on the water heater labeling for further assis-tance if the problem has not been corrected after performing the procedures outlined here.
Technical Literature Department 44 of 52 Ashland City, TN © 2008Servicing should only be performed by a Qualified Service Agent

ULTRA HIGH EFFICIENCY POWER VENT/POWER DIRECT VENT - SERVICE MANUAL
FAULT MESSAGES (CONT)
DISPLAYED MESSAGECONDITION/INDICATES CHECK/REPAIR
“Flame Detect Error”
The control system has detected flame sensing current out of sequence.
• The burner has not shut down properly. Check gas valve for 100% closure. Check for flame candling after the heating cycle has ended through the Burner View Port, see page 11.
• If burner flame is candling after the heating cycle has ended - replace gas valve assembly, see gas valve removal procedure page 15.
• Call the technical support phone number shown on the water heater labeling for further assis-tance if the problem has not been corrected after performing the procedures outlined here.
“Energy Cut Out (ECO)”
The control system has detected water temperature in the tank above 190°F. Tank temperature must cool to 140°F before the fault message (lock out) can be reset. Cycle power off (20 seconds) and on again to reset.
• Be extremely careful - record temperature from a nearby hot water fixture.
• If recorded temperature is above 180°F - shut off power and gas to the water heater and call the technical support phone number shown on the water heater labeling for further assistance. DO NOT LEAVE THE WATER HEATER IN OPERATION.
• If recorded temperature from above is well below 180°- cycle power to reset the control system. Watch the water heater through several heating cycles. If tank temperature climbs to excessively high temperatures - shut off power and gas to the water heater and call the techni-cal support phone number shown on the water heater labeling for further assistance. DO NOT LEAVE THE WATER HEATER IN OPERATION.
• Check Temperature Probe plug and socket con-nection at CCB’s J7 Socket (page 36). Perform close visual inspection of the pins inside the plug and socket - ensure plugs and sockets are mating properly and providing good contact.
• Check all wiring between the Temperature Probe and the J7 Socket on the CCB. Repair/replace anything worn or damaged.
• With the J7 plug disconnected from the CCB (page 36) check for continuity between the two red wires in the plug end (pins 1 & 4) with an ohm meter. If there is no continuity between these two wires and the tank temperature is not excessive - replace the Temperature Probe.
Technical Literature Department 45 of 52 Ashland City, TN © 2008Servicing should only be performed by a Qualified Service Agent

ULTRA HIGH EFFICIENCY POWER VENT/POWER DIRECT VENT - SERVICE MANUAL
FAULT MESSAGES (CONT)
DISPLAYED MESSAGECONDITION/INDICATES CHECK/REPAIR
“Blocked Inlet”
The control system has detected open contacts at the Blocked Intake air pressure switch - inadequate supply of intake (combustion) air.
• If the water heater has been installed as a con-ventional vent appliance - Ensure the intake air connection screen is not clogged with debris. See Service Notes - Venting on page 7.
• If water heater has been installed as a direct vent appliance - check for restrictions, too many equivalent feet, or too many elbows in the intake air piping. Review venting installation section of the Instruction Manual that came with the water heater - see Table 1 on page 7 in this manual. Ensure the vent/intake air piping has been installed within manufacturers requirements.
• If water heater has been installed as a direct vent appliance - temporarily disconnect the intake air pipe at the blower connection on the water heater - ensure the screen inside the intake air connection was removed during installation. See the Service Notes for venting on page 7.
• Check all wiring between the Blocked Intake air pressure switch and the CCB’s J6 Socket (page 36) pins 4 & 14. Perform close visual inspection of the pins inside the plug and socket - ensure plugs and sockets are mating properly and pro-viding good contact. Repair/replace anything worn or damaged.
• Review the air pressure switch information beginning on page 18. Perform the pressure switch test procedure for the Blocked Intake air pressure switch - see pages 21 through 23. Replace the Blocked Intake switch if defective.
• Call the technical support phone number shown on the water heater labeling for further assis-tance if the problem has not been corrected after performing the procedures outlined here.
Technical Literature Department 46 of 52 Ashland City, TN © 2008Servicing should only be performed by a Qualified Service Agent

ULTRA HIGH EFFICIENCY POWER VENT/POWER DIRECT VENT - SERVICE MANUAL
FAULT MESSAGES (CONT)
DISPLAYED MESSAGECONDITION/INDICATES CHECK/REPAIR
“Blocked Exhaust Vent”
The control system has detected open contacts at the Blocked Exhaust air pressure switch - the water heater is not venting properly.
• Check for restrictions, too many equivalent feet, or too many elbows in the vent pipe. Ensure
• Review venting installation section of the Instruction Manual that came with the water heater - see Table 1 on page 7 in this manual. Ensure the vent/intake air piping has been installed within manufacturers requirements.
• Check all wiring between the Blocked Exhaust air pressure switch and the CCB’s J6 Socket (page 36) pins 5 & 10. Perform close visual inspection of the pins inside the plug and socket - ensure plugs and sockets are mating properly and providing good contact. Repair/replace any-thing worn or damaged.
• Review the air pressure switch information beginning on page 18. Perform the pressure switch test procedure for the Blocked Exhaust air pressure switch - see pages 21 through 23. Replace the Blocked Exhaust switch if defec-tive.
• Call the technical support phone number shown on the water heater labeling for further assis-tance if the problem has not been corrected after performing the procedures outlined here.
“Blower Prover Failure”
The control system has detected closed contacts at the Blower Prover air pressure switch out of sequence. Blower Prover air pressure switch contacts should be open at the beginning of each heating cycle - see the Sequence of Operation on page 40.
• Check all wiring between the Blower Prover air pressure switch and the CCB’s J6 Socket (page 36) pins 6 & 7. Ensure there are no shorted or pinched wires.
• Ensure there are no jumper wires installed on the Blower Prover switch.
• Ensure there are no jumper wires installed between the CCB’s J6 Socket pins 6 & 7.
• Review the air pressure switch information beginning on page 18. Perform the pressure switch test procedure for the Blower Prover air pressure switch - see pages 21 through 23. Replace the Blower Prover switch if defective.
• Call the technical support phone number shown on the water heater labeling for further assis-tance if the problem has not been corrected after performing the procedures outlined here.
Technical Literature Department 47 of 52 Ashland City, TN © 2008Servicing should only be performed by a Qualified Service Agent

ULTRA HIGH EFFICIENCY POWER VENT/POWER DIRECT VENT - SERVICE MANUAL
FAULT MESSAGES (CONT)
DISPLAYED MESSAGECONDITION/INDICATES CHECK/REPAIR
“Blower Prover Open”(Blower Not Running)
The control system has detected open contacts at the Blower Prover air pressure switch after Blower has been energized.
PERFORM ALL THESE TESTS WITH POWER TURNED ON AND A CALL FOR HEAT ACTIVE.
• Check for 120 VAC at the CCB’s J2 Socket (page 36) pins 1 & 2. Perform close visual inspection of the pins inside the plug and socket - ensure plugs and sockets are mating properly and providing good contact.
• Check all wiring between CCB’s J2 Socket pins 1 & 2 and the blower motor assembly’s high voltage 3 Pin Socket (see page 10).
• Disconnect the plug at the blower motor assem-bly’s high voltage 3 Pin Socket - check for 120 VAC at the plug end.
• Perform close visual inspection of the pins inside the plug and socket at the blower motor assembly’s high voltage 3 Pin Socket - ensure plugs and sockets are mating properly and pro-viding good contact.
• Disconnect the plug at the blower assembly’s Low Voltage PWM 5 pin plug (see page 10). If the Blower has not been running prior and starts running when this plug is disconnected - call the technical support phone number shown on the water heater labeling for further assistance.
“Blower Prover Open”(Blower Is Running)
The control system has detected open contacts at the Blower Prover air pressure switch after Blower has been energized.
• Ensure the Blower Prover air pressure switch sensing tube is connected properly at both ends and that it is not kinked or damaged. Repair/replace anything worn or damaged as neces-sary.
• Check all wiring between CCB’s J6 Socket (page 35) pins 6 & 7 and the Blower Prover air pressure switch. Repair/replace anything worn or damaged as necessary.
• Perform close visual inspection of the pins inside the CCB J6 plug and socket - ensure plugs and sockets are mating properly and pro-viding good contact.
• Review the air pressure switch information beginning on page 18. Perform the pressure switch test procedure for the Blower Prover air pressure switch - see pages 21 through 23. Replace the Blower Prover switch if defective.
Technical Literature Department 48 of 52 Ashland City, TN © 2008Servicing should only be performed by a Qualified Service Agent

ULTRA HIGH EFFICIENCY POWER VENT/POWER DIRECT VENT - SERVICE MANUAL
FAULT MESSAGES (CONT)
DISPLAYED MESSAGECONDITION/INDICATES CHECK/REPAIR
“Low Igniter Current”
The control system has detected less than 2.0 AC amps through the igniter during the igniter warm up period.
• Check all wiring between CCB’s J5 Socket (page 35) pins 1 & 2 and the hot surface igniter. Repair/replace anything worn or damaged as necessary.
• Perform close visual inspection of the pins inside the CCB J5 plug and socket - ensure plugs and sockets are mating properly and pro-viding good contact. Repair/replace anything worn or damaged as necessary.
• With power turned on and a call for heat active - ensure there is 120 VAC between pins 1 & 2 of the CCB’s J5 Socket during the igniter warm up period. - the igniter lighting bolt icon will appear on the UIM display during the igniter warm up period. See Table 4 on page 30.
• Turn off power to the water heater - disconnect wires to igniter at the igniter. Check for continu-ity between the two igniter wires. If the igniter shows to be an open circuit - replace the igniter.
• With power turned on and a call for heat active - check amp draw through the igniter with an AC amp meter during the igniter warm up period. This procedure is illustrated and explained on page 25. Replace igniter if amp draw is less than 3.0 AC amps.
• Call the technical support phone number shown on the water heater labeling for further assis-tance if the problem has not been corrected after performing the procedures outlined here.
Technical Literature Department 49 of 52 Ashland City, TN © 2008Servicing should only be performed by a Qualified Service Agent

ULTRA HIGH EFFICIENCY POWER VENT/POWER DIRECT VENT - SERVICE MANUAL
FAULT MESSAGES (CONT)
DISPLAYED MESSAGECONDITION/INDICATES CHECK/REPAIR
“Ignition Failure”
The control system has detected less than 1.0 µA (DC micro amps) through the flame sensor during the Ignition Verification operating state on three consecutive trials for ignition.
Rough Starting - Rough Operation Note:
If the water heater is experiencing rough operation or rough starting review the Service Notes - Blower Flange & Blower Adapter Gaskets on page 13.
Call the technical support phone number shown on the water heater labeling for further assistance if the problem has not been corrected after performing the procedures outlined here.
• Visually check for burner flame through the view port on the top of the water heater (see illustra-tions on page 11) during the Ignition Verification operating state (Table 5 - page 31) - the Gas Valve icon will appear on UIM display during this operating state.
• Ensure the gas supply shut off valve is open.
• Ensure there is adequate air for combustion & ventilation. See air requirements in the Instruc-tion Manual that came with the water heater.
• Ensure the burner is grounded - see electrical requirements and service notes on page 8.
• Ensure flame sensor wiring is plugged in securely at the CCB’s J4 male spade connector (page 35) and at the flame sensor wiring termi-nal (page 24).
• Check all wiring between the flame sensor and the CCB J4 connection. Repair/replace anything worn or damaged as necessary.
• Remove and clean the flame sensor (page 24) with fine steel wool - check for signs of exces-sive wear, bent, damage, cracks in the insulator - replace flame sensor if worn or damaged.
• Check for flame sensing current during the Igni-tion Verification operating state - Gas Valve icon will appear on UIM display (Table 5 - page 31). Flame sensing current test procedure is illus-trated and explained on page 24.
If flame sensing current measured is well above the 1.0 µA (DC micro amps) minimum during this test and the control system continues to declare the Ignition Failure fault condition after three trials - call the technical support phone number shown on the water heater labeling for further assistance.
If the flame sensing current measured is not established or is below 1.0 µA - continue to the next check/repair procedure.
Technical Literature Department 50 of 52 Ashland City, TN © 2008Servicing should only be performed by a Qualified Service Agent

ULTRA HIGH EFFICIENCY POWER VENT/POWER DIRECT VENT - SERVICE MANUAL
FAULT MESSAGES (CONT)
DISPLAYED MESSAGECONDITION/INDICATES CHECK/REPAIR
“Ignition Failure”
The control system has detected less than 1.0 µA (DC micro amps) through the flame sensor during the Ignition Verification operating state on three consecutive trials for ignition.
Rough Starting - Rough Operation Note:
If the water heater is experiencing rough operation or rough starting review the Service Notes - Blower Flange & Blower Adapter Gaskets on page 13.
Call the technical support phone number shown on the water heater labeling for further assistance if the problem has not been corrected after performing the procedures outlined here.
• Check for 24 VAC to the Gas Valve solenoid coil at the in-line male/female spade connectors during the Ignition Activation operating state (Gas Valve icon will be visible on the UIM dis-play during this period).
• Check all wiring, plugs, and sockets between the Gas valve solenoid coil and CCB’s J6 Socket pins 2 & 15 (page 35). Repair/replace anything worn or damaged.
If 24 VAC is not being sent to the Gas Valve solenoid coil during the Ignition Activation oper-ating state and all wiring, plugs, and sockets are in good condition and making good contact - call the technical support phone number shown on the water heater labeling for further assistance.
• Check supply and manifold gas pressures. This procedure is illustrated and explained on pages 16 and 17.
If supply gas pressure is below the minimum requirement shown in Table 2 on page 17 - raise/restore supply gas pressure to minimum requirement. If supply gas pressure is above maximum requirement - reduce supply gas pressure below maximum requirement.
If there is not a rise in manifold pressure and a corresponding drop in supply gas pressure when the Gas Valve is energized as outlined on on pages 16 and 17 the gas valve is not open-ing or is clogged and is not allowing gas to flow to the burner - continue to the next procedure.
• Remove the Gas Valve and ensure the gas ori-fice and gasket are installed properly and that the correct size orifice for the fuel type is installed. The procedure for removing the gas valve to check the gas orifice is illustrated and explained on page 15. Inspect the Gas Valve for any signs of damage - replace if necessary.
• Remove the burner and inspect it for damage or debris that may have collected inside the burner and be causing the ignition failure. The burner removal procedure is illustrated and explained on pages 11 through 13. If the burner is dam-aged or severely clogged with debris - replace the burner.
Technical Literature Department 51 of 52 Ashland City, TN © 2008Servicing should only be performed by a Qualified Service Agent

ULTRA HIGH EFFICIENCY POWER VENT/POWER DIRECT VENT - SERVICE MANUAL
FAULT MESSAGES (CONT)
DISPLAYED MESSAGECONDITION/INDICATES CHECK/REPAIR
“Gas Valve Failure”
The control system has not detected any current through the gas valve after it has been energized.
• Turn off power - check all wiring and connectors between the CCB’s J6 Socket (page 35) pins 2 & 15 and the Gas Valve’s solenoid coil. Repair/replace anything worn or damaged as neces-sary.
• Perform close visual inspection of the pins inside the CCB J6 plug and socket - ensure plugs and sockets are mating properly and pro-viding good contact. Repair/replace anything worn or damaged as necessary.
• Turn off power - disconnect the Gas Valve wir-ing plug on top of the Gas Valve solenoid coil. Check Gas Valve solenoid coil resistance with an ohm meter at the solenoid coil terminals. Normal resistance is approximately 7 million ohms. If the Gas Valve solenoid coil is an open circuit - replace the Gas Valve.
• Check for 24 VAC at CCB’s J6 Socket pins 2 & 15 during the Ignition Activation operating state (the Gas Valve status icon will be visible on the UIM display during this period.
• Call the technical support phone number shown on the water heater labeling for further assis-tance if the problem has not been corrected after performing the procedures outlined here.
“Communication Failure”
Loss of communication between the CCB and the UIM.
• Turn off power - check the communication cable connections between the J2 Socket on the UIM circuit board (page 27) and the CCB J16 Port (page 35).
• Try a new communication cable (standard cate-gory V network cable) between the CCB and the UIM.
• Call the technical support phone number shown on the water heater labeling for further assis-tance if the problem has not been corrected after performing the procedures outlined here.
Technical Literature Department 52 of 52 Ashland City, TN © 2008Servicing should only be performed by a Qualified Service Agent

2
500TennesseeWaltzParkwayAshlandCity,TN37015