Ultimate Guide to Sketching Cars - driventodraw.com · The car sketches that ... Sketching...
14
Ultimate Guide to Sketching Cars Disclaimer! All content within this document are copy protected. Distribution of this copy without prior consent from www.drivenmavens.com is strictly prohibited. Author: Arvind Ramkrishna
Transcript of Ultimate Guide to Sketching Cars - driventodraw.com · The car sketches that ... Sketching...

Ultimate Guide to Sketching Cars
Disclaimer! All content within this document are copy protected. Distribution of this copy without prior consent from www.drivenmavens.com is strictly prohibited.
Author: Arvind Ramkrishna

2
How to Draw Cars Ultimate Guide to Sketching
Table of Contents
1. Objective 3
2. Sketching Materials 4
3. Value Range 5-6
4. Line Weight 7
5. Top 5 Techniques Essential to a Designers Success! 8-13
6. Thank You! 14
Disclaimer! All content within this document are copy protected. Distribution of this copy without prior consent from www.drivenmavens.com is strictly prohibited.
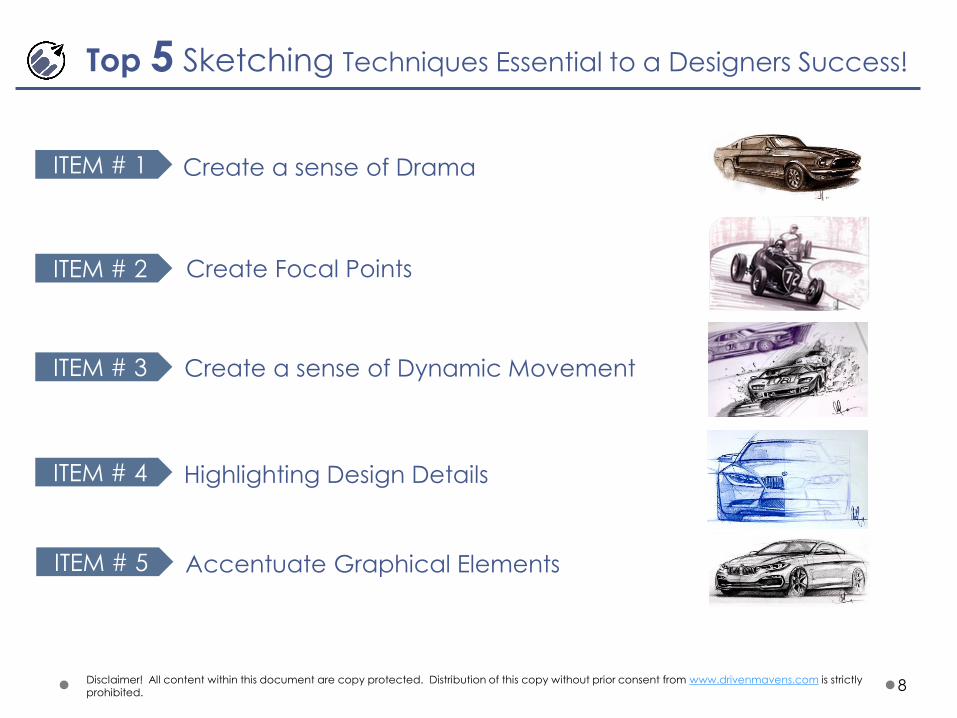
Top 5 Sketching Techniques Essential to a Designers Success!

3
How to Draw Cars Ultimate Guide to Sketching
Objective of this Guide:
Ever wondered what gives designer sketches that extra emotional power and dynamism to their sketch? You
are not alone. Many hungry individuals like yourself crave to become proficient at sketching cars and this guide
will provide you with some initial inspiration to accelerate your passion for drawing.
The goal of this guide is to introduce to you the technique involved for creating sweet, dynamic looking sketches.
I’ll explain the fundamental principles regarding the necessity to understand “value range” and how it applies to
sketching cars.
All this information will be provided with our Top 5 Sketching Techniques Essential to a Designers Success!
Be sure to send me an email at [email protected] to let me know what you think after going through
the materials!
Enjoy!
Disclaimer! All content within this document are copy protected. Distribution of this copy without prior consent from www.drivenmavens.com is strictly prohibited.
Arvind

4
Sketching Materials
Disclaimer! All content within this document are copy protected. Distribution of this copy without prior consent from www.drivenmavens.com is strictly prohibited.
Types of Pencils for Sketching
1 2 3 4
1. Prismacolor Premier Pencils (Most Preferred)
a. Wax based Pencil – low to no smudge.
b. Extended Light to Dark Value Range
2. Extenders
Used for extending the “life” of short pencils
3. Prismacolor Verithin Pencils
a. Low to no smudge/lower value range to
that of Prismacolor Premier Pencils
4. Ebony or Regular Pencils
a. High Smudge but Ebony’s Tend to have
darker values then 2B Pencils. Ebony pencils
are typically used for “life” drawing but are
suitable for any application
NOTE:
Notice I have not listed erasers! This is because the objective is not to erase or “correct” your drawing. If
you make a mistake, just take it easy and move on to the next drawing.
Pencils
Preferred
5
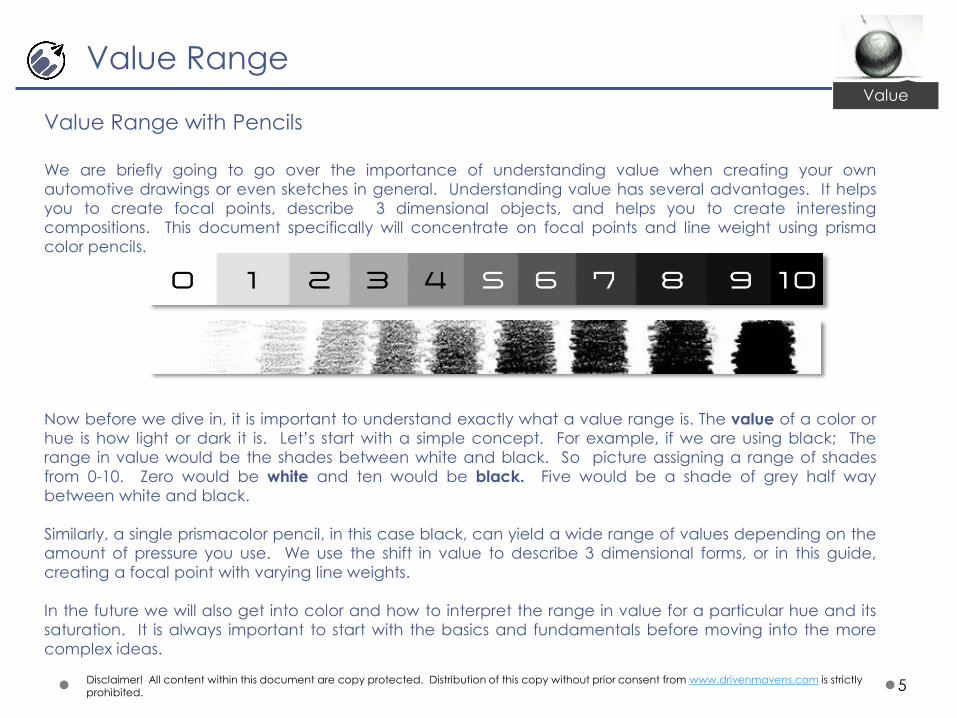
Value Range with Pencils
We are briefly going to go over the importance of understanding value when creating your own
automotive drawings or even sketches in general. Understanding value has several advantages. It helps
you to create focal points, describe 3 dimensional objects, and helps you to create interesting
compositions. This document specifically will concentrate on focal points and line weight using prisma
color pencils.
Now before we dive in, it is important to understand exactly what a value range is. The value of a color or
hue is how light or dark it is. Let’s start with a simple concept. For example, if we are using black; The
range in value would be the shades between white and black. So picture assigning a range of shades
from 0-10. Zero would be white and ten would be black. Five would be a shade of grey half way
between white and black.
Similarly, a single prismacolor pencil, in this case black, can yield a wide range of values depending on the
amount of pressure you use. We use the shift in value to describe 3 dimensional forms, or in this guide,
creating a focal point with varying line weights.
In the future we will also get into color and how to interpret the range in value for a particular hue and its
saturation. It is always important to start with the basics and fundamentals before moving into the more
complex ideas.
Value Range
Disclaimer! All content within this document are copy protected. Distribution of this copy without prior consent from www.drivenmavens.com is strictly prohibited.
Value

6
Shading primitive shapes like sphere, cones, boxes, and other simple objects are part of fundamentals and
basics in form description. Without learning how to shade simple shapes, complex forms will pose a formidable
challenge.
The best way to shade a sphere is to take a spherical shape and apply a light source. The drawing above
shows the light source coming from the top left side of the sphere. A core shadow will be cast along the
tangency points (T1 and T2) of the projected angle of the light source. We’ll dive deeper into this in future
lessons.
Primitive Shape Shading - Sphere
Disclaimer! All content within this document are copy protected. Distribution of this copy without prior consent from www.drivenmavens.com is strictly prohibited.
T1
T2
Core Shadow
Value RangeValue
7
Line Weight
Disclaimer! All content within this document are copy protected. Distribution of this copy without prior consent from www.drivenmavens.com is strictly prohibited.
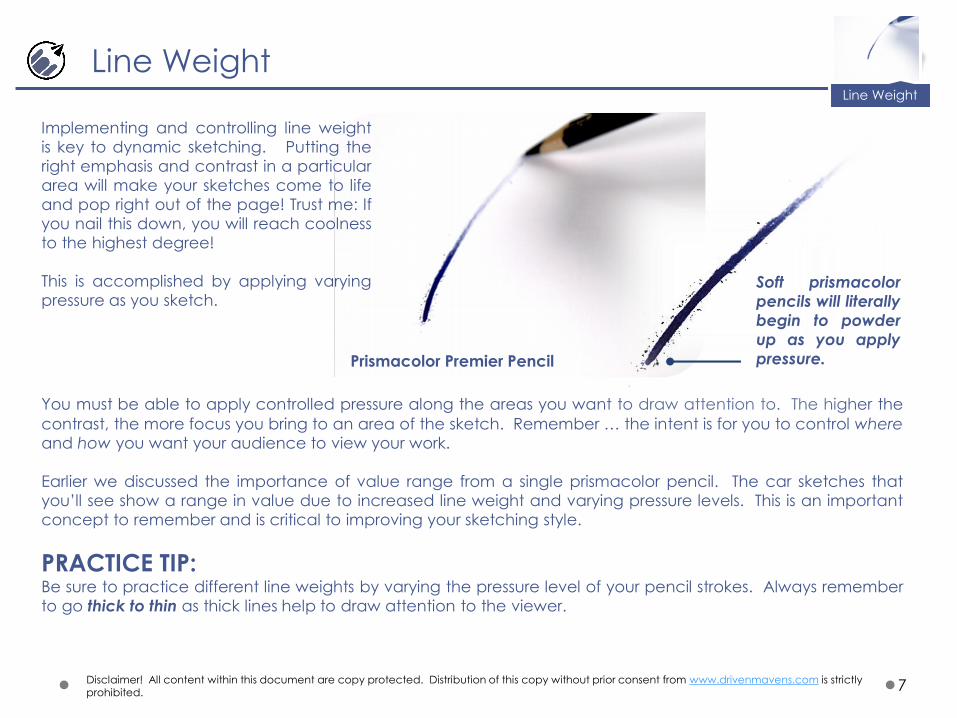
Implementing and controlling line weight
is key to dynamic sketching. Putting the
right emphasis and contrast in a particular
area will make your sketches come to life
and pop right out of the page! Trust me: If
you nail this down, you will reach coolness
to the highest degree!
This is accomplished by applying varying
pressure as you sketch.
You must be able to apply controlled pressure along the areas you want to draw attention to. The higher the
contrast, the more focus you bring to an area of the sketch. Remember … the intent is for you to control where
and how you want your audience to view your work.
Earlier we discussed the importance of value range from a single prismacolor pencil. The car sketches that
you’ll see show a range in value due to increased line weight and varying pressure levels. This is an important
concept to remember and is critical to improving your sketching style.
PRACTICE TIP:Be sure to practice different line weights by varying the pressure level of your pencil strokes. Always remember
to go thick to thin as thick lines help to draw attention to the viewer.
Prismacolor Premier Pencil
Soft prismacolor
pencils will literally
begin to powder
up as you apply
pressure.
Line Weight
8
Top 5 Sketching Techniques Essential to a Designers Success!
Disclaimer! All content within this document are copy protected. Distribution of this copy without prior consent from www.drivenmavens.com is strictly prohibited.
Create a sense of DramaITEM # 1
ITEM # 2
ITEM # 3
ITEM # 4
ITEM # 5
Create Focal Points
Create a sense of Dynamic Movement
Accentuate Graphical Elements
Highlighting Design Details

9
Let’s talk about describing form with a set of warm grey markers. Warm grey or cool gray markers are
typically numbered between 1-10 or 10% - 90% to Black. We use a range of grey markers to describe the
shape of the vehicle here. Remember that the higher the contrast between two shades, the greater the
form description. This particular sketch of the GT 500 has a high contrast compared to the white background
so it sort of pops out! Combining this with a forced perspective gives it DRAMA!
Disclaimer! All content within this document are copy protected. Distribution of this copy without prior consent from www.drivenmavens.com is strictly prohibited.
Bold graphical elements
Value 10
Fade out the rear portion
Value 2-3
Accentuate the character line
Value 8-9
Gouache Highlights
Value 0 (white)
Drama with Warm Grey Scale Markers
Creating DramaITEM # 1
Value

10
Let’s take the sketch on the
left. Clearly in this sketch,
the car in the front is the
focal point due to the
higher contrast in value.
The car in front is darker
then the car at the rear,
which is in turn darker than
the background. So you
clearly have a hierarchy of
Primary, Secondary, and
Tertiary elements in this
composition.
This gives the car a sort of
SILHOUETTE treatment!
1
2
3
Disclaimer! All content within this document are copy protected. Distribution of this copy without prior consent from www.drivenmavens.com is strictly prohibited.
Primary Focal Points with Cool Gray Markers:Value
ITEM # 2
As discussed previously, understanding value range is KEY in order to establish form, create focal points, and
increase the dynamics of a sketch. This is the first thing you will need to understand BEFORE exploring color.
Creating Focal Points

11Disclaimer! All content within this document are copy protected. Distribution of this copy without prior consent from www.drivenmavens.com is strictly prohibited.
Dynamic Movement with Prismacolor Premier Pencils:
The Ford GT sketch. Shown here is an exercise in proper line weight and varying contrast levels. Even the debris and
dust particles have a little varying line weight. So depending on whether you want “movement” to be
communicated, you will need to add thick to thin lines in different areas including debris to give the sketch some
DYNAMIC motion!
Line Weight
ITEM # 3 Create a Sense of Dynamic Movement
12Disclaimer! All content within this document are copy protected. Distribution of this copy without prior consent from www.drivenmavens.com is strictly prohibited.
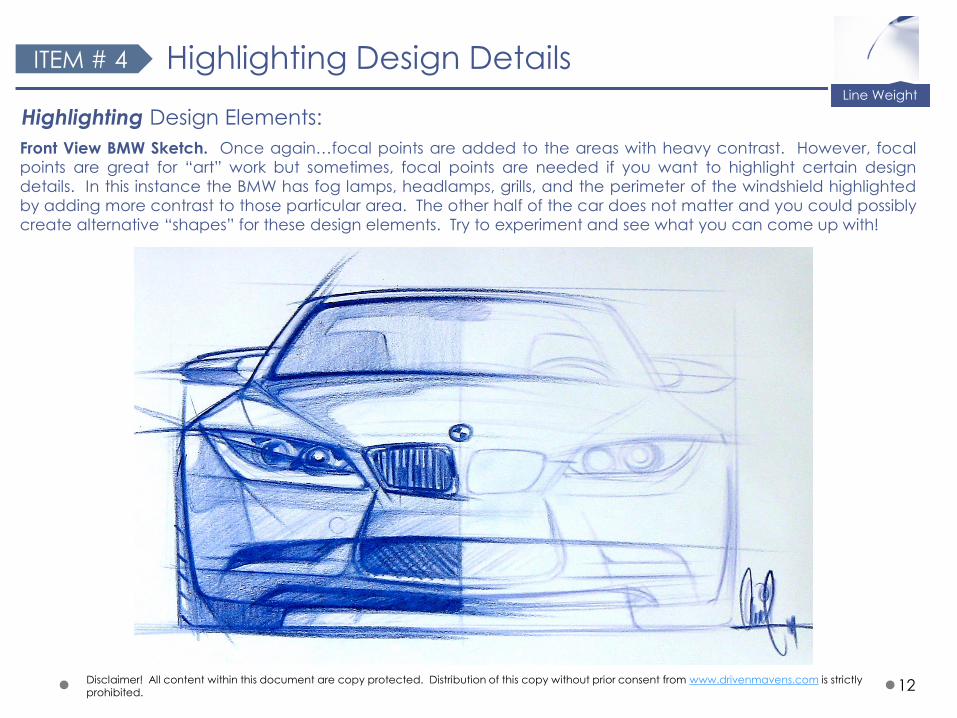
Highlighting Design Elements:Line Weight
ITEM # 4
Front View BMW Sketch. Once again…focal points are added to the areas with heavy contrast. However, focal
points are great for “art” work but sometimes, focal points are needed if you want to highlight certain design
details. In this instance the BMW has fog lamps, headlamps, grills, and the perimeter of the windshield highlighted
by adding more contrast to those particular area. The other half of the car does not matter and you could possibly
create alternative “shapes” for these design elements. Try to experiment and see what you can come up with!
Highlighting Design Details
13Disclaimer! All content within this document are copy protected. Distribution of this copy without prior consent from www.drivenmavens.com is strictly prohibited.
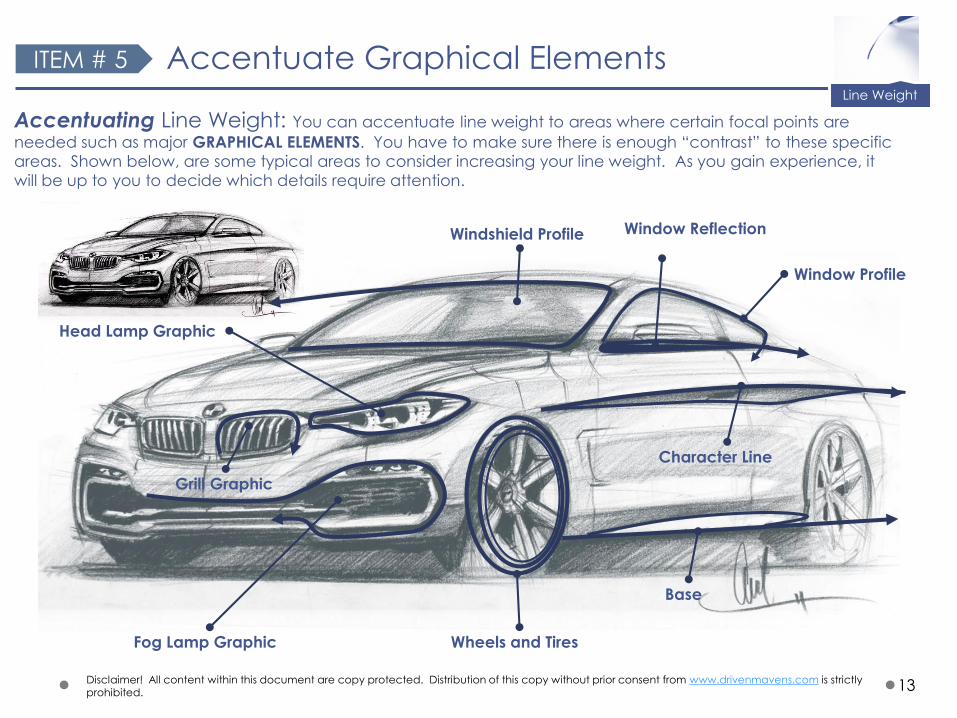
Accentuating Line Weight: You can accentuate line weight to areas where certain focal points are
needed such as major GRAPHICAL ELEMENTS. You have to make sure there is enough “contrast” to these specific
areas. Shown below, are some typical areas to consider increasing your line weight. As you gain experience, it
will be up to you to decide which details require attention.
Character Line
Windshield Profile
Wheels and TiresFog Lamp Graphic
Base
Head Lamp Graphic
Window Reflection
Grill Graphic
Window Profile
ITEM # 5 Accentuate Graphical ElementsLine Weight

14
Thanks so much!
Disclaimer! All content within this document are copy protected. Distribution of this copy without prior consent from www.drivenmavens.com is strictly prohibited.
Thanks so much for taking the time to go through
the Ultimate Guide to Sketching. I hope this guide
illustrated why fundamentals such as Materials,
Value Range, and Line Weight are important forcreating excitement in your sketches.
Buy Now >>
“Use the DVD's and practice, practice, practice,and the sky's the limit! ” John M II –Former Chief Designer
As a practicing professional, I found greatinterest in these lessons as well, as Arvind hasa natural teaching style which attracts andkeeps your interest. ”Brian S. – Owner Studio PCK
Looking for more in-depth lessons? Try ourPopular 5 hr Starter Course!
“Even myself as a professional automotive designer, found new techniques and reminded me of some I forgot.” Dustin S. –Automotive Seating Designer
Digital Download
“Being an Automotive Design student, I was eagerly looking for some valuable sketch rendering tutorials to master my marker rendering skills. This DVD set was a proper educational video of how to render photo-realistic renders of vehicles” Ajay P. –Design Student
4.75 Star Amazon Rating!
Thanks to folks like you! We’re Rockin it!