UG ENWW CrickMLK - Los Angeles Valley College
112
User’s Guide
Transcript of UG ENWW CrickMLK - Los Angeles Valley College

User’s Guide


HP Business Inkjet 1200 series printer
User’s Guide
Copyright Information
© 2004 Copyright Hewlett-Packard Development Company, L.P.
Edition 1, 8/2004
Reproduction, adaptation or translation without prior written permission is prohibited, except as allowed under the copyright laws.
The information contained herein is subject to change without notice.
The only warranties for HP products and services are set forth in the express warranty statements accompanying such products and services. Nothing herein should be construed as constituting an additional warranty. HP shall not be liable for technical or editorial errors or omissions contained herein.
Trademark Credits
Microsoft®, Windows®, Windows NT®, and MS-DOS® are U.S. registered trademarks of Microsoft Corporation.
Novell® and NetWare® are registered trademarks of Novell Corporation.
Pentium® is a registered trademark of Intel Corporation.
Adobe® and Acrobat® are registered trademarks of Adobe Systems Incorporate.
Safety Information
Always follow basic safety precautions when using this product to reduce risk of injury from fire or electric shock.
1 Read and understand all instructions in the documentation that comes with the printer.
2 Use only a grounded electrical outlet when connecting this product to a power source. If you do not know whether the outlet is grounded, check with a qualified electrician.
3 Observe all warnings and instructions marked on the product.
4 Unplug this product from wall outlets before cleaning.
5 Do not install or use this product near water, or when you are wet.
6 Install the product securely on a stable surface.
7 Install the product in a protected location where no one can step on or trip over the line cord, and the line cord cannot be damaged.
8 If the product does not operate normally, see Maintaining and troubleshooting.
9 There are no user-serviceable parts inside. Refer servicing to qualified service personnel.

Contents
1 Getting started
Finding other resources for the product . . . . . . . . . . . . . . . . . . . . . . . . . . . . . . . . . . . . . . . 6Understanding the printer parts . . . . . . . . . . . . . . . . . . . . . . . . . . . . . . . . . . . . . . . . . . . . . . 7
2 Using the printer
Selecting print media . . . . . . . . . . . . . . . . . . . . . . . . . . . . . . . . . . . . . . . . . . . . . . . . . . . . . . 9Tips for selecting and using print media . . . . . . . . . . . . . . . . . . . . . . . . . . . . . . . . . . . . 9Understanding specifications for supported media . . . . . . . . . . . . . . . . . . . . . . . . . . . 10Setting minimum margins . . . . . . . . . . . . . . . . . . . . . . . . . . . . . . . . . . . . . . . . . . . . . . 12
Loading media . . . . . . . . . . . . . . . . . . . . . . . . . . . . . . . . . . . . . . . . . . . . . . . . . . . . . . . . . . 13Configuring trays . . . . . . . . . . . . . . . . . . . . . . . . . . . . . . . . . . . . . . . . . . . . . . . . . . . . . . . . 14Changing print settings . . . . . . . . . . . . . . . . . . . . . . . . . . . . . . . . . . . . . . . . . . . . . . . . . . . 15Canceling a print job . . . . . . . . . . . . . . . . . . . . . . . . . . . . . . . . . . . . . . . . . . . . . . . . . . . . . 16Printing on both sides (duplexing) . . . . . . . . . . . . . . . . . . . . . . . . . . . . . . . . . . . . . . . . . . . 16
Guidelines for printing on both sides of a page . . . . . . . . . . . . . . . . . . . . . . . . . . . . . . 16To perform duplexing (Windows). . . . . . . . . . . . . . . . . . . . . . . . . . . . . . . . . . . . . . . . . 17To perform automatic duplexing (Mac OS) . . . . . . . . . . . . . . . . . . . . . . . . . . . . . . . . . 17To perform manual duplexing (Mac OS 9, version 9.1 and later) . . . . . . . . . . . . . . . . 18
Printing on special and custom-sized media . . . . . . . . . . . . . . . . . . . . . . . . . . . . . . . . . . . 18
3 Maintaining and troubleshooting
Replacing the ink cartridges. . . . . . . . . . . . . . . . . . . . . . . . . . . . . . . . . . . . . . . . . . . . . . . . 20Maintaining the printheads . . . . . . . . . . . . . . . . . . . . . . . . . . . . . . . . . . . . . . . . . . . . . . . . . 21Calibrating the color . . . . . . . . . . . . . . . . . . . . . . . . . . . . . . . . . . . . . . . . . . . . . . . . . . . . . . 25Troubleshooting tips and resources . . . . . . . . . . . . . . . . . . . . . . . . . . . . . . . . . . . . . . . . . . 25General troubleshooting tips . . . . . . . . . . . . . . . . . . . . . . . . . . . . . . . . . . . . . . . . . . . . . . . 25Resolving printing problems. . . . . . . . . . . . . . . . . . . . . . . . . . . . . . . . . . . . . . . . . . . . . . . . 26
Printer shuts down unexpectedly. . . . . . . . . . . . . . . . . . . . . . . . . . . . . . . . . . . . . . . . . 26All printer lights are blinking. . . . . . . . . . . . . . . . . . . . . . . . . . . . . . . . . . . . . . . . . . . . . 26Printer is not responding (nothing prints). . . . . . . . . . . . . . . . . . . . . . . . . . . . . . . . . . . 26Printer does not accept printhead . . . . . . . . . . . . . . . . . . . . . . . . . . . . . . . . . . . . . . . . 28Printer takes a long time to print . . . . . . . . . . . . . . . . . . . . . . . . . . . . . . . . . . . . . . . . . 28Blank page printed. . . . . . . . . . . . . . . . . . . . . . . . . . . . . . . . . . . . . . . . . . . . . . . . . . . . 29Something on the page is missing or incorrect . . . . . . . . . . . . . . . . . . . . . . . . . . . . . . 29Placement of the text or graphics is wrong . . . . . . . . . . . . . . . . . . . . . . . . . . . . . . . . . 30
Poor print quality and unexpected printouts. . . . . . . . . . . . . . . . . . . . . . . . . . . . . . . . . . . . 31Meaningless characters print. . . . . . . . . . . . . . . . . . . . . . . . . . . . . . . . . . . . . . . . . . . . 32Ink is smearing . . . . . . . . . . . . . . . . . . . . . . . . . . . . . . . . . . . . . . . . . . . . . . . . . . . . . . 32Ink is not filling the text or graphics completely . . . . . . . . . . . . . . . . . . . . . . . . . . . . . . 33Output is faded or dull colored. . . . . . . . . . . . . . . . . . . . . . . . . . . . . . . . . . . . . . . . . . . 33Colors are printing as black and white. . . . . . . . . . . . . . . . . . . . . . . . . . . . . . . . . . . . . 33Wrong colors are printing . . . . . . . . . . . . . . . . . . . . . . . . . . . . . . . . . . . . . . . . . . . . . . 33Printout shows bleeding colors . . . . . . . . . . . . . . . . . . . . . . . . . . . . . . . . . . . . . . . . . . 34Colors do not line up properly . . . . . . . . . . . . . . . . . . . . . . . . . . . . . . . . . . . . . . . . . . . 34Lines or dots are missing from text or graphics . . . . . . . . . . . . . . . . . . . . . . . . . . . . . . 34
Resolving paper-feed problems . . . . . . . . . . . . . . . . . . . . . . . . . . . . . . . . . . . . . . . . . . . . . 35Tray cannot be inserted . . . . . . . . . . . . . . . . . . . . . . . . . . . . . . . . . . . . . . . . . . . . . . . . 35Another paper-feed problem is occurring . . . . . . . . . . . . . . . . . . . . . . . . . . . . . . . . . . 35
Resolving printer management problems . . . . . . . . . . . . . . . . . . . . . . . . . . . . . . . . . . . . . 36Embedded Web server (EWS) cannot be opened. . . . . . . . . . . . . . . . . . . . . . . . . . . . 36
ENWW 3
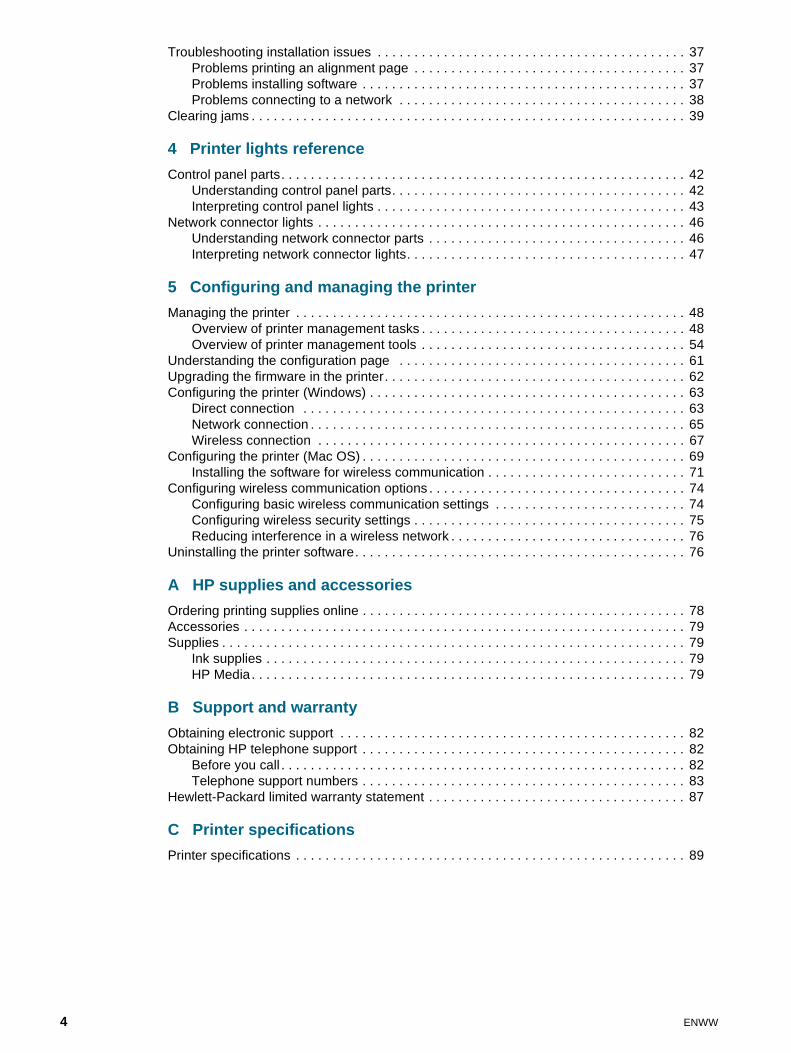
Troubleshooting installation issues . . . . . . . . . . . . . . . . . . . . . . . . . . . . . . . . . . . . . . . . . . 37Problems printing an alignment page . . . . . . . . . . . . . . . . . . . . . . . . . . . . . . . . . . . . . 37Problems installing software . . . . . . . . . . . . . . . . . . . . . . . . . . . . . . . . . . . . . . . . . . . . 37Problems connecting to a network . . . . . . . . . . . . . . . . . . . . . . . . . . . . . . . . . . . . . . . 38
Clearing jams . . . . . . . . . . . . . . . . . . . . . . . . . . . . . . . . . . . . . . . . . . . . . . . . . . . . . . . . . . . 39
4 Printer lights reference
Control panel parts. . . . . . . . . . . . . . . . . . . . . . . . . . . . . . . . . . . . . . . . . . . . . . . . . . . . . . . 42Understanding control panel parts. . . . . . . . . . . . . . . . . . . . . . . . . . . . . . . . . . . . . . . . 42Interpreting control panel lights . . . . . . . . . . . . . . . . . . . . . . . . . . . . . . . . . . . . . . . . . . 43
Network connector lights . . . . . . . . . . . . . . . . . . . . . . . . . . . . . . . . . . . . . . . . . . . . . . . . . . 46Understanding network connector parts . . . . . . . . . . . . . . . . . . . . . . . . . . . . . . . . . . . 46Interpreting network connector lights. . . . . . . . . . . . . . . . . . . . . . . . . . . . . . . . . . . . . . 47
5 Configuring and managing the printer
Managing the printer . . . . . . . . . . . . . . . . . . . . . . . . . . . . . . . . . . . . . . . . . . . . . . . . . . . . . 48Overview of printer management tasks . . . . . . . . . . . . . . . . . . . . . . . . . . . . . . . . . . . . 48Overview of printer management tools . . . . . . . . . . . . . . . . . . . . . . . . . . . . . . . . . . . . 54
Understanding the configuration page . . . . . . . . . . . . . . . . . . . . . . . . . . . . . . . . . . . . . . . 61Upgrading the firmware in the printer. . . . . . . . . . . . . . . . . . . . . . . . . . . . . . . . . . . . . . . . . 62Configuring the printer (Windows) . . . . . . . . . . . . . . . . . . . . . . . . . . . . . . . . . . . . . . . . . . . 63
Direct connection . . . . . . . . . . . . . . . . . . . . . . . . . . . . . . . . . . . . . . . . . . . . . . . . . . . . 63Network connection . . . . . . . . . . . . . . . . . . . . . . . . . . . . . . . . . . . . . . . . . . . . . . . . . . . 65Wireless connection . . . . . . . . . . . . . . . . . . . . . . . . . . . . . . . . . . . . . . . . . . . . . . . . . . 67
Configuring the printer (Mac OS) . . . . . . . . . . . . . . . . . . . . . . . . . . . . . . . . . . . . . . . . . . . . 69Installing the software for wireless communication . . . . . . . . . . . . . . . . . . . . . . . . . . . 71
Configuring wireless communication options . . . . . . . . . . . . . . . . . . . . . . . . . . . . . . . . . . . 74Configuring basic wireless communication settings . . . . . . . . . . . . . . . . . . . . . . . . . . 74Configuring wireless security settings . . . . . . . . . . . . . . . . . . . . . . . . . . . . . . . . . . . . . 75Reducing interference in a wireless network . . . . . . . . . . . . . . . . . . . . . . . . . . . . . . . . 76
Uninstalling the printer software. . . . . . . . . . . . . . . . . . . . . . . . . . . . . . . . . . . . . . . . . . . . . 76
A HP supplies and accessories
Ordering printing supplies online . . . . . . . . . . . . . . . . . . . . . . . . . . . . . . . . . . . . . . . . . . . . 78Accessories . . . . . . . . . . . . . . . . . . . . . . . . . . . . . . . . . . . . . . . . . . . . . . . . . . . . . . . . . . . . 79Supplies . . . . . . . . . . . . . . . . . . . . . . . . . . . . . . . . . . . . . . . . . . . . . . . . . . . . . . . . . . . . . . . 79
Ink supplies . . . . . . . . . . . . . . . . . . . . . . . . . . . . . . . . . . . . . . . . . . . . . . . . . . . . . . . . . 79HP Media. . . . . . . . . . . . . . . . . . . . . . . . . . . . . . . . . . . . . . . . . . . . . . . . . . . . . . . . . . . 79
B Support and warranty
Obtaining electronic support . . . . . . . . . . . . . . . . . . . . . . . . . . . . . . . . . . . . . . . . . . . . . . . 82Obtaining HP telephone support . . . . . . . . . . . . . . . . . . . . . . . . . . . . . . . . . . . . . . . . . . . . 82
Before you call . . . . . . . . . . . . . . . . . . . . . . . . . . . . . . . . . . . . . . . . . . . . . . . . . . . . . . . 82Telephone support numbers . . . . . . . . . . . . . . . . . . . . . . . . . . . . . . . . . . . . . . . . . . . . 83
Hewlett-Packard limited warranty statement . . . . . . . . . . . . . . . . . . . . . . . . . . . . . . . . . . . 87
C Printer specifications
Printer specifications . . . . . . . . . . . . . . . . . . . . . . . . . . . . . . . . . . . . . . . . . . . . . . . . . . . . . 89
4 ENWW

D Regulatory information
FCC statement . . . . . . . . . . . . . . . . . . . . . . . . . . . . . . . . . . . . . . . . . . . . . . . . . . . . . . . . . . 93EMI statement (Korea) . . . . . . . . . . . . . . . . . . . . . . . . . . . . . . . . . . . . . . . . . . . . . . . . . . . . 94VCCI statement (Japan). . . . . . . . . . . . . . . . . . . . . . . . . . . . . . . . . . . . . . . . . . . . . . . . . . . 94Regulatory model number . . . . . . . . . . . . . . . . . . . . . . . . . . . . . . . . . . . . . . . . . . . . . . . . . 94Power cord statement . . . . . . . . . . . . . . . . . . . . . . . . . . . . . . . . . . . . . . . . . . . . . . . . . . . . 94LED classification. . . . . . . . . . . . . . . . . . . . . . . . . . . . . . . . . . . . . . . . . . . . . . . . . . . . . . . . 95Regulatory notices for wireless products . . . . . . . . . . . . . . . . . . . . . . . . . . . . . . . . . . . . . . 95
Notice to users in Canada/Note à l’attention des utilisateurs Canadien . . . . . . . . . . . 95ARIB STD-T66 (Japan) . . . . . . . . . . . . . . . . . . . . . . . . . . . . . . . . . . . . . . . . . . . . . . . . 96Notice to users in Italy . . . . . . . . . . . . . . . . . . . . . . . . . . . . . . . . . . . . . . . . . . . . . . . . . 96Notice to users in France. . . . . . . . . . . . . . . . . . . . . . . . . . . . . . . . . . . . . . . . . . . . . . . 96Notice to users in the European Union . . . . . . . . . . . . . . . . . . . . . . . . . . . . . . . . . . . . 97
Declaration of conformity . . . . . . . . . . . . . . . . . . . . . . . . . . . . . . . . . . . . . . . . . . . . . . . . . . 98HP Business Inkjet 1200/1200d/1200dn/1200dtn printer . . . . . . . . . . . . . . . . . . . . . . 98HP Business Inkjet 1200dtwn printer. . . . . . . . . . . . . . . . . . . . . . . . . . . . . . . . . . . . . . 99
Environmental sustainability program . . . . . . . . . . . . . . . . . . . . . . . . . . . . . . . . . . . . . . . 100Reduction and elimination . . . . . . . . . . . . . . . . . . . . . . . . . . . . . . . . . . . . . . . . . . . . . 100Power consumption . . . . . . . . . . . . . . . . . . . . . . . . . . . . . . . . . . . . . . . . . . . . . . . . . . 100Hazardous materials . . . . . . . . . . . . . . . . . . . . . . . . . . . . . . . . . . . . . . . . . . . . . . . . . 101Recycling . . . . . . . . . . . . . . . . . . . . . . . . . . . . . . . . . . . . . . . . . . . . . . . . . . . . . . . . . . 101Material safety data sheets . . . . . . . . . . . . . . . . . . . . . . . . . . . . . . . . . . . . . . . . . . . . 101End-of-life returns . . . . . . . . . . . . . . . . . . . . . . . . . . . . . . . . . . . . . . . . . . . . . . . . . . . 101
Index
ENWW 5

1 Getting started
Thank you for buying the printer. This guide provides details about how to use the printer and to resolve printer and printing problems.
Finding other resources for the product
You can obtain product information and further troubleshooting resources that are not included in this guide from the following resources:
Resource Description Location
Setup poster Provides illustrated setup information. A printed version of this document is provided with the printer. Also, an electronic version is available as an Adobe® Acrobat® Portable Document Format (PDF) file on the Starter CD.
Getting started guide
Provides instructions for setting up the printer and information about the warranty and safety issues.
Included as a printed guide in the box with the printer.
Readme file and release notes
Provide late-breaking information and troubleshooting tips.
Included on the Starter CD.
Embedded Web server (network connection)
Allows you to view status information, change settings, and manage the printer from any computer on the network. See Embedded Web server (EWS).
Available through any standard Web browser.
Toolbox (Microsoft® Windows®)
Provides information about printhead health and access to printer maintenance services. See Toolbox (Windows) for more information.
Available if you choose an installation option that includes the Toolbox.
Printer-driver onscreen Help (Windows)
Provides an explanation of the features in the printer driver.
Available from the printer driver.
HP Inkjet Toolbox (Mac OS)
The HP Inkjet Toolbox contains tools to calibrate the printer, clean the printheads, print a test page, and find website support information. See HP Inkjet Toolbox (Mac OS) for more information.
Available at the computer.
HP InstantSupport
Helps you quickly identify, diagnose, and resolve printing problems.
See HP Instant Support for more information.
Available through any standard Web browser or through the Toolbox (Windows).
Control-panel Provides status, error, and warning information about printer operation.
See Printer lights reference.
Logs and reports Provides information about events that have occurred.
See Monitor the printer.
6 1 - Getting started ENWW

Understanding the printer parts
Front view
1 Paper guides
2 Output tray
3 Control panel
4 Top cover
5 Ink cartridge cover
6 Tray 1
7 Tray 2
8 Paper stack indicator
9 Printhead latch
10 Printheads
11 Ink cartridges
Configuration page
Provides information about the printer hardware (such as the firmware version and model number), printer settings, and accessories that are installed (such as memory and trays). If the printer is connected to a network, an additional network configuration page is available.
See Understanding the configuration page.
System tests and printouts (such the demo page printout and paper-path test)
Provides information to help diagnose problems in the print mechanism and paper path.
Demo page printoutPaper-path test
See Administer the printer.
HP websites Provides the latest printer software, product and support information.
http://www.hp.com/support/businessinkjet1200
http://www.hp.com
HP telephone support
Lists information to contact HP. During the warranty period, this support is often free of charge.
See Obtaining HP telephone support.
Resource Description Location
1
2 4 5
7 10
3
9
1186
ENWW Understanding the printer parts 7
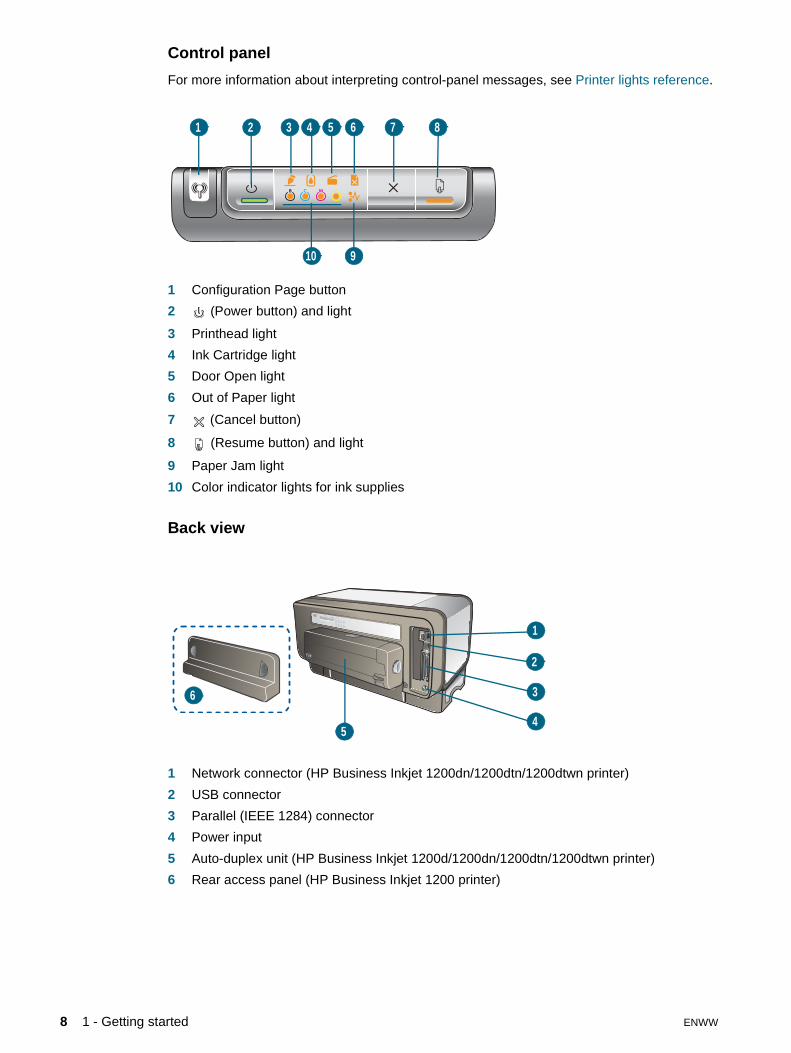
Control panel
For more information about interpreting control-panel messages, see Printer lights reference.
1 Configuration Page button
2 (Power button) and light
3 Printhead light
4 Ink Cartridge light
5 Door Open light
6 Out of Paper light
7 (Cancel button)
8 (Resume button) and light
9 Paper Jam light
10 Color indicator lights for ink supplies
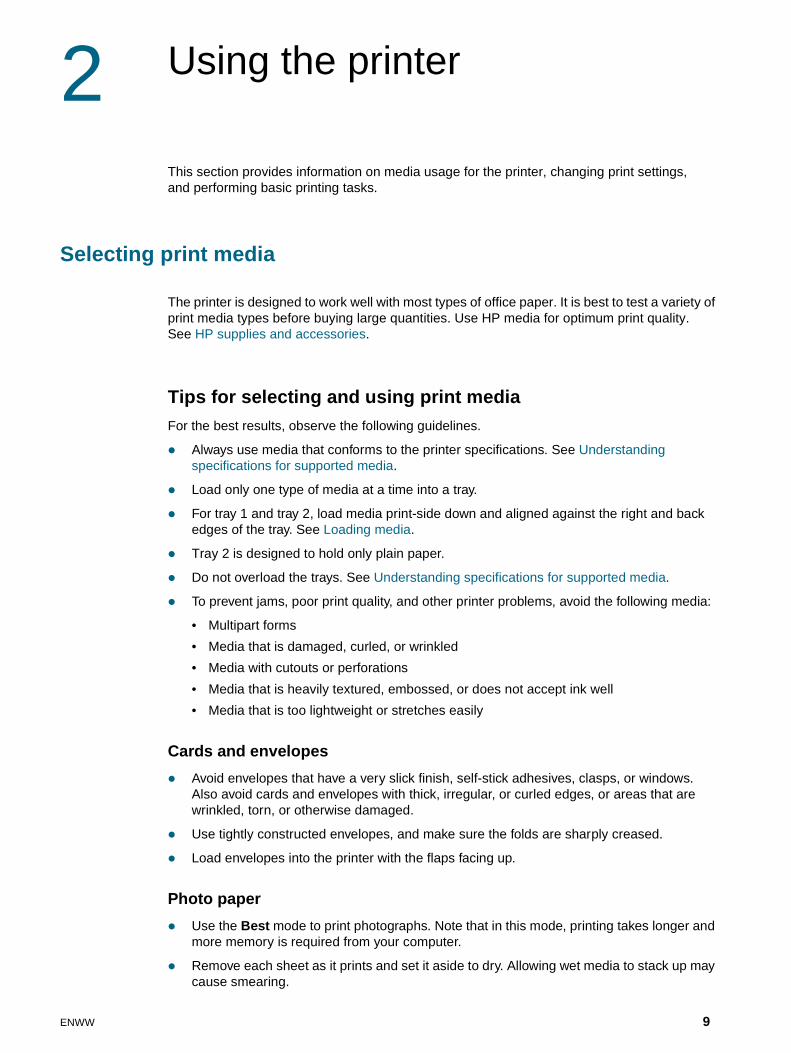
Back view
1 Network connector (HP Business Inkjet 1200dn/1200dtn/1200dtwn printer)
2 USB connector
3 Parallel (IEEE 1284) connector
4 Power input
5 Auto-duplex unit (HP Business Inkjet 1200d/1200dn/1200dtn/1200dtwn printer)
6 Rear access panel (HP Business Inkjet 1200 printer)
3 7 8
9
2 4 5 6
10
1
1
2
3
4
6
5
8 1 - Getting started ENWW
2 Using the printer
This section provides information on media usage for the printer, changing print settings, and performing basic printing tasks.
Selecting print media
The printer is designed to work well with most types of office paper. It is best to test a variety of print media types before buying large quantities. Use HP media for optimum print quality. See HP supplies and accessories.
Tips for selecting and using print mediaFor the best results, observe the following guidelines.
Always use media that conforms to the printer specifications. See Understanding specifications for supported media.
Load only one type of media at a time into a tray.
For tray 1 and tray 2, load media print-side down and aligned against the right and back edges of the tray. See Loading media.
Tray 2 is designed to hold only plain paper.
Do not overload the trays. See Understanding specifications for supported media.
To prevent jams, poor print quality, and other printer problems, avoid the following media:
• Multipart forms
• Media that is damaged, curled, or wrinkled
• Media with cutouts or perforations
• Media that is heavily textured, embossed, or does not accept ink well
• Media that is too lightweight or stretches easily
Cards and envelopes
Avoid envelopes that have a very slick finish, self-stick adhesives, clasps, or windows. Also avoid cards and envelopes with thick, irregular, or curled edges, or areas that are wrinkled, torn, or otherwise damaged.
Use tightly constructed envelopes, and make sure the folds are sharply creased.
Load envelopes into the printer with the flaps facing up.
Photo paper
Use the Best mode to print photographs. Note that in this mode, printing takes longer and more memory is required from your computer.
Remove each sheet as it prints and set it aside to dry. Allowing wet media to stack up may cause smearing.
ENWW 9

Transparencies
Insert transparencies with the rough side down and the adhesive strip pointing towards the back of the printer.
Use the Best mode to print transparencies. This mode provides longer drying time and ensures that the ink dries completely before the next page is delivered to the output tray. Allowing wet media to stack up may cause smearing.
Custom-size media
Use only custom-size media supported by the printer.
If your application supports custom-size media, set the media size in the application before printing the document. If not, set the size in the printer driver. You might need to reformat existing documents to print them correctly on custom-size media.
Understanding specifications for supported mediaThis section provides information regarding the sizes, types, and weights of media that the printer supports. It also provides information on the tray capacity.
Note Tray 2 comes with the HP Business Inkjet 1200dtn and HP Business Inkjet 1200dtwn printers.
Understanding supported sizes
Media size Tray 1 Tray 2 Auto-duplex unit
Standard paper sizes
U.S. Letter*(216 by 279 mm; 8.5 by 11 inches)
U.S. Legal*(216 by 356 mm; 8.5 by 14 inches)
A4* (210 by 297 mm; 8.3 by 11.7 inches)
U.S. Executive*(184 by 267 mm; 7.25 by 10.5 inches)
U.S. Statement*(140 by 216 mm; 5.5 by 8.5 inches)
ISO B5*(176 by 250 mm; 6.9 by 9.8 inches)
A5*(148 by 210 mm; 5.8 by 8.3 inches)
10 2 - Using the printer ENWW

* These media sizes support manual duplex. See Printing on both sides (duplexing).
Envelopes
U.S. #10 Envelope (105 by 241 mm; 4.12 by 9.5 inches)
Monarch Envelope (98 by 191 mm; 3.88 by 7.5 inches)
HP Greeting Card Envelope (111 by 152 mm; 4.38 by 6 inches)
A2 Envelope (111 by 146 mm; 4.37 by 5.75 inches)
DL Envelope (110 by 220 mm; 4.3 by 8.7 inches)
C5 Envelope (162 by 229 mm; 6.4 by 9 inches)
C6 Envelope (114 by 162 mm; 4.5 by 6.4 inches)
Envelope Kaku #2 (240 by 333 mm; 9.4 by 13.1 inches)
Japanese Envelope Chou #3 (120 x 235 mm; 4.7 by 9.3 inches)
Japanese Envelope Chou #4 (90 x 205 mm; 3.5 by 8.1 inches)
Cards
Index card*(3 by 5 inches; 76.2 by 127 mm)
Index card*(4 by 6 inches; 102 by 152 mm)
Index card*(5 by 8 inches; 127 by 203 mm)
ISO A6 card*(4.13 by 5.83 inches; 105 by 149 mm)
Hagaki*(100 by 148 mm; 3.9 by 5.8 inches)
Ofuku Hagaki*(148 by 200 mm; 5.8 by 7.9 inches)
Other media
Photo media*(4 by 6 inches; 102 by 152 mm)
Banner paper (up to 8.5 inches wide and 234 inches long; up to 216 mm wide and 594.4 cm long)
Custom-size media* between 3 to 8.5 inches wide and 5 to 14 inches long (76.2 to 216 mm wide and 127 to 356 mm long)*
Media size Tray 1 Tray 2 Auto-duplex unit
ENWW 11

Understanding supported media types and weights
Setting minimum marginsThe document margins must match (or exceed) these minimum margin settings in portrait orientation.
Tray Type Weight Capacity
Tray 1 Paper 60 to 135 g/m2
(16 to 36 lb bond)Up to 150 sheets of plain paper (15 mm or 0.6 inch stacked)
Transparencies or labels Up to 30 sheets (8 mm or 0.3 inch stacked)
Envelopes 75 to 90 g/m2
(20 to 24 lb bond envelope)
Up to 22 sheets (15 mm or 0.6 inch stacked)
Cards Up to 200 g/m2
(110 lb index)Up to 5 cards
Tray 2 Plain paper only 60 to 105 g/m2
(16 to 28 lb bond)Up to 250 sheets of plain paper (25 mm or 1 inch stacked)
Auto-duplex unit Paper 60 to 105 g/m2
(16 to 28 lb bond)N.A.
Output tray All supported media Up to 150 sheets of plain paper (text printing)
Top
Bottom
RightLeft
Left
Top
Bottom
Right
12 2 - Using the printer ENWW

*The top and bottom margins of banner paper refer to the space between individual sheets in the banner paper.
Note When you are using the auto-duplex unit, the minimum top and bottom margin must match or exceed 12.7 mm (0.5 inch).
Loading media
This section provides instructions for loading media into the printer.
To load tray 1 or tray 2
1 Pull the tray out of the printer by grasping under the front of the tray.
2 If you are loading tray 1, raise the output tray.
3 If the media is too long, move the latch on the front of the tray to the right and lower the front of the tray.
Media Left margin Right margin Top margin Bottom margin
U.S. Letter, U.S. Legal, A4, U.S. Executive, U.S. Statement, ISO B5, A5, cards, custom-size media
3.3 mm(0.13 inch)
3.3 mm(0.13 inch)
1.8 mm(0.069 inch)
11.7 mm(0.46 inch)
Envelopes 11.7 mm(0.46 inch)
11.7 mm(0.46 inch)
3.3 mm(0.13 inch)
3.3 mm(0.13 inch)
Photo media (4 by 6 inches, or 101.6 by 152.4 mm) with tear-off tab
3.0 mm(0.12 inch)
3.0 mm(0.12 inch)
3.0 mm(0.12 inch)
3.0 mm(0.12 inch)
Banner paper 3.3 mm(0.13 inch)
3.3 mm(0.13 inch)
0.0 mm*(0.0 inch)
0.0 mm*(0.0 inch)
Letter/A4 Legal
ENWW 13

4 Press the button of the media width guide and slide the guide to the left. Press the button of the media length guide and slide the guide towards you.
5 Insert the media print-side down along the right of the tray. Make sure the stack of media aligns with the right and back edges of the tray, and does not spill over the edges.
6 Press the buttons of the media guides and slide the guides to the edges of the loaded media. If you have raised the output tray, lower it to its original position.
7 Gently reinsert the tray into the printer.
CAUTION If you have loaded legal-size or longer media, keep the front of the tray lowered. Damage to the media or printer might result if you raise the front of the tray with this longer media loaded.
Configuring trays
By default, the printer draws media from tray 1. If tray 1 is empty, the printer draws media from tray 2 (if installed). You can change this default behavior using the following features in the embedded Web server or the Toolbox (Windows).
Tray lock. Use this feature to protect special media such as letterhead or preprinted media from accidental use. If the printer runs out of paper while printing a document, it will not use paper from a locked tray to complete the print job.
Default tray. Use this feature to determine the first tray from which the printer draws media.
Note To use the tray lock and default tray settings, you must select the automatic tray selection option in the printer software. If the printer is on a network and you set a default tray, the setting will affect all users of the printer.
Tray 2 is designed to hold only plain paper.
To configure the tray
1 Make sure the printer is turned on.
2 From the Toolbox: Click the Printer Services tab, and then click Advanced Configuration.From the embedded Web server: Click the Settings tab, and then click Paper Handling in the left pane.
3 Change the desired tray settings and click OK or Apply.
14 2 - Using the printer ENWW

The following table lists possible ways you can use the tray settings to meet your printing needs.
Changing print settings
You can change print settings (such as media size or type) from an application or the printer driver. Changes made from an application take precedence over changes made from the printer driver. However, after the application is closed, the settings return to the defaults configured in the printer driver.
Note To set print settings for all print jobs, make the changes in the printer driver.
For more information about printer driver features in Windows, see the printer driver online help. For more information about printing from a specific application, see the documentation for that application.
To change settings from an application for current jobs (Windows)
1 Open the document you want to print.
2 On the File menu, click Print, and then click Setup or Properties. (Specific options may vary depending on the application you are using.)
3 Change any other desired settings and click OK, Print, or a similar command.
To change default settings for all future jobs (Windows)
1 Click Start, point to Settings, and then click Printers or Printers and Faxes.
2 Right-click the printer icon, and then choose Properties, Document Defaults, or Printing Preferences.
3 Change any other desired settings and click OK.
To change settings (Mac OS)
1 On the File menu, click Page Setup.
2 Change any desired settings and click OK.
3 On the File menu, click Print.
4 Change any desired settings and click Print.
I want to... Follow these steps
Load both trays with the same media and have the printer pick media from one tray if the other one is empty.
1 Load media in tray 1 and tray 2. See Loading media.
2 Make sure tray lock is disabled.
Have both special media (such as transparencies or letterhead) and plain paper loaded in the trays.
1 Load special media in tray 1 and plain paper in tray 2.
2 Make sure tray lock is set to tray 1.
Load media in both trays but have the printer pick media from a specific tray first.
1 Load media in tray 1 and tray 2.
2 Make sure default tray is set to the desired tray.
ENWW 15

Canceling a print job
You can cancel a print job using one of the following ways.
Control panel
Press the (Cancel button). This will clear the job that the printer is currently processing. It does not affect jobs waiting to be processed.
Windows
Double-click the printer icon that appears in the lower right corner of the computer screen. Select the print job, and then press the Delete key on the keyboard.
Mac OS 9 (9.1 and later)
Double-click the desktop printer icon, select the print job, and then click Trash.
Mac OS X (10.1.5 and later)
Click the Print Center icon, and then double-click the printer icon. Select the print job and click Delete.
Printing on both sides (duplexing)
You can print on both sides of a sheet of media, either automatically by using the auto-duplex unit or manually by turning the media over and feeding it into the printer again.
Guidelines for printing on both sides of a pageAlways use media that conforms to the printer specifications. See Understanding specifications for supported media.
Specify duplex options in your application or in the printer driver.
Do not print on both sides of transparencies, banner media, envelopes, photo paper, glossy media, or paper lighter than 16 lb bond (60 g/m2) or heavier than 24 lb bond (90 g/m2). Jams might occur with these media types.
Several kinds of media require a specific orientation when you print on both sides of a page, such as letterhead, preprinted paper, and paper with watermarks and prepunched holes. When you print from a computer running Windows, the printer prints the first side of the media first. When you print from a computer using the Mac OS, the printer prints the second side first. Load the media with the front side facing down.
When printing finishes on one side of the media, the printer holds the media and pauses while the ink dries. Once the ink dries, the media is pulled back into the printer and the second side is printed. When printing is complete, the media is dropped onto the output tray. Do not grab it before printing is complete.
You can print on both sides of supported custom-sized media by using the printer’s manual duplex capabilities. (For a list of supported custom-sized media, see Understanding specifications for supported media.)
16 2 - Using the printer ENWW
To perform duplexing (Windows)1 Load the appropriate media. See Guidelines for printing on both sides of a page and
Loading media.
2 With a document open, on the File menu, click Print, and then choose Properties, Document Defaults, or Printing Preferences.
3 Click the Finishing tab.
4 Select the Print on Both Sides check box.
5 For automatic duplexing, ensure that Use auto-duplex unit is selected.For manual duplexing, ensure the option is cleared.
6 To automatically resize each page to match the document's onscreen layout, ensure Preserve Layout is selected. Clearing this option may result in unwanted page breaks.
7 Select or clear the Flip Pages Up check box depending on which way you want the binding. See the graphics in the printer driver for examples.
8 Change any other desired settings and click OK.
9 Print your document.
Note If you are using a computer running Windows NT 4.0, click Continue in the dialog box that appears to print the document. Otherwise, the printer does not start printing.
10 For manual duplexing, after the first side of the document is printed, follow the onscreen instructions and reload the paper into the tray to complete printing.
To perform automatic duplexing (Mac OS)1 Load the appropriate media. See Guidelines for printing on both sides of a page and
Loading media.
2 On the File menu, click Print.
3 For Mac OS 9, open the Layout panel.For Mac OS X, open the Two Sided Printing panel.
4 Select the option to print on both sides.
5 Select the desired binding orientation by clicking the appropriate icon.
6 For Mac OS 9, select Automatic.
7 Change any other desired settings and click Print.
ENWW 17
To perform manual duplexing (Mac OS 9, version 9.1 and later)
Note Manual duplexing is available in Mac OS 9 (9.1 and later) only.
1 Load the appropriate media. See Loading media.
2 On the File menu, click Print.
3 Open the Layout panel.
4 Select the option to print on both sides.
5 Select Manual if the auto-duplex unit is installed.
6 Select the desired binding orientation by clicking the appropriate icon.
7 Change any other desired settings and click OK or Print.
8 Follow the onscreen instructions to complete printing.
Printing on special and custom-sized media
This section provides information on how to print on media such as envelopes, photo paper, postcards, and transparencies, as well as custom-sized media.
To print on special media (Windows)
1 Load the appropriate media. See Loading media.
1 With a document open, on the File menu, click Print, and then click Setup or Properties.
2 Click the Paper/Quality tab.
3 Select the media type from the Type is drop-down list.
4 Select the media size from the Size is drop-down list.-OrClick Custom, enter the dimensions of the media, and click OK.
5 Change any other desired settings and click OK.
6 Print your document.
18 2 - Using the printer ENWW

To print on special media (Mac OS)
1 Load the appropriate media. See Loading media.
2 On the File menu, click Page Setup.
3 Select the media size.
4 To set a custom media size, complete the following steps:
a For Mac OS 9, click Edit Custom Paper Sizes in the Paper Size pull-down menu.For Mac OS X, click Custom Paper Size in the Settings pull-down menu.
b Click New, and then type a name for the size in the Paper Size Name box.
c In the Width and Height boxes, type the dimensions. For Mac OS X, you can also set the margins.
d Click Done or OK.
e For Mac OS 9, click Done again.
5 On the File menu, click Print.
6 For Mac OS 9, select the media source in the General panel.
7 Open the Paper Type/Quality panel.
8 For Mac OS 9, select the media source and media group and type.For Mac OS X, click the Paper tab and select the media type.
9 Change any other desired settings and click Print.
ENWW 19

3 Maintaining and troubleshooting
Replacing the ink cartridges
You can check the ink levels from the Toolbox (Windows), the HP Inkjet Toolbox (Mac OS), or the embedded Web server. For information about using these tools, see Overview of printer management tools.
After removing a cartridge from its package, install it right away. Do not remove a cartridge from the printer for long periods of time.
CAUTION HP recognizes customer’s choice, but cannot guarantee the quality or reliability of non-HP ink cartridges. Printer services or repairs required as a result of using non-HP or refilled ink cartridges is not covered under warranty.
Note To find out which ink cartridges work with your printer, see Supplies.
To replace an ink cartridge
1 Ensure the printer is turned on.
2 Open the ink cartridge cover by pressing and releasing it.
3 Remove the ink cartridge that requires replacement by grasping it between your thumb and forefinger and pulling it firmly toward you.
4 Remove the new ink cartridge from its package.
5 Insert the cartridge into its own color-coded slot. Press down firmly on the cartridge to ensure proper contact.
6 Close the ink cartridge cover.
20 3 - Maintaining and troubleshooting ENWW
Maintaining the printheads
If printed characters are incomplete, or dots or lines are missing from printouts, this may be caused by clogged ink nozzles and you might need to clean the printheads. To find out which printheads work with your printer, see Supplies.
When the quality of printouts deteriorates, complete the following:
Check the health of the printheads
Initiate the automatic printhead cleaning process
Manually clean the printhead contacts
Replace the printheads, if the problems persist after cleaning.
CAUTION HP is not responsible for damage to the printer that results from modifying the printheads.
To check printhead health
Configuration page
1 Press the Configuration Page button to print the configuration page. See Understanding the configuration page.
2 Check the printhead health section of the configuration page. If any printhead status is bad, clean or replace the printhead.
Embedded Web server
1 Open the embedded Web server. See To open the EWS.
2 Click the Information tab.
3 Click Ink Supplies in the left pane. If any printhead status is bad, clean or replace the printhead.
Toolbox (Windows)
1 Open the Toolbox. See To open the Toolbox.
2 On the Information tab, click Printhead Health. If any printhead status is bad, clean or replace the printhead.
To clean printheads automatically
Note Clean the printheads only when necessary; cleaning uses ink and shortens the life of the printheads. There are three levels of cleaning available. After one level of cleaning, perform the next level of cleaning only if the results are not satisfactory.
Control panel
1 Press and hold (Power button).
2 While holding the button, do one of the following. Perform the next level of cleaning only if results from previous level are not satisfactory.
a For level 1 cleaning: Press (Cancel button) twice.
b For level 2 cleaning: Press (Cancel button) twice and (Resume button) once.
c For level 3 cleaning: Press (Cancel button) twice and (Resume button) twice.
ENWW 21

3 Release (Power button). The printer begins the cleaning process.
4 Print the configuration page of the printer. See Understanding the configuration page.
Embedded Web server
1 Open the embedded Web server. See To open the EWS.
2 Click the Settings tab.
3 To clean the printheads, click Diagnostic in the left pane. Then, select the appropriate cleaning level from the drop-down list in the Printheads section.
Toolbox (Windows)
1 Open the Toolbox. See To open the Toolbox.
2 Click the Printer Services tab, click Clean Printheads, and follow the onscreen instructions.
HP Inkjet Toolbox (Mac OS)
1 Open the HP Inkjet Toolbox. See To open the HP Inkjet Toolbox.
2 Click Clean and follow the onscreen instructions.
To align the printheads
Whenever you replace a printhead, the printer automatically aligns the printheads to ensure the best print quality. However, if the appearance of your printed pages indicates that the printheads are misaligned, you can align them manually.
Control panel
Press and hold (Power button), press (Resume button) three times, and release (Power button).
Embedded Web server
1 Open the embedded Web server. See To open the EWS.
2 Click the Settings tab.
3 Click Diagnostic in the left pane.
4 In the Printheads section, select the align printheads option from the drop-down list.
Toolbox (Windows)
1 Open the Toolbox. See To open the Toolbox.
2 Click the Printer Services tab, click Align Printheads, and follow the onscreen instructions.
HP Inkjet Toolbox (Mac OS)
1 Open the HP Inkjet Toolbox. See To open the HP Inkjet Toolbox.
2 Click Calibrate and follow the onscreen instructions.
22 3 - Maintaining and troubleshooting ENWW
To replace the printheads
Note Only replace printheads after you have attempted to clean the printheads. See To clean printheads automatically and To clean the printhead contacts manually.
1 Ensure the printer is plugged in and turned on.
2 Open the top cover.
3 Lift to open the printhead latch.
4 Lift the handle of a printhead and use it to pull the printhead out of its slot.
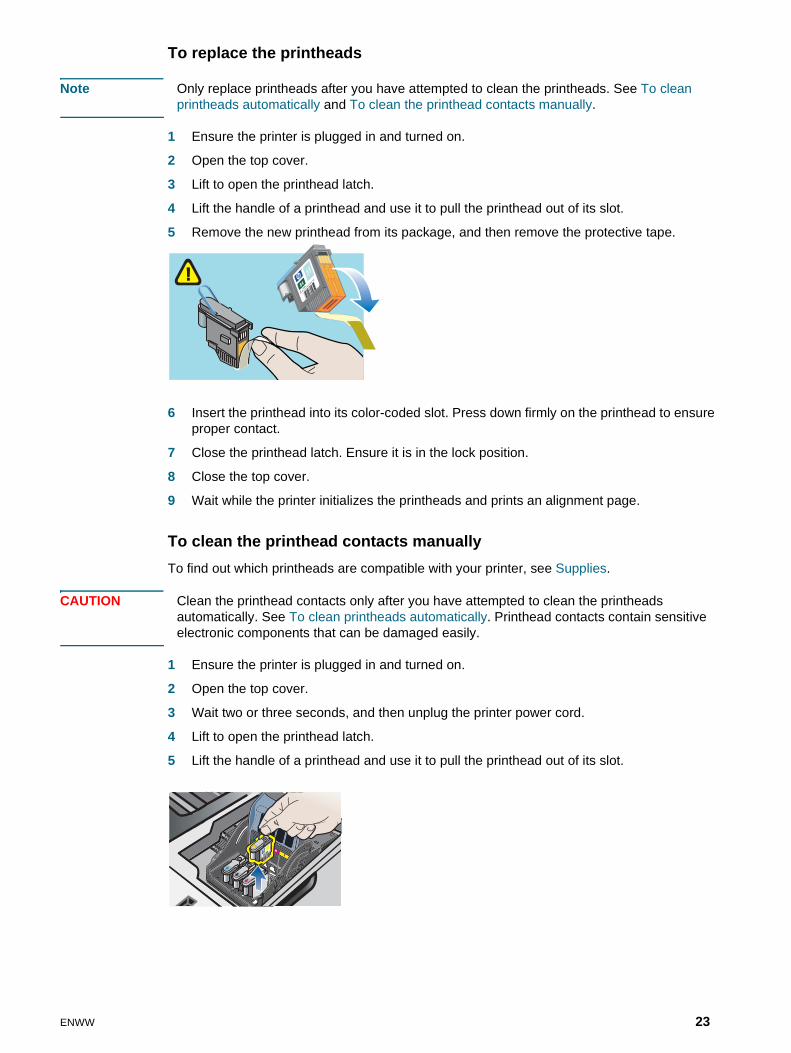
5 Remove the new printhead from its package, and then remove the protective tape.
6 Insert the printhead into its color-coded slot. Press down firmly on the printhead to ensure proper contact.
7 Close the printhead latch. Ensure it is in the lock position.
8 Close the top cover.
9 Wait while the printer initializes the printheads and prints an alignment page.
To clean the printhead contacts manually
To find out which printheads are compatible with your printer, see Supplies.
CAUTION Clean the printhead contacts only after you have attempted to clean the printheads automatically. See To clean printheads automatically. Printhead contacts contain sensitive electronic components that can be damaged easily.
1 Ensure the printer is plugged in and turned on.
2 Open the top cover.
3 Wait two or three seconds, and then unplug the printer power cord.
4 Lift to open the printhead latch.
5 Lift the handle of a printhead and use it to pull the printhead out of its slot.
ENWW 23

6 Carefully remove any ink from the contact pads on the printhead using a dry cotton swab or a soft, dry, lint-free cloth that will not come apart or leave fibers behind.
CAUTION Only wipe the contact pads. Wiping the nozzles (located on the underside of the printhead) can cause severe damage to the printhead.
7 If some residue remains, slightly moisten the swab with distilled, filtered, or bottled water and continue wiping until the contacts are clean.
CAUTION Avoid using drinking water or alcohol, which could damage the printheads.
8 After cleaning, place the printhead on a sheet of paper or paper towel.
9 Clean the contact points in the printhead slot inside the printer with a dampened cotton swab. Before re-inserting the printheads, make sure all the electrical contacts have had at least five minutes to dry.
10 Plug in the power cord and turn on the printer. The control panel should still indicate that a printhead is missing.
11 If you are replacing a printhead, remove the new printhead from its package, and then remove the protective tape.
12 Insert the printhead into its color-coded slot. Press down firmly on the printhead to ensure proper contact.
13 Close the printhead latch. Ensure it is in the lock position.
14 Close the top cover.
15 Where necessary, repeat the above steps for the remaining printheads.
16 Wait while the printer initializes the printheads and prints an alignment page. If the printer does not print an alignment page, replace the printhead you have cleaned.
24 3 - Maintaining and troubleshooting ENWW

Calibrating the color
Whenever you replace a printhead, the printer automatically calibrates the colors to ensure the best print quality. If you are not satisfied with the appearance of the colors, you can calibrate colors manually.
Toolbox (Windows)
Click the Printer Services tab. Then, click Calibrate Color and follow the onscreen instructions.
HP Inkjet Toolbox (Mac OS)
Click Calibrate Color and follow the onscreen instructions.
Troubleshooting tips and resources
Use the following tips and resources to resolve printing problems.
For paper jam, see Clearing jams.
For paper-feed problems, such as the paper skew and paper pick, see Resolving paper-feed problems.
Some printer problems can be resolved by resetting the printer.
To reset the printer
1 While pressing the Configuration Page button, press (Resume button) three times.
2 Wait about 20 seconds, and then press (Power button) to turn off the printer.
3 Disconnect the power cord from the printer.
4 Wait about 20 seconds, and then reconnect the power cord.
5 Press (Power button) to turn on the printer.
General troubleshooting tips
Ensure the following:
Power light is on and not blinking. When the printer is first turned on, it takes approximately 45 seconds to warm up.
Make sure the printer is in the Ready state. If lights are on or blinking, see Printer lights reference.
No error messages appear on the computer screen.
Power cord and other cables are working and firmly connected to the printer. Make sure the printer is connected firmly to a functioning alternating current (AC) power outlet and is turned on. See Printer specifications for voltage requirements.
Media is loaded correctly in the tray and is not jammed in the printer.
Printheads and ink cartridges are properly installed in their correct color-coded slots. Press down firmly on each one to ensure proper contact. Ensure you have removed the tape from each printhead.
Printhead latch and all covers are closed.
ENWW 25

Rear access panel or auto-duplex unit is locked into place.
All packing tapes and materials are removed from the printer.
Printer can print a configuration page. See Understanding the configuration page.
The printer is set as the current or default printer. For Windows, set the printer as the default in the Printers folder. For Mac OS, set the printer as the default in the Chooser or the Print Center. See your computer’s documentation for more information.
Pause Printing is not selected if you are using a computer running Windows.
You are not running too many programs when you are performing a task. Close programs that you are not using or restart the computer before attempting the task again.
Resolving printing problems
This section provides solutions to common printing problems.
Printer shuts down unexpectedly
Check power and power connections
Make sure the printer is connected firmly to a functioning alternating current (AC) power outlet. See Printer specifications for voltage requirements.
Check printer vents
The printer vents are located on the sides of the printer. If the vents are covered and the printer overheats, the printer automatically turns off. Make sure the vents are not covered and the printer is in a cool, dry location. See Printer specifications for the required operating environment for the printer.
All printer lights are blinking
A non-recoverable error has occurred
Reset the printer. See To reset the printer.
If the problem persists, contact HP. See Support and warranty.
Printer is not responding (nothing prints)
Check printer setup
See General troubleshooting tips.
26 3 - Maintaining and troubleshooting ENWW
Check the printhead initialization
When printheads are installed or replaced, the printer automatically prints an alignment page to align the printheads. This process takes about seven minutes. Until this process is complete, only the automatic alignment page can be printed.
Check the printer software installation
If the printer is turned off when printing, an alert message should appear on your computer screen; otherwise, the printer software might not be installed correctly. To resolve this, uninstall the software completely, and then reinstall the printer software. See Uninstalling the printer software.
Check cable connections
Make sure both ends of the cable (USB, parallel, or network) are secure.
If the printer is connected to a network, check the following:
• Check the Link light on the back of the printer. See Network connector lights.
• Make sure you are not using a phone cord to connect the printer.
• The network hub, switch, or router is on and working properly.
Check printer setup for network environment
Ensure the correct printer driver and printer driver port are being used. For more information about network connections, see Configuring the printer (Windows), Configuring the printer (Mac OS), or the documentation provided by your network vendors.
Check any personal firewall software installed on the computer
The personal software firewall is a security program that protects a computer from intrusion. However, the firewall might block communication between the computer and the printer. If there is a problem communicating with the printer, try temporarily disabling the firewall. If the problem persists, the firewall is not the source of the communication problem. Re-enable the firewall.
If disabling the firewall allows you to communicate with the printer, you might want to assign the printer a static IP address and re-enable the firewall. See Configure network options.
Check wireless communication settings
Make sure the computer's wireless card is set to the correct wireless profile. A wireless profile is a set of network settings unique to a given network. A single wireless card might have several wireless profiles (for example, one for a home network and one for an office network).
Open the configuration utility for the network card installed on your computer and ensure that the profile selected is the profile for the printer's network.
Make sure the printer's network settings match those of your network.
1 Do one of the following to find the settings for your network:
• Infrastructure communication mode: Open the Wireless Access Point's (WAP) configuration utility.
• Ad hoc communication mode: Open the configuration utility for the network card installed in your computer.
ENWW 27
2 Compare the network's settings to those that appear on the configuration page. Note any differences. Possible problems include:
• The WAP filters hardware addresses (MAC addresses). See Configuring wireless security settings.
• One of these settings in the printer might be incorrect: Communication mode, Network Name (SSID), Channel (Ad hoc networks only), Authentication Type, Encryption. See Configuring wireless communication options.
3 Print a document. If the document still does not print, then reset the printer to its factory default settings (see Administer the printer) and reinstall the printer software (see Configuring the printer (Windows) or Configuring the printer (Mac OS)).
Printer does not accept printhead
Inspect the printhead
Remove the printhead and make sure the protective tape has been removed completely from the printhead. See To clean the printhead contacts manually.
Clean the printhead
Complete the printhead cleaning procedure. See To clean the printhead contacts manually.
Turn off the printer after removing the printhead
After removing the printhead, turn the printer off, and then turn on the printer without the printhead installed. After the printer has restarted, reinsert the printhead.
Printer takes a long time to print
Check the system configuration
Make sure the computer meets the minimum system requirements for the printer. See Printer specifications.
Check the port setting
The port setting configuration in your system might not be set to ECP.
See the documentation that came with the computer for information on how to change the port setting, or contact the computer manufacturer.
Check the printer software settings
The printer prints slower when Best or Maximum dpi is selected as the print quality. To increase the print speed, select different print settings in the printer driver. See Changing print settings.
Check for radio interference
If the printer is connected using wireless communication and is printing slowly, then the radio signal might be weak. See Reducing interference in a wireless network.
28 3 - Maintaining and troubleshooting ENWW

Blank page printed
Check for empty ink cartridges
If you are printing black text and a blank page prints, the black ink cartridge might be empty. See Replacing the ink cartridges.
Check media settings
Make sure you select the correct print quality settings in the printer driver for the media loaded in the trays. For example, Maximum dpi is only available for photo paper and cannot be used with other media types.
Make sure the page settings in the printer driver matches the width of media loaded in the tray. See Changing print settings.
Check the parallel port on your computer
If you are using a parallel cable, make sure the printer is connected directly to the parallel port. Avoid sharing the port with other devices, such as a Zip drive or other printers.
Something on the page is missing or incorrect
Check margin settings
Make sure the margin settings for the document do not exceed the printable area of the printer. See Setting minimum margins.
Check color print settings
Make sure Print in Grayscale is not selected in the printer driver.
Check the printer location and length of USB cable
High electromagnetic fields (such as those generated by USB cables) can sometimes slightly distort printouts. Move the printer away from the source of the electromagnetic fields. Also, it is recommended that you use a USB cable that is less than 3 meters (9.8 feet) long to minimize the effects of these electromagnetic fields.
ENWW 29

Placement of the text or graphics is wrong
Check how the media is loaded
Make sure the media width and length guides fit snugly against the edges of the stack of media, and make sure the tray is not overloaded. See Loading media.
Check the media size
Content on a page might be cut off if the document size is larger than the media that you are using.
Make sure the media size selected in the printer driver matches the size of media loaded in the tray. See Changing print settings.
If you are using a computer running Windows, select Emulate LaserJet Margins in the printer driver to scale the document to fit the media size currently selected. See Changing print settings.
Check margin settings
If the text or graphics are cut off at the edges of the page, make sure the margin settings for the document do not exceed the printable area of your printer. See Setting minimum margins.
Check the page-orientation setting
Make sure the media size and page orientation selected in the application match the settings in the printer driver. See Changing print settings.
Check the printer location and length of USB cable
High electromagnetic fields (such as those generated by USB cables) can sometimes slightly distort printouts. Move the printer away from the source of the electromagnetic fields. Also, it is recommended that you use a USB cable that is less than 3 meters (9.8 feet) long to minimize the effects of these electromagnetic fields.
If the above solutions do not work, the problem may be caused by the inability of the application to interpret print settings properly. See the release notes for known software conflicts; or refer to the application’s documentation, or contact the software manufacturer for specific help.
30 3 - Maintaining and troubleshooting ENWW

Poor print quality and unexpected printouts
Check the printheads and ink cartridges
Replace any clogged or worn printheads or low ink cartridges (see Maintaining the printheads), and try to print again.
Check the paper quality
The paper might be too moist or too rough. Make sure the media used meets HP specifications (see Selecting print media), and try to print again.
Check the type of media loaded in the printer
Make sure the tray supports the type of media you have loaded. See Understanding specifications for supported media.
Make sure you have selected the tray in the printer driver that contains the media you want to use. See Changing print settings.
Check rollers in the printer
The rollers in the printer might be dirty, causing lines or smudges to appear on your printout. Turn off the printer, disconnect the power cord, clean the rollers in the printer with isopropyl alcohol on a lint-free cloth, and try to print again.
Check the printer location and length of USB cable
High electromagnetic fields (such as those generated by USB cables) can sometimes slightly distort printouts. Move the printer away from the source of the electromagnetic fields. Also, it is recommended that you use a USB cable that is less than 3 meters (9.8 feet) long to minimize the effects of these electromagnetic fields.
ENWW 31

Meaningless characters printIf an interruption occurs to a job that is printing, the printer might not recognize the rest of the job.
Cancel the print job and wait for the printer to return to the ready state. If the printer does not return to the ready state, cancel all jobs, and wait again. When the printer is ready, resend the job. If prompted by the computer to retry the job, click Cancel.
Check cable connections
If the printer and computer are connected with a USB or parallel cable, the problem may be due to a poor cable connection.
Make sure the cable connections at both ends are secure. If the problem persists, turn off the printer, disconnect the cable from the printer, turn on the printer without connecting the cable, and delete any remaining jobs from the print spooler. When the Power light is on and not flashing, reconnect the cable.
Check the document file
The document file may be damaged. If you can print other documents from the same application, try printing a backup copy of your document, if available.
Check the symbol set
If you are using MS-DOS, use the HP DJCP to set the appropriate symbol set for the language of your document. See HP Deskjet Control Panel (HP DJCP).
Ink is smearing
Check print settings
When you print documents that use much ink, allow more time to dry before handling the printouts. This is especially true for transparencies. In the printer driver, select the Best print quality, also increase the ink drying time and reduce the ink saturation using the ink volume under the advanced features (Windows) or ink features (Mac OS) in the printer software. However, note that decreasing ink saturation might give printouts a “washed-out” quality.
Color documents that have rich, blended colors can wrinkle or smear when printed using the Best print quality. Try using the other print mode such as Draft to reduce ink, or use HP Premium Paper designed for printing vivid color documents. See Changing print settings.
Check the media type
Some types of media do not accept ink well, ink will dry more slowly and smearing may occur. See Selecting print media.
Check the margin settings
If you are using a computer running Windows, make sure the Minimize margins option is not selected. See Changing print settings.
Increase the margins in your document. For more information, see the documentation included with your software application.
32 3 - Maintaining and troubleshooting ENWW

Ink is not filling the text or graphics completely
Check the ink cartridges
Ink cartridges might have run out of ink. Replace any empty cartridge. Or try removing and reinstalling the cartridges, make sure they snap firmly into place. See Replacing the ink cartridges.
Check the media type
Some media types are not suitable for use with the printer. See Selecting print media.
Output is faded or dull colored
Check the print mode
The FastNormal and Draft modes in the printer driver allow you to print at a faster rate, they are good for printing drafts. To get better result, select Normal or Best. See Changing print settings.
Check the paper type setting
When printing on transparencies or other special media, select the corresponding media type in the printer driver. See Printing on special and custom-sized media.
Check the ink cartridges
If lines in the text or image are broken or do not print properly, one or more of the ink cartridges may have run out of ink or are defective. Replace these cartridges with new ones.
Colors are printing as black and white
Check print settings
Make sure Print in Grayscale is not selected in the printer driver.
Wrong colors are printing
Check print settings
Make sure Print in Grayscale is not selected in the printer driver.
Check the printheads
Whenever print quality noticeably decreases, you may need to clean the printheads. See Maintaining the printheads.
ENWW 33

Printout shows bleeding colors
Check print settings
Some media type settings (such as Transparency Films and Photo Papers) and print quality settings (such as Best) require more ink than others. Choose different print settings in the printer driver, make sure you select the correct media type. See Changing print settings.
Check ink cartridges
Make sure ink cartridges have not been tampered with. Refilling processes and the use of incompatible inks can disrupt the intricate printing system and result in reduced print quality and damage to the printer. HP does not guarantee or support refilled ink cartridges. For ordering information, see HP supplies and accessories.
Colors do not line up properly
Check printheads
The printheads are automatically aligned when a printhead is replaced. However, you might notice improvement in the print quality by performing the alignment procedure yourself. See Maintaining the printheads.
Check graphics placement
Use the zoom or print preview feature of your software to check for gaps in the placement of graphics on the page.
Lines or dots are missing from text or graphics
Check printheads
The printheads or printhead contact pads might need cleaning. See Maintaining the printheads.
34 3 - Maintaining and troubleshooting ENWW

Resolving paper-feed problems
This section provides solutions to common paper-feed problems.
For information on resolving jams, see Clearing jams.
Tray cannot be inserted With the tray removed from the printer, turn the printer off and then on again. Reinsert the tray.
Make sure that the tray is aligned with the printer opening.
Another paper-feed problem is occurring
Media is not supported for the printer or tray
Use only media that is supported for the printer and the tray being used. See Understanding specifications for supported media.
Media is not picked up from tray 1 or tray 2
Make sure the media guides are set to the correct markings in the trays for the media size you are loading. Also make sure the guides are snug, but not tight, against the stack.
Make sure media in the tray is not curled. Uncurl paper by bending it in the opposite direction of the curl.
Make sure the tray is inserted properly.
Media is not coming out correctly
Make sure the output tray extension is extended, otherwise, printed pages may fall off the printer.
Remove excess media from the output tray. There is a limit to the number of sheets the tray can.
If the auto-duplex unit is not installed properly during a duplex job, media may exit through the rear of the printer. Reinstall the auto-duplex unit or close its cover.
ENWW 35

Pages are skewing
Make sure that media loaded in tray 1 or tray 2 is aligned to the right and front guides.
Multiple pages are being picked up
Make sure the media guides are set to the correct markings in the trays for the media size you are loading. Also make sure the guides are snug, but not tight, against the stack.
Make sure that the tray is not overloaded with paper.
When you load paper, avoid fanning the stack. Fanning paper can cause static electricity to build up and intensify multiple-pick problems.
When reinserting a tray into the printer, do so gently. Forceful insertion with a full stack of paper may cause sheets to slide up within the printer, causing the printer to jam or pick multiple sheets at one time.
Resolving printer management problems
This section provide solutions to common problems that involve managing the printer.
Embedded Web server (EWS) cannot be opened
Check your network setup
Make sure you are not using a phone cord to connect the printer to the network.
Make sure the network cable is securely connected to the printer.
Make sure the network hub, switch, or router is on and working properly.
Check the computer
Make sure the computer that you are using is connected to the network.
Check your Web browser
Make sure the Web browser meets the minimum system requirements. See Printer specifications.
Check the printer IP address
Print a configuration page, and then locate the printer’s IP address on the second page. See Understanding the configuration page.
Ping the printer using the IP address from an MS-DOS prompt. For example, if the IP address is 123.123.123.123, type the following at the MS-DOS prompt:
C:\Ping 123.123.123.123
If the a reply appears, the IP address is correct.
36 3 - Maintaining and troubleshooting ENWW

Troubleshooting installation issues
Problems printing an alignment pageWhen printheads are installed or replaced, the printer automatically prints an alignment page to align the printheads. This process takes about seven minutes, and once complete, the alignment page may be discarded after it is printed. If the printer does not print the page, see General troubleshooting tips.
Problems installing software
Verify the computer requirements
Make sure the computer meets the system requirements. See System requirements.
Verify installation preliminaries
Before installing software on a Windows computer, ensure all other programs are closed.
If the computer does not recognize the path to the CD drive that you type, ensure you are specifying the correct drive letter.
If the computer cannot recognize the Starter CD in the CD drive, inspect the CD for damage. You can download the printer driver from http://www.hp.com/support/businessinkjet1200.
Reinstall the printer software
If you are using Windows and the computer cannot detect the printer, run the Scrubber utility (located in the Utils\Scrubber folder on the Starter CD) to perform a clean printer driver uninstallation. Restart your computer, and re-install the printer driver. See Uninstalling the printer software.
ENWW 37

Problems connecting to a network
Note After correcting any of the following, run the setup program again.
General network troubleshooting
If you are unable to install the printer software on the computer, verify that:
All cable connections to the computer and the printer are secure.
The network is operational and the network hub is turned on.
All applications, including virus protection programs and personal firewalls, are closed or disabled.
Make sure the printer is installed on the same subnet as the computers that will be using the printer.
If the installation program cannot discover the printer, print the configuration page and enter the IP address manually in the installation program. See Understanding the configuration page.
Ping the printer using the IP address from an MS-DOS prompt. For example, if the IP address is 123.123.123.123, type the following at the MS-DOS prompt:
C:\Ping 123.123.123.123
If the a reply appears, the IP address is correct.
If you are using a computer running Windows, make sure that the network ports created in the printer driver match the printer IP address:
1 Print a configuration page. For instructions, see Understanding the configuration page.
2 From the Windows desktop, click Start, point to Settings, and then click Printers or Printers and Faxes.
3 Right-click the printer icon, click Properties, and then click the Ports tab.
4 Select the TCP/IP port for the printer, and then click Configure Port.
5 Compare the IP address listed in the dialog box and make sure it matches the IP address listed on the configuration page. If the IP addresses are different, change the IP address in the dialog box to match the address on the configuration page.
6 Click OK twice to save the settings and close the dialog boxes.
Problems connecting to a wired network
If the Link light on the network connector does not turn on, make sure that all of the General troubleshooting tips conditions are met.
Though it is not recommended that you assign the printer with a static IP address, you might resolve some installation problems (such as a conflict with a personal firewall) by assigning the printer with a static IP address. For more information, see Configure network options.
38 3 - Maintaining and troubleshooting ENWW

Problems setting up wireless communication
If you cannot communicate with the printer after completing the software installation and removing the network cable, then one or more of the following network settings in the printer might be wrong:
Network Name (SSID)
Communication Mode (infrastructure or ad hoc)
Channel (ad hoc networks only)
Security settings (such as Authentication Type, and Encryption)
Follow these steps to correct the printer's network settings:
1 Connect the printer to your network with a network cable or to the computer using the cross cable included with the printer.
2 Open the printer's embedded Web server (EWS). See Embedded Web server (EWS).
3 Click the Networking tab, and then click Wireless (802.11) in the left pane.
4 Use the Wireless Setup wizard on the Wireless Setup tab to change the printer's settings to match the settings of the network.
5 Close the printer's EWS, then disconnect the network cable from the printer.
Clearing jams
If print media is jammed in the printer, follow these instructions to clear the jam.
To clear a jam
1 Remove all media from the output tray.
2 Check the rear access panel or the auto-duplex unit.
a Push the button on either side of the rear access panel or the auto-duplex unit and remove the unit.
b Locate any jammed media inside the printer, grasp it with both hands and pull it towards you.
c If the jam is not there, push the latch on the top of the auto-duplex unit and lower its cover. If the jam is inside, carefully remove it. Close the cover.
ENWW 39

d Reinsert the rear access panel or the auto-duplex unit into the printer.
3 If you cannot locate the jam, lift the output tray and check for a jam in tray 1. If media is jammed in the tray, do the following:
a Pull out tray 1.
b Pull the paper towards you.
c Reinsert the tray and lower the output tray.
4 If you have not found the jam and have tray 2 installed, pull out the tray and remove the jammed media, if possible. If not, do the following:
a Ensure the printer is turned off, and disconnect the power cord.
b Lift the printer off tray 2.
c Remove the jammed media from the bottom of the printer or from tray 2.
d Reposition the printer on top of tray 2.
5 Open the top cover. If there is paper remaining inside the printer, ensure the carriage has moved to the right of the printer, free any paper scraps or wrinkled media and pull the media towards you through the top of the printer.
WARNING! Do not reach into the printer when the printer is on and the carriage is stuck. When you open the top cover, the carriage should return to its position on the right side of the printer. If it does not move to the right, turn off the printer before you remove any jam.
6 After clearing the jam, close all covers, turn on the printer (if you turned it off), and then press (Resume button) to continue printing.
The printer will continue printing the next page. You will need to resend any page that was jammed in the printer.
40 3 - Maintaining and troubleshooting ENWW

To avoid jams
Make sure that nothing is blocking the paper path.
Do not overload the trays. See Understanding specifications for supported media.
Load paper properly. See Loading media.
Do not use media that is curled or crumpled.
Always use media that conforms with specifications. See Selecting print media.
Make sure the output tray is not overly full when you send a job to print.
Make sure media is aligned against the right side of the tray.
Make sure the media length and width guides are adjusted snugly against the media, but do not crinkle or bend it.
ENWW 41

4 Printer lights reference
The printer LEDs (or lights) indicate printer status and are useful for diagnosing printing problems. This chapter provides a list of LED status light combinations, what they indicate, and how to solve the problem.
Control panel parts
Understanding control panel parts
1 Configuration Page button
2 Power button and light
3 Printhead light
4 Ink Cartridge light
5 Door Open light
6 Out of Paper light
7 Cancel button
8 Resume button and light
9 Paper Jam light
10 Color indicator lights
3 7 8
9
2 4 5 6
10
1
42 4 - Printer lights reference ENWW

Interpreting control panel lights
Note If the printer supports wireless communication but is connected to a wired network, the Configuration Page button does not turn on.
Light pattern Light description Explanation and recommended action
No lights are on. The printer is off.Connect the power cable.Press the (Power button).
Configuration Page button is off. The Power light is on.
The printer is turned on and idle. It is connected using a USB or parallel cable.
No action is required.
The printer is turned on and idle. It is connected to a network using a network cable or wireless communication.
If the printer is connected using a network cable, check the network connector lights to verify that the printer is connected to the network. See Network connector lights.If the printer is connected using wireless communication, make sure that the wireless communication settings are set correctly. See Configuring wireless communication options.Verify that the printer is set up properly on the network. See Problems connecting to a network.
Configuration Page button is green. Power light is on.
The printer is connected to a wired network. It is turned on and idle.
No action is required.
Configuration Page button is blue. Power light is on.
The printer is connected to a wireless network. It is turned on and idle.
No action is required.
The Power light blinks. The printer is turning on or off or processing a print job, or a print job has been cancelled.
No action is required.
The printer is pausing for the ink to dry.
Wait for the ink to dry.
ENWW 43

The Power light is on and the Resume light blinks.
The printer is in manual duplex mode. It is waiting for the ink to dry so the pages can be flipped over and reloaded.
Reload the stack into the printer and press the (Resume button).
The printer has printed a banner, and the banner needs to be removed from the printer.
Press the (Resume button) to remove the banner from the printer.
The printer carriage has stalled.Open the top cover and remove any obstructions (such as jammed media).Press the (Resume button) to continue printing.If the error persists, turn the printer off, and then on again.
The Power light is on and the Resume light and the Paper Jam light blink.
Print media is jammed in the printer.
Press the (Resume button) to eject the jammed media.
Remove all media from the output tray. Locate and clear the jam. See Clearing jams. After clearing the jam, press the (Resume button) to continue the print job.
The Power light is on and the Resume light and the Out of Paper light blink.
The printer is out of paper.
Load paper and then press the (Resume button).
The Power light and the Door Open light are on.
A cover is not closed completely.
Make sure all covers are completely closed.
The Power light is on and the Door Open light blinks.
The rear-access panel or the auto-duplex unit is not inserted completely.
Make sure the rear-access panel (HP Business Inkjet 1200) or the auto-duplex unit (HP Business Inkjet 1200d/1200dn/1200dtn/1200dtwn) is inserted completely in the back of the printer.
Light pattern Light description Explanation and recommended action
44 4 - Printer lights reference ENWW
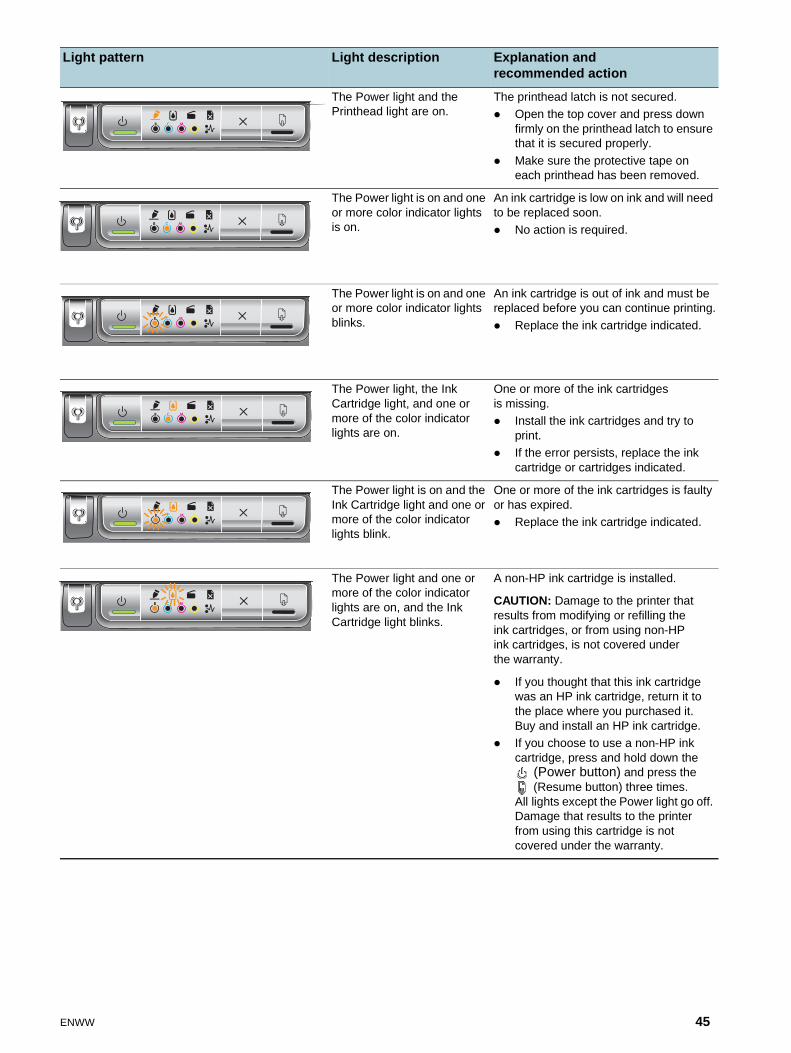
The Power light and the Printhead light are on.
The printhead latch is not secured.Open the top cover and press down firmly on the printhead latch to ensure that it is secured properly.
Make sure the protective tape on each printhead has been removed.
The Power light is on and one or more color indicator lights is on.
An ink cartridge is low on ink and will need to be replaced soon.
No action is required.
The Power light is on and one or more color indicator lights blinks.
An ink cartridge is out of ink and must be replaced before you can continue printing.
Replace the ink cartridge indicated.
The Power light, the Ink Cartridge light, and one or more of the color indicator lights are on.
One or more of the ink cartridges is missing.
Install the ink cartridges and try to print. If the error persists, replace the ink cartridge or cartridges indicated.
The Power light is on and the Ink Cartridge light and one or more of the color indicator lights blink.
One or more of the ink cartridges is faulty or has expired.
Replace the ink cartridge indicated.
The Power light and one or more of the color indicator lights are on, and the Ink Cartridge light blinks.
A non-HP ink cartridge is installed.
CAUTION: Damage to the printer that results from modifying or refilling the ink cartridges, or from using non-HP ink cartridges, is not covered under the warranty.
If you thought that this ink cartridge was an HP ink cartridge, return it to the place where you purchased it. Buy and install an HP ink cartridge.If you choose to use a non-HP ink cartridge, press and hold down the
(Power button) and press the (Resume button) three times.
All lights except the Power light go off. Damage that results to the printer from using this cartridge is not covered under the warranty.
Light pattern Light description Explanation and recommended action
ENWW 45

Network connector lights
Understanding network connector parts
The Power light is on and the Printhead light and one or more of the color indicator lights blink.
One or more of the printheads needs attention.
Reinstall the printheads and try to print.
Try cleaning the printhead contacts. See Maintaining the printheads.
If the error persists, replace the printhead or printheads indicated.
The Power light, the Printhead light, and one or more of the color indicator lights are on.
One or more of the printheads is missing.Make sure that the protective tape on the printhead has been removed.Reinstall the printheads and try to print.
The Power light blinks. All control panel lights are on.
One or more printer errors have occurred. Cancel all print jobs from the printer spooler. Turn the printer off and wait for about 20 seconds before turning on the printer again. Try printing again.
If the problem persists, reset the printer. See Troubleshooting tips and resources.If these measures do not work, see Support and warranty.
Light pattern Light description Explanation and recommended action
1) Activity light
2) Network connector
3) Link light
2
3
1
46 4 - Printer lights reference ENWW

Interpreting network connector lights
Note The printer's wireless communication is turned off when the printer is connected using a network cable.
Light pattern Light description Explanation and recommended action
Link light is on. Activity light is off.
The printer is connected to the network but is not receiving or transmitting data over the network. The printer is turned on and idle.
No action is required.
Link light is on. Activity light blinks.
The printer is receiving or transmitting data over the network.
No action is required.
Link light is off. Activity light is off.
The printer is turned off or is not connected to the network.
Turn on the printer. If the printer is already turned on and a network cable is connected, see Problems connecting to a network.
ENWW 47

5 Configuring and managing the printer
Managing the printer
Overview of printer management tasks The following table lists the printer tools that can be used to manage the printer, as well as the tools that can be used to perform them.
Note The table lists the most common tools that are used for administrator functions. Specific procedures might include other methods.
For more information about the administrator tools listed in the table, see Overview of printer management tools.
48 5 - Configuring and managing the printer ENWW

*Windows users can use the control panel, EWS, Toolbox, HP Web Jetadmin, and myPrintMileage.
Mac OS users can use the control panel, EWS, and the HP Inkjet Toolbox.
If you want to...
...use these tools.*
Control panel parts
Embedded Web server (EWS)
Toolbox (Windows)
HP Web Jetadmin software
myPrintMileageHP Inkjet Toolbox (Mac OS)
Monitor the printer
Operation and status
Media and supplies
Jobs and printer usage
Administer the printer
Printer security
Configure job-accounting options
Set language
Set PowerSave mode time
Change tray and media-handling settings
Set up alerts and notifications
Upgrade firmware on the printer
Reset the HP Jetdirect print server
Configure network options
Configure I/O timeout
Configure network parameters
ENWW 49
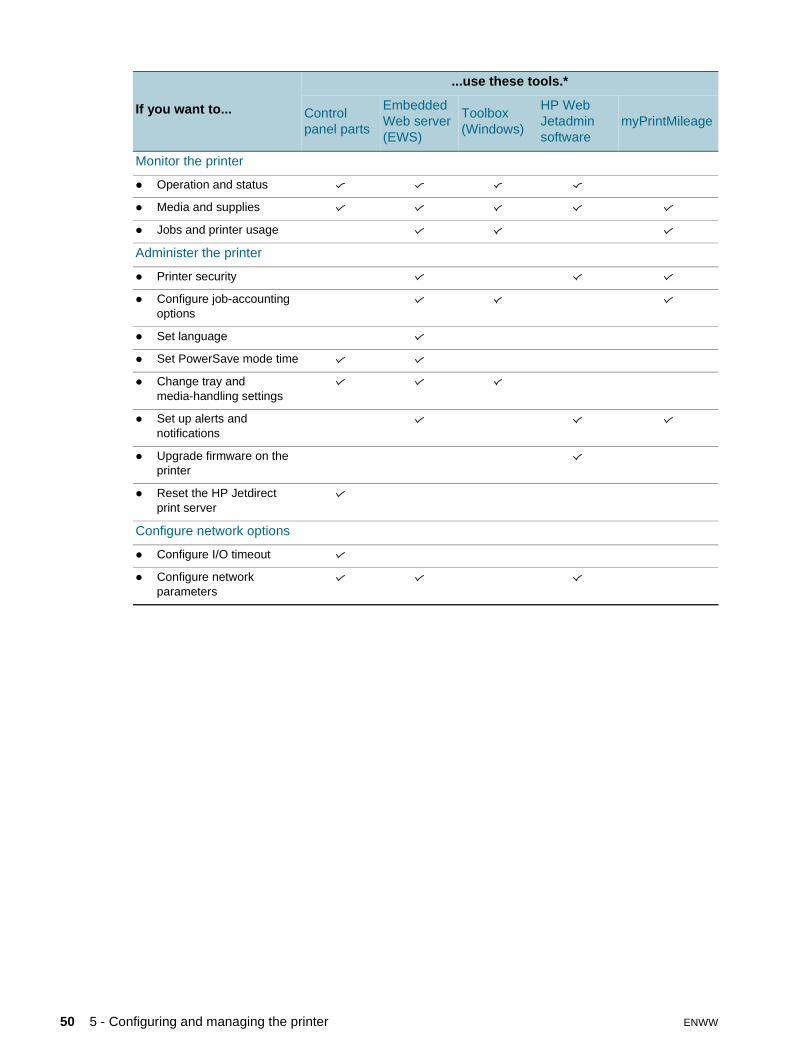
If you want to...
...use these tools.*
Control panel parts
Embedded Web server (EWS)
Toolbox (Windows)
HP Web Jetadmin software
myPrintMileage
Monitor the printer
Operation and status
Media and supplies
Jobs and printer usage
Administer the printer
Printer security
Configure job-accounting options
Set language
Set PowerSave mode time
Change tray and media-handling settings
Set up alerts and notifications
Upgrade firmware on the printer
Reset the HP Jetdirect print server
Configure network options
Configure I/O timeout
Configure network parameters
50 5 - Configuring and managing the printer ENWW
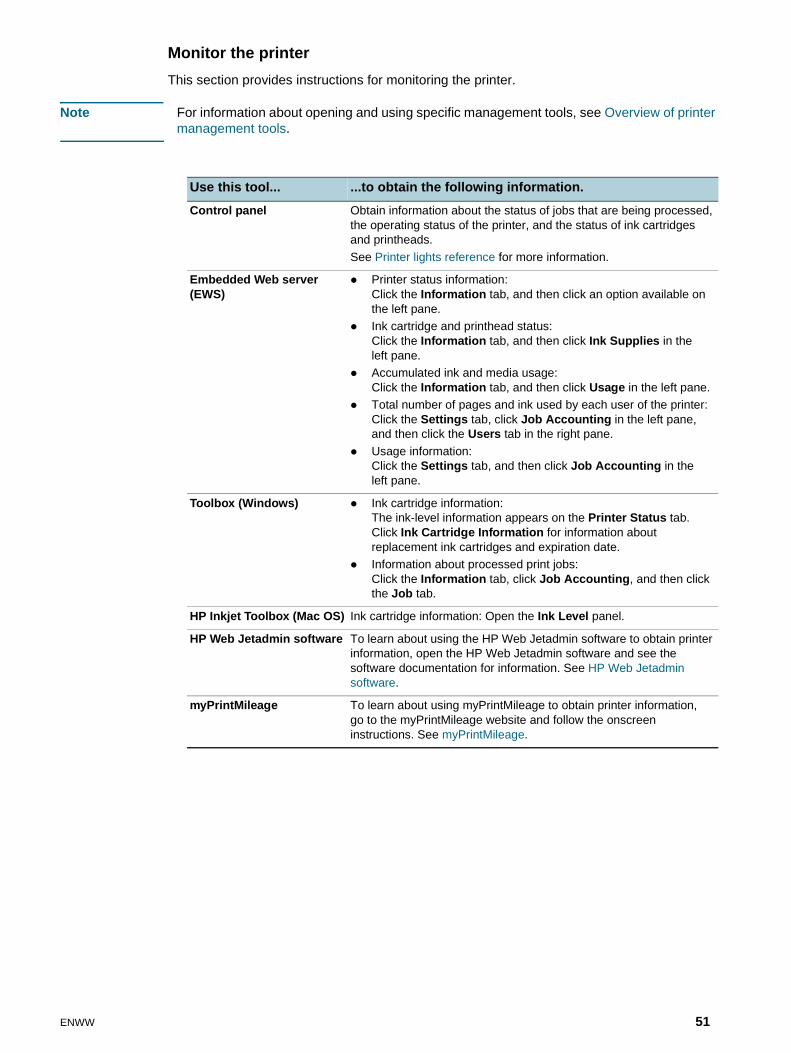
Monitor the printer
This section provides instructions for monitoring the printer.
Note For information about opening and using specific management tools, see Overview of printer management tools.
Use this tool... ...to obtain the following information.
Control panel Obtain information about the status of jobs that are being processed, the operating status of the printer, and the status of ink cartridges and printheads.
See Printer lights reference for more information.
Embedded Web server (EWS)
Printer status information: Click the Information tab, and then click an option available on the left pane.Ink cartridge and printhead status: Click the Information tab, and then click Ink Supplies in the left pane.Accumulated ink and media usage: Click the Information tab, and then click Usage in the left pane. Total number of pages and ink used by each user of the printer: Click the Settings tab, click Job Accounting in the left pane, and then click the Users tab in the right pane.
Usage information: Click the Settings tab, and then click Job Accounting in the left pane.
Toolbox (Windows) Ink cartridge information: The ink-level information appears on the Printer Status tab. Click Ink Cartridge Information for information about replacement ink cartridges and expiration date.Information about processed print jobs: Click the Information tab, click Job Accounting, and then click the Job tab.
HP Inkjet Toolbox (Mac OS) Ink cartridge information: Open the Ink Level panel.
HP Web Jetadmin software To learn about using the HP Web Jetadmin software to obtain printer information, open the HP Web Jetadmin software and see the software documentation for information. See HP Web Jetadmin software.
myPrintMileage To learn about using myPrintMileage to obtain printer information, go to the myPrintMileage website and follow the onscreen instructions. See myPrintMileage.
ENWW 51

Administer the printer
This section contains information about administering the printer and modify printer settings.
Note For information about opening and using specific management tools, see Overview of printer management tools.
Use this tool... ...to do the following.
Embedded Web server Modify the administrator password: Click the Settings tab, and click Security in the left pane. Change job accounting settings: Click the Settings tab, click Job Accounting in the left pane, and then click the Options tab.
Change tray and media-handling settings: Click the Settings tab, and then click Paper Handling in the left pane.
Perform printer maintenance tasks: Click the Settings tab, and then click Diagnostic in the left pane.
Toolbox (Windows) Configure job-accounting options: Click the Information tab, click Job Accounting, and then click the Track tab.Note: Job accounting features are only available in the Toolbox if the printer is connected to a network.Perform printer maintenance tasks: Click the Printer Services tab.
HP Inkjet Toolbox (Mac OS) Perform printer maintenance tasks: Select the panel for the task you want to perform.
HP Web Jetadmin software To learn about using the HP Web Jetadmin software to administer the printer and modify printer settings, open the HP Web Jetadmin software and see the software documentation for information. See HP Web Jetadmin software.
myPrintMileage To learn about using myPrintMileage to administer the printer and modify printer settings, go to the myPrintMileage website and follow the onscreen instructions. See myPrintMileage.
52 5 - Configuring and managing the printer ENWW

Configure network options
This section contains information about configuring the printer’s network settings.
For information about opening and using specific management tools, see Overview of printer management tools.
For a list of current settings, print a configuration page. See Understanding the configuration page.
Use this tool... ...to do the following.
Embedded Web server To configure network parameters: Click the Networking tab.To set a static IP address: Click the Networking tab, select Manual from the IP Configuration Method drop-down list, enter the static IP address in the IP Address box, enter the Host Name, Subnet Mask, and Default Gateway, if needed, and click Apply.
Note: It is not recommended that you assign a static IP address to the printer. However, a static IP address might resolve certain setup and printing problems, such as a conflict with a personal firewall.
HP Web Jetadmin software To learn about using the HP Web Jetadmin software to configure the printer’s network settings, open the HP Web Jetadmin software and see the software documentation for information. See HP Web Jetadmin software.
ENWW 53

Overview of printer management tools
Embedded Web server (EWS)
When the printer is connected to a network, you can use the printer’s EWS to view status information, change settings, and manage the printer at your computer.
Note For a list of system requirements for the EWS, see Printer specifications.
Some settings might be restricted by the requirement for an EWS password.
You can open and use the EWS without being connected to the Internet. However, some features will not be available.
To open the EWS
You can open the EWS in the following ways:
Note To open the EWS from the Toolbox (Windows) or the HP Inkjet Toolbox (Mac OS), the printer must be on a network and must have an IP address.
Web browser
In a supported Web browser on your computer, type the IP address that has been assigned to the printer. For example, if the IP address is 123.123.123.123, type the following address into the Web browser:
http://123.123.123.123.
The IP address for the printer is listed on the configuration page. For instructions, see Understanding the configuration page.
After you open the EWS, you can bookmark it so that you can return to it quickly in the future.
Toolbox (Windows)
1 Open the Toolbox. For instructions, see Toolbox (Windows).
2 Click the Information tab, and then click Launch EWS.
HP Inkjet Toolbox (Mac OS)
1 Open the HP Inkjet Toolbox. For instructions, see HP Inkjet Toolbox (Mac OS).
2 Select the Printer Info panel, and then click Launch EWS.
54 5 - Configuring and managing the printer ENWW

EWS pages
The EWS contains pages that you can use to view product information and change printer settings. The pages also contain links to other e-services.
HP Web Jetadmin software
The HP Web Jetadmin software is a Web-based management solution for remotely installing, configuring (both individually or in batch mode), monitoring status (including levels for supplies), conducting remote diagnostics, and troubleshooting a wide variety of HP and non-HP network peripherals.
After the HP Web Jetadmin software has been installed, you can gain access to it from anywhere within your intranet by using a standard Web browser.
For more information about the HP Web Jetadmin software and to download the software, go to http://www.hp.com/go/webjetadmin.
Toolbox (Windows)
The Toolbox provides status and maintenance information about the printer. It also provides links to this guide for help in performing basic printing tasks and solving problems.
Note If the Toolbox was not installed with the other printer software components, you can install it using the installation program on the Starter CD.
To monitor a printer on a shared port (for example, \\portname\printername) from a client machine, the Toolbox must be running on the server machine as well as on the client machine.
To open the Toolbox
1 From the Start menu at your computer, point to Programs.
2 Point to the printer name, and then click the Toolbox icon.
Pages Contents
Information Shows status information about the printer, its ink supplies and usage, and a log of printer events (such as errors).
Settings Shows the settings that have been configured for the printer and gives you the ability to change these settings.
Networking Shows network status and the network settings that have been configured for the printer. These pages only appear if the printer is connected to a network. See Configure network options for more information.
Other Links Connects you to other resources, including e-services, such as HP Instant Support, myPrintMileage, and online ordering of supplies. For more information, see HP Instant Support and myPrintMileage.
You can also add or customize up to five links to the websites of your choice. These links appear on the left pane throughout the EWS pages.
ENWW 55

Toolbox tabs
The Toolbox contains tabs that you can use to view product information and change configuration settings.
Tabs Contents
Printer Status Selected printerDisplays a list of installed printers that are supported by the Toolbox.Ink Level InformationShows estimated ink levels for each cartridge.
Order SuppliesProvides access to an a website where you can order printing supplies for the printer online.Ink Cartridge InformationShows order numbers and expiration dates for the installed ink cartridges.PreferencesGives you the ability to set advanced Toolbox settings, such as selecting which printer error messages appear, specifying whether you want to be notified by an audio alert when an error occurs, as well as the types of error messages that you want to see. Also, you can turn on myPrintMileage AutoSend, a service that HP provides to help you keep track of your device usage to help you forecast device usage and plan the purchase of supplies. See myPrintMileage for more information.
Information Printer InformationProvides links to myPrintMileage and shows the printer hardware and printhead health information. You can also use the tab to obtain information about accumulated ink and media use, statistics up to the last 20 jobs, and job tracking. See myPrintMileage for more information.Help InformationProvides links to HP Instant Support and HP Customer Support, as well as to the this guide for help in performing tasks and troubleshooting. It also provides instructions that guide you through registering the printer onscreen. See HP Instant Support for more information.
Printer Services
Align PrintheadsGuides you through aligning the printheads. See To align the printheads for more information.
Clean PrintheadsGuides you through cleaning the printheads. See To clean the printhead contacts manually for more information.Calibrate ColorAllows you to calibrate color manually. See Calibrating the color for more information.Print a Demo pagePrints a demonstration page. This is used to verify that the installed is connected to the computer and that the printer and printer software are working properly.
Advanced ConfigurationAllows you to set tray lock and select a default tray (if Tray 2 is installed). See Configuring trays for more information.
56 5 - Configuring and managing the printer ENWW

HP Inkjet Toolbox (Mac OS)
The HP Inkjet Toolbox contains tools to calibrate the printer, clean the printheads, print a test page, print a configuration page for the printer, and find website support information.
To open the HP Inkjet Toolbox
1 Double-click the Macintosh HD icon on the desktop.
2 Do one of the following steps.
• Mac OS 9 (9.1 and later): Select Applications (Mac OS 9), select Utilities, select hp, and select HP Printer Selector.
• Mac OS X (10.1.5 and later): Select Applications, select Utilities, and select HP Printer Selector.
To view the HP Inkjet Toolbox panels
The following options are available on the HP Inkjet Toolbox:
WOW! Prints a sample page to view the print output quality.
Ink Level. Displays ink levels in the ink cartridges.
Test. Prints a test page.
Printer Info. Prints a configuration page and launches the EWS.
Clean. Cleans the printheads.
Calibrate. Aligns the printheads.
Calibrate Color. Adjusts color to correct problems with tint.
Support. Provides access to the HP website where you can find support for the printer and information about HP products and supplies.
Register. Accesses the HP website to register the printer.
ENWW 57

HP Instant Support
HP Instant Support is a suite of Web-based troubleshooting tools. HP Instant Support helps you quickly identify, diagnose, and resolve printing problems.
HP Instant Support provides the following information about your device:
Easy access to troubleshooting tips
Provides tips that are customized for your device.
Resolution of specific device errors
Provides immediate access to information that can help you resolve error messages specific to your device.
To see a description of the problem, as well as recommendations for solving or preventing the problem, click the link within the message. To see a list of past device errors, click Alerts on the left side of the HP Instant Support page.
Notification of device driver and firmware updates
Alerts you when there is a firmware or driver update, a message appears on the HP Instant Support homepage. Click the link within the message to go directly to the download section of the HP website.
Obtaining support services
Provides a list of the support services that are available for your device.
Managing ink and media usage (myPrintMileage)
Helps you manage and forecast printer supplies usage.
Self diagnostic testing for your device
Runs a diagnostic test of your device. Select Printer on the Self Help menu on the Instant Support page to start diagnosing the devices. HP Instant Support checks the computer, and a list of configured devices appears. When you select the device that you want to diagnose, HP Instant Support can help you with such tasks as making sure that you have the latest device driver available and gaining access to reports about the device status and detailed device-diagnostic information.
If any errors are detected during this process, you are given the option to perform updates to the device drivers or to perform detailed diagnostic tests on the device.
HP expert help online (Active Chat)
Provide personalized help from an HP support expert over the Web at any time. Simply submit a question or a description of your problem. Your recent device history, system configuration, and any actions that you have attempted are automatically forwarded to HP (upon your approval) so that you will not need to describe the problem again. An HP support expert will respond online to solve your problem through a real-time Web chat.
Knowledge database
Use the HP knowledge database to quickly find answers to your questions.
58 5 - Configuring and managing the printer ENWW

Security and privacy
When you use HP Instant Support, detailed device information, such as the serial number, error conditions, and status, is sent to HP. HP respects your privacy and manages this information according to the guidelines that are outlined in the HP Online Privacy Statement (http://www.hp.com/country/us/eng/privacy.htm).
Note To view all of the data that is sent to HP, select Source (for Internet Explorer) or Page Source (for Netscape) from the View menu in your Web browser.
To gain access to HP Instant Support
Toolbox (Windows)
Click the Information tab, and then click HP Instant Support.
Embedded Web server
In a Web browser, type the IP address assigned to the device. (The address is listed on the configuration page. See Understanding the configuration page.) In the Other Links section of the Information or Settings tab, click HP Instant Support.
Note Do not bookmark the Web pages that are used to open HP Instant Support. If you bookmark the site and connect to it by using the bookmark, the pages will not contain the current information.
myPrintMileage
myPrintMileage is a service that HP provides to help you keep track of your device usage to help you forecast device usage and plan the purchase of supplies. It consists of two parts:
myPrintMileage website
myPrintMileage AutoSend, a utility that periodically updates the device usage information on the myPrintMileage website
To use myPrintMileage, you must have the following:
Toolbox (Windows) installed
Internet connection
Device connected
Note HP recommends that you enable myPrintMileage to send data for three to six months to allow a meaningful amount of data to accumulate on the myPrintMileage website.
To use the Print accounting features, you must register for the service through the myPrintMileage site.
On the myPrintMileage website, you can see the following items:
Print analysis, such as the amount of ink you have used, whether you use more black or color ink, and the estimated number of pages you can print with the remaining amount of ink.
Print accounting, which allows you to generate reports showing usage data, cost per page, or cost per job for a specific time period; export this data as Microsoft Excel spreadsheet files; and configure the e-mail alerts and notifications to receive print accounting reports.
ENWW 59
To gain access to myPrintMileage
Embedded Web server
Click myPrintMileage in the Other Links section.
Toolbox (Windows)
On the Information tab, click myPrintMileage, and then follow the onscreen instruction.
Windows taskbar
Right-click the Toolbox icon in the Windows taskbar, click myPrintMileage, and then select View my print usage.
Note Do not bookmark the Web pages that are used to open myPrintMileage. If you bookmark the site and connect to it by using the bookmark, the pages will not contain the current information.
HP Deskjet Control Panel (HP DJCP)
Some software manufacturers do not develop printer drivers for their MS-DOS® programs. The HP Deskjet Control Panel (HP DJCP) can allow you to gain access to certain useful printer features when you are printing from MS-DOS. The HP DJCP utility allows you to do the following tasks:
Adjust print settings (Printing using special features is not supported.)
Specify the default printer from your MS-DOS program.
Set the symbol set for the language you are using in a document.
Note Changes made to settings in your MS-DOS program may override changes made to the same settings in the HP DJCP.
For more information about the HP DJCP utility and to download the utility, go to http://www.hp.com/support/businessinkjet1200.
60 5 - Configuring and managing the printer ENWW
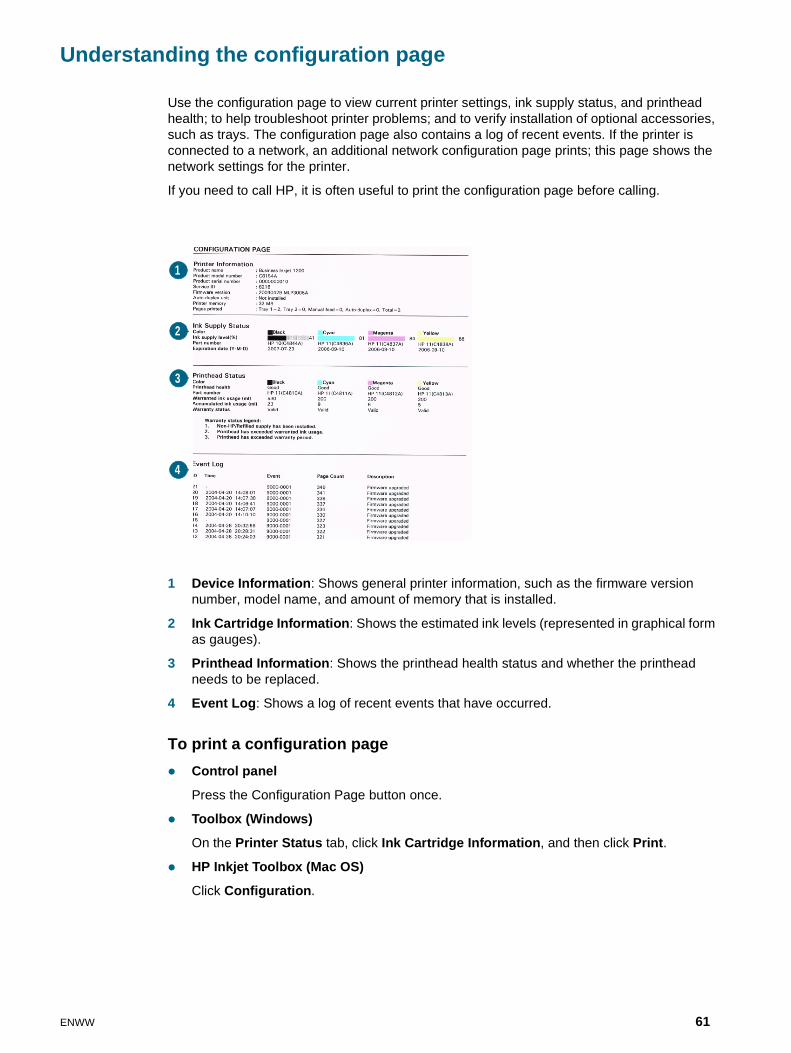
Understanding the configuration page
Use the configuration page to view current printer settings, ink supply status, and printhead health; to help troubleshoot printer problems; and to verify installation of optional accessories, such as trays. The configuration page also contains a log of recent events. If the printer is connected to a network, an additional network configuration page prints; this page shows the network settings for the printer.
If you need to call HP, it is often useful to print the configuration page before calling.
1 Device Information: Shows general printer information, such as the firmware version number, model name, and amount of memory that is installed.
2 Ink Cartridge Information: Shows the estimated ink levels (represented in graphical form as gauges).
3 Printhead Information: Shows the printhead health status and whether the printhead needs to be replaced.
4 Event Log: Shows a log of recent events that have occurred.
To print a configuration page
Control panel
Press the Configuration Page button once.
Toolbox (Windows)
On the Printer Status tab, click Ink Cartridge Information, and then click Print.
HP Inkjet Toolbox (Mac OS)
Click Configuration.
3
2
4
1
ENWW 61

Upgrading the firmware in the printer
HP provides firmware upgrades for products. These upgrades provide additional or improved functionality. When a firmware upgrade for the printer is available, a notification message appears on the HP Instant Support homepage. You can open the download site from the homepage.You can also obtain information about available upgrades at http://www.hp.com/support/businessinkjet1200.
Use the methods in the following sections to upgrade the firmware. See the readme file associated with the firmware upgrade for details.
You do not need to keep the firmware upgrade file after you have performed the upgrade.
CAUTION Do not cancel the firmware upgrade after you have started it. Canceling the process can damage the firmware in the printer.
To upgrade the firmware by using the MS-DOS prompt (Windows only)
Note To upgrade the firmware using this procedure, the printer must be connected directly to the computer using a parallel cable.
1 Download the firmware upgrade file from the HP website and store it on the hard disk of your computer.
2 Open an MS-DOS command window.
3 Type copy /b path\filename portname at the command prompt.
• path is the location of the firmware upgrade file
• filename is the name of the firmware upgrade file that you downloaded from the website
• portname is the appropriate printer port (for example, LPT1)
4 Press Enter. The firmware upgrade file is copied onto the printer, replacing the old firmware file.
62 5 - Configuring and managing the printer ENWW
Configuring the printer (Windows)
You can connect the printer directly to a computer, or you can share the printer among other users on a network.
Note You must have administrator privileges to install a printer driver in Windows 2000 or Windows XP.
Direct connection You can connect the printer directly to your computer using a USB cable or an IEEE 1284-compliant bidirectional parallel cable.
Note Windows NT 4.0 does not support USB.
Do not connect a USB and a parallel cable to printer at the same time.
If you install the printer software and connect a printer to a computer running Windows, you can connect additional printers to the same computer with USB cables without reinstalling the printing software.
Installing printer software and sharing the printer
When setting up the printer, HP recommends that you connect the printer after you install the software because the installation program is designed to provide you with the easiest setup experience.
However, if you have connected the cable first, see To connect the printer before the installing software.
To install the software before connecting the printer (recommended)
It is recommended to install the Toolbox, which provides status and maintenance information about your printer. It also provides access to documentation and online help tools for solving printer problems. If you do not install the Toolbox you will not see printer error messages on your computer screen and will not have access to the myPrintMileage website. See Toolbox (Windows) for more information.
1 Close any running applications.
2 Insert the Starter CD into the CD drive. The CD menu runs automatically.
If the CD menu does not start automatically, click Start, and then click Run. Browse to the CD-ROM drive for the computer, click Autorun.exe, and then click Open. In the Run dialog box, click OK.
3 On the CD menu, click Install Printer Driver.
4 Follow the instructions on the screen to complete the installation.
5 When prompted, connect the USB or parallel cable to the computer and the printer. The Found New Hardware wizard appears on the computer screen and the printer icon is created in the Printers folder.
Note You can also share the printer with other computers using a simple form of networking known as locally shared networking. See To share the printer on a locally shared network.
ENWW 63

To connect the printer before the installing softwareIf you connected the printer to the computer before installing the printer software, the Found New Hardware wizard appeared on the computer screen.
Note If you have turned on the printer, do not turn off the printer or unplug the cable from the printer while the installation program is running. If you do so, the installation program will not finish.
1 In the Found New Hardware dialog box that provides the option for selecting a method to locate the driver, select the advanced option and click Next.
Note Do not allow the Found New Hardware wizard to perform an automatic search for the driver.
2 Select the check box for specifying the driver location, and ensure that the other check boxes are clear.
3 Insert the Starter CD into the CD-ROM drive.If the CD menu appears, close the CD menu.
4 Browse to locate the root directory on the Starter CD (for example, D), and then click OK.
5 Click Next, and then follow the instructions on the screen.
6 Click Finish to close the Found New Hardware wizard. The wizard automatically starts the installation program (this might take a short while). For Windows 98 and Windows Me, you must complete the installation program at this point if you wish to install a non-English driver.
7 Complete the installation process.
Note The setup program provides options to install non-driver components such as the Toolbox, which you are recommended to install. For instructions about installing these components, follow the steps outlined in To install the software before connecting the printer (recommended).
You can also share the printer with other computers using a simple form of networking known as locally shared networking. See To share the printer on a locally shared network.
64 5 - Configuring and managing the printer ENWW

To share the printer on a locally shared network
In a locally shared network, the printer is connected directly to the USB or parallel connector of a selected computer (known as the server) and is shared by other computers (clients).
Note When sharing a directly connected printer, use the computer with the newest operating system as the server. For example, if you have a computer running Windows 2000 and another computer running an older version of Windows, use the computer running Windows 2000 as the server.
Use this configuration only in small groups or when usage is low. The computer that is connected to the printer is slowed down when many users print to the printer.
1 From the Windows desktop, click Start, point to Settings, and then click Printers or Printers and Faxes.
2 Right-click the printer icon, click Properties, and then click the Sharing tab.
3 Click the option to share the printer, and give the printer a share name.
4 If you are sharing the printer with client computers that use other versions of Windows, you can click Additional Drivers to install their drivers as a convenience to them. This optional step requires you to have the Starter CD in your CD drive.
Network connectionIf the printer has network capability, the printer can be shared in a network environment by connecting it directly to the network. This type of connection offers the ability to manage the printer using the embedded Web server from any computer on the network.
Installing printer software and sharing the printer
Choose the installation option for the type of network you have:
Client/server network: If your network has a computer acting as a dedicated print server, install the printer software on the server (To install the software on a network), and then install the printer software on the client computers (To install the printing software on client computers).
Peer-to-peer network: If you have a peer-to-peer network (a network without a dedicated print server), install the software on the computers that will be using the printer (To install the software on a network).
In addition, you can connect to a network printer in both types of networks using the Add Printer wizard in Windows (To install the printer driver using Add Printer).
ENWW 65

To install the software on a network
Use the following steps to install the printer software in the following networking scenarios:
Your network has a computer acting as a dedicated print server
You have a peer-to-peer network (a network without a dedicated print server)
1 Connect the printer to the network.
2 Close any programs that are open.
3 Insert the Starter CD into the CD-ROM drive. The CD menu starts automatically.
If the CD menu does not start automatically, click Start, and then click Run. Browse to the CD-ROM drive for the computer, click Autorun.exe, and then click Open. In the Run dialog box, click OK.
4 Click Install Printer Driver and follow the instructions on the screen to complete the installation.
Note If you are installing the software on a dedicated print server, select the option to share the printer when prompted, and then select to install drivers for Windows clients. The installation program installs the driver for the server and copies the client drivers to a location on the server for users (clients).
To share the printer with Windows client computers, see To install the printing software on client computers.
To install the printing software on client computers
After the drivers have been installed on the computer that is acting as the print server, the printing functionality can be shared. Individual Windows users who want to use the network printer must install the software on their computers (clients).
A client computer can connect to the printer in the following ways:
In the Printers folder, double-click the Add Printer icon and follow the instructions for a network installation. (See To install the printer driver using Add Printer.)
On the network, browse to the printer and drag it to your Printers folder.
Add the printer and install the software from the INF file on your network.
On the Starter CD, the INF files are stored in folders that use the following format: <CD drive>:\Setup\Drivers\<operating system>\<language>.
For example, if your CD drive letter is D, then D:\Setup\Drivers\Win2k_XP\English would contain the English INF file for Windows 2000 and Windows XP.
To install the printer driver using Add Printer
1 From the Windows desktop, click Start, point to Settings, and then click Printers.Or, click Start, click Control Panel, and then click Printers and Faxes.
2 Double-click Add Printer, and then click Next.
3 Select Network Printer or Network Printer Server.
4 Click Next.
5 Do one of the following:
• Type in the network path or queue name of the shared printer and click Next. Click Have Disk when prompted to select the printer model.
• Click Next, and then locate the printer in the Shared printers list.
6 Click Next, and then follow the instructions on the screen to complete the installation.
66 5 - Configuring and managing the printer ENWW

Wireless connectionIf your printer supports wireless communication, you can connect the printer to a computer or a network without cables.
Note To use wireless communication, make sure that the printer is not connected to the network using a network cable.
For more information about setting up and configuring wireless communication and security options, see Configuring wireless communication options.
Installing printer software and sharing the printer
Before installing the printer software, complete the following tasks:
Obtain your network’s network name (SSID) and communication mode (infrastructure or ad hoc) from the configuration utility for the network’s wireless access point (WAP) or the computer’s network card. See Configuring basic wireless communication settings.
Find out the type of security your network uses (such as WPA or WEP), and then configure these settings in the EWS. See Configuring wireless security settings.
After you complete these tasks, follow the onscreen instructions to install the printer software for your communication mode (infrastructure or ad hoc).
To set wireless network settings in an infrastructure network (recommended)
1 Set up the printer hardware (see the setup poster and the getting started guide).
2 Connect the printer to the computer with the cross cable (included with the printer).-Or-Connect the printer to the network with a network cable.
3 Close any programs that are open on your computer.
4 Insert the Starter CD into the CD-ROM drive. The CD menu starts automatically.
If the CD menu does not start automatically, click Start, and then click Run. Browse to the CD-ROM drive for the computer, click Autorun.exe, and then click Open. In the Run dialog box, click OK.
5 Click Install Printer Driver and follow the instructions on the screen to complete the installation.
6 When prompted, disconnect the cable.
To share the printer with other computers
You must install the printer software on each computer that will use the printer. The cable is only needed when installing the printer software and configuring its wireless settings during the first installation on the network. The cable is not required for installing the printer on other computers on the network.
ENWW 67

To set wireless network settings in an ad hoc network (advanced users only)
Devices on the ad hoc network must:
Be 802.11b/g-compatible
Have ad hoc as the communication mode
Have the same network name SSID
Be on the same subnet
Be on the same channel
Have the same 802.11b/g security settings
Follow these steps to connect to the printer using its factory default ad hoc network settings:
1 Set up the printer hardware (see the setup poster and the getting started guide).
2 Connect the printer to the computer with the cross cable (included with the printer).-Or-Connect the printer to the network with a network cable.
3 Reset the printer’s network settings. See Troubleshooting tips and resources.
4 Open the configuration utility for your computer’s wireless network card, then do the following:
a Note the profile for the wireless network you are connected to. You will need this information later.
b Create a new wireless profile with the following values:
• Communication mode: ad hoc
• Network Name (SSID): hpsetup
• Security (encryption): disabled
c Activate the profile.
Note After activating the new profile, the computer loses communication with other devices on the network.
5 Wait two minutes for the printer to obtain an IP address, then press the printer’s Configuration Page button to print the configuration pages.
6 On the network configuration page, verify the following:
• The network name (SSID) is hpsetup
• The communication mode is ad hoc
• The IP address is not 0.0.0.0
If one of the above is not true, then repeat steps 1 through 5.
7 Close any programs that are open.
8 Insert the Starter CD into the CD-ROM drive. The CD menu starts automatically.
If the CD menu does not start automatically, click Start, and then click Run. Browse to the CD-ROM drive for the computer, click Autorun.exe, and then click Open. In the Run dialog box, click OK.
9 Click Install Printer Driver and follow the instructions on the screen to complete the installation.
10 Reconnect to your wireless network using the network profile noted in step 4a.
Note After activating the original profile, the computer loses communication with the printer.
68 5 - Configuring and managing the printer ENWW

To share the printer with other computers
You must install the printer software on each computer that will use the printer. Follow the steps beginning on page 10 to install the printer software on other computers that will use the printer.
Advanced setup
For instructions on configuring the printer to operate on ad hoc networks other than the hpsetup factory default, visit HP’s Web site at http://www.hp.com/support/businessinkjet1200.
Configuring the printer (Mac OS)
You can use the printer with a single Macintosh computer using a USB cable, or you can share the printer among other users on a network.
To install the software for network or direct connection
1 Connect the printer to the computer with the USB cable or to the network with a network cable.
2 Insert the Starter CD into the CD-ROM drive. The CD menu starts automatically.
If the CD menu does not start automatically, double-click the CD icon on the desktop, and then double-click the Setup icon.
3 Click Install Driver and follow the instructions on the screen for your connection type.
4 Complete the installation:
Mac OS 9 (9.1 or later)
a When prompted, restart the computer.
b Select Chooser from the Apple menu.
c Select hp inkjet 6.x in the upper left window of the Chooser window, where x represents the version of the current printer driver.
d Select the printer in the right window of the Chooser screen.
e Close the Chooser.
f To share the printer, see To share the printer on a locally shared network.
Mac OS X (10.1.5 or later)
a Open the Print Center, which is located in the Applications\Utilities folder.
b Click Add Printer.
c For a direct connection, select USB from the menu.-Or-For a network connection on an IP network, on the pop-up menu, select HP IP Printing, and then type the IP address for the printer, or select Rendezvous.
d Select the printer from the printer list, and then click Add. A mark appears beside the printer name, indicating that this printer is now the default printer.
e Close the Print Center.
ENWW 69

5 If necessary, share the printer with other Macintosh computer users.
• Direct connectionShare the printer with the other Macintosh computer users. See To share the printer on a locally shared network for more information.
• Network connectionIndividual Macintosh computer users who want to use the network printer must install the printer software on their computers.
To share the printer on a locally shared network
When you connect the printer directly, you can still share the printer with other computers using a simple form of networking known as locally shared networking. Use this configuration only in small groups or when usage is low. The computer that is connected to the printer is slowed down when many users print to the printer.
Basic requirements for sharing in a Macintosh environment include the following items:
The Macintosh computers must be communicating on the network using TCP/IP, and the Macintosh computers must have IP addresses. (AppleTalk is not supported.)
The printer that is being shared must be connected to a built-in USB port on the host Macintosh computer.
Both the host Macintosh computer and the client Macintosh computers that are using the shared printer must have printer-sharing software installed and the printer driver or PPD for the printer that is installed. (You can run the Installer program to install the printer sharing software and associated Help files.)
The client Macintosh computers should have the appropriate HP printer drivers installed.
The client Macintosh computers must be PowerMac computers.
For more information about USB printer sharing, see the support information that is available on the Apple website (http://www.apple.com) or the Mac Help on the computer.
To share among computers with the same operating system
Use the following steps to share the printer among Macintosh computers with the same operating system:
1 Turn on printer sharing on the computer that is connected to the printer (the host).
• Mac OS X (10.2.x and later): Open System Preferences, click Sharing, click Services, and then select the Printer Sharing check box.
• Mac OS 9 (9.1 and later): Open Control Panels, and then click USB Printer Sharing.
2 To print from the other Macintosh computers (the clients) on the network, preselect the printer in USB Printer Sharing (Mac OS 9, version 9.1 and later) or Sharing (Mac OS X, version 10.2.x and later). Then, choose the neighborhood where the printer is shared and select the printer.
3 To print from the other Macintosh computers (the clients) on the network, preselect the printer in Sharing. Then, choose the neighborhood where the printer is shared and select the printer.
70 5 - Configuring and managing the printer ENWW

To share among computers with different operating systems
Use the following steps to share with Mac OS 9 (9.1 and later) computers when the host computer is running the Mac OS X (10.1.5 and later).
Note Printers connected using USB cables can only be shared between the Mac OS 9 (9.1 and later) and the Mac OS X (10.1.5 and later) through the Classic environment in the Mac OS X.
1 On the Mac OS X (10.1.5 and later) host computer, open System Preferences, make sure that printer sharing is off, and then quit System Preferences.
2 Locate the Mac OS 9 (9.1 and later) System Folder, open Control Panel, and then open USB Printer Sharing. (If the Classic environment is not already running, it starts.)
3 Click the Start/Stop tab, and then click Start.
4 When USB Printer Sharing On appears, click the My Printers tab.
5 Select the check box next to the device that you want to share.
6 Close the control panel.
Installing the software for wireless communicationThis section contains information about installing and configuring the wireless networking software for Macintosh computers.
Before installing the printer software, complete the following tasks:
Obtain the your network’s network name (SSID, or Service Set Identifier) and communication mode (infrastructure or ad hoc) from the configuration utility for the network’s wireless access point (WAP) or the computer’s network card. See Configuring basic wireless communication settings.
Find out the type of security your network uses (such as WPA or WEP), and then configure these settings in the EWS. See Configuring wireless security settings.
After you complete these tasks, install the printer software for your communication mode (infrastructure or ad hoc).
Note Make sure that the printer is not connected to the network using a network cable.
Mac OS 9 (9.1 and later)
To set wireless network settings in an infrastructure network
1 Set up the printer hardware (see the setup poster and the getting started guide).
2 Open the Airport Admin Utility, and then do the following:
a Click Base Station, and then select Equivelant Network Password.
b Write down the network name (SSID) and the WEP key.
c Close the Airport Admin Utility.
3 Press the printer’s Configuration Page button to print the configuration pages.
ENWW 71

4 Click the Apple menu, point to Control Panels, click TCP/IP, and then do the following:
a Click File, and then click Configurations to open the Configuration dialog box.
b Click Duplicate, enter HP Business Inkjet 1200, and then click OK.
c Click Make Active to close the Configuration dialog box.
d From the Connect via menu, select AirPort.
e From the Configure menu, select Manually.
f Enter the printer’s Subnet Mask and Default Gateway from the network configuration page.
g Enter 169.254.0.1 in the IP address box.
5 Open the AirPort Setup Assistant, and then follow the onscreen instructions for joining an existing wireless network. Use hpsetup as the existing network to join. You may also go to the Apple menu, select Airport, and then select hpsetup as the existing network to join.
6 Use the IP address listed on the network configuration page to open the printer’s embedded Web server, and then enter the printer’s security settings (see Configuring wireless security settings). Use the WEP key you wrote down in step 1.
7 To return to your previous network settings, follow step 5 and selecting the name of your network instead of hpsetup.
8 Insert the Starter CD in the computer’s CD drive, and then double-click the CD desktop icon.
9 Double-click the HP Inkjet Installer icon, then restart the computer when prompted.
10 Open the Chooser, then select the hp inkjet 6.x icon.
11 When asked if you want the computer to search for the printer, click Yes.
12 Select the printer, and then close the Chooser.
To set wireless network settings in an ad hoc network (advanced users only)
1 Set up the printer hardware (see the setup poster and the getting started guide).
2 Reset the printer’s network settings. See Troubleshooting tips and resources.
3 Press the printer’s Configuration Page button to print the configuration pages.
4 Open the AirPort Setup Assistant, and then follow the onscreen instructions for joining an existing wireless network. Use hpsetup as the existing network to join. You may also go to the Apple menu, select Airport, and then select hpsetup as the existing network to join.
5 Use the URL listed on the network configuration page to open the printer’s embedded Web server, then enter the printer’s security settings. See Configuring wireless security settings.
6 Insert the Starter CD in the computer’s CD-ROM drive, and then double-click the CD desktop icon.
7 Double-click the HP Inkjet Installer icon, and then restart the computer when prompted.
8 Open the Chooser, then select the hp inkjet 6.x icon.
9 When asked if you want the computer to search for the printer, click Yes.
10 Select the printer, then close the Chooser.
72 5 - Configuring and managing the printer ENWW

Mac OS X (10.1.5 and later)
To set wireless network settings in an infrastructure network (recommended)
1 Set up the printer hardware (see the setup poster and the getting started guide).
2 Insert the Starter CD in the computer’s CD-ROM drive, and then double-click the CD desktop icon.
3 Double-click the HP Inkjet Installer icon, then follow the onscreen instructions.
4 On the Connection Type screen, select Wireless, then click Next.
5 Follow the onscreen instructions to complete the software installation.
6 When prompted, enter the printer’s security settings. See Configuring wireless security settings.
7 On the Add Printer screen, click Open Print Center.
8 Click Add Printer.
9 Do one of the following depending on the version of Mac OS X you are using:
• Mac OS X (10.2.3 and later): Select Rendezvous.
• Mac OS X (10.1.5 to 10.2.2): Select HP IP Printing, and then click Discover.
10 Select the printer, click Add, and then close the Print Center.
To set wireless network settings in an ad hoc network (advanced users only)
1 Set up the printer hardware (see the setup poster and the getting started guide).
2 Reset the printer’s network settings. See Troubleshooting tips and resources.
3 Press the printer’s Configuration Page button to print the configuration pages.
4 Open the AirPort Setup Assistant, and then follow the onscreen instructions for joining an existing wireless network. Use hpsetup as the existing network to join.
5 Use the URL listed on the network configuration page to open the printer’s embedded Web server, and enter the printer’s security settings (see Configuring wireless security settings).
6 Insert the Starter CD in the computer’s CD-ROM drive, and then double-click the CD desktop icon.
7 Double-click the HP Inkjet Installer icon, and then follow the onscreen instructions.
8 On the Connection Type screen, select Wireless, and then click Next.
9 Close the setup utility and install the printer driver.
10 On the Add Printer screen, click Open Print Center.
11 Click Add Printer.
12 Do one of the following depending on the version of Mac OS X you are using:
• Mac OS X (10.2.3 and later): Select Rendezvous.
• Mac OS X (10.1.5 to 10.2.2): Select HP IP Printing, and then click Discover.
13 Select the printer, and then click the Add button.
14 Close the Print Center.
ENWW 73
Classic environment for Mac OS X (10.1.5 and later)
1 Install the printer software as specified for a computer with Mac OS X (10.1.5 and later). See Mac OS X (10.1.5 and later) for more information.
2 Open the Chooser, and then select the hp inkjet 6.x icon.
Note If you do not see the hp inkjet 6.x icon, then insert the Starter CD into the computer CD drive and follow the onscreen instructions to install the Mac OS 9 printer driver. Then repeat step 1.
3 When asked if you want the computer to search for the printer, click Yes.
4 Select the printer, and then close the Chooser.
Configuring wireless communication options
Configuring basic wireless communication settingsIn order to install the printer on a wireless network, you need to know the network’s communication mode and its network name (SSID, or Service Set Identifier). Consult the configuration utility for your computer’s network card or for your network’s Wireless Access Point (WAP).
There are two options for a network’s communication mode.
Infrastructure (recommended)
When the printer is set to the infrastructure communication mode, the printer communicates with other devices on the network, whether the devices are wired or wireless, through a WAP. WAPs commonly act as routers or gateways on small networks.
Ad hoc (advanced users only)
When the printer is set to the ad hoc communication mode, the printer communicates directly with other wireless devices without the use of a WAP.
For instructions on installing the printer on an existing ad hoc network, visit HP’s Web site at http://www.hp.com/support.
74 5 - Configuring and managing the printer ENWW

Configuring wireless security settingsThe printer must share the same network security settings as the other devices on your network. If the printer does not have the correct security settings, other devices on the network will not be able to use the printer.
To find the security settings for your wireless network, consult the configuration utility for your computer’s wireless network card or the network’s Wireless Access Point (WAP).
Types of wireless security
You can configure the printer to use the following security options:
Open System (no security)
The network does not require security for authorization or encryption. This is the printer's factory default setting.
Wired Equivalent Privacy (WEP)
WEP provides security by encrypting data sent over radio waves from one wireless device to another wireless device.
Devices on a WEP-enabled network use WEP keys to encode data. If your network uses WEP, you must know the WEP key(s) it uses.
Wi-Fi Protected Access (WPA)
WPA provides security by doing the following:
• Encrypting data sent over radio waves from one wireless device to another wireless device
• Controlling access to network resources through authentication protocols
WPA either requires the use of an authentication server (best suited for enterprise networks) or a pass phrase known to all devices on the network.
Configuring security options
You can configure security options for wireless communication from the installation program or the EWS.
To configure security options from the installation program
See Wireless connection or Installing the software for wireless communication for information about running the installation program.
To configure security options in the EWS
1 Connect a cross cable (included with the HP Business Inkjet 1200dtwn) to the printer and the computer.
2 Open the printer's embedded Web server (EWS). See Embedded Web server (EWS).
3 Click the Networking tab, and then click Wireless (802.11) in the left pane.
4 On the Wireless Setup tab, click Start Wizard.
5 Follow the instructions on the screen.
6 Click Apply, and then close the EWS.
ENWW 75

To add hardware addresses to a Wireless Access Point (WAP)
MAC filtering is a security feature in which a Wireless Access Point (WAP) is configured with a list of MAC addresses (also called “hardware addresses”) of devices that are allowed to gain access to the network through the WAP.
If the WAP does not have the hardware address of a device attempting to access the network, the WAP denies the device access to the network.
If the WAP filters MAC addresses, then the printer's MAC address must be added to the WAP's list of accepted MAC addresses.
1 Print a configuration page. (See Understanding the configuration page.)
2 Open the WAP's configuration utility, then add the printer's hardware address to the list of accepted MAC addresses.
Reducing interference in a wireless networkThe following tips will help reduce the chances for interference in a wireless network:
Keep the wireless devices away from large metal objects, such as filing cabinets, and other electromagnetic devices, such as microwaves and cordless telephones, as these objects can disrupt radio signals.
Keep the wireless devices away from large masonry structures and other building structures as these objects can absorb radio waves and lower signal strength.
For an infrastructure network, position the WAP in a central location in line of sight with the wireless devices on the network.
Keep all wireless devices on the network within range of one another.
Uninstalling the printer software
To uninstall the software for Windows computers
If you are using Windows 2000 or Windows XP, you must have administrator privileges to uninstall the printer software.
1 If the computer is connected directly to the computer using a USB or parallel cable, disconnect the printer.
2 Close any running applications.
3 From the Start menu, open the Control Panel.
4 Double-click Add/Remove Programs.
5 Select the printing software that you wish to remove.
6 Click the button for adding or removing software.
7 Follow the instructions on the screen to complete the removal of the printer software.
Note If the uninstallation process fails, restart the computer and complete the steps above to uninstall the software.
If the software was not successfully installed or the uninstaller could not be found, complete the following steps to run the scrubber utility. (The scrubber utility is not available for computers running Windows NT 4.0.)
76 5 - Configuring and managing the printer ENWW

8 Disconnect the printer from the computer.
9 On the computer, restart Windows.
10 Insert the Starter CD in the CD drive. If the CD menu appears, exit the CD menu.
11 Locate the scrubber utility on the Starter CD and run the utility.
• For Windows 98 and Windows Me, use the scrub9x.exe file located in the Utils\Scrubber\Win9x_Me folder.
• For Windows 2000 and Windows XP, use the scrub2k.exe file located in the Utils\Scrubber\Win2k_XP folder.
To uninstall the software for Macintosh computers
1 If the computer is connected directly to the computer using a USB cable, disconnect the printer.
2 Restart the computer.
Note If you do not restart the computer before you uninstall the software, some files are not removed from your computer when you run the Uninstall option.
3 Insert the Starter CD into the CD drive.
4 Double-click the CD icon on the desktop.
5 Double-click the installer icon and follow the instructions on the screen.
6 When the Main Installation dialog box appears, select Uninstall from the drop-down list located in the upper-left part of the dialog box.
7 Follow the instructions on the screen to remove the printer software.
ENWW 77

A HP supplies and accessories
This section provides information on HP supplies and accessories for the printer. The information is subject to changes, visit HP website (http://www.hpshopping.com) for the latest updates. You may also make purchase through the website.
Ordering printing supplies online
Besides the HP website, you may order printing supplies through the embedded Web server (EWS) or the Toolbox (Windows).
System requirements for ordering printing supplies
To use the Toolbox, ensure you have the following:
Internet access
Printer connected to your computer using a USB or parallel cable, or connected to the network
Toolbox installed on your computer (supported for Windows only)
To use the EWS, ensure you have the following:
TCP/IP-based network (IPX/SPX-based networks are not supported)
Printer connected to the network
Web browser installed on your computer (either Netscape Navigator 4.8 or Microsoft Internet Explorer 5.0 or later)
To order printing supplies
1 From the Toolbox (Windows): On the Printer Status tab, click Order Supplies. Your default web browser starts and displays a website.From the EWS: On the Information tab, click Order Supplies.
2 Follow the instructions on the website to select and order printing supplies.
78 A - HP supplies and accessories ENWW

Accessories
Accessories and cables
Supplies
Ink supplies
Ink cartridges
Printheads
HP Media
Plain paper
250-sheet input tray C8254A
HP IEEE-1284 A-B Parallel Cable (2 meter) C2950A
HP IEEE-1284 A-B Parallel Cable (3 meter) C2951A
HP USB A-B (2 meter) C6518A
HP 10 Black C4844A
HP 11 Cyan C4836A
HP 11 Magenta C4837A
HP 11 Yellow C4838A
HP 11 Black C4810A
HP 11 Cyan C4811A
HP 11 Magenta C4812A
HP 11 Yellow C4813A
HP Bright White Inkjet Paper
500 sheets Letter (8.5 by 11 inches) HPB1124
500 sheets A4 (210 by 297 mm) C1825A
HP Office Paper
2500 sheets Letter (8.5 by 11 inches) 25005
10-ream carton Letter (8.5 by 11 inches) C8511
10-ream carton (3-hole punched) Letter (8.5 by 11 inches) C3HP
10-ream carton Legal (8.5 by 14 inches) C8514
ENWW 79

Photo paper
Business communication paper
HP Office Recycled Paper
500 sheets Letter (8.5 by 11 inches) E1120
500 sheets (3-hole punched) Letter (8.5 by 11 inches) E113H
500 sheets Letter (8.5 by 11 inches) E1420
HP Multipurpose Paper
5-ream carton Letter (8.5 by 11 inches) M115R
250 sheets Letter (8.5 by 11 inches) 25011
500 sheets Letter (8.5 by 11 inches) M1120
500 sheets (3-hole punched) Letter (8.5 by 11 inches) M113H
500 sheets Legal (8.5 by 14 inches) M1420
HP Premium Plus Photo Paper 20 sheets, glossy Letter (8.5 by 11 inches) C6831A
50 sheets, glossy Letter (8.5 by 11 inches) Q1785A
20 sheets, glossy 4 by 6 inches Q1977A
20 sheets, matte Letter (8.5 by 11 inches) C6950A
20 sheets, matte A4 (210 by 297 mm) C6951A
20 sheets, glossy A4 (210 by 297 mm) C6832A
HP Premium Photo Paper 50 sheets, glossy Letter (8.5 by 11 inches) C6979A
15 sheets, glossy A4 (210 by 297 mm) Q2519A
HP Photo Paper 20 sheets, two-sided glossy Letter (8.5 by 11 inches) C1846A
20 sheets, two-sided glossy A4 (210 by 297 mm) C1847A
20 sheets, one-sided glossy A4 (210 by 297 mm) C6765A
HP Colorfast Photo Paper 20 sheets, glossy Letter (8.5 by 11 inches) C7013A
20 sheets, glossy A4 (210 by 297 mm) C7014A
HP Photo-Quality Inkjet Paper25 sheets, two-sided, semi-gloss A4 (Europe) (210 by 297 mm) C6984A
HP Everyday Photo Paper 100 sheets, two-sided, matte Letter (8.5 by 11 inches) C7007A
25 sheets, two-sided, matte Letter (8.5 by 11 inches) C6983A
25 sheets, two-sided, semi-gloss A4 (Asia/Pacific) (210 by 297 mm) C7006A
HP Brochure and Flyer Paper 50 sheets, two-sided, glossy Letter (8.5 by 11 inches) C6817A
50 sheets, matte Letter (8.5 by 11 inches) C6955A
100 sheets, tri-fold, two-sided, glossy Letter (8.5 by 11 inches) C7020A
50 sheets, two-sided, glossy A4 (210 by 297 mm) C6818A
HP Premium Presentation Paper 50 sheets, two-sided, glossy Letter (8.5 by 11 inches)
50 sheets, two-sided, glossy A4 (210 by 297 mm)
80 A - HP supplies and accessories ENWW

Cards
Creative project papers
HP Premium Inkjet Transparency Film 20 sheets Letter (8.5 by 11 inches) C3828A
50 sheets Letter (8.5 by 11 inches) C3834A
20 sheets A4 (210 by 297 mm) C3832A
50 sheets A4 (210 by 297 mm) C3835A
HP Premium Plus Inkjet Transparency Film 20 sheets Letter (8.5 by 11 inches) C7030A
50 sheets Letter (8.5 by 11 inches) C7028A
HP Premium Paper 200 sheets Letter (8.5 by 11 inches) 51634Y
HP Premium Inkjet Paper 200 sheets, coated, matte A4 (210 by 297 mm) 51634Z
100 sheets, coated, heavyweight A4 (210 by 297 mm) C1853A
HP Textured Greeting Cards 20 sheets, 20 envelopes, felt-textured, ivory/half-fold
Letter (8.5 by 11 inches) C6828A
20 sheets, 20 envelopes, textured, white/half-fold
Letter (8.5 by 11 inches) C7019A
20 sheets, 20 envelopes, felt-textured, cream/half-fold
A4 (210 by 297 mm) C6829A
HP Photo Greeting Cards 10 sheets, 10 envelopes, half-fold
Letter (8.5 by 11 inches) C6044A
10 sheets, 10 envelopes, half-fold
A4 (210 by 297 mm) C6045A
HP Matte Greeting Cards20 sheets, 20 envelopes, white/quarter-fold
Letter (8.5 by 11 inches) C1812A
20 sheets, 20 envelopes,white/ quarter-fold
A4 (210 by 297 mm) C6042A
20 sheets, 20 envelopes, white/half-fold
A4 (210 by 297 mm) C7018A
HP Banner Paper 100 sheets Letter (8.5 by 11 inches) C1820A
100 sheets A4 (210 by 297 mm) C1821A
HP Iron-on T-shirt Transfers10 sheets (12 transfers per sheet) Letter (8.5 by 11 inches) C6049A
10 sheets (12 transfers per sheet) A4 (210 by 297 mm) C6050A
ENWW 81

B Support and warranty
The information in this section suggests solutions to common problems. If your printer is not operating properly and those suggestions did not solve your problem, try using one of the following support services to obtain assistance.
Obtaining electronic support
You can obtain support from HP from the following electronic sources:
Web
Visit the printer website on hp.com for the latest software, product, operating system, and support information: http://www.hp.com/support/businessinkjet1200
Toolbox (Windows)
The Toolbox provides easy, step-by-step solutions to common printing problems. See Toolbox (Windows).
Obtaining HP telephone support
During the warranty period, you may obtain assistance from the HP Customer Care Center.
Before you callTo assist our Customer Care Center representatives to serve you better, prepare the following information before calling.
1 Print the printer configuration page. See Understanding the configuration page for instructions on how to print this page. If the printer does not print, get the following information ready.
a model number and serial number. (Check the back of the printer.)
b printer model
2 Check the operating system that you are using, such as Windows 98 SE.
3 If the printer is connected to the network, check the network operating system, such as Windows NT Server 4.0.
4 Note how the printer is connected to your system, such as parallel, USB, or network.
82 B - Support and warranty ENWW

5 Obtain the printer driver and version number of the printer software, such as HP Business Inkjet 1200 Series Version: 2.325.0.0. (To find the printer driver version number, open the printer settings or properties dialog box and click the HP logo in the dialog box.)
6 If you have a problem printing from a particular application, note the application and version number.
Telephone support numbersIn many location, HP provides toll free telephone support during the warranty period. However, some of the support numbers listed below may not be toll free.
For the most current list of telephone support numbers, see http://www.hp.com/support.
Country/Region Telephone number
Albania *
Algeria 213 17 63 80
Anguila 1-800-8722881
Argentina 0-810-555-5520
Aruba 800-8000
Australia (03) 8877 8000
Austria 08 1000 1000
Bahamas 1-800-711-2884
Bahrain 800 171
Barbados 001-800-8722881
Belgium 078 600 600
Belize 811
Bermuda 1-800-711-2884
Bolivia 0-800-1110
Bosnia-Hercogovina *
Brazil Outside São Paolo: 0800-157751Greater Sao Paolo: (11) 4689-2012
Brit. Virgin Islands 001-800-8722881
Bulgaria *
Canada (905) 206-4663
(877) 621-4722
Cayman Islands 1-800-711-2884
Chile 800-3600999
China 021-38814518
Colombia 01-8000-114726
Costa Rica 0-800-011-0524
Croatia *
Cyprus 800 9 2649
Czech Republic 2 61 307 310
Denmark 70 11 77 00
ENWW 83
Dominican Republic 1-800-711-2884
Ecuador Andinatel 999119
Pacifictel 1-800-225528
Egypt 202 532 5222
El Salvador 800-1-785
Finland 0203 53232
France 0826 10 4949
GermanyHP bietet während der Gewährleistungsfrist vielerorts gebührenfreien telefonischen Support an. Die nachfolgend aufgelisteten Rufnummern sind jedoch unter Umständen nicht gebührenfrei.
Zur weiteren Klärung oder um zusätzliche Information zu erhalten, können Sie Kontakt mit der Online-Kundenbetreuung von HP (http://www.hp.com/cpso-support/guide/psd/cscemea.html) aufnehmen.
01805 258 143
Gibraltar 0870 842 2339
Greece 801 11 22 55 47
Guatemala 1-800-999-5105
Guyana 165
Haiti 183
Honduras 800-0-123
Hong Kong 85 (2) 2802 4098
Hungary 1 382 1111
Iceland 507 10 00
India +91-80-8526900 or 1 600 447-737
Support in Hindi & English
Indonesia +62 (21) 350 3408
Ireland 1890 946 500
Israel 9 830 4848
Italy 02 3859 1212
Jamaica 0-800-711-2884
Japan 0570-000-511(Navi Dial, Japan Domestic Only)
81-3-3335-9800
Jordan +971 4 366 2020
Kazakhstan *
Korea, Republic of 1588 3003
Kuwait +971 4 366 2020
Lebanon +971 4 366 2020
Liechtenstein 0848 802 020
Luxembourg 27 303 303
Macedonia *
Country/Region Telephone number
84 B - Support and warranty ENWW

Malaysia +1800 805 405
Malta *
Mexico Mexico City: 52-58-9922 Outside Mexico City: 01-800-472 6684
Moldova *
Monaco 0826 104949
Morocco 22 40 47 47
Netherlands 0900 117 0000
New Zealand +64 (9) 356 6640
Nicaragua 174
Nigeria *
Norway 800 62 800
Oman +971 4 366 2020
Panama 001-800-711-2884
Peru 0-800-10111
Philippines (2) 867 3551
Poland 22 5666 000
Portugal 213 164 164
Puerto Rico 1 877 232 0589
Qatar +971 4 366 2020
Romania +40 (21) 315 4442
Russia Moscow: 095 797 3520St. Petersburg: 812 346 7997
San Marino 02 3859 1212
Saudi Arabia 800 897 1444
Serbia and Montenegro +359 (2) 960-1963
Singapore 6272 5300
Slovakia 2 5752 5752
Slovenia *
South Africa (RSA), Republic of 086 000 1030
Spain 902 010 333
Suriname 156
Sweden 077 130 3000
Switzerland 0848 80 20 20
Syria +971 4 366 2020
Taiwan 886-2-8722-8000 886-800-010-055
Thailand (2) 353 9000
Trinidad & Tobago 1-800-711-2884
Tunisia 71 89 12 22
Turkey 212 444 71 71
Country/Region Telephone number
ENWW 85

* For support information, call your HP service provider.
United Kingdom 0870 842 2339
Ukraine Kiev: 44 4903520
United Arabic Emirates (UAE) 800 452004 366 2020
United States 1-800 HP INVENT
Vatican City 02 3859 1212
Vietnam (8) 823 4530
West Africa (English-speaking countries/regions) *
West Africa (French-speaking countries/regions) +351 213 17 63 80
Yemen +971 4 366 2020
Country/Region Telephone number
86 B - Support and warranty ENWW

Hewlett-Packard limited warranty statement
Extent of limited warranty
1 Hewlett-Packard warrants to the end-user customer that the HP products specified above will be free from defects in materials and workmanship for the duration specified above, which duration begins on the date of purchase by the customer.
2 For software products, HP’s limited warranty applies only to a failure to execute programming instructions. HP does not warrant that the operation of any product will be uninterrupted or error free.
3 HP’s limited warranty covers only those defects that arise as a result of normal use of the product, and does not cover any other problems, including those that arise as a result of:
a Improper maintenance or modification;
b Software, media, parts, or supplies not provided or supported by HP; or
c Operation outside the product’s specifications.
d Unauthorized modification or misuse.
4 For HP printer products, the use of a non-HP ink cartridge or a refilled ink cartridge does not affect either the warranty to the customer or any HP support contract with the customer. However, if printer failure or damage is attributable to the use of a non-HP or refilled ink cartridge, HP will charge its standard time and materials charges to service the printer for the particular failure or damage.
5 If HP receives, during the applicable warranty period, notice of a defect in any product which is covered by HP’s warranty, HP shall either repair or replace the product, at HP’s option.
6 If HP is unable to repair or replace, as applicable, a defective product which is covered by HP’s warranty, HP shall, within a reasonable time after being notified of the defect, refund the purchase price for the product.
7 HP shall have no obligation to repair, replace, or refund until the customer returns the defective product to HP.
8 Any replacement product may be either new or like new, provided that it has functionality at least equal to that of the product being replaced.
9 HP products may contain remanufactured parts, components, or materials equivalent to new in performance.
10 HP’s Limited Warranty Statement is valid in any country/region where the covered HP product is distributed by HP. Contracts for additional warranty services, such as on-site service, are available from any authorized HP service facility in countries/regions where the product is distributed by HP or by an authorized importer.
HP product Duration of Limited Warranty
Software 1 year
Accessories 1 year
Ink cartridges 6 months
Printheads 1 year*
Printer peripheral hardware (see below for details) 1 year
*For more detailed warranty information, see http://www.hp.com/support/businessinkjet1200.
ENWW 87

Limitations of warranty
TO THE EXTENT ALLOWED BY LOCAL LAW, NEITHER HP NOR ITS THIRD PARTY SUPPLIERS MAKES ANY OTHER WARRANTY OR CONDITION OF ANY KIND, WHETHER EXPRESS OR IMPLIED WARRANTIES OR CONDITIONS OF MERCHANTABILITY, SATISFACTORY QUALITY, AND FITNESS FOR A PARTICULAR PURPOSE.
Limitations of liability
1 To the extent allowed by local law, the remedies provided in this Warranty Statement are the customer’s sole and exclusive remedies.
2 TO THE EXTENT ALLOWED BY LOCAL LAW, EXCEPT FOR THE OBLIGATIONS SPECIFICALLY SET FORTH IN THIS WARRANTY STATEMENT, IN NO EVENT SHALL HP OR ITS THIRD PARTY SUPPLIERS BE LIABLE FOR DIRECT, INDIRECT, SPECIAL, INCIDENTAL, OR CONSEQUENTIAL DAMAGES, WHETHER BASED ON CONTRACT, TORT, OR ANY OTHER LEGAL THEORY AND WHETHER ADVISED OF THE POSSIBILITY OF SUCH DAMAGES.
Local law
1 This Warranty Statement gives the customer specific legal rights. The customer may also have other rights which vary from state to state in the United States, from province to province in Canada, and from country/region to country/region elsewhere in the world.
2 To the extent that this Warranty Statement is inconsistent with local law, this Warranty Statement shall be deemed modified to be consistent with such local law. Under such local law, certain disclaimers and limitations of this Warranty Statement may not apply to the customer. For example, some states in the United States, as well as some governments outside the United States (including provinces in Canada), may:
a Preclude the disclaimers and limitations in this Warranty Statement from limiting the statutory rights of a customer (e.g. the United Kingdom);
b Otherwise restrict the ability of a manufacturer to enforce such disclaimers or limitations; or
c Grant the customer additional warranty rights, specify the duration of implied warranties which the manufacturer cannot disclaim, or allow limitations on the duration of implied warranties.
3 FOR CONSUMER TRANSACTIONS IN AUSTRALIA AND NEW ZEALAND, THE TERMS IN THIS WARRANTY STATEMENT, EXCEPT TO THE EXTENT LAWFULLY PERMITTED, DO NOT EXCLUDE, RESTRICT, OR MODIFY, AND ARE IN ADDITION TO, THE MANDATORY STATUTORY RIGHTS APPLICABLE TO THE SALE OF THE HP PRODUCTS TO SUCH CUSTOMERS.
88 B - Support and warranty ENWW

C Printer specifications
Printer specifications
For media and media-handling specifications, see Selecting print media.
Physical specifications
Available models and physical dimensions
Size (width by depth by height)
506 by 419 by 211 mm (19.9 by 16.5 by 8.3 inches)
With auto-duplex unit: 506 by 464 by 211 mm (19.9 by 18.3 by 8.3 inches)
With tray 2: 506 by 419 by 275 mm (19.9 by 16.5 by 10.8 inches)
Weight (does not include printheads or ink cartridges)
9 kg (19.8 lb) With auto-duplex unit: 9.4 kg (20.7 lb)With tray 2: 12 kg (26.5 lb)
Product features and capacities
Connectivity IEEE 1284-compliant bidirectional parallel (all models)USB 2.0-compliant full speed (all models)Fast Ethernet 10/100Base-TX for wired network connection (HP Business Inkjet 1200dn/1200dtn/1200dtwn)802.11b/g wireless network (HP Business Inkjet 1200dtwn)
Print method Drop-on-demand thermal inkjet printing
Ink cartridges 4 ink cartridges (1 each for black, cyan, magenta, and yellow)
Printheads 4 printheads (1 each for black, cyan, magenta, and yellow)
Supply yields (based on 5% coverage)
Ink cartridges 1,750 pages
Printheads Black: 16,000 pages
Cyan, magenta, and yellow: 24,000 pages
Color calibration ColorSyncICC Profiles
Device languages HP PCL 3 enhanced
Font support US fonts: CG Times, CG Times Italic, Universe, Universe Italic, Courier, Courier Italic, Letter Gothic, Letter Gothic Italic.
Built-in support for Arabic and Hebrew symbol sets
Duty cycle Up to 6,250 pages per month
ENWW 89

Processor and memory specifications
Device processor Motorola 32-bit ColdFire 4e HPA (240 MHz)
Device memory 32 MB built-in RAM
4 MB built-in Flash ROM
Operating system and network protocol specifications
Operating system compatibility Windows 98, Windows Me, Windows NT 4.0, Windows 2000, Windows XP 32-bit (Professional and Home Editions), and Windows 2003
Mac OS 9 (9.1 and later), Mac OS X (10.1.5 and later)IBM OS/2Linux
MS-DOS printer driver support through third-party applications
System requirements
Note: Graphic- intensive, complex, and large files might require more hard disk space.
Minimum Windows 98:Pentium® 90 MHz, 16 MB RAM, 145 MB free hard disk spaceWindows Me: Pentium® 90 MHz, 32 MB RAM, 145 MB free hard disk space
Windows NT 4.0 (Service Pack 6 or later): Pentium 100 MHz, 32 MB RAM, 145 MB free hard disk spaceWindows 2000:Pentium 300 MHz, 64 MB RAM, 145 MB free hard disk spaceWindows XP 32-bit edition:Pentium 233 MHz, 64 MB RAM, 145 MB free hard disk space
Mac OS 9 (9.1 and later):32 MB RAMMac OS X (10.1.5 and later): 128 MB RAM
Recommended Windows 98, and Windows Me: Pentium 266 MHz, 32 MB RAM, 175 MB free hard disk spaceWindows NT 4.0 (Service Pack 6 or later):Pentium 266 MHz, 64 MB RAM, 175 MB free hard disk spaceWindows 2000: Pentium 300 MHz, 64 MB RAM, 175 MB free hard disk space
Windows XP 32-bit edition:Pentium 300 MHz, 128 MB RAM, 175 MB free hard disk spaceMac OS 9 (9.1 and later):64 MB RAMMac OS X (10.1.5 and later): 128 MB RAM
90 C - Printer specifications ENWW

Network operating system compatibility Windows 98, Windows Me, Windows NT 4.0, Windows 2000, Windows XP 32-bit (Professional and Home Editions)
Mac OS 9 (9.1 and later), Mac OS X (10.1.5 and later)Microsoft Windows Terminal Server Edition 4.0Microsoft Windows 2003 Server (formerly known as Microsoft Windows XP Server Terminal Services)Microsoft Windows 2000 Server Terminal Services with Citrix MetaFrame 1.8Microsoft Windows 2003 Server Terminal Services with Citrix MetaFrame 1.8Microsoft Windows NT and Windows 2000 Server Terminal Services with Citrix V1.8Microsoft Windows NT and Windows 2000 Server Terminal Services with Citrix XPMicrosoft Windows 2000 Server Terminal Services
Compatible network protocols TCP/IP
Network management
HP Web Jetadmin plug-ins
Embedded Web server
FeaturesAbility to remotely configure and manage network devicesJob accounting
HP myPrintMileage
System requirementsTCP/IP-based network (IPX/SPX-based networks are not supported)A Web browser (either Netscape Navigator 4.8 or Microsoft Internet Explorer 5.0 or later)
Network connection. (You cannot use the embedded Web server when the printer is connected directly to a computer.)Internet connection (for some features) You can open and use the embedded Web server without being connected to the Internet. However, some features will not be available.
Must be on the same side of a firewall as the printer
ENWW 91

Functional specifications
Speed (U.S. Letter and A4) FAST mode: � Black text: 28 pages per minute (ppm)
� Mixed text with color graphics: 24 ppm FAST NORMAL mode:� Black text: 15 ppm
� Mixed text with color graphics: 13 ppmNORMAL mode:� Black text: 9 ppm
� Mixed text with color graphics: 8 ppmBEST mode:� Black text: 8 ppm
� Mixed text with color graphics: 4 ppmLaser-quality speed*:� Black text: 6.8 ppm
� Mixed text with color graphics: 6 ppm
*The “laser-quality speed” comparison has the page-per-minute speeds of the HP Business Inkjet 1200 series printer against the benchmark of the HP Color LaserJet 4600 at comparable print quality. This comparison is based solely on HP's internal testing.
Resolution Black: � Up to 1,200 by 600 dpi with pigmented black ink
Color: � HP enhanced Color Layering Technology with
PhotoREt III for photo quality (up to 4,800 by 1,200-optimized dpi on HP premium photo papers, 1,200 by 1,200-input dpi)
Environmental specifications
Operating environment
Operating temperature
5° to 40° C (41° to 100° F)
Recommended operating conditions
15° to 35° C (59° to 95° F)
Recommended relative humidity
15 to 80 percent noncondensing
Storage environment Storage temperature
-40° to 70° C (-40° to 158° F)
Storage relative humidity
Up to 90 percent noncondensing at a temperature of 65° C (150° F)
Electrical specifications
Power supply Universal power adapter
Power requirements � Input voltage: 110 to 240 VAC (± 10 percent), 50 to 60 Hz
� Output supply: 31-32 Vdc, 2200mA
Maximum allowable power consumption
� 70 to 75 Watts
Acoustic emission specifications (print in Draft mode, noise levels per ISO 7779)
Sound pressure (bystander position) LpAm 54 dB(A)
Sound power LwAm 61 dB(A)
92 C - Printer specifications ENWW

D Regulatory information
FCC statement
The United States Federal Communications Commission (in 47 cfr 15.105) has specified that the following notices be brought to the attention of users of this product.
This device complies with part 15 of the FCC rules. Operation is subject to the following two conditions: (1) This device may not cause harmful interference, and (2) this device must accept any interference received, including interference that may cause undesired operation.
Shielded cables
Use of a shielded data cable is required to comply with the Class B limits of Part 15 of the FCC Rules.
Pursuant to Part 15.21 of the FCC Rules, any changes or modifications to this equipment not expressly approved by the Hewlett-Packard Company, may cause harmful interference and void the FCC authorization to operate this equipment.
This equipment has been tested and found to comply with the limits for a Class B digital device, pursuant to Part 15 of the FCC Rules. These limits are designed to provide reasonable protection against harmful interference in a residential installation. This equipment generates, uses and can radiate radio frequency energy and, if not installed and used in accordance with the instructions, may cause harmful interference to radio communications. However, there is no guarantee that interference will not occur in a particular installation. If this equipment does cause harmful interference to radio or television reception, which can be determined by turning the equipment off and on, the user is encouraged to try to correct the interference by one or more of the following measures:
Reorient or relocate the receiving antenna.
Increase the separation between the equipment and receiver.
Connect the equipment into an outlet on a circuit different from that to which the receiver is connected.
Consult the dealer or an experienced radio/TV technician for help.
Exposure to radio frequency radiation
CAUTION The radiated output power of this device is far below the FCC radio frequency exposure limits. Nevertheless, the device shall be used in such a manner that the potential for human contact during normal operation is minimized.
This product and any attached external antenna, if supported, shall be placed in such a manner to minimize the potential for human contact during normal operation. In order to avoid the possibility of exceeding the FCC radio frequency exposure limits, human proximity to the antenna shall not be less than 20cm (8 inches) during normal operation.
ENWW 93

EMI statement (Korea)
VCCI statement (Japan)
Regulatory model number
For regulatory identification purposes, your product is assigned a Regulatory Model Number. The Regulatory Model Number for your product is SNPRC-0401-01 (HP Business Inkjet 1200/1200d/1200dn/1200dtn) or SNPRC-0401-02 (HP Business Inkjet 1200dtwn). This regulatory number should not be confused with the marketing name (HP Business Inkjet 1200) or product number (C8169A, C8154A, C8170A, C8155A, C8156A).
Power cord statement
The power cord cannot be repaired. If it is defective, it should be discarded or returned to the supplier.
94 D - Regulatory information ENWW

LED classification
Regulatory notices for wireless products
Notice to users in Canada/Note à l’attention des utilisateurs CanadienFor Indoor Use. This digital apparatus does not exceed the Class B limits for radio noise emissions from the digital apparatus set out in the Radio Interference Regulations of the Canadian Department of Communications. The internal wireless radio complies with RSS 210 of Industry Canada.
For Indoor Use. Le présent appareil numérique n’émet pas de bruit radioélectrique dépassant les limites applicables aux appareils numériques de la classe B prescrites dans le Règlement sur le brouillage radioélectrique édicté par le ministère des Communications du Canada. Le composant RF interne est conforme a la norme CDN-210 d’Industrie Canada.
ENWW 95

ARIB STD-T66 (Japan)
Notice to users in ItalyLicense required for use. Verify with your dealer or directly with General Direction for Frequency Planning and Management (Direzione Generale Pianificazione e Gestione Frequenze).
E’necessaria una concessione ministeriale anche per l’uso del prodotto. Verifici per favore con il proprio distributore o direttamente presso la Direzione Generale Pianificazione e Gestione Frequenze.
Notice to users in FranceFor 2.4 GHz Wireless LAN operation of this product certain restrictions apply: This equipment may be used indoor for the entire 2400-2483.5 MHz frequency band (channels 1-13). For outdoor use, only 2454-2483.5 MHz frequency band (channels 10-13) may be used. For the latest requirements, see http://www.art-telecom.fr.
Pour une utilisation en rseau sans fil 2,4 GHz de ce produit, certaines restrictions s’appliquent : cet appareil peut tre utilis l’intrieur des btiments sur toute la bande de frquences 2400-2483,5 MHz (canaux 1 13). Pour une utilisation l’extrieur des btiments, seule la partie 2454-2483,5 MHz (canaux 10 13) peut tre utilise. Pour connatre les dernires rglementations en vigueur, consultez le site Web http://www.art-telecom.fr.
96 D - Regulatory information ENWW

Notice to users in the European UnionRadio products with the CE 0984 or CE alert marking comply with the R&TTE Directive (1999/5/EC) issued by the Commission of the European Community.
Note Low-power radio LAN product operating in 2.4-GHz band, for Home and Office environments. In some countries/regions, using the product may be subject to specific restrictions as listed for specific countries/regions below.
This product may be used in the following EU and EFTA countries/regions: Austria, Belgium, Denmark, Finland, Germany, Greece, Iceland, Ireland, Italy, Liechtenstein, Luxembourg, Netherlands, Norway, Portugal, Sweden, Switzerland and United Kingdom. For normal wireless LAN operation of this product, only a limited band is available in France (Channels 10, 11, 12 and 13). L’Autorité de régulation des télécommunications (ART) has special regulations for hotspots allowing additional channels. For more information, including local rulings and authorization, please see the ART website: http://www.art-telecom.fr.
ENWW 97

Declaration of conformity
HP Business Inkjet 1200/1200d/1200dn/1200dtn printer
DECLARATION OF CONFORMITYaccording to ISO/IEC Guide 22 and EN 45014
Manufacturer's Name: Hewlett-Packard Singapore (Pte) Ltd.
Manufacturer’s Address: Imaging and Printing Manufacturing Operation Singapore60 Alexandra Terrace, #07-01, The Comtech,Singapore 118502
declares, that the product
Product Name: HP Business Inkjet 1200, HP Business Inkjet 1200d, HP Business Inkjet 1200dn, HP Business Inkjet 1200dtn
Product Number: C8169A, C8154A, C8170A, C8155A
Regulatory Model Number(1): SNPRC-0401-01
Product Accessory Number: C8254A / 250 sheet Tray 2C8253A / HP auto-duplexer unit
Product Options: All
conforms to the following Product Specifications:
Safety: IEC 60950-1: 2001 / EN 60950-1: 2001
IEC 60825-1: Edition 1.2: 2001/ EN 60825-1+A11+A2+A1: 2002 Class 1(Laser/Led)
EMC: CISPR 22: 1997 / EN 55022:1998 Class B (2)(3)
CISPR 24:1997 + A1 / EN 55024: 1998 + A1
IEC 61000-3-2:2000 / EN 61000-3-2:2000
IEC 61000-3-3 / A1:2001 / EN 61000-3-3 / A1:2001
FCC Title 47 CFR, Part 15 Class B / VCCI-2 (2)
ICES-003, Issue 4
Supplementary Information:The product herewith complies with the requirements of the Low Voltage Directive 73/23/EEC and the EMC Directive 89/336/EEC, and carries the CE marking accordingly.(1) The product is assigned a Regulatory model number that stays with the regulatory aspects of the design. The Regulatory Model Number is the main product identifier in the regulatory documentation and tests reports, this number should not be confused with the marketing name or the product numbers.(2) The product was tested in a typical configuration with Hewlett-Packard personal computer systems.(3) Excepting clause 9.5 which was not applied.
Singapore, 30 April 2004 Chan Kum YewDirector, Quality
Local Contact for regulatory topics only:European Contact: Hewlett-Packard GmbH, HQ-TRE, Herrenberger Strasse 140, 71034 Boeblingen, Germany USA Contact: Hewlett-Packard Company, HPCC, 20555 S.H. 249 Houston, Texas, 77070Australia Contact: Hewlett-Packard Australia Ltd, Product Regulations Manager, 31-41 Joseph Street, Blackburn, Victoria 3130, Australia
98 D - Regulatory information ENWW

HP Business Inkjet 1200dtwn printer
DECLARATION OF CONFORMITYaccording to ISO/IEC Guide 22 and EN 45014
Manufacturer's Name: Hewlett-Packard Singapore (Pte) Ltd.
Manufacturer’s Address: Imaging and Printing Manufacturing Operations Singapore60 Alexandra Terrace, #07-01, The Comtech,Singapore 118502
declares, that the product
Product Name: HP Business Inkjet 1200dtwn
Product Number: C8156A
Regulatory Model Number(1): SNPRC-0401-02
Product Accessory Number: C8254A / 250 sheet Tray 2
C8253A / HP auto-duplexer unit
Radio Module No: RSVLD-0303
Product Options: All
conforms to the following Product Specifications:
Safety: IEC 60950-1: 2001 / EN 60950-1: 2001
IEC 60825-1 Edition 1.2: 2001/ EN 60825-1+A11+A2+A1: 2002 Class 1(Laser/Led)
EMC: CISPR 22: 1997 / EN 55022:1998 Class B (2)(3)
CISPR 24:1997 + A1 / EN 55024: 1998 + A1
IEC 61000-3-2:2000 / EN 61000-3-2:2000IEC 61000-3-3 / A1:2001 / EN 61000-3-3 / A1:2001
FCC Title 47 CFR, Part 15 Class B / VCCI-2 (2)
ICES-003, Issue 4
Radio: EN 301 489-17 v 1.2.1(2002)EN 300 328-2 v 1.2.1(2001)
Equipment Class 2, R&TTE Directive Annex 4
Notified Body Number - 0984
Health: EU: 1999/519/EC
Supplementary Information:The product herewith complies with the requirements of the Low Voltage Directive 73/23/EEC, EMC Directive 89/336/EEC and with the R&TTE Directive 1999/5/EC (Annex 4) and carries the CE marking accordingly.(1) The product is assigned a Regulatory model number that stays with the regulatory aspects of the design. The Regulatory Model Number is the main product identifier in the regulatory documentation and tests reports, this number should not be confused with the marketing name or the product numbers.(2) The product was tested in a typical configuration with Hewlett-Packard personal computer systems.(3) Excepting clause 9.5 which was not applied.
Singapore, 25 May 2004 Chan Kum YewDirector, Quality
Local Contact for regulatory topics only:European Contact: Hewlett-Packard GmbH, HQ-TRE, Herrenberger Strasse 140, 71034 Boeblingen, Germany USA Contact: Hewlett-Packard Company, HPCC, 20555 S.H. 249 Houston, Texas, 77070Australia Contact: Hewlett-Packard Australia Ltd, Product Regulations Manager, 31-41 Joseph Street, Blackburn, Victoria 3130, Australia
ENWW 99
Environmental sustainability program
Hewlett-Packard is committed to providing quality products in an environmentally sound manner. HP continuously improves the design processes of its products to minimize the negative impact on the office environment and on the communities where products are manufactured, shipped, and used. HP has also developed processes to minimize the negative impact of the disposal of the product at the end of its printing life.
For more information about the HP environmental sustainability program, see http://www.hp.com/hpinfo/globalcitizenship/environment/index.html.
Reduction and elimination
Paper use
The two-sided (duplex) printing and N-up printing features of this product (which you can use to print multiple pages of a document on one sheet of paper) can reduce paper usage and the resulting demands on natural resources. See this guide for more information about using these features.
Ink use
The Fast mode of this product uses less ink, which might extend the life of the cartridges. See the printer driver onscreen Help for more information.
Ozone-depleting chemicals
Ozone-depleting chemicals, such as chlorofluorocarbons (CFCs), have been eliminated from HP manufacturing processes.
Power consumptionPower usage drops significantly while in PowerSave mode, which saves natural resources and saves money without affecting the high performance of this product. This product qualifies for ENERGY STAR®, which is a voluntary program to encourage the development of energy-efficient office products.
ENERGY STAR® is a U.S. registered service mark owned by the U.S. government. As an ENERGY STAR® Partner, Hewlett-Packard Company has determined this product meets ENERGY STAR® guidelines for energy efficiency. For more information, see http://www.energystar.gov.
100 D - Regulatory information ENWW

Hazardous materialsThis HP product contains the following materials that might require special handling at end-of-life:
Lead in the solder
RecyclingDesign for recycling has been incorporated into this product:
The number of materials has been kept to a minimum while ensuring proper functionality and reliability.
Dissimilar materials have been designed to separate easily.
Fasteners and other connections are easy to locate, gain access to, and remove by using common tools.
High-priority parts have been designed so that you can reach them quickly for efficient disassembly and repair.
Product packaging
The packaging materials for this product have been selected to provide maximum protection for the least cost possible, while attempting to minimize environmental impact and facilitate recycling. The rugged design of the product assists in minimizing both packaging materials and damage rates.
HP printing supplies
In many countries/regions, the printing supplies for this product (for example, printheads) can be returned to HP through the HP Printing Supplies Returns and Recycling Program. An easy-to-use and free take-back program is available in more than 48 countries/regions.
Material safety data sheetsMaterial safety data sheets (MSDSs) can be obtained from the following HP website: http://www.hp.com/go/msds.
End-of-life returnsAt the end of the product life, you can return the product to HP.
ENWW 101

IndexNumerics250-sheet tray. See tray 2
Aaccessories
ordering,part numbers 79warranty 87
accounting options for jobs. See job accountingacoustic emissions 92ad hoc mode
description 74installing software for the Mac OS 71installing software for Windows 67
administratorfunctions and tools 48, 54
aligning printheads 56Apple Macintosh. See MacintoshApple website 70auto-duplex unit
weight 89clearing jams 39illustration 8media specifications 12using 16
AutoSend for myPrintMileage 59
Bbanners
HP Banner Paper 81sizes supported 11trays supporting 11
bidirectional port. See parallel portblack and white pages
troubleshooting 33blank pages, troubleshooting 29bleeding colors
troubleshooting 34blinking
Ink Cartridge light 46Out of Paper light 44Paper Jam light 44Power light 43, 44, 46Printhead light 46Resume light 44, 45, 46
both sides, printing on. See auto-duplex unit; duplexing
Bright White Inkjet Paper, HP 79brochure
HP Brochure and Flyer Paper 80buttons on control panel 8
Ccables
connections 8regulatory compliance 93
calibratingcolor 25, 56printer 57
Cancel buttonillustration 8
capacitiestrays 12
cardsHP Matte Greeting Cards 81HP Photo Greeting Cards 81HP Textured Greeting Cards 81sizes supported 11trays supporting 11
cartridgespurchase 79
cartridges. See ink cartridges 8CD, Starter 6CFS in product 100chlorofluorocarbons in product 100cleaning printheads 56, 57color
calibrating 25, 56calibration methods 89specifications 92troubleshooting 33, 34
ColorSync color calibration 89CONFIGURATION PAGE button
illustration 8connections
direct 63, 69illustration 8network 63, 69parallel 63, 69print servers 8specifications 89
connectivity 63, 69consumption
ink 100paper 100power 92, 100
control panelillustration 7parts 8
coversprinter supplies 7top 7
customer supportHP Instant Support 55
customer support. See supportcustom-size
trays supporting 11custom-size media 10cut-off pages
troubleshooting 29
DDeclaration of Conformity (DOC)
U.S. 98demo page, printing 56deskjet control panel (DJCP) 60dimensions, printer 89
ENWW Index 102

DIMMs (dual inline memory modules)specifications 89
direct connection 63, 69description 63, 69
direct printing 63display. See control panelDJCP (Deskjet Control Panel) 60DOC (Declaration of Conformity)
U.S. 98documentation 6Door Open light
illustration 8dots per inch (dpi) resolution specifications 92double-sided printing. See auto-duplex unit;
duplexingdownloading firmware upgrades 62drivers. See printer driversduplexer. See auto-duplex unitduplexing
descriptions and guidelines 16duty cycles 89
Eelectrical specifications 92embedded Web server
description 54opening 54system requirements 91
EMI statement (Korea) 94end-of-life returns 101energy consumption 92Energy Star 100envelopes
sizes supported 11trays supporting 11
environmentalspecifications 92sustainability program 100
error messagessettings in Toolbox 56
events, monitoring 51EWS (embedded Web server). See embedded Web
server
FFCC statement 93film transparencies. See transparenciesfirmware
upgrading 62version number 61
flyerHP Brochure and Flyer Paper 80
fontssupported 89
Ggarbled text 32getting started guide 6graphics
print speed 92troubleshooting 33
guides on printer for paper 7
Hhazardous materials in product 101height, printer 89help
HP Instant Support 55online 6printer drivers 6See also support; troubleshooting
HP auto-duplex unit. See auto-duplex unitHP Inkjet Toolbox
description 6using 57
HP Instant Supportdescription 58opening 59security and privacy 59
HP Web Jetadmin software 55humidity specifications 92
IICC Profiles color calibration 89image quality
troubleshooting 31image quality, resolution specifications 92index cards. See cardsInformation page, embedded Web server 55Information tab, Toolbox 56infrastructure mode
description 74installing software for the Mac OS 71installing software for Windows 67
Ink Cartridge lightillustration 8
ink cartridgeschecking ink level 20illustration 7light patterns on control panel 45, 46non-HP 45purchase 79replacing 20specifications 89status 6, 56status information 55status light 8supply yields 89warranty 87
Ink Level Information window 56ink smears 32inkjet paper
HP Photo-Quality Inkjet Paper 80inkjet paper, HP 79inkjet printing technology 89Inkjet Toolbox, HP
description 6using 57
installingsoftware, Macintosh computers 69software, Windows computers 63
Instant Support See HP Instant SupportIntellifont rasterizer 89
103 Index ENWW

IP addressfinding for printer 54
Iron-on T-shirt TransfersHP Iron-on T-shirt Transfers 81
ISPE. See HP Instant Support
Jjams
clearing 39preventing 41
Japanese VCCI statement 94job accounting
monitoring 51jobs
cancelling 8monitoring 51resuming 8
KKorean EMI statement 94
Llanguages
font support 89supported for printer 89
laser-quality speed 92latch for printheads 7LED classification statement 95LEDs. See lights on control panellights on control panel
description of patterns 42illustration and description 8
limited warranty statement 87links, customizing in embedded Web server 55loading
custom-size media 10media 13
local printing 63, 69locking trays 14
MMac OS
configuring sharing 70installing software 69
Macintoshinstalling software 69installing wireless communication software 71
main paper tray. See tray 1manuals 6margins, minimum 12Material Safety Data Sheets (MSDSs) 101media 12
cards 11clearing jams 39custom-size 11envelopes 11HP Banner Paper 81HP Brochure and Flyer Paper 80HP ColorFast Photo Paper 80HP Everyday Photo Paper 80HP Iron-on T-shirt Transfers 81HP Matte Greeting Cards 81
HP Photo Greeting Cards 81HP Photo Paper 80HP Photo-Quality Inkjet Paper 80HP Premium Inkjet Paper 81HP Premium InkJet Transparency Film 81HP Premium Paper 81HP Premium Photo Paper 80HP Premium Plus InkJet Transparency Film 81HP Premium Plus Photo Paper 80HP Premium Presentation Paper 80HP Textured Greeting Cards 81loading 13locking trays 14minimum margins 12monitoring 51purchase 79sizes supported 10special 18specifications 9tray capacities, specifications 12
memoryspecifications 90
memory cardsupgrading firmware with 62
Microsoft Windows. See Windowsmonitoring
ink levels 51jobs 51media and supplies 51operation and status 51printhead health 51supplies 51usage 51
monochrome resolution specifications 92MS. See MicrosoftMS-DOS
upgrading firmware with 62MSDSs (Material Safety Data Sheets) 101Multipurpose Paper, HP 80myPrintMileage
description 59opening 59
Nnetwork connection
description 63, 69network port
connecting to 8specifications 89
network printing 63, 65, 69network protocols
specifications 91Networking page, embedded Web server 55networks
configuring options 53configuring wireless options 74operating systems supported 91parallel connection 63, 69printer information 56USB connection 63, 69
noise specifications 92non-HP ink cartridges 45
ENWW Index 104

OOffice Paper, HP 79Office Recycled Paper, HP 80online help
sources 6opening
embedded Web server 54myPrintMileage 59
operating environment specifications 92operating systems
supported 90system requirements 90
options. See settingsordering supplies 55Other Links, embedded Web server 55Out of Paper light
blinking 44illustration 8
output trayillustration 7
overhead transparencies. See transparenciesoverheating of printer 26ozone-depleting chemicals in product 100
Ppages per minute print speed 92pages per month (duty cycles) 89paper
clearing jams 39HP Premium Inkjet Paper 81HP Premium Paper 81HP Premium Presentation Paper 80loading 13locking trays 14minimum margins 12monitoring 51purchase 79special 18specifications 9
paper guides on printer 7paper output tray. See output traypaper stack indicator 7paper trays. See tray 1; tray 2; tray, output; trays;
trays, inputparallel port
connecting to 63, 69specifications 89troubleshooting 29
partscontrol panel 8printer 7
PCL 3support 89
personalities (languages)included with printer 89
phone support. See supportphoto
HP Photo Greeting Cards 81photo media
sizes supported, trays supporting 11
photo paperHP ColorFast Photo Paper 80HP Everyday Photo Paper 80HP Photo Paper 80HP Photo-Quality Inkjet Paper 80HP Premium Photo Paper 80HP Premium Plus Photo Paper 80sizes supported, trays supporting 11
photo-quality paperHP Photo-Quality Inkjet Paper 80
PhotoREt III 92physical dimensions, printer 89platforms
supported 90system requirements 90
portsincluded 89location 8settings 28troubleshooting 29
powerinput connection 8light and button 8light patterns on control panel 43, 46specifications 92troubleshooting 26
power cord statement 94ppm (pages per month) (duty cycles) 89Preferences, Toolbox 56print cartridges. See ink cartridgesprint duty cycle 89print jobs
cancelling 8resuming 8
print media. See mediaprint quality
troubleshooting 31print speed 92print speed slow
troubleshooting 28printer drivers
checking for updated 56onscreen Help 6uninstalling 76warranty 87
printer language support 89Printer Services tab, Toolbox 56Printer Status tab, Toolbox 56Printhead light
illustration 8printheads
aligning 56checking status, cleaning, replacing 21cleaning 56, 57illustration 7latch 7light patterns on control panel 45, 46purchase 79specifications 89status 56status information 55supply yields 89
105 Index ENWW

printingtechnology used 89
printing on both sidesautomatically,manually 16
printing suppliesarea in printer 7cover 7ink cartridges 79lights 8printheads 79
privacy while using HP Instant Support 59processor specifications 90purchase printing supplies 79
Qquality, troubleshooting 31
Rradio interference
reducing 76troubleshooting 28
RAM (random access memory). See memoryrasterizer support 89rear access panel
clearing jams 39recycling 101refilled ink cartridges 45registering printer 56regulatory information 93regulatory model number 94relative humidity specifications 92release notes 6replacing
ink cartridges 20resolution specifications 92resources
administrator 48printer management 54
resume button 8Resume light
blinking 44, 45, 46resume light
illustration 8returns, end-of-life 101
Sscrubber utility 76security
managing 52while using HP Instant Support 59wireless communication 75
Settings page, embedded Web server 55sharing the printer
Mac OS 70Windows 63
sizeprinter 89
slots for connectivity, specifications 89
softwareinstalling for Macintosh 69installing for the Mac OS 69installing for Windows 63Toolbox 56uninstalling 76warranty 87
sound pressure and level 92special media
printing on 18specifications 12
compatible network protocols 91media 9printer 89system requirements 90
speedspecifications 92
start guide 6Starter CD 6status
monitoring 51supplies 8, 56
storage temperature specifications 92supplies
monitoring 51ordering 55ordering,part numbers 79
supply yields for ink cartridges and printheads 89support
contact information, warranty 82telephone 82websites 7, 57
support. See customer supportsustainability program 100symbol set support 89system requirements 90
Ttechnical support. See supporttelephone support. See supporttemperature specifications 92test page, printing 57text
troubleshooting 33thermal inkjet printing technology 89thick paper. See heavy mediaToolbox
description 55Information tab 56opening 55Printer Services tab 56Printer Status tab 56
top cover 7tracking
jobs 51media and supplies 51
transparenciesHP Premium InkJet Transparency Film 81HP Premium Plus InkJet Transparency Film 81
ENWW Index 106

trayclearing jams 39inserting, troubleshooting 35
tray 1illustration 7
tray 2illustration 7weight 89
tray, outputillustration 7
trayscapacities, specifications 12cards 11custom-size 11envelopes 11feeding problems 35illustration 7loading media 13selecting,configuring,locking 14sizes of media supported 10
troubleshootingblank pages 29clearing jams 39color problems,faded output 33colors 34colors are printing as black and white 33cut-off pages,missing details,incorrect details 29garbled text 32ink smears 32inserting tray 35light patterns on control panel 42multiple pages are being picked up 36not responding, nothing prints 26ports 29power 26print quality 31printed output 35radio interference 28skewed output 36slow printing,speed of printer is slow 28text,graphics 33text,graphics,layout 30tips 25tray, feeding problems 35
troubleshooting resourcesdemo page 56HP Instant Support 6
troubleshooting, resources forConfiguration page 61
turning on and offnetwork protocols 53
two-sided printing. See auto-duplex unit; duplexing
Uuninstalling printer software 76upgrading
firmware 62USB
connector 8USB port
specifications 89users
monitoring usage 51
VVCCI statement (Japan) 94vents on printer 26voltage specifications 92
Wwarranty
statement 87Web server, embedded. See embedded Web serverwebsites
Apple 70Energy Star 100printer information 6product support 7support 7, 57
weightprinter 89
WEP (Wired Equivelant Privacy) 75width, printer 89Wi-Fi Protected Access (WPA) 75Windows
configuring sharing 65installing software 63installing wireless communication software 67onscreen Help 6Toolbox 55
Wired Equivelant Privacy (WEP) 75wireless communication
installing software for Macintosh 71installing software for Windows 67reducing interference 76regulatory notices 95security 75
wireless networksconfiguring options 74regulatory notices 95security 75
wireless printing 67WPA (Wi-Fi Protected Access) 75
107 Index ENWW

108 - ENWW


copyright © 2004 Hewlett-Packard Development Company, L.P.
http://www.hp.com/support/businessinkjet1200