UForge AppCenter V3.8.0 FUJITSU Softwaresoftware.fujitsu.com/jp/manual/manualfiles/m180001/... ·...
109
FUJITSU Software UForge AppCenter V3.8.0 User Documentation Linux J2UL-2178-03ENZ0(00) February 2018
Transcript of UForge AppCenter V3.8.0 FUJITSU Softwaresoftware.fujitsu.com/jp/manual/manualfiles/m180001/... ·...

FUJITSU SoftwareUForge AppCenter V3.8.0
User Documentation
Linux
J2UL-2178-03ENZ0(00)February 2018

Welcome to the UForge AppCenter User DocumentationContents:
- Chapter 1 Getting Started
- 1.1 Signing In to UForge Portal
- 1.2 Basic Concepts
- Chapter 2 Managing Your Accounts
- 2.1 Modifying Your User Profile
- 2.2 Viewing Your Statistics
- 2.3 Changing Your Password
- Chapter 3 Managing Your Credentials
- 3.1 Managing Cloud Accounts
- 3.2 Managing Your Artifact Accounts
- 3.3 Managing API Keys
- 3.4 Managing SSH Keys
- Chapter 4 Managing Appliance Templates
- 4.1 Supported Operating Systems
- 4.2 Supported Machine Image Types
- 4.3 Creating an Appliance Template
- 4.4 Searching for an Appliance Template
- 4.5 Listing Appliance Templates
- 4.6 Modifying an Appliance Template
- 4.7 Adding a Logo
- 4.8 Managing the OS Profile
- 4.9 Generating a Machine Image
- 4.10 Launching a PXE Image
- 4.11 Publishing a Machine Image
- 4.12 Deploying a Machine Image
- 4.13 Listing Deployed Machine Images
- 4.14 Tracking OS Package Updates
- 4.15 Adding Custom Software Components
- 4.16 Updating the Install Profile
- 4.17 Configuring Multiple Network Internet Cards
- 4.18 Configuring Advanced Partitioning
- 4.19 Managing Configuration
- 4.20 Cloning an Appliance Template
- 4.21 Importing and Exporting Templates
- Chapter 5 Migrating Live Workloads
- 5.1 Migration Process Overview
- 5.2 Blackbox Migration Process
- 5.3 Whitebox Migration Process
- i -

- 5.4 Migration Process In Detail
- 5.5 Scanning the Source System
- 5.6 Viewing a Scan
- 5.7 Differences between Source and Target Instances
- Chapter 6 Using Workspaces
- 6.1 Creating a Workspace
- 6.2 The Activity Stream
- 6.3 Managing Workspace Members
- 6.4 Sharing an Appliance Template in a Workspace
- 6.5 Adding a Comment to a Shared Appliance Template
- Chapter 7 Using the REST API
- 7.1 Response & Error Codes
- 7.2 Sending a Request
- 7.3 Response Body Types
- 7.4 Using the API Keys
- 7.5 Query Parameters
- 7.6 REST API Examples
- Chapter 8 Using the Java SDK
- 8.1 Download and Installing the SDK
- 8.2 Communicating with UForge
- 8.3 Creating an Appliance Template
- 8.4 Adding an OS Profile
- 8.5 Generating a Machine Image
- 8.6 Publishing an Image
- 8.7 Adding a Project from the Project Catalog
- 8.8 Uploading a Software Component
- 8.9 Adding a Boot Script
- Chapter 9 Using the Python SDK
- 9.1 Download and Installing the SDK
- 9.2 Communicating with UForge
- 9.3 Creating an Appliance Template
- 9.4 Creating My Software
- 9.5 Creating a Project for a Specific OS
- Chapter 10 Hammr Command Line Tool
- 10.1 Getting the Source Code
- 10.2 Further Reading
- Chapter 11 Using UForge CLI
- 11.1 Installing UForge CLI
- 11.2 Launching UForge CLI
- ii -

Trademarks
UForge is a registered trademark of UShareSoft, a Fujitsu company.
LINUX is a registered trademark of Linus Torvalds.
Microsoft and Windows are either registered trademarks or trademarks of Microsoft Corporation in the United States and/or other countries.
Oracle, GlassFish, Java, and all Java-based trademarks and logos are trademarks or registered trademarks of Oracle Corporation and/or itsaffiliates.
Apache Ant, Ant, and Apache are trademarks of The Apache Software Foundation.
UNIX is a registered trademark of the Open Group in the United States and in other countries.
Red Hat Enterprise Linux is a trademark of Red Hat.
MySQL and the MySQL logo are the servicemarks, trademarks, or registered trademarks owned by Oracle Corporation Inc.
Other company names and product names are trademarks or registered trademarks of their respective owners.
Copyright FUJITSU LIMITED 2016-2018
All rights reserved, including those of translation into other languages. No part of this manual may be reproduced in any form whatsoeverwithout the written permission of FUJITSU LIMITED
High Risk Activity
The Customer acknowledges and agrees that the Product is designed, developed and manufactured as contemplated for general use,including without limitation, general office use, personal use, household use, and ordinary industrial use, but is not designed, developed andmanufactured as contemplated for use accompanying fatal risks or dangers that, unless extremely high safety is secured, could lead directlyto death, personal injury, severe physical damage or other loss (hereinafter "High Safety Required Use"), including without limitation,nuclear reaction control in nuclear facility, aircraft flight control, air traffic control, mass transport control, medical life support system,missile launch control in weapon system. The Customer shall not use the Product without securing the sufficient safety required for the HighSafety Required Use. In addition, FUJITSU (or other affiliate's name) shall not be liable against the Customer and/or any third party for anyclaims or damages arising in connection with the High Safety Required Use of the Product.
Export Restrictions
Exportation/release of this document may require necessary procedures in accordance with the regulations of your resident country and/orUS export control laws.
- iii -

ContentsChapter 1 Getting Started.........................................................................................................................................................1
1.1 Signing In to UForge Portal.................................................................................................................................................................11.1.1 Supported Browsers for UI Access...............................................................................................................................................21.1.2 Language Selection for the Graphical User Interface...................................................................................................................2
1.2 Basic Concepts.....................................................................................................................................................................................21.2.1 Organization..................................................................................................................................................................................21.2.2 User...............................................................................................................................................................................................31.2.3 Appliance Templates.................................................................................................................................................................... 31.2.4 Workspaces...................................................................................................................................................................................4
Chapter 2 Managing Your Accounts.........................................................................................................................................52.1 Modifying Your User Profile...............................................................................................................................................................52.2 Viewing Your Statistics....................................................................................................................................................................... 5
2.2.1 Your Usage................................................................................................................................................................................... 52.2.2 Generations................................................................................................................................................................................... 7
2.3 Changing Your Password.................................................................................................................................................................... 7
Chapter 3 Managing Your Credentials..................................................................................................................................... 83.1 Managing Cloud Accounts.................................................................................................................................................................. 8
3.1.1 Setting up a Microsoft Azure Resource Manager Account.......................................................................................................... 83.2 Managing Your Artifact Accounts...................................................................................................................................................... 93.3 Managing API Keys...........................................................................................................................................................................103.4 Managing SSH Keys..........................................................................................................................................................................10
Chapter 4 Managing Appliance Templates............................................................................................................................ 114.1 Supported Operating Systems............................................................................................................................................................11
4.1.1 Notes on Licensing..................................................................................................................................................................... 124.2 Supported Machine Image Types...................................................................................................................................................... 124.3 Creating an Appliance Template....................................................................................................................................................... 13
4.3.1 Creating a Linux-based Appliance............................................................................................................................................. 134.3.2 Creating a Windows-based Appliance........................................................................................................................................14
4.4 Searching for an Appliance Template............................................................................................................................................... 174.5 Listing Appliance Templates............................................................................................................................................................. 174.6 Modifying an Appliance Template.................................................................................................................................................... 184.7 Adding a Logo................................................................................................................................................................................... 184.8 Managing the OS Profile................................................................................................................................................................... 19
4.8.1 Adding a New OS Profile........................................................................................................................................................... 194.8.2 Adding Packages to the OS Profile.............................................................................................................................................19
4.9 Generating a Machine Image.............................................................................................................................................................204.9.1 Generating a Docker Image........................................................................................................................................................ 21
4.10 Launching a PXE Image.................................................................................................................................................................. 224.10.1 Initializing the Boot Process Using a Customized ipxe.iso File...............................................................................................234.10.2 Using a DHCP Server that Redirects to an iPXE Script...........................................................................................................24
4.11 Publishing a Machine Image............................................................................................................................................................244.11.1 Publishing a Windows Image to KVM on Red Hat Linux....................................................................................................... 26
4.12 Deploying a Machine Image............................................................................................................................................................274.13 Listing Deployed Machine Images.................................................................................................................................................. 294.14 Tracking OS Package Updates........................................................................................................................................................ 30
4.14.1 Modifying a Windows-based Appliance.................................................................................................................................. 314.14.2 Pinning Packages...................................................................................................................................................................... 31
4.15 Adding Custom Software Components........................................................................................................................................... 324.15.1 Adding Software from the Project Catalog...............................................................................................................................324.15.2 Adding Software from Your Software Library.........................................................................................................................334.15.3 Restricting Software Components for OSes and Formats........................................................................................................ 37
4.16 Updating the Install Profile..............................................................................................................................................................394.16.1 Updating a Linux-based Install Profile.....................................................................................................................................39
- iv -

4.16.2 Adding Users and Groups.........................................................................................................................................................394.16.3 Updating a Windows-based Install Profile............................................................................................................................... 41
4.17 Configuring Multiple Network Internet Cards................................................................................................................................ 414.18 Configuring Advanced Partitioning.................................................................................................................................................42
4.18.1 Advanced Partitioning for Linux.............................................................................................................................................. 434.18.2 Advanced Partitioning for Windows........................................................................................................................................ 45
4.19 Managing Configuration..................................................................................................................................................................454.19.1 Adding a Boot Script................................................................................................................................................................ 45
4.20 Cloning an Appliance Template...................................................................................................................................................... 474.21 Importing and Exporting Templates................................................................................................................................................ 47
4.21.1 Exporting.................................................................................................................................................................................. 484.21.2 Importing.................................................................................................................................................................................. 494.21.3 Updating a Windows Appliance Before Import....................................................................................................................... 50
Chapter 5 Migrating Live Workloads...................................................................................................................................... 515.1 Migration Process Overview............................................................................................................................................................. 515.2 Blackbox Migration Process..............................................................................................................................................................525.3 Whitebox Migration Process............................................................................................................................................................. 545.4 Migration Process In Detail............................................................................................................................................................... 55
5.4.1 Scanning the Source Machine.....................................................................................................................................................555.4.2 Analysis of Report...................................................................................................................................................................... 565.4.3 Build the Overlay Archive..........................................................................................................................................................565.4.4 Overlay Extraction......................................................................................................................................................................565.4.5 Generate an Image (Black Box Migration).................................................................................................................................565.4.6 Import to an Appliance Template (Whitebox Migration)...........................................................................................................57
5.5 Scanning the Source System..............................................................................................................................................................575.5.1 Scanning a Linux Machine......................................................................................................................................................... 585.5.2 Scanning a Microsoft Windows Machine...................................................................................................................................60
5.6 Viewing a Scan.................................................................................................................................................................................. 625.6.1 Viewing the Details of Scan....................................................................................................................................................... 62
5.6.1.1 Linux-based......................................................................................................................................................................... 625.6.1.2 Windows-based....................................................................................................................................................................63
5.6.2 Generate a Machine Image......................................................................................................................................................... 645.6.3 Create an Appliance from a Scan............................................................................................................................................... 65
5.6.3.1 Changing a Configuration with "No-Console" Features..................................................................................................... 665.6.3.2 Changing Configuration Information.................................................................................................................................. 665.6.3.3 Adding Security Patches......................................................................................................................................................675.6.3.4 Changing the OS Version of Middleware............................................................................................................................675.6.3.5 Modifying the Scan Overlay................................................................................................................................................68
5.6.4 Comparing Scans........................................................................................................................................................................ 685.6.5 Synchronize Target Environment with Scanned Machine......................................................................................................... 69
5.6.5.1 Download the uforge-sync Tool.......................................................................................................................................... 695.6.5.2 Launch the uforge-sync Tool...............................................................................................................................................69
5.7 Differences between Source and Target Instances............................................................................................................................ 695.7.1 IP Address and MAC Addresses................................................................................................................................................ 705.7.2 New Libraries Added..................................................................................................................................................................705.7.3 System Clock /etc/adjtime.......................................................................................................................................................... 705.7.4 Service State............................................................................................................................................................................... 70
Chapter 6 Using Workspaces.................................................................................................................................................726.1 Creating a Workspace........................................................................................................................................................................726.2 The Activity Stream...........................................................................................................................................................................726.3 Managing Workspace Members........................................................................................................................................................ 73
6.3.1 Inviting Members to Your Workspace....................................................................................................................................... 736.3.2 Managing Member Access Rights..............................................................................................................................................736.3.3 Deleting a Member..................................................................................................................................................................... 73
6.4 Sharing an Appliance Template in a Workspace...............................................................................................................................736.5 Adding a Comment to a Shared Appliance Template....................................................................................................................... 74
- v -

Chapter 7 Using the REST API.............................................................................................................................................. 757.1 Response & Error Codes....................................................................................................................................................................75
7.1.1 Success Codes.............................................................................................................................................................................757.1.2 Error Codes................................................................................................................................................................................. 76
7.2 Sending a Request..............................................................................................................................................................................767.2.1 The Request Headers.................................................................................................................................................................. 767.2.2 Request Example........................................................................................................................................................................ 76
7.3 Response Body Types........................................................................................................................................................................777.4 Using the API Keys........................................................................................................................................................................... 777.5 Query Parameters...............................................................................................................................................................................787.6 REST API Examples......................................................................................................................................................................... 78
7.6.1 Retrieving a User........................................................................................................................................................................ 787.6.2 Adding a Cloud Account............................................................................................................................................................ 797.6.3 Get User Appliance Templates................................................................................................................................................... 797.6.4 Create an Appliance Template....................................................................................................................................................797.6.5 Retrieve Available OS Profiles for an Operating System...........................................................................................................807.6.6 Add an OS Profile to an Appliance Template............................................................................................................................ 807.6.7 Searching for Operating System Packages (Linux Only)...........................................................................................................817.6.8 Adding a Package to an Appliance's OS Profile (Linux Only)...................................................................................................827.6.9 Adding Custom Software to an Appliance Template................................................................................................................. 827.6.10 Generate a Machine Image....................................................................................................................................................... 847.6.11 Publish/Register a Machine Image to a Cloud Environment....................................................................................................85
Chapter 8 Using the Java SDK...............................................................................................................................................868.1 Download and Installing the SDK..................................................................................................................................................... 868.2 Communicating with UForge............................................................................................................................................................ 868.3 Creating an Appliance Template....................................................................................................................................................... 878.4 Adding an OS Profile.........................................................................................................................................................................878.5 Generating a Machine Image.............................................................................................................................................................888.6 Publishing an Image...........................................................................................................................................................................898.7 Adding a Project from the Project Catalog........................................................................................................................................908.8 Uploading a Software Component.....................................................................................................................................................908.9 Adding a Boot Script......................................................................................................................................................................... 90
Chapter 9 Using the Python SDK...........................................................................................................................................929.1 Download and Installing the SDK..................................................................................................................................................... 92
9.1.1 Installing pip............................................................................................................................................................................... 929.1.2 Installing UForge Python API.................................................................................................................................................... 92
9.1.2.1 For Linux............................................................................................................................................................................. 929.1.2.1.1 Debian...........................................................................................................................................................................929.1.2.1.2 Red Hat and CentOS.....................................................................................................................................................929.1.2.1.3 Upgrading the SDK...................................................................................................................................................... 92
9.1.2.2 For Mac OS..........................................................................................................................................................................939.1.2.2.1 Upgrading the SDK...................................................................................................................................................... 93
9.1.2.3 For Microsoft Windows.......................................................................................................................................................939.1.2.3.1 Upgrading the SDK...................................................................................................................................................... 93
9.2 Communicating with UForge............................................................................................................................................................ 939.3 Creating an Appliance Template....................................................................................................................................................... 94
9.3.1 Adding an OS Profile to the Appliance...................................................................................................................................... 949.3.2 Generating a Machine Image......................................................................................................................................................95
9.4 Creating My Software........................................................................................................................................................................959.4.1 Adding a Package to My Software............................................................................................................................................. 969.4.2 Uploading a License to My Software......................................................................................................................................... 969.4.3 Listing All My Software............................................................................................................................................................. 97
9.5 Creating a Project for a Specific OS..................................................................................................................................................979.5.1 Listing all Projects for a Specific OS..........................................................................................................................................989.5.2 Listing Target Formats and Target Platforms.............................................................................................................................98
Chapter 10 Hammr Command Line Tool..............................................................................................................................100
- vi -

10.1 Getting the Source Code................................................................................................................................................................ 10010.2 Further Reading............................................................................................................................................................................. 100
Chapter 11 Using UForge CLI..............................................................................................................................................10111.1 Installing UForge CLI....................................................................................................................................................................10111.2 Launching UForge CLI..................................................................................................................................................................101
- vii -

Chapter 1 Getting Started
1.1 Signing In to UForge PortalTo sign in, go to the UForge Portal sign in page:
https://your-uforge-server-hostname/uforge/
The UForge Portal has the following pages, accessible from the left-hand sidebar:
- Dashboard: It shows statistics on your UForge usage.
- Apps: This is where your appliances are created and listed. You also go to this page to add custom software, update packages inappliances, and create images, among other things.
- Deployments: This area lists published images that have at least one instance running on Amazon or OpenStack. This menu is onlyvisible if you have the correct entitlements. Contact your UForge administrator for more information.
- Collaboration: This is a private area where you can share appliances with other users who are part of your workspace. These users mustbe invited and join your workspace. They can be part of your organization or part or another organization.
- Migration: This is where you can launch a scan of a live system, view the results, or compare scans.
- Credentials: This is where you manage your cloud account information, SSH keys and API keys.
- Profile: This is your UForge account information.
- Administration: (only for administrators of platform). Provides administration tasks including operating system and formatsmanagement.
Note
Depending upon your access rights one or more of these tabs may not be visible.
- 1 -

1.1.1 Supported Browsers for UI AccessThe following browser versions are officially supported when using the user interface:
- Firefox v35 or later
- Chrome v29 or later
- Safari v9 or later
- Internet Explorer 11 or later
- Opera v15 or later
Information
Javascript is required when using the UI. The following error will appear if you have disabled Javascript (check your browser configuration,plugins or security settings).
1.1.2 Language Selection for the Graphical User InterfaceThe UForge UI is accessible in different languages. You can select the language using the the drop-down menu at the top right-hand of theUI, next to the sign-in button.
Information
The language choice is saved at the level of the browser and not of the user account.
1.2 Basic Concepts
1.2.1 OrganizationUForge AppCenter is a multi-tenant platform which can serve multiple users. All the resources of the platform are held within anOrganization. The organization contains:
- One or more users
- One or more operating systems
- A project catalog containing software components that can be used by its users
- 2 -

- One or more formats available to generate images
1.2.2 UserEach user on the platform has:
- an Appliance Library containing all the appliance templates created by the user
- a Software Library (My Software) containing all the custom software uploaded by the user, which can be used in one ore more appliancetemplates
- a list of one or more Cloud Accounts to allow the user to publish and register generated machine images to various cloud andvirtualization platforms
1.2.3 Appliance TemplatesAn Appliance Template is meta-data describing a software stack. It consists of five layers, namely:
- an Install Profile (mandatory) - specific information for the first time the image boots
- an OS Profile (mandatory) - a list of operating system packages. Each operating system within the organization provides one or morestandard OS profiles to choose from when creating the OS Profile of the appliance template. It is also possible to create custom OSprofiles.
- Projects (optional) - a list of Project software components chosen from the Organization's Project Catalog
- My Software (optional) - a list of software components chosen from the User's private "Software Library"
- Configuration (optional) - configuration information including boot scripts and/or other software components to manage the image afterprovisioning
- 3 -

Depending on the user's roles and privileges, the user may only have access to a restricted number of operating systems, projects and imageformats the organization has to offer.
Using an appliance template, the user can generate machine images in different formats. For some formats, the user can publish and registermachine images to a target cloud or virtualization platform. Each appliance template stores meta-data regarding each machine imagegenerated and published.
1.2.4 WorkspacesEach user can also create and join workspaces. A workspace is an area for members to collaborate and share appliances. A workspace iscreated and maintained by users. The user can invite members to be part of a workspace. When the user invites a member that is not partof the UForge database, an email is sent to the new member to invite them to register on UForge.
The workspaces are listed under the Collaboration tab. Each workspace has:
- an activity stream, which lists the members' comments, the activities, such as invites and appliances shared
- a templates page, which lists all the templates shared with the people that are part of the workspace
- a members page where the user who created the workspace (the workspace administrator) can invite new members, delete members orchange the role of a workspace member.
Members of a workspace are either:
- Administrator. This is generally the user who has created the workspace. There can be several administrators in a workspace. Theadministrator can invite or delete members and is able to delete a workspace. The administrator has all the same basic rights as thecollaborator.
- Collaborator. The collaborator has the same basic rights as the Guest, but can also share templates.
- Guest. They can read and post to the activity stream, and import templates into their private appliance library.
- 4 -

Chapter 2 Managing Your AccountsThe Profile tab on the left-hand sidebar allows you to modify a large number of your personal details, including your password.
The following sub-sections go into detail on how to manage your account information:
- 2.1 Modifying Your User Profile
- 2.2 Viewing Your Statistics
- 2.3 Changing Your Password
2.1 Modifying Your User ProfileYou can edit your user profile by going to the Profile page. The only mandatory information is your email address.
You can add or modify your name, company information and address and click save.
To add a photo to your profile or modify the existing one:
1. Go to the My Account page.
2. Click on the Profile tab.
3. Click on the round photo icon on the left hand side.
4. Navigate to the desired image (preferably a .jpeg or .png).
5. Click Open.
6. Click save.
2.2 Viewing Your Statistics
2.2.1 Your UsageWhen you log in to the UForge Portal, the first page you will see is the Dashboard > Usage sub tab. This view displays your statistics onthe platform.
The first part of the page displays your current usage and quota information for appliance templates, software components, machine imagegenerations and scans created.
The Appliances summary shows the number of appliance templates you currently have in your Appliance Library. Your quota usage andlimit is displayed under the summary information. If you have reached your quota limit, you can delete existing appliance templates to freeup space to create new ones. This information is not shown if you do not have access to creating and managing appliance templates.
The Software Components summary is the number of software components (also known as software bundles) you currently have in yourSoftware Library. Your quota usage and limit is displayed under the summary information. If you have reached your quota limit, you candelete existing software components to free up space to create new ones. This information is not shown if you do not have access to creating
- 5 -

and managing appliance templates (as these software components are added to appliance templates). This information is not shown if youdo not have access to creating and managing appliance templates.
The Generations summary is the number of machine images you have currently stored on the platform. These machine images are generatedfrom appliance templates or scans. Your quota usage and limit is displayed under the summary information. The quota information ismeasured on the number of successful machine images you have requested over a period of time; and not necessarily the number of machineimages you currently have listed on your account. Even if you delete an existing machine image, the quota usage will not be changed. Yourquota usage will be reset if you have a quota that is associated with a frequency (e.g. 5 generations per month). If you cancel a generationor if there is an error during the generation, the quota value is not updated.
The Scans summary displays the current number of successful live machine scans stored on the platform. Your quota usage and limit isdisplayed under the summary information. The quota information is measured on the number of successful scans you hve requested overa period of time. This number does not necessarily reflect the number of scans you currently have in your account. If you delete a scan fromyour account the quota value is not changed. Your quota usage will be reset if you have a quota that is associated with a frequency (e.g. 5scans per month). If you cancel a scan or if there is an error during a scan, the quota usage is not updated. This information is not shownif you do not have access to migration features.
The rest of the Usage page provides more detailed activity information including:
- Your Disk Usage. This shows the disk space consumed by you for storing software components, machine images and scan data. If youhave reached your quota limit, you can delete software components, machine images or scans to save space.
- An Appliance Activity displaying a timeline of the number of appliance templates and machine image generations created. It alsoprovides a breakdown of operating systems used in the appliances and the types of formats of the generated machine images.
- A Scan Activity displaying a timeline of the number scans and machine image generations created. It also provides a breakdown ofoperating systems found for each scan and the types of formats of the generated machine images.
- A Disk Usage displaying the disk space consumed to store your software components, machine images and scan data. This includes anysoftware that has been imported.
- 6 -
2.2.2 GenerationsThe Dashboard > Generations view provides you a current list of machine images stored in your account along with any machine imagesyou have published to one or more cloud environments.
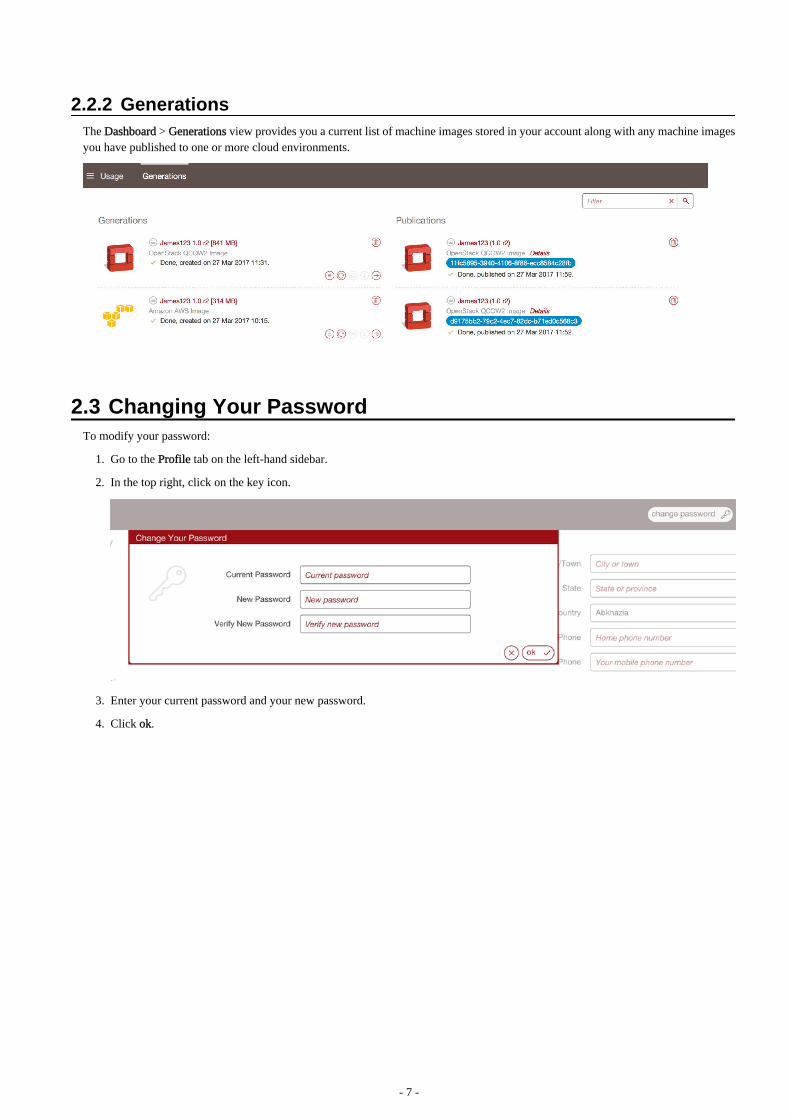
2.3 Changing Your PasswordTo modify your password:
1. Go to the Profile tab on the left-hand sidebar.
2. In the top right, click on the key icon.
3. Enter your current password and your new password.
4. Click ok.
- 7 -

Chapter 3 Managing Your CredentialsThe Credentials tab on the left-hand sidebar allows you to modify your credentials such as: Cloud Account information, API Keys and SSHkeys.
The following sub-sections go into detail on how to manage your credentials:
- 3.1 Managing Cloud Accounts
- 3.2 Managing Your Artifact Accounts
- 3.3 Managing API Keys
- 3.4 Managing SSH Keys
3.1 Managing Cloud AccountsIn order to publish an image to a cloud using UForge AppCenter, you will need to add your cloud credentials to UForge. You must havea cloud account prior to setting up your credentials on the platform. Have all the information for your cloud account on hand before starting.
Information
If you are an Amazon IAM user you will need to generate an X.509 Certificate following these instructions prior to creating your MicrosoftAzure classic cloud account on UForge.
1. Go to the Credentials tab in the left-hand sidebar.
2. Go to Cloud Account.
3. Select the type of account you want to create from the Add account drop-down menu at the top right.
4. Scroll over any given field for more information on the mandatory information to provide for a given cloud account.
Information
In order to set up the credentials for an Amazon ARM account, there are a number of steps you must complete first. For moreinformation refer to 3.1.1 Setting up a Microsoft Azure Resource Manager Account.
5. Click Create to complete.
3.1.1 Setting up a Microsoft Azure Resource Manager AccountIf you want to publish images to Microsoft ARM, you must first set up the correct Azure ARM credentials in UForge. To do so, first, fromyour Microsoft Azure account you will need to:
1. Create an Azure Active Directory application (as described in the official Microsoft Azure documentation related to Azure ActiveDirectory creation).
2. Get the subscription ID from your Microsoft Azure account.
3. Get the application ID and authentication key (as described in official Microsoft Azure documentation related to application ID andauthentication key).
- 8 -

4. Retrieve the tenant ID which you will need to enter in UForge credentials (as described in official Microsoft Azure documentationrelated to tenant ID retrieval).
5. Assign the contributor role to the application (as described in official Microsoft Azure documentation related to application roleassignation).
Then you will need to fill in your credential information in UForge. To do so:
1. Go to the Credentials tab in the left-hand sidebar.
2. Go to Cloud Account.
3. Select the Microsoft Azure Resource Manager from the Add account drop-down menu at the top right.
3.2 Managing Your Artifact AccountsIn order to download files for My Software, you can create an artifact account in UForge.
1. Go to the Credentials tab in the left-hand sidebar.
2. Go to Artifact Account.
3. Click on create.
4. Enter a name for the account.
5. Select the type from the drop-down menu.
6. Enter the host name and port.
7. Click create to complete.
- 9 -

3.3 Managing API KeysAPI Keys are used to communicate with UForge AppCenter more securely when using the platform APIs (rather than using basicauthentication).
If you have the rights, you will be able to manage your API keys. See your UForge Administrator to be given these rights, if needed.
The number of API key pairs that a user can create is set by the administrator. If you have reached your quota of key pairs, contact youradministrator.
To create a key pair:
1. Go to the Credentials on the left-hand sidebar.
2. Go to API Keys.
3. Click create.
3.4 Managing SSH KeysYou can manage one or more SSH keys that can be added to an appliance template.
To add an SSH key:
1. Go to the Credentials tab on the left-hand sidebar.
2. Go to SSH Keys.
3. Click create.
4. Enter the key name and the key details.
5. Click add.
- 10 -
Chapter 4 Managing Appliance TemplatesAn appliance template is a meta-data description of an entire software stack. The following sub-sections go into detail on how to create andmanage your appliance templates:
- 4.1 Supported Operating Systems
- 4.2 Supported Machine Image Types
- 4.3 Creating an Appliance Template
- 4.4 Searching for an Appliance Template
- 4.5 Listing Appliance Templates
- 4.6 Modifying an Appliance Template
- 4.7 Adding a Logo
- 4.8 Managing the OS Profile
- 4.9 Generating a Machine Image
- 4.10 Launching a PXE Image
- 4.11 Publishing a Machine Image
- 4.12 Deploying a Machine Image
- 4.13 Listing Deployed Machine Images
- 4.14 Tracking OS Package Updates
- 4.15 Adding Custom Software Components
- 4.16 Updating the Install Profile
- 4.17 Configuring Multiple Network Internet Cards
- 4.18 Configuring Advanced Partitioning
- 4.19 Managing Configuration
- 4.20 Cloning an Appliance Template
- 4.21 Importing and Exporting Templates
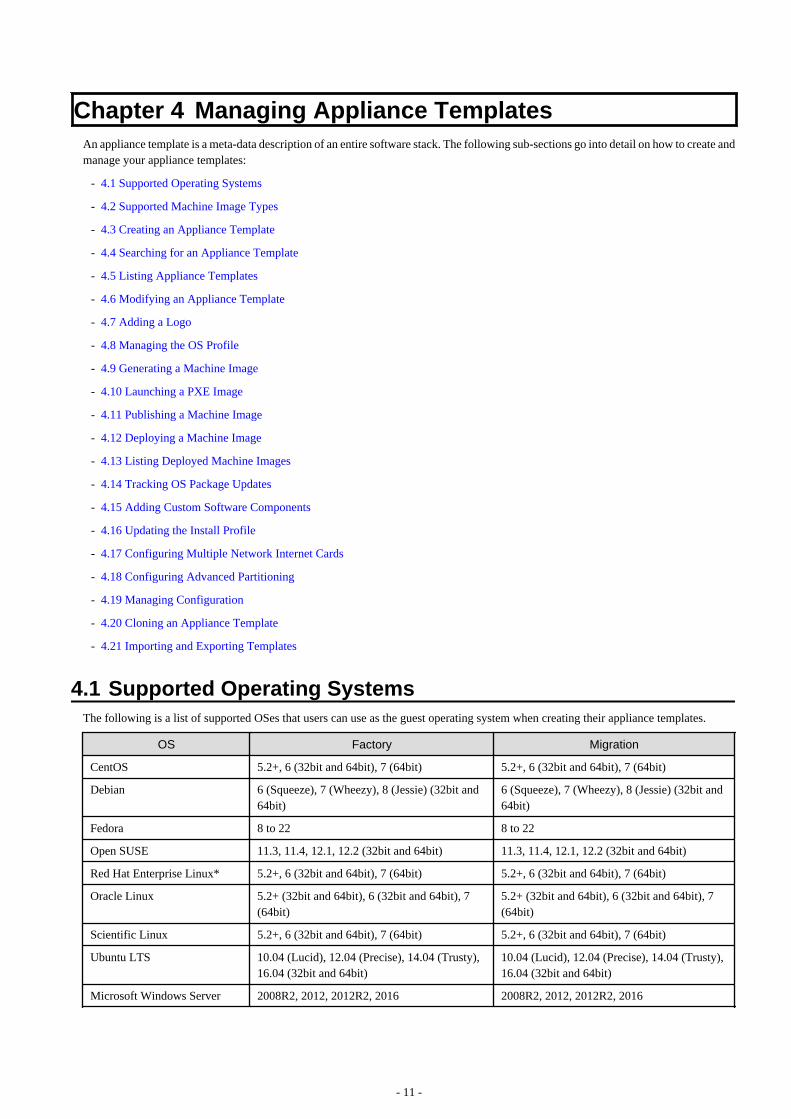
4.1 Supported Operating SystemsThe following is a list of supported OSes that users can use as the guest operating system when creating their appliance templates.
OS Factory Migration
CentOS 5.2+, 6 (32bit and 64bit), 7 (64bit) 5.2+, 6 (32bit and 64bit), 7 (64bit)
Debian 6 (Squeeze), 7 (Wheezy), 8 (Jessie) (32bit and64bit)
6 (Squeeze), 7 (Wheezy), 8 (Jessie) (32bit and64bit)
Fedora 8 to 22 8 to 22
Open SUSE 11.3, 11.4, 12.1, 12.2 (32bit and 64bit) 11.3, 11.4, 12.1, 12.2 (32bit and 64bit)
Red Hat Enterprise Linux* 5.2+, 6 (32bit and 64bit), 7 (64bit) 5.2+, 6 (32bit and 64bit), 7 (64bit)
Oracle Linux 5.2+ (32bit and 64bit), 6 (32bit and 64bit), 7(64bit)
5.2+ (32bit and 64bit), 6 (32bit and 64bit), 7(64bit)
Scientific Linux 5.2+, 6 (32bit and 64bit), 7 (64bit) 5.2+, 6 (32bit and 64bit), 7 (64bit)
Ubuntu LTS 10.04 (Lucid), 12.04 (Precise), 14.04 (Trusty),16.04 (32bit and 64bit)
10.04 (Lucid), 12.04 (Precise), 14.04 (Trusty),16.04 (32bit and 64bit)
Microsoft Windows Server 2008R2, 2012, 2012R2, 2016 2008R2, 2012, 2012R2, 2016
- 11 -

Information
For Red Hat Enterprise Linux you must provide the ISO images or access to a repository.
Note
If you intend to generate machine images for cloud environments, ensure that the operating system you are using in the machine image iscorrectly supported by the cloud environment. For example, Microsoft Azure supports the following operating systems.
4.1.1 Notes on LicensingWhen using UForge, you have to comply with the license agreement of OSes and software which UForge handles, in particular:
- Publishing OS image of RHEL (Red Hat Enterprise Linux) subscription to public cloud
Cloud provider has to be CCSP (Certified Cloud & Service Provider) and you must register to Red Hat Cloud Access. For moredetails, please confirm with cloud provider.
- Scanning server
You have to check whether the licenses of OS and software which the source machine contains allow you to use them on thedestination server which you are migrating to.
If the source machine contains rpm packages which Red Hat provides, please ask the administrator whether UForge repositorycontains these packages, because UForge automatically regenerates rpm packages which the repository doesn't contain andregenerated packages are NOT supported by Red Hat.
On UForge Portal, you can see the list of rpm packages which the source machine contains and header In Repo tells you whetheror not the package comes from the repository (Refer to 5.6 Viewing a Scan). Once migration is done, you can see where the packagecomes from by rpm command on the destination server. If regenerated, Build Host is overwritten as uforge.
- Handling Microsoft Windows
UForge user must acquire Windows license in order to handle Windows OSes in UForge. When publishing Windows OS image orscanning Windows server, you have to confirm usage conditions of cloud provider and virtualization software which you publishto or scan.
4.2 Supported Machine Image TypesWith UForge you can create machine images in the following formats.
Physical Format Additional information
ISO none
PXE Only for CentOS systems
Virtual Additional information
Hyper-V none
KVM none
OVF Supported hardware types: 4 (ESXi >=3.x) 7 (ESXi >=4.x) 9 (ESXi >=5.x)
QCOW2 none
Raw none
tar.gz none
Vagrant Base Box none
VHD none
- 12 -

Virtual Additional information
Virtual Box none
VMware vCenter Supported hardware types: 4 (ESXi >=3.x) 7 (ESXi >=4.x) 9 (ESXi >=5.x) For Windows,ensure your HW version is the most up to date for the ESXi host
VMware Server Supported hardware types: 4 (ESXi >=3.x) 7 (ESXi >=4.x) 9 (ESXi >=5.x)
Vagrant none
Xen none
Citrix XenServer none
Container Additional information
Docker none
LXC none
Cloud Additional information
Abiquo Supported hardware types: 4 (ESXi >=3.x) 7 (ESXi >=4.x) 9 (ESXi >=5.x)
Amazon AWS none
Azure Resource Manager Ubuntu <= 12.04 not supported
Cloudstack Target formats: CloudStack VMWare (OVA) CloudStack Citrix Xen (VHD) CloudStackKVM (QCOW2)
Eucalyptus Target formats: Eucalyptus KVM Eucalyptus Xen
Flexiant Target formats: Flexiant RAW - KVM/Xen Flexiant OVA - VMWare Flexiant QCOW2 -KVM/Xen/VMWare
Fujitsu K5 none
Google Compute Engine none
Microsoft Azure none
Nimbula Target formats: Nimbula ESX Nimbula KVM
OpenStack Target formats: OpenStack QCOW2 OpenStack VMDK OpenStack VDI OpenStack VHD
Oracle Cloud - For OS versions supported by Oracle Cloud, refer to FAQ at Oracle Cloud
- Debian 8 is not supported by UForge for publication to Oracle Cloud.
- Supported subscriptions are Metered Service Offerings. Nonmetered Service Offeringsare not supported by UForge.
SUSE Cloud none
VMware vCloud Director Supported hardware types: 4 (ESXi >=3.x) 7 (ESXi >=4.x) 9 (ESXi >=5.x)
4.3 Creating an Appliance TemplateYou can create either Linux-based or Windows-based appliance templates. The steps differ slightly. Please refer to the appropriate sectionbelow.
4.3.1 Creating a Linux-based ApplianceTo create a new appliance in your private workspace:
1. Select Apps icon on the left.
2. On the Appliance Library page, click on create in the top right.
- 13 -

3. Enter the Name and Version of the appliance.
4. From the drop-down menus, select the operating system (distribution, release and architecture).
5. Click the create button. This creates a skeleton of an appliance template in the platform which you can now customize with operatingsystem packages, middleware and application software.
Information
If SELinux is installed (ie the file /etc/selinux/config exists), the filesystem will be relabeled on the first boot of a UForge generatedmachine image in order to add the SELinux context in the all system files ' extended attribute. At boot time, init.rc checks for theexistence of /.autorelabel. If this file exists, SELinux performs a complete file system relabel (using the /sbin/fixfiles -f -F relabelcommand), and then deletes /.autorelabel.)
6. You should now see the appliance overview page. You can add a description to your appliance (optional) and a logo (optional). Thelogo format must be .jpg, .jpeg or .png.
7. An OS profile is mandatory. See 4.8.1 Adding a New OS Profile. However, you can leave the appliance at this point and edit it later.
8. If you have made any modifications, click the checkmark to save.
Information
When you create an appliance, the packages are stored locally in the UForge cache repository. This ensures that the packages will alwaysbe available.
4.3.2 Creating a Windows-based ApplianceTo create a Windows Appliance:
1. From the Apps tab, select create.
2. Enter the appliance name and version.
3. Choose Windows from the OS Distribution drop-down menu.
- 14 -

4. Select the Release and Architecture from the drop-down menus.
5. Click create.
6. From the Stack page, select the OS Profile from the drop-down list under Profile name. Click save.
Information
Once you have chosen the OS Profile, you cannot add any packages or run updates. The OS Profile is static. Once created, if you selectOS Profile, you will only be able to view the details of the profile you selected.
7. Set the Install profile and click Save. For more information, refer to 4.16.3 Updating a Windows-based Install Profile.
Information
Unlike Linux, the following cannot be set for Windows appliances: Keyboard, Root user, User & Groups, Kernel Parameters andFirewall.
- 15 -

8. Optionally you can add partitions.
a. Click on Partitioning and select Advanced Partitioning.
b. Click on the green + sign at the top.
c. You can modify the name and partition type
d. Select the filesystem to ntfs and mount point to D: (for example).
e. Enter the size. The install disk should be 12 Gb for core versions and not less than 32Gb for the full version.
f. Check the box in the Grow column if you want the partition to be growable.
g. Click save.
9. Add software bundles from the Projects or MySoftware pages.
Note
Software bundles included in MySoftware and Projects will be put on the image disk but the UForge generation tool WILL NOTinstall them even if these are executable/installers files (.exe, .msi, etc.). It is up to the end user to manually complete the installationof the software bundles.
For Windows, .exe or .msi files can be given extra parameters. The parameters depend on the .exe or .msi file, and can be used forexample for silent installation, providing extra configuration values, etc.
Information
For Windows, with Software bundle whose name begins with UForgeWinDrivers, you can specify drivers to be installed in a generatedmachine image.
- 16 -

Information
A binary called UShareInstallConfig is embedded at generation time, which helps the final user of the Appliance do the last-mileconfiguration.
Information
A Windows appliance created using a golden image will not list the appliances and services under Stack OS Profile.
4.4 Searching for an Appliance TemplateTo find a particular appliance template you can:
1. Go to the Apps tab on the left sidebar.
2. Use the search engine. The search runs on the appliance name or the OS name. To use the search engine, enter the text in the filter field.
3. If you are in the grid view you can sort the appliances. From the drop-down menu select how you want to sort the appliances in yourlibrary.
4.5 Listing Appliance TemplatesTo view the appliance templates you have access, go to the Apps tab in the user interface. By default the appliance templates are listed bylatest first.
Under the Appliance Library, the appliances are organized as follows:
- Created Appliances are appliance templates you created
- Imported Appliances have been imported from a Collaboration workspace or from the UForge Marketplace if you have access to one
- Shared Appliances are appliance templates that you have shared to a Collaboration workspace or to the UForge Marketplace if you haveaccess
- 17 -

You can view the details of an appliance template, generate images from them and comment on them.
4.6 Modifying an Appliance TemplateYou can modify and update appliances that are in your library, including ones that have been imported.
To modify an appliance template:
1. Click on the appliance template to modify.
2. From the Overview page you can add or change the logo, modify the name, version or description.
3. On the Stack page, you will notice the appliance toolbox on the left-hand side.
The toolbox allows you to define the five key elements of an appliance, namely:
- Install Profile – to customize the questions asked when the image is booted for the very first time (or during installation for a physicalimage format). It also allows you to customize the disk size and partitioning. For more information see 4.16 Updating the InstallProfile.
- OS Profile - (mandatory) to choose the operating system packages that are to be used for the appliance. For more information, see 4.8Managing the OS Profile. Note that the OS Profile cannot be modified for Windows-based appliances. Refer to 4.14.1 Modifying aWindows-based Appliance.
- Projects - to access the UForge Project Catalog. This catalog provides a set of commonly used 3rd party software components whenbuilding appliances. The Project Catalog is maintained by the UForge administrator. To add software from the Project Catalog to anapplication, see 4.15.1 Adding Software from the Project Catalog
- My Software - to add to the appliance any software components that you have uploaded. This is also where you can use the Overlayfeatures to manage where the files are installed during generation, if UForge should unzip archives as part of the generation, and set ifUForge should on the contrary not install native OS packages. For more information, see 4.15.2 Adding Software from Your SoftwareLibrary
- Configuration - to add boot scripts to configure the appliance after provisioning. For more information, see 4.19 ManagingConfiguration
4.7 Adding a LogoYou can add or modify the appliance logo as follows:
- 18 -

1. Click on the appliance to modify.
2. From the Overview page click on the square and plus (+) image on the left hand-side.
3. Select the image you want to use as the logo. The format must be .jpg, .jpeg or .png.
4. Click ok and save.
4.8 Managing the OS Profile
4.8.1 Adding a New OS ProfileEvery appliance must have an OS profile, which contains all the operating system packages for the appliance. UForge allows you to easilycreate an OS profile from a set of standard profiles. You can then add specific operating system packages.
The goal is to only include the operating system packages you require to run your application. This process is known as JeOS (Just EnoughOperating System). By only using the operating system packages you need, not only do you reduce the footprint of the resulting machineimage, you also make the machine image easier to maintain (as there are less updates) and (hypothetically) more secure as there will be lessunwanted services started.
To add an OS profile to your appliance:
1. Double click on the appliance you want to edit.
2. Go to the Stack page.
3. Click on OS Profile in the toolbox.
4. From the drop-down menu, select the OS profile template you wish to use. The operating system packages are added automaticallyand your appliance revision number is increased.
4.8.2 Adding Packages to the OS ProfileYou may want to add packages that are provided as part of the operating system distribution. To get a list of all the packages that correspondto your search criteria:
1. Select the appliance to modify and go to the Stack page.
2. Click on OS Profile in the toolbox.
3. Click on the search button in the top right hand.
4. Enter your search string. For example, add php as a search string to get a list of all the PHP packages provided by CentOS.
5. Click the search icon.
- 19 -
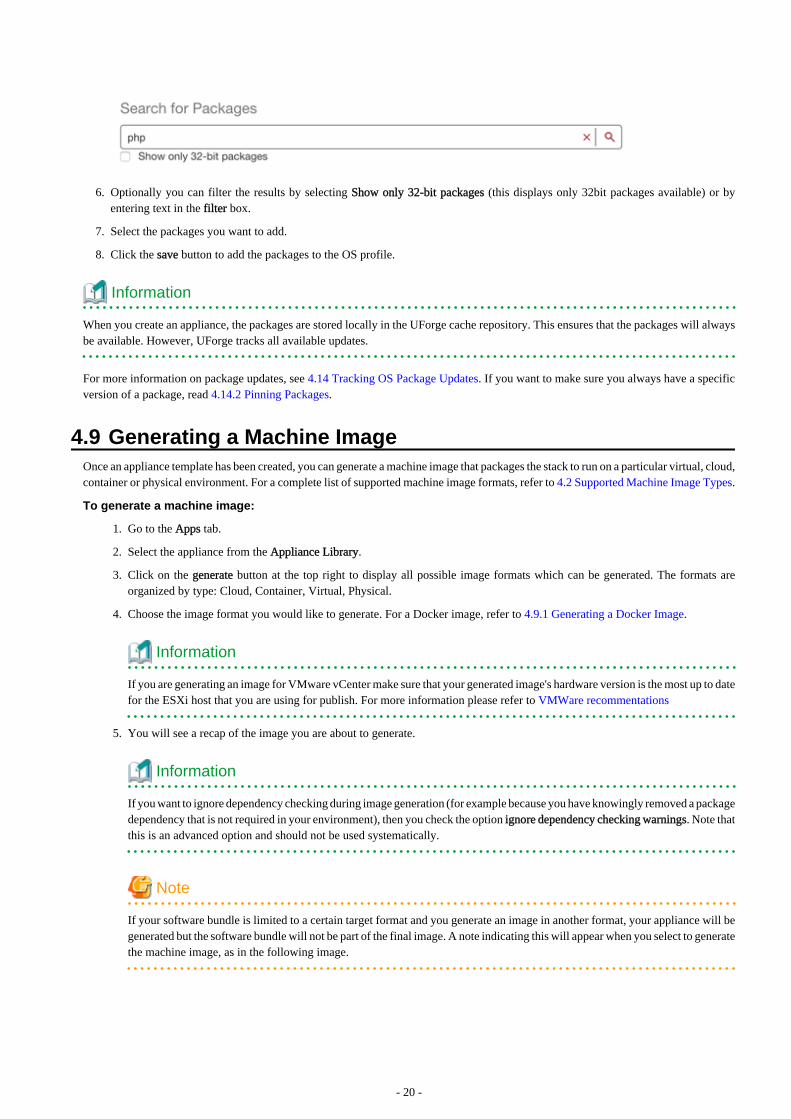
6. Optionally you can filter the results by selecting Show only 32-bit packages (this displays only 32bit packages available) or byentering text in the filter box.
7. Select the packages you want to add.
8. Click the save button to add the packages to the OS profile.
Information
When you create an appliance, the packages are stored locally in the UForge cache repository. This ensures that the packages will alwaysbe available. However, UForge tracks all available updates.
For more information on package updates, see 4.14 Tracking OS Package Updates. If you want to make sure you always have a specificversion of a package, read 4.14.2 Pinning Packages.
4.9 Generating a Machine ImageOnce an appliance template has been created, you can generate a machine image that packages the stack to run on a particular virtual, cloud,container or physical environment. For a complete list of supported machine image formats, refer to 4.2 Supported Machine Image Types.
To generate a machine image:
1. Go to the Apps tab.
2. Select the appliance from the Appliance Library.
3. Click on the generate button at the top right to display all possible image formats which can be generated. The formats areorganized by type: Cloud, Container, Virtual, Physical.
4. Choose the image format you would like to generate. For a Docker image, refer to 4.9.1 Generating a Docker Image.
Information
If you are generating an image for VMware vCenter make sure that your generated image's hardware version is the most up to datefor the ESXi host that you are using for publish. For more information please refer to VMWare recommentations
5. You will see a recap of the image you are about to generate.
Information
If you want to ignore dependency checking during image generation (for example because you have knowingly removed a packagedependency that is not required in your environment), then you check the option ignore dependency checking warnings. Note thatthis is an advanced option and should not be used systematically.
Note
If your software bundle is limited to a certain target format and you generate an image in another format, your appliance will begenerated but the software bundle will not be part of the final image. A note indicating this will appear when you select to generatethe machine image, as in the following image.
- 20 -

6. You can set the disk size, then click the generate button to launch a generation in UForge for this appliance template.
Information
Depending on the packages you install and the size of your software, make sure that the disk size is large enough to accommodatethe software to be installed. For Windows-based operating systems, it is advised to have a disk size of at least 14GB for coreversions, and at least 20GB for full versions.
The generation will take a few minutes to complete (depending on the number of packages in the appliance template and the disk sizechosen). The generation progress is shown.
Information
Some services are disabled or enabled depending on the target machine image being created (refer to 5.7.4 Service State).
Once the generation is complete, you can download the image locally, or for certain cloud formats register the machine image directly tothe target environment using your cloud credentials.
Information
For PXE, you cannot download the image but can launch it through an iPXE shell. For more information, refer to 4.10 Launching a PXEImage.
You will note that a package uforge-install-config is injected in the generated image. This file is responsible for:
1. launching the dialog for the install profile configurations which are not automatic (keyboard, root password, licenses, time zone, staticIP)
2. executing the installation bootscript of the template
If the template is configured to be fully automatic in the Install Profile and has no bootscript that is supposed to run at every boot, the uforge-install-config package and associated /etc/UShareSoft directory can be removed safely.
However, it is preferable to leave this file.
4.9.1 Generating a Docker ImageTo generate a machine image:
1. Go to the Apps tab.
2. Select the appliance from the Appliance Library.
3. Click on the generate button at the top right to display all possible image formats which can be generated.
- 21 -

4. Choose Container, then Docker image format.
5. You can set the disk size, then click the generate button to launch a generation in UForge for this appliance template. The followingpop-up will be displayed once the generation ends on the summary view.
6. As indicated in the pop-up, you need to click download to download the tar.gz.
7. Run the appropriate docker import command to create the image. The appliance and docker image name will depend on the nameyou have given them.
8. You should now be able to see the Docker image in your library.
4.10 Launching a PXE ImageThe PXE format can be used to install an OS through the network, based on a PXE image created from your UForge. The only differenceis that the PXE format is not downloaded with the UI of the UForge, but through an iPXE shell. By default the connection will be via httpsbut if it fails it will fall back to http.
Information
The PXE format is only available for CentOS-based images.
You can execute iPXE script provided by UForge directly from iPXE shell. To do so, first make sure that your CentOS-based image iscreated in PXE format.
Information
You must be in an iPXE shell. Most virtual machines already implement iPXE. Make sure that you have the latest version of iPXE installed.
1. Start your machine and boot it on the iPXE shell.
2. Make sure the network interface is configured by executing "dhcp" in the iPXE shell.
3. Run the following command:
chain http://YOUR_FORGE_ADRESS/resources/ipxe-init
For example:
chain http://10.1.2.197/resources/ipxe-init
or:
chain https://uforge.yourdomain.com/resources/ipxe-init
4. The following screen should appear and the boot process can be started.
- 22 -

Enter your UForge IP, root context and credentials. Then select Connect.
5. You can then select the PXE image you want to launch.
Note
It is possible to have a kernel panic error during the installation. This is caused by a bug in the Linux kernel (fixed in 3.16). In that case, justrestart the installation.
Note
When using Virtual Box, depending on the version, the installation can freeze. You may want to upgrade VirtualBox (version >=5.1.26).
4.10.1 Initializing the Boot Process Using a Customized ipxe.iso FileMost virtual machines already implement iPXE. You can customize to ease the use of iPXE in uForge.
The process of booting through iPXE can be started by using an ipxe.iso file. This file is built using the iPXE open source project.
To do so, clone or download the ipxe open source project and build it. However, there are some parameters that canbe used and combined:
- You can embed a script in ipxe.iso so that it automatically executes some iPXE commands when booting on it. We already providea script that allows to select the UForge from which you want to download PXE images at: PATH_TO_THE_SCRIPT. For example:
make EMBED=/home/user/scripts/myScript.ipxe
- You can activate the HTTPS protocol to download files. First, check in src/config/general.h that there is the line defineDOWNLOAD_PROTO_HTTPS and not undef DOWNLOAD_PROTO_HTTPS. Then build the ipxe.iso by adding the argument:TRUST=/etc/ssl/certs/CertificateAuthority.pem. To build iPXE with HTTPS enabled run:
make TRUST=/home/uforge.yourdomain.com.crt
More information about how to build your project can be found on ipxe.org.
The project must be build in /src and the resulting output is found at /src/bin/ipxe.iso. This ISO can then be used through qemu, VirtualBox,VMware vcenter or on a USB stick to boot using iPXE protocol.
Once you are booting on ipxe.iso, the following screen should appear and the boot process can be started.
Enter your UForge IP, root context and credentials. Then select Connect. You can then select the PXE image you want to launch.
Note
It is possible to have a kernel panic error during the installation. This is caused by a bug in the Linux kernel (fixed in 3.16). In that case, justrestart the installation.
- 23 -

Note
When using Virtual Box, depending on the version, the installation can freeze. You may want to upgrade VirtualBox (version >=5.1.26).
4.10.2 Using a DHCP Server that Redirects to an iPXE ScriptThe options of a DHCP server can be modified so that it redirects to an iPXE script (the one given on a UForge for example). To do so, thefield named next-server must be associated with the filename to be executed. Using this, it possible to automatically execute the script givenon a UForge (at http://YOUR_FORGE_ADRESS/resources/pxe). Then in an iPXE shell, execute the command dhcp. The following screenshould appear and the boot process can be started.
Enter your UForge IP, root context and credentials. Then select Connect. You can then select the PXE image you want to launch.
Note
It is possible to have a kernel panic error during the installation. This is caused by a bug in the Linux kernel (fixed in 3.16). In that case, justrestart the installation.
Note
When using Virtual Box, depending on the version, the installation can freeze. You may want to upgrade VirtualBox (version >=5.1.26).
4.11 Publishing a Machine Image
Information
When publishing an image, you have to comply with the license agreement of OSes and software which UForge handles, in particular:
- Publishing OS image of RHEL subscription to public cloud
Cloud provider has to be CCSP (Certified Cloud & Service Provider) and be registered to Red Hat Cloud Access. For more details,please confirm with cloud provider.
- Publishing Windows OS image
You must acquire Windows licenses in order to handle Windows OSes in UForge and confirm usage conditions of cloud providerand virtualization software which you publish to.
In order to publish a machine image to a cloud environment or container, you must already have credentials to access that environment.
Information
If you want to publish a Windows image to KVM on Red Hat Linux you need to inject specific VirtIO drivers. See the specific proceduredocumented in 4.11.1 Publishing a Windows Image to KVM on Red Hat Linux.
1. If not already done, create an account for the target environment. For more information, see 3.1 Managing Cloud Accounts.
2. Go to the appliance and click the Machine Images page. If you have not generated a machine image, you will need to do so as describedin 4.9 Generating a Machine Image.
- 24 -

3. Click on the arrow pointing to the right to publish your image.
4. Following the instructions in the tooltips, choose the account and fill in any additional information required.
Information
When publishing to Microsoft Azure Resource Manager you should note the following restrictions:
- The storage account must exist in your Microsoft account
- The container is mandatory. If the value you set does not match an existing container it will be created with the new name you haveset.
- The blob and cloud image name must be unique. If they already exist, this will overwrite an existing one with the same name.
- The resource group is optional. If you enter a value here, it must already exist in your Microsoft account.
5. Click publish.
Information
Publishing an image to Amazon will be billed to the user account. Trial accounts are not supported for publishing images from UForge.Only full Amazon accounts can be used.
Information
Currently, publication to Docker are only supported for Docker Registry v2.
6. The publication will take a few minutes to complete (depending on the size of the image and the network connectivity between UForgeand the target environment). The publication progress is shown. At the end of the publication, the machine image has been publishedby UForge to your target environment. The published image can be found in the target cloud environment or container.
- 25 -

Information
If your publication to AWS fails this may be due to your security settings. Your default security group for AWS must allow SSH.Contact your administrator.
UForge does not launch instances in the target cloud environment. If you wish to launch an instance from this machine image, you shouldgo to your target cloud environment console for further actions.
Information
When you publish an image to Amazon or OpenStack, and you have the correct UForge entitlements, you will be able to launch yourmachine image directly from UForge using the Deploy option, without having to connect to your cloud platform. Refer to 4.12 Deployinga Machine Image.
Information
When you publish an image to VMware, the result will be a template and not a virtual machine.
Note
If your Fujitsu K5 publish failed, there may be data published to cloud, incurring costs, even if not visible on your cloud account. You shouldrun a cleanup manually. Refer to Chapter 2.7 Object storage of the FUJITSU Cloud Service K5 IaaS API Reference (Foundation Service)guide
4.11.1 Publishing a Windows Image to KVM on Red Hat Linux
Information
If you want to publish a Windows image to KVM on Red Hat Linux you need to inject specific VirtIO drivers.
1. In order to add the specific drivers, the Red Hat VirtIO drivers can be either added to AppCenter as a Project if it has been added toyour AppCenter by the administrator, or using MySoftware.
Information
If you create a specific VirtIO driver (refer to 4.15.2 Adding Software from Your Software Library for more information), the softwarebundle MUST have a prefixed name UForgeWinDrivers.
The following files should be included in your software bundle:
- viostor.sys
- viostor.inf
- viostor.cat
- vioscsi.sys
- vioscsi.inf
- vioscsi.cat
- netkvm.sys
- netkvm.inf
- netkvm.cat
1. When creating your appliance template, add the Project or MySoftware bundle that contains the VirtIO drivers.
- 26 -

2. Generate the machine image.
3. Publish the machine image.
4.12 Deploying a Machine Image
Information
Currently, only Linux machine images published on Amazon, OpenStack and Microsoft Azure Resource Manager can be deployed fromUForge. You cannot deploy a Windows based appliance.
You can only deploy a machine image if you have AMP installed. For more information on installing AMP, refer to the official CloudsoftAMP documentation
The credentials to deploy a machine image are those used to publish it. For Amazon, only full accounts can be used, trial accounts are notsupported for publishing images from UForge.
1. If not already done, create an account for the target environment. For more information, see 3.1 Managing Cloud Accounts.
2. Go to the appliance and click the Machine Images page. If you have not generated a machine image, you will need to do so as describedin 4.9 Generating a Machine Image.
3. Click on the arrow pointing to the right to publish your image.
4. Following the instructions, choose the account and fill in any additional information required.
Note
If your appliance has any elements such as passwords that must be set up by the user or licenses accepted at installation, you will seea warning when you publish the image which indicates This image requires additional user interactions at startup (as shown below).In this case, you will not be able to use the deploy feature.
5. Click publish.
Information
Publishing an image will be billed to the user account.
- 27 -

6. The publication will take a few minutes to complete (depending on the size of the image and the network connectivity between UForgeand the target environment). The publication progress is shown. At the end of the publication, the machine image has been publishedby UForge to your target environment.
7. Under Published Machine Images, next to your appliance, you will now see the deploy (play) icon. In order to deploy your machineimage, click on this icon.
8. In the deploy view, enter the name of the deployment. Click on deploy. This will connect to cloud platform and launch your machineimage instance. Once deployed, a green button will appear under the Status column.
9. From the Deployments page you can see the instances deployed and their status. If the status is green it is up and running. If it is red,there has been an issue during deployment and/or it is stopped.
Information
If you want to stop your deployment, you can do so by clicking on the delete (garbage) icon. This will stop it and remove the instancefrom your cloud.
- 28 -

Note
Terminating an OpenStack deployment may fail due to a known issue in AMP. Click again on the delete (garbage) icon to work aroundthe issue.
4.13 Listing Deployed Machine ImagesIn order to view a list of the deployed machine images, go to the Deployments tab. A window similar to the following will appear.
From this window you can see the cloud platform the published machine image was deployed to, the name of the deployed instance, thelocation of the machine image published, the OS the machine image is based on and the state of the deployed instance on the cloud platform.
Information
If you want to stop your deployed instance, you can do so by clicking on the delete (garbage) icon. This will stop it and remove the instancefrom your cloud.
If you click on the application name you will see the details of the instance that has been deployed, including the name of the appliance itis based on and the IP address of the machine.
If you click on the i next to the hostname, a popup will appear indicating the IP adress, the user name and the SSH key (if any). An examplecode will also be given to connect to your instance.
- 29 -

4.14 Tracking OS Package UpdatesAll the OS packages added to the OS Profile section of the appliance templates are tracked for any updates by UForge AppCenter. Basedon a timestamp stored in the appliance template, UForge AppCenter can detect any OS package updates that are available. Updates aredisplayed in the user interface for each appliance template.
If you are in grid view:
If you are in table view, it is listed in the Updates column:
You can then easily update the packages using the UForge GUI. Using this tool, you can also roll-back to previous versions of OS packages.
Information
This feature is only available for appliance templates using Linux operating systems.
To update the OS packages:
1. Select your appliance from your appliance library under the Apps tab.
2. Go to the Updates page.
3. You can see from the graphic when updates were made and how many are available.
- 30 -

4. You can select current updates (if any) or select to return to a previous version of the OS by moving the cursor on the graph.
5. Click simulate to see the changes that will be applied. The changes will be listed at the bottom of the screen. Scroll to view the results.
6. If you want to apply the changes listed, then click update.
Information
The triangle indicates a Milestone. For CentOS, this is the versions (6.1, 6.2 etc). Milestones are customized by the UForge administrator.
4.14.1 Modifying a Windows-based ApplianceFor Windows-based appliances UForge will indicate the number of updates available, however you cannot use this procedure to update thepackages for an existing Windows appliance.
In order to benefit from a newer version of Windows, you will have to:
1. Create or retrieve a new Golden Image. See your administrator.
2. Create a new appliance.
3. You can re-use the MySoftware components contained in the current appliance.
4. You can download from the current template the boot scripts and save them on your local hard drive. You can then upload them tothe new appliance.
5. You must re-produce the configuration (Install Profile, Configuration).
4.14.2 Pinning PackagesUForge allows you to "pin" certain packages in your appliance (previously refered to a "sticky" package). This means that during imagegeneration, the package version you have pinned is chosen regardless of the current appliance template timestamp for calculating packageversions. All the package dependencies of this package are also calculated.
To pin a specific package:
1. Select the appliance you want to modify.
2. Go to the Stack page.
3. From the OS profile, click on the pinned bar in the right hand side of the package info. In the following image, the first package hasbeen pinned.
4. A pop-up window will list all of the versions of the package available, allowing you to select the version you want to pin.
- 31 -

5. Choose the version of the package you want to pin, then click save.
4.15 Adding Custom Software ComponentsThere are two ways to add 3rd party software components or your own software to an appliance template.
The first way is through the Project Catalog. This catalog is public to all the users on UForge and is maintained by the privileged users andadministrators.
If the catalog does not contain the software component you are looking for, then you can upload the software into the My Software library.This is your own private software library, allowing you to upload any software into UForge and be able to add it to any of your appliancetemplates.
4.15.1 Adding Software from the Project CatalogThe following describes how to add MySQL and Apache to an appliance.
1. Select the appliance to modify and go to the Stack page.
2. Click on the Projects in the toolbox. This displays the Project Catalog. The bottom table lists which projects have already been addedto the appliance.
3. Select the projects, for example Apache and MySQL and click the down arrow button. You can scroll through the available projectsor enter a search string to filter the list.
- 32 -

4. Click Save. These projects should now be displayed in the second table.
4.15.2 Adding Software from Your Software LibraryYou can add your own custom software either using the Software Library or by including boot scripts. My Software overlay files (forexample /etc/profile.d/xxx.sh) will be run before bootscripts when the machine is booted.
The following is a list of supported file formats:
- Linux only, note by default .rpm and .deb files will be installed at generation. This can be modified when you upload the files (seeprocedure below):
- .rpm ("rpm i" will be executed)
- .deb ("dpkg -i" will be executed)
- Windows only:
- .msi
- .exe
- Linux and Windows compatible:
- .tar.bz2
- .bz2
- .tar.gz
- .tgz.bz2
- .tgz
- .gz
- .tar
- .zip
- .tar.zip
To add custom software components to an appliance:
1. From the Apps tab, click on Software Library in the top left hand side of the UI. This opens your private Software Library.
2. Click on the add software in the top right hand side.
3. You are now prompted for the name, version and maintainer of the software component you would like to add. You can also set a tagand category. Click create to complete.
- 33 -

Information
If you want to create specific software bundle with the VirtIO drivers which will allow you to publish Windows images to Red Hat,then the name must begin with UForgeWinDrivers.
4. The software Overview page will now open. You can modify the name and version, and add a description.
5. To upload the files, go to the Files page.
Information
If you want to group a set of files, you can create a folder by clicking create folder. Then enter a folder name and click create folder.Now if you want to put files in this folder, click on the upload icon next to the folder name.
If you create a folder, you can then click on the pencil icon to edit the file properties. Here you can select to apply the same owner andrights to all the files added to the folder.
Note
Folders are not supported if you are uploading VirtIO drivers for publishing Windows images to Red Hat.
- 34 -

You can now upload the files as follows:
a. Click upload to select the files you want to add and click open.
b. Click fetch to set an archive location where the files should be retrieved. When using the fetch option you can indicate aremote URL or artifact account (for information on artifact accounts, refer to 3.2 Managing Your Artifact Accounts). Youcan also select to have the files uploaded to the UForge by checking use cache.
Note
If you are uploading VirtIO drivers for publishing Windows images to Red Hat, archive files such as zip or tar are not supported.
6. Optionally, you can modify the default install path that will be used. If you have modified the name of your appliance, it may not bereflected in the install path.
7. By default .deb and .rpm files will be installed at generation time. Optionally you can edit the settings for thosefiles:
- Click on the pencil on the right hand side of your uploaded file.
- Un-select Install this native package as part of the generation.
- Click the check mark to save your changes.
In this case, the .deb or .rpm archive file will be in the directory but will not be installed at generation time.
8. Optionally, you can select to unzip archives as part of the generation. To do so:
- Click on the pencil on the right hand side of your uploaded file.
- You can then edit the install path and select if it should be extracted.
- Click the check mark to save your changes.
- 35 -

9. Optionally, you can restrict the distribution or target format that the software applies to, from the Restrictions page. The restrictionrule is set as a regular expression. For more information, refer to 4.15.3 Restricting Software Components for OSes and Formats.
10. From the Repository Packages page, you can set the packages with which your software is compatible. This page will only be visibleif the restriction rule matches only one distribution. You can search for packages. Select and click the down arrow to add them. Clicksave.
11. From the Boot Scripts page, upload any boot scripts you want to add to this software. You can either:
- Upload an existing boot script file by using the upload icon.
- Create a new boot script by clicking new.
In both cases, you must select the type. If you select first boot, then the boot script will be launched once, the first time the instanceis launched. If you select every boot, then the boot script will be launched every time the instance is rebooted. You must also set theboot order.
12. From the Licenses page, upload any licenses you want to add to this software. Click upload, select your license and click save.
13. Add the uploaded software component to the appliance. Click on the Appliance Library to view your Appliance Library. Double-clickon the appliance template you want to add the software to.
14. Go to the Stack page and click on the My Software button in the toolbox.
- 36 -

15. Select the software components you want to add and click the down arrow button.
16. Click save to add this software component to your appliance template.
4.15.3 Restricting Software Components for OSes and FormatsUnder My Software you can restrict the usage of a software bundle based on a distribution name, family, architecture or for a specificmachine image format.
- To set restriction rules:
1. Under the Apps go to the Software Library page.
2. Select the sofware you want to modify.
3. Go to the Restrictions tab. Enter the restriction rule. The restriction rule is represented by a logicalexpression with format Object#field=value or Object#field!=value, where:
- object is either Distribution or TargetFormat
- for Distribution field is family, pkgType, name, version or arch. The version must be a major version.
- for TargetFormat field is name or type
- value is the value you want to match with the fields. For example, CentOS for Distribution name, linux for Distributionfamily, x86_64 for Distribution arch, VirtualBox for TargetFormat name, cloud for TargetFormat type.
- logical operator is || for OR and && for AND
- carriage return is not authorized
For example, if the software bundle is designed only for distributions CentOS 7 x86_64 or Debian 8 x86_64, or for image format with typevirtual, then you would note the Restriction rule as follows:
(Distribution#arch=x86_64 && ((Distribution#name=CentOS && Distribution#version=7) ||
(Distribution#name=Debian && Distribution#version=8))) || TargetFormat#type=virtual
Once you have set a restriction rule, you will see a cube next to the software component, under the column Format dependent.
- 37 -

Note
If your software bundle is limited to a certain target format and you generate an image in another format, your appliance will be generatedbut the software bundle will not be part of the final image. A note indicating this will appear when you select to generate the machine image,as in the following image.
- Restriction rule values:
By using the command-line tool hammr, you are able to retrieve available distributions:
$ hammr os list --url https://uforge.example.com/api -u username -p password
Where Distribution fields possible values are:
- name: the value listed in the Name column
- version: the value listed in the Version column
- arch: the value listed in the Architecture column
- family: can be one of the following linux, unix or windows
- pkgType: can be either application/x-rpm or application/x-debian-package
By using the command-line tool hammr, you are able to retrieve available machine image formats:
$ hammr format list --url https://uforge.example.com/api -u username -p password
Where TargetFormat fields possible values are:
- name: the value listed in the Builder Type column
- type: can be one of the following cloud, container, physical or virtual
- 38 -

4.16 Updating the Install ProfileThe Install Profile on the Stack page allows you to customize the questions asked when the image is booted for the very first time (or duringinstallation for a physical image format). The install profile is mandatory. However, the options you set will differ depending on if youappliance in Linux-based or Windows-based. Please refer to the appropriate section below.
4.16.1 Updating a Linux-based Install ProfileYou can define the following as part of a Linux-based appliance install profile:
- Root User: The root user password by default is prompted during the first boot of the machine image i.e. ask during installation.However, you can pre-set a root password. You can enter an SSH key to allow users to login as root. If you select Disable root passwordlogin via SSH, root will still be able to login from the console.
- Users and Groups (optional): you can add operating system users and groups. See 4.16.2 Adding Users and Groups for more information
- Network: You can set the internet settings. The default is set automatically. See 4.17 Configuring Multiple Network Internet Cards
- Security: You can activate or deactivate the firewall present in the filesystem when launching the appliance (regardless of whether thefirewall is iptables or other). Firewall is set to Off by default. You can also set the SELinux configuration here.
- Partitioning: You can modify the disk and swap size for the automatic set up, select ask during install, or set up Advanced Partitioning(for several disks). For more information see 4.18 Configuring Advanced Partitioning.
- Kernel. You can add kernel parameters by clicking plus, entering data and click save.
- Keyboard: default is ask during installation. You can choose set automatically and select the keyboard from the drop down menu.
- Licenses: default is accept licenses during installation.
- Time Zone: default is set automatically to London.
- Welcome Message: You can enter a welcome message.
Information
For basic partitioning disk size, you must ensure that the disk is large enough to store all the binaries and files for the appliance template.For windows based operating systems, it is advised to have a disk size of at least 14GB for core versions, and at least 20GB for full versions.
4.16.2 Adding Users and GroupsYou can add operating system users and groups to a Linux-based appliance Install Profile. These will be integrated to the appliance template.
Note
The users and groups created in UForge are not linked. If you create a user and list it as part of a specific group, you must then also createthe group; otherwise the image generation will fail.
To add a user to an appliance:
1. Select the appliance template you want to modify.
2. From the Stack page, click on Install Profile in the toolbox.
3. Select Users and Groups.
4. Click the plus symbol next to the Users table. The Create User page will be displayed.
- 39 -

5. Enter a user name.
6. If you want to manually enter the user ID, deselect set the user id automatically and enter the ID number.
7. If you want to manually create the primary group the user is part of, deselect automatically create primary group for user and enterthe group name.
8. Click create.
Note
If you create a user and list it as part of a specific group, you must then also create the group; otherwise the image generation will fail.
To add a group to a Linux-based appliance install profile:
1. Select the appliance template you want to modify.
2. From the Stack page, click on Install Profile in the toolbox.
3. Select Users and Groups.
4. Click the plus symbol next to the Groups table. The Create Group page will be displayed.
- 40 -
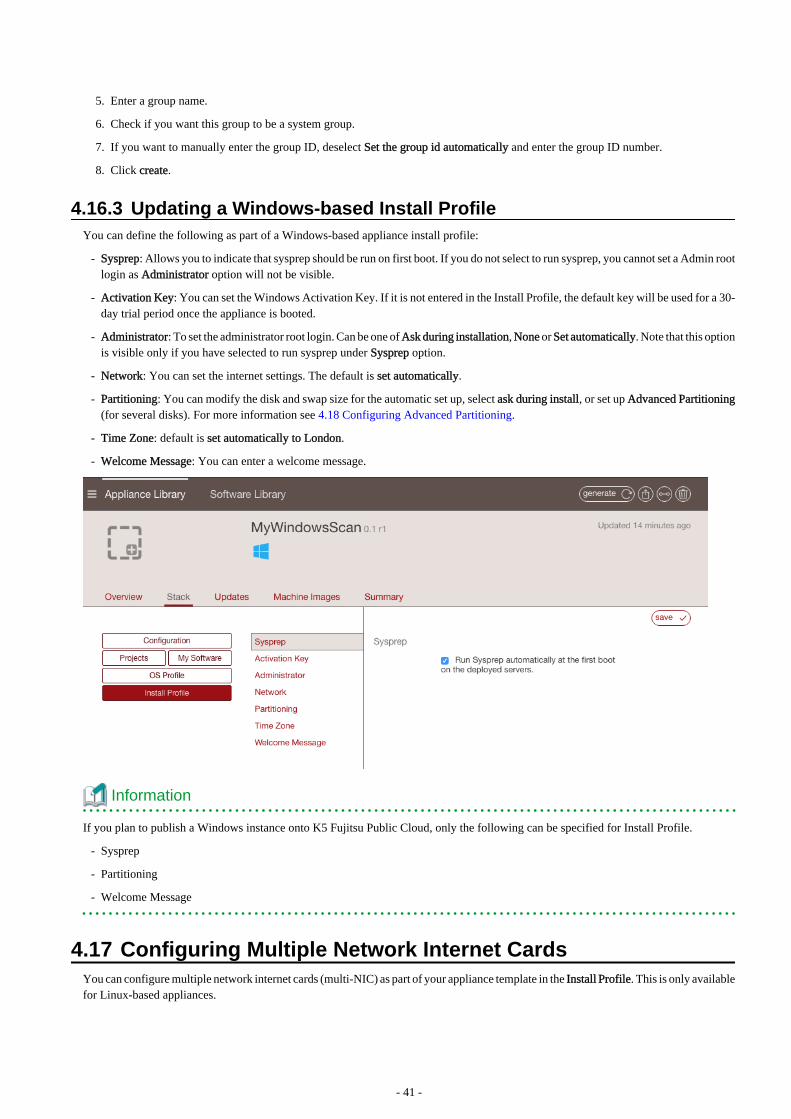
5. Enter a group name.
6. Check if you want this group to be a system group.
7. If you want to manually enter the group ID, deselect Set the group id automatically and enter the group ID number.
8. Click create.
4.16.3 Updating a Windows-based Install ProfileYou can define the following as part of a Windows-based appliance install profile:
- Sysprep: Allows you to indicate that sysprep should be run on first boot. If you do not select to run sysprep, you cannot set a Admin rootlogin as Administrator option will not be visible.
- Activation Key: You can set the Windows Activation Key. If it is not entered in the Install Profile, the default key will be used for a 30-day trial period once the appliance is booted.
- Administrator: To set the administrator root login. Can be one of Ask during installation, None or Set automatically. Note that this optionis visible only if you have selected to run sysprep under Sysprep option.
- Network: You can set the internet settings. The default is set automatically.
- Partitioning: You can modify the disk and swap size for the automatic set up, select ask during install, or set up Advanced Partitioning(for several disks). For more information see 4.18 Configuring Advanced Partitioning.
- Time Zone: default is set automatically to London.
- Welcome Message: You can enter a welcome message.
Information
If you plan to publish a Windows instance onto K5 Fujitsu Public Cloud, only the following can be specified for Install Profile.
- Sysprep
- Partitioning
- Welcome Message
4.17 Configuring Multiple Network Internet CardsYou can configure multiple network internet cards (multi-NIC) as part of your appliance template in the Install Profile. This is only availablefor Linux-based appliances.
- 41 -

To set multi-NICs for an appliance template:
1. Select the appliance you want to modify.
2. From the Stack page, click on Install Profile in the toolbox.
3. Select Network.
4. Click create. By default it is set to Automatic.
5. Select Manual. The following page will appear.
6. Enter the name and IP information.
7. Click save.
8. Optionally you can change the network card order. Click on the symbol on the left of the pencil icon, on the main Network page.
4.18 Configuring Advanced PartitioningYou can configure advanced partitioning as part of your appliance template in the Install Profile. The elements you can configure willdepend if your template is Linux or Windows based.
- 42 -

4.18.1 Advanced Partitioning for LinuxThe following example assumes that you want to build the following partitions, with a virtual hard drive of 20 GB.:
part /boot -fstype=ext4 -size=500 -ondisk=sda
part pv.1 -grow -size=1 -ondisk=sda
volgroup ROOTVG -pesize=4096 pv.1
logvol / -fstype=ext4 -name=LogVolROOT -vgname=ROOTVG -size=3072
logvol swap -name=LogVolSWAP -vgname=ROOTVG -size=1024
logvol /usr -fstype=ext4 -name=LogVolUSR -vgname=ROOTVG -size=5120
logvol /var -fstype=ext4 -name=LogVolVAR -vgname=ROOTVG -size=1024
logvol /home -fstype=ext4 -name=LogVolHOME -vgname=ROOTVG -size=5120
logvol /tmp -fstype=ext4 -name=LogVolTMP -vgname=ROOTVG -size=1024
logvol /opt -fstype=ext4 -name=LogVolOPT -vgname=ROOTVG -size=1024
To set advanced partitioning for an appliance template:
1. Select the appliance you want to modify.
2. From the Stack page, click on Install Profile in the toolbox.
3. Select Partitioning, then Advanced Partitioning.
Information
In order to view the information more easily, you can click on the enlarge button in the top right. This opens a separate windowwhere you will see all the advanced partitioning.
4. Advanced partitioning works sequentially, from top to bottom. The three sections offered by the UI, which are Disks, LogicalGroups, and Logical Volumes should be filled in order, sequentially:
- disks with partitions including the total virtual disk size required
- logical group(s), assigning the associated physical extent (partition)
- specify the logical volume specification for the created logical group(s)
5. Click on the arrow in Disks next to sda. You will see the default disks.
- 43 -

6. Delete the default linux swap partition by clicking the x at the end of the line with linux-swap. You must not set the swap size to0.
7. Click on the size of the MSDOS partition to set it to 20000.
8. Click on the partition 1 information to modify the file system to ext4 and the mount point to /boot.
9. Click on the + sign to create a new partition with type lvm2 and size set to 18000 MB.
10. Unselect Grow and set the size of the /boot disk to 500.
11. In the Logical Groups section, click on the + sign and set the name of the logical group. For this example: ROOTVG.
Information
Image generation will fail when migrating if the volume group name set in the Partitioning Table is the same as the name of LVMvolume group in UForge server.
12. Next to the newly created volume group, click on the + sign to create a new volume extent. A pop-up window will appear proposinga sda/2 physical extent with size automatically set to 18000 MB. Click ok.
13. Create the logical volumes one by one, or create them all at once and then edit the respective specifications. For each logicalvolume to create, click on the + sign in the Logical Volumes section. For our example, you will need seven logical volumes.
- LogVolROOT ext4 / 3072
- 44 -

- LogVolSWAP linux-swap 1024
- LogVolUSR ext4 /usr 5120
- LogVolVAR ext4 /var 1024
- LogVolHOME ext4 /home 5120
- LogVolTMP ext4 /tmp 1024
- LogVolOPT ext4 /opt 1024
14. Click Save.
4.18.2 Advanced Partitioning for WindowsYou can set an advanced partitioning table for a Windows-based appliance template. To set advanced partitioning:
1. Click on Partitioning and select Advanced Partitioning
2. Click on the green + sign at the top.
3. You can modify the name and partitions type
4. Select the filesystem to ntfs and mount point, for example: D:.
5. Enter the size. The install disk should be at least 14 Gb for core versions and 20Gb for full versions
6. Check the box in the Grow column if you want the partition to be growable.
7. Click save.
Information
If you plan to publish a Windows instance onto K5 Fujitsu Public Cloud, only a single disk can be defined in Advanced partitioning page.
4.19 Managing ConfigurationWhen you create your appliance, you can include boot scripts to configure the appliance after provisioning or to configure the appliance tocommunicate with a DevOps platform for further communication steps.
4.19.1 Adding a Boot ScriptYou can add boot scripts that will be run either the first time the appliance is booted or every time the machine or virtual machine is started.The boot scripts will be run once all the software and appliance packages are installed, prior to launching the machine. The scripts are runin numeric then alphabetical order. The boot scripts will be executed as root.
Information
The firstboots are run before everyboot scripts. Bootscripts named 1_script will be run before a_script, which will be run before script_1,which is run before script_a.
- 45 -

Note
Only .bat files will be executed for Windows. If you want to upload a Powershell script then you should upload it to My Software and callthe execution of the Powershell script from a .bat configuration bootscript.
If you want to install software or packages as part of the installation, you can use My Software to upload overlay files (e.g. /etc/profile.d/xxx.sh). For more information, refer to 4.15.2 Adding Software from Your Software Library.
To add a boot script to your appliance:
1. Select the appliance you want to modify.
2. From the Stack page, click on Configuration in the toolbox.
3. Select Boot Scripts.
4. Click on new or upload button on the right hand side.
If you are creating a new boot script:
1. Enter the name.
2. Select the type: If you select first boot, then the boot script will be launched once the first time the instance is launched. If you selectevery boot, then the boot script will be launched every time the instance is rebooted.
3. Select the boot order.
4. Enter the contents of the boot script.
5. Click save.
- 46 -

If you are uploading an existing boot script:
1. Select the type: If you select first boot, then the boot script will be launched once on the first time the instance is launched. If you selectevery boot, then the boot script will be launched every time the instance is rebooted.
2. Select the boot order.
3. Click choose to locate your file and click open.
4. Click save.
4.20 Cloning an Appliance TemplateOnce you have created an appliance, you can clone it. This clones all the meta-data of the original appliance template.
Information
Your clone will not include any machine image information that was generated or published for the original.
You can clone an appliance template as follows:
1. Select the appliance you want to clone.
2. Click clone in the top right hand toolbar.
3. Enter the appliance name and version of the clone.
4. Click clone.
4.21 Importing and Exporting TemplatesYou can import and export appliance templates. When exporting, an archive is created of the appliance template. This archive includes ameta-data file describing the appliance template (based on the hammr specification) as well as any bundled software that was initiallyuploaded as part of the template creation.
- 47 -

Likewise, an archive can be imported to the UForge platform, creating a new appliance template in your Appliance Library under theImported Appliances section.
4.21.1 ExportingTo export an existing appliance:
1. Go to your Appliance Library.
2. Click on the export icon on the right hand side of the appliance template in question to export.
3. A pop-up will appear, allowing you to select the format you would like (yaml or json).
4. Click export. This will start the export process.
5. Once the export is complete, you will be prompted to download the archive file.
- 48 -

The equivalent export feature is available when editing an appliance template.
4.21.2 Importing
Note
You will only be able to import a Windows appliance to a UForge that has the same golden image as the one used by the appliance. If thegolden does not exist on the target UForge you must export the appliance without OS Profile or remove some OS section fields in templatefile. Refer to 4.21.3 Updating a Windows Appliance Before Import.
To import an archive:
1. Go to your Appliance Library.
2. Click on the import button at the top right hand side of the view.
3. A number of options are proposed. Select the method of import and click the folder icon to select the archive to import.
4. Click import. This will start the import process. The import progress will be shown.
- 49 -

5. Once the import is complete, a new appliance template can be found in the Imported Appliances sub-section of your ApplianceLibrary.
4.21.3 Updating a Windows Appliance Before ImportWhen you import a Windows appliance, UForge checks if the golden image used to create the appliance exists on the UForge. If it does notexist, the import will fail. In order to import the template, you must export the appliance and remove the OS profile.
For example, in order to remove some OS section fields before importing your Windows appliance:
1. Go to your Appliance Library.
2. Click on the export icon on the right hand side of the appliance template to export.
3. Once the export is complete, you will be prompted to download the archive file.
4. Open the archive file. The OS section should look something like:
os:
name: "Windows"
version: "Server2012R2"
arch: "x86_64"
profile: "Win2K12R2 scan Scan #1"
windowsEdition: "standard"
windowsType: "full"
windowsLanguage: "English"
5. Update the OS section to remove the lines profile, windowsEdition, windowsType, windowsLanguage. For example:
os:
name: "Windows"
version: "Server2012R2"
arch: "x86_64"
6. Save the file.
7. Go to your Appliance Library.
8. Click on the import button at the top right hand side of the view.
9. A number of options are proposed. Select the method of import and click the folder icon to select the archive to import.
10. Click import. This will start the import process.
You can also remove the OS Profile from the UI by going to the Stack page of the appliance before exporting.
- 50 -

Chapter 5 Migrating Live WorkloadsUForge AppCenter offers the capability to migrate a live system. UForge Migration will "deep scan" a live system and report back the meta-data of every file and package that makes up the running workload. It also allows you to change or add individual components prior to thefinal migration.
The following sub-sections describe in detail the scan steps and the differences between black box and white box migration:
- 5.1 Migration Process Overview
- 5.2 Blackbox Migration Process
- 5.3 Whitebox Migration Process
- 5.4 Migration Process In Detail
- 5.5 Scanning the Source System
- 5.6 Viewing a Scan
- 5.7 Differences between Source and Target Instances
5.1 Migration Process OverviewTo migrate a live workload to a new target environment, you first copy the uforge-scan binary to the target environment and launch thebinary. This binary analyzes the live system and sends back a report. You can select two types of scan: scan or scan with overlay. A scanwill scan the target environment, but will only return the system packages and configuration known to UForge. A scan with overlay willinclude an overlay report which details all the extra files, packages or specific configuration.
Information
Scan with overlay is only supported for Linux-based machines.
From the scan, you can then generate a new machine image that is compatible for the target environment. Once a machine image has beengenerated, the machine image can then be registered to the cloud environment and used to provision an instance. This instance will containthe same packages and files as the original running environment. This is known as “black box” migration.
You can transform a scan to an appliance template. By doing this, you have the opportunity to change the packages, files or configurationinformation prior to generating and registering a machine image. This is known as “white box” migration.
The five main steps of migration are as follows:
1. The live system is "deep scanned", detecting all the files and configuration information.
2. The scan report and overlay is sent to UForge AppCenter.
3. A machine image is generated from the scan (black box migration). You can also import the scan prior to machine image generationto change the content (white box migration).
4. The machine image is uploaded and registered to the target environment.
5. The registered machine image (also known as a template in cloud terminology) can be used to provision one or more instances. Theseinstances have near identical content to the original live system.
- 51 -

5.2 Blackbox Migration ProcessThe goal of black box migration is to reproduce a near identical copy of the currently running workload. However, there will always be smalldifferences between the two workloads after migration is complete, notably some services are disabled or enabled depending on the targetmachine image being created (refer to 5.7.4 Service State). When scanning a system the following information is detected:
- all the files and packages on the system (including configuration information). If you have selected a scan without overlay, then extrafiles and specific configuration information will be detected but will not be included in the report.
- network settings including all NICs. Note that if the first card is static, it will be changed to DHCP.
- root and user password (encrypted)
- timezone
- keyboard settings
- kernel parameters
- users and groups
- SSH keys
- filesystem layout (partitioning)
- SELinux settings (for Linux only). When SELinux is detected on the migrated system, the /.autorelabel file is added to the file systemin order to relabel it on first boot.
Note
The following file types are not included in the scan overlay file:
- character device
- block device
- FIFO (named pipe)
- socket
When you generate a machine image from the scan, all the information included in the scan report is used in constructing the new machineimage (except extra files if you performed a scan without overlay). However, prior to the generation starting, you will be prompted toindicate if you want to change some basic settings of the filesystem, namely the overall disk size and the swap size. You cannot set the swapsize to 0. If you want to delete the swap partition, you must do this in Advanced Partitioning (refer to 4.18 Configuring AdvancedPartitioning).
- 52 -

Note
If the IP address of the live system being scanned has a static IP address, then this IP address is preserved, except when migrating a K5 image.For K5 migration, the settings will be changed so that DHCP is used. In all other cases, when the machine is migrated, the new instance hasthe same IP address as the original machine. In the case where the machine being scanned uses DHCP, then DHCP will be used for themigrated instance also. In this case the target environment must provide a DHCP service for an IP address to be assigned. If you wish tomigrate a workload that has a static IP address, and you wish to reset the IP address or use DHCP then you should use white box migration.
Note
Currently, UForge is not able to migrate the Yum repository GPG keys. This means that the user will have to accept the repository GPG keywhen the user installs or updates a package. The user will have to do this only once per repository.
Information
If you plan to migrate a Windows instance onto K5 Fujitsu Public Cloud, you must also do the following before scanning:
1. Uninstall VMWare Tools (if installed).
2. Disable NLA for RDP (Please refer to official Microsoft documentation Configure Network Level Authentication for RemoteDesktop Services Connections).
3. Uninstall CloudBase-Init (if installed).
For more detailed information, please refer to official Fujitsu K5 IaaS Documentation.
Information
Currently, publications to Microsoft Azure platform https://azure.microsoft.com/en-us/ require to install WALinuxAgent 2.0.18 (forCentOS) or waagent 2.0.16 (for Debian and Ubuntu) which are not compatible with NetworkManager (or network-manager) package.Therefore, if you plan to migrate, you must also do the following before scanning:
1. Uninstall NetworkManager (if installed).
2. Uninstall the Microsoft Azure agent, i.e. WALinuxAgent and waagent packages (if installed).
Note
Ubuntu 14.04 migration for Microstoft Azure target platform is not supported by UForge.
When you carry out black box migration (by generating a machine image directly from a scan), the following steps are carried out:
1. You are prompted to indicate if you want to change the overall disk size.
2. Choose the machine image format to generate. Further options are provided depending upon the format chosen.
3. UForge AppCenter generates the machine image:
- Dependency checking is SKIPPED. This is done intentionally so that UForge does not alter the package list manifest detectedduring the scan process.
- Create the disk ready for installation (using the disk size and partitioning by the user if they have requested a change)
- Install the native os packages from the scan report
- Apply the overlay file from the scan report, if you performed a scan with overlay
- Apply the low configuration information detected in the scan report (passwords, timezone, keyboard, etc)
- 53 -

- Apply any specific libraries or configuration depending on the machine image format chosen (e.g for AWS UForge adds therequired AWS libraries)
4. Register the new machine image to the target environment.
5. You can provision one or more instances from the machine image. Each instance being a near identical workload from the original.
5.3 Whitebox Migration ProcessThe goal of white box migration is to change the contents found during the scan of the live system prior to migration. To carry out a whitebox migration, the user must import the scan report as an appliance template. The import process basically transforms the meta-data of thescan report to an appliance template.
As part of this transformation process, the scan information is mapped to one or more of the appliance template layers as follows:
- Native packages that have been analyzed by the scan process and correctly found in one of UForge AppCenter package repositories areadded to the OS Profile.
- Native packages that have been analyzed by the scan process and NOT found in any of UForge AppCenter's package repositories areadded to a My Software component.
- All other files (including configuration files) that are not part of a native package are added to a My Software component if youperformed a scan with overlay.
- Partitioning table information is added to the Install Profile
- Root and user passwords are added to the Install Profile (encrypted)
- Timezone is added to the Install Profile
- Keyboard is added to the Install Profile
- Kernel parameters are added to the Install Profile
- Users and groups are added to the Install Profile
- SELinux settings are added to the Install Profile for CentOS, Red Hat and Scientific Linux only. Note the following:
- if SELinux is not activated on the scanned machine, it will still not be activated on a VM generated from this scan.
- if SELinux is activated, it will be activated with the same rules, and the file system will be relabeled on the first boot becauseof "/.autorelabel" file (and this file is deleted by SELinux once the relabel is done). Parameters from the /etc/selinux/config fileother than the SELinux mode are lost during the appliance import. If you want to modify some of these parameters you will needto add a MySoftware overlay with a /etc/selinux/config file after the scan. Refer to 4.15.2 Adding Software from Your SoftwareLibrary.
Note
All other information found in the scan is not used (reset) and the Install Profile default information is used. This includes:
- Networking information (IP address). Furthermore, appliance templates do not support multiple NICs, therefore only the first NIC istaken into consideration.
- SSH keys. You will need to manually add the ssh keys to the install profile.
Note
Currently, UForge is not able to migrate the Yum repository GPG keys. This means that the user will have to accept the repository GPG keywhen the user installs or updates a package. The user will have to do this only once per repository.
- 54 -

Once the scan report has been imported as an appliance template, you can update the content prior to generating a machine image.
The generation process is slightly different between black box and white box migration. UForge is not generating a machine image froma scan report, rather from an appliance template. You can add and remove packages at will from the OS Profile layer. Consequently packagedependencies are calculated using the list of packages in the OS Profile. Any missing packages from the OS Profile are added prior togenerating the machine image.
5.4 Migration Process In DetailThe entire migration process has 5 main steps. These are:
1. Scan the source machine.
2. Report the scan results to UForge AppCenter, where the platform analyzes the report. The scan differentiates between knownpackages and extra files.
3. The results are used to build an archive. The extra files are only included in the archive if the user is performing a scan with overlay.The archive is sent back to the platform.
4. The archive is uncompressed, and the information is stored in the database as a Scan.
5. The scan can be used to generate machine images (black box migration) or imported to create a new appliance template (white boxmigration). The generated machine image can then be published to the target environment and instances can be provisioned.
In order to migrate a system, it must meet the following conditions:
- The operating system must be in one of the supported formats (refer to 4.1 Supported Operating Systems).
Information
Your scan will take longer if not all minor versions of a distribution are install in your UForge AppCenter. For example, if you scan a CentOS6.8 machine, but your AppCenter has only been populated with packages up to CentOS 6.7, then the AppCenter will use the machine's yumrepo to download the missing packages. As a result, the scan will take longer before completing.
- The image formats must be in supported formats (refer to 4.2 Supported Machine Image Types)
- For Windows, the partition format must be NTFS
- For Windows, GPT is not supported. Scanned Windows machine has to have MBR.
5.4.1 Scanning the Source MachineOn the scan target, the uforge-scan binary is copied and launched as root to analyze the entire system. The scan carries out the followingphases:
1. uforge-scan tests the connection to UForge server with the information provided by the user in the command line.
- 55 -

2. uforge-scan checks the basic information of the machine (Operating System, architecture) and the installation parameters(partitioning, timezone, keyboard, etc.).
3. Analysis of the operating system native packages installed on the system. The uforge-scan binary checks which packages have beeninstalled, the state of the files in these packages etc. The scan process registers all the metadata (rights, user and groups, checksums).
4. Analysis of the files that are not part of any operating system native packages.
5.4.2 Analysis of ReportA report is created by the uforge-scan binary based on all the information discovered. This report is transferred via HTTPS to UForgeAppCenter.
Information
The extra files are only included in the archive if the user is performing a scan with overlay.
UForge AppCenter stores all the report information. This data is then processed to identify what information is missing by UForgeAppCenter to rebuild the source machine. The processing includes:
- which operating system native packages UForge AppCenter does not have in its repository or in an incremental scan.
- which files from operating system native packages have been modified compared to the official native packages in the UForgeAppCenter repositories.
- which files that are not part of any OS native packages and are not in any incremental scan of the same machine.
The results of this analysis are then sent via HTTPS back to the uforge-scan binary on the source machine. This is basically all theinformation that UForge AppCenter does not have already based on the initial report received.
5.4.3 Build the Overlay ArchiveThe uforge-scan binary retrieves the analysis results from UForge AppCenter. These results include a list of all the packages and filesUForge requires. The uforge-scan binary builds an overlay archive of all these packages, as well as the extra files if the user has performeda scan with overlay.
The overlay is all the things that are missing compared to a known state (a previous scan of a machine or the operating system nativepackages). This overlay is a standard tar archive. Once created, it is uploaded via HTTPS to the UForge AppCenter.
The overlay is not built on the scan target but it is stream uploaded (faster and does not need any space on the scan target machine).
At this stage in the process, the uforge-scan binary has finished its job and no further communication between the scanned machine andUForge AppCenter is required. For this reason, the uforge-scan binary exits.
Information
No temporary files related to overlay remain on the scan target.
5.4.4 Overlay ExtractionUForge AppCenter retrieves and extracts the overlay sent by the uforge-scan binary if the user has performed a scan with overlay. It thenrecreates all the necessary OS native packages that are not present in any of the package repositories known by UForge AppCenter.
The analysis and overlay processes are now finished. All the scan metadata remain in UForge AppCenter until the scan gets deleted.
You can now carry out a black box or a white box migration. For black box migration, you generate a new machine image from the scan.For white box migration, you must first import the scan as an appliance template.
5.4.5 Generate an Image (Black Box Migration)At this stage, the scan report is used to generate a new machine image. The generation tool:
- 56 -
1. Returns all the packages discovered on the scan target and installs them.
2. Takes the overlay and applies it on top of the built system (for scan with overlay).
3. Tunes the machine for the target environment. This is specific to the machine image format chosen. This includes injecting extralibraries and packages required by the target environment.
4. The networking information is treated differently depending on whether the IP address of the workload being migrated is using a staticIP address or DHCP.
- Static IP Addresses: The current information detected during the scan is kept. During the generation phase, this networkinginformation is also kept. Consequently, the new machine instance has the same static IP address set.
- Dynamic (DHCP) IP addresses: In this case, the networking information, is reset namely the IP address information is removedduring the generation process, and is setup as DHCP. When the new machine instance is provisioned, the instance sends a requestto the local cloud DHCP service to get a new IP address.
In the case of a migration from a para-virtualized platform to a non para-virtualized platform, UForge AppCenter injects everything that isneeded to make the machine work (the kernel and its tools). Based on the packages discovered on the scan target and on the underlyingoperating system, UForge AppCenter calculates the most accurate kernel version to inject for your machine.
Once the image is generated, it is possible to push it to a remote environment. The image is then ready to be launched in the new environmentand the migration is finished.
5.4.6 Import to an Appliance Template (Whitebox Migration)At this stage, the scan is used to create a new appliance template. This allows you to change and modify the contents of the machine thathas been scanned.
The process of importing:
1. Creates a template.
2. Creates an OS Profile and injects all the native packages.
3. Injects the overlay as a My Software component and is added to the appliance template (for scan with overlay).
4. Sets the scanned installation configuration information in the Install Profile.
It is then completely detached from the scan and you can do exactly the same things as with any other template.
If you generate an image from this template, it will go through the same steps as a standard template generation:
1. Checks all the dependencies.
2. Installs all the packages.
3. Installs all the my software components.
4. Tunes the machine for the target environment. This is specific to the machine image format chosen. This includes injecting extralibraries and packages required by the target environment.
Once the image is generated, it is possible to push it to a remote environment. The image is then ready to be launched in the new environmentand the migration is finished.
5.5 Scanning the Source SystemThe first step in migrating your system is running a scan of the target system. This identifies the meta-data of every file and package thatmakes up the running workload.
You must have root access on the target system in order to complete the scan, as you will need to copy and run a binary file on the targetsystem.
Note
UForge AppCenter does not support multi-kernels. When scanning a machine with more than one kernel, only the kernel running will bescanned and imported.
- 57 -

When you run a scan of a system, UForge AppCenter will differentiate between “known” data (OS packages and files that are already partof UForge AppCenter repository) and files that are “unknown”.
Note
Any pre-install or post-install scripts on the system you are about to scan should only use ascii character set. Otherwise UForge AppCenterwill return a scan error: DB Error – invalid characters.
Recommendations pre-scan:
- Custom packages on the live system to be scanned should not contain references to package dependencies as relative path. They shouldbe expressed as absolute paths.
- If custom packages are installed using --nodeps flag, the scan process will not detect these packages. When carrying out white boxmigration, UForge AppCenter will check for these dependencies. If they are custom packages that are not on the live system, thegeneration will fail. Therefore, it is recommended to provide a custom repository with all the necessary custom packages. Otherwise,they can be added after the scan to the appliance template in My software.
5.5.1 Scanning a Linux Machine
Note
When scanning a Linux machine, you have to check whether the licenses of OS and software which the source machine contains allow youto use them on the destination server which you are migrating to. For more detail, refer to 4.1.1 Notes on Licensing.
To carry out a scan, go to the Migration tab:
1. Click on scan in the top right.
2. Enter a name for the scan of the target system you want to migrate.
3. Select Linux from the drop-down menu.
4. Leave Include overlay selected if you want to run a scan with overlay. This will return all the packages, files and configurationinformation of the source machine.
Information
If you do not include the overlay, all files needed to rebuild packages are still transferred to UForge, including the packageconfiguration files. However, all "extra_files" are excluded from the scan.
5. If you want to exclude certain directories or files from the scan then click add and enter the directory path or full pathname of the file.
6. Click Next. Follow the instructions on the UForge AppCenter GUI.
- 58 -

7. Download binary locally by clicking Download.
8. Copy the binary on the target environment you want to migrate.
9. Open a terminal window and login to the target environment.
10. Run the scan command on the running target environment to start a scan of the system you want to migrate. Note the -o option in thescan command indicates that you will launch a scan with overlay. The binary identifies the packages, files and custom files on thesystem.
By default the scan data will be saved in /tmp. You can modify the directory where the data will be saved using the -t option in orderto ensure that there is enough space to save the scan data.
Use the -e option if you want to exclude certain files or directories from the scan.
You can also use API keys to run the command. In this case, in the command you copied, remove the password and enter the API keysusing -a option for the public key and -s option for the secret key. For example:
./uforge-scan.[bin/exe] -u <username> -a <public-key> -s <secret-key> -U http://ip:port/ufws -n
'Test_scan'
Information
The -n option to indicate the scan name is mandatory. If a scan with this name already exists, the scan will be grouped under this name.
11. A report is sent to UForge AppCenter which can be used for migration. To view the progress, go back to the Migration tab and clickok.
Information
The duration of the scan depends on:
- the power of the machine in the target environment,
- the complexity of the target environment OS (number of packages installed),
- the network bandwidth between the target environment and UForge.
Scans of typical simple target environments can last about 5 to 15 minutes. In the case of larger and more complex target environments,together with poorer bandwidth, one can experience durations of up to one hour.
12. To view the details of a scan, click on the scan and refer to 5.6 Viewing a Scan.
Information
Image generation will fail when migrating if the source server has the same LVM volume group name as the UForge server's one. It willfail also if the volume group name set in the Partitioning Table is the same as the name of LVM volume group in UForge server.
- 59 -
5.5.2 Scanning a Microsoft Windows Machine
Note
When scanning a Microsoft Windows machine, you must acquire Windows licenses in order to handle Windows OS in UForge and confirmusage conditions of cloud provider and virtualization software which you scan and migrate to.
Information
It is not possible to scan a Windows "Core" system for all versions: 2008R2, 2012, 2012R2 and 2016.
Note
If the target filesystem is NTFS, the scan is optimized by extracting only "used space" from target disks on the source system. Someapplications might hold their data on "free space," which is not used by the operating system. If the source system of the scan has suchapplications installed, these applications may not work correctly on a machine image generated from the scan. With the other filesystems,such as FAT, ReFS and so on, all the space including "free space" on target disks will be copied by the scan.
Information
If you plan to migrate a Windows instance onto K5 Fujitsu Public Cloud, you must also do the following before scanning:
1. Uninstall VMWare Tools (if installed).
2. Disable NLA for RDP (Please refer to official Microsoft documentation Configure Network Level Authentication for RemoteDesktop Services Connections).
3. Uninstall CloudBase-Init (if installed).
For more detailed information, please refer to official Fujitsu K5 IaaS Documentation.
To carry out a scan, go to the Migration tab:
1. Click on scan in the top right.
2. Enter a name for the scan of the target system you want to migrate.
3. Select Windows from the drop-down menu and click next.
4. Select if you want to use the graphical user interface or the command line. Follow the instructions on the pop-up to download the scanbinary.
- 60 -
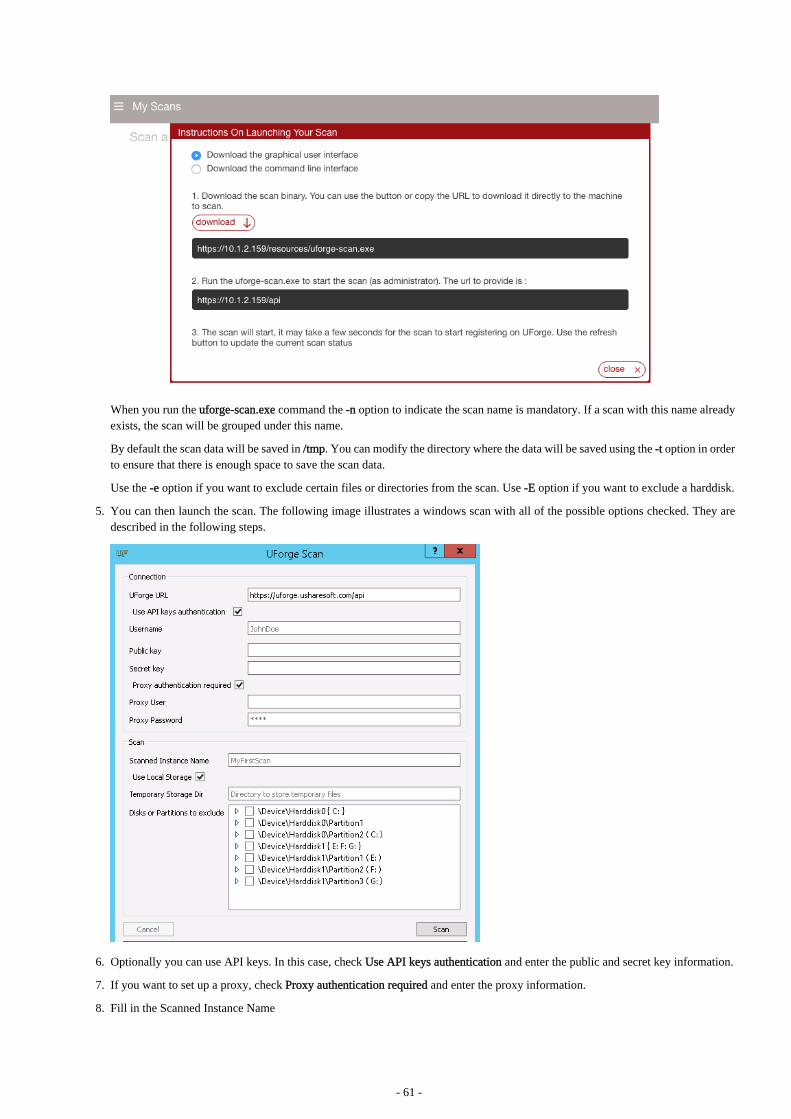
When you run the uforge-scan.exe command the -n option to indicate the scan name is mandatory. If a scan with this name alreadyexists, the scan will be grouped under this name.
By default the scan data will be saved in /tmp. You can modify the directory where the data will be saved using the -t option in orderto ensure that there is enough space to save the scan data.
Use the -e option if you want to exclude certain files or directories from the scan. Use -E option if you want to exclude a harddisk.
5. You can then launch the scan. The following image illustrates a windows scan with all of the possible options checked. They aredescribed in the following steps.
6. Optionally you can use API keys. In this case, check Use API keys authentication and enter the public and secret key information.
7. If you want to set up a proxy, check Proxy authentication required and enter the proxy information.
8. Fill in the Scanned Instance Name
- 61 -

Information
Scan name can be mix of alphanumeric characters, spaces and the following special characters ._- all other characters are notsupported at this time.
9. Optionally you can select Use local storage. This means that the scan will be not be done in streaming but in 2 phases. First the datawill be stored on a temporary storage drive during the scan process. This temporary storage can be a local directory or a virtual spaceon the network. It must be at least half the size of the machine you want to scan.
Information
If you are using local storage you will have to launch a script at the end to upload the archive to UForge AppCenter later.
10. If you want to exclude certain directories or files from the scan then click add and enter the directory path or full pathname of the file.
11. Click scan to launch the scan. A report is sent to UForge AppCenter which can be used for migration. To view the progress, go backto the Migration tab and click ok.
12. To view the details of a scan, click on the scan and refer to 5.6 Viewing a Scan.
5.6 Viewing a ScanOnce you have run a scan, you can view the scan details.
To view the scans, go to the Migration tab > My Scans. All the scans are listed by name. If you have run the same scan with the same name,it will appear as Scan <number>.
From this page you can:
- 5.6.1 Viewing the Details of Scan
- 5.6.2 Generate a Machine Image
- 5.6.3 Create an Appliance from a Scan
- 5.6.4 Comparing Scans
- 5.6.5 Synchronize Target Environment with Scanned Machine
5.6.1 Viewing the Details of ScanYou can view the details of the scan report that will display the packages that are present as well as the filesystem detected on the scannedsource instance. The information available depends on whether the scanned instance is Linux-based or Windows-based.
5.6.1.1 Linux-basedTo view the details of a scanned Linux-based instance:
1. Go to the Migration tab and click My Scans.
2. Click on the scan. All of the packages and non-native files will be listed.
- 62 -

3. You can also filter the packages that have been modified (UForge AppCenter compares the packages scanned with its repo) bychecking Only show the packages with changes.
4. To view the more details of a package, click on the package name and then the arrow.
Information
The number of packages between your scanned system and the one in UForge AppCenter will differ for several reasons. First, if youhad more than 1 kernel only 1 is imported into UForge AppCenter. Also, UForge AppCenter adds files for install configuration andinstall profile.
5.6.1.2 Windows-based
Information
The details of the scan are for information purposes only. They cannot be modified.
Following applications in your scanned system are shown in Applications tab.
- Applications displayed in Control Panel > Programs and Features page
- Windows Store applications
To view the details of a scanned Windows-based instance:
1. Go to the Migration tab and click My Scans.
2. Click on the scan.
3. To view the Windows applications, go to the Applications tab.
- 63 -
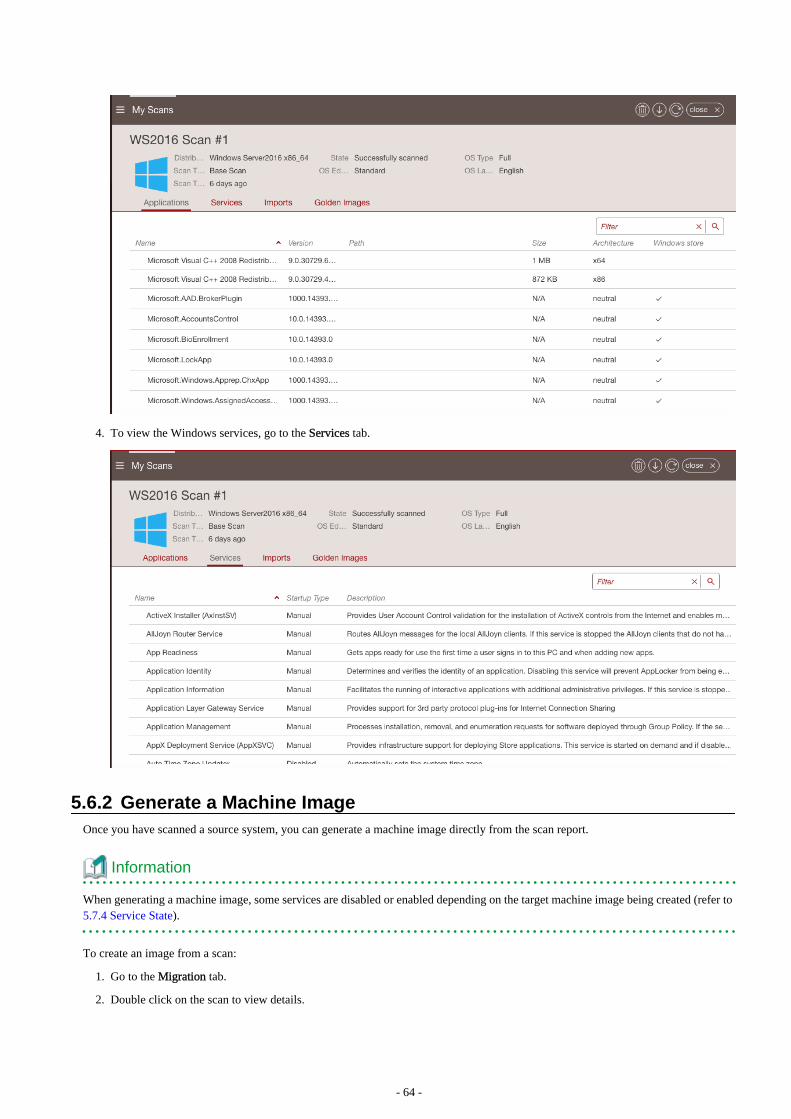
4. To view the Windows services, go to the Services tab.
5.6.2 Generate a Machine ImageOnce you have scanned a source system, you can generate a machine image directly from the scan report.
Information
When generating a machine image, some services are disabled or enabled depending on the target machine image being created (refer to 5.7.4 Service State).
To create an image from a scan:
1. Go to the Migration tab.
2. Double click on the scan to view details.
- 64 -

3. Click on the generate icon in the top right.
4. Select the image format you want.
5. Click Generate.
5.6.3 Create an Appliance from a ScanYou can create an appliance template from a scan. Once you create an appliance template packages and files that are known will be listedunder OS profile, while "unknown" packages and files will be listed under MySoftware.
To create an appliance template from a scan:
From the Migration tab:
1. Go to My Scans.
2. Select the import button (downward arrow) to create an appliance template from the scan. The following example is for Linux, butyou can also import a Windows scan.
Information
If you have administrator rights, for a Windows scan you can choose to import as appliance or import scan as a golden image. Formore information, refer to the Admin guide.
3. Enter the appliance name and version.
4. Click import.
You can now generate a machine image and share it, as you would any other appliance template.
Information
When you create a Windows appliance from scan, the applications and services will be visible under OS Profile on the Stack page.
- 65 -

More importantly you can now change the contents of the original scanned system. If you go to the Apps tab, the new appliance templatewill be listed in the Imported Appliances section. Double-click on it to view the details or modify it.
Note
Once you have created a Windows appliance using import from a scan, you will only be able to import this appliance to another UForgeplatform by removing some OS section fields. Refer to 4.21.3 Updating a Windows Appliance Before Import.
5.6.3.1 Changing a Configuration with "No-Console" FeaturesThis is typically the case when migrating to Azure. Azure does not have any console facility today during first boot of the instance. Whenyou migrate a workload in black box, no install type questions are asked on first boot. This is due to:
- root password is copied
- SSH keys are copied
- partitioning table is preserved
- keyboard is preserved
- timezone is preserved
Access to the machine would typically be done via SSH.
White box migration provides more flexibility. As soon as you import a scan, which effectively creates an appliance template, you will haveaccess to the Install Profile. This allows you to reset and change many of the "installation"/first boot parameters including prompting theend user to provide the information (for example: ask the end user to set the root password). Any prompt to the end user is normally displayedin the console. However if the user logs into the machine for the first time via SSH, these prompts are displayed in the SSH terminal andnot the console.
Note
If you decide to prompt the user for the root password, then an SSH key mechanism must already be determined (private key owned by theuser and public key set in the Install Profile). Otherwise the user will be locked out of the system with no way to SSH into the machine asno password has been set yet.
5.6.3.2 Changing Configuration InformationIf you want to modify configuration information of a scanned system, there are several solutions:
- 66 -

1. Using pre-install and post-install scripts
2. Using boot scripts
3. Integrate with a Configuration Management platform
In each case, you must import the scan as an appliance template (white box migration).
Solution #1: Using pre-install and post-install scripts in the package mechanism: RPM and DEB package mechanism allows you to registerscripts that are executed at various moments during the installation of the package. By packaging your middleware or application binariesas a native package you can register such scripts. These scripts are automatically taken into account as part of the machine image generationprocess. These packages can be added into the appliance template – either in a custom repository known by UForge AppCenter (in this casethe packages are displayed as part of the repository and are added in OS Profile) or as part of a Project or My Software component.
Solution #2: Using boot scripts. UForge AppCenter allows you to add boot scripts in the appliance template. These boot scripts are executedthe first time the migrated instance is provisioned. Boot scripts can also be registered to be run every time the instance is rebooted.
Solution #3: Integrate with a Configuration Management platform: There are many 3rd party platforms including Puppet, Chef, Ansible andSaltstack that can be used to configure middleware and application layers. Once a system has been migrated or a machine image generatedfrom an appliance template, such configuration management platforms can be used for package update and configuration. You may needto include a bootstrapping mechanism to register the instance to the configuration management platform of your choice. This bootstrappingcan be done using boot scripts (see solution #2).
5.6.3.3 Adding Security PatchesWhen a scan is imported as an appliance template all the native packages detected from the scan are compared with the UForge AppCenterpackage repositories. UForge AppCenter will immediately inform you whether new package versions are available for your scan report.Using the "appliance update" feature, a graph is displayed showing you all the available updates and allows the user to update the appliancetemplate to the latest available packages. Once the appliance template has been updated, the user can then generate the machine image andregister the machine image on the target environment. The migrated instance will have the latest package updates.
Of course this is not the only way to update a migrated system. The administrator can update the live system using the standard operatingsystem update mechanism. Depending on the operating system this will be yum, apt, yast etc. The administrator can run this updatemanually, or add a boot script in the appliance template that carries out the update during first boot.
This allows the administrator to decide to use other configuration management platforms (Puppet, Chef, Ansible, Saltstack, BMCBladelogic to name a few) to manage such updates. For some of these configuration platforms though, you will need to add a boot scriptas part of the appliance template to bootstrap the running instance with the configuration management platform.
5.6.3.4 Changing the OS Version of MiddlewareNative packages, middleware and application software can be changed or swapped out; and the user can use the appliance updatemechanism to determine if any package updates are available that can be applied prior to generating and migrating the workload.
Information
Changing the operating system for example from CentOS to Ubuntu is not supported.
For a list of supported OSes for Migration, see the table in 4.1 Supported Operating Systems.
Major OS versions, for example upgrading from CentOS 5.0 to CentOS 6.0 is not supported automatically, though as we have the completelist of operating system packages from the scan, a new appliance template can be constructed with the new operating system version.
This process can further be automated by using the command-line tool hammr (see hammr.io). This tool allows you to create identicalmachine images from a single configuration file (in JSON). The procedure would be to:
1. Scan the original system (note the scan process can be launched by hammr too)
2. Import the scan as an appliance template (this step can be done by hammr)
3. Export the appliance template using hammr. This will create an archive including a JSON or YAML file of all the meta-data.
4. Update manually the major version of the operating system in the JSON or YAML file.
- 67 -

5. Attempt to import using the new JSON or YAML file. A new appliance template will be created with the new major operating system.Note, you may need to iterate on this, if some packages listed in the JSON or YAML file are not found (due to potential packagerenaming).
6. Once the import is done, re-generate which would effectively migrate the system you scanned but with a major operating systemupgrade.
Qualification of any middleware and application software is strongly recommended.
5.6.3.5 Modifying the Scan Overlay
Information
This section only applies if you performed a scan with overlay.
When you import a scan as an appliance template, the overlay created as part of the scan process is registered as a My Software component.This My Software component is added to the appliance template.
The My Software component created from the overlay contains two archives. The first includes all the native package meta-data changes(permissions, ownership changes) and data changes (due to configuration modifications through the lifetime of the live machine). Thesecond archive includes all files that are not part of any native package.
To modify a file in this overlay, you need to download, extract, modify and re-upload it to MySoftware once the changes have been made.
5.6.4 Comparing ScansAs scans are just meta-data, you can compare two scans to determine their differences. This can be used to detect the differences betweentwo live machines (for example between staging and production) or to detect changes of the live machine over time.
Note
This is only supported for Linux based source instances.
From the Migration tab:
1. Click on the compare button (balance icon) at the top right hand side of the My Scans page.
2. Select the source and target scan.
Note
The source and target scan must be of the same type. For example, if the source scan is a scan with overlay, then it must be comparedto a scan with overlay. Similarly, a scan without overlay can only be compared to a scan without overlay.
3. Click compare.
UForge lists all the differences between the two systems. The results show the changes you would need to make manually to get your sourcescan to the state of the target scan.
- 68 -

For example, if you have source scan A and target scan B, in the list, any items that are listed mean they are in scan B but not in scan A. Itemsthat are in strikethrough mean that they were in your source scan A but not in scan B.
5.6.5 Synchronize Target Environment with Scanned MachineAt the end of the migration process, you can synchronize the running migrated instance with the source machine data.
Note
This feature is only available for scans without overlay for the following Operating Systems:
- CentOS 6, 7
- Red Hat Enterprise Linux 6, 7
- Debian 7, 8
From the scan detail view, you can get the instructions to synchronize your data by clicking the Synchronize button.
5.6.5.1 Download the uforge-sync ToolYou need the uforge-sync binary in the source machine, available at /resources/uforge-sync.bin, for example:
$ curl --insecure -O https://10.1.2.206/resources/uforge-sync.bin
5.6.5.2 Launch the uforge-sync ToolOnce the uforge-sync binary has been copied to the source machine, you can launch it:
$ chmod +x ./uforge-sync.bin ; ./uforge-sync.bin -U http://10.1.2.206 -u guest \
-n users/guest/scannedinstances/1/scans/1 -d 11.12.13.14 -i ~/.ssh/id_rsa
The following are mandatory parameters:
- -U: the UForge server URL
- -u: the UForge user
- -n: the scan URI
- -d: the migrated instance address
Information
The usage of an SSH key pair is strongly recommended to connect to the migrated instance. You must specify the private key path using the-i parameter, and have the public key in the migrated instance's ~/.ssh/authorized_keys file.
5.7 Differences between Source and Target InstancesThe goal of blackbox migration is to create an "identical" copy of the source system and run it on a new target environment. The wordidentical though is slightly misleading, as there are small differences that must be carried out to ensure the migrated sysem correctly bootsand runs on the target environment. This section highlights these differences.
- 69 -

5.7.1 IP Address and MAC AddressesWhen a live machine is scanned the networking is treated differently depending on whether the IP address is static or DHCP.
- Static IP Addresses: We keep the current information detected during the scan. During the generation phase, this networkinginformation is also kept. Consequently, the new machine instance has the same static IP address set. If you require to change the staticIP address, then the current recommendation is to use white box migration. By importing the scan report into an appliance template, youwill have access to the Install Profile allowing you to change NIC settings prior to the generation process.
- Dynamic (DHCP) IP Addresses: In this case, the operating system resets the networking information at boot time. When the newmachine instance is provisioned, the instance will send a request to the local cloud DHCP service to get a new IP address.
Consequently networking configuration files including /etc/hosts may be different bwetween the source and target systems.
5.7.2 New Libraries AddedDepending on the source and target environments, some packages or libraries are added to ensure that the system boots correctly on thetarget environment:
- For all white box migrations (see 5.3 Whitebox Migration Process): UForge injects uforge-install-config and uforge-install-profilepackages. These packages provides features provided by templating to prompt users for some additional information during the initialbooting of the system (root password, keyboard, timezone etc based on the Install Profile settings) and the execution of any boot scriptssaved as part of the appliance template.
- Para-virtualized Source -> Full Virtualized Target (Linux): UForge injects the kernel package and its dependent libraries to boot thesystem.
- Source -> Azure (Linux): UForge injects the Windows Azure Linux agent walinuxagent
- Source -> Azure (Windows): UForge injects Windows VM Agent.msi
- Source -> OpenStack (Linux): UForge injects cloud-init package
5.7.3 System Clock /etc/adjtimeFor Linux systems, the /etc/adjtime might be different between source and target systems. The Hardware Clock is usually not very accurate.However, much of its inaccuracy is completely predictable - it gains or loses the same amount of time every day. This is called systematicdrift. The /etc/adjtime file keeps historical information on the clock's drift. Changing hardware environments may change the contents ofthis file when hardware clock is adjusted (in many cases the kernel will automatically adjust the hardware clock periodically).
5.7.4 Service StateWhen generating a machine image from a scan, certain services are disabled or enabled depending on the target machine image beingcreated. The following changes are common to all formats:
- libvirtd disabled
- sshd enabled
- rewrite grub configuration and initramfs/initrd
If present, NetworkManager is enabled, otherwise network is enabled. If the user requested a firewall , services iptables or ip6tables willbe enabled. Otherwise, iptables or ip6tables are always disabled.
Information
NetworkManager is the name used by some operating systems which is the equivalent to network-manager. The name network is used bysome operating systems which is the equivalent to networking.
EC2 AMI Image
- hal disabled
- haddaemon disabled
- 70 -

- network enabled
- ip6tables disabled
- iptables disabled
OpenStack Image
- hal disabled
- haddaemon disabled
- network enabled
- ip6tables disabled
- iptables disabled
Microsoft Azure Image
- network enabled
- 71 -

Chapter 6 Using WorkspacesUForge AppCenter allows users to create workspaces. Only users that have been given the right to create workspaces will be able to createand manage workspaces. If this is not the case, contact your UForge Administrator.
Under the Collaboration tab, users can create a number of workspaces, invite other users and share appliance templates with the membersof their workspace. A collaboration workspace allows you to restrict the users that can see and use your appliance templates by inviting themto join your workspace. Only users who accept the invitation will be able to view your appliances.
The following sub-sections go into detail on how to manage workspaces:
- 6.1 Creating a Workspace
- 6.2 The Activity Stream
- 6.3 Managing Workspace Members
- 6.4 Sharing an Appliance Template in a Workspace
- 6.5 Adding a Comment to a Shared Appliance Template
6.1 Creating a WorkspaceTo create a workspace:
1. Go to the Collaboration tab in the left-hand sidebar.
2. Click on create workspace in the top right hand corner.
3. Enter the workspace name.
4. Select the organization from the drop-down menu.
5. Click create workspace.
You can now invite users, share appliance templates, and post comments in the activity stream.
6.2 The Activity StreamEach workspace has an Activity Stream. This is a log of the current actions being carried out by the members of the workspace (for exampleadding a new appliance template).
Members can also add comments to the workspace for other members of the workspace to see. For example, to ask questions or shareinformation. Your comments will be posted in chronological order in the activity stream.
To add a comment in a workspace, do the following:
1. Go to the Collaboration tab.
2. If you have several workspaces, select the workspace you want from the drop-down menu at the top right.
3. Enter your comment in the square.
4. Click post.
You can also post comments on a specific appliance that is shared in the workspace. For more information, see 6.5 Adding a Comment toa Shared Appliance Template.
- 72 -

6.3 Managing Workspace Members
6.3.1 Inviting Members to Your WorkspaceOnce you have created a workspace, you can invite users to it. By inviting users, they will be able to view appliance templates you haveadded to the workspace, and depending upon their access rights share their appliance templates.
To invite users to your workspace:
1. Go to the Members page of the Collaboration tab.
2. Click on invite in the top right.
3. Enter the email addresses of the people you want to invite to your workspace. If the email you specify is not recognized by UForgeAppCenter, you will be prompted to invite them to join the platform.
4. You can modify the invitation message. This message will be included in the email inviting members to join your workspace.
5. Click invite.
6.3.2 Managing Member Access RightsOnce a user has joined your workspace, you (or another workspace administrator) can modify their status. By default, when users acceptyour invitation and join your workspace they will be collaborators.
Members of a workspace are either:
- Guest. A guest can read and post to the activity stream, and import appliances into their private appliance library.
- Collaborator. The collaborator has the same basic rights as the Guest, but can also share appliances.
- Administrator. This is generally the user who has created the workspace. There must be at least one administrator in a workspace, thoughthere can be more. The administrator can invite or delete members and is able to delete a workspace. The administrator has all the samebasic rights as the collaborator.
6.3.3 Deleting a MemberIf you are a workspace administrator, you can delete any member of the workspace simply by going to the Members page and clicking thesmall symbol to the right of the member's name and info.
6.4 Sharing an Appliance Template in a WorkspaceThe main purpose of the workspace is to share appliance templates with a group of users.
To share an appliance template:
1. Go to the Collaboration tab.
2. If you have several workspaces, select the workspace you want to add your appliance template to from the drop-down menu on thetop right.
3. Go to the Shared Templates page.
- 73 -

4. Click on share in the top right. This lists your private appliance templates.
5. Select an appliance template from your list and click next arrow.
6. Add a description.
7. Click share to push the appliance template to the workspace.
Once an appliance template has been shared, other users in the workspace can import it into their private appliance library. They can thenmodify, use and share the appliance as they wish.
Note
Any changes you make to your original appliance will NOT be propagated to the shared copy in the collaboration workspace. You will needto share the new version again for members of your workspace to see the changes. The older version will be overwritten.
6.5 Adding a Comment to a Shared Appliance TemplateTo add a comment to a specific appliance template in a workspace, do the following:
1. Go to the Collaboration tab.
2. If you have several workspaces, select the workspace you want from the drop-down menu on the top right.
3. Go to the Shared Templates page.
4. Select the appliance template you want to comment on.
5. Click on Comments.
6. Add your text.
7. Click post.
If you want to reply to a comment, enter your comment below the initial comment and click reply.
- 74 -

Chapter 7 Using the REST APIUForge API is a RESTful resource.
The UForge API follows the design principles of Representational State Transfer (REST). UForge platform provides a set of resources (theAPI), each of which is referenced with a global identifier (URI). In order to manipulate these resources, clients communicate via the standardHTTP(S) protocol and exchange representations of these resources in a specific format. The documentation notes which formats areavailable for each method. The API presently supports XML and JSON. To get the results in the format of your choice, the Accept-Typeheader attribute is used in the request.
To make the UForge API easier to use, UForge has a Java SDK and Python SDK. You can create the API for other languages.
Communication with UForge is done via HTTP(S). For security reasons it is recommended to use HTTPS, however you may submit HTTPrequests for debugging purposes.
- GET requests retrieve data
- POST requests create data
- PUT requests modify existing data
- DELETE request destroy existing data
API methods that require a particular HTTP method will return an error if you do not make your request with the correct one. All HTTPmethods return codified response codes.
For a complete list of all the REST interface, refer to the REST APIs Reference documentation.
7.1 Response & Error CodesThe UForge API returns typical HTTP status codes for every request received. HTTP status codes in the 200 range mean that the requestwas successful, while the 400 and 500 range indicates an error. The status codes in the 300 range are reserved for redirection.
Some of the error codes are returned by the web server container, while all the other response codes are returned by the UForge REST webservice. Errors returned by the UForge REST web service may include a more detailed error message indicating why the request failed.
7.1.1 Success CodesThe following codes indicate a successful connection. The response may also include a body section providing the requested information.This information is in a MIME format specified as acceptable in the request.
- 200 OK: Success. The request was fulfilled.
- 201 Created: Following a POST command, a new resource has been created. The new resource URI is included in the response.
- 204 No Response: Server has received the request but there is no information to send back. This is usually the case in a DELETEcommand, where a resource has been deleted
- 304 Not Modified: Used when a client does a Conditional GET Request. If the document has not been modified since the date and timespecified in If-Modified-Since field, the server responds with a 304 status code and does not send the document body to the client. The
- 75 -

purpose of this feature is to allow efficient updates of local cache information (including relevant meta-information) without requiringthe overhead of multiple HTTP requests (e.g. a HEAD followed by a GET) and minimizing the transmission of information alreadyknown by the requesting client (usually a caching proxy).
7.1.2 Error CodesThe 4xx codes are intended for cases where the client seems to have erred, and the 5xx codes for the cases where the server identifies thatthe server has erred. It is impossible to distinguish these cases in general, so the difference is only informational. The UForge platform willattempt to provide a detailed error message to help the client diagnose the problem.
- 400 Bad Request: The request has bad syntax or was inherently impossible to satisfy.
- 401 Unauthorized: The request did not provide an acceptable authorization parameter. The client should retry the request with a suitableAuthorization header.
- 403 Forbidden: The client does not have the privileges to access this resource. Authorization will not help.
- 404 Not found: The server did not find anything matching the resource provided in the request.
- 409 Conflict: Following a POST command, if the resource being created already exists.
- 415 Unsupported Media Type: The server refuses to service the request because the entity of the request is in a format not supportedby the requested resource for the requested method.
- 500 Internal Error: The server encountered an unexpected condition which prevented it from fulfilling the request.
- 502 Bad Gateway: UForge is down or being upgraded.
- 503 Service Unavailable: UForge is overloaded with requests. Try again later.
7.2 Sending a RequestThe UForge Platform Services are all RESTful services, where clients communicate via the standard HTTP(S) protocol. That means youcan easily construct request URLs that will work on the command line and in your code.
All UForge requests (with some exceptions) require authentication information as part of the request.
The UForge REST API uses a public and secret API key pair for authenticating each request. The public key is inserted as a query in therequest URI. The secret key is then used to encode the entire URI to create a signature using HMAC_SHA1. This signature is then addedto the end of the request URI.
Note that you can use Basic Authentication by adding an extra HTTP header Authorization:Basic username:password. However, this is lesssecure. We recommend this only be used on local area networks for instance.
All request URLs start with the hostname of where UForge is running, the port where UForge is listening for incoming requests, the servicename and version number. This is known as the BASE URL. Such request URLs resemble the following sample:
https://myuforge.example.com:443/api
Even though UForge accepts HTTP requests, it is highly recommended for security reasons that HTTPS requests be used. HTTP requestsshould only be used for debugging purposes. Sensitive information will be exposed using HTTP.
7.2.1 The Request HeadersUForge expects certain headers containing authentication information to be present as part of the URL request. UForge also accepts otherheader information, for example, to specify response content type and caching.
7.2.2 Request ExampleThe following is an example of a request sent to an UForge platform with hostname 10.0.0.20 using cURL to get the user myUser. Note thatthe response body (the user information) has been omitted here for clarity:
$ curl 'http://10.1.2.206/api/users/myUser?
apiKey=XX8Bs2prKPdFrKH_i4rsW7WR0f4FQ05IO7A8vuQUoNDino-7513mmEDecIAzpeMwWXZvnyZ6W0bJTKBwwc&signature=
3qD1oxLwOI321BJ1pDZ6Dzmqbac%3D' -H "Accept: application/xml" -v
- 76 -

* Trying 10.1.2.206...
* Connected to 10.1.2.206 (10.1.2.206) port 80 (#0)
> GET /api/users/guest HTTP/1.1
> Host: 10.1.2.206
> User-Agent: curl/7.42.1
> Accept: application/xml
< HTTP/1.1 200 OK
< Date: Mon, 29 May 2017 14:28:19 GMT
< Server: Apache
< Last-Modified: Mon, 29 May 2017 08:49:24 GMT
< ETag: "837201f6b809de2aeedca4814e7a85e5"
< Content-Language: en
< version: 3.7.4-SNAPSHOT
< Content-Type: application/json
< Set-Cookie: JSESSIONID=708921B1F0C2AFA55262119F5E321FAF; Path=/ufws/; HttpOnly;HttpOnly;Secure
< Connection: close
< Transfer-Encoding: chunked
The example illustrates the following:
- a GET request is sent (cURL by default uses GET) on the resource: /users/myUser
- an API key is used in this case for authorization
- the Accept header is being used to request that the response be sent in XML.
- the response header includes ETag and Last-Modified allowing cache validation and a conditional GET requests.
7.3 Response Body TypesThe API reponse types supported are XML or JSON. The Accept header is used in the request to determine which response type you wouldlike.
- For JSON, use: -H "Accept: application/json"
- For XML, use: -H "Accept: application/xml"
If no accept header is used, then XML is returned by default.
For example, to retrieve the user information in JSON, the following request is used:
$ curl "http://10.1.2.206/api/users/guest" -X GET -u "guest:guest_password" -H "Accept: application/
json"
.. note:: This example has used basic authentication (which is not advised). Furthermore, the
response body i.e. the user information has been omitted here for clarity.
7.4 Using the API KeysTo use the UForge AppCenter APIs, it is recommended to use a public and secret API key as part of the request. This allows UForgeAppCenter to correctly authenticate and authorize the request. API key pairs are managed on the My Accounts page under API Key. If youcannot see this tab, then you do not have the right to access UForge via the APIs. Contact your administrator for an initial API key pair.
The API keys are used inside and to sign each request URI to the UForge platform. The creation of a properly signed request URI is donein 5 steps:
1. Add the public API key to the end of the request URI with the query parameter apiKey.
2. Encrypt the request URI using HMAC_SHA1 with your secret API key to create a signature string.
3. Encode the signature string using Base64.
4. URL encode the signature string.
5. Add the signature to the end of the request URI created in step 1 with the query parameter signature.
- 77 -

7.5 Query ParametersCertain resources within the UForge AppCenter API allow query parameters (or query strings) as part of the request URI. This allows youto pass extra parameters during search requests or to restrict the response data.
To pass a query parameter in a URL, the question mark symbol (?) is used as a separator. For example:
http://server/uripath?query_string
The query string is composed of one or more field-value pairs, each separated by the equals symbol (=). The series of field pairs is separatedby the ampersand symbol (&). For example:
http://server/uripath?field1=value1&field2=value2&field3=value3
7.6 REST API ExamplesFor clarity, the following examples use basic authentication to communicate with UForge. As this is an insecure request, this is notrecommended for production use. All response information is also ommitted.
7.6.1 Retrieving a UserTo retrieve a user's profile information use the API resource:
GET /users/{uid}
- uid: is the login of the user
Example:
$ curl "http://10.1.2.206/api/users/guest" -X GET -H "Authorization: Basic guest:guest_password" -H
"Accept: application/xml" | tidy -xml -indent -quiet
References:
- 78 -

- API referenc: user_get
7.6.2 Adding a Cloud AccountA cloud account is used to register machine images that have been generated from an appliance template. To create a cloud account use theAPI resource:
POST /users/{uid}/accounts
- uid: is the login of the user
- credAccount: CredAccount object you wish to create in the request body
Example:
$ curl "http://10.1.2.206/api/users/guest/accounts" -X POST -H "Authorization: Basic
guest:guest_password" -H "Content-Type: application/xml" -H "Accept: application/xml" --data-binary
"@representation.xml" | tidy -xml -indent -quiet
The representation.xml content (the request body):
<ns0:credAccount
xmlns:ns0="http://www.usharesoft.com/uforge"
xmlns:xsi="http://www.w3.org/2001/XMLSchema-instance"
xsi:type="ns0:CredAccountOpenStack">
<name>OpenStack John</name>
<targetPlatform>
<name>OpenStack</name>
<type>openstack</type>
</targetPlatform>
<glanceUrl>http://ip:9292</glanceUrl>
<keystoneUrl>http://ip:5000</keystoneUrl>
<login>username</login>
<password>password</password>
<keystoneVersion>v3</keystoneVersion>
</ns0:credAccount>
References:
- API reference: cloudAccount_create
- CredAccount object
7.6.3 Get User Appliance TemplatesTo retrieve all the appliance templates for a particular user, use the following API resource:
GET /users/{uid}/appliances
- uid: is the login of the user
Example:
$ curl "http://10.1.2.206/api/users/guest/appliances" -X GET -H "Authorization: Basic
guest:guest_password" -H "Accept: application/xml" | tidy -xml -indent -quiet
References:
- API resource appliance_getAll
7.6.4 Create an Appliance TemplateAn Appliance Template contains the model of the software stack. The model includes all the operating system packages, middleware andapplication software for generating an image that can be provisioned on a virtual or cloud platform. To create an appliance template, youneed to decide which operating system to build the template from, as well as the name and version.
To create an Appliance Template, the following API resource is used:
- 79 -

POST /users/{uid}/appliances
- uid: is the login of the user
- appliance: Appliance template object you wish to create in the request body
Example:
$ curl "http://10.1.2.206/api/users/guest/appliances" -X POST -H "Authorization: Basic
guest:guest_password" -H "Content-Type: application/xml" -H "Accept: application/xml" --data-binary
"@representation.xml" | tidy -xml -indent -quiet
The representation.xml content (the request body):
<ns0:appliance
xmlns:ns0="http://www.usharesoft.com/uforge">
<name>My Appliance</name>
<version>1.0</version>
<description>Appliance created with UForge API</description>
<distributionUri>distributions/1</distributionUri>
<orgUri>orgs/1</orgUri>
</ns0:appliance>
References:
- API resource appliance_create
- Appliance object
7.6.5 Retrieve Available OS Profiles for an Operating SystemEach appliance template can contain an OS profile. This lists the operating system packages for the appliance template. To help users tocreate OS profiles for an appliance template, each Operating System registered in the UForge platform has one or more base OS profiles(also known as OS templates) the user can choose from to get started. To retrieve the list of available OS profiles (or templates) for aparticular operating system, use the following API resource:
GET /distributions/{id}/profiles
- id: is the id of the Operating System
Example:
$ curl "http://10.1.2.206/api/distributions/1/profiles" -X GET -H "Authorization: Basic
guest:guest_password" -H "Accept: application/xml" | tidy -xml -indent -quiet
References:
- API resource osTemplate_getAll
- OS Profile object
7.6.6 Add an OS Profile to an Appliance TemplateTo add an OS profile (template) to an Appliance Template, firstly list all the OS profiles for the opertaing system (see 7.6.5 RetrieveAvailable OS Profiles for an Operating System) and note down the name and URI of the profile you would like to add. Then use thefollowing API resource to add this OS profile:
POST /users/{uid}/appliances/{aid}/osprofile
- uid: is the login of the user
- aid: the id of the appliance template where to add the os profile
- OS Profile: OS profile to add to the appliance template (in the request body)
Example (Linux):
- 80 -

$ curl "http://10.1.2.206/api/appliances/1616/osprofile" -X POST -H "Authorization: Basic
guest:guest_password" -H "Content-Type: application/xml" -H "Accept: application/xml" --data-binary
"@distribprofile.xml" | tidy -xml -indent -quiet
The distribprofile.xml content (the request body):
<ns0:linuxProfile
xmlns:ns0="http://www.usharesoft.com/uforge">
<name>Minimal</name>
<standardProfileUri>distribution/1/profiles/4</standardProfileUri>
</ns0:linuxProfile>
Example (Windows):
$ curl "http://10.1.2.206/api/appliances/1616/osprofile" -X POST -H "Authorization: Basic
guest:guest_password" -H "Content-Type: application/xml" -H "Accept: application/xml" --data-binary
"@distribprofile.xml" | tidy -xml -indent -quiet
The distribprofile.xml content (the request body):
<ns0:windowsProfile
xmlns:ns0="http://www.usharesoft.com/uforge">
<name>Standard 2012 English with agent</name>
<standardProfileUri>distribution/9/profiles/27</standardProfileUri>
</ns0:windowsProfile>
References:
- API resource applianceOSProfile_create
- Appliance object
- Linux OS Profile object
- Windows OS Profile object
7.6.7 Searching for Operating System Packages (Linux Only)Registered Operating Systems in UForge have package repositories attached to them (Linux only). You can search for packages in theserepositories. These packages can then be added to an Appliance's OS profile. To search for packages, the following API resource is used:
GET /distributions/{id}/pkgs
- id: is the id of the Operating System
This would retrieve all the packages for this operating system. To carry out a search, a search criteria is used. This is based on FIQL, allowingyou to search for packages based on different attribute values (including names, dates etc).
Example (retrieving all packages with the name nginx):
$ curl "http://10.1.2.206/api/distributions/1/pkgs&query=(name=='*nginx*'" -X GET -H "Authorization:
Basic guest:guest_password" -H "Accept: application/xml" | tidy -xml -indent -quiet
Information
Wildcards can be used in FIQL queries.
References:
- API resource osPkg_getAll
- Package object
- 81 -

7.6.8 Adding a Package to an Appliance's OS Profile (Linux Only)Once an Appliance Template has an OS profile, you can add or remove operating system packages to it. To add one or more packages, youwill need the URI of the packages(s) you wish to add. You can search for packages for packages to retrieve this information.
Use the following API resource to add or remove these packages to the OS profile of an Appliance Template:
PUT /users/{uid}/appliances/{aid}/osprofile/{osid}/pkgs
- uid: is the login of the user
- aid: the id of the appliance template
- osid: the id of the os profile to which the packages should be added
Example:
$ curl "http://10.1.2.206/api/appliances/1616/osprofile/2040/pkgs" -X PUT -H "Authorization: Basic
guest:guest_password" -H "Accept: application/xml" --data-binary "@pkg.xml | tidy -xml -indent -quiet
The pkg.xml content (the request body):
<ns0:packages xmlns:ns0="http://www.usharesoft.com/uforge">
<addedPkgUris>
<uri>distributions/1/pkgs/631993</uri>
</addedPkgUris>
</ns0:packages>
Removing the same package, the pkg.xml content would be (the request body):
<ns0:packages xmlns:ns0="http://www.usharesoft.com/uforge">
<deletedPkgUris>
<uri>distributions/1/pkgs/631993</uri>
</deletedPkgUris>
</ns0:packages>
References:
- API resource applianceOSProfilePkg_updateAll
- Package object
7.6.9 Adding Custom Software to an Appliance TemplateSoftware components can also be added to an Appliance Template. This is done in four stages:
1. A software component container is created. This is registered into your software library.
2. Create a software artifact container. This is the meta-date container for an uploaded file
3. Upload the software files into this software artifact container.
4. Add the software component to an appliance template. Note, that this software component can be added to multiple appliancetemplates.
To create the software component container, use the following API resource:
POST /users/{uid}/mysoftware
- uid: is the login of the user
Example:
$ curl "http://10.1.2.206/api/users/guest" -X POST -H "Authorization: Basic guest:guest_password" -H
"Accept: application/xml" --data-binary "@software.xml | tidy -xml -indent -quiet
The software.xml content (the request body):
<ns0:mySoftware xmlns:ns0="http://www.usharesoft.com/uforge">
<name>Zabbix</name>
- 82 -

<version>3.0.1</version>
</ns0:mySoftware>
Once created, note down the artifactsUri of this software component. This is the URI we need to use to register one or more artifact objects.
Now we can create an artifact container. To do this use the uri of the software component. The resource API is:
POST /users/{uid}/mysoftware/{msid}/artifacts
- uid: is the login of the user
- msid: the id of the software compnent created
Example (uploading a RPM, but this can be any file type):
$ curl "http://10.1.2.206/api//users/guest/mysoftware/918/artifacts" -X POST -H "Authorization:
Basic guest:guest_password" -H "Accept: application/xml" --data-binary "@artifact.xml | tidy -xml -
indent -quiet
The artifact.xml content (the request body):
<ns0:softwareFile
xmlns:ns0="http://www.usharesoft.com/uforge">
<name>
zabbix-release-3.0-1.el6.noarch.rpm
</name>
<fullName>
zabbix-release-3.0-1.el6.noarch.rpm
</fullName>
<origName>
zabbix-release-3.0-1.el6.noarch.rpm
</origName>
<subSoftwareArtifacts/>
</ns0:softwareFile>
Now you can upload the binary. Note down the binaryUri of the newly created artifact object. This is the resource uri you use to upload thefile:
POST /users/{uid}/mysoftware/{msid}/artifacts/{said}/bin/{fileName}
- uid: is the login of the user
- msid: the id of the software compnent created
- said: the id of the software artifact
- fileName (optional): The filename to upload
Example (uploading a RPM, but this can be any file type):
$ curl "http://10.1.2.206/api/users/guest/mysoftware/918/artifacts/1078/bin/" -X POST -H
"Authorization: Basic guest:guest_password" -H "Accept: application/xml" --data-binary "/path/to/
file/zabbix-release-3.0-1.el6.noarch.rpm" | tidy -xml -indent -quiet
Finally you can now add this software component to an appliance template. The following resource API is used:
PUT /users/{uid}/appliances/{aid}
- uid: is the login of the user
- aid: the id of the appliance template
Example:
$ curl "http://10.1.2.206/api/users/guest/api/appliances/1616" -X PUT -H "Authorization: Basic
guest:guest_password" -H "Accept: application/xml" --data-binary "@appliancesoftware.xml" | tidy -xml
-indent -quiet
The appliancesoftware.xml content (the request body):
- 83 -

<ns0:appliance xmlns:ns0="http://www.usharesoft.com/uforge">
<name>My Appliance</name>
<version>1.0</version>
<distributionUri>distributions/1</distributionUri>
<orgUri>orgs/1</orgUri>
<uri>users/guest/api/appliances/1616</uri>
<mySoftwareList>
<mySoftware>
<name>Zabbix</name>
<version>3.0.1</version>
<uri>users/guest/mysoftware/918</uri>
</mySoftware>
</mySoftwareList>
</ns0:appliance>
References:
- Create software component resource mySoftware_create
- Create software artifact resource mySoftwareArtifact_add
- Upload a binary file mySoftwareArtifact_upload
- Add software component to an appliance template appliance_update
- Software Component object
- Software Artifact object
- Appliance object
7.6.10 Generate a Machine ImageMachine images can be generated from appliance templates by using the following API resource:
POST /users/{uid}/appliances/{aid}/images
- uid: is the login of the user
- aid: the id of the appliance template
Example (generating an OpenStack QCOW2 image):
$ curl "http://10.1.2.206/api/users/guest/api/appliances/1616/images" -X POST -H "Authorization:
Basic guest:guest_password" -H "Accept: application/xml" --data-binary "@generateimage.xml" | tidy -
xml -indent -quiet
The generateimage.xml content (the request body):
<ns0:image xmlns:ns0="http://www.usharesoft.com/uforge">
<compress>false</compress>
<targetFormat>
<name>OpenStack QCOW2</name>
</targetFormat>
<installProfile>
<memorySize>512</memorySize>
<diskSize>2048</diskSize>
</installProfile>
</ns0:image>
References:
- Generate a machine image machineImage_generate
- Machine Image object
- 84 -
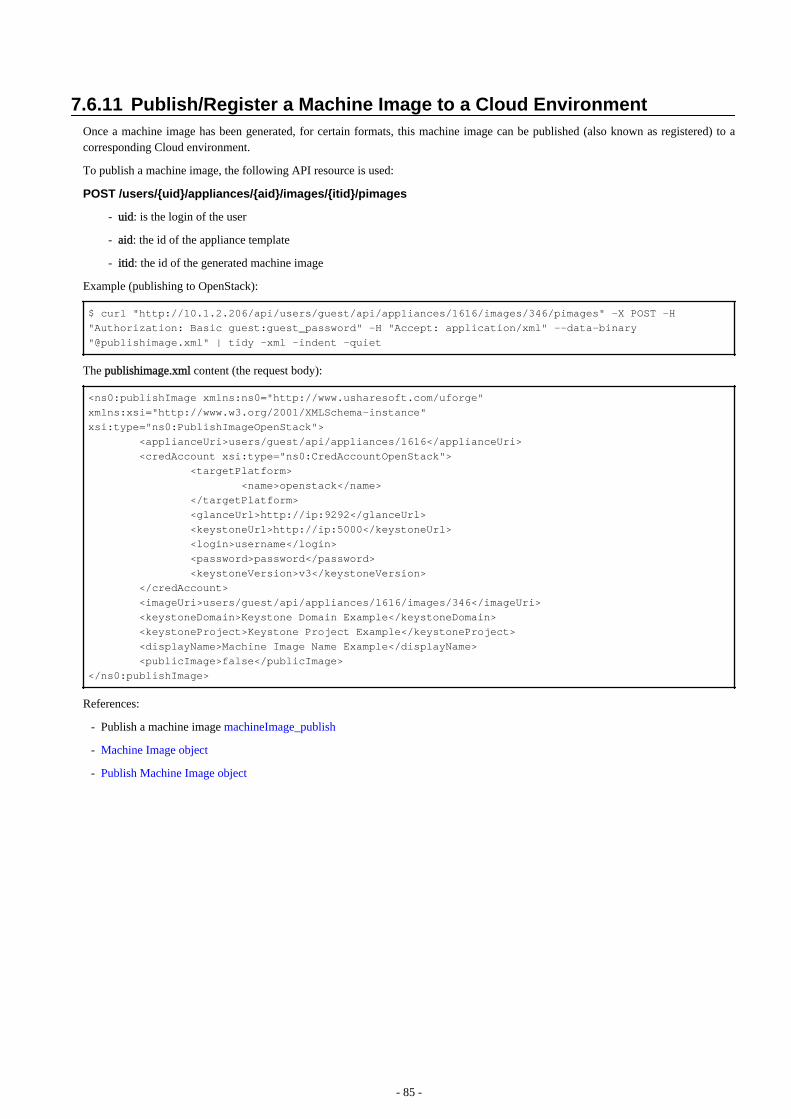
7.6.11 Publish/Register a Machine Image to a Cloud EnvironmentOnce a machine image has been generated, for certain formats, this machine image can be published (also known as registered) to acorresponding Cloud environment.
To publish a machine image, the following API resource is used:
POST /users/{uid}/appliances/{aid}/images/{itid}/pimages
- uid: is the login of the user
- aid: the id of the appliance template
- itid: the id of the generated machine image
Example (publishing to OpenStack):
$ curl "http://10.1.2.206/api/users/guest/api/appliances/1616/images/346/pimages" -X POST -H
"Authorization: Basic guest:guest_password" -H "Accept: application/xml" --data-binary
"@publishimage.xml" | tidy -xml -indent -quiet
The publishimage.xml content (the request body):
<ns0:publishImage xmlns:ns0="http://www.usharesoft.com/uforge"
xmlns:xsi="http://www.w3.org/2001/XMLSchema-instance"
xsi:type="ns0:PublishImageOpenStack">
<applianceUri>users/guest/api/appliances/1616</applianceUri>
<credAccount xsi:type="ns0:CredAccountOpenStack">
<targetPlatform>
<name>openstack</name>
</targetPlatform>
<glanceUrl>http://ip:9292</glanceUrl>
<keystoneUrl>http://ip:5000</keystoneUrl>
<login>username</login>
<password>password</password>
<keystoneVersion>v3</keystoneVersion>
</credAccount>
<imageUri>users/guest/api/appliances/1616/images/346</imageUri>
<keystoneDomain>Keystone Domain Example</keystoneDomain>
<keystoneProject>Keystone Project Example</keystoneProject>
<displayName>Machine Image Name Example</displayName>
<publicImage>false</publicImage>
</ns0:publishImage>
References:
- Publish a machine image machineImage_publish
- Machine Image object
- Publish Machine Image object
- 85 -

Chapter 8 Using the Java SDK
8.1 Download and Installing the SDKTo use the UForge AppCenter Java API, you need the jar files. You can either download the jar bundle and then add the dependency jar filesto your classpath, or use maven to handle all the dependencies by adding the following to your pom.xml file:
<dependency>
<groupId>com.usharesoft</groupId>
<artifactId>uforge-client</artifactId>
<version>3.6</version>
</dependency>
<repository>
<id>maven.usharesoft.com</id>
<name>UShareSoft Repository</name>
<url>http://maven.usharesoft.com/repository/official/</url>
<layout>default</layout>
</repository>
To use the API, you must have:
- The base URL of the UForge AppCenter platform you will be communicating with, for example:
https://factory.usharesoft.com:443
- An account on the UForge AppCenter platform you will be communicating with
- An API key pair (secret and public) for the account (or use Basic Authentication)
8.2 Communicating with UForgeThe UForgeConnector class provides all the lower level communication with UForge AppCenter by leveraging the Jersey client API. Thisclass creates HTTP packets with the correct header information and constructs the request URI to authenticate the request (using the secretand public keys). The response is parsed by JAXB to provide POJO Java classes of the response information.
Normally the first step is to get the user information of the account being used to authenticate. The response provides the URIs to theorganizations, appliances and software this user has access to. The code below shows how to recuperate the user information. Note, asUForge is completely RESTful, when the method login() is used, no session is created between the client and UForge. Each request willreuse the authentication information stored in this UForgeConnector instance.
import com.usharesoft.client.common.connector.UForgeConnector;
import com.usharesoft.client.common.objects.User;
import org.apache.log4j.Logger;
private static String UFORGE_BASE_URI = "https://factory.usharesoft.com:443";
private static String USER_NAME = "myUser";
public static String SECRET_API_KEY = "b9024Ox-
N5jvPqzYw8I1fYvFRuSQv9sFuNM30gNAwZ4RqY5nOt2zPdB8XyOS2hp3oKB09-XsYbNr_e4apR";
public static String PUBLIC_API_KEY =
"PHBowFEeRxX8D9KCDGNsNYErk2GvOqIepruLEIQzGKHZowfQtSgQNmIsBGRTvk6Y_4swVIV5BAPQRzwyZ1";
UForgeConnector connector = new UForgeConnector(UFORGE_BASE_URI, USER_NAME, PUBLIC_API_KEY,
SECRET_API_KEY);
User me = connector.login();
logger.info("Successfully connected to UForge. User: " + me.getLoginName());
- 86 -

8.3 Creating an Appliance TemplateAn Appliance Template contains the model of the software stack. The model includes all the operating system packages, middleware andapplication software for generating an image that can be provisioned on a virtual or cloud platform. To create an appliance template, youneed to decide which operating system to build the template from, as well as the name and version.
When creating an appliance or choosing an operating system, you must choose the organization where to create the appliance or to searchan operating system. The user must be a member of the organization to have authorization to search the organization resources. By defaulta user will be a member of at least one organization.
The following code provides an example of constructing an appliance template.
// require to have the organization information in the connector when getting distributions
// and creating appliances
// get the first organizaton of the user
URI orgUri = me.getOrgUris().getUris().iterator().next();
OrgDelegate orgDelegate = new OrgDelegate(connector);
Org org = orgDelegate.get(orgUri);
connector.setOrg(org);
// Use the connector holding the user authentication information to get
// the operating system to use for constructing the appliance template
DistributionDelegate distributionDelegate = new DistributionDelegate(connector);
Distribution distribution = distributionDelegate.get(Distribution.CENTOS_5_6_I386);
// Create the appliance
ApplianceDelegate applianceDelegate = new ApplianceDelegate(connector);
Appliance appliance = new Appliance(distribution, "WordPress", "3.2.1");
appliance = applianceDelegate.create(appliance);
8.4 Adding an OS ProfileAn Appliance Template must contain an operating system profile. This profile contains a subset of operating system packages required bythe middleware and application software to run correctly. Each operating system provided by UForge contains a set of standard operatingsystem profile templates to choose from. These contain commonly used package bundles for the operating system to run, providing the basicoperating system services.
The "Minimal" OS profile contains the minimum set of packages for the operating system to run properly and provide a minimum set ofnetworking services and administration tools.
The following code shows how to create a new OS profile from a standard OS profile template and add it to an Appliance Template.
// Get the minimum template from the distribution
DistribProfileTemplate osProfileTemplate = distributionDelegate.getProfile(distribution,
DistribProfile.MINIMAL);
// Create the os profile that will be added to the appliance from the template
DistribProfile osProfile = new DistribProfile(osProfileTemplate);
osProfile.setDistribProfileTemplate(osProfileTemplate);
// Create this os profile in the appliance
ApplianceOSProfileDelegate aospDelegate = new ApplianceOSProfileDelegate(connector);
osProfile = aospDelegate.create(this.appliance, osProfile);
Extra packages can be added to the appliance template's OS profile.
// Get the current list of packages in the os profile
PkgList pkgs = aospDelegate.getPkgs(osProfile);
// Add more packages
// php53
Pkg pkg = distributionDelegate.getPkg(distribution, "php53");
if (pkg == null) {
- 87 -
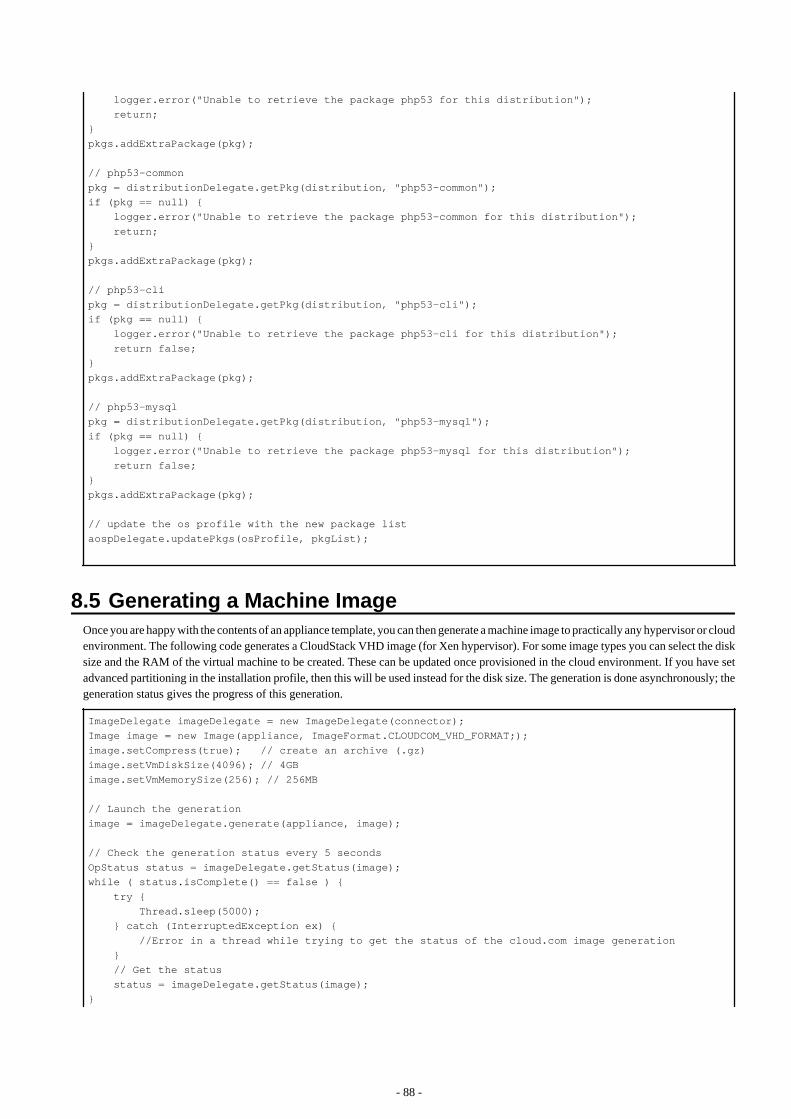
logger.error("Unable to retrieve the package php53 for this distribution");
return;
}
pkgs.addExtraPackage(pkg);
// php53-common
pkg = distributionDelegate.getPkg(distribution, "php53-common");
if (pkg == null) {
logger.error("Unable to retrieve the package php53-common for this distribution");
return;
}
pkgs.addExtraPackage(pkg);
// php53-cli
pkg = distributionDelegate.getPkg(distribution, "php53-cli");
if (pkg == null) {
logger.error("Unable to retrieve the package php53-cli for this distribution");
return false;
}
pkgs.addExtraPackage(pkg);
// php53-mysql
pkg = distributionDelegate.getPkg(distribution, "php53-mysql");
if (pkg == null) {
logger.error("Unable to retrieve the package php53-mysql for this distribution");
return false;
}
pkgs.addExtraPackage(pkg);
// update the os profile with the new package list
aospDelegate.updatePkgs(osProfile, pkgList);
8.5 Generating a Machine ImageOnce you are happy with the contents of an appliance template, you can then generate a machine image to practically any hypervisor or cloudenvironment. The following code generates a CloudStack VHD image (for Xen hypervisor). For some image types you can select the disksize and the RAM of the virtual machine to be created. These can be updated once provisioned in the cloud environment. If you have setadvanced partitioning in the installation profile, then this will be used instead for the disk size. The generation is done asynchronously; thegeneration status gives the progress of this generation.
ImageDelegate imageDelegate = new ImageDelegate(connector);
Image image = new Image(appliance, ImageFormat.CLOUDCOM_VHD_FORMAT;);
image.setCompress(true); // create an archive (.gz)
image.setVmDiskSize(4096); // 4GB
image.setVmMemorySize(256); // 256MB
// Launch the generation
image = imageDelegate.generate(appliance, image);
// Check the generation status every 5 seconds
OpStatus status = imageDelegate.getStatus(image);
while ( status.isComplete() == false ) {
try {
Thread.sleep(5000);
} catch (InterruptedException ex) {
//Error in a thread while trying to get the status of the cloud.com image generation
}
// Get the status
status = imageDelegate.getStatus(image);
}
- 88 -

// Generation complete!
8.6 Publishing an ImageUForge has connectors to many of the popular cloud platforms including Amazon, Microsoft Azure, Google Compute Engine, OpenStack,CloudStack, Eucalyptus and Flexiant to name a few. Once an image has been generated you can either download the image or publishdirectly to a cloud environment using your own cloud account credentials. Like generations, publishing images is asynchronous. You canget the progress of the publish from the publish status. The following code publishes a generated VHD image directly to the template libraryof a CloudStack environment.
// Create the credential information to communicate with the Cloud.com environment
CredAccount credAccount = new CredAccount();
credAccount.setType(InfraType.CLOUD_COM);
credAccount.setName("My Cloud.Com Account");
credAccount.setServerUrl(new URI("http://10.0.1.251:8080/client/api"));
credAccount.setPublicAPIKey("8pqqg0HV8ocpt6j8qYiCpDZ4cqzbtLaxCErIOpCD0r9VOjnILgahX85_J2CFvC8863en3NG
ZEFIlY82PKbAfWQ");
credAccount.setSecretAPIKey("9Q-
vVxokmMbI_l4t7aAfbocTgoLBlnt41Xy6iLZUfC6PzAdXNy2rRegAWhBMF3mQ9jk4MtPaCVULDu7ORxX2ZQ");
// Add the zone on where the image should be published
credAccount.setZoneName("zone1");
// Provide information on the image being uploaded to the Cloud.com template library
credAccount.setDisplayName("WordPress image");
credAccount.setDescription("WordPress image for the cloud.com platform");
credAccount.setPasswordEnabled(true);
credAccount.setFeaturedEnabled(false);
// Allow this image to be accessed to all cloud.com users
credAccount.setPublicImage(true);
// Publish the image
PublishDelegate publishDelegate = new PublishDelegate(connector);
PublishImage publishImage = new PublishImage();
publishImage.setCredAccount(credAccount);
publishImage.setImage(image);
publishImage = publishDelegate.publish(appliance, publishImage);
// Get the status of the publish
OpStatus status = publishDelegate.getStatus(publishImage);
while (status.isComplete() == false) {
try {
Thread.sleep(5000);
} catch (InterruptedException ex) {
// Error in a thread while trying to get the status of the iso image generation
}
// get the status
status = publishDelegate.getStatus(publishImage);
}
// Publish finished
// Can check for errors
if (status.isError()) {
// error occurred during the publish
}
- 89 -

8.7 Adding a Project from the Project CatalogEach UForge organization provides a Project Catalog where commonly used software components can be added to an appliance template.The Project Catalog must belong to the same organization as the appliance. The following code adds some projects to an appliance template.
ProjectDelegate projectDelegate = new ProjectDelegate(connector);
// Add Apache HTTP Server
Project project = projectDelegate.get(distribution, "Apache HTTP server", "2.2.3", null);
if (project == null) {
logger.error("Unable to retrieve project");
return;
}
appliance.addProject(project);
// Add MySQL
Project project = projectDelegate.get(distribution, "MySQL5 Server", "5.0.77", null);
if (project == null) {
logger.error("Unable to retrieve project");
return;
}
appliance.addProject(project);
// Save the updated appliance instance
applianceDelegate.update(appliance);
8.8 Uploading a Software ComponentYou can upload your own software components to a private software library (My Software Library). This software can then be added to anyof your appliance templates. This provides a mechanism to compliment the Project Catalog. The following code shows how to upload files,attach a license and then add it to an appliance template.
MySoftwareDelegate mySoftwareDelegate = new MySoftwareDelegate(connector);
File wpf = new File("wordpress-3.2.1.zip");
File lf = new File("wp-license.html");
// Create a My Software component and upload the wordpress zip file
MySoftware mySoftware = mySoftwareDelegate.upload("WordPress", "3.2.1", wpf);
// Attach a license
mySoftware = mySoftwareDelegate.uploadLicense(mySoftware, lf);
// Add the software component to the appliance
appliance.addMySoftware(mySoftware);
// Save the changes to the appliance
applianceDelegate.update(appliance);
8.9 Adding a Boot ScriptBoot scripts can be added to the appliance template allowing initial configuration to be executed either during the first time the image isstarted or during every boot of the image.
The following code shows how to upload a boot script to an appliance.
ApplianceConfigDelegate configDelegate = new ApplianceConfigDelegate(connector);
// upload a boot script to the appliance
File bsf = new File("myscript.sh");
BootScript bootscript = new BootScript();
// only execute this boot script once during first boot
- 90 -

bootscript.setBootType(BootScript.FIRST_BOOT);
bootscript = configDelegate.uploadBootScript(appliance, bootscript, bsf);
- 91 -

Chapter 9 Using the Python SDK
9.1 Download and Installing the SDKThe Python API is supported on all major operating systems: Linux, Mac-OS, and Windows. The easiest way to install the API is usingpip, the widely used package management system for installing and managing software packages written in Python.
Information
This API is used by the open source Hammr project. You can find more examples on how to use the API in the source code of this project.
9.1.1 Installing pipIf you already have pip installed on your system, you can skip this section.
To install or upgrade pip, download this file:
https://raw.githubusercontent.com/pypa/pip/master/contrib/get-pip.py
Then run the command:
$ python get-pip.py
For more information on installing pip, refer to the official pip documentation: http://www.pip-installer.org/en/latest/installing.html
9.1.2 Installing UForge Python APIOnce pip has been installed, you can now install the UForge Python API packages. You may have to run this command as sudo oradministrator.
See below the instructions for installing the Python API for your target platform:
- 9.1.2.1 For Linux
- 9.1.2.2 For Mac OS
- 9.1.2.3 For Microsoft Windows
9.1.2.1 For LinuxFirst, you need to install extra packages on your system, and then install the SDK package.
9.1.2.1.1 Debian
$ apt-get install python-dev gcc
$ pip install uforge-python-sdk
9.1.2.1.2 Red Hat and CentOS
$ yum install gcc python-devel
$ pip install uforge-python-sdk
9.1.2.1.3 Upgrading the SDK
To upgrade an already installed SDK, run:
$ pip install --upgrade uforge-python-sdk
- 92 -

9.1.2.2 For Mac OSAs a pre-requisite, you need to have XCode installed.
To install the SDK run:
$ export ARCHFLAGS="-Wno-error=unused-command-line-argument-hard-error-in-future"
$ pip install uforge-python-sdk
9.1.2.2.1 Upgrading the SDK
To upgrade an already installed SDK, run:
$ pip install --upgrade uforge-python-sdk
9.1.2.3 For Microsoft WindowsRun the following command:
c:\Python27> .\Scripts\easy_install.exe uforge-python-sdk
9.1.2.3.1 Upgrading the SDK
To upgrade an already installed SDK, run:
c:\Python27> .\Scripts\easy_install.exe --upgrade uforge-python-sdk
9.2 Communicating with UForgeThe Python API provides all the lower level communication with UForge AppCenter by creating HTTP request packets with the headerinformation to authenticate correctly.
Normally the first step is to get the user information of the account being used to authenticate. The response provides the URIs to theorganizations, appliances and software this user has access to. The code below shows how to recuperate the user information. Note, asUForge is completely RESTful, when the method login() is used, no session is created between the client and UForge. Each request willreuse the authentication information stored in this api instance.
# Import the Uforge python API
from uforge.application import Api
login='root'
passwd='uforgedemo'
# Create the API object
api = Api(url = 'https://mylittleuforge.usharesoft.com/api',
username = login, password = passwd,
disable_ssl_certificate_validation = True)
# Send a request (getting the user object)
user = api.Users(login).Get()
if user is not None:
print user.loginName + ' - ' + user.email
Information
All UForge Python objects are in the file objects.py, contained in the Python SDK. You can find all attribute names for each object type.
- 93 -

9.3 Creating an Appliance TemplateAn Appliance Template contains the model of the software stack. The model includes all the operating system packages, middleware andapplication software for generating an image that can be provisioned on a virtual or cloud platform. To create an appliance template, youneed to decide which operating system to construct the template from, as well as the name and version.
When creating an appliance or choosing an operating system, you must choose the organization where to create the appliance or to searchan operating system. The user must be a member of the organization to search the organization resources.
The following code provides an example for constructing an appliance template. You will then need to add add an OS profile to the template.Refer to 9.3.1 Adding an OS Profile to the Appliance.
# Import the Uforge python API
from uforge.application import Api
from uforge.objects.uforge import *
login='root'
passwd='uforgedemo'
# Create the API object
api = Api(url = 'https://mylittleuforge.usharesoft.com/api',
username = login, password = passwd,
disable_ssl_certificate_validation = True)
# all Orgs
newOrg = api.Users(login).Orgs().Getall()
#for i in newOrg.orgs.org:
# print i.uri + " - " + i.name
# all Distributions
newDistribution = api.Users(login).Distros.Getall()
#for i in newDistribution.distributions.distribution:
# print i.uri + " - " + i.name + " " + i.version + " " + i.arch
newAppliance = appliance()
newAppliance.name = "app1testpythonsdk"
newAppliance.version = "2.3"
# Let's use first organization
newAppliance.orgUri = newOrg.orgs.org[0].uri
# Let's use first distribution
newAppliance.distributionUri = newDistribution.distributions.distribution[0].uri
# create appliance
try:
createdAppliance = api.Users(login).Appliances.Create(newAppliance)
except Exception as e:
print str(e.args[0].statusCode)+" "+e.args[0].localizedErrorMsg.message
sys.exit(1)
print "Created appliance: " + createdAppliance.uri
9.3.1 Adding an OS Profile to the ApplianceAn Appliance Template must contain an operating system profile. This profile contains a subset of operating system packages required bythe middleware an application software to run correctly. Each operating system provided by UForge contains a set of standard operatingsystem profile templates to choose from. These contain commonly used package bundles for the operating system to run, providing the basicoperating system services.
The "Minimal" OS profile contains the minimum set of packages for the operating system to run properly and provide a minimum set ofnetworking services and administration tools.
The following code shows how to create a new OS profile from a standard OS profile template and add it to an Appliance Template. TheAppliance template must already be created, as described in 9.3 Creating an Appliance Template.
- 94 -

# List available osprofiles for this distribution to apply on appliance
newProfile = api.Distributions(newDistribution.distributions.distribution[0].dbId).Profiles.Getall()
newProfile = newProfile.distribProfileTemplates.distribProfileTemplate
#for profile in newProfile:
# print profile.name
print "Will set profile: " + newProfile[0].name + " - " + newProfile[0].uri
newApplianceOSProfile = distribProfile()
newApplianceOSProfile.standardProfileUri = newProfile[0].uri
# apply os profile
try:
api.Users(login).Appliances(createdAppliance.dbId).Osprofile().Create(newApplianceOSProfile)
except Exception as e:
print str(e.args[0].statusCode)+" "+e.args[0].localizedErrorMsg.message
sys.exit(1)
print "Profile applied."
9.3.2 Generating a Machine ImageOnce you are happy with the contents of an appliance template, you can then generate a machine image to practically any hypervisor or cloudenvironment. The following code generates a CloudStack VHD image (for Xen hypervisor). For some image types you can select the disksize and the RAM of the virtual machine to be created. These can be updated once provisioned in the cloud environment. If you have setadvanced partitioning in the installation profile, then this will be used instead for the disk size. The generation is done asynchronously.
# all target formats, search for VirtualBox
newTargetFormat = api.Users(login).Targetformats.Getall()
for i in newTargetFormat.targetFormats.targetFormat:
# print i.uri + " - " + i.name
if i.name == "VirtualBox":
print "VirtualBox target format found for user " + login + "."
break
if i.name != "VirtualBox":
print "VirtualBox target format not found for user " + login + ", will not generate."
sys.exit(1)
newImage = image()
newImage.compress = "true"
newTargetFormat = targetFormat()
newTargetFormat.name = "VirtualBox"
newImage.targetFormat = newTargetFormat
newInstallProfile = installProfile()
newInstallProfile.memorySize = 512
newImage.installProfile = newInstallProfile
# generate target Virtualbox
try:
api.Users(login).Appliances(createdAppliance.dbId).Images().Generate(newImage)
except Exception as e:
print str(e.args[0].statusCode)+" "+e.args[0].localizedErrorMsg.message
sys.exit(1)
print "Launched generation of appliance for VirtualBox target format."
9.4 Creating My SoftwareIn addition to projects and OSes, you can add your own personal software to an appliance. In order to do this, you must create a My Softwarecontainer, add the packages (refer to 9.4.1 Adding a Package to My Software), and (optionally) add a license (refer to 9.4.2 Uploading aLicense to My Software). Once you have created the My Software, you can then add it to an appliance.
- 95 -

# Import the Uforge python API
from uforge.application import Api
from uforge.objects.uforge import *
import os
login='root'
passwd='uforgedemo'
# Create the API object
api = Api(url = 'https://mylittleuforge.usharesoft.com/api',
username = login, password = passwd,
disable_ssl_certificate_validation = True)
newMySoftware = mySoftware()
newMySoftware.name = "newmstest"
newMySoftware.version = "5.6"
newMySoftware.description = "This is the description."
try:
createdMySoftware = api.Users(login).Mysoftware().Create(newMySoftware)
except Exception as e:
print str(e.args[0].statusCode)+" "+e.args[0].localizedErrorMsg.message
sys.exit(1)
print "Created mysoftware: " + createdMySoftware.uri
9.4.1 Adding a Package to My SoftwareOnce you have created the My Software container, you can add packages (files) using the following code. For a list of supported file formats,refer to the list provided in 4.15.2 Adding Software from Your Software Library.
myNewPackage = package()
myNewPackage.origName = "/etc/redhat-release"
try:
myNewPackage.size = os.stat(myNewPackage.origName).st_size
except Exception as e:
print "Problem reading file " + myNewPackage.origName + ". Will not be added to mysoftware."
sys.exit(1)
# add package file to mysoftware
try:
api.Users(login).Mysoftware(createdMySoftware.dbId).Pkgs().Add(myNewPackage)
except Exception as e:
print str(e.args[0].statusCode)+" "+e.args[0].localizedErrorMsg.message
sys.exit(1)
print "Added package file " + myNewPackage.origName + " to mysoftware."
9.4.2 Uploading a License to My SoftwareIf you want to add a license file to your software (optional), add the following code.
try:
myLicenseFile = open("/etc/redhat-release")
except Exception as e:
print "Problem reading file " + myLicenseFile.name + ". Will not add license to mysoftware."
sys.exit(1)
# add license file to mysoftware
try:
- 96 -

api.Users(login).Mysoftware(createdMySoftware.dbId).Licenses(createdMySoftware.license.dbId).Uploadf
ile(myLicenseFile)
except Exception as e:
print str(e.args[0].statusCode)+" "+e.args[0].localizedErrorMsg.message
myLicenseFile.close()
sys.exit(1)
print "Added license file " + myLicenseFile.name + " to mysoftware."
myLicenseFile.close()
9.4.3 Listing All My SoftwareYou can list all your private software for your account as follows:
print "Listing all mysoftware:"
# all MySoftware
newMySoftware = api.Users(login).Mysoftware().Getall()
for i in newMySoftware.mySoftwareList.mySoftware:
print " ID " + str(i.dbId) + " " + i.name + " v" + i.version + " " + ("", "IMPORTED")
[i.imported == True]
9.5 Creating a Project for a Specific OSYou can also add third-party software to an appliance using projects. The catalog of projects is public to all users on UForge and ismaintained by the privileged users and administrators.
# Import the Uforge python API
from uforge.application import Api
from uforge.objects.uforge import *
login='root'
passwd='uforgedemo'
# Create the API object
api = Api(url = 'https://mylittleuforge.usharesoft.com/api',
username = login, password = passwd,
disable_ssl_certificate_validation = True)
# all Distributions
newDistribution = api.Users(login).Distros.Getall()
#for i in newDistribution.distributions.distribution:
# print i.uri + " - " + i.name + " " + i.version + " " + i.arch
# all Organisations
newOrg = api.Users(login).Orgs().Getall()
# create a project for 1st distribution and 1st organisation
newMyProject = project()
newMyProject.name = "testnewproject"
newMyProject.version = "1.9"
newMyProject.release = "14"
newMyProject.category = "Blogging"
newMyProject.shortTag = "INTERNAL"
newMyProject.description = "test new project description"
newMyProject.company = company()
newMyProject.company.name = "UShareSoft"
newMyProject.license = license()
newMyProject.license.type = "Custom"
newMyProject.distributionUri = newDistribution.distributions.distribution[0].uri
try:
- 97 -

createdproject = api.Orgs(newOrg.orgs.org[0].dbId).Projects.Create(newMyProject)
except Exception as e:
print str(e.args[0].statusCode)+" "+e.args[0].localizedErrorMsg.message
sys.exit(1)
print "Created project: " + createdproject.uri
9.5.1 Listing all Projects for a Specific OS# listing all projects for same distribution
print "Listing projects for distribution " + newDistribution.distributions.distribution[0].name + " "
+ \
newDistribution.distributions.distribution[0].version + " " + \
newDistribution.distributions.distribution[0].arch + ":"
print "-v--------------------------------------------------------"
newProjects =
api.Distributions(newDistribution.distributions.distribution[0].dbId).Projects.Getall()
for i in newProjects.projects.project:
print " +-- " + i.uri + " - " + "\033[1m\033[93m" + i.name + " v" + i.version + " r" + \
str(i.release) + "\033[0m" + "\t(tag: " + i.shortTag + ") (size: +" + str(i.size/
1024/1024) + "MB)"
print (" |"," ")[i == newProjects.projects.project[-1]] + " path: " +
i.defaultInstallLocation
print (" |"," ")[i == newProjects.projects.project[-1]] + " category: " + i.category + \
" maintainer: " + i.company.name
if i.description:
print (" |"," ")[i == newProjects.projects.project[-1]] + " description: " +
i.description
9.5.2 Listing Target Formats and Target Platforms# Import the Uforge python API
from uforge.application import Api
from uforge.objects.uforge import *
login='root'
passwd='uforgedemo'
# Create the API object
api = Api(url = 'https://mylittleuforge.usharesoft.com/api',
username = login, password = passwd,
disable_ssl_certificate_validation = True)
# all Organisations
newOrg = api.Users(login).Orgs().Getall()
targetformatswithtargetplatform = []
# all target platforms & target formats
allTargetPlatforms = api.Orgs(newOrg.orgs.org[0].dbId).Targetplatforms().Getall()
for i in allTargetPlatforms.targetPlatforms.targetPlatform:
print i.uri + " \033[1m\033[93m" + i.name + ":\033[0m" + \
" (type " + i.type + ") (" + \
("not active, ","active, ")[i.active] + \
("no access)","access)")[i.access]
allTargetFormats =
api.Orgs(newOrg.orgs.org[0].dbId).Targetplatforms(i.dbId).Targetformats().Getallformats()
for u in allTargetFormats.targetFormats.targetFormat:
targetformatswithtargetplatform.append(u.uri)
print " " + u.uri + " : \033[96m" + u.name + "\033[0m (type " + u.type + ") (" + \
("not active, ","active, ")[u.active] + \
("no access)","access)")[u.access]
- 98 -

print "\033[1m\033[93mNo target platform:\033[0m"
allTargetFormats = api.Orgs(newOrg.orgs.org[0].dbId).Targetformats().Getall()
for u in allTargetFormats.targetFormats.targetFormat:
if u.uri not in targetformatswithtargetplatform:
print " " + u.uri + " : \033[96m" + u.name + "\033[0m (type " + u.type + ") (" + \
("not active, ","active, ")[u.active] + \
("no access)","access)")[u.access]
- 99 -

Chapter 10 Hammr Command Line ToolUForge AppCenter provides an open source command-line tool called hammr to allow users to create machine images for differentenvironments from a single configuration file.
Hammr is a lightweight client-side tool based on Python, and can be installed on all major operating systems.
Hammr can be used as part of your "DevOps tool chain" and in conjunction with other tools such as Jenkins, Chef, Puppet and SaltStack,allowing you to easily build your machine images and maintain your live running instances. Hammr also has migration capabilities,allowing you to scan a live system, generate a machine image for a different environment as well as export it back to a configuration filefor sharing.
10.1 Getting the Source CodeAll the source code is available on GitHub.
10.2 Further ReadingAll the documentation on installing and using hammr can be found on: http://hammr.io
- 100 -

Chapter 11 Using UForge CLIYou can manage UForge AppCenter using the UForge command-line interface (CLI).
11.1 Installing UForge CLIThe UForge CLI is available for CentOS 6 clients.
In order to install the version of the UForge CLI which corresponds to your UForge AppCenter, please ask your administrator to provideyou with the /etc/yum.repos.d/uforge-ee-centos.repo file of the UForge AppCenter installation.
Then, run the following commands:
To install the UForge CLI run:
yum clean all
yum install uforge-cli
11.2 Launching UForge CLITo launch UForge CLI locally on the machine, launch:
/opt/UShareSoft/uforge/cli/bin/uforge -u LOGIN_NAME -p PASSWORD -U http://IP-OF-MACHINE/api
The -p argument is optional. If the password is not entered in the command, the user will be prompted to enter their password.
Use --help to get a list of available commands.
Information
When accessing from outside the machine, use: https://IP-OF-MACHINE/api
- 101 -


![AppCenter for CE.NET v1 - Barcode Datalink · system settings. [Fig. 8] 5) From here you can Change the Admin Password and configure AppCenter to hide the Start Menu when in user](https://static.fdocuments.us/doc/165x107/5f998be39177bd6eeb567684/appcenter-for-cenet-v1-barcode-system-settings-fig-8-5-from-here-you-can.jpg)