UEILogger Data Logger System User Manual
89
UEILogger Data Logger System User Manual Standalone Data Logger for the PowerDNA PowerPC Cube and I/O Layers/Boards Release 3.0.1 September 2012 PN Man-DNx-UEILogger-0912 © Copyright 1998-2012 United Electronic Industries, Inc. All rights reserved.
Transcript of UEILogger Data Logger System User Manual

UEILoggerData Logger System
User Manual
Standalone Data Logger
for the PowerDNA PowerPC Cube and I/O Layers/Boards
Release 3.0.1
September 2012
PN Man-DNx-UEILogger-0912
© Copyright 1998-2012 United Electronic Industries, Inc. All rights reserved.

No part of this publication may be reproduced, stored in a retrieval system, or transmitted, in any form by any means, electronic, mechanical, by photocopying, recording, or otherwise without prior written permission.
Information furnished in this manual is believed to be accurate and reliable. However, no responsibility is assumed for its use, or for any infringement of patents or other rights of third parties that may result from its use.
All product names listed are trademarks or trade names of their respective companies.
See the UEI website for complete terms and conditions of sale:
http://www.ueidaq.com/cms/terms-and-conditions/
Contacting United Electronic Industries
Mailing Address:
27 Renmar Avenue Walpole, MA 02081 U.S.A.
For a list of our distributors and partners in the US and around the world, please see http://www.ueidaq.com/partners/
Support:
Telephone: (508) 921-4600 Fax: (508) 668-2350
Also see the FAQs and online “Live Help” feature on our web site.
Internet Support:
Support: [email protected] Web-Site: www.ueidaq.com FTP Site: ftp://ftp.ueidaq.com
Product Disclaimer:
WARNING!
DO NOT USE PRODUCTS SOLD BY UNITED ELECTRONIC INDUSTRIES, INC. AS CRITICAL COMPONENTS IN LIFE SUPPORT DEVICES OR SYSTEMS.
Products sold by United Electronic Industries, Inc. are not authorized for use as critical components in life support devices or systems. A critical component is any component of a life support device or system whose failure to perform can be reasonably expected to cause the failure of the life support device or system, or to affect its safety or effectiveness. Any attempt to purchase any United Electronic Industries, Inc. product for that purpose is null and void and United Electronic Industries Inc. accepts no liability whatsoever in contract, tort, or otherwise whether or not resulting from our or our employees' negligence or failure to detect an improper purchase.
Specifications in this document are subject to change without notice. Check with UEI for current status.

UEILogger Data Logger System Contents iii
Table of ContentsChapter 1 Introduction . . . . . . . . . . . . . . . . . . . . . . . . . . . . . . . . . . . . . . . . . . . . . . . . . . . . 1
1.1 Organization of Manual. . . . . . . . . . . . . . . . . . . . . . . . . . . . . . . . . . . . . . . . . . . . . . . . 1
1.2 Overview . . . . . . . . . . . . . . . . . . . . . . . . . . . . . . . . . . . . . . . . . . . . . . . . . . . . . . . . . . . 3
1.3 Quick Start . . . . . . . . . . . . . . . . . . . . . . . . . . . . . . . . . . . . . . . . . . . . . . . . . . . . . . . . . 3
1.4 Working with Firewall and Anti-virus Software . . . . . . . . . . . . . . . . . . . . . . . . . . . . . . 3
1.5 Types of Systems . . . . . . . . . . . . . . . . . . . . . . . . . . . . . . . . . . . . . . . . . . . . . . . . . . . . 3
1.6 Features . . . . . . . . . . . . . . . . . . . . . . . . . . . . . . . . . . . . . . . . . . . . . . . . . . . . . . . . . . . 6
1.7 Specifications . . . . . . . . . . . . . . . . . . . . . . . . . . . . . . . . . . . . . . . . . . . . . . . . . . . . . . . 7
1.8 Block Diagram. . . . . . . . . . . . . . . . . . . . . . . . . . . . . . . . . . . . . . . . . . . . . . . . . . . . . . . 8
1.9 Major Components . . . . . . . . . . . . . . . . . . . . . . . . . . . . . . . . . . . . . . . . . . . . . . . . . . . 81.9.1 UEILogger Cube . . . . . . . . . . . . . . . . . . . . . . . . . . . . . . . . . . . . . . . . . . . . . . . 91.9.2 Layers/Boards . . . . . . . . . . . . . . . . . . . . . . . . . . . . . . . . . . . . . . . . . . . . . . . . 10
1.10 Scan Rate and Timing Control . . . . . . . . . . . . . . . . . . . . . . . . . . . . . . . . . . . . . . . . . 12
Chapter 2 Configuring Your System . . . . . . . . . . . . . . . . . . . . . . . . . . . . . . . . . . . . . . . . 13
2.1 Layers/Boards. . . . . . . . . . . . . . . . . . . . . . . . . . . . . . . . . . . . . . . . . . . . . . . . . . . . . . 13
2.2 Graphical User Interface (GUI) . . . . . . . . . . . . . . . . . . . . . . . . . . . . . . . . . . . . . . . . . 132.2.1 File Menu . . . . . . . . . . . . . . . . . . . . . . . . . . . . . . . . . . . . . . . . . . . . . . . . . . . . 132.2.2 Edit Menu. . . . . . . . . . . . . . . . . . . . . . . . . . . . . . . . . . . . . . . . . . . . . . . . . . . . 152.2.3 Network Menu . . . . . . . . . . . . . . . . . . . . . . . . . . . . . . . . . . . . . . . . . . . . . . . . 162.2.4 Tools Menu . . . . . . . . . . . . . . . . . . . . . . . . . . . . . . . . . . . . . . . . . . . . . . . . . . 17
2.3 MTTTY Serial Line Interface . . . . . . . . . . . . . . . . . . . . . . . . . . . . . . . . . . . . . . . . . . . 182.3.1 Set IP Address . . . . . . . . . . . . . . . . . . . . . . . . . . . . . . . . . . . . . . . . . . . . . . . . 18
2.4 Logger File Structure . . . . . . . . . . . . . . . . . . . . . . . . . . . . . . . . . . . . . . . . . . . . . . . . 19
2.5 Repository. . . . . . . . . . . . . . . . . . . . . . . . . . . . . . . . . . . . . . . . . . . . . . . . . . . . . . . . . 202.5.1 Copying a Configuration to a Cube or Layer . . . . . . . . . . . . . . . . . . . . . . . . . 20
2.6 Configuring a Layer . . . . . . . . . . . . . . . . . . . . . . . . . . . . . . . . . . . . . . . . . . . . . . . . . 232.6.1 Configuring Analog Input Channels . . . . . . . . . . . . . . . . . . . . . . . . . . . . . . . . 232.6.2 Configuring Equations for Units Conversion . . . . . . . . . . . . . . . . . . . . . . . . . 262.6.3 Configuring Clock and Trigger Options . . . . . . . . . . . . . . . . . . . . . . . . . . . . . 282.6.4 Configuring Alarms . . . . . . . . . . . . . . . . . . . . . . . . . . . . . . . . . . . . . . . . . . . . 33
2.7 Configuring Excitation Voltage . . . . . . . . . . . . . . . . . . . . . . . . . . . . . . . . . . . . . . . . . 37
2.8 Configuring a DIO-403 Digital Input/Output Layer . . . . . . . . . . . . . . . . . . . . . . . . . . 38
2.9 Configuring an SL-501 Serial Comm. Layer . . . . . . . . . . . . . . . . . . . . . . . . . . . . . . . 392.9.1 Config.ini File for SL-501 . . . . . . . . . . . . . . . . . . . . . . . . . . . . . . . . . . . . . . . . 402.9.2 Configuring Clock and Trigger Options for SL-501 . . . . . . . . . . . . . . . . . . . . 402.9.3 SL-501 Data Display . . . . . . . . . . . . . . . . . . . . . . . . . . . . . . . . . . . . . . . . . . . 402.9.4 Exporting SL-501 Data. . . . . . . . . . . . . . . . . . . . . . . . . . . . . . . . . . . . . . . . . . 41
2.10 Configuring an SL-501 Layer for Outgoing Messages . . . . . . . . . . . . . . . . . . . . . . . 422.10.1 User Interface . . . . . . . . . . . . . . . . . . . . . . . . . . . . . . . . . . . . . . . . . . . . . . . . 432.10.2 Configuration File Format . . . . . . . . . . . . . . . . . . . . . . . . . . . . . . . . . . . . . . . 442.10.3 Retrieving Raw Samples . . . . . . . . . . . . . . . . . . . . . . . . . . . . . . . . . . . . . . . . 45
Tel: 508-921-4600 www.ueidaq.com Vers: 3.0.1 Date: September 2012 LoggerManualTOC.fm
© Copyright 2012 United Electronic Industries, Inc.

UEILogger Data Logger System Contents iv
2.11 Configuring a CAN-503 Serial Bus Layer . . . . . . . . . . . . . . . . . . . . . . . . . . . . . . . . 462.11.1 Config.ini File for CAN-503 . . . . . . . . . . . . . . . . . . . . . . . . . . . . . . . . . . . . . . 472.11.2 Configuring Clock and Trigger Options for CAN-503. . . . . . . . . . . . . . . . . . . 472.11.3 CAN-503 Data Display. . . . . . . . . . . . . . . . . . . . . . . . . . . . . . . . . . . . . . . . . . 482.11.4 Exporting CAN-503 Data . . . . . . . . . . . . . . . . . . . . . . . . . . . . . . . . . . . . . . . . 502.11.5 Error Indication. . . . . . . . . . . . . . . . . . . . . . . . . . . . . . . . . . . . . . . . . . . . . . . . 51
2.12 Configuring a 429-566 ARINC Comm. Layer. . . . . . . . . . . . . . . . . . . . . . . . . . . . . . 522.12.1 Config.ini File for 429-566 . . . . . . . . . . . . . . . . . . . . . . . . . . . . . . . . . . . . . . . 532.12.2 Configuring Clock and Trigger Options for 429-566 . . . . . . . . . . . . . . . . . . . 532.12.3 429-566 Data Display . . . . . . . . . . . . . . . . . . . . . . . . . . . . . . . . . . . . . . . . . . 532.12.4 Exporting 429-566 Data . . . . . . . . . . . . . . . . . . . . . . . . . . . . . . . . . . . . . . . . . 55
2.13 Configuring an 429-566 Layer for Outgoing Messages . . . . . . . . . . . . . . . . . . . . . . 552.13.1 User Interface . . . . . . . . . . . . . . . . . . . . . . . . . . . . . . . . . . . . . . . . . . . . . . . . 562.13.2 Configuration File Format . . . . . . . . . . . . . . . . . . . . . . . . . . . . . . . . . . . . . . . 57
2.14 Configuring a 429-512 ARINC Comm. Layer. . . . . . . . . . . . . . . . . . . . . . . . . . . . . . 582.14.1 Config.ini File for 429-512 . . . . . . . . . . . . . . . . . . . . . . . . . . . . . . . . . . . . . . . 592.14.2 Configuring Clock and Trigger Options for 429-512 . . . . . . . . . . . . . . . . . . . 592.14.3 429-512 Data Display . . . . . . . . . . . . . . . . . . . . . . . . . . . . . . . . . . . . . . . . . . 592.14.4 Exporting 429-512 Data . . . . . . . . . . . . . . . . . . . . . . . . . . . . . . . . . . . . . . . . . 61
2.15 Configuring a MIL-STD-1553 Comm. Layer . . . . . . . . . . . . . . . . . . . . . . . . . . . . . . 622.15.1 Config.ini File for 1553-553 . . . . . . . . . . . . . . . . . . . . . . . . . . . . . . . . . . . . . . 642.15.2 Configuring Clock and Trigger Options for 1553-553 . . . . . . . . . . . . . . . . . . 642.15.3 1553 Data Display . . . . . . . . . . . . . . . . . . . . . . . . . . . . . . . . . . . . . . . . . . . . . 642.15.4 Exporting 1553-512 Data . . . . . . . . . . . . . . . . . . . . . . . . . . . . . . . . . . . . . . . . 65
Chapter 3 Running Your Application . . . . . . . . . . . . . . . . . . . . . . . . . . . . . . . . . . . . . . . . 67
3.1 Overview . . . . . . . . . . . . . . . . . . . . . . . . . . . . . . . . . . . . . . . . . . . . . . . . . . . . . . . . . . 673.1.1 Start Scan . . . . . . . . . . . . . . . . . . . . . . . . . . . . . . . . . . . . . . . . . . . . . . . . . . . 673.1.2 Stop Scan . . . . . . . . . . . . . . . . . . . . . . . . . . . . . . . . . . . . . . . . . . . . . . . . . . . 67
3.2 Viewing Results . . . . . . . . . . . . . . . . . . . . . . . . . . . . . . . . . . . . . . . . . . . . . . . . . . . 673.2.1 Displaying a Chart of Analog Results . . . . . . . . . . . . . . . . . . . . . . . . . . . . . . 693.2.2 Displaying Results Data. . . . . . . . . . . . . . . . . . . . . . . . . . . . . . . . . . . . . . . . . 703.2.3 Displaying Digital IO Data . . . . . . . . . . . . . . . . . . . . . . . . . . . . . . . . . . . . . . . 71
3.3 Displaying Real-Time Data with the Diagnostic Display . . . . . . . . . . . . . . . . . . . . . . 71
3.4 Analyzing the Data Offline . . . . . . . . . . . . . . . . . . . . . . . . . . . . . . . . . . . . . . . . . . . . 723.4.1 Converting Data for Export and Analysis . . . . . . . . . . . . . . . . . . . . . . . . . . . . 72
3.5 Exporting Stored Data with no Logger Hardware Connected . . . . . . . . . . . . . . . . . . 73
3.6 Error Codes and Troubleshooting. . . . . . . . . . . . . . . . . . . . . . . . . . . . . . . . . . . . . . . 74
B.1 Multi-Cube Synchronization . . . . . . . . . . . . . . . . . . . . . . . . . . . . . . . . . . . . . . . . . . . 76
B.2 Synchronizing a 2-Cube System. . . . . . . . . . . . . . . . . . . . . . . . . . . . . . . . . . . . . . . . 76
B.3 Synchronizing a Multi-Cube System . . . . . . . . . . . . . . . . . . . . . . . . . . . . . . . . . . . . . 77
B.4 Firmware Update Procedure. . . . . . . . . . . . . . . . . . . . . . . . . . . . . . . . . . . . . . . . . . . 78
B.5 Daisy-chaining Multiple Cubes . . . . . . . . . . . . . . . . . . . . . . . . . . . . . . . . . . . . . . . . . 79
C.1 UEILogger under Vista and higher . . . . . . . . . . . . . . . . . . . . . . . . . . . . . . . . . . . . . . 80
C.2 Location Of Data Files . . . . . . . . . . . . . . . . . . . . . . . . . . . . . . . . . . . . . . . . . . . . . . . 82
Tel: 508-921-4600 www.ueidaq.com Vers: 3.0.1 Date: September 2012 LoggerManualTOC.fm
© Copyright 2012 United Electronic Industries, Inc.

UEILogger Data Logger System Figures vi
List of FiguresChapter 1 – Introduction . . . . . . . . . . . . . . . . . . . . . . . . . . . . . . . . . . . . . . . . . . . . . . . . . . . . . 11-1 Typical Multi-Cube Wired Ethernet System .................................................................. 41-2 Cellular Wireless UEILogger System (Single or Multi-Cube)........................................ 41-3 Local Wireless UEILogger System (Single or Multi-Cube) ........................................... 51-4 Block Diagram of UEILogger ........................................................................................ 81-5 UEILogger Cube Front Panel (3-layer) ......................................................................... 91-6 Using a DNA-STP-SYNC Board to Connect an External Clock to the Sync Port ....... 122-1 Graphical User Interface (GUI) Initial Screen ............................................................. 132-2 Right-click Menu for SD Card ..................................................................................... 142-3 New Cube Configuration Screen ................................................................................ 152-4 Edit Cube List Screen ................................................................................................. 162-5 Tools Menu Options Dialog Box ................................................................................. 172-6 Changing IP Address with MTTTY.............................................................................. 182-7 Logger File Structure .................................................................................................. 192-8 Logger File Structure - Data Folder ............................................................................ 192-9 Copying a Configuration to a Cube - Step 1 ............................................................... 202-10 Copying a Configuration to a Cube - Step 2 ............................................................... 202-11 Copying a Configuration to a Cube - Step 3 ............................................................... 212-12 Copying a Configuration to a Cube - Step 4 ............................................................... 212-13 Copying a Configuration to a Cube - Step 5 ............................................................... 222-14 UEILogger Initial Screen ............................................................................................. 232-15 Scan Network Screen ................................................................................................. 232-16 Changing IOM Name in PowerDNA Explorer ............................................................. 242-17 Expand IOM Screen.................................................................................................... 242-18 AI-207 Configuration Screen – Configuration Tab ..................................................... 252-19 Dialog Box for Computing Units Conversion Equation ............................................... 262-20 Sampled Data Point Dialog Box.................................................................................. 272-21 Configuring Clock and Trigger .................................................................................... 282-22 Selecting Layer Start Trigger – Level.......................................................................... 292-23 Starting a Layer from the Previous Layer Trigger ....................................................... 302-24 Selecting Sync Clock Trigger...................................................................................... 302-25 Configuring a Time Duration Session ......................................................................... 312-26 Selecting Scan Rate and Clock Source ...................................................................... 312-27 Selecting Alarms ......................................................................................................... 332-28 Adding a New Alarm ................................................................................................... 332-29 Alarm Configuration Options....................................................................................... 342-30 Configuring Alarm – Level........................................................................................... 342-31 Configuring a Level Alarm Source .............................................................................. 352-32 Configuring a Level Alarm Action................................................................................ 362-33 Configuring Excitation Voltage for DNA-AI-208 Sensors ............................................ 372-34 Configuring DIO Channels .......................................................................................... 382-35 Configuring the SL-501 Ports...................................................................................... 392-36 Typical Display of SL-501 Data................................................................................... 412-37 Display of SL-501 Data Exported to Microsoft Excel .................................................. 422-38 SL-501 Outgoing Message Configuration Screen ...................................................... 432-39 Configuring Initialization and Periodic Messages ....................................................... 432-40 Display of SL-501 Message as ASCII Text................................................................. 442-41 Configuring the CAN-503 Ports .................................................................................. 462-42 Configuring a Start/Stop Trigger on a CAN-503 Message.......................................... 482-43 Typical Display of CAN-503 Scan Results.................................................................. 492-44 Display of CAN-503 Data Exported to Microsoft Excel ............................................... 50
Tel: 508-921-4600 www.ueidaq.com Vers: 3.0.1 Date: September 2012 LoggerManualLOF.fm
© Copyright 2012 United Electronic Industries, Inc.

UEILogger Data Logger System Figures vii
2-45 Display of Exported CAN-503 Data Containing Errors ............................................... 512-46 Configuring the 429-566 Ports .................................................................................... 522-47 Typical Display of 429-566 Scan Results ................................................................... 542-48 Display of 429-566 Data Exported to Microsoft Excel................................................. 552-49 429-566 Outgoing Message Configuration Screen..................................................... 562-50 Configuring the Logger for Outgoing 429-566 Messages ........................................... 562-51 Configuring the 429-512 Ports .................................................................................... 582-52 Typical Display of 429-512 Scan Results ................................................................... 602-53 Display of 429-512 Data Exported to Microsoft Excel................................................. 612-54 Configuring the 1553 ports.......................................................................................... 622-55 Configuring the 1553 message filter ........................................................................... 632-56 Typical Display of 1553 Scan Results......................................................................... 652-57 Display of 1553 Data Exported to Microsoft Excel...................................................... 663-1 Displaying Results of an Analog Input Scan ............................................................... 673-2 Displaying Charts of Analog Scan Results ................................................................. 693-3 Displaying Analog Scan Data in Excel........................................................................ 703-4 Displaying Digital IO Scan Data.................................................................................. 713-5 Diagnostic Display ...................................................................................................... 72B-1 Interconnection Diagram for 2-Cube Synchronization ................................................ 76B-2 Interconnection Diagram for Multi-Cube System ........................................................ 77B-3 Daisy-chaining Multiple Cubes in a Network with a Direct-Connect Host PC............. 79B-4 Daisy-Chaining Multiple Cubes when a Hub/Switch is Used ...................................... 79
Tel: 508-921-4600 www.ueidaq.com Vers: 3.0.1 Date: September 2012 LoggerManualLOF.fm
© Copyright 2012 United Electronic Industries, Inc.

Chapter 1 1Introduction
© CopyUnit
Chapter 1 Introduction
This document outlines the feature-set of the DNR- and DNA-UEILogger layer and how to use it for synchro/resolver applications.
1.1 Organization of Manual
This UEILogger User Manual is organized as follows:
• Introduction This section provides an overview of the UEILogger features.
• Configuring Your System Shows how to configure the system.
• Running Your Application Provides an overview of running your application.
• Appendix A - Accessories The appendix provides a list of accessories available for the UEILogger.
• Appendix B - Connection Diagrams The appendix contains connection diagrams for the UEILogger.
• Index An alphabetical listing of the topics covered in this manual.
Tel: 508-921-4600 www.ueidaq.com Vers: 3.0.1 Date: September 2012 LoggerManualChap1.fm
right 2012 ed Electronic Industries, Inc.

Chapter 1 2Introduction
© CopyUnit
Manual ConventionsTo help you get the most out of this manual and our products, please note that we use the following conventions:
Tips are designed to highlight quick ways to get the job done or to reveal good ideas you might not discover on your own.
NOTE: Notes alert you to important information.
CAUTION! Caution advises you of precautions to take to avoid injury, data loss, and damage to your boards or a system crash.
Text formatted in bold typeface generally represents text that should be entered verbatim. For instance, it can represent a command, as in the following example: “You can instruct users how to run setup using a command such as setup.exe.”
Text formatted in fixed typeface generally represents source code or other text that should be entered verbadim into the source code, initialization, or other file.
Examples of Manual Conventions
Before plugging any I/O connector into the Cube, be sure to remove power from all field wiring. Failure to do so may cause severe damage to the equipment.
Usage of Terms
Throughout this manual, the term “Cube” refers to a PowerDNA Cube product. The term DNA refers to the PowerDNA I/O Cube.
Tel: 508-921-4600 www.ueidaq.com Vers: 3.0.1 Date: September 2012 LoggerManualChap1.fm
right 2012 ed Electronic Industries, Inc.

Chapter 1 3Introduction
© CopyUnit
1.2 Overview The UEILogger is a powerful standalone data logger based on the UEI PowerDNA Ethernet DAQ Cube. Using an intuitive Windows graphical user interface (GUI) supplied with the unit, you can configure the system with no programming whatsoever. You can configure it through a PC with an Ethernet connection and then, if you want, disconnect it and run in standalone mode. You can start/stop logging either manually from your computer or automatically through a variety of internal or external syncs and triggers, including analog alarm events and digital signals/event.
You can use the UEILogger in a variety of systems, local or remote PC, wired or wireless, single or multi-Cube, stationary or mobile.
Except for special firmware/software, the UEILogger is exactly the same as a standard PowerPC PowerDNA Cube. This means that existing users of PowerPC PowerDNA Cubes can easily add data logging capability by installing a firmware/software upgrade package. (Some earlier models manufactured without an alarm buzzer may require use of a digital output for an audible alarm function.) This also means that a purchaser of a UEILogger can use the unit as a standard PowerDNA Cube instead of as a logger.
The UEILogger offers the same choice of I/O layers/boards, analog inputs/outputs, digital inputs/outputs, counter/timer inputs/outputs, and other features of a PowerPC PowerDNA Cube.
As you use the UEILogger dekstop application to edit a logger configuration, the changes are stored locally until you upload them to the SD card on the Cube. This means that you can easily store application-specific configurations on multiple SD cards. When you want to use a pre-defined configuration for a particular application, simply insert the card with that configuration. If you are swapping SD cards in the cube to change the configuration, scan to bring the changes into the editor, be careful not to press the upload button as this will overwrite any configuration on the card with what is in the editor.
Note also that after you configure your logger, you can copy the configuration file to the Repository and then copy the configuration to other Cubes in your system, thus duplicating the configuration quickly and conveniently.
1.3 Quick Start For a quick start-up procedure, refer to the document titled “UEILogger Quick Start Manual,” which you can download directly from www.ueidaq.com.
1.4 Working with Firewall and Anti-virus Software
If you experience any difficulty communicating with the UEILogger, check to see if your efforts are being sabotaged by any Internet security, anti-virus, or firewall programs. The UEI logger uses UDP protocol on port 6334 and TCP/IP protocol on port 21. Some of the various firewall and security programs on the market have optional configuration windows that will allow you to enter the UEI ports and protocols, thus allowing data to pass. If no such configuration window is available and communication errors persist, try disabling the firewall and security programs to see if that fixes the problem.
1.5 Types of Systems
As shown In Figures 1-1 to 1-3, the UEILogger can be used in a variety of systems, such as
• Single or Multiple Cube system
• Dedicated Host PC system
• Standard Ethernet system
Tel: 508-921-4600 www.ueidaq.com Vers: 3.0.1 Date: September 2012 LoggerManualChap1.fm
right 2012 ed Electronic Industries, Inc.

Chapter 1 4Introduction
© CopyUnit
• Stationary or mobile system applications
• Cellular wireless system (using a JBM C120 Router)
• Local wireless system (using a local wireless link)
Figure 1-1Typical Multi-Cube Wired Ethernet System
C120 Wireless Router
PCPC
UEILogger SensorsEthernet
port
Wireless Cellular Network
JBM C120 Wireless Router
AirCard
May be stationary or mobile
Internetbroadband connectionCell
NetworkCarrier
Figure 1-2. Cellular Wireless UEILogger System (Single or Multi-Cube)
PC UEILoggerPC UEILogger SensorsEthernetport
Ethernetport
UEILoggerUEILogger SensorsEthernetport
UEILoggerUEILogger SensorsEthernetport
0
1
n
NetworkEthernet
Note: The PC that you use to configure the logger Cubes is not needed for logger operation. You may disconnect it when you run your application.
Tel: 508-921-4600 www.ueidaq.com Vers: 3.0.1 Date: September 2012 LoggerManualChap1.fm
right 2012 ed Electronic Industries, Inc.

Chapter 1 5Introduction
© CopyUnit
Figure 1-3. Local Wireless UEILogger System (Single or Multi-Cube)
C120 Wireless Router
PCPC UEILogger SensorsEthernet
port
Local Wireless Network
Local Wireless Transceiver
Ethernet
port
C120 Wireless Router
Local Wireless Transceiver
May be stationary or mobileMay be stationary or mobile
Tel: 508-921-4600 www.ueidaq.com Vers: 3.0.1 Date: September 2012 LoggerManualChap1.fm
right 2012 ed Electronic Industries, Inc.

Chapter 1 6Introduction
© CopyUnit
1.6 Features Some of the features of the UEILogger are;
• Flexible — full range of 20 PowerDNA I/O boards to match application
• Mix and match multiple (up to 64) synchronized Cubes
• Up to 150 analog inputs or 288 digital inputs per cube
• Easy-to-use intuitive Windows graphical user interface – no programming required
• Stores data on standard SD Card (8 GB Card included as standard)
• Retrieves and installs stored configurations from multiple SD cards
• Compact design
4” x 4.1” x 4” UEILogger 300 (3-layers/boards)4” x 4.1” x 5.8” UEILogger 600 (6-layers/boards)
• Extremely cost effective
• AC, DC, or Battery powered
• Configure via Ethernet or load configuration file from SD Card
• Flexible start/stop control via software trigger, manual pushbutton, external clock, external sync input, internal layer/board clock, power on, date/time trigger, digital input, event triggers from analog threshold, level, or range limit
• Selectable audiable alarm on out of bound input conditions
• Can be run as a standalone device without a host PC
• Real-time diagnostic data display (most recent 10 seconds of data on selected inputs)
Tel: 508-921-4600 www.ueidaq.com Vers: 3.0.1 Date: September 2012 LoggerManualChap1.fm
right 2012 ed Electronic Industries, Inc.

Chapter 1 7Introduction
© CopyUnit
1.7 Specifications The technical specifications for the standard UEILogger 300/600 are:
Table 1-1. Technical Specifications
Technical specifications for the Fiber Optic version of the UEILogger are the same as those listed in Table 1-1, except that instead of RJ-45 connectors on the first two lines of the table, the two interface connectors are Fiberoptic Transceivers Type HFBR-58, each provided with two receptacles that accept coaxial fiber optic cables.
Note that the UEILogger is a standard PowerDNA DAQ Cube with the added firmware and functionality of the standalone logging function.
Standard InterfacesTo host computer 10/100Base-T, standard RJ-45 connectorDaisy chain output 10/100Base-T, standard RJ-45 connectorConfig/general RS-232, 9-pin “D”I/O Slots AvailableUEILogger 600 6 slotsUEILogger 300 3 slotsData StorageStorage media Secure Digital (SD) Card
Storage capacity 32 Gigabyte (max), 8 Gbyte SD Card includedData retrieval Via logger Ethernet port or SD Card may be read
directly with a standard SD Card readerI/O PerformanceMax sample rate up to 500 kS/S (16-bit) or 250 kS/S (18-24-bit)
at least 320 kS/S (16-bit), 160 kS/S (18-24-bit).I/O Boards All PowerDNA analog/digital input boardsProcessorCPU Freescale MPC5200, 400 MHz, 32-bitDDRAM 128 MBOn-board Flash 4 MBStatus LEDsOn front panel Attention, Read/Write, Power,
Communications ActiveEnvironmentalTemp (operating) Tested to -40 °C to 85 °CTemp (storage) -40 °C to 100 °CHumidity 0 to 95%, non-condensingVibration(IEC 60068-2-64) 10–500 Hz, 5 g (rms), Broad-band random(IEC 60068-2-6) 10–500 Hz, 5 g, SinusoidalShock(IEC 60068-2-27)
50 g, 3 ms half sine, 18 shocks at 6 orientations; 30 g, 11 ms half sine, 18 shocks at 6 orientations
Altitude 70,000 feet, maximumPower RequirementsInput voltage 9-36 VDC. 120/240 VAC universal power supply
includedPower consumption 3.5 Watt max, plus power required by I/O boards.
Total power dissipation < 15 WattsPhysical DimensionsUEILogger 300 4.1” x 4.0” x 4.0”UEILogger 600 4.1” x 4.0” x 5.8”
Tel: 508-921-4600 www.ueidaq.com Vers: 3.0.1 Date: September 2012 LoggerManualChap1.fm
right 2012 ed Electronic Industries, Inc.

Chapter 1 8Introduction
© CopyUnit
1.8 Block Diagram
Figure 1-4 shows a block diagram of a typical UEILogger system:
Figure 1-4Block Diagram of UEILogger
As shown in the diagram of Figure 1-4, data received from or transmitted to the analog and digital layer boards is processed by the PowerPC CPU. It is then stored on the SD Card and/or transmitted through the NIC to the network for real time display and evaluation. For remote reading of historical data from the SD card, however, data acquisition must be halted. The software provided with the Logger also converts raw input data to engineering units and performs linearization for various types of sensors.
Complete isolation between internal and external grounds is ensured by the use of transformer isolator components rather than opto-isolators.
Note that the unit includes a manual start/reset button as one of the many options for starting and stopping data acquisition.
1.9 Major Components
The major components comprising a PowerDNA UEILogger system are:
• One or more PowerDNA UEILogger Cubes, either 3-layer or 6-layer, up to 64 maximum)
• Selected PowerDNA Input/Output Layer Boards
• Input/output sensors/devices to match the selected layers/boards
• A Windows-based Host PC with Ethernet Port
• Optional wireless communication equipment for mobile or remote systems
g
FreescalePowerPC
Contr
ol
Logic
4 MB Flash 128 MB DDRAM
DC/DC
Synchronization1 In/1 Out
NIC
9-36V DC Input
Isolation
StatusLEDs
Power Out
Power In
32-bit 6
6-M
Hz
bus
Fiber
Fiber
RS-232Port
SD CardSlot
Start/RstButton
Tel: 508-921-4600 www.ueidaq.com Vers: 3.0.1 Date: September 2012 LoggerManualChap1.fm
right 2012 ed Electronic Industries, Inc.

Chapter 1 9Introduction
© CopyUnit
1.9.1 UEILogger Cube
The front panel of the UEILogger Cube is shown in Figure 1-5.
Figure 1-5. UEILogger Cube Front Panel (3-layer)
The Cube is available as either a 3-I/O Layer unit or a 6-I/O Layer unit plus two common layers/boards — the CPU Layer (second position), and the NIC Network Interface Control Layer (top position). When specified with fiber optic connectors, the layer is marked as FNIC and no network read/write LEDs are provided.
The CPU Layer/board uses an MPC5200 PowerPC CPU, with 4MB Flash memory, 128MB of DDRAM, and an SD Card for storage with a capacity from 16MB to 32GB (8GB included as standard). The unit has an external Sync interface (Sync In/Out +5V @10mA isolated DC out) for triggering start/stop of the data logging function.
A manual pushbutton is also provided for a manual start trigger. Note that the pushbutton is recessed to prevent accidental triggering and that it has a long debounce setting. To use the button, you must press and hold the button in for about 1 second and then release it. The action is triggered when you release the button. Pressing/holding the button for more than 5 seconds asserts a system-wide reset. Performing a system-wide reset while logging is enabled will result in the data set becoming corrupted as lost file clusters.
Power Connectors
Ethernet Connectors to/from
(may also be specified asfiber optic connectors) USB Port
(not currently
Start Pushbutton(recessed, hold 1 sec, activate onrelease)
CommunicationStatus LEDs —ATT - AttentionR/W - Read/WriteCOM - Comm. ActivePG - Power Good
Serial Port
SD Card
Sync Connector(External syncinput/output)
I/O Layer 0
I/O LayerStatus LEDsRDY - ReadySTS - Status
Network Interface Control (NIC)
used)
EthernetRead/writeLEDs
I/O Layer 1
I/O Layer 2
(Position 1)
(Position 2)
(Position 3)
Tel: 508-921-4600 www.ueidaq.com Vers: 3.0.1 Date: September 2012 LoggerManualChap1.fm
right 2012 ed Electronic Industries, Inc.

Chapter 1 10Introduction
© CopyUnit
The NIC layer/board controls access to the Ethernet network and may be specified with either RJ-45 connectors or HFBR-58 fiber optic connectors. Several cubes (up to 64) can be daisy-chained together by connecting Ethernet cables to the NIC In and NIC Out ports or to DNA-STP-SYNC terminal interconnection boards.
The NIC In port can be thought of as an Ethernet “straight” connection and the NIC Out port as an Ethernet “cross” connection. When you use a direct-connect PC host, therefore, an Ethernet straight cable should run from a PC Ethernet port (In) to an Ethernet cross port (NIC Out) on a Cube. Run a cable for the next Cube in the chain from the NIC In port to the NIC Out port on the second Cube. Repeat for each subsequent Cube in the chain. (Refer to Figure B-3 on page 70).
The more common setup, however, would be to use an Ethernet Hub/switch between the Host PC and the Logger Cubes, as shown in Figure B-4 on page 79. In this arrangement, you connect a cable between the Ethernet port on the PC and a port on the Hub/switch. You then run a “straight” cable from the Hub/switch to the NIC In port on the Cube 1, another from the NIC Out port on Cube 1 to NIC In on Cube 2, and so on until all Cubes are daisy-chained together as shown in the diagram.
Current status of the network communication activity is indicated by four LEDs on the front panel:
• A red LED marked ATT flashes on/off whenever the Cube needs operator attention, including a missing or locked SD card.
• A green LED marked READ/WRITE is ON whenever a read or write action occurs
• A green LED marked COM is ON whenever communication activity is taking place.
• A green LED marked PG is ON when power is on.
1.9.2 Layers/Boards Note that the I/O connectors for the various layers/boards are marked as I/O 1, I/O 2, and I/O 3, which refer to Layer Positions 1 through n. The software, however, refers to these layer positions as Layer 0, Layer 1, and Layer 2.
A UEILogger Cube is designed to accept up to 3 (or 6) PowerDNA I/O Layers, which may include any of the following types plus others to be released in the future:
• DNA-AI-201 Analog Input Layer (24-channel,16-bit, ±15V)
• DNA-AI-202 Analog Current Input Layer, 12-channel, 16-bit, (±1.5 mA, ±15 mA. ±150 mA input range)
• DNA-AI-205 Analog Voltage Input Layer, 4-channel, 18-bit, simultaneous sampling (±100V, ±10V, ±1V, ±0.1V input range)
• DNA-AI-207 Analog Voltage Input Layer, 16 channel, 18-bit, ±10V, with CJC for TC Inputs
• DNA-AI-208 Analog Strain Gauge (8-channel, 18-bit, full-, half-, quarter- bridge) Input Layer
• DNA-AI-211 IEPE/ICP Vibration Sensor Interface (4-channel)
• DNA-AI-217 Analog Voltage Input Layer, 16 channel, 24-bit, ±10V, with CJC for TC Inputs
Tel: 508-921-4600 www.ueidaq.com Vers: 3.0.1 Date: September 2012 LoggerManualChap1.fm
right 2012 ed Electronic Industries, Inc.

Chapter 1 11Introduction
© CopyUnit
• DNA-AI-225 Analog Input Layer, 25-channel, 24-bit, Voltage/TC with CJC, ±1.25V input range
• DNA-DI-401 24-channel Digital Input Layer, 5-36V logic level input
• DNA-DIO-403 48-channel Digital Input Layer, 5V TTL, 16 mA/channel output
• DNA-DIO-404 12-channel DI (3.3-36V input), 12-channel DO (current source)100kS/s, 350mA/channel output, Layer
• DNA-DIO 405 12-channel DI (5-36V logic level), 12-channel DO (opto-darlington, 80mA output drive) Layer
• DNA-SL-501 4-port, RS-232C/485 Serial Communications Layer
• DNA-SL-508 8-port, RS-232C/485 Serial Communications Layer
• DNA-GPS interface for the SL-501 Layer
• DNA-CAN-503 4-port, CAN Bus/Interface Layer
• DNA-MIL-1553 2-port, MIL-STD-1553 Communications Layer
• DNA-429-5xx (566 or 512) ARINC Communications Layer
• DNA-CT-601 8 counter/timer/PWM/quadrature encoder Layer
• DNA-PC-911/912/913 +15/+24V/+45V Power Conversion Layers
NOTE: UEI is continually adding new layer types. Check the website for the current list of available layer models. Contact UEI directly regarding support for AI-224, AI-254, AI-255, AI-256, DIO-448, CT-602, CT-604, SOE-648, SL-504, ARINC 708-453, IRIG-650 and other new layers.
The following layer types cannot be used for logging applications, but can be used when the Cube is used in standard Cube applications:
• DNA-AO-308 Analog Output Layer, ±10V, 8-channel, 16-bit, 100kS/s/channel
• DNA-AO-308-350 High Current Analog Output Layer, ±10V, 8-channel, 16-bit, 100kS/s/channel, up to 50mA/channel output
• DNA-AO-308-353 High Voltage Analog Output Layer, ±40V, 8-channel, 16-bit, 100kS/s/channel, up to 5mA/channel output
• DNA-AO-308-420 4-20mA Analog Current Output Layer, 8-channel, 16-bit, 100kS/s/channel, 4-20 mA current output
• DNA-AO-332/333 ±10mA 10kS/s simultaneous current output layers
• DNA-DIO-402 80mA 24 digital output board
• DNA-DO-416 8-channel Solenoid Drive Digital Output Layer, 500 mA/channel
• DNA-DIO-433 600mA 32 digital output board
• DNA-DIO-452/462 12-channel Electromechanical Relay Layer
• DNA-DIO-470 10-Channel Electromechanical Relay Interface
Tel: 508-921-4600 www.ueidaq.com Vers: 3.0.1 Date: September 2012 LoggerManualChap1.fm
right 2012 ed Electronic Industries, Inc.

Chapter 1 12Introduction
© CopyUnit
1.10 Scan Rate and Timing Control
Timing of the UEILogger is controlled by one of three clock sources: Internal, Sync Clock, or an External Clock
The internal clock refers to the clock on a specific layer board. Note that each layer can run at its own clock rate, which is individually settable from the Clock and Trigger screen on the Configuration Tab of the UEILogger desktop application. For configuration details, refer to “Timing” on page 31.
The External clock, as the name implies, is generated from a source outside the Logger and received either through the Sync port (on the Sync In line) or through the DB-37 connector on the layer. The Sync port connection should be used when you set up a “global” clock for the system. When you configure a single layer to use an external clock, however, connect the clock signal to the DB-37 connector for the layer.
When you use an external clock for a global clock, use a DNA-STP-SYNC interconnection panel to make the cable connection, as shown in Figure 1-6.
Figure 1-6Using a DNA-STP-SYNC Board to Connect an External Clock to the Sync Port
When the system uses only two Cubes, they can be slaved together by selecting the Sync clock for each layer and then using the DNA-CBL-SYNC-10 cable to interconnect the two Sync ports.
When the system comprises large numbers of Cubes, you must use multiple DNA-STP-SYNC interconnection panels as described in the Appendix to synchronize scan rates for all Cubes.
S5 S6 M
S1S3S4 S2
BNCIN
BNCOUT
TBSYNC_IN
GND
SYNC_OUT
GNDGNDGND
+5VDC
+5VDC
BNC_OUT
BNC_IN
ExternalClock
Cube
DNA-STP-SYNCInterconnection
Panel
DNA-CBL-SYNC-RJ
Note: As an alternative,connect the clock to theSTP panel using a BNCcable plugged into theBNC IN connector.
Tel: 508-921-4600 www.ueidaq.com Vers: 3.0.1 Date: September 2012 LoggerManualChap1.fm
right 2012 ed Electronic Industries, Inc.

Chapter 2 13Configuring Your System
© CopyUnit
Chapter 2 Configuring Your System
2.1 Layers/Boards
A UEILogger Cube is designed to accept up to 3 (or 6) PowerDNA I/O Layers, which may include one or more of any of the types listed in “Layers/Boards” on page 10.
2.2 Graphical User Interface (GUI)
The software included with the UEILogger includes a Windows-based Graphical User Interface (GUI) that enables you to configure and run the logger completely — without requiring you to do any programming at all. When you start the logger program, the initial screen of the GUI appears, as shown in Figure 2-1.
Figure 2-1. Graphical User Interface (GUI) Initial Screen
2.2.1 File Menu The File Menu has the following commands (grayed out if not applicable):
New → Cube Configuration This command enables you to define a configuration for a new Cube that will reside in the Repository (see “Repository” on page 20 for more detail). This command is active only for the Repository. When you first create a new Cube or Layer Configuration or change an existing one, the name is displayed with an asterisk. The asterisk disappears when you save the configuration.
NewCubeConfig
SaveLayer
Save Cube
SaveAll
EditCubeList
ScanNetwork
Copy Paste Rename Delete
UploadConfig.
Send Start
Trigger
SendStop
TriggerCopy to
Repository
Tel: 508-921-4600 www.ueidaq.com Vers: 3.0.1 Date: September 2012 LoggerManualChap2.fm
right 2012 ed Electronic Industries, Inc.

Chapter 2 14Configuring Your System
© CopyUnit
Mount Local SD Card → This command lets you manage an SD card taken from a Logger cube and inserted into an SD card reader connected to your PC. This allows you to copy a configuration stored on the card to the repository and also allows you to delete acquired data from the card.
Right-clicking on SD card in the left pane displays the menu shown below.
Figure 2-2. Right-click Menu for SD Card
Note that when an SD card is actually inserted in the logger, the menu options above are active and appear in black.
Copy Config to Repository →This command copies a configuration stored on the SD card to the Repository.
Delete Acquired Data . . . →This command permits you to delete acquired data stored on the SD card.
Unmount→ This command unmounts the SD card reader.
Right-clicking a cube in the left pane displays a menu with the following options:
Rename→This command permits you to enter a new name for the cube
Copy→This command permits you to copy this configuration to another Cube
Paste→This command permits you to paste a configuration to this cube
Delete→This command permits you to delete this cube.
Copy to local SD card→This command permits you to copy the configuration of this cube to the SD card.
Copy to Repository→This command permits you to copy the configuration of this cube to the repository.
Upload Configuration→This command permits you to upload the current configuration to the cube.
Set Cube Clock to Host Time→This command permits you to match the cube clock to that of the host PC. It is recommended to update your host time with this command after daylight savings time.
Tel: 508-921-4600 www.ueidaq.com Vers: 3.0.1 Date: September 2012 LoggerManualChap2.fm
right 2012 ed Electronic Industries, Inc.

Chapter 2 15Configuring Your System
© CopyUnit
Figure 2-3 shows the screen that appears when you select New → Cube Configuration.
Figure 2-3. New Cube Configuration Screen
As illustrated, you first select the number of layers (1 to 6) installed in your cube. Selecting the layer position automatically selects the default Layer Name (Layer0 through Layer5 corresponding to Layer Positions 1 through 6) as indicated in the box at the right of the screen. You can enter new names for the Cube and Layers, if you wish. Next, select the type of Layer board you will use from the list box. Ignore the second box, which lists the version of the layer. When complete, click OK to save your selections and close the screen.
Save Layer – This command saves the configuration file for a Layer.
Save Cube – This command saves the configuration file for a Cube.
Save All – This command saves the configuration files for all Layers and Cubes.
Exit – This command exits and closes the logger program.
2.2.2 Edit Menu The Edit Menu can also be displayed by right-clicking an item in the left pane of the window. The Edit Menu has the following commands (grayed out if not applicable):
Rename – This command enables you to rename the selected file.
Copy – This command enables you to copy the selected text or file.
Paste – This command enables you to insert (paste) the copied text or file.
Delete – This command enables you to delete the selected text or file.
Copy to Repository – This command enables you to copy the selected text or file to the Repository.
List ofEligible
LayerTypes
Number of
in Cube
Layer ID No.
Layer Option No.
Layers
Tel: 508-921-4600 www.ueidaq.com Vers: 3.0.1 Date: September 2012 LoggerManualChap2.fm
right 2012 ed Electronic Industries, Inc.

Chapter 2 16Configuring Your System
© CopyUnit
Upload Configuration – This command enables you to upload the selected configuration file.
Set Cube Clock to Host Time – This command sets the Cube clock to match the Host time and date. (We recommend that you use this command to set time and date rather than the MTTTY serial terminal program.)
2.2.3 Network Menu The Network Menu has the following commands (grayed out if not applicable):
Edit Cube List – This command lets you display and modify the list of Cubes in your network system.
Figure 2-4Edit Cube List Screen
Figure 2-4 shows the Edit Cube List screen. In this screen, you can add new cubes by entering a name in the Name box and a valid IP address and a port for the new Cube in the Host box. Then click on the Add button and the new Cube is added to the list in the top window.
If you want to modify or delete a cube listed in the top window, highlight the cube name in the list, enter any changes you want to make, and then click Apply. The changes are then made effective.
If you want to delete a cube, select the cube name and click on Delete.
Scan Network – This command scans the network and displays the Cubes and Layer boards actually connected to your network at the present time. The list is displayed in the explorer window at the left of the screen under PowerDNA Network.
Start Logging – Starts logging with a software start trigger.
Stop Logging – Stops logging with a software stop trigger.
Set Cube Clock to Host Time – Sets the cube’s time to PC time.
SetTimeoutPeriod
Tel: 508-921-4600 www.ueidaq.com Vers: 3.0.1 Date: September 2012 LoggerManualChap2.fm
right 2012 ed Electronic Industries, Inc.

Chapter 2 17Configuring Your System
© CopyUnit
Run SD Card Speed Test – Requests that the cube perform a read/write test of the SD card. Speed Test results influence maximum sample rate of layers, since the maximum write speed influences how much sampled data can be written to the SD card. Since SD cards wear-out over time we recommend that you run the speed test after several gigabytes of data have been written to the card. Note that the results are not displayed in the user interface, but rather, are stored as the file “hw_info.ini” in the root of the SD card.
Format SD Card – Formats the SD Card. This command destroys the card’s original contents, please make sure you back up any configurations or data sets before proceeding.
Run SD Card Speed Test for high-speed sampling
Run the SD Card Speed Test before using the SD Card or speeds may be limited to a very low sample rate. Please repeat this test every hundred times of using the SD card.
2.2.4 Tools Menu The Tools Menu has one item, as follows:
Options – This command opens the dialog box shown in Figure 2-5 below.
Figure 2-5Tools Menu Options Dialog Box
Click to addtimestampsto data files.Click againto remove.
Click to usesmall samplesets for Excel
Tel: 508-921-4600 www.ueidaq.com Vers: 3.0.1 Date: September 2012 LoggerManualChap2.fm
right 2012 ed Electronic Industries, Inc.

Chapter 2 18Configuring Your System
© CopyUnit
2.3 MTTTY Serial Line Interface
An MTTTY (Multi-Threaded TTY) high performance RS-232 serial terminal program is included with the UEILogger software. Use this tool to communicate with the logger cube and to set/change parameters such as the IP address.
NOTE: We recommend that you not use the MTTTY serial line interface to change date and time of the Cube. Instead, use the “Set Cube Clock to Host Time” command in the Edit Menu of the UEILogger application, as shown in Figure 2-1 on page 13. If you prefer, of course, you can use the MTTTY to set time and date. To do so, type time, edit the new time and date, and then type store to save the new value. To verify the new entry, type time again.
2.3.1 Set IP Address Figure 2-6 shows a typical MTTTY screen with commands for changing the IP address of the Cube.
Figure 2-6Changing IP Address with MTTTY
To change the logger IP address, do the following:
STEP 1: As shown in Figure 2-6, enter the command “set ip ip, where ip is the desired IP address.
STEP 2: Enter the command store to save the change. Then enter show to confirm the entry and display the new value.
The IP address value is persistent and will keep this value when restarted.
Tel: 508-921-4600 www.ueidaq.com Vers: 3.0.1 Date: September 2012 LoggerManualChap2.fm
right 2012 ed Electronic Industries, Inc.

Chapter 2 19Configuring Your System
© CopyUnit
2.4 Logger File Structure
Figure 2-7 shows the file structure of a typical UEILogger system.
Figure 2-7Logger File Structure
As shown in Figure 2-7, the Cube folder has two sub-folders, CFG and DATA. The right panel of the screen lists the contents of the CFG folder, the configuration files being used by the Cube. The first file is the cube configuration. The second and third files are configuration .ini files for the individual layers installed in the Cube, identified by the Layer name (Layer0, Layer1).
Figure 2-8 shows the contents of the DATA folder, all data files generated by the logger. In the case illustrated, the logger generated multiple files, which are listed in sequence. Note that when these files are exported for off line analysis or displayed as charts on the Results page, they are joined together as a single large file.
Figure 2-8Logger File Structure - Data Folder
Active CubeConfiguration Folder
Data File Folder
RepositoryOther Stored Cube(s)
Multiple Data Files(for each layer)
Header Files
Tel: 508-921-4600 www.ueidaq.com Vers: 3.0.1 Date: September 2012 LoggerManualChap2.fm
right 2012 ed Electronic Industries, Inc.

Chapter 2 20Configuring Your System
© CopyUnit
2.5 Repository The Repository, which is displayed at the top left of the Initial Screen, is a working folder that contains miscellaneous Cube definitions, configuration files, and associated header and data files for editing, copying, and pasting to other Cubes and layers in your system. The Repository, which is sometimes referred to as the “Configuration Vault,” is the vehicle through which you can store and retrieve pre-tested configurations and conveniently re-apply them to other cubes and layers throughout your logging system.
The structure of the Repository folder is illustrated in Figure 2-7 and Figure 2-8.
2.5.1 Copying a Configuration to a Cube or Layer
To copy an existing configuration from a previous logging session, the procedure is as follows:
STEP 1: Copy the existing configuration folder into the repository. The structure should then look something like that in Figure 2-9.
Figure 2-9Copying a Configuration to a Cube - Step 1
STEP 2: Right-click on the setup to be copied and select Copy, as shown in Figure 2-10.
Figure 2-10Copying a Configuration to a Cube - Step 2
Tel: 508-921-4600 www.ueidaq.com Vers: 3.0.1 Date: September 2012 LoggerManualChap2.fm
right 2012 ed Electronic Industries, Inc.

Chapter 2 21Configuring Your System
© CopyUnit
STEP 3: Move cursor to the Active Cube, right-click, and select Paste, as shown in Figure 2-11. This action copies the configuration files from Setup1 to the Cube for the current session. Be sure to paste the files to the Cube and not to the CFG folder under the Cube.
Figure 2-11Copying a Configuration to a Cube - Step 3
STEP 4: Click on the “+” beside the Cube name to expand the display to show the LayersClick on Layer0 to display the Configuration window for the layer in the right panel. Visually check the configuration and confirm that it was copied correctly from Setup 1.
Figure 2-12Copying a Configuration to a Cube - Step 4
Tel: 508-921-4600 www.ueidaq.com Vers: 3.0.1 Date: September 2012 LoggerManualChap2.fm
right 2012 ed Electronic Industries, Inc.

Chapter 2 22Configuring Your System
© CopyUnit
STEP 5: To verify that the operation was successful, click on Setup 1 Layer 0. This displays the Setup 1 Configuration, which you can use as a reference.
Figure 2-13Copying a Configuration to a Cube - Step 5
You are now ready to proceed with your session. You can use the same technique to copy a configuration from one cube to any other cube. This is very convenient when you work with a multi-cube system.
Tel: 508-921-4600 www.ueidaq.com Vers: 3.0.1 Date: September 2012 LoggerManualChap2.fm
right 2012 ed Electronic Industries, Inc.

Chapter 2 23Configuring Your System
© CopyUnit
2.6 Configuring a Layer
Most of the configuration screens of the UEILogger GUI are self-explanatory. To aid your understanding, however, this section is an example that describes procedures for configuring an analog input layer. The first subsection configures analog input channels; the second shows how to select options for clocks and triggers; and the third shows how to set alarms and alarm output actions. Note that to use the logger, you must configure the channels, clocks, and triggers.
2.6.1 Configuring Analog Input Channels
The procedure for configuring the analog input channels is as follows:
STEP 1: Connect the host PC to the Cube via a Serial Cable. Also connect a straight Ethernet cable between the PC Ethernet In Port and the Cube NIC Out Port. Power up the Cube.
STEP 2: On the PC, locate the DNALogger.exe file. Double-click the file to start execution. The screen shown in Figure 2-14 appears.
Figure 2-14. UEILogger Initial Screen
The Repository is a folder used for temporary storage and offline analysis and editing of files. It may be used for storing multiple configuration files for future recall and use. Refer to “Repository” on page 20 for a more detailed description of the Repository and how to use it.
The PowerDNA Network folder contains the Cubes and Layers for your system. To see the current configuration in your system, perform a Scan Network operation as described in the next step.
STEP 3: Pull down the Network Menu and click on “Scan Network.” The screen shown in Figure 2-15 then appears.
Figure 2-15. Scan Network Screen
The screen shows an IOM-xxxxx, where xxxxx represents the serial number of your Cube. Click on the IOM to display Cube information in the right panel of the screen.
Tel: 508-921-4600 www.ueidaq.com Vers: 3.0.1 Date: September 2012 LoggerManualChap2.fm
right 2012 ed Electronic Industries, Inc.

Chapter 2 24Configuring Your System
© CopyUnit
If you want to use a different name for the IOM, run the PowerDNA Explorer program, which is supplied as part of the UEILogger Software Suite. See Figure 2-16
Figure 2-16Changing IOM Name in PowerDNA Explorer
STEP 4: Click on the “+” icon to expand the IOM xxxxx item, which identifies the Cube. The following screen appears.
Cube NameAnalog Input Layer
Digital Input Layer
Analog Input Layer
Figure 2-17. Expand IOM Screen
This screen shows all Layers currently installed in your Cube, identified by Model No. and Layer Mounting position (0 to 5).
STEP 5: Click on a Cube and perform an SD Card Speed Test from the Network menu.
1. Click on IOM Name.
2. Enter new IOM name.3. Click File >> Save.
Tel: 508-921-4600 www.ueidaq.com Vers: 3.0.1 Date: September 2012 LoggerManualChap2.fm
right 2012 ed Electronic Industries, Inc.

Chapter 2 25Configuring Your System
© CopyUnit
STEP 6: Click on a layer. For example, we click on the AI-207-1’Layer0’; the screen shown in Figure 2-18 appears. in the Configure box, pull down the menu and select “Channels.”
Start Scan Button (Red, if active)Stop Scan Button (Gray)
Cube NameLayer Name
Layer Info
ChannelConfiguration
Data
UnitsConversionEquations
Click box
to displaydialog boxfor enteringa formula or
on any
deriving aformula forthat input
enabledinput
Click toconfigure all
channelssame as Ch. 0
Figure 2-18AI-207 Configuration Screen – Configuration Tab
In Figure 2-18, the screen shows the configuration settings for each analog input on the layer. You can enter a descriptive name in the Name box for each channel. To select other settings, click the down arrow beside each item to pull down the menu and select the desired option (sensor type, thermocouple type, measurement units, selected range). Clicking the check box on each input line enables or disables that specific channel. Clicking the Enable All Channels button turns on all channels. To configure all channels the same as Channel 0, click on the Make All Like Ch. 0 button.
To store your settings, click the Save Configuration button. To reload the configuration file, click on the Update Logger button.
To start a scan manually, click on the red button at the top of the screen. The button will change from red to gray when the scan starts.
To stop a scan, click on the square button next to the red start scan button.
NOTE: For the AI-207, if you select a thermocouple as the sensor for a channel, the Logger reads the status of the Cold Junction Compensator as an additional channel named Channel 33. Channel 33, therefore, appears in the Results Datasets and Chart Displays as a separate channel.
Tel: 508-921-4600 www.ueidaq.com Vers: 3.0.1 Date: September 2012 LoggerManualChap2.fm
right 2012 ed Electronic Industries, Inc.

Chapter 2 26Configuring Your System
© CopyUnit
2.6.2 Configuring Equations for Units Conversion
The rightmost column in Figure 2-18 labeled “Conversion” contains the equations used to convert analog voltage inputs to engineering units. If you know the polynomial equation needed to perform the conversion, you can enter it in a dialog box using the standard notation used with Excel, in which exponents are entered as numerals following a caret (^). The polynomial can be of any order, but will normally displayed in an ascending sequence.
If you do not know the polynomial equation, you can use a two-point interpolation method to derive a linear equation automatically, using a procedure described below.
Manual Entry of EquationThe procedure for manually entering a conversion equation is as follows:
STEP 1: In the configuration screen for your analog input layer, make sure that the input you want to work with is “enabled”. Then click in the Conversion column for that particular analog input. The dialog box shown in Figure 2-19 then appears.
Figure 2-19Dialog Box for Computing Units Conversion Equation
STEP 2: In the dialog box above, first enter the desired engineering units in the Units box.
STEP 3: In the Formula box, enter the polynomial equation, using a caret (^) to indicate an exponent. When your entry is complete and error-free, click OK. The dialog box then closes and the formula appears in the appropriate location within the Conversion column of the Configuration screen. If you make a syntactical error in entering the polynomial equation, the OK button is grayed out. If this occurs, check your entry and correct any errors. The OK button will then re-appear. Then click OK and proceed.
Tel: 508-921-4600 www.ueidaq.com Vers: 3.0.1 Date: September 2012 LoggerManualChap2.fm
right 2012 ed Electronic Industries, Inc.

Chapter 2 27Configuring Your System
© CopyUnit
Two-Point InterpolationThe procedure for deriving an equation from two sampled datapoints is as follows:
STEP 1: In the configuration screen for your analog input layer, make sure that the input you want to work with is “enabled”. Then click in the Conversion column for that particular analog input. The dialog box shown in Figure 2-19 then appears.
STEP 2: In the dialog box, first enter the desired engineering units in the Units box.
STEP 3: Click on “Compute From Sampled Data Points”. The dialog box shown in Figure 2-20 appears.
Label changes to match Unitsentered in dialog box ofFigure 2-17.
Figure 2-20Sampled Data Point Dialog Box
STEP 4: Apply a voltage input to the analog input terminals for this channel equal to the value you want to use for the lower-valued data point.
STEP 5: Enter a value for units at the lower-value data point.
STEP 6: Apply a voltage input to the analog input terminals for this channel equal to the value you want to use for the higher-valued data point.
STEP 7: Enter a value for units at the higher-value data point.
STEP 8: Click OK when finished. The configuration screen will then show the computed equation in the appropriate box in the Conversion column.
Tel: 508-921-4600 www.ueidaq.com Vers: 3.0.1 Date: September 2012 LoggerManualChap2.fm
right 2012 ed Electronic Industries, Inc.

Chapter 2 28Configuring Your System
© CopyUnit
2.6.3 Configuring Clock and Trigger Options
This section describes the procedure for setting Clock and Trigger options. The AI-207 analog input layer is used as an example.
The procedure for setting Clock & Trigger options is as follows:
STEP 1: In the left screen panel, click on Layer0 to display the AI-207 configuration screen. Then, in the Configure box, pull down the menu and select the “Clock and Trigger” option. The screen shown in Figure 2-21 appears.
Figure 2-21. Configuring Clock and Trigger
In this screen, you can select the following options:
• Software or Hardware Trigger for the Master Trigger Source
• Layer Start Trigger
• Layer Stop Trigger
• Timing Scan Rate
• Timing Clock Source: Layer, Sync Clock, External Clock
• File Limits
NOTE: You can use an external clock as the source for Sync Clock. To do so, connect the external clock to the Cube through the Sync port, using a DNA-STP-SYNC interconnection board to make the connections. Refer to Figure 1-6 on page 12 (Chapter 1) for details.
Tel: 508-921-4600 www.ueidaq.com Vers: 3.0.1 Date: September 2012 LoggerManualChap2.fm
right 2012 ed Electronic Industries, Inc.

Chapter 2 29Configuring Your System
© CopyUnit
NOTE: The Sync input is not supported as a layer start/stop source for messaging layers such as the 501, 503, and 429 layers.
2.6.3.1 Master Trigger Source
Specifying a software trigger lets you start scanning from the red Start Scan button at the top of the screen and to stop scanning from the square button next to the start button. Selecting the software trigger option also permits you to start/stop scanning using an external program.
Selecting the hardware Trigger option lets you configure the Master Trigger Start Scan from a range of sources, such as a manual pushbutton (provided on the Cube), a Sync signal (except on 501, 503, 508, or 429 layers), or a specific time. It also permits you to control the scan stop from a pushbutton, Sync signal, time, or time duration. In all cases, you can also enable “Auto Start On Boot” and “Allow Software Trigger” by clicking the appropriate check box. If you enable “Allow Software Trigger” when in hardware Trigger mode, the red Start Scan button is enabled. If “Allow Software Trigger” is not checked, the button is disabled. In configuring the Master Trigger Source, you should always leave the “Allow Software Trigger” box checked. This provides a backup method to stop logging if one of the other selected methods fails to occur.
Note that specifying values that are out of range for the triggers will cause undesirable results. These include not configuring the cube’s time, setting the date before the present date, or configuring the duration to a non-positive value. These out-of-range settings prevent the cube’s trigger from starting or stopping.
Note that for a Master Trigger Start to function properly, the Sync signal must remain in the active state for at least one second. Note that the Sync cable must be well-connected; a floating SYNC signal due to a loose connection or no cable will result in the cube triggering to start when the level is set to 1 (active-high) or never starting when the level is 0.
2.6.3.2 Layer Start Trigger
If you select Trigger rather than Software in the Master Trigger Source box, you can then select a Layer Start Trigger and a Layer Stop Trigger as described here. The options are as follows:
None — if you select this option, scanning starts and stops according to the setting for the Master Trigger for the Cube.
Level — if you select this option, scanning starts and stops based on the level of a specified channel input, as shown in Figure 2-22. The signal level can generate a trigger if it deviates from a specified threshold (above, below, in, or out of a specified range).
Figure 2-22. Selecting Layer Start Trigger – Level
Check this box to enablethis trigger to start other Layers
Tel: 508-921-4600 www.ueidaq.com Vers: 3.0.1 Date: September 2012 LoggerManualChap2.fm
right 2012 ed Electronic Industries, Inc.

Chapter 2 30Configuring Your System
© CopyUnit
NOTE: If “Can Start Other Layers” is checked, this Start Trigger appears as an available trigger option in other layers, as shown in Figure 2-23.
Selecting this optionstarts Layer 1 from the trigger selectedfor Layer 0.
Layer 1 selectedfor configuration
Figure 2-23Starting a Layer from the Previous Layer Trigger
Sync — If you select this option, scanning starts and stops on a sync signal (except on 501, 503, or 429 layers), which can be externally generated, similar to that shown in Figure 2-24. The sync signal is fed into the Cube through the Sync connector on the Cube panel (refer to 2.6.3.3 below). Note that the signal must stay at the selected level for at least one second.
Figure 2-24Selecting Sync Clock Trigger
Alarm — If you select this option, scanning starts when a particular alarm event occurs, as described in “Configuring Alarms” on page 33.
2.6.3.3 Start/Stop from Remote Pushbutton
To start/stop scanning from a remote pushbutton (other than the button mounted on the face of the Cube), do the following:
STEP 1: Plug a SYNC-RJ cable (or equal) into the SYNC connector on the face of the Cube. The SYNC connector is a 10-pin ST-series connector similar to those used in cell phones and digital cameras.
STEP 2: At the far end of the cable, attach a connector or other device that permits you to connect an on/off switch or pushbutton between the cable conductors attached to Pins 9 and 10 of the SYNC connector.
STEP 3: On the UEILogger, select the following configuration options:
1. In the configuration screen, select “Clock and Trigger” in the Configure box.
2. In the Master Trigger window Source box, select “Trigger” and check the “Allow Software Trigger” box.
Tel: 508-921-4600 www.ueidaq.com Vers: 3.0.1 Date: September 2012 LoggerManualChap2.fm
right 2012 ed Electronic Industries, Inc.

Chapter 2 31Configuring Your System
© CopyUnit
3. In the Start Source Box, select “Sync.” This activates the remote button connection.
4. In the Stop Source box, select “Sync.” This enables the button to stop the scan.
Do not make any selections in the Layer Start Trigger, Layer Stop Trigger, and Timing boxes.
2.6.3.4 Layer Stop Trigger
This trigger offers similar options to those described above for the Layer Start Trigger, except that no Alarm option is available.
2.6.3.5 Time Duration Trigger
You can configure a time duration scan by selecting Clock and Trigger >> Trigger and then selecting Duration in the Stop Source window. Duration should be non-zero. You can select any of the options for Start Source that you wish.
Next, enter the desired time duration for the scan in the duration window as shown in Figure 2-25. The scan will then start on the trigger you have selected and run for the length of time you entered in the duration window.
Figure 2-25Configuring a Time Duration Session
2.6.3.6 Timing You can specify the scan rate in Hz by entering the rate in the Scan Rate box as shown in Figure 2-26. The maximum scan rate is limited by the write speed of the SD card, performed by right-clicking your IOM cube in PowerDNA Network and selecting Run SD Card Speed Test in UEILogger 3.x.
You can also select the Clock Source from three options: Layer (internal), Sync Clock, or External Clock.
Figure 2-26. Selecting Scan Rate and Clock Source
Scan Duration
Tel: 508-921-4600 www.ueidaq.com Vers: 3.0.1 Date: September 2012 LoggerManualChap2.fm
right 2012 ed Electronic Industries, Inc.

Chapter 2 32Configuring Your System
© CopyUnit
Note that the scan rate sets the CL clock, the Channel List clock. The CV (conversion) clock is automatically set to an optimum rate that ensures the correct settling time for each A/D conversion.
2.6.3.7 File Limits You can specify limits for the data files that are produced in the writing process. The following fields can be set:
• Data File Size
• Data Files Number
• Recycle Data Files
• Recycle Datasets
Data File Size is the maximum size any one single file produced by a layer. The minimum filesize is 1 KiB (1024 bytes), the maximum is 2097151 KiB (2GiB).
Data Files Number is the maximum number of files that any one layer can produce. Note that hundreds of files will slow down the filesystem noticeably.
Recycle Data Files instructs the Logger to overwrite the oldest data file rather than stop logging. If you do not check the Recycle Data Files box, the Logger will write data to the SD card until the maximum number and size of files selected is reached. If you do check the Recycle Data Files box, the Logger will start to overwrite the oldest data when the maximum number and size is reached.
Recycle Datasets instructs the Logger to delete older data sets when there is insufficient space available on disk on legacy devices. It is recommended that Recycle Data Files is used instead.
Ensure that enough space is available to write to disk or logging will end prematurely. The space that is used is equivalent to the product of these fields: [Data File Size] * [Data Files Number] * [Number of (Active) Layers in Cube] * [ Bits per sample] = Total Space Necessary In the case that logging has ended prematurely due to not enough disk space, free up space and reset your Logger before beginning to log again.
Resolving Filesystem Errors
To resolve filesystem errors that result from improper shutdown or bad file allocation from an example volume E: the following tools are recommended: 1 Mount the SD card in your PC using an SD card reader. 2a. Right-click the volume > Properties > Tools > Check Now..., or 2b. Use the Command Prompt to perform a chkdsk /f e: on the volume. 3 Delete any lost clusters in the hidden folders E:\FOUND.??? If this method fails, then re-format the card using FAT32 with 32K clusters.
Tel: 508-921-4600 www.ueidaq.com Vers: 3.0.1 Date: September 2012 LoggerManualChap2.fm
right 2012 ed Electronic Industries, Inc.

Chapter 2 33Configuring Your System
© CopyUnit
2.6.4 Configuring Alarms
Alarms are identified by numbered labels Alarm0 to AlarmN, sequentially numbered for an entire Cube rather than being Layer-specific. You can select one of two options for each alarm: None, Level.
Selecting None effectively disables the specific alarm. Selecting Level specifies an alarm action based on the signal level of an input channel, as described below. How each alarm is triggered and the action taken when it occurs is described in this section.
2.6.4.1 Adding an Alarm
The procedure for adding an alarm to the Cube is as follows:
STEP 1: In the Configure window, pull down the menu and select Alarms, as shown in Figure 2-27.
Figure 2-27Selecting Alarms
The screen shown in Figure 2-28 then appears.
Figure 2-28. Adding a New Alarm
Click to add Alarm0
Tel: 508-921-4600 www.ueidaq.com Vers: 3.0.1 Date: September 2012 LoggerManualChap2.fm
right 2012 ed Electronic Industries, Inc.

Chapter 2 34Configuring Your System
© CopyUnit
STEP 2: To add a new alarm, enter a name for the alarm in the box at the bottom of the screen. If a default name is already displayed, either accept the default name or enter another unique name. Then click the Add button to add the alarm. The new alarm name then appears at the top of the window panel. Note that the name applies for the entire Cube and not just a specific Layer; i.e., only one AlarmX can be used for any layer in a Cube.
2.6.4.2 Configuring an Alarm
To configure a new alarm, use the following procedure:
STEP 1: Click on the alarm name in the left panel. A panel then appears at the right with available configuration options, as shown in Figure 2-29.
Figure 2-29Alarm Configuration Options
In the Type box, pull down the menu and note that the available options are:
• None
• Level
If you select None, you effectively disable this alarm. if you select Level, the screen shown in Figure 2-30 appears.
Figure 2-30. Configuring Alarm – Level
Tel: 508-921-4600 www.ueidaq.com Vers: 3.0.1 Date: September 2012 LoggerManualChap2.fm
right 2012 ed Electronic Industries, Inc.

Chapter 2 35Configuring Your System
© CopyUnit
2.6.4.3 Configuring a Level Alarm
To configure an alarm based on the signal level on an analog input line, use the following procedure:
STEP 1: In the Type box, pull down the menu and select Level. The screen shown in Fig-ure 2-31 appears.
Alarm SourceOptions
Alarm OutputAction Options
Figure 2-31. Configuring a Level Alarm Source
You can examine the various configuration options by clicking the down arrows and pulling down the menus for each item.
The alarm source options (see Figure 2-31) for a Level alarm are:
• Alarm Source – the Layer on which the signal is measured
• Channel – the specific channel on which the signal appears (select channel with the up/down arrows)
• Level 0 – the lower range limit of the input signal
• Level 1 – the upper range limit of the input signal
• Compare – definition of the alarm trigger condition (In Range, Above, Below, Out of Range)
The alarm output and action options are:
• Output Layer – the layer that will generate the alarm signal. May be a specific DIO Layer or the PPC (for new PPC layers built after 2012).
• Output Line – the channel or line on which the alarm signal will appear. Select the specific line by clicking the down arrow at the right and highlighting the desired line. If you select PPC as the Output Layer, SyncOut is specified as the Output Line.
• Assert – Click the down arrow and select either High or Low. This defines the output signal that will appear on the line.
• Beep on Alarm – Click the check box to activate an audible alarm when the alarm is triggered.
Tel: 508-921-4600 www.ueidaq.com Vers: 3.0.1 Date: September 2012 LoggerManualChap2.fm
right 2012 ed Electronic Industries, Inc.
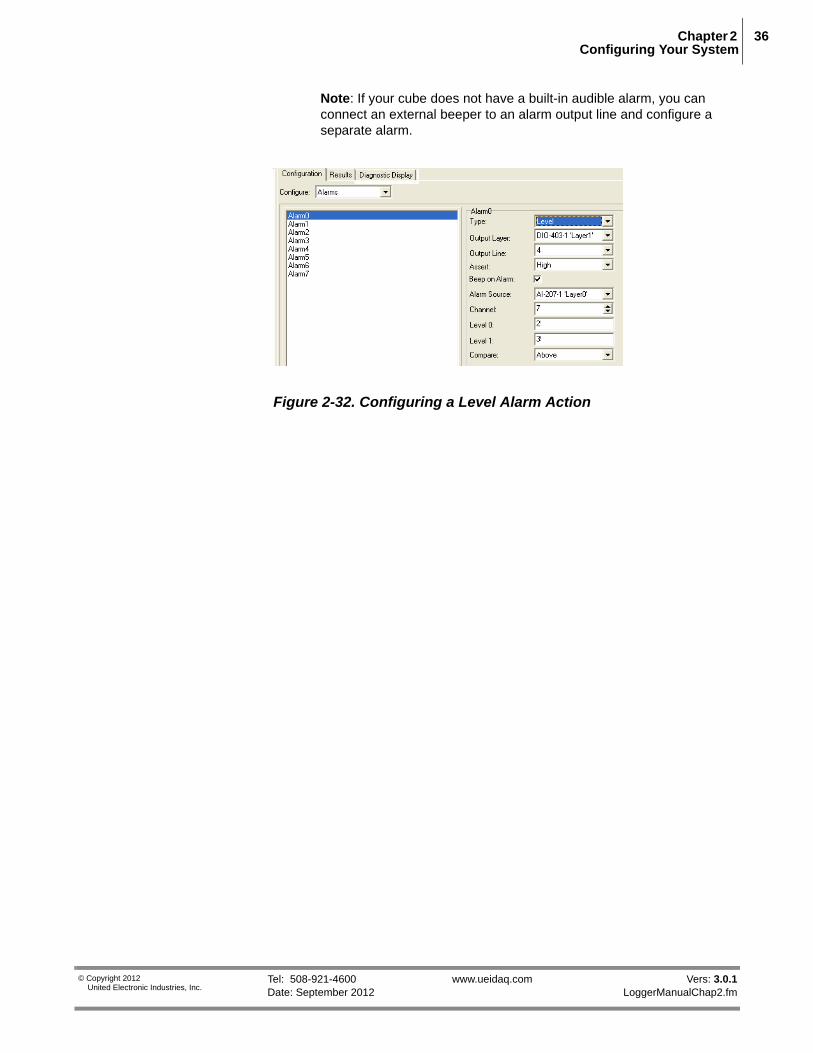
Chapter 2 36Configuring Your System
© CopyUnit
Note: If your cube does not have a built-in audible alarm, you can connect an external beeper to an alarm output line and configure a separate alarm.
Figure 2-32. Configuring a Level Alarm Action
Tel: 508-921-4600 www.ueidaq.com Vers: 3.0.1 Date: September 2012 LoggerManualChap2.fm
right 2012 ed Electronic Industries, Inc.

Chapter 2 37Configuring Your System
© CopyUnit
2.7 Configuring Excitation Voltage
Some layer boards, such as the DNA-AI-208 Strain Gauge Input Layer, provide excitation voltages for connected sensors.
The procedure for configuring the excitation output voltage for this type of layer is illustrated in Figure 2-33.
Figure 2-33. Configuring Excitation Voltage for DNA-AI-208 Sensors
Select excitation voltage output here
Tel: 508-921-4600 www.ueidaq.com Vers: 3.0.1 Date: September 2012 LoggerManualChap2.fm
right 2012 ed Electronic Industries, Inc.

Chapter 2 38Configuring Your System
© CopyUnit
2.8 Configuring a DIO-403 Digital Input/Output Layer
The procedure for configuring a DIO-403 Digital Input/Output Layer is generally similar to that for an AI-207 Analog Input Layer.
To configure a DIO-403 Layer, do the following:
STEP 1: Divide the input/output lines into groups of eight (DIn0 to DIn5). A group may be declared either an input or an output group of lines.The states of all lines in a group are represented by a hexadecimal word between 0x00 and 0xFF.
STEP 2: In the left panel of the Logger screen, click on DIO-403-1 ‘Layer1’. Then, in the right hand window, click on the Configuration tab. In the Configure box, pull down the menu and select Channels. The screen shown in Figure 2-34 then appears.
Enter adescriptivename for 8-line
Click fordigitalinput
Click fordigitaloutput
group
Figure 2-34Configuring DIO Channels
In this screen, enable or disable groups of DIO lines by checking the Enabled or Output checkboxes on each line of the display. If you check an Enabled box, you cannot also check an Output box. Similarly, if you check an Output box, you cannot check the corresponding input Enabled box of a group.
When you start a scan, the states of the input lines at each scan interval are recorded as hexadecimal words (0x00 to 0xFF) for each group of 8 inputs. The results are recorded as cells in a .csv file and displayed as an Excel spreadsheet.
Tel: 508-921-4600 www.ueidaq.com Vers: 3.0.1 Date: September 2012 LoggerManualChap2.fm
right 2012 ed Electronic Industries, Inc.

Chapter 2 39Configuring Your System
© CopyUnit
2.9 Configuring an SL-501 Serial Comm. Layer
The procedure for configuring an SL-501 Serial Communication Layer is generally similar to that for an AI-207 Analog Input Layer, except that there is no signal level to set and the Sync input is not available for use as a Start/Stop trigger. (Refer to “Configuring a Layer” on page 23 for details.)
To configure an SL-501 Layer, do the following:
STEP 1: In the left window of the Logger screen, click on the Layer marked SL-501-1. Then, in the right hand window, click on the Configuration tab. In the Configure box, pull down the menu and select Channels. The screen shown in Figure 2-35 then appears.
Figure 2-35Configuring the SL-501 Ports
STEP 2: The screen shows the current configuration settings for all four serial ports. Enable a specific port by clicking on the Enable checkbox for that port. As an alternative, you can click on Enable All Channels to enable all four ports. To start over, click on the Enable checkbox again or click on Disable All Channels.
STEP 3: For each enabled port, select the configuration setting option from the following:
• Mode: RS-232, RS-485 full duplex, RS-485 half duplex
• Baud: 300, 600, 1200, 2400, 4800, 9600, 10200, 56000, 115200, 128000, 250000, 256000, 1000000
• Parity: None, Even, Odd
• Data Bits: 5, 6, 7, 8
• Stop Bits: 1, 1.5, 2
Click on SL-501-1 to select Layer
Tel: 508-921-4600 www.ueidaq.com Vers: 3.0.1 Date: September 2012 LoggerManualChap2.fm
right 2012 ed Electronic Industries, Inc.

Chapter 2 40Configuring Your System
© CopyUnit
In the column labeled “Timeout”, enter the message termination time in milliseconds. Default is 500 ms.
In the column labeled “Term Type”, select either “Length” or “Bytes”. If you select “Length”, the cell in the last column displays a number indicating how many characters constitute a complete message. If you select “Bytes”, the cell in the eighth column displays a hexadecimal number that indicates the message terminator.
In the column labelled “Output”, select either “Hex” or “ASCII.” If you select “Hex”, output will be in hexidecimal representation. If you select ASCII, output will be in ASCII representation.
STEP 4: When you have made all configuration selections, click the Save Configuration button to save your entries locally. When you are ready to run the Logger, click the Update Logger button to transfer all configuration settings to the Logger.
2.9.1 Config.ini File for SL-501
In the SL-501 config.ini file, active channels are listed in the [CHANNELS_0] section just as with other layer types. Each channel line contains a 32-bit hex number indicating the channel value, including all necessary flags, followed by three or four values in parentheses. The mode, baud, parity, data bits, and stop bits values are included as flags in the channel value, using the standard DQ_SL501_ flags defined in the DAQLib. The first parenthetical value following the channel number is the message termination timeout value in milliseconds. The second value is either “TermLen” or “TermStr”. If it is “TermLen”, the third value is a numeric termination length; if it is “TermStr”, the third value is the number of bytes in the termination string, and the fourth value is the termination string itself. A termination string is stored as a space-separated list of 8-bit hex values, each value having a prefix of “0x”.
For example, the channel listing in the layer .ini file might look like this:
[CHANNELS_0]
nbOfChannels=2
Ch:0=0x80480400(500,TermLen,8)
Ch:1=0x00189100(2000,TermStr,2,0x0D 0x0A)
2.9.2 Configuring Clock and Trigger Options for SL-501
The procedure for configuring the Clock and Trigger options for an SL-501 layer is the same as that for configuring an AI-207, except that there is no signal level to set and the Sync input is not available for use as a Start/Stop trigger. The scan rate has no effect on measurement speed of serial layers and may be ignored. Therefore, please refer to “Configuring Clock and Trigger Options” on page 28 for information on configuring these settings for an SL-501 layer.
2.9.3 SL-501 Data Display
SL-501 data received from the logger cube in a .dat file consists of a sequence of records. Each record consists of:
• 32-bit timestamp value (milliseconds since start of acquisition)
• 16-bit message length
• 1 byte channel number
• Message bytes, the number of which was indicated in the preceding length field
Tel: 508-921-4600 www.ueidaq.com Vers: 3.0.1 Date: September 2012 LoggerManualChap2.fm
right 2012 ed Electronic Industries, Inc.

Chapter 2 41Configuring Your System
© CopyUnit
In addition, the corresponding .hdr file has a parameter in its LOG_0 section called mCount. The value of mCount is a number indicating the number of messages in the .dat file. This is used by the UEILogger application to display the number of messages in the Scans column of the dataset table.
(Refer to Figure 3-1 on page 67 for a typical display of analog data received from an AI-207 layer and a detailed description of the fields on the screen.) For a display of SL-501 serial data, refer to Figure 2-36 below. Note that the “Chart” option in the Show box on the screen is not applicable to the SL-501.
Figure 2-36. Typical Display of SL-501 Data
2.9.4 Exporting SL-501 Data
As described in “Analyzing the Data Offline” on page 72 of Chapter 3, data can be exported from the Logger in a CSV format. The first line of an exported CSV file for an SL-501 layer is a header line, containing the labels “Timestamp”, “Channel”, and “Message”. Each of the subsequent lines represents a single message. The first two fields contain the timestamp and channel number, respectively. The third field contains the message data as a list of hexadecimal byte values. The following is a sample output file:
Timestamp, Channel, Message3/16/2007 14:13:52.000, 2, 0x48 0x65 0x6C 0x6C 0x6F 0x0D 0x0A3/16/2007 14:13:57.010, 1, 0x74 0x65 0x73 0x74 0x0D 0x0A
SL-501 data can also be exported from the Logger to Microsoft Excel. A typical display of data exported to Excel is shown in Figure 2-37.
Tel: 508-921-4600 www.ueidaq.com Vers: 3.0.1 Date: September 2012 LoggerManualChap2.fm
right 2012 ed Electronic Industries, Inc.

Chapter 2 42Configuring Your System
© CopyUnit
Figure 2-37Display of SL-501 Data Exported to Microsoft Excel
For those who want to export logged data in a user-selected format other than CSV or Excel, refer to the UEI document called UEILogger Data Conversion Procedure, which is available online at www.ueidaq.com.
2.10 Configuring an SL-501 Layer for Outgoing Messages
Some customers have the requirement when using the UEILogger with an SL-501 layer that the logger be able to send outgoing messages from the serial ports to devices driven by the layer. There are two kinds of messages, classified by when they are sent: (1) initialization messages, which must be sent when acquisition starts; and (2) periodic messages, which must be sent at regular intervals during acquisition.
You may specify any number of initialization messages. The specification consists of a time interval value, and a series of bytes indicating the message itself. The time interval is specified as a number of milliseconds, indicating how much time to wait before sending the message. The time interval of the first initialization message is relative to the logger startup time. The time interval of each subsequent initialization message is relative to the time interval of the previous message.
You may specify any number of periodic messages in the same way. The time interval value of each periodic message is the interval for repeated transmissions of that message, in milliseconds.
Setting a message that takes longer to transmit than the time available between messages will cause that message to be dropped if there is no space in the transmit buffer. Take care when setting your initialization message delays and periodic message rate to avoid losing messages.
Tel: 508-921-4600 www.ueidaq.com Vers: 3.0.1 Date: September 2012 LoggerManualChap2.fm
right 2012 ed Electronic Industries, Inc.

Chapter 2 43Configuring Your System
© CopyUnit
2.10.1 User Interface The drop-down menu in the Configuration tab for the SL-501 layer has an additional item labeled “Outgoing Messages”, which allows you to access a configuration panel for setting up outgoing messages. See Figure 2-38.
Figure 2-38SL-501 Outgoing Message Configuration Screen
The Outgoing Messages configuration panel contains a tabbed pane, with one tab for each port. Each port tab contains two grid controls for specifying outgoing messages. One is for initialization messages, and the other is for periodic messages. See Figure 2-39.
Figure 2-39Configuring Initialization and Periodic Messages
Tel: 508-921-4600 www.ueidaq.com Vers: 3.0.1 Date: September 2012 LoggerManualChap2.fm
right 2012 ed Electronic Industries, Inc.

Chapter 2 44Configuring Your System
© CopyUnit
To configure the SL-501 for Periodic Messages, do the following:
STEP 1: Enter the time interval for each message in the first grid column, and the mes-sage content in the second column. The message content is a sequence of hexadecimal digits as space-separated pairs. For user convenience, the pairs are not prefixed by “0x”.
The grid automatically adds rows as needed. The grid always contains one empty row below the last non-empty row. As soon as the user enters a value into the last row, a new row is added. Click the “x” next to the row to delete it.
Messages can also be to serial comm devices as ASCII text messages. To do so, click the box marked ASCII Text Messages on the Outgoing Messages screen. A screen similar to that in Figure 2-40 then appears.
Figure 2-40Display of SL-501 Message as ASCII Text
2.10.2 Configuration File Format
The configuration INI file for the layer contains, in addition to all other configuration values, the outgoing messages that you have specified for the SL-501 layer. Each channel that has outgoing messages will have its own section in the INI file, called OUTGOING_CHAN_x, where “x” is the channel number. This section contains the following name/value pairs:
• initMsgCount, whose value is the number of initialization messages
• One entry per initialization message named initMsgX, where “x” is a message count starting at 0 for the first one
Tel: 508-921-4600 www.ueidaq.com Vers: 3.0.1 Date: September 2012 LoggerManualChap2.fm
right 2012 ed Electronic Industries, Inc.

Chapter 2 45Configuring Your System
© CopyUnit
• periodicMsgCount, whose value is the number of periodic messages
• One entry per periodic message named periodicMsgX, where “x” is a message count starting at 0 for the first one
The values for initMsgX and periodicMsgX consist of the time interval, followed by a comma and a space, followed by the number of bytes of the message, followed by a comma and a space, followed by a list of space-separated 8-bit hexadecimal values specifying the message. Note that unlike the Logger application User Interface, the message bytes in the INI file are each preceded by “0x” to ease the processing.
The following is a sample excerpt from a SL-501 layer INI file, in which outgoing messages are specified for channels 0 and 2:
[OUTGOING_CHAN_0]initMsgCount=5initMsg0=100, 5, 0x56 0xB7 0xE3 0x29 0xFFinitMsg1=100, 7, 0x46 0x78 0xCF 0xA9 0x22 0x6F 0x90initMsg2=5000, 3, 0x89 0x0E 0x53initMsg3=100, 3, 0xFE 0x78 0x98initMsg4=250, 3, 0x67 0x88 0xB4periodicMsgCount=2periodicMsg0=500, 3, 0x56 0xDE 0x04 periodicMsg1=3000, 5, 0x89 0x24 0xD3 0xB7 0x0B
[OUTGOING_CHAN_2]initMsgCount=2initMsg0=200, 4, 0xE3 0xBD 0x0A 0x4BinitMsg1=500, 6, 0x41 0x79 0x86 0x16 0xBC 0xE3periodicMsgCount=3periodicMsg0=500, 2, 0x53 0xE8 periodicMsg1=5000, 2, 0xAA 0x62 periodicMsg2=10, 2, 0x41 0x79
2.10.3 Retrieving Raw Samples
Data is stored on the SD card in the appropriately timestamped directory. When the UEILogger 3.0 GUI’s Download from SD function is used, raw samples can be found in the folder %AllUsersProfile%\UEI\Logger\Repository.
Tel: 508-921-4600 www.ueidaq.com Vers: 3.0.1 Date: September 2012 LoggerManualChap2.fm
right 2012 ed Electronic Industries, Inc.

Chapter 2 46Configuring Your System
© CopyUnit
2.11 Configuring a CAN-503 Serial Bus Layer
The procedure for configuring an CAN-503 Controller Area Network Serial Bus Layer is generally similar to that for an AI-207 Analog Input Layer, except that there is no signal level to set and the Sync input is not available for use as a Start/Stop trigger. (Refer to “Configuring a Layer” on page 23 for details.)
The CAN-503, however, has an additional feature that permits the layer to generate a start or stop trigger when a message with a specific ID, port, and message content is received.
To configure an CAN-503 Layer, do the following:
STEP 1: In the left window of the Logger screen, click on the Layer marked CAN-503. Then, in the right hand window, click on the Configuration tab. In the Configure box, pull down the menu and select Channels. The screen shown in Figure 2-41 then appears.
Figure 2-41Configuring the CAN-503 Ports
STEP 2: The screen shows the current configuration settings for all four CAN ports. Enable a specific port by clicking on the associated Enable checkbox for that port. As an alternative, you can click on Enable All Channels to enable all four ports. To start over, click the Enable checkbox again or click on Disable All Channels.
Click on CAN-503-1 to select Layer Click to enable CAN port
Tel: 508-921-4600 www.ueidaq.com Vers: 3.0.1 Date: September 2012 LoggerManualChap2.fm
right 2012 ed Electronic Industries, Inc.

Chapter 2 47Configuring Your System
© CopyUnit
STEP 3: For each enabled port, select the configuration setting options from the following:
The channel configuration table for the CAN-503 layer contains five columns, for setting speed, mode, listen-only flag, accept mask, and accept code. The speed and mode values are set by pulldown list boxes, and the listen-only flag is a checkbox. The accept mask and accept code values are 32-bit hexadecimal numbers, though only the least significant 8 or 29 bits are used, depending on whether the mode is standard or extended. The values in the pulldown list boxes are:
• Speed (Kb/s): 10, 20, 50, 100, 125, 500, 800, 1000
• Mode: Basic, Extended
The basic mode has an 11-bit identifier and the extended mode has a 29-bit identifier (combining two separate fields).
STEP 4: When you have made all configuration selections, click the Save Configuration button to save your entries locally. When you are ready to run the Logger, click the Update Logger button to transfer all configuration settings to the Logger.
2.11.1 Config.ini File for CAN-503
In the layer config.ini file, active channels are listed in the [CHANNELS_0] section just as with other layer types. Each channel line contains a 32-bit hex number indicating the channel value, including all necessary flags, followed by two values in parentheses. The speed, mode, and listen-only flag values are included as flags in the channel value, using the standard DQ_CAN503_ flags defined in the DAQLib. The parenthetical values are the accept mask and accept code, respectively.
For example, the channel listing in the layer .ini file might look like this:
[CHANNELS_0]nbOfChannels=2Ch:0=0x80002600(0x000000FF,0x00000000)Ch:1=0x00001601(0xFFFFFFFF,0x0000ABCD)
2.11.2 Configuring Clock and Trigger Options for CAN-503
The procedure for configuring the Clock and Trigger options for an CAN-503 layer is the same as that for configuring an AI-207, except that there is no signal level to set and the Sync input is not available for a Start/Stop Trigger. Therefore, please refer to “Configuring Clock and Trigger Options” on page 28 for information on configuring these settings for a CAN-503 layer.
Tel: 508-921-4600 www.ueidaq.com Vers: 3.0.1 Date: September 2012 LoggerManualChap2.fm
right 2012 ed Electronic Industries, Inc.

Chapter 2 48Configuring Your System
© CopyUnit
The CAN-503, however, has an additional feature that permits the layer to generate a start or stop trigger when a message with a specific ID, port, and message content is received. This feature is illustrated in the screen shown in Figure 2-42.
Figure 2-42Configuring a Start/Stop Trigger on a CAN-503 Message
To configure the trigger(s), do the following:
STEP 1: In the 503 configuration screen, click on the arrow in the Type box under Layer Start Trigger and select the “Message” option.
STEP 2: Click the “Can start other layers” box.
STEP 3: Enter the Port, ID, and Message content in the appropriate boxes.
STEP 4: Repeat these steps as applicable for the Layer Stop Trigger.
STEP 5: Click ”Save Configuration” and then “Update Logger”.
2.11.3 CAN-503 Data Display
CAN-503 data received from the logger cube in a .dat file consists of a sequence of records. Each record consists of:
• 32-bit timestamp value (milliseconds since start of acquisition)
• 8-bit message length
• 1 byte channel number
Tel: 508-921-4600 www.ueidaq.com Vers: 3.0.1 Date: September 2012 LoggerManualChap2.fm
right 2012 ed Electronic Industries, Inc.

Chapter 2 49Configuring Your System
© CopyUnit
• 32-bit CAN ID value
• Message bytes, the number of which was indicated in the preceding length field
In addition, the corresponding .hdr file has a parameter in its LOG_0 section called mCount. The value of mCount is a number indicating the number of messages in the .dat file. This is used by the UEILogger application to display the number of messages in the Scans column of the dataset table.
(Refer to Figure 3-1 on page 67 for a typical display of analog data received from an AI-207 layer and a detailed description of the fields on the screen.) For a display of CAN-503 serial data, refer to Figure 2-43 below. Note that the “Chart” option in the Show box on the screen is not applicable to the CAN-503.
CAN errors are returned from the cube the same way they currently are in PowerDNA. An error is returned as a normal message record within the data stream. However, the channel number of an error message is 0x80 instead of a valid CAN-503 channel number, and the message consists of a single byte containing one of the DQ_CAN503_ERR_ error values.
Figure 2-43. Typical Display of CAN-503 Scan Results
Tel: 508-921-4600 www.ueidaq.com Vers: 3.0.1 Date: September 2012 LoggerManualChap2.fm
right 2012 ed Electronic Industries, Inc.

Chapter 2 50Configuring Your System
© CopyUnit
2.11.4 Exporting CAN-503 Data
As described in “Analyzing the Data Offline” on page 72 of Chapter 3, data can be exported from the Logger in a CSV format. The first line of an exported CSV file for an CAN-503 layer is a header line, containing the labels “Timestamp”, “Channel”, “ID”, and “Message”. Each of the subsequent lines represents a single message. The first two fields contain the timestamp and channel number, respectively. The third field contains the message ID as a 32-bit hexadecimal value. The fourth field contains message data as a list of hexadecimal byte values. The following is a sample output file:
Timestamp, Channel, ID, Message3/16/2007 14:13:07.000, 2, 0x00000084, 0xAB 0x34 0x05 3/16/2007 14:13:54.010, 0, 0x0029FE8B, 0x393/16/2007 14:14:32.070, 1, 0x003C2010, 0x74 0x65 0x73 0xFD 0x33
CAN-503 data can also be exported from the Logger to Microsoft Excel. A typical display of data exported to Excel is shown in Figure 2-44.
Figure 2-44Display of CAN-503 Data Exported to Microsoft Excel
For those who want to export logged data in a user-selected format other than CSV or Excel, refer to the UEI document called UEILogger Data Conversion Procedure, which is available online at www.ueidaq.com.
Tel: 508-921-4600 www.ueidaq.com Vers: 3.0.1 Date: September 2012 LoggerManualChap2.fm
right 2012 ed Electronic Industries, Inc.

Chapter 2 51Configuring Your System
© CopyUnit
2.11.5 Error Indication
If there is an error on the CAN bus, such as data errors caused by the bus wiring being not terminated correctly, the error will be shown in the Log file. To distinguish error messages from normal CAN data, 128 is automatically added to the channel number.
Figure 2-45Display of Exported CAN-503 Data Containing Errors
Port Number greater than 128 indicates an error condition
Tel: 508-921-4600 www.ueidaq.com Vers: 3.0.1 Date: September 2012 LoggerManualChap2.fm
right 2012 ed Electronic Industries, Inc.

Chapter 2 52Configuring Your System
© CopyUnit
2.12 Configuring a 429-566 ARINC Comm. Layer
The procedure for configuring an 429-566 ARINC Communication Layer is generally similar to that for an AI-207 Analog Input Layer. (Refer to “Configuring a Layer” on page 23 for details.)
To configure an 429-566 Layer, do the following:
STEP 1: In the left window of the Logger screen, click on the Layer marked 429-566. Then, in the right hand window, click on the Configuration tab. In the Configure box, pull down the menu and select Channels. The screen shown in Figure 2-46 then appears.
Figure 2-46Configuring the 429-566 Ports
STEP 2: The screen shows the current configuration settings for all twelve 429-566 ports. Enable a specific port by clicking on the associated Enable checkbox for that port. As an alternative, you can click on Enable All Channels to enable all 12 ports. To start over, click the Enable checkbox again or click on Disable All Channels.
STEP 3: For each enabled port, select the configuration setting options from the following:
Click on 429-566-1 to select Layer Click to enable 429 port
Tel: 508-921-4600 www.ueidaq.com Vers: 3.0.1 Date: September 2012 LoggerManualChap2.fm
right 2012 ed Electronic Industries, Inc.

Chapter 2 53Configuring Your System
© CopyUnit
The channel configuration table for the 429-566 layer contains five columns, for setting speed, SDI On checkbox, SDI value, parity, and filter list for each channel. The speed and parity values are set by pulldown list boxes. The values in the pulldown list boxes are:
• Speed (Kb/s): 12.5,100
• Parity: None, Even, Odd
The SDI On column contains checkboxes to indicate on/off status of the SDI identifier. The SDI column contains a number in the range 0 - 3 that specifies the two SDI bits. A filter list value contains a space-separated-list of hex digit pairs. Note that a cell in the filter list can also be empty.
STEP 4: When you have made all configuration selections, click the Save Configuration button to save your entries locally. When you are ready to run the Logger, click the Update Logger button to transfer all configuration settings to the Logger.
2.12.1 Config.ini File for 429-566
In the layer config.ini file, active channels are listed in the [CHANNELS_0] section just as with other layer types. Each channel line contains a 32-bit hex number indicating the channel value, including all necessary flags, followed by four comma-separated values in parentheses. The first value is speed, (either 12.5 or 100), the second is a number from 0 to 3, indicating the SDI value, and the third is the parity value, which may be Odd, Even, or None. The fourth value is the filter list which consists of a space-separated list of hexadecimal numbers. If this field consists of a single 0x000 value, it indicates that no filter list is used. The logger allows you to set filter list values from 0x001 up to 0x1FF. Addition of the 9th bit to the 8-bit Label permits you to set/reset the ND bit, for enabling/disabling the New Data Only option.
The “New Data Only” option, which is available with the ARINC 429-566/512 layer, configures the layer to accept only “changed data” and to discard unchanged data. Note that the label filter and “changed data only” features are not available when the 429-566 is used in internal loopback mode.
For example, the channel listing in the layer .ini file might look like this:
[CHANNELS_0]nbOfChannels=2Ch:0=0x80000001(100,3,Odd,0x000)Ch:1=0x00000004(12.5,0,None,0x106 0x1D4 0x1B9 0x180)
2.12.2 Configuring Clock and Trigger Options for 429-566
The procedure for configuring the Clock and Trigger options for an 429-566 layer is the same as that for configuring an AI-207, except that there is no signal level to set and the Sync input is not available for use as a Start/Stop trigger. Therefore, please refer to “Configuring Clock and Trigger Options” on page 28 for information on configuring these settings for a 429-566 layer.
2.12.3 429-566 Data Display
Data received from the logger cube in a .dat file consists of a sequence of records. Each record consists of:
• 32-bit timestamp value (hundreds of microseconds elapsed since start of acquisition)
• 1 byte channel number
Tel: 508-921-4600 www.ueidaq.com Vers: 3.0.1 Date: September 2012 LoggerManualChap2.fm
right 2012 ed Electronic Industries, Inc.

Chapter 2 54Configuring Your System
© CopyUnit
• 32-bit ARINC word, stored in network byte order (big-endian)
The bits in an ARINC word are defined as follows:
Bit 32:Parity bit Bits 31-30:SSM bits Bits 11-29:Message data Bits 9-10:SDI bits Bits 1-8:Label
In addition, the corresponding .hdr file has a parameter in its LOG_0 section called mCount. The value of mCount is a number indicating the number of messages in the .dat file. This is used by the UEILogger application to display the number of messages in the Scans column of the dataset table.
(Refer to Figure 3-1 on page 67 for a typical display of analog data received from an AI-207 layer and a detailed description of the fields on the screen.) For a display of 429-566 serial data, refer to Figure 2-47 below.
Figure 2-47. Typical Display of 429-566 Scan Results
Tel: 508-921-4600 www.ueidaq.com Vers: 3.0.1 Date: September 2012 LoggerManualChap2.fm
right 2012 ed Electronic Industries, Inc.

Chapter 2 55Configuring Your System
© CopyUnit
2.12.4 Exporting 429-566 Data
As described in “Analyzing the Data Offline” on page 72 of Chapter 3, data can be exported from the Logger in a CSV format. The first line of an exported CSV file for an 429-566 layer is a header line, containing the labels “Timestamp”, “Channel”, “Label”, and “Message”. Each of the subsequent lines represents a single message. The first field contains the timestamp, the second contains the channel number. The third field contains the message label value as a decimal integer. The fourth field contains message data as a hexadecimal value. The following is a sample output file:
Timestamp, Channel, Label, Message3/16/2007 14:13:52.000, 0, 20, 0x000070483/16/2007 14:13:57.010, 4, 254, 0x00078D0A
429-566 data can also be exported from the Logger to Microsoft Excel. A typical display of data exported to Excel is shown in Figure 2-48.
Figure 2-48Display of 429-566 Data Exported to Microsoft Excel
For those who want to export logged data in a user-selected format other than CSV or Excel, refer to the UEI document called UEILogger Data Conversion Procedure, which is available online at www.ueidaq.com.
2.13 Configuring an 429-566 Layer for Outgoing Messages
Some customers have the requirement when using the UEILogger with a 429-566 layer that the logger be able to send outgoing messages from the Tx ports to devices driven by the layer. There are two kinds of messages, classified by when they are sent: (1) initialization messages, which must be sent when acquisition starts; and (2) periodic messages, which must be sent at regular intervals during acquisition.
You may specify any number of initialization messages between 0 and 255. The specification consists of a time interval value, and a series of bytes indicating the message itself. The time interval is specified as a number of milliseconds, indicating how much time to wait before sending the message. The time interval of the first initialization message is relative to the logger startup time. The time interval of each subsequent initialization message is relative to the time interval of the previous message.
Tel: 508-921-4600 www.ueidaq.com Vers: 3.0.1 Date: September 2012 LoggerManualChap2.fm
right 2012 ed Electronic Industries, Inc.

Chapter 2 56Configuring Your System
© CopyUnit
You may specify any number of periodic messages in the same way. The time interval value of each periodic message is the interval for repeated transmissions of that message, in milliseconds.
2.13.1 User Interface The drop-down menu in the Configuration tab for the 429-566 layer has an additional item labeled “Output Messages”, which allows you to access a configuration panel for setting up outgoing messages. See Figure 2-49.
Figure 2-49429-566 Outgoing Message Configuration Screen
The Outgoing Messages configuration panel contains a tabbed pane, with one tab for each port. Each port tab contains a two grid controls for specifying outgoing messages. One is for initialization messages, and the other is for periodic messages, as shown in Figure 2-50.
Figure 2-50Configuring the Logger for Outgoing 429-566 Messages
Click to select Outgoing Message function
Tel: 508-921-4600 www.ueidaq.com Vers: 3.0.1 Date: September 2012 LoggerManualChap2.fm
right 2012 ed Electronic Industries, Inc.

Chapter 2 57Configuring Your System
© CopyUnit
To configure the logger for sending 429-566 messages, enter the following items into the Initialization Message and Periodic Message tables:
1. Time — an integer specifying the time to send the message. The timebase for the value is 100 us. In the initialization table, the time value of the first entry is relative to the start of acquisition. The time value of each subse-quent entry is relative to the time of the previous entry. In the periodic mes-sage table, each time value specifies the period to wait before sending the next periodic message.
2. Label — an 8-bit label value specified as an integer from 0 to 255.3. Message — a 19-bit message data value specified in hexadecimal.4. SDI — a 2-bit SDI value specified as an integer from 0 to 3.5. SSM — a 2-bit SSM value specified as an integer from 0 to 3.6. Parity — a parity bit specified as 0 or 1.
The grid automatically adds rows as needed. The grid always contains one empty row below the last non-empty row. As soon as the user enters a value into the last row, a new row is added. Click the “x” next to the row to delete it.
2.13.2 Configuration File Format
The configuration INI file for the layer contains, in addition to all other configuration values, the outgoing messages that you have specified for the 429-566 layer. Each channel that has outgoing messages has its own section in the INI file, called OUTGOING_CHAN_x, where “x” is the channel number. This section contains the following name/value pairs:
• initMsgCount, whose value is the number of initialization messages
• One entry per initialization message named initMsgX, where “x” is a message count starting at 0 for the first one
• periodicMsgCount, whose value is the number of periodic messages
• One entry per periodic message named periodicMsgX, where “x” is a message count starting at 0 for the first one
The values for initMsgX and periodicMsgX consist of the time interval, followed by a comma and a space, followed by a 32-bit value in hexadecimal notation. The 32-bit value encapsulates all of the outgoing message values, encoded according to the ARINC spec, as follows:
Bit 32:Parity bit Bits 31-30:SSM bits Bits 11-29:Message data Bits 9-10:SDI bits Bits 1-8:Label
The following is a sample excerpt from a 429-566 layer INI file, in which outgoing messages are specified for channel 0:
[OUTGOING_CHAN_0]initMsgCount=3initMsg0=100,0x56B7E329initMsg1=100,0x4678CFA9 initMsg2=5000,0x890E53FEperiodicMsgCount=2periodicMsg0=500,0x56DE0489 periodicMsg1=3000,0x24d3B70B
Tel: 508-921-4600 www.ueidaq.com Vers: 3.0.1 Date: September 2012 LoggerManualChap2.fm
right 2012 ed Electronic Industries, Inc.

Chapter 2 58Configuring Your System
© CopyUnit
2.14 Configuring a 429-512 ARINC Comm. Layer
The procedure for configuring an 429-512 ARINC Communication Layer is generally similar to that for an AI-207 Analog Input Layer. (Refer to “Configuring a Layer” on page 23 for details.)
To configure an 429-512 Layer, do the following:
STEP 1: In the left window of the Logger screen, click on the Layer marked 429-512. Then, in the right hand window, click on the Configuration tab. In the Configure box, pull down the menu and select Channels. The screen shown in Figure 2-46 then appears.
Figure 2-51Configuring the 429-512 Ports
STEP 2: The screen shows the current configuration settings for all twelve 429-512 ports. Enable a specific port by clicking on the associated Enable checkbox for that port. As an alternative, you can click on Enable All Channels to enable all 12 ports. To start over, click the Enable checkbox again or click on Disable All Channels.
STEP 3: For each enabled port, select the configuration setting options from the following:
Click on 429-512-1 to select Layer Click to enable 429 port
The “1” indicatesthat the “new data only” option(ND bit) is set.
Tel: 508-921-4600 www.ueidaq.com Vers: 3.0.1 Date: September 2012 LoggerManualChap2.fm
right 2012 ed Electronic Industries, Inc.

Chapter 2 59Configuring Your System
© CopyUnit
The channel configuration table for the 429-512 layer contains four columns, for setting speed, SDI, parity, and filter list for each channel. The speed and parity values are set by pulldown list boxes. The values in the pulldown list boxes are:
• Speed (Kb/s): 12.5,100
• Parity: None, Even, Odd
The SDI column contains a number in the range 0 - 3 that specifies the two SDI bits. A filter list value contains a space-separated-list of hex digit pairs. Note that a cell in the filter list can also be empty.
STEP 4: When you have made all configuration selections, click the Save Configuration button to save your entries locally. When you are ready to run the Logger, click the Update Logger button to transfer all configuration settings to the Logger.
2.14.1 Config.ini File for 429-512
In the layer config.ini file, active channels are listed in the [CHANNELS_0] section just as with other layer types. Each channel line contains a 32-bit hex number indicating the channel value, including all necessary flags, followed by four comma-separated values in parentheses. The first value is speed, (either 12.5 or 100), the second is a number from 0 to 3, indicating the SDI value, and the third is the parity value, which may be Odd, Even, or None. The fourth value is the filter list which consists of a space-separated list of 9-bit hexadecimal numbers. If this field consists of a single 0x000 value, it indicates that no filter list is used. The logger allows you to set filter list values from 0x001 up to 0x1FF. Addition of the 9th bit to the 8-bit Label permits you to set/reset the ND bit, for enabling/disabling the New Data Only option.
The “New Data Only” option, which is available with the ARINC 429-512 layer, configures the layer to accept only “changed data” and to discard unchanged data.
For example, the channel listing in the layer .ini file might look like this:
[CHANNELS_0]nbOfChannels=2Ch:0=0x80000001(100,3,Odd,0x000)Ch:1=0x00000004(12.5,0,None,0x006 0x0D4 0x0B9 0x080)
2.14.2 Configuring Clock and Trigger Options for 429-512
The procedure for configuring the Clock and Trigger options for an 429-512 layer is the same as that for configuring an AI-207, except that there is no signal level to set and the Sync input is not available for use as a Start/Stop trigger. Therefore, please refer to “Configuring Clock and Trigger Options” on page 28 for information on configuring these settings for a 429-512 layer.
2.14.3 429-512 Data Display
Data received from the logger cube in a .dat file consists of a sequence of records. Each record consists of:
• 32-bit timestamp value (hundreds of microseconds elapsed since start of acquisition)
• 1 byte channel number
• 32-bit ARINC word, stored in network byte order (big-endian)
The bits in an ARINC word are defined as follows:
Tel: 508-921-4600 www.ueidaq.com Vers: 3.0.1 Date: September 2012 LoggerManualChap2.fm
right 2012 ed Electronic Industries, Inc.

Chapter 2 60Configuring Your System
© CopyUnit
Bit 32:Parity bit Bits 31-30:SSM bits Bits 11-29:Message data Bits 9-10:SDI bits Bits 1-8:Label
In addition, the corresponding .hdr file has a parameter in its LOG_0 section called mCount. The value of mCount is a number indicating the number of messages in the .dat file. This is used by the UEILogger application to display the number of messages in the Scans column of the dataset table.
(Refer to Figure 3-1 on page 67 for a typical display of analog data received from an AI-207 layer and a detailed description of the fields on the screen.) For a display of 429-512 serial data, refer to Figure 2-47 below. Note that the “Chart” option in the Show box on the screen is not applicable to the 429-512.
Figure 2-52. Typical Display of 429-512 Scan Results
Tel: 508-921-4600 www.ueidaq.com Vers: 3.0.1 Date: September 2012 LoggerManualChap2.fm
right 2012 ed Electronic Industries, Inc.

Chapter 2 61Configuring Your System
© CopyUnit
2.14.4 Exporting 429-512 Data
As described in “Analyzing the Data Offline” on page 72 of Chapter 3, data can be exported from the Logger in a CSV format. The first line of an exported CSV file for an 429-512 layer is a header line, containing the labels “Timestamp”, “Channel”, “Label”, and “Message”. Each of the subsequent lines represents a single message. The first field contains the timestamp, the second contains the channel number. The third field contains the message label value as a decimal integer. The fourth field contains message data as a hexadecimal value. The following is a sample output file:
Timestamp, Channel, Label, Message3/16/2007 14:13:52.000, 0, 20, 0x000070483/16/2007 14:13:57.010, 4, 254, 0x00078D0A
429-512 data can also be exported from the Logger to Microsoft Excel. A typical display of data exported to Excel is shown in Figure 2-48.
Figure 2-53Display of 429-512 Data Exported to Microsoft Excel
For those who want to export logged data in a user-selected format other than CSV or Excel, refer to the UEI document called UEILogger Data Conversion Procedure, which is available online at www.ueidaq.com.
Tel: 508-921-4600 www.ueidaq.com Vers: 3.0.1 Date: September 2012 LoggerManualChap2.fm
right 2012 ed Electronic Industries, Inc.

Chapter 2 62Configuring Your System
© CopyUnit
2.15 Configuring a MIL-STD-1553 Comm. Layer
The procedure for configuring an MIL-STD-1553 Communication Layer is generally similar to that for an AI-207 Analog Input Layer. (Refer to “Configuring a Layer” on page 23 for details.)
To configure an DNA-MIL-1553 Layer, do the following:
STEP 1: In the left window of the Logger screen, click on the Layer marked 1553-553. Then, in the right hand window, click on the Configuration tab. In the Configure box, pull down the menu and select Channels. The screen shown in Figure 2-54 then appears.
Click on 1553-553-1 to select Layer Click to enable 1553 port
Opens the filter list
Figure 2-54Configuring the 1553 ports
STEP 2: The screen shows the current configuration settings for both 1553-553 ports. Enable a specific port by clicking on the associated Enable checkbox for that port. As an alternative, you can click on Enable All Channels to enable both ports. To start over, click the Enable checkbox again or click on Disable All Channels.
Tel: 508-921-4600 www.ueidaq.com Vers: 3.0.1 Date: September 2012 LoggerManualChap2.fm
right 2012 ed Electronic Industries, Inc.

Chapter 2 63Configuring Your System
© CopyUnit
STEP 3: For each enabled port, select the configuration setting options from the following:
The channel configuration table for the 1553 layer contains five columns, for setting active bus and filter list for each channel. The active bus is set by a pulldown list box. The values in the pulldown list box are:
• Active Bus: A, B, A+B
A filter list value contains a space-separated-list of hex digit groups. Click on this list to open the MIL-STD-1553 Message Filter window and edit the filter list by selecting the appropriate checkboxes as seen in Figure 2-55.
Figure 2-55Configuring the 1553 message filter
STEP 4: When you have made all configuration selections, click the Save Configuration button to save your entries locally. When you are ready to run the Logger, click the Update Logger button to transfer all configuration settings to the Logger.
STEP 5: The logger is ready to perform data logging. Once that you have started logging, you may monitor the FIFO level in the Diagnostic Display, but note that no graph is available for messaging and communication layers such as the 1553.
Click checkboxes to select remote terminal addresses
Select checkboxes to select subaddresses for filtering
Tel: 508-921-4600 www.ueidaq.com Vers: 3.0.1 Date: September 2012 LoggerManualChap2.fm
right 2012 ed Electronic Industries, Inc.

Chapter 2 64Configuring Your System
© CopyUnit
2.15.1 Config.ini File for 1553-553
In the layer config.ini file, active channels are listed in the [CHANNELS_0] section just as with other layer types. Each channel line contains a 32-bit hex number indicating the channel value, including all necessary flags, followed by 32 comma-separated values in parentheses. These are the filter list which consist of a space-separated list of 32-bit hexadecimal numbers. The logger allows you to set filter list values from 0x00000000 up to 0xFFFFFFFF.
For example, the channel listing in the layer .ini file might look like this:
[CHANNELS_0]nbOfChannels=2Ch:0=0x80000300(0:FFFFFFFF 1:FFFFFFFF 2:FFFFFFFF 3:FFFFFFFF 4:FFFFFFFF 5:FFFFFFFF 6:FFFFFFFF 7:FFFFFFFF 8:FFFFFFFF 9:FFFFFFFF 10:FFFFFFFF 11:FFFFFFFF 12:FFFFFFFF 13:FFFFFFFF 14:FFFFFFFF 15:FFFFFFFF 16:FFFFFFFF 17:FFFFFFFF 18:FFFFFFFF 19:FFFFFFFF 20:FFFFFFFF 21:FFFFFFFF 22:FFFFFFFF 23:FFFFFFFF 24:FFFFFFFF 25:FFFFFFFF 26:FFFFFFFF 27:FFFFFFFF 28:FFFFFFFF 29:FFFFFFFF 30:FFFFFFFF 31:FFFFFFFF)Ch:1=0x00000301(0:FFFFFFFF 1:FFFFFFFF 2:FFFFFFFF 3:FFFFFFFF 4:FFFFFFFF 5:FFFFFFFF 6:FFFFFFFF 7:FFFFFFFF 8:FFFFFFFF 9:FFFFFFFF 10:FFFFFFFF 11:FFFFFFFF 12:FFFFFFFF 13:FFFFFFFF 14:FFFFFFFF 15:FFFFFFFF 16:FFFFFFFF 17:FFFFFFFF 18:FFFFFFFF 19:FFFFFFFF 20:FFFFFFFF 21:FFFFFFFF 22:FFFFFFFF 23:FFFFFFFF 24:FFFFFFFF 25:FFFFFFFF 26:FFFFFFFF 27:FFFFFFFF 28:FFFFFFFF 29:FFFFFFFF 30:FFFFFFFF 31:FFFFFFFF)
2.15.2 Configuring Clock and Trigger Options for 1553-553
The procedure for configuring the Clock and Trigger options for an 1553 layer is the same as that for configuring an AI-207, except that there is no signal level to set and the Sync input is not available for use as a Start/Stop triggerTherefore, please refer to “Configuring Clock and Trigger Options” on page 28 for information on configuring these settings for a 1553 layer. Note that the scan rate under the layer timing section has no effect on the 1553.
2.15.3 1553 Data Display
Data received from the logger cube in a .dat file consists of a sequence of records.
In addition, the corresponding .hdr file has a parameter in its LOG_0 section called mCount. The value of mCount is a number indicating the number of messages in the .dat file. This is used by the UEILogger application to display the number of messages in the Scans column of the dataset table.
For a display of 1553 serial data, refer to Figure 2-56 below. Note that the “Chart” option in the Show box on the screen is not applicable to the 1553.
Tel: 508-921-4600 www.ueidaq.com Vers: 3.0.1 Date: September 2012 LoggerManualChap2.fm
right 2012 ed Electronic Industries, Inc.

Chapter 2 65Configuring Your System
© CopyUnit
Figure 2-56. Typical Display of 1553 Scan Results
2.15.4 Exporting 1553-512 Data
As described in “Analyzing the Data Offline” on page 72 of Chapter 3, data can be exported from the Logger in a CSV format. The first line of an exported CSV file for an 1553-553 layer is a header line, containing the labels “Timestamp”, “Channel”, “IM Gap”, “Bus”, “Command”, “Status”, “Status2”, and “Data Words”. Each of the subsequent lines represents a single message. The first field contains the timestamp as an incrementing integer. The second field contains the timestamp, the third contains the channel number. The fourth field contains the Inter-message Gap value in microseconds. The fifth field contains the which bus received the message. The sixth field contains the command and mode codes. The seventh and eighth field contain the status data. The ninth field contains message data as a hexadecimal value. The following is a sample output file:
Sequence #,Timestamp,"Channel","IM Gap (us)","Bus","Command","Status","Status 2","Data Words"0, 4/5/2012 10:50:04.0072,0,0,A,0020 (0-R-1-32 BCRT),0000,,0000 0001 0002 0003 0004 0005 (etc)1, 4/5/2012 10:50:04.0079,0,0,B,0020 (0-R-1-32 BCRT),0000,,0001 0002 0003 0004 0005 0006 (etc)
1553 data can also be exported from the Logger to Microsoft Excel. A typical display of data exported to Excel is shown in Figure 2-57.
Tel: 508-921-4600 www.ueidaq.com Vers: 3.0.1 Date: September 2012 LoggerManualChap2.fm
right 2012 ed Electronic Industries, Inc.

Chapter 2 66Configuring Your System
© CopyUnit
Figure 2-57 Display of 1553 Data Exported to Microsoft Excel
For those who want to export logged data in a user-selected format other than CSV or Excel, refer to the UEI document called UEILogger Data Conversion Procedure, which is available online at www.ueidaq.com.
2.15.5 1553-553 Trouble-shooting
Note that, if the layer appears to freeze and logging appears to stop, the layer is likely to be receiving “garbage data”, which is discarded because data that does not fit the pattern filter for the message. Logging will start again when the pattern is matched again. It is recommended to “sniff” the bus and ensure that bus is not being affected by a misconfigured or malfunctioning controller or by nearby electromagnetic noise.
Tel: 508-921-4600 www.ueidaq.com Vers: 3.0.1 Date: September 2012 LoggerManualChap2.fm
right 2012 ed Electronic Industries, Inc.

Chapter 3 67Running Your Application
© CopyUnit
Chapter 3 Running Your Application
3.1 Overview After your system is assembled, configured, and all input sensors and output devices are properly installed and connected to the Logger, you are ready to start collecting, displaying, and analyzing data.
3.1.1 Start Scan No matter how you have designed your system to start/stop scanning, you should probably perform an initial test with a manual start, using the Red Start Scan button. To enable this feature, be sure that the “Allow Software Trigger” box on the Clock and Trigger page of the Configuration screen is checked.
To start a scan manually, click on the red Start Scan button at the top of the screen.
3.1.2 Stop Scan To halt a scan manually, click on the square gray button at the top of the screen (next to the red Start Scan button.)
3.2 Viewing Results
To view results of the analog scan, go the Results Tab, pull down the Show menu, and select Datasets. The screen shown in Figure 3-1 appears.
NOTE: You should expect a few seconds delay when the logger application communicates with the Cube or when it processes large datasets.
Figure 3-1Displaying Results of an Analog Input Scan
Datasets(Scan
Results)
Click toenableviewingas chart
Click to
(afterdownloading to PC)
This columnshows thelocation(s)of the results file(SD, PC, orSD+PC)
Filename (for editing) Click to export selected file
downloaddataset file
to PCfor viewing
Size of data file
Number of files generated in the selected dataset
Tel: 508-921-4600 www.ueidaq.com Vers: 3.0.1 Date: September 2012 LoggerManualChap3.fm
right 2012 ed Electronic Industries, Inc.

Chapter 3 68Running Your Application
© CopyUnit
As shown in this figure, each scan is recorded as a dataset (one or more files numbered sequentially), which is first stored on the SD card. To view the contents of the dataset, you must download it to the PC and click on the View checkbox to enable viewing. You can also export the file to a location of your choice by clicking on the Export button and selecting the directory and folder. Note that when you export a dataset composed of multiple files, the multiple files are exported as a single CSV file. You also have the option of deleting selected files from the SD Card or the PC by clicking the appropriate button.
You can set the maximum size of a data file by entering a value in the Data File Size window. You can also set the maximum number of files in the dataset by entering a value in the Data Files Number window.
To rename a dataset file, select it in the main window. When it appears in the rename box at the lower left of the screen, edit the name and then click the Rename button.
Tel: 508-921-4600 www.ueidaq.com Vers: 3.0.1 Date: September 2012 LoggerManualChap3.fm
right 2012 ed Electronic Industries, Inc.
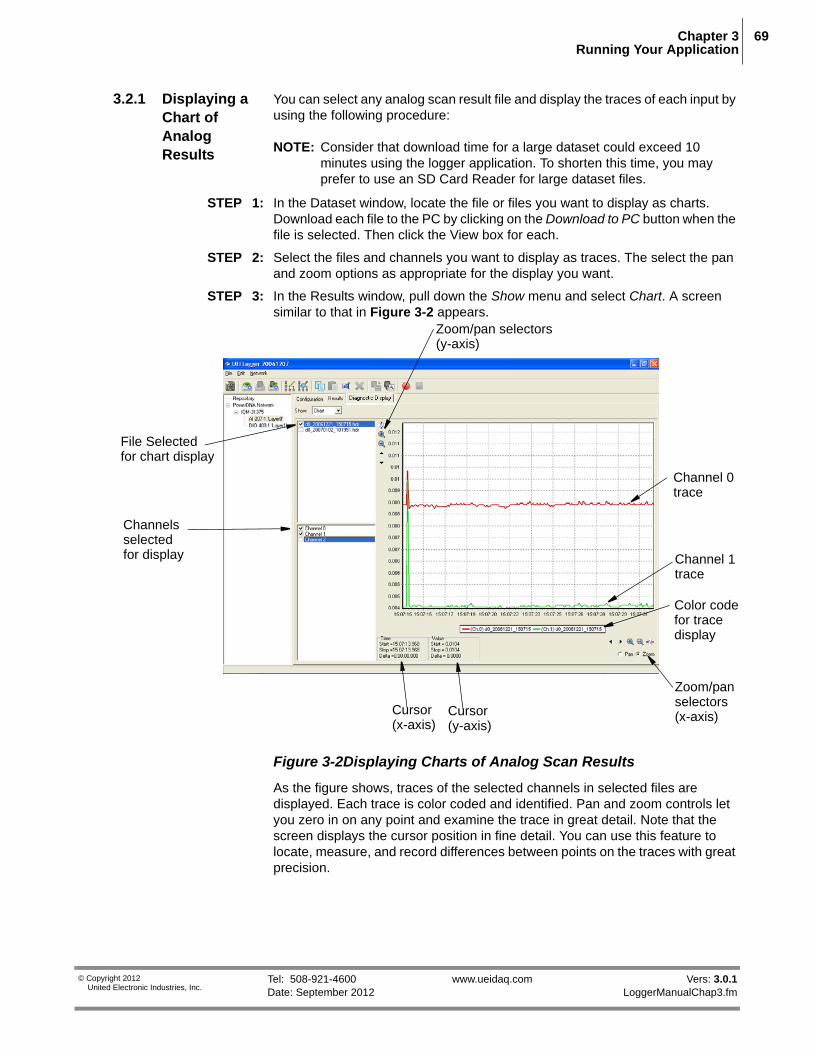
Chapter 3 69Running Your Application
© CopyUnit
3.2.1 Displaying a Chart of Analog Results
You can select any analog scan result file and display the traces of each input by using the following procedure:
NOTE: Consider that download time for a large dataset could exceed 10 minutes using the logger application. To shorten this time, you may prefer to use an SD Card Reader for large dataset files.
STEP 1: In the Dataset window, locate the file or files you want to display as charts. Download each file to the PC by clicking on the Download to PC button when the file is selected. Then click the View box for each.
STEP 2: Select the files and channels you want to display as traces. The select the pan and zoom options as appropriate for the display you want.
STEP 3: In the Results window, pull down the Show menu and select Chart. A screen similar to that in Figure 3-2 appears.
File Selectedfor chart display
Channels selectedfor display
Color codefor tracedisplay
Zoom/panselectors
Channel 0trace
Channel 1trace
(x-axis)
Zoom/pan selectors(y-axis)
Cursor(x-axis)
Cursor(y-axis)
Figure 3-2Displaying Charts of Analog Scan Results
As the figure shows, traces of the selected channels in selected files are displayed. Each trace is color coded and identified. Pan and zoom controls let you zero in on any point and examine the trace in great detail. Note that the screen displays the cursor position in fine detail. You can use this feature to locate, measure, and record differences between points on the traces with great precision.
Tel: 508-921-4600 www.ueidaq.com Vers: 3.0.1 Date: September 2012 LoggerManualChap3.fm
right 2012 ed Electronic Industries, Inc.

Chapter 3 70Running Your Application
© CopyUnit
3.2.2 Displaying Results Data
Scanned data stored and exported as a CSV file can be displayed in Excel, as shown in Figure 3-3. Note that CJC data is displayed under “Channel 33”.
Figure 3-3Displaying Analog Scan Data in Excel
NOTE: If the displayed data is expressed in engineering units, the column header for each channel contains the Channel Number, the name of the engineering units for the data, and the formula used to convert the data to units.
CJC Channel 33
Channel Names
Timestamp
Scan Time(relative tostart time)
Dataset filename
Layer ID Date Time of scan
(See note below)
Tel: 508-921-4600 www.ueidaq.com Vers: 3.0.1 Date: September 2012 LoggerManualChap3.fm
right 2012 ed Electronic Industries, Inc.

Chapter 3 71Running Your Application
© CopyUnit
3.2.3 Displaying Digital IO Data
Digital scan data is stored as hexadecimal words (0x00 to 0xFF) in a .csv file that can be displayed as an Excel spreadsheet. An example is illustrated in Figure 3-4.
Figure 3-4. Displaying Digital IO Scan Data
3.3 Displaying Real-Time Data with the Diagnostic Display
The UEILogger can also display real-time data for selected inputs. This feature is accessed by clicking the Diagnostic Display tab in the Configuration/Results/Diagnostic Display window, as shown in Figure 3-5 on page 72. The display operates as follows:
When activated by clicking the Diagnostic Display tab, the logger starts to display real-time data for the selected inputs. When data is first displayed, it fills the complete screen. As time progresses, the display is compressed along the time axis until a total of 10 seconds of data has accumulated. Thereafter, the screen continues to display the most recent 10 seconds of real-time data for the selected inputs.
Note that the trace for each input is automatically color-coded and identified in the legend at the bottom of the screen.
The purpose of the Diagnostic Display is a very simple tool to help you diagnose that the correct data is being recorded by each layer. Note that, to reduce the burden on the processor, the Diagnostic Display tool requests buffered data from the selected layer only at a refresh rate no faster than 10Hz. Waveforms in the Diagnostic Display may appear to be distorted due to aliasing.
Dataset filename
Scan Timestamp
Scanned Data
DIO Channel
(relative to start time)
Tel: 508-921-4600 www.ueidaq.com Vers: 3.0.1 Date: September 2012 LoggerManualChap3.fm
right 2012 ed Electronic Industries, Inc.

Chapter 3 72Running Your Application
© CopyUnit
Figure 3-5Diagnostic Display
3.4 Analyzing the Data Offline
Data is collected and stored in the UEILogger on the SD card. You can then download selected dataset files to the host PC, where you can display and chart the data. You can also select and export the data files in CSV format to a destination of your choosing.
You can analyze your collected data using any of several widely available general purpose analytical tools, such as MATLAB, LabView, and DasyLab. To do so, select the applicable CSV dataset file and open it directly in your application.
3.4.1 Converting Data for Export and Analysis
For information on the UEILogger Data Conversion Procedure, refer to the document entitled “PowerDNA UEILogger Data Conversion Procedure” which is included as part of the UEILogger Installation package. This manual includes instructions for exporting data in a user-selected format. To display this manual, click Start >> Programs >> UEI >> Logger >> UEILogger Data Conversion Manual.
Last 10 seconds of real-time data
Tel: 508-921-4600 www.ueidaq.com Vers: 3.0.1 Date: September 2012 LoggerManualChap3.fm
right 2012 ed Electronic Industries, Inc.

Chapter 3 73Running Your Application
© CopyUnit
3.5 Exporting Stored Data with no Logger Hardware Connected
If you have an SD card reader and UEI Software Suite installed on your computer, you can export data stored in CSV format on an SD card — without having any UEILogger hardware connected to your computer. To do this, use the following procedure:
STEP 1: Remove the SD card (containing data to be exported) from your logger cube and insert it into the SD card reader mounted on the computer from which you want to export.
STEP 2: In the Logger’s Repository directory, create a new directory with the IOM name for the data collected. For version 3, this folder is:
• %AllUsersProfile%\UEI\Logger\Repository (Windows Vista)
For older versions, data is stored in the directory of the UEILogger executable: C:\Program Files\UEI\Logger\Repository\ by default on Windows 2000/XP, or for Windows 7: %LocalAppData%\VirtualStore\Program Files (x86)\UEI\Logger
STEP 3: Copy CFG and Data folders from the SD card to the new directory you created.
STEP 4: Click Start >> UEI >> Logger >> UEILogger to start the Logger application.
STEP 5: In the left pane of the Logger window under Repository, click on the IOM name and then click on the layer for which the data was collected.
STEP 6: In the right-hand window, click on the Results tab, pull down the Show menu, and select the Dataset option. This will display the data you can export. When data is present on the SD card, the Export button is enabled.
STEP 7: To export data, first select the files to be exported. If timestamps should be included in exported file, click on Tools >> Options and then click the “Include Timestamps” checkbox in the Options dialog box.
STEP 8: Click on the Export button, enter the destination directory and folder, and then click OK to execute the transfer.
Tel: 508-921-4600 www.ueidaq.com Vers: 3.0.1 Date: September 2012 LoggerManualChap3.fm
right 2012 ed Electronic Industries, Inc.

Chapter 3 74Running Your Application
© CopyUnit
3.6 Error Codes and Trouble-shooting
The UEILogger user interface may result in various error codes defined in the PowerDNA SDK\includes\DAQLib.h header file. Some of these codes include:
When encountering errors that cause the cube to stop unexpectedly, the following methods can help resolve the problem:
1. Double-check that your configuration is correct.2. Reset the cube. Right-click in PowerDNA Explorer and “Reset IOM”, or hold
down the push-button for five seconds.3. Re-run the SD Card Speed Test and check your settings again.4. Check the SD card for errors. See “File Limits” on page 32.5. Try the same settings :
(a) Save the configuration to the repository. (b) Copy your datasets locally (c) Delete the cube from the user interface and re-scan the network. (d) Copy the settings back from the repository, or enter them by hand.
6. Retry method 5 above, formatting the SD card after step 5c.7. Contact UEI technical support at 1-508-921-4600 or [email protected].
Save a copy of your configuration files (CFG folder) with the steps that cause the problem. Our staff will help you to resolve the problem promptly.
# Definition Description
-1 DQ_ILLEGAL_ENTRY illegal entry in parameters
-3 DQ_SOCK_LIB_ERROR socket error
-4 DQ_TIMEOUT_ERROR command returns upon timeout
-5 DQ_SEND_ERROR packet sending error
-6 DQ_RECV_ERROR packet receiving error
-7 DQ_IOM_ERROR IOM reports an unrecoverable error
-16 DQ_DEVICE_BUSY device in use by someone else
-17 DQ_EVENT_ERROR event handling error
-19 DQ_DATA_ERROR layer returned invalid data
-20 DQ_DEVICE_NOTREADY device is not ready
-24 DQ_FIFO_OVERFLOW device FIFO overflowed
Table 3-1 Common Error Codes defined in DAQLib.h
Tel: 508-921-4600 www.ueidaq.com Vers: 3.0.1 Date: September 2012 LoggerManualChap3.fm
right 2012 ed Electronic Industries, Inc.

UEILogger Data Logger System 75
Tel: 508-921-4600 www.ueidaq.com Vers: 3.0.1 Date: September 4, 2012 12:15 pm File: LoggerManualAppxA.fm
© Copyright 2012 United Electronic Industries, Inc.
Appendix A
A. Accessories The accessory cables and STP boards offered with standard UEI PowerDNA Layers are also available for use with the UEILogger. For detailed information, refer to the applicable datasheets for each Layer model.
The following cables and STP boards are available for the UEILogger.
DNA-STP-SYNC
An multi-connector panel for interconnecting Sync cables between multiple Log-ger Cubes. Contains 7 RJ-45 connectors (1 Master, 6 Slaves), two BNC connec-tors (Sync_In, Sync_Out), ten screw terminals (SYNC_IN, SYNC_OUT, 4 GND, +5VDC, +5VDC, BNC_IN, BNC_OUT). Supplied with DIN Rail mounting kit. You can download a datasheet for the DNA-STP-SYNC panel from www.ueidaq.com.
DNA-CBL-SYNC-10
A 30-inch 4-conductor cable with flat 4-pin Sync connectors on both ends for interconnecting two UEILogger Cubes in a 2-cube system. The cable makes a crossover connection between two cubes.
DNA-CBL-SYNC-RJ
A 30-inch 8-conductor cable with flat SYNC connector on one end and an RJ-45 on the other. Typically used for connecting a UEILogger Cube Sync Port to a DNA-STP-SYNC interconnection panel.
DNA-CBL-37
3-ft, 37-way flat ribbon cable, used to connect the Cube I/O Layers to external STP boards of various types.
DNA-CBL-37S
3-ft, 37-way round shielded extender cable with thumb-screw connectors on both ends.

76
© CopyUnit
Appendix BB.1 Multi-Cube
Synchro-nization
This Appendix describes how to synchronize clocks of multiple Cubes.
B.2 Synchronizing a 2-Cube System
Synchronizing a 2-Cube Logger system is easily accomplished by simply connecting a cable between the Sync connectors on the two Cubes as shown in Figure B-1. One Cube is designated as Master and the other as a Slave. The connecting cable, called DNA-CBL-SYNC-10, is a 30-inch 4-conductor cable with Sync connectors on both ends. For greater distances, use two DNA_CBL-SYNC-RJ cables plus an Ethernet crossover extender cable, as shown below.
Figure B-2 illustrates the method used to synchronize multiple UEILogger Cubes.
Figure B-1Interconnection Diagram for 2-Cube Synchronization
Master Cube Slave Cube
DNA-CBL-SYNC-10*
Sync Sync
(4/c, 30-inch, Sync connectors on both ends)
*For greater separation distances, use two DNA-CBL-SYNC-RJ cables with Ethernet extender cables in between, as shown below.
Master Cube Slave Cube
DNA-CBL-SYNC-RJ
Sync Sync
Ethernet Crossover Extender Cable
RJ-45RJ-45
Tel: 508-921-4600 www.ueidaq.com Vers: 3.0.1 Date: September 4, 2012 12:15 pm File: LoggerManualAppxB.fm
right 2012 ed Electronic Industries, Inc.

77
© CopyUnit
B.3 Synchronizing a Multi-Cube System
Synchronizing a multi-cube logger system requires the use of one or more DNA-STP-SYNC interconnection panels, as illustrated in Figure B-2. Refer to DNA-STP-SYNC datasheet for more detail.
Figure B-2Interconnection Diagram for Multi-Cube System
S5 S6 M
S1S3S4 S2
DNA-STP-SYNC-RJ 1
BNCIN
BNCOUT
TB
S5 S6 M
S1S3S4 S2
DNA-STP-SYNC-RJ 2
BNCIN
BNCOUT
TB
S5 S6 M
S1S3S4 S2
DNA-STP-SYNC-RJ N
BNCIN
BNCOUT
TB
External CLK,
Master Slave 1 Slave 2 Slave 3 Slave 4 Slave 6
BNC Cable
Trigger/Sync Inputs
SYNC_IN
GND
SYNC_OUT
GND
GND
GND
+5VDC
+5VDC
BNC_OUT
BNC_IN
via BNC or screw terminals
To mating RJ-45 connectorson STP board 1
M S1 S2 S3 S4 S6. .
Tel: 508-921-4600 www.ueidaq.com Vers: 3.0.1 Date: September 4, 2012 12:15 pm File: LoggerManualAppxB.fm
right 2012 ed Electronic Industries, Inc.

78
© CopyUnit
The Sync Interconnection Panel allows a master cube to channel its trigger pulse through buffers to the slaves (and also back to the master Sync In) so that timing of the master matches that of the slave cubes. All cubes use the same sync trigger signal.
Additional STP panels can be daisy-chained together through BNC connectors, as shown in the diagram.
B.4 Firmware Update Procedure
Before using a new release of the Logger application program, you must install the latest version of the firmware onto the UEILogger cube. The version of the firmware must correspond to the version of the Logger application — mismatched versions cause an error. The firmware for any particular version is placed in the folder C:\Program Files\UEI\Logger\Tools when the software is installed.
The procedure for updating the UEILogger Cube via PowerDNA Explorer over an Ethernet LAN line is:
STEP 1: Supply power to the UEILogger Cube.
STEP 2: Connect the cube to its network.
STEP 3: Start PowerDNA Explorer on the Microsoft Windows Desktop from: Start >> Programs >> UEI >> Logger >> Tools >> PowerDNA Explorer.
STEP 4: Choose Network >> Scan Network.
STEP 5: Select the UEILogger cube to be updated.
STEP 6: Select Network >> Update Firmware. . . from the menu.
STEP 7: Click on “Yes” when you are prompted with “Are you sure you want to update firmware...”
STEP 8: Double-click on the logger_fw.mot file.
STEP 9: Wait for the progress dialog to complete. The UEILogger cube will then be updated and running the new firmware.
STEP 10: If you seen an arror (e.g. DQCMS_ECHO), disconnect and reconnect the ethernet cable from the Cube to re-establish the connection.
Tel: 508-921-4600 www.ueidaq.com Vers: 3.0.1 Date: September 4, 2012 12:15 pm File: LoggerManualAppxB.fm
right 2012 ed Electronic Industries, Inc.

79
© CopyUnit
B.5 Daisy-chaining Multiple Cubes
A system can be configured with multiple Cubes daisy-chained together as shown in Figure B-3. To do this, use straight Ethernet cables connected as shown in the diagram below. Start with the Ethernet In port on the host PC and connect the other end to the NIC Out port on the first Cube, and then proceed to the next as illustrated.
Figure B-3. Daisy-chaining Multiple Cubes in a Network with a Direct-Connect Host PC
When you use an Ethernet Hub/switch instead of a direct-connect host PC, connect the Cubes as shown in Figure B-4.
Figure B-4. Daisy-Chaining Multiple Cubes when a Hub/Switch is Used
NICIN
NICOUT
NICIN
NICOUT
NICIN
NICOUT
NICIN
NICOUT
NICIN
NICOUTNIC
IN
NICIN
NICOUT
NICIN
NICOUT
NICIN
NICOUT
PC
CUBE 0 CUBE NCUBE 1 CUBE 2
Ethernet “Straight” Cables
NICIN
NICOUT
NICIN
NICOUT
NICIN
NICOUT
NICIN
NICOUT
ETHNICIN
NICOUT
NICIN
NICOUT
NICIN
NICOUT
PCETHERNET
CUBE NCUBE 10 CUBE 1
Ethernet “Straight” Cables
HUB/SWITCH
toothernodes
Tel: 508-921-4600 www.ueidaq.com Vers: 3.0.1 Date: September 4, 2012 12:15 pm File: LoggerManualAppxB.fm
right 2012 ed Electronic Industries, Inc.

80
© CopyUnit
Appendix CC.1 UEILogger
under Vista and higher
When using UEILogger under Windows 7, users may encounter difficulties in getting the application to communicate with the Cube, due to Windows security features that are not present in Windows XP. Also, users who are familiar with UEILogger under Windows XP may find that certain program support files are not where they expect them to be when running under Windows 7. This section is intended to help the user resolve problems encountered when operating the UEILogger under Windows 7, which do not occur with Windows XP.
C.1.1 Enabling Communication With the Cube
The first time you attempt to perform the Scan Network function in a freshly installed copy of the UEILogger application under Windows 7, Windows will display a Security Alert box asking you to allow or disallow the UEILogger application to communicate on various types of networks.
By default, only the first checkbox is selected. Depending on the type of network you are using to connect to your UEILogger Cube, you may have to select one or both of the other network types. Selecting all three checkboxes will ensure that the UEILogger application can communicate with the Cube. Click the “Allow access” button to accept your selection.
C.1.2 Changing the Firewall Configuration for UEILogger
The Windows Security Alert dialog described above will only appear once. After you have chosen an access configuration for the UEILogger application, Windows 7 will remember it, and not display the dialog again. If the access options have not been set correctly, and the UEILogger application is unable to communicate with the Cube due to this, you can edit the firewall configuration for UEILogger directly.
Tel: 508-921-4600 www.ueidaq.com Vers: 3.0.1 Date: September 4, 2012 12:15 pm File: LoggerManualAppxC.fm
right 2012 ed Electronic Industries, Inc.

81
© CopyUnit
To do this, open the Start menu, and type “firewall” into the search field. Click on the “Allow a program through Windows Firewall” item.
This will bring up a dialog allowing you to set which types of network each program is allowed to communicate on. See the screenshot below. Scroll down to the entry or entries for UEILogger. Click the “Change settings” button to allow you to edit its settings. If more than one UEILogger entry exists, only one of those entries will be checked; that is the one you should configure. Check/uncheck the entry’s three network type checkboxes as appropriate, and then click OK to save the settings.
If configured properly, the UEILogger application should now be able to successfully communicate with the Cube.
Tel: 508-921-4600 www.ueidaq.com Vers: 3.0.1 Date: September 4, 2012 12:15 pm File: LoggerManualAppxC.fm
right 2012 ed Electronic Industries, Inc.

82
© CopyUnit
C.2 Location Of Data Files
When the UEILogger application is launched, it creates two folders for data storage, called IOM and Repository, if they don’t already exist. Under Windows XP, these folders are created in the same folder as the UEILogger.exe executable, which by default is C:\Program Files\UEI\Logger.
Under Windows 7, the UEILogger application is installed by default in C:\Program Files (x86)\UEI\Logger. As a security measure, Windows 7 does not allow the UEILogger software to modify the contents of this folder. Instead, the IOM and Repository folders are created in:
• C:\ProgramData\UEI\Logger\Repository for UEILogger 3.
• C:\Users\username\AppData\Local\VirtualStore\Program Files (x86)\UEI\Logger for UEILogger 2.0.2 and earlier.
Note that the path is dependent on the current user’s username, and thus the data files will not be shared between users as they would be under Windows XP
Tel: 508-921-4600 www.ueidaq.com Vers: 3.0.1 Date: September 4, 2012 12:15 pm File: LoggerManualAppxC.fm
right 2012 ed Electronic Industries, Inc.

Tel: 508-921-4600 www.ueidaq.com Vers: 3.0.1 Date: September 2012 LoggerManualIX.fm
© Copyright 2012 United Electronic Industries, Inc.
Tel: 508-921-4600 www.ueidaq.com Vers: 3.0.1 Date: September 2012 LoggerManualIX.fm
© Copyright 2012 United Electronic Industries, Inc.
UEILogger Data Logger System 83
IndexBBlock Diagram 8CCable(s) 75Cellular Wireless 4Components 8Configuration Tab 25Configuring Analog Input 23Configuring Clock and Trigger 28Configuring Your System 13Conventions 2DDaisy-chaining 79Displaying a Chart 69Displaying Digital IO Data 71EExpand IOM Screen 24FFeatures 6Firmware Update Procedure 78Front Panel 9front panel 9GGUI 3HHalt A Scan 67IInitial Screen 23IO Scan Data 71LLayer Start Trigger 29Layers 10LEDs 10Local Wireless 5
MMaster Trigger 29NNIC In port 10NIC layer 10PPowerPC 9Pushbutton 9QQuickstart 3RRecycle Data Files Option 29Running Your Application 67SSave Configuration 25Scan Network Screen 23Scan Rate 12Scan Rate and Clock Source 31Screw Terminal Panels 75Specifications 7Start Scan Manually 67Support email iiSync Clock Trigger 30Synchronizing a 2-Cube System 76Synchronizing a Multi-Cube System 77TTiming 12Types of Systems 3UUpdate 25VViewing Results 67