UDT - Universal Defrost Timer - Robertshaw
12
1 UDT - Universal Defrost Timer Universal Defrost Timer (UDT) The Universal Defrost Timer family consists of two models: electric defrost and off-cycle defrost. Both models can be wired directly to 120V AC, 208V AC or 240V AC power sources. The timers can be used in place of traditional electromechanical defrost time clocks. Users should review this document, including terminal specifications, to ensure compatibility with the application. The timer maintains and displays the current time and each defrost cycle. The user can glance at the display and immediately determine what time it is as well as see the defrost settings (start time and duration). In addition, colored LEDs indicate the current system mode (refrigeration or defrost).
Transcript of UDT - Universal Defrost Timer - Robertshaw
1
UDT - Universal Defrost Timer
Universal Defrost Timer (UDT)
The Universal Defrost Timer family consists of two models: electric defrost and off-cycle defrost. Both models can be wired directly to 120V AC, 208V AC or 240V AC power sources. The timers can be used in place of traditional electromechanical defrost time clocks. Users should review this document, including terminal specifications, to ensure compatibility with the application.
The timer maintains and displays the current time and each defrost cycle. The user can glance at the display and immediately determine what time it is as well as see the defrost settings (start time and duration). In addition, colored LEDs indicate the current system mode (refrigeration or defrost).
2
Operation and Functions
The Paragon® Universal Defrost Timer series is designed to accept power supply voltages of 120V AC, 208V AC or 240V AC directly connected to the power terminals. This is accomplished without the use of jumpers or switches. It is designed to be as easy to use as similar electromechanical defrost time clocks. • Dial style clock face • Current time indicated by flashing segment • Scheduled defrosts and defrost duration indicated by solid segments • Simple programming using three buttons and a rotating dial
Features not found on traditional electromechanical defrost time clocks include: • System status indicators – LED for refrigeration and defrost • Manual defrost initiation with a single button press • Terminal G (defrost termination wiring connection) diagnostics
Features / Benefits
Universal Voltage Directly connect to 120V AC, 208V AC or 240V AC power supply.Electronic User Interface .................................... Easy-to-read time of day. Simple defrost cycle programming. No
complicated dials and hard-to-use pins.Program Carryover ............................................. Maintains clock up to 100 hours and program indefinitely in case of
power outage. When power restores, the program detects the current time and program status and continues as programmed.
Backlit Display..................................................... Easy to see in poorly lighted spaces.System Status Indicators .................................... Green LED indicates refrigeration. Red LED indicates defrost.Manual Defrost ................................................... User-initiated 15 minute manual defrost cycle.Non-Volatile Memory ......................................... The programmed parameters will remain in the memory.Capacitor Carryover for the Clock ...................... Maintains the correct time-of-day for a minimum of 100 hours.Microprocessor-Based Electronics ..................... High reliability and repeatability.
Agency Listings:
File number SA512 (9045-00 and 9145-00)
File number SA512 (9045-00M and 9145-00M)
The devices are listed as Refrigeration Controllers.
FCC Compliance*
This device complies with CFR 47, Part 15, Subpart B, Class A.Operation is subject to the following two conditions: (1) This device may not cause harmful interference, and (2) this device must accept any interference received, including interference that may cause undesired operation. Changes or modifications not expressly approved by Robertshaw Controls could void the user’s authority to operate the equipment.
NOTE: This equipment has been tested and found to comply with the limits for a Class A digital device, pursuant to Part 15 of the FCC Rules. These limits are designed to provide reasonable protection against harmful interference when the equipment is operated in a commercial environment. This equipment generates, uses and can radiate radio frequency energy and, if not installed and used in accordance with the instruction manual, may cause harmful interference to radio communications. Operation of this equipment in a residential area is likely to cause harmful
3
interference, in which case the user will be required to correct the interference at his own expense.
Canadian Compliance*
This Class A digital apparatus meets all of the Industry Canada, ICES-003 requirements (Canadian Interference-Causing Equipment Regulations).Cet appareil numerique de la classe A respecte toutes les ezigences du Reglement sur le material brouilleur du Canada.
*NOTE: These compliance statements apply to NEMA 1 enclosed models only All modular units are the responsibility of the purchaser to obtain the compliance
Installation Instructions
IMPORTANT • All UDT series controls are designed as operating controls only If an operating control failure could result in
personal injury or loss of property, a separate safety control and/or alarm should be installed • The schematic drawings and other information included in these instructions are for the purpose of
illustration and general reference only. • These instructions do not expand, reduce, modify or alter the Robertshaw Terms in any way. No warranty or
remedy in favor of the customer or any person arises out of these instructions. • The 9045 and 9145 controls have been certified by Underwriters Laboratories Inc. The certification does not
extend to their use for any other purpose. Robertshaw assumes no responsibility for any unconventional application of its control unless such application has been approved in writing by Robertshaw.
• It is the responsibility of the installer and the user to assure that the application and use of Robertshaw products are in compliance with all federal, state and local requirements, including, without limitation, all requirements imposed under the National Electric Code and any applicable building codes.
MountingMount these controls to a wall or any flat surface using the three holes in the metal case (models 9045-00 and 9145-00). The control’s components are not position sensitive, but should be mounted so they can be easily wired and adjusted. The models that do not come in a metal case must be mounted inside an enclosure (Nema 1 type or better).
NOTE: The manufacturer recommends removal of the electronic controller prior to mounting the metal case to a wall or any flat surface to facilitate installation and the installation of conduit fittings and conduit installation.
CAUTIONTo prevent possible electric shock or equipment damage, disconnect electrical power to the unit before and during installation. DO NOT restore electrical power to the unit until the control is properly installed and the cover is assembled. DO NOT locate the control in an explosive atmosphere as a safety hazard can result due to possible spark generation in the control. Controls are not to be located in areas of significant moisture, dirt or dust, or in a corrosive, explosive atmosphere. Using a control in such environments may result in injury or damage to persons or property (or both) and are likely to shorten the control life. DO NOT connect the supply (as shown connected to terminal F in Figures 4 and 6) directly to any other terminal. DO NOT remove jumpers between terminals C and D on model 9145 or between terminals B, C and D on model 9045.
Robertshaw assumes no responsibility for any such use
MISE EN GARDEPour prévenir les chocs électriques ou les dommages aux équipements, couper l’alimentation électrique de l’unité avant et pendant l’installation. NE PAS ali-menter le thermostat avant que la commande ne soit correctement installée et le couvercle assemblé. NE PAS placer le thermostat dans une atmosphère explo-sive car une étincelle dans le thermostat représente un danger. Les thermostats ne doivent pas être placés dans des zones très humides, poussiéreuses ou sales, ou dans une atmosphère corrosive et explosive. Si le thermostat est utilisé dans de tels environnements, des préjudices aux personnes ou des dommages aux biens (ou les deux) peuvent survenir et sont susceptibles de raccourcir la durée de vie du thermostat. NE PAS brancher l’électricité (comme branché à la borne F dans les figures 4 et 6) directement à n’importe quelle autre borne. NE PAS retirer les cavaliers entre les bornes C et D sur le modèle 9145 ou entre les bornes B, C et D sur le modèle 9045.Robertshaw n’assume aucune responsabilité pour de telles utilisations
4
NOTE: For models 9045-00M and 9145-00M: Place the peel-and-stick label (3.25” x 7”), over the old label on the inside cover of the metal enclosure used by the 8100 or 8200 series of products.
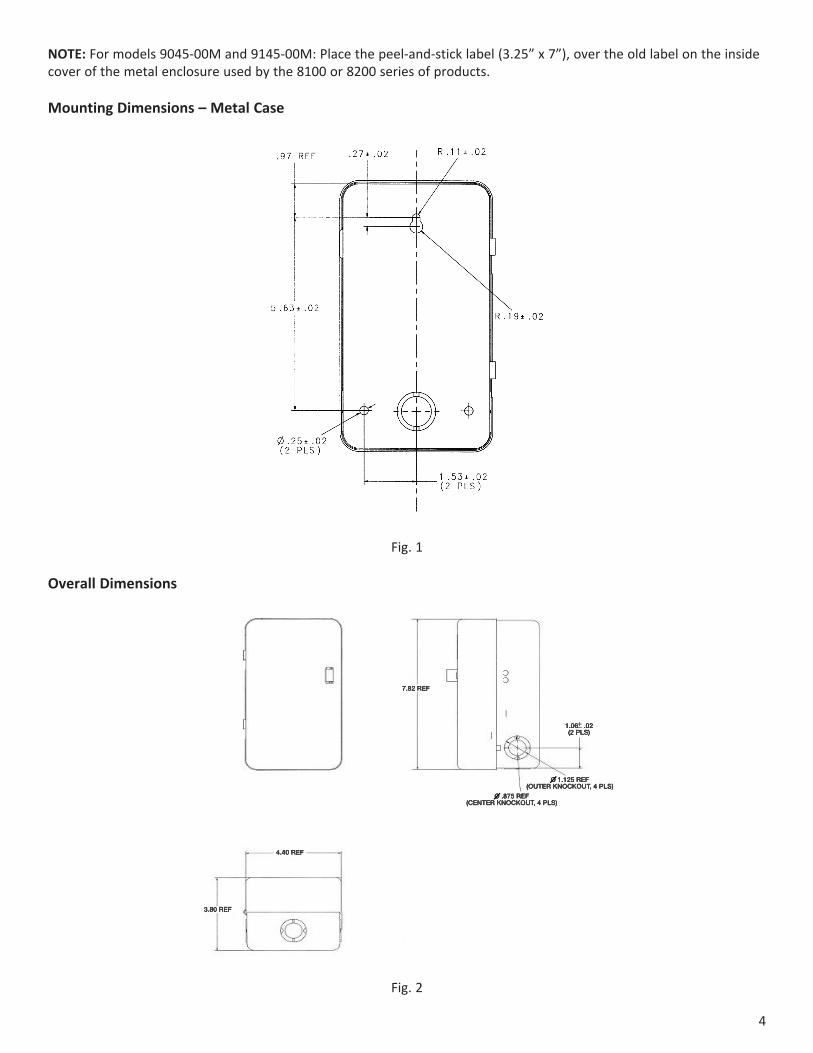
Mounting Dimensions – Metal Case
Fig. 1
Overall Dimensions
Fig. 2
5
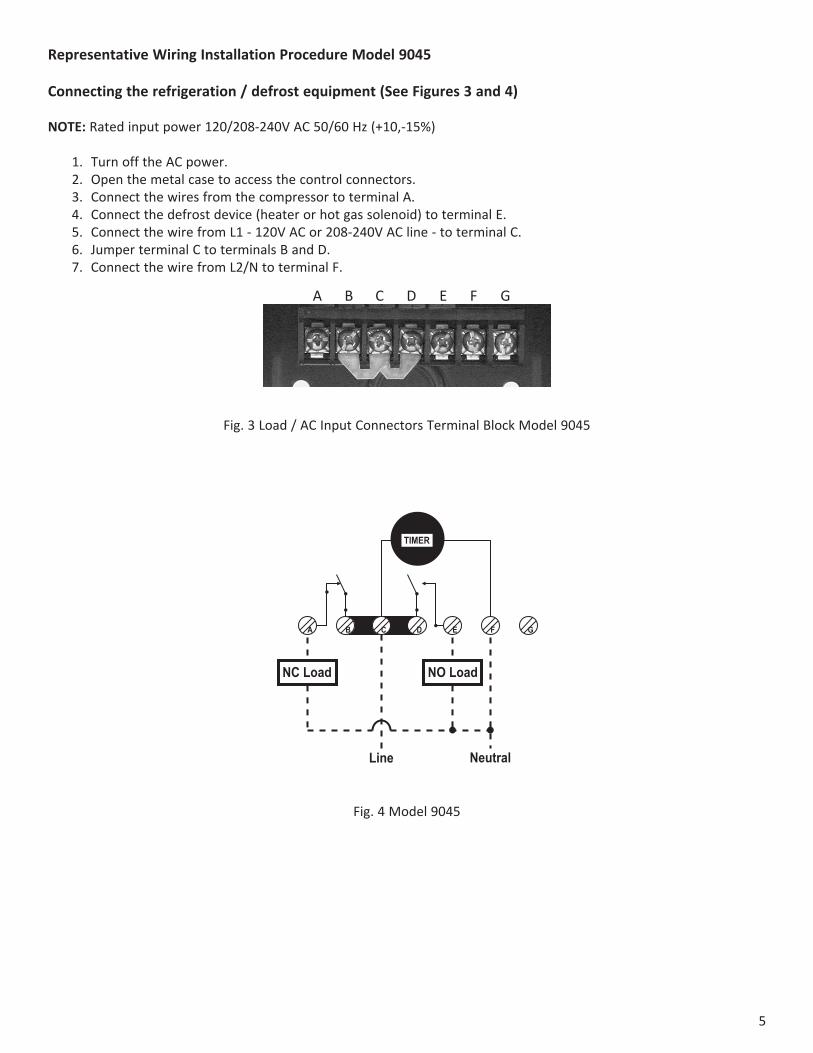
Representative Wiring Installation Procedure Model 9045
Connecting the refrigeration / defrost equipment (See Figures 3 and 4)
NOTE: Rated input power 120/208-240V AC 50/60 Hz (+10,-15%)
1. Turn off the AC power. 2. Open the metal case to access the control connectors. 3. Connect the wires from the compressor to terminal A. 4. Connect the defrost device (heater or hot gas solenoid) to terminal E. 5. Connect the wire from L1 - 120V AC or 208-240V AC line - to terminal C. 6. Jumper terminal C to terminals B and D. 7. Connect the wire from L2/N to terminal F.
Fig. 3 Load / AC Input Connectors Terminal Block Model 9045
Fig. 4 Model 9045
A B C D E F G
6
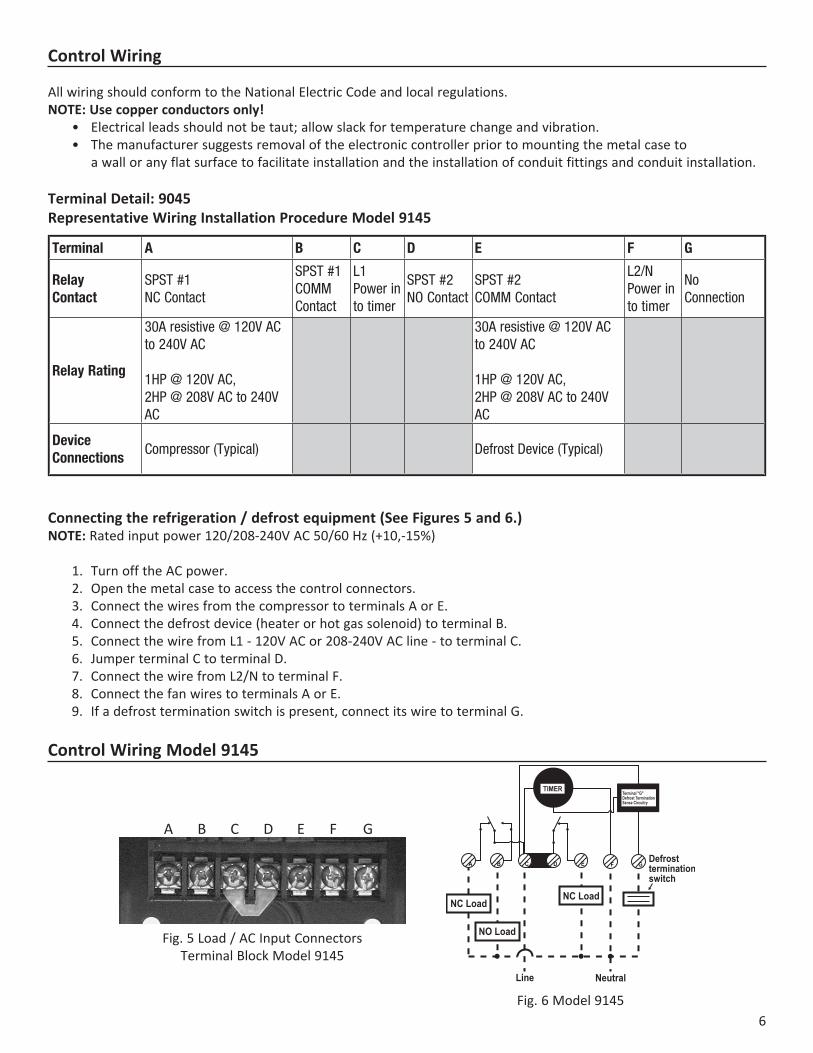
Control Wiring
All wiring should conform to the National Electric Code and local regulations.NOTE: Use copper conductors only! • Electrical leads should not be taut; allow slack for temperature change and vibration. • The manufacturer suggests removal of the electronic controller prior to mounting the metal case to
a wall or any flat surface to facilitate installation and the installation of conduit fittings and conduit installation.
Terminal Detail: 9045Representative Wiring Installation Procedure Model 9145
Connecting the refrigeration / defrost equipment (See Figures 5 and 6)NOTE: Rated input power 120/208-240V AC 50/60 Hz (+10,-15%)
1. Turn off the AC power. 2. Open the metal case to access the control connectors. 3. Connect the wires from the compressor to terminals A or E. 4. Connect the defrost device (heater or hot gas solenoid) to terminal B. 5. Connect the wire from L1 - 120V AC or 208-240V AC line - to terminal C. 6. Jumper terminal C to terminal D. 7. Connect the wire from L2/N to terminal F. 8. Connect the fan wires to terminals A or E. 9. If a defrost termination switch is present, connect its wire to terminal G.
Control Wiring Model 9145
Terminal A B C D E F G
RelayContact
SPST #1NC Contact
SPST #1COMM Contact
L1Power in to timer
SPST #2NO Contact
SPST #2COMM Contact
L2/NPower in to timer
No Connection
Relay Rating
30A resistive @ 120V AC to 240V AC
1HP @ 120V AC,2HP @ 208V AC to 240V AC
30A resistive @ 120V AC to 240V AC
1HP @ 120V AC,2HP @ 208V AC to 240V AC
Device Connections
Compressor (Typical) Defrost Device (Typical)
A B C D E F G
Fig. 5 Load / AC Input Connectors Terminal Block Model 9145
Fig. 6 Model 9145
7
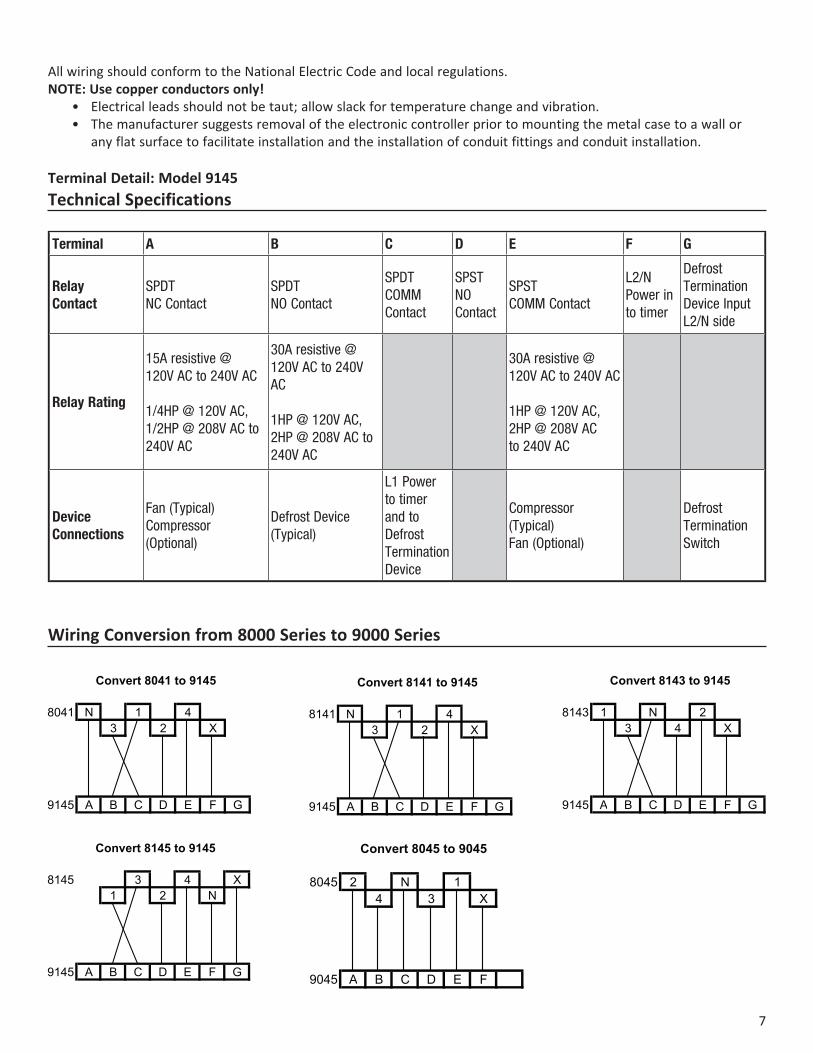
Wiring Conversion from 8000 Series to 9000 Series
Convert 8041 to 9145
8041 N 1 43 2 X
9145 A B C D E F G
Convert 8045 to 9045
8045 2 N 14 3 X
9045 A B C D E F
Convert 8141 to 9145
8141 N 1 43 2 X
9145 A B C D E F G
Convert 8143 to 9145
8143 1 N 23 4 X
9145 A B C D E F G
Convert 8145 to 9145
8145 3 4 X1 2 N
9145 A B C D E F G
All wiring should conform to the National Electric Code and local regulations.NOTE: Use copper conductors only! • Electrical leads should not be taut; allow slack for temperature change and vibration. • The manufacturer suggests removal of the electronic controller prior to mounting the metal case to a wall or
any flat surface to facilitate installation and the installation of conduit fittings and conduit installation.
Terminal Detail: Model 9145Technical Specifications
Terminal A B C D E F G
RelayContact
SPDTNC Contact
SPDTNO Contact
SPDTCOMM Contact
SPSTNO Contact
SPSTCOMM Contact
L2/NPower in to timer
Defrost Termination Device Input L2/N side
Relay Rating
15A resistive @ 120V AC to 240V AC
1/4HP @ 120V AC,1/2HP @ 208V AC to 240V AC
30A resistive @ 120V AC to 240V AC
1HP @ 120V AC,2HP @ 208V AC to 240V AC
30A resistive @ 120V AC to 240V AC
1HP @ 120V AC,2HP @ 208V AC to 240V AC
Device Connections
Fan (Typical)Compressor (Optional)
Defrost Device (Typical)
L1 Power to timer and to Defrost Termination Device
Compressor (Typical)Fan (Optional)
Defrost Termination Switch
8
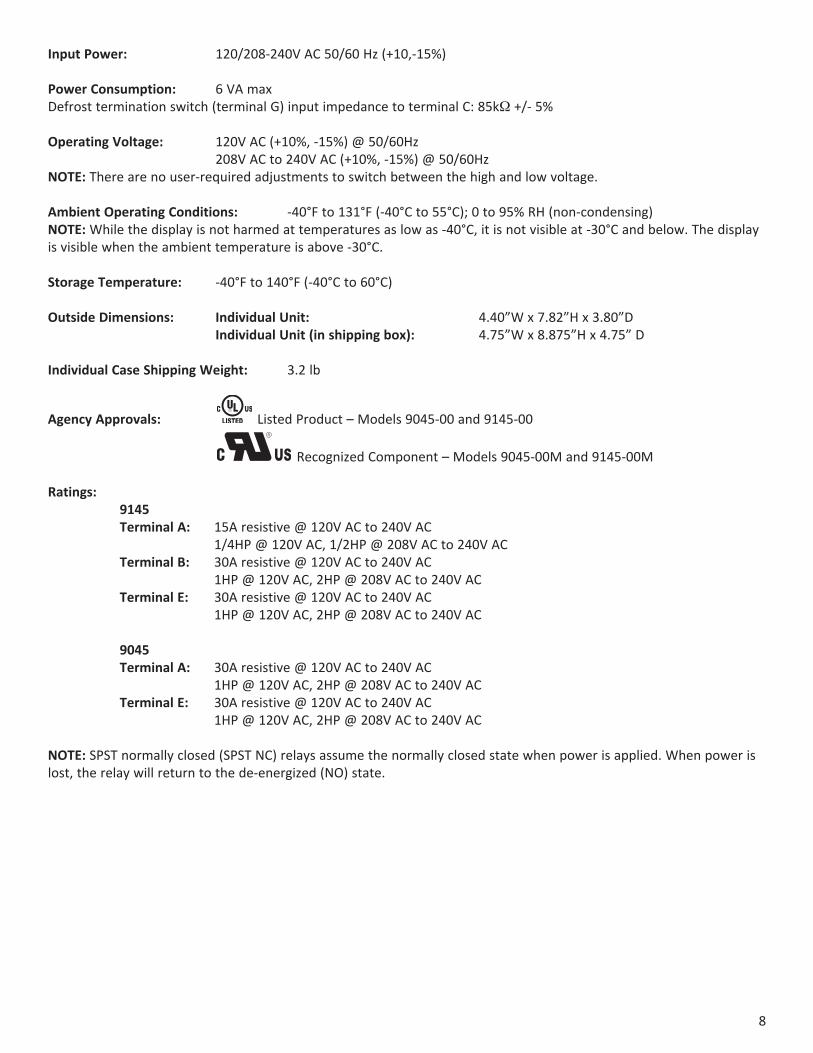
Input Power: 120/208-240V AC 50/60 Hz (+10,-15%)
Power Consumption: 6 VA maxDefrost termination switch (terminal G) input impedance to terminal C: 85kΩ +/- 5%
Operating Voltage: 120V AC (+10%, -15%) @ 50/60Hz 208V AC to 240V AC (+10%, -15%) @ 50/60HzNOTE: There are no user-required adjustments to switch between the high and low voltage.
Ambient Operating Conditions: -40°F to 131°F (-40°C to 55°C); 0 to 95% RH (non-condensing)NOTE: While the display is not harmed at temperatures as low as -40°C, it is not visible at -30°C and below. The display is visible when the ambient temperature is above -30°C.
Storage Temperature: -40°F to 140°F (-40°C to 60°C)
Outside Dimensions: Individual Unit: 4.40”W x 7.82”H x 3.80”D Individual Unit (in shipping box): 4.75”W x 8.875”H x 4.75” D
Individual Case Shipping Weight: 3.2 lb
Agency Approvals: Listed Product – Models 9045-00 and 9145-00
Recognized Component – Models 9045-00M and 9145-00M
Ratings: 9145 Terminal A: 15A resistive @ 120V AC to 240V AC 1/4HP @ 120V AC, 1/2HP @ 208V AC to 240V AC Terminal B: 30A resistive @ 120V AC to 240V AC 1HP @ 120V AC, 2HP @ 208V AC to 240V AC Terminal E: 30A resistive @ 120V AC to 240V AC 1HP @ 120V AC, 2HP @ 208V AC to 240V AC
9045 Terminal A: 30A resistive @ 120V AC to 240V AC 1HP @ 120V AC, 2HP @ 208V AC to 240V AC Terminal E: 30A resistive @ 120V AC to 240V AC 1HP @ 120V AC, 2HP @ 208V AC to 240V AC
NOTE: SPST normally closed (SPST NC) relays assume the normally closed state when power is applied. When power is lost, the relay will return to the de-energized (NO) state.
9
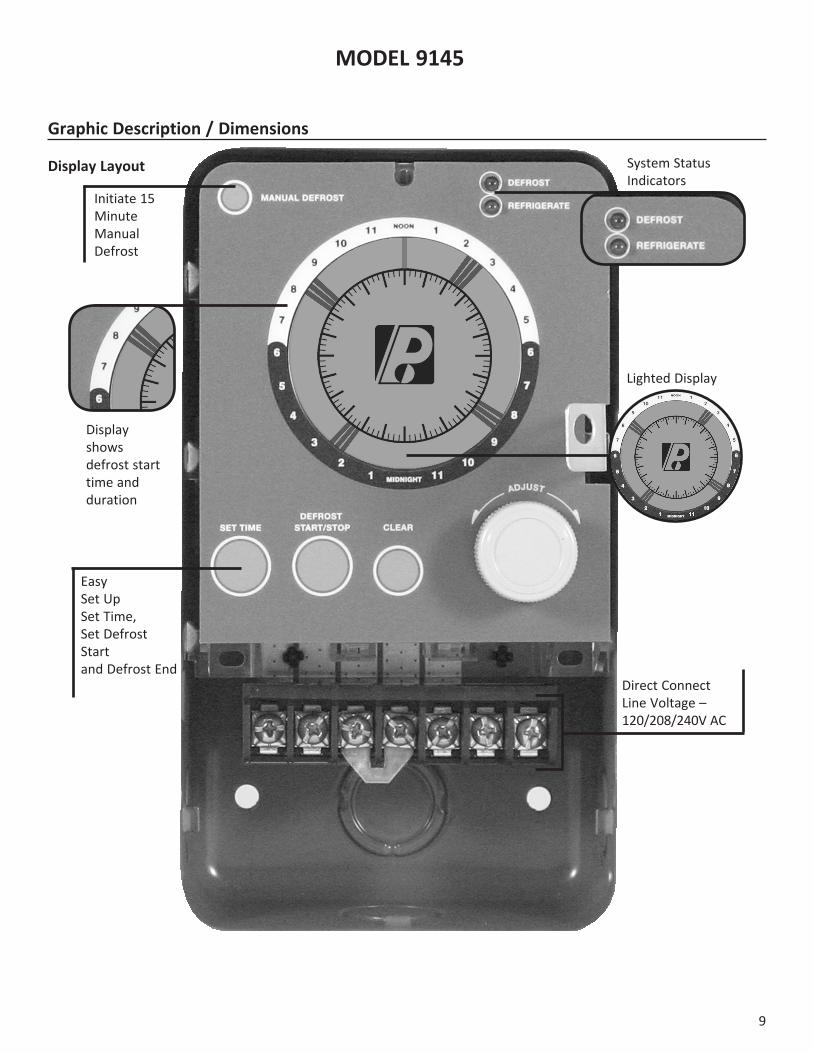
Graphic Description / Dimensions
Display Layout
Display shows defrost start time and duration
System Status Indicators
EasySet UpSet Time,Set Defrost Start and Defrost End
Direct Connect Line Voltage – 120/208/240V AC
Lighted Display
MODEL 9145
Initiate 15 Minute Manual Defrost

10
Programming
Upon initial power up the flashing segment should be at 12:00 pm (noon). Turning the ADJUST knob will activate the programming cursor and momentarily turn off the time. If any of the other segments are on (lit), they may be related to a previous program. The display backlight will turn on when the ADJUST knob is turned. The backlight remains lighted for 10 seconds after the last activity.
Program ResetProgram reset deletes any existing program and returns the clock to 12:00 pm (noon). 1. Press and hold the following (4) buttons at the same time for 1 second: MANUAL DEFROST, SET TIME, DEFROST
START/STOP and CLEAR. 2. Lighted segments showing any program will turn off, and the time segment will show 12:00 pm (noon).
Set the TimeThe flashing segment shows the actual time. 1. Rotate ADJUST knob until the correct time is shown. Each segment is 15 minutes. 2. Press the SET TIME button to set the time.
Program a Defrost Cycle 1. Refer to original equipment manufacturer’s operating instructions for recommended defrost schedule. 2. Rotate ADJUST to move the cursor to desired defrost start time. 3. Press DEFROST START/STOP once. This indicates a timed defrost start time. 4. Rotate ADJUST to move the cursor to the desired time terminated or backup termination time. 5. Press DEFROST START/STOP once. This shows the termination time.
All the segments between the start and stop times will be lit. • Number of defrost cycles user may set: 12 • Defrost periods: minimum 15 minutes, maximum 105 minutes (each segment is 15 minutes) Each defrost
cycle can have its own independent period. • Minimum time between defrost cycles: 15 minutes
ClearTo remove a defrost cycle: 1. Rotate ADJUST to the start time. 2. Press CLEAR once. 3. Defrost cycle is deleted. (All the lit segments linked with the defrost cycle, turn off.)
To remove part of the defrost cycle: 1. Rotate ADJUST to a segment within a defrost cycle. 2. Press CLEAR once. 3. The segments from the cursor location to the termination time are deleted. (The lit segments will turn off.)
Manual DefrostPress the MANUAL DEFROST button to begin a manual defrost at any time during a refrigeration cycle. A manual defrost lasts 15 minutes.
If a programmed automatic defrost is scheduled to start during a manual defrost, the control will automatically switch from the manual defrost mode to the automatic defrost mode. The automatic defrost will end normally (time or temperature).
If a manual defrost is started so that the refrigeration ON time between the end of the manual defrost and the start of the next scheduled defrost violates the Short Cycle ON time requirement (see below), the manual defrost period will be lengthened to the start of the scheduled defrost. Manual defrosts occurring after ascheduled defrost that violate the Short Cycle OFF time requirement will initiate the manual defrost immediately.
11
Short Cycle ProtectionThe control will not schedule a compressor run (ON) time shorter than five minutes. The control will not schedule a compressor OFF time shorter than thirty seconds except for loss of power situations.The operator can stop or start the compressor at any time.
Program CarryoverTime will be retained for a minimum of 100 hours; program retention is indefinite.During loss of power, the display will be blank, the indicating lights are off and the relay(s) is/are de-energized. When power is restored (less than 100 hours), the time and program will pick up where the program is as if there had been no loss of power.
NOTE: After 100 hours, if the clock is lost the time is set to noon, and the program resumes.
Troubleshooting
Problem Solution
Backlight is not on.The display backlight will turn on when the ADJUST knob is turned and will remain on for 10 seconds after the last activity.
The display segments and backlight are not on.
1. Verify proper voltage is applied to the correct terminals.2. Perform PROGRAM RESET.3. Replace timer.
All the display segments and LEDs are flashing.
The control has detected a catastrophic or programming failure. If possible the UDT will return to refrigerate.1. Verify proper voltage is applied to the correct terminals.2. Verify wiring of the device.3. Perform PROGRAM RESET.4. If problem clears, reprogram the device.5. If indication remains, replace the timer.
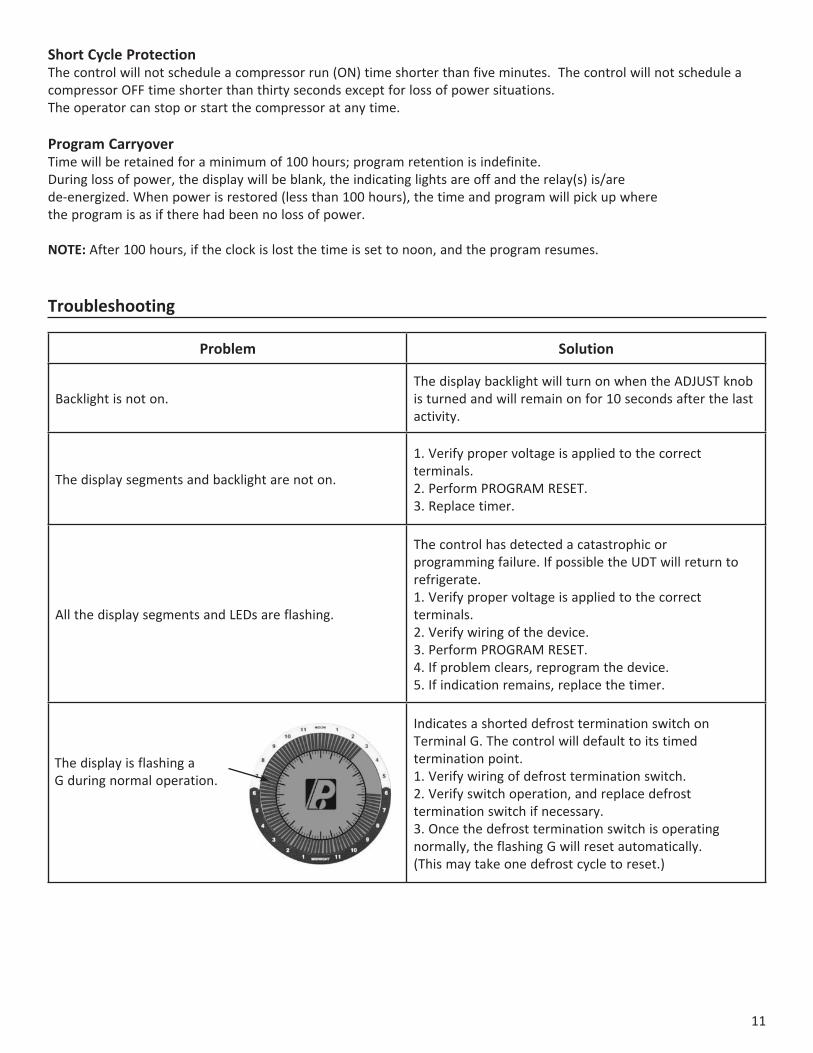
The display is flashing a G during normal operation.
Indicates a shorted defrost termination switch on Terminal G. The control will default to its timed termination point.1. Verify wiring of defrost termination switch.2. Verify switch operation, and replace defrost termination switch if necessary.3. Once the defrost termination switch is operating normally, the flashing G will reset automatically. (This may take one defrost cycle to reset.)

Customer Service Telephone 1.800.304.6563Customer Service Facsimile [email protected]
Robertshaw®, Ranco®, Paragon® and Uni-Line® are trademarks of Robertshaw, its subsidiaries and/or affiliated companies. All other brands mentioned may be the trademarks of their respective owners.
For Technical ServiceTelephone [email protected]
www.robertshaw.com©2016 Robertshaw09/16 –352-00006-001 RevE