UDS Enterprise 1.9 Installation, Administration & User … · 4.4.3 Windows Basic OS Manager ......
210
UDS Enterprise Installation, Administration & User Guide Versión 1.9 Rev. 1 03 November 2015
Transcript of UDS Enterprise 1.9 Installation, Administration & User … · 4.4.3 Windows Basic OS Manager ......

UDS Enterprise Installation, Administration & User Guide Versión 1.9 Rev. 1 03 November 2015

Page 1 of 209
UDS Enterprise 1.9 Installation, Administration & User Guide
www.udsenterprise.com
INDEX
1. INTRODUCTION ............................................................................................ 6
1.1 Enterprise, Free & Evaluation versions ......................................................... 7
1.2 Features ........................................................................................................ 8
1.3 Platform architecture with UDS Enterprise .................................................... 9
1.4 UDS Enterprise Components ...................................................................... 11
1.4.1 UDS Server ............................................................................................... 12
1.4.2 UDS Tunneler ........................................................................................... 13
1.4.3 UDS Database* ........................................................................................ 14
1.4.4 UDS Actor ................................................................................................. 15
1.4.5 UDS Plugin ............................................................................................... 16
2. BEFORE INSTALLING UDS ........................................................................ 17
2.1 Installation of UDS Enterprise on VMware vSphere virtual platform ........... 18
2.1.1 Virtual platform requirements ................................................................... 18
2.1.2 Network connections ................................................................................ 19
2.1.3 Storing UDS elements on VMware vSphere ............................................ 19
2.2 UDS Enterprise installation on oVirt virtual platform ................................... 25
2.2.1 Virtual platform requirements ................................................................... 25
2.2.2 Network connections ................................................................................ 26
2.3 UDS Enterprise installation on RHEV virtual platform ................................. 27
2.3.1 Virtual platform requirements ................................................................... 27
2.3.2 Network connections ................................................................................ 28
2.4 UDS Enterprise installation on Microsoft Hyper-V ...................................... 29
2.4.1 Virtual platform requirements ................................................................... 29
2.4.2 Network connections ................................................................................ 31
2.5 UDS Enterprise installation on Citrix XenServer ......................................... 32

Page 2 of 209
UDS Enterprise 1.9 Installation, Administration & User Guide
www.udsenterprise.com
2.5.1 Virtual platform requirements ................................................................... 32
2.5.2 Network connections ................................................................................ 33
2.6 UDS Enterprise installation on Nutanix Acropolis ....................................... 34
2.6.1 Virtual platform requirements ................................................................... 34
2.6.2 Network connections ................................................................................ 35
3. INSTALLING UDS ENTERPRISE ................................................................ 36
3.1 UDS Enterprise Platform Requirements ..................................................... 36
3.1.1 Infrastructure requirements ...................................................................... 36
3.1.2 Network requirements .............................................................................. 36
3.2 UDS Enterprise Platform installation ........................................................... 37
3.2.1 UDS Database setup ................................................................................ 37
3.2.2 UDS Server setup ..................................................................................... 41
3.2.3 UDS Tunneler setup ................................................................................. 47
3.2.4 UDS Actor setup ....................................................................................... 52
3.2.4.1 Windows UDS Actor installation ........................................................... 54
3.2.4.2 Linux UDS Actor installation ................................................................. 58
3.2.5 UDS Plugin setup ..................................................................................... 61
3.2.5.1 Plugin UDS Windows setup .................................................................. 63
4. ADMINISTERING UDS ................................................................................ 66
4.1 Configuring Service Providers ..................................................................... 70
4.1.1 VDI platform with VMware vSphere .......................................................... 71
4.1.1.1 Registering “VMware Virtual Center Provider” service provider ............ 71
4.1.1.2 Configuring service based on “VMware Linked Clones” ....................... 74
4.1.2 VDI platform with oVirt .............................................................................. 79
4.1.2.1 Registration of service provider oVirt Platform Provider........................ 79
4.1.2.2 Configuring service based on oVirt Linked Clone ................................. 81
4.1.3 VDI platform with RHEV ........................................................................... 85
4.1.3.1 Registration of service provider oVirt/RHEV Platform Provider ............. 85
4.1.3.2 Configuring service based on oVirt Linked Clone ................................. 87
4.1.4 VDI platform with Microsoft Hyper-V ........................................................ 92

Page 3 of 209
UDS Enterprise 1.9 Installation, Administration & User Guide
www.udsenterprise.com
4.1.4.1 Registration of service provider Hyper-V Platform Provider .................. 92
4.1.4.2 Configuring service based on Hyper-V Linked Clone ........................... 95
4.1.5 VDI platform with Citrix XenServer ........................................................... 98
4.1.5.1 Registration of service provider XenServer Platform Provider .............. 98
4.1.5.2 Configuring service based on Xen Linked Clone ................................ 101
4.1.6 VDI platform with Nutanix Acropolis ....................................................... 103
4.1.6.1 Registration of service provider Nutanix Acropolis Platform Provider . 103
4.1.6.2 Configuring service based on Nutanix KVM ........................................ 106
4.1.7 Connection to persistent hardware ......................................................... 109
4.1.7.1 Registering service provider “Physical Machine Providers” ................ 109
4.1.7.2 Configuring service based on “Physical Machines Providers” ............ 110
4.1.8 RDS applications Service Provider ......................................................... 114
4.1.8.1 Registering Service Provider “RDS Provider” ..................................... 114
4.1.8.2 Configuring a service baed on “RDS RemoteAPP” ............................. 117
4.2 Configuring Authenticators ........................................................................ 119
4.2.1 Active Directory Authenticator ................................................................ 120
4.2.2 eDirectory Authenticator ......................................................................... 122
4.2.3 Internal Database ................................................................................... 124
4.2.4 IP Authenticator ...................................................................................... 127
4.2.5 SAML Authenticator ................................................................................ 129
4.2.6 LDAP Authenticator ................................................................................ 131
4.3 Configuring users, user groups and user metagroups .............................. 133
4.3.1 Creating "Internal Database" groups and users ..................................... 138
4.3.2 Creating IP Authenticator groups and users .......................................... 139
4.4 Configuring OS Managers ......................................................................... 140
4.4.1 Linux OS Manager .................................................................................. 141
4.4.2 Linux Random Password OS Manager .................................................. 142
4.4.3 Windows Basic OS Manager .................................................................. 144
4.4.4 Windows Domain OS Manager .............................................................. 145
4.4.5 Windows Random Password OS Manager ............................................ 147

Page 4 of 209
UDS Enterprise 1.9 Installation, Administration & User Guide
www.udsenterprise.com
4.4.6 RDS OS Manager ................................................................................... 149
4.5 Configuring Networks ................................................................................ 150
4.6 Configuring Transports .............................................................................. 152
4.6.1 HTML5 RDP Transport ........................................................................... 154
4.6.2 NX Transport (direct) .............................................................................. 157
4.6.3 NX Transport (tunneled) ......................................................................... 160
4.6.4 RDP Transport (direct) ........................................................................... 163
4.6.5 RDP Transport (tunneled) ...................................................................... 166
4.6.6 RDS Transport (direct) ........................................................................... 169
4.6.7 RDS Transport (tunneled) ...................................................................... 171
4.6.8 RGS Transport (direct) ........................................................................... 173
4.6.9 RGS Transport (tunneled) ...................................................................... 176
4.6.10 RHEV/oVirt SPICE Transport (direct) ................................................... 178
4.6.11 RHEV/oVirt SPICE Transport (tunneled) .............................................. 180
4.7 Configuring Services Pools ....................................................................... 182
4.8 Configuring Permissions ........................................................................... 189
5. DEPLOYING VIRTUAL DESKTOPS WITH UDS ENTERPRISE ............... 192
6. UDS ENTERPRISE ADVANCED CONFIGURATION ................................ 195
6.1 Image gallery ............................................................................................. 196
6.2 Reports ...................................................................................................... 198
6.3 UDS advanced parameters ....................................................................... 202
6.3.1 UDS ........................................................................................................ 202
6.3.2 RGS ........................................................................................................ 203
6.3.3 SAML ...................................................................................................... 204
6.3.4 IPAUTH ................................................................................................... 204
6.3.5 NX ........................................................................................................... 204
6.3.6 CLUSTER ............................................................................................... 205
6.3.7 WYSE ..................................................................................................... 205
6.3.8 ENTERPRISE ......................................................................................... 205

Page 5 of 209
UDS Enterprise 1.9 Installation, Administration & User Guide
www.udsenterprise.com
6.3.9 SECURITY .............................................................................................. 206
6.3.10 VMWARE .............................................................................................. 207
6.4 Flush System Cache ................................................................................. 208
7. ABOUT VIRTUALCABLE ........................................................................... 209

Page 6 of 209
UDS Enterprise 1.9 Installation, Administration & User Guide
www.udsenterprise.com
1. INTRODUCTION
UDS Enterprise is a multiplatform connection Broker for Windows and Linux. It manages user access to virtual and remote desktops, applications and any service validated in the system. UDS Enterprise provides a set of software elements for services lifecycle management, administration and deployment. This document contains basic instructions to setup UDS software on a virtual infrastructure and procedure for a proper administration of the different services.

Page 7 of 209
UDS Enterprise 1.9 Installation, Administration & User Guide
www.udsenterprise.com
1.1 Enterprise, Free & Evaluation versions
UDS software requires a Data Base (DB) to storage system configuration parameters. To perform this function, UDS is compatible with MySQL different versions. UDS Enterprise paid version requires an external Data Base. In case you don’t have one, VirtualCable will provide a DB in virtual appliance format, which is not included in UDS software support. UDS Enterprise Free Edition & UDS Enterprise Evaluation Edition feature an internal MySQL Data Base. External DB integration is not supported in these versions. NOTE: In case you’re about to setup UDS Enterprise Free Edition or UDS Enterprise Evaluation Edition, the sections included in this guide regarding UDS Data Base don’t apply, since as we explained before the DB is embedded in the system. Principales diferencias entre UDS Enterprise, Free Edition & Edición de Evaluación:
Enterprise Edition Free Edition Evaluation Edition
Nº of users Unlimited 10 Unlimited
Duration Unlimited Unlimited 60 days
New hypervisors? Yes No No
Data Basee? External required Internal Internal
Tunneled WAN connections?
Yes No Mail to UDS Team
Security updates? Yes No No
Updates between versions?
Yes No Yes
New Modules? Yes No No
Support? Yes Per incident No
Premium Support? Yes No No
Page 8 of 209
UDS Enterprise 1.9 Installation, Administration & User Guide
www.udsenterprise.com
1.2 Features
The main features of UDS Enterprise include:
Very easy installation and administration
Virtual and remote desktops deployment
Application virtualization for users in Windows environment through RDS
Multi-hypervisor, with the ability to migrate the platform to more efficient future
solutions (currently it is compatible with VMware vSphere, KVM, Microsoft
Hyper-V, Citrix XenServer and Nutanix Acropolis)
Multi-authenticator, which permits users and user groups from different sources
to be set up with a practically unlimited number of configurations
Authentication system via multiple connectors, for example: Active Directory,
LDAP, OpenLDAP, eDirectory, SAML, CAS, Internal authentication system,
authentication system by device, IP, MAC, Hostname…
Reports featuring users lists/accesses and services pools use
Secure WAN access for publishing PCs on the Internet, using an SSL tunneler
included in the subscription
Tool personalization using customized development
Product roadmap based on client and community requests
Ready for heterogeneous environments where other solutions do not have
access because of functionalities or cost scaling, for example: AAPP or
academic environment
Subscription model based on support and updates
Non-redistributable subscription model up to an unlimited number of users

Page 9 of 209
UDS Enterprise 1.9 Installation, Administration & User Guide
www.udsenterprise.com
1.3 Platform architecture with UDS Enterprise
An optimal design of a services platform is essential in order to obtain all the benefits which may be provided by the architecture. Each layer that forms this architecture may be designed to fulfill its function without affecting the other ones. The main elements that form an architecture with UDS are:
Connection clients: Devices used to access the virtual desktops and
applications, such as thin clients, zero clients, PCs, etc…. It is important to
identify if the access to the desktop services will be carried out from a LAN or
from WAN
UDS Servers: They are formed by a database (DB) to storage all the data
related to the environment, a connection Broker which will manage the desktop
services lifecycle and communication with the hypervisors and other service
providers; and a tunnel server to allow secure access from outside. All of them
will be served in virtual appliance format
Authenticator/s: Active Directory, OpenLDAP, eDirectory Servers, etc…
Through their integration with UDS they will control the users access to desktop
services. Depending on the environment, you may have from one to an
unlimited number of authenticators
Service Providers
o Hypervisor platform: It executes the creation, switch on and
removal of the virtual desktops which are managed from the Broker.
UDS integrates itself with Microsoft Hyper-V, VMware vSphere, KVM
(oVirt and Red Hat Enterprise Virtualization), Citrix XenServer and
Nutanix Acroplis hypervisors
o RDS Applications: It provides virtualized applications which will be
administered by UDS Enterprise
Storage: They will host the servers, virtual and remote desktops, applications
and other services of the platform. The choice of the type of storage is an
important part of the design. Depending on the needs demanded by the users
in the desktop services, we may select the most appropriate one regarding
performance
With a clear idea of the architecture design, you may start scaling the platform, bearing in mind the number of users that will access to it.

Page 10 of 209
UDS Enterprise 1.9 Installation, Administration & User Guide
www.udsenterprise.com
In the following image you can see an example of an architecture with UDS Enterprise:

Page 11 of 209
UDS Enterprise 1.9 Installation, Administration & User Guide
www.udsenterprise.com
1.4 UDS Enterprise Components
UDS Enterprise is made up of 5 elements that interact with each other.
UDS Server (Broker). It is installed as a virtual machine (VM) and it is provided
in virtual appliance format
UDS Tunneler: It is installed as a VM and it is provided in virtual appliance
format
UDS Data Base: It is installed as a VM and it is provided in virtual appliance
format (It doesn’t apply to UDS Enterprise Free Edition & Evaluation Edition))
UDS Actor: It is installed on the VM as a service that will be used as a template
for deploying the desktop groups
UDS Plugin: It is installed on the client device to connect to the desktop
services (with all connection protocols except HTML5)
The features and technical requirements of each component are defined below:

Page 12 of 209
UDS Enterprise 1.9 Installation, Administration & User Guide
www.udsenterprise.com
1.4.1 UDS Server
This is the software that mediates among clients and service providers. This is the basic element of UDS, as it performs the functions of connection Broker to the desktop services and enables the administration and management of virtual desktop platforms defined as implemented services. Virtual Appliance with the following features:
Virtual hard drive: 5 GB
Memory: 1 GB
CPU: 2 vCPU
Network: 1 vNIC
Requirements:
1 IP Address
IP DNS
Network mask
IP Gateway
Domain name
Database IP
DB port and instance name
Activation code
Page 13 of 209
UDS Enterprise 1.9 Installation, Administration & User Guide
www.udsenterprise.com
1.4.2 UDS Tunneler
Software that establishes secure connections to desktop services through WAN. It also provides HTML5 access to the services. UDS tunneler allows the connection from any device/browser/client to the desktop services through a SSH tunnel without having installed any software beforehand. Moreover, it allows RDP access to desktop services through HTML5. Virtual Appliance with the following features:
Hard drive: 5 GB
Memory: 1 G
CPU: 2 vCPU
Network: 1 vNIC
Requirements:
1 IP Direction
IP DNS
Network mask
IP Gateway
Domain name
IP UDS Server

Page 14 of 209
UDS Enterprise 1.9 Installation, Administration & User Guide
www.udsenterprise.com
1.4.3 UDS Database*
This component is responsible for storing all system UDS data, such as service providers, authenticators, connectivity… and all the information needed to generate statistics. Currently, in UDS 1.9 version, database manager MySQL 5.5 version onwards are the only ones supported. It is necessary to have an appropriately configured MySQL database with a valid instance and user at the time of installation. IMPORTANT!: In the event that you do not have said database manager, VirtualCable can provide this component as a virtual appliance. This component is not included in UDS Enterprise support. Virtual Appliance with the following features:
Hard drive: 8 GB
Memory: 1 GB
CPU: 1 vCPU
Network: 1 vNIC
Requirements:
1 IP address
DNS IP
Network mask
IP Gateway
Domain name
User with instance permission
*THIS COMPONENT DOES NOT APPLY TO UDS ENTERPRISE FREE EDITION &
UDS ENTERPRISE EVALUATION EDITION

Page 15 of 209
UDS Enterprise 1.9 Installation, Administration & User Guide
www.udsenterprise.com
1.4.4 UDS Actor
This software performs the communication and interface functions for transmitting data (virtual desktop status, machine name…) and commands among the Broker and the desktop services managed by UDS. It is installed on the virtual machine as a service that will be used as a template (Gold image) for generating desktop services groups based on Llinked Clones. The supported operating systems are:
Windows 10
Windows 8.1
Windows 8
Windows 7
Windows 2008
Windows 2012
Linux (Debian, Ubuntu, CentOS, Fedora, OpenSuse, etc…)
Requirements:
.Net Framework 3.5 SP1 (Windows machines)
Python 2.7 (Linux machines)
UDS Server IP

Page 16 of 209
UDS Enterprise 1.9 Installation, Administration & User Guide
www.udsenterprise.com
1.4.5 UDS Plugin
This software allows the connection to the connection protocol to run desktop services. It is installed on the client device to connect to desktop services. The supported operating systems are:
Windows 10
Windows 8.1
Windows 8
Windows 7
Windows 2012
Windows 2008
Linux (Debian, Ubuntu, CentOS, Fedora, OpenSuse, etc…)
MAC OSX (10.5 onwards)

Page 17 of 209
UDS Enterprise 1.9 Installation, Administration & User Guide
www.udsenterprise.com
2. BEFORE INSTALLING UDS
The UDS Enterprise components can be hosted on different virtualization platforms. Even though the UDS Enterprise components are hosted on a single virtual platform, UDS is capable of managing the deployment of virtual desktops on multiple virtual platforms that are completely independent of the virtual platform where UDS Enterprise is hosted. This section describes the requirements for installing UDS Enterprise on different virtualization platforms and the requirements of the virtual platform on which the software is to be installed.

Page 18 of 209
UDS Enterprise 1.9 Installation, Administration & User Guide
www.udsenterprise.com
2.1 Installation of UDS Enterprise on VMware vSphere
virtual platform
2.1.1 Virtual platform requirements
UDS Enterprise will be able to be deployed on VMware vSphere platforms starting with version 5. To find out the requirements of a VMware vSphere platform, you can access the following documentation:
VMware Compatibility Guide
vCenter Server and vSphere Client Hardware Requirements
The VMware platform on which UDS will be deployed must meet the following requirements:
At least one VMware ESXi server with a valid license is needed for hosting the
UDS servers and generating the virtual desktops
The vSphere platform must be administered by a vCenter with a valid license
For UDS to be installed and capable of sending requests to a vCenter, and for
these requests to be carried out, the user must have credentials with
administration rights on the VMware vSphere platform on which the virtual
desktops are to be deployed
At least one Virtual Machine Port Group to which the virtual appliance of the
UDS platform is going to be connected must be established
At least one Virtual Machine Port Group to which the different virtual desktops
managed by UDS are going to be connected must be established
There must be at least 18 GB of free space on the hard drive to host the virtual
appliance that makes up UDS
There must be at least 3 GB of free RAM to host the virtual appliance that
makes up UDS
E1000E virtual network adapter of the template machine (gold image) is not
supported

Page 19 of 209
UDS Enterprise 1.9 Installation, Administration & User Guide
www.udsenterprise.com
2.1.2 Network connections
The following connections between the different elements which make up the UDS Enterprise platform must be enabled:
Origin Destination Port
UDS Broker DB MySQl 3306
UDS Broker vCenter 443
UDS Broker Authenticator 389, 636 (SSL)
Tunneler UDS Broker 80, 443
UDS Broker Virtual Desktops 3389 (RDP), 22 (NX), 42966 (RGS)
Tunneler Virtual Desktops 3389 (RDP), 22 (NX), 42966 (RGS)
Users UDS Broker 80, 443
Users Tunneler 443
Users HTML5 (Tunel) 10443
2.1.3 Storing UDS elements on VMware vSphere
The main component of UDS is provided as virtual appliance to upload the VM to vSphere platform, using the vSphere client. Steps: 1.- Once established connection on the target platform though VMware vSphere client, please choose the menu option File \ deploy OVF Template ...

Page 20 of 209
UDS Enterprise 1.9 Installation, Administration & User Guide
www.udsenterprise.com
2.- Select the source location of the virtual machine .ova file

Page 21 of 209
UDS Enterprise 1.9 Installation, Administration & User Guide
www.udsenterprise.com
3.- On next step the wizard displays virtual machine features to be hosted in the target virtual platform:
4.- Next step, select inventory name and location of the virtual machine on the target platform.

Page 22 of 209
UDS Enterprise 1.9 Installation, Administration & User Guide
www.udsenterprise.com
5.- Then, select the destination datastore where the virtual machine is going to be stored.
6.- The wizard displays the name and size of the selected datastore; you can choose the machine virtual hard drive format. It is recommended to select “Thick Provision Lazy Zeroed” format, as this provides better performance.

Page 23 of 209
UDS Enterprise 1.9 Installation, Administration & User Guide
www.udsenterprise.com
7.- Select the virtual network to connect the virtual machine.
8.- In the last step, wizard displays the virtual machine conversion details. Clicking "Finish" button starts the conversion process.

Page 24 of 209
UDS Enterprise 1.9 Installation, Administration & User Guide
www.udsenterprise.com
Once the conversion process has been completed, you now have the UDS Broker server in its Enterprise version stored on the vSphere virtual platform. NOTE: Steps 1 to 8 (if necessary) must be repeated for the tunneler’s virtual appliance and the MySQL DB server (only in the event that VirtualCable provides the DB’s virtual appliance).

Page 25 of 209
UDS Enterprise 1.9 Installation, Administration & User Guide
www.udsenterprise.com
2.2 UDS Enterprise installation on oVirt virtual platform
2.2.1 Virtual platform requirements
UDS can be deployed on oVirt platforms version 3.2, 3.3, 3.4 & 3.5.4.
The oVirt platform on which UDS is going to be deployed must meet the following requirements:
At least one oVirt server node is needed to host the UDS servers and create the
virtual desktops
The oVirt platform must be administered by an oVirt-engine
For UDS to be installed and capable of sending requests to an oVirt-engine, and for these requests to be carried out, the user must have credentials with administration rights on the oVirt platform on which the virtual desktops are to be deployed
You must have at least one setup cluster for creating and configuring the different virtual desktops managed by UDS
You must have at least one setup “Logical network” to which the virtual servers of the UDS platform are going to be connected
You must have at least one setup “Logical network” to which the different virtual desktops managed by UDS are going to be connected
There must be at least 18 GB of free space on the hard drive to host the virtual servers that make up UDS
There must be at least 3 GB of free RAM to host the virtual servers that make up UDS

Page 26 of 209
UDS Enterprise 1.9 Installation, Administration & User Guide
www.udsenterprise.com
2.2.2 Network connections
The following ports among the different elements that make up the UDS platform must be enabled:
Origin Destination Port
UDS Broker DB MySQL 3306
UDS Broker oVirt-engine 443
UDS Broker Authenticator 389, 636 (SSL)
Tunneler UDS Broker 80, 443
UDS Broker Virtual desktops 3389 (RDP), 22 (NX), 42966 (RGS)
Tunneler Virtual desktops 3389 (RDP), 22 (NX), 42966 (RGS)
Users UDS Broker 80, 443
Users Tunneler 443
Users s HTML5 (Tunnel) 10443

Page 27 of 209
UDS Enterprise 1.9 Installation, Administration & User Guide
www.udsenterprise.com
2.3 UDS Enterprise installation on RHEV virtual
platform
2.3.1 Virtual platform requirements
UDS Enterprise can be deployed on Red Hat Enterprise Virtualization platforms version 3. The RHEV platform on which UDS is going to be deployed must meet the following requirements:
At least one RHEV server is needed to host the UDS servers and create the
virtual desktops
The RHEV platform must be administered by a RHEV-Manager server
For UDS to be installed and capable of sending requests to a RHEV-Manager,
and for these requests to be carried out, the user must have credentials with
administration rights on the RHEV platform on which the virtual desktops are to
be deployed
You must have at least one setup cluster for creating and configuring the
different virtual desktops managed by UDS
You must have at least one setup “Logical network” to which the virtual servers
of the UDS platform are going to be connected
You must have at least one setup “Logical network” to which the different virtual
desktops managed by UDS are going to be connected
There must be at least 18 GB of free space on the hard drive to host the virtual
servers that make up UDS
There must be at least 3 GB of free RAM to host the virtual servers that make
up UDS

Page 28 of 209
UDS Enterprise 1.9 Installation, Administration & User Guide
www.udsenterprise.com
2.3.2 Network connections
The following ports among the different elements that make up the UDS platform must be enabled:
Origin Destination Port
UDS Broker DB MySQL 3306
UDS Broker RHEV-Manager 80, 443
UDS Broker Authenticator 389, 636 (SSL)
Tunneler UDS Broker 80, 443
UDS Broker Virtual Desktops 3389 (RDP), 22 (NX), 42966 (RGS)
Tunneler Virtual Desktops 3389 (RDP), 22 (NX), 42966 (RGS)
Users UDS Broker 80, 443
Users Tunneler 443
Users HTML5 (Tunnel) 10443

Page 29 of 209
UDS Enterprise 1.9 Installation, Administration & User Guide
www.udsenterprise.com
2.4 UDS Enterprise installation on Microsoft Hyper-V
2.4.1 Virtual platform requirements
UDS can be deployed on Microsoft Hyper-V platforms version 3 The Microsoft Hyper-V platform on which UDS is going to be deployed must meet the following requirements.
At least one Microsoft Hyper-V server with a valid license to host the UDS
servers and create the virtual desktops
It is necessary that Microsoft Hyper-V servers are not part of a Microsoft cluster
For UDS to work properly against a Microsoft Hyper-V server, it is necessary
that this server is not part of a Microsoft cluster. Clustered Microsoft Hyper-V
will be supported in next UDS versions
You must have at least one Virtual Switch to connect the virtual servers of
UDS platform
You must have at least one Virtual Switch to connect the different virtual
desktops managed by UDS
You must have the credentials of one user with administration rights on the
Microsoft Hyper-V platform where the virtual desktops are going to be deployed
There must be at least 18 GB of free space on the hard drive to host the virtual
servers that make up UDS
There must be at least 3 GB of free RAM to host the virtual servers that make
up UDS
You must enable WSMan on every Hyper-V host used with UDS so that
Microsoft Hyper-V with UDS will perform properly
To enable it through HTTPS, you must have a valid certificate.

Page 30 of 209
UDS Enterprise 1.9 Installation, Administration & User Guide
www.udsenterprise.com
To enable it through HTTP, run:
winrm quickconfig winrm set winrm/config/service '@{AllowUnencrypted="true"}' winrm set winrm/config/service/auth '@{Basic="true"}'

Page 31 of 209
UDS Enterprise 1.9 Installation, Administration & User Guide
www.udsenterprise.com
2.4.2 Network connections
The following connections among the different elements which make up the UDS platform must be enabled:
Origin Destination Port
UDS Broker DB MySQL 3306
UDS Broker Hyper-V 80, 443
UDS Broker Authenticator 389, 636 (SSL)
Tunneler UDS Broker 80, 443
UDS Broker Virtual Desktops 3389 (RDP), 22 (NX), 42966 (RGS)
Tunneler Virtual Desktops 3389 (RDP), 22 (NX), 42966 (RGS)
Users UDS Broker 80, 443
Users Tunneler 443
Users HTML5 (Tunnel) 10443

Page 32 of 209
UDS Enterprise 1.9 Installation, Administration & User Guide
www.udsenterprise.com
2.5 UDS Enterprise installation on Citrix XenServer
2.5.1 Virtual platform requirements
UDS can be deployed on Citrix XenServer 6.5 platforms. The XenServer platform on which UDS is going to be deployed must meet the following requirements:
At least one XenServer server to host the UDS servers and create the virtual desktops
For UDS to work properly against a XenServer server, it is necessary to have a user with credentials with administration rights on the XenServer platform where the virtual desktops are going to be deployed
You must have at least one network to connect the virtual servers of UDS platform
You must have at least one network to connect the different virtual desktops managed by UDS
There must be at least 18 GB of free space on the hard drive to host the virtual servers that make up UDS
There must be at least 3 GB of free RAM to host the virtual servers that make up UDS

Page 33 of 209
UDS Enterprise 1.9 Installation, Administration & User Guide
www.udsenterprise.com
2.5.2 Network connections
The following connections among the different elements which make up the UDS platform must be enabled:
Origin Destination Port
UDS Broker DB MySQL 3306
UDS Broker XenServer 80, 443
UDS Broker Authenticator 389, 636 (SSL)
Tunneler UDS Broker 80, 443
UDS Broker Virtual Desktops 3389 (RDP), 22 (NX), 42966 (RGS)
Tunneler Virtual Desktops 3389 (RDP), 22 (NX), 42966 (RGS)
Users UDS Broker 80, 443
Users Tunneler 443
Users HTML5 (Tunnel) 10443

Page 34 of 209
UDS Enterprise 1.9 Installation, Administration & User Guide
www.udsenterprise.com
2.6 UDS Enterprise installation on Nutanix Acropolis
2.6.1 Virtual platform requirements
UDS can be deployed on Nutanix Acropolis platforms. The Nutanix Acropolis platform on which UDS is going to be deployed must meet the following requirements.
In order to setup UDS and Acropolis can receive and run UDS’ requests, you
must have credentials for a user with administration permissions on the
Acropolis platform where the virtual desktops are going to be deployed
You must have at least one network to connect the virtual servers of
UDS platform
You must have at least one network to connect the different virtual desktops
managed by UDS
There must be at least 18 GB of free space on the hard drive to host the virtual
servers that make up UDS
There must be at least 3 GB of free RAM to host the virtual servers that make
up UDS

Page 35 of 209
UDS Enterprise 1.9 Installation, Administration & User Guide
www.udsenterprise.com
2.6.2 Network connections
The following connections among the different elements which make up the UDS platform must be enabled:
Origin Destination Port
UDS Broker DB MySQL 3306
UDS Broker Acropolis 80, 443
UDS Broker Authenticator 389, 636 (SSL)
Tunneler UDS Broker 80, 443
UDS Broker Virtual Desktops 3389 (RDP), 22 (NX), 42966 (RGS)
Tunneler Virtual Desktops 3389 (RDP), 22 (NX), 42966 (RGS)
Users UDS Broker 80, 443
Users Tunneler 443
Users HTML5 (Tunnel) 10443

Page 36 of 209
UDS Enterprise 1.9 Installation, Administration & User Guide
www.udsenterprise.com
3. INSTALLING UDS ENTERPRISE
The installation of UDS Enterprise components is described in this section. The installation procedure will be the same for the different virtualization platforms supported by UDS Enterprise.
3.1 UDS Enterprise Platform Requirements
3.1.1 Infrastructure requirements
The infrastructure requirements needed to deploy UDS are:
Virtualization platform. This will be responsible for hosting the virtual desktops generated by UDS and running the servers that make up UDS o Username and Password of the manager of the virtualization platform with
administrator permissions
DNS server. This service is necessary for both the proper running of the virtual platform as well as for the UDS platform to be deployed
DHCP server. A DHCP server that enables to assign IP addresses to the virtual desktop groups created by Linked Clones is needed
3.1.2 Network requirements
In order to configure the UDS network, you must have at least 3 IP addresses to configure UDS (Broker, tunneler and MySQL Database). To setup UDS Enterprise Free Edition or UDS Enterprise Evaluation Edition you only must have 2 IP addresses (Broker and tunneler). It is also necessary to have the following components available:
Network mask
IP address of the DNS server
Gateway IP address
Domain name (if there is one)
IP address of the virtualization platform manager
Page 37 of 209
UDS Enterprise 1.9 Installation, Administration & User Guide
www.udsenterprise.com
3.2 UDS Enterprise Platform installation
3.2.1 UDS Database setup
Please, remember that UDS Enterprise Free Edition & UDS Enterprise Evaluation Edition feature an internal database, so UDS Database setup is not required. If VirtualCable provides the UDS DB virtual appliance, the following steps should be followed: Access MySQL server with the following credentials:
User: root Password: uds

Page 38 of 209
UDS Enterprise 1.9 Installation, Administration & User Guide
www.udsenterprise.com
We configure the virtual machine’s network parameters. The file “interfaces”should be modified and a static IP address should be assigned (the virtual appliance is configured with dhcp by default).
It is also necessary to modify the “resolv.conf” file in order to configure the dns server:

Page 39 of 209
UDS Enterprise 1.9 Installation, Administration & User Guide
www.udsenterprise.com
Once the IP data of the VM are configured, it is ready to be used with UDS. The MySQL server has configured the following DB by default to use it with UDS server:
Instance: uds User: uds Password: uds
If you need to create a new DB instance for UDS, you should perform the following process: Access MySQL with these credentials:
User: root Password: uds
The DB is created using the following command:
create database database_name;

Page 40 of 209
UDS Enterprise 1.9 Installation, Administration & User Guide
www.udsenterprise.com
UTF-8 collation is assigned through the following command:
alter database “database_name” character set “UTF8” collate “UTF8_general_ci”;
A user with administration rights is created on the new DB using the command:
grant all on database_name.* to 'usuario'@'%' identified by 'password';
The DB will be available to be used with UDS system.

Page 41 of 209
UDS Enterprise 1.9 Installation, Administration & User Guide
www.udsenterprise.com
3.2.2 UDS Server setup
Once the virtual machine that makes up the UDS Broker server is turned on, a client console will be displayed to access the virtual machine. NOTE: In order to successfully configure a UDS Broker server, a MySQL database server with a completely empty database must be configured. If you use a database which has already been used and it contains data from another UDS version, all data will be migrated in order to be used in UDS Server version 1.9 (database migrations are only allowed from 1.5 version onwards). UDS Enterprise Free Edition & UDS Enterprise Evaluation Edition don’t require MySQL DB, since the system automatically enables a local DB. In this moment the UDS Broker server configuration process starts:

Page 42 of 209
UDS Enterprise 1.9 Installation, Administration & User Guide
www.udsenterprise.com
Step 1.- You must enter the subscription activation code.
Step 2.- You should configure the following parameters:
Host Name. This name has to be created in the appropiate name server
Domain. Domain where the Broker server UDS is going to be hosted
Broker Server UDS network data (IP Address, Network Mask, Gateway and DNS)

Page 43 of 209
UDS Enterprise 1.9 Installation, Administration & User Guide
www.udsenterprise.com
Step 3.- Enter the database server connection data:
MySQL Server: IP address or database server DNS name
MySQL Port: Connection port to the MySQL server. By default: 3306
MySQL Username: Database administrator user
MySQL Password: User password previously defined
MySQL Database: Database where the table structure will be created to host the data needed for the UDS platform

Page 44 of 209
UDS Enterprise 1.9 Installation, Administration & User Guide
www.udsenterprise.com
Step 4.- Configuration of UDS administration user. In this step, a username will be created in order to access UDS Administration for the first time. The access of such user can be disabled in UDS advanced configuration options. The following information must be filled in:
Username: User with administrator permission for managing the UDS platform
Password: Password for the administrator user created in the previous step
NOTE: The assigned password to the UDS system administrator user will be also valid for the Linux SO root user that hosts UDS software. It may be changed via console inside the virtual appliance.

Page 45 of 209
UDS Enterprise 1.9 Installation, Administration & User Guide
www.udsenterprise.com
Step 5.- Configuration summary. If all the data entered in the configuration wizard are right, click on “Continue” to start the UDS Server virtual appliance configuration.

Page 46 of 209
UDS Enterprise 1.9 Installation, Administration & User Guide
www.udsenterprise.com
Once all the steps are completed, the Broker server UDS has no te rebooted.
If you need to run the configuration wizard again to modify any data, you’ll have to validate yourself on the server (using the root user and the password for UDS system administration user fixed in Step 4) and execute “SetupUDS.sh”.
Once the new configuration has been setup, it is necessary to reboot the server manually.

Page 47 of 209
UDS Enterprise 1.9 Installation, Administration & User Guide
www.udsenterprise.com
3.2.3 UDS Tunneler setup
Once the virtual machine that makes up the UDS tunneler is turned on, a client console will be displayed to access the virtual machine. NOTE: To configure a UDS server tunneler successfully you must configure a UDS server Broker and know its IP address. At this moment the UDS tunneler configuration process starts:

Page 48 of 209
UDS Enterprise 1.9 Installation, Administration & User Guide
www.udsenterprise.com
Step 1.- The following parameters will be configured:
Host Name. This name must be defined in the corresponding DNS server
Domain. Domain where the UDS Server Tunneler will be hosted
UDS server Tunneler Network data (IP Address, Network Mask, Gateway and DNS)

Page 49 of 209
UDS Enterprise 1.9 Installation, Administration & User Guide
www.udsenterprise.com
Step 2.- Fill in connection data to UDS Broker server:
Broker Address: UDS server Broker IP address or DSN name
Broker Port: Communication Port with UDS server Broker. By default 443 Use SSL secure connection

Page 50 of 209
UDS Enterprise 1.9 Installation, Administration & User Guide
www.udsenterprise.com
Step 3.- Configuration of the Linux OS root user that hosts the UDS software tunneler. Fill in the following data:
Username: Linux OS root user`s password Password: root user`s password
Step 4.- Start the UDS server tunneler configuration:

Page 51 of 209
UDS Enterprise 1.9 Installation, Administration & User Guide
www.udsenterprise.com
Once all the steps have been completed, the UDS server tunneler has to be rebooted.
If a rerun of the configuration wizard is needed to modify any data, we will have to validate us in the server using the credentials we obtained in the Step 3 and run “SetupTunneler.sh”
Once the configuration is finished, we will have to manually reboot the server for the changes to be made.

Page 52 of 209
UDS Enterprise 1.9 Installation, Administration & User Guide
www.udsenterprise.com
3.2.4 UDS Actor setup
In order to install UDS Actor, you must previously download in the UDS Broker the suitable Actor for each platform (Windows and Linux). In order to do that, connect to the UDS Broker via web browser and using credentials for a user with administration permission to access the downloads.
Select “Downloads” in the user menu:

Page 53 of 209
UDS Enterprise 1.9 Installation, Administration & User Guide
www.udsenterprise.com
The UDS Actors available for download will be displayed in the browser. Select the Actor corresponding to the operating system installed on the template on which the desktops are going to be deployed:
UDSActorSetup-1.9.0.exe: UDS Actor for Windows machines
UdsActor-opensuse-1.9.0-1.noarch.rpm: UDS Actor for Linux OpenSuse machines
UdsActor-1.9.0-1.noarch.rpm: UDS Actor for Linux CenOS, Fedora, RHEL, etc…
UdsActor_1.9.0_all.deb : UDS Actor for Linux, Debian, Ubuntu, Xubuntu…machines
RDSActorSetup-1.9.0.exe: UDS Actor for Windows 2012 servers with RDS
which will serve virtualized applications

Page 54 of 209
UDS Enterprise 1.9 Installation, Administration & User Guide
www.udsenterprise.com
3.2.4.1 Windows UDS Actor installation
Once the UDS Actor has been downloaded and it has been transferred to the template, it’s time to setup it: NOTE: Before UDS Actor has been setup, you need the IP address of the UDS server Broker.
In the first window, accept the license agreement:

Page 55 of 209
UDS Enterprise 1.9 Installation, Administration & User Guide
www.udsenterprise.com
In the next window, select the install location for UDS Actor:
Click on “Install” and the UDS Actor will begin its installation process:

Page 56 of 209
UDS Enterprise 1.9 Installation, Administration & User Guide
www.udsenterprise.com
Once the installation has been completed, the UDS Actor is configured:
Enter the IP address of the UDS server Broker and indicate if you will use a secure connection and the level of logs generated. We need to indicate the “UDS Master Key” that the UDS server Broker has created (this code provides more security to the system). In order to obtain this code you have to access UDS administration (with an user with administration rights), go to “Tools” section and there select “Security” tab and copy the code from the “Master Key” parameter.

Page 57 of 209
UDS Enterprise 1.9 Installation, Administration & User Guide
www.udsenterprise.com
Once these parameters have been configured, run the connection test to check the connectivity to the server Broker.
Once the UDS Actor has been configured and installed, you can switch off the virtual machine. It is now ready to be used as an UDS system virtual desktop template. NOTE: To make the connection through RDP transport, it will be necessary to enable the remote access to the virtual desktop template.

Page 58 of 209
UDS Enterprise 1.9 Installation, Administration & User Guide
www.udsenterprise.com
3.2.4.2 Linux UDS Actor installation
Once we have downloaded the appropiate UDS Actor for the chosen Linux distro and it has been transferred to the base template, we run the Actor in order to setup it. NOTE: Before installing the UDS Actor we need the UDS server Broker IP address.
We enter the UDS server Broker address in the configuration wizard:
Page 59 of 209
UDS Enterprise 1.9 Installation, Administration & User Guide
www.udsenterprise.com
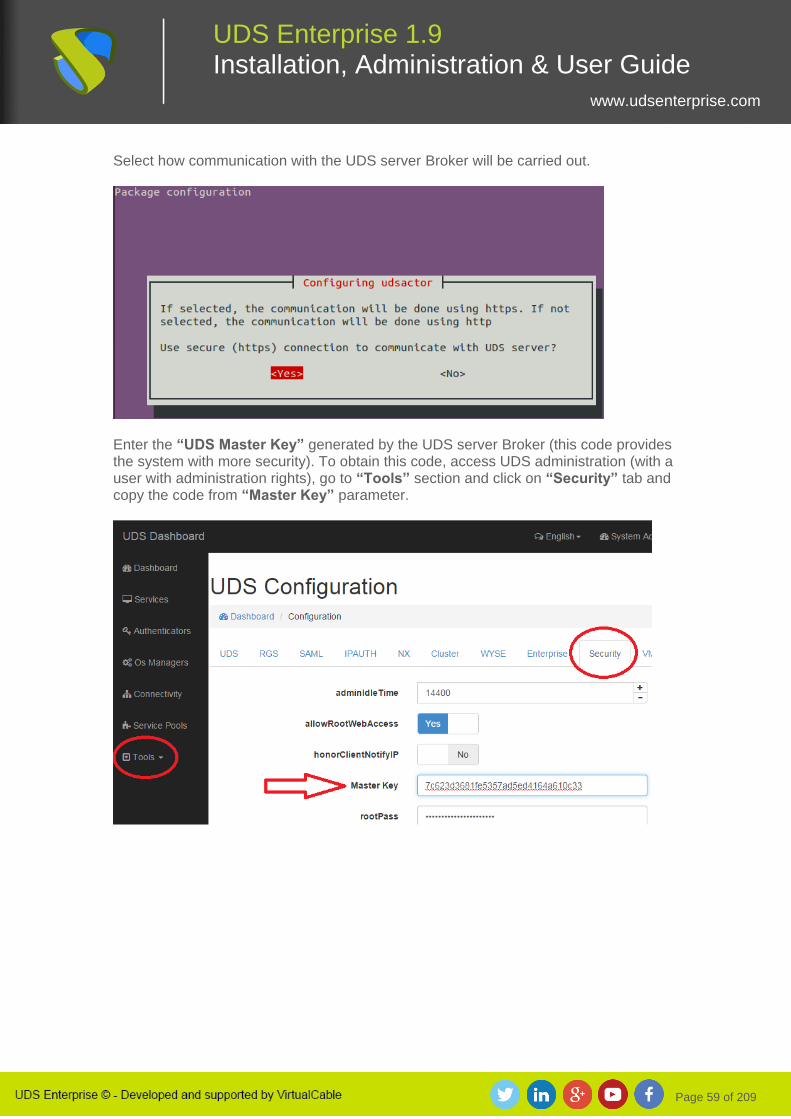
Select how communication with the UDS server Broker will be carried out.
Enter the “UDS Master Key” generated by the UDS server Broker (this code provides the system with more security). To obtain this code, access UDS administration (with a user with administration rights), go to “Tools” section and click on “Security” tab and copy the code from “Master Key” parameter.

Page 60 of 209
UDS Enterprise 1.9 Installation, Administration & User Guide
www.udsenterprise.com
Click on “ok”. UDS Actor installation and configuration process ends here. The virtual machine is now ready to be used as a UDS virtual desktop template and can be switched off.
NOTE: To make the connection through RDP transport, you must install XRDP package in order to enable the remote access to the virtual desktop template. Yo may follow the steps explained in this article. You can modify any configuration parameter of the UDS Actor for Linux desktops in the Actor configuration file localet in: /etc/udsActor/udsActor.cfg
If the desktop’s base template has already a previous version of the UDS Actor, it is necessary to completely uninstall it and install the new Actor. You may follow the steps explained in this article.

Page 61 of 209
UDS Enterprise 1.9 Installation, Administration & User Guide
www.udsenterprise.com
3.2.5 UDS Plugin setup
In order to connect to a virtual desktop through any transport except HTML5, the connection client device must have UDS Plugin installed. In your first access to a virtual desktop, UDS will automatically recognize the Operating System the user is using to connect, and the appropiate plugin download will be displayed.

Page 62 of 209
UDS Enterprise 1.9 Installation, Administration & User Guide
www.udsenterprise.com
We can also access the plugin’s downloads window clicking on the drop down menu and selecting “UDS Plugin”
It may be that the system does not automatically detect that the UDS Plugin is already installed on your device and thus, the Plugin UDS download window is displayed. In this case, it is recommended to reboot the browser and log in again in UDS. If this issue persists, select the option WARNING: Automatic plugin detection is disabled in order to avoid automatic access to this window and to connect directly to the virtual desktop.

Page 63 of 209
UDS Enterprise 1.9 Installation, Administration & User Guide
www.udsenterprise.com
3.2.5.1 Plugin UDS Windows setup
Once the appropiate UDS Plugin is downloaded, run it to start the setup process:

Page 64 of 209
UDS Enterprise 1.9 Installation, Administration & User Guide
www.udsenterprise.com
In the first window, acccept the license agreement:
In the next window, choose the UDS Plugin location:

Page 65 of 209
UDS Enterprise 1.9 Installation, Administration & User Guide
www.udsenterprise.com
Click on “Install” and UDS Plugin installation process starts:
Once the installation is completed, you can connect virtual desktops through UDS Plugin.

Page 66 of 209
UDS Enterprise 1.9 Installation, Administration & User Guide
www.udsenterprise.com
4. ADMINISTERING UDS Once the UDS platform has been setup, the system will be ready for its initial administering and configuration. To do this, input the IP address or UDS Broker server name through http or https access.

Page 67 of 209
UDS Enterprise 1.9 Installation, Administration & User Guide
www.udsenterprise.com
The first time you enter UDS administration dashboard, you must enter using the administrator user and the password indicated in the UDS Broker virtual appliance configuration script (step 3.2.2.) Once you access the administration dashboard, you will be able to change the password and create or select new users to enter to the administration dashboard. If you already have a user with administration permission for UDS platform, enter that user, the password and select the authenticator that will be used to validate the user.

Page 68 of 209
UDS Enterprise 1.9 Installation, Administration & User Guide
www.udsenterprise.com
If more than one authenticator is connected to UDS platform and you would like to access the administration dashboard with the administrator user and password indicated in the configuration script of the UDS Broker virtual appliance (see 3.2.1 section), the selected authenticator won’t be used, because this user won’t be validated against any authenticator. In the user menu, select "Dashboard" to enter UDS administration:

Page 69 of 209
UDS Enterprise 1.9 Installation, Administration & User Guide
www.udsenterprise.com
Once inside UDS administration, the initial configuration of the services will start.
The configuration of each "Services Pool" must be approached like the building of a puzzle, it is made up of different elements:
Each "Services Pool" is made up of different elements or pieces (Base Services, OS Managers, Transports and Authenticators)
Once the elements of the first "Services Pool" have been configured, the creation thereof will begin, repeating the process with the next "Service Pool", if there is one
All configured "Services Pools" together will form the type of virtual desktop deployment managed by the UDS platform

Page 70 of 209
UDS Enterprise 1.9 Installation, Administration & User Guide
www.udsenterprise.com
4.1 Configuring Service Providers
A Service Provider is responsible for offering IP services. The services offered by UDS will be on-demand virtual desktops or applications provided by a virtualization platform or persistent physical/virtual desktops assigned to specific users via IPs assignment. In order to build a “Service Pool”, at least one Service Provider must be created. Currently, UDS supports the following Service Providers:

Page 71 of 209
UDS Enterprise 1.9 Installation, Administration & User Guide
www.udsenterprise.com
4.1.1 VDI platform with VMware vSphere
Deployment of VDI platform via VMware vSphere virtual infrastructure.
4.1.1.1 Registering “VMware Virtual Center Provider” service provider
Enter "Services", click "New" and select “VMware Virtual Center Provider”.

Page 72 of 209
UDS Enterprise 1.9 Installation, Administration & User Guide
www.udsenterprise.com
In a VMware Virtual Center Provider, the minimum parameters to configure are: Service Name, vCenter server IP (“Host” field), an username and password with administrator rights on vCenter. We can also select “Timeout” in the connection with vCenter and specify a range of MAC addresses to cretate the virtual desktops. By clicking the “Test” button, we check if the connection has been correctly made.

Page 73 of 209
UDS Enterprise 1.9 Installation, Administration & User Guide
www.udsenterprise.com
When saving this configuration, we already have a valid "Service Providers" to start creating base services in the VMware vCenter platform. We can register all “VMware Virtual Center Provider” Service Providers we need in the UDS platform.
In order to modify any parameter in an existing Service Provider, we have to select it and click on “Edit”. Clicking the “Maintenance” button we can stop all operations running in UDS Broker on a service provider. It is recommended to enter a maintenance service provider when the communication with those service provider is lost or you’re planning a maintenance stoppage.

Page 74 of 209
UDS Enterprise 1.9 Installation, Administration & User Guide
www.udsenterprise.com
4.1.1.2 Configuring service based on “VMware Linked Clones” Once the vSphere platform where the desktops will be created has been configured, you must create “Base Services” based on “VMware Linked Clones”. Select the Service Providers where a “VMware Linked Clone” is going to be created and click on "New".

Page 75 of 209
UDS Enterprise 1.9 Installation, Administration & User Guide
www.udsenterprise.com
Choose a descriptive name for the template and configure the service parameters: Datacenter: Datacenter where the service will be hosted. Network: Network to which the desktops will be connected. Pub. Resource Pool: vCenter resources pool where the Linked Clones virtual desktops will be hosted (if there are no Pools in the VMware infrastructure, they will be created in the root). Clones Folder: Location of the Linked Clones virtual desktops in the VMs view and the vCenter templates. Resource Pool: vCenter resources pool where the template to be used by the service is located. Base Machine: Template for deploying the virtual desktops. Memory: Amount of memory to be assigned to the Linked Clones virtual desktops. Pub. Datastores: Location where the publication of the service will be stored. We can select one, several or all the datastores. If you select more than one, the system will always locate the new publications in the datastore with more free space (By default, the system won’t generate new publications in datastores with less than 30GB of free space. This parameter can be modified entering the UDS system advanced options). Inc. Datastores: Location where the created Linked Clones will be stored. We can select one, several or all the datastores. If you select more than one, the system will always locate the new Linked Clone desktops in the datastore with more free space (By default, the system won’t generate new virtual desktops in datastores with less than 30GB of free space. This parameter can be modified entering the UDS system advanced options). Machine Names: Root name of all of the Linked Clones virtual desktops to be deployed on this service. (eg: Machine Names= UDSW8).

Page 76 of 209
UDS Enterprise 1.9 Installation, Administration & User Guide
www.udsenterprise.com
Name Length: Number of digits of the counter attached to the root name of the desktops (ex: Name Length= 3, UDSW8-000... UDSW8-999).
Page 77 of 209
UDS Enterprise 1.9 Installation, Administration & User Guide
www.udsenterprise.com
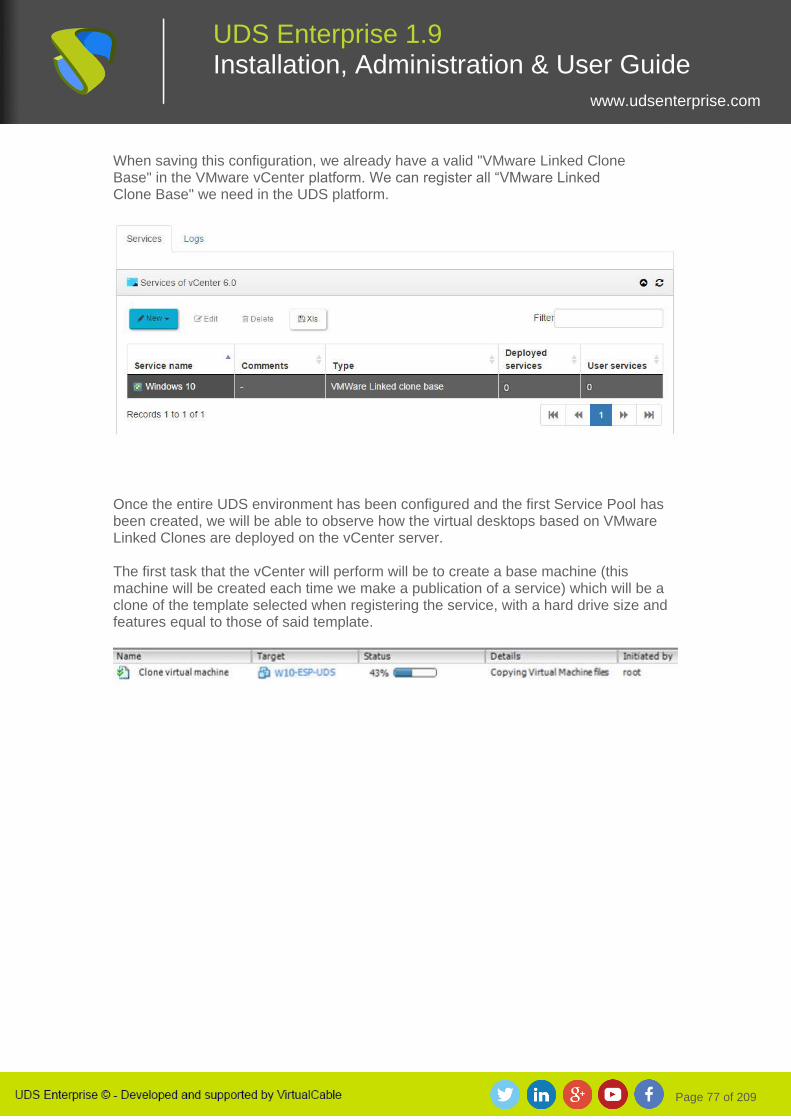
When saving this configuration, we already have a valid "VMware Linked Clone Base" in the VMware vCenter platform. We can register all “VMware Linked Clone Base" we need in the UDS platform.
Once the entire UDS environment has been configured and the first Service Pool has been created, we will be able to observe how the virtual desktops based on VMware Linked Clones are deployed on the vCenter server. The first task that the vCenter will perform will be to create a base machine (this machine will be created each time we make a publication of a service) which will be a clone of the template selected when registering the service, with a hard drive size and features equal to those of said template.

Page 78 of 209
UDS Enterprise 1.9 Installation, Administration & User Guide
www.udsenterprise.com
Once the process of creating the base machine has been completed (the UDS system calls it: “UDS Publication name_service –number_publication”), the creation of virtual desktops in the vCenter automatically begins (the UDS system calls it: “UDS service Machine_Name+Name_Length”). The hard drive space taken up by the virtual desktops (“Linked Clones”) will be exclusively that which is taken up by the changes made by the users on the machines after their initial connection.
NOTE: UDS Enterprise doesn’t support E1000E virtual card, we recommend using VMXNET 3.

Page 79 of 209
UDS Enterprise 1.9 Installation, Administration & User Guide
www.udsenterprise.com
4.1.2 VDI platform with oVirt
Deploying the VDI platform via virtual oVirt infrastructure.
4.1.2.1 Registration of service provider oVirt Platform Provider Enter "Services", click "New" and select “oVirt/RHEV Platform Provider”:
In an “oVirt/RHEV Platform Provider,” you must configure at least the following parameters: Service Name, oVirt-engine IP server (“Host” field), username (with user@domain format) and password with administration rights on the oVirt- engine. We can also indicate the “Timeout” in the connection with oVirt-engine and specify a range of MAC addresses for creating the virtual desktops.

Page 80 of 209
UDS Enterprise 1.9 Installation, Administration & User Guide
www.udsenterprise.com
We will check that the connection has been correctly made by clicking on the “Test” button.
When saving this configuration, we already have a valid "Service Provider" to start creating base services in the oVirt platform. We can register all “oVirt/RHEV Platform Provider” Service Providers we need in the UDS platform.

Page 81 of 209
UDS Enterprise 1.9 Installation, Administration & User Guide
www.udsenterprise.com
In order to modify any parameter in an existing Service Provider, we may select it and click on “Edit”. Clicking the “Maintenance” button we can stop all operations running in UDS Broker on a service provider. It is recommended to enter a maintenance service provider when the communication with those service provider is lost or you’re planning a maintenance stoppage.
4.1.2.2 Configuring service based on oVirt Linked Clone Once the oVirt platform where the desktops will be created has been setup, you must create base services based on oVirt/RHEV Linked Clones. Select the Service Providers where an oVirt/RHEV Linked Clone is going to be created and click on "New".

Page 82 of 209
UDS Enterprise 1.9 Installation, Administration & User Guide
www.udsenterprise.com
Type a descriptive name for the template and configure the service parameters: Base Machine: Template for deploying the virtual desktops. Cluster: oVirt node cluster that will host the deployed Linked Clones. Datastore Domain: Storage established for deploying the Linked Clones. Reserved Space: Minimum free space a datastore may have to be used by UDS system. Memory: Amount of memory that will be assigned to the Linked Clones. Memory Guaranteed: Amount of memory that will be guaranteed to the Linked Clones. Machine Names: Root name of all of the Linked Clones to be deployed in this service (eg. Machine Names= Win7lab2). Name Length: Number of counter digits attached to the root name of the desktops (ex: Name Length= 3, Win7lab2000... Win7lab2999). Display: Connection protocol of the virtual desktops deployed via Linked Clones.

Page 83 of 209
UDS Enterprise 1.9 Installation, Administration & User Guide
www.udsenterprise.com
When saving this configuration, we already have a valid "oVirt Linked Clone" in the oVirt platform. We can register all "oVirt Linked Clone" we need in the UDS platform.

Page 84 of 209
UDS Enterprise 1.9 Installation, Administration & User Guide
www.udsenterprise.com
When the entire UDS environment has been configured and the first deployed service has been created, we will be able to observe how the virtual desktops based on oVirt Linked Clones are deployed on the oVirt-engine server.
Page 85 of 209
UDS Enterprise 1.9 Installation, Administration & User Guide
www.udsenterprise.com
4.1.3 VDI platform with RHEV
Deploying the VDI platform via virtual Red Hat Enterprise Virtualization infrastructure.
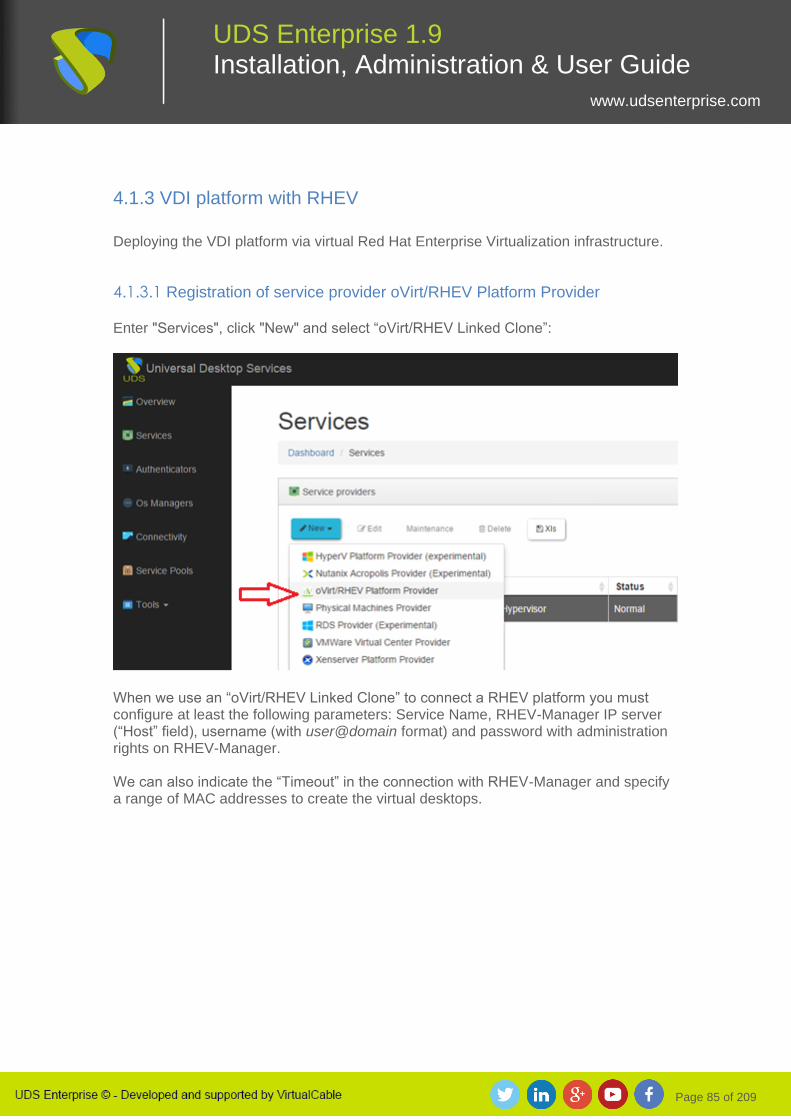
4.1.3.1 Registration of service provider oVirt/RHEV Platform Provider Enter "Services", click "New" and select “oVirt/RHEV Linked Clone”:
When we use an “oVirt/RHEV Linked Clone” to connect a RHEV platform you must configure at least the following parameters: Service Name, RHEV-Manager IP server (“Host” field), username (with user@domain format) and password with administration rights on RHEV-Manager. We can also indicate the “Timeout” in the connection with RHEV-Manager and specify a range of MAC addresses to create the virtual desktops.

Page 86 of 209
UDS Enterprise 1.9 Installation, Administration & User Guide
www.udsenterprise.com
We will check that the connection has been correctly made clicking on the “Test” button.
When saving this configuration, we already have a valid "Service Providers" to start creating base services in the RHEV platform. We can register all “oVirt/RHEV Linked Clone” Service Providers we need in the UDS platform.

Page 87 of 209
UDS Enterprise 1.9 Installation, Administration & User Guide
www.udsenterprise.com
In order to modify any parameter in a current “Service Providers”, we select it and click on “Edit”. Clicking the “Maintenance” button we can stop all operations running in UDS Broker on a service provider. It is recommended to enter a maintenance service provider when the communication with those service provider is lost or you’re planning a maintenance stoppage.
4.1.3.2 Configuring service based on oVirt Linked Clone Once the RHEV platform where the virtual desktops are going to be created is configured through “oVirt/RHEV Platform Provider” service provider, you must create Base Services based on oVirt/RHEV Linked Clones. Select the Service Providers where we an oVirt/RHEV Linked Clone is going to be created and click on "New".

Page 88 of 209
UDS Enterprise 1.9 Installation, Administration & User Guide
www.udsenterprise.com

Page 89 of 209
UDS Enterprise 1.9 Installation, Administration & User Guide
www.udsenterprise.com
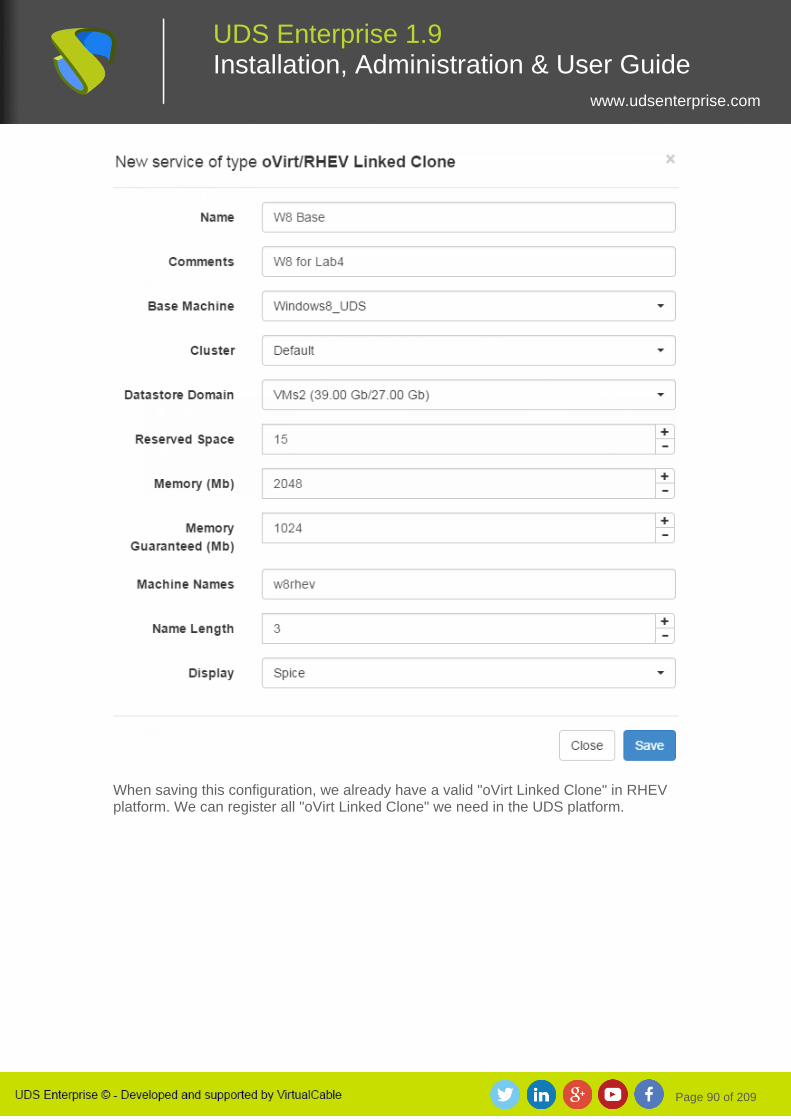
Type a descriptive name for the template and configure the service parameters: Base Machine: Virtual Machine Image where the Linked Clokes will be deployed from. Cluster: RHEV cluster that will host the deployed Linked Clones. Datastore Domain: Storage established for deploying the Linked Clones. Reserved Space: Minimum free space a Datastore may have to be used by UDS system. Memory: Amount of memory that will be assigned to the Linked Clones. Memory Guaranteed: Amount of memory that will be guaranteed to the Linked Clones. Machine Names: Root name of all the Linked Clones to be deployed in this service (eg. Machine Names= Win7lab2). Name Length: Number of counter digits attached to the root name of the desktops (ex: Name Length= 3, Win7lab2001... Win7lab2999). Display: Connection protocol of the virtual desktops deployed via Linked Clones.
Page 90 of 209
UDS Enterprise 1.9 Installation, Administration & User Guide
www.udsenterprise.com
When saving this configuration, we already have a valid "oVirt Linked Clone" in RHEV platform. We can register all "oVirt Linked Clone" we need in the UDS platform.

Page 91 of 209
UDS Enterprise 1.9 Installation, Administration & User Guide
www.udsenterprise.com
When the entire UDS environment has been configured and the first Service Pool has been created, we will be able to observe how the virtual desktops based on oVirt Linked Clones are deployed on the RHEV-Manager server.

Page 92 of 209
UDS Enterprise 1.9 Installation, Administration & User Guide
www.udsenterprise.com
4.1.4 VDI platform with Microsoft Hyper-V
Deploying the VDI platform via Microsoft Hyper-V virtual infrastructure.
4.1.4.1 Registration of service provider Hyper-V Platform Provider Enter "Services", click "New" and select “Hyper-V Platform Provider”.
In a “Hyper-V Platform Provider” you must configure at least the following parameters: Service Name, Microsoft Hyper-V IP server (“Host” field), user name and password with administration rights on the Microsoft Hyper-V. We can also indicate the “Timeout” in the connection with Microsoft Hyper-V and specify a range of MAC addresses for creating the virtual desktops.

Page 93 of 209
UDS Enterprise 1.9 Installation, Administration & User Guide
www.udsenterprise.com
We will check the connection has been made correctly by clicking on the “Test” button.
When saving this configuration, we already have a valid "Service Provider" to start creating base services in the Microsoft Hyper-V platform.

Page 94 of 209
UDS Enterprise 1.9 Installation, Administration & User Guide
www.udsenterprise.com
We will be able to register all Hyper-V Platform Provider "Service Providers" we need in the UDS platform.
In order to modify any parameter in a current “Service Provider”, we select it and click on “Edit”. Clicking the “Maintenance” button we can stop all operations running in UDS Broker on a service provider. It is recommended to enter a maintenance service provider when the communication with those service provider is lost or you’re planning a maintenance stoppage.

Page 95 of 209
UDS Enterprise 1.9 Installation, Administration & User Guide
www.udsenterprise.com
4.1.4.2 Configuring service based on Hyper-V Linked Clone Once the Microsoft Hyper-V platform where the desktops will be created has been configured, you must create base services based on "Hyper-V Linked Clone". Select the Service Providers where a "Hyper-V Linked Clone" is going to be created and click on "New".

Page 96 of 209
UDS Enterprise 1.9 Installation, Administration & User Guide
www.udsenterprise.com
Type a descriptive name for the template and configure the service parameters: Base Machine: Template for deploying the virtual desktops. Network: Network to which the desktops will be connected. Memory: Amount of memory to be assigned to the Linked Clones virtual desktops. Datastores Drives: Location where the publication of the service and the Linked Clones created will be stored. We can select one, several or all of the datastores clicking the “Ctrl” button. If you select more than one, the system will always locate the new publications and desktops in the datastore with more free space. Machine Names: Root name of all of the Linked Clones virtual desktops to be deployed on this service. (eg: Machine Names= W1). Name Length: Number of digits of the counter attached to the root name of the desktops (eg: Name Length= 3, W7000...W7999).

Page 97 of 209
UDS Enterprise 1.9 Installation, Administration & User Guide
www.udsenterprise.com
Once the entire UDS environment has been setup and the first Service Pools have been created, we will be able to observe how the virtual desktops based on Microsoft Hyper-V are deployed on the Microsoft Hyper-V server.
The first task the Microsoft Hyper-V server will perform will be to create a base machine (this machine will be created each time we make a publication of a service) which will be a clone of the template selected when registering the service, with a hard drive size and characteristics equal to those of said template.
Once the process of creating the base machine has been completed (the UDS system calls it: “UDS Publication name_service –number_publication”), the creation of virtual desktops in the Microsoft Hyper-V automatically begins (the UDS system calls it: “UDS service Machine_Name+Name_Length”. The hard drive space taken up by the virtual desktops (“Linked Clones”) will be exclusively that which is taken up by the changes made by the users on the machines after their initial connection.

Page 98 of 209
UDS Enterprise 1.9 Installation, Administration & User Guide
www.udsenterprise.com
4.1.5 VDI platform with Citrix XenServer
Deploying VDI platform via Citrix XenServer virtual infrastructure.
4.1.5.1 Registration of service provider XenServer Platform Provider Enter "Services", click "New" and select “XenServer Platform Provider”.
In a “XenServer Platform Provider” you must configure at least the following parameters: Service Name, XenServer IP server (“Host” field), user name and password with administration rights on XenServer. We can also indicate the “Timeout” in the connection with XenServer and specify a range of MAC addresses for creating the virtual desktops.

Page 99 of 209
UDS Enterprise 1.9 Installation, Administration & User Guide
www.udsenterprise.com
We will check that the connection has been correctly made clicking on the “Test” button.
When saving this configuration, we already have a valid "Service Providers" to start creating base services in the XenServer platform.

Page 100 of 209
UDS Enterprise 1.9 Installation, Administration & User Guide
www.udsenterprise.com
We will be able to register all XenServer Platform Provider "Service Providers" we need on the UDS platform.
In order to modify any parameter in a current “Service Providers”, we select it and click on “Edit”. Clicking the “Maintenance” button we can stop all operations running in UDS Broker on a service provider. It is recommended to enter a maintenance service provider when the communication with those service provider is lost or you’re planning a maintenance stoppage.

Page 101 of 209
UDS Enterprise 1.9 Installation, Administration & User Guide
www.udsenterprise.com
4.1.5.2 Configuring service based on Xen Linked Clone Once the Microsoft Citrix XenServer platform where the desktops will be created has been setup, base services based on "Xen Clone" must be created. Select the Service Providers where a "Xen Linked Clone" is going to be created and click on "New".

Page 102 of 209
UDS Enterprise 1.9 Installation, Administration & User Guide
www.udsenterprise.com
Type a descriptive name for the template and configure the service parameters: Base Machine: Template for deploying the virtual desktops. Network: Network to which the desktops will be connected. Memory: Amount of memory to be assigned to the Linked Clones virtual desktops. Datastores Drives: Location where the publication of the service and the Linked Clones created will be stored. We can select one, several or all of the datastores clicking the “Ctrl” button. If you select more than one, the system will always locate the new publications and desktops in the datastore with more free space. Machine Names: Root name of all of the Linked Clones virtual desktops to be deployed on this service. (eg: Machine Names= W1). Name Length: Number of digits of the counter attached to the root name of the desktops (eg: Name Length= 3, W7000...W7999).
Once the entire UDS environment has been setup and the first Service Pools have been created, we will be able to observe how the virtual desktops based on Citrix XenServer are deployed on Xen Linked Clones.

Page 103 of 209
UDS Enterprise 1.9 Installation, Administration & User Guide
www.udsenterprise.com
4.1.6 VDI platform with Nutanix Acropolis
Deploying VDI platform via Nutanix Acropolis virtual infrastructure.
4.1.6.1 Registration of service provider Nutanix Acropolis Platform Provider Enter "Services", click "New" and select “Nutanix Acropolis Provider”.
In a “Nutanix Acropolis Provider” you must configure at least the following parameters: Service Name, Acropolis IP server (“Host” field), user name and password with administration rights on Acropolis. We can also indicate the “Timeout” in the connection with Acropolis and specify a range of MAC addresses for creating the virtual desktops.

Page 104 of 209
UDS Enterprise 1.9 Installation, Administration & User Guide
www.udsenterprise.com
We will check that the connection has been correctly made clicking on the “Test” button.
When saving this configuration, we already have a valid "Service Provider" to start creating base services in Nutanix Acropolis platform.

Page 105 of 209
UDS Enterprise 1.9 Installation, Administration & User Guide
www.udsenterprise.com
We can register all “Nutanix Acropolis Provider” Service Providers we need in the UDS platform.
In order to modify any parameter in a current “Service Providers”, we select it and click on “Edit”. Clicking the “Maintenance” button we can stop all operations running in UDS Broker on a service provider. It is recommended to enter a maintenance service provider when the communication with those service provider is lost or you’re planning a maintenance stoppage.
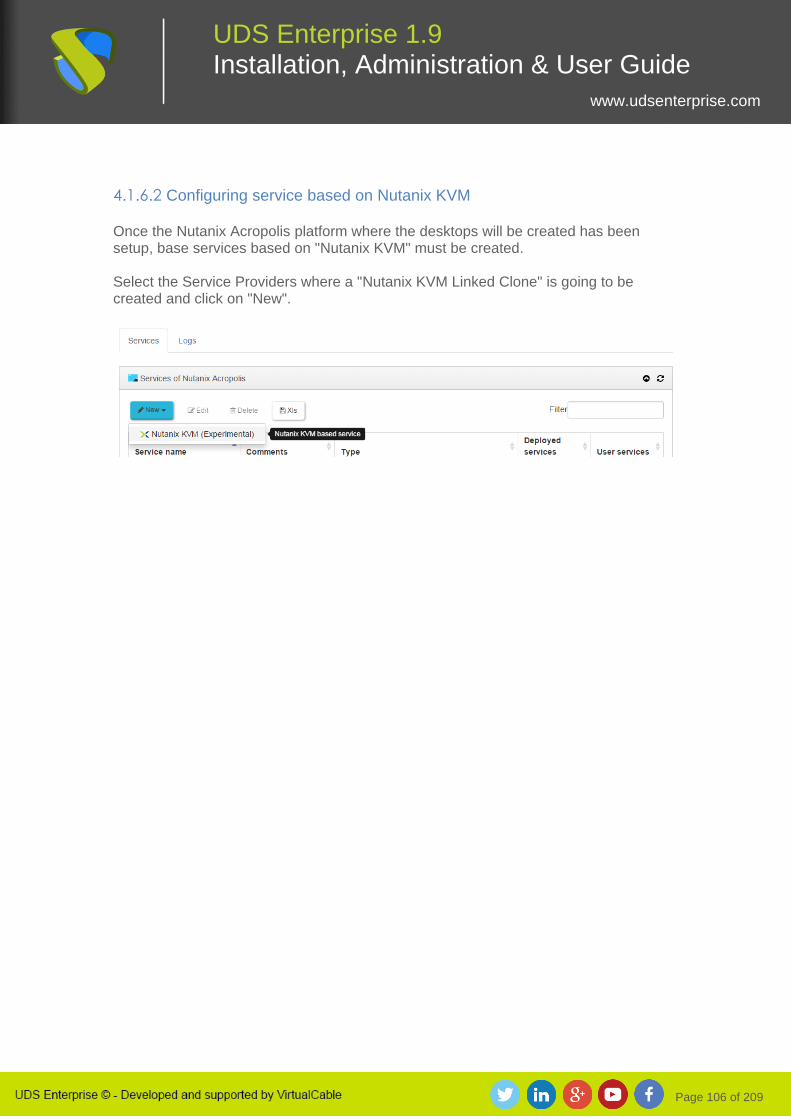
Page 106 of 209
UDS Enterprise 1.9 Installation, Administration & User Guide
www.udsenterprise.com
4.1.6.2 Configuring service based on Nutanix KVM Once the Nutanix Acropolis platform where the desktops will be created has been setup, base services based on "Nutanix KVM" must be created. Select the Service Providers where a "Nutanix KVM Linked Clone" is going to be created and click on "New".

Page 107 of 209
UDS Enterprise 1.9 Installation, Administration & User Guide
www.udsenterprise.com
Type a descriptive name for the template and configure the service parameters: Base Machine: Template for deploying the virtual desktops. Network: Network to which the desktops will be connected. Memory: Amount of memory to be assigned to the Linked Clones virtual desktops. Datastores Drives: Location where the publication of the service and the Linked Clones created will be stored. We can select one, several or all of the datastores clicking the “Ctrl” button. If you select more than one, the system will always locate the new publications and desktops in the datastore with more free space. Machine Names: Root name of all the Linked Clones virtual desktops to be deployed on this service. (eg: Machine Names= W1). Name Length: Number of digits of the counter attached to the root name of the desktops (eg: Name Length= 3, W7000...W7999).
We save and we’ll have a valid Nutanix KVM on Nutanix Acropolis platform. We can register all “Nutanix Acropolis Provider” Service Providers we need in the UDS platform.

Page 108 of 209
UDS Enterprise 1.9 Installation, Administration & User Guide
www.udsenterprise.com
Once the entire UDS environment has been configured and the first Service Pools have been created, we will be able to see how the virtual desktops based on Nutanix KVM are deployed on the Nutanix Acropolis server.

Page 109 of 209
UDS Enterprise 1.9 Installation, Administration & User Guide
www.udsenterprise.com
4.1.7 Connection to persistent hardware
Access persistent hardware by assigning fixed-user IP addresses. Assigning IP addresses and usernames will be done by order of access, that is, the first user that accesses this service will be assigned the first IP address on the list. In order to connect to the machine with the IP address assigned to a user, the machine must have previously been switched on, the Terminal Services for Windows machines must be enabled and the NX software for Linux machines must be installed.
4.1.7.1 Registering service provider “Physical Machine Providers” Enter "Services", click "New" and select “Physical Machines Provider”.
Choose a name for the “Physical Machine Provider”.

Page 110 of 209
UDS Enterprise 1.9 Installation, Administration & User Guide
www.udsenterprise.com
4.1.7.2 Configuring service based on “Physical Machines Providers” Once the Service Provider for persistent hardware has been created, a Base Service based on “Physical machines accessed by IP” must be registered. Select the "Service Providers" where a "Physical machines accessed by IP" is going to be created and click on "New".

Page 111 of 209
UDS Enterprise 1.9 Installation, Administration & User Guide
www.udsenterprise.com

Page 112 of 209
UDS Enterprise 1.9 Installation, Administration & User Guide
www.udsenterprise.com
Choose a name for the service and enter the IP addresses to which they will provide access. Click “List of IPS” to add IPs addresses:
Enter the IP addresses of the machines to which it will have access and save the changes:

Page 113 of 209
UDS Enterprise 1.9 Installation, Administration & User Guide
www.udsenterprise.com
When saving we’ll have a valid “Physical machines accesed by IP”. We’ll be able to create all “Physical machines accesed by IP we need on UDS platform.
NOTE: The user & IP address assignation will be made according to the order of access; the first user accessing the service will be assigned the first machine (IP assigned in the list) and so on with the rest of them.

Page 114 of 209
UDS Enterprise 1.9 Installation, Administration & User Guide
www.udsenterprise.com
4.1.8 RDS applications Service Provider
Applications deployment through Microsoft Remote Desktop Services.
4.1.8.1 Registering Service Provider “RDS Provider” In "Services", we click on "New" and select “RDS Provider”:

Page 115 of 209
UDS Enterprise 1.9 Installation, Administration & User Guide
www.udsenterprise.com
In a “RDS Provider” we should type a descriptive name for the template and configure the following parameters: List of servers: List of RD servers available to publish applications. User list for mappling: Users belonging to an Active Directory who will be able to log in the RDS applications servers and will be used by UDS to run an application. User`s password: Passwords of all users in the “User`s password” section. All users must have the same pasword. We will check the connection has been correctly made clicking on the “Test” button.

Page 116 of 209
UDS Enterprise 1.9 Installation, Administration & User Guide
www.udsenterprise.com
When saving this configuration, we already have a valid "Service Providers" to start creating base applications in RDS. We can register all “RDS Provider” Service Providers we need in the UDS platform.
In order to modify any parameter in a current “Service Providers”, we select it and click on “Edit”. Clicking the “Maintenance” button we can stop all operations running in UDS Broker on a service provider. It is recommended to enter a maintenance service provider when the communication with those service provider is lost or you’re planning a maintenance stoppage.

Page 117 of 209
UDS Enterprise 1.9 Installation, Administration & User Guide
www.udsenterprise.com
4.1.8.2 Configuring a service baed on “RDS RemoteAPP” Once the RDS application provider where the desktops will be created has been configured, base services based on "RDS RemoteAPP" must be created. Select the Service Providers where a "RDS RemoteAPP" is going to be created and click on "New".
Type a descriptive name and configure the service parameters: Application path: Application route, hosted in RDS servers, which is going to be published. Max. Allowd services: Maximum number of services to be published (0 = unlimited)

Page 118 of 209
UDS Enterprise 1.9 Installation, Administration & User Guide
www.udsenterprise.com
When saving this configuration, we already have a valid " RDS RemoteAPP". We can register all “RDS RemoteAP” we need in the UDS platform.
NOTA: UDS needs one or several RDS Windows 2012 external servers to connect and provide applications. The server must be configured and properly integrated with UDS Actor in order to work properly. To setup and integrate RDS with UDS you can read the following document: How to setup Microsoft RDS with UDS Enterprise

Page 119 of 209
UDS Enterprise 1.9 Installation, Administration & User Guide
www.udsenterprise.com
4.2 Configuring Authenticators
An Authenticator is a basic component within a desktop services platform since it allows the users and user groups to which you have granted sign in credentials to connect to the different desktop services. An Authenticator is not needed to create a Service Pool. But if the Service Pool hasn’t at least one authenticator assigned, there will be no users able to connect to UDS platform desktop services. You can choose between different types of authenticators.

Page 120 of 209
UDS Enterprise 1.9 Installation, Administration & User Guide
www.udsenterprise.com
4.2.1 Active Directory Authenticator
In an Active Directory Authenticator, we configure the authenticator name, the domain controller IP (“Host” field), a username (“Ldap User” field) and a password with reading rights on the Active Directory. The username (“Ldap User” field) must be typed in with the format user@domain. We can also indicate: the priority of this authenticator, the lower that priority is, the higher it will appear on the list of authenticators available in the user access window (this field admits negative values). We can also choose if we want to use an SSL connection and the Timeout in the connection with the Active Directory. If the “Small Name” field is chosen, it only allows this “authenticator” to appear on the user login screen. To do this, we have to access the login screen with the following format: address_server_Broker/Small_Name For example: https://BrokerVC/AD

Page 121 of 209
UDS Enterprise 1.9 Installation, Administration & User Guide
www.udsenterprise.com
Clicking on the “Test” button, we can check whether the connection has been made correctly.

Page 122 of 209
UDS Enterprise 1.9 Installation, Administration & User Guide
www.udsenterprise.com
4.2.2 eDirectory Authenticator
This authenticator is available to provide Novell network users and user groups access to UDS desktop services.
In an eDirectory Authenticator, we configure the authenticator name, the eDirectory IP server (Host field), a username (Admin User field) and password with reading rights on the eDirectory. We can also indicate the priority of this authenticator. The lower that priority is, the higher it will appear on the list of authenticators available in the user access window (this field admits negative values). We can also choose if we want to use a SSL connection and the Timeout in the connection with Active Directory. If the “Small Name” field is chosen, it only allows this “authenticator” to appear on the user login screen. To do this, we have to access the login screen using the following format: address_server_Broker/Small_Name For example: https://BrokerVC/ED

Page 123 of 209
UDS Enterprise 1.9 Installation, Administration & User Guide
www.udsenterprise.com
Clicking on the “Test” button, we can check whether the connection has been made correctly.

Page 124 of 209
UDS Enterprise 1.9 Installation, Administration & User Guide
www.udsenterprise.com
4.2.3 Internal Database
In environments where no external authenticator is available, it is possible to use the internal authenticator. This authenticator is included in the UDS Broker and enables to manually create users and user groups so that they can subsequently access the different Service Pools provided by UDS.
In an Internal Database, we configure the authenticator name. We can also indicate the priority of this authenticator. The lower that priority is, the higher it will appear on the list of authenticators available in the user access window (this field admits negative values). If the “Small Name” field is chosen, it only allows this “authenticator” to appear on the user login screen. To do this, we have to access the login screen with the following format: address_server_Broker/Small_Name For example: https://BrokerVC/IN

Page 125 of 209
UDS Enterprise 1.9 Installation, Administration & User Guide
www.udsenterprise.com
In this section, we see two options:
“Different user for each host”. This option allows connections to virtual desktops using a single connection user ID. These types of connections are made creating multiple users in the internal database with the following username structure:
Hostname terminal ID + Connection User ID
“Reverse DNS” The behavior is exactly the same as in the previous option, but the username structure would be:
Hostname terminal ID + User ID

Page 126 of 209
UDS Enterprise 1.9 Installation, Administration & User Guide
www.udsenterprise.com
In order to use this option, the reverse DNS resolution must be in the connection terminal IDs. In the event that this does not exist, the username structure would continue using the IP address connection terminal ID.

Page 127 of 209
UDS Enterprise 1.9 Installation, Administration & User Guide
www.udsenterprise.com
4.2.4 IP Authenticator
It is possible to assign virtual desktops to connecting devices via the IP identifier. Ex: Thin Clients in kiosk mode, Call Center environments, proprietary applications, etc...

Page 128 of 209
UDS Enterprise 1.9 Installation, Administration & User Guide
www.udsenterprise.com
In an IP Authenticator, we configure the authenticator name. We can also indicate the priority of this authenticator. The lower that priority is, the higher it will appear on the list of authenticators available in the user access window (this field admits negative values). If the “Small Name” field is chosen, it only allows this “authenticator” to appear on the user login screen. To do this, we have to access the login window with the following format: address_server_Broker/Small_Name For example: https://BrokerVC/IP1

Page 129 of 209
UDS Enterprise 1.9 Installation, Administration & User Guide
www.udsenterprise.com
4.2.5 SAML Authenticator
SAML is used to exchange authentication and authorization data among security domains, that means, among an identity provider (an assertion producer) and a service provider (an assertion consumer).
In a SAML Authenticator, we configure the authenticator name and data: Private Key, Certificate IDP Metedata, Entity ID, User name attrs, Group name attrs and Real name attrs. We can also indicate the priority of this authenticator. The lower that priority is, the higher it will appear on the list of authenticators available in the user access window (this field admits negative values). If the “Small Name” field is chosen, it only allows this “authenticator” to appear on the user login screen. To do this, we have to access the login screen with the following format: address_server_Broker/Small_Name For example: https://BrokerVC/SL

Page 130 of 209
UDS Enterprise 1.9 Installation, Administration & User Guide
www.udsenterprise.com

Page 131 of 209
UDS Enterprise 1.9 Installation, Administration & User Guide
www.udsenterprise.com
4.2.6 LDAP Authenticator
This is a generic authenticator available within the UDS platform. By configuring the correct parameters according to each case, we can define practically any authentication service based on LDAP.
In an LDAP Authenticator (Simple or Regex), we configure the authenticator name, the LDAP server IP (“Host” field), the connection port, a username (“Ldap User” field) and password with reading rights on LDAP, the name of the user and groups search base (“base” field) in the format: dc=name_domain,dc=extension_domain The username (Ldap User field) must be typed in with the format: cn=user,dc=name_domain,dc=extension_domain We can also indicate the priority of this authenticator. The lower that priority is, the higher it will appear on the list of authenticators available in the user access window (this field admits negative values). If the “Small Name” field is chosen, it only allows this “authenticator” to appear on the user login screen. To do this, we have to access the login screen with the following format: address_server_Broker/Small_Name For example: https://BrokerVC/OLDAP

Page 132 of 209
UDS Enterprise 1.9 Installation, Administration & User Guide
www.udsenterprise.com

Page 133 of 209
UDS Enterprise 1.9 Installation, Administration & User Guide
www.udsenterprise.com
4.3 Configuring users, user groups and user
metagroups
Once the authenticator or authenticators have been configured, you must configure the user groups that contain the users to which access to the desktop services is to be granted. It is also possible to create metagroups, which will be used to combine several groups. To create a group, select the authenticator where we want to create or add the group. In the new window displayed at the bottom of the window, select “Groups” tab and click "new".

Page 134 of 209
UDS Enterprise 1.9 Installation, Administration & User Guide
www.udsenterprise.com
Searching for user groups is done automatically in all of the defined authenticators in UDS, with the exception of “Internal” and “by IP” authenticators (Sometimes the search option doesn’t work in OpenLdap or eDirectory authenticators. In that case, you may indicate manually the group name in which the groups are registered and you won’t be able to perform a search. To look for a group, click "Search". We can write down a root name to enclose the search. If we leave this field empty, all the available groups on the authenticator will appear. If we need to add more than one group, we’ll have to do it one by one.
Once the group is selected, click “Accept”. If you know the name, you can write it down directly, but it is recommended to check that it appears in the right way in the search option. The groups, metagroups and users can be temporarily activated or deactivated.

Page 135 of 209
UDS Enterprise 1.9 Installation, Administration & User Guide
www.udsenterprise.com
To create a metagroup, select the groups that will form part of the metagroup, choose a name for the new group and click “Accept.” A user will belong to this metagroup if he belongs to all the groups included in the metagroup.
The users of the configured groups are automatically added to the system when they connect to the UDS platform for the first time, except in “Internal” or “by IP” authenticators, in which the users will have to be manually registered. If we need to register new users manually, to assign special permissions before they connect for the first time and they add themselves automatically, we’ll have to select the authenticator. Then, in “Users” tab click on "New".

Page 136 of 209
UDS Enterprise 1.9 Installation, Administration & User Guide
www.udsenterprise.com
The additional “Staff” parameter allows access to downloads (UDS Actor) and to UDS administration. The additional “Admin” parameter allows access to downloads (UDS Actor), to the administration and also allows for the modification of advanced UDS configurations (Tab “Tools” - “Configuration”). An “Admin” user has to simultaneously be a “Staff” member. By clicking "Search" button we can search users created in the authenticator and add them. Once the user has been created, click "Edit" to check that the user has been automatically assigned to the group it belongs.

Page 137 of 209
UDS Enterprise 1.9 Installation, Administration & User Guide
www.udsenterprise.com
If we register a user that belongs to a group which is not registered in the authenticator, it will appear without group and we won’t be able to use that user.
The "Staff member" and "Admin" user options can be modified anytime. To delete a user, a group or a metagroup, select it and click "Delete" button. If we have registered users in the system that belong to a group and this group is deleted, the users won’t have an assigned group and they won’t be able to be validated in the system.

Page 138 of 209
UDS Enterprise 1.9 Installation, Administration & User Guide
www.udsenterprise.com
4.3.1 Creating "Internal Database" groups and users
In an Internal Database authenticator the first thing we have to do is create a group or groups of users. Select the Internal Database authenticator and in “Groups” tab click "New".
Once the group or groups of users are created, register the users and assign them to one or several groups. Select the Internal Database authenticator and in “Users” tab click "New".

Page 139 of 209
UDS Enterprise 1.9 Installation, Administration & User Guide
www.udsenterprise.com
4.3.2 Creating IP Authenticator groups and users
The creation of a group in the “by IP” authenticator is different from the other ones, because in this case it will be a range of IPs addresses which will be registered to allow access to all the hardware within this range. This range of addresses is defined as follows: IP address start range – IP address end range Select “IP Authenticator" authenticator and in "Groups" tab click "New".
The IP addresses for the new users, will be automatically added to the “Users” tab the first time they log in.

Page 140 of 209
UDS Enterprise 1.9 Installation, Administration & User Guide
www.udsenterprise.com
4.4 Configuring OS Managers
An OS Manager runs a previously configured service. The UDS Actor, hosted on the virtual desktop or application server, is responsible for the interaction among the OS and the Broker based on the configurations or type of OS Manager chosen. In order to perform VDI deployments via Linked Clones, you will have to select the disconnection behavior of the Linked Clones, within the configuration of each OS Manager. If a non persistent desktop policy is configured, you can indicate user downtime before the system will automatically log out. You can choose different types of OS Managers.

Page 141 of 209
UDS Enterprise 1.9 Installation, Administration & User Guide
www.udsenterprise.com
4.4.1 Linux OS Manager
A Linux OS Manager is used for virtual desktops based on Linux systems. It renames the machines.
In order to configure Linux OS Manager, input the name and configure which action the system will perform when a user disconnects:
Keep service assigned: When a user logs out the desktop won’t undergo any
change. If this same user requests a virtual machine to the system again, the
system will provide the same virtual desktop
Remove service: When a user logs out, the system will destroy the desktop. If
this same user requests a virtual machine to the system again, the system will
provide a new virtual desktop
When we configure non persistent desktops (Remove service) we can specify a
maximum idle time (in seconds) in the virtual desktop. When it finishes, the
UDS Actor will automatically log out from the virtual desktop. The “Max. Idle
time” field doesn’t apply to persistent desktops (keep service assigned)

Page 142 of 209
UDS Enterprise 1.9 Installation, Administration & User Guide
www.udsenterprise.com
4.4.2 Linux Random Password OS Manager
A Linux Random Password OS Manager is used for virtual desktops based on Linux systems which require a higher level of security in user access.
A random password is assigned to an existing local user, which has been previously defined during the configuration process, in each new deployed virtual desktop, thus providing a higher level of security in the access.

Page 143 of 209
UDS Enterprise 1.9 Installation, Administration & User Guide
www.udsenterprise.com
In order to configure a Linux Random Password OS Manager, input the following data:
OS Manager name
Local user defined on the template
The action that the system will perform when the user logs out is configured:
o Keep service assigned: When a user logs out the desktop won’t
undergo any change. If this same user requests a virtual machine to the system again, the system will provide the same virtual desktop
o Remove service: When a user logs out, the system will destroy the desktop. If this same user requests a virtual machine to the system again, the system will provide a new virtual desktop When we configure non persistent desktops (Remove service) we can specify a maximum idle time (in seconds) in the virtual desktop. When it finishes, the UDS Actor will automatically log out from the virtual desktop. The “Max. Idle time” field doesn’t apply to persistent desktops (keep service assigned)

Page 144 of 209
UDS Enterprise 1.9 Installation, Administration & User Guide
www.udsenterprise.com
4.4.3 Windows Basic OS Manager
A Windows Basic OS Manager is used for virtual desktops based on Windows systems which aren’t part of a domain.
In order to configure a Windows Basic OS Manager, enter the name and configure which action the system will perform when a user disconnects.
Keep service assigned: When a user logs out the desktop won’t undergo any change. If this same user requests a virtual machine to the system again, the system will provide the same virtual desktop
Remove service: When a user logs out, the system will destroy the desktop. If this same user requests a virtual machine to the system again, the system will provide a new virtual desktop When we configure non persistent desktops (Remove service) we can specify a
máximum idle time (in seconds) in the virtual desktop. When it finishes, the
UDS Actor will automatically log out from the virtual desktop. The “Max. Idle
time” field doesn’t apply to persistent desktops (keep service assigned)

Page 145 of 209
UDS Enterprise 1.9 Installation, Administration & User Guide
www.udsenterprise.com
4.4.4 Windows Domain OS Manager
A Windows Domain OS Manager is used for virtual desktops based on Windows systems which are part of a domain.

Page 146 of 209
UDS Enterprise 1.9 Installation, Administration & User Guide
www.udsenterprise.com
In order to configure a "Windows Domain OS Manager", input the following data:
The name of the OS Manager
The domain name to which the virtual desktops deployed with this OS Manager
are going to belong
User credentials with permission to add machines to the domain
Information of the Organizing Unit (OU) where the virtual desktops deployed
with this OS Manager are going to be registered (if we don’t write anything, the
desktops will be located in the branch by default)
Configure the action the system will perform when a user logs out:
o Keep service assigned: When a user logs out the desktop won’t
undergo any change. If this same user requests a virtual machine to the
system again, the system will provide the same virtual desktop
o Remove service: When a user logs out, the system will destroy the
desktop. If this same user requests a virtual machine to the system
again, the system will provide a new virtual desktop
When we configure non persistent desktops (Remove service) we can
specify a maximum idle time (in seconds) in the virtual desktop. When it
finishes, the UDS Actor will automatically log out from the virtual
desktop. The “Max. Idle time” field doesn’t apply to persistent desktops
(keep service assigned)

Page 147 of 209
UDS Enterprise 1.9 Installation, Administration & User Guide
www.udsenterprise.com
4.4.5 Windows Random Password OS Manager
A Windows Random Password OS Manager is used for virtual desktops based on Windows systems that are not part of a domain and require a higher level of security in user access.
A random password is assigned to an existing user, previously defined during the setup process, in each new deployed virtual desktop; thus providing a higher level of access security.

Page 148 of 209
UDS Enterprise 1.9 Installation, Administration & User Guide
www.udsenterprise.com
To configure a Windows Random Password OS Manager input the following data:
OS Manager Name
Local user defined in the template
Password initially established for the local user in the template
Configure which action the system will perform when a user disconnects:
o Keep service assigned: When a user logs out the desktop won’t undergo
any change. If this same user requests a virtual machine to the system again, the system will provide the same virtual desktop
o Remove service: When a user logs out, the system will destroy the
desktop. If this same user requests a virtual machine to the system again, the system will provide a new virtual desktop When we configure non persistent desktops (Remove service) we can specify a máximum idle time (in seconds) in the virtual desktop. When it finishes, the UDS Actor will automatically log out from the virtual desktop. The “Max. Idle time” field doesn’t apply to persistent desktops (keep service assigned)
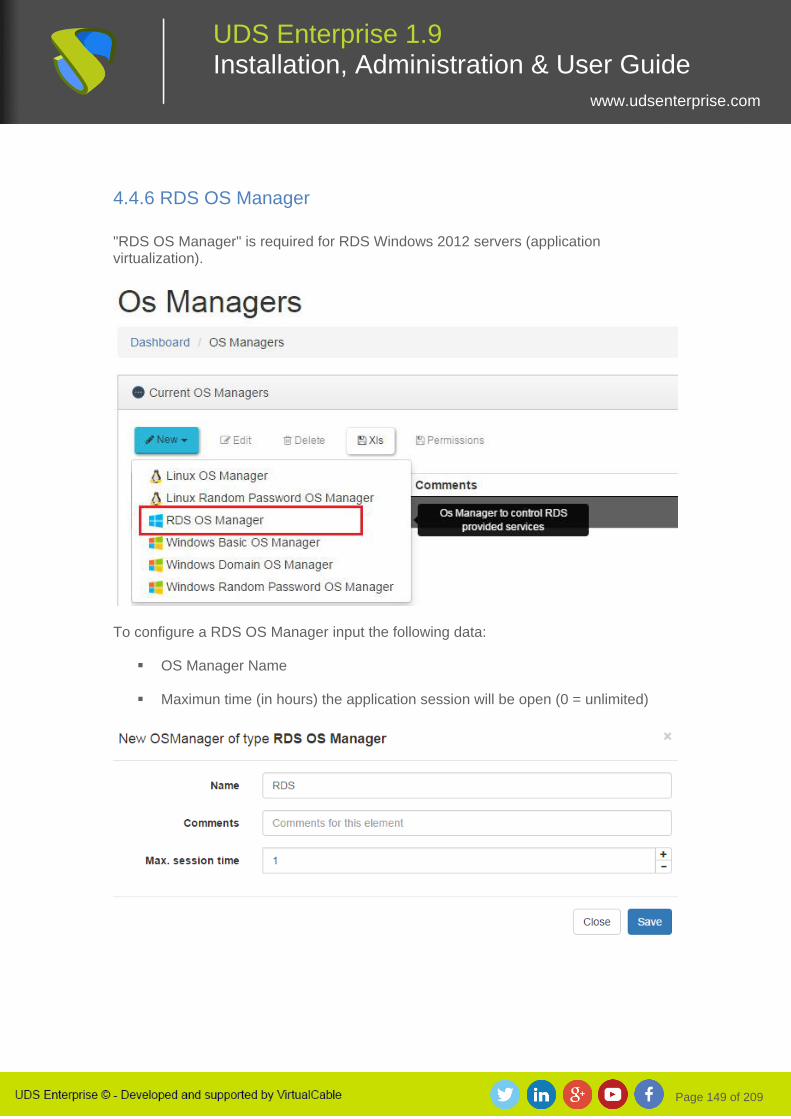
Page 149 of 209
UDS Enterprise 1.9 Installation, Administration & User Guide
www.udsenterprise.com
4.4.6 RDS OS Manager
"RDS OS Manager" is required for RDS Windows 2012 servers (application virtualization).
To configure a RDS OS Manager input the following data:
OS Manager Name
Maximun time (in hours) the application session will be open (0 = unlimited)
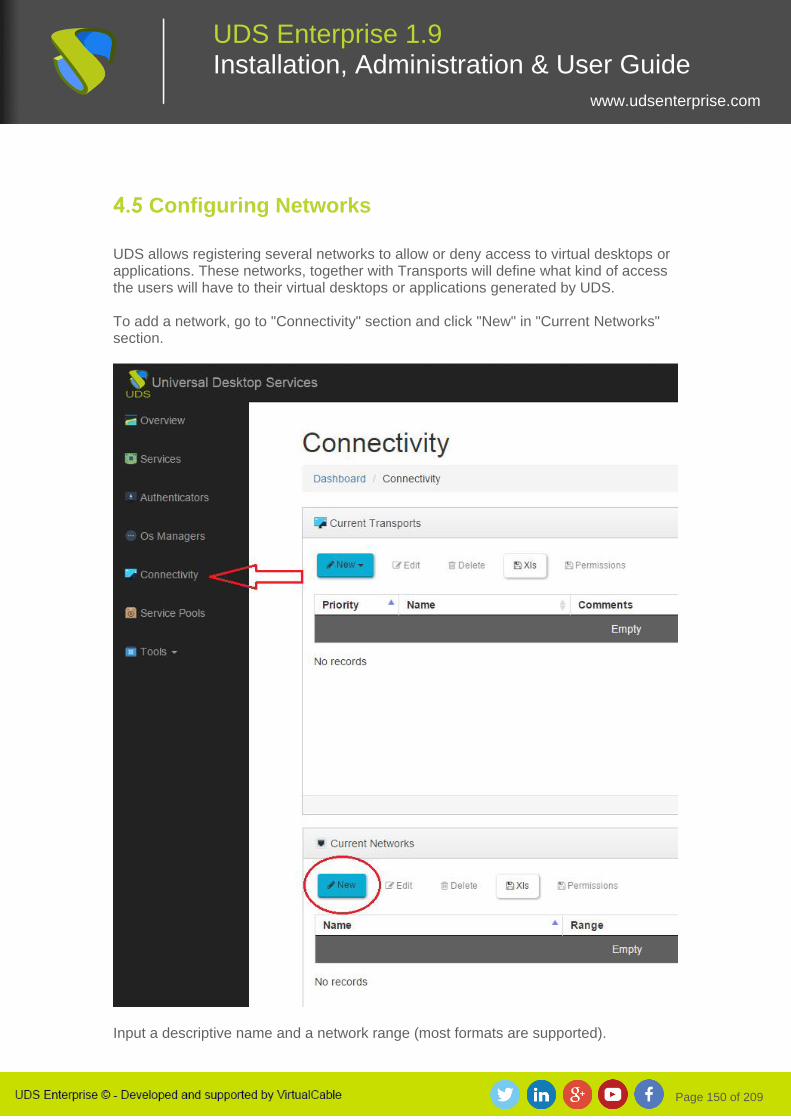
Page 150 of 209
UDS Enterprise 1.9 Installation, Administration & User Guide
www.udsenterprise.com
4.5 Configuring Networks
UDS allows registering several networks to allow or deny access to virtual desktops or applications. These networks, together with Transports will define what kind of access the users will have to their virtual desktops or applications generated by UDS. To add a network, go to "Connectivity" section and click "New" in "Current Networks" section.
Input a descriptive name and a network range (most formats are supported).

Page 151 of 209
UDS Enterprise 1.9 Installation, Administration & User Guide
www.udsenterprise.com
If no network is registered, access to the virtual desktops or applications will be allowed from any network.

Page 152 of 209
UDS Enterprise 1.9 Installation, Administration & User Guide
www.udsenterprise.com
4.6 Configuring Transports
In order to connect to the virtual desktops and applications, Transports must be created. Transports are small applications that will be run on the client and which will be responsible for providing access to the implemented service. Depending on the type of virtual desktop configured, the location and way of connection to our virtual desktops, different types of transports must be created. The following Transports are currently available:
We can configure the "Transport" indicated as "direct" for users accesses from an internal LAN, VPN, LAN Extension, etc... We can configure the "Transport" indicated as "Tunneled" to user access through WAN. These "Transports" will be supported in the UDS Tunneler server to make the connection against the virtual desktops. The HTML5 "Transport" can be used for any type of access. This "Transport" uses the UDS Tunneler server to make the connection against the virtual desktops.

Page 153 of 209
UDS Enterprise 1.9 Installation, Administration & User Guide
www.udsenterprise.com
To create a "Transport", in the "Connectivity" section, click "New" in "Current Transports" section.

Page 154 of 209
UDS Enterprise 1.9 Installation, Administration & User Guide
www.udsenterprise.com
4.6.1 HTML5 RDP Transport
A "HTML5 RDP Transport" enables access to Windows and Linux virtual desktops through RDP protocol using a browser which supports HTML5 (for Linux desktops the machines must have XRDP package installed. For Windows desktops RDP access must be setup). This transport uses UDS Tunneler server to make the connection against the virtual desktops. It must be configured beforehand in order to work properly.
For HTML5 RDP Transport, we configure the name of the transport, the IP address of the UDS tunneler server and port (“Tunnel Server” field) with the format https://IP_Tunneler:10443 (port by default). We indicate whether we want to redirect specific credentials to the virtual desktop, and if the “Empty creds” box is checked, no credential will pass through to the virtual desktop. If we do not check the “Empty creds” box and enter a “username” and “password” (it is also possible to enter a domain name), these credentials will be redirected to the virtual desktops.

Page 155 of 209
UDS Enterprise 1.9 Installation, Administration & User Guide
www.udsenterprise.com
In the "Network access" section, we indicate if in the selected network in "Networks" access to users through this “Transport” will be allowed (the available networks will be the configured ones in the "Networks" section). We can also indicate the priority of this transport. The lower that priority is, the higher it will appear on the list of transports available in virtual desktop window of each user (this field admits negative values).

Page 156 of 209
UDS Enterprise 1.9 Installation, Administration & User Guide
www.udsenterprise.com

Page 157 of 209
UDS Enterprise 1.9 Installation, Administration & User Guide
www.udsenterprise.com
4.6.2 NX Transport (direct)
A "NX Transport (direct)" enables access to Linux virtual desktops through NX software (the virtual machines and the connection clients must have NX installed). Currently, NX supported version is 3.5.
For a NX Transport (direct), we configure the transport name and we indicate whether we want to redirect specific credentials to the virtual desktop. If the “Empty creds” box is checked, no credential will pass through to the virtual desktop. If we do not check the “Empty creds” box and enter a “username” and “password”, these credentials will be redirected to the virtual desktops. In the "Network access" section, we indicate if in the selected network in "Networks" access to users through this “Transport” will be allowed (the available networks will be the configured ones in the "Networks" section). We can also indicate the priority of this transport.

Page 158 of 209
UDS Enterprise 1.9 Installation, Administration & User Guide
www.udsenterprise.com
The lower that priority is, the higher it will appear on the list of transports available in virtual desktop window of each user (this field admits negative values). We can also indicate what port and optimization connection parameters we want to use for the connection, such as: "Connection", "Session", "Disk Cache" and "Memory Cache".

Page 159 of 209
UDS Enterprise 1.9 Installation, Administration & User Guide
www.udsenterprise.com

Page 160 of 209
UDS Enterprise 1.9 Installation, Administration & User Guide
www.udsenterprise.com
4.6.3 NX Transport (tunneled)
A "NX Transport (tunneled)" enables access to Linux virtual desktops through NX software (the virtual machines and the connection clients must have NX installed). Currently, NX supported version is 3.5 This transport uses UDS tunneler server to make the connection against the virtual desktops, and it must be configured beforehand in order to work properly.
For a NX Transport (tunneled), we configure the transport name, the UDS Tunneler server IP address and a port (“tunnel server” field) with the format IP_Tunneler:443 (port by default). We indicate if we want to redirect specific credentials to the virtual desktop. If we check the “Empty creds” box, no credential will be passed to the virtual desktop. If we don’t check the “Empty creds” box and we indicate a “username” and “password”, these credentials will be redirected to the virtual desktop. In the "Network access" section, we indicate if in the selected network in "Networks" access to users through this “Transport” will be allowed (the available networks will be the configured ones in the "Networks" section).

Page 161 of 209
UDS Enterprise 1.9 Installation, Administration & User Guide
www.udsenterprise.com
We can also indicate the priority of this transport. The lower that priority is, the higher it will appear on the list of transports available in the virtual desktop window of each user (this field admits negative values). We can also indicate what port and optimization connection parameters we want to use for the connection, such as: "Connection", "Session", "Disk Cache" and "Memory Cache".

Page 162 of 209
UDS Enterprise 1.9 Installation, Administration & User Guide
www.udsenterprise.com

Page 163 of 209
UDS Enterprise 1.9 Installation, Administration & User Guide
www.udsenterprise.com
4.6.4 RDP Transport (direct)
A "RDP Transport (direct)" enables access to Windows virtual desktops through RDP protocol (the virtual machines must have RDP service enabled).
For the RDP Transport (direct), we configure the transport name, we indicate whether we want to redirect specific credentials to the virtual desktop. If the “Empty creds” box is checked, no credential will pass through to the virtual desktop. If we do not check the “Empty creds” box and enter a “username” and “password” (it is also possible to enter a domain name), these credentials will be redirected to the virtual desktop. In the "Network access" section, we indicate if in the selected network in "Networks" access to users through this “Transport” will be allowed (the available networks will be the configured ones in the "Networks" section).

Page 164 of 209
UDS Enterprise 1.9 Installation, Administration & User Guide
www.udsenterprise.com
We can also indicate the priority of this transport. The lower that priority is, the higher it will appear on the list of transports available in virtual desktop window of each user (this field admits negative values). We can also indicate the parameters “Allow Smartcards”, “Allow Printers”, “Allow Drives” and “Allow Serials”.

Page 165 of 209
UDS Enterprise 1.9 Installation, Administration & User Guide
www.udsenterprise.com

Page 166 of 209
UDS Enterprise 1.9 Installation, Administration & User Guide
www.udsenterprise.com
4.6.5 RDP Transport (tunneled)
A "RDP Transport (tunneled)" enables access to Windows virtual desktops through RDP protocol (the virtual machines must have RDP service enabled). This transport uses UDS Tunneler server to make the connection against the virtual desktops. It must be configured beforehand in order to work properly.
For the RDP transport (tunneled), we configure the transport name, the IP address of the UDS tunneler server and port (“Tunnel server” field) with the format: IP_Tunneler:443 (port by default). We indicate whether we want to redirect specific credentials to the virtual desktop, and if the “Empty creds” box is checked, no credential will pass through to the virtual desktop. If we do not check the “Empty creds” box and enter a “username” and “password” (it is also possible to enter a user domain), these credentials will be redirected to the virtual desktop.

Page 167 of 209
UDS Enterprise 1.9 Installation, Administration & User Guide
www.udsenterprise.com
In the "Network access" section, we indicate if in the selected network in "Networks" access to users through this “Transport” will be allowed (the available networks will be the configured ones in the "Networks" section). We can also indicate the priority of this transport. The lower that priority is, the higher it will appear on the list of transports available in virtual desktop window of each user (this field admits negative values). We can also indicate the parameters “Allow Smartcards”, “Allow Printers”, “Allow Drives” and “Allow Serials”.

Page 168 of 209
UDS Enterprise 1.9 Installation, Administration & User Guide
www.udsenterprise.com

Page 169 of 209
UDS Enterprise 1.9 Installation, Administration & User Guide
www.udsenterprise.com
4.6.6 RDS Transport (direct)
A "RDS Transport (direct)" enables access to Windows virtual applications within a LAN.
For the RDS Transport (direct), we configure the transport name and we indicate whether we want to redirect specific credentials to the application server. If the “Empty creds” box is checked, no credential will pass through to the application server. In the "Network access" section, we indicate if in the selected network in "Networks" access to users through this “Transport” will be allowed (the available networks will be the configured ones in the "Networks" section). We can also indicate the priority of this transport. The lower that priority is, the higher it will appear on the list of transports available in services window of each user (this field admits negative values). We can also indicate the parameters “Allow Smartcards”, “Allow Printers”, “Allow Drives” and “Allow Serials”.

Page 170 of 209
UDS Enterprise 1.9 Installation, Administration & User Guide
www.udsenterprise.com

Page 171 of 209
UDS Enterprise 1.9 Installation, Administration & User Guide
www.udsenterprise.com
4.6.7 RDS Transport (tunneled)
A "RDS Transport (tunneled)" enables access to Windows virtual applications.
This transport uses UDS Tunneler server to make the connection against the application server. It must be configured beforehand in order to work properly. For the RDS transport (tunneled), we configure the transport name, the IP address of the UDS tunneler server and port (“Tunnel server” field) with the format: IP_Tunneler:443 (port by default). We indicate whether we want to redirect specific credentials to the application server, and if the “Empty creds” box is checked, no credential will pass through to the application server. In the "Network access" section, we indicate if in the selected network in "Networks" access to users through this “Transport” will be allowed (the available networks will be the configured ones in the "Networks" section).

Page 172 of 209
UDS Enterprise 1.9 Installation, Administration & User Guide
www.udsenterprise.com
We can also indicate the priority of this transport. The lower that priority is, the higher it will appear on the list of transports available in services window of each user (this field admits negative values). We can also indicate the parameters “Allow Smartcards”, “Allow Printers”, “Allow Drives” and “Allow Serials”.
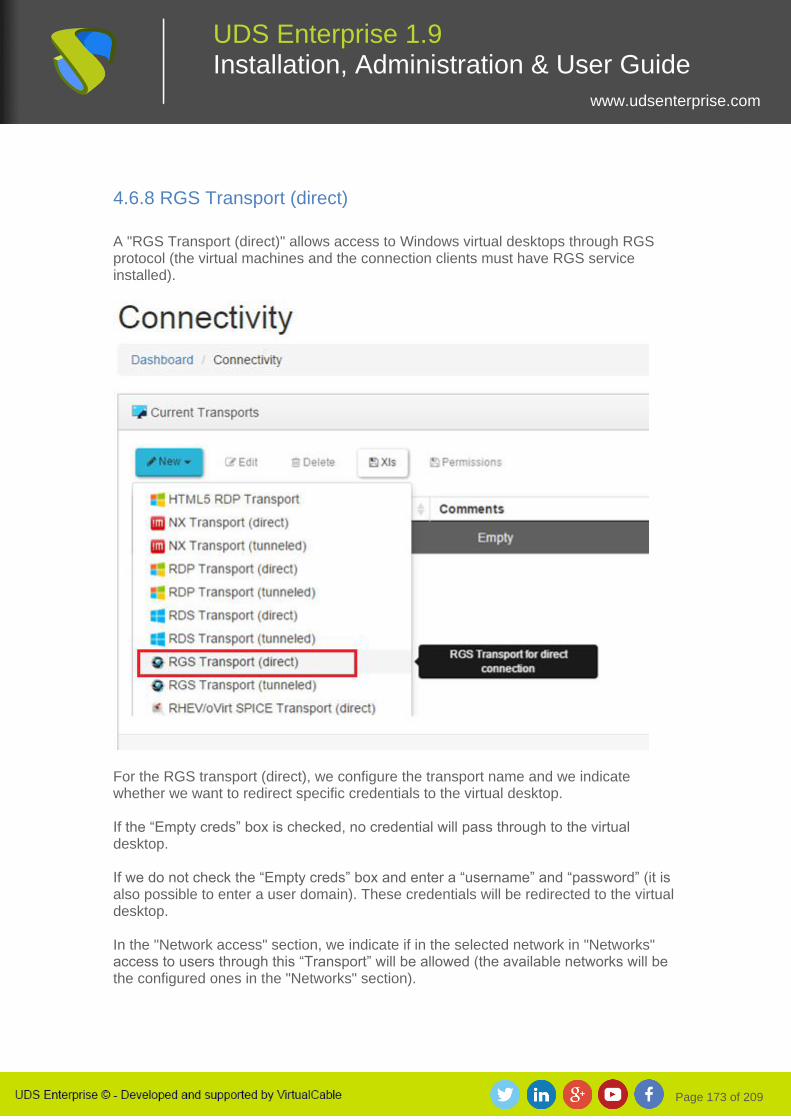
Page 173 of 209
UDS Enterprise 1.9 Installation, Administration & User Guide
www.udsenterprise.com
4.6.8 RGS Transport (direct)
A "RGS Transport (direct)" allows access to Windows virtual desktops through RGS protocol (the virtual machines and the connection clients must have RGS service installed).
For the RGS transport (direct), we configure the transport name and we indicate whether we want to redirect specific credentials to the virtual desktop. If the “Empty creds” box is checked, no credential will pass through to the virtual desktop. If we do not check the “Empty creds” box and enter a “username” and “password” (it is also possible to enter a user domain). These credentials will be redirected to the virtual desktop. In the "Network access" section, we indicate if in the selected network in "Networks" access to users through this “Transport” will be allowed (the available networks will be the configured ones in the "Networks" section).

Page 174 of 209
UDS Enterprise 1.9 Installation, Administration & User Guide
www.udsenterprise.com
We can also indicate the priority of this transport. The lower that priority is, the higher it will appear on the list of transports available in virtual desktop window of each user (this field admits negative values). We can also indicate the parameters “Image Quality”, “Adjustable Quality”, “Min Adjustable Quality”, “Adjustable Frame Rate”, “Match Local Resolution”, “Redirect USB”, “Redirect Audio” and Redirect Mic”.

Page 175 of 209
UDS Enterprise 1.9 Installation, Administration & User Guide
www.udsenterprise.com

Page 176 of 209
UDS Enterprise 1.9 Installation, Administration & User Guide
www.udsenterprise.com
4.6.9 RGS Transport (tunneled)
A "RGS Transport (tunneled)" allows access to Windows virtual desktops through RGS protocol (the virtual machines and the connection clients must have RGS service installed). This transport uses UDS Tunneler server to make the connection against the virtual desktops. It must be configured beforehand in order to work properly.
For the RGS Transport (tunneled), we configure the transport name, the IP address of the UDS Tunneler server and port (“Tunnel server” field) with the format IP_Tunneler:443 (port by default). We indicate whether we want to redirect specific credentials to the virtual desktop, and if the “Empty creds” box is checked, no credential will pass through to the virtual desktop. If we do not check the “Empty creds” box and enter a “username” and “password” (it is also possible to enter a user domain), these credentials will be redirected to the virtual desktop.

Page 177 of 209
UDS Enterprise 1.9 Installation, Administration & User Guide
www.udsenterprise.com
In the "Network access" section, we indicate if in the selected network in "Networks" access to users through this “Transport” will be allowed (the available networks will be the configured ones in the "Networks" section). We can also indicate the priority of this transport. The lower that priority is, the higher it will appear on the list of transports available in virtual desktop window of each user (this field admits negative values). We can also indicate the parameters “Image Quality”, “Adjustable Quality”, “Min Adjustable Quality”, “Adjustable Frame Rate”, “Match Local Resolution”, “Redirect USB”, “Redirect Audio” and Redirect Mic”.

Page 178 of 209
UDS Enterprise 1.9 Installation, Administration & User Guide
www.udsenterprise.com
4.6.10 RHEV/oVirt SPICE Transport (direct)
A "RHEV/oVirt SPICE Transport (direct)" enables access to virtual desktops through SPICE protocol.
For the “RHEV/oVirt SPICE Transport (direct)”, we configure the transport name and we indicate whether we want to redirect specific credentials to the virtual desktop. If the “Empty creds” box is checked, no credential will pass through to the virtual desktop. We must copy the content of the certificate located in etc/pki/ovirt-engine/certs/ca.der to “Certificate” section. In the "Network access" section, we indicate if in the selected network in "Networks" access to users through this “Transport” will be allowed (the available networks will be the configured ones in the "Networks" section).

Page 179 of 209
UDS Enterprise 1.9 Installation, Administration & User Guide
www.udsenterprise.com
We can also indicate the priority of this transport. The lower that priority is, the higher it will appear on the list of transports available in virtual desktop window of each user (this field admits negative values).

Page 180 of 209
UDS Enterprise 1.9 Installation, Administration & User Guide
www.udsenterprise.com
4.6.11 RHEV/oVirt SPICE Transport (tunneled)
A "RHEV/oVirt SPICE Transport (tunneled)" enables access to virtual desktops through SPICE protocol. This transport uses UDS Tunneler server to make the connection against the virtual desktops. It must be configured beforehand in order to work properly.
For the "RHEV/oVirt SPICE Transport (tunneled)”, we configure the transport name, the IP address of the UDS tunneler server and port (“Tunnel server” field) with the format: IP_Tunneler:443 (port by default). In the "Network access" section, we indicate if in the selected network in "Networks" access to users through this “Transport” will be allowed (the available networks will be the configured ones in the "Networks" section). We must copy the content of the certificate located in etc/pki/ovirt-engine/certs/ca.der to “Certificate” section.

Page 181 of 209
UDS Enterprise 1.9 Installation, Administration & User Guide
www.udsenterprise.com
We can also indicate the priority of this transport. The lower that priority is, the higher it will appear on the list of transports available in virtual desktop window of each user (this field admits negative values).

Page 182 of 209
UDS Enterprise 1.9 Installation, Administration & User Guide
www.udsenterprise.com
4.7 Configuring Services Pools
Once the different pieces of UDS platform are configured, “Service Pools” can be created. “Services Pools” are made up of a “Base Service” created from a “Service Provider” and an “OS Manager”. You must indicate one or several “Transports”, one or several access “Network” (if no access network is specified, all networks will be allowed) and a group or groups of users to access this service. To create a "Service Pool" click on "New".
To configure a “Service Pool” you must indicate: Name: Service name which will be shown to the user to access the virtual desktop. Base Services: Base service configured beforehand in a "Service Provider", where it will be used to make the virtual desktops based in “Linked Clones” deployment. OS Manager: We must indicate an “OS Manager" created beforehand which configuration will be applied to each virtual desktop generated in this "Services Pool". Associated image: Image associated to the service. It must first be added to the image repository accessible from "Tools" - "Gallery" section. Initial available services: Virtual desktops that will be created, configured and will be initially available in the system. Services to keep in cache: Virtual desktops available in the system cache. These desktops will be configured and ready to be assigned (this number of desktops will be automatically generated until the maximum number of machines indicated in the field "Maximum number of services to provide" will be reached).
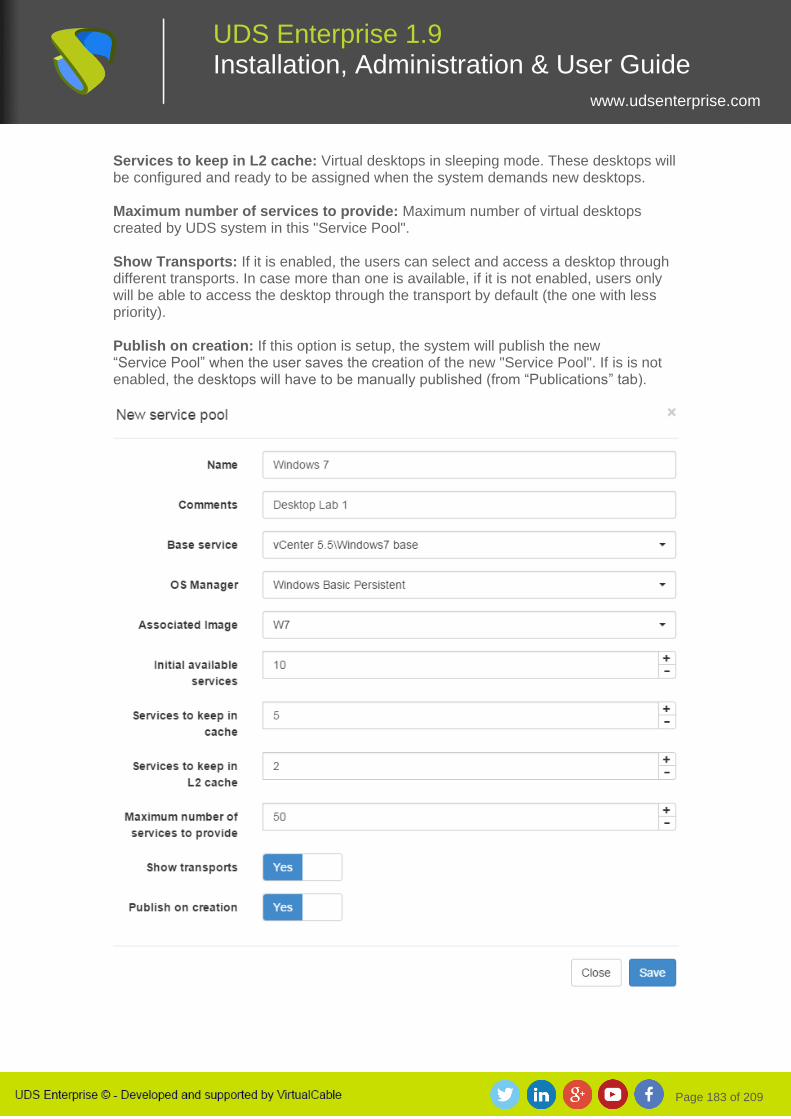
Page 183 of 209
UDS Enterprise 1.9 Installation, Administration & User Guide
www.udsenterprise.com
Services to keep in L2 cache: Virtual desktops in sleeping mode. These desktops will be configured and ready to be assigned when the system demands new desktops. Maximum number of services to provide: Maximum number of virtual desktops created by UDS system in this "Service Pool". Show Transports: If it is enabled, the users can select and access a desktop through different transports. In case more than one is available, if it is not enabled, users only will be able to access the desktop through the transport by default (the one with less priority). Publish on creation: If this option is setup, the system will publish the new “Service Pool” when the user saves the creation of the new "Service Pool". If is is not enabled, the desktops will have to be manually published (from “Publications” tab).

Page 184 of 209
UDS Enterprise 1.9 Installation, Administration & User Guide
www.udsenterprise.com
When we save the creation of a "Service Pool" and if we have selected the option "Publish on creation", the system will start the publication of the service generating the base machine on which the virtual desktops will be deployed. Clicking the "Delete" button, we will be able to completely delete a "Service Pool" and clicking “Edit" we will be able to change the service pool name, the image associated to the service, the access to all transports and all system cache values (Initial available services, Services to keep in cache, Services to keep in L2 cache and Maximum number of services to provide). But the "Base Service" and "OS Manager" can’t be modified once the “Service Pool” is created.

Page 185 of 209
UDS Enterprise 1.9 Installation, Administration & User Guide
www.udsenterprise.com
Once a "Service Pool" is created, we select it and we’ll have the following control and configuration menus available:
Assigned Services: Virtual desktops assigned to users. It shows information
about the desktop creation date, revision number (or publication) on which the
desktop is generated, the MAC address of the VM network card, the virtual
desktop DNS and IP name, the current desktop state (if it is being used) the IP
name of the connection client, the machine owner and the UDS agent version
installed on the base machine
Selecting the virtual desktop and clicking on "Delete" we can delete it manually.
Cache: Virtual desktops available in the system cache (including level 2 cache machines). These desktops will go through different states: o In Preparation: The virtual desktops are being created in the virtualization
platform

Page 186 of 209
UDS Enterprise 1.9 Installation, Administration & User Guide
www.udsenterprise.com
o Waiting OS: The virtual desktops are being configured with the parameters
indicated in the “OS Manager”
o Valid: Virtual desktop available to be used
Groups: To allow the users connection, it is necessary to assign access groups
or metagroups. These groups or metagroups must be created in the
“Authenticators” section and we will be able to assign one or several access
groups or metagroups to each “Service Pool”
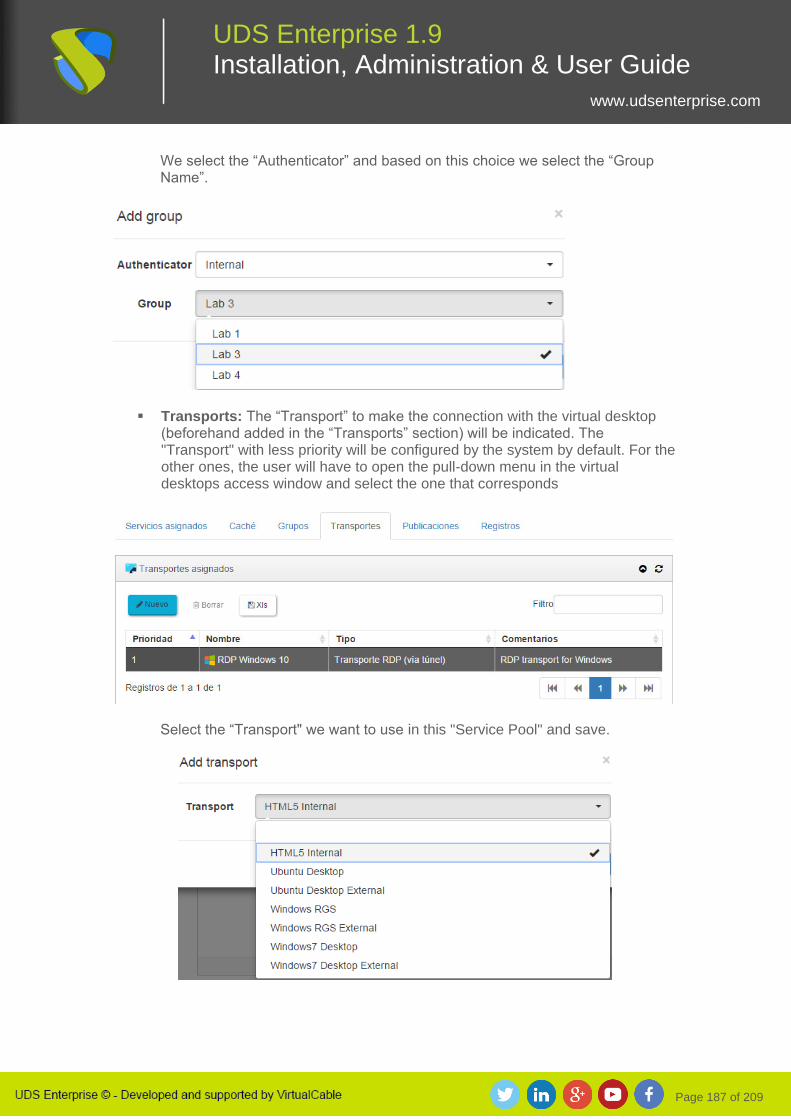
Page 187 of 209
UDS Enterprise 1.9 Installation, Administration & User Guide
www.udsenterprise.com
We select the “Authenticator” and based on this choice we select the “Group Name”.
Transports: The “Transport” to make the connection with the virtual desktop (beforehand added in the “Transports” section) will be indicated. The "Transport" with less priority will be configured by the system by default. For the other ones, the user will have to open the pull-down menu in the virtual desktops access window and select the one that corresponds
Select the “Transport" we want to use in this "Service Pool" and save.

Page 188 of 209
UDS Enterprise 1.9 Installation, Administration & User Guide
www.udsenterprise.com
Publications: In this menu we will be able to make a new service publication.
Once the publication process has finished, the whole system cache with the new Linked Clones based on this last publication will be regenerated
If we make a new publication, a new base machine will be generated and once it is available, the system will delete the virtual desktops from the previous version and it will generate new ones based on the new publication.
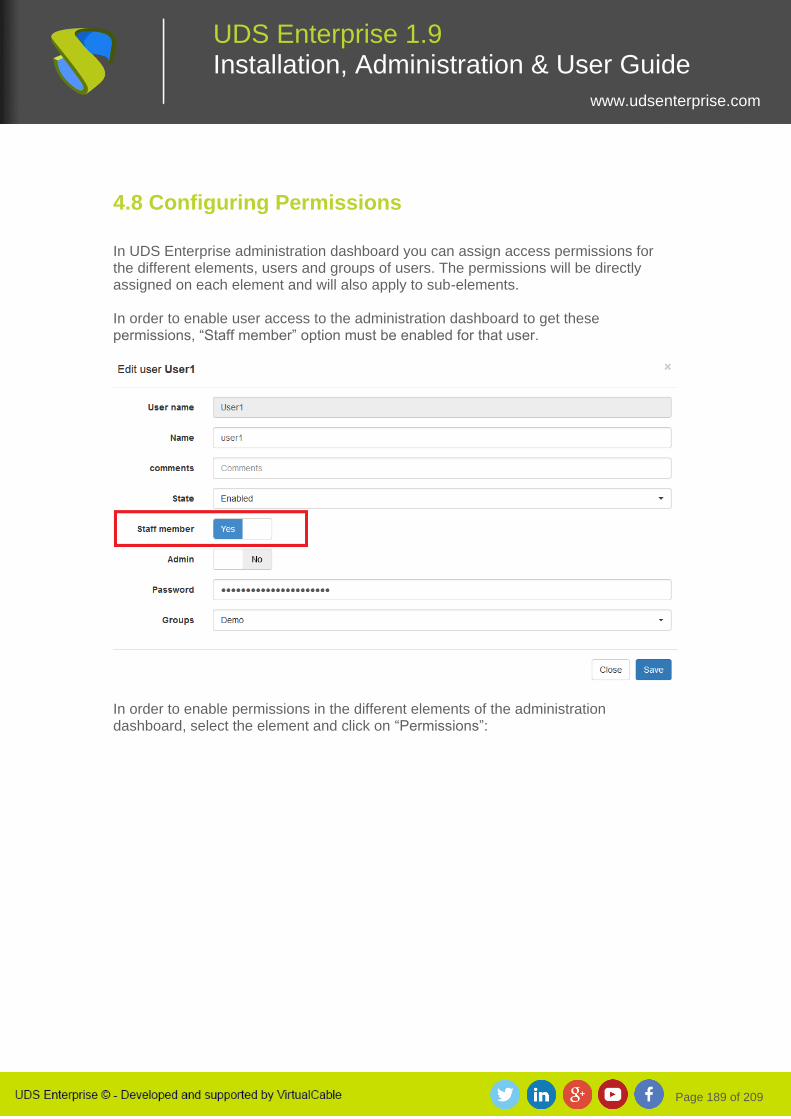
Page 189 of 209
UDS Enterprise 1.9 Installation, Administration & User Guide
www.udsenterprise.com
4.8 Configuring Permissions
In UDS Enterprise administration dashboard you can assign access permissions for the different elements, users and groups of users. The permissions will be directly assigned on each element and will also apply to sub-elements. In order to enable user access to the administration dashboard to get these permissions, “Staff member” option must be enabled for that user.
In order to enable permissions in the different elements of the administration dashboard, select the element and click on “Permissions”:

Page 190 of 209
UDS Enterprise 1.9 Installation, Administration & User Guide
www.udsenterprise.com
Click on “Add group permission” in the permissions window to add permissions to a group. Click on “Add user permission” to add permisions to a user. Then, select the authenticator and the group/user that is going to get those permissions. We must specify wether this user or group of users will have read only access or full access.
Once applied, the users with “Staff member” option enabled will be able to access this administration element with the given permissions.

Page 191 of 209
UDS Enterprise 1.9 Installation, Administration & User Guide
www.udsenterprise.com
In order to revoke user or group permissions, select it and click on “Revoke user permission” / “Revoke group permission”.

Page 192 of 209
UDS Enterprise 1.9 Installation, Administration & User Guide
www.udsenterprise.com
5. DEPLOYING VIRTUAL DESKTOPS WITH UDS
ENTERPRISE
Once one or several Service Pools are available, we can run a connection to a virtual desktop. Access UDS Enterprise via web browser (Internet Explorer, Chrome and Firefox browsers are supported), enter a valid username and password and select the authenticator if more than one is available.
In Services dashboard, the available services for that user will be displayed. Click on the one you want to run.

Page 193 of 209
UDS Enterprise 1.9 Installation, Administration & User Guide
www.udsenterprise.com
By default, if we click directly on the service image, the connection with the Transport which has the lower priority will be performed. If several Transports are setup, a pull-down menu will be displayed and you will be able to select the Transport you are going to use to connect to the virtual desktop.
To start the connection to the virtual machine, you must have UDS Plugin installed in the client machine to start the connection for all the transports except HTML5. For connections by NX we will have to have the software NX installed and for connections by RGS you must have the RGS software installed. RDP connection example:
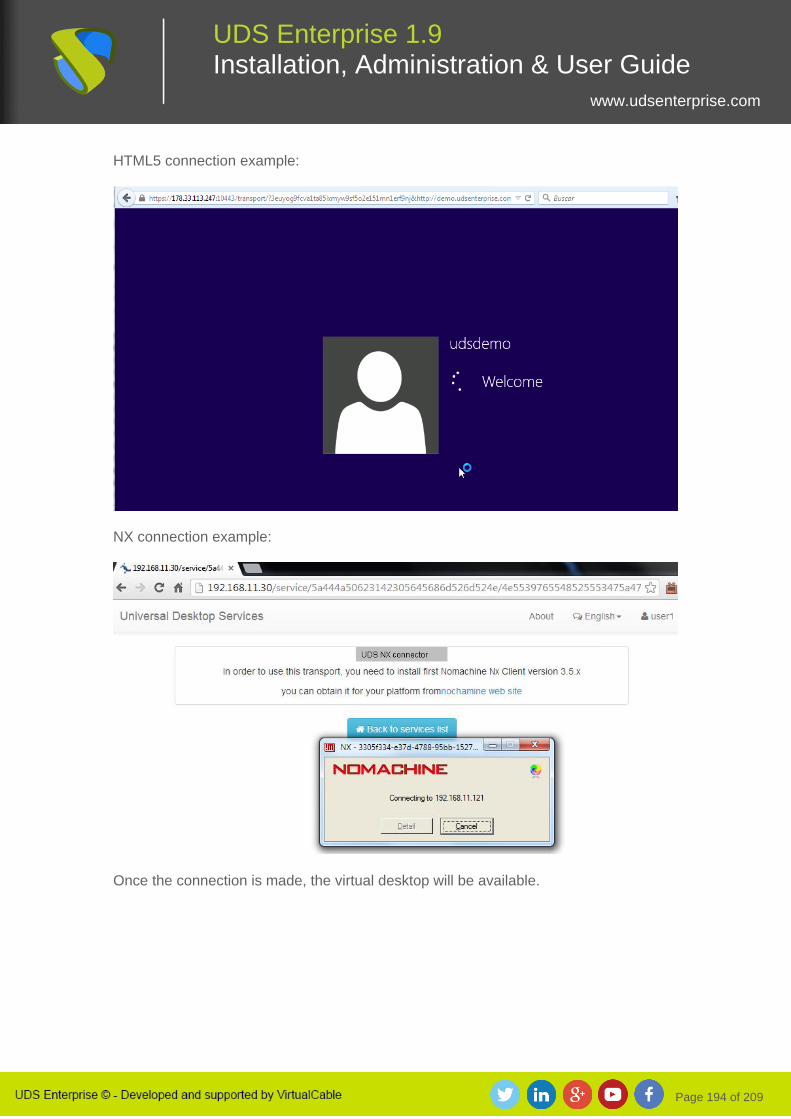
Page 194 of 209
UDS Enterprise 1.9 Installation, Administration & User Guide
www.udsenterprise.com
HTML5 connection example:
NX connection example:
Once the connection is made, the virtual desktop will be available.

Page 195 of 209
UDS Enterprise 1.9 Installation, Administration & User Guide
www.udsenterprise.com
6. UDS ENTERPRISE ADVANCED CONFIGURATION
UDS provides advanced parameters which will define the running of the system. These parameters will be responsible for defining security, connectivity, operating mode… both of UDS system and its communication with the virtual platforms (vSphere, oVirt/RHEV, Hyper-V, XenServer, Acropolis…) registered on UDS. Here you can find the system variables that are considered to be the more useful ones to manage the virtual desktops. When using the variables which aren’t mentioned here, it is recommended not to modify the default values, as some of them indicate how the system has to work (number of simultaneous tasks, time for tasks execution, programmed checks, etc…) and a wrong parameter modification may completely stop the system or make it work in a wrong way. Once the values of one of the UDS advanced configuration variables have been modified, it will be necessary to reboot the UDS Server so that the changes will be applied. If you want to modify any value which isn’t included in this section, we recommend you to contact the UDS Enterprise support team in order to verify that change and confirm that it doesn’t affect in a negative way to the running of UDS system.

Page 196 of 209
UDS Enterprise 1.9 Installation, Administration & User Guide
www.udsenterprise.com
6.1 Image gallery
UDS has a repository of images that may be associated to a “Service Pool" to facilitate the identification of the virtual desktop. The supported formats are: PNG, JPEG and GIF. The maximum image size is 256 Kb. To access UDS’ image Gallery, enter "Tools" section and select "Gallery":
Click on “New” to add the image to the repository and write a name. Click on “Select image” to search the image you want to save.

Page 197 of 209
UDS Enterprise 1.9 Installation, Administration & User Guide
www.udsenterprise.com
Once the image is stored, it will be available in order to be assigned to a “Service Pool” (see more details in 4.7).

Page 198 of 209
UDS Enterprise 1.9 Installation, Administration & User Guide
www.udsenterprise.com
6.2 Reports
UDS generates automatically reports about different platform elements. In order to access the reports, go to “Tools” section and click on “Reports”:
You can generate the following reports:
List os users: It creates a report featuring all users belonging to an authenticator. To create the report click on “List”, then click on “Generate report” and select an authenticator:
Once the report is created, we’ll obtain a list of users belonging to that authenticator:

Page 199 of 209
UDS Enterprise 1.9 Installation, Administration & User Guide
www.udsenterprise.com
User access: It creates a report with all user accesses to the system in a specific date range. To create the report, select the “Statistics / Users access report by date” group and click on “Generate report” and select the date range and the number of intervals
Once the report is generated, you’ll get a graphic and a list with all users accesses:

Page 200 of 209
UDS Enterprise 1.9 Installation, Administration & User Guide
www.udsenterprise.com
“Service Pool” performance: It creates a report about the use of a services pool in a specific date range. In order to create the report, select the “Statistics / Pools performance by date” group, click on “Generate report” and select the pool, date range and number of intervals:

Page 201 of 209
UDS Enterprise 1.9 Installation, Administration & User Guide
www.udsenterprise.com
Once the report is created, you’ll get a graphic and a performance list of the selected “Service Pool”:

Page 202 of 209
UDS Enterprise 1.9 Installation, Administration & User Guide
www.udsenterprise.com
6.3 UDS advanced parameters
In order to access the UDS advanced configuration parameters, access “Tools” section and click “Configuration”:
6.3.1 UDS
The most important parameters regarding UDS internal procedures, appearance and communication with the hypervisor platforms. AutorunService = It performs direct access to the virtual desktop when a user only has one service assigned (0 = off 1 = on). If this parameter is turned on, the users who only have one virtual desktop assigned will connect to it straightaway, the window where you select the service won’t appear and the first configured transport will be used. Default value 0. CustomHtmlLogin= HTML code for partial customization of UDS login page. The code you enter will appear under the user login box in the UDS Access dashboard. Empty by default. DisallowGlobalLogin = If it is turned on, the entire authenticators list won’t appear (0 = off 1 = on).

Page 203 of 209
UDS Enterprise 1.9 Installation, Administration & User Guide
www.udsenterprise.com
If this variable is turned on, you must use a “short name” to see an authenticator and allow user access to the system. Default value 0 RedirectToHttps = It automatically redirects UDS Enterprise access from http to https (0 = off 1 = on). Default value 0 SessionExpireTime = It indicates the maximum time a user session will be opened after publishing something new. After, the user session will be closed and the system will delete the service. Default value 24 Hours. StatsDuration = It indicates how long the system will keep the statistics. Default value 365 days. UDSTheme = Name of the folder which contains the HTML templates for the login Windows, user, preferences, downloads, etc… Default name html5.
6.3.2 RGS
Find below the description of the parameters related to the RGS Transport: DownloadUrl = Web address to download RGS software. TunnelOpenedTime = Maximum time the tunnel will wait for the RGS connection to be opened. If the connection isn’t carried out in the time indicated in this variable, it will be canceled and you will have to make the connection again (if you make the connection using slow clients, it is recommended to increase this value) Default value 30 seconds.
Page 204 of 209
UDS Enterprise 1.9 Installation, Administration & User Guide
www.udsenterprise.com
6.3.3 SAML
Find below the description of the parameters related to the SAML authenticator: Global logout on exit = It indicates the logout mode (0 = off 1 = on). If it is enabled, when you logout from UDS you also logout from SAML. Default value 0. IDP Metadata Cache = Time the IDP.m searched metadata are kept. Default value 86400 seconds (24 hours). Organization Display Name = Organization name displayed. Organization Name = Organization name. Organization URL = Organization web address. User cleanup = It indicates how often the system cleans up the users without activity. If a user remains inactive for the time indicated in this variable, the system will delete it. Default value 2592000 seconds (30 days).
6.3.4 IPAUTH
These variables are inactive in this UDS Enterprise version.
6.3.5 NX
Find below the description of the parameters related to the NX Transport: DownloadUrl = Web address to download NX software. DownloadUrlMACOS = Web address to download NX software for MAC.

Page 205 of 209
UDS Enterprise 1.9 Installation, Administration & User Guide
www.udsenterprise.com
6.3.6 CLUSTER
These variables are inactive in this UDS Enterprise version.
6.3.7 WYSE
Find below the description of the parameters related to the connection with Wyse clients: Autoconnect = It allows the automatic connection of the device. Default value no. Colors = It defines the quality of the colours displayed during the connection. Default value High. DefaultUser = Default user redirected to the device. Default value UDS. Language = Device language. Default value us. Privilege = User privilege level. Default value NONE. For more details about these parameters see Wyse official documentation or the following reference guide: http://www.freewysemonkeys.com/downloads/wtos/Wyse%20Thin%20OS%2064%20Parameters.pdf
6.3.8 ENTERPRISE
Find below the description of the parameters related to UDS Enterprise subscription: Serial Number = Subscription activation code. During the UDS Server configuration you must indicate a valid serial number. Using this variable you can update or change it.

Page 206 of 209
UDS Enterprise 1.9 Installation, Administration & User Guide
www.udsenterprise.com
6.3.9 SECURITY
Find below the description of the parameters related to UDS system security: AdminIdleTime = It indicates how long an administrator session will be opened. After this period, you must authenticate yourself again in the system. Default value 14400 seconds (4 hours). AllowRootWebAccess = It allows the root user login via web (0 = off 1 = on). The modification of this variable doesn’t affect the root user access through the administration client. Default value 1. RootPass = Root user password, previously indicated in the UDS Server configuration script. SuperUser = User with UDS system administration rights. By default: root. Trusted Hosts = Hosts considered to be secure by UDS. These host can make sensitive requests to UDS, for example tunnelers (it is recommended to modify this variable so that the only displayed option is the list of tunnelers). By default * (all allowed), it admits addresses range values. UserSessionLength = It indicates how long the user session will be opened. After this period, it will be necessary for the user to authenticate himself again in the system. Default value 14400 seconds (4 hours)

Page 207 of 209
UDS Enterprise 1.9 Installation, Administration & User Guide
www.udsenterprise.com
6.3.10 VMWARE
Find below the description of the parameters related to VMware vSphere virtual platform: MaxRetriesOnError = Number of times and operation is retried in case VMware reports an error to UDS system. Default value 63 retries. MinUsableDatastoreGB = Minimum free space in a datastore to create the virtual desktops. If the VMware platform datastores selected to create services in UDS have less free space than the value of this variable, the virtual desktops won’t be created. Once this value is modified or the needed space is available, the system will work properly. Default value 30.

Page 208 of 209
UDS Enterprise 1.9 Installation, Administration & User Guide
www.udsenterprise.com
6.4 Flush System Cache
In order to flush the UDS system’s cache, enter the “Tools” section and click on “Flush cache”.
The most common reasons to flush the system cache are:
Blocking of a user: when a user enters an invalid password up to 4
consecutive times, UDS blocks that user. To unlock it it will be necessary to
flush the cache system
Inventory update: it is possible that when you edit a "Service", some elements
as datastores, networks, base machines, etc. recently added, are not available.
To view them, we will have to flush the system cache. In this way the Broker will
again make the request to the hypervisor and data will be updated

Page 209 of 209
UDS Enterprise 1.9 Installation, Administration & User Guide
www.udsenterprise.com
7. ABOUT VIRTUALCABLE
VirtualCable commercializes UDS Enterprise via a subscription model, including product support and segment updates by number of users. VirtualCable also offers a broad portfolio of professional services in order to help its clients in both installation processes and UDS Enterprise configuration and in virtualization projects with other platforms. For more information, visit www.udsenterprise.com or email us at [email protected]
All the proper names of programs, operating systems, hardware, etc. that appear in this document are registered trademarks of their respective companies or organizations. All rights reserved. The content of this work is protected by law, which establishes prison sentences and /or fines in addition to appropriate compensation for damages for the ones that copy, plagiarise, distribute or communicate publically, whole or in part, a literary, artistic or scientific work or its transformation, interpretation or artistic execution fixed in any type or format or communicated through any means without the required authorization.
-END OF DOCUMENT-