
UCS Client for Android
44
UCS Client for Android (Unified Communication Solution) Installation & User Guide
Transcript of UCS Client for Android

UCS Client for Android
(Unified Communication Solution)
Installation & User Guide

ECS UCS Client for Android Installation & User Guide
Copyright© 2012 Ericsson-LG Co., Ltd. All Rights Reserved This material is copyrighted by Ericsson-LG Co., Ltd. Any unauthorized reproductions, use or disclosure of this material, or any part thereof, is strictly prohibited and is a violation of Copyright Laws. Ericsson-LG reserves the right to make changes in specifications at any time without notice.
The information furnished by Ericsson-LG in this material is believed to be accurate and reliable, but is not warranted to be true in all cases.
Ericsson-LG is a trademark of Ericsson-LG Co., Ltd. All other brand and product names are trademarks or registered trademarks of their respective companies.
Revision History
Issue A.0 2012.04 First release
Issue 1.0 2012.08 Added audio settings manually or automatically.
Automatic re-login after entering Wi-Fi zone
Issue 1.1 2012.09 change CI.
Issue 1.2 2012.09 Added a Setting item for Dialing Rule.

ECS UCS Client for Android Installation & User Guide
i iss. 1.2
Table of Contents
1 Introduction ........................................................................................................... 1
2 Installation and Setup ............................................................................................ 2
2.1 Hardware and OS Requirement ............................................................................................ 2
2.2 License and Lock Key .......................................................................................................... 3
2.3 iPECS UCS Client Installation ............................................................................................. 3
2.4 Initial Setup & Login ............................................................................................................ 6
3 General Description ............................................................................................... 8
3.1 Main Menu ........................................................................................................................... 9
3.2 Options Menu ....................................................................................................................... 9
3.3 Context Menu ....................................................................................................................... 9
3.4 Home Button and Back Button ............................................................................................. 9
3.5 Notifications ......................................................................................................................... 9
4 Presence ............................................................................................................... 10
4.1 Presence Tab ....................................................................................................................... 10
4.1.1 View option ............................................................................................................................... 11
4.2 Searching the Presence Window ......................................................................................... 12
4.3 Adding and Deleting Contacts ............................................................................................ 13
4.4 Blocking/UnBlocking and Move member .......................................................................... 14
4.5 Associated Feature Window ............................................................................................... 15
5 Phone ................................................................................................................... 16
5.1 Voice Call............................................................................................................................ 16
5.1.1 Simple Mode ............................................................................................................................. 16
5.1.2 Phone Mode .............................................................................................................................. 17
5.1.3 Advanced Features.................................................................................................................... 17
5.1.4 Add-ons Features ...................................................................................................................... 19
5.2 Video Call ........................................................................................................................... 20
5.2.1 Video Call Screen ..................................................................................................................... 20
5.2.2 Video Pause / Video Start ......................................................................................................... 21
5.2.3 Mic Mute / Speaker Phone Mode ............................................................................................. 21
5.2.4 Hangup Video Call ................................................................................................................... 22
5.2.5 Landscape Mode ....................................................................................................................... 22
6 IM ........................................................................................................................ 24

ECS UCS Client for Android Installation & User Guide
ii iss. 1.2
6.1 IM List Tab ......................................................................................................................... 24
6.2 IM Window ......................................................................................................................... 25
7 Logs ..................................................................................................................... 26
7.1 Logs Tab ............................................................................................................................. 26
7.2 Logs List ............................................................................................................................. 27
7.3 Logs Detail Information ..................................................................................................... 27
8 Settings ................................................................................................................ 28
8.1 My Information ................................................................................................................... 29
8.1.1 Change Picture .......................................................................................................................... 29
8.1.2 Change Password ...................................................................................................................... 30
8.1.3 Change Today’s Message .......................................................................................................... 30
8.2 IM Presence ........................................................................................................................ 31
8.3 Phone Presence ................................................................................................................... 32
8.3.1 Set Do Not Disturb (DND) ....................................................................................................... 32
8.3.2 Set Simple Call Forwarding ...................................................................................................... 33
8.4 System Settings ................................................................................................................... 34
8.4.1 Dialing Rule .............................................................................................................................. 34
8.4.2 Call Option ............................................................................................................................... 35
8.4.2.1 Audio Setting Mode ....................................................................................................................... 35
8.4.3 Search Base ............................................................................................................................... 36
8.4.4 LDAP Server............................................................................................................................. 37
8.4.5 Notification ............................................................................................................................... 37
8.4.6 Automatic Re-login .................................................................................................................. 38
8.4.7 Phone Version ........................................................................................................................... 38
8.5 Logout ................................................................................................................................. 38
9 Message ............................................................................................................... 39
9.1 Short Message Service (SMS) ............................................................................................ 39
9.2 Note .................................................................................................................................... 40

ECS UCS Client for Android Installation & User Guide
1 iss.1.2
1 Introduction
The iPECS UCS (Unified Communications Solution) Client for Android is an Android mobile phone
based application, which operates in conjunction with the iPECS UCS Server, expanding and enhancing
the communication services of iPECS to dramatically improve business productivity and customer
responsiveness. In addition to the rich voice services available with the iPECS system, users of iPECS
UCS Client for Android are provided access to a wide range of video, text collaborative and messaging
services. Services available include Presence, Video Conferencing, Instant Messaging and more.
Employing a simple intuitive graphical user interface, the UCS Client for Android has access to both
private and shared contacts and directory database applications which are fully integrated with the various
services available. The UCS Client for Android user interface is highly flexible and can be customized to
address the needs of the individual user. As an Internet Protocol (IP) solution, the UCS Client for Android
overcomes geographical limitations allowing access to services and databases while in the office or on the
road.
The following describes installation and details for use and operation of the iPECS UCS Client for
Android.
NOTE: iPECS UCS Client for Android, we call it iPECS UCS Client from this point onwards.

ECS UCS Client for Android Installation & User Guide
2 iss.1.2
2 Installation and Setup
Installation and set-up of the iPECS UCS Client is a simple three step process:
1. Install the iPECS UCS Client for Android application on the user’s mobile phone supporting
Android.
2. Adjust UCS Client login settings.
3. Login to complete registration of the iPECS UCS Client application to the iPECS system and
UCS Server.
Completing the login and registration process may require assistance from the iPECS Administrator to
adjust settings of the iPECS system and the UCS Server; both will require the Client User ID and
Password. Also, iPECS UCS Client will require entry of the host iPECS system and UCS Server IP
address.
Prior to installation, the mobile phone and operating system should be verified for compatibility with the
iPECS UCS Client application. Assure that the Hardware and Operating System (OS) comply with the
minimum requirements of Section 2.1.
2.1 Hardware and OS Requirement
The UCS Client application software requires a mobile phone with the minimum configuration defined
below.
Hardware:
CPU 1GHz
RAM 512MB
ROM 1GB
LCD with a minimum resolution of 800 x 480
Wi-Fi
Front Camera (for Video Call)
SD Card (for Camera/Gallery and Package download/installation)
NOTE: Voice/video quality depends on the mobile phone manufacturer and each model.
Operating System:
Android 2.3.3 above

ECS UCS Client for Android Installation & User Guide
3 iss.1.2
2.2 License and Lock Key
Prior to registration of iPECS UCS Clients with the host iPECS system and UCS Server, the host
iPECS system will require installation of a UCS Client software license. iPECS UCS employs a
concurrent-user (floating) license scheme. In this scheme, the maximum number of active (logged in)
UCS Clients is set by the number of clients allowed by the installed lock-key. The lock-key installation
is permitted only by an authorized agent of Ericsson-LG. For information on Lock-keys, contact the
local Ericsson-LG distributor.
2.3 iPECS UCS Client Installation
This section explains how to install the iPECS UCS Client. The software can be obtained by download
from the iPECS UCS Web Admin Download Client Program window. Download from the iPECS UCS
Web Admin may require assistance of the UCS Administrator.
To obtain the software by download:
1. Open a browser on the mobile phone.
2. Point the browser to http://ip address of UCS Web Admin/UCS, the UCS Administrator should
have the IP address.
3. Click the link of ‘Click to download UCS Client Program’ on the left.
4. Select Download from the Download UCS Client Program for Android (Mobile).

ECS UCS Client for Android Installation & User Guide
4 iss.1.2
To install the UCS Client application:
1. After downloading, open Android notifications in Android status bar by dragging down.
2. Select UCS client package named UCSmClientInstall.apk
3. Select Install to install UCS client directly on the mobile phone.
ECS UCS Client for Android Installation & User Guide
5 iss.1.2
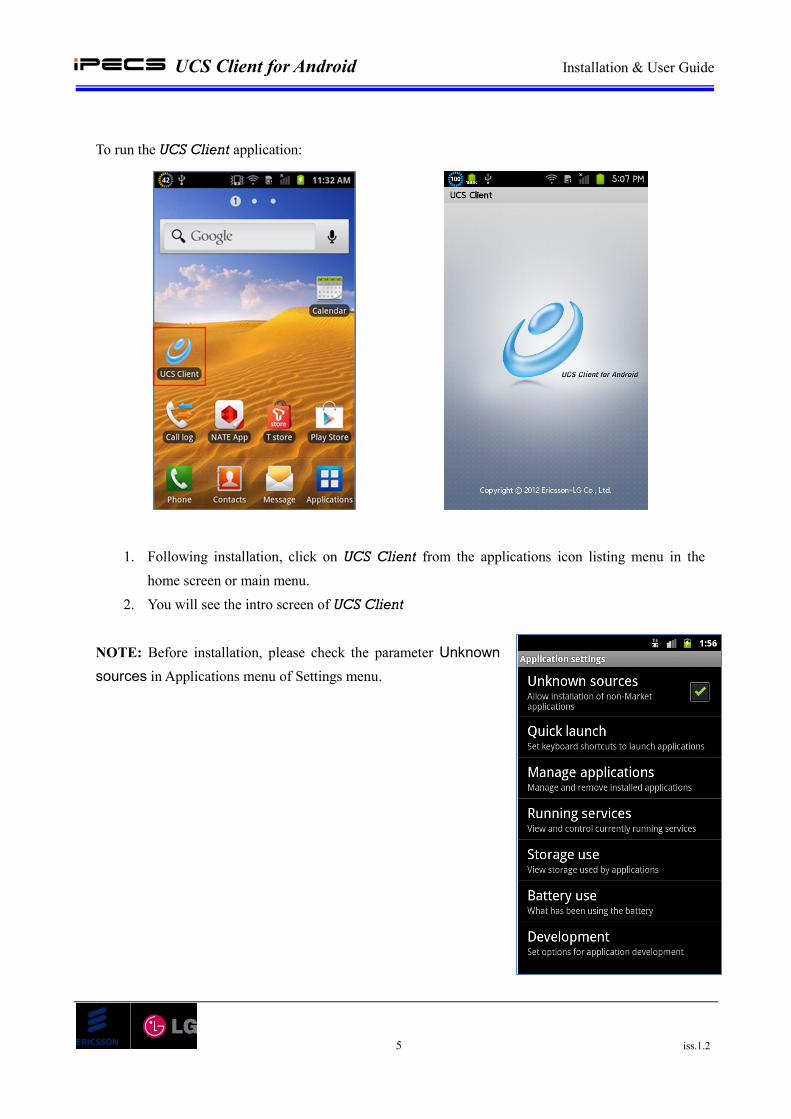
To run the UCS Client application:
1. Following installation, click on UCS Client from the applications icon listing menu in the
home screen or main menu.
2. You will see the intro screen of UCS Client
NOTE: Before installation, please check the parameter Unknown
sources in Applications menu of Settings menu.

ECS UCS Client for Android Installation & User Guide
6 iss.1.2
2.4 Initial Setup & Login
To set-up the UCS Client application, perform the following steps:
1. Once launched, the iPECS UCS Client Login screen will appear. For the initial installation
you must add a user account having the IP address and other basic parameters for the UCS
Server and client in the Account Input window for login.
2. Select Add Account button from the Account window.
3. Enter Account Input parameters. Remember, the User ID and Password is case sensitive.
- The UCS Server is IP Address provided by your UCS Administrator
- The User ID may be 2-12 alpha-numeric characters
- The Password can be 1 to 12 alphabet, numeric and symbol characters.
The Password is editable when The Password Save is in checked state only
- The Primary Account is checkable parameter for setting to prirmary of a user account
- The Password Save is checkable parameter for remembering password
- The Auto Login is checkable parameter for each user account
4. In a single or multi user environment, use the Pimary Account, Password Save and Auto Login
checkboxes, to automate login to the iPECS system and UCS Server every time the UCS
Client application is launched.
5. Select OK to add the new user account.
ECS UCS Client for Android Installation & User Guide
7 iss.1.2
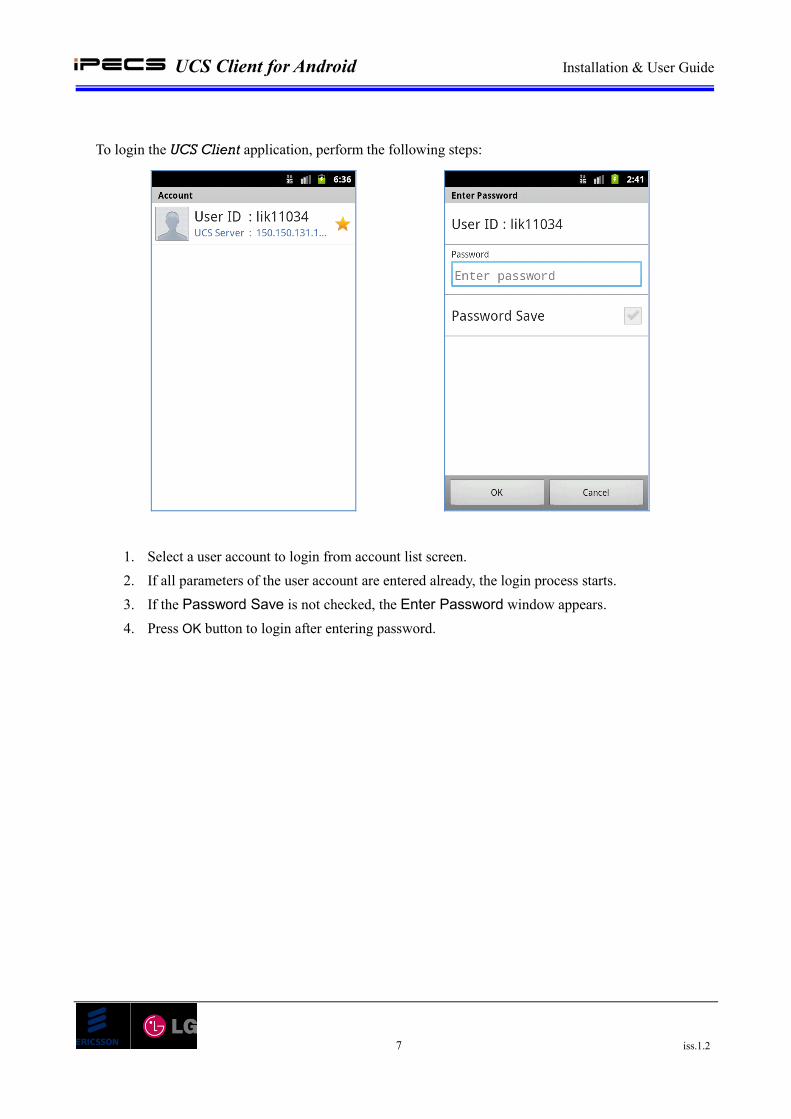
To login the UCS Client application, perform the following steps:
1. Select a user account to login from account list screen.
2. If all parameters of the user account are entered already, the login process starts.
3. If the Password Save is not checked, the Enter Password window appears.
4. Press OK button to login after entering password.
ECS UCS Client for Android Installation & User Guide
8 iss.1.2
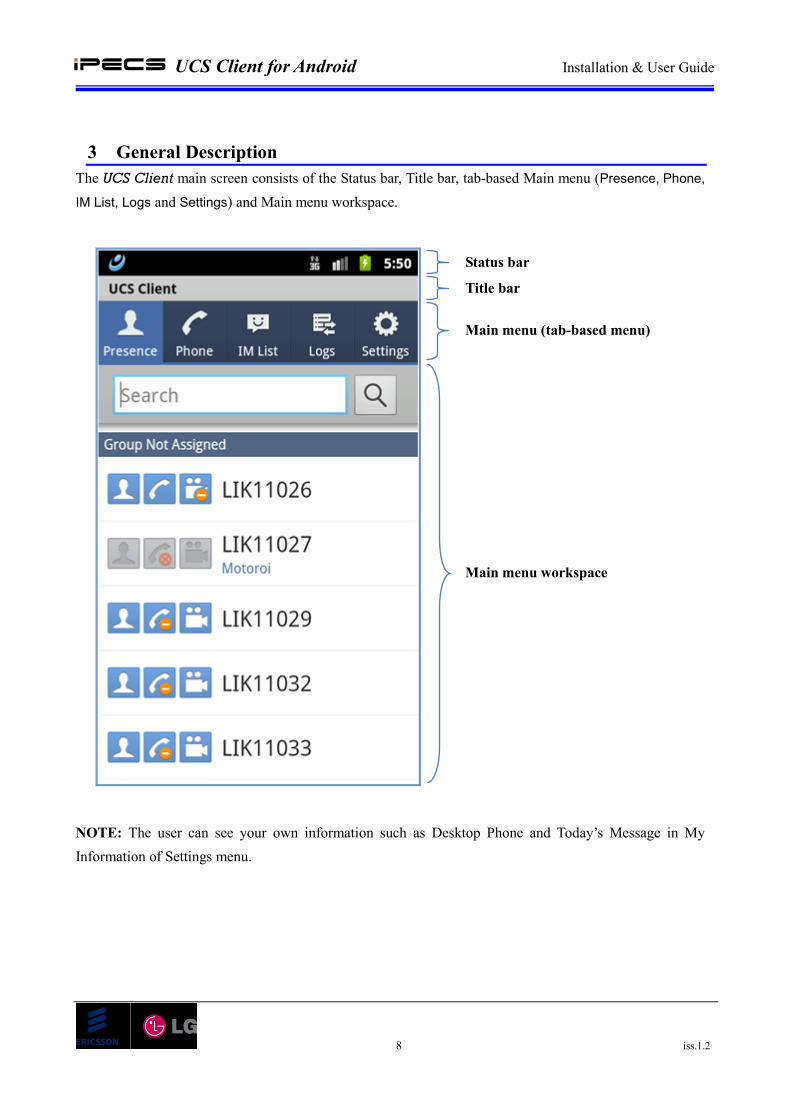
3 General Description
The UCS Client main screen consists of the Status bar, Title bar, tab-based Main menu (Presence, Phone,
IM List, Logs and Settings) and Main menu workspace.
NOTE: The user can see your own information such as Desktop Phone and Today’s Message in My
Information of Settings menu.
Status bar
Title bar
Main menu (tab-based menu)
Main menu workspace

ECS UCS Client for Android Installation & User Guide
9 iss.1.2
3.1 Main Menu
The tab-based main menu displays a set of items in a horizontal bar that has major functionalilties of
UCS Client application.
3.2 Options Menu
The options menu is the primary collection of menu items for an activity, users can reveal the options
menu panel by pressing the Menu button. It's where users can find actions that have a global impact on
the app.
3.3 Context Menu
A context menu is a floating menu that appears when the user performs a long-click on an element. It
provides actions that affect the selected content or context frame.
3.4 Home Button and Back Button
The user presses the Home button, the Home screen appears and the application goes to background.
The long click of the Home button invokes Task manager after that you can select background
application to go.
The user presses the Back button at the UCS Client main menu then the UCS Client shows the Logout
dialogbox.
3.5 Notifications
The status bar notification adds an icon to the system's status bar (with an optional ticker-text message)
and a notification message in the notifications window.
It is used when mobile client is working in a background and needs to notify the user about an new
message or event.
The user can move mobile client window touching notification item in notification window and can get
back to audio/video call screen from other program.

ECS UCS Client for Android Installation & User Guide
10 iss.1.2
4 Presence
The Presence displays the status of contacts you select from the shared directory available with UCS.
The contacts in the Shared directory, which is managed by the UCS Administrator, are available to all users.
4.1 Presence Tab
The Presence Tab displays the list of presence members showing the status of the UCS Client, iPECS
desktop phone and Video (Webcam of PC Client or Embedded Camera of Mobile client) with listed
contacts using icons. Also each list shows member’s name and today’s message.
NOTE: The group which has no members will not be displayed in the list
My IM presence icon
My Phone presence icon
Real time search box
Advanced search button
Group name
User name
Today’s message
Video presence
Phone presence
IM presence

ECS UCS Client for Android Installation & User Guide
11 iss.1.2
The status icons employed in the Presence window are shown below.
4.1.1 View option
You can sort the list of members using the Options menu.
There are two options
1. View All : shows all members.
2. IM Online user : shows the members that are online.
The iPECS Phone status icons The Video status icons The IM Presence icons
ECS UCS Client for Android Installation & User Guide
12 iss.1.2
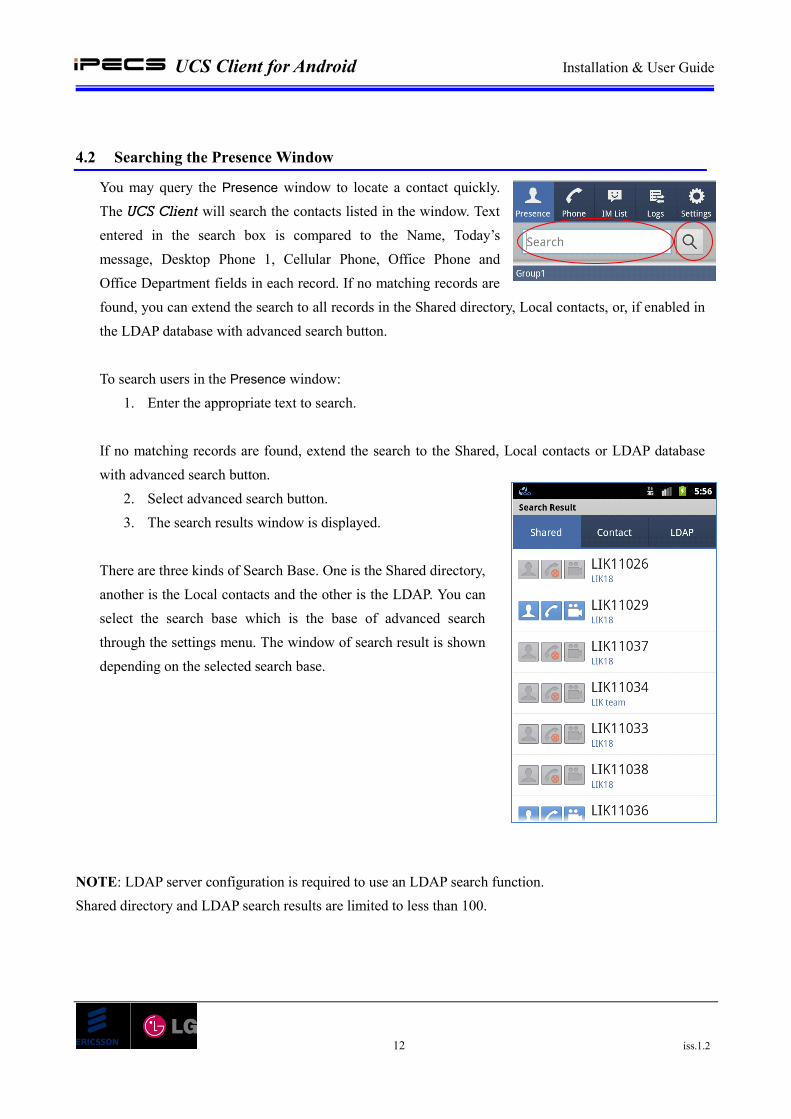
4.2 Searching the Presence Window
You may query the Presence window to locate a contact quickly.
The UCS Client will search the contacts listed in the window. Text
entered in the search box is compared to the Name, Today’s
message, Desktop Phone 1, Cellular Phone, Office Phone and
Office Department fields in each record. If no matching records are
found, you can extend the search to all records in the Shared directory, Local contacts, or, if enabled in
the LDAP database with advanced search button.
To search users in the Presence window:
1. Enter the appropriate text to search.
If no matching records are found, extend the search to the Shared, Local contacts or LDAP database
with advanced search button.
2. Select advanced search button.
3. The search results window is displayed.
There are three kinds of Search Base. One is the Shared directory,
another is the Local contacts and the other is the LDAP. You can
select the search base which is the base of advanced search
through the settings menu. The window of search result is shown
depending on the selected search base.
NOTE: LDAP server configuration is required to use an LDAP search function.
Shared directory and LDAP search results are limited to less than 100.

ECS UCS Client for Android Installation & User Guide
13 iss.1.2
4.3 Adding and Deleting Contacts
A contact may be added to or deleted from the Presence window from the Shared contacts directory.
The Shared contacts directory is stored in the UCS Server and is managed by the UCS Administrator.
To add a contact from the Shared directory:
1. Search the member whom you want to add from the
Shared contacts directory using advanced search button.
2. Select the member in the search result list.
3. In the Associated feature window, select the Add field to
add the member into the presence members.
To delete a contact from the Presence window:
1. Select the member whom you want to delete in the
Presence list.
2. In the Associated feature window, you can select ‘Delete
User’ to delete the member from the presence members
using the options menu.

ECS UCS Client for Android Installation & User Guide
14 iss.1.2
4.4 Blocking/UnBlocking and Move member
You can block or unblock the member in the presence list. Also you can move the members to another
group.
The following describes options menu items:
Delete User – deletes the selected user from the
Presence list
Move Member – moves the selected user to another
group
Block – blocks the selected user from receiving your
presence
UnBlock – Unblocks the selected user from receiving
your presence

ECS UCS Client for Android Installation & User Guide
15 iss.1.2
4.5 Associated Feature Window
You can enter the Associated Feature Window after selecting a member in the presence list or the search
result list. From Associated Feature Window you may select ‘Make A Call’ to place a voice call to the
selected contact, send SMS, initiate IM for online contacts, send Email, or view detail contact information
(Detail Information). In addition, for offline contacts, you may leave a note.
The following describes menu items available:
Make a Call – places a call to the selected contact
SMS – sends an SMS to the selected contact
IM – starts IM to the selected contact
Email – sends an Email to the selected contact
Leave A Note – leaves a note to the selected offline
contact
Detail Information – opens the selected user’s detail
information window
Add – add the member into the presence members. (only for
the member from shared search result)
NOTE: ‘Make A Call’ and ‘SMS’ menu is shown when the member’s phone status is available
‘IM’ menu is shown when the member’s IM status is online.
‘Leave A Note’ menu is shown when the member’s IM status is offline.

ECS UCS Client for Android Installation & User Guide
16 iss.1.2
5 Phone
5.1 Voice Call
In this chapter, it explains for call specific features as follows:
- Basic feature like as making and answering a call
- Advanced feature like as Group Call, Conference Room, and SMS.
5.1.1 Simple Mode
1. Making a call
The user can make a call by directly pressing digit keypad and
Call button on mode.
Alternatively, UCS mobile client shows the presence member
information that includes the entered numbers on the list by real-
time search and then the user can make a call by pressing Call
button with the numbers
NOTE: UCS mobile client supports the making a call function in
other tab as well as in phone tab.
At this time, UCS mobile client operates the function to simple
mode by default.
2. Answering a call
When a call arrives, UCS mobile client appears a separate ringing
screen that displayed the number, name, picture for caller with ring sound.
At this time, the user can answer a call by pressing Answer button.
3. Hang up a call
The user can end a call for dialing, ringing, and connected call by pressing Hang-up button.
NOTE:
- If the user presses phone tab, UCS mobile client displays the simple mode by default.
- The user can change the mode through the Option menu.
- In simple mode, there is no hang-up button. If you want to hang-up the call, you can go to phone mode

ECS UCS Client for Android Installation & User Guide
17 iss.1.2
to hang-up
5.1.2 Phone Mode
In phone mode, UCS mobile client supports all iPECS system specific features available with desktop type
IP phone except for a few features.
(Please refer to the iPECS system or IP phone user manual for the relevant features)
NOTE: In phone mode, the user can’t request video call, but the user can accept video call.
5.1.3 Advanced Features
1. Group Call
This is the feature that makes a call from UCS mobile client to several users simultaneously.
In order to use this feature, the device connected to PBX should be installed.
To start a group call:
Step 1. Option menu -> select Group Call
Step 2. Enter the number for group call member and press Search icon.
Step 3. Select the members in the one of four places below
A. Presence

ECS UCS Client for Android Installation & User Guide
18 iss.1.2
B. Shared
C. (Android) Contact
D. Direct input
Step 4. Show the selected member in the list.
Step 5. Press the OK button.
Step 6. Start a group call in phone mode
NOTE: The user can’t add member on group call.
2. Conference Room
In order to use this feature, the device connected to PBX should be installed.
Conference Room Status Icon
: Conference room is created, but there is no one in the room.
: Conference room is created, and there is someone in the room
To enter the Conference Room:
Step 1. Option menu -> select Conference Room
Step 2. It shows the Conference Room status, number and joined member count.

ECS UCS Client for Android Installation & User Guide
19 iss.1.2
Step 3. Select the Conference Room that you want to join, and enter the password.
Step 4. Enter the Conference Room in phone mode.
NOTE: UCS mobile client doesn’t support the Conference Room create/delete feature.
3. SMS
The user can send the internal or external SMS to other internal/external users.
To start SMS, press Option menu and select SMS.
5.1.4 Add-ons Features
When the user is busy, UCS mobile client supports the add-ons features as follows;
A. Transfer
B. IM
C. Video Call
D. Mute
E. Speaker

ECS UCS Client for Android Installation & User Guide
20 iss.1.2
5.2 Video Call
The UCS Client for Android uses a camera and application to implement real-time video
communications over an IP-based network.
5.2.1 Video Call Screen
In this chapter, the detail about video call screen of UCS Client
for Android will be introduced.
There are two video images. One is user’s camera preview image
and the other one is peer-side video image. The camera preview
image is displayed when front camera of mobile device starts to
send video image. If there is problem using front camera, video
call will be disconnected and user will be asked to close video call
screen.
The peer-side video image is played after receiving video image
from peer-side. It could take several seconds to display video
image in the beginning of video call, due to network condition,
such as video packet losses and packet delay.
The UCS Client for Android would be asked to close video
window in the middle of video conversation in case it fails to receive complete video images within a
certain time it permits.
There is text box that shows peer-side information. If there is information about peer-side such as
phone-number/user name, it is displayed on that text box.
In this call screen mode, three function buttons are available such as muting mike, speakerphone mode
and video pause/start. The “Muting Microphone” and “Speakerphone Mode” are same function with
that in voice call mode, while the function of “Video Pause/Start” only applies to video image. The
detail will be described in the next chapter.

ECS UCS Client for Android Installation & User Guide
21 iss.1.2
5.2.2 Video Pause / Video Start
During the video call you can pause sending your video image there is 2 ways to use this function. The
first way is clicking “Video Pause” toggle button. This function is also used when video call screen
disappears. For example, if you click “Home” button (video screen disappeared), sending your video
stops. The specific usage of this function will be described below.
To pause sending my video image
1. Click “Video Pause” toggle button.
2. The camera preview image will be changed to default
picture image
3. The video image from peer-side on peer-side device
displays paused video image or default image.
The opposite function of “Video Pause” is “Video Start”. It restarts sending video image after “Video
Pause” function is used. The specific usage of this function will be described below.
To restart sending video image
1. Click “Video Start” toggle button
2. The default picture image will be changed to camera
preview image.
5.2.3 Mic Mute / Speaker Phone Mode
In video call screen, “Mic mute” function and “speakerphone” function are available as same as in
voice call screen. The way of using these functions is also similar with the way in audio call screen.
The specific usage of this function will be described below.
To mute microphone (same function in voice call mode)
1. Click “Mute” toggle button which is black color.
2. The microphone will be MUTED and this button text
color will be changed to green color
To disable mute microphone (same function in voice call mode)
1. Click “Mute” toggle button which is green color.
2. The microphone will be UNMUTED and this button text color will be changed to black color

ECS UCS Client for Android Installation & User Guide
22 iss.1.2
To turn speaker phone on (same function in voice call mode)
1. Click “Speaker” toggle button which is black color.
2. The speakerphone will be turned ON and this button text
color will be changed to green color.
To turn off speaker phone (same function in voice call mode)
1. Click “Speaker” toggle button which is green color.
2. The speakerphone will be turned OFF and this button text color will be changed to black color.
5.2.4 Hangup Video Call
The video call is disconnected in two cases. The user can disconnect video call by clicking “Hang-up”
button. In this case, voice call is disconnected at the same time. In the second case, if peer-side user
(UCS Client for PC/Phonetage/some IP-Phones) disconnects only video call with connecting voice call
and then the UCS Client for Android also disconnects video call. After that, the video screen disappears
and it goes back to the voice call screen. In this case, the video call can be connected again. The
specific usage of this function will be described below.
To disconnect video call
1. Click Hang-up button
2. “Video call” and voice call are disconnected at the same time.
NOTE: The UCS Client for Android disconnects video call when the network condition is not stable
enough to use video call. But the voice call is still connected.
5.2.5 Landscape Mode
The UCS Client for Android supports
landscape mode for video call screen. To
use this mode, “Auto-rotate screen”
setting option should be set up. After that,
user’s mobile device should be rotated
BEFORE starting video call. If “Auto-
rotate screen” setting option is not checked,
the video call screen will be in portrait
mode that is normally default setting value
of mobile device.

ECS UCS Client for Android Installation & User Guide
23 iss.1.2
NOTE: The UCS Client for Android does not support changing view mode (portrait/landscape) while
video call has been already connected although “Auto-rotate screen” setting option is enabled.

ECS UCS Client for Android Installation & User Guide
24 iss.1.2
6 IM
IM (Instant Messaging) is an IP-based real-time communication service for text information. You can
create and send a message to other UCS Client users in the IM session. Other users can create and send
responses as they desire.
An IM session can be created as an ad-hoc session in order to chat with several members.
NOTE:
- You must be online to initiate, be invited to or join an IM session.
- UCS Mobile client supports only the text.
- UCS Mobile client does NOT save any chatting contents at all.
6.1 IM List Tab
IM List Tab displays the list of IM Session containing name and date & time.
If there is new arrived IM, Icon of IM List Tab will change to new message icon so that user can
check new IM easily.
If user starts IM with others or the other user initiates IM for you,
IM List will be updated and you can enter the IM session
Also you can simply back from the other function to the IM
session through IM List Tab.
To close each IM Session, you just select the close icon .
The following describes options menu items:
Close All – Close all IM session in the IM List Tab.
NOTE: IM List will be cleared after logout.

ECS UCS Client for Android Installation & User Guide
25 iss.1.2
6.2 IM Window
With the IM window displayed, you can send and receive messages
with text.
For an ad-hoc session, once an IM window is opened, additional
participants may be added using ‘Add A member’ from the IM options
menu. Up to 6 users can simultaneously participate in an ad-hoc
session.
The following describes options menu items:
Show the Attendees – show the list of attendees.
Add Member – add member for Ad-hoc IM
Show Main Window – move to the main window directly
Close IM – close the IM session immediately

ECS UCS Client for Android Installation & User Guide
26 iss.1.2
7 Logs
The Logs window is the log of UCS services used by the UCS Client. The log identifies the service type,
name of connected party and time the service was employed.
NOTE: If more than 200 records are stored, the oldest log will be deleted automatically as the maximum
log is limited to 200.
NOTE: In phone mode, the conference call and the speed dial don’t leave call logs.
7.1 Logs Tab
Logs Tab shows the number of new message displayed in “( )” by the type.
You can see the log list according to the log type selected.
Selecting the Voice Mail lets you access your voice mail server.
If you have multiple Voice Mail servers and you should select
appropriate server.
If there is new arrived message, missed call, Voice Mail, or Admin
message, Icon of Logs Tab will change to new message icon so
that user can check new message easily.
The following describes Logs type:
- missed call
- Incoming call
- Outgoing call
- Voice mail
- SMS
- Note
- IM
- Admin message

ECS UCS Client for Android Installation & User Guide
27 iss.1.2
7.2 Logs List
The Logs List displays the information about the name or number
and date & time
You can immediately reply to the member corresponding to the
selected log touching the shortcut icon.
The following describes options menu items:
View Logs – select view option sorting with logs type.
Delete – Delete the log checked
7.3 Logs Detail Information
You can see the detail information of the selected log and run the
other functions. Also you can delete the log selected.
Logs Detail Information includes the Service Type, Name,
Date&Time, and Contents.
To run associated features:
1. Select the ‘Others icon’.
2. Select the feature you want to run when the Associated
Feature window is shown
To delete the log selected:
1. Select the ‘Delete icon’.

ECS UCS Client for Android Installation & User Guide
28 iss.1.2
8 Settings
The Setting menu provides a number of items to configure the UCS Client information and status, and
other characteristics discussed in this section. When Setting is selected in the main menu, the Setting
menu will be displayed.
ECS UCS Client for Android Installation & User Guide
29 iss.1.2
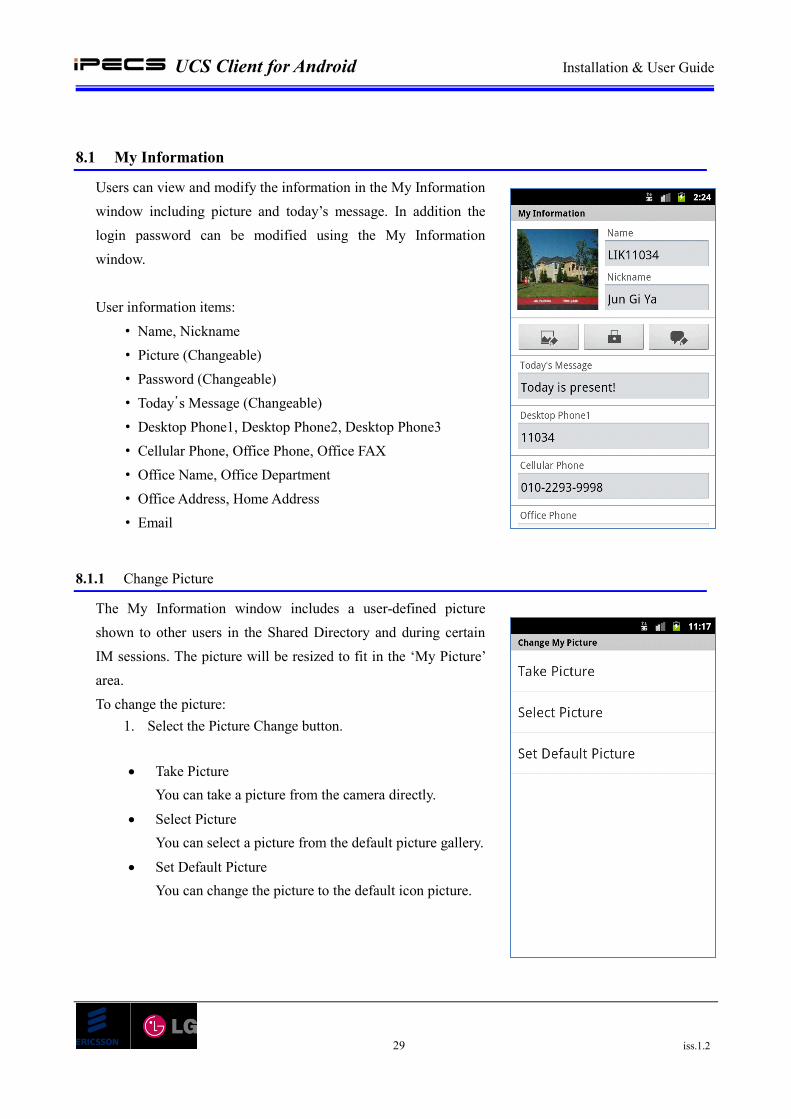
8.1 My Information
Users can view and modify the information in the My Information
window including picture and today’s message. In addition the
login password can be modified using the My Information
window.
User information items:
• Name, Nickname
• Picture (Changeable)
• Password (Changeable)
• Today’s Message (Changeable)
• Desktop Phone1, Desktop Phone2, Desktop Phone3
• Cellular Phone, Office Phone, Office FAX
• Office Name, Office Department
• Office Address, Home Address
8.1.1 Change Picture
The My Information window includes a user-defined picture
shown to other users in the Shared Directory and during certain
IM sessions. The picture will be resized to fit in the ‘My Picture’
area.
To change the picture:
1. Select the Picture Change button.
Take Picture
You can take a picture from the camera directly.
Select Picture
You can select a picture from the default picture gallery.
Set Default Picture
You can change the picture to the default icon picture.

ECS UCS Client for Android Installation & User Guide
30 iss.1.2
8.1.2 Change Password
The UCS Client sends the User ID and Password to the iPECS
system and UCS Server during login to authenticate the client.
The password can be changed from the My Information window
or from the UCS Server Web Admin. To change your password
in the My Information window:
1. Select Change Password; the Change Password dialog
window displays.
2. Enter the current password.
3. Enter and retype the desired password in the New
Password and Confirm Password boxes.
4. Select OK to save the change.
NOTE: Password length should be longer than or equal
to the minimum password length which is set by UCS
Administrator.
8.1.3 Change Today’s Message
Users can write a message to display to other UCS clients.
To post your message:
1. Select Change Today’s Message; the Change
Today’s Message dialog window displays.
2. Enter the today’s message.
3. Select OK to save the change.

ECS UCS Client for Android Installation & User Guide
31 iss.1.2
8.2 IM Presence
Presence establishes your availability to be part of an Instant Messaging session. iPECS UCS Server
monitors and automatically updates your Presence as Online, Busy. Away, Be Right Back, Out of Office
or In a Meeting. The presence of other users is also provided in the Presence window. Your status is
displayed by the IM Status icon, which is located on the tap-based main menu icons. You may change
the status with the IM Presence selection in the Settings menu.
To change the UCS Client IM status:
1. Select IM Presence in the Settings menu.
2. Select the IM status (presence) desired from the status window.
ECS UCS Client for Android Installation & User Guide
32 iss.1.2
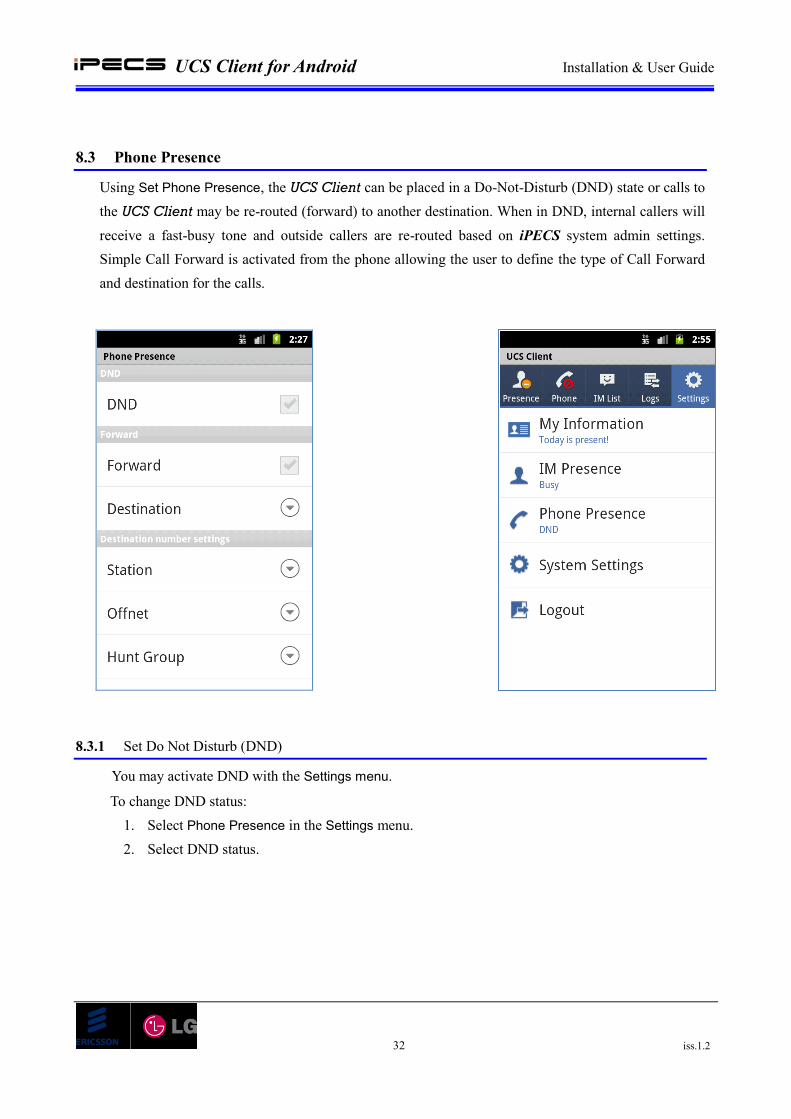
8.3 Phone Presence
Using Set Phone Presence, the UCS Client can be placed in a Do-Not-Disturb (DND) state or calls to
the UCS Client may be re-routed (forward) to another destination. When in DND, internal callers will
receive a fast-busy tone and outside callers are re-routed based on iPECS system admin settings.
Simple Call Forward is activated from the phone allowing the user to define the type of Call Forward
and destination for the calls.
8.3.1 Set Do Not Disturb (DND)
You may activate DND with the Settings menu.
To change DND status:
1. Select Phone Presence in the Settings menu.
2. Select DND status.
ECS UCS Client for Android Installation & User Guide
33 iss.1.2
8.3.2 Set Simple Call Forwarding
You may select to re-route incoming calls to other stations, station groups, the system Voice Mail,
or over CO/IP resources.
To activate Call Forward:
1. Select Phone Presence in the Settings menu.
2. Set destination number.
3. Select destination.
4. Set IM Presence condition.
5. Check the checkbox for Forward to activate Call Forward.

ECS UCS Client for Android Installation & User Guide
34 iss.1.2
8.4 System Settings
System Settings is the feature that the user determines the choice
when using the UCS mobile client as follows;
Dialing Rule
Call Option
Search Base
LDAP Server
Notification
Automatic Re-login
Version
The user can be accessed through Option Menu in Account Screen
or Settings tab.
Depending on Login state of the UCS mobile client, the items of
System Settings may be limited.
8.4.1 Dialing Rule
When the user tries to make a call through the UCS mobile client,
should be separated station and trunk call and should be dial after add
or delete Country/Area code according to Country/Area.
For trunk call, the user should make a call referring to CO Access,
PBX, Area, Country, International Call code and so on.
Dialing Rule is the function to register and edit the codes.
Each code value and its meaning is as follows,
1. CO Access code: the code for occupying CO line
2. PBX code: the code for using when the CO line of iPECS
system connects to other PBX.
3. Country code: the code for separating with own Country
code in standard phone number type
4. Area code: the code for separating with own Area code in
standard phone number type
5. International call: Business identification number for
international call
6. Long Distance call: the code for long distance call
7. Add a Zero Digit: the option for whether add a zero digit before the Area/Mobile code without

ECS UCS Client for Android Installation & User Guide
35 iss.1.2
zero digit when dialing within the country or not.
8. Advanced/Special Dialing Rule: Advanced/Special rules for changing the dialing number
when make a call.
8.4.2 Call Option
The Call Option should be set to use some features of iPECS system
connected with UCS mobile client.
The Option is as follow,
Enable/Disable IP Bridge
Codec Selection
- System Codec
- G.711
- G.729
Audio Setting Mode
- Manual Setting
- Automatic Setting
Manual(Automatic) Setting
NOTE: IP Bridge Enable must be set before UCS mobile client is
logged in UCS server.
8.4.2.1 Audio Setting Mode
The user can select Audio Setting Mode between Manual Setting and
Automatic Setting.
If Manual Setting is selected, the user can set each audio setting
manually.
If Automatic Setting is selected, audio setting is set automatically by
value which is received from UCS server.
UCS server administrator can set each audio setting according to
mobile phone model or each user.
The Settings is set as follow for each phone mode(Earpiece/Earphone
and Speaker phone mode).
Noise Suppression : reduce noise in the microphone signal
- Disable NS
- Low Suppression

ECS UCS Client for Android Installation & User Guide
36 iss.1.2
- Moderate Suppression
- High Suppression
- Very High Suppression
Automatic Mic Volume : adjust the microphone signal to an appropriate level
- Disable
- Enable
Echo Control : eliminate or mitigate the echo(The remote participant hearing their speech
repeated back to them)
- Disable EC
- Quiet earpiece/headset
- Most earpiece
- Loud earpiece/Quiet speakerphone
- Most speakerphone
- Loud speakerphone
- Normal Echo Suppression
- High Echo Suppression
- Echo Attenuation
8.4.3 Search Base
It is the place where user selects ‘Search Base’.
Shared
(Android) Contacts
LDAP
NOTE: Default setting is logged is Shared and Contacts.

ECS UCS Client for Android Installation & User Guide
37 iss.1.2
8.4.4 LDAP Server
The user can choose one of several LDAP servers registered in
UCS server when user is online.
NOTE: UCS server administrator should set LDAP setting in UCS
server to use this setting.
Advanced Setting
The user can verify the contents setting by LDAP server
administrator.
If you need to change the contents of the Advanced Settings, please
contact your server administrator.
8.4.5 Notification
The user can assign or select the setting items as follow,
Station Ring Sound
CO(Trunk) Ring Sound
Message Notification Type
- Notification in the system's status bar
- Pop-up
- Vibrate
- Sound
Notification Ringtone for new message

ECS UCS Client for Android Installation & User Guide
38 iss.1.2
8.4.6 Automatic Re-login
The user can enable/disable Automatic Re-login function.
If Automatic Re-login function is enabled, UCS mobile client tries to re-login automatically via Wi-Fi
network when network is available.
8.4.7 Phone Version
The user can show the installed version of UCS mobile client.
8.5 Logout
To logout, the user can select the Logout in the Settings menu or can
select the Back button in the main menu.

ECS UCS Client for Android Installation & User Guide
39 iss.1.2
9 Message
9.1 Short Message Service (SMS)
Internal SMS is for internal users. All terminals including UCS Client, Phontage and Ericsson-LG IP
Phone can send and receive text messages.
Fixed Line SMS is for the external users. The Fixed Line SMS board should be installed for the User to
send and receive Fixed Line SMS. Fixed Line SMS should be enabled by System Administer of System
To send a text message:
1. Select SMS Icon from the Associated Feature window or
Phone options menu.
2. Select the Internal radial button to send to other iPECS users.
OR
3. Select the Fixed Line radio button to send an external SMS.
4. Select the Add icon to add directly OR
5. Select the Search icon to search the destination member and
then add the member from the Search results window
6. Enter the message in the Message area, maximum 80
characters.
7. Press the Send button, the status of sending result will be
shown in the receiver list.
To receive a text message:
1. Select the log of SMS in the Logs list.

ECS UCS Client for Android Installation & User Guide
40 iss.1.2
9.2 Note
Leave a Note is the function of leaving message for the offline users.
To leave a Note to an offline contact:
1. Select ‘Leave a Note’ Icon from the Associated Feature
window.
2. Enter your note in the Leave a Note window, maximum 100
characters.
3. Select send icon to send the Note.
4.
To read a Note:
1. Select the log of Note in the Logs list.