U Build Rods – RodKits Fishing Rod Building Manual
38
U Build Rods – RodKits Fishing Rod Building Manual Building a sustainable environment
Transcript of U Build Rods – RodKits Fishing Rod Building Manual

U Build Rods – RodKits Fishing Rod Building Manual
Building a sustainable environment

U Build Rods RodKits Fishing Rod Building Manual pg. 2
Contents
RodKits - An Introduction ................................................................................................................................ 3
Health and Safety ............................................................................................................................................ 3
Getting Started – Whats Required ................................................................................................................... 4
Tools Required: .................................................................................................................................................. 4
Material Components Required: ........................................................................................................................ 5
Optional Tools that make Rod Build a breeze .................................................................................................... 7
Lesson 1 - Unboxing the Kit .............................................................................................................................. 8
Lesson 2 - Finding the Spine ............................................................................................................................. 9
Lesson 3 - Installing the Butt Cap, Rod Handle and Reel Seat ......................................................................... 12
Lesson 4 - Installing the Rod Tip ..................................................................................................................... 18
Lesson 5 - Placing the Guides ......................................................................................................................... 19
Lesson 6 - Setting up Your Work Area and Preparing Your Guides ................................................................. 23
Lesson 7 - Wrapping the Guides ..................................................................................................................... 26
Lesson 8 - Aligning the guides and Prepping for epoxy................................................................................... 35
Lesson 9 - Applying the Epoxy Coat ................................................................................................................ 36

U Build Rods RodKits Fishing Rod Building Manual pg. 3
RodKits - An Introduction
The RodKits Fishing Rod Building Manual aims to provide a comprehensive instruction on rod
building methods and techniques. With the focus on a traditional hands on approach students will
cover all the fundamental aspects of building a fishing rod from the RodKit components and these
skills can also be applied to the repair of existing fishing rods.
This manual follows and fulfils all the criteria for the Australian Curriculum Unit Standard
SISOFSH314A Construct and repair fishing Rods - Element 2 Construct a Rod and element 3 Repair a
fishing Rod. For more information on Unit Standards and Lesson Plans please see our website
www.RodKits.com.au.
On completion of the course students will take unique skills relative to a thriving industry and a
quality hand built fishing rod.
Health and Safety
Health and Safety is paramount and the last thing we want is someone getting injured while
completing this course. We have taken measures to insure the course is safe and enjoyable for
everyone but this does not mean it is without risk. Please follow our safety guidelines and eliminate
risk wherever possible.
While completing this course you will use some chemicals that are outside the control of U Build
Rods. Whenever chemicals are involved please follow the manufacturer’s safety guides explicitly. If
you have any queries or concerns regarding the safety of this course or the composition of the
products we use please do not hesitate to contact us.
Building a fishing rod is safe but please do take care and follow all safety guidelines.
We recommend always working in an appropriately ventilated area and please wear the appropriate
personal protective equipment whenever possible.
Safety First!
When you see this sign please follow the safety guidelines.

U Build Rods RodKits Fishing Rod Building Manual pg. 4
Getting Started
Building a fishing rod involves unique techniques and therefore unique tools to get the job done.
Here is what you will need to complete the course.
Tools Required:
Butane Burner or high heat source For melting the thermal glue
Rod Stands Holds the Rod Blank during construction
Bobbin Holder Holds the thread bobbin and creates tension in the thread.
Thread Scissors or sharp blade For cutting thread during wrapping.
Burnishing Tool For tightening and finishing the wraps.
Dryer + Dryer Stands Rotates the rod during the epoxy curing process.
Alcohol Burner Removes epoxy bubbles.
File or Grinder Filing down guides prior to wrapping

U Build Rods RodKits Fishing Rod Building Manual pg. 5
Material Components Required:
Arbor Tape Used for creating arbors, marking the rod and in wrapping the guides.
Chinagraph Pencil Non-permanent pencil used for marking the rod blank. Easy to see and easy to clean.
Epoxy Kit For fixing the handle assembly and coating the wraps Includes 2 part epoxy and fumed silica
Methylated Spirits For cleaning Epoxy
Sand Paper For scoring blank prior to installing handle
Mixing Cups Mixing epoxy
Mixing Sticks Mixing and applying epoxy
Measuring Syringe x 2 For measuring epoxy parts
Sable Brush For applying clear coat epoxy to guide wraps.

U Build Rods RodKits Fishing Rod Building Manual pg. 6
Thermal Glue For gluing the rod tip
Metallic or coloured wrapping thread For creating unique or advanced wraps
Cleaning Rags For cleaning epoxy

U Build Rods RodKits Fishing Rod Building Manual pg. 7
Optional Tools that make Rod Build a breeze
Spine Finder An easy to use tool used for finding the spine of a blank with 100% accuracy.
Electric Epoxy Mixer For mixing epoxy perfectly without bubbles
Guide Holder A fantastic tool for holding the guides while wrapping
Permanent Market or Indelible Ink Pen Creating permanent writing or markings on the rod
Braid Pull Through Loop for tying off tag end of each wrap
U Build Rods RodKits Fishing Rod Building Manual pg. 8
Lesson 1 - Unboxing the Kit
Each RodKit will contain all the components you need to build a fishing rod. Each kit should contain
the following components:
Rod blank This is the main structural element of the fishing rod, made from T24 Carbon
Butt Cap Sits on the butt of the rod protecting the carbon blank from damage.
EVA grips x2 Foam tubes that become the handles / grips for the fishing rod
Reel Seat Sits between the fore and rear grip and acts as a seat for attaching a reel to the fishing rod
Rod Guides - #25, #16, #12, #10, #8, #6 The rod guides carry or guide the fishing line. Double coated black stainless steel with titanium oxide shock rings.
Rod Tip Acts as a guide for the tip of the rod – tip can also be wrapped like a guide.
Thread Used for wrapping the rod guides to the blank.

U Build Rods RodKits Fishing Rod Building Manual pg. 9
Lesson 2 - Finding the Spine
In this lesson we will find and mark the spine of the rod.
Components used in this lesson:
Rod Blank
Tool and Materials used in this lesson:
Tape
Chinagraph Pencil
Spine Finder
All fishing rod blanks today are manufactured by wrapping the rod material around a steel mandrel.
This will produce a hollow tube. It is near impossible to produce a perfect tube as the overlaps and
joins in the material create unevenness in the wall of the blank. This results in a soft side and stiff
side commonly referred to as the spine of the blank. Think of the spine like your backbone. You have
a lot more strength bending straight forward than you do to the side.
All fishing rods have a spine, some can even have more than one. There should always be one that is
more defined than the others. Some store bought rods are not built on spine and by building on
spine we are building a better quality better performing rod. A rod that is built on spine will have the
most lifting power, will last longer and cast further.
On a two piece or multi piece rod you must locate the spine on each piece. Steps: 1. Using the Traditional Method:
1.1. Place some tape around the rod blank and stick the two ends together to make a kind of flag. This is used as an indicator so you can see how the blank is turning.
1.2. With one hand support the top of the rod and hold it at about a 30 degree angle to the ground/table where you are working.
The fishing rod can hold a lot of tension when it is bent. Wear eye protection. Be
aware of your surroundings and those standing near you in case you lose control
of the rod

U Build Rods RodKits Fishing Rod Building Manual pg. 10
1.3. With your other hand apply some pressure onto the blank about 1/3 of the way up and using your fingers twist or turn the rod. You should feel the blank pop into a position that it is hard to twist or turn out of. This is the spine of the blank. Repeat the process a few times to make sure you have found the strongest or most pronounced spine (the hardest to twist out of.)
1.4. The outside of this curve is the spine of the blank. Make a mark on the inside of the curve
using either tape or a chino graph pencil
We mark the inside of the curve (opposite of the spine) because we are building a spinning rod. All the guides and reel seat will align with the inside of the curve therefore it makes sense to
mark there.
1.5. Because you are building a 2 piece rod you need to repeat the process with both pieces of the blank. The process is identical.
2. Using a U Build Rods Spine Finder 2.1. Insert one end of the rod blank through the spine finder. 2.2. Support the spine finder on a table or insert into a holder. 2.3. Apply some pressure to the end of the blank and turn in your fingers and it will roll into the
natural curve 100% accurate. 2.4. The outside of this curve is the spine of the blank. Make a mark on the inside of the curve
using either tape or a chino graph pencil
Figure 2-1 Finding the Spine

U Build Rods RodKits Fishing Rod Building Manual pg. 11
It is always good practice to repeat the process a few times to ensure that you have found the most
pronounced spine.
If you are building a casting rod (overhead reel) the rod guides will go on the opposite side i.e. the outside of the curve or on the spine.
Figure 2-2 Using a Spine Finder

U Build Rods RodKits Fishing Rod Building Manual pg. 12
Lesson 3 - Installing the Butt Cap, Rod Handle and Reel Seat
In this lesson we will complete the handle assembly be installing the EVA grips and reel seat using
epoxy paste.
Components used in this lesson:
Rod Blank
Butt Cap
EVA grips
- Bottom Grip 9” (180mm)
- Fore Grip 4” (100mm)
Reel Seat
Tool and Materials used in this lesson:
Tape
Chino graph Pencil
Handle Kit Epoxy with Epoxy Filler
Mixing Cup, Measuring Syringes and Mixing Sticks
Methylated Spirits
Rags
Sand Paper
Different fisherman prefer different handles on their rods. Fishing Rod builders have to determine
the correct type of grips for the rod they are building and what their clients require. There are many
different types of grips, some longer, shorter, split grips or even out of different materials like cork.
Notes on Epoxy:
We will be using UBR Handle Kit Epoxy Paste a high quality slow cure epoxy that creates a very
strong bond flexible between the blank and components. The bond will is completely waterproof and
flexible giving the user a responsive feel through the handle.
Steps:
1. Build Rod Map
1.1 From the bottom end of the rod, the thickest end of the blank, line up the butt end, rear
grip, reel seat and fore grip in that order and make a mark at the top end of the fore grip.
This is the total length of the handle assembly.

U Build Rods RodKits Fishing Rod Building Manual pg. 13
1.2 Using 100 grit sand paper, sand the blank the length of the handle assembly. Sand the blank
on a 45 degree angle backwards and forwards to create a diamond pattern. Don’t sand too
roughly just enough to score the surface. Sanding increases the surface area of the blank
and provides a better key for the epoxy.
1.3 Clean surface with a rag and Methylated Spirits to remove any sanding dust.
2. Fitting the Butt Cap to the blank.
2.1 Try and push the butt cap onto the bottom end of the blank. If it is a nice snug fit you can
proceed with the next step.
2.2 If the butt cap is loose on the end of the rod blank we need to build up the thickness by
adding an arbor using 18mm arbor tape. This involves wrapping the tape around the rod
blank until the but cap fits snugly but not so much that it’s hard to push it on. Once you
have a snug fit leave the butt cap on the blank and proceed with the next step.
3. Fitting the Bottom Grip or Rear Grip. (The Longer Grip)
3.1 Check the rear grip on the blank. If there is movement between the grip and the blank and
you can slide it on and off easily without any resistance we need to build up the thickness of
the rod blank using arbors. (Like step 2.2).
3.2 Leave about a 5mm gap from the butt cap and wrap enough arbor tape around the rod
blank so that there is resistance when you try and slide the grip back over it. (Not so much
that it is hard to push it over.)
3.3 Pull the grip back off and start your next arbor about 10mm up the blank from the last one.
The gaps between the arbors are where the epoxy bonds the blank and the grip.
3.4 Repeat this process until the arbors support the full length of the grip. See figure 3-2 below.
4. Mixing UBR Handle Kit Epoxy Paste
4.1 Add 2 parts of A (4 millilitres) with 1 part of B (2 millilitres) to a mixing cup. This should be
enough to complete the rear handle and butt cap.
4.2 Add approximately 1 heaped teaspoon of fumed silica powder to the mix.
4.3 Stir thoroughly for 5 minutes with a stirring stick.
4.4 Working time is approximately 30mins at 25°C
Figure 3-1 Mark Rod Map

U Build Rods RodKits Fishing Rod Building Manual pg. 14
Please refer to the UBR Ultra Clear Safety Data Sheet for complete safety
guidelines when using UBR Ultra Clear Epoxies.
Please wear appropriate personal protective equipment.
4.5 Check the mix. If it is stiff enough to stick to the stirring stick without dripping it is good. If it
is a bit runny add a small amount of fumed silica until it is the right consistency.
5. Glue Rear Grip and Butt Cap
We glue the rear grip and butt cap before proceeding because the reel seat arbors are larger
than the rear grips hollow and it cannot be fitted after the reel seat arbors are on the blank.
5.1 Apply the mixed handle kit epoxy paste to the end of the rod blank up to the first arbor for
the rear grip and the inside of the butt cap.
5.2 Push the butt cap into place and clean off any excess glue with methylated spirits.
5.3 Apply the mixed handle kit epoxy paste to the gaps between the tape arbors for the rear
grip. Don’t forget the area above the top arbor.
5.4 Make sure the gaps are completely filled with epoxy.
Epoxy on top of the tape will not provide any adhesion between the handle and the blank
only the epoxy in the gaps between arbors achieves adhesion. The arbors are only there to
centre the component.
5.5 Once the gaps are filled, coat the inside of the grip with some Methylated Spirits.
While blocking one end of the grip with one hand pour some methylated spirits in the other.
Block both ends of the grip and shake the grip for a few seconds. Discard any excess meths
from inside the grip. This helps the EVA grips to slide over the arbors.
Figure 3-2 Rear Handle Arbors

U Build Rods RodKits Fishing Rod Building Manual pg. 15
5.6 Now slide the grip in a smooth motion without stopping down the blank until it butts up
against the butt cap.
5.7 Clean off any excess glue from the blank/grip with methylated spirits.
6. Fitting the Reel Seat. The reel seat sits above and butts into the rear grip. The threaded hood
should point down the rod.
6.1 Fitting the reel seat is the same as the rear grip. Build up your arbors for the length of the
reel seat. Usually the reel seat arbors are much larger than the handle so just keep
wrapping until you get a snug fit.
7. Fitting the Fore Grip or Front Grip
7.1 Fitting the fore grip is the same as the rear grip. Build up your arbors for the length of the
fore grip.
8. Glue Reel Seat and Fore Grip
8.1 Tape each end of the reel seat to protect the thread and hoods from epoxy and making
clean up easier.
8.2 Repeat step 4 and mix up some more handle epoxy.
8.3 The gluing process is the same as for the rear grip. Repeat this process for the reel seat and
fore grip. The reel seat does not need its hollow coated with methylated spirits before
sliding on. This is only necessary for the EVA material.
Figure 3-3 Reel Seat Arbors

U Build Rods RodKits Fishing Rod Building Manual pg. 16
8.4 Remove tape and Clean off any excess glue from the blank, grip and reel seat with
methylated spirits.
IMPORTANT! – Before the Epoxy Hardens
9. Align Reel Seat to the Spine.
9.1 Turn the reel seat until the centre of the hoods aligns with the mark we made when finding
the spine.
Figure 3-4 Reel Seat and Fore Grip Arbors
Figure 3-5 Align Reel Seat

U Build Rods RodKits Fishing Rod Building Manual pg. 17
Remember - on a spin rod the hoods will be the inside of the natural curve of the blank or the
opposite side of the spine (which should be where you made the mark when finding the
spine). On casting rods with overhead reels the reel seat hoods will be on spine or on the
outside of the natural curve of the blank.
The threaded hood on the reel seat will usually point down towards the butt of the rod.
Wait until the handle kit epoxy paste has completely dried (24 hours) before proceeding with the
rod build.

U Build Rods RodKits Fishing Rod Building Manual pg. 18
Lesson 4 - Installing the Rod Tip
In this lesson we will attached the rod tip to the tip of the rod
Components used in this lesson:
Rod Blank
Rod Tip
Tool and Materials used in this lesson:
Thermal Glue
Butane Burner or Heat Source to melt thermal glue.
Looking down the blank from the butt, affix the tip so it sits in line with the hoods on the reel seat.
Because you are using a 2 piece blank it would be a good idea to join the blanks together and align
the spine by using your marks before aligning the rod tip to the reel seat.
Steps:
1. Heat the end of the thermal glue using a butane burner until you see the adhesive begin to
melt / soften.
We recommend heating the thermal glue with the butane burners supplied by U Build Rods. A
heat gun will not get the thermal glue hot enough safely. Heating the thermal glue with a lighter
or similar is possible but there is the risk of falling hot glue as you will need to heat it from below.
Using a lighter can also contaminate the thermal glue.
When using thermal glue be careful. Always work in a well ventilated area.
Thermal glue when heated can burn and is very sticky. If you get hot glue on you
treat it as a burn and flush immediately with water.
Keep heat sources away from flammable objects and be sure to completely
extinguish and flames.
2. Apply a liberal amount of the melted glue to the tip of the blank so it is completely covered
all the way around.
3. Try to apply some glue to the inside of the pipe end of the rod tip.
4. Push the rod tip onto the end of the blank.
5. Align the tip with the marks you made when finding the spine
6. If you don’t manage to align the tip before it hardens, reheat and adjust as needed. You can
apply heat directly to the rod tip to do this.
Thermal Glue supplied by U Build Rods is a high heat glue stick specifically designed for
adhering the rod tip. It will not soften in sunlight and has high adhesion. Should the tip be
damaged it can be easily removed and replaced without compromising the strength of the
blank.

U Build Rods RodKits Fishing Rod Building Manual pg. 19
Lesson 5 - Placing the Guides
In this lesson we will discover and mark the position of each of the guides on the rod.
Components used in this lesson:
Rod
Guides
Tool and Materials used in this lesson:
For Rod Recipe:
Chinagraph Pencil
Rod Recipe
Tape measure
For Calculating the Guide Spacing
Chinagraph Pencil
Rod Holder
Tape or Guide Holders
Spin Reel + Line
Rod Recipe
Tape measure
Correct placement of the guides is critical to building a better performing rod. Guides in the correct
position distribute the load evenly across each guide and throughout the rod. Incorrect placement of
the guides means there will be undue stress on some guides and not enough on others. It will also
create more friction on the fishing line and guide rings themselves. This will effect overall
performance and casting.
UBR RodKits come with a rod recipe so there is no need to conduct step 5.2, but if you would like to
further your knowledge of rod building and have the time it is encouraged.
5.1 Using a Rod Recipe to determine Guide Spacing
Using the Rod Recipe is very easy. All measurements are made from the tip of the rod with the tip
installed. The Rod Recipe will look like the following. 108 - 269 - 440 - 637 - 897 - 1225. Do not use
these measurements they are only an example. Use the Rod Recipe supplied with your RodKit. These
are the measurements in millimetres from the tip down the rod to the centre of each guide ring.
Steps
1. Measure down from the tip of the rod the first measurement. (Example 108mm.) Mark this
point on your rod blank using a chinagraph pencil or tape. This will be the position of the
centre of the first guide ring.
2. Measure down from the tip of the rod the second measurement. (Example 269mm.) Mark
this point on your rod blank using a chinagraph pencil or tape. This will be the position of the
centre of the second guide ring.

U Build Rods RodKits Fishing Rod Building Manual pg. 20
3. Continue this process for the entire recipe.
5.2 Guide Spacing Process – If using the rod recipe skip this step.
To determine the guide spacing you will need to fit a reel into the reel seat (spin reel for this
example). Fix the largest guide (stripper) then feed the line through all the guides and rod tip. Apply
pressure to the line to produce a bend in the rod and position the guides so that they all create an
equal angle in the line.
Creating equal angles along the line means the load will be spread evenly across all guides.
Steps:
1. Place a spin reel on the reel seat.
2. Measure the total length of the rod and divide this by 3. Tape the stripper 1/3 of the way up
from the butt end. Ensure the foot of the guide is pointing down the blank towards the butt.
For a two footed guide ensure the larger foot is facing down the blank.
Remember we are building a spin rod so the guides will go on the inside of the curve if we were
building an overhead or casting rod the guides would go on the outside of the curve
3. Now feed some line from the reel and thread it through the stripper. Now thread the rest of
the guides on the line from largest to smallest (foot pointing down the blank) and finally
through the rod tip.
4. For this step you need put the rod under pressure and create a 90 degree bend (critical
angle). Mount the rod in a rod holder at an angle of 45 degrees. Attach the line to a weight
and position it so that the line is bending the rod to form a 90 degree angle. See figure 5.2.
The fishing rod can hold a lot of tension when it is bent. Wear eye protection. Be
aware of your surroundings and those standing near you in case the rod flicks up
or the line holding the rod breaks or comes loose.
Figure 5-1 Measuring Guide Position

U Build Rods RodKits Fishing Rod Building Manual pg. 21
Please note the 45 degree angle does not have to be exact.
5. Move the guides up and down the blank, fixing each to the blank using a guide holder or
tape, until the deviation angle in the line created by each guide is the. The angle on the
stripper (closest guide to the reel seat) and the next guide are usually slightly larger it just
depends on the action of the rod. See figure 5.3 – Good Spacing. You can see the curve of
the line follows the “perfect curve” of the rod. The Angle A – B – C and angle B – C – D
should be approximately 15 degrees.
6. The RodKits 6’8” foot rod has 6 guides plus a tip. When under load the line should create
about a 15 degree angle as it crosses the guide. See figure 5.3. Once all the angles are equal
the load is spread evenly across each one.
7. You can now mark the position of each guide using a chinagraph pencil before removing.
Please study Figure 5.3 Good Spacing and Figure 5.4 Bad spacing. As you can see in Figure 5.3 the
line follows the red “perfect curve” much more closely than Figure 5.4. In Figure 5.4 Bad Spacing the
angle B – C – D is more than angle A – B – C therefore spacing needs to be reduced and or more
guides added. In this situation there would be a lot more pressure on Guide C.
Figure 5-2 Critical Angle for Guide Spacing

U Build Rods RodKits Fishing Rod Building Manual pg. 22
Figure 5-4 Bad Spacing
Figure 5-3 Good Spacing

U Build Rods RodKits Fishing Rod Building Manual pg. 23
Lesson 6 - Setting up Your Work Area and Preparing Your Guides
In this lesson we will assemble our stands and set up our rod wrapping area
Components used in this lesson:
Guides
Thread
Tool and Materials used in this lesson:
File or Grinder
Safety Glasses
Bobbin holder
Rod Stands
Glue, Epoxy or Screw and Drill
We need to prepare our guides and bobbin for wrapping. Your work area for wrapping the guides is
also very important. The work area can be set up for standing or sitting but it is important that you
are comfortable at your work area.
Steps:
1. Preparing the Guide for Wrapping
When wrapping the guides we need to wrap our thread up onto the foot of the guide. A guide
with a blunt foot makes this much harder. By filing the end of the guide foot to a point we make
the wrapping process so much easier.
1.1 Using a file or grinder, file a ramp on the end of the guide foot. Try not to damage the guide
ring or frame in this process.
Figure 6-1 Guide before prep

U Build Rods RodKits Fishing Rod Building Manual pg. 24
When using power tools please use the appropriate Personal Protective
Equipment.
Always be aware of your surroundings.
1.2 Grind the ramp and the sides of the foot a little until you have a nice sharp point.
1.3 Check the underside of the guide and file off any burrs you may have created.
Figure 6-2 Prepared Guide
Figure 6-3 Guides Compared

U Build Rods RodKits Fishing Rod Building Manual pg. 25
2. Threading the bobbin.
2.1 Place your spool of thread into the bobbin holder
2.2 Take the end of thread and wrap it around one of the arms
2.3 Thread the thread up through the tube of the bobbin.
3. Setting up the Rod Stands:
3.1 Assemble your Rod Stands by attaching each base to its upright either with handle Epoxy or
by screwing them together.
If using the handle epoxy please allow 24hrs for the epoxy to dry before using the Rod Stands.
3.2 Place the stands on your work bench so that the uprights are approximately 500mm apart
and you want the edge of the base to line up with the edge of your workbench (or close to
it) This ensures that weight of the bobbin on the rod pulls as close to down as possible and
not pull it out of the stand.
3.3 Test your work area by placing a blank in the stands and adjust the height if necessary. You
will spend a lot of time in this position so make sure it is comfortable.
Figure 6-2Threaded Bobbin

U Build Rods RodKits Fishing Rod Building Manual pg. 26
Lesson 7 - Wrapping the Guides
In this lesson we will wrap each of the guides onto the rod.
Components used in this lesson:
Rod
Guides
Thread
Tool and Materials used in this lesson:
Rod stands
Tape
Guide holder
Bobbin holder
Thread scissors or blade
Burnishing tool
Pull through
Wrapping the guides (also known as binding the guides) is an integral part of the rod building
process. This not only binds the guides onto the rod but also is where most rod builders get to add
their own personal touch to their rods. There are a number of different bind or wrap styles to create
unique looking wraps. In this course we focus on a basic single colour wrap. If you are interested in
other types of wraps please see the Advanced Lessons section of the course.
Steps:
1. Wrapping the Guide
1.1. Place your rod in the Rod Stands ready for wrapping.
1.2. Make sure the foot of the guide is pointing towards the butt of the rod. Align the guide to the
reel seat hoods. Using your spacing from lesson 5 fix your guide into position using either a
UBR Guide Holder or a thin piece of tape. Perfect alignment is not essential. You will realign
the guides in the next lesson.
When taping the guides on try and use a thin strip of tape so that a large portion of the foot is
still available to wrap.
For a two footed guide ensure the larger foot is facing down the blank.
1.3. Looking at the guide you are ready to wrap, tape the end of the thread to the right of the
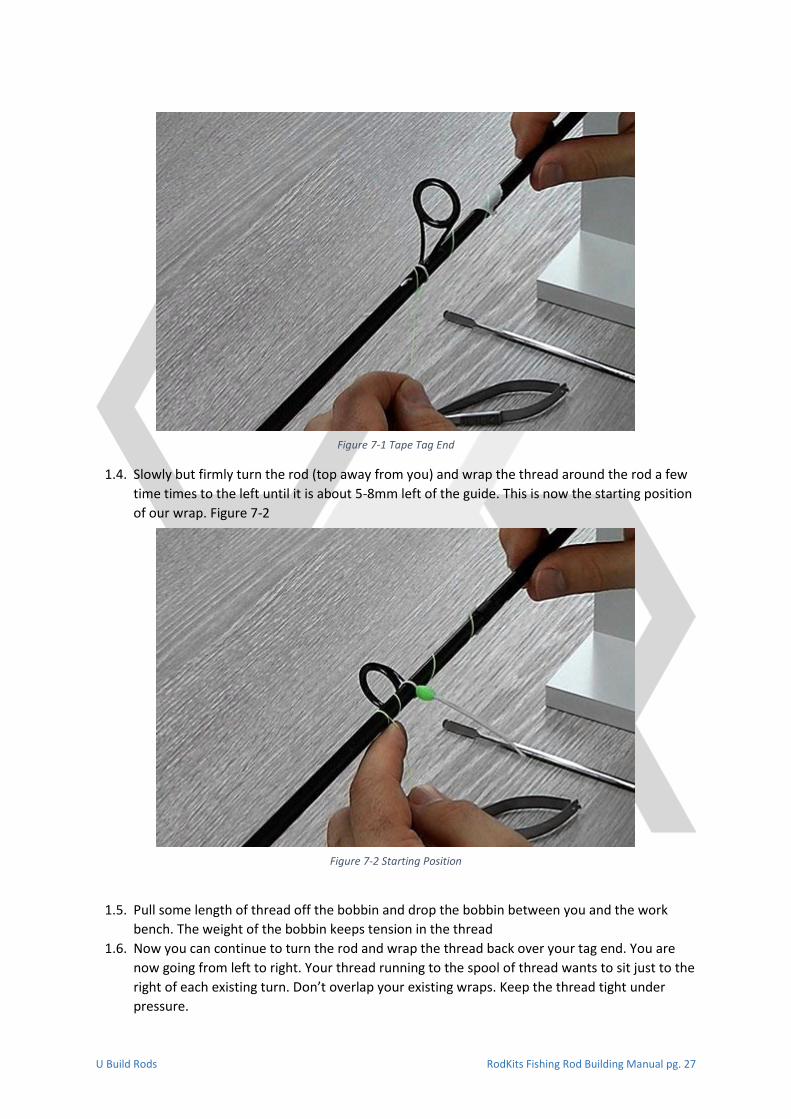
guide. This thread will end up being the tag end and will get cut off. Figure 7-1
U Build Rods RodKits Fishing Rod Building Manual pg. 27
1.4. Slowly but firmly turn the rod (top away from you) and wrap the thread around the rod a few
time times to the left until it is about 5-8mm left of the guide. This is now the starting position
of our wrap. Figure 7-2
1.5. Pull some length of thread off the bobbin and drop the bobbin between you and the work
bench. The weight of the bobbin keeps tension in the thread
1.6. Now you can continue to turn the rod and wrap the thread back over your tag end. You are
now going from left to right. Your thread running to the spool of thread wants to sit just to the
right of each existing turn. Don’t overlap your existing wraps. Keep the thread tight under
pressure.
Figure 7-1 Tape Tag End
Figure 7-2 Starting Position
U Build Rods RodKits Fishing Rod Building Manual pg. 28
When wrapping you will need to “feel” the right pressure or tension in the thread. If you apply the
right pressure and hold the thread just slightly angling back (to the left). You should be able to get a
nice tight wrap.
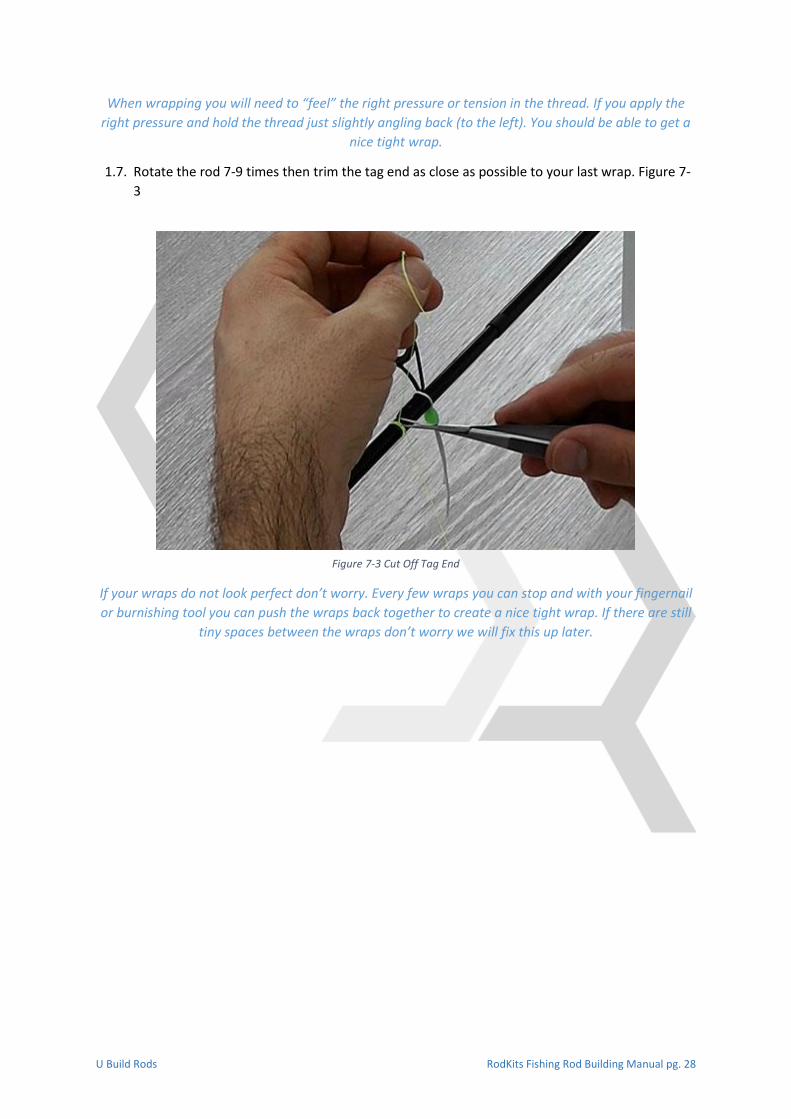
1.7. Rotate the rod 7-9 times then trim the tag end as close as possible to your last wrap. Figure 7-
3
If your wraps do not look perfect don’t worry. Every few wraps you can stop and with your fingernail
or burnishing tool you can push the wraps back together to create a nice tight wrap. If there are still
tiny spaces between the wraps don’t worry we will fix this up later.
Figure 7-3 Cut Off Tag End

U Build Rods RodKits Fishing Rod Building Manual pg. 29
1.8. While wrapping if you notice any gaps appearing stop and with your fingernail or burnishing
tool push the threads back together - right to left. This will tighten up the bind and remove the
gap.
1.9. Keep wrapping up along the rod. Continue up onto the foot of the guide until the guide is
secure.
1.10. Once the guide is secure you can now remove the guide holder or tape. Figure 7-4
1.11. Continue wrapping until you are about 3mm from the leg, or base, of the guide foot.
2. Finishing the Wrap
2.1. Using a braid pull through – Tuck it up under your thread and tape it to the rod up above the
guide (to the right of the guide). The tape helps keep in place while wrapping. Figure 7-5
Figure 7-4 Remove Guide Holder
Figure 7-5 Insert Braid Pull Through

U Build Rods RodKits Fishing Rod Building Manual pg. 30
U Build Rods suggests using a braid pull through as they are stronger and thinner than the wrapping
thread. It will be easier to pull back through and there is less risk of the pull through breaking and
needing to unwind to place a new pull through. Alternatively to a braid pull through you can use a
piece of thread. Cut about a 20cm length and tie it into a loop and use in place of a braid.
2.2. With the pull through in place continue wrapping until you have bound the entire foot of the
guide.
IMPORTANT: Do not wrap up the leg. This creates a large gap underneath the thread which
compromises the quality of the wrap and can lead to excess water intrusion and there is more chance
of the wrap becoming loose and needing to be replaced.
2.3. While keeping the thread on the rod under tension. Cut the thread about 10cm from the last
wrap. This end of thread will be called the tag end. Do not release the tension or the wrap
may unwind. Figure 7-6
For these steps it is good to work on the top or opposite side to the guide so it can’t get in your way.
Figure 7-6 Cut Tag End

U Build Rods RodKits Fishing Rod Building Manual pg. 31
2.4. Apply pressure with one finger to the end of your wrap so it does not unwind. While keeping
pressure on the wrap you can now release pressure on the thread and insert the end into the
right hand loop of the braid pull through. Figure 7-7
2.5. You are now going to pull the braid pull through back (to the left) under the wraps which will
take the tag end of the thread with it. Once again apply tension to the tag end of the thread so
you can release your finger from the wrap. While keeping tension on the tag end you can
slowly pull the pull through back underneath the wrap (to the left). Make sure the pull
through is nice and square to the wraps and doesn’t have any twists in it or it may not pull
through smoothly. Figure 7-8
Figure 7-7 Thread Pull Through
Figure 7-8 Pulling out Pull Through

U Build Rods RodKits Fishing Rod Building Manual pg. 32
2.6. Once the pull through comes out from under the wrap keep pulling the tag end until it is
completely through and the wrap is quite tight.
2.7. Pull the tag end with a good amount of pressure directly up away from the wrap. Using your
thread scissors cut the tag end as close to the wrap as possible. Figure 7-9
If you are suing a blade to cut the thread. Use the same process but hold the blade flat against the
wrap where the tag end comes out and pull the tag end back against the blade to cut it.
3. Burnishing the Wrap.
Figure 7-9 Trim Tag End

U Build Rods RodKits Fishing Rod Building Manual pg. 33
3.1. Using your burnishing tool place the flat part on the wrap and rub the entire wrap while
turning it slowly. You will notice this flattens out the wrap and gets rid of any small gaps.
The wrap for this guide is now complete.
4. Continue wrapping the next guide and complete with each guide on the rod.
5. Wrapping the ferrule
5.1. The ferrule of the blank is where the two blanks meet. Specifically it is the female part. To
strengthen this we wrap about 4cm up from the end of the female side of the join.
5.2. Start your wrap in the same way as you would if you were wrapping a guide just ignore the
fact that there is no guide.
5.3. Straighten up when you are about 1-2mm from the end of the blank.
Figure 7-10 Burnishing the Wrap

U Build Rods RodKits Fishing Rod Building Manual pg. 34
5.4. Continue wrapping about 4cm up the blank before finishing your wrap.
Figure 7-12 Finished Ferrule Wrap
6. Wrapping the Rod Tip
6.1. If the Rod Tip has a little tag you can also wrap the Rod Tip. This is for aesthetics only and is
optional.
Figure 7-11 Starting Ferrule Wrap

U Build Rods RodKits Fishing Rod Building Manual pg. 35
Lesson 8 - Aligning the guides and Prepping for epoxy
In this lesson we will make sure all the guides are aligned correctly ready for the epoxy coat.
Components used in this lesson:
Rod
Tool and Materials used in this lesson:
Rod Stands
The alignment of the guides is extremely important. Aesthetically you want the guides to align and
this will also produce a better performing rod. With the guides in a straight line there will be less
friction on the line. This will reduce wear and tear on the fishing line, improve overall casting
distance, minimizes wind knots when casting in windy conditions and overall puts less strain on the
rod and line.
There are a few different ways to align the guides. Some people use lasers, fishing line or just their
eyes. In this example you are going to use your eyes.
Steps:
1. Aligning the Guides
1.1 Connect the two pieces of the rod and sit it into the rod stands with the reel seat hoods
facing upwards (vertical).
1.2 Looking down the rod ensure that the rod tip is also vertical. Do this by turning the entire
top blank while holding the bottom blank still. This means the two parts are now aligned.
1.3 Look at the stripper (the guide closest to the butt) and see if it is vertical. If it needs aligning
gently twist or wiggle the guide into alignment. Repeat with each guide
1.4 Once you are happy with each guide have a look along the rod from the butt end and see if
any guides are out of alignment then adjust accordingly.
2. Cleaning Marks
2.1 Go over your rod from top to bottom and remove any marks that you don’t want to epoxy
over. Once the epoxy is on it it’s there forever.
The rod is now ready for the epoxy coat. Be careful with your rod now because you don’t want to
bump a guide out of alignment.
If you want to you can now add any more details to the rod that you like. You can add a graphic
decal to the rod or write something on it like a personalised signature using an Indelible Ink Pen. It is
ideal to do this before the epoxy coat so that you can also epoxy your additions to make them
durable and weather resistant.

U Build Rods RodKits Fishing Rod Building Manual pg. 36
Lesson 9 - Applying the Epoxy Coat
In this lesson we will need to set up the dryer and dryer stands. We will then apply the epoxy to all
the guide wraps, aesthetic wraps, decals and writing to the rotating rod.
Components used in this lesson:
Rod
Tool and Materials used in this lesson:
Dryer
Epoxy Kit
Measuring Syringes
Mixing Cup
Mixing Sticks
Powered Epoxy Mixer (optional)
Sable Brush
Alcohol Burner
Rod finishes are made from 2 part epoxy resins that give a crystal clear, pliable finish that will
protect the guide feet and their wraps and also add strength to the junction.
Some rod builders use a low build epoxy that requires multiple coats. The first coat will be applied
and left to dry (usually 24hrs) and then the next coat will be applied. You will be using a high build
epoxy. High build epoxies are applied in a single coat as they have much better coverage. Choosing a
high or low build epoxy comes down to preference and what you are trying to achieve with the rod
but for most situation a quality high build epoxy will suffice.
U Build Rods Ultra Clear Epoxy is a two component, solvent free, low viscosity protective coating
which gives an amazing finish and is extremely durable. It even has excellent curing, even at low
temperatures and high humidity.
Steps:
1. Setting up the Dryer
1.1. Once you have coated your rod it will need to remain in the rotisserie dryer for 2-3 hours so
it is imperative to set up your work area somewhere that it will not be disturbed.
1.2. Align the rod dryer with the rod dryer stands
1.3. Install the rod but into the rubber chuck on the dryer. Make sure it has a good firm fit. Then
lay the rod onto the rod dryer stands. Position the dryer stands, away from any guides that
will get epoxy coated, where it will support the entire rod in a steady position.
1.4. Turn the dryer on to make sure it works and is spinning smoothly. It should spin at about 8-
9 rpm.
2. Final Checks
2.1. It is good practice to now make a final check of the rod.
2.2. Re check the alignment of the guides.
Any marks that get coated in epoxy are there forever so make sure you double check everything and
remove any unwanted marks

U Build Rods RodKits Fishing Rod Building Manual pg. 37
3. Mixing the epoxy – These mixing instructions apply for UBR Ultra Clear.
Please refer to the UBR Ultra Clear Safety Data Sheet for complete safety
guidelines when using UBR Ultra Clear Epoxy.
Please wear appropriate personal protective equipment.
3.1. In your mixing cup add 2 parts of A (2 millilitres) with 1 part of B (1 millilitres) by volume in a
clean and dry mixing vessel. This should be enough to complete your wraps.
3.2. Insert a mixing ball and attach the mixing cup to your UBR Mixer for 5 minutes OR...
3.3. Stir thoroughly for 5 minutes using mixing stick. Scrape the edges of the mixing container to
ensure complete and thorough mixing has been achieved. Keep your movements slow and
the stirrer touching the bottom of the mixing cup. Stirring too quickly can introduce
unwanted bubbles into the mix.
WORKING TIME – Approx. 30 minutes at 25°C
U Build Rods recommends using a UBR Mixer to mix the epoxy. Using a UBR Mixer ensures perfectly
mixed epoxy. Inaccurate and or incomplete mixing may give inferior performance.
4. Applying the Epoxy
4.1. Turn on the dryer and make sure the rod is turning smoothly
4.2. Dip your brush into the mixed epoxy and scrape off the epoxy on the side of the mixing cup.
This will help remove some of the bubbles. The brush is now ready to apply to the rod.
U Build Rods recommend the use of a quality UBR sable brush. A quality brush will improve your
finish and you won’t spend time removing bristles from your coating. Brushes can be cleaned and
reused.
4.3. Dip your brush again this time being careful not to get any bubbles and apply it to the
bottom of the wrap (towards the butt of the rod).
4.4. Ideally you want to go about 0.5 - 1mm past the bottom of the wrap and create a clean
straight edge. To do this use a steady hand and just move the brush into position and let
the turning of the rod do all the work.
Take your time and don’t apply too much epoxy at a time. You do not need to paint the epoxy on. You
should just be moving the epoxy around using the brush to create an even coating and let the epoxy
spread itself.
4.5. Continue applying epoxy up the wrap until you get to the leg of the guide.
4.6. At the top of the guide you also want to go past about 0.5 - 1mm and create a straight clean
line.
4.7. At the top of the guide there will also be a gap between the foot, wrap and rod. It is crucial
to apply some epoxy into this gap. See figure 9-1. This will help prevent any water intrusion.
4.8. If any bubbles have appeared in the coating you can remove these with the alcohol burner.
Simply heat the epoxy and this will remove the air bubbles.

U Build Rods RodKits Fishing Rod Building Manual pg. 38
U Build Rods recommend the use of an alcohol burner as it produce a clean flame with no
contaminants and doesn’t produce soot. Using a lighter can “blacken” the finish. Using a heat gun
can blow dust into the finish.
When using an alcohol burner be careful. Always work in a well ventilated area.
Keep heat sources away from flammable objects and be sure to completely
extinguish any flames.
4.9. Once you are satisfied with the coating move on to the next wrap and so on.
4.10. If you applied any decals, additional wraps or writing do not forget to completely
coat them with epoxy also.
4.11. Once everything is coated leave your rod to rotate in the dryer for 3 – 4 hours. The
epoxy will remain tacky for the first 6 hours and will only completely cure after 24hrs so be
gentle with your rod.
Drying times are relative to a temperature of 25°C. Please refer to the manufacturer’s instructions for
alternate drying times.
Congratulations you have completed building your first fishing rod.
Figure 9-1 Gap needing epoxy