
Tweet dominator user manual new
29
User manual User manual User manual User manual User manual User manual User manual User manual User manual User manual User manual User manual User manual User manual User manual User manual User manual User manual User manual User manual User manual User manual User manual User manual User manual User manual User manual User manual Tweet Dominator User Manual 16/05/2012 Twt dominator support team
description
Tweet dominator user manual new
Transcript of Tweet dominator user manual new

User manual User manual User manual User manual User manual User manual User manual User manual User manual User manual User manual User manual User manual User manual User manual User manual User manual User manual User manual User manual User manual User manual User manual User manual User manual User manual User manual User manual User manual User manual User manual User manual User manual User manual User manual User manual User manual User manual User manual User manual User manual User manual User
Tweet Dominator
User Manual
16/05/2012
Twt dominator support team

2
Twt Dominator as the name suggests, it’s an application which will dominate the Tweeter marketing operations, that we use to do manually. Account creation, updating profiles, Follower, Un follow, Tweet, Re-tweet, Account checker, delay & reply etc can be done in fraction of seconds.
Twt Dominator will act as a BOT, once the profile details for each user has been uploaded in the respective format, it will start the process.
*for ignoring mouse scrolling just place the mouse cursor an specific content which you want to watch and press Ctrl+left click.
Contents
1. Account Creator.......................................................................................................................3
2. Profile Manager……….…………………………………………………………………………………………………………….5
3. Follower..................................................................................................................................7
4. Tweet......................................................................................................................................9
5. Account checker....................................................................................................................12
6. Un follower............................................................................................................................13
7. Wait n Reply..........................................................................................................................14
8. Scrape Users…………………………………………………………………………………………………………………………..
9. Tweet Creator…………………………………………………………………………………………………………………………
10. Fake Email Creator…………………………………………………………………………………………………………………
11. Manual videos..………………………………………………………………………………………………………………..14

3
1. Account Creator
In order to create the Accounts, we need to upload the Names, User Name, and the Email ids with passwords. Upon uploading them, it will go to web browser and will start creating the accounts; In fact we can see the progress in Logs section.
Image 01
To Create Account :-
1. To create account in twitter we need a name, a username and email id with Password. We need same to create accounts here.
2. To upload names Used this Format , each new name in new line as shown in image
Name

4
3. To upload Usernames Used this Format , each new name in new line as shown in image Username
4. To upload Emails Used this Format, each email id n password in a new line separated with colon (password must be of email used so that account can be verified) as shown in image.Email: password
5. When we create twitter id’s it asks for capctha. To solve capctha we use Death By Capctha. Check Box “Death By capctha” to solve capctha by DBC.
6. Enter DBC Details in Setting Window from menu as shown below

5
7. Enter DBC Username and DBC Password in the Text as shown in image above.8. The Details will be stored in the Database . So that next time you can use it directly
no need to enter again.
9. Use Proxies to create Accounts. There are two types of proxies used Public Proxies : - Check on “Use Public Proxy” to use public proxies. Private Proxies : - Check on “Use Private Proxy” to use private
proxies.

6
10. Use Fake Email’s to create twitter Accounts. Check Fake Email Creator to create Twitter Accounts from Fake Email Id. If there are no fake emails it will redirect you to Fake Email Creator tab you can create new Fake Emails see in image above.
11. Set threads to start creating no of accounts simultaneously, enter number of accounts you want to start together. Please do not use a very large number it may slow down the Process. Number of thread will be between 7 to 10.
12. Click “Start Account creation “ To start the Account creation Process.13. Progress can be seen in Log in Account Creator tab.14. After Account are created they are stored in Database and in text file located on
Desktop->TwtDominator->SuccessfulCreatedAccounts.txt
15. Twitter Accounts created From Fake Email Accounts Could not be verified so those Accounts will be stored in
Desktop->TwtDominator->NonEmailVerifiedAccounts.txt
16. To fill accounts details in accounts, Upload accounts from menu in My Accounts.
17. To upload accounts in database, use “Load Accounts” to upload twitter account in the database. Loaded Accounts can be seen in the grid view on the Window. The uploaded data can be use to create profiles, follow, un-follow, tweet, re-tweet i.e. wherever we need twitter accounts. Load Accounts Must Be in Format
Email:Password OrEmail:Password:ProxyAddress:ProxyPort Or
7
Email:Password:ProxyAddress:ProxyPort:ProxyUsername:ProxyPassword
18. To Use New Accounts Clear the Existing Accounts with “Clear Accounts”. Accounts are removed from the grid view on the Window as shown above.
19.To remove Proxies from the Existing Accounts use “Clear Proxies” only the proxies from the accounts will be removed.
20. To Get Accounts which are being used in the Process Use “Export Account”, select a text file all the loaded accounts will get stored in the text.
2.Manage Profile:- After Account creation, created Accounts can be created using “Profile Manager”. We just upload accounts from menu > my accounts > load accounts.

8
1. Upload your Profile Picture using “Pics Folder”, Upload a Folder Containing photos with .jpg and .gif extensions as shown above.
2. To set your profile use “Profile Folder”, upload an Folder Containing with text File Relating as shown above.ProfileLocations.txt -> Setting Location to your Twitter Account in format each new location in new line.ProfileUsernames.txt -> setting new Username to your Twitter Account in this format : each new Username in new line.ProfileURLs.txt -> setting new Url To your twitter Account in format each new url in new line.ProfileDescriptions.txt -> setting description to your twitter Account in this : format each new description in new line.
3. Click “start” To Start Profile Editing.
4. Click “stop” To Stop Profile Editing.
3. Follower :-
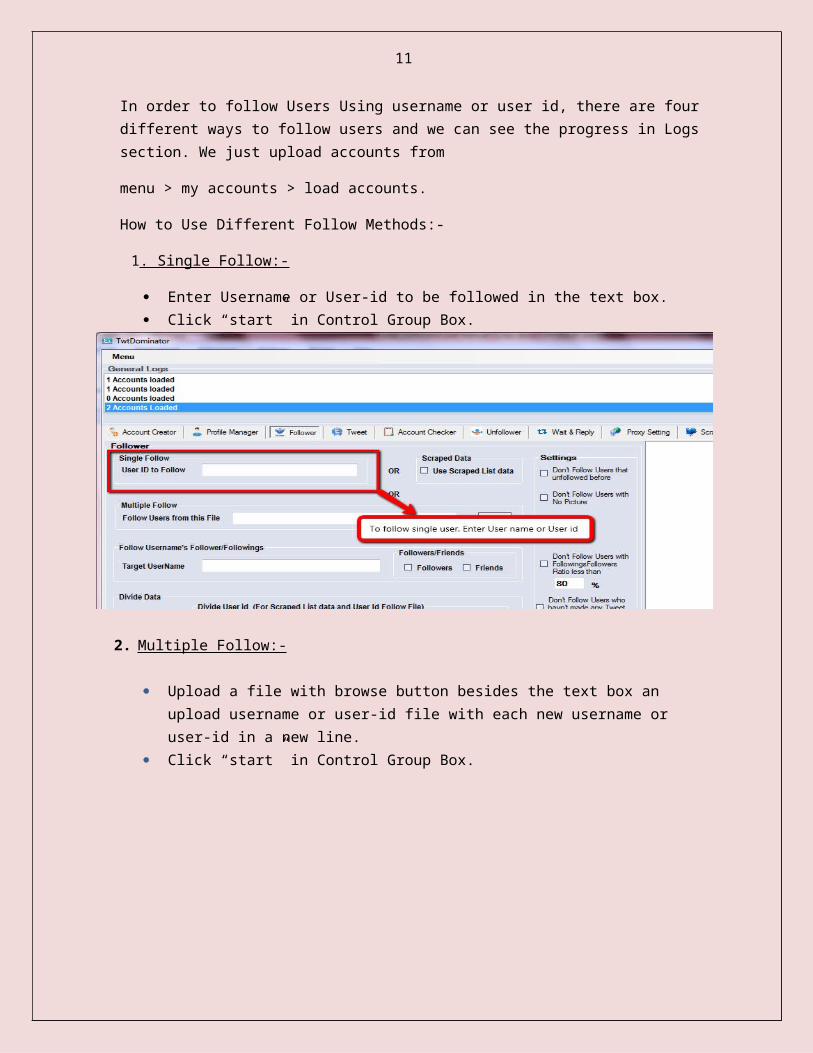
In order to follow Users Using username or user id, there are four different ways to follow users and we can see the progress in Logs section. We just upload accounts from
menu > my accounts > load accounts.
How to Use Different Follow Methods:-

9
1. Single Follow:-
Enter Username or User-id to be followed in the text box. Click “start” in Control Group Box.
2. Multiple Follow:-
Upload a file with browse button besides the text box an upload username or user-id file with each new username or user-id in a new line.
Click “start” in Control Group Box.
3. Scraped data:-
If you want to use scrape data , check “Use Scrape List Data” to get data. After you check “Use Scrape List Data” if it does not have scraped data it will
redirect you to tab “Scrape Users”, where you can scrape data. Click “start” in Control Group Box.

10
4. Follow Username's Follower/Followings:-
Enter a Username or user-id in the textbox and check “Follower” or “Friends” or both to follow them.
Click “start” in Control Group Box.
There are various setting that can be used to set your follow data:-
Settings :- Use the below image to refer to setting data.
Don't Follow Users with No Picture : - If you check “Don't Follow Users with No Picture”, Usernames or user-id that have been loaded or scraped will be
11
processed and those user-id or usernames with no profile picture will not be followed.
Don't Follow Users with too many links on Tweets :- being worked upon. Don't Follow Users with Followings/Followers Ratio less than :- If you check
“Don't Follow Users with FollowingsFollowers Ratio less than” the users who have followers/following ratio less than the % entered in the text box below check box.
Don't Follow Users who haven't made any Tweet for :- If you check “Don't Follow Users who haven't made any Tweet for” the users who haven’t made tweet for the entered number of days in the text below the check box.
Delay :- Delay is used to stop Following Process for some seconds. To Enter Delay Enter minimum numerical value in First Text Box and maximum numerical value in Second Text. It will take a random value between these two values and stop process for those seconds.
Follow Count :- Follow Count is the Number of users to be followed for a single Account.

12
Thread Setting: - Set the No of Threads to start Those No of Accounts Together.
Divide Data :- Divide Data we divide data between Different accounts so that each account follows limited no of accounts. We can divide data in 2 different types:-
a) Divide Equally :- We divide total no of follow username or user id equally to number of uploaded accounts.
b) Divide Given By User :- We divide According to the Number given by the User to each Account. Enter the Number of accounts in text besides the radio Button.
Scheduler:- Schedule data to be followed later at a given time. Perform operation necessary to be done to do follow i.e. load accounts , add
usernames or user-ids Set time to start the follow process in the date-time box to start the follow process. Click on “Schedule Later”. As task will be scheduled ,open window
Menu->Scheduler You see your task scheduled in Scheduler window, Click “Start” on the Window. Please don’t close Window of task scheduled.

13
4. Tweet :-
Following two different features include in this module:
(A) Tweet: Tweet a message to the account.(B) Re Tweet: Re Tweet other’s tweet to your account.(C) Reply : Reply on the Tweets on your account.
(a) Tweet
We just upload accounts from menu > my accounts > upload accounts Upload your tweets in txt file with each tweet in a new line. Enter number of thread and click “start tweeting”. To stop the process click “Stop” in Tweet Group Box.
(b) Re –Tweet
We just upload accounts from menu > my accounts > upload accounts Enter the Keyword to search tweets on. Click “Start ReTweeting”. To stop the process click “Stop” in ReTweet Group Box.
(c) Reply

14
We just upload accounts from menu > my accounts > upload accounts Upload your reply in txt file with each reply in a new line. Enter Keyword to find tweets on. Enter the No of Replies per Re-tweet Click “Start Replying” to start reply. To stop the process click “Stop” in ReTweet Group Box.
5. Account checker :-
This feature can help to check tweeter account status that account is active or not.
Upload the file with username or User-id to check accounts are active or not. We can see the progress in Logs section. After process completion the data will be stored in text
Desktop->TwtDominator->Existing User IDs.txt

15
6. Un follower :- Un-Follow has two types of details
(i) Unfollow those Not Following :- If You Select this option then it will unfollow those from your account who are
not following you back. If you check the check box “Not Followed Back in” it will un-follow those
whom you have followed and they have not followed you back in number of days mentioned in the text box besides the check box “Not Followed Back ”.
Enter the number to users to be un-followed Use delay if you want to have delay between two un-follow processes.
Unfollow Random:- If You Select this option then it will randomly un-follow those people who are following you or may not be following you.

16
7.Wait n Reply:- Wait n reply module helps you in replying on the tweet.
We just upload accounts from menu > my accounts > upload accounts Upload your “Reply Message file” in txt file with each reply in a new line.
Upload your “Tweet file” in txt file with each tweet in a new line.
Enter Keyword to find tweets on or Upload your “Keyword file” in txt file with each keyword in a new line.
Enter the No of Tweets per Reply i.e. after Suppose 4 tweets there will be one reply on the keyword reply.

17
Set an interval in the text so that there is an interval between two different tweets and reply i.e randomly a time will be selected which will be within your set interval.
Click “Start Replying” to start reply. To stop the process click “Stop” in ReTweet Group Box. Check box “Spintak” is used to spin text i.e. create various text from the format.
(Hey|hi|Wasssup), how are you (today|now)Which will give text as -
Hey , how are you , today I am Hi , how are you now
Set Number of threads to start no of Tweets n Reply together.

18
7.Proxy Setting:- Proxy Setting is to assign Proxies to accounts and create accounts. We can see the progress in Logs section
A. Public Proxy:-a) Upload text file with Public Proxy in format
ProxyAddress:ProxyPortb) If you click “Test” the Proxies will be tested and then stored in the database.
c) If you check on “Import Without Testing” all the proxies will be stored in the database.
d) Number of threads to check proxy will run proxy in the number of threads entered.
e) To Clear Proxies from Database click “Clear Public Proxies from Database”.

19
B. Private Proxy:-a) Upload text file with Public Proxy in format
ProxyAddress:ProxyPort:ProxyUsername:ProxyPassword.
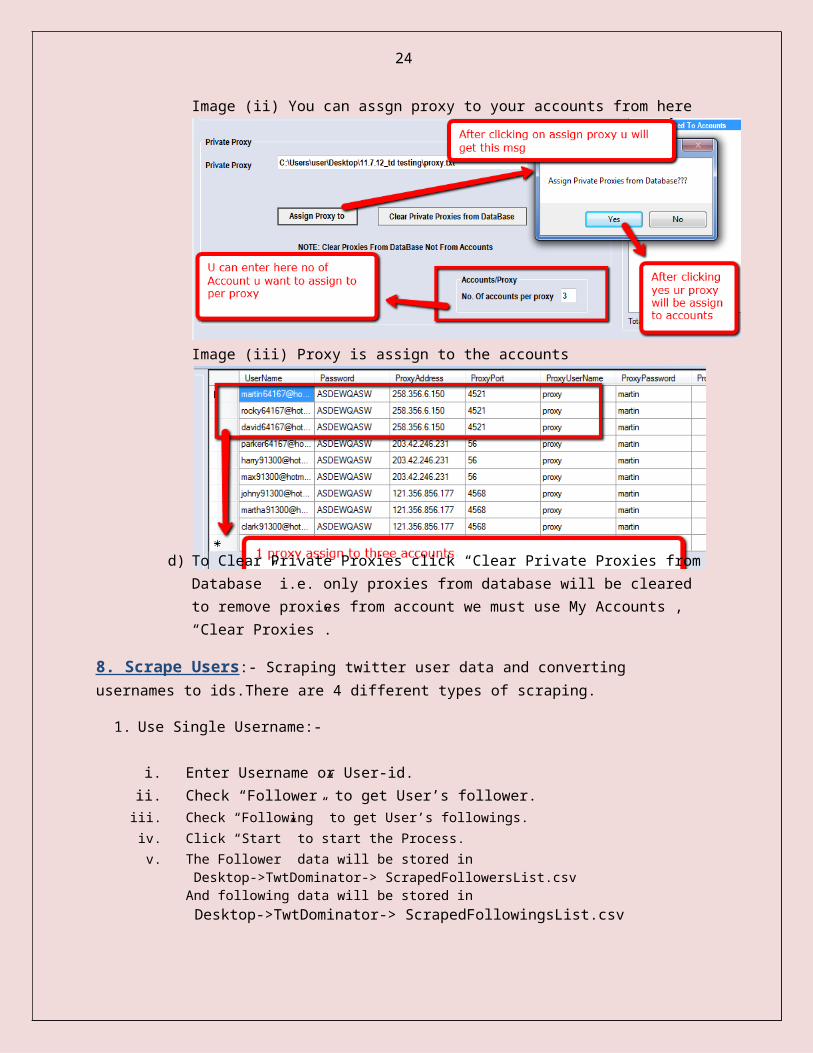
b) To Assign Private Proxies to the Uploaded Accounts Use “Assign Proxy To”.c) Enter number of Proxies to be assigned per account in the Accounts/Proxy
group box. Please check images for more detailsImage (i) Accounts Uploaded in my accounts.
Image (ii) You can assgn proxy to your accounts from here
Image (iii) Proxy is assign to the accounts

20
d) To Clear Private Proxies click “Clear Private Proxies from Database” i.e. only proxies from database will be cleared to remove proxies from account we must use My Accounts , “Clear Proxies”.
8. Scrape Users:- Scraping twitter user data and converting usernames to ids.There are 4 different types of scraping.
1. Use Single Username:-
i. Enter Username or User-id.ii. Check “Follower” to get User’s follower.iii. Check “Following” to get User’s followings.iv. Click “Start” to start the Process.v. The Follower data will be stored in
Desktop->TwtDominator-> ScrapedFollowersList.csvAnd following data will be stored in
Desktop->TwtDominator-> ScrapedFollowingsList.csv
2. Use Username List :-i. Upload Username List File which contains username or userids.ii. Check “Follower” to get User’s follower.iii. Check “Following” to get User’s followings.iv. Click “Start” to start the Process.vi. The Follower data will be stored in
Desktop->TwtDominator-> ScrapedFollowersList.csvAnd following data will be stored in
Desktop->TwtDominator-> ScrapedFollowingsList.csv

21
3. Scrape By Keyword :-i. Enter a keyword for which you need to tweets of.ii. Enter no Of tweets you want to get.iii. Click “Start” to get Tweets.iv. The data will be stored in
Desktop->TwtDominator-> KeywordScrapedList.txt
4. Username>>User-id :-i. Upload a txt file with username’s , each username in a new line.ii. It will start converting username to user id.iii. After you click the you get a message box which will ask if you want to store data in a
new place if yes then new file with “.csv” or “.txt” extension will be selected and data will be stored. If no then default place is Desktop->TwtDominator-> ScrappedUserIds.csv
9.Tweet Scraper:- Tweet Scraper has two parts one which create tweets other one which extract tweets of others. These are the following two parts:-
i. Tweet creator:- a) Upload tweet file in “Message Input File” in format
(Hey|hi|Wasssup), how are you , (today|now)b) Select a text file where spinned output file data will be stored.c) Click “Start Creating Tweets” to create spinned text.

22
ii. Tweet Extractor:- a) Enter Username or user id in the text box OR Upload a username or user-id text file with
each username or user-id in a new line.b) Enter the number of tweets in the count text box.c) Click “Start Extraction”.d) Data will be stored in
Desktop->TwtDominator-> TweetExtractor.txt
10.Fake Email Creator:- Create Fake Email for creating twitter accounts. These emails are not actually created so using these emails in creating twitter accounts will not be verified.
i. Upload Names to create email ids , each name in a new line.ii. Enter the Password in the text box will create same password for all emails created OR Check
“Make Random Password” to generate password which will generate random password for each email account.
iii. Enter a domain name for ex gmail.com , yahoo.com anything which resembles domain names.iv. Enter No Of Accounts i.e. number of emails you want to create.v. If you check “Change Export Location” you will get your emails accounts exported to new
location.vi. By default your emails will be exported to
Desktop->TwtDominator-> FakeEmailAccounts.txt

23
http://www.mediafire.com/?mfccqpy7q1m1yar mediafirelink : for td
8. Manual videos
Following videos are more helpful for users to work with Tweet dominator:
1. Account Creator -2. Profile Manager -3. Follower -4. Tweet
(a) Tweet -(b) Re Tweet -(c) Wait and reply –
5. Account Checker -6. Un follower -
24