Tutorial Potoshop 4
30
This is what I started with - an image of my love one and her double-second-cousin. The first thing is to duplicate the image layer (CTRL + ! and run a "igh #ass filter on the duplicated layer. Then choose $.% as filter radius. &'& )on*t be alarmed we will fi, this in a sec...
-
Upload
mochamad-yogi-wasngadiredja -
Category
Documents
-
view
225 -
download
0
Transcript of Tutorial Potoshop 4

8/13/2019 Tutorial Potoshop 4
http://slidepdf.com/reader/full/tutorial-potoshop-4 1/30
This is what I started with - an image of my love one and her double-second-cousin.
The first thing is to duplicate the image layer (CTRL + ! and run a "igh #ass filter on the duplicated
layer. Then choose $.% as filter radius. &'& )on*t be alarmed we will fi, this in a sec...
8/13/2019 Tutorial Potoshop 4
http://slidepdf.com/reader/full/tutorial-potoshop-4 2/30
The ne,t step is to select vivid light as the layer blending mode. ow flatten the layers (CTRL +
/"I0T + 1!.
2gain duplicate the layer and do a "igh #ass filter on the dup. This time select 3.4 as radius and
color as blending mode.

8/13/2019 Tutorial Potoshop 4
http://slidepdf.com/reader/full/tutorial-potoshop-4 3/30
ow choose layer opacity $%5 and flattened again.
ow again - duplicate the layer. ow call on the 6aussian 7lur (0ilter-8 7lur-8 6aussian 7lur! filter
and set it to 4.9. /till using the dup layer call on the noise filter (0ilter -8 oise -8 2dd oise! and
apply :5 noise.
8/13/2019 Tutorial Potoshop 4
http://slidepdf.com/reader/full/tutorial-potoshop-4 4/30
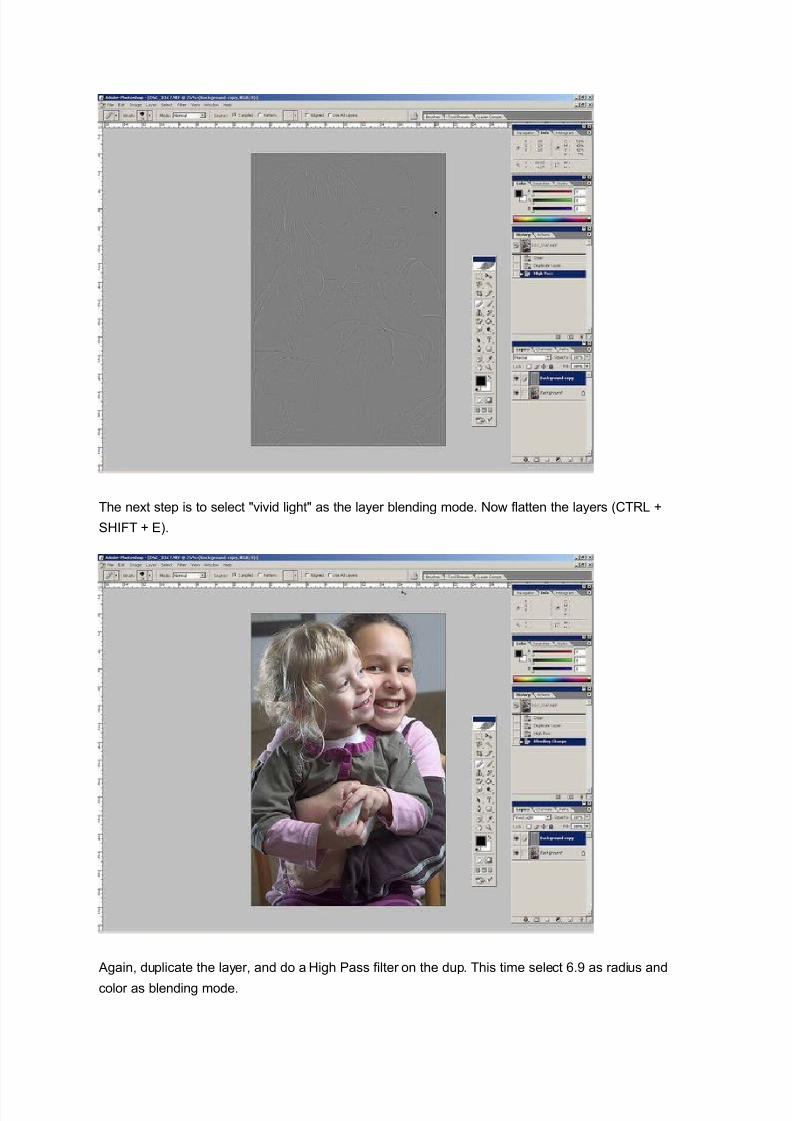
'; that loo<s really blurry we will do something about it. Li<e remove all the blur from the eyes
and ....
ow add a layer mas< (Layer -8 2dd Layer =as< -8 "ide 2ll! and select the eyes using the lasso tool
(L is the short cut for this!. ow invert the selection (/hift + Control + I!.
ow ta<e the brush tool (7! set the opacity to :%5 and paint over the entire image. T2)2 1yes are a
bit sharper then the rest of the image. 0latten again.

8/13/2019 Tutorial Potoshop 4
http://slidepdf.com/reader/full/tutorial-potoshop-4 5/30
The final step is to apply some unsharp mas< filter (0ilter -8 /harpen -8 >nsharp =as<!. >se the
following values? 2mount @%%5 Radius :%.% #i,els Threshold %. 2nd ....
8/13/2019 Tutorial Potoshop 4
http://slidepdf.com/reader/full/tutorial-potoshop-4 6/30
8/13/2019 Tutorial Potoshop 4
http://slidepdf.com/reader/full/tutorial-potoshop-4 7/30
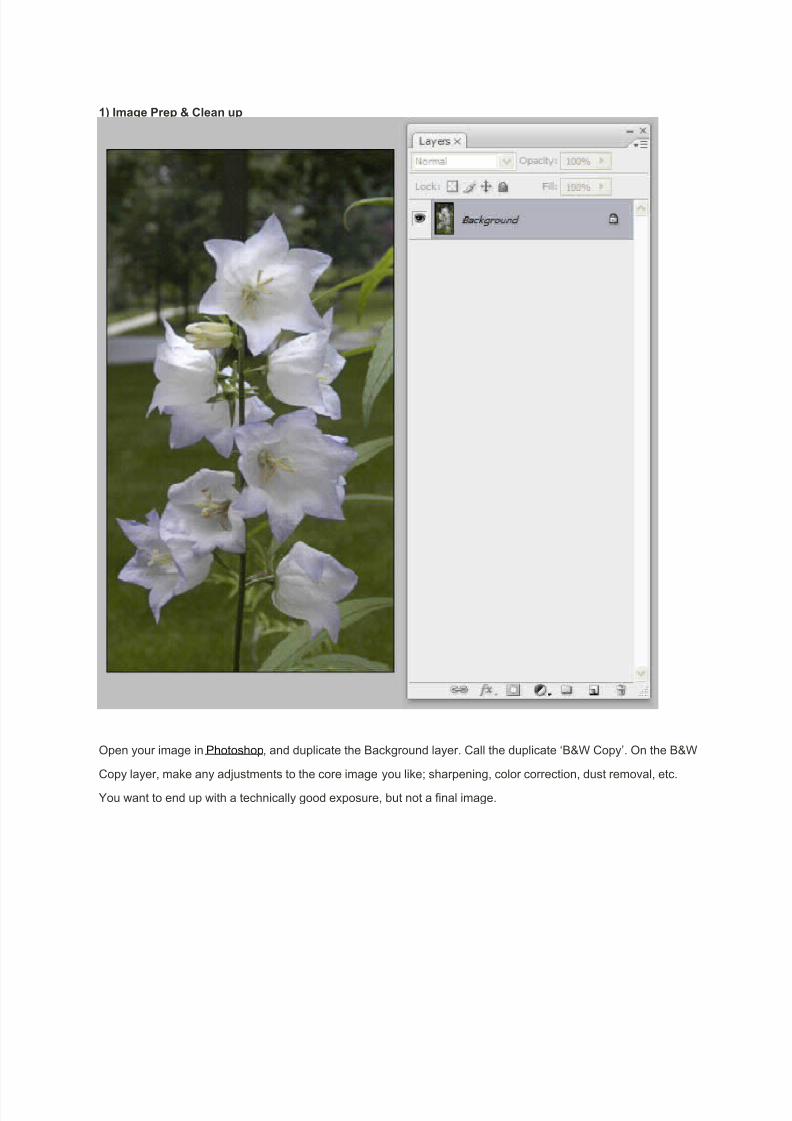
1) Image Prep & Clean up
'pen your image in #hotoshop and duplicate the 7ac<ground layer. Call the duplicate A7B& Copy . 'n the 7B&
Copy layer ma<e any adDustments to the core image you li<eE sharpening color correction dust removal etc.
Fou want to end up with a technically good e,posure but not a final image.
8/13/2019 Tutorial Potoshop 4
http://slidepdf.com/reader/full/tutorial-potoshop-4 8/30
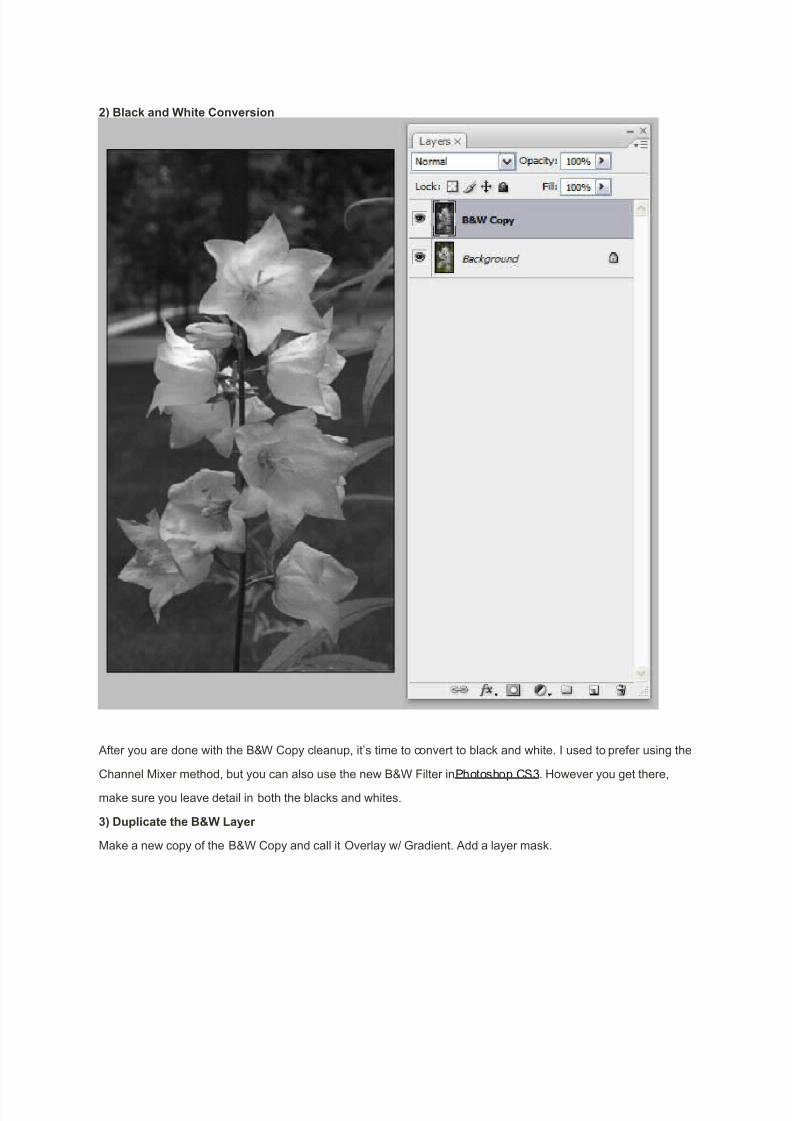
2) Black and White Conversion
2fter you are done with the 7B& Copy cleanup it s time to convert to blac< and white. I used to prefer using the
Channel =i,er method but you can also use the new 7B& 0ilter in #hotoshop C/: . "owever you get there
ma<e sure you leave detail in both the blac<s and whites.
3) Duplicate the B&W La er
=a<e a new copy of the 7B& Copy and call it 'verlay wG 6radient. 2dd a layer mas<.

8/13/2019 Tutorial Potoshop 4
http://slidepdf.com/reader/full/tutorial-potoshop-4 9/30
8/13/2019 Tutorial Potoshop 4
http://slidepdf.com/reader/full/tutorial-potoshop-4 10/30
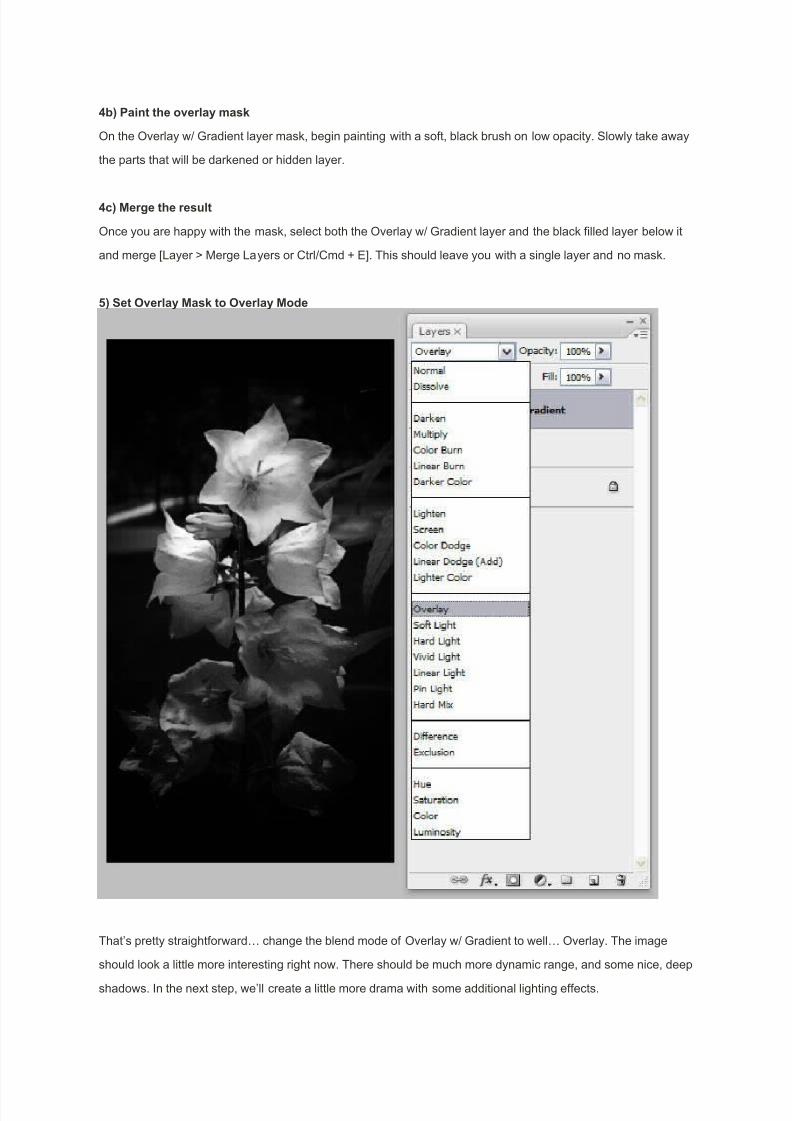
!#) Paint the overla mask
'n the 'verlay wG 6radient layer mas< begin painting with a soft blac< brush on low opacity. /lowly ta<e away
the parts that will be dar<ened or hidden layer.
!c) "erge the result
'nce you are happy with the mas< select both the 'verlay wG 6radient layer and the blac< filled layer below it
and merge JLayer 8 =erge Layers or CtrlGCmd + 1K. This should leave you with a single layer and no mas<.
%) et 'verla "ask to 'verla "ode
That s pretty straightforward change the blend mode of 'verlay wG 6radient to well 'verlay. The image
should loo< a little more interesting right now. There should be much more dynamic range and some nice deep
shadows. In the ne,t step we ll create a little more drama with some additional lighting effects.

8/13/2019 Tutorial Potoshop 4
http://slidepdf.com/reader/full/tutorial-potoshop-4 11/30
() Create a Light Beam la er
Create a new blan< layer above the 'verlay wG 6radient layer and call it Light 7eam. >sing whatever method
you li<e create some soft white light beams. 0or this e,ample image I used the #olygon Lasso tool with about
M%p, of feathering to draw a triangle. I then filled with white and blurred this a couple of times. e,t I rotated the
triangle slightly and then duplicated it to a new layer which was flipped about the vertical a,is. 0inally I merged
the two together. "owever you may find it much easier to simply paint your light beams and then use a
transform warp. &hatever wor<s for you /et the Light 7eam layer blend mode to 'verlay and lower the opacity
to taste. I used $35.
8/13/2019 Tutorial Potoshop 4
http://slidepdf.com/reader/full/tutorial-potoshop-4 12/30
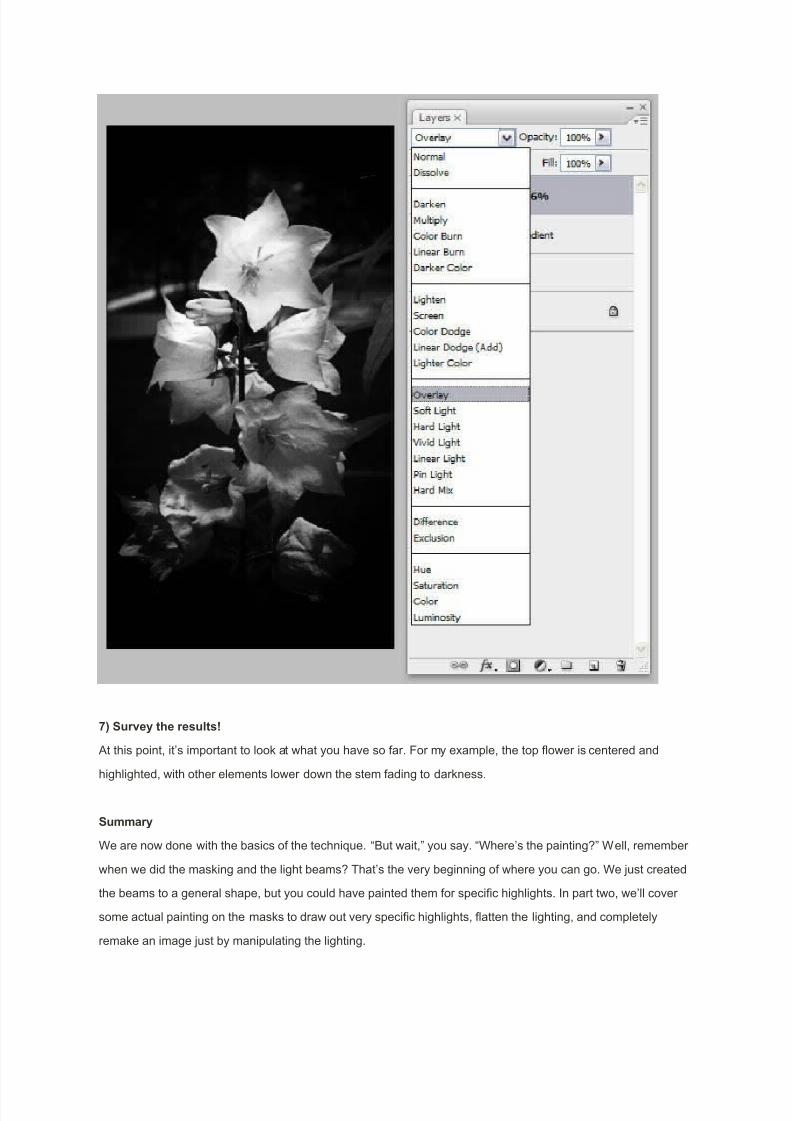
) urve the results*
2t this point it s important to loo< at what you have so far. 0or my e,ample the top flower is centered and
highlighted with other elements lower down the stem fading to dar<ness.
ummar
&e are now done with the basics of the techniNue. O7ut wait P you say. O&here s the paintingQP &ell remember
when we did the mas<ing and the light beamsQ That s the very beginning of where you can go. &e Dust created
the beams to a general shape but you could have painted them for specific highlights. In part two we ll cover
some actual painting on the mas<s to draw out very specific highlights flatten the lighting and completely
rema<e an image Dust by manipulating the lighting.

8/13/2019 Tutorial Potoshop 4
http://slidepdf.com/reader/full/tutorial-potoshop-4 13/30
0or now it s important to see the concepts at wor<. The blend modes are added to push the dynamics and we
added a light layer to focus and enhance the effect even more. &ith a little playing around you can develop your
own approaches such as building light layers from other images or adding filters to get special effects . In this
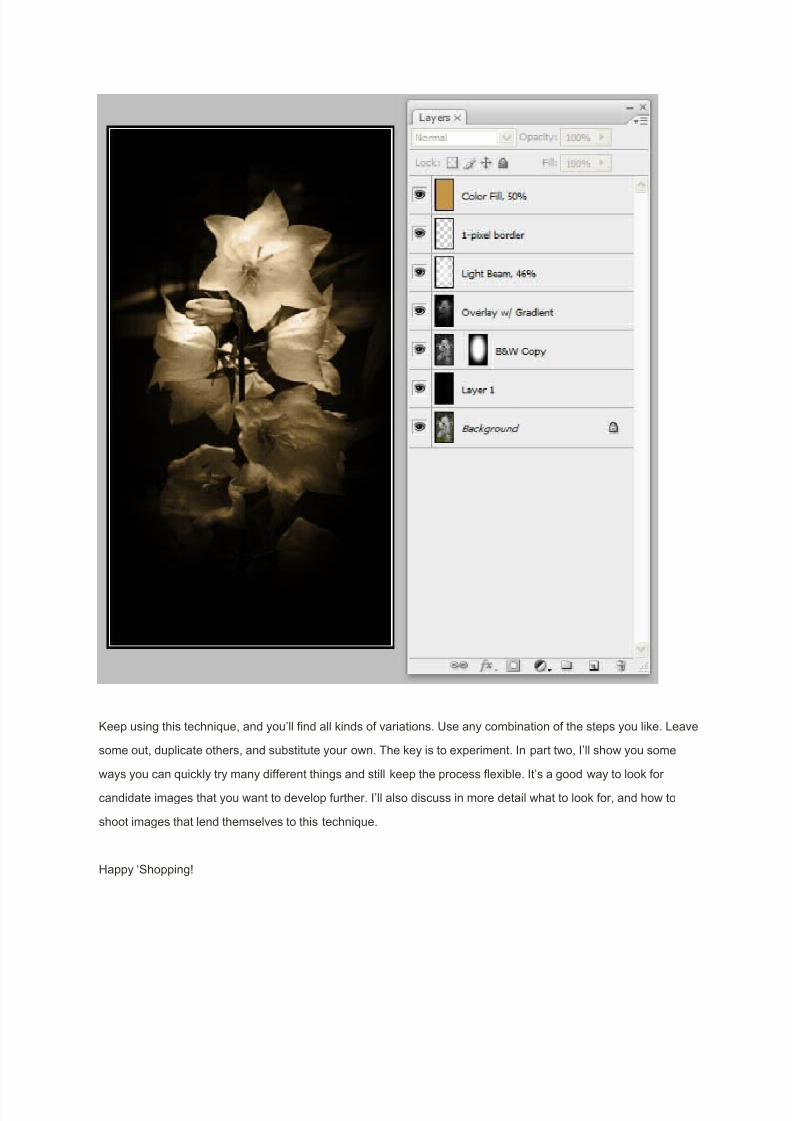
image I added a @-pi,el border and an additional color layer at the very top to give an aged feel.
To get a nicely toned monochrome image simply add a blan< layer at the top of everything else and fill with a
color of your choosing. /et the blend mode of that layer to Color and reduce the opacity or fill to suit your tastes.
0or my version I used a <ind of light tobacco color and set the opacity at 9%5. 0inally I added an oval vignette
layer mas< to my 7B& Copy layer Dust to give it that old portrait feeling (this also reNuires a blac< filled layer
underneath so the original doesn t show through!.
8/13/2019 Tutorial Potoshop 4
http://slidepdf.com/reader/full/tutorial-potoshop-4 14/30
;eep using this techniNue and you ll find all <inds of variations. >se any combination of the steps you li<e. Leave
some out duplicate others and substitute your own. The <ey is to e,periment. In part two I ll show you some
ways you can Nuic<ly try many different things and still <eep the process fle,ible. It s a good way to loo< for
candidate images that you want to develop further. I ll also discuss in more detail what to loo< for and how to
shoot images that lend themselves to this techniNue.
"appy A/hopping

8/13/2019 Tutorial Potoshop 4
http://slidepdf.com/reader/full/tutorial-potoshop-4 15/30
/tart by duplicating your layer JCtrl + K. Fou don t "2 1 to duplicate the layer but it helps if you ma<e a mista<e.
)esaturate your duplicated layer by pressing JCtrl + /hift + >K.
8/13/2019 Tutorial Potoshop 4
http://slidepdf.com/reader/full/tutorial-potoshop-4 16/30
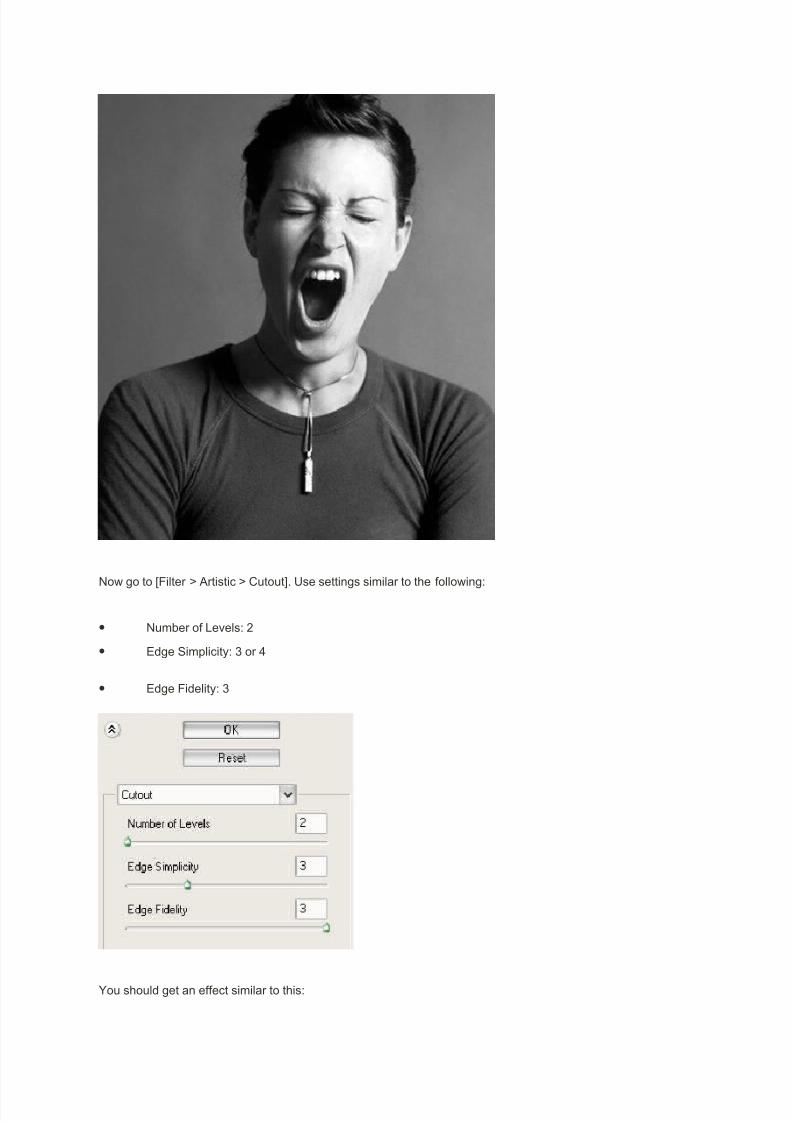
ow go to J0ilter 8 2rtistic 8 CutoutK. >se settings similar to the following?
• umber of Levels? M
• 1dge /implicity? : or $
• 1dge 0idelity? :
Fou should get an effect similar to this?
8/13/2019 Tutorial Potoshop 4
http://slidepdf.com/reader/full/tutorial-potoshop-4 17/30
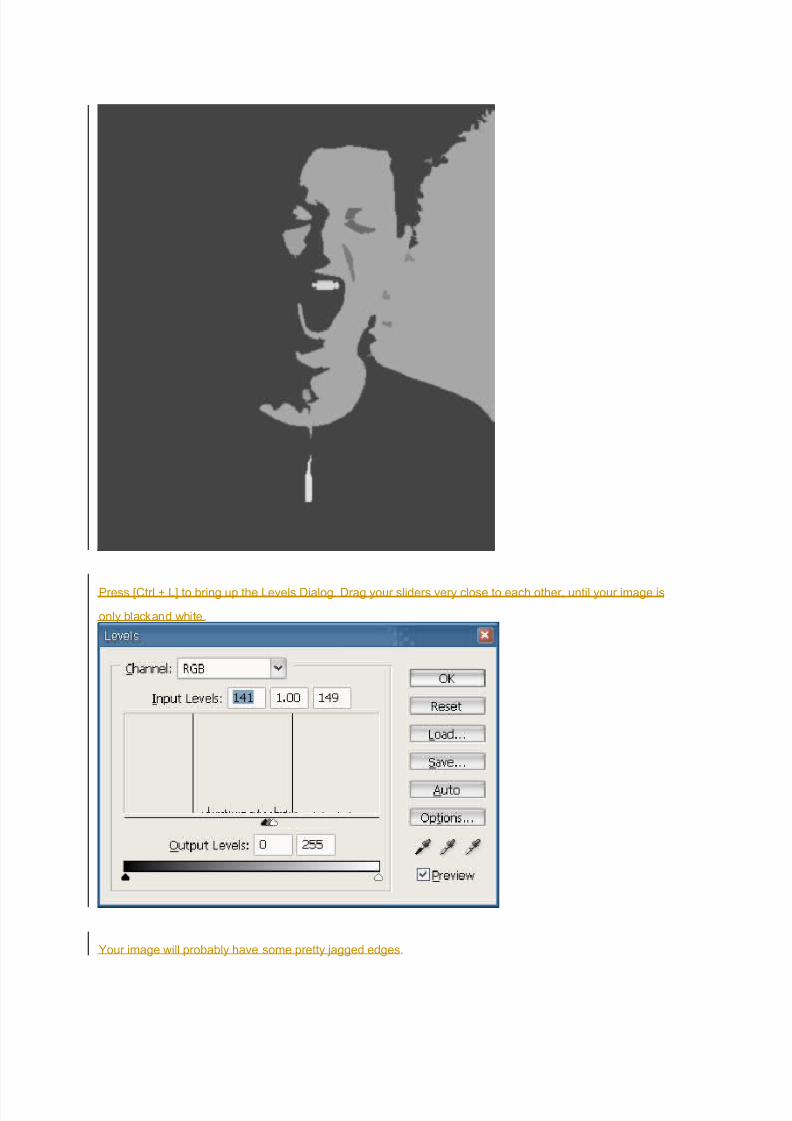
#ress JCtrl + LK to bring up the Levels )ialog. )rag your sliders very close to each other until your image is
only blac<and white .
Four image will probably have some pretty Dagged edges.
8/13/2019 Tutorial Potoshop 4
http://slidepdf.com/reader/full/tutorial-potoshop-4 18/30
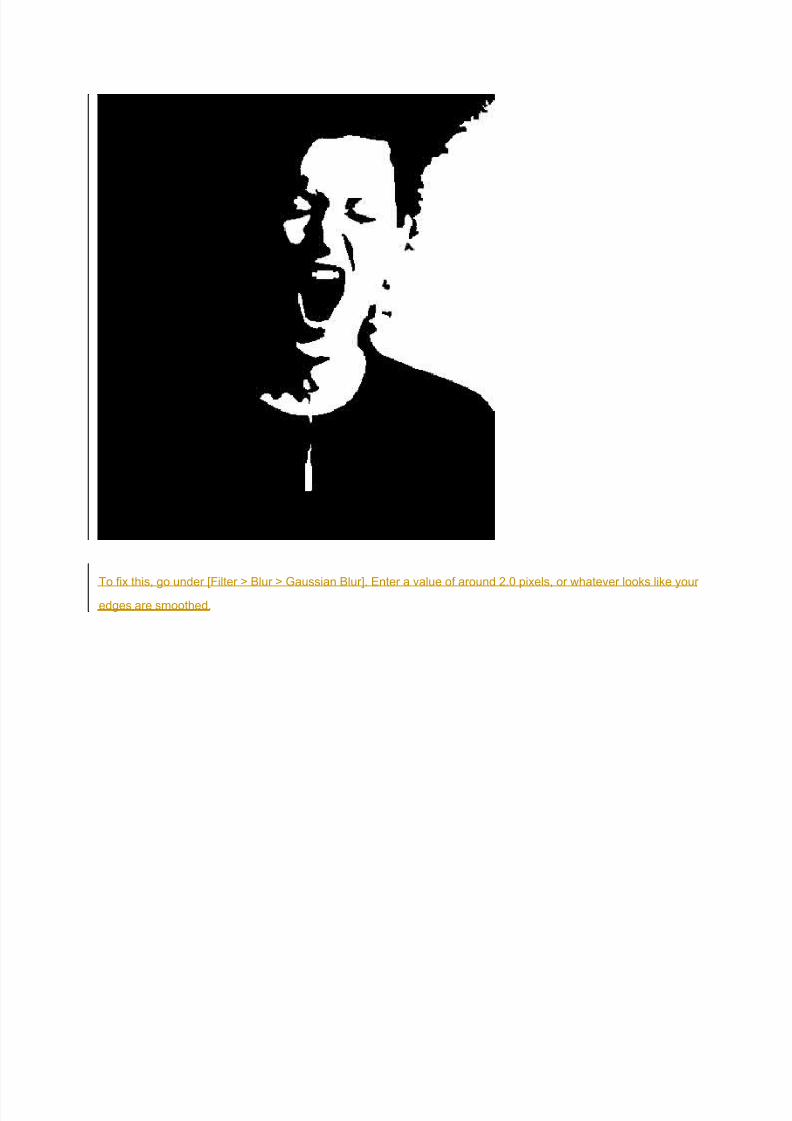
To fi, this go under J0ilter 8 7lur 8 6aussian 7lurK. 1nter a value of around M.% pi,els or whatever loo<s li<e your
edges are smoothed.

8/13/2019 Tutorial Potoshop 4
http://slidepdf.com/reader/full/tutorial-potoshop-4 19/30
7ring up the Curves )ialog by pressing JCtrl + =K. 2dDust your Curves so the edge blurriness is gone but there is
still no Dagged-ness. (Is Dagged-ness a wordQ!.
8/13/2019 Tutorial Potoshop 4
http://slidepdf.com/reader/full/tutorial-potoshop-4 20/30
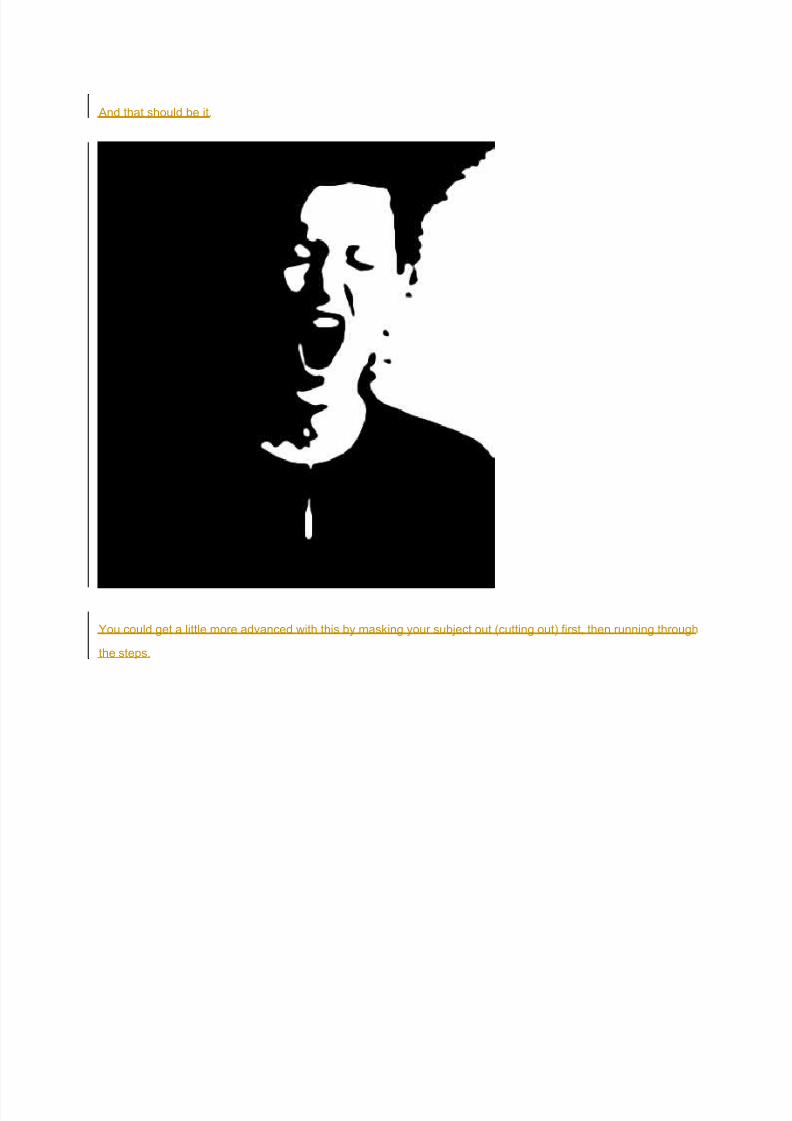
2nd that should be it.
Fou could get a little more advanced with this by mas<ing your subDect out (cutting out! first then running through
the steps.

8/13/2019 Tutorial Potoshop 4
http://slidepdf.com/reader/full/tutorial-potoshop-4 21/30
. 2dDust the "ueG/aturation? ⌘>GCTRL->

8/13/2019 Tutorial Potoshop 4
http://slidepdf.com/reader/full/tutorial-potoshop-4 22/30
M. 2dDust the brightness and contrast? "enu + Image + ,d-ustments + ./posure0

8/13/2019 Tutorial Potoshop 4
http://slidepdf.com/reader/full/tutorial-potoshop-4 23/30

8/13/2019 Tutorial Potoshop 4
http://slidepdf.com/reader/full/tutorial-potoshop-4 24/30

8/13/2019 Tutorial Potoshop 4
http://slidepdf.com/reader/full/tutorial-potoshop-4 25/30
9. Clic< on the Aadd layer mas< button at the bottom of La er window. Then clic< and select the ALayer mas<
thumbnail (the white rectangle!.

8/13/2019 Tutorial Potoshop 4
http://slidepdf.com/reader/full/tutorial-potoshop-4 26/30
3. /elect #rush tool (b! set the master diameter to ! p/ . Then choose the focus point in the photo and clic< on
it.

8/13/2019 Tutorial Potoshop 4
http://slidepdf.com/reader/full/tutorial-potoshop-4 27/30
ilm e$$ect
S. Create a new layer by clic<ing the Acreate a new layer button located at the bottom of La er window.
. 0ill the new layer with blac< colour? reset colour to default blac< B white (d! switch blac< colour to bac<ground
(,! fill the layer ( ⌘-delGCTRL-bac<space!
4. /et the opacity of the blac< layer to by pressing SU
@%. >se erase tool (e! set the master diameter to ! p/ . Then start erase the center of the photo.

8/13/2019 Tutorial Potoshop 4
http://slidepdf.com/reader/full/tutorial-potoshop-4 28/30
@@. 0latten the image? "enu + La er + latten Image and add noise? "enu + ilter + 4oise + ,dd 4oise0

8/13/2019 Tutorial Potoshop 4
http://slidepdf.com/reader/full/tutorial-potoshop-4 29/30
Cinemascope 5optional)
@M. 2dd blac< bars on top and bottom of photo and it s done
>se 6ectangular "ar7uee 8ool (m! to select (drag! upper part of photo hold the shift <ey and select the bottom
part fill with blac< colour ( ⌘-delGCTRL-bac<space!

8/13/2019 Tutorial Potoshop 4
http://slidepdf.com/reader/full/tutorial-potoshop-4 30/30