White Color Standards and Color Gamut Analysis for Ceramic Tiles

1
Tutorial One: Exploring math concepts with color tilesIn this lesson you will create a new project using the Kidspiration Color Tiles™ Math Tool. In the context of representing math expressions, solving a word problem and exploring area, you will learn to do the following:
• StartKidspiration
• StartanewKidspirationColorTilesproject
• Addyournametoaproject
• Saveyourwork
• UseaMathTextBox
• Deleteanobjectfromtheworkspace
• Undoandredoyourwork
• Lockanitem
• CreateapasswordfortheTeachermenu
• Movecolortilesontotheworkspace
• Selectmultipleitemsontheworkspace
• Duplicateitemsontheworkspace
• Resizemanipulativesontheworkspace
• UsetheCross-OutStamp
• Addpagestoyourproject
• UseaMathSuperGrouper™
• Changethecolorofacolortile
• Lockapage
• Addabackgroundgrid
• UsealinefromtheMathpalette
• Printyourproject
• CloseyourprojectandreturntotheKidspirationStarter

2
Starting Kidspiration
To start Kidspiration on a Macintosh:• Open the Kidspiration 3 folder and double-click the Kidspiration icon.
The Kidspiration Starter opens.
To start Kidspiration in Windows:• ClicktheStart button,pointtoProgramsandclickKidspiration 3.
TheKidspirationStarteropens.
The Kidspiration Starter is the place where you start new projects, open existing projects and use the many different Kidspiration activities. You will begin by clicking the Math View button to open the Math Tool Starter.
Starting a new Kidspiration Color Tiles projectTo start a new Kidspiration Color Tiles project, click the Color Tiles button on the Math Tool Starter.
A new blank workspace opens in the Kidspiration Color Tiles Math Tool.
3
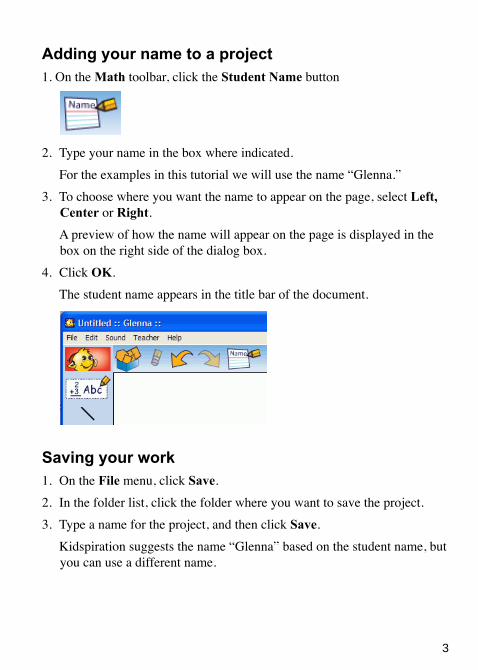
Adding your name to a project1. On the Math toolbar, click the Student Name button
2. Type your name in the box where indicated. For the examples in this tutorial we will use the name “Glenna.”3. To choose where you want the name to appear on the page, select Left,
Center or Right. A preview of how the name will appear on the page is displayed in the
box on the right side of the dialog box.4. Click OK. The student name appears in the title bar of the document.
Saving your work1. On the File menu, click Save.2. In the folder list, click the folder where you want to save the project.3. Type a name for the project, and then click Save. Kidspiration suggests the name “Glenna” based on the student name, but
you can use a different name.

4
Using a Math Text BoxMath Text Boxes allow students to describe their work with words, numbers and math notation, including structured frames for writing fractions, division problems and vertical math notations. Math Text Boxes also allow teachers to place instructions and helpful text in projects.1. Click the Math Text Box in the Math palette and drag it onto
your workspace.2. Click inside the text box and write Use color tiles to show 7 minus 4
and 7 minus 2, but follow the steps below so it looks like this:
3. Click the Open Math Frame button on the Bottom toolbar to create the vertical frames and click the Minus Sign button on the Bottom
toolbar to add the minus signs.4. Enlarge the text size by clicking the Resize Text button on the
Bottom toolbar once. 5. Click outside the box and then back on it to select it. When a text box is
selected, it has corner handles .6. Resize the text box by dragging on one or more of its corner handles so
that all of the text fits on one line. 7. Move the text box up so it is near the top of the workspace.8. Click back inside the box and drag your cursor over the word “and.”
Italicize it by clicking the Italic button on the Bottom toolbar. 9. Click outside the text box and then back on it to select it. Add a
border and a background color to the text box by clicking the Border button on the Bottom toolbar, and then the
Background Color button next to it. Choose a background color from the palette.

5
Note: If you make a mistake in your work, you have several options on the Math toolbar:• YoucandeleteanitembyselectingitandclickingtheClearbutton
ontheMathtoolbar.
-or–
• YoucanundouptothelasteightchangesinyourprojectbyclickingtheUndobutton ontheMathtoolbar.
–or–
• YoucanredouptothelasteightchangesyouusedtheUndo buttontoundobyclickingtheRedobutton ontheMathtoolbar.
Locking an item on the workspaceNow that your Math Text Box is set up, you can lock it so that it cannot be moved or deleted. • Withthetextboxselected,clickLocked ItemontheTeacher menu.
AcheckmarkappearsnexttoLocked Itemwhenthetextboxislocked,andthecornerhandleschangeonthebox.
Note:TheTeachermenumustbeenabledfortheLocked Itemoptiontoappear.ToturntheTeachermenuonoroff,clickEnable Teacher MenuontheTeachermenu.
Creating a password for the Teacher menuYou can create a password for the Teacher menu to prevent students from using it and changing teacher preferences.1. On the Teacher menu, click Application Options.2. Select the Password Enabled check box.3. Click Set Password. The Set Password dialog box appears.4. Type the password you want to use in the Enter Password box.
6
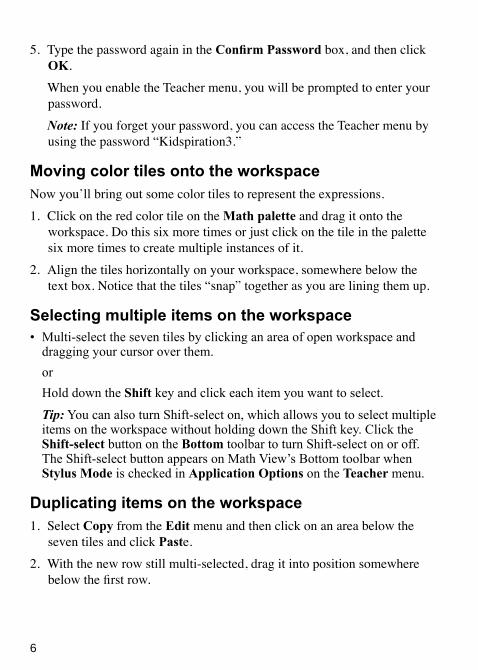
5. Type the password again in the Confirm Password box, and then click OK.
When you enable the Teacher menu, you will be prompted to enter your password.
Note: If you forget your password, you can access the Teacher menu by using the password “Kidspiration3.”
Moving color tiles onto the workspaceNow you’ll bring out some color tiles to represent the expressions.1. Click on the red color tile on the Math palette and drag it onto the
workspace. Do this six more times or just click on the tile in the palette six more times to create multiple instances of it.
2. Align the tiles horizontally on your workspace, somewhere below the text box. Notice that the tiles “snap” together as you are lining them up.
Selecting multiple items on the workspace• Multi-selecttheseventilesbyclickinganareaofopenworkspaceand
draggingyourcursoroverthem.
or
HolddowntheShiftkeyandclickeachitemyouwanttoselect.
Tip:YoucanalsoturnShift-selecton,whichallowsyoutoselectmultipleitemsontheworkspacewithoutholdingdowntheShiftkey.ClicktheShift-selectbuttonontheBottomtoolbartoturnShift-selectonoroff.TheShift-selectbuttonappearsonMathView’sBottomtoolbarwhenStylus ModeischeckedinApplication OptionsontheTeachermenu.
Duplicating items on the workspace1. Select Copy from the Edit menu and then click on an area below the
seven tiles and click Paste. 2. With the new row still multi-selected, drag it into position somewhere
below the first row.

7
Resizing manipulatives on the workspace• Resize all of the color tiles on the workspace by clicking the Resize
Manipulatives button once on the Bottom toolbar. Yourprojectshouldlooksomethinglikethis:
Using the Cross-Out StampUse the Cross-Out Stamp to mark tiles and visually represent the subtraction in expressions.1. Multi-select four color tiles in the first row and two color tiles in the
second row by holding down the Shift key and clicking on each tile one at a time.
2. Now click the Cross-Out Stamp button on the Bottom toolbar. The tiles should look like this:
Adding pages to your projectMath View allows for the creation of multiple pages within a single document, giving teachers the opportunity to create an extended activity with multiple parts, or students the opportunity to show their thinking using one or more tools.

8
Now you’ll learn how to add two new pages to your project so you can continue working with Kidspiration Color Tiles. 1. Click the Go To Page button on the Math toolbar to open the
Choose Page dialog.
2. Click the Add Page button to add a new page.3. Choose Color Tiles from the Math Tool Starter, and repeat the process
to add a third page also using Kidspiration Color Tiles.4. Navigate back to page 2 by clicking the Go to Previous Page button
on the Math toolbar. Note:When you have more than one page in a project, a page number
for the page you are working on appears in the upper-left corner of the workspace.
Working with Math SuperGroupers™
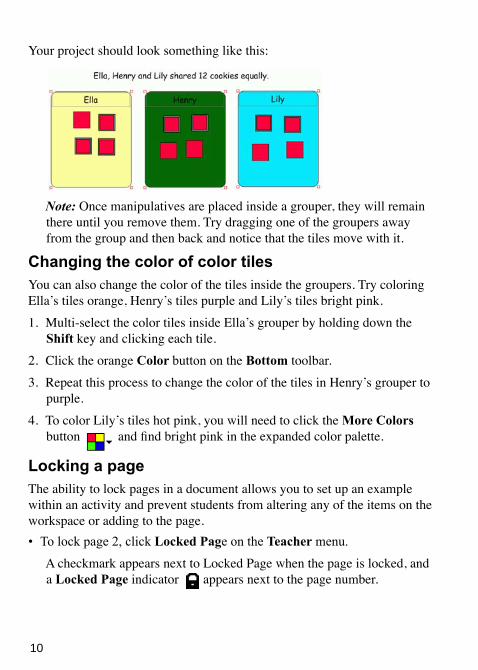
Math SuperGroupers are similar to the SuperGroupers in Picture View. They are used for grouping, sorting, categorizing and counting activities.On page 2 of your project, you will model a word problem using Math SuperGroupers.1. Drag a Math Text Box onto the workspace and type Ella, Henry and
Lily shared 12 cookies equally.
9
2. Click off the box and then back on it to select it. Resize the text box by dragging one or more of its corner handles so that all of the text fits on one line, and then move it to the top of the workspace.
3. Click and drag the rectangular Math SuperGrouper from the Math palette onto the left side workspace.
4. Click and drag one of its corner handles to make it about 20% larger. 5. Select Copy from the Edit menu, click to an area of open workspace and
click Paste. 7. Click another area of open workspace and click Paste one more time to
create a third grouper on the workspace. 8. Click and drag the groupers to line them up horizontally across the
workspace. 9. Notice that when you have a grouper selected, a label box appears in
dotted lines at the top. 10. Double-click inside the label box to select it and a cursor will appear.
Type Ella into the first one, Henry into the second one and Lily into the third one.
11. You may want to change the background color of the groupers to give your document visual interest. Experiment by changing Henry’s grouper to green and Lily’s grouper to turquoise. • Clicktoselecttheirgroupersoneatatimeandthenclickthe
correspondingcolorfromColorbuttons ontheBottomtoolbar.
12. Now that your groupers are ready, use color tiles to represent the situation. Drag 12 red tiles from the Math palette, distributing them until there are four in each grouper.
10
Your project should look something like this:
Note: Once manipulatives are placed inside a grouper, they will remain there until you remove them. Try dragging one of the groupers away from the group and then back and notice that the tiles move with it.
Changing the color of color tilesYou can also change the color of the tiles inside the groupers. Try coloring Ella’s tiles orange, Henry’s tiles purple and Lily’s tiles bright pink. 1. Multi-select the color tiles inside Ella’s grouper by holding down the
Shift key and clicking each tile. 2. Click the orange Color button on the Bottom toolbar. 3. Repeat this process to change the color of the tiles in Henry’s grouper to
purple.4. To color Lily’s tiles hot pink, you will need to click the More Colors
button and find bright pink in the expanded color palette.
Locking a page The ability to lock pages in a document allows you to set up an example within an activity and prevent students from altering any of the items on the workspace or adding to the page.• Tolockpage2,clickLocked PageontheTeachermenu.
A checkmark appears next to Locked Page when the page is locked, and a Locked Page indicator appears next to the page number.

11
Note: The Teacher menu must be enabled for the Locked Page option to appear. To turn the Teacher menu on or off, click Enable Teacher Menu on the Teacher menu.
Your project should now look something like this:
Using a background gridA background grid can help you to organize color tiles on the workspace, making it easier to create bar charts, build models, and explore perimeter and area.1. Go to page 3 of your project by clicking the Go to Next Page button
on the Math toolbar.2. Click the Show Background Grid button on the Bottom
toolbar.3. Resize the grid to large by clicking the Resize Manipulatives button
on the Bottom toolbar one time.
Using a lineA line is available in the Math palette and is helpful for visually organizing your project.1. Click and drag a line from the Math palette onto the workspace.
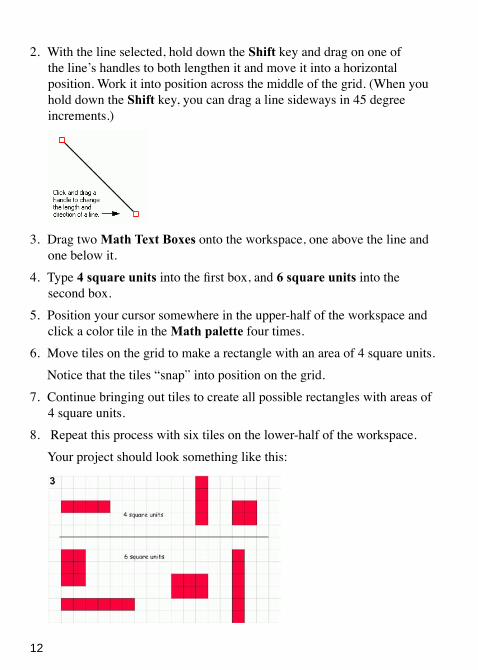
12
2. With the line selected, hold down the Shift key and drag on one of the line’s handles to both lengthen it and move it into a horizontal position. Work it into position across the middle of the grid. (When you hold down the Shift key, you can drag a line sideways in 45 degree increments.)
3. Drag two Math Text Boxes onto the workspace, one above the line and one below it.
4. Type 4 square units into the first box, and 6 square units into the second box.
5. Position your cursor somewhere in the upper-half of the workspace and click a color tile in the Math palette four times.
6. Move tiles on the grid to make a rectangle with an area of 4 square units. Notice that the tiles “snap” into position on the grid.7. Continue bringing out tiles to create all possible rectangles with areas of
4 square units.8. Repeat this process with six tiles on the lower-half of the workspace. Your project should look something like this:

13
Printing your projectTo print a project, click Print on the File menu.You can also choose from the following options before printing:
Selecting page orientation In Math View, landscape orientation is the default. To switch to portrait
orientation before printing a project:1.OntheFilemenu,clickPage Setup.
2.NexttoOrientation,clickthePortraitorLandscapeicon(Macintosh).
–or–
UnderOrientation,selectPortraitorLandscape(Windows).
Selecting paper size Letter is the default paper size in Kidspiration. To select a
different paper size:1.OntheFilemenu,clickPage Setup.
2.InthePaperlist,selectthepapersizeyouwant(Macintosh).
–or–
3.UnderPaper,selectthepapersizeyouwantintheSizelist(Windows).
Printing page numbers If you choose to print page numbers, they will appear at the bottom of the
page. To print page numbers:1.ClicktheStudent Namebutton.
2.Selectthecheckboxwhereindicated.

14
Closing your project and returning to the Kidspiration StarterCongratulations! You have completed Tutorial One: Exploring math concepts with color tiles. To close your project and return to the Kidspiration Starter, click the Go to Starter button.
When you return to the Kidspiration Starter, you are prompted to save the open project. Click Yes if you want to save the project.