
Troubleshooting Guide for Electrically ... - Symmetry Office...Initialization process allows table...
12
Release Date: 8/18/16 Subject to change without notice. Errors and omissions excepted. OMT-Veyhl cannot accept responsibility for incorrect operation or use of the products other than for the intended purpose. Under the warranty terms, OMT-Veyhl shall replace or repair any products that prove defective at the time of delivery. OMT-Veyhl shall not assume any further liability. If you have any questions or special requests, please contact OMT-Veyhl direct. 1 Troubleshooting Guide for Electrically Actuated Height Adjustable Tables Visual Glossary of Referenced Parts Programmable Hand Switch Standard Up / Down Hand Switch Control Boxes: 2-Leg Tables 3-Leg Tables
Transcript of Troubleshooting Guide for Electrically ... - Symmetry Office...Initialization process allows table...
Release Date: 8/18/16 Subject to change without notice. Errors and omissions excepted. OMT-Veyhl cannot accept responsibility for incorrect operation or use of the products other than for the intended purpose. Under the warranty terms, OMT-Veyhl shall replace or repair any products that prove defective at the time of delivery. OMT-Veyhl shall not assume any further liability. If you have any questions or special requests, please contact OMT-Veyhl direct.
1
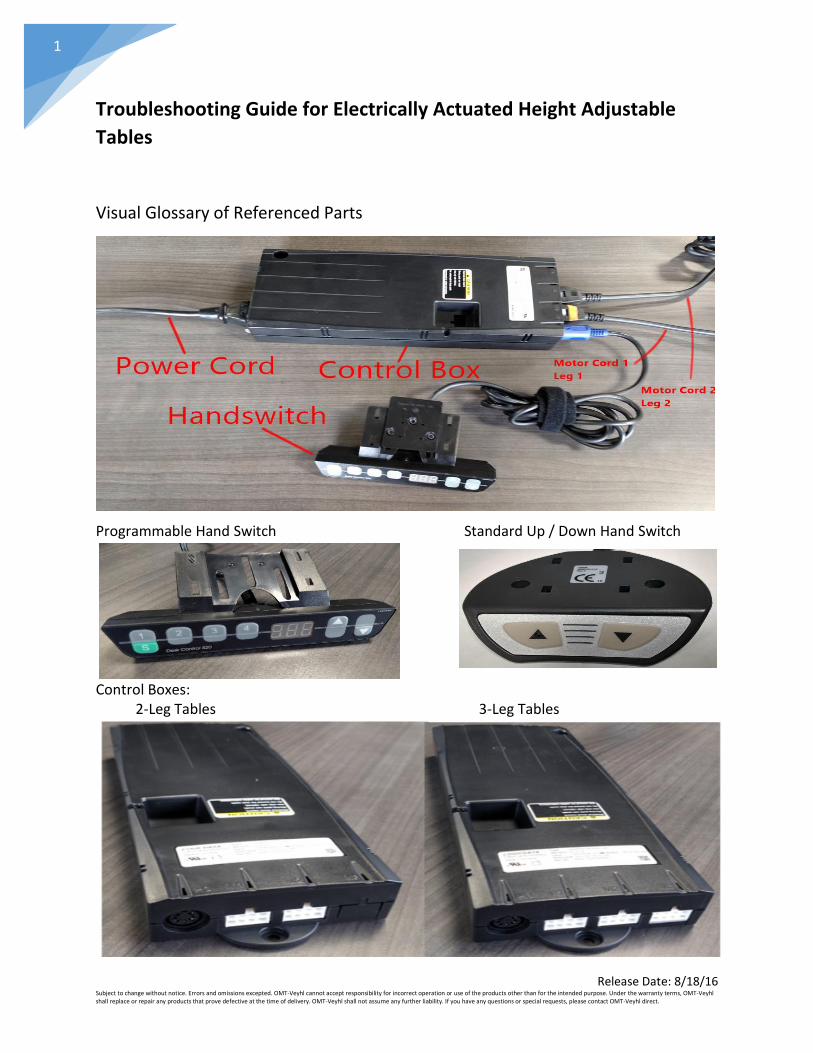
Troubleshooting Guide for Electrically Actuated Height Adjustable
Tables
Visual Glossary of Referenced Parts
Programmable Hand Switch Standard Up / Down Hand Switch
Control Boxes: 2-Leg Tables 3-Leg Tables

Release Date: 8/18/16 Subject to change without notice. Errors and omissions excepted. OMT-Veyhl cannot accept responsibility for incorrect operation or use of the products other than for the intended purpose. Under the warranty terms, OMT-Veyhl shall replace or repair any products that prove defective at the time of delivery. OMT-Veyhl shall not assume any further liability. If you have any questions or special requests, please contact OMT-Veyhl direct.
2
Before You Start
Ensure correct control box is used for product.
Use of incorrect control box may cause table to overdrive, thus damage mechanism.
Ensure cord connections are firmly seated.
Initialize tables prior to using them for first time.
Do not drive a new tables upward before initializing.
Do not drive a table upward with uneven legs.
Programmable hand switch error code E61 is normal, it means a leg has been unplugged.Initialize table legs when error code E61 is displayed.
A 3-Port Control Box cannot run a 2 leg table
Do not attach a device that might squeeze, compress or penetrate a leg.
Use specified fasteners. Do not substitute.

Release Date: 8/18/16 Subject to change without notice. Errors and omissions excepted. OMT-Veyhl cannot accept responsibility for incorrect operation or use of the products other than for the intended purpose. Under the warranty terms, OMT-Veyhl shall replace or repair any products that prove defective at the time of delivery. OMT-Veyhl shall not assume any further liability. If you have any questions or special requests, please contact OMT-Veyhl direct.
3
Troubleshooting Sequence
1. Clear all Obstructions
Remove objects below and above table that could interfere with its operation.
Make sure cords don’t get pulled tight or caught between components.
2. Initialize Table Legs
IMPORTANT NOTE
When installing a new table or reconfiguring existing tables, initialize tables to insure
optimum performance.
Initialization process allows table legs to find lowest point of travel; it ensures table legs
start at correct height for program and are fully synchronized for day to day use.
An electrical, height adjustable table, can be initialized with any available switch.
Failure to initialize new tables and reinitialize existing tables, may lead to severe
damage.
Release Date: 8/18/16 Subject to change without notice. Errors and omissions excepted. OMT-Veyhl cannot accept responsibility for incorrect operation or use of the products other than for the intended purpose. Under the warranty terms, OMT-Veyhl shall replace or repair any products that prove defective at the time of delivery. OMT-Veyhl shall not assume any further liability. If you have any questions or special requests, please contact OMT-Veyhl direct.
4
Performing Initialization Process on New and Existing Tables:
A. Run table to lowest point. (Programmable hand switch for a new table will read “E61”). B. Release the down button, if compressed. C. Press and hold the down button for up to 30 seconds.
Table will drive down slightly, upon reaching the bottom of its stroke it will stop and
return upward.
D. Release the down button on hand switch.
Table is now initialized.
Programmable hand switch will read a table height of “022”, “023” or “027”.
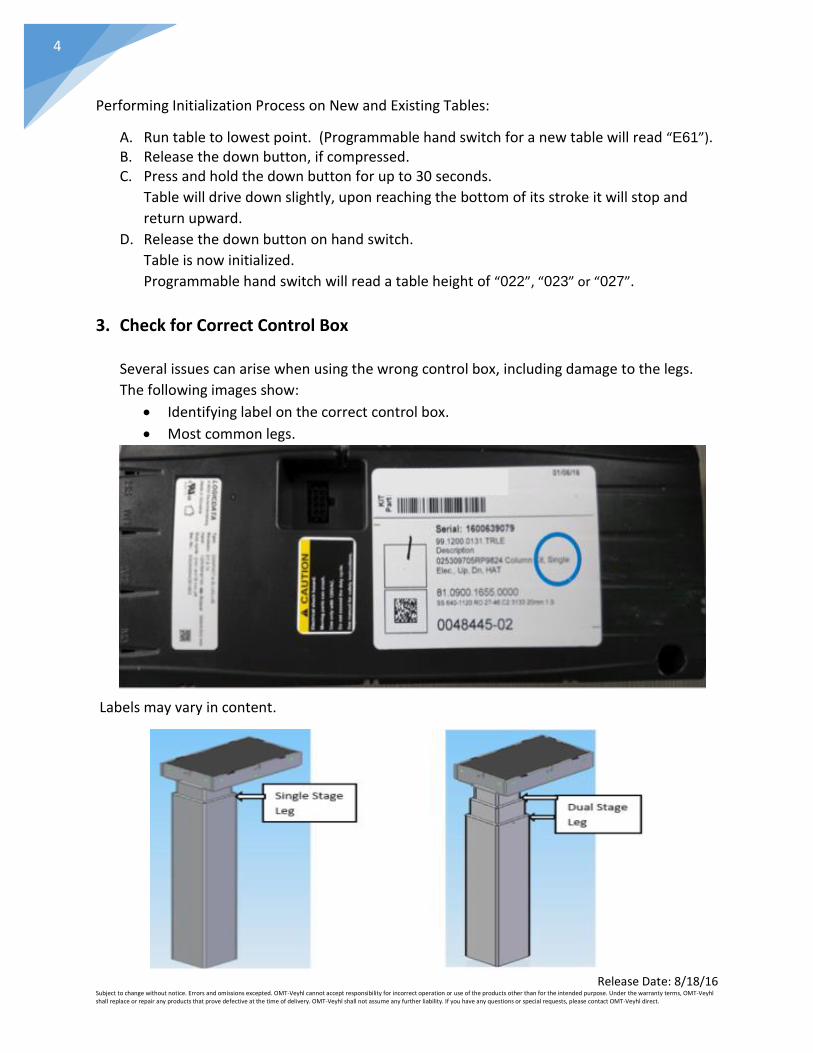
3. Check for Correct Control Box
Several issues can arise when using the wrong control box, including damage to the legs.
The following images show:
Identifying label on the correct control box.
Most common legs.
Labels may vary in content.

Release Date: 8/18/16 Subject to change without notice. Errors and omissions excepted. OMT-Veyhl cannot accept responsibility for incorrect operation or use of the products other than for the intended purpose. Under the warranty terms, OMT-Veyhl shall replace or repair any products that prove defective at the time of delivery. OMT-Veyhl shall not assume any further liability. If you have any questions or special requests, please contact OMT-Veyhl direct.
5
4. Seat All Connections
This is a straightforward process. Unplug all cords from control box beginning with power cord circled in red. Reconnecting cords, make sure power cord is last. Be mindful of snap feature on motor cords.
Depress hook feature on motor cord
prior to disconnection.
5. Container Stop /Shelf Stop
A container and shelf stop can be set by end user to restrict bottom and top travel limits on table. A lower limit (container stop) and upper limit (shelf stop) can be set in bottom and top half of table’s travel range. Adding and removing container/shelf stops:
A. Move table to desired lower or upper set position.
B. Press and hold - up and down buttons simultaneously until:
Control box clicks twice (2). Container or shelf stop is NOW set at that height.
Control box clicks once (1). Container or shelf stop is NOW removed.
Table should run through its normal travel range.

Release Date: 8/18/16 Subject to change without notice. Errors and omissions excepted. OMT-Veyhl cannot accept responsibility for incorrect operation or use of the products other than for the intended purpose. Under the warranty terms, OMT-Veyhl shall replace or repair any products that prove defective at the time of delivery. OMT-Veyhl shall not assume any further liability. If you have any questions or special requests, please contact OMT-Veyhl direct.
6
6. Reset Control Unit to Factory Settings (This procedure requires a
programmable hand switch)
A. Press and hold 1, 2 and ^ buttons simultaneously. Keep button combination pressed
for roughly 10 seconds.
B. Display will show S and a number, e.g. “S 5”.
C. Release buttons
D. Press & release up button until the display reads “S 0”.
Note: It may take 2 press & release sequences before “S 0” is displayed.
E. Press S (green) memory button.
F. Control box should click 5 times. “Click-Click (space) Click-Click-Click”. (Control unit will
be reset to its factory settings).
G. E61 will be displayed on hand switch.
Note: The menu timeout is 5 seconds, this means that the menu will close automatically
without storing new settings if the user does not press a key for 5 seconds.
Important Note: After control unit is reset to factory settings, perform initialization process per
section #2 above!
7. Leg Swap Procedure
Benefit: Pinpoints source of problem when a specific subset of error codes is displayed. Initiate procedure when programmable hand switch displays one of these error codes: E12, E13, E14, E24, E25, E26 Procedure applies to 2 & 3 leg tables. A programmable hand switch is required to perform a leg swap. Procedure:
A. Hand switch displays one of the error codes above, let’s assume it reads E12. B. Swap leg cord positions on control box. (See image on next page) C. Unplug legs from control box ports M1 & M2. D. Connect legs into opposite ports. E. Initialize legs. F. Hand switch display now reads E13. (Indicates issue shifted from port M1 (E12) to port
M2 (E13) with leg, not control box.

Release Date: 8/18/16 Subject to change without notice. Errors and omissions excepted. OMT-Veyhl cannot accept responsibility for incorrect operation or use of the products other than for the intended purpose. Under the warranty terms, OMT-Veyhl shall replace or repair any products that prove defective at the time of delivery. OMT-Veyhl shall not assume any further liability. If you have any questions or special requests, please contact OMT-Veyhl direct.
7
If error code remained E12, port (M1) after legs were connected to opposite
ports, the issue resides with control box.
G. Isolate the leg that caused issue - for return.
It is not necessary to return both legs when only one (1) malfunctions. Legs of similar table types and engineering revisions are compatible. E12 - E14 error codes readings are common when legs are disconnected and swapped.
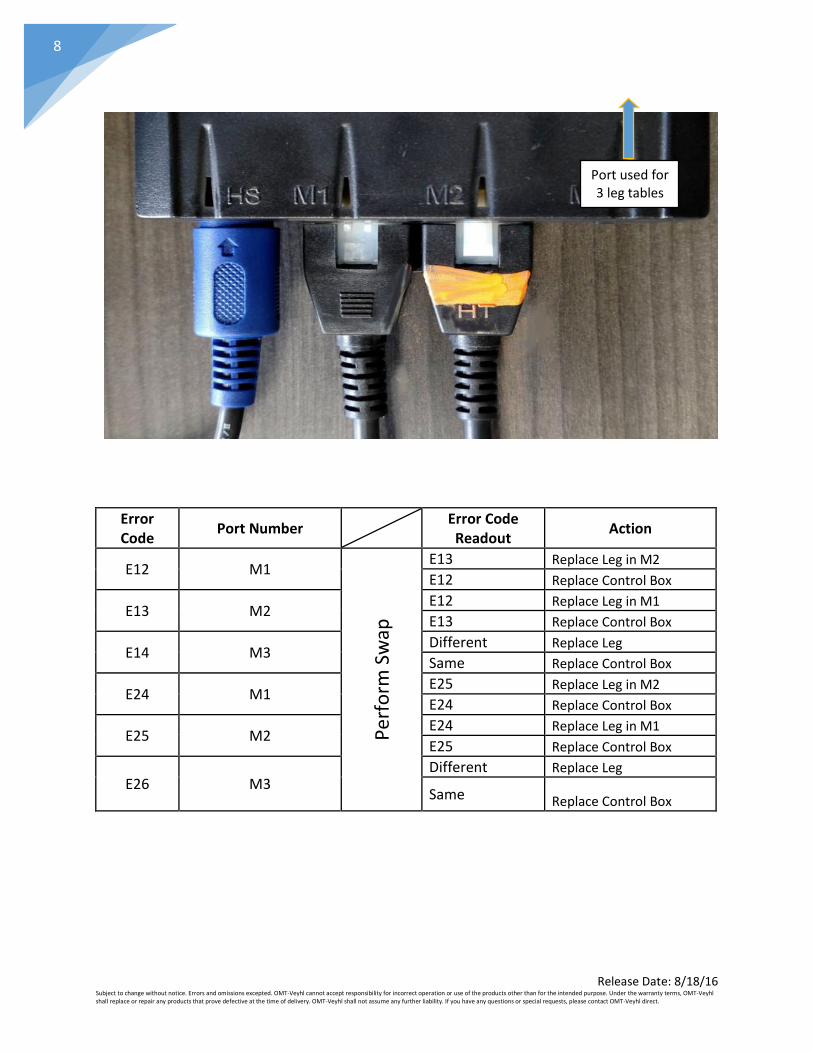
Note: Properly connected cords to minimize error code occurrence. Procedure pictorially shown: Motor cords are connected to ports M1 & M2 as shown.
A. Hand switch display reads “E12”.
B. E12 error code indicates an electrical connection issue with cord connected to port M1.
Port # is displayed above cord with a yellow band.
C. Swap cords
Note: Position change of cord with yellow band.
D. Initialize legs and cycle table up and down.
E. Display reads “E13”
Leg attached to cord with yellow band is faulty.
Display reads E12, control box issue, replace control box.
Release Date: 8/18/16 Subject to change without notice. Errors and omissions excepted. OMT-Veyhl cannot accept responsibility for incorrect operation or use of the products other than for the intended purpose. Under the warranty terms, OMT-Veyhl shall replace or repair any products that prove defective at the time of delivery. OMT-Veyhl shall not assume any further liability. If you have any questions or special requests, please contact OMT-Veyhl direct.
8
Error Code
Port Number Error Code Readout
Action
E12 M1
Per
form
Sw
ap
E13 Replace Leg in M2
E12 Replace Control Box
E13 M2 E12 Replace Leg in M1
E13 Replace Control Box
E14 M3 Different Replace Leg
Same Replace Control Box
E24 M1 E25 Replace Leg in M2
E24 Replace Control Box
E25 M2 E24 Replace Leg in M1
E25 Replace Control Box
E26 M3 Different Replace Leg
Same Replace Control Box
Port used for 3 leg tables

Release Date: 8/18/16 Subject to change without notice. Errors and omissions excepted. OMT-Veyhl cannot accept responsibility for incorrect operation or use of the products other than for the intended purpose. Under the warranty terms, OMT-Veyhl shall replace or repair any products that prove defective at the time of delivery. OMT-Veyhl shall not assume any further liability. If you have any questions or special requests, please contact OMT-Veyhl direct.
9
8. Plug Detection
9. Manual Reset (Initialization Procedure)

Release Date: 8/18/16 Subject to change without notice. Errors and omissions excepted. OMT-Veyhl cannot accept responsibility for incorrect operation or use of the products other than for the intended purpose. Under the warranty terms, OMT-Veyhl shall replace or repair any products that prove defective at the time of delivery. OMT-Veyhl shall not assume any further liability. If you have any questions or special requests, please contact OMT-Veyhl direct.
10
10. Container and Shelf Stop Positions

Release Date: 8/18/16 Subject to change without notice. Errors and omissions excepted. OMT-Veyhl cannot accept responsibility for incorrect operation or use of the products other than for the intended purpose. Under the warranty terms, OMT-Veyhl shall replace or repair any products that prove defective at the time of delivery. OMT-Veyhl shall not assume any further liability. If you have any questions or special requests, please contact OMT-Veyhl direct.
11
11. Additional Error Messages from hand switch display
Release Date: 8/18/16 Subject to change without notice. Errors and omissions excepted. OMT-Veyhl cannot accept responsibility for incorrect operation or use of the products other than for the intended purpose. Under the warranty terms, OMT-Veyhl shall replace or repair any products that prove defective at the time of delivery. OMT-Veyhl shall not assume any further liability. If you have any questions or special requests, please contact OMT-Veyhl direct.
12
12. The following information is helpful when reporting product issues: a. Order #
b. Product ID
c. Color
d. Condition of product leading up to problem.
e. Troubleshooting steps
f. Specific part(s) requested. Often, only one component may have to be replaced.


