troop overnight certification 2 homestudy packet
39
1 TROOP OVERNIGHT CERTIFICATION 2 HOMESTUDY PACKET Overnights at Places Without Indoor Facilities Updated 2/2017
Transcript of troop overnight certification 2 homestudy packet

1
TROOP OVERNIGHT CERTIFICATION 2
HOMESTUDY PACKET
Overnights at Places Without Indoor Facilities
Updated
2/2017

2
Thank you for your interest in Troop Overnight Certification (TOC) 2. Please read through this
packet. You will find helpful information on council properties for advanced camping, recipes and
information about outdoor cooking, program ideas, and more! In order to receive the certification
you must complete a set of questions at the end of this packet or the same set of questions online.
You will be notified by email when your Course Completion has been received. Your certification
will be documented in Badgerland Council’s database.
Troop Overnight Certification 2 (TOC 2) Q & A’s:
What is TOC 2 required for? TOC 2 is required for overnights without indoor facilities such as
tent/tipi or yurt camping.
Who should be certified? At least one leader or parent interested in helping to plan, organize and
attend overnights for a troop/group must be certified.
What is required of the person certified? They must be a registered, background checked
volunteer with Badgerland Council. They must also plan to help organize and attend every
overnight their troop/group participates in. If they are unable to attend an overnight, another
registered, background checked adult who can attend must become certified.
Does the certification expire? No. Once you have taken TOC 2, you are certified for the rest of
your time as a volunteer with Badgerland Council.
What about CPR/First Aid? Girl Scouts recommends that at least one registered, background
checked adult volunteer be certified in CPR/First Aid on an overnight. This person does not have to
be the same person certified in TOC 2. Courses through Badgerland Council, The Red Cross,
American Heart Association or equivalent qualify.
What if I want more hands-on training? TOC 2 is offered in person during the warmer months
when a training can be conducted outside. Contact Badgerland’s Adult Learning Specialist, Katie
Ravich, at 608.237.1143 or [email protected] for more information.
Do I need anything else? You should refer to Volunteer Essentials and the Safety Activity
Checkpoints in addition to this packet when planning or attending an overnight. Volunteer
Essentials and Safety Activity Checkpoints and required forms for an overnight can be found on
www.gsbadgerland.org .
What about longer trips? If you plan on traveling for three or more nights, you must use the
Traveling Troops Guide found on our website, www.gsbadgerland.org.
Who should I contact for more information or for questions? Badgerland Council’s Adult
Learning Specialist: Katie Ravich [email protected] 608.237.1143
3
Troop Overnight Certification 2
Places without full indoor facilities
In this packet there is information on:
Progression in Girl Scouts and progression of property usage: page 4
Badgerland Council properties suitable for advanced camping: page 4
Procedures for reserving and using Badgerland Council properties: page 6
Advanced Camping Readiness: tools to help determine how ready your troop/group is for
advanced camping: page 8
Safety: Including, Girl Scout safety guidelines and checkpoints, transportation, adult-to-girl
ratios, severe weather, animals, plants and emergencies, forms for overnights: page 9
Leave-No-Trace camping principles: page 18
What to bring, making an equipment list: page 19
Basic housekeeping and food safety, fire building and fire safety: page 20
Progression in cooking, Advanced campfire cooking techniques and recipes: page 24
Techniques for teaching girls skills such as using jackknives, tying knots and tent etiquette
and maintenance: page 33
Course Completion: To record that you completed Troop Overnight Certification 2, you must
complete and submit the test questions on the last pages of this packet to Badgerland
Council OR you may complete the test questions online.
Please return the completed test questions at least two weeks prior to an overnight. You can
mail, email, fax or complete the questions online.
Mail: the completed questions to: GSWIBC, Attn: Adult Learning Specialist, 2710 Ski Lane, Madison WI, 53713
Email: the completed questions to [email protected].
Fax: the completed questions to 608.276.9160
Online: To complete the questions online, simply click on this link: Course Completion Questions or paste this url into your browser: https://www.surveymonkey.com/r/7Y8THS8?sm=vUMlEe6F%2bN1JiR16EmrTYQ%3d%3d
If you have any questions, please contact the Badgerland Council Adult Learning Specialist at [email protected] or 608.237.1143.
4
What does progression in Girl Scouts mean?
Girls grow and develop new skills by starting with activities that are familiar, then working their way up to new and challenging ones. Girl progression is the gradual increase of skills and knowledge, designed to match the girls’ learning levels to their abilities and needs. As girls progress in their skills and knowledge, they enjoy the challenges, rather than become frustrated by attempting to learn skills that are beyond their readiness. The more comfortable and prepared the girls are in performing tasks, the easier your role as the adult volunteer becomes. The Troop Overnight Certification One home study packet has more information on progression in Girl Scouts and can be downloaded here:
TOC 1 packet
Certain topics common through all levels in progression: skill development safety and standards program goals girl planning age appropriateness environmental protection fun!
“Progression Beyond the Troop Activities” starts with looking out and exploring out before moving on to sleeping in, sleeping out and eventually trips out. As the girls in your troop advance through the progression activities, they will add to their skills and their confidence. Allow them to move up as fast as they are ready and able.
Progression of property usage and Badgerland Council properties
suitable for advanced camping:
Your troop has probably done several overnights and/or camping trips at Badgerland properties like council buildings or troop houses (Hawk’s Nest at Camp Brandenburg for example) or at a community center, cabin or school. These are places that have full indoor facilities. If your troop or group has had successful overnight experiences like these, you may be ready to move on to overnights at places without full indoor facilities.
The following Badgerland Properties are available with Troop Overnight Certification Two:
Sumac tent unit & Kinderspielen primitive site located at Camp Brandenburg 30 minutes
west of Madison:
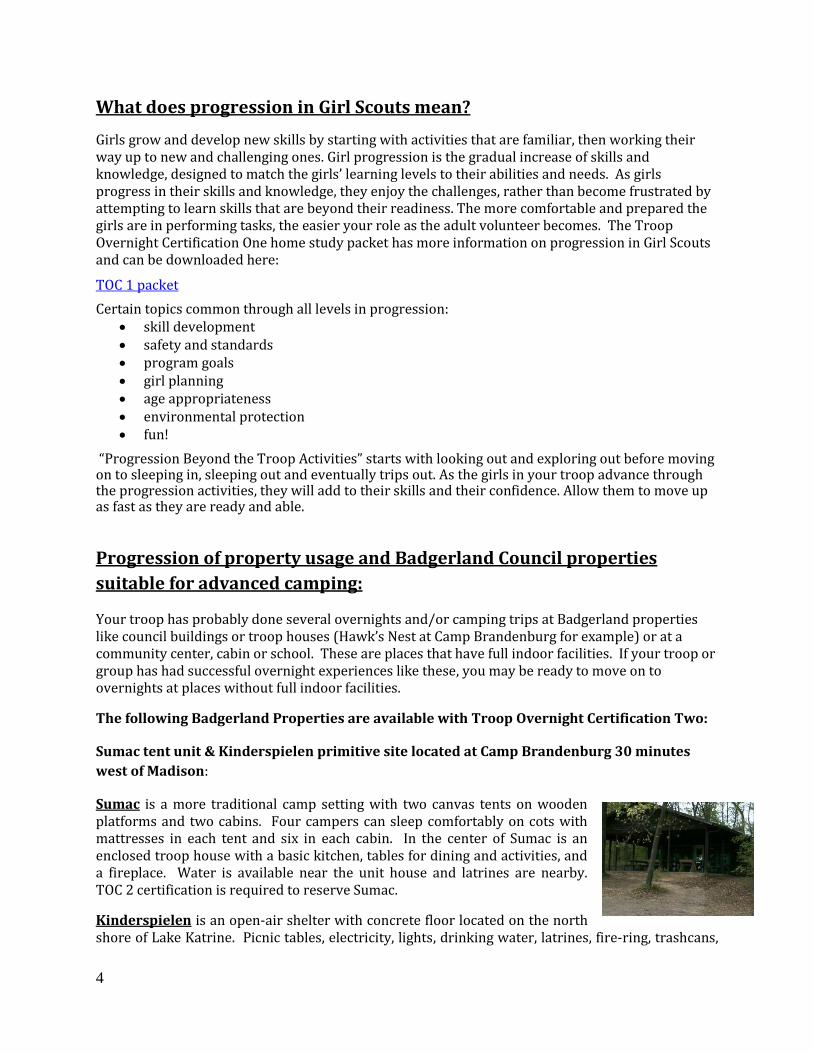
Sumac is a more traditional camp setting with two canvas tents on wooden platforms and two cabins. Four campers can sleep comfortably on cots with mattresses in each tent and six in each cabin. In the center of Sumac is an enclosed troop house with a basic kitchen, tables for dining and activities, and a fireplace. Water is available near the unit house and latrines are nearby. TOC 2 certification is required to reserve Sumac.
Kinderspielen is an open-air shelter with concrete floor located on the north shore of Lake Katrine. Picnic tables, electricity, lights, drinking water, latrines, fire-ring, trashcans,

5
outdoor grill, flagpole and large grass activity area make Kinderspielen the perfect place for a day of fun and learning, or you can pitch your tent and make it an overnight adventure. Nearby is a boathouse filled with canoes, paddles and personal flotation devices for you to enjoy. Canoes must be reserved at least one week prior to your visit. Any troop undertaking canoeing must fulfil the requirements of the Girl Scout Safety Activity Checkpoints for canoeing which can be found here: http://www.gsbadgerland.org/content/dam/gsbadgerland/documents/Safety%20Activity%20Checkpoints13-14.pdf
Lake Katrine is a 38-acre lake that lies completely within the boundaries of Camp Brandenburg. In its deepest spot, Lake Katrine is about six feet deep. Lake Katrine is classified as a “seepage” lake, meaning it relies on rainfall, snow-melt and groundwater to maintain its depth – there are no streams or rivers flowing in or out. Because of its shallow depth, Lake Katrine does not support a large fish population. The lake bottom is “mucky,” which makes it ideal habitat for leeches. As leeches go, the “yuck” factor is far more serious than any health hazard. Swimming is not recommended. Lake Katrine is wonderful place to relax and learn. Be sure to bring your curiosity and your binoculars as the lake is home to a variety of turtles and salamanders, and is a popular nesting place and fall-migration stop-over for many species of waterfowl.
**Poison ivy, poison oak, wild parsnip, wood ticks and deer ticks are present at Camp Brandenburg. Be sure to familiarize yourself with each of these pests. Do your best to avoid them and learn how to deal with them should you come in contact**
Other facilities appropriate for TOC 2 camping include yurts, primitive campsites and state park campsites.
Procedures for Reserving Badgerland Council Properties
1) Review the property descriptions online at www.gsbadgerland.org to see which property or unit within a property best meets your needs. Be sure to check what amenities are available, what level of Troop Overnight Certification is needed, fees, etc.
2) Read the Badgerland Council Property Rental Policy online. It contains important information regarding security deposits, rental guidelines, and property policies.
3) Check availability: To check availability on a Badgerland Council property, look on gsbadgerland.org,
under the”CAMP” tab, “rent a camp” for the “Reserved Badgerland Properties” calendar. This calendar will list what is already reserved.
Property calendars will be opened one month at a time, six months out, on the first business day of the month. To provide a fair opportunity for all troops and membership areas, we cannot accept reservations further than 6 months out from the date of the stay.
All properties will be closed during the gun deer hunting season (the Saturday before Thanksgiving through the Sunday of Thanksgiving weekend) plus any additional dates designated by the Wisconsin Department of Natural Resources
6
Reservations for property use on holidays (Memorial Day weekend, 4th of July, Labor Day weekend) must be made two months in advance in order to ensure staff coverage.
All sites are subject to immediate closure per designation by the council. In the event of a closure, every effort will be made to find an alternate date or property for your stay, or a full refund will be issued.
4) Complete the “Rent a Camp” Reservation Form online found here:
http://www.gsbadgerland.org/en/camp/Rent.html After your reservation form has been submitted you will receive an email confirmation. The confirmation email will also include instructions on how to pay appropriate fees/security deposit. Full payment is expected no later than 2 weeks prior to the reservation date and may be done by cash check or credit card. We reserve the right to raise fees or charge a fuel/energy surcharge if costs warrant. Reservations are processed on a first come, first served basis. An active email account is required to reserve a property.
5) Cancellation/Refund Procedure: Fees for any council property reservation may be refunded
only with a written request at least two weeks prior to the date of the reserved stay. If weather conditions make transporting girls dangerous, leaders must notify a council staff person of their cancellation before they are scheduled to arrive at the property. If this is done, every effort will be made to find the troop an alternate date for property use or provide a refund.
General Information and Guidelines about Property Usage
• Adults in charge are responsible for following Safety Activity Checkpoints and volunteer responsibilities in order to ensure the safety of all girls and adults. Safety Activity Checkpoints can be found here: http://www.gsbadgerland.org/content/dam/gsbadgerland/documents/Safety%20Activity%20Checkpoints13-14.pdf.
• Properties are checked regularly, but please keep in mind that when they are frequently used, the list of amenities at each property may not be completely accurate. Please make every effort to only take what you brought with you. If you see something that is missing or needs to be fixed, contact Badgerland Council when you get home.
• No alcoholic beverages may be consumed at girl activities or when minors are present at Girl Scout adult events (e.g. fund-raising). No smoking, illegal drugs or misuse of substances is allowed in any Badgerland Council building or on any property. Disruptive behavior due to alcohol consumption or drug usage will result in immediate dismissal from the site.
• In order to maintain low cost facilities for use, Badgerland Council needs your help to keep our properties looking better than you found them. Badgerland Council does not have janitorial service clean our sites. Each troop or group staying at a site is responsible for removing garbage and recyclables from the site.

7
Dumpsters are provided. You are also responsible for cleaning the site. Graffiti of any kind is not acceptable (including paint, carvings, charred wood writing, chalk, spray paint)! Please take all art/craft projects with you when you leave. If sidewalk chalk is used, please remove it when leaving.
• All properties will be closed during deer hunting season (the Saturday before
Thanksgiving through Sunday of Thanksgiving weekend) plus any additional dates designated by the DNR.
• No snowmobiles or motorized wheeled vehicles are permitted on the property.
• Reservations for property use on holidays (Memorial Day weekend, 4th of July, Labor Day weekend) must be made two months in advance in order to ensure staff coverage.
• If the electricity goes out at any time, please call the Site Manager at the site
you are at or the Director of Property, and do not flush any toilets until the electricity is back on.
Cancellation/Refund Procedure
Fees for any council property reservation may be refunded only with a written request at least two weeks prior to the date of the reserved stay. If weather conditions make transporting girls dangerous, leaders must notify a council staff person of their cancellation (800.236.2710) before they are scheduled to arrive at the property. If this is done, every effort will be made to find the troop an alternate date for property use or provide a refund.
8
Advanced Camping Readiness: tools to help determine how ready your
troop/group is for advanced camping:
Is your troop/group ready to stay overnight or longer at places without full indoor facilities? Are you and the other adults chaperoning ready to lead your group or troop effectively under these conditions so that advanced camping is a good experience for everyone?
For both girls and adults the most important factor is probably past experience and appropriate progression through outdoor/overnight activities. If you or your troop/group have not had successful overnight experiences at places with full indoor facilities you are not ready to attempt the challenge of overnights at places without indoor facilities.
The lead trip/travel adult should have knowledge, skills and experience in the following areas:
• Outdoor leadership, outdoor cooking
• Progression and readiness
• Trip planning in a girl-led environment
• Safety management
• First aid, CPR, safety, handling emergency situations
• Judgment and maturity
• Program activities specific to the trip
• Group dynamics and management
• Supervision of girls and adults
• Participation in similar trips
• Familiarity with the area in which the trip is conducted
• Physical fitness and skills necessary to lead the group
Adults selected as chaperones for the trip should be trained or have documented experience with:
• Travel or trip camping skills
• Group management and group dynamics
• Mode of transportation
• Site orientation
• First aid and CPR
• Emergency procedures
Girls who are ready for an overnight in a place without full indoor facilities should:
Want to go Be willing to sleep, eat, and cooperate with all girls Be able to cope with unknowns: strange places, darkness, woods, night noises, bugs Be able to manage with little or no privacy Have stamina Be strong enough to carry bucket of water, pot of food Have strength and coordination needed for planned activities Be able to follow a recipe or a Kaper Chart

9
Be able to use camping equipment including tents, dunk bags and jackknives Be able to wash dishes, clean up kitchen/cooking area and store food properly Be able to build a fire outside or in a fireplace, and/or can operate type of stove to be used Have been on a series of day trips, cookouts, overnights and/or has been to day or
resident camp. Have done all the camp jobs usually found on Kaper Charts Be able to determine what is needed and pack appropriately for trip Understand the principles of Leave-No-Trace camping
Safety: including, Girl Scout safety guidelines and checkpoints,
transportation, adult-to-girl-ratios, severe weather, animals, plants and
emergencies:
Responsibilities of the Volunteer: Girl Scout Safety Guidelines Every adult in Girl Scouting is responsible for the physical and emotional safety of girls, and we all demonstrate that by agreeing to follow these essential safety guidelines at all times. 1. Follow the Safety Activity Checkpoints. Instructions for staying safe while participating in activities are detailed in the Safety Activity Checkpoints, available at: www.gsbadgerland.org. Read the checkpoints, follow and share them with other volunteers, parents, and girls before engaging in activities with girls. 2. Arrange for proper adult supervision of girls. Your group must have at least two unrelated, background checked and registered adult volunteers present at all times, plus additional adult volunteers as necessary, depending on the size of the group and the ages and abilities of girls. Adult volunteers must be at least 18 years old and must be screened and approved by Badgerland Council before volunteering. One lead volunteer in every group must be female. 3. Get parent/guardian permission. When an activity takes place that is outside the normal meeting time and place, advise each parent/guardian of the details of the activity and obtain permission for girls to participate (see the forms section on the the Badgerland Website for a sample permission slip). 4. Report abuse. Sexual advances, improper touching, or sexual activity of any kind with girl members is strictly forbidden. Physical, verbal, and emotional abuse of girls is also forbidden. Follow Badgerland Council’s guidelines in the Volunteer Policies for reporting concerns about abuse or neglect that may be occurring inside or outside of Girl Scouting. 5. Be prepared for emergencies. Work with girls and other adults to establish and practice procedures for emergencies related to weather, fire, lost girls/adults, and site security. Always keep handy a well-stocked first-aid kit, girl and adult health histories, current contact information for girls’ families, and GSWIBC Procedures for Emergencies. 6. Travel safely. When transporting girls to planned Girl Scout field trips and other activities that are outside the normal meeting time and place, every driver must be a background checked and registered adult volunteer and have a good driving record, a valid license, and a registered/insured vehicle. Everyone must be in a legal seat and wear their seatbelt at all times, and adhere to
10
state laws regarding booster seats and requirements for children in rear seats. 7. Ensure safe overnight outings. Prepare girls to be away from home by involving them in planning, so they know what to expect. Unrelated men may not sleep in the same space as girls and women. 8. Role-model the right behavior. Never use illegal drugs. Don’t consume alcohol, smoke, or use foul language in the presence of girls. Do not carry ammunition or firearms in the presence of girls unless given special permission by Badgerland Council for group marksmanship activities. 9. Create an emotionally safe space. Adults are responsible for making Girl Scouting a place where girls are as safe emotionally as they are physically. Protect the emotional safety of girls by creating a team agreement and coaching girls to honor it. Agreements typically encourage behaviors like respecting a diversity of feelings and opinions; resolving conflicts constructively; and avoiding physical and verbal bullying, clique behavior, and discrimination. 10. Ensure that no girl is treated differently. Girl Scouts welcomes all members, regardless of race, ethnicity, background, disability, family structure, religious beliefs, and socioeconomic status. When scheduling, helping plan, and carrying out activities, carefully consider the needs of all girls involved, including school schedules, family needs, financial constraints, religious holidays, and the accessibility of appropriate transportation and meeting places. 11. Promote online safety. Instruct girls never to put their full name or contact information online, engage in virtual conversation with strangers, or arrange in-person meetings with online contacts. On group websites, publish girls’ first names only and never divulge their contact information. Teach girls the Girl Scout Online Safety Pledge http://www.girlscouts.org/help/internet_safety_pledge.asp and have them commit to it. 12. Keep girls safe during money-earning activities. Girl Scout cookies and other council-sponsored product sales are an integral part of the program. During Girl Scout product sales, you are responsible for the safety of girls, money, and products. In addition, a wide variety of organizations, causes, and fundraisers may appeal to Girl Scouts to be their labor force. When representing Girl Scouts, girls cannot participate in money-earning activities that represent partisan politics or other non-profit organizations that are not Badgerland Council-approved product sales and efforts.
Responsibilities of the Girls Girls who learn about and practice safe and healthy behaviors are likely to establish lifelong habits of safety consciousness. For that reason, each Girl Scout is expected to:
Attend and participate in meetings and outings Pass along important information to parents or leaders Respect leaders and parents Conduct herself in a safe manner Treat fellow Girl Scouts as her sister Have fun!

11
Transportation, Adult-to-Girl Ratios
How you plan to transport girls is an important decision. You can use public or private transportation methods. If using public transportation such as a train or bus, make sure everyone in the group knows where they are going, has a map and directions and the leader’s cell phone number. It is a good idea to designate a meet-up area in case someone gets separated from the group.
Private transportation includes private passenger vehicles, rental cars and chartered buses. Badgerland Council’s procedures for transporting girls:
There must be at least two unrelated, background checked and registered volunteers traveling with the group, one of whom is female, and the adult/girl ratios in this packet must be followed
Any additional drivers must be registered and have a current background check on file with Badgerland Council
Drivers must have a good driving record, a valid license, and a registered/insured vehicle Girls never drive other girls Care should be taken so that a single car is not separated from the group for an extended
length of time Drivers should keep health history forms and emergency contact information for the girls
traveling in their vehicle

12
Adult-to-Girl Ratios
Girls Scouts adult-to-girl ratios show the minimum number of background checked and registered
adults needed to supervise a specific number of girls to ensure the safety and health of the girls. If
you have Girl Scout Daisies, you may want to have one adult per girl for a first overnight.
Events, Travel, and Camping
Two unrelated,
background
checked, registered
adults (at least one
of whom is female)
for this number of
girls:
Plus one additional
background
checked, registered
adult for each
additional number
of this many girls:
Girl Scout Daisies
(K–grade 1) 6 4
Girl Scout Brownies
(grades 2–3) 12 6
Girl Scout Juniors
(grades 4–5) 16 8
Girl Scout Cadettes
(grades 6–8) 20 10
Girl Scout Seniors
(grades 9–10) 24 12
Girl Scout
Ambassadors
(grades 11–12)
24 12

13
Severe Weather
Tornadoes
When inside, move to an interior room with no windows or into a basement until the tornado has passed. If you are outside and unable to get to a safe building, the safest place to go is to a ditch or other low area. Get as low to the ground as possible and cover your head to avoid debris. You want to refrain from hiding under an overpass as they act like wind tunnels during a tornado.
Lightning
Stay inside when there is lightning. If you can hear thunder, you are close enough to be hit by lightning. Stay inside for 30 minutes after you hear the last clap of thunder. If you are caught outside while there is lightning, find a low spot away from trees, fences and poles.
Floods
If you are dealing with floodwaters, do not attempt to travel through them. Turn around and head for higher ground. Flooding can be very dangerous. Do not try to drive through water if you don’t know how deep it is. A depth of 18-24 inches is often enough to float most vehicles, and the driver is then no longer in control.
Blizzard
Do not attempt to go out in the event of a blizzard. The best thing to do is stay inside what shelter you have and wait it out. It is always a good idea to bring extra food and activities for any overnight trip in case of an unexpected event like a blizzard. If you have reserved a Badgerland property, we know you are there and Council employees will come to plow you out. Do not attempt to drive until blizzard conditions have lifted and the roads have been cleared.
Fire
Badgerland properties are inspected and maintained for fire safety and clear directions in the event of a fire are posted at each site, but it is a good idea to familiarize yourself with general wildfire

14
guidelines like this: http://www.ready.gov/wildfires AND general house fire guidelines like this: http://www.ready.gov/home-fires
Other Severe Weather Tips
All GSWIBC properties have weather radios, so make sure to use them—don’t ignore the warnings!
Check the weather forecast before you leave for your trip. If you don’t think it’s safe to be camping, then decide with your group whether to delay or postpone the trip.
Prepare yourself and your girls for what to do in case of a severe weather emergency.
Pack prepared for the weather. Bring rain gear, clothing for warmer days, and clothing for when it’s cool. Don’t forget about footwear for activities you have planned!
Wildlife/Dangerous Plant Awareness
This guide is a resource for you to be aware of some plants and animals you may come across when exploring Wisconsin nature with your girls.
Mosquitoes: There are two important mosquito borne viruses to be aware of in Wisconsin: West Nile Virus and LaCrosse Virus. The best way to protect yourself and the girls is to reduce the risk of mosquito bites by: covering up (long pants, shirts etc.), using an effective repellant according to the instructions for the repellant (different repellants have age restrictions, application instructions etc.), limiting your time outdoors between dusk and dawn when the mosquitoes that carry these viruses are most likely to bite and mosquito proofing your shelter. It should be noted that the platform tents at GS properties offer no mosquito protection. If mosquitoes are a concern when using the platform tents, you might want to bring along portable mosquito netting for girls to sleep under.
Deer and Wood Ticks: Found in tall grass and wooded areas where they wait to attach to a host, so be sure to wear long pants, long sleeved shirts, and hats to help prevent a tick from biting you. Always do tick checks after being outside because deer ticks can sometimes carry Lyme disease. To remove a tick, grasp it by the head with a sharp pair of tweezers. Remove slowly and in a straight line with no twisting or turning. You want to make sure you get every part of the tick out. If you suspect that a tick you are removing off a girl or an adult is a deer tick, it is good idea to save the tick in a tightly sealed container so it can be shown to a healthcare professional.
Bats: The 7 species of bats in Wisconsin are all insect-eaters and are very beneficial to our environment. However, if you find a bat (alive or dead) leave it alone, as it is possible that it may carry disease. Call the emergency contact at Badgerland Council if there is reason to believe someone in your group might have been bitten. The correct health and wildlife professionals will then be contacted.
Skunks: If threatened, skunks will spray a horrible smelling, hard to remove odor. If you encounter a skunk, walk away slowly to avoid threatening it and causing it to spray. They can spray up to 20 feet, so be careful. Along with other wild animals, skunks are known to carry disease, so do not approach them to avoid being bitten.

15
Raccoons: Nocturnal animals with a mask-like face and a ringed tail. Do not approach raccoons, as they are known to carry disease. To avoid raccoons in your campsite, keep all food secure when you are not cooking or eating; and don’t leave garbage or extra food lying around your site.
Coyotes: You are more likely to hear a coyote than to see one, as they are generally nocturnal creatures. As with other wild animals, coyotes are meant to be left alone and are dangerous if they feel threatened. To avoid having a coyote enter your campsite, secure garbage, as that is an easy way for them to get food. If one does enter your site, try to scare it away by shouting at it and waving your arms over your head. This will reinforce the coyote’s natural fear of humans.
Gray Wolves: They are currently a federally protected species, and a growing population calls Wisconsin their home. Wolves are normally secretive, and will run away if they encounter humans. However, if you encounter a wolf that doesn’t back away, wave your arms to make yourself seem bigger, make lots of noise, and back away slowly without turning your back to the wolf.
Black Bears: They typically live in large forested areas, but will leave those in search of food. Bears are scavengers and generally eat fruits, plants, and small animals. They are not searching for humans and if you are in a large group, they will often avoid you. If you come across a black bear, remain calm and avoid sudden movements. Give the bear lots of room and back away. If it spots you, make noise, talk, and wave your arms. Do not run from a bear.
Rattlesnakes: There are only two poisonous snakes in Wisconsin, the Timber Rattlesnake and the Massasauga Rattlesnake. The Timber Rattlesnake can sometimes reach a length of 4 ½ feet and is a yellowish color with dark crossbars, black tail, an unmarked yellowish-tan head and tan rattles. It is found near cliffs, rocks, and steep hillsides. The Massasauga Rattlesnake is smaller, reaching a length of 20-32 inches. Colors range from gray to brown with dark and light brown blotches on its top and sides. Both snakes are endangered in Wisconsin, are not prone to striking and if they sense the presence of a human, will slither away. However, if you hear the rattle, you are too close and should back away. If you or someone in your group is bitten, stay calm, seek medical attention immediately (call 911), notify authorities and the Council’s emergency contact person. While the other snakes in Wisconsin are not poisonous, they may bite and have very sharp teeth. Do not handle any snake you come across.
Snapping Turtles: Found near bodies of water, but prefer those with muddy bottoms and lots of vegetation. These turtles will strike when threatened, and due to their aggressive nature, should not be handled.
Timber
Rattler
Massasauga Rattler

16
Poison Ivy: Three sometimes notched, divided leaves with the center leaf on a longer stalk. White, waxy berries on the stem and can be found as a shrub, or a climbing vine. If you come into contact with Poison Ivy, wash the area immediately with soap and cold water to reduce effects of the oil. Touching clothes that have been contaminated by the oil, or burning the plant is also a way people contract the rash.
Poison Sumac: One of the easiest ways to identify poison sumac is by the red stem that stays red throughout the entire year. The groups of leaves are in odd numbers ranging from 5-13 and have a glossy/waxy look to them. The berries are a creamy white to light yellow and grow in the center, between the main stems of the leaves. The oil from the leaves creates a rash
reaction like that of poison ivy.
Wild Parsnip: This plant holds hundreds of yellow flowers in a single flower stalk that can be 4 feet tall and can burn your skin. The chemicals in the juices of the plant when paired with ultraviolet light from the sun can cause your skin to burn and blister. To avoid this reaction, stay clear from the plant, as well as wear long pants and a long sleeved shirt when hiking.
Do not touch or ingest any plants that you are not familiar with. Remember, wild animals are meant to stay in the wild. If you come across one, you can observe them from afar by being quiet and still, but do not disrupt them in their natural habitat.
17
Procedures for Serious Accident, Emergency or Fatality
The procedures listed below must be followed in instances of extreme emergency, such as an
automobile accident (in which the police are called); a missing child (one who isn't found within a
reasonable length of time); a child or adult badly injured at a Girl Scout event; property severely
damaged during a Girl Scout event (by fire, for example); national or local emergencies directly
impacting the Council.
STAY CALM. Express an attitude of control to the children under your supervision. Provide all possible care to the injured. Call parents; abide by their decision regarding medical care. Call an ambulance. Assign an adult to stay with the injured and another adult to stay with those who are not injured. The uninjured should be removed from the scene of the accident.
Notify police in accidents involving vehicles or any conveyances (cars, boats, bicycles, etc.) or if police assistance is needed. Keep a responsible adult at the scene of the accident. The victims or surroundings are not to be disturbed until the police indicate to do so. Collect names, addresses and phone numbers of all witnesses.
Contact one of the following as soon as possible. Call in the following order of names listed. DO NOT leave a message. Continue calling until you reach a live person on the list. Director of GSLE : Christine Posey 608.630.0595 Director of Marketing: Christy Gibbs 608.630.3281 CEO: Marci Henderson 608.250.0491 COO: Wendy Dordel 608.332.5479
Contact the Troop Emergency Contact Person as listed on the Property Reservation for and the Parental Permission form.
Make no statements orally or in writing that could be interpreted as either an assumption or a rejection of responsibility of the accident.
Council staff will handle making any necessary statements about the accident to anyone concerned including the media, police and insurance adjustors.
If you are pressured for a statement by the press or the public simply say, “All questions
will be answered by the official Girl Scout spokesperson who will have a statement soon.”
Keep all of your permission slips and health histories.
Contact Badgerland Council at 1.800.236.2710 to receive and submit an official incident report.
18
Forms for Overnights
Forms to complete prior to an overnight:
Property Reservation Form (must be submitted in order to reserve a Badgerland property)
Forms that MAY be needed:
Additional Insurance Form (used if non-registered Girl Scouts are in attendance)
Bus Transportation Form (used if bus services will be used to transport participants)
Forms to have with you at all times on an overnight:
Girl Health History - Should be completed at the beginning of the year, kept in the troop files and brought to all outings and overnights.
Adult Health History – Adults chaperoning on an overnight should complete a health history prior to the overnight. This form can be put in a sealed envelope for confidentiality. Be sure to put the person’s name on the envelope.
Parent Permission for Special Events and Overnights
Emergency Procedures for Badgerland Council
All forms can be found on www.gsbadgerland.org or from your local service center.
Leave-No-Trace Camping Principles
Girls Scouts always try to leave a place better than they found it!
Plan Ahead and Prepare! Prepare for extreme weather hazards and emergencies Repackage food to minimize waste Travel and Camp on Durable Surfaces Good campsites are FOUND not MADE Dispose of Waste Properly Pack it in, Pack it out Leave What you Find Do not build structures or dig trenches Minimize Campfire Impacts Use already established burning places do not make new ones Respect Wildlife Observe wildlife from a distance and do not approach Be Considerate of Others Let Nature’s sounds prevail
Planning a longer trip?
If you are planning a trip with 3 or more nights a Traveling Troops Packet is required. Find this packet on our website here:
http://www.gsbadgerland.org/co
ntent/dam/gsbadgerland/docum
ents/Traveling%20Troops%20Gui
de.pdf

19
What to bring, making an equipment list Pack light! A good rule when packing for an overnight is to pack only what can be carried in one trip. Making a packing list is a great group activity prior to the overnight so everyone has a chance to think about what is and is not needed. Here are suggested but by no means exhaustive lists to help you get started. It is a good idea to keep running personal and troop equipment lists that you can add to and change as you gain more experiences camping. Personal Gear:
Sleeping bag for outdoor use with the appropriate temperature rating not a cotton sleeping bag intended for light indoor use
If tent camping, a sleeping pad intended for outdoor use Clothing and footwear appropriate for the weather and planned activities Pajamas, underwear and socks Personal care items: toothbrush, toothpaste, towel, washcloth, shampoo, deodorant,
etc. (all in one bag that can be locked in a car so as not to attract animals) Sunscreen, lip balm, bug spray, etc. (all in one bag that can be locked in a car so as
not to attract animals) Flashlight Outer wear: jacket, hat, gloves/mittens, rain gear Hair care items: comb/brush, hair bands
(especially important to remember to pull long hair pack around a campfire)
Medications should be given to the adult in charge Dunk bag/mess kit
Troop Gear:
First aid kit Troop paper work (health histories, permission
slips, etc.) Cooking gear Dishwashing gear Hand washing gear Tents and ground clothes if using Food for all meals Materials for activities (binoculars, Girl’s Guides
etc.) Extra bug repellent Extra sunscreen A “rain kit” that includes: games and activities
that can be done indoors and on the fly What to leave at home:
Cell phones and other electronics Food, candy, gum, etc. Money, jewelry and other valuables
Cell Phones and other Handheld
Electronic Devices
Handheld electronic devices are
everywhere these days and many
girls will have one or more phones,
tablets, MP3 players etc. that she
brings with her everywhere.
Troops can develop their own
philosophies about the place for
these electronics in Girl Scout
activities, but feedback from
experienced leaders indicates that it
is best to leave these devices at
home. They distract the girl who
owns the device as well as the other
girls around her from fully
experiencing their time outdoors.
These devices are also easily
damaged or lost on any camping
trip. As long as the adults
responsible for the girls have access
to a phone for emergencies, no one
else should need a handheld
electronic device.

20
Basic housekeeping and food safety, fire building and fire safety
Basic Housekeeping and Food Safety
Hand washing
When running tap water is not available, a simple washing station can be made from a plastic jug and a wooden dowel or twig. Make a small hole near the bottom of the jug. Use the twig or dowel to plug up the hole. Fill the jug with water. Place a bar of soap in a net bag (onion or orange bags or a piece of pantyhose work well) and tie the net bag to the handle of the jug. Hang hand washing stations near latrine and kitchen. When you want the water to flow, loosen the jug cap and remove the twig or dowel. To stop water flow, replace twig or dowel and tighten cap. Sometimes these homemade hand washing stations are called dribble buckets.
Dish Washing
Each person should have a “dunk bag” for their personal dishes (usually a plate, bowl, mug and set of utensils). Dunk bags can be made out of any mesh material. Nylon works best as it dries quickly. Dunk bags should have a drawstring top and are able to be hung from a line to drip dry. Making a dunk bag is a great project for girls to do to get ready for their camping experience. Directions and ideas for making a dunk bag can easily be found by searching “how to make a dunk bag,” on Pintrest or on YouTube.
Recommended Dish Washing Procedure:
1. Each person thoroughly scrapes their dishes into a trash receptacle with a rubber scraper (it is a good idea to have an adult supervise this part of the procedure).
2. Each person washes her own dishes in a pan of hot soapy water. Biodegradable soap (sometimes labeled “Camp Soap”) is recommended.
3. She rinses her dishes in a separate pan of warm rinse water. 4. She dips her clean dishes in a third pan of cool chlorinated water (one capful bleach
per gallon of water). 5. She places clean dishes in her dunk bag and hangs the bag to drip dry from a
clothesline strung between two trees. 6. After each girl has washed her personal dishes, then the serving and cooking dishes
are washed by the assigned clean-up crew. 7. Before disposing of dishwater, remove as many food particles as possible. 8. Throw the dishwater in an area distant from the campsite and in such a way that the
water will not run into a stream or other body of water.

21
STORE ALL TRASH IN THE TRUNK OF SOMEONE’S CAR IF YOU ARE LEAVING THE CAMPSITE
DURING THE DAY AND OVERNIGHT. OTHERWISE ANIMALS WILL BE ATTRACTED TO YOUR
CAMPSITE!
Keeping Food Cold
If there is no refrigeration at your site you will most likely store your food in a cooler. Plastic, fiberglass or steel coolers are durable and have good cold retention. A block of ice will last much longer than ice cubes. You can use commercial cold packs or make homemade ones by freezing water in empty milk jugs or water bottles. Fill the cooler full of cold or frozen foods. Pack foods in reverse order of their usage. The first foods packed should be the last foods used. It is safer to cook meat at home and bring cooked meat rather than pack raw meat in your cooler. Take foods in the smallest quantity needed. At the campsite insulate the cooler with a reflective (think light not dark colors) blanket, tarp or towel. PUT THE COOLER IN SOMEONE’S CAR IF YOU ARE LEAVING THE CAMPSITE DURING THE DAY AND OVERNIGHT. OTHERWISE THE SMELL OF FOOD WILL ATTRACT ANIMALS.
Latrine Care
If there are no flush toilets at your site you will be using a latrine or a pit toilet. Leave the pit toilet better than you found it! Sweep the floors and walls. Wipe down seats and lids with a weak bleach solution (one capful of bleach per quart of water). Make sure and close seat lids when not in use. Never throw anything including sanitary napkins and tampons down into the pit or tank! Only human waste and toilet paper go in there.
Fire building and Fire Safety
Campfires are a long-standing Girl Scout tradition. Many council properties have fireplaces in them or fire rings nearby. Campfires provide warmth, comfort, ceremony, and shared fun. However, there are negative impacts of fires: fire rings leave evidence of human impact; heat damages soil; burning wood impacts natural resources; and burning produces air pollution.
As an alternative to a traditional campfire you could try some of these ideas:
Star watching, candle lanterns, luminaries or flashlight circle (girls shine their flashlights in the center of the circle)
If you choose to have a campfire, it is important for you and your girls to know how to build, tend to and safely put out a fire. Make sure that burning wood is permitted and fire danger is low.
These guidelines are for both indoor and outdoor fires:
• Always have firefighting equipment available, including fire extinguisher, water, loose soil or sand, and a shovel and rake, as appropriate, before you start your fire. Never leave a fire unattended
• Do not use liquid fuels to light or increase the fire
• Do not wear flammable clothing such as plastic or fleece, or items with dangling ends
• Keep all combustible materials at least three feet away from a fire
• Restrict the number of people who are tending the fire

22
• Avoid playing active games or other activities near the fire
• Do not poke the fire with a stick or pull out a burning stick – once the stick goes in the fire it stays in the fire
• Restrict the size of the fire as appropriate – don’t add more wood than you can expect to burn in the time you will be by the fire and don’t add any wood in the last half hour. You want your fire to almost burn itself out by the time you’re ready to put it out.
• Put out your fire completely when you are done. You should be able to put your hand on the ashes to ensure they are no longer burning.
Fire Building
A fire requires three things to burn: air, fuel and heat. The structure of the fire is
built to provide for airflow. A lit fire starter or tinder will provide enough heat to
light the fuel. The fuel is provided in increasing sizes as the fire takes hold. Fire
starters are a bridge between your match and your fuel. It is something that
catches fire easily and stays burning long enough to get some wood burning.
Follow these steps to build your outdoor fire:
1. Choose a suitable and safe place. Use an existing fire circle or scar (damaged
soil that hosted a previous fire) and place a large bucket of water and shovel
nearby for putting the fire out.
2. Gather your wood pile. You will need three types of fire material: tinder (half inch in diameter
or less), kindling (wider, one inch or more durable sticks), and fuel (logs). The match lights the
tinder; the tinder lights the kindling; the kindling lights the fuel.
3.Build a foundation fire. Use three pieces of fuel to form an “A” or “teepee” in your fire ring with
the open end facing the wind. Place a fire starter and a large handful of tinder in the triangular
open space of the “A.” Leave space to place the match under the tinder. Then place several pieces
of kindling on top of the tinder. Light the fire starter. Make sure you have additional kindling and
fuel on hand before you start the fire. Keep adding kindling to the fire one piece at a time.
Gradually increase the size of the wood until the fire is robust. If the fire needs oxygen do NOT
blow on the fire. You can become dangerously light-headed. You can use a plate or a piece of
cardboard to generate wind and fan the fire.

23
‘A’ Frame Fire Teepee Fire
4. Enjoy your fire. Continue adding wood as needed to keep your fire going, but don’t add more
than you’re likely to burn. Make sure you allow for airflow as you add additional fuel.
5. Put out your fire.
• Burn remaining wood to ash and let your fire die down.
• Use a shovel to break up and spread out coals.
• Stir the ashes, sprinkle them with water, and then stir again. Repeat until there is no gray ash
anywhere in the fire pit.
• Pass your hand several inches above the ashes. Sprinkle hot spots with more water.
• The fire is out when there are no live coals or gray ash, and you can hold your hand over any
spot for 25 seconds and not feel any warmth.
• Dispose of ashes as recommended at the site.
Be sure to practice your fire building skills before working with the girls in your troop to
model correct behavior for the girls.

24
Progression In Cooking
Skillet Cooking: Cook for groups on a
stove or grate. Older
girls may cook on
individual skillets.
Dutch Oven Cooking: Broil, stew, fry or
bake in one pot over
hot coals.
Ember Cooking: Cook over coals, foil
cooking, or more
advanced pie iron
cooking.
Box Oven Cooking: Coals contained in a box.
Bake quick breads, cakes,
pizza, or cookies. Then
move on to meats or pies.
Stick or Fork Cooking: Individual cooking with hot
dogs and marshmallows on
a fork over a fire. Keep it
simple.
One-Pot Cooking: Main course is kept
simple and cooked in
one pot. Try stew or
chili.
No-Cook Meals: (Bag meals) No cooking, or
just heating one item like
cocoa or soup. Can be
prepared indoors or outside
1.
2.
3.
4.
5.
6.
7.
Skill progression is important for building
comfort and confidence in girls. As they
progress from Step 1 to Step 7, girls learn
the following skills:
To balance menu and variety
Proper food care
Clean up procedures
Conservation (alternatives to cutting sticks)
Safety, taking turns
Fire building and fire safety
Use of camp stove and different fuels
Planning menus
Food preparation
Starting charcoal without liquid starter
Making a box oven
Handling hot coals
Use of spatula, tongs
Maintaining even heat for cooking
Increased fire building skills
Patience
Lifting a heavy pot
Different ways to use coals
Creativity
These guidelines will vary depending on the group
-Girl Scout Daisy - no-cook meals
-Girl Scout Brownie: one-pot, stick, or fork cooking
-Girl Scout Junior: stick or fork, box-oven, or ember cooking
-Girl Scout Cadettes and higher:
Dutch-oven or skillet cooking

25
Advanced campfire cooking techniques
Campfires: making them to cook over
Before your camping trip, at a troop meeting, plan a wood gathering activity. Gather dry tinder and kindling and store it in a dry place. Bring it to camp with you in a plastic bag to keep it from getting wet. It doesn’t have to rain for the fire materials to get wet. Morning dew can saturate tinder, kindling and fire starters. Keep matches in a dry zip lock plastic bag.
Your troop can also make fire starters as an activity before your camping trip. Good fire starters are made with flammable materials in such a way that the wind will not blow them away. Loose newspaper is not a good fire starter. Newspapers rolled into logs and tied with string do make a good fire starter.
Some Fire Starter Ideas: THE FIRE KISS
small square of wax paper about 6" x 6" (doubled works better) candle stubs, used birthday candles, paraffin wax chips, crayon stubs use vegetable peeler to make paraffin chips twist both ends of wax paper to resemble candy kiss
"EGG" FIRE STARTERS (Waxed Cardboard Egg Carton)
• fill cardboard egg cartons half full of sawdust, wood shavings, pencil shavings, or dryer lint (or charcoal briquette)
• pour melted paraffin (or other wax) into each compartment until each space is full. (Wax should be melted in a double boiler and poured with adult supervision. Double boiler can be made with a metal can set in a pot of water.)
• when cool, break apart each "egg" or store the whole carton for future use.
TRENCH CANDLES
• roll several sheets of newspaper into a long, tight roll • tie roll with string at 3" intervals and leave 3" ends on the string for dipping • cut the roll between the strings with a serrated knife or saw • dip each trench candle into a container of melted wax (see "egg" directions) • hang by the strings to dry
TOILET PAPER ROLLS
empty, cardboard toilet paper rolls can also be stuffed with dryer lint of other tinder and used as fire starters
Keep in mind that a steady, small fires work much better than a large one. Many people make their fires too big building heat sources up to 500 degrees. These fires have to burn down before anything can be cooked on them. A small fire in which heat is concentrated is the best. It is a bed of

26
coals, not a big blaze, which cooks food evenly. The small cooking fire no larger than the size of the pot or just large enough for the toasting forks to be used, is the trademark of the good fire builder.
When putting out a fire, don't douse it with water while it is still hot. The steam created can burn you severely. Once you are done with the fire, spread the logs apart and let the fire cool down. Then dribble water over the spots that are still hot. Turn logs over and dribble water on the other side too. Use your shovel to spread dirt over the hot logs. Depriving the fire of air puts it out as effectively as pouring water on it. If you plan on using the campfire again use a minimum amount of water so that the ground in the fire circle does not become saturated with water, making it difficult to start the next fire.
Advanced Campfire Cooking Techniques and Recipes
When you and the girls have experienced using “pudgie pie” irons, making s’mores or cooking a hot dog on a stick over the fire try moving on to Dutch oven cooking.
The Dutch oven is a heavy flat bottomed cast-iron kettle with a close-fitting lid and a sturdy handle. It has heavy sides which hold heat evenly for a long period of time. There are indoor and outdoor Dutch ovens. In general, the outdoor Dutch oven has three legs that allow the oven to sit above the coals and air to circulate. Outdoor models have relatively flat lids with handles that are turned up at the edges so that hot coals can be shoveled on the top of the oven.
Outdoor Dutch oven
Care of a Dutch Oven: Although cast iron Dutch ovens are very heavy they can be broken if dropped or hit with something heavy. Cold water on a hot oven might also break or warp it.
Seasoning: Cast iron cookware has to be properly seasoned before use. To season a new cast iron Dutch oven, rub all the surfaces with a paper towel saturated in vegetable oil or shortening. Place the oiled oven in a 400 degree oven for 30 minutes. At 30 minutes turn off the oven and allow the Dutch oven to cool slowly in the oven.
Cooking in a Dutch Oven: Dutch Ovens are very versatile. You can bake, stew, roast and even cook bread and desserts in a Dutch oven over the campfire. Some recipes will follow.
Fire: The Dutch oven is designed to be hung over open flames, placed on the ground over coals
(wood or charcoal), or buried underground in coals.

27
Charcoal Briquettes Below is a chart to guide you in how much charcoal (lit and ready) and where to place the charcoal around your oven to reach a desired cooking temperature.
Temperature Desired
Oven Size
325 350 375 400 425 450
8" Total Briquettes 15 16 17 18 19 20
Top/Bottom 10/5 11/5 11/6 12/6 13/6 14/6
10" Total
Briquettes 19 21 23 25 27 29
Top/Bottom 13/6 14/7 16/7 17/8 18/9 19/10
12" Total
Briquettes 23 25 27 29 31 33
Top/Bottom 16/7 17/8 18/9 19/10 21/10 22/11
14" Total
Briquettes 30 32 34 36 38 40
Top/Bottom 20/10 21/11 22/12 24/12 25/13 26/14
16" Total
Briquettes 37 39 41 43 45 47
Top/Bottom 25/12 26/13 27/14 28/15 29/16 30/1
Cleaning a Dutch oven: Cast iron should never be scrubbed with soap. Scrape off food with a soap free scrubber and rinse with hot water. Dry immediately and wipe with an oiled paper towel.
Safety Considerations: Dutch ovens are very heavy and girls may not be able to handle them when they are loaded with food. Make sure everyone handling the Dutch oven can heft it easily and is wearing heavy, heat proof gloves. Refer to GS Safety Activity Checkpoints for Dutch oven and all outdoor cooking available on the Badgerland website. One technique for moving a heavy Dutch oven is to put a sturdy branch though the handle of the Dutch oven and then two people can lift it.
28
Dutch Oven Recipes:
Main Courses:
Cheese Enchiladas 4 c. Monterey Jack, shredded 2 c. Cheddar, shredded 2 medium onions, chopped 1 c. sour cream or plain yogurt 1 c. chopped green bell pepper 3-15 oz. cans tomato sauce 4 T. chopped fresh parsley 1/2 t. dried oregano 18 flour tortillas 3 T. chili powder 3/4 t. ground cumin 1/2 t. pepper 2 cloves garlic, finely chopped Grease Dutch oven with cooking spray, vegetable oil or shortening. Mix Monterey Jack, one cup cheddar cheese, 1/2 onion (chopped), sour cream, parsley and pepper. Spoon about 1/3 - 1/2 cup mixture onto each tortilla around filling and face seam side down. Mix remaining ingredients except cheese. Pour over enchiladas. Sprinkle with remaining cheese. Bake until hot and bubbly. Serve about 18. Chicken Pot Pie 3-4 precooked chicken breasts cut into chunks or 2 cans cooked chicken, drained 1 can mixed vegetables with potatoes, drained 1 small onion, chopped 1 can cream of mushroom 1 can cream of chicken soup 1 package stuffing mix For easy clean up, line the Dutch oven with aluminum foil and grease foil with cooking spray or some other oil. Mix together all the ingredients except the stuffing mix and pour into the oven. Sprinkle the dry stuffing mix over the chicken mixture. Cover Dutch oven and cook until bubbling. Serves about 8. Dutch Oven Lasagna 1-1/2 lb. of precooked lean ground beef or sweet Italian sausage 23 oz spaghetti sauce 9 oz shredded mozzarella cheese 3 eggs 2-1/4 c cottage or ricotta cheese 1/4 cup grated Parmesan cheese 13 lasagna noodles 1-1/2 tsp. oregano 3/4 c hot water
29
In a separate bowl add the precooked meat to the spaghetti sauce and mix well. In another bowl, add the cottage or ricotta cheese, Parmesan cheese, mozzarella cheese (reserve a few ounces for later), eggs, and oregano, and mix well. Place the layers in the oven in the following order: Break up four lasagna noodles into the bottom of the oven. Spread about 1/3 of the meat mixture over the noodles. Spread 1/2 of the cheese mixture over the meat mixture. Break up five noodles and place over the top of the preceding mixtures. Spread 1/2 of the remaining meat mixture over the noodles. Spread the remaining cheese mixture over the meat mixture. Break up the remaining noodles and place over the cheese mixture. Spread the remaining meat mixture over the noodles. Pour the hot water all around the edges of the oven. Place the lid on the oven and bake one hour or until done melted and bubbly. Serves 12 Hints: This recipe works well with charcoal (12 briquettes on bottom and 12 on top). Cooking time can be reduced by precooking and draining the lasagna noodles.
Old Fashioned Macaroni and Cheese 8 oz macaroni 8 oz sour cream 2 c cottage cheese 8 oz cream cheese 1 small onion, chopped Salt & pepper 8 oz sharp cheddar cheese, shredded Prepare macaroni according to package instructions. Line Dutch oven with greased aluminum foil, Mix all ingredients together and place in Dutch oven. Place the lid on the oven and bake half an hour or until done melted and bubbly. Serves about 8 Desserts: Gingerbread Applesauce 1 large jar of applesauce 2 packages of gingerbread cake mix Eggs and oil or the other ingredients needed to make cake mixes Grease the Dutch oven. Spread applesauce evenly over bottom of oven. Prepare gingerbread cake mixes as directed on box. Pour gingerbread batter over applesauce. Place Dutch oven on coals , put on lid and place coals on lid. Cook for half an hour or so or until gingerbread cake springs back to the touch. Serves 12 Easy Peach Cobbler 1 box yellow cake mix 2 29-oz cans sliced peaches (or equivalent fresh sliced fruit) 3 eggs 1 cup sugar 1/2 cup brown sugar oil (at least 1/3 cup plus 4 teaspoons) 1 teaspoon cinnamon water large Ziploc bag to mix cake in In Ziploc bag, mix cake mix, 3 eggs, 1 and 1/3 cup water, 1/3 cup oil. Preheat oven over 8 burning coals. Add 4 teaspoons oil to pot. Add 1/2 cup brown sugar to pot. When sugar has melted, dump

30
in peaches (with no more than ½ cup of the juice), Add 1 cup sugar, Add 2 teaspoons cinnamon . . . and . . .stir. Pour cake batter on peaches S-L-O-W-LY. Put lid on oven and add 12 burning coals on top of lid. After 15 minutes remove oven from coals on bottom and continue baking from top until cake is brown and cake is done (check with toothpick). Allow cake to cool 30 minutes before serving. Serves 12
Baked Goods: Brown Sugar Cinnamon Biscuits 2 cups Biscuit Mix or Jiffy baking mix ¼ cup milk ¼ cup brown sugar ¼ cup white sugar 1 tsp. cinnamon 1 tbsp. cooking oil, butter or margarine, melted Blend the baking mix and milk and roll or pat out ¼ inch thick. Mix the brown and white sugars, cinnamon and oil or butter. Spread over the dough. Roll like a jelly roll and cut into ¾ inch thick slices. Place in a greased Dutch oven and bake with 8 coals under and 12 over about 15 – 20 minutes. Serves about 8
Breakfast: Quick & Easy Breakfast Casserole 8 slices of bread 2 pounds of precooked sausage or ham 16 oz grated cheddar cheese 12 eggs 1 qt. Milk 1-1/2 tsp. Dry mustard 1 tsp salt Line a 12" Dutch oven with heavy-duty foil. Lightly grease the foil with butter. Break up bread into the oven. Crumble cooked sausage meat over bread and cover with cheese. In a separate bowl, mix eggs (lightly beaten), milk, dry mustard, and 1 tsp. salt (to taste). Pour the egg mixture over the layered bread/sausage/cheese in the oven, cover, and bake for 35 to 40 minutes, checking occasionally. The cheese rises to the top, melting into a golden brown crust over a fluffy layer of eggs, making a super filling camp breakfast for a crowd! Serves 8-12

31
Charcoal
Charcoal is a clean, light fuel that does the work of several logs. A few different techniques are applied to charcoal cooking that are not used in wood fires.
Charcoal burns down to gray coals suitable for cooking in 15 to 20 minutes so plan to start your fire for cooking 15 to 20 minutes before you cook. A handy way to make your own charcoal starter chimney is to use a number 10 can (these are large cans used in food service) or a clean metal coffee can. Remove both ends of the can with a can opener and punch holes with a can opener, church key or awl on the sides at both ends.
If cooking on the ground, place a sheet of aluminum foil on the ground first to intensify the heat. Set the can down in the fire circle. Put two or three fire starters in the can and about 10-15 charcoal briquettes in the can. Ignite one of the fire starters at the bottom of the can by sticking a match through one of the holes in the can. After the charcoal in the can has turned gray, lift off the can with tongs. Do not attempt to begin cooking until most of the coals are gray/white. Keep coals close together to intensify heat. When finished cooking extinguish the charcoal by lifting or shoveling it out of the fire ring and soaking it with water. Be sure to store unused briquettes in a waterproof, metal container for use next time. You can also use a store bought chimney starter for the same charcoal lighting process.
Store bought chimney style charcoal starter
Hints for using charcoal
1. Fan the fire to increase the heart, sprinkle with water to slow it down. 2. Occasionally tap the coals with a stick to remove the white ash, since it cuts down on the
heat. 3. Keep kettle or pan close to the coals for quick heating. For slower cooking place the pan
farther away from the heat. 4. Be sure charcoal starter can is placed on bare ground or aluminum foil as a fire safety
precaution.
5. Use tongs when handling hot charcoal.
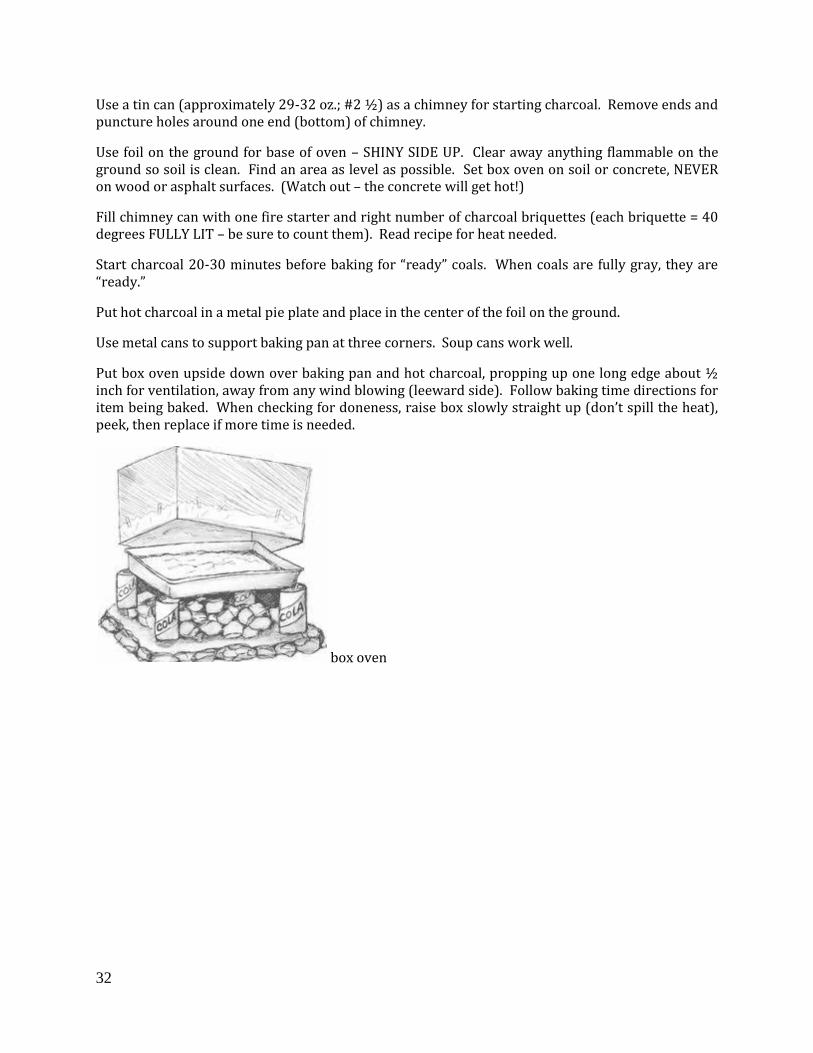
Box Ovens
There are many designs for building a box oven. Here is a simple one to try first:
To build a box oven, get a sturdy cardboard box (liquor boxes are sturdy; 6 half gallon size is good). It must fit over the pan being used to bake item in and have about a 1 inch clearance all around. This allows for airflow and even heat for baking. Remove the lid of the box before proceeding.
Line inside of box with heavy duty foil – SHINY SIDE SHOWING. Line it first from end to end; then side to side. The fewer creases in the foil, the better the reflection.
32
Use a tin can (approximately 29-32 oz.; #2 ½) as a chimney for starting charcoal. Remove ends and puncture holes around one end (bottom) of chimney.
Use foil on the ground for base of oven – SHINY SIDE UP. Clear away anything flammable on the ground so soil is clean. Find an area as level as possible. Set box oven on soil or concrete, NEVER on wood or asphalt surfaces. (Watch out – the concrete will get hot!)
Fill chimney can with one fire starter and right number of charcoal briquettes (each briquette = 40 degrees FULLY LIT – be sure to count them). Read recipe for heat needed.
Start charcoal 20-30 minutes before baking for “ready” coals. When coals are fully gray, they are “ready.”
Put hot charcoal in a metal pie plate and place in the center of the foil on the ground.
Use metal cans to support baking pan at three corners. Soup cans work well.
Put box oven upside down over baking pan and hot charcoal, propping up one long edge about ½ inch for ventilation, away from any wind blowing (leeward side). Follow baking time directions for item being baked. When checking for doneness, raise box slowly straight up (don’t spill the heat), peek, then replace if more time is needed.
box oven
33
Techniques for teaching girls skills such as using jack knives, tying knots and tent etiquette and maintenance
Using Jack Knives
Safety Circle
Have each girl find a place to sit, legs crossed. Each girl should be able to move her arms out straight, around and over herself without touching anyone or anything. She now has a safety circle. Girls should maintain a safety circle whenever they are using jack knives.
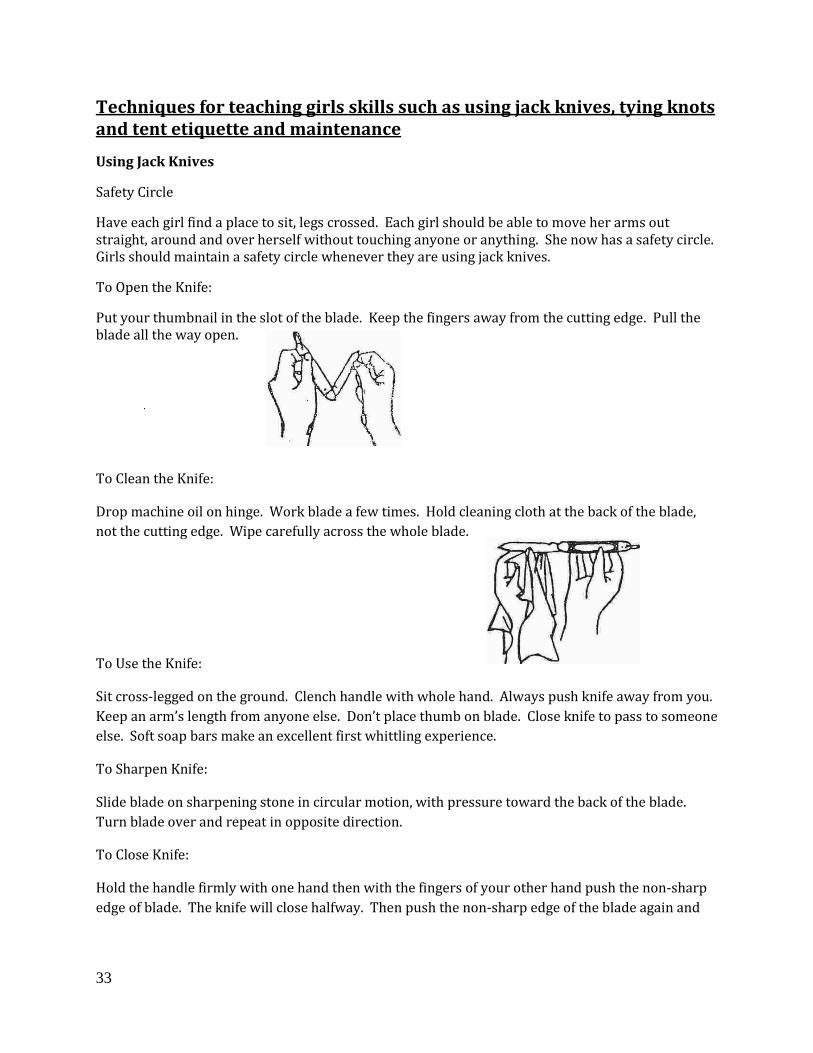
To Open the Knife:
Put your thumbnail in the slot of the blade. Keep the fingers away from the cutting edge. Pull the blade all the way open.
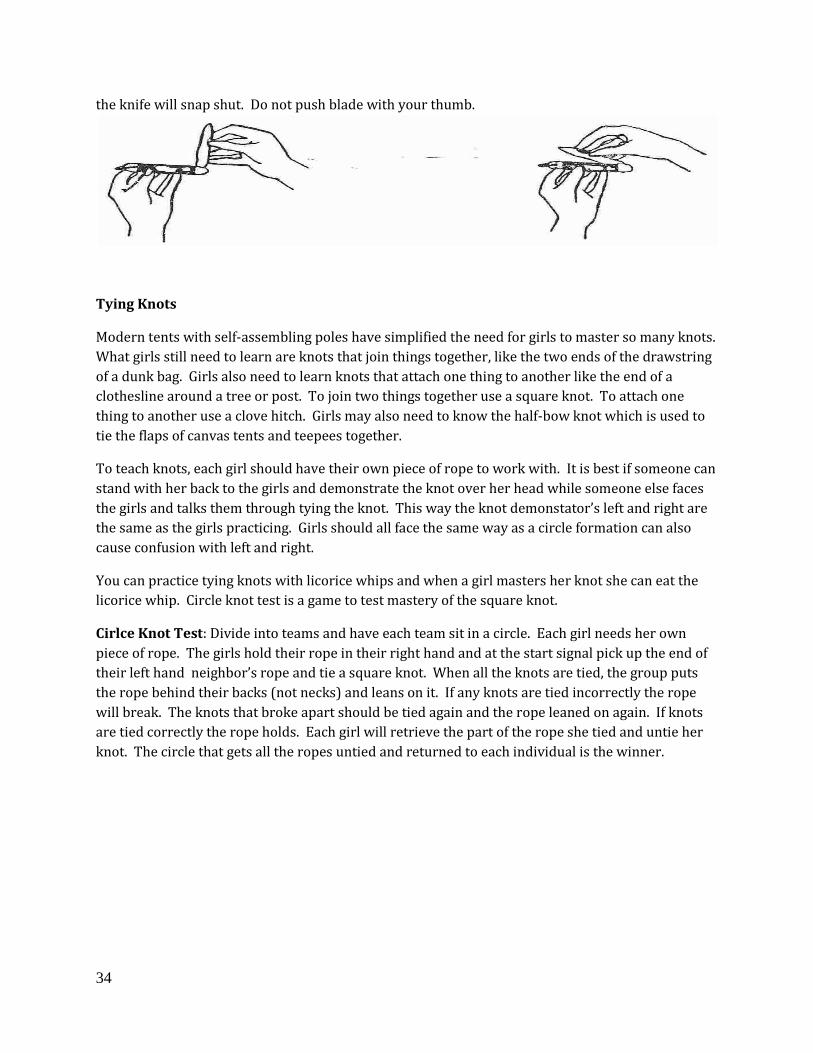
To Clean the Knife:
Drop machine oil on hinge. Work blade a few times. Hold cleaning cloth at the back of the blade,
not the cutting edge. Wipe carefully across the whole blade.
To Use the Knife:
Sit cross-legged on the ground. Clench handle with whole hand. Always push knife away from you.
Keep an arm’s length from anyone else. Don’t place thumb on blade. Close knife to pass to someone
else. Soft soap bars make an excellent first whittling experience.
To Sharpen Knife:
Slide blade on sharpening stone in circular motion, with pressure toward the back of the blade.
Turn blade over and repeat in opposite direction.
To Close Knife:
Hold the handle firmly with one hand then with the fingers of your other hand push the non-sharp
edge of blade. The knife will close halfway. Then push the non-sharp edge of the blade again and
34
the knife will snap shut. Do not push blade with your thumb.
Tying Knots
Modern tents with self-assembling poles have simplified the need for girls to master so many knots.
What girls still need to learn are knots that join things together, like the two ends of the drawstring
of a dunk bag. Girls also need to learn knots that attach one thing to another like the end of a
clothesline around a tree or post. To join two things together use a square knot. To attach one
thing to another use a clove hitch. Girls may also need to know the half-bow knot which is used to
tie the flaps of canvas tents and teepees together.
To teach knots, each girl should have their own piece of rope to work with. It is best if someone can
stand with her back to the girls and demonstrate the knot over her head while someone else faces
the girls and talks them through tying the knot. This way the knot demonstator’s left and right are
the same as the girls practicing. Girls should all face the same way as a circle formation can also
cause confusion with left and right.
You can practice tying knots with licorice whips and when a girl masters her knot she can eat the
licorice whip. Circle knot test is a game to test mastery of the square knot.
Cirlce Knot Test: Divide into teams and have each team sit in a circle. Each girl needs her own
piece of rope. The girls hold their rope in their right hand and at the start signal pick up the end of
their left hand neighbor’s rope and tie a square knot. When all the knots are tied, the group puts
the rope behind their backs (not necks) and leans on it. If any knots are tied incorrectly the rope
will break. The knots that broke apart should be tied again and the rope leaned on again. If knots
are tied correctly the rope holds. Each girl will retrieve the part of the rope she tied and untie her
knot. The circle that gets all the ropes untied and returned to each individual is the winner.
35
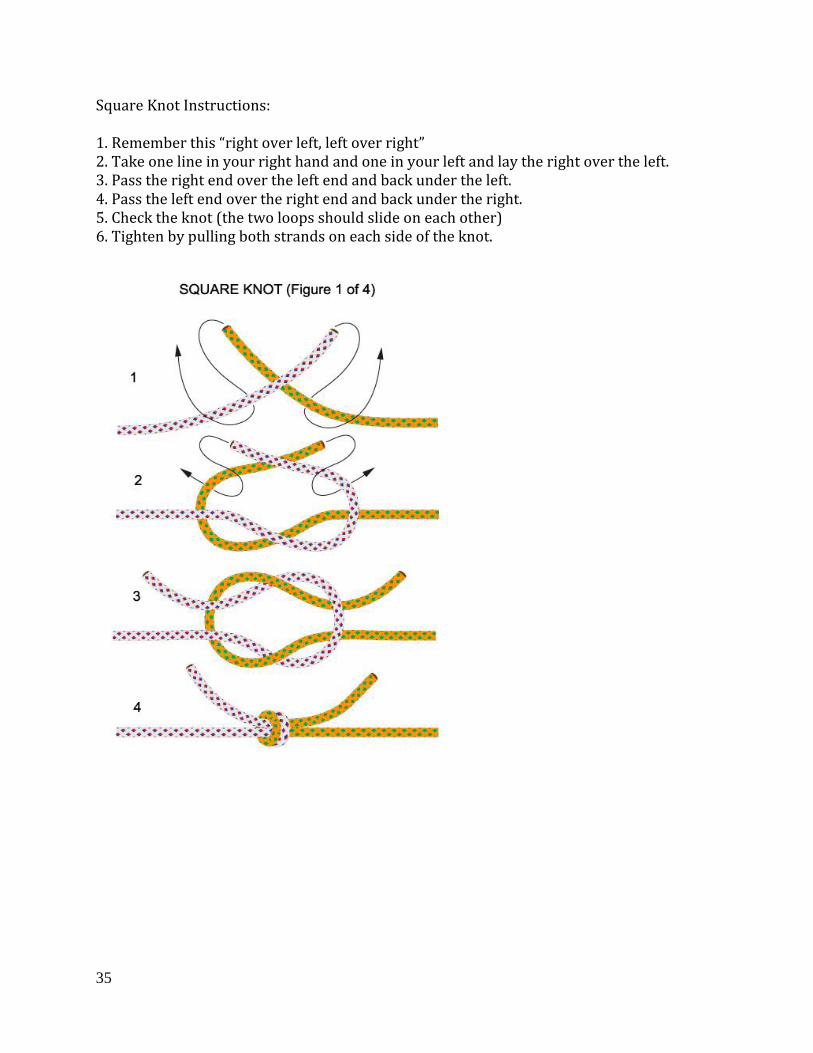
Square Knot Instructions:
1. Remember this “right over left, left over right” 2. Take one line in your right hand and one in your left and lay the right over the left. 3. Pass the right end over the left end and back under the left. 4. Pass the left end over the right end and back under the right. 5. Check the knot (the two loops should slide on each other) 6. Tighten by pulling both strands on each side of the knot.
36
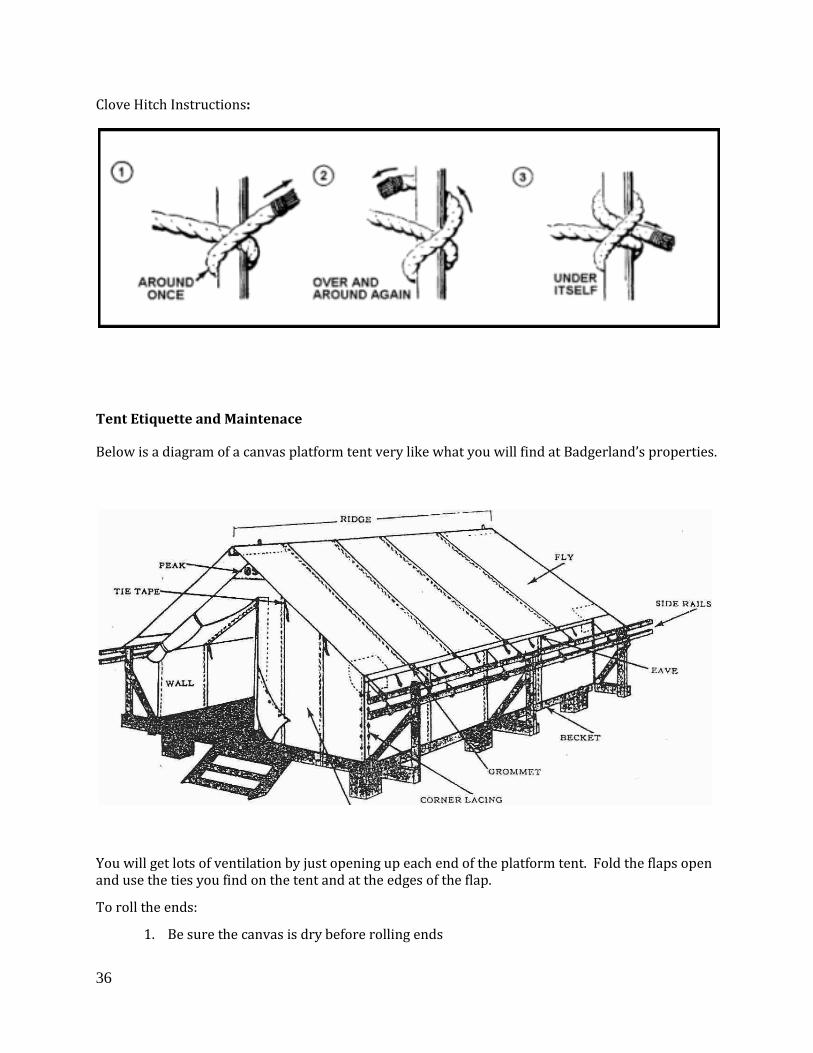
Clove Hitch Instructions:
Tent Etiquette and Maintenace
Below is a diagram of a canvas platform tent very like what you will find at Badgerland’s properties.
You will get lots of ventilation by just opening up each end of the platform tent. Fold the flaps open and use the ties you find on the tent and at the edges of the flap.
To roll the ends:
1. Be sure the canvas is dry before rolling ends

37
2. Roll to the inside to keep water from collecting on the roll
3. Tie tape holding rolled canvas in place using a half bow knot which is easy to untie
To live comfortably in a tent:
1. Keep flaps rolled up to let in air and light
2. Don’t let anything touch wet canvas
3. Do not use aerosol (hairspray, insect repellant) sprays in tents as it will damage the canvas
4. Keep extra weight off ropes, frames and poles
5. If weather is damp and cool at night, in the morning put your sleeping clothes under your pillow, close up and roll up your sleeping bag from the bottom with your pillow and sleeping clothes in it. This will keep the inside the sleeping bag, pillow and sleeping clothes drier.
To close tent:
1. Tie flaps together with a half bow knot
2. Leave unoccupied tent closed and fastened so it is safe from wind and rain.
When leaving the campsite:
1. Sweep tent floors
2. Be sure all flaps are secured with half bow knots
General Tent Tips: Always practice pitching and striking (taking down) an unfamiliar tent before you go camping. Be sure all tent stakes and poles are there before you go camping.
Use a ground cloth under a tent. Make sure the ground cloth does not stick out beyond the sides of the tent. If it does, it will direct any rainfall under your tent. The purpose of the ground cloth is to protect the tent floor from stones in the ground and keep it from getting wet from dew.
Pitch your tent on level ground. If this is not possible then sleep with your head uphill.
Use the rain fly whether or not the forecast calls for rain. The forecast could be wrong!
Always make sure your tent is completely dry prior to packing and storing it. If you must bring the tent home wet set it up as soon as possible and thoroughly dry it out before storing in a cool, dry place.
Do NOT keep food inside the tent. Hungry animals will chew through tent fabric to get to any food or personal items that smell like food (shampoo, toothpaste etc.). Any food or personal items should be kept in a car or enclosed shelter away from the sleeping areas overnight.
Tent Etiquette: Do not wear shoes in the tent. Bring a small mat or rug to leave by the tent door to wipe off mud and sand. Leave shoes on the mat. If it rains bring the mat inside the tent and place all shoes on it.
It is best not to wear sweaty, dirty or wet clothes to bed in your tent. Make sure the girls change out of the clothes they wore all day into clean nightclothes before they go to sleep in the tent.
38
Course Completion: To record that you completed Troop Overnight Certification TWO, you must complete and submit the test questions on the last pages of this packet to Badgerland Council OR you may complete the test questions online.
Please return the completed test questions at least two weeks prior to an overnight. You can mail, email, fax or complete the questions online.
Mail: the completed questions to: GSWIBC, Attn: Adult Learning Specialist, 2710 Ski Lane, Madison WI, 53713
Email: the completed questions to [email protected].
Fax: the completed questions to 608.276.9160
Online: To complete the questions online, simply click on this link: Course Completion Questions or paste this link into your browser: https://www.surveymonkey.com/r/7Y8THS8 If you have any questions, please contact the Badgerland Council Adult Learning Specialist at [email protected] or 608.237.1143.
Test Questions:
1. Your full name and email address:
2. What is different about the kind of overnight you can take with your troop when TOC 2 certified versus TOC 1 certified?
3. What are some ways you, as troop leader, know you are ready to take girls camping at a place without full indoor facilities?
4. What are some ways you know that your girls are ready to go camping at a place without full indoor facilities?
5. How many adults and what certifications do they need to accompany a troop of ten Junior Girl Scouts on a 2 day overnight to Sumac at Camp Brandenburg?
6. You are a leader taking 10 Juniors on a two day overnight at Kinderspielen at Camp Brandenburg. Your group plans to hike, bird watch and do all the cooking outside. What Girl Scout Safety Checkpoints should you consult and where can you find them.

39
7. Your troop is making s’mores around the fire and you hear coyotes howling in the distance This causes some girls to become frightened and some to want to track down the coyote. How will you handle this?
8. As a troop leader, what forms might need to be completed before an overnight? What forms must you have with you at all times on an overnight? Where can you find these forms?
9. How do you put out a camp fire? When is it safe to leave the fire?
10. What meals and foods are interesting to you for a trip to a place without full indoor
facilities? Was there a recipe in this packet you would like to try?
11. How will you wash your dishes?
12. Do you plan to teach your girls how to use a jackknife? If you do what activities do you
have planned where girls use jack knives?
13. How do you keep a tent clean and pleasant to sleep in over a three day camp out?