Tristan Instal Guide - Shannon Specialty Floors€¦ · · 2016-01-11Seam Grooving 25 10. Welding...
49
Altro Flooring Installation, Maintenance, and Architectural Detailing Guide visit www.altrofloors.com USA: 800.377.5597 / Canada: 800.565.4658 < Version 8.5 >
-
Upload
nguyenxuyen -
Category
Documents
-
view
213 -
download
1
Transcript of Tristan Instal Guide - Shannon Specialty Floors€¦ · · 2016-01-11Seam Grooving 25 10. Welding...

Altro FlooringInstallation, Maintenance, and Architectural Detail ing Guide
visit www.altrofloors.com
USA: 800.377.5597 / Canada: 800.565.4658
< Version 8.5 >

IntroductionThis publication is designed to provide technical information to assist in the
installation of Altro High Performance slip resistant and smooth sheet vinyl flooring.
Except where noted, this information applies to the complete range
of Altro slip resistant and smooth sheet vinyl floor covering products,
referred to throughout this guide as Altro floor covering.
Please note installation information specific to individual Altro
products.
The recommendations herein are derived from actual field and laboratory testing by
Altro’s technical specialists, combined with the recommendations of the Resilient
Floor Covering Institute. The procedures are widely accepted in the floor covering
industry.
Install Altro floor covering according to the definition of standards in this guide. Any
deviations from these definition of standards are to be attempted solely at the risk of
those specifying or attempting the actual installation, and are not the responsibility
of Altro or its distributors.
Installation of Altro floor covering should follow the instructions
detailed in this guide. Bidding and installation of any Altro
commercial flooring products should only be undertaken by
professional floor covering installers versed in the required tools and
techniques for professional installations. Failure to correctly install
Altro floor covering will void the Limited Product Warranty.

Table of Contents
1. Product Overview 1 - 2
2. Altro Training Courses 2
3. Storage & Handling 3
4. Basic Floor Laying Practices 4 - 11
5. System Accessories 12 - 13
6. Finishing Details 14 - 15
7. Adhesives 16 - 20
8. Installation Procedures 21 - 24
9. Seam Grooving 25
10. Welding 26 - 28
11. AltroMastic 100 29 - 30
12. Drains & Cleanouts 31 - 34
13. Altro Walkway 20SD Installation 33
14. Altro Everlay 36 - 37
15. Freezers & Coolers 38
16. Repairs 39
17. Maintenance & Protection 40 - 44
18. Directory 45
19. Appendix - Tools and Equipment 46 - 50

1.1 Altro Safety FlooringAltro High Performance safety flooring is a unique combination
of plasticized vinyl, aluminum oxide grains and silicon carbide
grains with a glass fiber reinforcement. Some ranges also
include quartz aggregates. A
bacteriostat is incorporated in
the flooring.
The underfoot safety of any
floor is dependent on the
coefficient of friction
between the floor surface and the sole of the shoe or bare
foot. The safety performance of Altro safety flooring relies
on the way in which the vinyl compresses under load,
leaving the abrasive grain protruding above the surface to
provide a reliable grip.
It is important to remember that suitable floor
maintenance also plays a vital part in safety underfoot.
Either Altro Original Easyclean Technology™ or Altro
Easyclean Maxis™ Technology is incorporated within most
Altro safety flooring products. Altro safety flooring easy to
maintain and continues to provide superior slip resistance
for many years.
1.2 Product LimitationsAltro floor covering is not normallyrecommended for use in the following areas:
n
Areas exposed to certain conditions that may cause
staining. For example, areas such as newly applied
asphalt in driveways or parking lots, or antioxidants in
certain types of rubber used in mats, wheels and tires.
Certain dark colors of Altro flooring or products with
Maxis Technology may minimize this effect.
n
Areas which may be subjected to hot objects that may
burn or melt vinyl flooring. Vinyl floor covering must
be protected from excessive heat, or items exceeding
140°F.
n
Areas where forklifts and/or pallet jacks travel at high
speed, since friction caused by the floor’s slip resistant
properties can lead to surface damage from tire burn.
n
Where the presence of sharp items, such as nails
protruding from pallets or other objects, could cause
severe physical damage.
n
Areas subject to excessive spillages of alcohol,
keytones or other solvents harmful to vinyl.
n
Altro can not accept responsibility for floor damage
resulting from excessive moisture or the use of
inappropriate, improperly designed, or inadequate
floor protection devices. It is the responsibility of the
equipment manufacturer to provide suitable floor
contacts to prevent indentation or delamination and
the responsibility of the
end-user/maintenance provider to assure excessive
water does not penetrate or damage the finished
flooring.
Please contact your local Altro distributor for advice
regarding the above.
Heavy Rolling Loads
Altro flooring is sometimes installed in areas where
heavy static and rolling loads occur, as well as in severe
surface moisture areas. Hospital beds are a prime
example; along with commercial kitchen environments
being another example.
While the supplied wheels or floor contact points of
certain hospital beds or other commercial equipment
should properly diffuse weight, installation precautions
can minimize indentation, delamination, and minimize
failure.
Areas directly underneath hospital bed wheels, or the
point load of heavy equipment, should be installed with
Ecofix 20 with a fine notched trowel. Please consult
Technical Services for installation method.
Severe Surface Moisture Areas
Areas to be subjected to severe surface moisture after
1
1. Product Overview

2. Altro Training Courses
2
installation, or where at least one floor drain exists, Altro
Safety Flooring must be installed with Altrofix 30 two-part
polyurethane adhesive.
Contact an Altro representative for installation information
concerning these areas.
Altro is dedicated in assisting the resilient flooring
installer in developing the necessary skills to install the
entire range of Altro High Performance products.
Courses vary in length from a few hours to an all-day
detailed presentation. The aim is to provide installers of
all levels of experience with the confidence, attitude, and
professional skills required to install Altro products.
Courses include:
n
Moisture testing
n
pH testing
n
Subfloor preparation
n
Adhesives (type and application)
n
Installation procedures
n
Heat welding
n
Flash coving
n
Maintenance
For more information on Altro training or to schedule a
course, please call 800.377.5597.
1. Product Overview

3
with the decorative side up. It should be left unrolled
for at least 10 minutes, then back-rolled loosely and
again unrolled to eliminate any stress in the material.
The flooring must be checked for defects before
installation. When installing safety flooring, check
carefully to see that drops match in shade. It may be
necessary to reverse sheets of Altro floor covering to
obtain a side shade match. If a side shade match
cannot be accomplished, do not install. Contact your
Altro distributor.
Do not install flooring with visible defects.
n
If storage temperature is below 70°F, Altro floor
covering must be moved to a warmer place and
allowed to reach this temperature before unrolling.
The room temperature must not be below 70°F and
the floor temperature between 65°F - 80°F.
n
Rolls of Altro floor covering must be stored
in dry conditions and stood upright on a level floor. If
stacked horizontally, there is a risk of “flattened
areas” developing which can lead to installation
difficulties.
n
Safety precautions should be taken to secure rolls
standing on end to prevent them from accidentally
falling.
n
Many of the Altro floor covering ranges incorporate a
colored quartz aggregate in the material. Eyeprotection should be used and care taken during
cutting and grooving procedures.
n
If more than one roll is used, unroll the flooring in
numeric sequence. The flooring should be unrolled
3. Storage & Handling

4
4. Basic Floor Laying Practices
4.1 Job Site Conditionsn
Altro floor covering must be installed at temperaturesbetween 70°F and 85°F, and a slab temperaturebetween 65°F and 80°F.
n
Building HVAC must be up and running and inpermanent operation prior to installation. Aminimum temperature of 70°F must be maintainedfor at least 72 hours before, during, and 72 hoursafter installation.
n
All materials and subfloors must be fully acclimatedto installation temperature.
n
The areas to receive floor covering are to beweathertight.
n
The areas of installation must be adequately lightedto allow for proper inspection of the flooring andsubfloor. This is especially critical when flashcoving.
n
The installation of floor covering must not begin untilwork of all other trades has been completed.
n
All traffic must remain off finished floors for 24 hours
before light traffic, 48 hours before light rolling loads,and 72 hours before heavy loads are allowed.
n
Area of installation must not be within 5 degrees ofdew point. Please reference the enclosed dew pointchart. Low relative humidity (dry air) must exist andbe maintained during the application of adhesive.Installations must not take place when the substrateof the area of installation is within 5 degrees of dewpoint.
n
Moisture tests must be taken to ensure the subfloor issufficiently dry for the installation of the Altro floorcovering. Please refer to Section 4.3.
n
Prior to the starting the installation please advise thegeneral contractor and or end user about the subfloormoisture requirements that will be needed at time ofinstallation..

5
DEW POINT TEMPERATURE IN FAHRENHEIT
Proceduren
Test and read the air temperature in the room.
n
Test and read the relative humidity in the room,
n
Test and read the concrete surface temperature.
n
Find the air temperature on the accompanying dewpoint chart. (left hand side, up and down of the chart)
n
Find the relative humidity on the dew point chart.(top of chart, across)
n
Intersect the air temperature (sideways movement)with the relative humidity (downward movement) onthe dew point chart.
n
Obtain the figure at this intersection.
n
Compare this figure with the concrete surfacetemperature.
If these figures are within five degrees of each otherfloorcovering should not be installed.
Dew point is the temperature at which the humidity in the air begins to condense in and onthe concrete substrate. Floor coverings and adhesives should not be installed any time theair temperature or concrete surface temperature is within 5 degrees of dewpoint.
4. Basic Floor Laying Practices

6
4.2 Wood SubfloorsASTMs may be obtained from www.astm.org
n
Suitable substrates may include:
n
Woodn
Concreten
Metaln
Existing Flooringn
Epoxy
n
Unsuitable substrates may include:
n
Rubbern
Cushioned Flooringn
Stripwoodn
Gypsum based underlayment
n
Wood floors should be double layer construction witha minimum total thickness of 1”. The subfloor mustbe rigid, free from movement, and have at least 18”of well-ventilated air space below.
n
Wood subfloors must not exceed 8% moisturecontent when measured with a Delmhorst WoodMoisture Tester.
n
Crawl spaces shall be insulated and protected by avapor barrier.
n
Do not install Altro floor covering over wood floorsbuilt on wooden sleepers, directly in contact with on-grade or below-grade concrete slabs.
n
Wood underlayment panels must be suitable forresilient floor covering and installed per ASTM F1482.
n
Certain underlayment panels may cause staining.Consult the underlayment panel manufacturer forspecific panel recommendations, panel warrantiesand application instructions.
n
Do not install over particle board, chip board,Masonite™ or Luan type panels unless specificallywarranted by the manufacturer for use as anunderlayment.
4. Basic Floor Laying Practicesn
Regardless of the type and manufacturer of theunderlayment panel used, any failures in theperformance of the underlayment or floor coveringdue to the underlayment is the responsibility of theunderlayment manufacturer, and/or the underlaymentinstaller.

7
4.3 Concrete SubfloorsASTMs may be obtained from www.astm.org
n
Suitable substrates may include:
n
Woodn
Concreten
Metaln
Existing Flooringn
Epoxy
n
Unsuitable substrates may include:
n
Rubbern
Cushioned Flooringn
Stripwoodn
Gypsum based underlayment
n
Please reference both ASTM F710 Standard Practicefor Preparing Concrete Floors to Receive ResilientFlooring and ACI 302.2R-06 Guide for concrete slabs that receivemoisture sensitive flooring materials. Please consultwww.astm.org and www.concrete.org for the mostcurrent editions of these guidelines.
n
Moisture testing must be performed on allconcrete subfloors, per ASTM F1869 and ASTMF2170. Results are not to exceed 5.0 lbs WVERand 85% IRH, respectively. pH testing must beperformed per ASTM F710. results not to exceed 9.9.
n
Concrete floors must be smooth, rigid, permanentlydry, and clean. Floors must be free of all foreignmaterials, including dust, sealers, paint, grease, oils,solvents, curing and hardening compounds, asphalt,old adhesive residue, and any other contaminants.
n
The surfaces of the concrete shall be flat to within theequivalent of 3/16” in 10 ft, per ASTM F710.
n
Concrete must have a minimum compressivestrength of 3500 psi.
n
Lightweight concrete (less than 115 lbs per cubicfoot) may be unsuitable for covering with resilient
flooring.
n
Gypsum based substrates and underlayments areunsuitable.
n
Adhesive bond to concrete is improved noticeably ifthe concrete substrate is sanded with a 16 or 20-gritsandpaper.
n
Prepare cracks and other minor imperfections usingquality Portland cementitious patching compounds.
4. Basic Floor Laying Practices

8
4.4 Metal SubfloorsASTMs may be obtained from www.astm.org
n
Suitable metal substrates may include:
n
Clean, rigid steeln
Primed steeln
Steel diamond platen
Galvanized steeln
Metal access raised floorn
Lead
n
Unsuitable substrates may include:
n
Rubbern
Cushioned Flooringn
Stripwoodn
Gypsum based underlayment
n
Metal subfloors must be clean, rigid, and free fromall rust, oil, grease, coatings and all othercontaminants.
n
In certain circumstances lead as a subfloor may betoo soft for the intended use.
n
Cleaning/preparation may consist of sanding,grinding, cleaning with TSP (trisodiumphosphate),and priming with Red Oxide primer such as Rust-OLEUM®.
n
Joints can be filled and made smooth using Altrofix30/31 two-part polyurethane adhesive when thefinished flooring is to be installed with the same two-part polyurethane adhesive.
n
In some instances (such as certain coolers andfreezers), when metal panels are prone to movement,Altro Everlay “A” sheet underlayment will be used toallow the installation of finished flooring.
n
Final determination of the suitability rests with theflooring contractor.
4. Basic Floor Laying Practices

9
4.6 Existing Flooring andAdhesive Residue
n
Altro recommends removal of all existing flooringwhenever possible; however in certain circumstancesit may be possible to install over an existing floor.Please consult the following information as well aswith your local Altro distributor.
n
Altro floor covering may be installed over existingflooring surfaces such as terrazzo, epoxy, ceramictile, quarry tile, metal floors, and in certain casesresilient floors and VCT, provided they are dry, wellbonded, sound, smooth, and free of waxes, polishesand/or any other foreign materials.
n
When going over existing flooring, moisture testingmust be performed per applicable ASTM standards.Partial removal of the existing flooring may berequired to facilitate moisture testing. See Section4.3 for limits.
n
Do not install over cushion-backed, heavilyembossed, or multiple layers of flooring.Installations over existing resilient flooring will bemore susceptible to indentation, and there is thepossibility that the existing flooring will telegraphthrough.
n
The responsibility of determining if the existing flooris a suitable subfloor rests solely with the installerand flooring contractor. If there is any doubt, theexisting floor should be removed.
n
Caution must always be exercised when removingold flooring or adhesive residues as they maycontain asbestos or harbor mold and mildew.Consult with your local authorities as regards to lawspertaining to removal. Also consult RFCI’sRecommended Work Practices for the Removal ofResilient Floor coverings at the Resilient FloorCovering Institute website at: www.rfci.com.
4. Basic Floor Laying Practices
n
Do not install resilient flooring directly overresidual adhesive or paint. All adhesiveand paint must be mechanically removedto a thin well-bonded residue beforeskimming.
n
Only use mechanical means to remove old residualadhesive, i.e. bead blasting or scarifying. Liquidremovers are unsuitable.
4.5 Raidant Heat SubfloorsASTMs may be obtained from www.astm.org
n
Suitable substrates may include:
n
Woodn
Concreten
Metaln
Existing Flooringn
Epoxy
n
Unsuitable substrates may include:
n
Rubbern
Cushioned Flooringn
Stripwoodn
Gypsum based underlayment
n
The subfloor must be fully acclimated to thebuilding’s ambient temperature, between 65° F and80° F.
n
The heating system should have been in use for atleast one week prior to the installation, and moisturetest results should not exceed the limitations asoutlined in Section 4.3.
n
Heat the slab to the required room temperature range,then turn off radiant heating system 3-4 hours priorto the installation.
n
After the installation has been completed, turn theheating system on slowly, and in stages, to achievenormal room operating temperature. Maximumsubfloor temperature is 85°F.Moisture tests must be taken to ensure the subfloor issufficiently dry for the installation of the Altro floorcovering. Advise the general contractor, architect andowner of existing conditions. Altro recommends theuse of independent testing agencies.

4.7 Moisture TestingASTMs may be obtained from www.astm.org
Use all the test methods described below to determinethe dryness of the subfloor and suitability of surface pHas required to ensure initial and long-term success.
n
Moisture testing determines the moisture conditions atthe time of testing only and does not guarantee orpreclude the possible future intrusion of excessmoisture.
n
All on-grade and below-grade concrete slabs musthave an effective moisture vapor retarder.
n
Document all tests taken.
n
Alkalinity Testing: ASTM F710 Maximum pH of 9.9
n
ASTM F1869 Standard Test Method for MeasuringMoisture Vapor Emission Rate of Concrete SubfloorUsing Anhydrous Calcium Chloride: This test methodcovers the quantitative determination of the rate ofmoisture vapor emitted from below-grade, on-grade,and above-grade (suspended) concrete floors.Conduct one calcium chloride test for every 1,000square feet (minimum 3 tests) to ensure concretemoisture emissions do not exceed 5 lbs per 1,000square feet within a 24-hour period.
n
ASTM F2170 Standard Test Method for DeterminingRelative Humidity in Concrete Slab Using in-situProbes: This test method covers the quantitativedetermination of percent relative humidity in concreteslabs for field or laboratory test. Conduct one test forevery 1,000 square feet (minimum 3 tests) to ensureconcrete does not exceed 85% internal relativehumidity.
10
4. Basic Floor Laying Practices

Optional additional moisture testing:
n
ASTM F2420 Standard Test Method for DeterminingRelative Humidity on the Surface of Concrete FloorSlabs Using Relative Humidity Probe Measurementand Insulated Hood. This test method covers thequantitative determination of percent relative humidityabove the surface of concrete floor slabs for field orlaboratory test. Conduct one test for every 1000square feet (minimum 3 tests) to ensure concretedoes not exceed 75% surface relative humidity.
n
Mat Moisture Tests and Electric Moisture Meters canbe used to detect the presence of moisture, howeverthese test methods do not replace the required testingas listed above (ASTM F1869 and F2170). Whenelectric meter and/or mat moisture tests indicate nomoisture and that the subfloor may be dry enough toinstall flooring, it is at this time that testing per ASTMF1869 and F2170 is to be done.
n
Mat Moisture Test
1. Tape 3’ x 3’ (0.9m x 0.9m) pieces of
polyethylene to the subfloor (approximately 50’ or
15m apart) for a minimum of 72 hours.
2. Remove the polyethylene after 72 hours and if
there is any evidence of moisture allow additional
time for the subfloor to dry before testing further, do
not install flooring.
n
Electric moisture meters are also useful in detectingthe presence of moisture; consult with the particularmeter manufacturer for meter calibration and reading.
Although the preceding moisture testing information andrecommendations are widely accepted within the resilientfloor covering industry, there is currently no known exactamount of lbs of moisture vapor emission, or exact % ofinternal RH to know exactly when a floor covering,adhesive, or coating system will fail. Moisture failuresare generally a complex, cumulative, and synergisticseries of events. The preceding moisture testinginformation is provided as an industry service and in aneffort to help reduce the likelihood of moisture relatedfailures within the floor covering industry.
n
Adhesive bond tests must be conducted with theflooring and adhesive specified to determined thecompatibility of the adhesive with the preparedsubfloor.
n
For all moisture emissions above 5 lbs (ASTMF1869) and/or internal relative humidity above 85%(F2170) a surface damp proof membrane is requiredto provide protection.
n
Wood subfloors must not exceed 8% moisturecontent when measured with a Delmhorst WoodMoisture Tester.
11
12
5. System Accessories
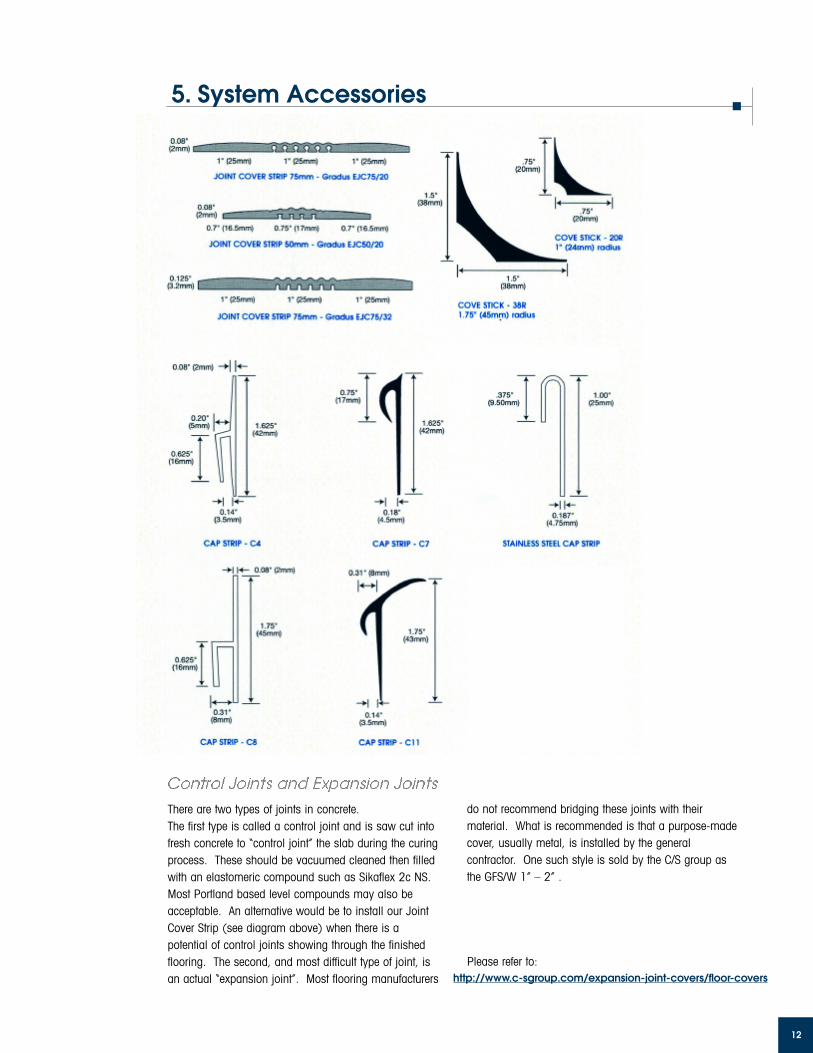
Control Joints and Expansion JointsThere are two types of joints in concrete. The first type is called a control joint and is saw cut intofresh concrete to “control joint” the slab during the curingprocess. These should be vacuumed cleaned then filledwith an elastomeric compound such as Sikaflex 2c NS.Most Portland based level compounds may also beacceptable. An alternative would be to install our JointCover Strip (see diagram above) when there is apotential of control joints showing through the finishedflooring. The second, and most difficult type of joint, isan actual “expansion joint”. Most flooring manufacturers
do not recommend bridging these joints with theirmaterial. What is recommended is that a purpose-madecover, usually metal, is installed by the generalcontractor. One such style is sold by the C/S group asthe GFS/W 1” – 2” .
Please refer to:http://www.c-sgroup.com/expansion-joint-covers/floor-covers

5. System Accessories
ALTRO GULLEY EDGE - GE 35/25ALTRO GULLEY EDGE - GE 35RE ALTRO GULLEY EDGE - GE 25RE
ALTRO GULLEY ANGLE - GA35/25 ALTRO GULLEY EDGE - GE 35RE ALTRO GULLEY EDGE - GE 25RE
13
ALTRO GULLEY ANGLE - GA35/25 ALTRO GULLEY EDGE - GE 25REALTRO GULLEY EDGE - GE 35RE

14
6. Finishing Details

6. Finishing Details
15

16
7. Adhesives
Adhesive Recommendations for Altro Flooring
Most concrete is considered to be non-porous (non-absorbent). To test for porosity, sprinkle water on the subfloor, if it isnot absorbed within about one (1) minute, the subfloor should be treated as a non-porous/low absorbency surface.The final determination for subfloor porosity is the responsibility of the flooring contractor.
Please note:
1) Adhesive coverage is only an approximation based on experience, manufacturers recommendations, and subfloorporisity, Altro does not warrant nor guarantee actual adhesive coverages.
2) Altrofix 31 is a faster setting Polyurethane adhesive and can also be used for repair and small installations of sheetmaterial requiring a quicker set time.
3) Adhesive bond tests must be conducted with the flooring and adhesive specified to determined the compatibility ofthe adhesive with the prepared subfloor.
PRODUCT POROUS (ABSORBENT) SUBFLOORS (most wood subfloors and some concrete)
NON-POROUS (NON-ABSORBENT) SUBFLOORS (most concrete, ceramic,
terrazzo, moisture sealers, metal and existing flooring)
COVING UP WALLS
Altrofix 30/31/300 (CANADA) Altrofix 30/31/300 (CANADA)(excessively heavy rolling loads and/or
excessively wet areas)(excessively heavy rolling loads and/or
excessively wet areas)
Ecofix 20 (dry areas) Ecofix 25 (dry areas)
Trowel: 1/32" x 1/16" x 5/64" Coverage 200 to 250 sf per gal.
Trowel: 1/32" x 1/16" x 5/64"Coverage 250 to 300 sf per gal.
Ecofix 20 Ecofix 25 Heavy Rolling Loads contact Altro technical sevices.
Trowel: 1/32" x 1/16" x 5/64" Coverage 200 to 250 sf per gal.
Trowel: 1/32" x 1/16" x 5/64" Coverage 250 to 300 sf per gal.
Conductive Acrylic Conductive Acrylic
Smooth Sheet Flooring
Walkway SD
Contact TapeEcofix 25 or Contact
Cement
Trowel: 1/16" x 1/16" x 1/16"Coverage 150 to 200 sf per gal.
Trowel: 1/32" x 1/16" x 1/32" Coverage 200 to 250 sf per gal.
Safety Sheet Flooring

17
ALTRO ADHESIVES PRODUCT UNIT APPROX. COVERAGE USE FOR
ALTROFIX 30/31 - 300 (CANADA)2 part polyurethane
1 gallon 150 – 200 sq. ft. Sheet
ALTROFIX 30/31 - 300 (CANADA)2 part polyurethane
2 gallon 300 – 400 sq. ft. Sheet
Altrofix 30/31/300 to be used with Altro safety floors when installed in wet or semi-wet areas or any floors containing drains.
ECOFIX 25 - COMPASS 1000 (CAN)1 part acrylic
1 gallon 225 – 300 sq. ft. Sheet & Tile
ECOFIX 25 - COMPASS 1000 (CAN)1 part acrylic
3.5 gallon 775 – 1050 sq. ft. Sheet & Tile
Ecofix 25/1000 to be used with Altro safety floors when installed in dry areas over non-porous substrates.
ECOFIX 201 part acrylic Acrylic hard set (wet set)
3.5 gallon 700 - 875 sq. ft. Sheet
Ecofix 20 to be used with AltroSmooth Ethos and Altro safety floors when installed in dry areas over porous substrates.
ALTRO ADHESIVES – DESCRIPTION CHART ADHESIVE NAME DESCRIPTION TYPICAL POROUS INSTALLATIONS TYPICAL NON-POROUS INSTALLATIONS
ALTROFIX 30/31 2-part Polyurethane (wet set)
Trowel size recommended: 1/32 deep x 1/16 wide x 1/32 apart.
Coverage - 150 to 200 sq.ft. per gallon
Trowel size recommended: 1/32 deep x 1/16 wide x 5/64 apart.
Coverage - 250 to 300 sq. ft. per gallon
Trowel size recommended: 1/32 deep x 1/16 wide x 1/32 apart.
Coverage - 225 to 275 sq. ft. per gallon ECOFIX 25/1000 Acrylic Pressure Sensitive
(dry set / wet tacky) For very absorbent substrates, please call Tech Services for trowel notch
recommendation.
Trowel size recommended: 1/32 deep x 1/16 wide x 5/64 apart.
Coverage - 250 to 300 sq. ft. per gallon
Trowel size recommended: 1/32 deep x 1/16 wide x 5/64 apart.
Coverage - 200 to 250 sq.ft. per gallon
For very absorbent substrates, please N/Acall Tech Services for trowel notch
recommendation.
ECOFIX 20Acrylic Hard Set
(wet tacky set)
CONTACT TAPE Dry, odorless,
double-faced tape
Nominal:
1” x 165’
4” x 165’
6” x 165’
TROWEL SIZE and COVERAGEn
For absorbent substrates and materials thicker than2.5mm. Including new, existing or abraded concreteand wood substrates, use a VCT notch of 1/32” deepx 1/16” wide x 1/32” apart.
Coverage will average 150-180 s.f. per gallon.
For any areas of high porosity, please consult Altrotechnical services.
7. Adhesives

18
7.1 Polyurethane AdhesivesAltrofix 30 & 31
For installations of Safety Sheet Flooring in areassubjected to excessive spillage of water, floors with adrain(s), extreme temperature change, and heavy rollingloads, Altrofix 30 or Altro approved adhesive is mandatory. Altrofix 31 isan extremely fast setting version of Altrofix 30.
Polyurethane adhesives are suitable for all approvedsubfloors including properly prepared metal.Polyurethane adhesives are generally not suitable forvertical surfaces due to their low initial grab.
7.2 Acrylic AdhesivesEcofix 20 and 25
Use in areas not subjected to spillage or heavy use ofwater, or where drains do not exist.
7.3 Contact Adhesives or TapesVinyl cap strips, cove stick, and integral cove may beadhered using a quality neoprene contact adhesive orquality contact tape.
NOTE: Only use approved Contact AdhesiveTape. Refer to Section 19 for distributor list.
7.4 Static ConductiveAdhesivesA static conductive adhesive must be used with AltroWalkway 20SD, Altro’s static dissipative safety flooring.
NOTE: Please contact your Altro distributor forthe approved static conductive adhesive for
specific applications.7.5 Important Adhesive Termsn
Coverage, which is the amount of adhesive applied
to a given surface, is measured in l/m2. To obtain a
good bond, the right amount of adhesive has to be
applied with the appropriate trowel, in accordance with
the manufacturer’s recommendations.
If not enough adhesive is applied, the bond willbe too weak and there will be insufficient contactbetween the adhesive and the material. If the material isporous and a fluid adhesive is used, the adhesive maybe absorbed by the substrate or the material, leavinginsufficient coverage for proper bonding. If the surface tobe bonded is rough, sufficient adhesive has to beapplied to ensure that it penetrates into all the nooks andcrannies of the material.
If too much adhesive is applied, solvent or watermay remain trapped inside and not evaporate properly.As a result, the adhesive will not harden at the properrate, causing blisters or even ungluing. In addition, toothick an application may result in indentation orpockmark problems.
To obtain the correct coverage, the installer must use theappropriate trowel. Furthermore, the notches of thetrowel must not be worn down, which may occurwhen steel trowels are used on hard substrates. Whenthe notches are worn, the trowel will not apply enoughadhesive. Worn-out trowels should be replaced.Renotching is not always a good alternative since laborsometimes costs more than a new trowel.
n
Pot life applies only to reactive adhesives (expoxy,
polyurethane, polyester, and dry-set mortars.) The
pot life is the length of time that an adhesive remains
usable after the components are mixed. Depending
on the product formula, the chemical reaction will
begin immediately or soon after mixing.
7. Adhesives

Factors affecting pot life include:
Temperature: The higher the temperature, the shorterthe pot life, since heat accelerates the chemical reactionproducing hardening.
Size of Mixture: In the case of certain products, anexothermic, or heat-generating reaction occurs, with theamount of heat generated increasing in proportion to themass of the mixture. If too much product is mixed atone time, the reaction could accelerate substantially,causing the adhesive to set prematurely. Therefore,when working with such products as, it is advisable tospread the adhesive in a thin coat. This allows the heatof the reaction to escape, thus prolonging the workingtime.
n
Tackifying time, is the interval of time between the
spreading of the adhesive on the substrate and the
installation of the material. During this time, the solvent
or water begins to evaporate (totally in the case of
neoprene cement and partially in the case of a direct
gluedown installation.) As a result, the adhesive
thickens and becomes tacky, producing sufficient
cohesion so that the material can be installed without the
risk of it lifting.
The tackifying time for various adhesives on the market
ranges between 0 and 20 minutes, depending on the
type of formula used.
Factors affecting the tackifying time include:
Temperature and humidity: If it is hot and dry,
solvent and water will evaporate rapidly and the material
must be installed faster. The opposite is true when it is
cool and humid.
Absorbency of substrate: If the direct gluedownmethod is being used to apply an adhesive in emulsionor solution, the installer must verify the permeability ofthe substrate and the material to ensure that the solventor water is able to evaporate out or be absorbed afterinstallation. If not, blistering may occur.
Installer MUST always respect tackifying time.
n
Open Time, begins when the adhesive is spreadand ends when it loses its adhesive properties.Therefore, the interval of time during which the materialcan be installed depends on the tackifying and opentime, as shown in the diagram below:
Factors affecting the open time include:
Temperature and humidity: Heat shortens the opentime by accelerating the evaporation of the solvent orwater. Cold prolongs open time.
Humidity: In the case of emulsion adhesives, humidityincreases open time by slowing the evaporation of water.
High Absorbent Substrates: High absorbentsshorten open time by absorbing more adhesive.
After this point, the adhesive will nolonger adhere to the oppositesurface.
- The adhesive is spread on the substrate at time T0.
- Between T0 and T1, the adhesive starts to acquire its tack and cohesion. The covering materialcannot be installed until T1.
- After T2, the adhesive completely loses its ability to adhere to the covering material. Therefore, theinstallation of the covering material must be carried out between T1 and T2.
7. Adhesives
19

n
Initial Tack, is an adhesive’s ability to hold the
adherend in place as soon as it is installed, so that it
does not lift or move. Sufficient initial tack is particularly
important for difficult areas such as joints, edges, cove
bases and stair nosings. If the adhesive does not have
enough initial tack, the material will lift immediately after
being installed and the installer will have to roll the area
again.
When an adhesive is first spread, it has little tack, but
the tack increases along with the tackifying time.
Adhesives with high initial tack are used to bond stiff
materials (i.e. materials with “memory” which have a
tendency to lift and curl), and to obtain impeccable
results under difficult installation conditions.
n
Setting mechanism is the process in which an
adhesive begins to cure.
Setting mechanisms include:
Catalyst: two-part polyurethane adhesives - (AltroFix30/31).
Water Absorption: acrylic adhesives - (EcoFix 20/25).
n
Setting Stages: there are several stages of setting:
Adequate: When the work site can be opened to foot
traffic (in general, a few hours after application, except in
the case of reactive adhesives.)
Complete: When the adhesive has acquired 90% or100% of its maximum properties, including its maximumpull strength. At this stage, the heat can be turned back onwithout risk of the material lifting and in the case of “wet”rooms, the floor covering can be thoroughly washed withwater if required.
n
Substrate Permeability: When selecting an adhesive,
the permeability of the substrate must be taken into
account.
Porous material on a porous substrate: This is no
problem, since the solvent or water can evaporate from
both sides.
Non-porous material on a porous substrate:Excess solvent or water will be absorbed into that
substate.
Non-porous material on a non-poroussubstrate: The solvent or water MUST be totally
evaporated before the material is installed. If not, the
adhesive will never set and the solvent or water trapped
inside may cause blistering. Another solution is to use a
reactive adhesive (two-part polyurethane, AltroFix
30/31), which does not require evaporation to set.
20
7. Adhesives

21
8. Installation Procedures
8.1 GeneralRecommendationsn
Regardless of where Altro floor covering is installed,
it is a standard requirement that all seams
(horizontal or vertical), internal and external corners
are cut in, grooved and heat welded to provide a
floor surface conforming to the highest standards of
safety and hygiene.
n
It is essential to ensure that rolls used in any one
area are from the same manufacturing batch and laid
in numerical sequential order.
n
For shade matching, no sheet should be laid at right
angles to another.
n
Always protect newly installed floor coverings from
work by other trades. Use a non-staining protective
covering.
n
The initial clean of Altro floor covering is essential. A
poor initial clean will make the routine maintenance
more difficult.
8.2 Preparationn
Subfloor preparation must be carried out inaccordance with the Resilient Floor Covering InstituteInstallation Practice #1 www.RFCI.com and asrecommended by Altro. Refer to Section 4.2 Subfloors & Underlayments.
n
All patching and leveling must be accomplished byusing only Portland cementitious underlaymentmaterial. Refer to Underlayment Manufacturer forsuitable products.
n
Never install over gypsum-based toppings,underlayments, leveling or patchingcompounds.
NOTE: Altro is not responsible for failuresrelated to subfloor preparation productsrecommended and installed by others.n
Surfaces must be prepared in accordance with theunderlayment manufacturer’s instructions.
n
It is best to make rough cuts and let the Altro floor
covering become conditioned to the recommendedinstallation temperature. This allows the material to“relax” and makes it easier to install.
n
Check carefully to see that drops match in shade. Itmay be necessary to reverse sheets of Altro floorcovering to obtain a side shade match. If a sideshade match cannot be accomplished, donot install. Contact your Altro distributor.
n
When cutting to length, allow 1" (25mm) at eachend for trimming.
8.3 Seamingn
Trim the factory edge in order to remove the edge-curl created during roll storage. Trim a minimum1/2” (1.25cm) off all seam edges.
n
Place material into position and overlap the seamedges 1" (25mm).
n
All seams must be cut to fit “net” and not pressurefitted or gapped.
n
Do not butt factory edges.
n
For AltroSmooth Ethos and Altro Timbersafe, werecommend all seams be run parallel to the runningpattern of the flooring. Cross joints should beavoided where possible as these will stand outagainst the natural wood pattern of the flooring.
n
Altro floor covering seams may be trace cut usingthe Altro scoring blade followed by the Altro hookblade. Use the trimmed edge as a guide.
n
Seams may also be hinged scribed (underscribed) ifdesired.
n
You may straight edge and butt short seams such asdoorways.
8.4 Adhesive ApplicationTwo-Part Polyurethane Adhesives
NOTE: Allow polyurethane adhesives aminimum open time of 10-15 minutes but nomore than one hour after spreading.n
Install Altro floor covering into adhesive followingadhesive label’s application instructions, taking carenot to trap any air between the flooring and thesubfloor.

22
NOTE: Take all necessary precautions toprevent the formation of air bubbles. Spreadthe adhesive so that the trowel ridges runstraight and uniform across the sheet width.For Ethos and Timbersafe spread adhesivewith the grain of the wood.n
Immediately roll the flooring from side to side in thedirection of the adhesive ridges using a 100 lbs(45kg) roller to ensure complete contact of flooringmaterial to the adhesive and ensure air is completelyfrom removed between the back of the Altro floorcovering and the subfloor. Roll again lengthwise. Rollagain in one hour. Check for and remove air pockets.
n
Weights such as sand bags must be placed overseams or around drains or in areas where pressureis required to keep the back of the Altro floor coveringinto the adhesive until the adhesive has set.
NOTE: When using one-part adhesive such asEcoFix 20 or 25 with Ethos and Timbersafe, theadhesive must be spread with all trowel ridgesrunning in the same direction as the woodgrain.8.5 Flash CovingWhen flash coving, wall surfaces should be sound,solid, smooth, dry, clean, and free of foreignsubstances.
n
After sub-floor preparation, install cove stick and capstrip as specified. Follow specifications of contractdocuments for wall cap detailing when coving upwalls.
n
Apply contact adhesive or tape to the areas beingcoved per tape or adhesive manufacturers’instructions.
n
Roll the Altro floor covering tightly into cove stick andtrim as required. Fit floor covering into cap strip androll with a hand roller.
n
Always seal top of cap with appropriate caulking.
Cornersn
When adhesive has set, all corners are to beheat welded.
n
External corners should be made using a butterflypiece fitted net without any gaps. A side piece (boot)may also be used where applicable.
n
Internal corners are to be cut to fit net without anygaps.
If in doubt on detailing of corners, please contact yourAltro distributor.
8. Installation Procedures

8. Installation Procedures
Forming an Internal Corner
Forming an External Corner Using a Side Fill Piece (Boot)
1.After warming the material,pushthe floor covering as far as possibleinto the internal corner.
2.Make a cut from the base of thematerial to the top of the floorcovering in line with the corner.
3.Fold in one side and graduallycut off the surplus material tocomplete the first part of thecorner.
4. Fold in the second side. 5. Gradually trim the surplus material toachieve a net fit.
6. Heat weld to complete the section. Referto Section 10 for more information aboutheat welding.
1.Roughly cut the floor coveringoversize to meet the requiredsection.
2.Cut in the back and front corner,then cut out the section toaccommodate the filler piece.
3.Take a separate piece of floorcovering and fit to the back of theinternal corner.
4.Cut in the front of the externalcorner.
5.Heat weld to complete thesection.Refer to Section 10 formore information about heatwelding.
23

24
8. Installation Procedures
Forming an External Corner Using a Butterfly Piece
1. Install cap strip and cove stickusing approved contact adhesiveor approved contact tape.Theoutside miter on the cove stickmust be rounded at the subfloorline then shaped to match theradius of the cove stick.
2.To cut a butterfly piece:(i) Cut a rectangle from a scrap ofthe floor covering material.A = the height of the cove x 2B = the distance from the top of thecap strip to half way down theradius of the cove stick.(ii) Cut along lines C and D to makea triangle.Round the bottom pointto the radius of a penny.
3.Folding a butterfly piece:(i) Warm the back of the butterflyfill piece along the center line.(ii) Fold the fill piece flat,back toback and along the center line.(iii) When cool,open to 90°.
6.Once the butterfly corner fill is inplace,the adhesive may be spreadand the field material laid intoposition.The relief cuts must bemade so the field material overlapsboth edges and the bottom pointof the butterfly corner fill.
7.Warm the material and ensurethe field material is held firmlydown against the cove stick whilemaking the final cut.Using an Altrohook blade or concave blade,trim the field material to fit net tothe perimeter of the butterflycorner fill.
8.Heat weld to complete thesection.Refer to Section 10 for moreinformation about heat welding.
5.Either place contact adhesive orcontact tape of the back of thecorner.Adhere with contactadhesive or contact tape.Fit the fillpiece up under the lip of the capstrip and press into place.
4.Finished butterfly piece.

9. Seam Grooving
After Altro floor covering has been cut in and adhesive is
properly set (usually the next day), seam grooving can
begin.
A 1/16" deep by 1/8" wide (1.5mm x 3mm) groove
must be cut equally along the seam using an Altro Hand
Grooving Tool and straightedge. Alternatively, special
power grooving blades are available.
Due to the metal particles in the Altro safety flooring, do
not use standard grooving blades
as the blades will dull very quickly.
9.1 Power Grooving
Power grooving should only be accomplished by using a
machine equipped with an Industrial Diamond Tipped
Blade designed for Altro Safety Flooring.
WARNING: Do not attempt to groove an AltroSafety Flooring seam with a standard groovingblade as the abrasive particles in the flooringwill quickly dull them.
Set the grooving machine to make a channel 1/16" deep
by 1/8" wide (1.5mm x 3mm). Line up the grooving
machine indicators with the center of the seam and push
the machine along the seam.
Practice on a scrap piece of material before grooving the
installed material to ensure the correct depth is set for the
grooving machine.
25

26
10. Welding
10.1 Welding HorizontalSeamsAfter all seams have been grooved, heat welding can
begin. All seams and corners must be heat welded with
Altro Weldrod. When welding traditional safety flooring
use a 5mm speed tip. For safety flooring with a clear
wear surface, use a narrow flow tip. Altro Weldrod is
supplied in colors to suit the floor covering being used.
Wait overnight for adhesive to set before welding.
Preparationn
Ensure the heat welding nozzle is free of debris by
cleaning with a wire brush.
n
Make certain the heat welding gun is between 482°F
(250°C) and 662°F (350°C). Test on scrap pieces
of material.
n
Ensure the Altro Weldrod is cut to the correct length
for the seam to be welded and that it will not catch
on any objects in the area.
Weldingn
Move the welding gun along the grooved seam with
the thread feeding through the nozzle at a
predetermined speed and temperature.
n
Do not lean the gun to the right or left. Keep the foot
of the nozzle parallel to the floor surface.
10.2 Welding CornersTo weld internal and external corners, turn the nozzle at
the end of the welding gun to the “up” position which
allows for an easier starting point and proceed as
shown. Once all the welding on the coved sections is
completed, turn the high speed nozzle to the “down”
position and heat weld the grooved floor seams.
A feed roller may be used in lieu of a welding tip.
Remove tip and reduce heat setting to approximately
250°F (120°C).
10.3 Trimming HorizontalSeamsHorziontal AreasIn flat areas, trimming of the Altro Weldrod should be
carried out in two stages:
n
Place a trim plate over the Altro Weldrod and trim off
the top layer of the Altro Weldrod with the spatula
knife. This can be done while the thread is still
warm.
n
When the remaining Altro Weldrod has cooled, trim
the excess weld flush with the flooring surface using
a spatula knife (without the trim plate).
Corners and Verticle Coved AreasUse X-ACTO blades to trim cooled Altro Weldrod in
corners and coved areas.
Altro Marine 20 Safety FlooringAfter heat welding Altro Marine 20, use a Slim Trim
Chisel, with a straightedge as a guide, to trim the excess
Altro Weldrod. Refer to Section 6 for moreinformation about Tools & Equipment.

Welding an InternalCorner
Welding a BootExternal Corner
1.The bottom section and floorseams must be grooved before theseams are welded.The top sectionnormally does not need to begrooved as a “V”shape will beformed when cutting in the corner.
2.Adhesive must be properly set.To make it easy to weld the corner,turn the nozzle around and feedthe Altro Weldrod through thenozzle and weld down the corner.
3.Allow the weldrod to cool downbefore cutting off the surplus witha spatula on the level floor seams.
Welding a ButterflyExternal Corner
1.The seams must be groovedbefore the seams are welded.
2.Feed the Altro Weldrod throughthe nozzle and weld down theseam,or use a feed roller for bettercontrol. Avoid contact with thevinyl cap.
3.Allow the Altro Weldrod to cooldown before cutting off the surpluswith a spatula.The X-ACTO large round router bladeshould be used for trimming theAltro Weldrod where the twoseams meet at the corner.
1. Internal corners of traditionalsafety flooring do not need to begrooved. All other sheet floor needsto be slightly grooved to remove thetop surface.
2.The X-ACTO small round routerblade should be used for trimmingthe cooled Altro Weldrod oninternal corners.
10. Welding
t t t
t t
t
4.The external corner should betrimmed off using the X-ACTOsquare router blade.
27

28
10.4 Chemical Seam Sealing of Altro Floorings
While Altro floor coverings are designed for heat-
welding, in certain residential or light use commercial
installations they may be seamed by a chemical (cold)
welding process. Consult Altro technical services for
authorization and further information.
For chemical welding to offer the best possible
performance, the installation, and in particular the
seaming process, needs to be of the best workmanship
quality.
Suitability and performance of chemical seamsealing of Altro flooring is the soleresponsibility of the specifier, flooringcontractor, and installer; any installationperformance shortcomings should not beconsidered an Altro product defect. Altrorecommends the heat-welding of all seams.
Chemical/Cold Weld SeamSealing Proceduren
Wait overnight before welding.
n
Areas to be chemically welded must fit net. Do not
cut in or fit areas too tight as it will be difficult to
chemically weld properly.
n
It’s imperative to keep the flooring adhesive from
touching and contaminating the seam edges.
n
Roll area that is to be chemically welded with a
hand roller and insure that the area is well adhered
and permanently bonded.
n
Clean the area that is to be chemically welded with
damp soapy cloth, using a neutral detergent and
water and allow to completely dry.
n
Take the chemical/cold weld unit and lightly squeeze
the unit expelling a small amount of air.
n
While slightly releasing the squeezing pressure on
the unit, invert the unit and insert the needle-tip firmly
down and into the full depth of the seam.
n
Reapply a light squeezing of the unit to allow the
chemical from within the unit to flow down into the
full depth of the seam.
n
Pull the unit slowly toward yourself continuing to
deposit a bead of chemical weld down into the full
depth of the seam and depositing approximately 1/8”
to 1/4” wide on the flooring surface.
n
When finished chemically welding stop squeezing the
chemical weld unit and remove from the seam area.
n
Ensure that the chemical weld has penetrated the full
depth of the seam as this provides the full strength of
the chemical weld throughout the seam thickness.
n
No traffic is recommended on the areas for
approximately two hours after chemically welding.
10. Welding

11. AltroMastic 100
29
Viscosity: Thixtropic
Density: 1.01
Cure Time: 24-72 hours
Skin Time: 20 minutes
Storage: Store between 40°F (5ºC) to 77°F
(25ºC) in cool, dry conditions
Shelf Life: At least 12 months, in an airtight
container, from date of manufacture
Coverage: Approximately 150 linear feet (48
linear meters) per 1/8th” (3mm) bead
Working temperature: Between 40°F (5ºC) to
104°F (40ºC)
Full bond: 4 days
Contains: 9.8oz (290ml)
Instructions for Use
1. AltroMastic is a specially formulated sealing
compound for use where Altro floorings abut edges,
skirting’s, wall surfaces etc, or where the flooring is cut
around pipes, door frames etc.
2. AltroMastic is not recommended for use in trafficed
areas, as a welded joint will give superior performance.
Where flooring abuts drainage channels, access covers,
quarry tiles etc, a clamping or welding system should be
used.
3. AltroMastic should only be used to seal joints in Altro
floorings where obstructions prevent the use of a hot air
welding gun.
Procedure1. Surfaces to be sealed must be dry and free from dirt,
oil, or grease.
2. All areas to be sealed should be masked with tape.
Note: Wet spillage of AltroMastic can be removed using
adhesive clean-up wipes.
Contains no Solvent or Isocyanate
- Can cause irritation by inhalation, skin contact and ingestion
- When using do not eat, drink or smoke
- Do not empty into drains
- Keep out of reach of children

30
AltroMastic™ 100 is used for sealing around pipes andother adjacent surfaces. It is not to be used for sealingseams of Altro High Performance floor covering, arounddrains or internal and external corners. AltroMastic 100is available in a variety of colors similar to standard Altrocolors. Please contact your Altro distributor for the closestcolor match.
n
Altro floor covering is to be fitted to pipes and otheradjacent surfaces with close-butted seams. Cut a1/8" (3mm) channel around the object to receive theAltroMastic 100. Ensure the channel is free fromforeign matter.
n
Cover the surface of the Altro floor covering aroundthe area to receive AltroMastic 100 with maskingtape to ensure it does not come into contact withsurfaces where AltroMastic 100 is not required.
n
Nozzle on tube must be cut back to allowapproximately 1/8" (3mm) bead of AltroMastic 100to flow from the cartridge.
n
Place nozzle and tube in caulking gun. Nozzle canthen be moved along channel at sufficient speed toensure the channel is completely filled.
n
Use a wet finger to smooth the AltroMastic 100before it skins over. Wet finger with water or a soapyliquid before touching the applied AltroMastic 100.
n
After application, it is important to remove maskingtape before the AltroMastic 100 skins over.
n
One cartridge should cover approximately 164 linear feet (50 linear meters) with a 1/8"(3mm) bead. Skin-over time is approximately 20minutes.
n
AltroMastic 100 completely cures in 1 to 3 days. Donot allow contact with AltroMastic 100 until at least8 hours after application.
n
Store and apply AltroMastic 100 at a minimumtemperature of 41˚F (5˚C) and a maximum of 77˚F(25˚C) in cool, dry conditions.
n
Keep out of the reach of children.
11. AltroMastic 100

Altro floor covering must be mechanically fastened to
all drain outlets and cleanouts to ensure a permanent
watertight installation as outlined in this section.
12.1 Existing Rectangular orSquare Drains & Floor Sinks Altro Gulley Edge/Angle or Visedge may
be used. For Gulley Edge/Angle see section 5. For
Visedge see section 12.3.
12.2 Altro Gulley Angle/EdgeStrips with Altro safety flooring
Cutting the Concrete
1) Using a small hand held electric grinder or circular
saw equipped with a diamond saw blade (wet type
preferred), cut a 1” deep x 3/32nd” wide saw cut in the
concrete substrate to receive the Gulley Angle/Edge. Two
(2) passes may be necessary to achieve the correct
width of groove unless the saw blade is 3/32nd” wide.
Note: The use of wet type saw blade would, if used
correctly, reduce the amount of airborne dust created
while cutting concrete. Dry cutting can be done if a dust
recovery cutting system is utilized.
2) If the area to be saw cut is in a doorway or abutting
a wall the saw/grinder will be unable to cut all the way
to the door casing or wall. In this case a series of 1”
deep holes may be drilled in the concrete substrate using
a 3/32nd” masonry drill bit and then chiseled out to
allow Gulley Angle/Edge to seat flush with the subfloor.
You may also cut back the leg of the Angle/Edge to be
inserted, within 1” of the ends.
3) If the area to be saw cut is at floor drains or trenches,
the cut must be directly up against the drain or trench.
4) On all types of cuts, it’s helpful to use some form of
straight edge or guide to create a straight saw cut
allowing for a professional fit and finish.
5) All water and concrete silt must be
removed/vacuumed from the saw cut. The area in and
around the saw cut must be allowed to dry completely
before gluing can take place.
Gluing Process
6) Using masking tape or other suitable tape, tape the
outside of perimeters of where the Gully Edge will be
installed, this will aid with the cleanup of excess
adhesive after installing the Gulley Edge.
7) Apply adhesive (Altrofix 30/31, 2-part polyurethane or
equal) on the floor and in the saw cut.
8) Place the Gulley Angle/Edge into the saw cut making
certain that the strip is completely embedded into the
adhesive.
9) Using a small scraper or putty knife remove excess
adhesive, if adhesive is on the surface of the Gulley Edge
remove using a small amount of denatured alcohol on a
clean white rag. Note: do not allow adhesive to dry on
the Gulley edge, once dry, the 2-part adhesive cannot be
removed.
10) It may also be necessary to weight down the Gulley
edge until the adhesive has a chance to set-up this will
insure that the strip is fully seated and without voids.
11) Always allow the Gulley Edge to set up in the
adhesive, (typically from 4 to 6 hours) prior to cutting
and fitting the Altro Safety Flooring to the newly installed
strip. The flooring material should be scribe fit to insure a
neat net fit seam for heat welding.
31
12. Drains & Cleanouts

32
Welding Process
12) Heat-welding the new flooring to the edging must
not be attempted until adhesive has cured (typically 24
hours on Altrofix 30 and 4 to 6 hours on the Altrofix 31).
13) Groove Gulley Edge and flooring as if it were a
seam in the flooring material, Gulley Edges are made of
vinyl and weld just like the flooring material. Note: When
hand grooving, always use a straight edge as a guide to
achieve a straight groove.
14) Clean all dirt and debris from grooved seam and
weld as you would the Altro flooring material. If
applicable, always weld mitered corners with a black
rod. Note: Traditionally a black rod is used to weld the
flooring to the Gulley Edge. However, a rod color that
matches the flooring material can also be used.
15) Once the welding rod is allowed to cool (typically
30 minutes) trim with a sharp trimming knife using a
trim plate for the initial cut followed by the trimming
spatula for the final flush cut.
16) Touch-up can be done using a hot tip repair tool or
bullet tip repair tool.
Note: Gulley Edge must be fully adhered bothinside the saw cut groove and onto thesubstrate. All joints, flooring to gulley edge aswell as corners of the Gulley Edge must bewelded, failure to do so may allow water toencroach compromising the integrity of theflooring and Gulley Edge.
12.3 Visedge VR A water resistant joint between Altro high performance
floor covering and other surfaces, such as ceramic tiles,
is achieved by using the Visedge VR vinyl edge securing
strip, or gully edge strip.
The flooring is heat welded to either strip, preventing
water seeping into the subfloor and protecting the tile
edge.
InstallationVisedge needs to be countersunk, or level compoundneeds to be used, to accommodate the thickness of theedging. Use the predrilled holes to secure the strip to thesubfloor. Use the appropriate screws and anchors for theinstallation. In addition, use a water resistant caulkingunder the edge to keep water from traveling back underthe flooring.
12. Drains & Cleanouts

12.4 New Round Drains &Cleanouts
Clamping drains are the best choice for a properinstallations, and the only choice for areas where waterpenetration concerns are a priority. These drains arereadily available from plumbing supply distributors.They may be installed at time of concrete placement orretrofitted. They are screw on and height adjustable.They come in a variety of drainage pipe diameters andcover sizes. We prefer the larger cover sizes.
The following are acceptable manufacturers and theirproducts:
Zurn Z 400 H – 6/9H
Wade 110 – FC6/9
Mifab F1100 - FC
33
12. Drains & Cleanouts
MIFAB - F1100 - FC FLOOR DRAIN WITH SURFACE MEMBRANCE CLAMP
7” (175) or 9” (230)FLOOR COVERING
VANDAL RESISTANTSTAINLESS STEELSCREWS
“FC” NICKEL BRONZE STRAINER
SURFACE MEMBRANECLAMP
WEEPHOLES FORDOUBLE DRAINAGE
STRAINERADJUSTMENT
BODY HEIGHT
Sample of an approved clamping

34
n
Place the Altro floor covering over the drain, and fit
cut only to the inside diameter of the drain plate
screws.
Note: Cutting to the outside of the screws will cause
the material to be short of the drain plate once it is
re-installed.
n
Cut small windows in the Altro floor covering at the
drain plate screws only.
n
After all final fitting is completed, warm material with
a hot air blower and secure the drain plate cover in
place. This process pinches the Altro floor covering
between the drain body and the drain plate cover.
(See Diagram C, completed drain)NOTE: In most cases, it will be necessary toweigh down the drain area to allow theAltrofix 30 two-part adhesive to set-up.
CAUTION: Failure to weigh down the drainarea during this process may cause a bubbleor a pucker in the Altro floor covering, towhich there is no remedy.
Approval from the General Contractor/owner must also be
obtained before commencing with this procedure.
Altro floor covering must be mechanicallyfastened to all drain outlets and cleanouts toensure a permanent watertight installation asoutlined in this section.
COMPLETED DRAIN
DIAGRAM C
Modifying an Existing Drainn
Remove the drain cover plate.
n
With a quality cementitious patching compound,finish the subfloor flush with the drain perimeter.NOTE: If drain body is higher than theconcrete surface, it must be either ground-off or chipped out and lowered. If the drainbody is lower than the concrete surface,you must slightly grind the concrete surfaceto allow for a slight slope-to-drain profile.
n
Using a small hand held electric grinder, remove the
square shoulder on the inside edge of the drain body
to create a 45-degree slope into the drain.
(See Diagram A)
n
Similarly, remove the square shoulder from the
perimeter of the backside of the drain cover plate
creating a 45-degree slope to match the drain body.
(See Diagram B)
n
Replace the cover plate screws for the purpose of
land marking the screw holes and preventing the
adhesive from filling the holes during the gluing
process.
Gluing & Cutting Processn
Apply adhesive (Altrofix 30 two-part polyurethane or
approved polyurethane adhesive) on the floor,
around, and onto the sloped perimeter of the drain.
12. Drains & Cleanouts
Square Shoulder Square Shoulder
DIAGRAM B
SQUARE SHOULDERS
DIAGRAM A

35
13. Altro Walkway 20SD Installation
Altro High Performance Walkway 20SD is a static
dissipative safety flooring that will dissipate static
electricity when properly installed.
The installation of Altro Walkway 20SD is the same as
all Altro safety floor coverings with the exception of using
a static conductive adhesive and the possible
requirement for grounding the installation.
WARNING: It is imperative that no sealers oracrylic floor finishes be applied to the surfaceof Altro Walkway 20SD as they would interferewith the static dissipative system.
Excessive cleaning or the use of floor finishes
and sealers can adversely affect the electrical properties
of the floor. Also, some cleaning agents can leave a film
and are unsuitable for use with static dissipative floors –
check with the manufacturer of the cleaning agent before
use.
13.1 Concrete Subfloorsn
Concrete subfloors provide a natural grounding when
Altro Walkway 20SD
is installed using a Static Conductive Adhesive.
Grounding is therefore not necessary, unless a
resistance to ground requirement has been specified.
The concrete floor must be dry, smooth and free of
any foreign substances on the surface.
n
Static Conductive Adhesive is to be spread in
accordance with the manufacturer’s instructions. Altro
Walkway 20SD is to be placed into the adhesive
while the adhesive is in a tacky/wet state. If any
bubbles occur, you should allow slightly more open
time. Immediately roll with a minimum 100 lbs
(45kg) roller to remove any air and to ensure
complete contact between the subfloor and the back
of the sheet vinyl.
n
Heat welding of seams should not be attempted until
the adhesive has set, which is normally the next day.
13.2 Wood or Subfloors Otherthan ConcreteIf the Altro Walkway 20SD is not installed directly on
concrete, it may be necessary
to provide copper ground strips with a connection to
ground.
n
Lay the first copper/brass strip (0.1mm thick) into the
adhesive 6" (150mm) in from the perimeter of the
room, running in the same direction, and the full
length of the flooring.
n
Allow sufficient ground strip to remain exposed, to be
connected to a grounding point by a qualified
electrician. It is advisable to use two groundingpoints in the event that one should become
damaged or disconnected.
n
Lay a second grounding strip at 90° to the first;
again, this should be placed 6" (150mm) in from
the edge of the room and running across the full
width of the room.
n
For large areas, lay extra strips at 65’ (20m)
intervals throughout the area.
n
All sheets must be in contact with the conductive
strip.
WARNING: Do not attempt to do the groundconnection as the grounding must be done bya qualified electrician.
NOTE: Please contact your Altro distributor forthe approved static conductive adhesive forspecific applications.

36
14. Altro Everlay
Altro Everlay™ is an impervious sheet vinyl
underlayment designed to overcome the problems that
can be encountered when laying Altro High Performance
sheet floor coverings over damp surfaces, existing
resilient flooring, or subfloors contaminated with oil,
paint or old adhesive residue.
Although Altro Everlay enables the installation of Altro sheet floor covering over dampsubfloors, the system does not constitute awaterproof membrane.
Consult your local Altro distributor for recommendations
when considering Altro Everlay over damp subfloors.
14.1 Technical DataCompositionAltro Everlay is a stabilizing and insulating glass fiber
sheet coated with an impervious vinyl layer on both
sides and a vinyl channel surface on the underside.
THICKNESS: AVERAGE LENGTH OF ROLL:0.05" (1.2mm) 164' (50m)
ROLL WIDTH: WEIGHT PER ROLL:6'7" (2m) 220 lbs (100kg)
NOTE: Always use Altrofix 30 polyurethaneadhesive unless you have consulted with Altrotechnical services on use of acrylic adhesivesand receive written approval.
14.2 LimitationsAltro Everlay must NOT be used in the followingareas:
n
On subfloors subject to continual moisture or
hydrostatic pressure.
n
Areas that are subjected to heavy wheeled traffic,
chair castors, fork lifts, and industrial pallet jacks, or
where indentation is likely to occur.
n
Altro Everlay must not be installed in wet areas
unless flash coved, caulked, and mechanically
fastened at all edges and openings.
n
On-grade wood subfloors that are not adequately
ventilated.
n
On wood block flooring installed over on-grade or
below-grade concrete slabs.
n
On soft or spongy subsurfaces.
No guarantees can be offered when Altro Everlay is used
with products other than Altro floor covering or other
products not specifically approved in writing by Altro.
14.3 InstallationExaminationThe substrate must be smooth and flat. Existing flooring
must be firmly adhered to the substrate. Ensure subfloor
is properly sloped to drains. Check for low spots that will
result in ponding of water.
PreparationRemove ridges, bumps, plaster droppings and other
foreign matter from the subfloor surface. Fill low spots,
joints, holes and other imperfections with a Portland
cement base subfloor filler with a minimum compressive
strength of 3500 psi. Prohibit traffic on prepared areas until
filler has cured. Install at temperature recommended for
specified flooring.
Installation Procedure1. Sweep or vacuum substrate to remove all dust, dirt
and debris.
2. Roll out the Altro Everlay in the same direction as
the flooring is to be laid.
3. Seams must be laid out to provide for a minimum
12" (30cm) offset from the seam placement of the
Altro floor covering to be installed over the Altro
Everlay.
4. Seams of the Altro Everlay are to be set factory
edge to edge or double cut. Do not pressure fit
seams as this could result in peaking.
5. Cut in Altro Everlay to fit from 1/8" to 1/4"
(approximately 3mm to 6mm) gap from walls, toe
kicks, columns, pipes or other abutments.
6. Door frames and other abutments should be
undercut to allow the Altro floor covering and the
Altro Everlay to move freely underneath.
7. The Altro floor covering being adhered to the loose-
laid Altro Everlay should also be cut 1/4" (6mm)

37
loose of all abutments.
8. Install Altro floor covering over the Altro Everlay in
accordance with the instructions in this guide. This
is considered a non-porous substrate.
9. Use mechanically fastened thresholds for transition
areas where Altro Everlay meets other surfaces in
doorways. In areas other than doorways where
Altro Everlay meets other surfaces, use a
mechanically fastened transition strip or heat weld
if applicable.
10. In areas where Altro floor covering is to be coved
up the wall, install as illustrated in Figure 1 using
appropriate Altro cap strip. Install cove stick to the
wall substrate. Refer to Section 8.5 FlashCoving.
11. At flash clamping drains, reduce the clamping ring
to a snug fit, not too tight. Allow the Altro Everlay to
breathe around the drain.
12. Consult Altro Technical Services for unusual
installation details.
NOTE: The Altro Everlay may be adheredaround the drain perimeter but leave at leastfour pathways [minimum 1” (25mm) wide],unadhered to allow water vapor or liquid toescape from beneath the Altro Everlay.
FIGURE 1
14. Altro Everlay

38
Altro High Performance Safety Flooring may be installed
in new or existing freezers and coolers following
procedures as outlined below.
n
Minimum operating temperatures should not drop
below -22°F (-30°C) for Altro Stronghold 30 and -
4ºF (-20ºC) for other Altro High Performance Safety
Flooring products.
n
Existing freezers and coolers must be shut down and
brought up to proper installation temperature and
conditions for installations.
n
The freezer/cooler subfloor may then be washed,
rinsed, and allowed to dry.
n
In order to flash cove Altro safety flooring in
freezers/coolers, the freezer/cooler must be
completely defrosted. Follow normal temperature
recommendations and flash coving procedures as
outlined in section 8.
n
It is recommended to adhere directly to the substrates. For Metal Subfloors, see Section
4.2
Everlayn
In some instances the extensive shutdown period
associated with a conventional flooring installation
can be minimized when using Altro Everlay.
n
In a heated area, 65°F (18°C) to 80°F (26°C),
outside the freezer/cooler, lay out the Altro Everlay
and Altro safety flooring following seam layout and
adhesive recommendations, see Section 7. Cut
materials slightly over the required size. If flash
coving, do not run Everlay up walls. This will
interfere with adhesion to walls.
n
In this separate heated area, glue the Altro Floor to
the Everlay and allow adhesive to cure 48 hours.
n
After the Altrofix 30/31 adhesive has cured, the
seams may be heat welded and the flooring
assembly trimmed to fit the installation area, unless
flash coving. Do not allow Everlay to flash up the
wall. Allow for a 1/8" (approximately 3mm) gap
between the walls and the edge of the flooring to
accommodate the AltroMastic 100 sealant.
n
Lay the new flooring in place allowing it to extend
under the door threshold.
n
Tighten down the threshold and seal the entire
perimeter with AltroMastic 100 sealant.
n
After applying AltroMastic 100, install rubber base or
other suitable wall trim to perimeter.
n
Allow 30 minutes for the AltroMastic 100 to skin over
before restarting the freezer/cooler.
n
The freezer/cooler may then be put back into service.
NOTE: Sectional steel panels must be stable.If not, this type of subfloor should be installedwith Altro Everlay.Only specific grades of Altro floor covering arerecommended for "cold" areas. Consult yourAltro distributor for recommendations.
15. Freezers and Coolers

39
16. RepairsA regular repair and maintenance program should be
adopted to identify areas of damage during the life of the
floor. Areas to check regularly include:
n
Welds
n
Seals around abutments
n
Drains
n
Other areas showing damage
Damage to Altro High Performance floor covering should
be repaired as quickly as possible.
In typically wet areas such as production kitchens and
shower stalls, the Altrofix 30/31 polyurethane adhesive
will slow down water migration but will not prevent it.
Cuts in the flooring must be heat welded immediately in
order to create a seal against moisture intrusion.
There are specific recommendations as to how best to
accomplish certain repairs. Please contact your Altro
distributor to discuss these.

40
17. Maintenance & Protection
18.1 Altro Floor CleaningInitial Cleaning PracticesMACHINE
1. Sweep and/or vacuum up dust and other debris.
2. Mix an approved detergent and dilute to
manufacturer’s recommendations. Please contact your
current cleaning supplier to determine correct
product(s) to use. We recommend a neutral
detergent. Check the back of this guide for a partial
list of manufacturers.
3. Apply solution and allow approximately five minutes
dwell time.
4. Scrub using synthetic brushes and/or blue or green
pads.
5. Wet vacuum residue or use black squeegee to remove
water.
6. Rinse thoroughly with hot, clean water toensure that the surface PH of the flooring isneutral (PH 7) and their is no residue ofcleaner.
7. Wet vacuum or squeegee.
8. Allow surface to dry before re-use.
Note: Do not use non-recommended detergents ordetergents containing pine oil.The use of hand ‘edge scrubber’ may be necessary intocorners to ensure complete cleaning.
The initial clean of Altro floor covering is essential. A
poor initial clean will make routine maintenance more
difficult.
Cleaning and maintenance practices will ultimately
determine the general appearance and functional benefits
offered by the entire range of Altro floor covering. The
following procedures will help to keep Altro floor covering
looking good and functioning correctly at a reasonable
cost.
Altro Flooring products with Altro Maxis Cleaning
Technology incorporate the highest levels of stain
resistance and cleanability. These floors are maintained
using the same regime as all other types of Altro High
Performance safety flooring, but the frequency of
scrubbing will be reduced.
Refer to the Altro Cleaning & MaintenanceGuide available online at www.altrofloors.comor by contacting your Altro distributor.

Recommended cleaning methodsMANUAL
1. Sweep and/or vacuum up dust and other debris.
2. Apply an approved detergent and dilute to
manufacturer’s recommendations. Leave on floor
for approximately five minutes.
3. Scrub with a deck scrubber.
4. Wet vacuum or use a black squeegee to remove all
residue.
5. Thoroughly rinse with hot, clean water toensure that the surface PH of the flooringis neutral (PH 7) and there is no residue ofcleaner.
6. Wet vacuum or squeegee. Allow to dry.
17. Maintenance & Protection
Stains & MarksThe nature of unsealed safety flooring means that it may
be prone to scuffing or marking. However, the flooring is
very tough and can easily withstand most abrasive
pads.
Stubborn scuff marks should be spot cleaned using a
machine fitted with a medium synthetic pad and strong
alkaline detergent solution.
Alternatively, clean by hand using a non-abrasive
scouring powder and rinse well.
Altro floor covering has good resistance to chemicals
and spillage. However in some cases, long term contact
with certain chemicals such as asphalt-type products or
antioxidants in certain types of rubber used in mats, cart
wheels and tires, can cause permanent staining
problems to Altro floor covering and other vinyl floorings.
Altro floor covering should be protected from excessive
spillages of keytones or other solvents harmful to vinyl.
Protect flooring from alcohol hand lotions.
18.2 Special FlooringCertain grades of Altro floor covering do require the use
of different techniques or cleaning agents:
Altro Marine 20Do not use pads when machine scrubbing Altro Marine
20 - use nylon or polypropylene brushes instead to
ensure the textured surface is thoroughly cleaned.
In showers, swimming pools or whirlpools where the
temperature and humidity are high, a sandwich effect of
hard lime deposits and dirt can be created as the
surface water dries and residue begins to build up. If this
happens, it is useful to apply an acid-based cleaning
agent in correct dilution on a monthly basis.
41

42
Altro Stronghold 30Alkaline cleaning agents can sometimes leave
a white bloom on the textured surface of Altro Stronghold
30. To avoid this, use a neutralizing (i.e. slightly acidic)
rinse or even clean water containing one teaspoon of
vinegar to 1.5 gallons (5L) of water.
Altro Walkway 20SDExcessive cleaning or the use of floor finishes
and sealers can adversely affect the electrical properties
of the floor. Also, some cleaning agents can leave a film
and are unsuitable for use with static dissipative floors –
check with the manufacturer of the cleaning agent before
use.
AltroSmooth Flooring ProductsAltroSmooth flooring products should be initially cleaned
using an alkaline cleaner to remove any factory release
agent. It should then be sealed before use, with two
coats of floor finish. Contact your local Altro
representative for a list of approved finishes. For routine
maintenance, use a neutral cleaner and mop or scrub
with a soft pad.
18.3 Sealing Altro Safety FloorCoveringIn areas where maximum slip resistance is not essential,
maintenance costs can be reduced by treating safety
floors with an acrylic floor finish or equivalent. However,
never use a floor finish or sealer in critical areas such as
kitchens, wet areas or showers.
Varying coats of floor finish can be applied according to
17. Maintenance & Protectionthe finish required and the proposed method of
maintenance. For example, apply two coats of acrylic
floor finish and spray buff with a maintainer chemical
using a high speed machine fitted with fine buffing pads.
This will give a sheen to the floor and make it easier to
maintain. Although this reduces slip resistance by
around 30%, the floor will still be more slip resistant
than smooth vinyl. Once sealed, the floor can be
maintained using a neutral cleaning agent/maintainer.
The floor will then require periodic stripping and
resealing, as do other sealed floors such as linoleum or
smooth vinyl.
Such maintenance will reduce slip resistance in the areas
concerned and it is the responsibility of the building
owner to assess the appropriate level of slip resistance in
all areas.
18.4 CautionSome types of cleaning agents should not be used on
vinyl, such as pine oil cleaning agents or phenolic
cleaners which can cause the floor to stain or become
brittle and shrink. Also, some cleaning agents used for
their antiseptic properties in operating rooms, showers,
jacuzzis, swimming pool decks, and footbaths can have
a lubricating effect, resulting in most flooring materials
becoming more slippery when wet, even when used in
concentrations below 3%.
The use of products not recommended by Altro can void
Altro Limited Product Warranties. Refer to Section 19for distributor list of Altro recommendedcleaning agents.

43
18.5 Statement onDisinfectant, Germicide &Alternative CleanersAltro Safety flooring contains Altrosan, which is an
integral bacteriostat and fungicide that prevents the
growth of many bacteria and molds, a list of these can
be obtained by contacting your local Altro distributor. In
addition, many of the products within the Altro Safety
flooring range incorporate Maxis Technology, which
provide these Altro floorings with an excellent resistance
to staining from most soils, cleaning chemicals, and
disinfectant cleaners.
Altro does, however, recognize the need for cleaning
chemicals and disinfectant cleaners to sometimes be
used on a regular basis and in some cases receives
requests from customers, inquiring if a particular type of
cleaning product is acceptable and/or approved for use
on Altro floors.
Altro, where possible, will assist in determining
suitability for use of these products. However, this
information is usually more readily available from the
particular chemical, cleaner, or disinfectant manufacturer
concerned. In some instances the end user may work
with their flooring contractor to install a test area of the
Altro flooring which can then be used to carry out their
own in service performance tests. When requested, Altro
will also supply samples of the particular Altro flooring
material to the chemical manufacturer/supplier, end user
or flooring contractor for testing and evaluation
purposes.
In certain cases it is requested that samples for the
particular product be provided to Altro for evaluation.
Altro UK Research & Development laboratories are wiling
to carry out these tests. However, it is often the case
that these products cannot be shipped overseas, as
some contain hazardous chemicals. In addition, most
North American disinfectant and cleaning chemical
companies/manufacturers do not have UK
manufacturing and/or availability of the equivalent
product overseas.
In cases when it is only possible to review a particular
product MSDS to determine suitability, however helpful
this may be, it cannot be conclusive as safety data
sheets are only required to show information on
composition/ingredients which are considered to be
hazardous, and there may be other substances not
listed which could damage the flooring.
While Altro is always willing to advise on the types of
chemicals being used on their flooring, we would
always recommend that the compatibility of a particular
product for use must come from the chemical
manufacturer/supplier.
17. Maintenance & Protection

44
17. Maintenance & Protection
18.6 Important MaintenanceTips All traffic must remain off finished floors for
24 hours for light traffic, 48 hours for light rolling loads
and 72 hours for heavy loads. Cover and protect the
newly installed Altro floor covering from damage from
other trades during construction. To avoid discoloration
or staining of the floor by printing ink, oil or bitumen
found in some coverings, Altro recommends a non-staining, temporary floor protection system, such as a
reusable textured plastic sheeting.
Protect Altro floor covering from outside dirt and dust. A
suitable dirt excluder outside all entrances and a non-
staining mat inside can protect the flooring. Any asphalt
carried in on shoes may stain or yellow vinyl. Clean all
mats regularly to maintain their effectiveness.
NOTE: The initial clean of Altro floor covering isessential. A poor initial cleaning will makeroutine maintenance more difficult.
Some ‘never do’s’ & helpful hintsn
Do not mix detergents,
n
Wipe up spillage immediately.
n
Use only approved detergents that do not containpine oil.
n
Use only the concentrations recommended by themanufacturer.
n
Remove any oil or grease spillage before you start.
n
Sweep or vacuum the floor thoroughly beforewashing.
n
When scrubbing use nylon brushes or select padsappropriate for soiling conditions.
n
Always rinse. When rinsing use hot, clean waterand clean equipment, replacing water regularly andalways use twin compartment buckets fitted with aringer and ensure mops are clean.
n
Remove any rubber heel marks by abrasion with anylon brush and recommended detergent.
n
Always use quality equipment and machines.
n
Dirty equipment, particularly mops, does not clean -they merely redistribute the dirt.
n
Allow labor sufficient time to provide thoroughcleaning service (A floor’s appearance is directly inrelation to the budget and time spent.)
n
Do not accept new floors until satisfied that the initialclean has been thoroughly carried out.
n
Cigarettes and oven hot objects will scar the surfaceof Altro Safety flooring. Therefore, oven sidecatchment trays and heat shields must beprovided.
n
New black rubber wheels, tires, rubber mats maycause brown discoloration - particularly on newfloors in strong sunlight and on floors that have notbeen thoroughly rinsed. Such items can be of a non-staining variety and/or lacquered to prevent thisdiscoloration.
n
Contact any ASF office or Technical Services forfurther advice.

Please ensure you have the Health and Safety Data sheet for any cleaner you intend to use.
18. Directory
DRAINS & CLEANOUTSZurn Industries USA 814-455-0921
CAN 905-405-8272
Watts Drainage Products USA 800-338-2581
Watts Industries CAN 888-208-8927
Jay R. Smith USA & CAN 800-467-6484
Wade Drains USA 800-527-8478 x2365
Mifab USA 800-465-2736
CAN 800-387-3880
CLEANING AGENTS COMPANYAltro 44 Cleaner Compass Flooring USA 800-356-7464
Johnsons Break-Up JohnsonDiversey USA 800-862-3600
Taski Profi JohnsonDiversey USA 800-862-3600
Center Cut The Butcher Company USA 800-225-9475
Super Grease Buster Hillyard Inc. USA 800-365-1555
Impact Detergent Degreaser Wood Wyant Inc. CAN 800-724-0130
Blue Thunder Wood Wyant Inc. CAN 800-724-0130
Oasis 115XP Ecolab Inc. USA & CAN 800-352-5326
ACRYLIC FLOOR FINISHES COMPANYTaski Wiwax Compass Flooring USA 800-356-7464
Taski Wiwax Diversey Lever USA 800-862-3600
Taski Wiwax Wood Wyant Inc. CAN 800-724-0130
Johnsons Complete S.C. Johnson USA 800-558-2332
Mainstay The Butcher Company USA 800-225-9475
Super Shine All Hillyard Inc. USA 800-365-1555
MACHINES & EQUIPMENTNilfisk Advance Co. USA 800-989-2235
CAN 800-668-8400
Clarke, Division of Alto USA 800-253-0367
CAN 888-252-7534
Taski JohnsonDiversey USA 800-862-3600
Taski Wood Wyant Inc. CAN 800-724-0130
Roto Wash R. E. Whittaker Company USA & CAN 800-422-7686
BRUSHESFlo-Pac Brushes Carlisle Sanitary Maintenance Products USA 800-654-8210
Flo-Pac Swivel Scrub 5310 Wood Wyant Inc. CAN 800-724-0130
MISCELLANEOUSVisedge VR Howe Green UK +44 (0) 1920 463230
Contact Tape Compass Flooring USA 800-641-2667
Compass Flooring CAN 888-393-8235
45

Altro is a world leader in themanufacture and delivery ofcreative, leading-edge HighPerformance flooring and wallingsolutions. Altro is committed toinnovation both in the design andperformance of its products.
A provider of quality products, Altrohas gained ISO 9001:2000 and ISO14001 certifications. Altro is aregistered provider in the AmericanInstitute of Architects ContinuingEducation System (AIA/CES) and aU.S. Green Building Councilmember.
For up-to-date or additional information,
please visit www.altrofloors.com.
Altro and are registered in the United States Patent and Trade Mark Office, and the Canadian Register of Trade Marks.
visit www.altrofloors.comUSA: 80 Industrial Way, Wilmington, MA 01887 USA Tel: 800.377.5597 Fax: 610.746.4325Canada: 6390 Kestrel Road, Mississauga, ON L5T 1Z3 Canada Tel: 800.565.4658 Fax: 905.564.0750
RF-0
12/0
9