Trijicon Bow Site Manual
32
-
Upload
jason-brewer -
Category
Documents
-
view
40 -
download
3
description
Trijicon Bow Site Manual
Transcript of Trijicon Bow Site Manual


Operator’s Manual: Trijicon
® AccuDial
™ Mount and AccuPin
™ Sight

2
TABLE OF CONTENTS Page
Warnings ............................................................................................................. 3
Introduction .......................................................................................................... 5
Characteristics ..................................................................................................... 6
Controls and Indicators ........................................................................................ 7
Preparation for Use .............................................................................................. 9
Identification & Markings .................................................................................... 10
Installation Procedures ....................................................................................... 11
Adjustment Procedures .................................................................................... 17
Safety ................................................................................................................ 24
Cleaning and General Care ................................................................................ 26
Models & Available Accessories .......................................................................... 27
Patents and Trademarks .................................................................................... 30
Limited Lifetime Warranty .................................................................................. 31

3
WARNINGS AND CAUTIONS RADIOACTIVE MATERIALS SAFETY PRECAUTIONS The Trijicon® Single Pin Bow Sight contains radioactive material for nighttime
illumination. The radiation source is Hydrogen-3 (3H), commonly known as trit-
ium. Tritium is an odorless, tasteless, colorless gas that reacts to the human
body in the same manner as natural hydrogen. The human body does not easily
retain hydrogen or Tritium as a gas. However, the oxide, HTO, which is formed
by the burning of Tritium, is 10,000 times more hazardous. For this reason great
care should be taken to avoid flame in the presence of the Bow Sight with a
Tritium lamp which is broken or is suspected of leaking. If the Tritium lamp in
the Bow Sight breaks follow the procedures on the following page. The Bow
Sight is regulated under an EXEMPT LICENSE from the United States Nuclear
Regulatory Commission (NRC) held by Trijicon, Inc. Disassembly of the sight is
prohibited except by Trijicon, Inc.
Handling a Damaged Bow Sight (exposed internals, fire, or crushed) DO NOT handle a defective sight if you have open skin cuts or abrasions (use
gloves). If the Tritium lamp in an Bow Sight is broken or suspected of being
broken, work in a well ventilated area and avoid inhaling air near the sight.
4
Place the sight in a sealed plastic bag and contact Trijicon® for return and proper
disposal. Immediately following contact with the sight wash your hands with soap
and water.
DO NOT eat, drink, smoke, or apply cosmetics in the presence of a damaged Bow
Sight.

5
INTRODUCTION
The Trijicon® AccuDial™
bow sight mount is the world’s most functionally advanced
range-adjustable mount available. This innovative mount features “bow-sync” technol-
ogy, an infinitely variable transmission enabling precision range adjustment synchroni-
zation to any bow/arrow combination. In addition, the precision laser etched range
ring removes the need for tapes. Just follow the easy step-by-step procedure to cali-
brate the AccuDial™
to your bow and enjoy the success.

6
CHARACTERISTICS
Description Length Width Height Weight Field of View
Bow Sight
Mount
6 in
(152 mm)
3.7 in
(94 mm)
2.8 in
(71 mm)
8 oz
(227 g)
N/A
Single Pin Bow
Sight
1.5 in
(38 mm)
2.1 in
(53 mm)
2.1 in
(53 mm)
2.29 oz
(65 g)
1.77in
(45mm)

7
CONTROLS AND INDICATORS
Figure 1
Range Adjustment Dial
Frame Range Ring
Locking Screw
Calibration
Locking Screw
Calibration
Adjustment Knob
Range
Indicator Pin
Range
Ring

8
Figure 2
Rail Grabber Base with Rail Adapter Integrated Dovetail Base

9
PREPARATION FOR USE
It is recommended that the tritium lamps be checked for proper functioning every six
months or immediately following any incident which might lead to lamp failure, such
as dropping of the Bow Sight onto a hard surface.
To determine that the tritium lamp is functioning in the Bow
Sight, enter a dark room and look through the sight. The sight
pin should be illuminated as to what is shown in FFigure 3. The
illumination provided by the tritium lamp is very faint and will be
hard to see without a dark adapted eye. Remain in the dark
room for a moment to adapt your eyes to the dark.
The sight pin should illuminate in low light to complete dark-
ness. If the sight does not appear to illuminate in the dark,
please contact Trijicon®. See further cautions under SAFETY on
page 24.
Figure 3

10
IDENTIFICATION & MARKINGS
Figure 4
Serial Number

11
INSTALLATION PROCEDURES
1. Rotate the Range Adjustment Dial so that the front end of the sight is in the full
down position. Do not worry about the indicated range at this time. Position the
sight attachment bracket as low as possible to allow enough clearance for your
arrow fletching and tighten the 2 cap screws to the bracket.
Figure 5
Cap Screws
Sight Attachment
Bracket

12
NOTE: The Trijicon® bow sight mount attaches to any bow with a standard 1-5/16
hole spacing.
2. Align the hole and slot of the frame to the proper mount holes of the bow riser
and use the supplied socket head screws to securely fasten the mount to the
bow riser as shown in FFigure 6.
Figure 6
Socket Head Screws

13
NOTE: The Trijicon® AccuDial™
will accept the Trijicon® AccuPin™
and any sights
equipped with Weaver™
or MIL-STD-1913 Picatinny bases. Rail Grabber and RMR
are sold separately.
3. Slide the Accupin™
bow sight directly onto the sight bracket, center it on the
windage adjustment arrow and tighten the 2 set screws to secure the position.
Figure 7
Set Screws Windage Adjustment Arrow
14
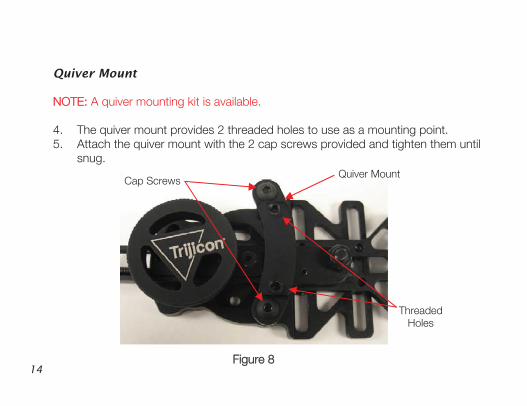
Quiver Mount
NOTE: A quiver mounting kit is available.
4. The quiver mount provides 2 threaded holes to use as a mounting point.
5. Attach the quiver mount with the 2 cap screws provided and tighten them until
snug.
Figure 8
Cap Screws Quiver Mount
Threaded
Holes

15
Rail Adapter NOTE: A rail adapter is available to adapt your AccuDial
™ to be compatible with any
sight that is rail mountable.
6. Slide the rail adapter onto the sight attachment bracket and secure it with the set
screw that is provided.
7. Loosen the rail mount screw with a hex key so
that the rail grabber will fit over the wide top
surface of the rail.
8. Slide the AccuPin™
with the rail grabber base
onto the rail adapter until the rail mount screw
fits into one of the slots on the rail and tighten
the screw until snug.
Figure 9
Set Screw Rail Mount
Screw
Rail Adapter

16
Optional Quick Release Competition Extension Arm
NOTE: An optional quick release competition extension arm kit is available to trans-
form your AccuDial™
into a precision mount ideal for competitive range shooting.
9. Position the extension arm onto the mount and secure it with the 2 cap screws
that are provided.
Figure 10
Quick Release
Knob
Extension Arm
Cap Screws

17
ADJUSTMENT PROCEDURES
NOTE: For the mount to be correctly calibrated, this procedure must be performed
with the actual bow and arrows that will be used in the field. If the AccuDial™
is
mounted on a different bow, the bow is adjusted, retuned or if the type of arrows,
fletching or the tips used changes, the initial zeroing procedure must be repeated to
provide the highest degree of accuracy.
1. If this is the first setup of this mount, make sure that the calibration locking screw
is loose by turning it counter-clockwise. See FFigure 11.
Figure 11
Calibration Locking Screw
18
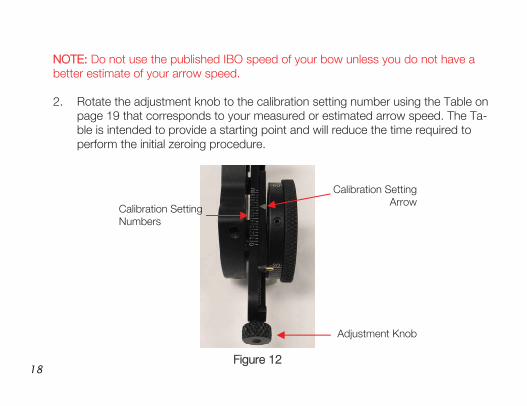
NOTE: Do not use the published IBO speed of your bow unless you do not have a
better estimate of your arrow speed.
2. Rotate the adjustment knob to the calibration setting number using the Table on
page 19 that corresponds to your measured or estimated arrow speed. The Ta-
ble is intended to provide a starting point and will reduce the time required to
perform the initial zeroing procedure.
Figure 12
Calibration Setting
Numbers
Calibration Setting
Arrow
Adjustment Knob

19
Measured Arrow Speed
(Feet per Second)
Calibration Setting
(See FFigure 12)
245 0
255 1
265 2
270 3
280 4
290 5
300 6
305 7
315 8
325 9
335 10
Table 1
20
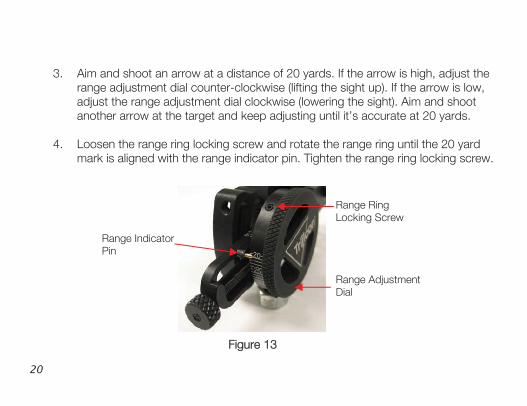
3. Aim and shoot an arrow at a distance of 20 yards. If the arrow is high, adjust the
range adjustment dial counter-clockwise (lifting the sight up). If the arrow is low,
adjust the range adjustment dial clockwise (lowering the sight). Aim and shoot
another arrow at the target and keep adjusting until it’s accurate at 20 yards.
4. Loosen the range ring locking screw and rotate the range ring until the 20 yard
mark is aligned with the range indicator pin. Tighten the range ring locking screw.
Figure 13
Range Indicator
Pin
Range Ring
Locking Screw
Range Adjustment
Dial

21
NOTE: If 60 yard range is unavailable, a distance of 40 or 50 yards can be used but
it’s recommended to use the furthest distance possible.
NOTE: It is recommended that adjustments are made in half number increments to
reduce potential for over adjustment.
5. Adjust the range adjustment dial to the 60 yard mark. If the arrow impacts high,
adjust the range adjustment knob to read a higher number. If the arrow is low,
adjust the range adjustment knob to read a lower number. Aim and shoot an-
other arrow at the target and keep adjusting until it’s accurate at 60 yards.
6. Repeat the calibration procedure beginning at 20 yards until there are repeated
accurate hits at both 20 and 60 yards. Once accurate at both ranges, tighten the
calibration locking screw and the AccuDial™
is fully calibrated to the bow and
arrow combination that was used and no further adjustment will be necessary.

22
AccuPin™ Sight Pin Replacement
NOTE: The sight pin is replaceable in the event that it gets damaged.
1. The retaining nut needs to be removed by using a 3/8” wrench and turning the
nut counter-clockwise.
Figure 14
O-ring
Retaining
Nut
Sight Pin

23
NOTE: The new sight pin should have an o-ring around the fiber.
2. Remove the sight pin out of the housing and install the new sight pin subassem-
bly. The sight pin will need to be rotated by the installer so that the full triangle is
illuminated. If the fiber is not positioned square to the user, it will not have a fully
illuminated triangle. The retaining nut should be tightened until snug to seat the
sight pin.
Figure 15

24
SAFETY
The Trijicon® Single Pin Bow Sight contains radioactive material for nighttime illumina-
tion. The radiation source is Hydrogen-3 (3H), commonly known as tritium. Tritium is
an odorless, tasteless, colorless gas that reacts to the human body in the same man-
ner as natural hydrogen. The human body does not easily retain hydrogen or Tritium
as a gas. However, the oxide, HTO, which is formed by the burning of Tritium, is
10,000 times more hazardous. For this reason great care should be taken to avoid
flame in the presence of the Bow Sight with a Tritium lamp which is broken or is sus-
pected of leaking.
If the tritium lamp in the Bow Sight is broken or is suspected of being broken, place
the unit in a sealed plastic bag and contact Trijicon, Inc. for handling and replacement
instructions.
After contact with a unit with a broken lamp, a person should wash their hands care-
fully with soap and water. Do not handle a defective Bow Sight if you have open skin
cuts or abrasions. Work with a defective unit only in a well-ventilated area and avoid
inhaling air near the unit.

25
Do not eat, drink, smoke or apply cosmetics in the presence of a defective unit.
Repair of these defective units is only authorized by the manufacturer, Trijicon, Inc.
Contact Trijicon, Inc. for handling and replacement instructions.
26
CLEANING AND GENERAL CARE
CAUTION: DO NOT allow the fiber cover of the Trijicon® Bow Sight to come in con-
tact with harsh organic chemicals, such as acetone, trichlorethane, or other cleaning
solvents. They will affect the appearance of the fiber cover though they will not affect
its performance.
Repair or maintenance other than that described in this manual is prohibited by any-
one other than the manufacturer because of the radioactive material contained in the
Bow Sight.
The Trijicon® Bow Sight requires very little maintenance. Keep the sight clean and dry
to minimize wear and oxidation. Wipe off the entire sight after use to remove dust, dirt
and moisture. If the sight gets wet, simply use a soft cloth to dry it off. Store the sight
in a clean, dry environment.

27
BOW SIGHT MODELS & AVAILABLE ACCESSORIES
Bow Sight Complete Assemblies MFG # Description
BW50G-BL AccuPin™
Bow Sight Green with Dovetail Base and AccuDial™
Mount
RH-Black
BW50G-LS AccuPin™
Bow Sight Green with Dovetail Base and AccuDial™
Mount
RH-Lost
BW50G-RT AccuPin™
Bow Sight Green with Dovetail Base and AccuDial™
Mount
RH-Realtree AP
BW51G-BL AccuPin™
Bow Sight Green with Dovetail Base and AccuDial™
Mount
LH-Black
BW51G-LS AccuPin™
Bow Sight Green with Dovetail Base and AccuDial™
Mount
LH-Lost
BW51G-RT AccuPin™
Bow Sight Green with Dovetail Base and AccuDial™
Mount
LH-Realtree AP

28
Sight Only MFG# Description
BW01G-BL AccuPin™
Bow Sight Green with Dovetail Base-Black
BW01G-LS AccuPin™
Bow Sight Green with Dovetail Base-Lost
BW01G-RT AccuPin™
Bow Sight Green with Dovetail Base-Realtree AP
BW02G-BL AccuPin™
Bow Sight Green with Rail Grabber Base-Black
BW02G-LS AccuPin™
Bow Sight Green with Rail Grabber Base-Lost
BW02G-RT AccuPin™
Bow Sight Green with Rail Grabber Base-Realtree AP
Mount Only MFG# Description
BW10-BL AccuDial™
Mount RH with Sight Bracket, Rail Adapter and Quiver
Attachment-Black
BW10-LS AccuDial™
Mount RH with Sight Bracket, Rail Adapter and Quiver
Attachment-Lost
BW10-RT AccuDial™
Mount RH with Sight Bracket, Rail Adapter and Quiver
Attachment-Realtree AP
BW11-BL AccuDial™
Mount LH with Sight Bracket, Rail Adapter and Quiver
Attachment-Black
BW11-LS AccuDial™
Mount LH with Sight Bracket, Rail Adapter and Quiver
Attachment-Lost

29
BW11-RT AccuDial™
Mount LH with Sight Bracket, Rail Adapter and Quiver
Attachment-Realtree AP
Bow Sight Accessories MFG# Description
BW20-1 Replacement Fiber Pin 3-Pack
BW21 Replacement Fiber Nut
BW22-BL AccuDial™
Sight Bracket-Black
BW22-LS AccuDial™
Sight Bracket-Lost
BW22-RT AccuDial™
Sight Bracket-RealTree AP
BW23-BL AccuDial™
Rail Adapter-Black
BW24-BL AccuDial™
Quiver Attachment-Black
BW24-LS AccuDial™
Quiver Attachment-Lost
BW24-RT AccuDial™
Quiver Attachment-RealTree AP
BW25-BL AccuDial™
Extension Arm-Black

30
PATENTS AND TRADEMARKS
Trijicon® AccuPin™
bow sight and the AccuDial™
mount are covered by the U.S. pat-
ents: Patent numbers pending.

31
LIMITED LIFETIME WARRANTY
The original owner of the Trijicon® product registered with the warranty card is entitled to repair
or replacement (at our option) of the registered item if it should fail due to defects in material or
workmanship during normal use. This warranty specifically applies to the metal structure of the
product and does not apply to the illumination system. The Tritium lamp is warranted to glow for
twelve years in the Bow Sight from date of original manufacture. If repair is necessary, please
contact our Customer Service Department for return instructions. This warranty does not apply
to defects caused by anything which is deemed abnormal, abusive or improper including any
fault resulting from an accident or improper service. Special Note: Trijicon® PRODUCTS CON-
TAIN TRITIUM AND ARE REGULATED BY THE NUCLEAR REGULATORY COMMISSION. THEY
MAY NOT BE DISASSEMBLED BY ANYONE OTHER THAN TRIJICON, INC WHICH HOLDS
THE NECESSARY LICENSES. Any attempt at disassembly or repair will annul this warranty. This
warranty gives you specific legal rights, and you may also have other rights which vary from
state to state.
Trijicon, Inc.
49385 Shafer Avenue
P.O. Box 930059
Wixom, MI 48393-0059
1-800-338-0563
248-960-7700
www.trijicon.com