Treasures of a Dragon's Corpse - neuronphaser of a Dragon's Corpse . ... C. Morganath’s Corpse...
16
Treasures of a Dragon's Corpse A D&D 5th edition adventure for 3rd-4th level characters. Written by Tim Bannock Artwork by Elena Naylor Maps by Tim Bannock using Hexographer (http://www.hexographer.com/free-version/) and Dungeonographer (http://www.dungeonographer.com/free-version/). This adventure centers around the malignant — even mutating — effects of a slain black dragon’s blood and spirit. Nature itself is twisted by the corpse of Morganath the dragon: blights stand vigil over her remains. Human treasure hunters have gone missing: they are now feral mutants enslaved by kobolds. This savage tribe of kobolds — the chosen among them granted wings — serve Ningal, a lizardfolk shaman that pledges to continue spreading Morganath’s sickness and dread even after her demise. Yet the dragon herself lingers on in a spectral form, filled with rage and yearning for revenge.
Transcript of Treasures of a Dragon's Corpse - neuronphaser of a Dragon's Corpse . ... C. Morganath’s Corpse...

Treasures of a Dragon's Corpse A D&D 5th edition adventure for 3rd-4th level characters.
Written by Tim Bannock Artwork by Elena Naylor Maps by Tim Bannock using Hexographer (http://www.hexographer.com/free-version/) and Dungeonographer (http://www.dungeonographer.com/free-version/). This adventure centers around the malignant — even mutating — effects of a slain black dragon’s blood and spirit. Nature itself is twisted by the corpse of Morganath the dragon: blights stand vigil over her remains. Human treasure hunters have gone missing: they are now feral mutants enslaved by kobolds. This savage tribe of kobolds — the chosen among them granted wings — serve Ningal, a lizardfolk shaman that pledges to continue spreading Morganath’s sickness and dread even after her demise. Yet the dragon herself lingers on in a spectral form, filled with rage and yearning for revenge.

Adventure Background For many years, the black dragon Morganath terrorized the countryside, amassing great wealth from the smoking remains of villages and towns that fell to her acidic breath. Dark pacts were made to appease her and quell her wrath, but rarely did these last very long. One day, a brave band of adventurers slew the dragon, combining spell and sword to draw Morganath out and entomb her corpse in the shallows of the marsh she claimed as her lair. These heroes were celebrated, but have since disappeared on other adventures, leaving the folk near the swamps to their own devices. In recent months, a company of mercenaries set out to plunder Morganath’s former lair for whatever treasures might remain. They haven’t been heard from since. Furthermore, merchants and wanderers have been attacked by roving monsters, fell mutants that are said to be warped by Moranath’s dabblings in foul sorcery. Heroes are needed, perhaps now more than ever.
Adventure Summary The Player Characters will uncover a link between the random monster attacks on nearby travelers and the missing expedition of treasure-seekers, leading them into the marsh. At its edge, they will discover the corpse of the dragon Morganath, and witness firsthand its warping effect on the land and creatures surrounding it.
Tracking down Morganath’s lair — and the home of the beasts her foul blood has created — the party will enter a dangerous complex of groves and caves inhabited by her former followers. Ultimately, they will come face-to-face with the remaining spiritual power of Morganath herself, in the form of a ghostly apparition!
The Hook The Player Characters should be traveling through or based out of a small village or town not far from Morganath’s Marsh, a swampy area that overtook the ruins of several ancient towns and temples. Here are several potential story threads to get the players interested in the adventure. Considering the finale of the adventure, a silvered weapon (or a few) can prove significant in aiding the party’s chances of success, and therefore, each hook described below presents an opportunity for at least one player character to receive a silvered weapon appropriate to their typically equipped weapons. (If the DM does not wish to simply hand out a silvered weapon, it’s simple enough to place one or two among the stashes of treasure throughout this adventure, or to use one of the random encounters in the swamps as a means to provide such a weapon. The fairy glade encounter specifically notes this possibility. See “Through Morganath’s Marsh” for additional opportunities.) The Lone Survivor. Edmere, the lone survivor of the mercenary company that ventured to Morganath’s Lair stumbles into

town, having been hunted by the blights or mutants that infest the swamps. He never even got to the corpse of the dragon before his company was largely captured or killed, and knows little of their fate. He’s been wandering, starving and lost for weeks. During his roaming, he did come across a silvered weapon (of a type useful to one of the more weapon-oriented player characters of your group), and gladly hands it over as payment for finding the fate of his allies. My Lost Brother-in-Arms. Perhaps one of the mercenary treasure-seekers is a relative of or otherwise knows one of the Player Characters. The PC was gifted with a silvered weapon (of a type useful to the character), a family heirloom, as a parting gift from this NPC. Merchant’s Tales. Merchants and travelers are being attacked by the blights, kobolds, and mutants from the swamps, and thus it may be that the Player Characters are guarding a caravan or otherwise connected to the victims of one such attack. One of the guardians of the caravan that dies in the assault — or perhaps it’s an heirloom in possession of one of the merchants — had a silvered weapon (of a type useful by one of the player characters). It can be a dying gift, payment for avenging their death or grievous wounds, or payment for saving the merchants’ hides.
Encounters The following monsters appear in this adventure (Challenge Rating is noted in parentheses):
● Tribal Warrior (1/8) ● Berserker (2) ● Twig Blight (1/8) ● Needle Blight (1/4)
● Awakened Tree (2) ● Shambling Mound (5) ● Kobold (1/8) ● Winged Kobold (1/4) ● Giant Frog (1/4) ● Faerie Dragon, indigo (2) ● Sprite (1/4) ● Druid (2) ● Commoner (0) ● Ningal, Lizardfolk Shaman (2) ● Morganath, Black Dragon spectre
(5)
Scaling this Adventure Removing or adding tribal warriors, twig blights, and kobolds are the easiest ways to scale various encounters up or down in difficulty for parties of less than 5 adventurers, or of higher or lower levels. For lower-level parties, consider limiting Morganath’s Multiattack ability (she makes only 2 claw attacks and cannot use her bite at the same time, or remove it entirely), and decreasing her breath weapon to more manageable damage (maybe 3d6 acid damage). Being a spectral creature makes her an especially tough opponent. Without silvered weapons, low-level parties will find even her meager hit points to be too much, so either ensure the party has silvered weapons or remove some of her resistances and immunities. Consider rewarding a few more healing potions throughout the adventure, as well. For higher level parties, or especially large parties, consider adding a couple more lizardfolk to the adventure. Morganath is still a deadly foe (and tough because of her resistances and immunities), but you can possibly up her hit point total a little to keep her around longer (consider pushing it closer to her maximum hit points of 91), and

have her breath weapon recharge on 4-6 instead of 5-6.
Wilderness Map

Part One: Mutants and Mayhem
A. The Mutants Once the Player Characters set out on their journey toward Morganath’s Marsh, two figures ambush them on the road. Bursting forth from the vine-wrapped trees and thorny brambles are two figures that were once men or elves, but now sport distended jaws and long, spindly appendages. Their eyes are wide and bloodshot, tainted by madness. As they bark and grunt in distorted tones, their frothing mouths reveal jagged, rotting teeth. The two mutated, seemingly feral humans are a tribal warrior and a berserker. They were members of the expedition headed to claim whatever remained of Morganath’s hoard, but when they were attacked by kobolds, they fled into the marsh and drank of the tainted waters there, causing their current disposition. If captured alive, they can be cured of their affliction provided they are tended to by a skilled healer, and subjected to a remove curse spell. For heightened drama, consider having one of these two appear as an NPC familiar to one of the party members, perhaps based one of the character’s connections (see The Hook, above). Additionally, the tension can be increased by staging this encounter at nighttime, while the party is camping (hope they set a watch!).
B. Slimewall Downs As the lightly wooded plains dip lower and lower, giving way to marshy lowlands and then swamp, a shallow body of water
partially conceals the bones of a long-dead dragon. This is the corpse of Morganath, and it is a macabre waymarker on the trip to her former lair. It is also the site of some treasure, and a font of unholy power to the kobolds. Accordingly, they have sentries keeping watch throughout the lands approaching. The first line of defense includes four twig blights and two needle blights. These creatures act as a roving patrol circling the higher ground west of the lake. They will use the terrain to their advantage, having a cunning intelligence bestowed upon them by Morganath’s blood, and therefore may attempt to ambush the party from higher ground, rolling two boulders at them, before charging into the fray. Boulder Trap. The boulders travel in a straight line for 50 feet, and take up a 5 foot by 5 foot area. Anyone in their path must make a successful Dexterity saving throw against DC 13 or suffer 1d10 bludgeoning damage.
C. Morganath’s Corpse Arriving at the fetid pool, the party sees the bones of Morganath piercing the stagnant waters. They immediately sense the taint of evil about the area, and can tell by the color of the water that Morganath’s blood has polluted the surrounding swamp. The valley levels out, a murky lake lying still at its bottom before the area becomes entangled with ominous looking trees at the far side. Protruding from the water’s edge are the bones of a huge dragon’s corpse.

The ribs hold ruined bits of spine roughly 10 feet above the water’s surface. The tail disappears about halfway into the lake. Bits and pieces of animal feathers and furs hang off of the bones, as if they were the vestiges of the massive dragon’s hide. A single tree looms ominously at the edge of the water near the dragon’s skull, which is half submerged in swampy muck. The ghastly powers of Morganath’s blood has given its own perverted life to the surrounding environment. An awakened tree stalks the area, killing any that might seek to consecrate this unholy font of power, and another patrol of blights will back it up; there are four twig blights using
their natural powers to hide in the underbrush. Treasure. Ningal and the kobolds bring offerings of a sort to the corpse of the dragon, and have left some of their mistress’ hoard — originally embedded in her scaly hide — unmolested. A silver ewer (drinking pitcher worth 25 gp) can be found half submerged in muck, and a gold ring inset with bloodstones (worth 250 gp) has been placed on a bone of Morganath’s corpse. Scattered about are 200 cp and the following gemstones (each worth 100 gp): 4 chrysoberyls, 2 tourmalines, and 2 jets.

Part Two: Swamp Perilous
D. Through Morganath’s Marsh… Discovering the way to Morganath’s lair shouldn’t be too difficult, considering the kobolds utilize her corpse for various rituals, and thus regularly beat a path between the two points. Of course, that doesn’t mean the journey will be easy. As the party has already seen, Morganath’s death seems to have caused more trouble in the swamps than anyone could have imagined. A number of roving beasts stalk to the swamp. Every hour, roll on the following table to determine what the party might encounter. If the party has no trouble following the kobolds’ tracks, they should arrive in 2-3 hours. Therefore, the GM may save time by simply choosing two results from below.
Random Encounters (1d8) 1. Swamp thing. A shambling mound
rises from the muck to attack! Treasure. Nearby, the party can find a lair of sorts — really a nest — containing some valuables collected from the bodies of the shambling mound’s previous meals. Amongst the debris are 20 ep, 200 sp, 200 gp, and a single potion of healing.
2. Taskmasters & slaves. Two kobolds lead a squad of trained attack mutants: two berserkers and two tribal warriors.
3. Aerial patrol. Two winged kobolds flit from tree to tree as four non-winged kobolds stalk the swamps,
hunting for mutated fish; a kobold lair needs to eat, too!
4. Sudden deeps! If the party isn’t using a 10-foot pole to check their footing, they might fall into a deeper section of swamp, one that features quicksand-like mud. This can be avoided with passive Wisdom (Perception) of 15 or higher; otherwise, a DC 13 Strength saving throw is required to avoid becoming immobilized. See the sidebar labeled Sinky Sand!, below, for additional rules. Treasure. Anyone who sinks will feel that there is something hard and solid at the bottom. Fishing it out, the party uncovers a small chest. In it are 2 potions of healing, a spell scroll of your choice, a ceremonial electrum dagger with a black pearl in its pommel (worth 750 gp), 200 gp, 20 ep, a blue quartz worth 10 gp, a shard of obsidian also worth 10 gp, and a piece of amber carved into the likeness of a kite shield with a mysterious coat of arms on it (worth 100 gp).
5. Ribbit! Three giant frogs are out for blood, enraged by years of feeding on Morganath’s hate-filled blood.
6. The fairy glade. An indigo faerie dragon, Monalyndra, and two sprites, Enoren and Drexil, inhabit a small glade, having consecrated it against the foul nature of Morganath’s blood. They are wary of interlopers, however, as they had a not-so-peaceful run-in with some of the treasure-hunters before they turned feral. If attacked — or worse, slain — a druid ally of the faerie dragon, Redd de Moralis, may come

calling for revenge. Treasure. If convinced that the party can be useful allies, these fey creatures will provide two potions of healing. If they party was not given a silvered weapon at the start of this adventure, then they should receive one now; silvered weapons will help immensely at the conclusion of this adventure. These creatures will not accompany the group, however, instead concentrating their efforts on using their ritual magic to cleanse more areas of the swamp.
7. Carrion. The slain body of a treasure-hunter. Her remains clearly tell the tale of a person ripped apart by other people…such as feral mutants. Treasure. Searching the area uncovers the following: a tiger eye gemstone worth 10 gp and a spell scroll of your choice.
8. Lost expedition. A few of the mercenaries that were attempting to plunder Morganath’s lair survived the assault of kobolds and awakened foliage. Tired, half-starved, and scared nearly witless, they might still prove somewhat useful to the party. They include the black-haired, tattooed shieldmaiden Rix and the failed magic-user’s apprentice, Phamath; treat them as commoners, but arm them with studded leather and short swords.
Sinky Sand! The marsh quicksand is quite dangerous, certainly more so than typical quicksand (see the Dungeon Master’s Guide). It can be avoided completely when using a 10-foot pole, or with passive Wisdom (Perception) of 15 or higher. If quicksand is not avoided, a single character (which can be chosen by marching order or at random) must succeed on a DC 13 Strength saving throw to avoid becoming immobilized. If they succeed, the path of quicksand can easily be avoided. A character that fails this initial Strength saving throw is caught by the quicksand, however, and is in extreme peril. They might drown, and every attempt to free them makes subsequent saving throws more difficult. Draw five boxes on a blank piece of paper, labeling the third box “Drowning.” Having failed the initial Strength saving throw, place a marker (such as the character’s miniature) in the first box. The rolls and effects of each box are described below, and simulate the character sinking into the marsh. Box 1 – I’m not waving, I’m drowning! The character makes a DC 15 Strength saving throw. If at least one of the other characters in the party immediately lends their help (by succeeding on a Strength check with a DC of 10), the sinking character gains Advantage on this saving throw. Success: they are free of the quicksand. Failure: they sink, moving to Box 2. Box 2 – Faster would be better! The character makes a DC 17 Strength saving throw. Unless the party is busy with other actions, they may lend aid as in Box 1 (but the DC is now 12), giving the sinking character Advantage. Success: the character moves to Box 1. Failure: they sink, moving to Box 3. Box 3 – Grrruuugggllleghgh! The character is now suffocating! As the ground swallows them up, treat the character as if they have run out breath on this round. A DC 19 Strength saving throw is required. Assuming at least one member of the party is actively aiding and succeeds at a Strength check with a DC of 14, they provide Advantage. Success: the character moves to Box 2 and is no longer drowning. Failure: they sink, moving to Box 4 and moving into round 2 of suffocating. Box 4 – Guys, he’s not really struggling anymore! The character is on their second round of suffocating; if they have a Constitution modifier less than 2, they drop to zero hit points and are dying and cannot even attempt the DC 20 Strength saving throw required this round. If that’s the case, it’s up to the rest of the party making a group Strength check at Disadvantage (you may cancel this out by awarding Advantage if they have secured a rope around the character or are using pack animals to help pull the character, for example); the DC for this check is 16. Success: the character moves up to Box 3, continues suffocating. Failure: the character moves to Box 5 and continues suffocating. Box 5 – Should we start divvying up the gear he left in those saddle bags? On the bright side, if the character’s not already dead, things won’t get any worse. They have reached the bottom of the quicksand, and are now on round three of suffocating. A DC 20 Strength saving throw (with Advantage) or ally’s DC 20 Strength check (with the same note about Disadvantage as Box 4) is all that can hope to save them. Success: they move up to Box 4 and continue suffocating. Failure: they stay put…and continue suffocating.

E. …and Approaching the Dragon’s Lair As the party nears Morganath’s former lair, several small “watchposts” come into view.
These areas feature a cage for the mutant slaves, and a few kobolds that watch over them and generally treat them like animals.
Swamp Lair
The Cages There are four such stations scattered about, and at each there is a single kobold guard armed with a whip and a pike. The cages themselves are made of fairly durable wood, requiring a DC 15 Strength check to burst them open. They each feature a fairly simple locking latch mechanism to hold them shut, though this can be picked with a successful DC 13 Dexterity (Sleight of
Hand) check using thieves’ tools. The cages feature the following: First Cage. Two mutants reside in this cage (treat as two tribal warriors). They are not entirely feral, and could be rehabilitated, but there physical mutations may never go away. Second Cage. A merchant (Picran), his caravan drover (Elanda), and a villager

(Jobrun) reside in this cage (treat them as commoners). They have not begun the process of mutation, having only recently been captured by the blights and delivered to the kobolds. That said, they are in bad shape, suffering greatly under the abuse of their kobold captors. Third Cage. Two mutants reside in this cage (treat as two berserkers). They are fully under the sway of the kobolds, and if let loose, will obey whatever simple commands they are given by their taskmasters (such as “kill them!”). Fourth Cage. A single mutant resides in this cage (treat him as a berserker). This is Sirboc, a strong willed warrior from the burning wastes of the Southlands, and his incredible discipline has kept his mind from breaking, despite the agony of transformation and the torture from the kobolds. He’s not fully aware of what’s going on around him due to this constant pain, but if approached without immediate hostility, he may see this as his chance to escape. To that end, he could certainly join the party for the rest of this adventure, though he must make a DC 12 Wisdom saving throw at the start of every combat encounter. If Sirboc fails, he acts as though he is under the effects of a confusion spell until he makes a successful Wisdom saving throw (per the spell). If he succeeds, he can act normally throughout that particular encounter.
Traps The kobolds have set up several traps throughout the area to keep out intruders and to get rid of any mutants that might prove too ornery.
Cage Pit. This 10 foot square pit has a cage set inside of it (operating just like the cages detailed above). The pit is covered, requiring a DC 15 Wisdom (Perception) check to notice, and a DC 15 Intelligence (Investigation) check to confirm that the
cage is inside, and will lock shut if someone falls in. It is 10 feet deep. Drowning Snare. In a section of the swamp that is slightly deeper than other parts lies a deadly snare trap. A passive Wisdom (Perception) of 15 will notice the rope line and allow the party to avoid the trap, but if they don’t notice it, the first character that stumbles into it will have to make a DC 15 Dexterity saving throw or become ensnared. The rope pulls them off their feet and

suspends them upside down, but — if they are of medium size or larger (roughly 5 feet tall or more) — their upper body will be submerged. A DC 18 Wisdom saving throw allows them to hold their breath as normal, but if they fail, treat them as if they have run out of breath. Net Trap. The DC to spot the trip wire and net is 10. A successful DC 15 Dexterity check using thieves’ tools breaks the trip wire harmlessly. A character without thieves’ tools can attempt this check with disadvantage using any edged weapon or edged tool. On a failed check, the trap triggers. When the trap is triggered, the net is released, covering a 10-foot-square area. Those in the area are trapped under the net and restrained, and those that fail a DC 10 Strength saving throw are also knocked prone. A creature can use its action to make a DC 10 Strength check, freeing itself or
another creature within its reach on a success. The net has AC 10 and 20 hit points. Dealing 5 slashing damage to the net (AC 10) destroys a 5-foot-square section of it, freeing any creature trapped in that section.
Treasure The kobolds have kept a few of the captured sellswords’ weapons and items on hand to arm them once they become truly pliable and loyal to Ningal and the tribe. They are stashed in the hollowed trunk of a dead, gnarled tree located roughly central to the cages. The items include 3 daggers, 1 shortsword, 1 pike, 2 explorer’s packs, a 10-foot pole, 100 sp, 100 cp, and a piece of jade worth 100 gp tucked into one of the explorer’s packs.
Part Three: Spirit of the Dragon The party has finally made it to the cave complex that once was Morganath’s lair. Carved out of rocky plateau rising out of the swamps and concealed by knotty trees thick with hanging vines, this foreboding place has become the headquarters of the savage kobolds that once served Morganath in life, and now worship her in death.
General Features Terrain. Much of the complex is difficult terrain, caused by the muck and slippery surfaces of the naturally carved rock. The kobolds and their lizardfolk leader, however, are used to this, and thus do not suffer the effects of difficult terrain in this complex. There are several areas marked with skulls;
these are areas of bone piles. Some of these bones belong to animals or humanoids the tribe has killed, while others were pulled from Morganath’s corpse and brought here as religious idols for the tribe. These play into the Lair Actions available to Morganath’s specter. Finally, a few areas feature pools of swamp water. These are usually only a foot or two deep, and count as difficult terrain. Ceilings. A dragon lived here, so naturally the tunnels are on the larger side. In most cases they are 20 to 30 feet tall, with some variance from stalactites and other naturally occurring rock formations. Light. While the kobolds can see in the dark, their mutant slaves can’t. A few
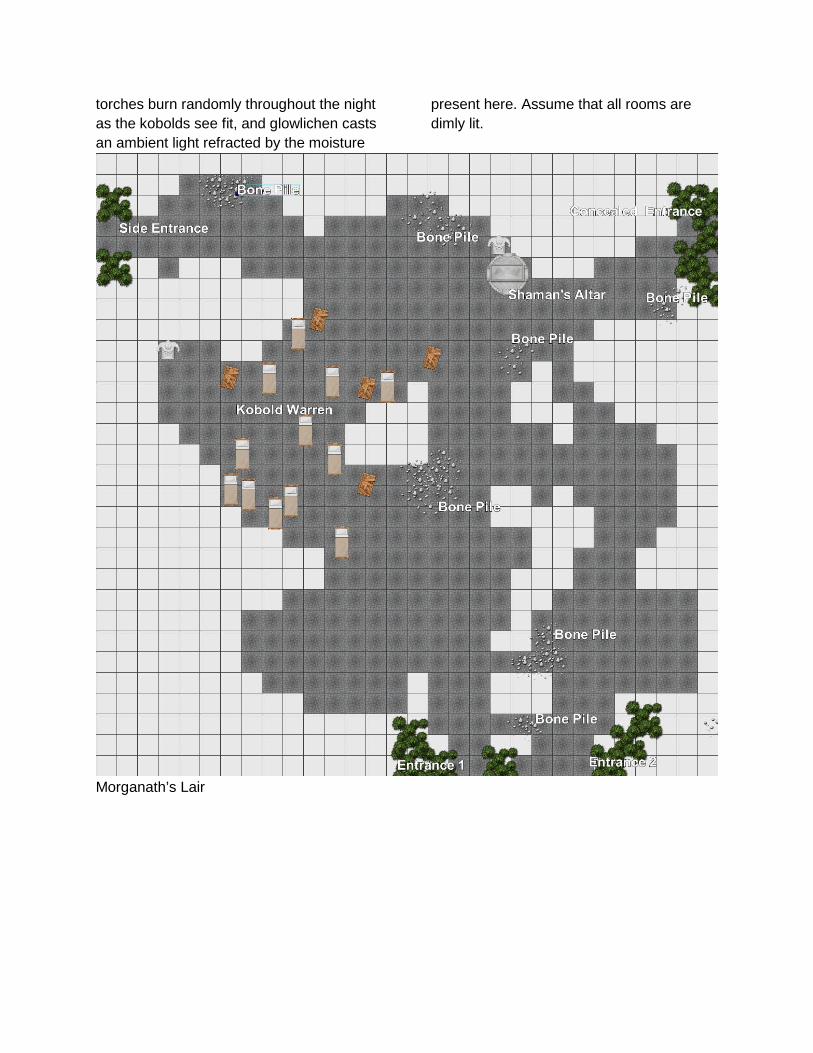
torches burn randomly throughout the night as the kobolds see fit, and glowlichen casts an ambient light refracted by the moisture
present here. Assume that all rooms are dimly lit.
Morganath’s Lair

F. Morganath’s Lair
F1: Converging Paths The two entryways feature multiple points where narrow tunnels connect them before they open into larger chambers and finally converge to form the main area of the complex. The kobolds use the tunnels and corners to their advantage, attacking from multiple sides whenever possible. A central chamber sprawls out, five wide corridors radiating out from it like tentacles in random directions. Against the back wall is a small pool of putrid, still water, and above it is hung one of the disturbingly large horns of Morganath’s corpse, twisted and spiraling back upon itself to a blunted point. Draped along the walls are several animal hides…as well as a few that appear awfully human-like… Two kobolds stand guard at the entryway, one on either side, about 20-30 feet from the cave mouth. Ningal, a lizardfolk shaman, is the de facto ruler of the kobolds, and so it is she that inhabits the main chamber, along with 1d4 additional kobold attendants (armed with pikes), and a single winged kobold lieutenant (also armed with a pike).
F2: The Side Door Two winged kobolds watch this entrance and lair in the alcoves here, acting as the “chosen” among the tribe, the elite warriors of Ningal. This corridor is extremely tall — nearly forty feet to the ceiling — and while the walls are mostly uneven, the stalactites and stalagmites that once formed here have
been broken and smoothed over for the most part. Movement from alcoves ten feet up the walls draw your attention, revealing kobolds…with draconic wings unfurling from their backs!
F3: Concealed Tunnel The entrance to this tunnel (from outside the caves) is concealed by rubble, vines, and mud, appearing like a dead-end at first glance. An Intelligence (Investigation) check against a DC of 15 will reveal the nature of this entrance, and discover that there is a carefully concealed path through the debris that any creature of Medium or smaller size can fit through with little difficulty (larger creatures can squeeze through). The many stalagmites and stalactites act as sources of cover. This corridor is broken up by stalactites and stalagmites, giving it the appearance of a distended maw.
F4: Kobold Warren The majority of the kobolds sleep here or stash their loot here; it was once the spot where Morganath piled her ill-gotten gains. Several small alcoves in the walls act much like a trophy case for the kobolds. At any time of day or night, 1d4 kobolds will be resting here, in various states of alertness. A smaller chamber of sorts protrudes from the main one; pockmarked by alcoves and littered with mounds of damp foliage, it appears to be one part trophy room and one part lair for the kobolds. The dried up offal of what most likely was once Morganath’s innards adorn several of the alcoves, but here and there, the glint of glass and precious metals suggests there are several items of value that have been recovered by

the tribe. Treasure. Among the loot stashed here — mostly because it’s shiny, and not at all because they care about the value — are 90 pp, 800 gp, 202 sp, and 1400 cp. Several gemstones also litter the alcoves: a lapis lazuli, malachite, and moss agate each worth 10 gp; one piece of jade, 2 garnets, a tourmaline, a spinel, a chunk of amethyst set in an otherwise worthless brooch, and a coral earring are each worth 100 gp. A carved, ivory statuette in the likeness of a sleeping black dragon (with one eye open, ironically) is the only material item that Ningal cares much about. Aside from being worth 250 gp, it is also a piece of Morganath’s hoard, commissioned by her from some local artisan that long ago took an acid bath.
Vengeful Spirit Morganath’s power still exists in a tenuous, ghostly form. The defeat of Ningal and the despoiling of her treasure will enrage her, giving her the power to take form and attempt to exact her revenge. Similarly, if there is any attempt to consecrate her physical corpse through magic, or the cavern complex now inhabited by Ningal or the kobolds, she will take form and attack. In any of these instances, Morganath’s ghostly form (see below) appears at the site of the dragon corpse (if the party is located there) or in the Kobold Warren (1-4), and takes flight to reach the player characters.
Concluding the Adventure If she is defeated, the mutating effects of her blood will fade away. Remaining mutants may slowly change back to their original selves…or may turn to banditry, their bodies remaining twisted and therefore keeping them shunned by the locals, but their minds gaining back some amount of intelligence and cunning.

Morganath Large undead, chaotic evil Armor Class 14 Hit Points 59 (7d10+21) Speed 0 ft., fly 60 ft. (hover) STR 6 (-2), DEX 14 (+2), CON 17 (+3), INT 12 (+1), WIS 11 (+0), CHA 15 (+2) Skills Perception +3, Stealth +5 Damage Immunity acid, necrotic, poison Damage Resistance bludgeoning, piercing, and slashing from nonmagical weapons that aren’t silvered Condition Immunity charmed, exhaustion, grappled, paralyzed, petrified, poisoned, prone, restrained Senses darkvision 120 ft., passive Perception 13 Languages Common, Draconic Challenge 5 (1,800 XP) Incorporeal Movement. Morganath can move through other creatures and objects as if they were difficult terrain. She takes 5 (1d10) force damage if she ends her turn inside an object. Sunlight Sensitivity. While in sunlight, Morganath has combat disadvantage on attack rolls, as well as on Wisdom (Perception) checks that rely on sight.
Actions Multiattack. Morganath makes three attacks: one with her bite and two with her claws. Poisoned Bite. Melee Weapon Attack. +6 to hit, reach 10 ft., one target. Hit: 13 (2d10+2) poison damage and the target must make a DC 13 Constitution saving throw or become poisoned. Acidic Claws. Melee Weapon Attack. +6 to hit, reach 5 ft., one target. Hit: 9 (2d6+2) acid damage. Necrotic Breath (Recharge 5-6). Morganath exhales necrotic energy in a 15 foot line that is 5 feet wide. Each creature in that line must make a DC 13 Dexterity saving throw, taking 27 (6d8) necrotic damage on a failed save, or half as much damage on a successful one.
Lair Actions On initiative count 20 (losing initiative ties), Morganath takes a lair action to cause one of the following effects; she can’t use the same effect two rounds in a row.
● Grasping Bones. Any creature within 10 feet of a pile of bones must succeed on a DC 13 Strength saving throw or be restrained until initiative count 20 on the following round.
● Miasmal Mist. A 30-foot cube within 120 feet of Morganath fills with green mist, becoming lightly obscured as well as difficult terrain. These effects last until initiative count 20 on the following round.
● Unnerving Waters. Pools of water that Morganath can see within 120 feet of her reflect bizarre prismatic lights that are both hypnotic and unnerving. Any creature on the ground within 20 feet of such a pool, and capable of seeing the pool, must succeed on a DC 13 Charisma saving throw or be pulled 5 feet towards the closest pool and knocked prone.

Thanks to the folks at RPGnet’s forums and to several Google+ members that helped in tweaking Morganath’s final stats! neuronphaser.com is the brainchild of Tim Bannock, a 30+ year D&D veteran and RPG enthusiast dedicated to creating the tools and sharing the tips you need to optimize your tabletop roleplaying experience. Elena Naylor is an artist and illustrator who has a graphic design & fine art degree. See more of her artwork at http://ladyelenanaylor.deviantart.com/gallery/