Travel Management Module - OILWEB - Corporate Intranet … · Travel Management Module A step by...
23
Travel Management Module A step by step End User Manual for Creation of Trip Request Tour Claim settlement - This Manual is prepared for the upgraded version of Travel Management Module (EHP7) by ERP_HR Dated:10.01.2018
Transcript of Travel Management Module - OILWEB - Corporate Intranet … · Travel Management Module A step by...

Travel Management Module
A step by step End User Manual
for
Creation of Trip Request
Tour Claim settlement
- This Manual is prepared for the upgraded version of Travel Management Module (EHP7) by ERP_HR
Dated:10.01.2018
CHAPTER 1
MAKING A TRAVEL REQUEST
(for all portal users)
Prerequisite:
Travel Privilege in info type (0017) has to be maintained for every Officer.[You
can contact Personnel Department for maintaining info type 0017 (Travel
Privilege) if an error regarding Travel Privilege occurs while making travel
request or tour claim]
Info type 2002 (Attendance) has to be recorded in the System for the purpose
and duration of Official Trip by the respective Department. Without this entry,
the system will throw a warning message in the portal.
Every Officer needs to have an OILEP user ID and password for accessing
the Travel Module under OILEP.
Procedure for creating Travel Request:
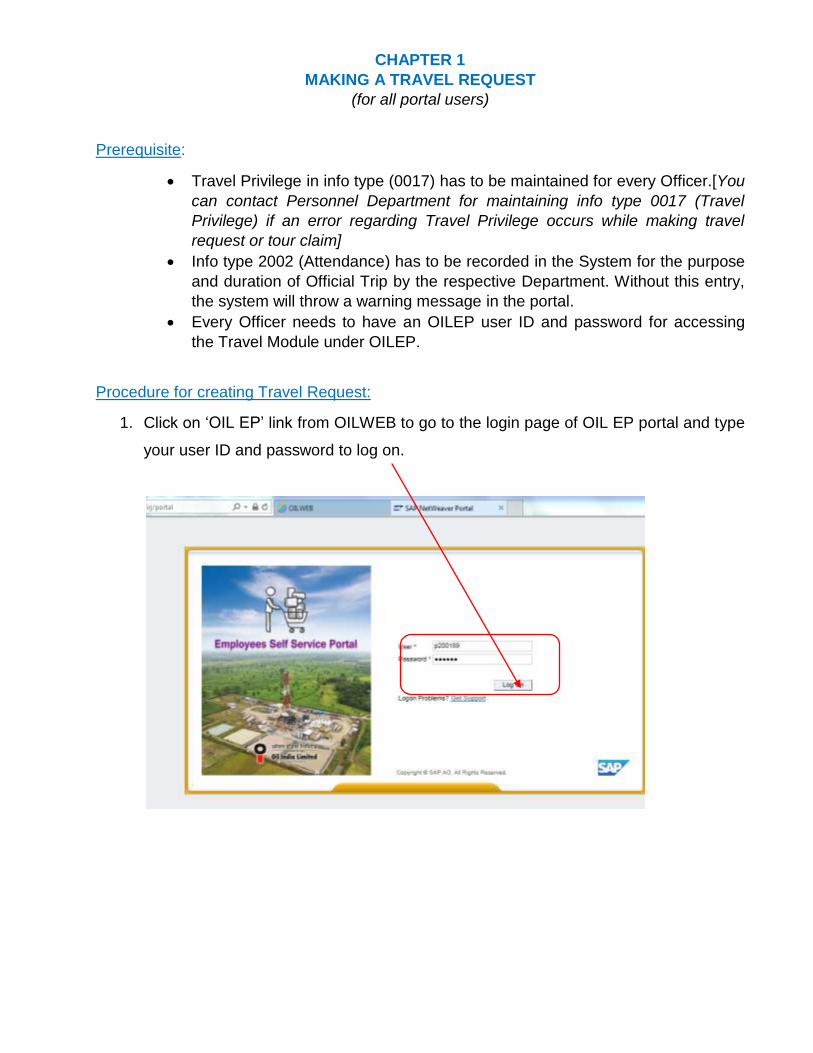
1. Click on ‘OIL EP’ link from OILWEB to go to the login page of OIL EP portal and type
your user ID and password to log on.
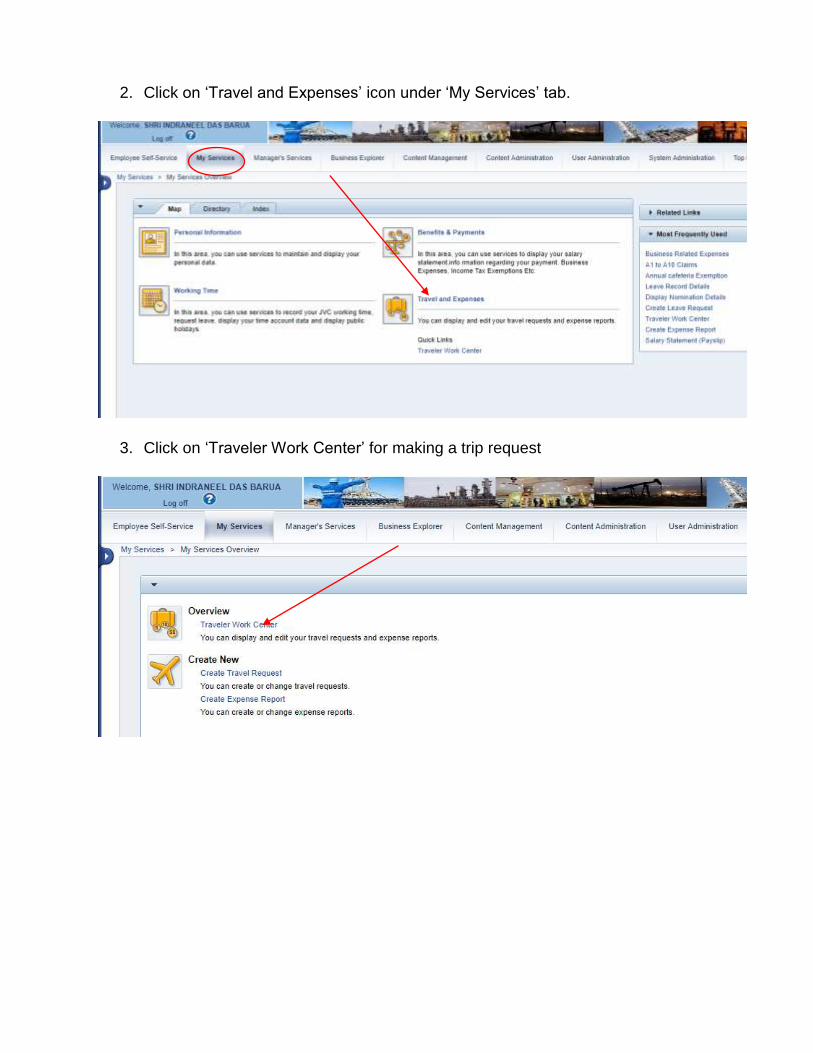
2. Click on ‘Travel and Expenses’ icon under ‘My Services’ tab.
3. Click on ‘Traveler Work Center’ for making a trip request

4. A separate window will pop up which contains all the previous travel requests and
tour claims. This is the main dashboard for travel management for the portal users.
5. For creating a new travel request, click on ‘Create New Travel Request’.
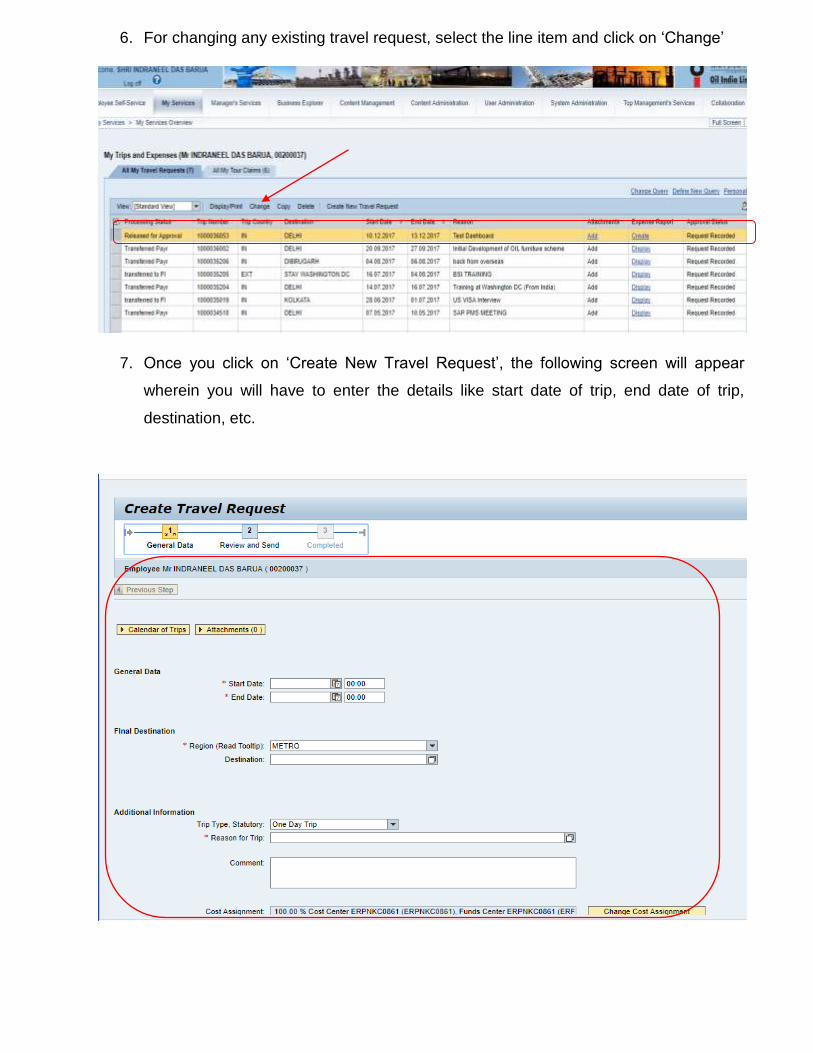
6. For changing any existing travel request, select the line item and click on ‘Change’
7. Once you click on ‘Create New Travel Request’, the following screen will appear
wherein you will have to enter the details like start date of trip, end date of trip,
destination, etc.

8. Enter the start date and time and end date and time. Enter destination and select
‘Region’ as ‘Metro’ or ‘Non Metro’ from the drop down menu. Eg: Enter destination as
‘Delhi’ and select ‘Metro’ from the ‘Region’ drop down menu.
9. Select ‘Trip Type, Statutory’ as ‘Multiple Days Trip’ or ‘One day trip’ (in this case
Multiple Days Trip) from the drop down menu and type the ‘Reason for Trip’ (eg:
Seminar, Official Tour, Training, etc.). You can also type any comments in the
Comment box.

10. Next, click on ‘Enter Travel Services’ button and enter service details for outbound
flight, return flight, hotel, car rental, etc.
11. If your attendance (info type 2002) is not maintained in the system, the following
warning message will come. Click on ‘Proceed’ to continue

12. Under ‘Travel Services’, click on ‘Add Flight’ tab for entering flight details:
13. Type name of place from where you will depart. Eg, ‘Duliajan’ and select country
‘India’ from the drop down menu. You may add comments in the box provided. (The
final destination i.e. Delhi in this case alongwith date and time will appear as entered
earlier.)

14. Next, click on ‘Add Return Flight’ tab. The return flight details will automatically
populate in the respective fields.
15. Next, click on ‘Add Hotel’ tab and respective fields will auto populate.

16. Similarly on clicking ‘Add Car Rental’ respective fields will automatically populate.
On completion of all the travel services, click on ‘Accept’ tab.
17. On clicking ‘Accept’ button, it will take you back to the previous screen wherein you
can review the trip details before submission.

18. On review, if travel details are correct, click on ‘Save and Submit’ button. You can also
save the request as Draft and submit it later.
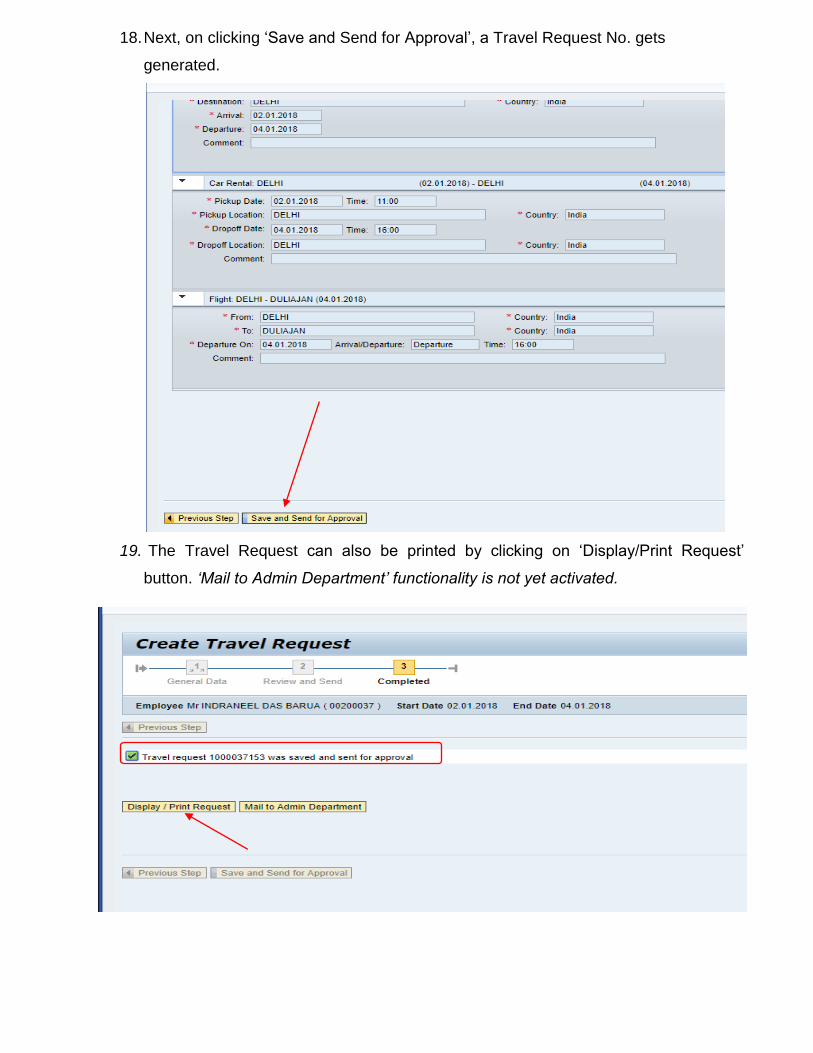
18. Next, on clicking ‘Save and Send for Approval’, a Travel Request No. gets
generated.
19. The Travel Request can also be printed by clicking on ‘Display/Print Request’
button. ‘Mail to Admin Department’ functionality is not yet activated.

20. On clicking, a PDF travel request form gets generated. The hard copy printout needs
to be signed by respective HOD before submitting to Admin (Passage) section.
--------------------------------------------------------//-----------------------------------------------------------
CHAPTER 2 How to make tour claims for settlement:
(for all Portal users)
The following steps detail the procedure for making a tour claim through OIL EP portal.
Prerequisites:
Ensure that your Attendance is maintained in Infotype 2002 for the duration of tour.
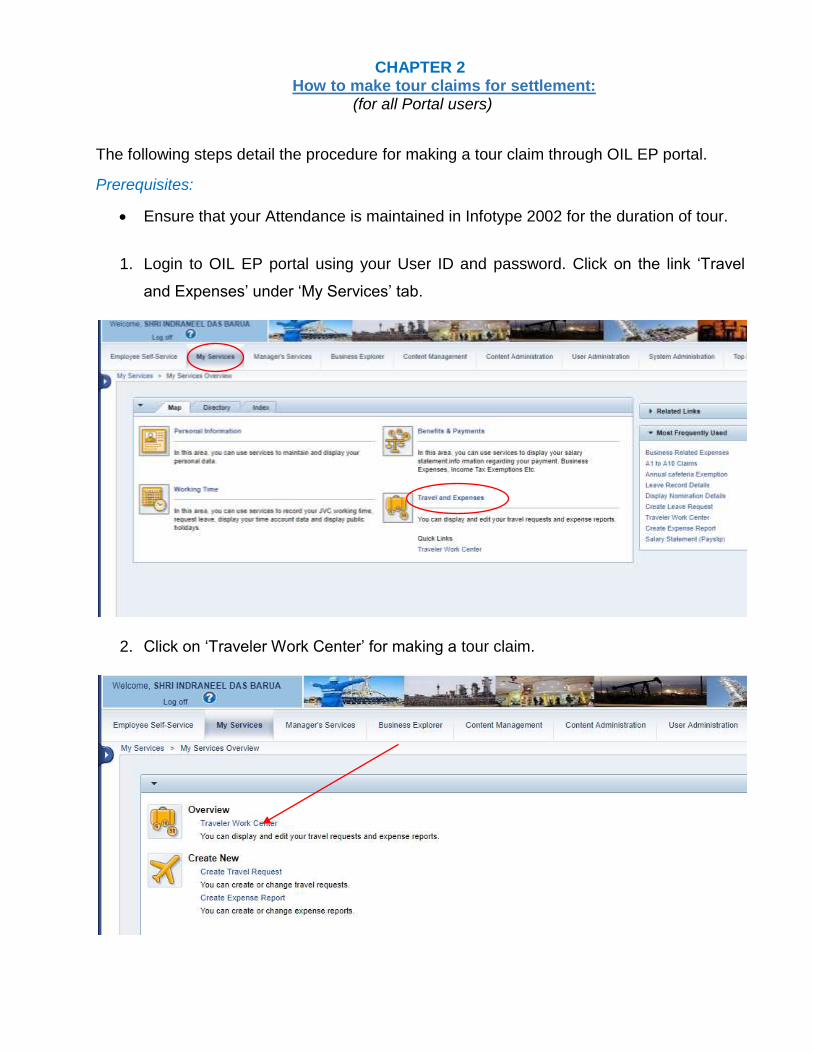
1. Login to OIL EP portal using your User ID and password. Click on the link ‘Travel
and Expenses’ under ‘My Services’ tab.
2. Click on ‘Traveler Work Center’ for making a tour claim.
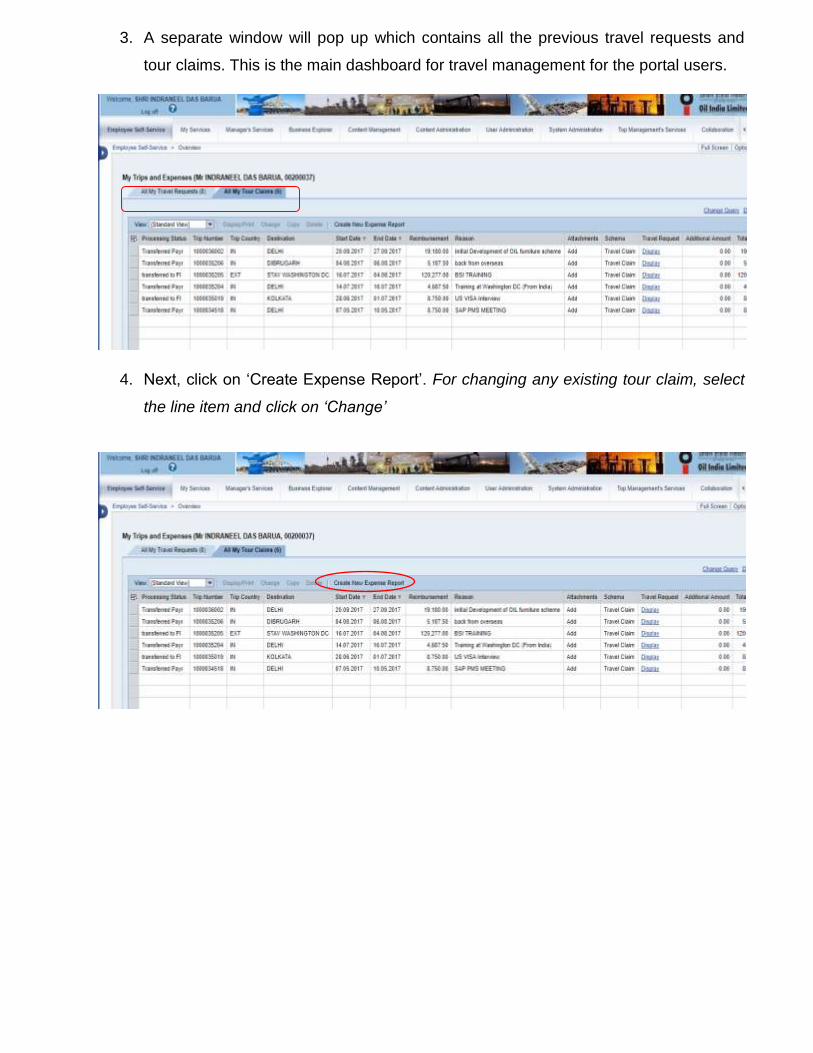
3. A separate window will pop up which contains all the previous travel requests and
tour claims. This is the main dashboard for travel management for the portal users.
4. Next, click on ‘Create Expense Report’. For changing any existing tour claim, select
the line item and click on ‘Change’
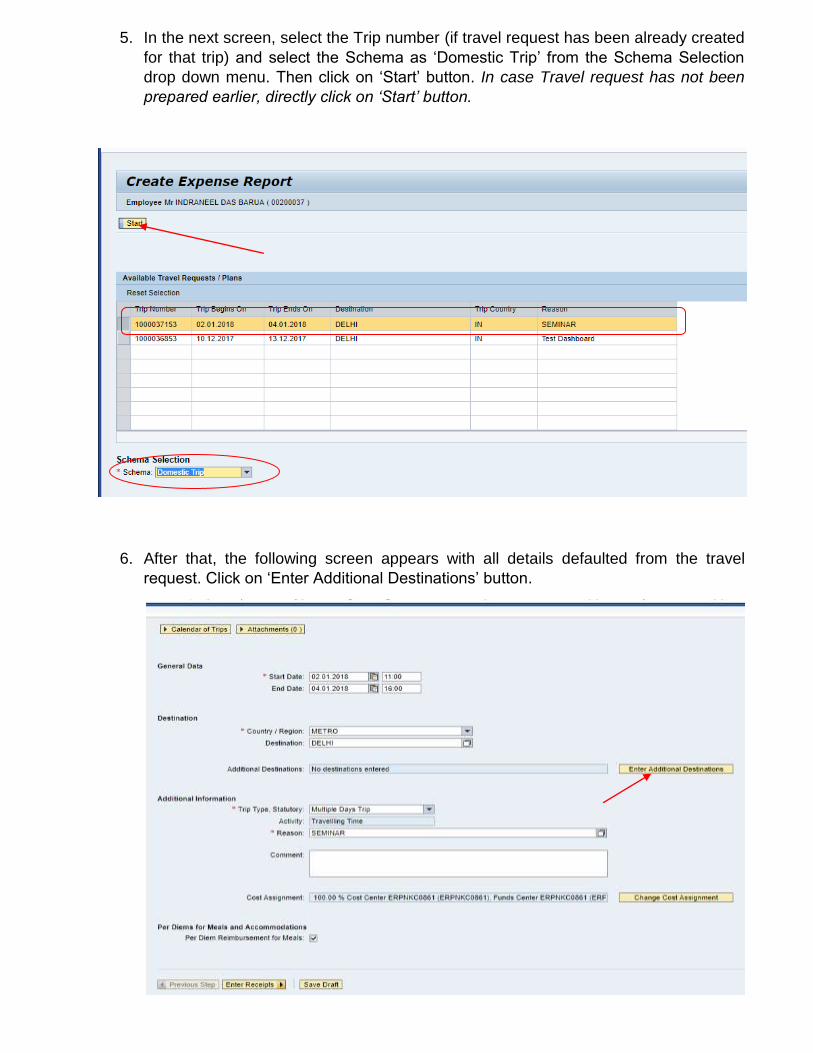
5. In the next screen, select the Trip number (if travel request has been already created
for that trip) and select the Schema as ‘Domestic Trip’ from the Schema Selection
drop down menu. Then click on ‘Start’ button. In case Travel request has not been
prepared earlier, directly click on ‘Start’ button.
6. After that, the following screen appears with all details defaulted from the travel
request. Click on ‘Enter Additional Destinations’ button.

7. In the next screen, you will observe that Trip Start and End Date along with time has
already been defaulted. The system takes the travel time from the previous screen
as your first activity. You don’t have to make any entry regarding this travel activity
(i.e. in this case the travel from Duliajan to Delhi)
8. In the same screen, you need to enter the start time (in this case 19:00 hrs) time for the
next activity (in this case it will be the stay period in Delhi with region as ‘Metro’). The
Trip Type, Statutory will be automatically defaulted from the previous screen. Select the
‘Activity’ from the drop down (in this case ‘Stay at Company Accommodation’). Then
click on ‘Accept and Add Additional Destination’ button for entering more details (in this
case the travel back activity to Duliajan)

9. A new row will be created with details as shown below:
10. In this row, enter the travel back date (in this case 04.01.2018) and travel start time
(i.e. travel back to Duliajan) and select the region as ‘Metro/Non Metro’ (in his case
‘Non Metro’). The Trip Type, Statutory will be automatically defaulted from the
previous screen. Select the ‘Activity’ from the drop down (in this case ‘Travelling
Time’). Click on ‘Accept’ button.
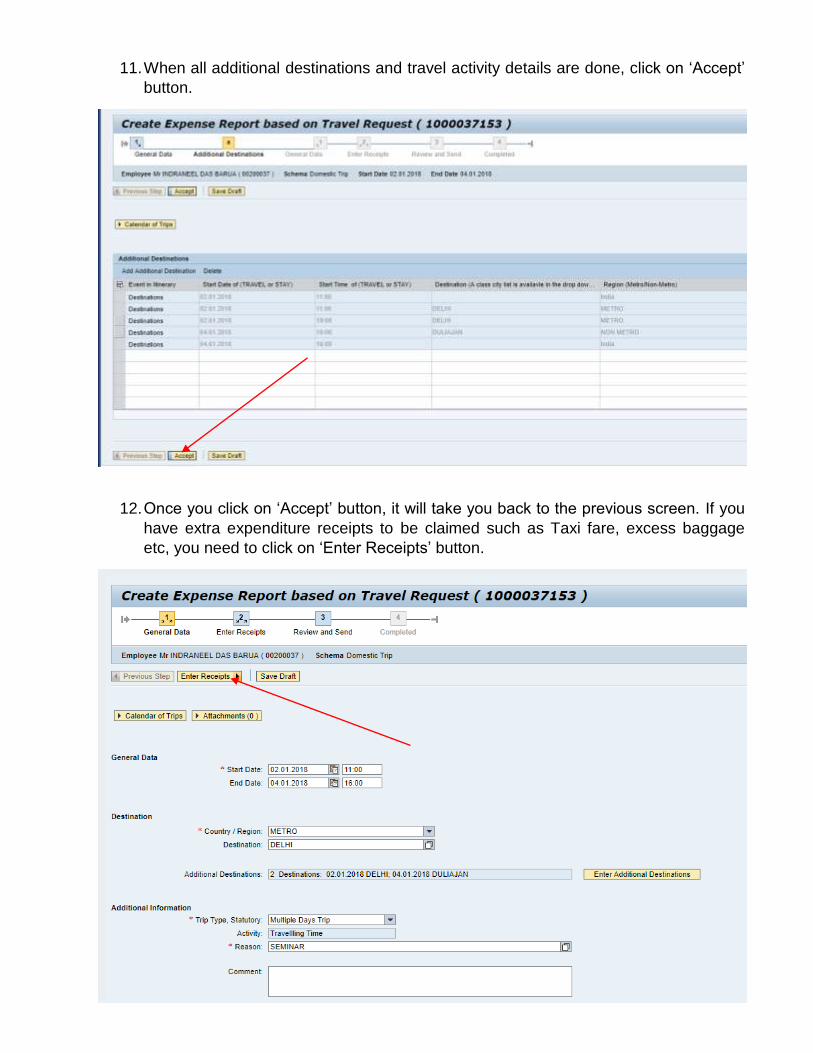
11. When all additional destinations and travel activity details are done, click on ‘Accept’
button.
12. Once you click on ‘Accept’ button, it will take you back to the previous screen. If you
have extra expenditure receipts to be claimed such as Taxi fare, excess baggage
etc, you need to click on ‘Enter Receipts’ button.
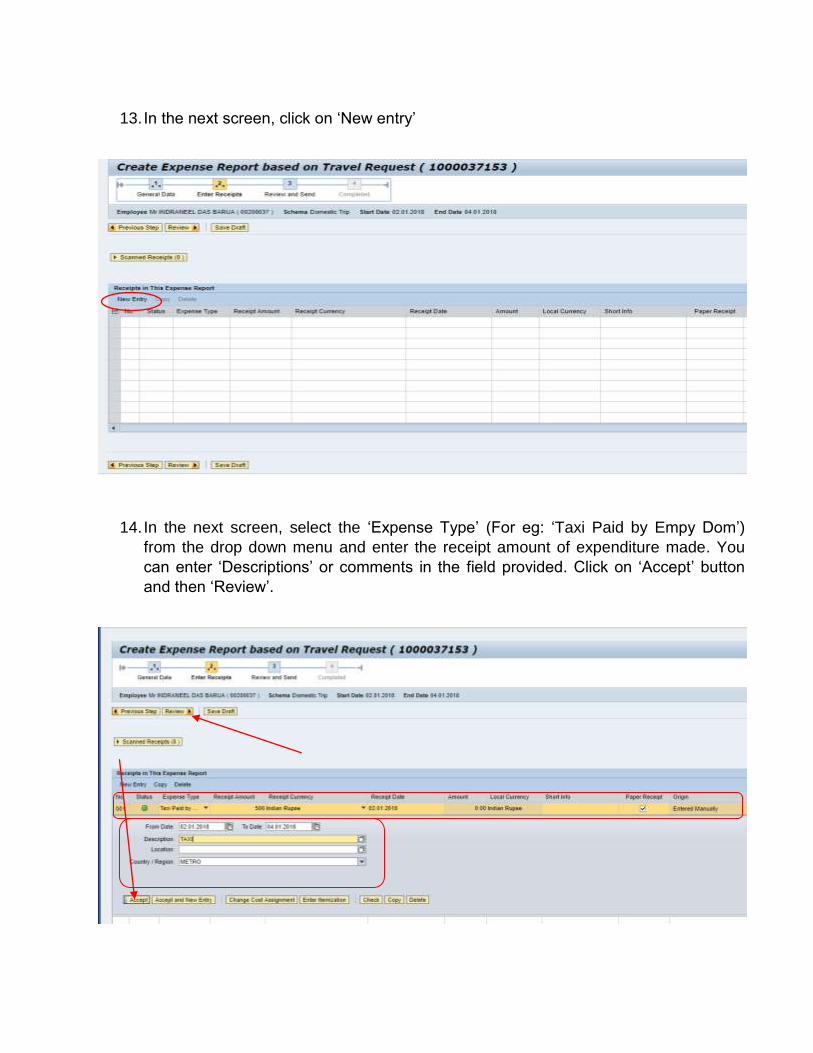
13. In the next screen, click on ‘New entry’
14. In the next screen, select the ‘Expense Type’ (For eg: ‘Taxi Paid by Empy Dom’)
from the drop down menu and enter the receipt amount of expenditure made. You
can enter ‘Descriptions’ or comments in the field provided. Click on ‘Accept’ button
and then ‘Review’.

15. Once you click on ‘Review’ button, the amount of the tour claim with breakup of rates
for total meals per diem and receipts will be displayed as follows:
16. On review, if trip details are correct, click on ‘Save and Send for Approval’ button.
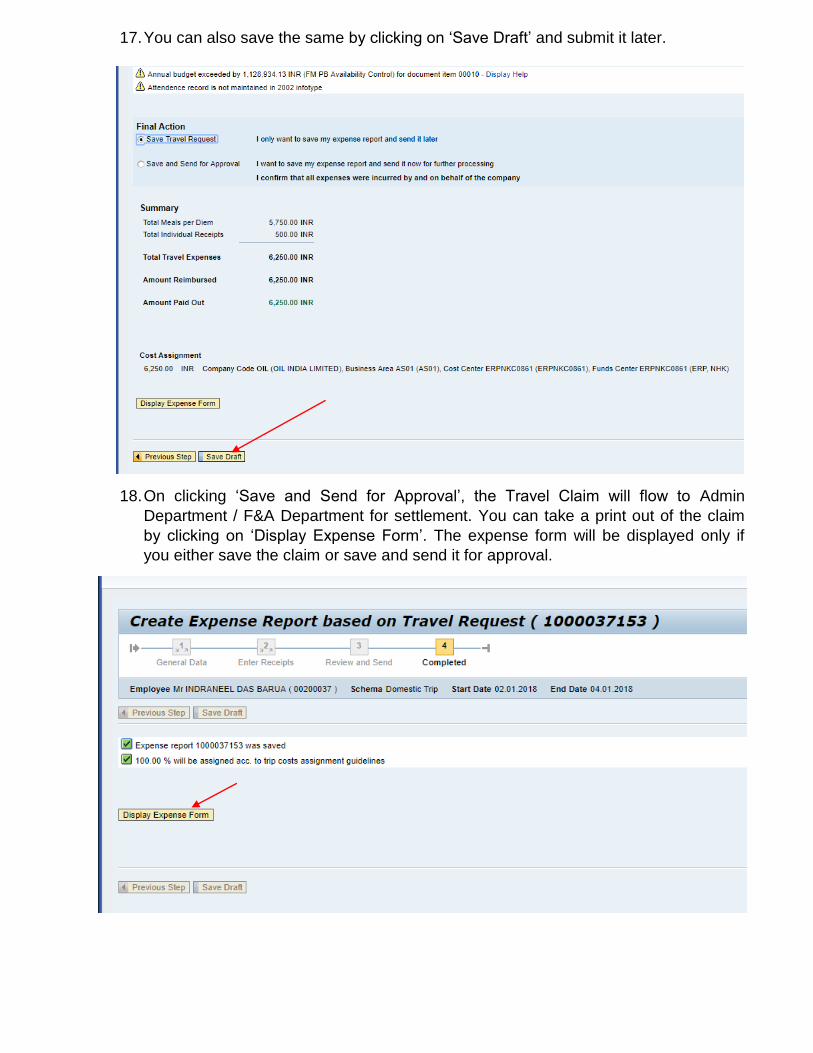
17. You can also save the same by clicking on ‘Save Draft’ and submit it later.
18. On clicking ‘Save and Send for Approval’, the Travel Claim will flow to Admin
Department / F&A Department for settlement. You can take a print out of the claim
by clicking on ‘Display Expense Form’. The expense form will be displayed only if
you either save the claim or save and send it for approval.

19. The expense form (a PDF form) will be displayed as follows. You can take a print out
of the same and send the same attaching all the relevant tickets, documents, etc.
through HOD to Admin department for further processing.
----------------------------------------------------//----------------------------------------------
This End User Manual is prepared for the upgraded version of Travel Management Module (EHP7) by ERP_HR .Dated:10.01.2018)