Trapezoidal Book Case
15
-
Upload
del-andrew -
Category
Documents
-
view
229 -
download
0
Transcript of Trapezoidal Book Case
8/2/2019 Trapezoidal Book Case
http://slidepdf.com/reader/full/trapezoidal-book-case 1/14
8/2/2019 Trapezoidal Book Case
http://slidepdf.com/reader/full/trapezoidal-book-case 2/14
8 1
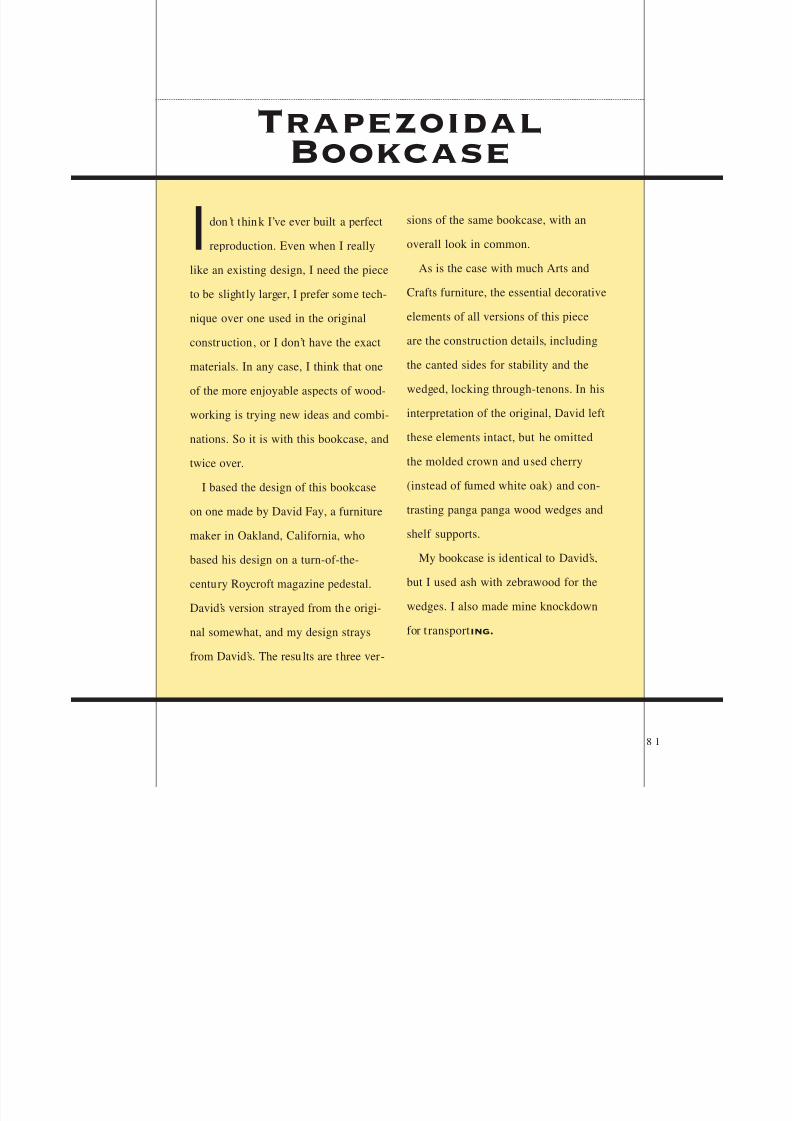
Idon’t think I’ve ever built a perfect
reproduction. Even when I really
like an existing design, I need the piece
to be slightly larger, I prefer some tech-
nique over one used in the original
construction, or I don’t have the exact
materials. In any case, I think that one
of the more enjoyable aspects of wood-
working is trying new ideas and combi-
nations. So it is with this bookcase, and
twice over.
I based the design of this bookcase
on one made by David Fay, a furniture
maker in Oakland, California, who
based his design on a turn-of-the-
century Roycroft magazine pedestal.
David’s version strayed from the origi-
nal somewhat, and my design strays
from David’s. The resu lts are three ver-
sions of the same bookcase, with an
overall look in common.
As is the case with much Arts and
Crafts furniture, the essential decorative
elements of all versions of this piece
are the construction details, including
the canted sides for stability and the
wedged, locking through-tenons. In his
interpretation of the original, David left
these elements intact, but he omitted
the molded crown and used cherry
(instead of fumed white oak) and con-
trasting panga panga wood wedges and
shelf supports.
My bookcase is identical to David’s,
but I used ash with zebrawood for the
wedges. I also made mine knockdown
for transporting.
TrapezoidalBookcase
8/2/2019 Trapezoidal Book Case
http://slidepdf.com/reader/full/trapezoidal-book-case 3/14
8 2
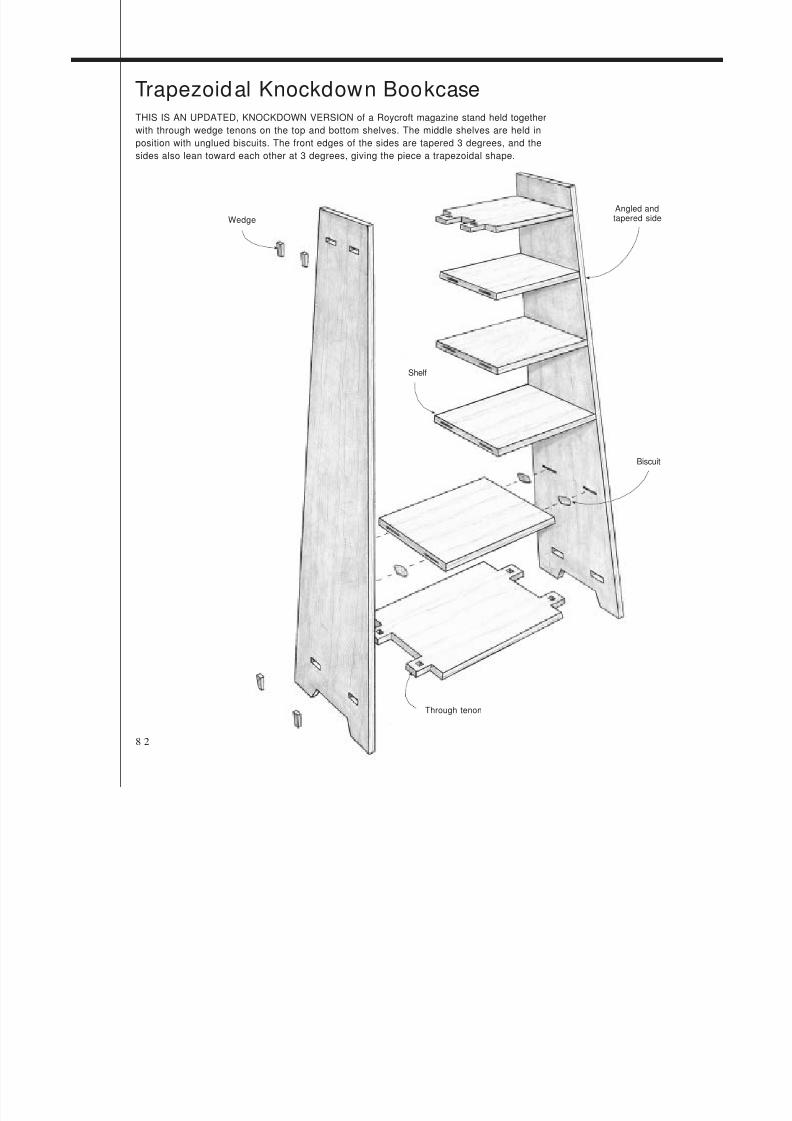
THIS IS AN UPDATED, KNOCKDOWN VERSION of a Roycroft magazine stand held together
with through wedge tenons on the top and bottom shelves. The middle shelves are held in
position with unglued biscuits. The front edges of the sides are tapered 3 degrees, and the
sides also lean toward each other at 3 degrees, giving the piece a trapezoidal shape.
Trapezoidal Knockdown Bookcase
Shelf
Through tenon
Biscuit
Angled andtapered sideWedge
8/2/2019 Trapezoidal Book Case
http://slidepdf.com/reader/full/trapezoidal-book-case 4/14
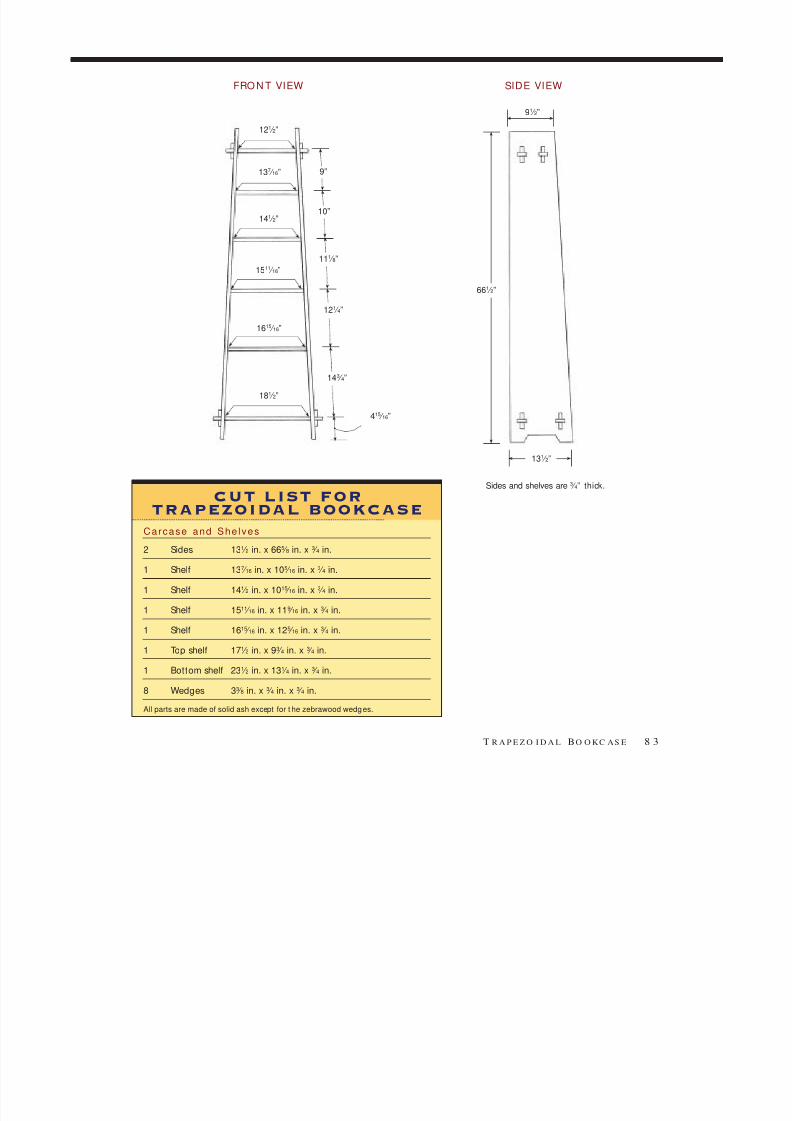
T R A P E Z O I D A L B O O K C A S E 8 3
Sides and shelves are 3 ⁄ 4” thick.
91
⁄ 2”
415 ⁄ 16”
1511 ⁄ 16”
141 ⁄ 2”
137 ⁄ 16”
121 ⁄ 2”
FRO N T VIEW SIDE VIEW
CUT LIST FORTRAPEZOIDAL BOOKCASE
Carcase and She lves
2 Sides 131 ⁄ 2 in. x 665 ⁄ 8 in. x 3 ⁄ 4 in.
1 Shelf 137
⁄ 16 in. x 105
⁄ 16 in. x3
⁄ 4 in.
1 Shelf 141 ⁄ 2 in. x 1015 ⁄ 16 in. x 3 ⁄ 4 in.
1 Shelf 1511 ⁄ 16 in. x 119 ⁄ 16 in. x 3 ⁄ 4 in.
1 Shelf 1615 ⁄ 16 in. x 125 ⁄ 16 in. x 3 ⁄ 4 in.
1 Top shelf 171 ⁄ 2 in. x 93 ⁄ 4 in. x 3 ⁄ 4 in.
1 Bottom shelf 231 ⁄ 2 in. x 131 ⁄ 4 in. x 3 ⁄ 4 in.
8 Wedges 33 ⁄ 8 in. x 3 ⁄ 4 in. x 3 ⁄ 4 in.
All parts are made of solid ash except for t he zebrawood wedges.
9”
10”
143 ⁄ 4”
121 ⁄ 4”
111 ⁄ 8”
181 ⁄ 2”
1615 ⁄ 16”
131 ⁄ 2”
661 ⁄ 2”
8/2/2019 Trapezoidal Book Case
http://slidepdf.com/reader/full/trapezoidal-book-case 5/14
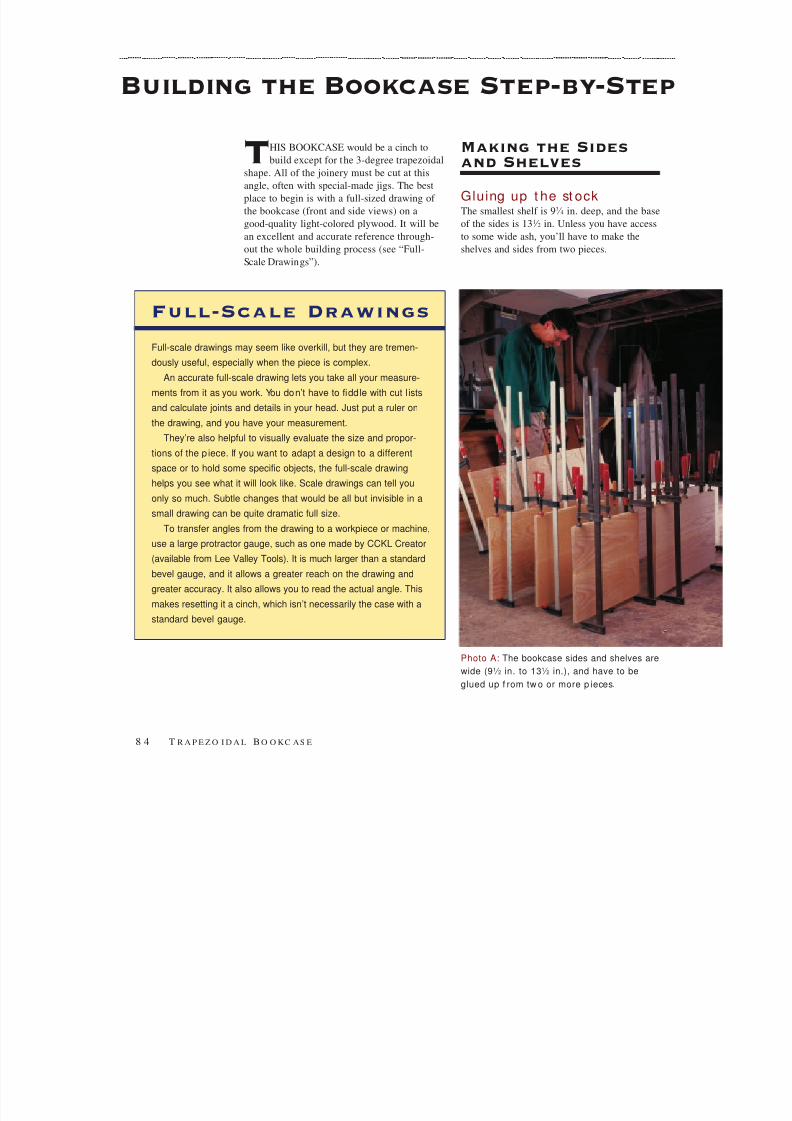
Making the Sides
and Shelves
Gluing up t he st ockThe smallest shelf is 93 ⁄ 4 in. deep, and the base
of the sides is 131 ⁄ 2 in. Unless you have access
to some wide ash, you’ll have to make the
shelves and sides from two pieces.
8 4 T R A P E Z O I D A L B O O K C A S E
Building the Bookcase Step-by-Step
Full-Scale Drawings
Full-scale drawings may seem like overkill, but they are tremen-
dously useful, especially when the piece is complex.
An accurate full-scale drawing lets you take all your measure-
ments from it as you work. You don’t have to fiddle with cut l ists
and calculate joints and details in your head. Just put a ruler on
the drawing, and you have your measurement.
They’re also helpful to visually evaluate the size and propor-
tions of the p iece. If you want to adapt a design to a different
space or to hold some specific objects, the full-scale drawing
helps you see what it will look like. Scale drawings can tell you
only so much. Subtle changes that would be all but invisible in a
small drawing can be quite dramatic full size.
To transfer angles from the drawing to a workpiece or machine,
use a large protractor gauge, such as one made by CCKL Creator
(available from Lee Valley Tools). It is much larger than a standard
bevel gauge, and it allows a greater reach on the drawing and
greater accuracy. It also allows you to read the actual angle. This
makes resetting it a cinch, which isn’t necessarily the case with a
standard bevel gauge.
Photo A: The bookcase sides and shelves are
wide (91 ⁄ 2 in. to 131 ⁄ 2 in.), and have to be
glued up f rom tw o or more p ieces.
THIS BOOKCASE would be a cinch to
build except for the 3-degree trapezoidal
shape. All of the joinery must be cut at this
angle, often with special-made jigs. The best
place to begin is with a full-sized drawing of
the bookcase (front and side views) on a
good-quality light-colored plywood. It will be
an excellent and accurate reference through-
out the whole building process (see “Full-
Scale Drawings”).
8/2/2019 Trapezoidal Book Case
http://slidepdf.com/reader/full/trapezoidal-book-case 6/14
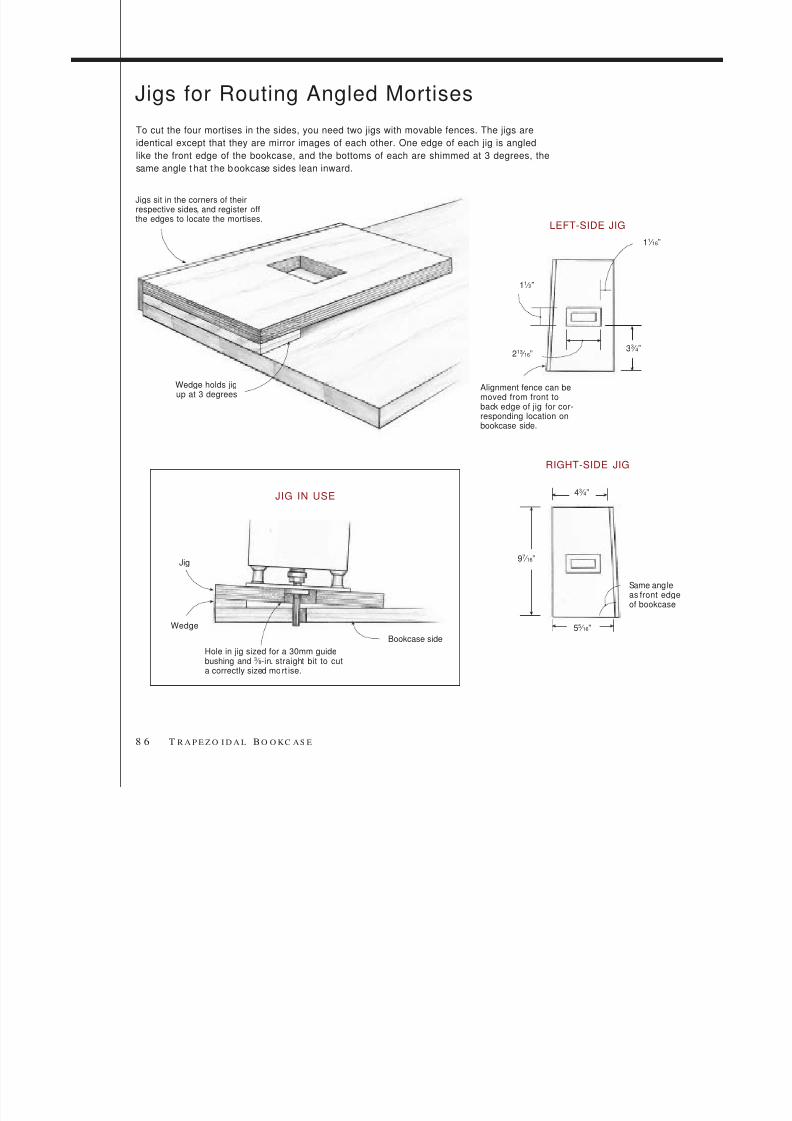
Joinery
Cutt ing t he mort isesThe mortises that are used to join the top and
bottom shelves to the sides are the trickiest
part of this piece because they are angled and
have to be cut cleanly to within a very close
tolerance—as does all the joinery in this
piece—because it all shows.
1. Make two router jigs, a right-handed one
and a left-handed one, to cut the four mortises
in the sides at a 3-degree angle (see “Jig for
Routing Angled Mortises” on p. 86).
2. Attach th e alignment fence to the left-
handed jig on the angled edge. It is now set
up to cut the mortises on the front edge of the
left side.
3. Position the jig flush with the top and front
edges on the outside face of the left side.
T R A P E Z O I D A L B O O K C A S E 8 5
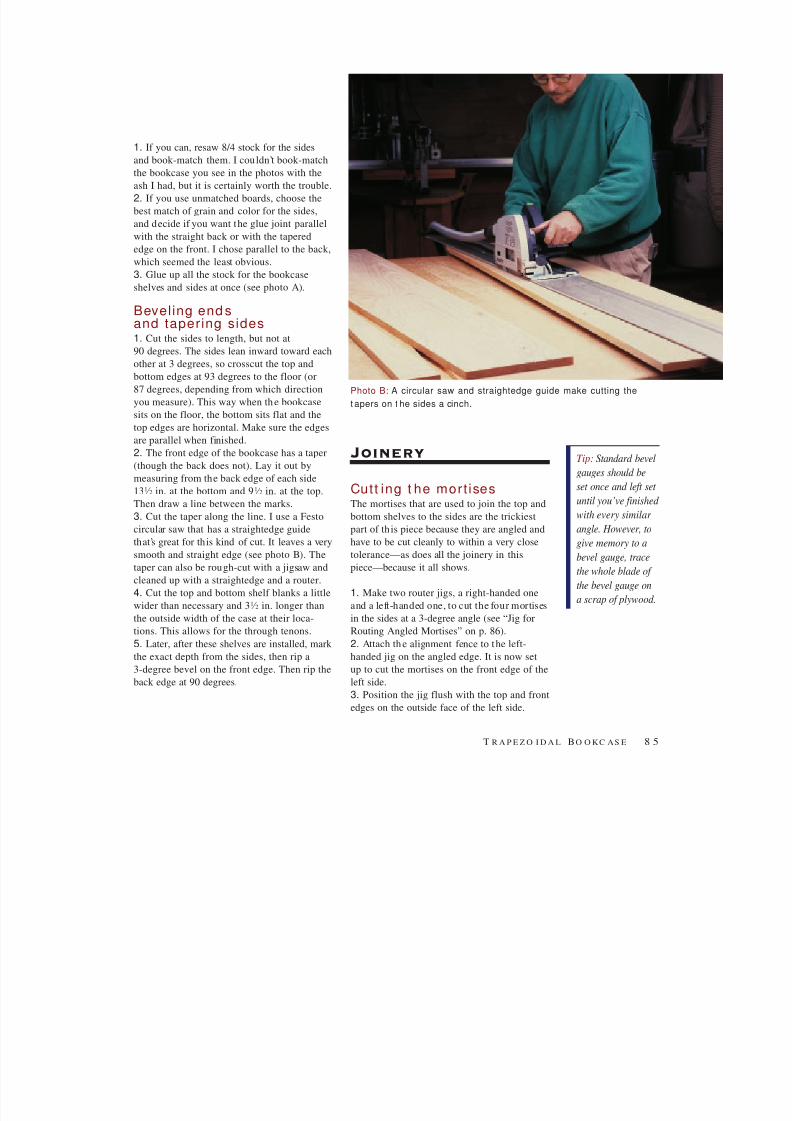
Photo B: A circular saw and straightedge guide make cutting the
t apers on t he sides a cinch.
Tip: Standard bevelgauges should be
set once and left set
until you’ve finished
with every similar
angle. However, to
give memory to a
bevel gauge, trace
the whole blade of the bevel gauge on
a scrap of plywood.
1. If you can, resaw 8/4 stock for the sides
and book-match them. I couldn’t book-match
the bookcase you see in the photos with the
ash I had, but it is certainly worth the trouble.
2. If you use unmatched boards, choose the
best match of grain and color for the sides,
and decide if you want the glue joint parallel
with the straight back or with the tapered
edge on the front. I chose parallel to the back,
which seemed the least obvious.
3. Glue up all the stock for the bookcase
shelves and sides at once (see photo A).
Beveling end sand tapering sides1. Cut the sides to length, but not at
90 degrees. The sides lean inward toward each
other at 3 degrees, so crosscut the top and
bottom edges at 93 degrees to the floor (or
87 degrees, depending from which direction
you measure). This way when th e bookcase
sits on the floor, the bottom sits flat and the
top edges are horizontal. Make sure the edges
are parallel when finished.
2. The front edge of the bookcase has a taper
(though the back does not). Lay it out by
measuring from the back edge of each side
131 ⁄ 2 in. at the bottom and 91 ⁄ 2 in. at the top.
Then draw a line between the marks.
3. Cut the taper along the line. I use a Festo
circular saw that has a straightedge guide
that’s great for this kind of cut. It leaves a very
smooth and straight edge (see photo B). The
taper can also be rough-cut with a jigsaw and
cleaned up with a straightedge and a router.
4. Cut the top and bottom shelf blanks a little
wider than necessary and 31 ⁄ 2 in. longer than
the outside width of the case at their loca-
tions. This allows for the through tenons.
5. Later, after these shelves are installed, mark
the exact depth from the sides, then rip a
3-degree bevel on the front edge. Then rip the
back edge at 90 degrees.
8/2/2019 Trapezoidal Book Case
http://slidepdf.com/reader/full/trapezoidal-book-case 7/14
8 6 T R A P E Z O I D A L B O O K C A S E
To cut the four mortises in the sides, you need two jigs with movable fences. The jigs are
identical except that they are mirror images of each other. One edge of each jig is angled
like the front edge of the bookcase, and the bottoms of each are shimmed at 3 degrees, the
same angle t hat the bookcase sides lean inward.
Jigs for Routing Angled Mortises
Jigs sit in the corners of theirrespective sides, and register offthe edges to locate the mortises.
Wedge holds jigup at 3 degrees
LEFT-SIDE JIG
RIGHT-SIDE JIG
11 ⁄ 2”
Alignment fence can bemoved from front toback edge of jig for cor-responding location onbookcase side.
Same angleas front edgeof bookcase
JIG IN USE
Hole in jig sized for a 30mm guidebushing and 3 ⁄ 8-in. straight bit to cuta correctly sized mort ise.
Bookcase side
Jig
Wedge
11 ⁄ 16”
213 ⁄ 16”
97 ⁄ 16”
33 ⁄ 4”
55 ⁄ 16”
43 ⁄ 4”
8/2/2019 Trapezoidal Book Case
http://slidepdf.com/reader/full/trapezoidal-book-case 8/14
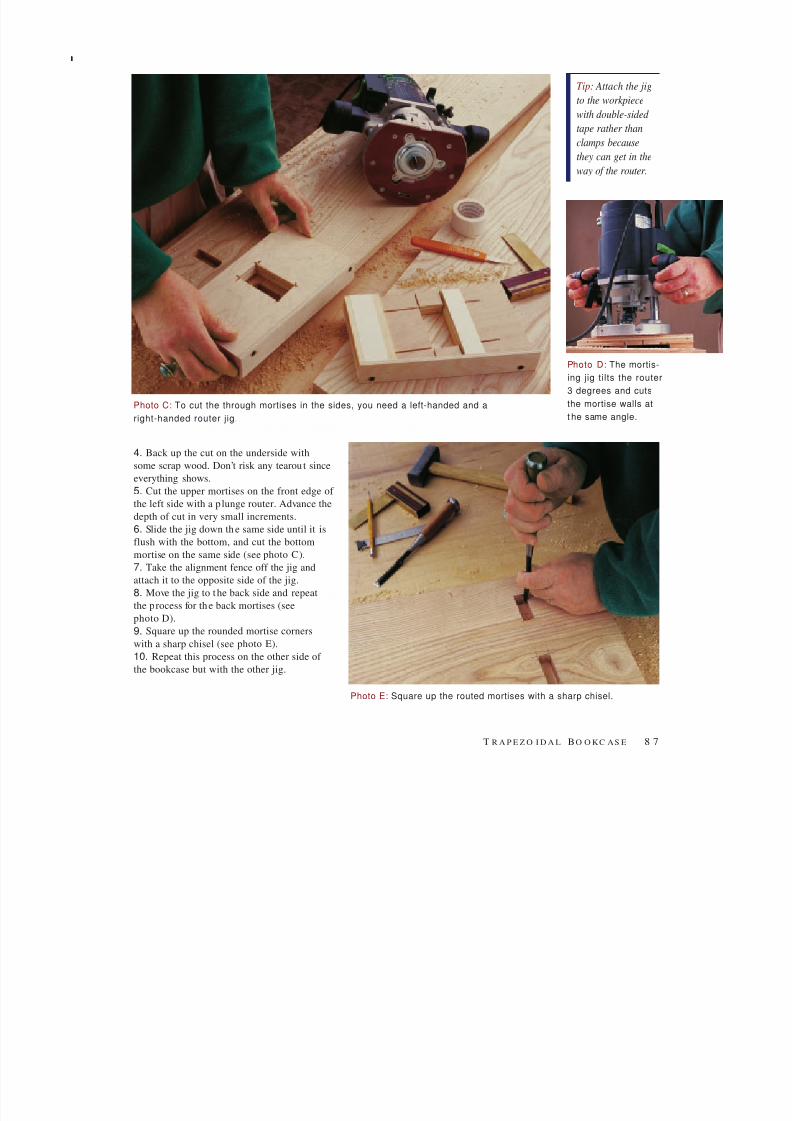
4. Back up the cut on the underside with
some scrap wood. Don’t risk any tearout since
everything shows.
5. Cut the upper mortises on the front edge of
the left side with a plunge router. Advance the
depth of cut in very small increments.
6. Slide the jig down th e same side until it is
flush with the bottom, and cut the bottom
mortise on the same side (see photo C).
7. Take the alignment fence off the jig and
attach it to the opposite side of the jig.
8. Move the jig to the back side and repeat
the process for the back mortises (see
photo D).
9. Square up the rounded mortise corners
with a sharp chisel (see photo E).
10. Repeat this process on the other side of
the bookcase but with the other jig.
T R A P E Z O I D A L B O O K C A S E 8 7
Photo D: The mortis-
ing jig tilts the router
3 degrees and cuts
the mortise walls at
t he same angle.
Photo C: To cut the through mortises in the sides, you need a left-handed and a
right-handed router jig.
Photo E: Square up the routed mortises with a sharp chisel.
Tip: Attach the jig
to the workpiece
with double-sided tape rather than
clamps because
they can get in the
way of the router.
8/2/2019 Trapezoidal Book Case
http://slidepdf.com/reader/full/trapezoidal-book-case 9/14
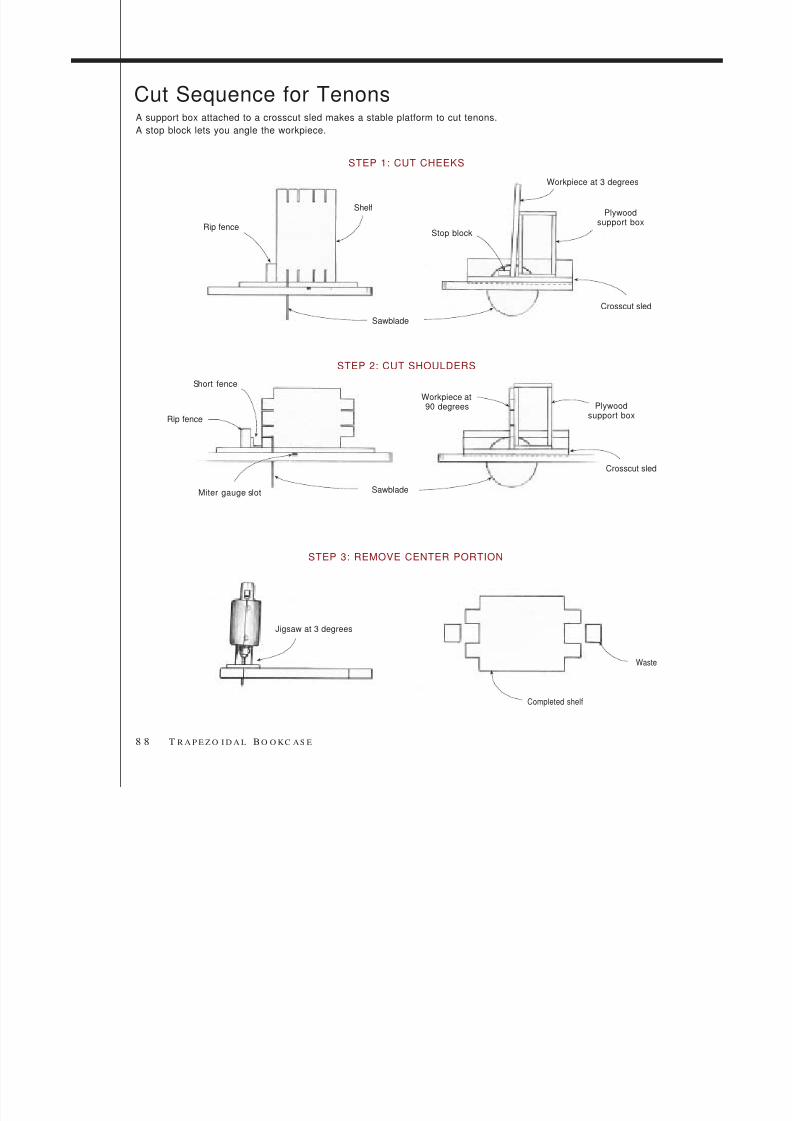
8 8 T R A P E Z O I D A L B O O K C A S E
Completed shelf
Waste
STEP 3: REMOVE CENTER PORTION
Miter gauge slot Sawblade
Workpiece at90 degrees Plywood
support box
Crosscut sled
Rip fence
Short fence
STEP 2: CUT SHOULDERS
Plywoodsupport box
Sawblade
Workpiece at 3 degrees
Crosscut sled
Stop block
Shelf
Rip fence
STEP 1: CUT CHEEKS
A support box attached to a crosscut sled makes a stable platform to cut tenons.A stop block lets you angle the workpiece.
Cut Sequence for Tenons
Jigsaw at 3 degrees
8/2/2019 Trapezoidal Book Case
http://slidepdf.com/reader/full/trapezoidal-book-case 10/14
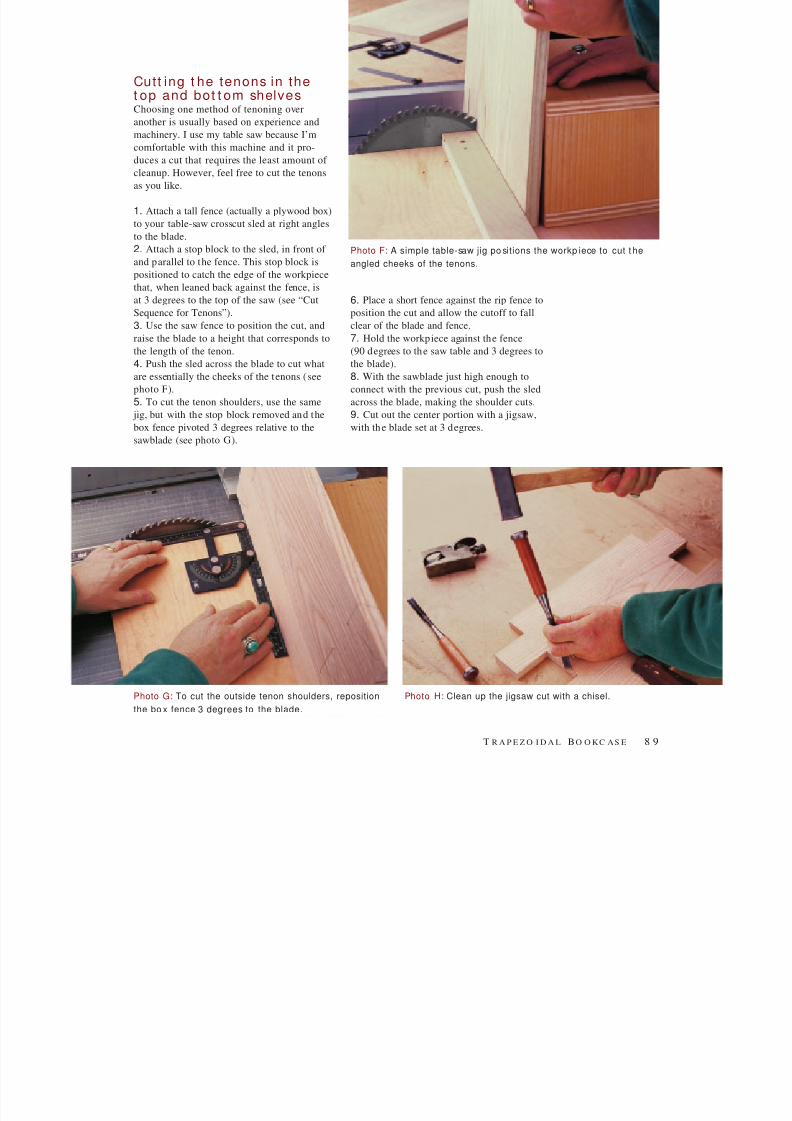
Cutt ing t he tenons in thet op and bot t om shelvesChoosing one method of tenoning over
another is usually based on experience and
machinery. I use my table saw because I’m
comfortable with this machine and it pro-
duces a cut that requires the least amount of
cleanup. However, feel free to cut the tenons
as you like.
1. Attach a tall fence (actually a plywood box)
to your table-saw crosscut sled at right angles
to the blade.
2. Attach a stop block to the sled, in front of
and parallel to the fence. This stop block is
positioned to catch the edge of the workpiece
that, when leaned back against the fence, is
at 3 degrees to the top of the saw (see “Cut
Sequence for Tenons”).
3. Use the saw fence to position the cut, and
raise the blade to a height that corresponds to
the length of the tenon.
4. Push the sled across the blade to cut what
are essentially the cheeks of the tenons ( see
photo F).
5. To cut the tenon shoulders, use the same
jig, but with the stop block removed and the
box fence pivoted 3 degrees relative to the
sawblade (see photo G).
6. Place a short fence against the rip fence to
position the cut and allow the cutoff to fall
clear of the blade and fence.
7. Hold the workpiece against the fence
(90 degrees to the saw table and 3 degrees to
the blade).
8. With the sawblade just high enough to
connect with the previous cut, push the sled
across the blade, making the shoulder cuts.
9. Cut out the center portion with a jigsaw,
with the blade set at 3 degrees.
T R A P E Z O I D A L B O O K C A S E 8 9
Photo G: To cut the outside tenon shoulders, reposition
the bo x fence 3 degrees to the blade.
Photo H: Clean up the jigsaw cut with a chisel.
Photo F: A simple table-saw jig po sitions the workp iece to cut t he
angled cheeks of the tenons.

8/2/2019 Trapezoidal Book Case
http://slidepdf.com/reader/full/trapezoidal-book-case 11/14
10. Pare to the layout lines on each side
with a sharp chisel, making sure to maintain
the 3-degree angle across the shoulder (see
photo H on p. 89).
Cutt ing t he mort ises in t het enons for t he wedgesIn a perfect world, the wedges would be simple
to fit in the tenons, needing only accurate
measurements and layout. In reality, there is
a lot of fitting to get the wedges just right.
Differences in the size of the mortise as little
as 1 ⁄ 32 in. can cause the height of the wedge to
vary as much as 1 ⁄ 4 in.
1. Check the fit of the mortises and tenons
and make any adjustments necessary.
2. Assemble the case with just the top and bot-
tom two shelves and clamp it tightly together.
3. Precisely mark the parts of the tenons that
protrude past the sides. From these marks, lay
out the mortises in the tenons that will accept
the wedges.
4. Lay out the mortises as wide as the wedges
and 3 ⁄ 4 in. deep. Though the wedges are only9 ⁄ 16 in. thick where they sit tight in the mortises,
you don’t want them to bottom out in their
holes before they pull the shelf up tight.
9 0 T R A P E Z O I D A L B O O K C A S E
WEDGED TENON DETAILS
FRONT VIEW
Photo I: A hollow-chisel mortiser with a 3 ⁄ 8-in.
bit is fast and accurate f or cutt ing t he mor-
tises for t he wedge.
Side splayed3 degrees
Back edge, straight Front edge, tapered 3 degrees
3 ⁄ 4”
2”3 ⁄ 4”
21 ⁄ 2”
33 ⁄ 8”
11 ⁄ 2”
SIDE VIEW
Hole in tenon isslightly deeper thanwedge is thick.7 ⁄ 16”
9 ⁄ 16”
13 ⁄ 4”
5 ⁄ 8”
Tip: Remember that the outer wedge faces
have to be perpendicular to the shelf (which is
horizontal) to seat against the vertical outer
walls of the mortise.
8/2/2019 Trapezoidal Book Case
http://slidepdf.com/reader/full/trapezoidal-book-case 12/14
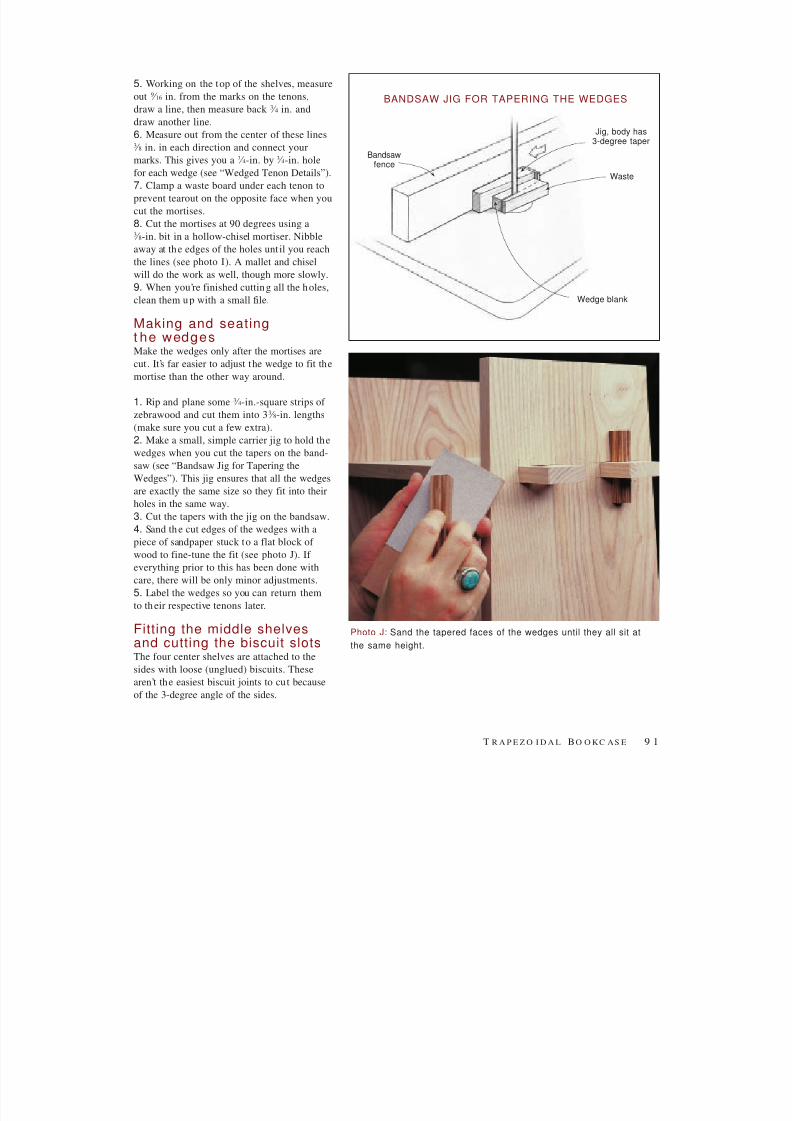
5. Working on the top of the shelves, measure
out 9 ⁄ 16 in. from the marks on the tenons,
draw a line, then measure back 3 ⁄ 4 in. and
draw another line.
6. Measure out from the center of these lines3 ⁄ 8 in. in each direction and connect your
marks. This gives you a 3 ⁄ 4-in. by 3 ⁄ 4-in. hole
for each wedge (see “Wedged Tenon Details”).
7. Clamp a waste board under each tenon to
prevent tearout on the opposite face when you
cut the mortises.
8. Cut the mortises at 90 degrees using a3 ⁄ 8-in. bit in a hollow-chisel mortiser. Nibble
away at the edges of the holes unt il you reach
the lines (see photo I). A mallet and chisel
will do the work as well, though more slowly.
9. When you’re finished cutting all the holes,
clean them up with a small file.
Making and seatingt he wedgesMake the wedges only after the mortises are
cut. It’s far easier to adjust the wedge to fit the
mortise than the other way around.
1. Rip and plane some 3 ⁄ 4-in.-square strips of
zebrawood and cut them into 33 ⁄ 8-in. lengths
(make sure you cut a few extra).
2. Make a small, simple carrier jig to hold the
wedges when you cut the tapers on the band-
saw (see “Bandsaw Jig for Tapering the
Wedges”). This jig ensures that all the wedges
are exactly the same size so they fit into their
holes in the same way.
3. Cut the tapers with the jig on the bandsaw.
4. Sand th e cut edges of the wedges with a
piece of sandpaper stuck to a flat block of
wood to fine-tune the fit (see photo J). If
everything prior to this has been done with
care, there will be only minor adjustments.
5. Label the wedges so you can return them
to th eir respective tenons later.
Fitting the middle shelvesand cutting the biscuit slotsThe four center shelves are attached to the
sides with loose (unglued) biscuits. These
aren’t the easiest biscuit joints to cut because
of the 3-degree angle of the sides.
T R A P E Z O I D A L B O O K C A S E 9 1
Photo J: Sand the tapered faces of the wedges until they all sit at
the same height.
Jig, body has3-degree taper
Bandsawfence
Waste
Wedge blank
BANDSAW JIG FOR TAPERING THE WEDGES
8/2/2019 Trapezoidal Book Case
http://slidepdf.com/reader/full/trapezoidal-book-case 13/14
1. Assemble the case, install the wedges, and
make sure everything is tight.
2. Measure up from the bottom shelf, marking
the location of the top of each shelf on both
sides of the case.
3. Measure horizontally across the bookcase
face with a straightedge and conn ect these
marks. This gives you the width of each shelf
(on the top face).
4. Starting with shelf blanks slightly over-
sized in width and length, crosscut one edge
of each on your table saw using the miter
gauge set at 90 degrees and the blade tilted
to 3 degrees.
5. Creep up on the finished width bit by bit,
checking the fit on the case after each cut.
Each shelf should fit tight but not bulge the
sides or affect the fit of the other shelves.
6. Rip the front edges of the shelves at
3 degrees as well, sizing them 1 ⁄ 8 in. narrower
than the depth of the case at each shelf loca-
tion. When installed, the shelves will sit flush
with the back and be recessed 1 ⁄ 8 in. from the
front of the case.
9 2 T R A P E Z O I D A L B O O K C A S E
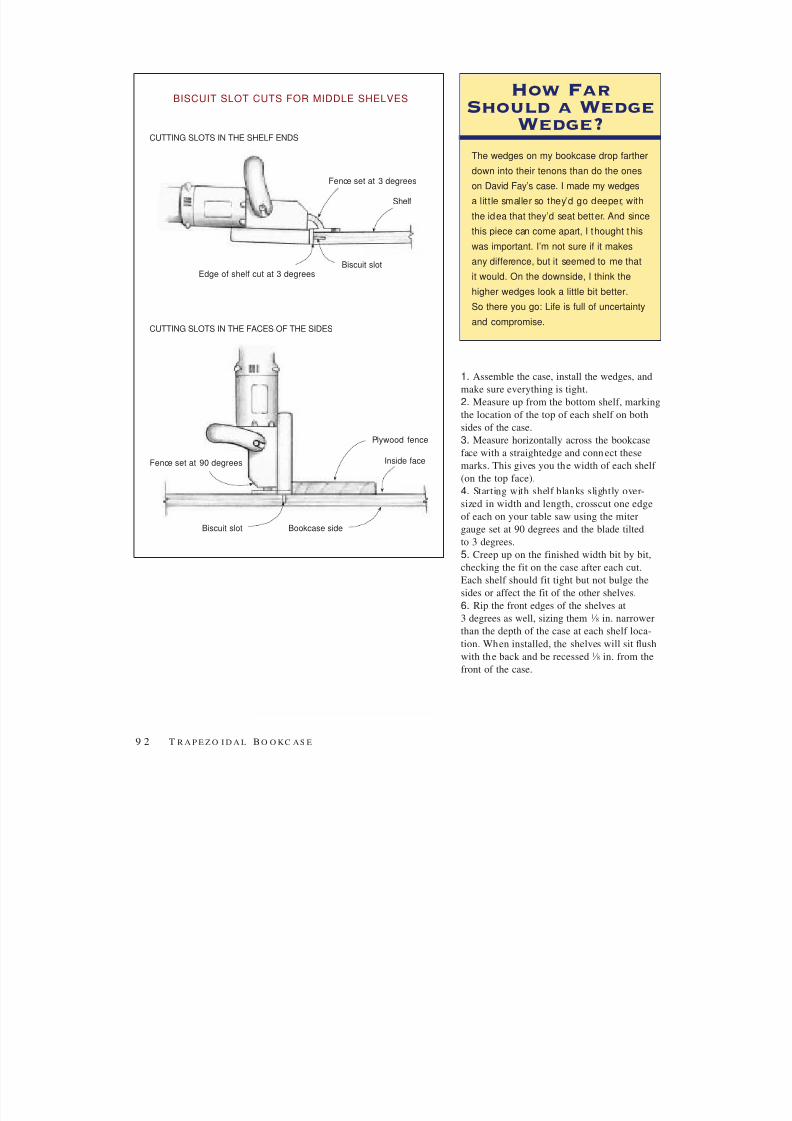
BISCUIT SLOT CUTS FOR MIDDLE SHELVES
CUTTING SLOTS IN THE SHELF ENDS
Inside face
Plywood fence
Bookcase side
Fence set at 90 degrees
Biscuit slot
CUTTING SLOTS IN THE FACES OF THE SIDES
Shelf
Fence set at 3 degrees
Edge of shelf cut at 3 degreesBiscuit slot
How Far
Should a Wedge
Wedge?
The wedges on my bookcase drop farther
down into their tenons than do the ones
on David Fay’s case. I made my wedges
a little smaller so they’d go deeper, with
the idea that they’d seat better. And since
this piece can come apart, I thought t hiswas important. I’m not sure if it makes
any difference, but it seemed to me that
it would. On the downside, I think the
higher wedges look a little bit better.
So there you go: Life is full of uncertainty
and compromise.
8/2/2019 Trapezoidal Book Case
http://slidepdf.com/reader/full/trapezoidal-book-case 14/14
7. Cut biscuit slots in the edges of the
shelves, two to an edge. Reference these slots
from the top of the shelves with the fence of
your biscuit joiner set at 3 degrees (see
“Biscuit Slot Cuts for Middle Shelves”).
8. Knock down the bookcase before you cut
the biscuit slots in the sides.
9. Draw layout lines across the sides at
90 degrees to the back, starting from the
marks that indicate where the tops of the
shelves intersect the sides.
10. Lay a piece of plywood along these lines
to act as a fence for the biscuit joiner.
11. Cut the biscuit slots in the sides, position-
ing the joiner against the fence and plunging
it in at 90 degrees to the side.
Finishing
and Final Assembly
Rounding the edges1. When you complete all the parts, do a
final check for fit, fuss with anything that may
still be bugging you, and disassemble the
bookcase.
2. Work all the edges of the mortises and the
holes for the wedges with a file to make the
piece look soft and rounded. Round them
until they have about a 1 ⁄ 8-in. radius on their
edges.
3. Slightly round all the edges of the tenons,
wedges, shelves, and sides with sandpaper to
the same 1 ⁄ 8-in. radius.
4. Sand everything to 180 grit.
App ly ing t he f in ishAt David Fay’s suggestion I finished the piece
with several coats of Formby’s low-gloss tung
oil. I felt an oil finish was important for a
knockdown piece. Frequent assembly and
disassembly would easily damage a harder,
lacquered finish, and the wedges would, in all
likelihood, scratch the finish around them
when taken in and out. Oil finishes wear in
these ways much better than lacquer finishes
and are easily repaired when they dry out or
become worn.
With this bookcase, final assembly is,
frankly, optional. As a knockdown bookcase,
it goes together and comes apart easily. And
after you test-fit everything and finish all the
pieces, the first thing you may want to do is
knock it down to take it somewhere (see
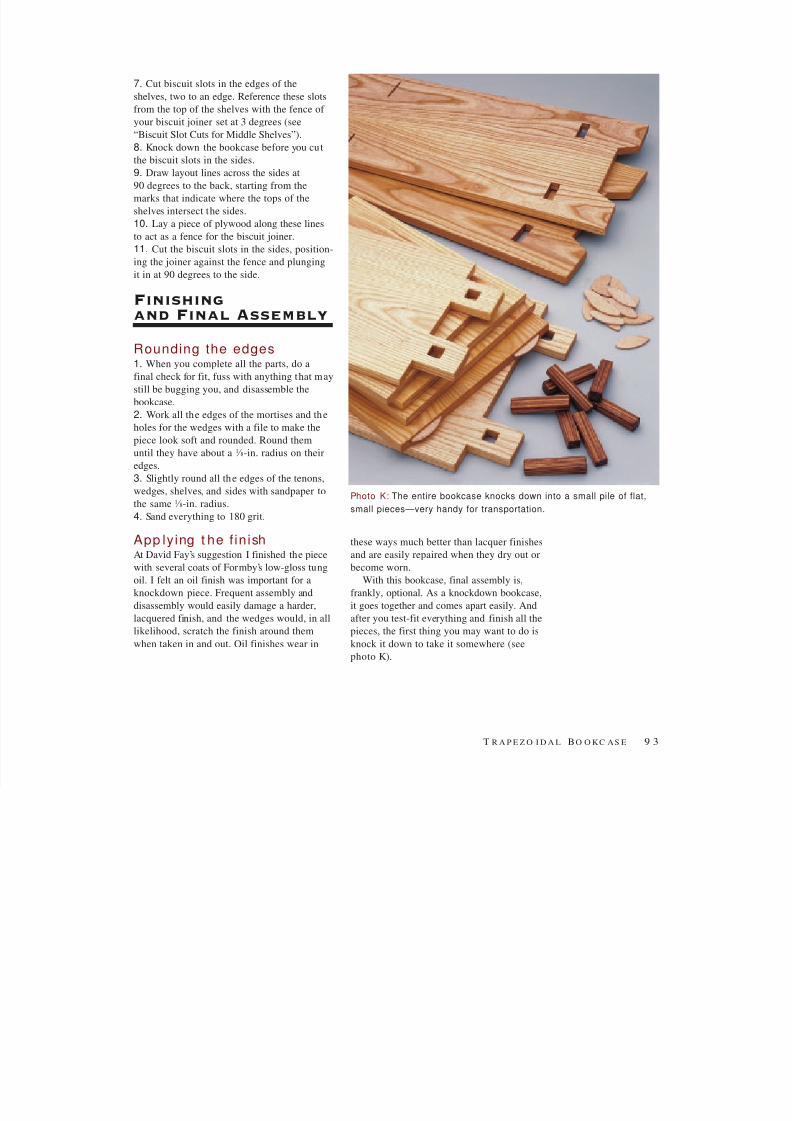
photo K).
T R A P E Z O I D A L B O O K C A S E 9 3
Photo K: The entire bookcase knocks down into a small pile of flat,
small pieces—very handy for transportation.