Transmission, disassemblingshane/stasj/pics/motor/dokumentasjon/A4-S4_B5/Tra… · Transmission,...
27
34-43 Transmission, disassembling and assembling Disassembly sequence Page 34 - 55 . Transmission overview 1 - 1st gear 2 - 2nd gear 3 - 3rd gear 4 - 4th gear 5 - 5th gear 6 - Reverse gear Removing and installing reverse idler gear Page 35 - 44 7 - Tapered roller bearing Adjusting Page 39 - 39 Page 1 of 27 Transmission, disassembling and assembling 11/19/2002 http://127.0.0.1:8080/audi/servlet/Display?action=Goto&type=repair&id=AUDI.B5.TM02.34.5
Transcript of Transmission, disassemblingshane/stasj/pics/motor/dokumentasjon/A4-S4_B5/Tra… · Transmission,...

34-43
Transmission, disassembling and assembling Disassembly sequence Page 34-55 .
Transmission overview
1 - 1st gear
2 - 2nd gear
3 - 3rd gear
4 - 4th gear
5 - 5th gear
6 - Reverse gear
Removing and installing reverse idler gear Page 35-44
7 - Tapered roller bearing
Adjusting Page 39-39
Page 1 of 27Transmission, disassembling and assembling
11/19/2002http://127.0.0.1:8080/audi/servlet/Display?action=Goto&type=repair&id=AUDI.B5.TM02.34.5
34-44
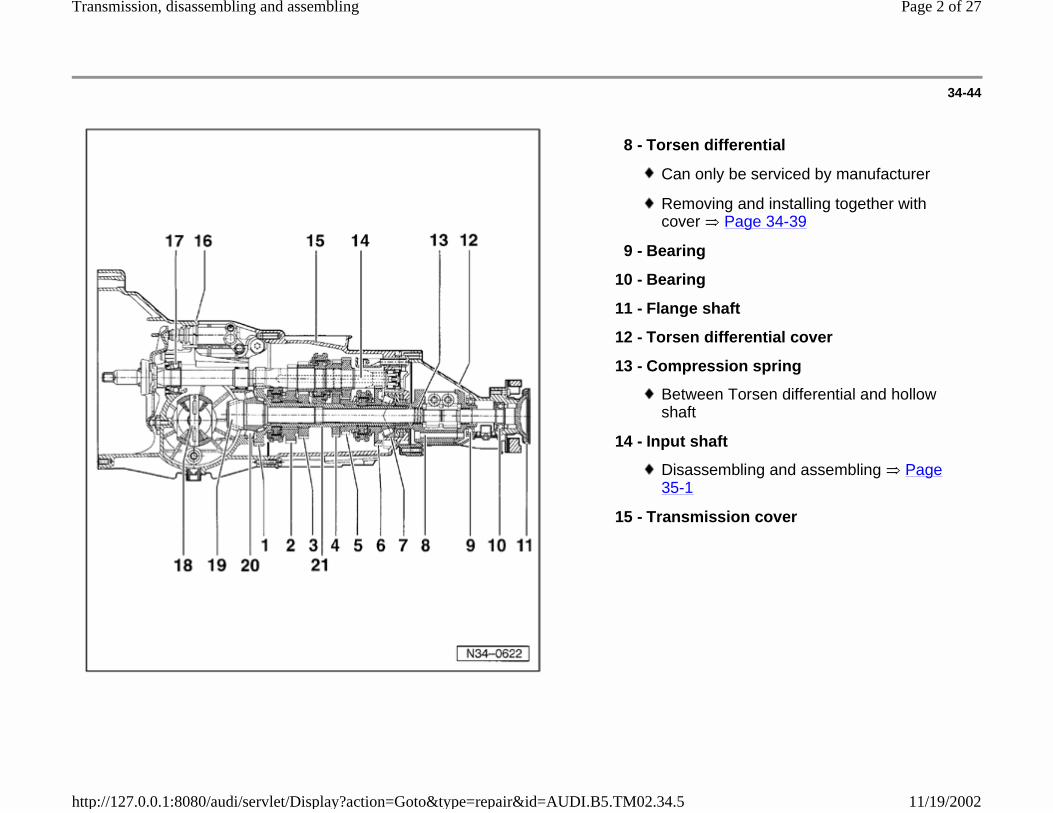
8 - Torsen differential
Can only be serviced by manufacturer
Removing and installing together with cover Page 34-39
9 - Bearing
10 - Bearing
11 - Flange shaft
12 - Torsen differential cover
13 - Compression spring
Between Torsen differential and hollow shaft
14 - Input shaft
Disassembling and assembling Page 35-1
15 - Transmission cover
Page 2 of 27Transmission, disassembling and assembling
11/19/2002http://127.0.0.1:8080/audi/servlet/Display?action=Goto&type=repair&id=AUDI.B5.TM02.34.5

34-45
16 - Transmission housing
17 - Ball bearing
Adjusting thickness Input shaft, adjusting Page 35-17
18 - Differential
Removing and installing Page 39-16
Disassembling and assembling Page 39-21
19 - Drive pinion
Disassembling and assembling drive pinion and hollow shaft Page 35-21
20 - Radial tapered roller bearing
Adjusting Page 39-39
21 - Hollow shaft
Disassembling and assembling drive pinion and hollow shaft Page 35-21
Page 3 of 27Transmission, disassembling and assembling
11/19/2002http://127.0.0.1:8080/audi/servlet/Display?action=Goto&type=repair&id=AUDI.B5.TM02.34.5

34-46
Assembly overview
I - Input shaft ball bearing and multi-function switch, removing and installing
Page 34-47
II - Input shaft, drive pinion, hollow shaft, selector rods, transmission cover and Torsen differential cover, removing and installing Page 34-51
Page 4 of 27Transmission, disassembling and assembling
11/19/2002http://127.0.0.1:8080/audi/servlet/Display?action=Goto&type=repair&id=AUDI.B5.TM02.34.5

34-47
Input shaft ball bearing and multi-function switch, removing and installing
1 - Transmission housing
With differential and flange shafts
Removing and installing flange shafts Page 39-1
Removing and installing differential Page 39-16
Removing and installing speedometer Vehicle Speed Sensor (VSS) Page 39-13
Removing and installing speedometer drive gear Page 39-14
Breather installation position Fig. 1
2 - Torx bolt
Always replace
35 Nm (26 ft lb)
Self-locking
3 - Guide sleeve
Installed with O-ring and seal for input shaft Page 30-20
4 - Dished washer
Page 5 of 27Transmission, disassembling and assembling
11/19/2002http://127.0.0.1:8080/audi/servlet/Display?action=Goto&type=repair&id=AUDI.B5.TM02.34.5

Smaller diameter (convex side) faces guide sleeve
Page 6 of 27Transmission, disassembling and assembling
11/19/2002http://127.0.0.1:8080/audi/servlet/Display?action=Goto&type=repair&id=AUDI.B5.TM02.34.5
34-48
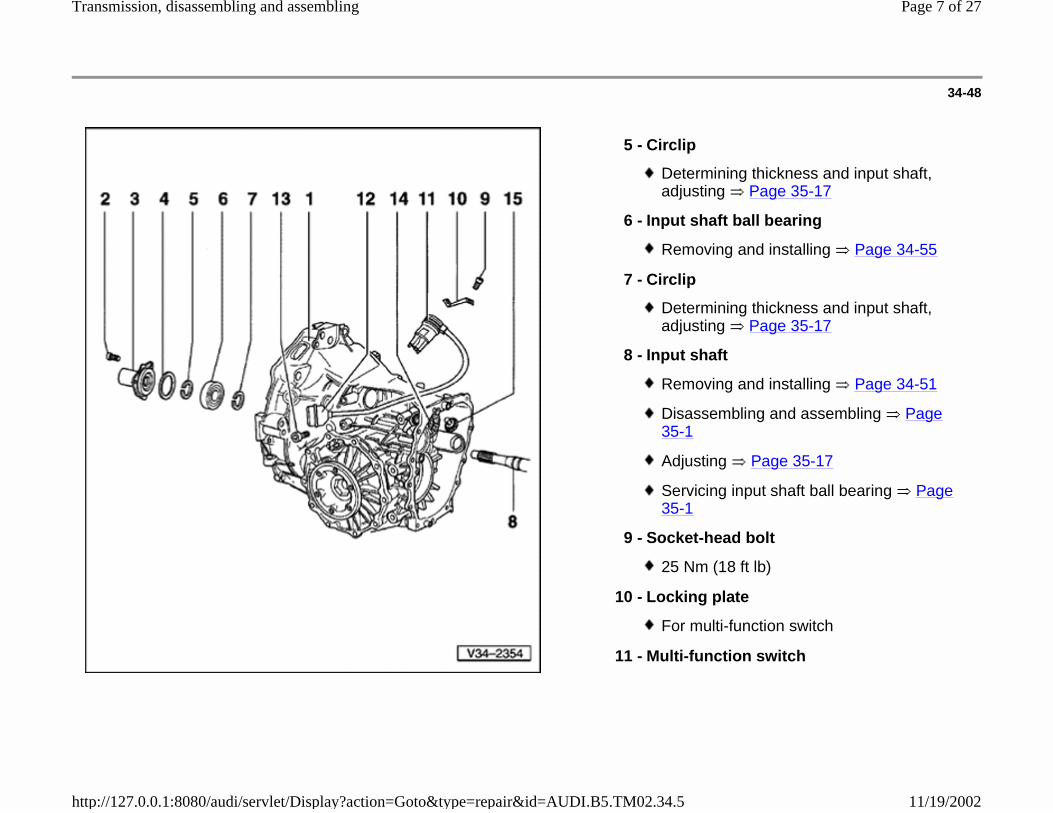
5 - Circlip
Determining thickness and input shaft, adjusting Page 35-17
6 - Input shaft ball bearing
Removing and installing Page 34-55
7 - Circlip
Determining thickness and input shaft, adjusting Page 35-17
8 - Input shaft
Removing and installing Page 34-51
Disassembling and assembling Page 35-1
Adjusting Page 35-17
Servicing input shaft ball bearing Page 35-1
9 - Socket-head bolt
25 Nm (18 ft lb)
10 - Locking plate
For multi-function switch
11 - Multi-function switch
Page 7 of 27Transmission, disassembling and assembling
11/19/2002http://127.0.0.1:8080/audi/servlet/Display?action=Goto&type=repair&id=AUDI.B5.TM02.34.5

34-49
12 - Multi-function switch harness connector
13 - Socket-head bolt
10 Nm (7 ft lb)
14 - Cover for shift rod
Removing and installing Page 34-79
15 - Gear lock for 5th and reverse gear
Removing and installing Page 34-86
Page 8 of 27Transmission, disassembling and assembling
11/19/2002http://127.0.0.1:8080/audi/servlet/Display?action=Goto&type=repair&id=AUDI.B5.TM02.34.5

34-50
After pressing in, the breather must project 21 mm (0.827 in.) out of the housing .
Fig. 1 Breather installation position
Page 9 of 27Transmission, disassembling and assembling
11/19/2002http://127.0.0.1:8080/audi/servlet/Display?action=Goto&type=repair&id=AUDI.B5.TM02.34.5
34-51
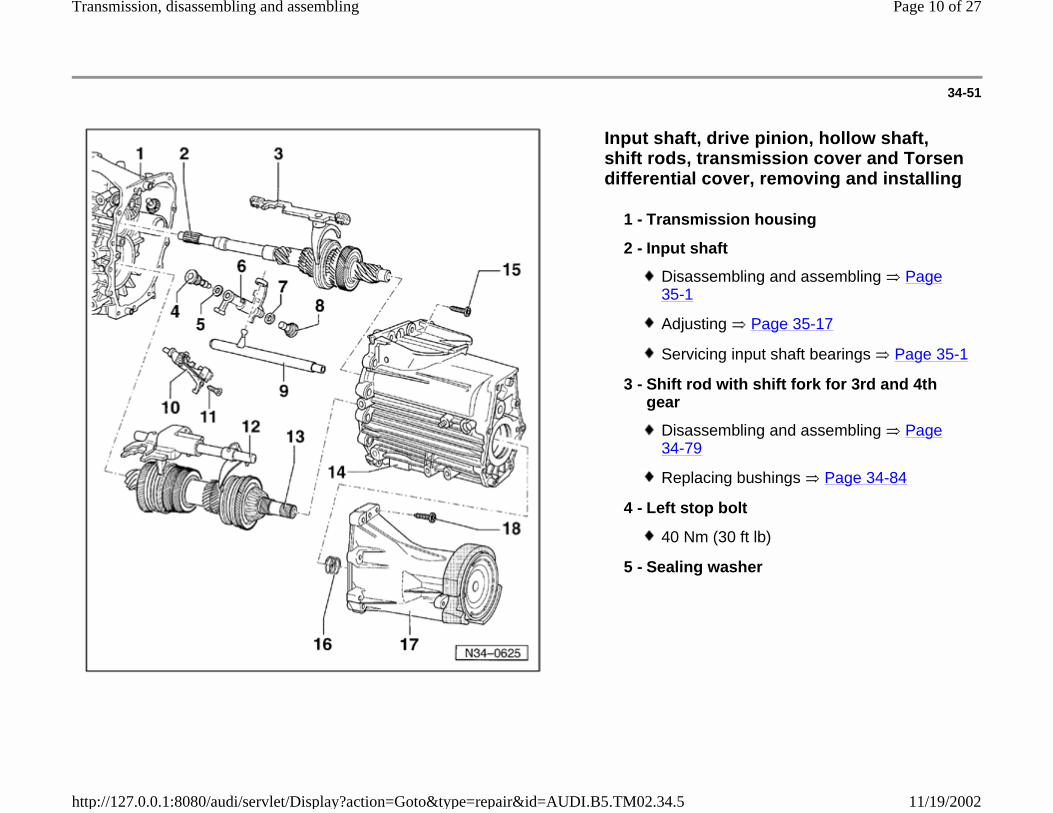
Input shaft, drive pinion, hollow shaft, shift rods, transmission cover and Torsen differential cover, removing and installing
1 - Transmission housing
2 - Input shaft
Disassembling and assembling Page 35-1
Adjusting Page 35-17
Servicing input shaft bearings Page 35-1
3 - Shift rod with shift fork for 3rd and 4th gear
Disassembling and assembling Page 34-79
Replacing bushings Page 34-84
4 - Left stop bolt
40 Nm (30 ft lb)
5 - Sealing washer
Page 10 of 27Transmission, disassembling and assembling
11/19/2002http://127.0.0.1:8080/audi/servlet/Display?action=Goto&type=repair&id=AUDI.B5.TM02.34.5
34-52
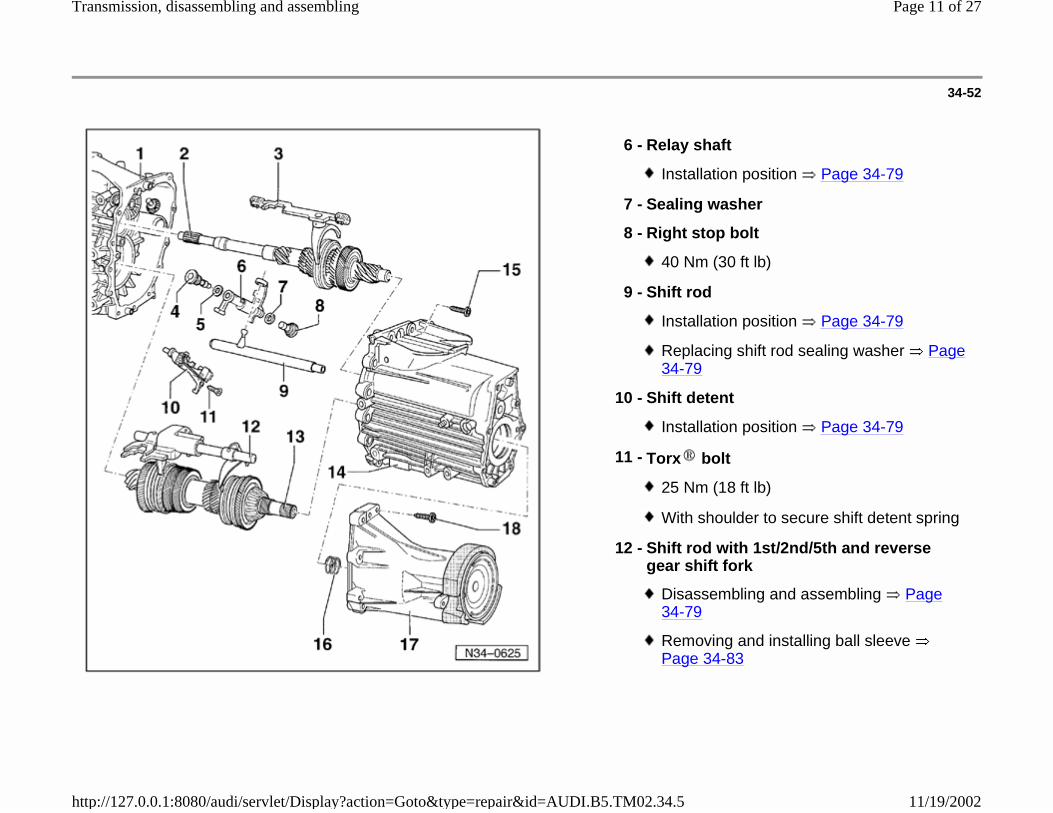
6 - Relay shaft
Installation position Page 34-79
7 - Sealing washer
8 - Right stop bolt
40 Nm (30 ft lb)
9 - Shift rod
Installation position Page 34-79
Replacing shift rod sealing washer Page 34-79
10 - Shift detent
Installation position Page 34-79
11 - Torx bolt
25 Nm (18 ft lb)
With shoulder to secure shift detent spring
12 - Shift rod with 1st/2nd/5th and reverse gear shift fork
Disassembling and assembling Page 34-79
Removing and installing ball sleeve Page 34-83
Page 11 of 27Transmission, disassembling and assembling
11/19/2002http://127.0.0.1:8080/audi/servlet/Display?action=Goto&type=repair&id=AUDI.B5.TM02.34.5

34-53
13 - Drive pinion with hollow shaft
Disassembling and assembling Page 35-21
Adjusting Page 39-34
Servicing drive pinion and hollow shaft bearings Page 35-21
14 - Transmission cover
Removing and installing oil collector tray Fig. 1
15 - Torx bolt
22 Nm (16 ft lb)
16 - Compression spring
17 - Torsen differential cover
Removing and installing with transmission installed Page 34-39
Removing and installing Torsen differential from cover Page 34-68
Servicing cover Page 34-68
18 - Torx bolt
22 Nm (16 ft lb)
Page 12 of 27Transmission, disassembling and assembling
11/19/2002http://127.0.0.1:8080/audi/servlet/Display?action=Goto&type=repair&id=AUDI.B5.TM02.34.5
34-54
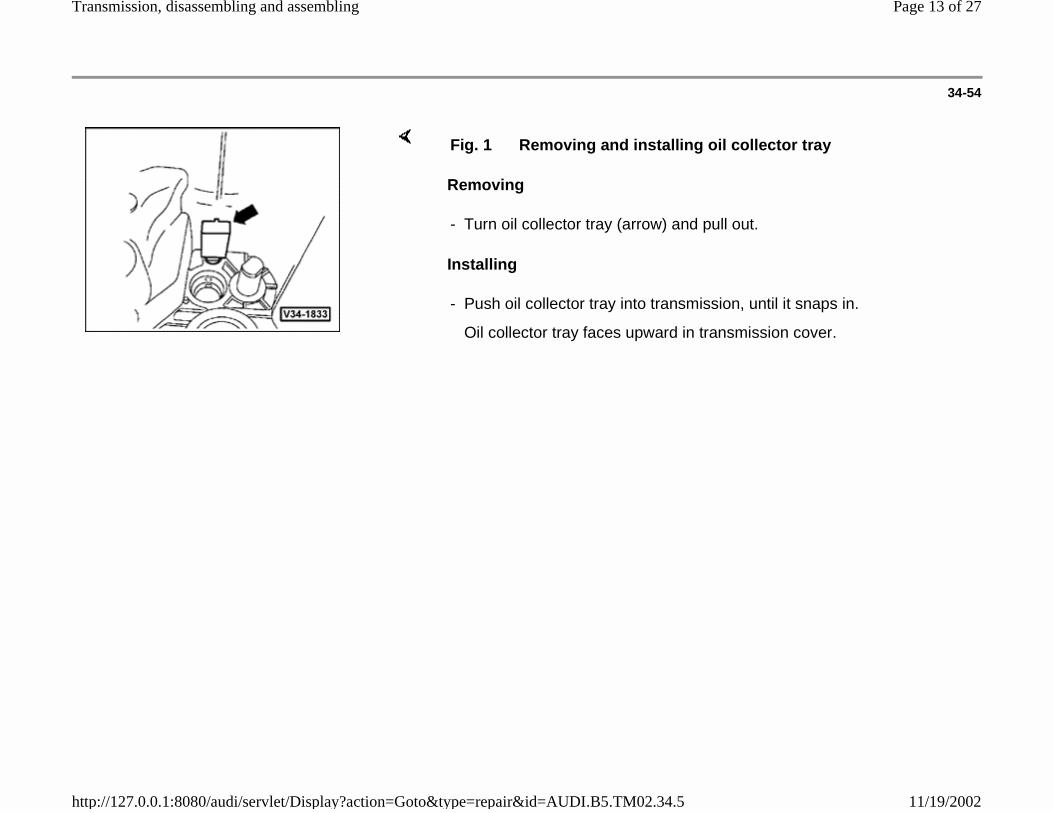
Removing
Installing
Fig. 1 Removing and installing oil collector tray
- Turn oil collector tray (arrow) and pull out.
- Push oil collector tray into transmission, until it snaps in.
Oil collector tray faces upward in transmission cover.
Page 13 of 27Transmission, disassembling and assembling
11/19/2002http://127.0.0.1:8080/audi/servlet/Display?action=Goto&type=repair&id=AUDI.B5.TM02.34.5
34-55
Input shaft ball bearing, multi-function switch, input shaft, drive pinion, shift rods, transmission cover and Torsen differential cover, removing and installing
Notes:
To remove the above-mentioned components it is not necessary to remove the differential.
Removal is only necessary when adjustments have to be performed Page 39-37 , list of adjustments
Special tools and equipment
VW309 holding plate
VW353 transmission support
3235 press device
VAG1306 drip tray
VAG1582 taper roller bearing puller
Page 14 of 27Transmission, disassembling and assembling
11/19/2002http://127.0.0.1:8080/audi/servlet/Display?action=Goto&type=repair&id=AUDI.B5.TM02.34.5

VAG1582/3 attachment to VAG1582
Page 15 of 27Transmission, disassembling and assembling
11/19/2002http://127.0.0.1:8080/audi/servlet/Display?action=Goto&type=repair&id=AUDI.B5.TM02.34.5

34-56
Removing
- Place drip tray below transmission.
- Drain gear oil.
- Secure transmission to assembly stand Page 34-30 .
Notes:
- Remove clutch release lever -A- with release bearing.
Before removing the guide sleeve, slide a shrink tube over the input shaft splines to protect the seal.
Remove the seal in the guide sleeve Page 30-20 .
- Remove guide sleeve -B-.
- Remove dished washer -C-.
- Remove circlip -D- in front of input shaft ball bearing.
- Note thickness of circlip, if ball bearing, drive axle or transmission housing is not replaced.
Page 16 of 27Transmission, disassembling and assembling
11/19/2002http://127.0.0.1:8080/audi/servlet/Display?action=Goto&type=repair&id=AUDI.B5.TM02.34.5

34-57
- Pull input shaft ball bearing out of transmission housing.
- Remove circlip (arrow) behind input shaft ball bearing.
- Note thickness of circlip, if ball bearing, drive axle or transmission housing are not replaced.
Page 17 of 27Transmission, disassembling and assembling
11/19/2002http://127.0.0.1:8080/audi/servlet/Display?action=Goto&type=repair&id=AUDI.B5.TM02.34.5

34-58
- Remove cover -A- together with Torsen differential from transmission cover -B-.
- Remove compression spring from drive pinion.
- Remove transmission cover -B- from transmission housing -C-.
- Remove bolts (arrows) and pull out multi-function switch.
Page 18 of 27Transmission, disassembling and assembling
11/19/2002http://127.0.0.1:8080/audi/servlet/Display?action=Goto&type=repair&id=AUDI.B5.TM02.34.5
34-59
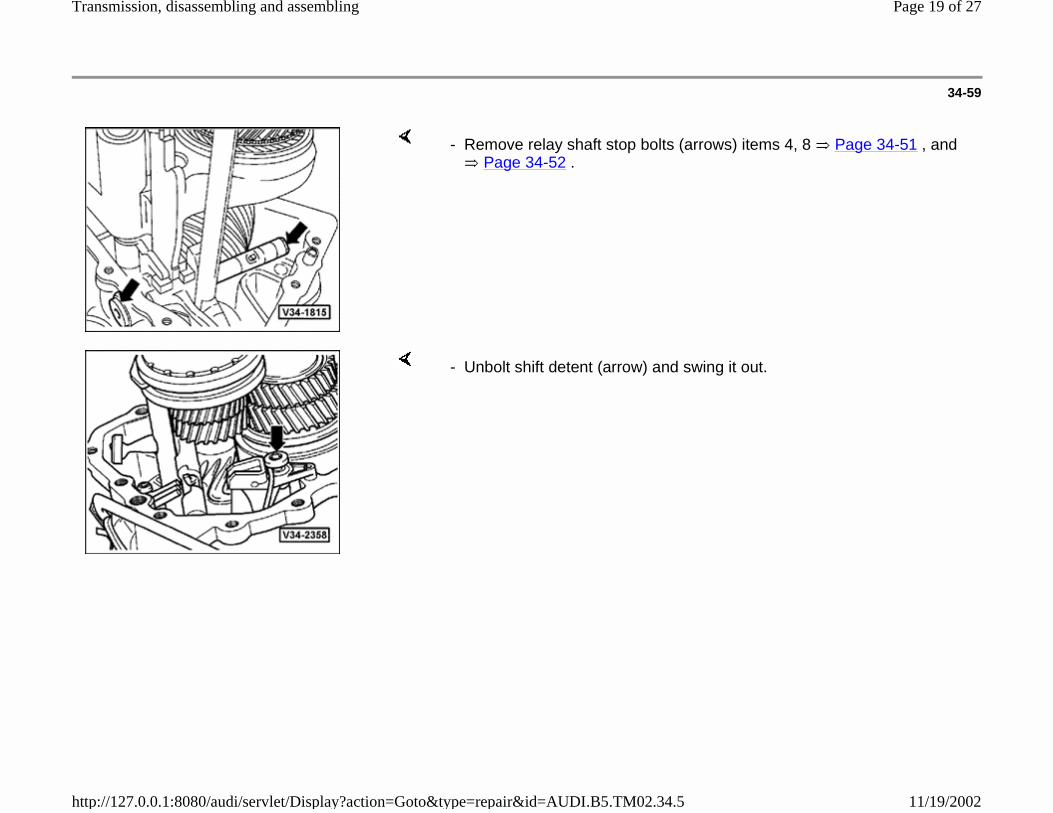
- Remove relay shaft stop bolts (arrows) items 4, 8 Page 34-51 , and Page 34-52 .
- Unbolt shift detent (arrow) and swing it out.
Page 19 of 27Transmission, disassembling and assembling
11/19/2002http://127.0.0.1:8080/audi/servlet/Display?action=Goto&type=repair&id=AUDI.B5.TM02.34.5

34-60
- Input shaft -A-, drive pinion -B-, relay shaft -C-, selector rods -D- with shift rod and selector forks -E- must all be carefully pulled out together.
Page 20 of 27Transmission, disassembling and assembling
11/19/2002http://127.0.0.1:8080/audi/servlet/Display?action=Goto&type=repair&id=AUDI.B5.TM02.34.5

34-61
Installing
Note:
If the input shaft ball bearing, the input shaft or the transmission housing are replaced, it is necessary to re-determine the thickness of the circlips for the input shaft first, input shaft, adjusting Page 35-17 .
- For easier installation of following components, swing transmission housing into position shown.
Note:
The relay shaft -C- and the shift rod can also be installed later if necessary Page 34-62 , Illustration V34-1816 and Page 34-63 , illustration V34-2120
- Assemble input shaft -A-, drive pinion -B-, relay shaft -C-, selector rods -D- with shift rod and selector forks -E-.
- Install these components into transmission housing as a set.
Page 21 of 27Transmission, disassembling and assembling
11/19/2002http://127.0.0.1:8080/audi/servlet/Display?action=Goto&type=repair&id=AUDI.B5.TM02.34.5
34-62
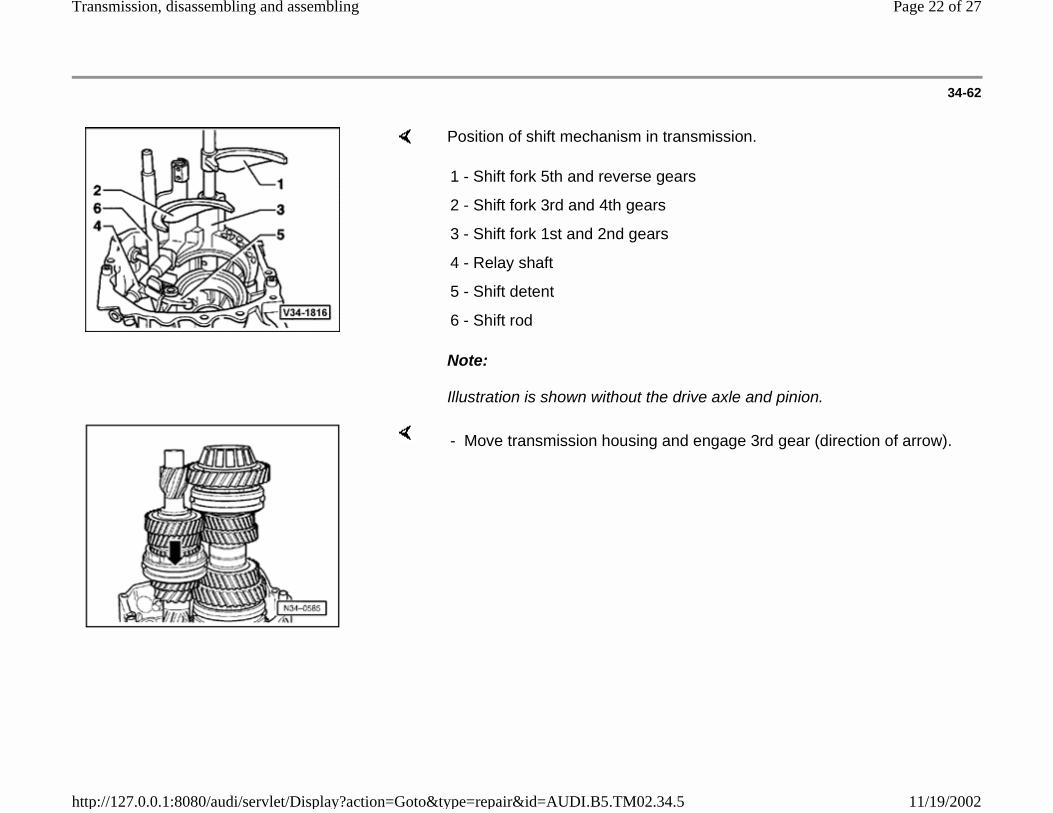
Position of shift mechanism in transmission.
Note:
Illustration is shown without the drive axle and pinion.
1 - Shift fork 5th and reverse gears
2 - Shift fork 3rd and 4th gears
3 - Shift fork 1st and 2nd gears
4 - Relay shaft
5 - Shift detent
6 - Shift rod
- Move transmission housing and engage 3rd gear (direction of arrow).
Page 22 of 27Transmission, disassembling and assembling
11/19/2002http://127.0.0.1:8080/audi/servlet/Display?action=Goto&type=repair&id=AUDI.B5.TM02.34.5
34-63
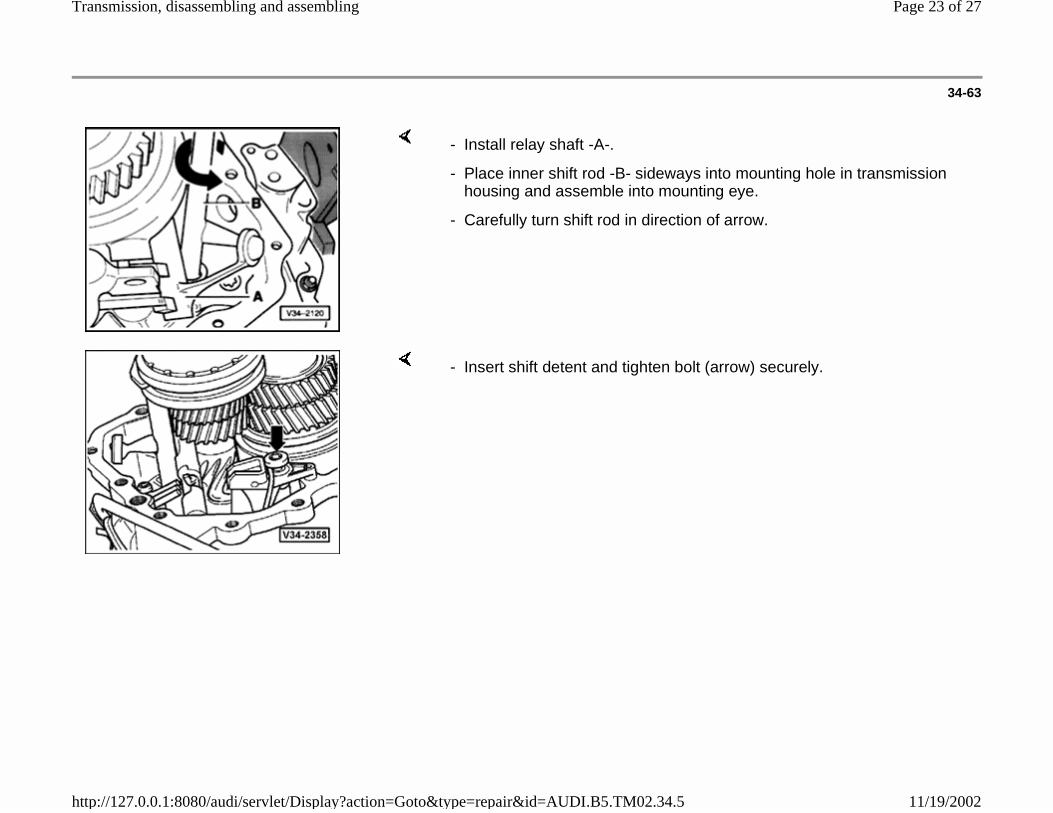
- Install relay shaft -A-.
- Place inner shift rod -B- sideways into mounting hole in transmission housing and assemble into mounting eye.
- Carefully turn shift rod in direction of arrow.
- Insert shift detent and tighten bolt (arrow) securely.
Page 23 of 27Transmission, disassembling and assembling
11/19/2002http://127.0.0.1:8080/audi/servlet/Display?action=Goto&type=repair&id=AUDI.B5.TM02.34.5

34-64
- Install relay shaft stop bolts (arrows).
- Replace O-ring for multi-function switch.
- Carefully insert multi-function switch and tighten (arrows).
Page 24 of 27Transmission, disassembling and assembling
11/19/2002http://127.0.0.1:8080/audi/servlet/Display?action=Goto&type=repair&id=AUDI.B5.TM02.34.5
34-65
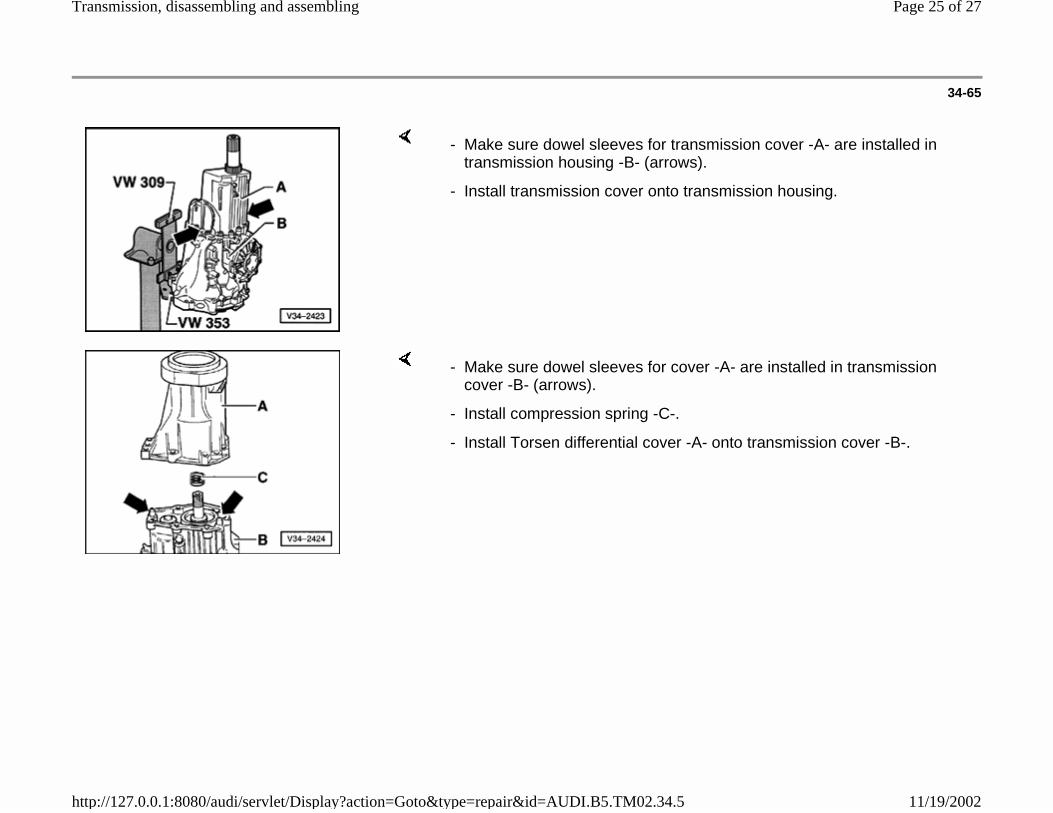
- Make sure dowel sleeves for transmission cover -A- are installed in transmission housing -B- (arrows).
- Install transmission cover onto transmission housing.
- Make sure dowel sleeves for cover -A- are installed in transmission cover -B- (arrows).
- Install compression spring -C-.
- Install Torsen differential cover -A- onto transmission cover -B-.
Page 25 of 27Transmission, disassembling and assembling
11/19/2002http://127.0.0.1:8080/audi/servlet/Display?action=Goto&type=repair&id=AUDI.B5.TM02.34.5

34-66
- Install rear circlip (arrow) for ball bearing onto input shaft.
- Slide ball bearing onto input shaft.
Closed side of ball cage faces toward transmission housing.
- Press in ball bearing.
- Slide thrust piece -A- of press device onto input shaft.
- Position press device behind splines for clutch plate.
- Screw in bolts -B- and tighten slightly.
The bolts bear against the indentations in thrust piece -A-.
- Press in ball bearing onto seat by alternately tightening bolts -B- (1/2-turn at a time) until stop is reached.
Page 26 of 27Transmission, disassembling and assembling
11/19/2002http://127.0.0.1:8080/audi/servlet/Display?action=Goto&type=repair&id=AUDI.B5.TM02.34.5

34-67
Notes:
- Install front circlip -D- for input shaft ball bearing.
- Install dished washer -C-.
Position: convex side faces guide sleeve -B-.
Before installing guide sleeve, cover splines on input shaft with a shrink-fit hose to protect the seal.
Installing seal in guide sleeve Page 30-20 .
- Install guide sleeve -B- for clutch release bearing.
- Install clutch release lever -A- and clutch release bearing.
Page 27 of 27Transmission, disassembling and assembling
11/19/2002http://127.0.0.1:8080/audi/servlet/Display?action=Goto&type=repair&id=AUDI.B5.TM02.34.5