TRANSITION - TC Electroniccdn-downloads.tcelectronic.com/media/...transition-manual-english.pdf ·...
16
TRANSITION USER MANUAL
Transcript of TRANSITION - TC Electroniccdn-downloads.tcelectronic.com/media/...transition-manual-english.pdf ·...

TRANSITION
USER MANUAL

2
Important Safety Instructions1 Read these instructions.2 Keep these instructions.3 Heed all warnings.4 Follow all instructions.5 Do not use this apparatus near water.6 Clean only with dry cloth.7 Do not block any ventilation openings. Install in accor-
dance with the manufacturer’s instructions.8 Do not install near heat sources such as radiators, heat
registers, stoves, or other apparatus (including ampli-fiers) that produce heat.
9 Only use attachments/accessories specified by the manufacturer.
10 Refer all servicing to qualified service personnel. Servicing is required when the apparatus has been damaged in any way, such as power-supply cord or plug is damaged, liquid has been spilled or objects have fallen into the apparatus, the apparatus has been exposed to rain or moisture, does not operate normally, or has been dropped.
Warning!
• Toreducetheriskoffireorelectricalshock,donotexpose this equipment to dripping or splashing and ensure that no objects filled with liquids, such as vases, are placed on the equipment.
• Donotinstallinaconfinedspace.
Service• Allservicemustbeperformedbyqualifiedpersonnel.
Caution:You are cautioned that any change or modifications not expressly approved in this manual could void your authority to operate this equipment.
When replacing the battery follow the instructions on battery handling in this manual carefully.
EMC/EMI
Thisequipmenthasbeentestedandfoundtocomplywiththe limits for a Class B Digital device, pursuant to part 15 of the FCC rules.

3
Theselimitsaredesignedtoprovidereasonableprotectionagainst harmful interference in residential installations. Thisequipmentgenerates,usesandcanradiateradiofrequency energy and – if not installed and used in accordance with the instructions – may cause harmful interference to radio communications. However, there is no guarantee that interference will not occur in a particular installation. If this equipment does cause harmful interference to radio or television reception – which can be determined by turning the equipment off and on –, the user is encouraged to try correcting the interference by one or more of the following measures:• Reorientorrelocatethereceivingantenna.• Increasetheseparationbetweentheequipmentand
the receiver.• Connecttheequipmenttoanoutletonacircuit
different from the one to which the receiver is connected.
• Consultthedealeroranexperiencedradio/TVtechnician for help.
For the customers in Canada:ThisClassBdigitalapparatuscomplieswithCanadianICES-003. Cet appareil numérique de la classe B est conforme à la norme NMB-003 du Canada.

4www.tcelectronic.com - www.youtube.com/tcelectronic
(EN) IntroductionCongratulations! You have just bought a delay pedal that is a stepping stone to a world of inspiration, innovation, and tone.
WeareproudtopresentTransition,providingTCElectronic’slegendarydelaysounds,intuitivecontrolsand instant satisfaction. Our delays are widely heralded as the best for a reason, but that’s not all. We love tone as much as any guitarist out there, so we are very excited to present a brand new, groundbreaking concept: TonePrint!
TonePrintgivesinstantaccesstocustom-tweakedsounds.Wehavegatheredanimpressivelistof guitar heroes and had them tailor their signature sounds – the tones that made them famous. TonePrintswillnotjustbringyouclosetothesoundsofyouridols,theygiveyoutheiractualsounds!
UsingTonePrintsisbotheasyandfun.JustdownloadtheTonePrintyouwantfromwww.tcelectronic.comand,voila,yourfavoriteartisthasjustputaTonePrintinyourpedal.Forgetemulation–let’stalkcollaboration!
5
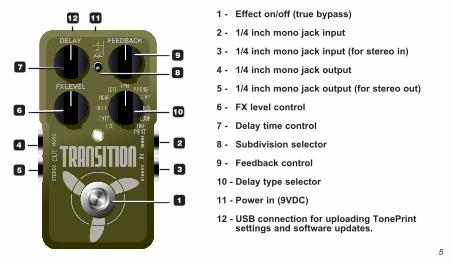
1 - Effect on/off (true bypass)
2 - 1/4 inch mono jack input
3 - 1/4 inch mono jack input (for stereo in)
4 - 1/4 inch mono jack output
5 - 1/4 inch mono jack output (for stereo out)
6 - FX level control
7 - Delay time control
8 - Subdivision selector
9 - Feedback control
10 - Delay type selector
11 - Power in (9VDC)
12 - USB connection for uploading TonePrint settings and software updates.

6
ConnectingInput jacks - Use MONO for mono input and both MONO andSTEREOinputsifconnectingastereosource.If the pedal runs on battery, we recommend removing the mono input jack to preserve battery power when you don’t play.
Output jacks - Connect to another pedal or directly into an amp or mixer. Use MONO for mono setups and both MONOandSTEREOforstereosetups.Note that it is possible to select between true bypass and buffered bypass mode via a dip switch located under the battery cover.
Power in-Usea9VDCpowersupplywiththefollowingsymbol:
USBConnect to a computer using the supplied USB cable for upload of TonePrint settings.Theconnector-typeisMini-B.

7
The controlsFX LEVELControls the level of the delay repeats. Notice that the direct signal is always passed at the original level (unity gain). Only the level of delay repeats are changed when turning the FX level knob.
DELAYThedelayknobcontrolsthedelaytime.Apartfrom“Slapback”,alldelaytypeshaveadelayrangeof20ms to 7000 ms (that’s 7 seconds). Slapback has a range from 20 ms to 300 ms.
FEEDBACKFeedback determines how many repetitions you will hear by controlling the amount of the delay that is fed back to the input.
Delay Type selectorTheDelayTypeselectorallowsyoutoselectbetween9delaytypes,looper,andTonePrint.
Delay Audio Tap function & Subdivision ThedelaytimecanofcoursebesetusingtheDELAYknobasdescribedabove.However,fortimingthe delay repeats to the tempo of the song you are playing, you can also tap in a the tempo via audio. Once you have tapped the songs tempo, the subdivision selector switch allows you to chose between letting Flashback play 1/4, 1/8. or 1/4+1/8., according to the tapped tempo.

8
Tosetthetempo:• HolddowntheON/OFFswitch.Withtheswitchhelddown,playsteadyshort1/4notesonyour
instrument. PleasenotethefollowingregardingAudioTap: –Theoutputisalwaysmutedwhileyoustrumforaudio-tap – In Buffered Bypass mode, your delay repeats ring out when the pedal is bypassed (spill-over)• Playsteadyshort1/4notesonyourinstrument.• Releasetheswitchagain.That’sit-youhavenowenteredtheglobaltempo,andthedelayrepeatswillplayaccordingtotheselectedsubdivision.Theoptionsare:1/4,1/8.and1/4+1/8.
EVOCustomSettingforTransition-youwon’tfindthisanywhereelse.EVOisatributetothelegendaryTCElectronic2290-thedigitaldelaythatchangedthegame.
FATYAnothercustomsettingmadeincollaborationwithBarryMitchellfromGuitarCenter.TheinspirationforFATYcomesfromtheoldanalogdelaymachinesthatgaveagrittierfeeloftherepeats. Brilliant setting for many uses - try it with the Delay and Feedback dials set fairly low for an authentic slapback setting with a twist.

9
DUCTCustom tweaked tape delay type setting.AslightlydifferenttakeontheregulartapesettingadjustedtothepreferenceofBarryMitchellofGuitarCenterandToreMogensenofTCElectronic.
MORFThefourthandfinalexclusivesettingtohideunderthehoodofTransitionisMORF-a2290-typesetting with modulation; great for slow chord progressions, arpeggiated soloing and much much more.
LOFIDeliberatelysquashingthesoundofthedelayrepeats,theLOFIdelayeffectallowsyoutomakeastatement delay type setting.
DYN - DynamicThisisareplicaofthelegendaryDynamicDelayinitiallyintroducedintherenownedTC2290.TheDelay’s output level is actively altered by the dynamics of the input level. While playing, the delay levelisattenuatedandinbetweenphrasesthedelaylevelisincreased.Thisallowsyoutoplaywitharelative large amount of delay without muddying fast riffs.

10
P.P - PingPongThePingPongdelaybasicallypansthedelayrepeatsfromlefttorightandbackwhilekeepingtheinputsignalatitsoriginalposition.Thisgivesaverywidespreadspecialeffect.
SLAPSlapbackdelayisaveryshortdelaywithonlyasingleorafewrepeats.Theeffectiscommonlyusedasa“doubling-effect”makingtheprocessedmaterialseemmoremassive.Shortslapbackdelaysarealso often used on funky rhythm guitars, - a bit longer on Rockabilly guitar or vocals.
RVS - ReverseTheReversedelayisagreateffectwhenamoremysterious,exoticdelaystyleisrequired.Theinputsignal is sampled and played in reverse.
LOOPWith Flashback’s loop function you can record and playback grooves and lines for playing along. You can even overdub your recording an unlimited number of times.Thedurationofaloopcanbeupto40secondsinmonoand20secondsinstereoregardlessofhowmany overdubs you make.

11
How does looping work?
1 SelectLOOP.2 Makesurethepedalisinbypassmode(LEDoff).Feelthegrooveandprepareforrecording.Then
presstheswitchtostartyourrecordingandplay.TheLEDflashesred.3 Presstheswitchagaintostoprecording.Flashbackimmediatelystartsplayingtheloop.Inthis
playmodetheLEDisgreen.4 Tooverdubyourrecordingpresstheswitchoncemore.TheLEDnowblinks.5 Todeleteallrecordings,double-clicktheswitch.
Pleasenotethefollowing
- Thefirstroundofrecordingalwayssetsthelengthoftheloop(1).Ifanoverdubexceedsthelengthoftheloop(2),athirdroundofrecordingbegins(3).Thisgivesaverynatural,logicandmusicalfeel when recording loops.
-TheDELAYandFEEDBACKknobsareinactiveinLoopmode.

12
TonePrintThinkoftheknobsandswitchesonyourpedalasafewhandlesthatactuallycontrolalargenumberof parameters. Dedicated staff has defined the controls, - but wouldn’t it just be cool to let the world’s leading guitar players contribute their own definition of how the controls should work?YES-thisisTonePrint.Weallowtopguitarplayerstodigoutthepedal’shiddentonalpotential,re-definethecontrolsandmaketheirownTonePrints.TheseTonePrintsareavailableforyouonline,anduploadingTonePrintstoyourpedaliseasy.
• ConnectthepedaltoyourMacorPCcomputerusingthesuppliedUSBcable.• Findyourpedalatwww.tcelectronic.com/pedalsanddownloadtheTonePrintsettingfromyour
favorite guitar player to a location where you can easily locate it again – e.g. your desktop.• OpentheapplicationandpressUPDATE.
Now,–onceyouhaveselectedTonePrint,allcontrolsreactexactlyasdefinedbytheartistthathasprovidedtheTonePrint.
TonePrint BeamingUsingonlyyourAndroidoriOSdevice,youcanbeamTonePrintsintoyourpedalviathepickupofyourinstrument. Download the App here: GooglePlay | AppleAppStore

13
Bypass modes and Kill-Dry on/offUnscrew the back-plate and look for the two small dip-switches in the upper left corner. Theupperdip-switch(closesttotheDC9Vinconnection),switchesbetweenTrueBypassmode(default) and Buffered Bypass mode.
True Bypass Buffered Bypass Kill-Dry - off Kill-Dry - on
True Bypass – is a hard-wire bypass that gives absolutely no coloration of tone when the pedal isbypassed.UsingTrueBypassonallpedalsisaperfectchoiceinsetupswithafewpedalsandrelatively short cables before and after the pedals.

14
Buffered Bypass – If you use a long cable between your guitar and the first pedal or if you use many pedals on your board or if you use a long cable from your board to the amp, then the best solution will most likely be to activate the buffer in the first and last pedal in the signal chain. CanyouhearthedifferencebetweenapedalinTrueBypassorBufferedBypassmode?Maybe,maybenot,–manyfactorsapply.Active/passivepick-ups,singlecoil/humbucker,cablequality,ampimpedance and more. We cannot give a single ultimate answer. Use your ears and find the best solution for yoursetup!
Kill-Dry on/off – With Buffered Bypass activated (upper switch to the right), the lower dip-switch sets Kill-Dry on/off. Kill-Dry removes all direct signal from the pedals output and is the mode to use when thepedalisplacedinaparalleleffectsloop.Kill-DryisNOTanoptioninTrueBypassmode.
Changing battery – Unscrew the thumb-screw on the back of the pedal and detach the back-plate. Unmount the old battery and attach the new battery to the battery clip making sure the polarity is correct.Thenremounttheback-plate.Tosavebatterylife,removetheinputjackwhenyoudon’tplay.
Batteries must never be heated, taken apart or thrown into fire or water. Only rechargeable batteries can be recharged. Remove the battery when the pedal is not being used for a longer period of time. Dispose batteries according to local laws and regulations.

15
9 delay effects with up to 7000 ms delay time40secondsLooper(20secondsinstereo)–createepicsoundscapesinsecondsUnique,newTonePrintsettingforstuffingTransitionDelaywithyourfavoriteartist’stones
72 mm x 122 mm x 50 mm - 300 g (excl. battery)
DualSupplyRailstechnologyensuresheadroomforlineleveleffectloopsfromasingle9Vbattery.BatteryfailurecircuitautomaticallyputsTransitionDelayintotruebypassmodeifthebattery runs out
Custom ‘hammerhead’ rugged, die-cast aluminum casing built for a life on the roadUnique one-screw battery access for lightning fast battery changes
Stereo inputs with automatic mono/stereo sensing – feed it any signalStereo outputs for that ultra-wide delay soundMiniUSBconnectorforuploadingcustomTonePrintsandsoftwareupdates
Delay,Feedback,FXLevelandDelayModeknobswithhigh-quality,metal-shaftpotentiometersHeavy duty tactile footswitch with true bypass for zero tone coloration
USBcableforuploadingTonePrints
Thes
e sp
ecifi
catio
ns a
re s
ubje
ct to
cha
nge
with
out n
otic
eSounds
Size & Weight
Battery
Design
Connectors &Inputs/Outputs
Knobs etc
In the box
(EN) Technical Specifications

TC Electronic, Sindalsvej 34, DK-8240 Risskov