Training Manual for Tour Guiding in Kayaking and...
44
SAM / MBRS PROJECT FOR THE CONSERVATION AND SUSTAINABLE USE OF THE MESOAMERICAN BARRIER REEF SYSTEM (MBRS) Belize – Guatemala – Honduras - Mexico Training Manual for Tour Guiding in Kayaking and Snorkeling December 2005 Project Coordinating Unit Coastal Resources Multi-Complex Building Princess Margaret Drive PO Box 93 Belize City, Belize Tel: (501) 223-3895; 223-4561 Fax: (501) 223-4513 E-mail: [email protected] Web page: http://www.mbrs.org.bz
Transcript of Training Manual for Tour Guiding in Kayaking and...

SAM / MBRS
PROJECT FOR THE CONSERVATION AND SUSTAINABLE USE
OF THE MESOAMERICAN BARRIER REEF SYSTEM (MBRS)
Belize – Guatemala – Honduras - Mexico
Training Manual for Tour Guiding in Kayaking and Snorkeling
December 2005 Project Coordinating Unit Coastal Resources Multi-Complex Building
Princess Margaret Drive PO Box 93
Belize City, Belize Tel: (501) 223-3895; 223-4561
Fax: (501) 223-4513 E-mail: [email protected]
Web page: http://www.mbrs.org.bz

Technical Document No. 23 Training Manual for Tour Guiding in Kayaking and Snorkeling
PROLOGUE The constant degradation of marine and coastal ecosystems creates the urgent need to establish reserves and marine protected areas which allow the conservation of biodiversity as well as improve the living conditions of the human communities which depend directly on them. Conservation actions related to the establishment of Marine Protected Areas (MPS’s), habitat protection and fishing site closures in the MBRS region have led to socio-economic displacements within human communities that are dependent on exploitation of the resources targeted for conservation. Such circumstances create additional economic constraints on these communities by diminishing the capital resources they have available for investing in sustainable alternative forms of livelihood. It is precisely for this reason that the MBRS Project promotes both the conservation of marine and coastal resources and supports sustainable development in those coastal communities, whose main source of income is the harvesting of marine resources. In the search for a balance between conservation and economic sustainability, the MBRS sub-program for Sustainable Fisheries Management has identified a series of alternatives for economic income to help cushion the vulnerable context in which these coastal communities live. In particular, these alternatives include guide-tourism related activities such as terrestrial wildlife appreciation, snorkeling, SCUBA diving, sport-fishing and canoeing/kayaking. For this reason, the Mesoamerican Barrier Reef System Project organized and coordinated regional training courses to improve the capacity of marine coastal communities and fisheries associations in the MBRS region to access these alternatives forms of livelihood through training in tour-guiding, business management, and product design, marketing, promotion and diversification. During this training, support material was provided based on existing experiences. This material was enriched by the input from delegates of the two countries (Mexico and Belize) in the MBRS region, which ultimately resulted in the creation of the current document in the form of a manual. The process involved the participation of local experts who prepared the initial training material, conducted the training, collected the input from the participants and developed the final version of this manual, incorporating the comments of the Project Coordination Unit (PCU.) The training included case studies, formal presentations, field trips, hand-on experience, participant presentations, assigned reading and dynamic discussions. With this manual, the MBRS Project reaffirms its commitment to generate support material for the conservation and sustainable use of marine and coastal resources, with the participation of the different sectors of civil society, community-base organizations and non-governmental organizations, promoting sustainable alternative forms of livelihood. It is our intention that this tool be used in similar training courses and serve as a guide in the training of marine tour guides in the various countries of the Mesoamerican region. In so doing, it will strengthen the efforts to conserve biological diversity as well as foster community development by increasing the economic benefits to coastal communities in the MBRS region.
i

Technical Document No. 23 Training Manual for Tour Guiding in Kayaking and Snorkeling
TABLE OF CONTENTS PROLOGUE i UNIT 1: INTRODUCTION 1 UNIT 2: TOUR GUIDING RESPONSIBILITIES AND ETHICS 3 UNIT 3: KAYAKING EQUIPMENT 4 3.1 Kayaks 4 3.1.1 Recreational kayaks 4 3.1.2 Touring/Sea kayaks 4 3.1.3 Whitewater kayaks 5 3.2 Paddles 5 3.3 Spray skirts 5 3.4 Life Vest / PFD (Personal Flotation Device) / BA (Buoyancy Aid) 6 3.5 Helmet 6 3.6 Accessories and other components 6 3.8 Equipment care and storage 8 UNIT 4: SKILL AND FIELD EXPERIENCE 9 4.1 Parts of the kayak 10 4.2 Outfitting 11 4.3 Paddle stroke and bracing 12 4.4 Throw ropes, towing and capsized kayaks 14 4.5 Navigation 14 UNIT 5: SAFETY AND FIRST AID 15
5.1 Safety considerations 15 5.2 Medical considerations 16 5.3 First Aid recommendations 16
UNIT 6: DESIGNING TOURS 17
6.1 Location 17 6.2 Current, tides and weather 17 6.3 Participant ability and fitness 17 6.4 Length 17
UNIT 7: SNORKELING EQUIPMENT 18
7.1 Mask 18 7.2 Snorkel 20 7.3 Fins 22
UNIT 8: SNORKELING SKILLS AND TIPS 24 UNIT 9: MARINE SPECIES IDENTIFICATION 26
9.1 Reef fish 26 9.2 Corals 32 9.3 Reef creatures and invertebrates 34
ii

Technical Document No. 23 Training Manual for Tour Guiding in Kayaking and Snorkeling
UNIT 10: REEF ETIQUETTES 38 UNIT 11: IMPACTS ON THE REEF 39
iii

Technical Document No. 23 Training Manual for Tour Guiding in Kayaking and Snorkeling
UNIT 1. INTRODUCTION
COURSE GOALS AND GENERAL OBJECTIVES The Mesoamerican Reef Barrier System (MBRS), which extends from Isla Contoy on the north of the Yucatán Peninsula to the Bay islands of Honduras, is recognized, in the Western Hemisphere for its uniqueness due to its length, diversity of reef types and associated species. The MBRS is also an invaluable resource for its socioeconomic important to the adjacent local communities. Within the MBRS, over 60 areas have been declared Marine Protected Areas (MPA) with different management regimes. Many of the conservation actions related to the establishment of Marine Protected Areas, habitat protection and the closure of fishing sites, generally lead to socio-economic displacements that affect the human communities that depend on the very resources they want to conserve. It is precisely for this reason that the MBRS Project promotes both the conservation of marine and coastal resources and supports sustainable development in those coastal communities, whose main source of income is the harvesting of marine resources. In attempting to balance both actions, a series of alternatives sources of income have been identified to mitigate the vulnerable situation in which coastal communities live. Such vulnerability is having an impact on the available capital, the ability to further generate or utilize such capital and consequently, on the options for feasible livelihoods. The present course is framed within the goal of the Mesoamerican Barrier Reef System Project to enhance the protection of the unique and vulnerable marine ecosystems comprising the MBRS.
The general objective is to promote measures which will serve to reduce non-sustainable patterns of economic exploitation of the MBRS, focusing initially on the fisheries and tourism sectors; . THE SPECIFIC OBJECTIVES WILL BE THE FOLLOWING: 1. To outline, analyze, contrast and compare different successful methodologies used in training that relate to sustainable livelihoods throughout the region in order to extract learning experiences for application and identify successful training programs. 2. To design and prepare training package for the tourism-related courses including: Nature guiding, snorkeling, recreational diving, sportfishing, canoeing, business management, marketing and promotion. 3. To train a minimum of twenty representatives of the four countries in the MBRS region taking into account the need for such representatives to begin these activities as alternative sources of income. 4. To take responsibility for receiving the equipment, its care, its maintenance, collecting the symbolic rent and administering the funds generated by such rent.
1

Technical Document No. 23 Training Manual for Tour Guiding in Kayaking and Snorkeling
COURSE STRUCTURE, METHODS AND LANGUAGE The course was delivered in a workshop format with interaction opportunities for the participants. Most of the information presented by the facilitator was enriched with the participant’s experiences. Since the course emphasized practical specialized training, and special attention was paid to the need of training methods for adult education and communication skills for fishers, the methods used demonstrated suggested strategies such as role playing, hand-on experience, small group discussions and the participants were required to use them in their exercises. Over all, the participants were exposed to: 1) slide presentations, 2) group discussions, 3) small group exercises, 4) lectures and 5) participants’ presentations. Given the social nature of the MBRS region, the course was conducted in English and Spanish.
2

Technical Document No. 23 Training Manual for Tour Guiding in Kayaking and Snorkeling
UNIT 2: TOUR GUIDING RESPONSIBILITIES AND ETHICS As a guide, you are responsible for many things. It’s no easy task- there are many things you will need to deal with all at once. Some of your most important responsibilities are to:
• Insure the safety of your guests at all times • Provide a professional level of service and be courteous and friendly • Provide quality and accurate information • Provide an opportunity to learn about the cultures, history, and environment of Belize in an
informative, educational, and meaningful way • Serve as a role model on how to conserve the natural resources and behave in the cultures
of Belize • Deliver all activities in a timely and professional manner • Work cooperatively with other parts of the tourism industry
As a tour guide, it is your job to be professional and provide a quality service to your guests. Part of doing this is maintaining a high ethical standard. One of the best ways to do this is to always be honest with your guests. It’s better to tell them you don’t know the answer to a question then to make one up and have them find out you lied. It’s also important to tell guests accurate information about what the trip will be like, how long it will take, and what kind of conditions they will find along the way. Some tourism related businesses give commissions to tour guides that bring their guests to their gift shops, restaurants, or other facilities. It is unethical to force going to these places on your guests. They should only go where they want to go and to scheduled places on the trip. It is also unethical to tell guests it is your birthday, ask them to help you with family expenses, or put up signs saying tips are expected in order to get tips. Guests do not have to tip you and you should not expect to be tipped. You also should not “steal” guests from other tour guides, tour operators, or tour suppliers. If you offer deals on the side or for a better rate, you cause problems of trust throughout the tourism industry. It’s very important that you do not drink, use drugs, or get romantically involved with your guests. Your guests will look to you to know how to behave during the tour. If they see you picking up wildlife and touching coral even though you are not supposed to, they will do it too. This will destroy our natural resources- the very ones we depend on for our income as tour guides. So, you should be a model of conservation. To do this successfully, you must first gain your guests interest and attention in the environment of Belize. You should reinforce conservation messages through briefing that describe what behaviors are expected of the guests before they begin an activity. Being a model of conservation also means correcting a guest if they are doing something that is damaging in a professional manner. You can also “reduce reuse and recycle” in your daily activities through using washable plates and use local food suppliers and local businesses to fill your needs. You should convey a message of ecotourism to your guests by having guidelines that prevent negative environmental and cultural impacts and that support the local economy directly.
3

Technical Document No. 23 Training Manual for Tour Guiding in Kayaking and Snorkeling
UNIT 3: KAYAKING EQUIPMENT KAYAKS AND MAIN COMPONENTS Kayaks Kayaks can be found in a wide variety of shapes and sizes to fit the needs of the specific activities you are looking to engage in. It is important to know about the different types of kayaks so you can choose the ones that are appropriate. The three main categories of kayaks are:
1. Recreational kayaks: This is the most commonly used kayak of all three types. They are usually around 12-18 ft. long and made of a light weight plastic for calm waters (lagoons, canals, estuaries, rivers without rapids, back reef). Some types have an open deck that you can sit on top off, while others have a closed deck that you sit inside of and have the option of using a spray skirt. Both types can be found in one person and two person models (Two person kayaks are referred to as double kayaks). In addition, some have forward and rear (bow and stern) compartments with hatches for storing gear. Some models include a rudder. Recreational kayaks are great for day trips, as well as multi-day adventures.
2. Touring/Sea kayaks: Generally made of fiberglass or a stronger plastic, they almost always have a closed deck, a larger storage capacity, and can handle the rougher waters of the ocean. They are at least 15 ft. long and are usually equipped with rudders. However, they are not as easy to maneuver as recreational kayaks. Sea kayaks are best utilized for multi-day trips in open waters along the coast by people with more experience.
3. Whitewater kayaks: These kayaks are made with a very strong plastic for navigating rapids on rivers. They are the smallest, shortest, and most maneuverable kayaks available. It takes years of learning and practice to be able to guide and teach others how
4

Technical Document No. 23 Training Manual for Tour Guiding in Kayaking and Snorkeling
to safely use these kayaks in rapids. We recommend that you contact a professional tour guide company specializing in whitewater kayaking if you wish to learn more.
Paddles Like kayaks, a variety of paddles are available to suit the specific needs of the type of kayaking you are doing. Paddles come in different lengths (typically 220 mm, 230 mm, and 240 mm), different blade sizes, and different ‘blade feathers’ that are measured in degrees (typically 45 degrees, 60 degrees, or no feather). When purchasing paddles as a tour guide operator, it is important to let the dealer know what kind of kayaking you will be doing.
Spray skirts Spray skirts are used specifically with closed deck kayaks. They help to keep water out of the kayak, especially in conditions that may result in a high amount of water entering the kayak (swell, waves, etc.). It is worn around your waist and attached to the kayak once you are seated. For anyone wearing a spray skirt, it is imperative they how to “wet exit” in the case of a capsizing and must practice it a couple times in calm, waist deep water with an instructor present.
Life Vest / PFD (Personal Flotation Device) / BA (Buoyancy Aid) This is a mandatory piece of gear and no participant should ever be without one on the water. There are numerous different styles and types of life vests that can be purchased. For general use in calm waters, only the most basic vest is needed. The most important thing to remember is to supply the correct size to the participants. A life vest should be snug enough so that it does not
5

Technical Document No. 23 Training Manual for Tour Guiding in Kayaking and Snorkeling
come off the shoulders by more than an inch. At the same time, the vest should not be too tight so as to be a discomfort to the participant.
Helmet Helmets are mandatory for whitewater kayaking. If kayaking in shallow areas such as reefs and shallow rocky areas where participants have the potential of flipping over and hitting their head, a kayaking helmet should be worn. Otherwise, for most trips in lagoons, the back reef, canals, and estuaries, a helmet may not be necessary.
ACCESSORIES AND OTHER COMPONENTS Bailer Each kayak should have one bailer and double kayaks should have two. Any simple plastic container cut in half will work well. Dry bags Dry bags are the most effective way for keeping your items dry. They come in a variety of sizes. As a guide, it is recommended that you keep your first aid kit in a small dry bag and your repair kit in another. You may also want to use a third dry bag for other personal items such as guide books, cameras, etc. In some cases, guides will provide one dry bag per kayak for the participants to keep their personal items dry.
6

Technical Document No. 23 Training Manual for Tour Guiding in Kayaking and Snorkeling
Throw Rope At least one throw rope per guiding team is necessary. Throw ropes are used in rescue situations and for towing another kayak. They come in a variety of sizes, but your rope should be around 9mm- 12mm in diameter x 35-45 ft long. It should come with a waist belt bag allowing you to wear the rope around your waist for easy access. A carabineer should also be attached to the end so you can quickly clip onto another kayak for towing.
Knife A good, sharp knife should always be carried by each guide and kept in an easily accessible location. Carabineers Extra carabineers are optional, but they are very useful for securing items in your kayak, or attaching to ropes for quick clipping onto other objects.
Two-way Radio or Cell phone In the case of an emergency, it is important to have a battery operated two-way radio or cell phone to contact help. Repair Kit It is important to have a small repair kit so you can make quick repairs in the field. The following list is a recommendation of items that should be included in your repair kit. The items in your repair kit should be kept in a dry bag. 1. Parachute cord (20 ft.): This is an inexpensive, light weight, small diameter, and very strong
multi-use cord that can be used for a number of repairs on kayaks and gear. 2. Duct tape: This is probably the most versatile tape available and is especially useful for
kayaking related repairs because of its waterproof qualities. Instead of carrying a whole roll of tape, it is recommended that you wrap a small diameter item, such as a pencil, with as much tape as you might want.
3. Spare kayak parts: Only a couple replacements are needed for removable parts. Since there are a number of different brands and models of kayaks you can buy, what extra parts you take along is up to your discretion.
4. JB Weld/ or any other quick dry bonding glue (for plastic kayaks only): In some situations, a small break or crack in the body of the kayak can allow a significant amount of water in the kayak. Quick dry bonding glue for plastics can sometimes be a good option for repairs in the field.
5. Leatherman/ or any other small pair of pliers: These are good for a number of repairs and are a very useful item to have on a kayaking trip.
6. Lighter: A lighter too, can be used for a number of repairs and is more efficient than matches. It should always be kept in a small plastic bag inside your repair kit to keep it from getting wet.
7

Technical Document No. 23 Training Manual for Tour Guiding in Kayaking and Snorkeling
CARE & STORAGE Follow these guidelines to ensure maximum life and enjoyment of your touring kayak. Store your kayak out of the sun HTP is blended with UV stabilizers similar to sunscreen for your skin. Nonetheless, HTP is susceptible to UV degradation as a result of prolonged exposure to the sun. Evidence of UV damage includes loss of color, hairline fractures and brittleness in the surface of the kayak. Shaded storage will add years to the useful life of your kayak. Store your kayak with care Although your touring kayak is extremely rugged and durable, it is possible to damage your kayak with improper storage. Your kayak can be stored on end, suspended in slings or placed on a cradle or level surface. If storing your boat on end, place it on the bow so as not to damage the rudder mount on the stern. If hanging your boat from the ceiling do so with slings fore and aft of the cockpit. Suspending the kayak by the grab loops for extended periods can cause the hull to deform, especially if the temperature is high. If placing the boat on a cradle or flat surface ensure that the hull has enough support so that it will not dent. Do not stack other boats or heavy objects on top of your kayak. Inspect your kayak regularly Check all the fittings and hardware on your kayak periodically for wear, damage and tightness. Tighten all loose screws and nuts and bolts, and replace worn and missing parts. Keep your kayak clean Occasionally rinse your kayak, inside and out, with fresh water. This will remove salt, sand and other debris that can slowly abrade the hull, seat and other outfitting. Fresh water rinsing can also help prevent the corrosion that can attack even the best stainless steel and brass hardware. Keep the soft hatch covers clean and free of salt and sand which can cause the neoprene to degrade. We recommend kayak travel bags for long term storage. Avoid unnecessary impacts and abrasions Although your touring kayak is extremely rugged and durable, it is prudent to avoid all unnecessary wear and tear. Do not drag your kayak over harsh, rocky and irregular surfaces. Do not launch off rocks and take care when landing on rocky shores. Ensure that your kayak is securely attached to your vehicle's rack before transporting. Read and follow the rack manufacturer's instructions. Damage caused by repeated harsh use and abuse will shorten the useful life of your kayak and void the warranty. We recommend the use of boat wagons or carts. Repairability Touring kayaks can be easily repaired with HTP sticks. These sticks are available in a variety of colors to match your kayak. Shaped to fit in a hot glue gun, the sticks can be used to fill gouges, bolt holes, small punctures or other minor damage to the hull of your kayak. HTP works excellent in conjunction with ski base repair tools
8

Technical Document No. 23 Training Manual for Tour Guiding in Kayaking and Snorkeling
UNIT 4: SKILL AND FIELD EXPERIENCE The following is a short outline and quick reference of the skills that you will learn in the Field Experience section.
Lanyard
Deck Pack Nets
Safety Deck Lines
Keyhole Cockpit
Storage Compartment
9
Technical Document No. 23 Training Manual for Tour Guiding in Kayaking and Snorkeling
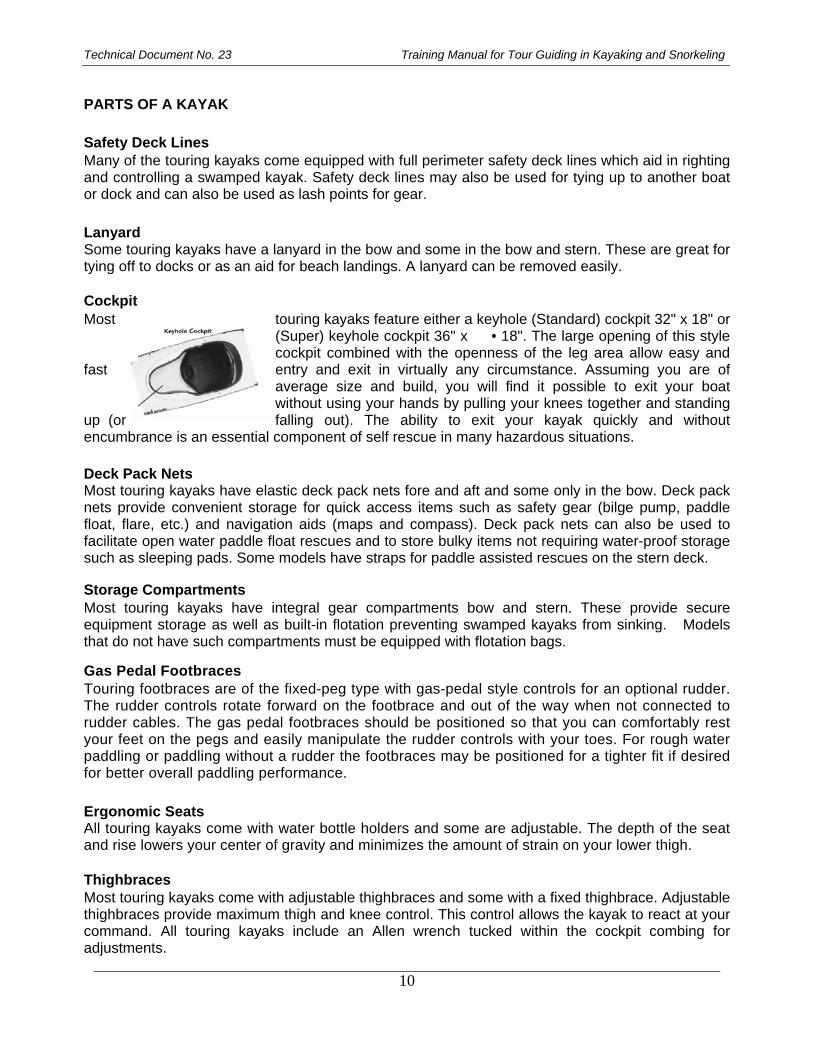
PARTS OF A KAYAK
Safety Deck Lines Many of the touring kayaks come equipped with full perimeter safety deck lines which aid in righting and controlling a swamped kayak. Safety deck lines may also be used for tying up to another boat or dock and can also be used as lash points for gear.
Lanyard Some touring kayaks have a lanyard in the bow and some in the bow and stern. These are great for tying off to docks or as an aid for beach landings. A lanyard can be removed easily.
Cockpit Most touring kayaks feature either a keyhole (Standard) cockpit 32" x 18" or
(Super) keyhole cockpit 36" x • 18". The large opening of this style cockpit combined with the openness of the leg area allow easy and
fast entry and exit in virtually any circumstance. Assuming you are of average size and build, you will find it possible to exit your boat without using your hands by pulling your knees together and standing
up (or falling out). The ability to exit your kayak quickly and without encumbrance is an essential component of self rescue in many hazardous situations. Deck Pack Nets Most touring kayaks have elastic deck pack nets fore and aft and some only in the bow. Deck pack nets provide convenient storage for quick access items such as safety gear (bilge pump, paddle float, flare, etc.) and navigation aids (maps and compass). Deck pack nets can also be used to facilitate open water paddle float rescues and to store bulky items not requiring water-proof storage such as sleeping pads. Some models have straps for paddle assisted rescues on the stern deck.
Storage Compartments Most touring kayaks have integral gear compartments bow and stern. These provide secure equipment storage as well as built-in flotation preventing swamped kayaks from sinking. Models that do not have such compartments must be equipped with flotation bags.
Gas Pedal Footbraces Touring footbraces are of the fixed-peg type with gas-pedal style controls for an optional rudder. The rudder controls rotate forward on the footbrace and out of the way when not connected to rudder cables. The gas pedal footbraces should be positioned so that you can comfortably rest your feet on the pegs and easily manipulate the rudder controls with your toes. For rough water paddling or paddling without a rudder the footbraces may be positioned for a tighter fit if desired for better overall paddling performance.
Ergonomic Seats All touring kayaks come with water bottle holders and some are adjustable. The depth of the seat and rise lowers your center of gravity and minimizes the amount of strain on your lower thigh.
Thighbraces Most touring kayaks come with adjustable thighbraces and some with a fixed thighbrace. Adjustable thighbraces provide maximum thigh and knee control. This control allows the kayak to react at your command. All touring kayaks include an Allen wrench tucked within the cockpit combing for adjustments.
10

Technical Document No. 23 Training Manual for Tour Guiding in Kayaking and Snorkeling
Rudder A rudder performs two functions; first, it assists in turning your kayak and second, a rudder allows you to make a constant steering correction which would otherwise require unequal paddle strokes such as in a quartering sea or gusty cross-wind. When handling or transporting a rudder-equipped kayak, be careful not to damage the rudder and do not lift the kayak by the rudder. With the WildWasser rudder be certain you attach your travel strap around the blade of the rudder to avoid the blade from dangling while transporting your kayak. OUTFITTING Cockpit Outfitting Paddlers find the ergonomically designed seats and cockpits to be very comfortable in stock con-figuration. Some, however, prefer to pad the contact points of their kayak for additional control and comfort. This can easily be accomplished by using the closed-cell foam fit kit included with your kayak. Adjusting the Gas Pedal Footbraces Pull outward (toward the center of the boat) on the spring-loaded retention peg in the center of the footbrace, and slide the footbrace to the desired position while holding the retention peg in the disengaged position. The retention peg may be "locked" in the disengaged position by rotating it slightly while disengaged. The gas pedal footbraces may be removed from the track entirely by pulling them to the end of the track toward the seat. We recommend that you keep the track clean for the best performance.
11

Technical Document No. 23 Training Manual for Tour Guiding in Kayaking and Snorkeling
Track & Pedal Spring-Loaded Retention Peg The pedal slides into the holes on the track. Keep the track clean for best performance. Adjusting the Gas-Pedal
Adjustable Backbrace Most touring kayaks come with an adjustable backbrace. This adjustable backbrace expands your lower back support for added comfort and powerful paddle strokes. You simply pull down on the adjusting cord, adjust the backbrace and cinch off the cord into the clam cleat. Moving Adjustable Seats Simply begin by turning the Allen bolts above the seat counter clockwise approximately two full rotations. Next, move the seat into your preferred position. For the best fit, move and adjust the seat and then test paddle your kayak. The seats only move forward and aft. Finally be sure to tighten the Allen bolts securely. Be certain to periodically clean and lubricate the seat hardware.
Moving the Adjustable Thighbraces Simply begin by turning the Allen bolt above the thighbrace counter clockwise approximately two full rotations. Next, move the thighbrace into your preferred position. For the best fit, move and adjust the thighbrace while seated in the kayak. The thighbraces only move forward and aft. Finally, be sure to tighten the Allen bolt securely. Be certain to periodically clean and lubricate the thighbrace hardware.
PADDLE STROKE AND BRACING Paddle Strokes and Bracing
The Trihedral hull style is designed with three surfaces. The flat bottom section of the hull provides maximum stability and unmatched tracking. Loaded down the primary stability and tracking increase even more. The two beveled sections, or angled sides, maximize your secondary stability and increase your ability to carve a turn. Comfortably carving turns in a touring kayak is unique with the trihedral hull design. Your options to turn a touring kayak are:
12

Technical Document No. 23 Training Manual for Tour Guiding in Kayaking and Snorkeling
13
Technical Document No. 23 Training Manual for Tour Guiding in Kayaking and Snorkeling
PRACTICAL EXERCISE Throw Ropes, Towing, and Capsized Kayaks Throw Ropes Towing Techniques Capsized Kayak:
Wet Exit Kayak Flipping Techniques Reentry Bailing Swimming with Kayak
Navigation Open Water Navigation Currents, Tides, and Wind
14

Technical Document No. 23 Training Manual for Tour Guiding in Kayaking and Snorkeling
UNIT 5: SAFETY AND FIRST AID Safety Considerations Your highest priority as a guide is client safety and well-being. From the beginning of the tour until you return and the clients are walking away, they are your responsibility. Therefore, taking all safety considerations will not only provide a good tour for the clients, but will also keep you from getting a poor reputation or having legal problems. The following is a list of safety considerations for kayaking trips. Participant Ability and Knowledge Appropriate Paddling Conditions:
General Weather Wind Swell
Environmental Aspects: Hazardous Flora and Fauna Rapidly Changing Weather
Location of Kayaking: Lagoons Canals Estuaries Back Reef
Safety Warning Kayak touring offers the rewards of thrill, pleasure and beauty to those who embrace it. It also offers an element of risk. We urge you to paddle responsibly by wearing appropriate gear, knowing your equipment and seeking qualified instruction. Know your limits and only challenge them deliberately and with the necessary safety precautions observed. Please read this owner's manual completely and familiarize yourself with your boat's design. Paddlesports can be very dangerous and physically demanding. The user of this product should understand that participating in paddlesports may involve serious injury. Observe the following safety standards whenever using this product:
• Get paddlesport instruction specific to your type of craft • Obtain certified First Aid training and carry First Aid and safety/rescue equipment • Always wear a nationally approved personal flotation device. • Always wear a helmet where appropriate. • Dress appropriately for weather conditions; cold and/or cold weather can result in
hypothermia. • Check your kayak prior to each use for signs of wear or failure. • Be aware of appropriate river water levels, tidal changes, dangerous currents and weather
changes. • Scout unfamiliar waters; portage where appropriate. • Do not exceed your paddling ability; be honest with yourself. • Consult your physician prior to beginning your paddle sport training. • Do not use alcohol or mind altering drugs prior to using this product. • Never paddle alone. • Do not paddle in flood conditions. • Follow manufacturer’s recommendations for use of this product. • If additional outfitting is added to this craft, use manufacturer approved materials only; do
not impair entry or exit access.
15

Technical Document No. 23 Training Manual for Tour Guiding in Kayaking and Snorkeling
Medical Considerations Any number of medical problems can arise while on a kayaking trip. It is recommended that all guides have minimum training in basic first aid or have a current certificate as a First Responder. The following is a list of possible medical problems that could arise on a tour. This list is an example of what you may come across on a tour; it is by no means a complete list of medical considerations that you may encounter. Dehydration Sunburn Broken/Fractured Foot/Toes (dropping kayak) Sore Shoulders/Arms/Back (improper paddling technique) Pulled Muscle (improper or inappropriate lifting of kayak) Small Cuts/Scraps (handling gear, stepping on something) General health and fitness of participants (pre-existing medical problems: heart problems, diabetes, etc.) First Aid Kit Recommendations For every tour, one of the guides should be equipped with a first aid kit. It should be kept in a dry bag and labeled clearly for easy identification. The following list is a recommendation only and may not contain all of the items you may want in your kit. Assortment of band aids Conforming bandage 2” x 2” Gauze (4-5) 4” x 4” Gauze (2-3) Medical tape (1 roll) Antiseptic towelletes or Iodine Antibiotic ointment Anti-histamine Anti-inflammatory Aspirin Tweezers Eye wash (small bottle) Latex gloves (2 pair)
16

Technical Document No. 23 Training Manual for Tour Guiding in Kayaking and Snorkeling
UNIT 6: DESIGNING TOURS Designing Tours When designing kayak tours, there are a number of things that you must keep in mind. Before taking clients on a tour of an area, it is important for you to have already paddled the planned route. This way you are very familiar with the surroundings from a kayaking stand point (Identifying good places to rest, points of interest, etc.). The following list of factors will help you create fun and safe tours for your clients. Location Where you take clients kayaking is as important for the participants, as it is for you. As a guide, you will need to provide a location that will be of great interest and beauty. Utilize the resources of the back reef, canals, and lagoons to give clients diversity in kayaking locations. However, choosing a location to kayak for the day is also dependent on weather. For example, on a windy day, it may not be appropriate to take clients along the coast, but conditions may be alright to kayak in the canals. In addition, remember that the more remote your kayaking location is, the more difficult logistics become. Currents, Tides, and Weather It is always more difficult kayaking against the current, tide, or wind. Even though this is hard to avoid, planning your tour according to these environmental factors can make the difference between a successful tour and a group of unhappy clients. If possible, it is best to kayak with the currents or wind on your return trip. Since it is nearly impossible to stay dry while kayaking, if it is not too windy, kayaking in the rain can also be a fun experience for interested participants. Participant Ability and Fitness This factor is very important when considering a tour. A good understanding of the client’s overall fitness and experience kayaking will help you recognize their capabilities. As the guide, you must remember that a group is only as strong as your weakest member. Going on a tour designed for the strongest paddlers of the group will likely be a problem for the weaker paddlers. Tour Length All of the above criteria will help you identify how long a kayaking tour should be. In general, a five hour day or 10 miles will be a long day for your clients. Some clients may want to spend the entire day paddling, while others may want to paddle to a specific destination, sit on the beach, have lunch, and then return. Again, location, environmental conditions, and participant ability and fitness will greatly affect appropriate lengths of tours.
17

Technical Document No. 23 Training Manual for Tour Guiding in Kayaking and Snorkeling
UNIT 7: SNORKELING EQUIPMENT
Masks Purpose: It's not earth-shattering news that you need a mask to see underwater. Why you need it is that light behaves differently in water than in air, and your eyes focus according to how light behaves in air. That's why water makes everything blurry. The mask creates an air space so your eyes can focus. Styles: Mask styles range from simple round or oval-shaped models to more modern styles with lower internal volumes and wider fields of vision. Wraparound masks feature two panels along the sides to improve peripheral vision. The vast majority of masks you'll choose from are lower-profile masks, which have a notched face plate and a nose pocket to allow your nose to protrude past the lens. This gets the lens closer to your face, for a wider vision field, plus makes it easy to pinch your nose for equalizing. Many wraparound type masks incorporate low-profile design. Features.: Masks have these features: 1. Tempered-glass lens plate. If broken, tempered glass is less likely to shatter into fine, hazardous slivers. 2. Comfortable skirt with a close fit against your face and a good seal. 3. Nose or finger pockets. To make equalizing your ears easier, a mask should have some way of letting you conveniently pinch or block your nose. 4. Low-profile. The lower the profile of the mask, the less air you need to equalize it and to clear if it floods, but the main benefit is that it gives you a wider vision field. 5. Adjustable strap that can be locked in place. 6. Wide field of vision. This is accomplished through low profile and/or wraparound design. An optional feature you might find in a few masks is a purge valve. A purge valve is a one-way valve used for clearing water from a mask. It's easy to clear water from a mask without a purge valve, so consider it optional.
18

Technical Document No. 23 Training Manual for Tour Guiding in Kayaking and Snorkeling
Materials. Masks are most often made from silicone rubber. Silicone rubber is usually translucent, though manufacturers sometimes add coloring agents to make it black, or a translucent color, which is primarily to make the mask look better. Why not be stylish and functional? At one time you could find masks made from black or colored neoprene rubber, but these have all but vanished, even in inexpensive models. This is because silicone lasts three to four times longer than neoprene, is generally softer and more comfortable, usually looks better, and doesn't usually irritate sensitive skin. You may see neoprene masks in use, but they tend to be the exception rather than the rule. Selection and Purchase: When buying snorkeling equipment, your two most important selection factors are fit and comfort. This is particularly true for your mask, which you should be able to accurately adjust to get a good seal. To test a mask for a proper fit, place it gently against your face without using the strap and inhale through your nose. A properly fitting mask will pull into place by suction and stay as you inhale. If you have to push or twist the mask to make it seal, try a different one. If you need visual correction, some masks accept prescription lenses. You'll want to think about this when buying a mask, because not all masks do this readily.
19

Technical Document No. 23 Training Manual for Tour Guiding in Kayaking and Snorkeling
Preparation for Use. Manufacturers coat new masks with a protective chemical that you need to scrub off or you won't be able to defog the mask. To remove the film, use a soft cloth to gently scour the glass inside and out with a non-gel toothpaste or another cleaner that can remove the film without scratching the glass. Next, adjust the mask strap for a comfortable fit across the crown of your head. The strap should be snug, but not tight. Maintenance: Three general maintenance procedures apply to caring for all snorkeling equipment, including masks: 1) rinse thoroughly with fresh water after each use (even in a swimming pool), 2) keep out of direct sunlight and 3) store in a cool, dry place. The freshwater rinse removes salt, chlorine and/or minerals that contribute to corrosion and deterioration. Rinse thoroughly as soon as possible after using; if you can't rinse your gear right away, it's generally better to keep it wet than to let salt water dry on it because it's much harder to remove salt after it dries. Sunlight damages silicone (and especially neoprene), so avoid leaving your equipment in direct sunlight. If it has to stay out in direct sunlight at a dive site or on a boat, you can throw a beach towel over it. Dry your equipment thoroughly before storing it in a cool, dry place away from hydrocarbons and ozone. Keep masks and other equipment made from silicone out of contact with neoprene. The neoprene leaches into the silicone and discolors it, which doesn't harm it functionally, but makes it look less attractive.
Snorkels Purpose: The snorkel permits you to view the underwater world continuously, without the interruption of having to lift your head for a breath. You can stay in the water all day resting with your face in the water, but you tire quickly if you keep having to raise your head to breathe. Try it and see. Styles: Snorkels are simple devices - at the most basic level, they're little more than a mouthpiece and tube that fits comfortably in your mouth and extends above the surface. They are available with a variety of features. Features. Look for an easy breathing snorkel. The snorkel's tube diameter (bore), length and shape affect breathing resistance, so generally look for: 1. A large bore 2. Not excessively long 3. Designed with smooth, rounded bends — avoid sharp bends. Today's popular snorkels have other features: they fit closely to the contours of your head to minimize drag, and most have an optional self-draining feature. This feature makes it easier to clear water from your snorkel at the surface. Some snorkels have a flexible lower portion that allows the
20

Technical Document No. 23 Training Manual for Tour Guiding in Kayaking and Snorkeling
mouthpiece to comfortably drop away from the mouth area when you're not using it.
Materials: Most snorkels sold today are made from a combination of silicone and plastic. The upper portion of the snorkel (the barrel) is usually constructed of semirigid plastic tubing. The lower portion and mouthpiece are usually made from silicone rubber. You can find snorkels in a variety of colors to match your mask. Selection and Purchase: Choose your snorkel based on comfort, fit and minimal breathing resistance. To check for these, place the snorkel in your mouth with the mouthpiece flange between your lips and teeth, and the barrel of the snorkel against your left ear. You should be able to adjust the mouthpiece to fit comfortably, without chaffing or causing jaw fatigue, while sitting straight in your mouth. Preparation for Use. Attach the snorkel to the left side of your mask (because your regulator comes from the right). You do this with a clip or slot on the snorkel, or with a snorkel keeper that comes with it. Adjust the snorkel and snorkel keeper so the top of the snorkel sits at the crown of your head with the mouthpiece in place. You should be able to relax your jaw without losing the mouthpiece. Preparación para el uso: Póngase su máscara y coloque el tubo de respiración cerca del frente de su oído izquierdo. Ajuste la altura del tubo de respiración y hágalo rotar hasta que el tubo de respiración permanezca en la boca incluso cuando tenga la boca totalmente abierta. La parte superior del tubo de respiración deberá quedar en la parte superior de la parte posterior de la cabeza. Cuando está bien situado, los músculos de la boca de deben tener que sujetar el tubo de respiración en su lugar cuando lo está usado.
21

Technical Document No. 23 Training Manual for Tour Guiding in Kayaking and Snorkeling
Maintenance: As with the mask, rinse your snorkel after each use and store it in a cool, dry place and kept out of direct sunlight. Store it away from neoprene rubber to prevent staining of silicone parts.
Fins Purpose: Fins provide a large surface area so your powerful leg muscles can move you through the water. This is much more effective than swimming with your arms, though there are divers with limited leg use who use their arms with special hand fins. All fins, regardless of style or features have pockets for your feet and blades for propulsion. Styles: Modern fins come in two basic styles: adjustable strap and full-foot. Adjustable fins have open heel foot pockets and adjustable heel straps, whereas full-foot fins enclose the heel and fit like rubber slippers. Most high-power fins are adjustable strap types, though there are exceptions. Warm water snorkelers often prefer full-foot fins because they don't need wet suit boots. Features: Fins have several features to choose from, especially blade design features. Blade features include ribs, which add rigidity to the blade and act as vertical stabilizers; vents, which reduce resistance to fin movement and increase efficiency; and channels, which increase efficiency by guiding water smoothly over the fin. Fins are often made of neoprene, even as neoprene fades from use in other dive equipment. Neoprene fins last a long time and have performance characteristics many divers prefer. Snokelers who prefer composite fins like the fact they're lighter in weight, may have greater propulsion efficiency and you can buy them in a variety of colors to match your mask and snorkel. Composite fins may affect your buoyancy compared to all neoprene fins because they're lighter.
22

Technical Document No. 23 Training Manual for Tour Guiding in Kayaking and Snorkeling
Selection and Purchase: You buy your fins based on your size, your physical ability and where you plan to dive. If you're looking at adjustable heel fins, you'll want to have your wet suit boots for a proper fit. With the boots on, put your foot in the pocket. The pocket should come to the point where your ankle meets your foot — if it won't come up that high, you need a larger size. Full foot fins should fit comfortably without binding, yet not feel loose. It helps to wet your bare feet when trying on full foot fins. For a given fin size, the larger and stiffer the blade, the more strength you need to use it. In looking at fins that accommodate your size, physical ability and where you intend to use them, your primary concerns are (you guessed it) fit and comfort. If you're not sure what model to select, have your PADI Instructor, Dive Center or Resort help you. Preparation for Use: Full-foot fins generally require no preparation, but you need to adjust adjustable-strap fins for a snug, comfortable fit. Do this with your wet-suit boots on, of course. You may find new fin straps coated with a slick preservative. Wipe this off, otherwise your straps will tend to slip out of adjustment. Maintenance: As with your mask and snorkel, rinse your fins in fresh water after use, store them in a cool, dry place and keep them out of direct sunlight. Inspect fin straps regularly — they tend to wear out faster than straps on other dive gear.
23

Technical Document No. 23 Training Manual for Tour Guiding in Kayaking and Snorkeling
UNIT 8: SNORKELING SKILLS AND TIPS Snorkeling Gear Besides your mask, fins and snorkel, a few other items make snorkeling more fun. A snorkeling vest helps you float, making it easy to rest if you get tired. An exposure suit helps prevent the occasional scrape or sting. Choose a thin, skin suit for warmer water, or a wet suit in cool water so you stay comfortable. Wet suits also make you float more, so if you like to dive down while snorkeling, you’ll want a weight belt so you’re not so buoyant. A dive flog makes you easier to see in the water.
Mask Defogging keeps your mask clear while you snorkel. When you get your new mask home for the first time, scrub the inside with commercial mask cleaner or toothpaste. This removes manufacturing residue that makes it fog up. When you go diving, take some defog, available at your local Dive Stores or Resort. Rinse the mask and follow the instruction on the bottle. Wearing Your Mask and Snorkel Wear your mask and snorkel at the crow of your head. This makes sure the snorkel tip stays out of the water. When You Put Your Fins On wet them first so they slide onto your feet easily. Avoid Walking With Fins On but if you must, walk backward so you don’t trip over them, and wa5tch over your shoulder. Weight Belts help you dive down when you wear a buoyant exposure suit. Use a proper weight belt with the right amount of weight and a quick release buckle. Put it on last, so it’s on top of all other strips. This ensures you can drop it easily if you want. Also, wear the belt so you open buckle with your right hand. Your Snorkeling Vest Helps You Float. If you want to float more, add a couple of breaths to your snorkeling vest. At the Surface, Swim at a Relaxed Pace with your arms at your side where they won’t slow you down. Take your time and enjoy yourself as you enjoy the underwater world below. If you Want a Closer Look take a deep breathe and hold it. Then bend forward quickly at the waist while raising your legs straight up above the surface. Kick downward as your feet submerge. As You Descend you may feel pressure in your ears and mask. Offset this pressure in your ears by pinching your nose and blowing slightly against it. Offset the pressure in your mask by blowing air into it through your nose. Don’t descend any deeper than you can comfortably equalize. As You Return to the Surface look up and hold one hand ahead of your. This makes sure you don’t bump into anything on the way up. Exhale Sharply through your snorkel to blow out the water when you reach the surface. Take your first breath carefully in case there’s a little water left. Now you can breathe through it without lifting your face from the water to drain it.
24

Technical Document No. 23 Training Manual for Tour Guiding in Kayaking and Snorkeling
For The Best Underwater Snap Shots get as close as possible and use an upward angle. Use the flash if your camera has one. It’s Best to look and Not Touch While Snorkeling This avoids accidental scrapes and stings, and avoids damaging or harming sensitive aquatic life.
25

Technical Document No. 23 Training Manual for Tour Guiding in Kayaking and Snorkeling
UNIT 9: MARINE SPECIES IDENTIFICATION REEF FISHES
26

Technical Document No. 23 Training Manual for Tour Guiding in Kayaking and Snorkeling
27

Technical Document No. 23 Training Manual for Tour Guiding in Kayaking and Snorkeling
28

Technical Document No. 23 Training Manual for Tour Guiding in Kayaking and Snorkeling
29

Technical Document No. 23 Training Manual for Tour Guiding in Kayaking and Snorkeling
30

Technical Document No. 23 Training Manual for Tour Guiding in Kayaking and Snorkeling
31

Technical Document No. 23 Training Manual for Tour Guiding in Kayaking and Snorkeling
SPONGES, CORALS AND INVERTEBRATES
32

Technical Document No. 23 Training Manual for Tour Guiding in Kayaking and Snorkeling
33

Technical Document No. 23 Training Manual for Tour Guiding in Kayaking and Snorkeling
34

Technical Document No. 23 Training Manual for Tour Guiding in Kayaking and Snorkeling
35

Technical Document No. 23 Training Manual for Tour Guiding in Kayaking and Snorkeling
36

Technical Document No. 23 Training Manual for Tour Guiding in Kayaking and Snorkeling
37

Technical Document No. 23 Training Manual for Tour Guiding in Kayaking and Snorkeling
UNIT 10: REEF ETIQUETTES Tour Guiding Best Practices Tourism has become the leading income earner in the countries of the MBRS. Tourists from all over the world visit the MBRS region primarily to experience our pristine environment. In essence, the natural resources play an important role in the region’s tourism product development and sustainability. The fragile and interconnected ecosystems in the coastal areas of these countries are experiencing increased stress due to direct and indirect impacts of tourism, recreation and related developments, human settlements, and natural phenomena and hazards. Therefore, it is paramount that sustainable utilization of our natural resources takes place so that the people and economy of the MBRS countries may continue to benefit whilst maintaining our marine resource base. One key component in balancing both activities is the practicing of the best-known method of operating a tourism and recreation venture so that a high level of enjoyment is achieved by only minimal impact to the coastal resources occurs. The following are some basic principles for best practices when guiding in the coastal environment.
1. Don’t pollute. Never put garbage or human waste in the water. Don’t leave trash on the beach.
2. Recycle. This is the first stem each of us can take to make a change. Recycle anything and everything.
3. Report dumping or other illegal activities. Environmental enforcement cannot be everywhere, and you involvement can make a big difference.
4. Keep it clean. You may be in the habit of picking up your own trash. You may even participate in an organize cleanup, but have you considered carrying away the trash that others have left behind?
5. Don’t anchor on the reef. If you go boating near a coral reef, use mooring buoy system when they are available.
6. If you dive or snorkel, don’t touch! Keep your fins and hands away from the coral, as this contact can hurt you and will damage the delicate coral animals. Watch out that your fins do not stir up sediments as these can settle on coral and smother it.
7. Warn your group not to touch, hold or collect anything. 8. As a guide, you should never spear, hook or troll up anything while conducting a tour in a
marine protected area. 9. No feeding or touching wildlife should be done! This can alter the feeding habits of some
fishes. Eg. Blue tangs can become carnivorous and don’t do their job as algae grazers. 10. When traveling through canal and coastal lagoons, travel at a moderate speed. This is to
avoid a high-speed collision with other boats and also to avoid erosion along the banks. Boat wake will also disturb crocodiles and other wildlife that harbors near the banks. You are also at risk on hitting a manatee.
11. When guiding around bird rookeries, approach the island very slow and quietly. Approach only as close as you can without causing birds to fly off and abandon their nest for extended periods. This could cause eggs to cool down too much and reduce brood success or increase predation of eggs and hatchlings.
12. Support the creation and maintenance of marine parks and reserves.
38

Technical Document No. 23 Training Manual for Tour Guiding in Kayaking and Snorkeling
UNIT 11: IMPACTS ON THE REEF Threats to Coral Reefs Unfortunately, there are a great many threats to coral reefs. It is widely acknowledged that coral reefs are threatened and immediate steps need to be taken in order to reverse the process of decline. 50% of coral reefs could be under moderate to severe threat by the middle of this century. Some of these threats are natural, but the vast majority are the result of human activities. The principal natural threat to coral reef ecosystems is hurricanes, which has resulted in considerable sedimentation in Belize. The violent sea action of hurricanes also breaks corals and damages living tissues with sand. Fortunately, early-stage coral growth may be very rapid following hurricane damage in some areas. Hurricanes are extremely powerful, but they pass quickly and afterwards the ecosystem can begin to recover. Disease can have a large impact on reef communities. One of the best-known examples is the 1983-84 die-off of 99% of the Long-spined Black Urchins (Diadema). The die-off was believed to have been caused by water-borne bacteria. The effects of the disease may have been exacerbated by chemical pollutants, which reduce the ability of immune systems to resist disease. This event occurred throughout the Caribbean Sea and only now are the urchins beginning to come back. Diseases are on the increase in the Caribbean and this is seen as an indication of declining reef health. In the 1990’s, there was a high percentage die-off of Elkhorn and Staghorn corals as a result of White Band disease. Some other coral diseases found in the Caribbean are: White Plague, White Pox, and Black Band disease. When corals become stressed, they expel their zooxanthellae. Since the zooxanthellae provide color to the coral, the coral becomes white. This process is called bleaching, leaves the coral very vulnerable, and is often followed by large scale die offs. In Belize in 1998, there was a mass bleaching event that was tied to rising water temperatures. This event saw the removal of large areas of reef building coral. Corals are particularly vulnerable to changes in water temperature, salinity, and alkalinity. These changes can all lead to bleaching and we could see a major decline in conditions for coral reefs in the next 30-50 years. Branching corals are more susceptible than massive corals. Corals that recover from bleaching have reduced growth and decreased calcification and repair capabilities. Global warming is one of major global threats to coral reefs. A 1-3.5° Celsius increase in temperature is predicted by 2100 by the International Panel on Climate Change. Increases in temperature lead corals to bleach, making them susceptible to disease, and if they do not recover fast enough, it can lead to death. A sea level rise of 15-95 centimeters over the next century has also been predicted. This increase in water levels makes the protection barrier reefs provide for coastal communities even more vital. These changes may also affect where coral are surviving- corals at end of their depth range may die and others will grow in newly flooded areas. If changes happen slowly enough, reefs may be able to adapt over time, but if they happen too quickly, it could spell disaster for the reef. Mariculture can also have a negative impact on the reef. Shrimp farms produce a lot of waste that needs to be disposed of. In Belize, shrimp farms are struggling to find a proper way to dispose of the shrimp heads that are discarded once the shrimp are prepared for sale. If they
39

Technical Document No. 23 Training Manual for Tour Guiding in Kayaking and Snorkeling
were dumped in the water, the amount of nutrients it would add to the water could dramatically affect the balance in the ecosystem. Anchor damage, boat groundings, and trampling by tourism or fishing visitation are also major threats to coral reefs around the world. These physical impacts with coral break through the living tissue and result in lesions in the colony, which may be attacked by pathogenic bacteria, algae, or boring sponges, all of which can weaken a coral colony. During the Hol Chan Carrying Capacity study, the staff determined that on average, each visitor has two impacts with the reef per trip. When you have hundreds of people visiting a site in a day, those two impacts can really add up. The impact of snorkeling/diving on the reef can be seen in several spots throughout Belize, especially where there are a lot of visitors from cruise ships. When you are visiting the reef always remember to anchor in sand or use reef moorings and think about your actions when you are in the water. Are you stirring up sand or are your fins hutting coral? Overfishing also interferes with the work of biodiversity on the reef, resulting in overgrowth by algae and loss of coral cover. Removal of large predators disturbs the balance, resulting in excessive numbers of other organisms, while removal of large algae grazers reduces the number of mouths available to clean the reef, which makes it more difficult for new coral recruits to find suitable habitat. A lot has been done in Belize terms of regulation and working with fishers to find alternative livelihoods, especially in the tourism industry. However, it takes a long time for a fishery to recover and as fishing technology increases, a smaller number of fishers can have a much greater impact. Poaching both from Belizeans and Mexicans is a significant issue within the Bacalar Chico Marine Reserve. Land-based sources of marine pollution including silt, fertilizers, sewerage, biocides, industrial effluent, oil, trash, and heavy metals (mercury and lead) cause great damage to coral reefs. Reef corals are particularly susceptible to various types of pollution. As cnidarians, their bodies are 95% water. Such animals do not have any defenses against impurities in the surrounding water because they absorb such large amounts of it compared to their body mass. In essence, a reef is only as good as the water around it. Sediment may suffocate coral outright or introduce disease or absorbed chemicals being carried along with it. Deforestation of mangroves and littoral forests in coastal zones and cayes, as well as dredging and improper placement of sand removed during dredging all result in sedimentation on the reef. Nutrients and sediments cloud seawater, which lowers the productivity of coral and seagrass. Increased nutrients also results in algal growth and reduced survival of coral recruits. Contaminated ground water enters the sea via porous, shallow soils during heavy rainfall events and often reaches the reef in a large burst of nutrients. Coral reefs are so sensitive to environmental contamination that they are indicators of environmental quality. As with many threatened ecosystems throughout the world, it may seem like the threats are too great and it is easy to loose hope. However, there are many innovative projects going on in reef restoration, alternative livelihood projects with fishers, and conservation. Awareness of the importance of coral reefs is increasing, as is our knowledge of how coral reefs work. All of these factors come together to increase the chances of survival of the reef. The more people know about the problem, the more attention it will receive and the more minds will come together to think of solutions. While you are here in Belize, please do your part to help us conserve our reef.
40