Training Drills, Conditioning and etc. - Rovesnikrovesnik.ee/Rovesnik/Koncovki/tajskij box...
41
Training Drills, Conditioning and etc. Training Drills To start off with, I feel that three things go into making a complete fighter. Technique, Physical Fitness, and Heart. Your instructor/coach can only help you with the first two. We have already discussed a lot of technique, so moving right along... Physical Fitness and Stamina: Anyone who fights competitively, or competes at sports in general can tell you that being physically fit can make or break you. Besides learning and practicing the techniques of your MA, you have to train to be able to do them, and keep doing them, even if you are tired, exhausted, hurt, etc. №1-RUN. To tell the truth, there is no exercise I hate more than running. But, I can also honestly say that there is no exercise that takes its place (and believe me, I've tried MANY). If you want to be able to fight, you have to run, run, run. You should have a mix between jogging for distance and wind sprints. №2-SEE №1! Yes! Running is THAT important! Besides running, there are a number of drills that we incorporate into our training to help build strength and stamina. DUCKWALKING or SQUATS: How do you think that Thai boxers are able to withstand those leg kicks? FOOTWORK DRILLS: A circle drill that I incorporate from the boxing gym. The students get in a circle as though they are in the ring (we don't have a ring at either of our gyms) and they skip sideways as though they are dancing around their opponent. The students are to stay on their toes! When the coach (me!) says "SWITCH" they change directions and go the other way. This should get them used to always circling around their opponents, and how to change directions quickly. (there's more to the drill than just that, but I don't feel like getting into it right now, sorry) JUMP ROPE: helps with stamina, and teaches boxers to be light on their feet. (if they do it right) PUSHUPS and SIT-UPS: This is a no brainer... MEDICINE BALL: has a myriad of uses. Strength, coordination, and impact drills. 216
Transcript of Training Drills, Conditioning and etc. - Rovesnikrovesnik.ee/Rovesnik/Koncovki/tajskij box...
Training Drills, Conditioning and etc. Training Drills
To start off with, I feel that three things go into making a complete fighter. Technique, Physical Fitness, and Heart. Your instructor/coach can only help you with the first two. We have already discussed a lot of technique, so moving right along...
Physical Fitness and Stamina:
Anyone who fights competitively, or competes at sports in general can tell you that being physically fit can make or break you. Besides learning and practicing the techniques of your MA, you have to train to be able to do them, and keep doing them, even if you are tired, exhausted, hurt, etc.
№1-RUN. To tell the truth, there is no exercise I hate more than running. But, I can also honestly say that there is no exercise that takes its place (and believe me, I've tried MANY). If you want to be able to fight, you have to run, run, run. You should have a mix between jogging for distance and wind sprints.
№2-SEE №1! Yes! Running is THAT important!
Besides running, there are a number of drills that we incorporate into our training to help build strength and stamina.
DUCKWALKING or SQUATS: How do you think that Thai boxers are able to withstand those leg kicks?
FOOTWORK DRILLS: A circle drill that I incorporate from the boxing gym. The students get in a circle as though they are in the ring (we don't have a ring at either of our gyms) and they skip sideways as though they are dancing around their opponent. The students are to stay on their toes! When the coach (me!) says "SWITCH" they change directions and go the other way. This should get them used to always circling around their opponents, and how to change directions quickly. (there's more to the drill than just that, but I don't feel like getting into it right now, sorry)
JUMP ROPE: helps with stamina, and teaches boxers to be light on their feet. (if they do it right)
PUSHUPS and SIT-UPS: This is a no brainer...
MEDICINE BALL: has a myriad of uses. Strength, coordination, and impact drills.
216

NECK ROLLS: This is very similar to the wrestling exercise. Do a three point stance with your feet on the ground and your head too. Arms behind your back. Slowly roll your neck around to work the neck muscles. For god's sake though, be careful on this one until you are used to it...
WEIGHTS: There are a number of very specific weight drills for punching power. Most of them concentrate on the shoulders and triceps. One drill is to take a non-weighted bar with both hands and pump it in and out from your chest (straight out while standing) as fast as you can for one round.
217
Improving Punching Power
There are a number of ways to increase your punching power. But, the most important way initially is to cultivate good form.
In talking about good form, we'll start with alignment and work from there.
Bone Alignment
With good form, you derive your power from proper bone alignment. From there, any of the other key attributes you develop will just multiply this effect. This is not to blow my own horn, but I've knocked the wind out of people holding the heavy bag for me as I punched it. It came from proper alignment.
Leverage
It starts in your base. Many people neglect this. You need a pivoting, weight-shifting base if you want real follow-through punching power. This pivoting base is what transfers weight down at the feet and legs, which in turn sends the hip, which in turn sends the shoulder. When you throw a cross, for instance, turn your rear heel out (pivot on ball of foot), and shift your weight onto your front foot (toes pointing forward at this time).
We Lose Leverage At Our Joints
One of the most common faults in a person's punching technique (which results in lost power) is that POWER IS LOST IN THE JOINTS. This usually means the shoulder, elbow, or wrist. All bones function as perfect transmitters of force, but where one bone ends and another begins is where we tend to lose it. Misaligned, over-tensed, or under-tensed joints will vent off your power. People who wing their punches, for instance, will tend to lose power at the shoulder and elbow.
People who bend their wrist when they hook, for another example, will tend to lose the power of that punch at the wrist.
Never "Lock Out" Your Punches
Power in a punch also comes from follow-through. You don't lock out your punches. Same goes for kicks (although they look "prettier" when you do them that way). I know a lot of classically trained martial arts teach you to lock out that "reverse punch", but I would differ on that methodology. I spent a lot of years in traditional martial arts, and I've spent a lot of years training around boxers and such. The latter hit much harder. A lot of it has to do with the follow-through allowed by a mobile, pivoting, weight-shifting, bent-knee base.
218
Muscle Grouping
You need:
Strong lats (pull-ups, seated row maching, shadowboxing, bag work, sparring).
Strong shoulders and traps (upright rows, standing flyes, skipping rope, LOTS of shadowboxing, etc.).
Strong Abs and Lower Back -- for conveying hip torque to the sweep of the shoulders.
Strong Quads and Calves -- Legs and abs should be seen as a pyramid which generates your power and shifting.
Strong Forearms -- for keeping the wrist aligned, and for a dense fist (underrated aspect of power punching). Wrist curls, hand squeezers, fingertip pushups, etc.
Secondarily:
Strong Pectoralis Major -- this can help in your power (projecting and aligning the shoulder of the punching arm) if you already have good form. People who start with large pec's, though, tend to throw shoulder punches (like a bench press). No real power there.
You DON'T need:
Strong Biceps -- these do NOT add to your straight punching power, and only help in holding the angle of the elbow in your hook, and drawing it in on the end (that's the french curve I talked about before). Same for the uppercut. People with huge biceps are usually the easiest ones to slip.
Relax
I always tell my students that "tension" is the opposite of everything good or favorable in your performance. Tension is the opposite of speed. Tension is the opposite of POWER. Tension is the opposite of nontelegraphy. Tension is also the opposite of mobility. Tension is a drain on endurance.
In the case of punching power, which is the subject at hand, it is TENSION IN THE SHOULDERS that most often diminishes not only one's power, but also one's ability to land the punch on an opponent -- because of its effect on the aforementioned aspects of a successful punch (speed, nontelegraphy, mobility, etc.).
219

The Body Is What Punches, Not Just The Arm
When you hit someone, it should feel like a piano fell out of a second story window and hit him on the end of your fist. This is in keeping with info provided earlier in this post about shifting the weight, etc. The reason why you're shifting your weight is SO THAT HE FEELS YOUR WEIGHT IN YOUR PUNCH. There's a Thai saying that a person who really knows how to hit moves fluidly but his touch is as heavy as a mountain. Sounds like good boxing to me. If your weight is settled on your feet, then that mass is not going into the punches.
Tight Fist
At the tail end of execution, the last place you can either add or lose power in a punch is in your fist itself. It should stay loose through most of your execution and tighten up just before impact.
The Snap - The Right Time and Place
The power of your punch is right on the end, where it snaps. This is true of ALL punches -- not just your linear punches. The art of punching then becomes the art of coordinating your own body mechanics (which is most of what I've talked about here) with the placement of your target AT PRECISELY THE RIGHT RANGE AT THE RIGHT TIME, where you hit target as your punch is snapping on the end. When you don't get this right, your power is either jammed because the range and timing weren't right, or it falls short or misses for the same reasons.
This, by the way, is one of several ways in which KEY attributes come together to equal success in your hitting. As far as the above paragraph, you get this ability from essentially two areas of training: sparring and fighting. Partner drilling will never in a million years give you this ability. Secondarily, you can get some aspects of this ability from focus mitt training and the top and bottom bag -- in both cases because they simulate either the chaos or the predictable flow of sparring and fighting, where through timing and range you get your punches to meet up with the target properly.
There's more to this, in general, as far as learning to punch with power is concerned. Much of it, though, is difficult to convey in text. Much easier to show.
One last point for you, is that you have to develop your kinesthetic perception if you really want to be able to hit with power. There is a correct sequence of muscular contractions for every punch, every kick, which happens very quickly in rapid succession. In addition to contractions, there is a correct series of RELEASES (very important) -- i.e. when a certain muscle in the chain has done its job, and now needs to let go before it starts to hinder your function.
220
Favorite Drills
One of our favorite drills is called 10-20-10's. Full speed and full power. Partner holds Thai Pads and you kick 10 Roundhouse on one side, then 20 Clinching Straight Knees, then another 10 Roundhouse on the other side.
We also used to have a competition to see who could do the most round kicks or straight knees in one round. The catch is that it's during shadowboxing. No target! We haven't used that drill in awhile.
The Elbow Train is just doing Horizontal or Vertical Elbow strikes on the focus mitts as fast as you can (alternate sides each strike). If you do it fast enough, it starts to sound like a train chugging along...
Neck Wrestling is a big drill. You "get dressed" (English-Thai translation of Clinching) with your opponent, each of you trying to gain the "control" position, with your opponents head trapped to your chest and they are bent over. If you get caught, you have to perform an escape.
Fun with the Medicine Ball: I like to have my students play Harlem Globetrotters with it. They pass the ball around for a few rounds like they are playing basketball. OR, I have them stand close and actually thrust the ball into each others stomachs or ribs. OR BETTER YET (I love this drill...) With a partner. Both put on bag/sparring gloves. One holds the med. ball while the other uses it as a punching bag. The holder is responsible for changing the target area around. The puncher just must punch full power constantly. You do this drill for about 3 rounds alternating punching/holding every round. If one student drops the ball, they do 20 push ups per drop. So the puncher should be trying to punch the ball out of the holders hands.
Another personal favorite: Progressive combo's. The idea is to work a combo from it's first strike and build it into at least 6 separate strikes, preferably 8 or more. Start with one strike. Repeat 10X. Then add another strike. Repeat 10X, add another, repeat 10X, etc. For example: 10 jabs, 10 double jabs, 10 dbl jabs and a cross, 10 jab- jab-cross-hook-bob n'weave, 10 jab-jab-cross-hook-bob n'weave-cross, etc, etc, etc. (don't forget to add kicks, knees, elbows, etc. I just used boxing as an example)
Those are some of the more creative ones. Most of the drills are pretty standard. Kick or punch the pads, shadow boxing, pushups, sit-ups, skip rope, etc.
221
Medicine Ball Drills
This is not a very complete list, as the drills are endless. Heck, they have entire books and videos devoted to this. For those of you who just want a few effective, simple drills, this is for you...
Drill №1- Everyone stands in a circle, close together. Hand the medicine ball around in a circle, changing directions occasionally. When you hand the ball around, do not simply "hand" it to the person next to you, but thrust it into their abdomen. Aim for the abs or obliques. The person being handed to should allow the ball to impact with their abdomen, then take the ball. DO NOT CATCH THE BALL BEFORE IT HITS YOU!
Drill №2- Again, in a circle, play Harlem Globetrotters with the medicine ball. The circle is more spread out this time, and the boxers should be getting some "air" under the ball. They should be throwing it up in the air, not straight into their partners chests. In this drill, if the medicine ball is dropped, the whole group does 10 pushups for each time the ball is dropped.
Drill №3- Sit-ups, with a partner. Boxer 1 does a sit-up, and is then handed a Medicine ball while in the "up" position. He hold medicine ball outstretched above head and then does another sit-up, handing the medicine ball back to his partner. He then does another sit-up, at the end of which he gets the ball again. Essentially, he is doing every other sit-up with the medicine ball.
Drill №4- With a partner, standing back to back. Stand far enough apart so that there is enough room to hand the ball between you two. Boxer №1 twists to right (keeping feet planted) and hands ball to Boxer №2, who is also twisted around to the right. Boxer №2 takes medicine ball and then twists around to left and hands ball to Boxer №1, who should now also be twisted around to the left. Repeat...
Drill №5- I like to knee the medicine ball up in the air in front of me as though it were a soccer ball. My students think I'm nuts though. I will eventually have them do this drill themselves.
Drill №6- Drop the medicine ball on boxers stomach in the midst of sit-ups. Boxer should do a sit-up, and while in the down position, partner drops ball onto his stomach. Be careful not to drop in on boxers lap or sternum.
Drill №7- Have boxer perform a V-Sit or Leg Raise. While holding that position, hit boxer in abs and obliques with medicine ball. Be careful doing this with your beginners. Start off softly, then build up power to find your boxers "threshold".
Drill №8- Personal Favorite of mine from the boxing gym. Both boxers wear gloves/bag gloves (I recommend thick bag gloves, not thin ones. Like Ringside's Super Bag Gloves. Just make sure they are thick gloves). This drill should be done
222
for 3 rounds apiece, meaning a total of 6 rounds. Boxer №1 hold the medicine ball around chest height, Boxer №2 boxes with the ball as though it were a heavy bag. Boxer №1 (the ball holder) should change positions of the ball to create different angles and punch levels, and should use footwork to do the same. Force Boxer №2 (the puncher) to move around a lot. Switch the ball between each round. If any boxer drops the ball, that boxer (not his partner) must do 10-20 pushups for each time the ball is dropped. 10 pushups for beginners, 20 for advanced boxers and fighters.
Drill №9- With the medicine ball on the ground in front of you. Set the round clock with 30 second intervals. Start with the round clock by jumping over the medicine ball front and back. Get the knees up high towards your chest! Keep this up until the interval timer sounds, then switch by jumping side to side. Again, jump with the knees up high to your chest. At next interval, back to front and back. Keep switching from front/back to side/side.
223
Neck Wrestling Drills
For 3 rounds, with a partner.
When the round starts, you begin Clinching/Neck Wrestling with your partner. I had the interval timer set to go off every 15 sec's. When the interval timer sounded, the fighters were to break, step back, then jump right back in and Clinch/Neck Wrestle again.
Due to the size differences in my class, I had every one stay with the same partner for the entire 3 rounds. I think that in the future, I will have everyone switch partners between rounds.
While clinching, the boxers are to be trying to get the Control Position that I have mentioned previously, where you have your opponents head trapped in a pincher-like grip to your chest. You can place your chin on top of their head as an extra measure of control.
The boxers, should they get caught in the Control Position, perform and escape. Then they should get right back at it.
Remember, if you try this drill, as soon as the fighters separate, they should immediately get right back at it. No pausing. The fighters should train as though the break is from the Ref separating them, then telling them to fight again. They should jump right back into it...
224

Thai Pad Drills
For those of you who are interested in picking up your own, I recommend one of these following brands:
1. Thaismai 2. Twins 3. Fairtex 4. Vut 5. Windy 6. Siam 7. Ringside
Some of these are Thai brands, and I am unsure of their availability in Europe and USA.
No matter what pads you get, try to find ones with velcro straps. They are so much more user friendly!
A few notes about using the pads first:
1. Grasp the pads so that your palm is towards your opponent, not towards your face.
2. When you are the pad holder, stand in your normal stance, facing your opponent. DO NOT STAND SIDEWAYS TO PRESENT THE TARGET! The Thai pads are designed so that the boxer can train realistically against a human opponent. Stand in your normal boxing stance, and then adjust to the attack as it is thrown. This way, the pad holder also gets experience reacting to attacks.
3. When holding for kicks, hold the pads parallel and rotate to face the kick as it is coming so that the kick can impact both pads flush.
4. When holding for knees, many people hold the pads parallel in front of them, as if they are crossing their arms. I prefer to have my students hold the pads in an "X" or crossed. It is a more stable way to hold them.
5. When holding the pads for ANY technique, you must create a SOLID target for your opponent to hit. Do not hold the pads lazily so that there is no impact. It will do nothing for your training partner, and besides, if you hold them weakly, the pads can be kicked into your own face. I have seen many black eyes, bloody noses and lips b/c people are not holding the pads correctly. When the strike comes, press the pads into the hit to create a solid impact.
6. A good Pad Holder will push their opponent to exhaustion. After a session of pad drills, the attacker should be ready to puke!
225
On to the drills...
Kicking Drills:
For one, you can have the kicker alternate kicks for an entire round. Left-right-left-right... The kicker needs to keep up a good solid pace. Do not rest in between unless necessary! Don't be lazy! Most of the time, when holding pads for round kicks, you hold them at mid body level. Even if you use Thai-style kicks mainly to attack the legs, you will benefit from practicing them higher, as it requires you to work harder.
Multiple kicks on one side can be practiced also. The kicker should kick repeatedly from one side. In between kicks, the kicking foot should only lightly touch to the floor before kicking again. The kicker should stay leaned away to facilitate the multiple kicks.
Low kicks can be practiced by holding the Thai pad against your thigh. Dangle it over your thigh while standing in your normal boxing stance. Make sure to push away the top part of the pad into the kick to help absorb the kick. Do not hold it flush, or you will not be able to take more than 3 or 4 kicks. It is advised not to use buckled Thai pads for this drill as the buckles will gouge your flesh.
Boxing/Elbow Drills:
Use them essentially the same way you use focus mitts.
Knee Drills:
As mentioned, I recommend crossing the pads in an "X" while holding for knee strikes for better, more solid impact.
Again, by round. Have the boxer practice free standing straight knees, or clinch knees. The boxer should do a skipping footwork to alternate knees. For instance, if I just kneed with my right, as my right foot drops to the floor, the left skips backwards to load up the left knee. Again, you can also drill multiple knees on the same side. Instead of dropping the knee to the front, bring it all the way back, continually loading for the next knee.
Push Kick Drills:
Thai pads are NOT conducive to Push Kick Drills. Either allow the attacker to push kick you, or invest in a belly protector. If you invest in a belly protector, stick to the above brands and try to find velcro straps.
The drills mentioned above are just very basic guidelines. Now let's get to the meat of it.
226
The pad holder has a great deal of responsibility to the person attacking, as the pad holder dictates the pace of the workout. You should push the attacker. If your attacker is slacking or lollygagging, hit them with the pad, or throw a kick and demand that they get to work. Constantly push them and shout out directions for them. Also, constantly move around and change the range. Force the boxer to adjust and use footwork. DO NOT BE A STATIC TARGET!!!
For example, the drills already mentioned are only working one given technique at a time. Change directions and the range so that the boxer is forced to constantly adjust to get the technique right. If they are slacking, tell them to strike harder or faster. TAUNT THEM! Tell them that they are weak! Tell them that you expect to feel the pain in the morning!
Keeping in mind all of the above advice for the pad holder, let's move on to combination drills...
When directing combination drills, the pad holder should vary between having the attacker execute the techniques/combo's for power, or for speed. Do not change in the middle of the round. The round is either a power or speed round. In most cases, the pad holder dictates what combo's are to be used. When holding the pads for combo's, use your imagination. Try to add variety, but not too much that the boxer does not get a good dose of the basics.
If you have an attacker who is very good, you can just hold the targets for the boxer to hit, as the boxer should learn over time what strike you want based on what position you are holding the pads in.
With fighters, or fight hopefuls, a drill I like to do is to "suit up" wearing belly protector, shin pads, lacrosse elbow pads, thai pads, and headgear. (cup and mouthpiece, too) Again, I call the combo's for full power. With all the gear on, the attacker can perform low kicks, and I, as the holder can also attack if the attacker starts to slack. Typically, stick to jabs, push kicks, and round kicks at your attacker to make sure that they stay busy and sharp.
Finally, I will do some rounds where the fighter simply attacks in combo as he feels. It is my job to adjust to his attack. He can low kick, punch, clinch knee, elbow, whatever. Since I am completely covered in protective gear, I am minimizing the chance of an accident. This drill should be reserved for the most experienced students, who will be able to do this without injuring each other AND taking the drill seriously.
227
Build Explosiveness You want to develop the greatest amount of force in the shortest amount of time. You want to be EXPLOSIVE!
Before you begin your development of explosiveness, you should first have a good 2 - 3 months of strength training under your belt, especially for the lower body. Strength training for the lower body includes squats, both front & back, lunges (forward & side), romanian deadlifts, and leg presses. These movements will stress the ankle, knee and hip joints, which play a HUGE part in building explosiveness.
Plyometrics
Since the 1960's, the former Soviet Union has been practicing what we now call, Plyometrics. The Soviets had been successful in the use of Plyometrics in their training regimes. The results showed in jumping events. It wasn't until 1975, when Fred Wilt, former Olympic runner, used the term Plyometrics here in the United States.
Yuri Verhoshansky could very well be call the "Father of Plyometrics". He has been the leading researcher and coach most recognized with the spread of Plyometrics. He also has be credited with most of the forms of Plyometric training that are used today!
Here in the U.S., the acceptance of Plyometrics has been slow. Most coaches, until now, believed that it hindered, not helped performance. That reseasoning could be because they did not understand how to apply it to training. Over the years, Plyometrics has been used more and more by coaches due to its significant increase in speed & explosiveness.
Now, if you've been following with me this far, you know that speed & explosiveness are essential in Muay Thai. Plyometric training incorporated into a workout schedule, is a MUST!
Plyometric Training Methods
Before undertaking serious plyometric training, it is important that you first develop a strength base. Since the force developed in some types of explosive training can reach 20 times your body weight, it is easy to see why you must be strong enough to withstand such forces. This means that you must develop concentric, eccentric, and isometric strength since all three of these muscle exercise regimes are used in plyometrics (explosive training). When you start training you should first go on an all - round total body conditioning program. You should do exercises to develop all the muscles of the body and all the joints in all of their actions. This type of training should last between 1 - 3 months, depending upon your initial level of fitness. Once this
228
general base is well developed, you should then begin to do strength exercises which more closely duplicate the actual movements involved in your sport(s), including plyometrics. The more specific the exercises, the greater will be the effectiveness of your workouts.
The development of explosive strength is more complex, and four methods are used. They are:
• exercises with weights • jump exercises (which up to this time have comprised the more popular
concept of plyometric training) • the hit (shock) method • specialized equipment
Exercises With Weights
Using approximately ONLY 60–80 % of your absolute strength Plyometric training is the key to developing that explosiveness and speed.
Exercises with weights are used to develop maximum absolute strength. Weight exercises are also used in combination with jump exercises or in series with them. One simple routine to develop explosive power is to assume a specific position and hold it for 3 - 5 seconds to develop isometric tension. Once the muscle is prepared, you explode in the opposite direction with maximum speed. For example, go into a squat and hold the bottom position, leap up as high and as quickly as possible. This helps to develop explosive legs.
To develop explosive arms with this method, you can do an exercise such as lying on your back on a narrow bench holding a weighted medicine ball in your hands with the ball almost touching your chest. Hold for 4 - 5 seconds and then throw the ball upwards with maximum force. A barbell or dumbbells may be used instead of the medicine ball, with the obvious exception that you won't throw the weights.
Jump Exercises
Jump exercises are the simplest form of plyometrics. The jumps are usually done in series of approximately 10 jumps. They can be done on both legs or on single legs or alternating between legs. However, when first beginning you should ALWAYS do double leg jumps up until your legs (or arms) become accustomed to the jumping. Remember that the amount of eccentric force generated in a single leg jump is about twice that of a double leg jump and if your muscles are not prepared for this force, it may be injurious.
Next in progression are series of jumps having different directions, jumping over various objects and jumping onto and off various objects. For example, you can jump sideways, then forward, and then backward. Or you can jump in a zigzag
229
fashion. It is also possible to jump with body turns so that you end up facing in different directions after you execute the jump. All body turns made while you are airborne. Jumping over objects becomes more effective than simple jumping because it forces you to jump a little higher, which, in turn, creates more force upon the landing. In turn, allowing for greater development, which, in time, allows you to jump even higher. Also, by jumping onto and off various objects it puts more variety into the program as well as exposing your nervous system to experience different amounts of force from the different jumps. This also provides for greater development.
The Hit (shock) Method
Next in the progression are altitude jumps, a term coined by Fred Wilt, which are an example of the hit or shock method. In essence, you step off from various heights and upon landing you undergo minimal flexion of the legs (or arms) which forces the muscle to stretch sharply and undergo maximum tension. This happens automatically and your mind is not involved in developing maximum tension. This is why this method is so effective. It produces a greater force than you would produce on your own.
In general, for highly trained athletes with great absolute strength, the altitude jumps are done from a height of approximately 5 - 6 feet and more. When first beginning you should begin with low heights of approximately 2 - 3 feet and gradually work up to 6 feet or more. Studies have shown that jumping off from heights of 9 feet or more are counterproductive and the athletes are hesitant to jump from such heights.
The main reason for using altitude jumps is to develop supermaximum strength, i.e., maximal eccentric strength. To do this, it is necessary to use exercises in which the muscles are forced, under the influence of significant external forces, to execute work in the eccentric range. The load must be such that it forces the muscles to contract at the upper limit of their supermaximal strength for a very brief period of time.
In the altitude jump, upon landing from a height of 6 - 7 feet, the extensors of the ankle, knee and hip joints and the spine are forced to execute eccentric work under the influence of inertial forces. In these brief conditions the athlete develops the ability to display brief muscle tension during which the force reaches values that are fantastic at first glance. It fluctuates from 1500 - 3500 kg, i.e., they exceed your weight by 20 or more times.
A person is not able to achieve such strength in other exercises, only in altitude jumps, which are excellent stimulators of muscle strength. The altitude jumps used for strength training must be done on soft gym mats or a well dug hole with sand. Altitude jumps in which the muscles under the influence of large external forces 230
execute only eccentric work. In eccentric work, there is maximum tension in the shortest time. This facilitates the growth of strength in eccentric and in concentric movements.
Depth Jumps
Depth jumps is the most popular and most effective method for the development of explosiveness. It is also the most effective method for developing the reactive ability of your neuromuscular system. When the muscle is stretched, it develops elastic strength. This not a metabolic process, it is purely physical. To execute depth jumps, you step off a box or bench set at a certain height so that you drop straight down. As soon as you hit the floor, you immediately jump straight upward or upward and forward, with as little bending of the legs as possible. All of the landing forces should be vertical so that they can create maximum loading on the muscles. Landing should take place on resilient mats such as gymnastic or wrestling mats. Also, in the landing you should land first on the balls of your feet and then on the whole foot, followed by the ankle, knee and hip joint flexion. Note that the amount of flexion should be minimal. The key to success in the depth jump is a maximum fast twitch from the eccentric contraction to the concentric. The faster the switch takes place, the greater the force produced and the greater will be the height of the take - off. To execute the depth jump explosively, you should start thinking about the take - off prior to the landing. In other words, prepare your body for the landing and take - off and do not just allow it to happen. To do this most effectively you must get yourself psyched for a maximally fast and forceful jump. Do not begin the jump up until after you land. You must allow the muscles time to sharply stretch and tense. The most effective height for the depth jump is between 30 - 40 inches. When first starting you should use a lower height until you get used to the mechanics of the depth jump. When your muscles are prepared, then go to a height between 30 - 40 inches. As a general rule-of-thumb, your depth jump height should be no more than a foot above your vertical jumping ability. At a height of 30 - 40 inches, the amount of speed and strength is well balanced and you get the maximum effect of both of these physical qualities. If you increase the height from which you step off, then you would rely more on the strength component and if you lower the height, you will rely more on the speed component. By adjusting the height of the depth jump you can variably improve more strength or speed. Depth jumping from too high a height typically happens with beginning and intermediate athletes who usually function on the principle "more is better". Because of this, they increase the height to amounts that are beyond their capabilities to execute the jump effectively. When you jump from too high a height, there is too much flexion in the legs, which absorb most of the force of the landing, and thus there is very little force to propel you upward. You end up with a
231
weaker and lower jump. Jumping from too high a height also involves different take off mechanisms. It is also important to realize that it is most advantageous to execute depth jumps after adequate strength preparation. Because of the great forces involved, it is necessary to begin doing such exercises very gradually. Practice has shown that in most cases you should be able to squat 2.5 times your body weight before undertaking maximum depth jumps. You should also know that the after effect of the depth jump is maintained for about 6 - 8 days. Because of this, such jumps should be discontinued 10 - 14 days before competition. How often you jump is also important. For athletes who are well prepared physically, doing depth jumps three times a week is usually sufficient for most sports. Also, the number of depth jumps in one session should not be greater than 40 times. For less physically prepared athletes, 20 - 30 repetitions of the jump one time per week is enough. Although there is some variability, depth jumps are executed in series (10 times from a lower height and 10 times from a slightly higher height). Two sets are done. In between each set you should do light running exercises and exercises for relaxation (stretching).
Leg Explosiveness
To build leg explosiveness you should train appropriately for the specifics of Muay Thai and the level you participate at. You do more stationary power jumping, using a double leg take-off. In this exercise you jump up as high as possible, reaching upward with your arms. If you are involved in a sport such as long jumping, then you can do bounding, which, in essence, is multiple hopping (like a kangaroo) for maximum distance. Use a double leg and single leg take-off. Repeat 5-7 times. Some of the more effective exercises are as follows:
• Double leg hops in place (150 - 160 jumps/min) • Double leg jumps over 6 - 8 medicine balls placed at suitable distances for
jumping over. If you want more height, keep the balls closer; if you want more forward movement, place the balls further apart.
• Jumps for height with an approach run, including kicking a hanging object • Single leg jumps (hops) with forward movement • Single leg hops over 6 - 8 medicine balls (low obstacles) • Skips • Leaps (from one leg to the other up to 10) • Ankle jumps. The key is to keep your legs straight and use ONLY ankles.
232
Change in Direction Jumps
After developing confidence in your ability to do these jump exercises, you can then begin doing some jumps with changing directions. Some of the exercises that you can do are as follows:
• Double leg hops forward. Prior to landing, turn 180 degrees so that when you land you face the position you took off from. Leap up again and make another 180 degree turn to again face forward. You can change body position with each jump or after several.
• Side jumps. Jump to the left and then to the right, staying in the same basic position.
• Side jumps over a medicine ball of other object. • Side jumps over a bench. • Zigzag jumps. Jump forward and to the left, then forward and to the right.
Go for approximately 10 jumps. Repeat for 2 - 3 series. • Box jumps. Jump forward, to the right, to the rear and then to the left and
repeat in the opposite direction. (Jump to each corner of a square traced on the ground.)
Altitude Jumps (Plyometric Shock Method)
Begin altitude jumps from about 5' - 7' and gradually work up to 6' - 9'. One way you can gauge at which height you should be jumping is to look at the amount of flexion in the knee joint. If it gets less than 90 degrees, your jump height is too high. It is most effective if your knees bend very little to absorb the force of landing. You must not jump from such a height that it becomes necessary to descend into a full-squat position upon landing. You can begin doing depth jumps at this stage in your training. However, altitude jumps are NOT a prerequisite to depth jumps. You may wish to begin depth jumps right away without first doing altitude jumps. Here are some important guidelines for depth jumping:
• Begin by stepping off a low box or chair and immediately after landing, jump upward for maximum height. Repeat 8 - 10 times for 2 - 3 sets. In time, gradually increase the height to between 30 - 40".
• Step off a box, drop down, jump up and over 6 medicine balls laid out in a row.
• Same thing but only jump over 3 medicine balls, and then jump over a low hurdle.
• Same as above but after jumping over 3 medicine balls you jump for maximum height.
• Straddle jumps. Stand between two benches placed long ways to you. Leap up and place one foot on each bench. Jump off, land between the benches and repeat.
233
• When your muscles are strong enough, execute a depth jump with one leg. Step down and immediately upon landing jump up and over 3 medicine balls laid out in a row. Use the same leg or alternate.
• Depth jumps with a jump up to another box. Jump off to the floor, then up to other boxes of the same height. When familiar with these jumps, try alternating the height of the boxes.
• Do several side jumps over a bench, followed by several forward jumps over benches.
• Same as above. Add jumps onto higher objects for a total of 10 - 15 jumps. • Jump over a box but prior to landing turn your body 90 degrees so you land
in a side facing position to the other box. Execute 2-3 side jumps and then execute another 90 degree turn to land facing forward or backward.
• Single leg hop onto a box and single leg hop off onto the floor, followed by another jump on and off.
• Stair jumps. Do forward and/or side jumps, taking 2-3 stairs at a time and move upwards as fast as possible.
Jumping with Weights (Plyometric Exercises With Weights Method)
Jump exercises with weights can also be done at this time (and some even earlier). For example, hold dumbbells in the hands and do squat jumps for 8 - 10 reps, 2 - 3 sets. You can also do split squats with our without dumbbells in the hands or barbell ob the shoulders. The key in these two exercises is to jump as quickly and as high as possible. If holding weights in the hands or on the shoulders is not comfortable you can hang weights on the waist or wear a weighted belt. You can do short, fast jumps with the take-off on one or both legs and variants of the triple and quintuple jumps from place. In the "short" jumps the exercises are executed with maximum take-off power.
Explosive Arms
In general, the same progression is used for explosive arms as it is for explosive legs. First, you must begin with an all-round strength training for the shoulders and arms. Thus, for the upper body you should do exercises such as bench press, overhead presses, incline and decline presses, lateral arm raises, medial shoulder joint rotation, bicep curls, triceps extensions, supinations-pronations, ulna and radial flexion, and finger flexion.
After getting a strong muscular base from these exercises, you can do combination exercises such as an isometric hold followed by an initial explosion in the beginning position. For example, when doing the bench press, hold the barbell close to your chest for a count of 5 and then maximally explode to raise the barbell. However, make sure the weight is heavy enough so that when you explode the bar will be slowing down and stop as your arms come to full extension. To ensure that
234
your arm is not moving explosively or very fast near the end of the range of motion, you should think of short, quick explosions.
In addition, to develop more speed you can execute the exercises at a faster rate of execution but always with the barbell coming to a stop or being quickly reversed near the end of the range of motion. After this, you will be ready for "jumping" with the arms.
"Jumping" With the Arms
This can be done in several ways as follows:
• Wheelbarrow walk. Have an assistant hold your legs up off the floor and you hop on your hands with small take-offs with double arms.
• Push-up jumps. Assume the push-up position and leap up off the floor and then back to the push-up position.
• Assume the push-up position. Push off the floor and leap up to a block approximately 4" high. As you improve in your ability to jump upward, jump up as high as you can, up to 1' - 2'.
• Arm jumps over objects. As you jump up and over the objects from a push-up position, your feet will slide so that your body is still in good position.
• Jumps sideways over a low object. These are very short range sideward jumps from a push-up position.
• Push-up jumps with a hand clap. From the push-up position jump up as high as possible and clap the hands. As you improve try to increase the number of claps that you can execute prior to landing.
• Stair jumps. Assume the push-up position in front of a stairway. Jump up to the first step, get yourself set again, and jump up to the next step and so on. Go up about 4 - 5 steps. As you improve have a partner hold your feet as you jump up the flight of stairs.
• Assume a push-up position on the floor wearing socks on your feet so they'll slide across the floor. Do a series of 5 - 10 jumps in a forward line.
• Same as above. Instead of traveling in a forward line, go in a slightly zigzag line forward.
Depth Jumps (Plyometric Shock Method)
Assume a push-off position on the first step of a double modified staircase. Leap up, land in between the staircases and then immediately jump up onto the first or, if possible, second step. From the second step leap up, land on the floor, and explode up to the second or, if possible, third step.
The depth jumps can also be done with a partner holding your feet. Assume a push-up position with a partner holding your feet and your hands on a box with the shoulders directly above. Jump down from the box, land, and immediately explode upward. Your partner keeps your legs up high enough so your body does not hit
235
the box. The boxes should not be so high that your body makes contact as you drop down.
Medicine Ball Exercises (Plyometric Exercises With Weights Method)
The catching and throwing of medicine balls can also be used to develop arms and upper body explosiveness. Some of the exercises that can be done are as follows:
Chest Throw
1. Stand opposite a partner with feet shoulder width apart and knees slightly bent. 2. Using both hands hold a medicine ball to your chest and throw it to your partner with a pushing action. 3. The pass should be explosive as though you are pushing someone away from you. Avoid snapping you elbows however. 4. Have your partner throw the ball back and repeat. You could also perform this drill against a wall.
Overhead Throw
1. Stand opposite a partner with feet shoulder width apart and knees slightly bent. 2. Hold a medicine ball above you head, arms fully extended. 3. With your arms still extended stretch your arms backward to move the ball behind your head. Try not to arch your lower back too much. 4. Throw the ball to your partner releasing it just behind or above your head. 5. Have your partner throw the ball back and repeat. You could also perform this drill against a wall.
Pullover throw
1. Lying on your back with knees bent, have your partner stand about 10 feet away. 2. Hold a medicine ball directly over your chest with your arms extended. 3. With your arms still extended, lower the ball behind your head as far as you can... if you can touch the floor with the ball great! 4. From this position throw ball forward toward your feet releasing it when your arms are over your chest and abdomen. 5. Have your partner pass the ball back to you and repeat.
Shot Put
1. Stand opposite a partner with feet shoulder width apart and knees slightly bent. 2. Hold a medicine ball in your left hand. Place the back of your hand against the front of your left shoulder. The medicine ball should be facing your partner. 3. Shot put the ball as forcefully as possible to your partner. Avoid snapping the elbows however.
236
4. Have your partner throw the ball back and repeat with your right arm. You could also perform this drill against a wall.
Side Throw
1. Stand side on, with your partner about 20 feet to your left. Keeping feet shoulder width apart and knees bent place your right foot slightly in front of your left. 2. Hold a medicine ball with both hands directly in front of you. Keep your arms extended and parallel to the floor. 3. Swing ball as far to the right as is comfortable allowing your hips to turn with your arms. From this position... 4. Immediately swing the ball to your left throwing the ball to your partner. 5. Repeat for the desired number of repetitions and then repeat for the other side to complete one set.
You can also use medicine balls to duplicate the isometric contraction and then an explosion. For example, hold a heavy medicine ball over and behind your head. Hold for 5 seconds and then throw upward and forward as forcefully as possible. The same can be done holding the ball in a sidearm, underhand, or 3/4 arm position.
237
Kicking Speed
Key muscle groups for speed in kicking: gluteus medius, hip flexors, lower back, and abdominal obliques. Develop these muscles with side raises (foot never goes below one foot off the floor) and side lockout extensions. Lack of development in these areas is the reason why most people kick slowly, as they are responsible for the raising of the kicking leg, and the arching and torquing the occurs in the back, counter rotation of hips to shoulders, etc. This is a weak area in most people (martial artists included), and development of these muscles will also enhance your ability to escape inferior positions in grappling (as a side benefit). Do the side raises in 3 directions: side, 45 front, and straight back -- while holding on to something at waist height with the opposite hand only (a table or counter). Light target training Hang a towel or rag from the ceiling in your training room. Vary the vertical level, and work multiple kicking angles in rapid succession. Lunging Kicks, The Race The key to attaining speed in your lunging lead leg kicks is to make sure you land the kick before your weight settles on the supporting foot. This will also help your power. Think of it as a race. Your lead leg is trying to kick before your supporting leg can bear weight. But. Don't bob or bounce. There should be no up and down motion. That's the trick. When you can do this, you'll be able to lunge horizontally like lightning. Think Fast The key to being fast is to think "fast". One of the first things I became known for in certain circles was my kicking speed. At tournaments, exhibitions, etc., people used to come up and ask me all the time how I could kick so fast. The easiest reply was, "Think fast, and you will be fast. Always insist of yourself that you move at top speed." Start At Full Speed, and Accelerate From There Another important concept that I always tell my students. Your first movement -- at the very beginning -- should be full speed. From there, you should be relaxed, and accelerate from there. This goes hand in hand with the previous item above, and is very difficult to do. But, it will help your speed and power tremendously if you practice and apply it.
238
Most people do not even realize that when they begin to move, they do so (either consciously or unconsciously) at a slower speed, so they can "build up" to top speed at full extension of a kick or punch. They do this so that their power reaches an apex at full extension. The problem, though, is that the opponent has eyes. He perceives this build-up, and makes it miss. Most people, if they start a kick at full speed, tend to peter out from that point onward, and the kick will have no power. This is why, once your kick starts off at full speed, it must accelerate from there -- so that it has power. When it is not accelerating, it is not *pushing off* of something. Acceleration is a major key to power (and some forms of leverage), since a kick when it is accelerating has mass behind it. When it is not accelerating, then it is out there on its own.
The above tips should help you out in developing faster kicks without compromising good technique or power (major problems if you are not careful).
239
Training to Fight!
OK, so you've been going to your Muay Thai classes for 2 or 3 nights a week for the last 6 months. You understand all your basics pretty well, and are confident with your combinations and with your sparring. You decide to take this to the next level...
The first thing is that a fighter should have a MINIMUM of 6 weeks notice (meaning 6 weeks of training) before any bout. Recently, I passed up on the opportunity for my students to enter a competition because there was only 4 weeks notice. Sorry, 6 weeks notice or we're not coming...
If you plan to fight, or are considering it, you must be ready to devote every day of your life for 6 full weeks to training. Well, actually six days each week.
First, from day 1 until a few days before the fight, you should run EVERY SINGLE DAY! Even on your one day off, you should run. For the first 2 weeks, you should be jogging for distance. Devote at least 40 min's each day to roadwork. After the first two weeks, then start alternating between jogging for distance and running wind sprints. When I used to run my sprints, I'd run approx 30-40 yards sprinting, then I would turn around and run back slowly to cool down, then turn around and sprint again. I would repeat this about 5 times my first time out, then gradually increase the repetitions until I was between 15-20. Lay off the sprints, and cut the distance on the jogging the last week, as you want your body to recuperate before you enter the ring.
Spend about 20 min's a day jumping rope.
For the first week or so, the workouts should steadily pick up pace. You should workout by rounds, and your workouts should be at the minimum of 2 hours. For the first two weeks, increase the rounds of shadowboxing, padwork, and heavy bag work from your normal workout.
For example, my class presently works out like this: (3 hour allotted time frame)
10 min's rope stretching (takes about 5-10 minutes) footwork and medicine ball drills (approx 2-5 rounds, varying) pushups sit-ups/crunches 3 rounds shadowboxing 10+ rounds of partner drills with Thai pads and Heavy bag work 30 minutes (approx.) of instruction in new techniques neck wrestling
240
(the last hour of class is reserved for students to work on what they feel they need extra practice on, and I "mingle")
We have one sparring class each week, on Saturdays...
Depending on the day, many of the drills are shortened, or dropped, based on the "group" need.
If I were to adjust this for fighters, it would be:
20 min's rope stretch footwork and medicine ball drills (3-5 rounds varying) pushups sit-ups/crunches 5 rounds shadowboxing 10+ rounds of Thai pad, heavy bag, speed bag, and double-end ball drills 20 minutes of neck wrestling
*sparring would take place at least twice a week*
Important note on sparring. It is of utmost importance that you train to prevent injury. Sparring should NOT be done full contact or full competition rules. Separate sparring into elements such as boxing, kicking, or clinching. You can mix the three in different combinations of sparring as long as you maintain control of the fighters, making sure that they are striking lightly. Sparring partners should wear full protective gear: Headgear, mouthpiece, 16 oz. gloves, elbow pads (if available use lacrosse pads), chest protector, shinpads, and groin protection.
As training goes on, the first two weeks as mentioned are a build up to what I listed above, gradually increasing intensity so that from 3-5 weeks the fighter is training as hard as possible. The last week of training should really taper off to a few rounds shadowboxing, pad drills, NO SPARRING and light jogging.
The last 2-3 days of training should consist of really light jogging and a couple of rounds of shadowboxing. Nothing else. You must spend the last week letting the body recuperate, hence why the big drop off in training. However, you must "keep the motor running", which is why you at least do something each day.
REMEMBER: running, weight training, and such are the fighters responsibility to do outside of class time. I do not recommend cross training with another martial art while training to fight. I personally cross trained by Mountain Biking when I was fighting.
241

By contrast, when Thais train to fight, they do all of the above TWICE a day. The get up in the AM to run as a group then train. They gather again and do it all over again in the evening.
242
How not to Flinch, Blink or Turn Away
You see it in a lot of students who are just beginning to freefight in Muay Thai. They are scared and aren't sure what they are doing. When a punch or kick comes at them, they react -- they flinch, cover their head, blink their eyes, and sometimes even turn their back. You can almost hear the internal dialogue, "On no. Here it comes. I'm going to get hurt."
Freefighting is at first very uncomfortable. This type of reaction is natural -- an instinctive response in an effort to defend yourself.
The result, however, is that the student is put at a momentary disadvantage since this type of reaction creates an opening an opponent can exploit. In competition the student might lose a point, but on the street this type of reaction can put him or her in real jeopardy.
If you blink you lose sight of an opponent momentarily. Vision is also disorientated during a flinch as everything becomes a blur of movement. And if you turn away, everything is exposed.
So what can you do? Actually there is a lot you can do, and answers fall into several general categories. You can retrain your reflexes, re-orient your attitude and learn how boost your visual skills.
Retraining The Reflexive Body
First you should gradually learn how to confront and deal with attacks - something that will reduce your fear and teach you how to control the natural instincts to run, flinch, blink or turn away.
One way to do this is through various drills. They go a long way to allow you to eliminate your fear in a safe environment.
One of the best drills is to use a pad (often on a handle) to simulate various attacks -- straight punches and hooks to the head, body shots and various types of kicks. Try to keep a proper fighting position, hands up, and move -- shift position, duck under hooks, and shift your head to the side of a punch (known as slipping a punch) while blocking it with your hand or forearm. Gradually you will become more comfortable with being attacked and the pace can be increased. The pace of the practice attack should always push you a little beyond where you feel comfortable. This forces you to improve.
Later, actual punches and kicks can be introduced -- at first done slowly and over time increased in speed and power. While you may just be defensive at first, after a while you will learn to also take the offensive. Be careful to use protective equipment unless you are practicing this drill in slow motion.
243
On an advanced level a similar activity entails actually allowing soft punches to land. If you are more advanced you can allow harder punches. Through this method you will learn how to take a punch, how to tighten up or move to eliminate its effects and this will reduce the fear factor by reducing perception of possible pain. Avoid any actual hits to the head, however. This is dangerous.
The Mental Switch To Offense
Most beginners focus on defense and not getting hurt. Mentally they are defensive and physically they are hesitant. They are waiting to get hit or hurt, and when anything comes near them they jump in anticipation.
Try to reorientate your thinking to one of offense, not defense. Mental focus will change from avoidance of getting hit to a focus on attack. You will begin to look for an opening and your dialogue will change too: "Good, here comes an attack I can respond to." Fear is reduced because attention has shifted elsewhere.
Visual Reorientation
Another method to reduce flinching, blinking and turning away is to be able to re-educate how you use and control your eyes.
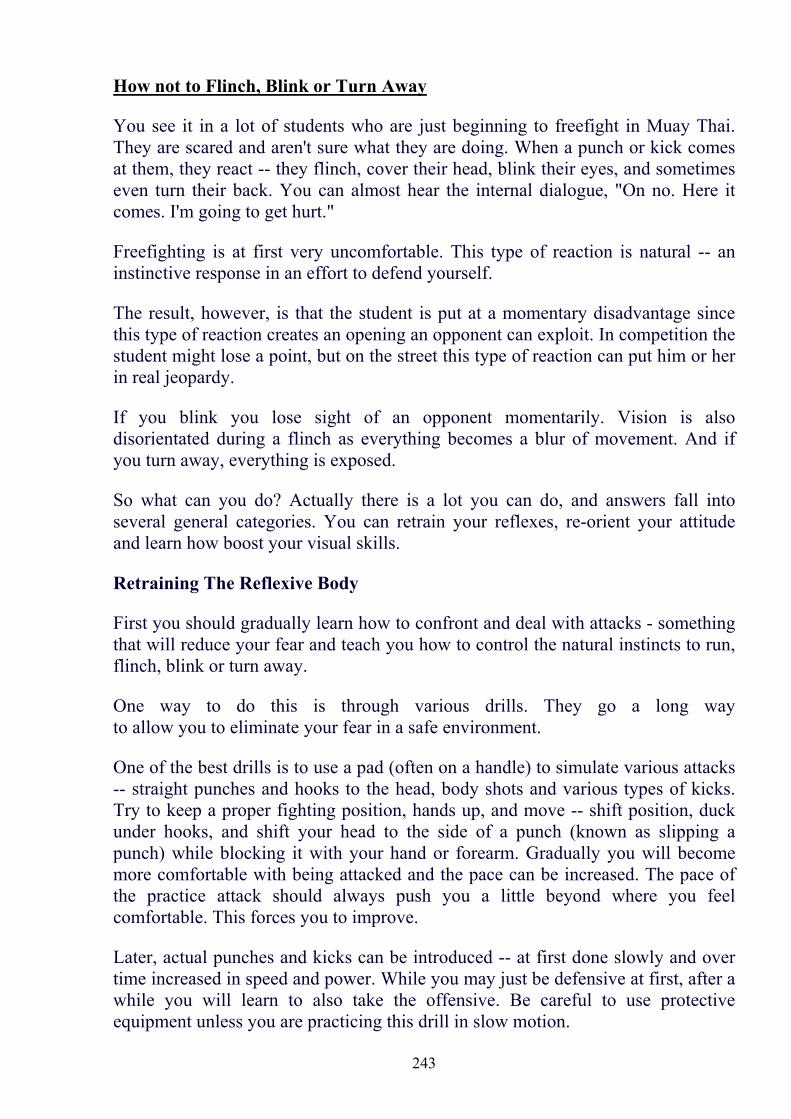
To reduce blinking you can control the muscles of the eyelid.
Many mistakenly try to hold their eyelids open to stop blinking, but this doesn't work because blinking is done with the muscles that close the lids, not open them.
Thus to stop or reduce the tendency to blink, slightly narrow your eyes, thus bringing conscious control over the muscles used in blinking. Have a partner punch to either side of your head, or jab toward you face but at a distance that contact won't be made. Practice controlling your blink reaction. Keep your eyes narrowed, observing everything, but not focusing on anything.
One way to help control flinching is to minimize the surprise of an opponent's actions. Visually this can be done in two ways. At the start of freefighting, or when action has momentarily ceased, I teach my students to look into their opponents' eyes but also perceive their whole body -- at least at the beginning.
The eyes will indicate when your opponent is about to attack. So practice picking up signals from your opponents' eyes. They provide great forewarning.
244
When there is action during freefighting you can also use your vision to reduce the potential surprise of an opponent's second or third technique. Do not focus on the attack itself, for if you look at it, it will fill your visual field and block your perception of what's following. Instead you should look past any attack for what is coming next. This gives you more time to react since you will pick up attacks as they are launched, not as they are about to land. This give you time to react.
Blink Reaction Drill
A drill we use is what we call Uppercut, Uppercut, Hook, Hook. (OK, not a very imaginative name...)
Each fighter wears headgear and gloves. You crowd against one another and alternate throwing 4 punches. Fighter №1 throws two uppercuts to the body (shovel punches) and then two hooks to the shoulders. Then fighter №2 immediately counters with the same. Each fighter defends by crowding the other fighter and blocking the hooks with elbows and "fanning" the hooks while rolling with the punches.
Even though these punches aren't aimed at the face, this really helps people get used to taking a hit without flinching.
245
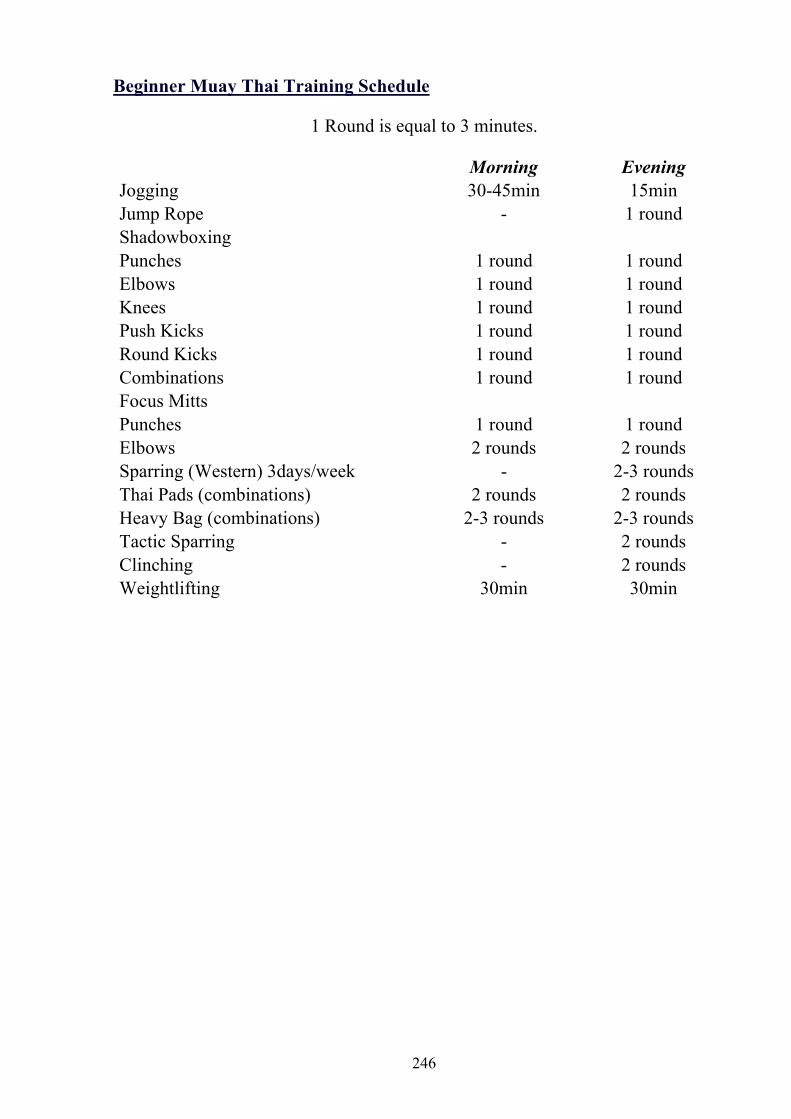
Beginner Muay Thai Training Schedule
1 Round is equal to 3 minutes.
Morning Evening Jogging 30-45min 15min Jump Rope - 1 round Shadowboxing Punches 1 round 1 round Elbows 1 round 1 round Knees 1 round 1 round Push Kicks 1 round 1 round Round Kicks 1 round 1 round Combinations 1 round 1 round Focus Mitts Punches 1 round 1 round Elbows 2 rounds 2 rounds Sparring (Western) 3days/week - 2-3 rounds Thai Pads (combinations) 2 rounds 2 rounds Heavy Bag (combinations) 2-3 rounds 2-3 rounds Tactic Sparring - 2 rounds Clinching - 2 rounds Weightlifting 30min 30min
246
Conditioning the Shins
Most common questions are: How do I condition my shins? It hurts so much when I train. How do I make my shins harder?
First, you must realize that a conditioned shin is one with deadened nerves. The shin is already hard and will unlikely get much harder. The key is to deaden the nerves so that you wouldn't feel the pain upon impact. However, you must also realize that you should not damage the shin bone while trying to deaden the nerves. This can be done only by practicing on the Thai pads and bags. The Thai pads and bags are softer than your shin bone while hard enough to damage the nerves on the skin above your shin bone with repeated impact. This process can take a while depending on how hard you train and how frequently you train. You must accept that in the beginning, it will be painful. You've just picked one of the most demanding sports in the world. There will be pain to go with it. This is only the beginning. The first time an opponent lands a hard Thai kick on your legs, you will get a wake up call more painful than shin conditioning. Mentally tell yourself that this is the initiation process. In time your shins will be properly conditioned. There are ointments that may alleviate some of the pain. Use them as needed. But understand that no ointment will make the process painless.
What I don't want to see any of you do is to try and take the shortcut at shin conditioning by using hard objects like wood or bottles. I was shocked to hear that some people were actually told by their trainers to take this route. If your trainer tells you to beat your shins with sticks or roll hard bottles on them, seek another Muay Thai gym. This is what will happen if you take these drastic measures. You will at first feel that your shins are conditioned fast. Why? Your nerves have been deadened fast so that you now feel little pain. But by using an object harder than your shin bone you've just damaged the bone too. Guess what will happen later in life? That's right, you will have to see a doctor for bone problems. This crazy method probably started from the myth that Thai boxers in Thailand kicked trees with their shins. The truth is long ago before the availability of pads and bags, Thai boxers kicked banana trees. The texture of a banana tree is rubbery and is softer than a person's shin. It is not like the wooden oak tree sitting in your backyard. The only thing as hard as or harder than your shin bone that you may one day hit are the shins, knees, and elbows of your opponents. And if you end up hurting your shin bone as a result of kicking into your opponents raised knee, then you may still suffer an injury. Just try to minimize injuries in training and save your luck for the ring.
247
Shin Conditioning Drills
1. Kick the Heavy Bag and/or Thai pads. You should kick over 100x's each day. I recommend 500x's, or around that figure.
2. When you start kicking the bag, start kicking lightly at first. Gradually increase the power so that you are kicking full power around your 30th kick.
3. Stop every so often and massage the shins vigorously to get the blood flowing back into them. (One of good massage techniques - place your shin between the middle knuckles of your second and third fingers, and rub vigorously the length of your shin several times) This promotes faster healing of the bruised flesh and any damage to the bone. You might also like to invest in Boxing Liniment (basically it's Ben Gay). Massage your shins with that before and after you kick, if available.
4. Do not "tap" or "beat" your shins with sticks, boards, bottles, etc. This causes bruises, knots, etc to form on the shin. These painful little areas may stick with you for quite some time.
There has been mention of the popular myth that in old age, Thai boxers shins become soft. Believe me, this is NOT TRUE! I have spoken with many older, retired Thai boxers, none of them have experienced any detrimental health issues concerning the conditioning of their shins and legs. I also spoke with a medical professional, and to the best of that person's knowledge, the only likely explanation would be if someone had osteoporosis, where the body leaches calcium from the bones when there is not enough in the diet. (Thailand is still in many ways a third world nation)
The only problem with the above method is that because we don't start training Muay Thai as early in life as the Thai's do, we are playing "catch up". Thai's start training usually by the time they are 12 years old. They kick the bag literally hundreds of times per day. Hell, they often actually live at their camp, so they have the "luxury" to train like that.
For most of us though, we have jobs, school, families, responsibilities... All kinds of distractions that prevent us from training like the Thai's do. That's why some try to find easier and cheaper way and use tools such as rolling pins, Coke bottles, broomsticks... It’s like steroids – one gets faster results but at the cost of one’s health. It’s your health, your life – don’t try to cheat on yourself. THE ONLY CORRECT WAY OF SHIN CONDITIONING IS TRHOUGH KICKING HEAVY BAG AND THAI PADS.
Kicking Trees
So, one Muay Thai beginner comes up to me and asks, "When will I be ready to kick trees?"
248
Don't laugh, he was serious. For many of you, this is a silly question, but to others this part of Muay Thai mythology is real.
As is the case with most myths, the belief that Thai Boxers train by kicking trees is based on fact. Thai boxers are known for their rigorous physical conditioning, and in particular, their extremely hard shins.
But contrary to what many believe, this is achieved through the use of very modern equipment.
Thai boxers use the finest boxing gear found in the world designed specifically for the rigorous use of Muay Thai. As they condition their bodies with pad drills, sparring, or exercise, they toughen their shins on the heavy bag. Most Thai boxers begin training between the ages of 8 and 12, then being competing professionally between the ages of 16 and 22. After 8 years of kicking the heavy bag every day, their shins are like iron! However, Thai boxers have not always had access to equipment such as heavy bags, hence, the banana tree.
A banana tree is not hardwood like most trees found in the USA. Banana trees have a softer, more plant-like trunk, which will give a little when kicked. Additionally, beginning Thai boxers would not start off by kicking a tree with full force, rather they would start kicking slowly without much power until the shins would eventually toughen to withstand the punishment. Trees are sometimes still used today for training. Thai boxers kick them with minimal power in order to improve speed and accuracy.
Though, in all honesty, there are those who are capable of kicking trees without any real harm to themselves (I have actually met quite a few of them), this is largely an old practice rendered obsolete by the use of modern boxing equipment. So in conclusion, please... DON'T TRY THIS AT HOME!
249
Common Muay Thai Injuries
A mild to moderate strain consists of a simple tear of the muscle fibers. Treatment consists protecting the muscle and tendon from further injury until healing is complete. Immediate treatment should include ice packs to the injured area followed by a compressive wrap. Forceful, quick contractions of the injured are should be avoided at all costs until pain and swelling subsides. Daily stretching and slow contractions of the injured area followed by ice if needed will speed recovery.
A severe strain consists of a complete tear of the tendon from its boney attachment and can be easily identified by a complete loss of function of the muscle-tendon group. Treatment is immediate attention by a trained physician. Surgical repair will be necessary in most cases.
A sprain is an injury to the ligament structure and the degree of damage depends on the amount of damage to the ligament itself. Ligaments are designed to hold to boney areas together at the joint and to prevent excess motion of the join.
A mild sprain involves only a small portion of the ligament with only minimal tearing of the ligament fibres. Treatment involves relieving symptoms only. This is best accomplished by applying ice to the injured area followed by a supportive elastic wrap. As pain subsides activity can usually be continued without restriction.
A moderate sprain involves up to half the ligament fibres being torn. Moderate sprains are immediately painful and accompanied by swelling and some disability in the moving joint. Because the ligament is still at least fifty percent intact there is no noticeable instability to the joint. The healing of a moderate sprain is slow and requires six to eight weeks for complete recovery (as long as a broken bone!). During this time the partially torn ligament must be protected by wrapping or strapping. Complete immobilization is usually the best treatment until the healing is complete.
A severe sprain means a complete tear of the ligament and results in the loss of stability of the joint. Treatment consists of prompt medical attention and usually surgery will be necessary.
When treating ALL soft-tissue and muscle-to-bone injuries a quick and easy method to use is the ICER method.
• Ice the injured area • Compression on the injured area • Elevation of the injured area • Rest
250

Finally, using heat on any muscle, tendon, or ligament injury during the first 72 hours is a bad mistake. It will increase swelling and make the injury worse. After the initial three-day period heat may be used.
251
Dealing with Psychological Problem of "Getting Hit"
There are a lot of beginners who are seemingly leery of "getting hit" - and yet they have a desire to take boxing. Some are concerned with getting brain damage; others just fear being hit...HARD. I don't think anyone of experience doubts that striking skills are important to a fighter: on the street, in tournament - wherever a fight takes place - knowing how to hit (and just as important, knowing how to avoid, or deal with, GETTING HIT) are invaluable to a fighter.
We who have Muay Thai experience know that there really isn't that much to worry about in learning true striking disciplines - but it is hard to convince the uninitiated that trading blows is really no big deal. While I am certainly no threat to any boxing title, I have learned the basics, and beyond, in the "sweet science" of boxing. I can honestly say it took me about a year to a year-and-a-half to RELAX in the ring. To be comfortable in going head-to-head with a professional fighter. To stop worrying about GETTING HIT and to start concentrating on HITTING. In my gym I saw many people come to take up boxing, but then QUIT after being hit a few times. The reasons were always two-fold: 1) their fragile egos couldn't handle the idea of losing, and/or 2) they had the mindsets of cowards; they couldn't control their FEAR of being hit. Basically, both 1 and 2 involve improper mindsets. For the benefit of those forum members who have no striking experience, but want to acquire it, and yet allow their FEAR to stop them from trying, I will analyze the proper mindset one needs, and address these two negative factors which get in the way of a proper mindset.
1) Not being able to handle losing. If we decide to learn tennis, we realize that we will never be able to go on a court and whip a pro. Same thing with weightlifting - we realize we can't just walk into a gym and bench press 500 lbs. WE HAVE TO WORK AT IT - for years. Muay Thai - same thing. You have to work, for years, to get good. Really good. Yet for some reason many of us think we can just walk up to a professional boxer and knock him out. We view ourselves, inside, as "the ultimate badasses" when it comes to punching power. When we step into the ring for the first time and get the snot beaten out of us, we can't handle it. Our egos are shattered. How many of us have heard drunk idiots, watching the fights on TV, say "Hell, I could kick his ass!" as they watch some fighter get defeated. Those who utter such nonsense deserve to be instantly teleported into the pit with the losing fighters they're ridiculing to see if they really can "kick his ass." Their bold declarations would soon turn into pleas of mercy.
Face it: when you first go to a Muay Thai boxing gym EXPECT TO BE DEFEATED WHEN YOU SPAR, but have this expectation IN A POSITIVE WAY. By that I mean LEARN FROM EVERY LOSS. Look at what the other fighter is doing to you, study it, and then TRY TO EMULATE WHAT HE'S DOING. This is
252
the proper mindset to get better: forget about your ego, you're in there TO LEARN. When you lose as a beginner (and even when you're experienced), you turn those losses into BENEFITS by realizing that the superior fighter kicking your ass is TEACHING YOU SOMETHING. Eventually, if you have the guts to stick with it, it will be YOU who is kicking ass. This leads us to the next mindset problem. 2) A natural tendency towards cowardice. A brave man is one who recognizes a danger, he feels the fear, but he CONTROLS THE FEAR and faces the danger anyway. A coward also recognizes the danger, he also feels the fear, but it is here where he chokes and lets that fear CONTROL HIM and thus AVOIDS the danger. MOST OF US FEAR WHAT WE DO NOT KNOW. If we know something, we are comfortable with it, so what's there to fear? If we DON'T know something, we're wary, concerned, FEARFUL OF WHAT MIGHT HAPPEN. It is bridging the gap from NOT knowing how to fist fight, to KNOWING how to, that we need to cross. The brave man decides to go learn; the coward never tries. The brave man controls his fear and ventures into the unknown (where he will soon KNOW - and thus no longer fear) whereas the coward is controlled by his fear, avoids the unknown (and thus he will NEVER KNOW - and thus ALWAYS fear). Well so how does the natural coward control his fear and become brave? [We've all been here.] It is through the internalizing of the basic principles of human effectiveness. My Muay Thai trainer always told me "The Lord said it's more blessed to give than to receive...and that's especially true in Muay Thai." I used to laugh at this, but the older I got, and the more fighting (as well as LIFE experience I gained), the deeper I internalized this wisdom. For instance, here comes Christmas In this holiday season you will find the one great division of mindsets amongst the populace: those who are worried about what they'll GET, and those who are worried about what they'll GIVE. Those people who only worry about what they will GET are the small of spirit, shriveled and unevolved. Those who worry about GIVING are the happy ones, the ones we like, the ones who shine. By the very nature of giving, we EXTEND OURSELVES, our limits, and thus we GROW. By the very nature of TAKING, we withdraw into ourselves, and thus we SHRIVEL. Those who worry about what they're GETTING for Christmas make inferior human beings. Those who worry about GIVING at Christmas are superior human beings. THE SAME TRUTHS OF MINDSET APPLY IN BOXING (and in anything). If you step into the ring worried (or, worse, elect NOT to step into the ring), you will never grow. You will curl up in a ball and TAKE punches, because you're mindset is focused on what you'll be GETTING instead of what you'll be GIVING. The mindset of a true boxer is worried about HITTING, not BEING HIT. He learns the necessary defenses only so that he can CONTINUE HITTING. The negative mindset worries about being hurt, GETTING HIT, and so will never amount to anything but being a whipping boy.
253

BOTTOM LINE:
If you want to evolve and grow as a human being, don't worry about what you'll get from others...learn to give, to try, to extend yourself, and to concentrate on what YOU'RE DOING to and for others, not on what's being done to or for you. If you want to learn how to box, same thing: don't worry about what others will do to you, learn to give, to try, to extend yourself with effort, and concentrate on what YOU'RE DOING, not on what's being done to you. It all has to do with mind control.
254
Basic Technique in Meditation Practice
The primary goal of meditation in Muay Thai is not simply to be able to make a meditative effort during formal sittings, but to maintain and generalize conscious attention to all aspects of Muay Thai practice and life in general, thereby eliminating mental tension.
Ultimately, the greatest achievement in Muay Thai is the simultaneous refinement of mind and body. The special training of consciousness effectively regulates every biological system of the body as well as its technical and mechanical facilities. Cultivation of the mind leads to cultivation of the body, leading to further cultivation of the mind and so on, eventually attaining an exquisite level of cooperation and coordination between the two. Successful meditation is easy to be achieved, if practiced in the right way. The following is step-by-step technique for beginners.
Preparation
First, you have to prepare yourself for the session.
• Remove as much concerns and worries as you can. • Make yourself as comfortable as possible for instance wear comfortable
clothes, choose a secured and peaceful place for your practice, etc. An appropriate temperature is also essential.
• Choose the most relaxed and comfortable as possible sitting position. • Draw your attention to building the concentration. Do not let your mind
wander toward unrelated thinking.
Practice
When you are ready, your instructor will help you with each step of practice as follows :
255
Step 1. Practice in One Pointed Mindfulness on Breathing:
a) Take deep breath twice to start concentrate on only your breathing. b) Close your eyes and let your breathing go by itself. c) Watch closely the "rhythm" and "depth" of your breathing, which alternate automatically. d) Ignore any thoughts occurred, by trying to watch breathing until it draws your complete attention to itself as "one pointed mindfulness"
Step 2. Practice Contemplation of the body: a) While watching your breathing, gradually divide your attention to your body. You will find discomfort in several places. b) Pay all attention on body adjustment. Gradually shift the position of hands, arms, legs and torso; until you are most comfortable. c) Turn your attention back to breathing, which becomes deeper and makes you feel better than ever.
Step 3. Practice in Contemplation of the Feelings: a) While watching breathing, turn your attention to the feelings at parts of the body, beginning with the right palm. You will find that if you concentrate one pointed at your hand, the feelings of your hand will disappear. Then move your concentration to your right arm, right shoulder, left shoulder, left arm and left hand, respectively. b) If you can watch your breathing while concentrate on your whole body, you will feel as if most of your disappear or weightless and floating in space. At time stage, you will be rewarded with feelings of total relaxation and peaceful contentment. c) Make sure to turn your attention back to breathing to retain your full consciousness. Such state of relaxation and contentment can easily makes you fall asleep or enter a trance which are not the purpose of this practice.
Step 4. Practice in contemplation of Mind a) While watching your breathing, turn your attention to the darkness inside your closed eyes, which looks like dark blank screen of the turned-off television set. b) While instructor provides selected Buddhist chant, you concentrate on breathing and look for picture or color or light in your closed eyes. c) If you can see a circle of light in your closed eyes; it is an indication that you get "Jhana" or the counterpart sign of your own mind.
The above four-step practice is part of Lord Buddha's Four Basis of Mindfulness, which helps a person of any religion purity his or her own mind so that to improve physical can mental health, and to lessen stress from everyday life. If practiced regularly, meditation practitioner will develop better understanding of life and ability to reduce ill emotions such as depression, doubt, confusion and etc.
256