Trainee Guide Complete Booklet
184
U.S. NAVY SURFACE RESCUE SWIMMER SCHOOL TRAINEE GUIDE NAME_____________________________ RATE________ CLASS NO.___________ COURSE MISSION STATEMENT The Surface Rescue Swimmer School (SRSS) is designed to provide Navy and USMC (E-1/E-9) personnel with knowledge and skills necessary to initially qualify as Search and Rescue swimmers, including water entry, first aid, CPR, parachute disentanglement, and waterborne lifesaving procedures under all environmental conditions. Upon completion of this course, the Rescue Swimmer is prepared for assignments with surface units to provide Rescue Swimmer duties.
-
Upload
covalciucbogdan -
Category
Documents
-
view
217 -
download
4
Transcript of Trainee Guide Complete Booklet

U.S. NAVY SURFACE
RESCUE SWIMMER SCHOOL
TRAINEE GUIDE
NAME_____________________________
RATE________ CLASS NO.___________
COURSE MISSION STATEMENT
The Surface Rescue Swimmer School (SRSS) is designed to provide Navy and USMC (E-1/E-9) personnel with knowledge and skills necessary to initially qualify as Search and Rescue swimmers, including water entry, first aid, CPR, parachute disentanglement, and waterborne lifesaving procedures under all environmental conditions. Upon completion of this course, the Rescue Swimmer is prepared for assignments with surface units to provide Rescue Swimmer duties.

TRAINEE GUIDE FOR SURFACE RESCUE SWIMMER
SCHOOL
JANUARY 2006
A-050-0500 PREPARED FOR NAVAL AVAITION SCHOOLS COMMAND 181 CHAMBERS AVE SUITE C PENSACOLA, FL 32508 JANUARY 2006

TRAINEE GUIDE A-050-0500
2
CHANGE RECORD
Number and description of change Entered By Date

TRAINEE GUIDE A-050-0500
3
TABLE OF CONTENTS
Change Record……………………………………………………...………………………….…..2 Security Awareness Notice………………………………………………………………………....6 Safety/Hazard Awareness Notice…………………………………………………………………..7 How To Use Your Trainee Guide………………………………………………………………….8 Terminal Objectives…………………………………………………………………………….….9 Unit 1.0: RESCUE SWIMMER SCHOOL (RSS) COURSE OVERVIEW/COURSE INTRODUCTION.
Lesson Topic 1.1: RSTTP Overview/ Course Introduction Outline Sheet 1.2-1………………………………………………….. …………..11 Lesson Topic 1.2: Pool Safety Regulations Outline Sheet 1.2...………………………………………………….. …………..15
Unit 2.0: PHYSICAL CONDITIONING Lesson Topic 2.1: Physical Training Outline Sheet 2.1..………………………………………………………………17 Lesson Topic 2.2: Swimming Proficiency and Conditioning
Outline Sheet 2.2...………………………………………………………………25 Job Sheet 2.2-1…………………………………………………………………..27 Lesson Topic 2.3: Open Water Laboratories Outline Sheet 2.3...………………………………………………………………29 Job Sheet 2.3-1…………………………………………………………………..31 Unit 3.0: LIFESAVING AND PARACHUTE DISENTANGLEMENT
Lesson Topic 3.1: Lifesaving Approaches/Carries
Outline Sheet 3.1…………………………………………………………………..33 Diagram Sheet 3.1-1………………………………………………………………36 Job Sheet 3.1-1……………………………………………………………………41 Lesson Topic 3.2: Front/Rear Head Hold Releases and Escapes Outline Sheet 3.2......……………………………………………………….……..43 Diagram Sheet 3.2-1.…………………………………………………………...…47 Job Sheet 3.2-1……………………………………………………………………51 Lesson Topic 3.3: Water Entry Outline Sheet 3.3………………………………………………………………… 55 Diagram Sheet 3.3-1…………………………………………………………...…59 Job Sheet 3.3-1……………………………………………………………………63

TRAINEE GUIDE A-050-0500
4
Lesson Topic 3.4: Canopy Escape Outline Sheet 3.4-………………………………………………………………..65 Lesson Topic 3.5: Disentanglement Procedures Free Floater Outline Sheet 3.5..……………………………………………………………….67 Lesson Topic 3.6: Disentanglement Procedures Back Pack Outline Sheet 3.6...……………………………………………………………....73 Lesson Topic 3.7: Disentanglement Procedures Jet Aircraft Outline Sheet 3.7..……………………………………………………………….77 Lesson Topic 3.8: Combative Survivor Outline Sheet 3.8..……………………………………………………………….81
Unit 4.0: RESCUE EQUIPMENT AND PROCEEDURES Lesson Topic 4.1 Rescue Swimmers Equipment Outline Sheet 4.1...………………………………………………………….…...87 Diagram Sheet 4.1-1 …………………………………………………………….91
Lesson Topic 4.2 Mask, Fins and Snorkel Outline Sheet 4.2...………………………………………………………………93 Job Sheet 4.2-1…………………………………………………………………..97 Lesson Topic 4.3: Primary Rescue Devices Outline Sheet 4.3..………………………………………………………………99 Diagram Sheet 4.3-1…………………………………………………………...107 Job Sheet 4.3-1……………………………………………………………........113
Lesson Topic 4.4: Alternate Rescue Devices Outline Sheet 4.4………………………………………………………………115 Lesson Topic 4.5 Aviation Life Support
Outline Sheet 4.5-1…………………………………………………………….119 Diagram Sheet 4.5-1.……………………………………………………...…...123
Lesson Topic 4.6: Survivor Marker/Locater Devices Outline Sheet 4.6………………………………………………………………125 Diagram Sheet 4.6-1……………………………………………………….…..127 Lesson Topic 4.7: SAR Publications and Reports Outline Sheet 4.7………………………………………………………………129 Lesson Topic 4.8: Rescue Boat Operations Outline Sheet 4.8...………………………………………………………….…133 Diagram Sheet 4.8-1 ……………………………………………………....…135

TRAINEE GUIDE A-050-0500
5
Lesson Topic 4.9: SAR Tactics Outline Sheet 4.9……………………………………………………………….137 Lesson Topic 4.10: Inanimate Object Recovery Outline Sheet……………………………………………………………………141
Unit 5.0: STANDARD FRIST AID AND AMERICAN RED CROSS CPR FOR THE PROFESSIONAL RESCUER Lesson Topic 5.1: American Red Cross CPR for the Professional Rescuer Outline Sheet 5.1………………………………...……………………………...147 Lesson Topic 5.2: Level “A” Medical Kit Outline Sheet 5.2………………………………...……………………………...149 Lesson Topic 5.3: Practical First aid and Moulage Outline Sheet……………………………………………………………………151 Diagram Sheet 5.3-1 ……………………..………………………………....…163 Job Sheet 5.3-1………………………………………………………...……..…171 Lesson Topic 5.4: Primary Survey Outline Sheet 5.4………………………………...……………………………...173 Lesson Topic 5.5: Secondary Survey Outline Sheet 5.5………………………………...……………………………...183
SECURITY AWARENESS NOTICE

TRAINEE GUIDE A-050-0500
6
******************************************************** * This course does not contain any classified material *
********************************************************
SAFETY/HAZARD AWARENESS NOTICE

TRAINEE GUIDE A-050-0500
7
THIS NOTICE PROMULGATES SAFETY PRECAUTIONS TO THE STAFF AND STUDENTS, OF THE SURFACE RESCUE SWIMMER SCHOOL COURSE. RESPONSIBILITIES ARE ASSIGNED BY THE CHIEF OF NAVAL EDUCATION AND TRAINING, THROUGH THE CHIEF OF NAVAL TECHNICAL TRAINING. STUDENTS MAY VOLUNTARILY REQUEST TERMINATION OF TRAINING AT ANY TIME. WHEN A STUDENT MAKES A STATEMENT SUCH AS "I QUIT" OR "DOR" (DROP ON REQUEST), HE/SHE SHALL BE IMMEDIATELY REMOVED FROM THE TRAINING ENVIRONMENT, AND REFERRED TO THE DIVISION OR TRAINING OFFICER FOR ADMINISTRATIVE ACTION. THE STUDENT SHALL THEN MAKE A WRITTEN STATEMENT, CLEARLY INDICATING THE DESIRE TO DOR. ANY TIME A STUDENT OR INSTRUCTOR EXPERESSES CONCERN FOR HIS/HER PERSONAL SAFETY, CLARIFCATION OF A SITUATION OR PROCEDURE, AND RECEIVE OR PROVIDE ADDITIONAL INSTRUCTION, HE/SHE SHALL SIGNAL FOR A TRAINING TIME OUT (TTO). TTO IS ALSO AN APPROATE MEANS FOR A STUDENT TO OBTAIN RELIEF IF THEY AER EXPERIENCING PAIN, HEAT STRESS, OR OTHER PHYSICAL DISCOMFORT. "TRAINING TIME OUT" SIGNALS, OTHER THAN VERBAL, SHALL BE APPROPRIATE TO THE TRAINING ENVIRONMENT.
HOW TO USE THIS TRAINEE GUIDE

TRAINEE GUIDE A-050-0500
8
This trainee guide is to be used concurrently with the instruction provided. Each trainee guide is numbered concurrently with the lesson topics. Each topic consists of an outline sheet, containing: subject introduction, list of enabling objectives, and information pertaining to that lesson topic. Some topics also contain Diagram Sheets, Information Sheets and Job Sheets for visual reference. This is yours to keep. Feel free to mark it as you see fit; highlighting, underlining, and note-taking are all appropriate and encouraged. This trainee guide may not be used during testing.
TERMINAL OBJECTIVES

TRAINEE GUIDE A-050-0500
9
1.0 Upon completion of this unit of instruction, the student will demonstrate knowledge of
the requirements for RSS training comply with safety procedures as taught by the Rescue Swimmer School and will state the Drop On Request/Training Time Out policies and safety precautions used during training.
2.0 Upon completion of this unit of instruction, the student will maintain a level of
physical condition enabling satisfactory performance of Rescue Swimmer duties, without injury to personnel or damage to equipment.
3.0 Upon completion of this unit of instruction, the student, while wearing swim trunks,
T-shirt, wet suit top, mask, fins, booties, snorkel, LPU-28, and Rescue Swimmer's harness, will develop stamina, endurance and perfect stroke mechanics in a swimming pool without injury to personnel or damage to equipment.
4.0 While wearing appropriate rescue swimmer equipment, the student will rescue a
simulated survivor in open water or swimming pool per the NTTP 3-50.1 without injury to personnel or damage to equipment.
5.0 Upon completion of this unit of instruction, the student will perform approach and
carrying procedures, release and escape, day and night water entry, execute the following escapes from a parachute: inadvertent entanglement in a collapsed parachute, trapped under a collapsed parachute, and will perform rescue procedures for a day and night condition in preparation for a recovery per NTTP 3-50.1 without injury to personnel or damage to equipment.
6.0 Upon completion of this unit of instruction the student will demonstrate knowledge of
procedures and rescue swimmer’s equipment and devices as outlined in NTTP 3-50.1 without injury to personnel or damage to equipment.
7.0 Upon completion of this unit of instruction, the student will administer Standard First
Aid per NAVEDTRA 12081 standards and CPR per current American Red Cross standards without injury to personnel or damage to equipment

TRAINEE GUIDE A-050-0500
10
THIS PAGE INTENTIONALLY LEFT BLANK

TRAINEE GUIDE A-050-0500
OUTLINE SHEET 1.1 RSSTP OVERVIEW/COURSE INDRODUCTION
ENABLING OBJECTIVES: 1.1 Cite OPNAVIST 3130.6 and NTTP 3-50.1 series requirements for RSS training. 1.2 Explain all safety precautions used during RSS training. 1.3 State the remedial training policy. 1.4 State the DOR/TTO policies and procedures. TOPIC OUTLINE:
A. Applicability: The Rescue Swimmer Course is designed for individuals who have not previously graduated from Rescue Swimmer School and are reporting to a rescue swimmer billet.
B. Goals: This course provides students with the initial training and hands-on experience in First Aid,
CPR, Rescue Equipment, Life Saving Techniques, Day/Night Water Entries, Parachute Disentanglement, Search and Rescue Tactics, Night and Multiple Rescue Situation. Students will undergo physical training consisting of calisthenics, swimming, and running
C. The NTTP 3-50.1 is the Naval Search and Rescue manual. It promotes and maintains standardization of
SAR procedures, equipment, and techniques. Course content is mandated by this manual and should be used in conjunction with Trainee Guide.
D. Evaluations:
1. Academic exams to test knowledge. 2. Practical exams to demonstrate correct rescue swimmer procedures.
3. Graded Physical Training events to verify effective conditioning.
4. Extra Instruction and Remediation.
a. Extra Instruction (EI)
(1) Designed to assist students having difficulty attaining Course Objectives (2) In comparison to standard instruction, EI consists of a lower student-to-instructor ratio and is
taught at the pace of the slowest student. (3) Students are strongly encouraged to seek EI. Instructors may also assign EI.
b. Remediation
(1) Assigned to students in response to failure of a criterion test; preparation for re-test. (2) Same instructional characteristics as EI.
11 FOR TRAINING USE ONLY

TRAINEE GUIDE A-050-0500
OUTLINE SHEET 1.1 RSSTP OVERVIEW/COURSE INDRODUCTION
5. Schedule
E. Drop on request/training time out policy:
1. Drop on Request (DOR) Policy
b. In all cases where a student states a desire to DOR from voluntary training based on concern for personal well-being, appropriate action shall be initiated, including removal from training, referral of the student for medical, counseling, or remedial action as appropriate, and review of the training environment, including training techniques. The scope and depth of these actions shall be determined by the nature of the complaint and the risk incurred in the training. A written summary of actions taken shall be made a permanent entry to the student’s service record. In no case shall a student be coerced or threatened to induce him or her to return to training following a DOR.
2. Training Time Out (TTO) Policy
b. A Training Time Out (TTO) may be called by any student or instructor in any training situation
where they are concerned for their own or another’s safety, or they request clarification of it, procedures or requirements. TTO is also an appropriate means for a student to obtain relief if he or she is experiencing pain, heat stress, or other serious physical discomfort. The purpose of the TTO is to correct the situation of concern, provide clarifying information, or remove the student or instructor from the possible hazardous environment. A TTO may be signaled with the abbreviation TTO, the words Training Time Out, crossed hand in a (T), a raised clenched fist, or other specific signal which will be briefed prior to a specific lab, test, or exercise. If the TTO signal is not acknowledged, the signaler shall shout “Time Out” (or other action as required b the training activity). The instructor shall attempt to relieve and remove the student from the possible hazardous environment. If an adequate number or instructors are available to allow training to continue safely, the lead instructor may elect to do so. However, if this is not practical, training will be stopped until the situation is corrected.
F. Administrative procedures and regulations:
1. Purpose of Pre-requisite screens, Students Screening forms, “medical up chits”.
2. Students will complete instructor, course and quality of life critiques
3. Security precautions for personal valuables
4. Following participation in rescue swimmer training, entries shall be made in the appropriate training jacket.
12 FOR TRAINING USE ONLY

TRAINEE GUIDE A-050-0500
OUTLINE SHEET 1.1 RSSTP OVERVIEW/COURSE INDRODUCTION
G. Safety precautions:
1. Hazardous conditions may exist in the training environment; students have a responsibility to report any unsafe/unhealthy condition they may discover.
2. In the event of an in-water emergency, signaled by multiple blasts on the whistle or sounding of
applicable alarm, students will exit the pool immediately and proceed to the predesignated location, and follow the directions of staff.
H. Mishap/near-miss/ unsafe condition reporting procedures:
1. A mishap is any unplanned or unexpected event causing personnel injury, occupational illness, death, material loss or damage, or an explosion of any kind whether damage occurs or not.
2. A hazardous condition is any situation which if allowed to go unchecked or uncorrected has the
potential to cause a mishap.
3. A near miss is when a mishap is avoided merely chance.
4. It is the responsibility of all Department of Defense personnel to report all mishaps, near misses, and any unsafe or unhealthy (hazardous) condition (s). If a mishap, hazardous condition or near miss occurs the student shall inform the instructor immediately. OPNAV 5100/11 with instructions is available for formal reporting.
13 FOR TRAINING USE ONLY

TRAINEE GUIDE A-050-0500
OUTLINE SHEET 1.1 RSSTP OVERVIEW/COURSE INDRODUCTION
14 FOR TRAINING USE ONLY
THIS PAGE INTENTIONALLY LEFT BLANK

TRAINEE GUIDE A-050-0500
OUTLINE SHEET 1.2 POOL SAFETY REGULATIONS
INTRODUCTION This information describes the rules and regulations to be adhered to during pool evolutions. ENABLING OBJECTIVES: 1.5 Cite general pool safety regulations per Rescue Swimmer School Standard Operating Procedures (SOP). TOPIC OUTLINE
A. General Pool Safety Regulations
1. No person with any type of skin fungus, open sores or disease is allowed in the pool without consent of the SAR Corpsman.
2. No running or skylarking.
3. Glass containers are not allowed on the pool deck or locker room at anytime.
4. Prior to entering the pool, all personnel shall take a shower.
5. Students will wear approved swim trunks, T-Shirt during pool training. Additionally, a LPU-28 will be worn during mask, fin, and snorkel training.
6. No smoking.
7. Whistle Blasts:
a. ____________________Instructor is seeking student attention.
b. ____________________Instructor seeking another instructors attention.
c. ____________________Emergency.
8. No jewelry (i.e., rings, chains, ect.)
9. No diving
10. Do not use ladders to climb out of the pool unless specifically told to do so. 11. Take off fins before standing or walking on the pool deck.
15 FOR TRAINING USE ONLY

TRAINEE GUIDE A-050-0500
OUTLINE SHEET 1.2 POOL SAFETY REGULATIONS
16 FOR TRAINING USE ONLY
12. Ensure all pool drain covers are installed prior to commencing any disentanglement training.
B. Water Exit
1. For Facilities with high pool deck edge:
a. Students swim to ladder, remove fins, and exit one at a time.
2. For facilities with low pool deck edge:
a. Students will swim to wall and place both hands on edge of pool. b. Holding onto the edge, students will push up resting on both arms extended, roll to the right,
and assume a sitting position facing the pool.
c. With both legs extended out of the water, remove gear and then turn to their left in order to avoid a collision.
C. Emergency Situations
1. Call for help anytime you are in trouble and ONLY when you are in trouble.
2. If a person is in actual danger the instructor only will enter the water to render assistance.
3. If you see anyone in trouble inform an instructor immediately.
D. Shallow Water Blackout
1. Hyperventilation (excessively rapid breathing) purges the blood of CO2, the body’s cue to breath.
2. Swimmer runs out of oxygen without ever feeling need to breathe, passes out and drowns.
WARNING Do not hyperventilate prior to underwater swims. Hyperventilation can lead to shallow water blackout.

TRAINEE GUIDE A-050-0500
OUTLINE SHEET 2.1
PRINCIPLES OF PHYSICAL FITNESS AND DRY-LAND CONDITIONING PROGRAM
INTRODUCTION Physical training is designed to provide the rescue swimmer with a balance and progression of physical training, which will develop both upper and lower body strength and cardiovascular endurance. ENABLING OBJECTIVES: 2.1 State the fundamentals of physical conditioning. 2.2 Perform proper physical conditioning exercises and Physical Training Level 1, 2 and 3. 2.3 Explain the importance of proper technique and form when utilizing weight lifting equipment. 2.4 Review proper techniques for developing and maintaining overall muscular strength utilizing weight
lifting equipment. TOPIC OUTLINE
A. Principles of Physical Fitness
1. Objectives of Rescue Swimmer conditioning program.
a. Achieve a level of conditioning which allows the rescue swimmer to operate for _______ minutes in a sea state of three (minimum). There is no substitute for practical preparation, but a comprehensive dry land conditioning program will assist toward this goal.
b. Pass level 1 Fitness Test and the Rescue Swimmer Fitness Test (per OPNAVINST
____________).
c. Enhance performance of Rescue Swimmer duties while reducing risk of injury to self or survivor.
2. Job performance is enhanced for the rescue swimmer by maintaining the following:
a. _________________is an approach to optimal health and emphasizes the swimmer’s deliberate effort to stay healthy and achieve the highest potential for well being. Wellness is an ongoing process which requires daily decisions in areas of proper nutrition, stress management, disease prevention, substance abuse control, and physical fitness.
b. ______________: is defined as the general capacity to adapt and respond favorably to physical
effort. A physically fit rescue swimmer is able to perform normal daily activities effectively and have enough energy remaining to complete a SAR mission.
3. General Principles
17 FOR TRAINING USE ONLY

TRAINEE GUIDE A-050-0500
OUTLINE SHEET 2.1
PRINCIPLES OF PHYSICAL FITNESS AND DRY-LAND CONDITIONING PROGRAM
NOTE
Rescue swimmers are like multi-sport athletes in that they must be able to perform a variety of physically demanding tasks on land and water. The rescue swimmer requires a variety of training workouts which focus on different goals. Because of the high level of multi-dimensional fitness required by the rescue swimmer 6-10 training sessions per week may be required.
a. _________________ - system must be stressed to loads greater than it is accustomed to in order to improve.
b. Increase resistance, repetitions, intensity, or duration during exercise.
c. Specificity - Effects of exercise limited to system being stressed. To be a good swimmer, you
must swim.
d. Progression - is continually applying overload to experience gain (training effect).
4. Aerobic Conditioning
a. Includes aerobic endurance,______________________ fitness, cardiopulmonary fitness, and heart rate training. Aerobic exercise requires large amounts of oxygen, large muscle groups, is rhythmical in nature, and should be maintained over time at a moderate intensity.
b. Examples include swimming, running, bicycling, etc. Weight-lifting and most team sports are not
aerobic activities. c. A good aerobic training program conforms to the ___________ principle:
(1) __________ - Minimum three times a week. If exercising daily, "Cross-Train" (alternate
different activities) so skeletal muscles are not over-trained. (2) ___________ - Heart and breathing rate must be accelerated, but only to a level which can be
maintained for extended periods of time. This is 60% - 75% of an individual's maximum heart rate. As a general guideline, an exerciser should be breathing hard yet still able to talk while performing aerobic activities.
(3) _______ - Must be an aerobic activity. (4) ___________ - Continuous exercise for a minimum of 20 minutes.
5. Anaerobic Conditioning
18 FOR TRAINING USE ONLY

TRAINEE GUIDE A-050-0500
OUTLINE SHEET 2.1
PRINCIPLES OF PHYSICAL FITNESS AND DRY-LAND CONDITIONING PROGRAM
a. Activities which are not long term or rhythmic in nature. They allow the body to recover between efforts. Many team sports and strength/speed training are considered anaerobic.
b. Two workouts a week can build strength (given sufficient intensity).
WARNING
Do not exercise the same skeletal muscle group on successive days. Minimum of 48 hours rest is required between workouts to avoid over-use injuries and optimize gains.
c. A muscle which is too fatigued to contract can still be exercised using a technique called
"negatives". For example, an exerciser performing pull-ups will reach a point where he/she can no longer lift themselves. The partner then assists (or "spots") the exerciser by QUICKLY lifting him/her all the way up. The exerciser SLOWLY returns to the starting position. Do not rest at the top or bottom of the cycle. This process can be repeated until the muscle achieves total failure.
6. Ideal Workout
a. An adequate ________________ period (light jogging, jumping jacks) increases the core temperature 1-2o, warming up the muscles for more effective stretching and exercise.
b. Slow, steady stretching reduces the risk of strains and improves performance. Avoid ballistic
(jerking) stretches - they can cause strains. Avoid unsupported bending at the waist as it can cause back injury.
c. Training period - aerobic or anaerobic. d. A cool-down period of light exercise helps the body returns to its normal state.
7. Preventing Dehydration
a. Dehydration, a below normal level of water in the body, is a dangerous situation which can lead
to heat injuries (_________ and heat _________) in the worst case and muscle cramps (including "side stitches") and sub-par performance at a minimum.
WARNING Exercisers, especially in hot, humid environments, are especially vulnerable to dehydration. Up to two quarts of water per hour may be lost through sweating during exercise and one quart per day is lost through urine.
b. Drink large amounts of clear, non-alcoholic, non-caffeinated, non-carbonated beverages before, during and after exercise.
(1) Water: The recommended amount for adults is ten 8ounce cups during a normal day.
19 FOR TRAINING USE ONLY
TRAINEE GUIDE A-050-0500
OUTLINE SHEET 2.1
PRINCIPLES OF PHYSICAL FITNESS AND DRY-LAND CONDITIONING PROGRAM
(2) Sports drinks with less than 8% dissolved sugar. (3) Make your own: 1 gallon water, 6 ounce sugar, 1 TBSP salt, flavored Koolaid sweetened
with fructose (not sugar).
(4) 6-8 ounces of fluid consumed every 20 minutes of exercise can help replenish the sweat lost during exercises.
c. By the time an active individual feels thirsty, he/she is behind the _______________ “Power
Curve”.
NOTE The best indication of adequate hydration is clear to light yellow urine.
8. Exercises to avoid.
a. ____________: Avoid exercises which require the knee to bear weight while bent beyond
_________degrees. b. ___________:
(1) Avoid unsupported bending at the waist (i.e. standing toe touch). (2) Avoid doing flutter kicks, leg levers, and horizontal scissor kicks in excessive amounts.
These common exercises, mistakenly thought to strengthen the abdomen, predominantly work the Illio Psoas (hip flexor) muscles. These muscles are attached to the top front of the leg, wrap around outside the hip, and attach to the back of the pelvic girdle. Over-developed hip flexor causes a lordotic (sway-backed) spinal curve and result in lower back pain.
9. Rest and Basic Nutrition
a. The Rescue Swimmer School is a very demanding physical program. Hard workouts without
adequate rest or nutrition will result in over-use injuries and illness. b. Adequate rest is vital if muscles are to recover and gain strength. __________ to __________
hours of uninterrupted sleep is adequate for many adults, however, participants in this program need to "listen to their body" and get more sleep as required.
c. Proper nutrition provides the rescue swimmer with the energy required to perform duties.
(1) Carbohydrates: Provide energy and is the main fuel source to the cells within the body. Glucose is the main product of carbohydrate digestion. Carbohydrates are usually referred to as the following:
20 FOR TRAINING USE ONLY

TRAINEE GUIDE A-050-0500
OUTLINE SHEET 2.1
PRINCIPLES OF PHYSICAL FITNESS AND DRY-LAND CONDITIONING PROGRAM
(a) _______________derive from fruits and sugars. (ie: soda, candy, cake)
(b) _________: derive from vegetables, grains, fruits, and beans. Most of your diet should
come from complex carbohydrates.
(2) Avoid fatty, fried, and oily foods.
10. Conclusion:
a. The Rescue Swimmer School Dry Land Conditioning Program is a comprehensive, total body workout designed by an exercise physiologist from the Naval Aeronautical Medical Institute. Special emphasis is given to muscle groups utilized in rescue swimming, specifically the ______________muscles of the upper body and the muscles in front of the ______________(which power the flutter kick).
b. The principles of this unit apply to the training environment and the fleet.
STRETCH SET
STRETCH COUNTS REP Ankle rotations 10 CW and 10 CCW 1 Jumping Jacks Four-Count 30
Rotator Cuff Stretch 15 Seconds Each Arm 1 Triceps Stretch 15 Seconds Each Arm 1
Quadriceps Stretch 15 Seconds Each Arm 1 Inside Hurdler
Stretch 15 Seconds Each Leg 1
Groin Stretch 15 Seconds Each Leg 1 Knee to Chest 15 Seconds 1
Both Knees to Chest 15 Seconds Each Leg 1 Back Twist 15 Seconds 1 Calf Stretch 15 Seconds Each Leg 1
Achilles Stretch 15 Seconds Each Leg 1
21 FOR TRAINING USE ONLY
TRAINEE GUIDE A-050-0500
OUTLINE SHEET 2.1
PRINCIPLES OF PHYSICAL FITNESS AND DRY-LAND CONDITIONING PROGRAM
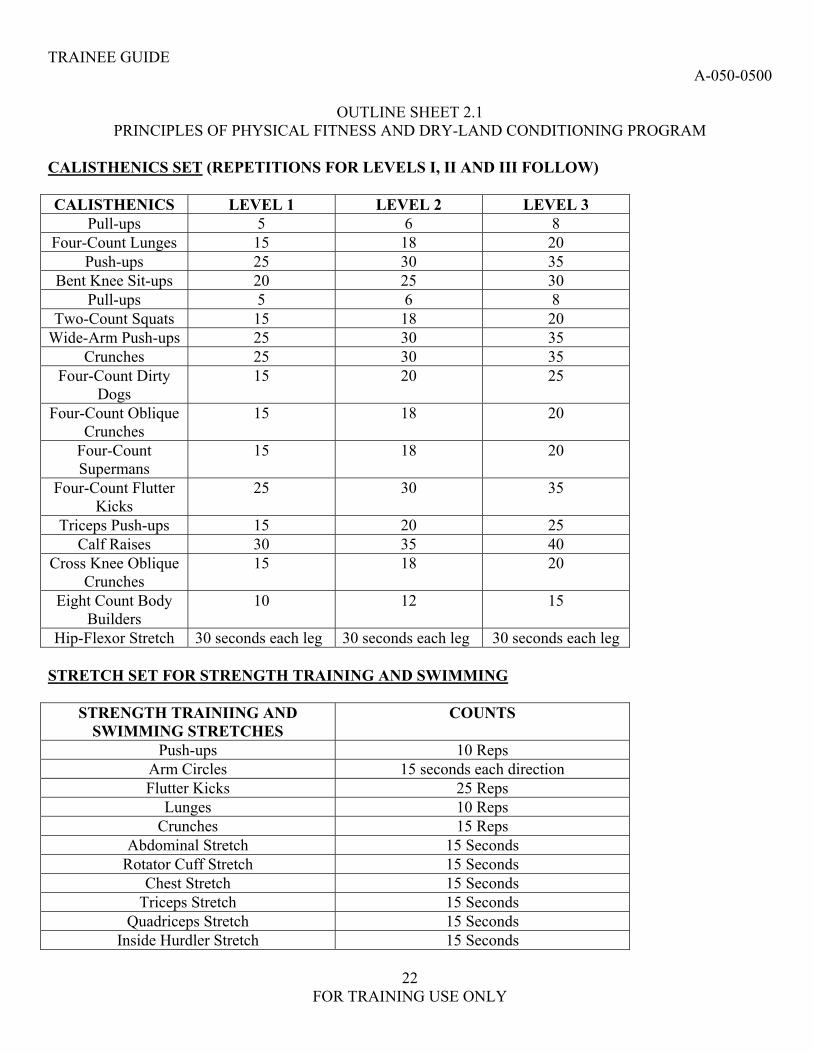
CALISTHENICS SET (REPETITIONS FOR LEVELS I, II AND III FOLLOW) CALISTHENICS LEVEL 1 LEVEL 2 LEVEL 3
Pull-ups 5 6 8 Four-Count Lunges 15 18 20
Push-ups 25 30 35 Bent Knee Sit-ups 20 25 30
Pull-ups 5 6 8 Two-Count Squats 15 18 20
Wide-Arm Push-ups 25 30 35 Crunches 25 30 35
Four-Count Dirty Dogs
15 20 25
Four-Count Oblique Crunches
15 18 20
Four-Count Supermans
15 18 20
Four-Count Flutter Kicks
25 30 35
Triceps Push-ups 15 20 25 Calf Raises 30 35 40
Cross Knee Oblique Crunches
15 18 20
Eight Count Body Builders
10 12 15
Hip-Flexor Stretch 30 seconds each leg 30 seconds each leg 30 seconds each leg STRETCH SET FOR STRENGTH TRAINING AND SWIMMING
STRENGTH TRAINIING AND SWIMMING STRETCHES
COUNTS
Push-ups 10 Reps Arm Circles 15 seconds each direction Flutter Kicks 25 Reps
Lunges 10 Reps Crunches 15 Reps
Abdominal Stretch 15 Seconds Rotator Cuff Stretch 15 Seconds
Chest Stretch 15 Seconds Triceps Stretch 15 Seconds
Quadriceps Stretch 15 Seconds Inside Hurdler Stretch 15 Seconds
22 FOR TRAINING USE ONLY

TRAINEE GUIDE A-050-0500
OUTLINE SHEET 2.1
PRINCIPLES OF PHYSICAL FITNESS AND DRY-LAND CONDITIONING PROGRAM
Knee to Chest 15 Seconds Both Knees to Chest 15 Seconds
Back Twist 15 Seconds POST SWIM/STRENGTH TRAINING: POST SWIM/ STRENGTH TRAINING COUNTS
Rotator Cuff Stretch 15 Seconds Chest Stretch 15 Seconds
Triceps Stretch 15 Seconds Quadriceps Stretch 15 Seconds
Inside Hurdler Stretch 15 Seconds Knee to Chest 15 Seconds
Both Knees to Chest 15 Seconds Back Twist 15 Seconds Calf Stretch 15 Seconds
STRENGTH TRAINING EXERCISES:
CORE EXERCISES AUXILIARY EXERCISES * Power Cleans Seated Cable Row
Pull-ups Triceps Cable Press Downs Back Squats Incline Dumbbell Bench Press Dead Lifts Dumbbell Biceps Curl
Standing Military Press Leg Press Standing Bent over Row Latissimus Pull Downs
Flat Bench Press Sit-ups Sit-ups Crunches
Crunches Oblique Sit-ups Oblique Sit-ups
OPTIONAL EXERCISES FOR ADVANCED TRAINEES ONLY. POWER CLEANS SHOULD BE AFTER QUALIFIED INSTRUCTION ON APPROPRIATE TECHNIQUE.
23 FOR TRAINING USE ONLY

TRAINEE GUIDE A-050-0500
OUTLINE SHEET 2.1
PRINCIPLES OF PHYSICAL FITNESS AND DRY-LAND CONDITIONING PROGRAM
24 FOR TRAINING USE ONLY
PHYSICAL TRAINING TEST OUT:
EXERCISES LEVEL 1 Pull-ups 3 Lunges 15
Regular Width Push-ups
25
Bent Knee Sit-ups 20 Wide Arm Push-ups 25
Crunches 25 Flutter Kicks 25
Triceps Push-ups 15 Run 18-20 minutes

TRAINEE GUIDE A-050-0500
OUTLINE SHEET 2.2 SWIMMING PROFICIENCY AND CONDITIONING
INTRODUCTION Swimming Proficiency and Conditioning is designed to provide the Rescue Swimmer with the purpose and value of gradually building strength and perfecting stroke mechanics. ENABLING OBJECTIVES: 2.5 Perform Swimming, Proficiency and Conditioning drills and timed swim evolutions. TOPIC OUTLINE
A. Swimming Proficiency B. Conditioning Drills
C. Timed swims
25 FOR TRAINING USE ONLY

TRAINEE GUIDE A-050-0500
OUTLINE SHEET 2.2 SWIMMING PROFICIENCY AND CONDITIONING
26 FOR TRAINING USE ONLY
THIS PAGE INTENTIONALLY LEFT BLANK

TRAINEE GUIDE A-050-0500
JOB SHEET 2.2-1 TIMED SWIMS AND BUDDY TOWS
TRAINEE NAME/RATE __________________. SSN CLASS . Evaluation Instructions Critical Steps: Observe trainee performing each event. Watch for correct use of equipment and adherence to safety regulations. Indicate trainee's performance by writing in the time and circling either Pass or Fail. SAFETY - Failure to adhere to all safety requirements will result in automatic failure of the performance tests. TIMED SWIMS 3.2 Complete 800 meter swim within 20 minutes. TIME
PASS/FAIL
3.2 Complete 400 meter Buddy Tow within
16minutes. TIME
PASS/FAIL
3.2 Complete 300 meter swim (6:35 min)/ 400 meter
B/T (16:30 min) (5 min break). TIME
PASS/FAIL
3.2 Complete 300 meter swim (6:00 min) / 400 meter
B/T (15:00 min) (3 min break). TIME
PASS/FAIL
3.2 Complete 300 meter swim/ 400 meter B/T within
21 minutes (NO Break). TIME
PASS/FAIL
3.2 Complete 2000 meter / 50 minutes swim. COMPLETE INCOMPLETE
27 FOR TRAINING USE ONLY

TRAINEE GUIDE A-050-0500
28 FOR TRAINING USE ONLY
THIS PAGE INTENTIONALLY LEFT BLANK

TRAINEE GUIDE A-050-0500
OUTLINE SHEET 3.1 APPROACHES AND CARRIES
INTRODUCTION During rescues, different types of approaches/carries are used depending on the survivor’s condition and or position. The following procedures are furnished to provide basic approaches/carries to deal with any situation that may arise. ENABLING OBJECTIVES: 3.1 List procedural steps for rescue swimmer approaches to, and carries of, an active/passive/unconscious
survivor. 3.2 Demonstrate rescue swimmer approaches to, and carries of, an active/passive/unconscious survivor in a
simulated rescue situation. TOPIC OUTLINE:
A. Survivor Characteristics:
1. Aircrewman
a. Rescue swimmers were originally tasked to assist downed aircrewman. b. Aircrewman are trained in water survival and may be able to assist. (Never assume they can)
c. Survivors with water survival training could become too helpful and actually be a hindrance. It
might become necessary to instruct him/her to do nothing.
WARNING An aircrewman who has ejected and/or is unconscious may potentially have a spinal injury, assess the situation and treat accordingly. Loss of ABC’s or other life threatening injury will take precedence over a spinal injury.
2. Panicking Survivor
a. Some rescues involve panicky survivors (even some aircrewmen). b. Appearance: Wide eyes, frantic activity, gasping for air, and other similar behavior.
c. Will attempt to grab and get on top of rescuer in order to keep his/her own head out of the water.
Rescuers could be drowned in this manner.
d. Best Defense: Do not get to close until you have assessed the situation and decided on the best approach to take for this survivor.
e. It may be possible too calm a panicking survivor by ___________ to them and explaining who
you are and what you are doing.
33 FOR TRAINING USE ONLY

TRAINEE GUIDE A-050-0500
OUTLINE SHEET 3.1 APPROACHES AND CARRIES
B. Cross Chest Carry/Controlled Cross Chest Carry:
1. From a position behind the survivor's shoulder, the rescuer reaches across the chest and pulls the
survivor from under the _________ with the palm of the rescuer's hand.
2. The survivor's shoulder is then tucked securely into the rescuer's armpit and the arm firmly grasped against the survivor's chest.
3. The rescue swimmer turns to the __________ with the hip directly against the small of the survivor's
back. The swimmer strokes vigorously with his legs, using a flutter kick to provide propulsion. 4. Should the survivor be aggressive, the rescuer shall lock his/her hands together under the survivor's
armpit to complete a controlled cross-chest carry.
C. Collar Tow/Equipment Carry:
WARNING Do not grasp survivor in a manner which may result in restricted breathing or circulation.
1. Grasp the survivor's ________________ or ________________ from behind and between the shoulder blades with a straight arm locked at the elbow.
2. The rescue swimmer assumes the _______________ position and strokes vigorously with the legs,
using a flutter kick.
D. Front Surface Approach:
1. Effective for _______________or _____________________survivors. The Front Surface Approach should be the rescue swimmers first choice when approaching an unconscious survivor.
STEP ACTION 1 Approach the survivor with head ____________________ and eyes on the survivor. 2 Upon reaching ____________length to survivor, execute a quick reverse. 3 Attempt to establish communication, reassure the survivor. If necessary splash and yell to get the
survivors attention. 4 Reach across with your hand grasping the survivor’s ______________ (i.e: right hand grabs right
wrist, left on left wrist). 5 Begin kicking to plane out survivor, lean back and flutter kick. 6 Pull survivor’s wrist up and across the front of swimmer’s body, turning the survivor onto his back. 7 When the survivor’s back is fully turned, the rescue swimmer places the survivor in a _____________
NOTE This procedure may be difficult to perform on aircrewmen due to their flotation and survival equipment.
34 FOR TRAINING USE ONLY

TRAINEE GUIDE A-050-0500
OUTLINE SHEET 3.1 APPROACHES AND CARRIES
NOTE
If the survivor is every attempt shall be made to approach the survivor from the rear. This can be accomplished by either asking the survivor to turn around, or by swimming to the rear of the survivor and executing a rear surface approach.
E. Rear Surface Approach:
STEP ACTION
1 Most common approach used by rescue swimmers. The rear surface approach should be used for all ______________survivors.
2 Approach the survivor with head out of the water and eyes on the survivor. 3 Upon reaching _____________________ from survivor, execute a quick reverse. 4 Attempt to establish communications, reassuring the survivor. If survivor appears unresponsive, splash
or yell to get his/her attention. 5 Secure survivor in a cross-chest or equipment carry.
WARNING
Underwater approach shall not be used if survivor is wearing a parachute.
F. Underwater Approach
STEP ACTION
1 Appropriate for _______________survivor. 2 Approach from the front, keeping head out of the water and eyes on the survivor. 3 Upon reaching a distance of ____________feet from the survivor, appraise the situation. When
comfortable, execute a surface dive and swim under the survivor. NOTE
4 Swim underneath, or to the side and below the survivor, while maintaining eye contact. Execute a half
turn (the survivor’s back should be towards the rescue swimmer), ascend towards the surface as close to the survivor as possible without touching him/her.
5 Upon breaking the surface of the water, immediately place the survivor in a _____________________ carry. Roll with the momentum and swim to plane out the survivor.
35 FOR TRAINING USE ONLY

TRAINEE GUIDE A-050-0500
DIGRAM SHEET 3.1-1 COLLAR TOW / EQUIPMENT TOW
36 FOR TRAINING USE ONLY

TRAINEE GUIDE A-050-0500 DIAGRAM SHEET 3.1-2
CROSS-CHEST TO CONTROLLED CROSS-CHEST CARRY
37 FOR TRAINING USE ONLY

TRAINEE GUIDE A-050-0500 DIAGRAM SHEET 3.1-3
FRONT SURFACE APPROACH
38 FOR TRAINING USE ONLY

TRAINEE GUIDE A-050-0500 DIAGRAM SHEET 3.1-4
REAR SURFACE APPROACH
39 FOR TRAINING USE ONLY

TRAINEE GUIDE A-050-0500 DIAGRAM SHEET 3.1-5
UNDERWATER APPROACH
40 FOR TRAINING USE ONLY

TRAINEE GUIDE A-050-0500 JOB SHEET 3.1-1
APPROACHES AND CARRIES
41 FOR TRAINING USE ONLY
TRAINEE NAME/RATE SSN____________________ INSTRUCTOR/EVALUATOR DATE___________________ Evaluation Instructions Critical Steps: Observe trainee performing each step. Watch for correct use of equipment and adherence to safety regulations. Indicate trainee's performance by circling either Q,CQ,UQ. "*" Denotes a critical area. Failure to adhere to items marked with an asterisk will result in automatic failure of this Performance test however a momentary deviation from prescribed procedures does not constitute an automatic failure. A mark of CQ on an asterisk item does not constitute an automatic failure the grade will be computed in for a final score. A mark of UQ on an asterisk item constitutes an automatic failure. A mark of Q = 4.0 a mark of CQ = 2.0 and a mark of UQ = 0.0 Minimum average score for passing is 3.6 If an item is not applicable line out that item and do not add it to the overall average
ACTION FRONT SURFACE APPROACH SCORE POINTS
Approach survivor Q CQ UQ _______ Utilizing modified crawl or
breast stroke Head out of the water eyes on the survivor
Execute quick reverse Q CQ UQ _______
Arms length away from survivor
Attempt to establish communication Q CQ UQ _______
*Hand placement Q CQ UQ _______ Right hand grasping right wrist
or left hand on left wrist Begin flutter kicking and plane
survivor out Pull and twist survivor’s wrist
and successfully turn survivor
*Attain and maintain a cross-chest carry Q CQ UQ _______ REAR SURFACE APPROACH
Approach survivor Q CQ UQ _______ Utilizing modified crawl or
breast stroke Head out of the water eyes on the survivor

TRAINEE GUIDE A-050-0500 JOB SHEET 3.1-1
APPROACHES AND CARRIES
Execute quick reverse Q CQ UQ _______ 6 to 8 feet distance separating
survivor and swimmer
Attempt to establish communication Q CQ UQ _______ Instruct survivor to turn around
with back facing swimmer
*Grasp center of survivors back Q CQ UQ _______ Begin flutter kicking and plane
survivor out Place and maintain cross-chest
carry with free arm
UNDERWATER APPROACH
Approach survivor Q CQ UQ _______ Utilizing modified crawl or
breast stroke Head out of the water eyes on the survivor
Attempt communication Try and calm survivor
Surface dive Q CQ UQ _______ Keep eyes on survivor No premature contact with survivor
*Surface behind survivor Q CQ UQ _______ Close enough to immediately
achieve a cross-chest carry
*Place survivor in a controlled cross-chest Q CQ UQ _______ carry
Plane survivor out Maintain control of survivor
4.0 X number of Q = _______
2.0 X number of CQ = _______
4.0’s + 2.0’s = Total grade Total grade_________ divided by __________(number of items tested) = _________
42 FOR TRAINING USE ONLY

TRAINEE GUIDE A-050-0500
OUTLINE SHEET 3.2 RELEASES AND ESCAPES
ENABLING OBJECTIVES: 3.3 List the procedural steps for rescue swimmer head hold releases and escapes in accordance with NTTP
3-50.1 series. 3.4 Demonstrate rescue swimmer head hold releases and escapes in a simulated rescue situation in
accordance with NTTP 3-50.1 series. TOPIC OUTLINE:
NOTE If caution is used and approaches are done correctly, these procedures should not have to be used. Releases and scapes are taught as a precaution. e
A. Releases/Escapes:
1. To allow rescuer to escape grasp of panicking survivor. 2. Remember that a panicking survivor will do anything to ensure he keeps his head above water. The
key to these techniques is that the rescuer submerges deeply enough that survivor goes underwater.
3. A properly performed escape will simply free the rescuer from the grasp of the survivor and require a re-approach; a properly executed release will result in the release of the survivor’s grasp while the rescuer remains in control.
B. Front Head Hold Release:
1. ________ - take a quick breath of air. 2. ________– tuck chin down and to the side.
3. _____________ - Rescue swimmer extends arms outward, palm up, moving them upward rapidly
several times which produces downward movement, and submerges the survivor and swimmer.
4. If the survivor's head is on the right of rescue swimmer's head, rescue swimmer brings right arm up and over encircling arm and places hand securely against survivor's right cheek, the little finger against the side of survivor's nose and thumb hooked under the jaw.
NOTE
If survivor's head is at the rescuer's left side, the method is reversed.
5. The remaining hand is brought up beneath the survivor’s other arm seizing it in a grip with the thumb just above the elbow on the pressure point.
43 FOR TRAINING USE ONLY

TRAINEE GUIDE A-050-0500
OUTLINE SHEET 3.2 RELEASES AND ESCAPES
6. In one continuous motion, the survivor's head is pressed out and around with the right hand while the
left hand is lifting the survivor's arm over the rescue swimmer's head and sweeping it across the far side. This is a pressing movement and it is continued until the survivor's back is to the rescuer.
7. The _____ hand continues to hold the arm until the right hand can be shifted from the survivor's face
to the chest. The left hand releases the elbow and the survivor is brought into a controlled cross-chest carry.
NOTE
If survivor's head is at the rescuer's left side, the method is reversed.
8. If survivor places a scissors lock on the rescue swimmer with the legs, the scissors lock is rarely held after the head hold is released. However, if it is not released the rescue swimmer uses one hand between the ankles to unlock the crossed feet.
C. Front Head Hold Escape:
1. Suck 2. Tuck 3. Duck 4. Without pause, the rescue swimmer places both hands on the front of survivor's _______________
with the heels of the hands against the body, fingers extended and thumbs grasping the survivor's sides. By forcefully pressing and extending the arms, the rescue swimmer pushes the survivor's body back and up toward the horizontal position. This leverage will loosen the survivor's grasp.
5. By tucking the chin inward and hunching the shoulders, the rescue swimmer's head is freed.
Survivor is then pushed away.
6. Rescue swimmer surfaces to reassess the situation. D. Rear Head Hold Release:
1. Suck 2. Tuck 3. Duck 4. Rescue swimmer places both hands on survivor's _____________, either top or bottom, and pulls
toward rescue swimmer's hips, rotating the hand and sliding the other hand up to the survivor's elbow.
5. By twisting inward and down on the survivor's wrist and pushing the survivor's elbow upward, the
grip is released. Rescuer slides survivor over his/her head until the survivor is in front of the rescuer with survivors fore-arm straight across survivor’s back and survivor is in front of rescue swimmer.
44 FOR TRAINING USE ONLY

TRAINEE GUIDE A-050-0500
OUTLINE SHEET 3.2 RELEASES AND ESCAPES
6. From this position behind survivor, rescue swimmer shall release grip on the elbow while
maintaining control of the wrist, reaching over the survivor with the free hand and then place survivor in controlled cross-chest carry.
E. Rear Head Hold Escape:
1. Suck 2. Tuck 3. Duck 4. Rescue swimmer brings the hands up to underside of each of the survivor's ______________.
While keeping chin tucked in and hunching the shoulders, Rescue Swimmer pushes forcefully upward freeing the head.
5. Survivor is then pushed back away. Swimmer turns to face survivor, prepared to prevent subsequent
grasps.
6. Rescue swimmer swims well ______________ of survivor, surfaces, and decides which rescue procedures to use.
45 FOR TRAINING USE ONLY

TRAINEE GUIDE A-050-0500
OUTLINE SHEET 3.2 RELEASES AND ESCAPES
46 FOR TRAINING USE ONLY
THIS PAGE INTENTIONALLY LEFT BLANK

TRAINEE GUIDE A-050-0500
DIAGRAM SHEET 3.2-1 FRONT HEAD HOLD ESCAPE (Top) AND REAR
HEAD HOLD ESCAPE (Bottom)
47 FOR TRAINING USE ONLY

TRAINEE GUIDE A-050-0500
DIAGRAM SHEET 3.2-2 FRONT HEAD HOLD RELEASE
48 FOR TRAINING USE ONLY

TRAINEE GUIDE A-050-0500
DIAGRAM SHEET 3.2-3 REAR HEAD HOLD RELEASE
49 FOR TRAINING USE ONLY

TRAINEE GUIDE A-050-0500
50 FOR TRAINING USE ONLY
THIS PAGE INTENTIONALLY LEFT BLANK

TRAINEE GUIDE A-050-0500 JOB SHEET 3.2-2
RELEASES AND ESCAPES
TRAINEE NAME/RATE SSN____________________ INSTRUCTOR/EVALUATOR DATE___________________ Evaluation Instructions Critical Steps: Observe trainee performing each step. Watch for correct use of equipment and adherence to safety regulations. Indicate trainee's performance by circling either Q,CQ,UQ. "*" Denotes a critical area. Failure to adhere to items marked with an asterisk will result in automatic failure of this Performance test however a momentary deviation from prescribed procedures does not constitute an automatic failure. A mark of CQ on an asterisk item does not constitute an automatic failure the grade will be computed in for a final score. A mark of UQ on an asterisk item constitutes an automatic failure. A mark of Q = 4.0 a mark of CQ = 2.0 and a mark of UQ = 0.0 Minimum average score for passing is 3.6 If an item is not applicable line out that item and do not add it to the overall average
FRONT HEAD HOLD ESCAPE SCORE POINTS
Suck, tuck and duck Q CQ UQ _______ Inhaled a breath of air Turned chin down to shoulder
Go far enough underwater that survivor is submerged
Hand placement Q CQ UQ _______
Hands on survivors hips Thumbs grasping survivor’s hips
*Perform escape Q CQ UQ _______ Thrust forcefully away with arms Hunch shoulders and drop head
*Surface far enough away that Q CQ UQ _______ survivor can’t grab hold of swimmer
FRONT HEAD HOLD RELEASE
Suck, tuck and duck Q CQ UQ _______ Inhaled a breath of air Turned chin down to shoulder
Go far enough underwater that survivor is submerged
Hand placement Q CQ UQ _______
Correct hands on survivors face and elbow Utilizing proper pressure points
51 FOR TRAINING USE ONLY

TRAINEE GUIDE A-050-0500 JOB SHEET 3.2-2
RELEASES AND ESCAPES *Perform release Q CQ UQ _______
Free head from grasp Turn survivor around
*Place and maintain survivor in a Q CQ UQ _______ controlled cross-carry
REAR HEAD HOLD ESCAPE
*Suck, tuck and duck Q CQ UQ _______ Inhaled a breath of air Turned chin down to shoulder Go far enough underwater that
survivor is submerged
Hand placement Q CQ UQ _______ Hands on survivors elbows Thumbs grasping survivors pressure
points
*Perform escape Q CQ UQ _______ Thrust away with arms in the direction swimmer is looking
Free head from grasp
*Surface far enough away that survivor Q CQ UQ _______ cannot grab hold of swimmer
REAR HEAD HOLD RELEASE
*Suck, tuck and duck Q CQ UQ _______ Inhaled a breath of air Turned chin down to shoulder Go far enough underwater that
survivor is submerged
Hand placement Q CQ UQ _______ Both swimmer’s hands on one of
survivor’s wrists thumbs grasping survivors pressure point
*Perform release Q CQ UQ _______ Break survivors grip Swimmer spins hand on survivor’s wrist Swimmer slides hand up to elbow
pressure point
52 FOR TRAINING USE ONLY

TRAINEE GUIDE A-050-0500 JOB SHEET 3.2-2
RELEASES AND ESCAPES
Swimmer gains position behind survivors Release elbow vice wrist
*Place and maintain survivor in a Q CQ UQ _______ controlled cross-chest carry
4.0 X number of Q = _______
2.0 X number of CQ = _______ 4.0’s + 2.0’s = Total grade Total grade_________ divided by __________(number of items tested) = _________
53 FOR TRAINING USE ONLY

TRAINEE GUIDE A-050-0500 JOB SHEET 3.2-2
RELEASES AND ESCAPES
THIS PAGE INTENTIONALLY LEFT BLANK
54 FOR TRAINING USE ONLY

TRAINEE GUIDE A-050-0500 OUTLINE SHEET 3.3
WATER ENTRY INTRODUCTION While performing duties as a rescue swimmer you will find it necessary to deploy from the ship/rescue boat to perform the rescue. The following is a guide to assist you in learning the procedures for safe day & night water entry. ENABLING OBJECTIVES: 3.5 List the procedures for day/night water entry from ship/rescue boat per NTTP 3-50.1. 3.6 Perform day/night water entry procedures from ship/rescue boat per NTTP 3-50.1. TOPIC OUTLINE A. Day Water Entry (Forecastle)
1. Don rescue strop ( do not attach arm retainer straps). 2. Connect swimmers tending line to “V” ring on left shoulder of swimmers harness (underneath strop).
3. Swimmer assumes ready position at deck’s edge(sit or stand).
4. Perform final gear check.
5. Lower swimmer to the water by J-bar davit on command from rig captain.
WARNING Be prepared to fend off ship with hands and feet if ship is rolling (rough seas).
WARNING Swimmer will never jump over the side or get out of the rescue strop until rescue strop is in the water.
6. Swimmer swims clear of rescue strop upon water entry.
7. Clear mask (if necessary). 8. Give hand signal “I am alright”.
B. Day Water Entry (Rescue Boat) 1. Deploy from the starboard bow.
a. Coxswain puts engine in neutral.
b. The rescue swimmer prepares for deployment.
55 FOR TRAINING USE ONLY

TRAINEE GUIDE A-050-0500 OUTLINE SHEET 3.3
WATER ENTRY 2. Prepare to deploy swimmer after receiving permission from boat officer/ coxswain.
a. Swimmer will sit on starboard bow. b. The boat crewmember holds the rescue swimmer by harness, maintaining control of the
swimmer while both scan water for debris. c. Boat crew member will give swimmer one tap on the shoulder, then swimmer will roll to
his/her left and come to rest on both hands, fins in water.
d. Boat crew member will give three taps on shoulder and release rescue swimmer harness.
NOTE The rescue swimmer tending line is optional when deploying from the rescue boat. The coxswain shall remain in close proximity and main visual contact of the rescue swimmer in the water.
e. Rescue swimmer pushes away and enters water, clears mask, and gives day signal “I am alright”.
C. Night Water Entry (Forecastle)
1. Don rescue strop (do not attach the arm retainer straps).
NOTE The Rescue Swimmer, rescue strop, and the rescue hook shall be illuminated by chemical lights before lowering.
2. Connect swimmers tending line to “V” ring on left shoulder of swimmers harness (underneath strop).
3. Swimmer assumes ready position at deck’s edge (sit or stand).
4. Perform final gear check.
5. Lower swimmer to the water by J-bar davit on command from rig captain.
WARNING
The swimmer will never jump over the side or get out of the rescue strop until rescue strop is in the water.
6. Swimmer swims clear of rescue strop upon water entry, clears mask, and gives hand signal, “ I am all right”.
D. Night Water Entry (Rescue Boat)
56 FOR TRAINING USE ONLY

TRAINEE GUIDE A-050-0500 OUTLINE SHEET 3.3
WATER ENTRY 1. Deploy from the starboard bow. a. Coxswain puts engine in neutral. b. The rescue swimmer prepares for deployment.
2. Prepare to deploy swimmer after receiving permission from the boat officer/ coxswain.
a. Swimmer will sit on starboard bow. b. The boat crewmember holds the rescue swimmer by the harness maintaining control of the
swimmer while both scan water for debris.
c. Boat crew member will give swimmer one tap on the shoulder, then swimmer will roll to his/her left and come to rest on both hands, fins in water.
d. Boat crew member will give three taps on shoulder and release rescue swimmer harness.
NOTE
During night operations, the rescue swimmer shall be illuminated with a chemical light before entering the water.
NOTE
The rescue swimmer tending line is optional when deploying from the rescue boat. The coxswain shall remain in close proximity and main visual contact of the rescue swimmer in the water.
e. Swimmer pushes away and enters water, clears mask, and gives night signal “I am alright”
57 FOR TRAINING USE ONLY

TRAINEE GUIDE A-050-0500 OUTLINE SHEET 3.3
WATER ENTRY
58 FOR TRAINING USE ONLY
THIS PAGE INTENTIONALLY LEFT BLANK

TRAINEE GUIDE A-050-0500 DIAGRAM SHEET 3.3-1
RESCUE SWIMMER ENTRY PAGE 1of 4
59 FOR TRAINING USE ONLY

TRAINEE GUIDE A-050-0500 DIAGRAM SHEET 3.3-2
RESCUE SWIMMER ENTRY PAGE 2of4
60 FOR TRAINING USE ONLY

TRAINEE GUIDE A-050-0500 DIAGRAM SHEET 3.3-3
RESCUE SWIMMER ENTRY PAGE 3of4
61 FOR TRAINING USE ONLY

TRAINEE GUIDE A-050-0500 DIAGRAM SHEET 3.3-4
RESCUE SWIMMER ENTRY PAGE 4of4
62 FOR TRAINING USE ONLY

TRAINEE GUIDE A-050-0500 JOB SHEET 3.3-3 CHECKLIST
Water Entry Indoctrination TRAINEE NAME/RATE SSN INSTRUCTOR/EVALUATOR DATE Evaluation Instructions Critical Steps: Observe trainee performing each step. Watch for correct use of equipment and adherence to safety regulations. Indicate trainee's performance by circling either SAT or UNSAT. "*" denotes a critical area. Failure to adhere to items marked with an asterisk will result in automatic failure of this Performance test.
PERFORM FORECASTLE DAY AND NIGHT WATER ENTRY PROCEDURES:
A. Day Entry (1) Sit down on deck. (2) Don mask, fins and snorkel *(3) Don rescue strop. (Do not use arm
retainer straps).
*(4) Connect swimmers tending line to V-ring on left shoulder of swimmers harness(underneath strop).
(5) Stand ready at deck edge.
(6) Step out from ship.
(7) Cross hands over groin, turn head to
left shoulder and kick legs.
(8) Swim clear of strop upon water entry.
(9) Check area for hazards.
*(10) Signal I am alright.
SAT UNSAT SAT UNSAT SAT UNSAT SAT UNSAT SAT UNSAT SAT UNSAT SAT UNSAT SAT UNSAT SAT UNSAT SAT UNSAT
63 FOR TRAINING USE ONLY

TRAINEE GUIDE A-050-0500 JOB SHEET 3.3-3 CHECKLIST
Water Entry Indoctrination
64 FOR TRAINING USE ONLY
B. Night Entry (1) Sit down on deck (2) Don mask, fins and snorkel *(3) Insert illuminated 4” green
chemlight into adel clamp. (4) Don rescue strop. (Do not use arm
retainer straps). *(5) Connect swimmers tending line to
V-ring on left shoulder of swimmers harness(underneath strop).
(6) Stand ready at deck edge. (7) Step out from ship. (8) Cross hands over groin, turn head to
left shoulder and kick legs. (9) Swim clear of strop upon water
entry. (10) Check area for hazards. *(11) Signal I am alright.
SAT UNSAT SAT UNSAT SAT UNSAT SAT UNSAT SAT UNSAT SAT UNSAT SAT UNSAT
SAT UNSAT SAT UNSAT SAT UNSAT SAT UNSAT

TRAINEE GUIDE A-050-0500
OUTLINE SHEET 3.4 CANOPY ESCAPE
INTRODUCTION: Performing your duties as a rescue swimmer the possibility exists that you could find yourself either under or
on top of a parachute canopy. The purpose of this lesson is to familiarize the rescue swimmer with techniques to handle such a situation.
ENABLING OBJECTIVES:
3.7 List procedural steps for parachute canopy escape. 3.8 Perform a hand-over-hand escape from underneath a collapsed parachute.
TOPIC OUTLINE:
A. Dangers of Collapsed Parachute:
1. Inability to breathe through a wet parachute.
2. Possibility of the parachute sinking and taking survivor with it.
3. Rescue swimmer becoming entangled.
4. Rescue swimmer or survivor panicking and becoming more entangled.
B. ENTANGLEMENT IN A COLLAPSED PARACHUTE:
1. Should a rescue swimmer inadvertently jump or swim onto a parachute canopy:
a. ____________________________.
b. Turn onto your _______________.
c. Arch your back to help float your body
d. Scull with the hands while repeatedly opening and closing the legs ____________, no more than
shoulder width, until clear of the parachute.
e. Once clear of parachute, ________________________________.
65 FOR TRAINING USE ONLY

TRAINEE GUIDE A-050-0500
OUTLINE SHEET 3.4 CANOPY ESCAPE
66 FOR TRAINING USE ONLY
C. TRAPPED UNDER COLLAPSED PARACHUTE:
STEP ACTION
1 Grasp ______________ in parachute seam.
2 Lift high above head.
3 Swim backwards; utilizing a _______________ hand over hand movement, keeping them high enough to create an air pocket.
4 Once at the apex, reach high to create another ______________.
5 Continue along one given shroud line until clear of parachute.

TRAINEE GUIDE A-050-0500 OUTLINE SHEET 3.5
DISENTANGLEMENT PROCEDURES FREE FLOATER/HELICOPTER AIRCREW
67 FOR TRAINING USE ONLY
ENABLING OBJECTIVES: 3.9 List the disentanglement procedures in both day and night conditions for survivors both with and without aircrew survival equipment. 3.10 Demonstrate disentanglement procedures in both day and night conditions for survivors both
with and without aircrew survival equipment. TOPIC OUTLINE:
WARNING Inhalation of resulting from aircraft fires and/or aircraft material damage may be harmful to rescue personnel. If smoke is present, the rescue swimmer shall be deployed up-wind and will approach the aircraft in a manner as to avoid any smoke. Discard wet suit if it becomes impregnated with composite fibers.
NOTE Equipment worn by survivor determines the procedures to be used in parachute disentanglement.
A. DISENTANGLEMENT PROCEDURES FOR FREE FLOTER
1. ASSESS situation to determine if survivor(s) are , or active. Assessing the situation begins water entry. The situation may change at any moment.
2. ESTABLISH communication to determine the condition of the survivor and make approach. Ask
“ ”? The rescue swimmer shall continually evaluate the medical condition of a survivor during the entire course of rescue.
3. Grasp survivor between the shoulder blades and pull survivor into wind. Obtain control of survivor
“ “.
NOTE _______________________. Give two rescue breaths if required.
4. CLEAR . If survivor is conscious ask about any known injuries or conditions.
5. CHECK FLOTATION, evaluate the condition of survivor’s flotation
NOTE
When the survivor has damaged or no flotation, the rescue swimmer may give up his/her SAR-1 vest. If the rescue swimmer chooses to give up flotation, he/she shall use the appropriate conscious or unconscious survivor procedures as outlined in LT. 3.8 Combative Survivor Procedures.
6. DISENTANGLEMENT from head to toe.

TRAINEE GUIDE A-050-0500 OUTLINE SHEET 3.5
DISENTANGLEMENT PROCEDURES FREE FLOATER/HELICOPTER AIRCREW
68 FOR TRAINING USE ONLY
7. SWEEP ARMS, ensure that the survivor’s arms are completely clear of any debris. Once it has been
verified that the survivor’s arms are clear, across the survivor’s chest.
8. , using the spine as a reference, submerge and proceed hand-over-hand
keeping one hand on the survivor at all times. Proceed down the back and remove any debris off of the survivor’s legs. Submerge as necessary to remove all possible entanglements.
WARNING
If survivor has suspected back injury, use the side of the survivor as a reference. Proceed hand-over-hand along the side, keeping one hand on the survivor at all times, remove all possible entanglements.
9. DISCARD RAFT, (if applicable).
NOTE
At the discretion of the rescue swimmer the raft may be punctured with a knife and sunk before, during, or after the survivor has been removed.
WARNING
Loss of is a serious life threatening condition requiring immediate medical treatment. This condition takes precedence and survivor should be recovered by _________ ________________________________.
10. Perform from head-to-toe, to ensure that all shroud lines and parachute
suspension lines are clear.
11. SIGNAL rescue platform. a. Day – . b. Night – .
NOTE
For a non-breathing survivor, if any delay occurs with the rescue platform, continue with rescue breathing procedures according to American Red Cross for the Professional Rescuer.
12. As the rescue boat is approaching:
c. Ensure the area is .
d. Establish a hand cross-chest carry, grasping survivors lifting “V” ring in your left hand.
13. If helicopter recovery, allow the rescue hook to touch the water, discharging static electricity. 14. Connect large end of rescue hook to survivor’s lifting “V” ring.

TRAINEE GUIDE A-050-0500 OUTLINE SHEET 3.5
DISENTANGLEMENT PROCEDURES FREE FLOATER/HELICOPTER AIRCREW
69 FOR TRAINING USE ONLY
WARNING
When connecting to a survivor who has an SV-2 vest, ensure that the chest strap on the survivor is loosened slightly to avoid injury to the survivor.
15. Use appropriate procedures for rescue device selected. 16. Perform on rescue devise, signal up hoist.
B. DISENTANGLEMENT PROCEDURES FOR ________________________________________ _____________ (CMU-33/P22P-18 & PRU-60/P22-15) ___________________________________ _____________(CMU-30/P22P-15 & PRU-61)
When the survivor is wearing the AIRSAFE/ASAIP vest with body armor, the rescue swimmer
shall:
1. ASSESS situation to determine if survivor(s) are conscious, unconscious, passive, or active. Assessing the situation begins before water entry. The situation may change at any moment.
2. ESTABLISH communication to determine the condition of the survivor and make approach. Ask,
“Are you OK”? The rescue swimmer shall continually evaluate the medical condition of a survivor during the entire course of the rescue.
3. Grasp survivor between the shoulder blades and pull survivor into wind and away from survivor.
Obtain control of survivor “ “.
NOTE ___________________________________. Give two rescue breaths if required.
4. CLEAR head, neck, and chest area. If survivor is conscious ask about any known injuries or
conditions.
NOTE If survivor is wearing an HGU series helmet the chin strap must be prior to inflating survivor’s flotation.
5. CHECK FLOTATION, evaluate the condition of survivor’s flotation.
NOTE
When the survivor has damaged flotation or no flotation, the rescue swimmer may give up his/her SAR 1 vest. If the rescue swimmer chooses to give up flotation, he/she shall use the appropriate conscious or unconscious survivor procedures as outlined in LT. 3.8, Combative Survivor Procedures.
NOTE
The following flotation assemblies can be utilized with the ASAIP VEST; LPU-21/P, LPU-27/P and LPU-35/P.

TRAINEE GUIDE A-050-0500 OUTLINE SHEET 3.5
DISENTANGLEMENT PROCEDURES FREE FLOATER/HELICOPTER AIRCREW
70 FOR TRAINING USE ONLY
WARNING
Depending on flotation assembly installed, the rescue swimmer must use the appropriate inflation procedures.
6. DISENTANGLEMENT, from head-to-toe. 7. SWEEP ARMS, ensure that the survivor’s arms are completely clear of any debris. Once it is been
verified that the survivor’s arms are clear across their chest. 8. , using the spine as a reference, submerge and proceed hand-over-hand
along the side, keeping one hand on the survivor at all times, and remove all possible entanglements.
9. DISCARD RAFT, (if applicable).
NOTE At the discretion of the rescue swimmer the raft may be punctured with a knife and sunk before, during, or after the survivor has been removed.
10. Perform , head to toe to ensure that all shroud lines and parachute suspension lines are
clear. 11. SIGNAL rescue platform.
a. Day – Armed raised, thumb up. b. Night –Arm raised, waving high intensity chemlight.
NOTE
For a non-breathing survivor, if any delay occurs with the rescue platform, continue with rescue breathing procedures according to American Red Cross for the Professional Rescuer.
12. As the rescue boat is approaching:
a. Ensure AREA IS CLEAR.
NOTE
Survivor’s lifting device is located on right side of vest. Lifting device could be covered by nylon restraining flap.
WARNING
The survivor will ride lower then normal on PNJ-205 and TRISAR rescue harnesses.
13. for rescue device selected. 14. Perform SAFETY CHECK on rescue device, signal “ready for pick-up”..
C. ARMOR PLATE REMOVAL PROCEDURES

TRAINEE GUIDE A-050-0500 OUTLINE SHEET 3.5
DISENTANGLEMENT PROCEDURES FREE FLOATER/HELICOPTER AIRCREW
71 FOR TRAINING USE ONLY
NOTE
The following procedures for armor plate removal will happen during Step 6 (disentanglement head-to-toe), immediately following the step.
WARNING
The rescue swimmer must decide if performing armor plate removal procedures could cause further injury to survivor.
NOTE
If vest is zippered fully, armor release will not detach normally. Armor release beaded pull handle will have to be detached at snaps to remove back plate.
WARNING
Failure of armor release beaded pull handle to completely come away from survivor could cause a choking hazard to survivor. If this occurs, rescue swimmer must to allow back plate to fall away.
1. Grasp armored release beaded pull handle located on front of vest, and pull out and away (________ ___________) to release back plate. If back plate does not fall away, pull free from hook/pile tape
located on rear of vest and discard.
NOTE Vest could be fully zippered which would cover access to chest plate. Unzip vest to expose chest plate.
2. Grasp nylon web handle on front plate, located on center of chest vest. Pull free from hook/pile tape and discard.
3. Continue disentanglement using appropriate procedures
D. RAFT EXTRACTION PROCEDURES
WARNING
Life raft must be discarded prior to .
NOTE The point at which disentanglement in the life raft becomes unfeasible is the point at which the rescue swimmer should extract the survivor from the raft. Once the survivor is in the water, the rescue swimmer resumes disentanglement procedures from where he/she left off.
1. _____________________________ methods of removing the survivor from the raft are as follows:
WARNING
____________________________________________________________________________.

TRAINEE GUIDE A-050-0500 OUTLINE SHEET 3.5
DISENTANGLEMENT PROCEDURES FREE FLOATER/HELICOPTER AIRCREW
72 FOR TRAINING USE ONLY
1.a. The rescue swimmer gets behind the survivor, places his/ her against the edge of the
life raft, and grasps the survivor’s harness/flight (DO NOT GRAB FLOTATION) suit between the shoulder blades.
b. Simultaneously, the rescue swimmer pulls the survivor up and over the raft lobe, and pushes
down and away with knees against the raft. c. Once the survivor is in the water, .
WARNING .
2.a. The rescue swimmer gets behind the survivor, and grasp the harness/flight (DO NOT GRAB
FLOTATION) suit between the shoulder blades. b. The rescue swimmer will roll the survivor and raft either to the right or left. Inform the survivor
if practical. Normally, in order to gain momentum, the rescue swimmer will rock the survivor/raft and prepare to roll the survivor out of the raft. On the third time, roll the survivor into the water immediately righting the survivor by rolling him/her onto their back.
c. Once the survivor is in the water, continue disentanglement procedures.
WARNING
.
3.a. The rescue swimmer gets behind the survivor and grasps the harness/flight suit between the shoulder blades.
b. With one hand, the rescue swimmer removes his/her while maintaining
positive control of the survivor with one hand. The rescue swimmer then uses the knife to puncture the raft and deflate it.
WARNING
This is done of the survivor ensuring not to injure the survivor or swimmer.
c. While raft is deflating, the rescue swimmer may stow the knife if practical. d. Once the survivor is in the water, continue disentanglement procedures.

TRAINEE GUIDE A-050-0500 OUTLINE SHEET 3.6
DISENTANGLEMENT PROCEDURES (BACK PACK) ENABLING OBJECTIVES 3.11 List parachute disentanglement procedures for personnel wearing U.S. Navy Back Pack parachute assembly. TOPIC OUTLINE:
WARNING
NOTE
Equipment worn by the survivor determines the procedures to be used in parachute disentanglement.
WARNING The parachute should never be allowed to come between the _________________________, as the rescue swimmer could lose sight of the survivor or could become entangled in the parachute or suspension lines.
A. DISENTANGLEMENT PROCEDURES FOR BACK PACK HARNESS
1. ASSESS situation to determine if survivor(s)_____________________________, or active. Assessing the situation begins before water entry. The situation may change at any moment.
2. ESTABLISH communication to determine the condition of the survivor and make approach. Ask,
“________________”? The rescue swimmer shall continually evaluate the medical condition of a survivor during the entire course of a rescue.
a. Swim to the parachute edge closest to the survivor and opposite the apex of the parachute canopy.
b. Lift the edge of the parachute, pull shroud line(s) until the survivor is within reach and the canopy
is gathered into the rescue swimmers hand.
3. Grasp survivor’s harness between the shoulder blades and pull survivor into the wind and away from parachute. Obtain control of survivor “__________”.
4. Remove ____________, if applicable. CLEAR head, neck, and chest area. If survivor is conscious
ask about any known injuries or conditions.
NOTE _______________. Give two rescue breaths if required.
73 FOR TRAINING USE ONLY

TRAINEE GUIDE A-050-0500 OUTLINE SHEET 3.6
DISENTANGLEMENT PROCEDURES (BACK PACK) WARNING
When the HGU series helmet is worn with the _________________, do not inflate vest until chinstrap is loosened or helmet is removed.
5. Disconnect survivor’s _________________located on the chest and ______________floatation (inflate manually or orally, if necessary).
WARNING
If releasing the quick ejector snap is not done prior to inflation and the survivor’s is wearing an LPP-1, there is a possibility of the LPP-1 _____________________. At a minimum, it will be hard for the survivor to breathe. This warning also applies to the ____________________________________________________________.
NOTE If the survivor is wearing a chest pack, one of the ______________________, that connect the pack to the harness, must be released to gain access to the chest quickly.
6. DISENTANGLE _________________________, checking for injuries during disentanglement procedures.
7. Remove ________________________ SWEEP ARMS, ensuring that survivor’s arms are
completely clear of any debris. Once it has been verified that the survivor’s arms are clear, cross the arms across the survivor’s chest.
8. SPINAL HIGHWAY, using the spine as a reference, submerge and proceed hand-over-hand keeping
one hand on the survivor at all times. Release quick ejector fittings on survivor’s legs. After fittings are released, submerge as before and remove all parachute suspension lines from survivor’s legs. Submerge as many times as necessary to remove all debris.
WARNING
If survivor has a suspected back injury, use the ___________________________. Proceed hand-over-hand along the side, keeping one hand on the survivor at all times, and remove all possible entanglements.
a. ________ the survivor clear of the parachute. If the survivor is still not free of the parachute or harness, use the washboard method.
WARNING If the survivor has a suspected back injury do not use the _______________ method.
b. Grasp survivor with both hands on the back of the flotation device.
c. In quick succession, push and pull survivor fore and aft. Make sure that the survivor’s head is kept above water.
74 FOR TRAINING USE ONLY

TRAINEE GUIDE A-050-0500 OUTLINE SHEET 3.6
DISENTANGLEMENT PROCEDURES (BACK PACK) 9. DISCARD RAFT (If applicable).
NOTE
At the discretion of the rescue swimmer the raft may be punctured with a knife and sunk before, during, or after the survivor has been removed.
WARNING Loss of ABC’s is a serious life threatening condition requiring immediate medical treatment. This condition takes precedence and survivor should be recovered by fastest means possible.
10. Perform ____________, head-to-toe to ensure that all shroud lines and parachute suspension lines are clear.
11. SIGNAL rescue platform.
a. ______ – Arm raised, thumb up. b. Night – Arm raised, waving high intensity chemlight.
NOTE
For a non-breathing survivor, if any delay occurs with the rescue platform, continue with rescue breathing procedures according to American Red Cross for the Professional Rescuer.
12. As the rescue/ helicopter boat is approaching:
a. Ensure the AREA IS CLEAR.
b. Establish a left-hand cross-chest carry, grasping survivor’s lifting “V” ring in your left hand.
WARNING When connecting to a survivor who has an SV-2 vest, ensure that the chest strap on the survivor is loosened slightly to avoid injury to the survivor.
13. Allow rescue hook to touch water, ___________ static electricity.
14. Use appropriate procedures for rescue device selected.
15. Perform __________________on rescue device, signal “signal for pick-up”.
B. BALLOONED CANOPY PROCEDURES
1. Establish communications during approach to survivor.
75 FOR TRAINING USE ONLY

TRAINEE GUIDE A-050-0500 OUTLINE SHEET 3.6
DISENTANGLEMENT PROCEDURES (BACK PACK)
76 FOR TRAINING USE ONLY
WARNING _______________________________________________________.
2. Swim to chute edge closest to survivor and ______________________________________. 3. Lift edge of parachute; pull one _______________ survivor is within reach. 4. With free arm, turn survivor around and grasp back of harness, pull to edge of canopy.
5. In one motion, lift skirt over survivor’s head and pull survivor clear. 6. With survivor out from under the parachute, continue pulling survivor into the wind and away from
parachute canopy. 7. When well clear of parachute canopy, use disentanglement procedures applicable to type of harness
the survivor is wearing.
TRAINEE GUIDE A-050-0500
OUTLINE SHEET 3.7 DISENTANGLEMENT PROCEDURES (JET AIRCRAFT)
ENABLING OBJECTIVES: 3.12 List disentanglement procedures for personnel wearing Jet aircraft survival equipment. 3.13 Demonstrate disentanglement procedures for personnel wearing Jet aircraft survival equipment in
day/night conditions. TOPIC OUTLINE:
NOTE Equipment worn by the survivor determines the procedures to be used in parachute disentanglement.
WARNING
WARNING The parachute should never be allowed to come between the rescue swimmer and the survivor, as the rescue swimmer could lose sight of the survivor or could become _______________________________________.
A. Disentanglement procedures for PCU/33, Integrated Torso Harness.
1. __________ situation to determine if survivor(s)are conscious, unconscious, passive or active. Assessing the situation begins before water entry. The situation may change at any moment.
2. ____________ communication to determine the condition of the survivor and make approach. Ask,
“Are you OK”? The rescue swimmer shall continually evaluate the medical condition of a survivor during the entire course of a rescue.
a. Swim to the parachute edge closest to the survivor and opposite the apex of the parachute
canopy.
b. Lift the edge of the parachute, pull shroud line(s) until the survivor is within reach and the canopy is gathered into the rescue swimmers hand.
3. Grasp survivor’s harness between the shoulder blades and pull survivor into the wind and away from
parachute. Obtain control of survivor “ICIC”. 4. Remove __________________. CLEAR head, neck, and chest area. If survivor is conscious ask
about any known injuries or conditions.
77 FOR TRAINING USE ONLY

TRAINEE GUIDE A-050-0500
OUTLINE SHEET 3.7 DISENTANGLEMENT PROCEDURES (JET AIRCRAFT)
a. If survivor is still wearing oxygen mask completely remove it from both
bayonet fittings and push mask through chest strap, away from survivor.
NOTE ___________________. Give two breaths if required.
5. ________________ (inflate manually or orally if necessary). 6. ________________ from head-to-toe, checking for injuries during disentanglement process.
a. Disconnect parachute risers by releasing ________________________
b. Remove parachute risers and throw them to the side, ensuring they do not fall back onto survivor.
7. SWEEP ARMS, ensuring that survivor’s arms are completely clear of debris. Once it has been
verified that the survivor’s arms are clear, cross the arms across the survivor’s chest. 8. SIDE CONTROL, using the side of the survivor as a reference, proceed hand-over-hand along the:
a. Left side. Move down towards the legs removing any shroud lines along the way. Release the
Oxygen hose (if applicable) from RSSK, and then disconnect mini-Koch fitting on lap. b. Move back up the left side and go down the right side toward the legs, removing any shroud lines
along the way. Disconnect the ______________fitting on lap. This releases the RSSK. c. Move back down the left side and ensure there are no entanglements around the survivor’s left
leg. Repeat for right leg.
9. Tow survivor clear of parachute and DISCARD RAFT (if applicable).
NOTE At the discretion of the rescue swimmer the raft may be punctured with a knife and sunk before, during, or after the survivor has been removed.
WARNING Loss of ABC’s is a serious life threatening condition requiring immediate medical treatment. This condition takes precedence and survivor should be recovered by the fastest means possible.
NOTE The litter should be the primary recovery device if survivor is an ejected aviator or other survivor suspected of having a spinal injury based on swimmer’s evaluation.
78 FOR TRAINING USE ONLY
TRAINEE GUIDE A-050-0500
OUTLINE SHEET 3.7 DISENTANGLEMENT PROCEDURES (JET AIRCRAFT)
10. Perform FINAL CHECK, head-to-toe to ensure that all shroud lines and parachute suspension lines
are clear. 11. _____________ rescue platform.
a. Day – Arm raised, thumb up
b. Night – Arm raised, waving __________________.
NOTE For a non-breathing survivor, if any delay occurs with the rescue platform, continue with rescue breathing procedures according to American Red Cross for the Professional Rescuer.
12. As the rescue boat is approaching:
a. Ensure the AREA IS CLEAR.
b. Establish a left-hand cross-chest carry, grasping survivor’s gated “D” ring in your left hand. 13. If helicopter recovery, allow RESCUE HOOK TO TOUCH WATER, discharging static
electricity. 14. USE APPROPRIATE PROCEDURES for rescue device selected. 15. Perform SAFETY CHECK on rescue device, signal “ready for pick-up”.
NOTE
If rescue scenario involves E-2C Hawkeye aircrew, all of the procedural steps are identical with those of ejection seat aircraft. The difference in gear is purely mechanical and will require deviations in technique only.
79 FOR TRAINING USE ONLY

TRAINEE GUIDE A-050-0500
OUTLINE SHEET 3.7 DISENTANGLEMENT PROCEDURES (JET AIRCRAFT)
80 FOR TRAINING USE ONLY
THIS PAGE INTENTIONALLY LEFT BLANK

TRAINEE GIUDE A-050-0500 OUTLINE SHEET 3.8
COMBATIVE SURVIVOR
ENABLING OBJECTIVES: 3.14 Describe characteristics of a panicking survivor. 3.15 State procedures for survivor emergency floatation of both conscious and unconscious. 3.16 Demonstrate emergency floatation procedures for conscious and unconscious victims in a simulated
rescue situation. 3.17 List procedural steps for a combative survivor. 3.18 Demonstrate combative survivor procedures in a simulated rescue situation. 3.19 State modified recovery procedures for a combative survivor. 3.20 Demonstrate modified recovery procedures for a combative survivor in a simulated rescue situation. 3.21 State procedures for providing care for combative survivor while aboard the rescue platform. 3.22 Describe appropriate combative survivor hand signals. 3.23 Demonstrate appropriate combative survivor hand signals.
TOPIC OUTLINE:
A. Survivor Characteristics 1. Naval Rescue Swimmers are sometimes faced with situations where the survivor can be categorized
as uncooperative. Uncooperative survivors can be categorized into two distinct types; panicked and combative.
2. Panicking Survivors
a. Some rescues involve panicky survivors (even some aviators). b. Appearance: Wide eyes, frantic activity, gasping for air and other similar behavior. c. Will attempt to grab and get on top of rescuer in order to keep his/her own head out of the water.
Rescuers could be drowned in this manner.
d. Best defense: Do not get to close until you have assessed the situation and decided on the best approach for this survivor.
81 FOR TRAINING USE ONLY

TRAINEE GIUDE A-050-0500 OUTLINE SHEET 3.8
COMBATIVE SURVIVOR
e. It may be possible to calm a panicking survivor by talking to them and explaining who you are and what you are doing.
f. Another means of calming a panicked survivor is to provide flotation.
B. Procedures for giving up flotation to a conscious/unconscious survivor:
NOTE
When the survivor has damaged or no flotation, the swimmer may give up his/her SAR-1 vest. If the swimmer chooses to give up floatation, the rescue swimmer shall use the following conscious or unconscious survivor procedures:
1. Conscious Survivor:
a. Approach the survivor and establish communication, using the front surface approach. b. Upon reaching a distance of 6 to 8 feet from the survivor, execute a quick reverse. c. Remove rescue swimmer’s mask, unclip and remove SAR-1, and replace mask. d. Inflate SAR-1, hold onto end of SAR-1 strap, and pass to survivor. Instruct survivors to place
SAR-1 over his/her head with pocket facing out. e. While survivor is donning SAR-1, the swimmer shall swim around to the right and behind
survivor with strap in right hand. f. Place left hand across chest under SAR-1 and grasp buckle. Bring strap under both arms and clip
into buckle. Tighten strap. g. Perform disentanglement procedures.
2. Unconscious survivor:
a. Approach the survivor using the front surface approach and establish communications or determine unresponsiveness.
b. Upon reaching a distance of an arm’s length from the survivor, execute a quick reverse. c. Remove rescue swimmer’s mask, unclip and remove SAR-1, and replace mask. d. Inflate SAR-1 and place right arm through neck hole with pocket facing in. e. Use front surface approach procedures.
82 FOR TRAINING USE ONLY

TRAINEE GIUDE A-050-0500 OUTLINE SHEET 3.8
COMBATIVE SURVIVOR NOTE
Remove survivor’s oxygen mask/helmet/cranial if applicable.
f. Place SAR-1 over survivor’s head with pocket facing out. This is done with rescue swimmer’s right arm, while keeping survivor in a left hand cross-chest carry.
g. Place left hand across chest under the SAR-1, and grasp buckle. Bring strap under both arms and
clip into buckle. Tighten strap. h. Check for breathing. Give _________ breaths if required. i. Perform Disentanglement Procedures.
j. Complete rescue using normal procedures.
C. Combative Survivor:
WARNING
Combative survivors may not initially desire to be rescued and may actively resist assistance from the rescue swimmer. The combative survivor may intentionally try to harm the rescue swimmer or themselves when approached. This type of behavior can continue indefinitely, even after repeated attempts by the rescue swimmer to provide assurance and recovery.
1. Indications that a survivor might be combative are:
a. Prior mentally unstable behavior, suicide attempt, voluntarily jumping into the water. b. Suspected or known enemy, foreign personnel demonstrating hostility towards Americans, or
suspicious personnel aboard vessels being detained. 2. Combative Survivor Procedures:
WARNING The rescue swimmer shall not be deployed into the water to recover enemy or hostile survivors armed with weapons.
WARNING Recovery of enemy or hostile survivors should only be attempted using a rescue boat or ships J-bar davit with armed security personnel on station in the rescue boat or ship’s forecastle. Helicopter recovery of an enemy or hostile survivor should only be used under operational necessity.
83 FOR TRAINING USE ONLY

TRAINEE GIUDE A-050-0500 OUTLINE SHEET 3.8
COMBATIVE SURVIVOR WARNING
A single rescue swimmer should not attempt the recovery of a combative survivor without assistance from a rescue boat and/or a second rescue swimmer.
a. Approach survivor and establish verbal communication. Attempt to calm the survivor with verbal reassurance and commands.
b. If survivor is actively combative, do not attempt to immediately gain physical control of the
survivor. The rescue swimmer should remain a safe distance (6 to 8 feet) from the survivor, and assess the situation.
c. If survivor does not have operable flotation, the rescue swimmer should attempt to provide a
flotation device to the survivor while still maintaining a safe distance.
d. Communicate with the rescue platform and brief the situation.
e. Request assistance utilizing radio or hand signals:
(1) Request rescue boat assistance (2) Request the assistance of a second rescue swimmer. The second rescue swimmer is backup
(3) to the primary rescue swimmer and has the following responsibilities:
(a) Ensure the safety of the primary rescue swimmer (b) Assist the primary rescue swimmer as needed. (c) Deploy with rescue equipment requested by primary rescue swimmer. (d) Once on scene, the back-up rescue swimmer may assume/help with communication duties
to the rescue platform. (e) Assist the primary rescue swimmer as required.
NOTE
There are no dual rescue swimmer procedures. The back-up rescue swimmer should act as a safety observer and assist the primary rescue swimmer as required.
D. Use the following modified recovery procedures:
1. Maintain 6 to 8 feet distance from survivor, remain vigilant and ready to render immediate assistance, and wait for the survivor to tire, calm down, and/or ask for assistance.
2. Be patient. Attempt to calm the survivor and provide flotation to the survivor if needed and/or
84 FOR TRAINING USE ONLY

TRAINEE GIUDE A-050-0500 OUTLINE SHEET 3.8
COMBATIVE SURVIVOR practical.
3. Assume physical control of the survivor only when deemed safe. Do not attempt to rescue an actively
combative survivor unless the following conditions occur:
a. The survivor requests assistance.
b. The survivor becomes unconscious/incapacitated.
4. Ensure the survivor has no weapons. a. If conscious, direct the survivor to maintain hands in view at all times. b. Once physical control is established, the rescue swimmer shall remain vigilant for survivor to
become actively combative or the presence of any weapons.
5. Recover survivor using appropriate device.
NOTE The rescue boat or ships J-Bar Davit is the preferred recovery vehicle. If a rescue boat or ship is unavailable, recovery may be made to a helicopter.
WARNING In all cases (whether the survivor is determined to be combative, panicked, or cooperative) the rescuer shall not hoist the survivor from an overland or maritime environment without the proper application of the selected rescue device to include any and all safety straps or safety devices per all applicable publications and instructions.
a. Rescue Strop:
(1) The rescue swimmer shall, in all cases, correctly employ the arm retaining straps prior to
signaling “ready for pick-up”.
E. Care and control of a combative survivor onboard the rescue platform:
1. The rescue platform shall notify the on-scene commander of the situation, survivor’s condition, and request medical and security personnel assistance at the rescue platforms location.
2. The rescue platform crew shall remain vigilant during transit. A member of the crew or security
personnel shall be stationed next to the survivor at all times during transit to provide immediate physical control if required.
85 FOR TRAINING USE ONLY

TRAINEE GIUDE A-050-0500 OUTLINE SHEET 3.8
COMBATIVE SURVIVOR
86 FOR TRAINING USE ONLY
WARNING Restraints will preclude the survivor from being able to egress/swim in the event of an aircraft mishap or rescue boat capsizing during transit. Rescue personnel may need to provide assistance to the survivor to egress the rescue platform in the event of a mishap.
3. Once onboard the rescue platform, the survivor should be secured into a Medevac Litter at the earliest
opportunity. If a board a helicopter, cabin doors and windows should be secured.
NOTE The rescue personnel shall assess condition of survivor and provide medical treatment during transit.
NOTE Once rescue platform is safely aboard ship or ashore, transfer survivor to awaiting medical and/or security personnel.
4. Hand Signals:
a. Request rescue boat assistance:
(1) The rescue swimmer extends both arms directly overhead, palms placed together.
b. Request the assistance of a second rescue swimmer:
(2) Rescue swimmer faces the rescue platform, raises one arm from side of body diagonally (45 degrees), palm down, fingers extended straight out, and rotate arm in circular motion.

TRAINEE GUIDE A-050-0500
OUTLINE SHEET 4.1 RESCUE SWIMMER’S EQUIPMENT
INTRODUCTION: During rescue operations the rescue swimmer has certain types of equipment that he/she will use to aid in the recovery of a survivor. This unit of instruction will describe the various types of equipment and the usage of each. ENABLING OBJECTIVES: 3.24 State requirements for the maintenance of rescue swimmers equipment per current NAVAIR 13-1-6
series manuals/Maintenance Requirement Cards (MRC’s). 3.25 Explain the functional operation of rescue swimmer’s equipment per NTTP 3-50.1:
a. Wet Suit b. Mask, Fins, and Snorkel c. Rescue Swimmer’s Harness (HBU-11) d. LPU-28(SAR-1)
TOPICE OUTLINE: RESCUE SWIMMER’S EQUIPMENT:
A. Wetsuit Ensemble
1. Preferred commercial grade 2. Neoprene rubber sandwiched by non-chaffing nylon
3. Consist of:
a. Jacket with long sleeves.
b. Trousers, Farmer John type
c. “______________” assembly
d. Booties
(1) Worn with fins to protect the ______________. (2) Worn at the discretion of the rescue swimmer, unless atmospheric conditions dictate
otherwise.
e. Gloves
(1) Worn at the swimmer’s discretion.
(2) Shall be the __________ finger type.
87 FOR TRAINING USE ONLY

TRAINEE GUIDE A-050-0500
OUTLINE SHEET 4.1 RESCUE SWIMMER’S EQUIPMENT
f. Hood
(1) Worn at the swimmer’s discretion.
(2) Reduces chill factor generated by rotor wash.
(3) Reduces heat loss through the head. ____ percent of all body heat is loss through the head.
4. _________________________________________________________________________________
__________________________.
5. Entire wetsuit shall be worn as per OPNAVINST 3710.7, specifically:
a. When water temperature is above _____ F and air temperature is above _____ F (wind chill corrected), full wetsuits shall be worn at the commanding officers’ discretion.
b. Whenever the water temperature is below 50F or air temperature is 32 F (wind chill corrected) or
below, full ____________ protection is mandatory.
B. U.S. Divers Wrap Around Mask
1. Allows rescue swimmers to see clearly underwater by providing an air space in front of the eyes.
2. Double skirted for comfort and optimum seal.
3. Wrap around offers a wide field of view and greater ___________ vision.
4. Plastic adel clamp on top of mask provides means to attach the ____________ High Intensity Chemical Light to the swimmer.
5. Mask fogging is prevented by coating the interior of all three lenses with commercial mask lens defogger, toothpaste, or __________________.
6. Mask _____________ tied off on either the left or right shoulder strap of the rescue swimmer’s harness and ______ passed through ____________ of the SAR-1 Vest. The mask shall not be tied off to the LPU-28.
C. U.S. Divers Rocket Fins
1. Fins provide greater propulsion, speed, power and mobility. U.S. Divers Rocket Fins are the only
____________ fins.
a. Slots or Vents:
(1) Redirect the flow of water through the fin and toward the tip. (2) Most efficient when used with the flutter kick.
88 FOR TRAINING USE ONLY

TRAINEE GUIDE A-050-0500
OUTLINE SHEET 4.1 RESCUE SWIMMER’S EQUIPMENT
(3) Fins have a stiff blade which may cause calf cramps
D. U.S. Divers Snorkel
1. Permits the rescue swimmer to breathe easily while working in the ______________________.
2. Barrel can be straight or gently curved.
3. Flexible hose connects barrel to mouthpiece.
4. Snorkel attaches to mask strap with a snorkel keeper.
E. Rescue swimmer’s Harness HBU-11
1. Incorporates one lifting devices attached to the harness.
2. Lifting “V”ring
a. Located center of chest.
b. Attaches to rescue hook.
3. Has left and right riser pockets which contain the following equipment:
a. Two six-inch General Purpose Chemical Lights for signaling or illumination of rescue devices.
(1) Carried in the ____________ riser pocket.
b. Two four-inch High Intensity Chemical Lights for use with the swimmer’s mask.
(1) Carried in the __________ riser pocket.
c. J-hook Knife
(1) Used only as a last resort to cut ________________. (2) Carried in the right riser pocket. (3) Has curved end for safety.
d. One Strobe Light
(1) Located on ____________________ shoulder strap (2) Used for emergency signaling by the rescue swimmer. (3) Covered with a ____________ for swimmer identification.
(a) Scabbard knife, attached to chest strap.
89 FOR TRAINING USE ONLY

TRAINEE GUIDE A-050-0500
OUTLINE SHEET 4.1 RESCUE SWIMMER’S EQUIPMENT
90 FOR TRAINING USE ONLY
F. LPU-28 (SAR-1)
1. Provides emergency flotation for the rescue swimmer. SAR-1 may also be used to provide flotation for ______________________.
2. Provides a minimum of ______ lbs of buoyancy.
3. Single cell construction.
4. Velcro on right shoulder is for attaching strobe light or the ____________ to the LPU-28.
5. Storage pouch is in front.
6. Normal inflation is through the ______ inflation tube, emergency inflation is accomplished with
CO2 cartridge.
7. Relief valve under storage pouch alleviates over inflation. RESCUE SWIMMER’S EQUIPMENT MAINTENANCE:
A. Care and Preventative Maintenance
1. ______________ rinse all equipment.
2. Hang in a cool, dry, windless place.
3. After drying hand fold wet suit loosely.
4. Lubrication:
a. Coat zippers, mechanical parts, and fins with _____________ spray lubricant.
b. Do not expose mask, fins, and snorkel to direct ____________ unnecessarily as this will accelerate the deterioration of the silicone rubber.
B. Inspection interval for rescue swimmers equipment
1. By the swimmer prior to flight or deployment.
a. Look for signs of deterioration. Dry rot, corrosion. Tears, worn or broken components.
2. Quarterly by the rescue swimmer as per Maintenance Requirement Cards (MRC’s).

TRAINEE GUIDE A-050-0500 DIAGRAM SHEET 4.1-1
LPU-28 (SAR 1) SWIMMER FLOTATION
91 FOR TRAINING USE ONLY

TRAINEE GUIDE A-050-0500 DIAGRAM SHEET 4.1-2
RESCUE SWIMMER’S HARNESS/ RESCUE SWIMMER
92 FOR TRAINING USE ONLY

TRAINEE GUIDE A-050-0500
OUTLINE SHEET 4.2 MASK, FINS, AND SNORKEL
INTRODUCTION During this unit of instruction the rescue swimmer will learn the proper procedures for donning the mask, fins, and snorkel. It is very important that the rescue swimmer becomes familiar and comfortable with utilizing the mask, fins and snorkel in an aquatic environment. This unit will train the rescue swimmer trainee with methods to safely clear water from their mask and snorkel during a rescue situation. ENABLING OBJECTIVES: 3.26 Demonstrate procedures for donning mask, fins, snorkel and procedures for clearing the mask and snorkel. 3.27 Perform side/crawl strokes while wearing mask, fins, and snorkel. TOPIC OUTLINE
A. Masks
1. Check for proper fit and seal.
a. Hold lightly in place without using strap.
b. Seal edge should touch everywhere with no ______________________, gaps, or pressure points.
c. Inhale gently
d. Good fit – Mask will stay in place with light pressure alone. You should feel comfortable and secure.
2. MASK DONNING METHOD:
METHOD ACTION
1 Put mask on face. 2 Pull strap over back of head.
93 FOR TRAINING USE ONLY

TRAINEE GUIDE A-050-0500
OUTLINE SHEET 4.2 MASK, FINS, AND SNORKEL
3. MASK CLEARING METHODS:
a. Replacing water with air
METHOD
A ACTION
1 Press the top of the mask against ____________with palm of hand and slowly exhale through your nose.
2 Air displaces the water and is forced out the bottom of the mask.
OR
METHOD B
ACTION
1 Place hands on sides of mask, then lift___________ of mask slightly away from face, and slowly exhale through your nose.
2 Air displaces the water and is forced out the bottom of the mask.
B. SNOKEL:
Attaches to ________________side of mask by snorkel keeper strap.
1. SNOKEL CLEARING METHODS:
EXHALATION METHOD GRAVITY METHOD As swimmer returns to surface, keep face submerged so that tip of snorkel is above water and _______________ exhale through the mouth into the snorkel. Take a slow deep breath and exhale forcefully again to clear any residual water and then breath normally.
As swimmer returns to surface, look upward toward the surface keeping snorkel pointed ___________, just prior to reaching the surface exhale into snorkel, as your face clears the surface continue exhaling and flip snorkel tip up by looking down. Take a slow deep breath and forcefully exhale into snorkel, then breath normally.
C. FINS
1. Fit: Fins come in small, medium, and large sizes; with adjustable heel strap to accommodate
different foot sizes. Work fins over foot as far as possible then pull strap up over heel. Straps should be adjusted so fins fit snugly. Straps that are too tight can cause painful foot _____________and loose straps will cause the fin to fall off.
2. Kick: Modified flutter kick is used when swimming with rocket fins.
94 FOR TRAINING USE ONLY

TRAINEE GUIDE A-050-0500
OUTLINE SHEET 4.2 MASK, FINS, AND SNORKEL
a. Legs are kept straight knees, __________bent, toes pointed.
b. Alternately flutter the legs up and down, moving them at the hip.
c. Fins are kept underwater when swimming on the surface.
D. SURFACE DIVING
1. FEET-FIRST SURFACE DIVE:
STEPS ACTION 1 Begin the dive while treading water, push arms down towards side while executing a
____________________________. 2 Push up and out of the water pointing fin tips down. 3 Allow body to sink until head is submerged, keep hands by your side. 4 Rotate palms outward and push arms upward towards the surface. 5 Level out and swim forward underwater.
2. PIKE SURFACE DIVE:
STEPS ACTION 1 Bend at the waist, and look at the bottom of the pool 2 Lift your legs ______________out of the water 3 Let the weight of your legs force you down, pull with your arms
3. DIVING PRECAUTIONS:
a. When diving beneath surface, pain and discomfort may arise from:
(1) ___________________________________________
(2) ___________________________________________
(3) ___________________________________________
b. To alleviate pain and discomfort you can either:
(1) Exhale slightly into mask.
(2) _______________ to equalize sinuses and ears.
95 FOR TRAINING USE ONLY

TRAINEE GUIDE A-050-0500
OUTLINE SHEET 4.2 MASK, FINS, AND SNORKEL
96 FOR TRAINING USE ONLY
(3) Ascend slightly if equalization will not occur.
WARNING If unable to equalize pressure using these methods, surface immediately. Continued descent could rupture ear drums and damage sinus membranes.

TRAINEE GUIDE A-050-0500 JOB SHEET 4.2-2
MASK, FINS, SNORKEL
TRAINEE NAME/RATE SSN____________________ INSTRUCTOR/EVALUATOR DATE__________________ Evaluation Instructions Critical Steps: Observe trainee performing each step. Watch for correct use of equipment and adherence to safety regulations. Indicate trainee's performance by circling either Q, CQ, or UQ. "*" Denotes a critical area. Failure to adhere to items marked with an asterisk will result in automatic failure of this Performance test however a momentary deviation from prescribed procedures does not constitute an automatic failure. A mark of CQ on an asterisk item does not constitute an automatic failure the grade will be computed in for a final score. A mark of UQ on an asterisk item constitutes an automatic failure. A mark of Q = 4.0 a mark of CQ = 2.0 and a mark of UQ = 0.0 Minimum average score for passing is 3.6 If an item is not applicable line out that item and do not add it to the overall average Demonstrate procedures for donning mask fins and snorkel Q CQ UQ _______ Demonstrate one of the following procedures for clearing the Mask Q CQ UQ _______
Method A Press the top of the mask against the forehead with
and exhale slowly through nose. Method B Place hands on side of mask, lift bottom of mask slightly away from face and exhale slowly through nose. Demonstrate one of the following procedures for clearing snorkel Q CQ UQ _______ Exhalation method Expansion method Perform crawl stroke while wearing mask, fins, and snorkel Q CQ UQ _______ Perform sidestroke while wearing mask, fins, and snorkel Q CQ UQ _______
4.0 X number of SAT’s =____ 2.0 X number of MRSAT’s =____ 4.0’s + 2.0’s = total grade ____
Total grade_____ divided by __5__ (number of items tested) = ____
97 FOR TRAINING USE ONLY

TRAINEE GUIDE A-050-0500 JOB SHEET 4.2-2
MASK, FINS, SNORKEL
98 FOR TRAINING USE ONLY
THIS PAGE INTENTIONALLY LEFT BLANK

TRAINEE GUIDE A-050-0500
OUTLINE SHEET 4.3
PRIMARY RESCUE DEVICES AND PROCEDURES
99
ENABLING OBJECTIVES: 3.28 Explain the functional operation of the following Rescue Devices per NTTP 3-50.1:
a. Double Rescue Hook b. Modified Rescue Strop c. Rescue Litter/SAR MEDEVAC Litter, Trail Line and Gloves
3.29 Demonstrate procedures for placing a survivor into the following rescue devices in a water environment:
a. Double Rescue Hook b. Modified Rescue Strop c. Rescue Litter/SAR MEDEVAC Litter d. Rescue Litter Sling Assembly
TOPIC OUTLINE
A. COMMUNICATION PROCEDURES:
1. Efficient communications keeps the ship, boat crew, deck crew and swimmer aware of a developing rescue situation and allows rescue platform to provide needed support to swimmer (i.e. deployment of rescue devices).
2. The radio offers an optimal secondary means of communications.
3. are the primary means of communication between rescue swimmer and
the rescue platform in a maritime environment.
a. All crewmembers must be familiar with the meaning of standard hand signals.
B. DOUBLE RESCUE HOOK 1. The Double Rescue Hook is the .
a. All other rescue devices can only be used with the Double Rescue Hook.
b. Load ratings of the Double Rescue Hook (per the NAVAIR 13-1-6.5):
(1) Large hook, rated at lbs., shall be the only hook to hoist . (2) Small hook, rated at lbs., is to be used only for lightweight items such as
mail.
(3) The equipment ring, rated at lbs., is used to hoist light equipment and mail.
FOR TRAINING USE ONLY

TRAINEE GUIDE A-050-0500
OUTLINE SHEET 4.3
PRIMARY RESCUE DEVICES AND PROCEDURES
100
c. Nigh-time Illumination
(1) Attach chemlight strap to and attach to strap.
2. Procedures for forecastle recovery by Rescue Hook.
WARNING
When connecting to a survivor who has an SV-2 vest, ensure that the chest strap on the survivor is loosened slightly to avoid injury to the survivor.
a. Perform approach and disentanglement procedures as necessary. b. Attach swimmer’s tending line to the gated “D” ring located on the
right shoulder of the pilot’s torso harness if needed.
c. When the rescue swimmer and survivor are ready to be hauled back the ship, the rescue swimmer shall position pilot and a thumbs-up signal to commence hauling in.
d. Once under the davit, the swimmer gives a closed fist signal to
stop hauling in. Position pilot under davit and attach largest hook of the double rescue hook to the ”D” ring on the torso harness or V-ring on the chest strap of non-ejection aviators.
e. Rescue swimmer connects the surface swimmer harness “V” ring
to the large end of the double rescue hook.
f. Rescue swimmer signals ship, “Ready to be hoisted”.
C. MODIFIED RESCUE STROP 1. Rescue device used with Double Rescue Hook. The Modified
Rescue Strop is a buoyant device with a red waterproof cover designed to accommodate survivor. A webbing strap runs through the cover and has a “V”-ring at both ends for attaching the . Two arm retainer straps are attached .
2. Night-time Illumination
Chemlights are attached to the chemlight strap. The strap is attached to Rescue Strop lower “V” ring.
3. Procedures for use:
FOR TRAINING USE ONLY

TRAINEE GUIDE A-050-0500
OUTLINE SHEET 4.3
PRIMARY RESCUE DEVICES AND PROCEDURES
101
NOTE
Arm retainer straps shall be in the position when lowering the Rescue Strop.
a. Signal for pick-up.
b. Once under the davit, the swimmer signals a closed fist to stop hauling in.
c. Approach hoist with survivor in an appropriate carry.
d. Working the survivor, with the arm retainer straps , the rescue swimmer shall pass the of the strop under one arm, around the back and under the other arm.
e. Connect the Rescue Strop free end lifting “V” ring to the large hook.
f. Position the Rescue Strop tightly under the survivor’s and on the upper half of
the .
WARNING Arm retainer straps shall always be used when hoisting survivor with the Rescue Strop. This prevents the survivor’s arms from _________________________ .
g. Pass the arm retainer straps the survivor’s arms, route and
across the survivor’s chest. h. Connect the snap-hook arm retainer strap to the “V” ring arm retainer strap.
i. Pull webbing on the “V” ring arm retainer strap until the arm retainer straps are secured tightly
around the survivor’s arms.
j. If swimmer is to be hoisted, connect swimmer’s lifting to large hook.
k. .
l. Signal “Ready for pick-up”.
m. Rescue swimmer and survivor are hoisted up. After reaching the rescue platform, the rescue
swimmer and crew shall assist the survivor.
n. Once the survivor is on the rescue platform, the rescue swimmer shall maintain __________ of the survivor until the crew gives a thumbs up. A thumbs up indicates to the rescue swimmer that the crew has positive control of the survivor in on the rescue platform.
FOR TRAINING USE ONLY

TRAINEE GUIDE A-050-0500
OUTLINE SHEET 4.3
PRIMARY RESCUE DEVICES AND PROCEDURES
E. RESCUE LITTER/SAR MEDEVAC LITTER
1. Litter Characteristics:
a. Both are for use with suspected victims and survivors. b. Both are designed to be used or in water with assemblies. c. Rescue Litter requires a flotation kit for over water use. When flotation is installed litter floats
with survivor’s head slightly reclined from the vertical.
WARNING If survivor is wearing the bright orange Quick Donning Anti-Exposure Suit it may counteract the self-righting feature of the Rescue Litter and the SAR MEDEVAC Litter.
d. Both have a two piece rescue litter hoisting sling, which are attached to the Double Rescue
Hook. Sling is color coded short and long . e. The SAR MEDEVAC Litter folds in half and can be stored in a backpack and weighs
approximately . It can be hoisted or with its own sling, making it especially useful in restricted access situations.
f. Night-time illumination.
Two chemlights are attached to each strap. One strap is attached to the of the litter, one to the .
g. Both litters utilize a controlled by the swimmer in the water to control litter deployment and stabilize the litter during hoisting.
102 FOR TRAINING USE ONLY

TRAINEE GUIDE A-050-0500
OUTLINE SHEET 4.3
PRIMARY RESCUE DEVICES AND PROCEDURES
103
(1) .
(2) Three eights inch thick polyethylene, diamond-braided line.
(3) A weak link is incorporated, designed to break if the trail line becomes entangled.
(4) Gloves and line are deployed together via a shot bag.
2. Securing Survivor to the Rescue Litter (Stokes Litter) :
a. Rescue Litter has straps. They are stowed with four retaining straps. b. Procedures for securing survivor:
(1) The rescue swimmer shall guide the survivor into the positioned litter by using the
collar tow or equipment carry.
(2) Once positioned, the swimmer shall take the top restraint strap from the front of the litter and secure it around the survivor’s chest. The strap is pulled loose from the right side, placed under the arms but over the chest, and attached to the fitting on the left.
(3) Next, working from the chest strap down, secure the rest of the restraint straps.
(4) Once the restraint straps are secured, attach the chest pad over survivor’s arms. The
rescue swimmer may encounter some difficulty if survivor has flotation; however, flotation shall not be removed. Instead, remove chest pad from litter and continue with rescue. If practical swimmer will return chest pad back to rescue platform when hoisted.
1. ADJUSTABLE CARRYING HARNESS 2 EA 6. HEAD RESTAINT 2. VERTICAL HOISTING SLING 7. HOISTING CONNECTING CABLE 3. FOOT RESTRAINT ASSEMBLY 8. PATIENT STRAPS 4. LOCKING COUPLERS 9. PATIENT IN LITTER 5. LUMBER SUPPORT PADS 10. CHEST FLOTATION
FOR TRAINING USE ONLY

TRAINEE GUIDE A-050-0500
OUTLINE SHEET 4.3
PRIMARY RESCUE DEVICES AND PROCEDURES
104
3. Securing survivor to the SAR MEDEVAC Litter:
a. Litter will need to be assembled by prior to lowering to swimmer. b. Litter has integral and head restraint, four survivor restraint straps, one
chest flotation pad assembly strap, and one assembly. c. Procedure for securing survivor:
(1) The rescue swimmer shall guide the survivor into the positioned litter by using the
collar tow or equipment carry.
(2) Once positioned, the swimmer shall take the top restraint strap from the front of the litter and secure it around the survivor’s chest. The strap is pulled loose from the right side, placed under the arms but over the chest, and attached to the fitting on the left.
(3) Next, working from the chest strap down, secure the rest of the restraint straps.
(4) Properly adjust foot restraint assembly.
(5) Once the restraint straps are secured, attach the chest pad over survivor’s arms. The rescue swimmer may encounter some difficulty if survivor has flotation; however, flotation shall not be removed. Instead, remove chest pad from litter and continue with rescue. If practical swimmer will return chest pad back to when hoisted.
(6) Secure head restraint assembly if possible. Do not remove survivor’s helmet if injury is suspected.
4. Forecastle Litter procedures:
NOTE When the rescue swimmer reaches a distance of 20 to 25 feet from the ship he or she will signal stop hauling. The rescue swimmer shall maintain a distance of 20 to 25 feet to prevent being battered against the ship.
a. Signal for litter. ( will come out first.)
WARNING The weight bag shall be deployed so as not to strike rescue swimmer or survivor.
b. The shall deploy the trail line ensuring that it is attached to the litter. The gloves shall be tied on by a slipknot located just above the weight bag.
WARNING
The rescue swimmer wear trail line or authorized rescue swimmer gloves with leather palms in order to prevent rope burns to the hands.
FOR TRAINING USE ONLY

TRAINEE GUIDE A-050-0500
OUTLINE SHEET 4.3
PRIMARY RESCUE DEVICES AND PROCEDURES
105
c. Put on gloves
d. The rescue swimmer shall pull on the trail line gently until the entire line is deployed.
e. Signal indicating ready for litter.
f. Use trail line to the litter and pull it into position as it is lowered.
g. The ship lowers the rescue litter into the water with hoisting slings attached to the rescue hook
behind the litter.
h. Disconnect the hoisting slings from the rescue hook, placing the hoisting slings outside the litter. Do not allow hoisting slings to foul restraining straps.
i. Position survivor on litter, adhering to warning regarding survivor’s buoyancy and self-righting feature of the litter.
j. Once the survivor is secure in the rescue litter the swimmer will disconnect one litter hoisting
sling from the rescue hook. Swimmer then reconnects the litter hoisting slings back in the front of the rescue litter.
k. The rescue swimmer shall give a thumbs-up signal indication, “ready to be hoisted.” When the
survivor is planed out, the swimmer will signal “stop hoisting”.
l. Conduct pre-hoisting safety check, ensuring survivor is securely within litter, litter is attached to large hook, , sling cables are in correct positioning, , and cable is clear and not wrapped around the litter or swimmer. Signal “ready to be hoisted”.
m. Signal “ready to be hoisted”.
NOTE Extreme care shall be utilized during train line evolutions in shallow waters. Cease hoisting immediately if the weighted bag becomes snagged on the bottom. Hoisting when this occurs may cause possible harm to personnel and/or equipment.
n. By the use of the trail line and flutter kicking away from the ship, the rescue swimmer shall steady the litter during the hoisting operation to ensure the litter remains parallel and does not strike the ship.
o. With the litter and trail line on board, the crew shall lower the rescue strop and recover the
swimmer.
5. Procedures for rescue boat recovery by rescue litter
a. The rescue swimmer shall give the verbal/hand signal for the rescue litter.
FOR TRAINING USE ONLY

TRAINEE GUIDE A-050-0500
OUTLINE SHEET 4.3
PRIMARY RESCUE DEVICES AND PROCEDURES
106 FOR TRAINING USE ONLY
b. The litter shall be placed in the water, back against the gunwale/tube, with the head of the litter
out of the water.
NOTE The hoisting sling and trail line assembly shall not be attached to the rescue litter for rescue boat operations.
c. The rescue swimmer shall place the survivor in the rescue litter utilizing proper procedures. d. Once the survivor is secured in the litter, the rescue swimmer shall give a thumbs-up signal to the
boat officer.
e. The boat officer will then direct the crew to retrieve the survivor aboard the rescue boat.
G. NIGHT UTILIZATION OF RESCUE DEVICES.
Normal hook up procedures are used at night. Chemlights are attached as appropriate.
WARNING Due to low visibility at night, the Rescue Swimmer must pay particular attention to ensure all safety straps, harnesses, ect. Are properly installed. Failure to do so could result in to the survivor/Rescue Swimmer.
H. RESCUE EQUIPMENT INSPECTION.
1. Visual inspection prior to use.
a. Inspect fabric for cuts, deterioration, and . b. Inspect seams for proper adhesion and stitching.
c. Inspect all hardware for security of _________, and if
applicable, ease of operation. d. Check for sharp edges and projections.
e. inspection cycle for equipment conducted by maintenance personnel.
WARNING
Unauthorized modification to, and deviation from, prescribed life support and survival equipment by individual crewmembers could create unknown safety hazards.

TRAINEE GUIDE A-050-0500
DIAGRAM SHEET 4.3-1 DAY HAND SIGNALS
MEANING SIGNAL FIGURE
FOR TRAINING USE ONLY
107

TRAINEE GUIDE A-050-0500
DIAGRAM SHEET 4.3-2 DAY HAND SIGNALS
MEANING SIGNAL FIGURE
FOR TRAINING USE ONLY
108

TRAINEE GUIDE A-050-0500
DIAGRAM SHEET 4.3-3 DAY HAND SIGNALS
MEANING SIGNAL FIGURE
Face the rescue platform raise one arm from the side of, diagonally (45 degrees), palm down, fingers extended straight out, rotate arm in circular motion.
FOR TRAINING USE ONLY
109

TRAINEE GUIDE A-050-0500
DIAGRAM SHEET 4.3-4 DAY HAND SIGNALS
MEANING SIGNAL FIGURE
Both arms extended directly overhead, palms placed together.
NIGHT HAND SIGNALS MEANING SIGNAL FIGURE
FOR TRAINING USE ONLY
110

TRAINEE GUIDE A-050-0500
DIAGRAM SHEET 4.3-5 NIGHT HAND SIGNALS/ TRAIL LINE ASSEMBLY
MEANING SIGNAL FIGURE
111 FOR TRAINING USE ONLY

TRAINEE GUIDE A-050-0500
DIAGRAM SHEET 4.3-6 HOISTING SLING AND V-STRAP
FOR TRAINING USE ONLY
112

TRAINEE GUIDE A-050-0500
JOB SHEET 4.3-1 RESCUE DEVICES AND PROCEDURES PAGE 1 of 2
TRAINEE NAME/RATE SSN____________________ INSTRUCTOR/EVALUATOR DATE__________________ Evaluation Instructions Critical Steps: Observe trainee performing each step. Watch for correct use of equipment and adherence to safety regulations. Indicate trainee's performance by circling either Q, CQ, or UQ. "*" Denotes a critical area. Failure to adhere to items marked with an asterisk will result in automatic failure of this Performance test however a momentary deviation from prescribed procedures does not constitute an automatic failure. A mark of CQ on an asterisk item does not constitute an automatic failure the grade will be computed in for a final score. A mark of UQ on an asterisk item constitutes an automatic failure. A mark of Q = 4.0 a mark of CQ = 2.0 and a mark of UQ = 0.0 Minimum average score for passing is 3.6 If an item is not applicable line out that item and do not add it to the overall average PLACE SIMULATED VICTIM INTO THE FOLLOWING RESCUE DEVICES IN A WATER ENVIRONMENT: A. DOUBLE RESCUE HOOK (1) Attach swimmer tending line to survivor's gated “D” ring (if needed).
(2) Signal to be hauled in. Once under davit, signal to stop hauling in.
* (3) Attach large hook to survivor's “D” ring or “V” ring. * (4) Hook up swimmer's “V” ring to large hook of double
rescue hook. * (5) Perform safety check (6) Signal for "up-hoist".
Q CQ UQ _____ Q CQ UQ _____ Q CQ UQ _____ Q CQ UQ _____ Q CQ UQ _____ Q CQ UQ _____
113 FOR TRAINING USE ONLY

TRAINEE GUIDE A-050-0500
JOB SHEET 4.3-1 RESCUE DEVICES AND PROCEDURES PAGE 1 of 2
B. SURVIVOR RESCUE STROP
(1) Signal to be hauled in. Once under the davit, signal to stop hauling in.
(2) Approach sling with survivor in an appropriate carry. (3) Place survivor in sling.
(a) Positioned at survivor`s back.
* (b) Keeping survivor`s head above water. * (c) Sling high on survivor`s back. * (d) Arm retainer straps routed and secured properly.
* (4) Hook up swimmer's “V” ring to large hook of
double rescue hook. * (5) Perform safety check.
(6) Signal "ready to be hoisted".
Q CQ UQ _____ Q CQ UQ _____ Q CQ UQ _____ Q CQ UQ _____ Q CQ UQ _____ Q CQ UQ _____ Q CQ UQ _____ Q CQ UQ _____ Q CQ UQ _____ Q CQ UQ _____
C. RESCUE LITTER
(1) Signal for litter. Q CQ UQ _____
(2) Retrieve litter via trail line while in control of survivor.
Q CQ UQ _____
* (3) Position survivor in litter. Q CQ UQ _____
* (4) Secure retaining straps in proper sequence. Q CQ UQ _____
(5) Disconnect litter lifting slings from double rescue hook and reattach to double rescue hook in front of rescue hook.
Q CQ UQ _____
* (6) Safety check. Q CQ UQ _____
(7) Signal "ready to be hoisted"and maintain positive Q CQ UQ _____
112 FOR TRAINING USE ONLY
TRAINEE GUIDE Q-050-0600 Q-050-0602
JOB SHEET 4.2-1
control of trail line. 4.0 X number of SAT’s =____ 2.0 X number of MRSAT’s =____ 4.0’s + 2.0’s = total grade ____
Total grade_____ divided by __23__ (number of items tested) = _____
85 FOR TRAINING USE ONLY

TRAINEE GUIDE A-050-0500
OUTLINE SHEET 4.4 ALTERNATE RESCUE DEVICES
INTRODUCTION During this unit of instruction the rescue swimmer will learn the alternate rescue devices used in different rescue scenarios. The various equipment listed below will aid the rescue swimmer in these situations. Along with knowing this equipment, the rescue swimmer will become familiar with the maintenance requirements before using the gear. ENABLING OBJECTIVES: 3.30 State the requirements for maintenance of emergency rescue equipment per, NAVAIR 13-1-6 series,
NTTP 3-50.1, and current maintenance requirement cards (MRC’s). 3.31 Describe the functional operation of the following Emergency Rescue Equipment per NTTP 3-50-1:
a. V-Blade Rescue Knife b. Grapnel Hook c. Boat Hook d. Level A Medical Kit e. Life Rafts f. Heaving Line g. Tending Line h. Life Rings i. Chemical Light Strap j. Chemical Light k. Blanket
TOPIC OUTLINE
A. V-blade Rescue Knife
1. Fixed cutting area, on one end cuts material up to 1/4 “ thickness.
2. DZUS (pronounce ZEUS) fastener remover to remove
access panels on aircraft (if necessary).
3. Handle grip fits either hand comfortably.
4. Used to cut parachute risers.
B. Grapnel hook
1. Multi-prong steel hook.
115 FOR TRAINING USE ONLY

TRAINEE GUIDE A-050-0500
OUTLINE SHEET 4.4 ALTERNATE RESCUE DEVICES
2. Used for recovering aircraft parts, body parts,
or hooking a sinking parachute that is out of the reach of the boat hook.
3. Weighs 4 lbs. and is attached to 100 feet
of 1.5” circumference nylon line via a ¼” chain.
C. Boat hook
1. Six foot wooden staff. 2. Has brass hook and prod at one end.
3. Normally used to fend off or hold on in a boat.
4. For SAR, used by boat crew to snag and retriev
parachute.
D. Level “A” Medical Kit
1. Designed for use by the _______________ and the ________________.
2. Carried on all SAR capable platforms.
3. Rescue swimmer shall have a working knowledge of all contents.
E. Life Rafts
1. Used when ______________ survivors are at th
2. Can support _______________ the rated capac
3. Can also be used for staging survivors during d
4. Discard life raft if it becomes a _____________
5. Discard rafts by puncturing prior to leaving sce
NOTEAn empty floating raft could start
116 FOR TRAINING
e
e rescue scene.
ity if survivors are placed arou
isentanglement.
_ to the rescue
ne.
an unnecessary rescue effort.
USE ONLY
nd outside of raft.
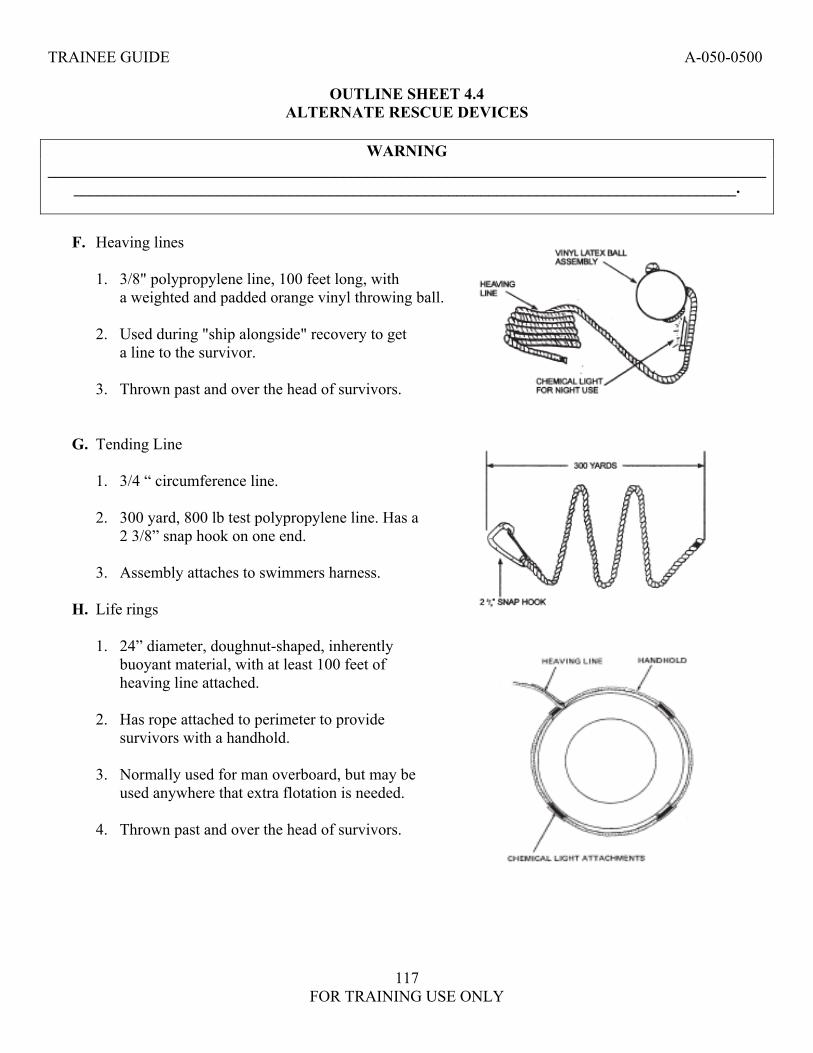
TRAINEE GUIDE A-050-0500
OUTLINE SHEET 4.4 ALTERNATE RESCUE DEVICES
WARNING
_____________________________________________________________________________________________________________________________________________________________________________.
F. Heaving lines
1. 3/8" polypropylene line, 100 feet long, with
a weighted and padded orange vinyl throwing ball.
2. Used during "ship alongside" recovery to get a line to the survivor.
3. Thrown past and over the head of survivors.
G. Tending Line
1. 3/4 “ circumference line.
2. 300 yard, 800 lb test polypropylene line. Has a 2 3/8” snap hook on one end.
3. Assembly attaches to swimmers harness.
H. Life rings
1. 24” diameter, doughnut-shaped, inherently buoyant material, with at least 100 feet of heaving line attached.
2. Has rope attached to perimeter to provide
survivors with a handhold.
3. Normally used for man overboard, but may be used anywhere that extra flotation is needed.
4. Thrown past and over the head of survivors.
117 FOR TRAINING USE ONLY

TRAINEE GUIDE A-050-0500
OUTLINE SHEET 4.4 ALTERNATE RESCUE DEVICES
118 FOR TRAINING USE ONLY
I. Chemical lights
1. Two types currently in use:
a. _________ minute high intensity.
b. __________hour general purpose
2. Self contained, compact, easily stored. 3. Emit Omni-directional light.
4. Windproof, waterproof, nonflammable and require no batteries.
J. Chemical light Straps
1. Nylon strap with three snap hooks. 2. One snap hook on each end and one
in the middle.
K. Blankets
1. Standard wool blanket _____________ feet.
2. Used for treatment of hypothermia.
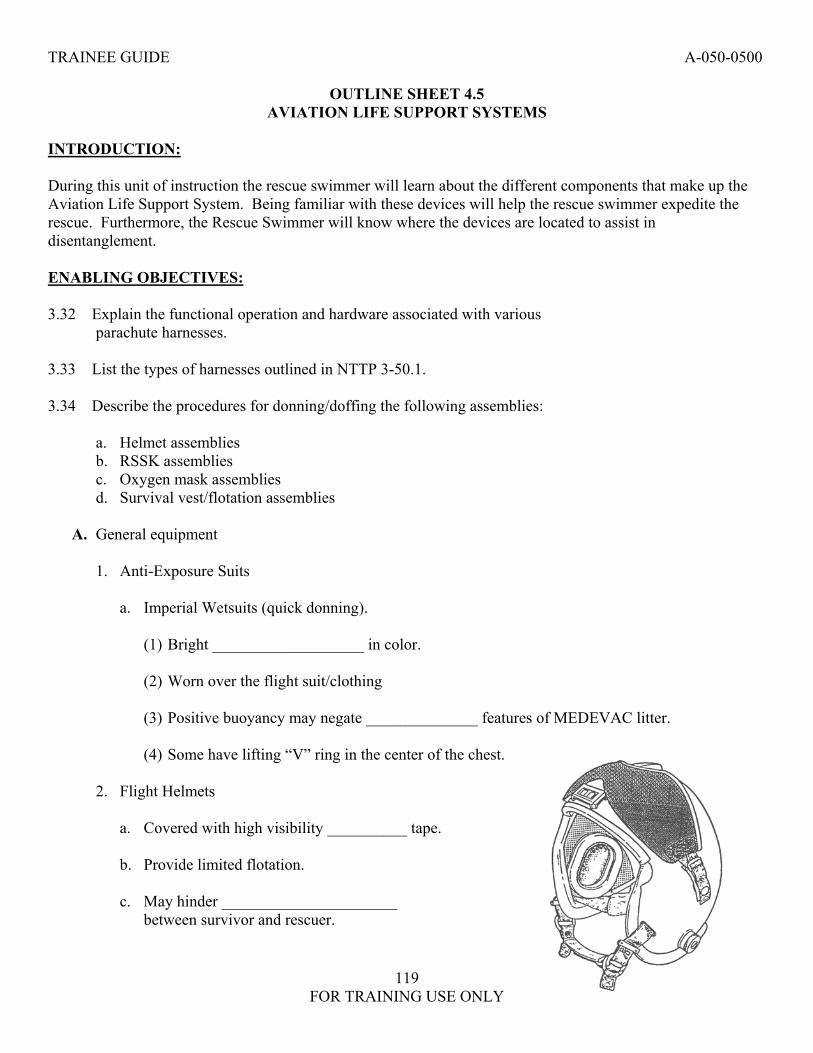
TRAINEE GUIDE A-050-0500
OUTLINE SHEET 4.5 AVIATION LIFE SUPPORT SYSTEMS
INTRODUCTION: During this unit of instruction the rescue swimmer will learn about the different components that make up the Aviation Life Support System. Being familiar with these devices will help the rescue swimmer expedite the rescue. Furthermore, the Rescue Swimmer will know where the devices are located to assist in disentanglement. ENABLING OBJECTIVES: 3.32 Explain the functional operation and hardware associated with various
parachute harnesses.
3.33 List the types of harnesses outlined in NTTP 3-50.1. 3.34 Describe the procedures for donning/doffing the following assemblies:
a. Helmet assemblies b. RSSK assemblies c. Oxygen mask assemblies d. Survival vest/flotation assemblies
A. General equipment
1. Anti-Exposure Suits
a. Imperial Wetsuits (quick donning).
(1) Bright ___________________ in color.
(2) Worn over the flight suit/clothing
(3) Positive buoyancy may negate ______________ features of MEDEVAC litter.
(4) Some have lifting “V” ring in the center of the chest. 2. Flight Helmets
a. Covered with high visibility __________ tape.
b. Provide limited flotation.
c. May hinder ______________________ between survivor and rescuer.
119 FOR TRAINING USE ONLY

TRAINEE GUIDE A-050-0500
OUTLINE SHEET 4.5 AVIATION LIFE SUPPORT SYSTEMS
d. Helmets are ___________________ until survivor is aboard rescue platform.
3. Oxygen Masks
a. Form fit to face.
b. Attach to helmet with _________________________.
c. Oxygen supply hose connects to
Rigid Seat Survival Kit (RSSK) or Aircraft console.
d. Always ________________ mask from
helmet first to eliminate the possibility of suffocation.
B. Flotation devices
1. Aircrew Flotation Devices
a. Naval aircrew flotation is provided by an LPU series life preserver assembly attached to either an __________________ or a _____________________ harness.
b. Providing flotation to the survivor is very important. There are three methods of inflating and
LPU.
(1) Some jet aircrew may have an automatic inflation device, such as the FLU-8. This device is activated within 8-15 seconds upon immersion in the water, and will require no action on the part of the rescue swimmer.
(2) Manual inflation is accomplished by pulling the beaded handles located near the
________________________.
(3) Oral inflation is accomplished by loosening the knurled knob on the inflation tube, holding it down with your teeth, and blowing into the tube. This method will require the most effort on the part of the rescue swimmer.
2. Other flotation assemblies.
a. Worn by flight deck personnel and aircraft passengers.
b. Inflated by CO2 or orally.
120 FOR TRAINING USE ONLY

TRAINEE GUIDE A-050-0500
OUTLINE SHEET 4.5 AVIATION LIFE SUPPORT SYSTEMS
(1) Pull cord for Co2 inflation.
(2) Oral inflation.
C. Backpack Parachute
1. Large fixed wing land bases aircraft crew (P-3, C-130) wear an NB- series Back Pack Type Parachute with quick donning harness.
a. Harness is worn over the SV-2
survival vest and flotation.
b. Harness must be removed to separate the survivor from the parachute
c. Removed by releasing three quick
ejector snaps, one at the chest, and one for each leg.
D. Tosro Harness-Style Parachute/ Rigid Seat Survival Kit Release (Diagram Sheet 4.5-1)
1. Jet and E-2 aircrew wear a PCU-Series Torso Harness.
a. The torso harness is not removed during the rescue.The parachute must be separated from the torso harness.
b. For Navy gear, the parachute is separated by releasing the Koch fittings which attach the parachute risers to the harness.
121 FOR TRAINING USE ONLY

TRAINEE GUIDE A-050-0500
OUTLINE SHEET 4.5 AVIATION LIFE SUPPORT SYSTEMS
122 FOR TRAINING USE ONLY
(1) Most jet gear incorporates____________________________________________________ (SEAWARS) which automatically release the Koch fittings upon complete immersion in salt
water. This system poses no danger to the rescue swimmer and requires no action of the rescue swimmer.
(2) Manual release is accomplished by separating the male portion of the koch fitting assembly
(located on the right and left upper chest area) from the female ends (on the parachute risers).
c. A Rigid Seat Survival Kit/Seat Kit Unit containing a raft, oxygen, and survival gear is attached to the lap belt of the torso harness. E-2 aircraft, incorporates a lap belt type detachment from the RSSK. (1) Disconnect oxygen hose from RSSK by lifting the knurled locking ring and pulling firmly on
the supply hose
(2) After ensuring the oxygen hose is disconnected, remove the RSSK by releasing the ____________________ fittings located near the aviator’s hips.
E. USAF/ Other Parachute Harnesses
1. USAF harnesses closely resemble Navy Backpack Type.
2. Risers may be attached with Frost,
Koch or J1 Capewell Fittings.
3. Seat Kits may use mini-koch fittings or a fitting closely resembling automotive lap belts.
F. Hoisting Attachment Points
1. For hoisting, the rescue hook or rescue swimmer’s snap hook may be attached directly to the aviator
in one of two ways:
a. Hoist via the lifting “V” ring of an SV-2 vest (if so equipped).
b. Hoist via the gated “D” ring of a PCU torso harness.

TRAINEE GUIDE A-050-0500
DIAGRAM SHEET 4.5-1 PCU-PARACHUTE RESTRAINT HARNESS ASSEMBLY/
RIGID SEAT SURVIVAL KIT/ SEAT KIT UNIT (RSSK/SKU)
123 FOR TRAINING USE ONLY

TRAINEE GUIDE A-050-0500
DIAGRAM SHEET 4.5-2 QUICK EJECTOR AND J-1 CAPEWELL FITTINGS
124 FOR TRAINING USE ONLY

TRAINEE GUIDE A-050-0500
OUTLINE SHEET 4.6 SURVIVOR MARKER /LOCATOR DEVICES
INTRODUCTION: During this unit of instruction the rescue swimmer will learn about Survivor Marker/Locater Devices. This will help the rescue swimmer in identifying survivors and distinguish between the different types of markers being used. The rescue swimmer must understand that some of these devices can be hazardous to the swimmer and survivor. ENABLING OBJECTIVES: 3.35 Explain the purpose and hazards of the following Survivor Marker/Locator Devices per NTTP 3-50.1:
a. MK-25 Marine Location Marker b. MK-58 Marine Location Marker c. Electric Marine Marker Light d. MK-13/MK-124 MOD 0 Day/Night Distress Flare e. MK-79 Pencil Flare f. Signal Mirror g. Sea Dye Marker
TOPIC OUTLINE
A. Survivor markers
1. Survivor markers are devices launched by _________/________ to provide ______or _______ reference points to the position of survivors.
2. Procedures for deploying pyrotechnic devices are contained in the ____________ 11-15-07.
WARNING
Should fuel be observed or suspected to be present in the water, pyrotechnic devices______________________ ________________________________ due to ignition hazards.
WARNING
All flares burn “________________” and can cause serious burns if allowed to come into contact with skin.
WARNING Avoid breathing potentially hazardous pyrotechnic fumes.
3. MK-25 Marine Location Marker (Diagram Sheet 4.6-1)
a. Produces smoke and light; burn time ______________ minutes.
125 FOR TRAINING USE ONLY

TRAINEE GUIDE A-050-0500
OUTLINE SHEET 4.6 SURVIVOR MARKER /LOCATOR DEVICES
126 FOR TRAINING USE ONLY
4. MK-58 Marine Location Marker (Diagram Sheet 4.6-1)
a. Produces a yellow flame and white smoke; burn time ________ minutes.
5. Electric Marine Marking Lights (Diagram Sheet 4.6-2)
a. Battery powered, an alternative to pyrotechnic devices when
________________________________________or suspected.
B. Survivor Signaling Devices
1. MK-13/MK-124 MOD 0 Flares (Diagram Sheet 4.6-2)
a. This signal is used for day or night distress signaling as appropriate by personnel on land or at sea.
b. Emits _______________ smoke for day use and _______ flames for night use.
c. Burn time for each is approximately ______ seconds.
d. MK-124 is the replacement for the MK-13 and its intended use is the same as MK-13, but is designed for single hand operation.
2. MK-79 Signal Kit Personal Distress (__________________) (Diagram Sheet 4.6-2)
a. Intended to be used by downed aircrew members or personnel in life rafts as a distress-signaling device.
b. Produces a single red star display at a minimum altitude of _____ feet.
c. Burns for a minimum of ______ seconds.
3. Non-Pyrotechnic Visual Signaling Devices (Diagram Sheet 4.6-2)
a. Includes _________, __________, ____________.
b. Pose no hazard to swimmers.
4. Sea Dye Markers (Diagram Sheet 4.6-2)
a. A dye packet dissolves in seawater. Dye packets create a large highly visible fluorescent signal. Standard Navy issue is a ___________________ color, other colors may be used.
b. The dissolved dye poses no hazard to swimmers.

TRAINEE GUIDE A-050-0500
DIAGRAM SHEET 4.6-1 MK-25 (TOP LEFT) AND MK-58 (TOP RIGHT) MARINE LOCATION MARKERS
ELECTRIC MARINE MARKER LIGHT (BOTTOM)
127 FOR TRAINING USE ONLY

TRAINEE GUIDE A-050-0500
DIAGRAM SHEET 4.6-2 MK-13 MOD 0 DAY/NIGHT DISTRESS FLARE AND MK-79 PENCIL FLARE (LEFT)
SIGNAL MIRROR AND SEA DIE MARKER (RIGHT)
128 FOR TRAINING USE ONLY
TRAINEE GUIDE A-050-0500
OUTLINE SHEET 4.7 SAR PUBLICATIONS AND REPORTS
INTRODUCTION: During this unit of instruction the rescue swimmer will learn about all of the Navy’s Search and Rescue doctrines. The rescue swimmer will also be able to name these doctrines and be able to complete a SAR Report for a given scenario. ENABLING OBJECTIVES: 3.36 Identify the title and content of publications applicable to a rescue swimmer. 3.37 Identify the steps to complete a rescue report SAR form 3-50.1/1, when given a rescue scenario. TOPIC OUTLINE:
A. NTTP 3-50.1 __________________________________________________
1. The most frequently used SAR publication.
2. This manual is intended to promote and maintain _____________________________________ within the U.S. Navy
3. These procedures shall serve as a basis for ___________________________. Therefore, it is
essential that this manual be maintained and readily available to unit personnel
4. Items covered in this manual are:
a. _____________________________________________________
b. _____________________________________________________
c. _____________________________________________________
d. _____________________________________________________
e. _____________________________________________________ f. _____________________________________________________
B. NAVAIR 13-1-6.5 ____________________________________________
1. Purpose of each volume is to provide technical information related to _________________________
_________________________________________________________________________________________________of a particular category of aircrew safety and survival equipment.
129 FOR TRAINING USE ONLY

TRAINEE GUIDE A-050-0500
OUTLINE SHEET 4.7 SAR PUBLICATIONS AND REPORTS
2. Two volumes that are of particular interest to the rescue swimmer are:
a. _____________________: Inflatable Survival Equipment.
b. _____________________: Rescue and Survival Equipment.
C. ATP 10 __________________________ Search and Rescue (SAR) Manual
1. Manual deals with operations based upon the doctrine of search and rescue. It presents the techniques and procedures for allied SAR problems.
2. Rescue swimmers should be aware of this manual and familiarize themselves with it.
D. _____________________, Helicopter Operating Procedures For Air-Capable Ships.
1. This publication sets forth the mandatory operational procedures and training requirements for the employment of helicopters.
a. Paragraph 1.3.14 - Ship Search and Rescue Team. b. Paragraph 4.3.2 - Search and Rescue Requirements. c. Paragraph 4.3.2.1 - Plane Guard Ship Procedures. d. Paragraph 4.3.2.2 - SAR Helicopter Equipment.
E. NWP 3-22.5 __________________________________.
1. Promotes standardized, efficient, and sound SAR tactics.
2. Every __________ capable ship and aircraft carries this publication.
F. OPNAVINST 3130.6 Naval Search and Rescue (SAR) Standardization Program
1. Provides for standardization of Navy Search and Rescue policies, procedures, training and evaluation program
2. _________________________________________________________
3. Outlines minimum annual proficiency training requirements.
G. Joint Pub 3-50/3-50.1/3-50.2_____________________________________
1. Provides guidance to federal agencies concerning implementation of the National Search and Rescue Plan
130 FOR TRAINING USE ONLY

TRAINEE GUIDE A-050-0500
OUTLINE SHEET 4.7 SAR PUBLICATIONS AND REPORTS
2. Establishes standards and provides common procedures, techniques, and terminology to all federal
forces, military and civilian, that support civil search and rescue (SAR) operations.
H. ____________________, NATOPS General Flight and Operation Instructions
1. This instruction prescribes general flight and operating instructions and procedures applicable to the operation of all naval aircraft and related activities.
2. Chapter _____ is of interest to aircrew and rescue swimmers. Briefly explains; initial training, extended wear of wet suits, effects of _________, ___________, _________, __________, and ________.
I. Locating SAR Reference Publications
1. These publications are stored in the Combat Information Center (CIC) of ships and may be checked out from the NWP custodian for short periods. In squadrons, the pubs are held by the Technical Publications Librarian.
131 FOR TRAINING
USE ONLY
TRAINEE GUIDE A-050-0500
OUTLINE SHEET 4.7 SAR PUBLICATIONS AND REPORTS
132 FOR TRAINING USE ONLY

TRAINEE GUIDE A-050-0500
OUTLINE SHEET 4.8 RESCUE BOAT OPRATIONS
ENABLING OBJECTIVES: 3.38 List all procedures and equipment used for the rescue of an aviator by rescue boat. TOPIC OUTLINE:
NOTE The deployment method of the rescue swimmer shall be dependent upon the type of rescue boat utilized. This will require follow on training at your command.
A. Rescue Boat Approach
1. The rescue boat shall remain close, but stay clear of the rescue until the helicopter rotating anti-
collision lights are turned off. At this signal, the rescue boat will assume the responsibility for the rescue.
2. Unless the boat coxswain can see the crash site, the boat should be maneuvered in accordance with
radio communications or flag/pyrotechnics from the ship.
B. Approach Survivor 1. Upon approaching survivor in the water, the rescue boat crew must determine if the helicopter is
successfully effecting the rescue. 2. The rescue boat shall never pass between helicopter and the survivor. This will avoid the possibility
of becoming fouled in the helicopter hoisting cable when it is determined that the helicopter has yielded the rescue to the rescue boat.
3. The motor whaleboat approach should be made directly to the survivor, keeping the survivor on the
port bow. The cast of the boat’s screw in reverse will set the boat alongside the survivor.
4. The rigid hull inflatable boat (RHIB) boat approach should be made directly at the survivor, keeping the survivor on the bow until the swimmer is deployed. The RHIB is then brought alongside the survivor. The out drive allows the RHIB to be backed either to port or starboard.
C. Rescue Boat Approach to Parachute
1. Personnel in the water with a parachute attached, shall be approached with caution. The survivor
may be entangled in the parachute shroud lines which may be submerged and not visible to the boat crew.
133 FOR TRAINING USE ONLY

TRAINEE GUIDE A-050-0500
OUTLINE SHEET 4.8 RESCUE BOAT OPERATIONS
134 FOR TRAINING USE ONLY
2. In making an approach on the parachute, ensure boat speed is slow enough to avoid going over the parachute.
D. Streamed Parachute
1. A streamed parachute should first be hooked and pulled into the rescue boat. This will provide a
positive means of preventing loss of the survivor.
2. If the survivor is entangled in the shroud lines, a swimmer should be put into the water to assist. 3. It has been found that when shroud lines are cut in the water, the problem of disentanglement
increases; therefore, shroud lines should be lifted clear and pulled away from the survivor.
E. Sinking Parachute 1. If the parachute sinks below the surface before the boat hook snags it, the swimmer secures a line
on the pilot and then attempts to free him of the parachute. 2. When the pilot is free of the parachute, he is pulled into the boat facing inboard to prevent injury to
his back when coming over the gunwale.
F. Rescue Priority
1. The rescue boat shall attempt to rescue the MOST severely injured survivor first. (If the crewman is left by his aircraft, he is automatically reverted to survivor status).
G. Rescue Position
1. All rescue boat recoveries of personnel from the water shall be attempted with the survivor facing
inboard of the gunwale of motor whale boats and outboard of the tube on a RHIB.
2. The rescue swimmer shall assist the survivor from the water.
H. First Aid
1. Once on board the rescue boat, the survivor's injuries should be investigated and first aid applied as necessary. Treat all survivors for shock.

TRAINEE GUIDE A-050-0500
DIAGRAM SHEET 4.8-1 RESCUE BOAT OPERATIONS
135 FOR TRAINING USE ONLY
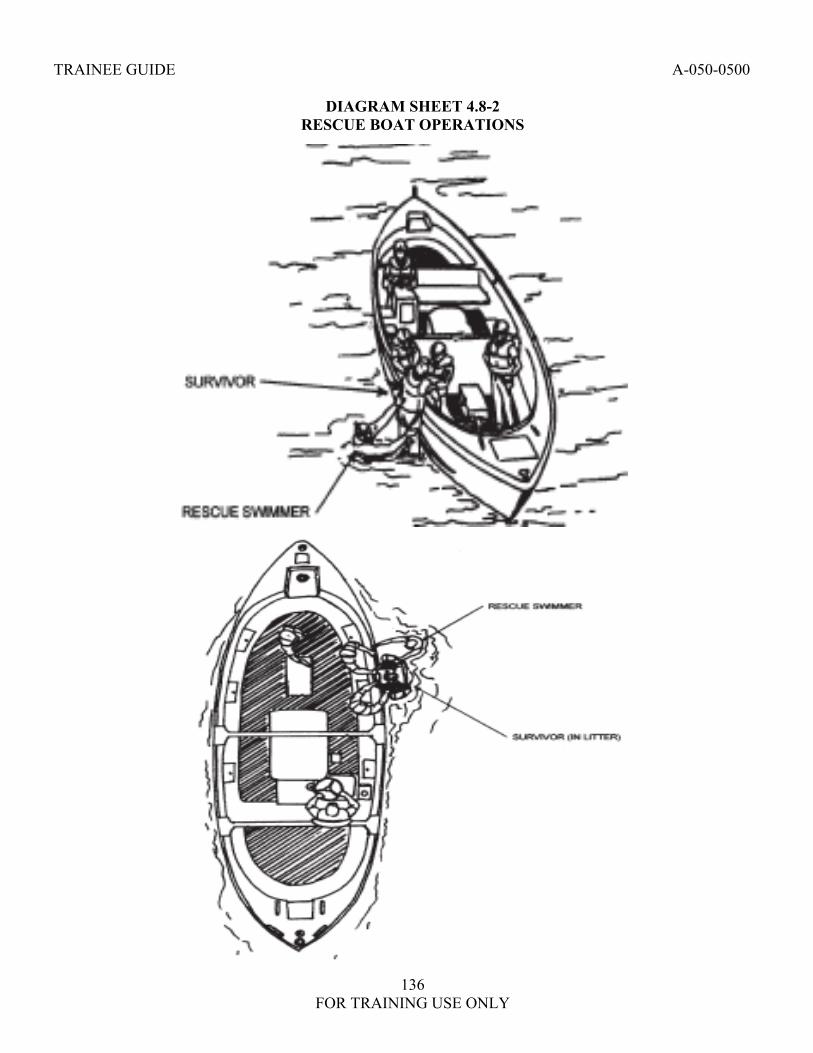
TRAINEE GUIDE A-050-0500
DIAGRAM SHEET 4.8-2 RESCUE BOAT OPERATIONS
136 FOR TRAINING USE ONLY
TRAINEE GUIDE A-050-0500
OUTLINE SHEET 4.9 SAR TACTICS
INTRODUCTION: During this lesson, you will receive all the information needed to provide a sound, safe search and rescue (SAR) tactics foundation. Although it is not possible to provide answers to all the different rescue scenarios, applying these basics will enable you to deal with any situation that arises. ENABLING OBJECTIVES: 3.39 State the five stages of Search and Rescue operations. 3.40 Describe SAR area conditions and survivor conditions which will allow for the execution of a multiple victim rescue. 3.41 Develop a rescue plan to effect a rescue of multiple survivors, when given a rescue scenario. 3.42 Describe procedures for recovery of survivors from motor whale boat/RHIB and forecastle. 3.43 Identify hand signals applicable to the specific rescue, when given a rescue scenario. 3.44 Demonstrate procedures for parachute disentanglement of multiple victims in a simulated rescue scenario. TOPIC OUTLINE
A. Search and rescue system The Search and Rescue system is a system which consists of a sequence of events called stages. Each stage represents a part of the logical approach to the overall rescue operation.
1. __________________________: SAR system becomes aware of incident.
2. __________________________: SAR facilities are alerted.
3. __________________________: Plan of operations is developed.
4. __________________________: SAR facilities proceed to the rescue scene, conduct search, rescue survivors, assist distressed craft, provide emergency care for survivors and deliver to suitable medical facility.
137 FOR TRAINING USE ONLY

TRAINEE GUIDE A-050-0500
OUTLINE SHEET 4.9 SAR TACTICS
NOTE
The NTTP 3-50.1 contains information for the safe and effective application of Search and Rescue (SAR) procedures and the execution of SAR operations. However, it is not a substitute for sound judgment. A dynamic SAR environment may require on-site deviations or modifications from procedures prescribed therein to successfully accomplish a SAR mission. The existing risk of deviation must continually be weighed against the benefit of deviating from the NTTP 3-50.1. Some examples of areas where deviations or modifications of procedures are most strongly advised against, are as follows: The proper application and use of rescue equipment restraint straps, safety straps, and safety devices as mandated by the NTTP 3-50.1.If a rescue crew member makes the decision not to properly utilize/apply any of the above mentioned safety devices or deviates from authorized procedures, he/she shall, communicate his/her intentions to the rest of the Search and Rescue unit crew prior to deviation. This will help utilize the full potential and experience of the crew to make a decision to deviate from authorized procedures. In all cases, all associated risks should be weighed prior to a decision to deviate from or modify a procedure as set forth in the NTTP 3-50.1.
1. ____________________________- SAR platforms return to base. Rescue swimmer assists in completion of rescue report.
B. Rescue platforms
NOTE
The helicopter is normally the primary means of rescue during all-weather day and night operations, except when the weather is below 300 feet and 1-mile visibility, then Motor-Whale Boat or Forecastle will be used. However, the goal is to use the fastest and most effective rescue platform for the given situation. Whichever is first on the scene will effect the rescue unless unable. The others should stay clear so as not to hamper the rescue operation and remain ready to assist if needed.
1. _____________________________________
2. _____________________________________
3. _____________________________________
C. Rescue scene initial assessment (From Rescue Platform) Upon arrival at the accident scene, assess the situation. Assessment begins in the rescue platform prior to swimmer deployment. The following factors should be determined prior to rescue swimmer deployment.
NOTE Swimmer must be aware that the situation can change.
1. Number of survivors
2. Location of survivors and their relation to, and distance from each other, and the rescue craft.
138 FOR TRAINING USE ONLY

TRAINEE GUIDE A-050-0500
OUTLINE SHEET 4.9 SAR TACTICS
3. Visible injuries to the survivors:
a. Conscious/unconscious b. Visible bleeding
4. Flotation devices inflated/not inflated
5. Parachute entanglement problem or presence of ballooned parachute.
6. Sea state/wind direction/ and water temperature.
7. Fuel in the water.
8. Debris littering the scene and its relation to survivors.
9. Presence of sea predators.
10. Feasibility of attempting multiple/single rescue.
11. Rescue order established according to apparent injuries. The worst injured survivor shall be rescued
first.
D. Conditions for multiple rescues
1. A multiple rescue occurs when there is more than one survivor and the rescue swimmer remains in the water aiding in the recovery of survivors.
2. Factors which should be considered before attempting a multiple rescue.
a. ___________________
b. ___________________
c. ___________________
d. ___________________
WARNING To avoid fatigue, the rescue swimmer shall avoid multiple rescues when a great deal of swimming is required
between survivors. Additionally, the reduced visibility during night/ IFR rescues makes multiple rescues hazardous.
3. In the event of a multiple rescue the rescue swimmer shall:
a. Signal the rescue platform to deploy raft (s).
b. Inflate the raft (s) if necessary and commence boarding the survivors into the raft (s).
139 FOR TRAINING USE ONLY

TRAINEE GUIDE A-050-0500
OUTLINE SHEET 4.9 SAR TACTICS
140 FOR TRAINING USE ONLY
E. Survivor/s and swimmer recovery procedures
1. Motor whaleboat/RHIB and helicopter recoveries shall be performed per NTTP 3-50.1.
NOTE
Prior to all rescue boat deployments, aviation SAR swimmers shall familiarize themselves with rescue boat recovery procedures as outlined in the NTTP 3-50.1. The rescue boat shall remain close, but stay clear of the rescue until the helicopter rotating anti-collision lights are turned off. At this signal, the rescue boat will assume the responsibility for the rescue.
2. All recoveries of personnel in the water shall be attempted with the survivor facing the gunwale of the boat.
3. Ship-Alongside Rescue
a. When helicopter is not available. b. The sea precludes lowering of whaleboat/RHIB c. When the rescue can be accomplished more expeditiously by ship.
NOTE When directed from the bridge, every attempt should be made by the deck recovery detail to deploy life rings, yellow low padded monkey fist, etc., to gain contact or positive control of the survivor. If the distance is to great, a swimmer should be lowered into the water.
4. Shipboard Recovery (Forecastle) a. Hoisting
Primary means for hoisting personnel from the water to the forecastle is the J-Bar Davit system with modified rescue strop attached. Advantages:
(1) Aircrew survivors are familiar with the strop
(2) Rescue strop floats
(3) The rescue strop can be tossed a short distance, which is an advantage over nets, litter, and seats that must be brought directly over or under the survivor. (4) First Aid
On board the rescue platform, First Aid and treatment for shock shall be administered to survivor as necessary.
NOTE Rescue reports show that almost all survivors are in some form of shock.

TRAINEE GUIDE A-050-0500
OUTLINE SHEET 4.10 INANIMATE OBJECT RECOVERY
ENABLING OBJECTIVES: 3.45 List the procedures for recovering a REXTORP/Drone. 3.46 List the safety precautions for recovering a REXTORP/Drone. 3.47 Perform procedures for recovering a REXTORP/Drone. TOPIC OUTLINE
A. OSCAR
1. Description
a. Kapok filled mannequin.
b. Typically bright orange. c. Used for training of ship's personnel. 2. Recovery Method (Commanding Officer's decision) a. Normally from the forecastle by deck division with grapnel hook. b. Alternate methods are from the forecastle or rescue boat with rescue swimmer (method of choice
for this topic). 3. Procedures a. Swimmer is deployed from forecastle (via rescue strop) or from rescue boat.
b. Rescue swimmer should complete disentanglement procedures (to hone skills). c. Recover via rescue strop or litter to forecastle or into rescue boat. 4. Safety Precautions When in close proximity of the rescue vehicle, inanimate objects shall be kept between the
swimmer and the rescue vehicle to provide a buffer zone. OSCAR poses no danger to the swimmer. However, the swimmer should not "drop his guard" and become lax. Ever present dangers are:
a. Ship's hull. b. Rescue boat propeller or screw.
141 FOR TRAINING USE ONLY

TRAINEE GUIDE A-050-0500
OUTLINE SHEET 4.10 INANIMATE OBJECT RECOVERY
c. Sea predators or jellyfish. d. Sea state.
B. Torpedoes
WARNING OTTO Fuel II is highly toxic, failure to observe all safety precautions contained in SW515-AO-010/MK46 could result in injury or death. The only torpedo that the rescue swimmer is authorized to enter the water to recover is the REXTORP
(MK46 training shape). The hazards of Otto Fuel II, used in other torpedoes, make a waterborne recovery too dangerous.
1. Description of Recoverable Exercise Torpedo (REXTORP) a. Length – 102” b. Diameter – 12.75” c. Weight - 517 lbs. with ballast and 337 lbs. without ballast d. Fuel - none e. Propulsion - none (has two non-functional propellers).
142 FOR TRAINING USE ONLY

TRAINEE GUIDE A-050-0500
OUTLINE SHEET 4.10 INANIMATE OBJECT RECOVERY
f. Ballast - a total of six separate lead weights totaling 180 lbs. g. Color - (1) Nose is anodized orange/red. (2) Ballast section is anodized orange with a blue band. (3) All other sections are a natural anodized finish. (4) Propellers are anodized red.
h. Floating Characteristics When surfaced, the REXTORP floats at a vertical attitude with approximately 10” of the nose exposed above the surface.
2. Recovery Methods
a. Torpedo Retriever - This method is accomplished with the use of poles, snares, and cages. The
weapon is hauled aboard ship via a ramp or crane. The use of a motor whale or RHIB, eliminates the requirement to deploy a swimmer.
b. Helicopter
c. Shipboard via davit and hoist (due to weight).
(1) Assisted by swimmer (method of choice for this topic). (2) Assisted by boat crew (requires calm seas). 3. Procedures a. Swimmer prepares for normal deployment from forecastle or rescue boat.
b. Swimmer deploys.
WARNING Due to floating characteristics of the REXTORP it is extremely difficult to move in rough water. The swimmer shall never place themselves between the REXTORP and the ship. Injury or death to swimmer could result.
c. Signal for nose cage(Used because torpedoes do not have an attachment point for the tow line). d. Approach and inspect.
143 FOR TRAINING USE ONLY

TRAINEE GUIDE A-050-0500
OUTLINE SHEET 4.10 INANIMATE OBJECT RECOVERY
e. Install nose cage.
CAUTION Insure handle on the nose cage is used to prevent injury to hands.
f. Signal ship or rescue boat to haul REXTORP alongside ship.
g. Signal ship for hoisting strap.
h. Install hoisting strap with a double wrap around body of REXTORP at center of gravity (may
require adjustment to balance REXTORP).
i. Signal ship for up hoist.
j. Swimmer is recovered.
4. Safety Precautions a. DO NOT attempt a waterborne recovery of other types of torpedoes due to the hazards of Otto
Fuel II.
C. Drones There are numerous types of drones that the rescue swimmer might recover. A drone is an unmanned
flying object used to simulate planes, missiles, etc. For this topic the MQM-74C will be discussed. 1. Description a. Length = 12’, 7” b. Wingspan = 5’, 6” c. Flotation - nose cone, fuel tank, oil smoke tank, and aft flotation bag. d. Color - International orange 2. Recovery Methods a. Helicopter b. Shipboard via davit and hoist (due to weight). (1) Assisted by swimmer (method of choice for this topic).
144 FOR TRAINING USE ONLY

TRAINEE GUIDE A-050-0500
OUTLINE SHEET 4.10 INANIMATE OBJECT RECOVERY
(2) Assisted by boat crew (requires calm seas). 3. Procedures
a. Swimmer prepares for normal deployment from forecastle or rescue boat.
b. Deploy with tow line.
c. Approach drone with care.
d. Attach tow line to recovery ring.
e. Place two half hitches on drones nose with tow line.
f. Signal ship or rescue boat to haul drone alongside ship.
g. Signal ship for hoist.
h. Attach hoist to recovery ring; tow line becomes tag line for swimmer to guide drone.
i. Signal ship for up hoist.
j. Swimmer is recovered.
WARNING Watch for the drone parachute. It should release automatically upon impact with the water. If not, it is easily unhooked and allowed to sink. Care should be exercised to avoid the sharp edges of the wings when attaching
the tow line to the recovery ring located above the wings.
D. Miscellaneous
WARNING If the swimmer is tasked to recover debris from an aircraft mishap, extreme caution should be utilized to avoid injury from hazards and unexpended ordnance, i.e.; parachute ballistic spreaders, ejection seat ordnance, etc.. Information concerning these hazards can be obtained from your ships safety officer and the Material Safety Data Sheet.
1. Other objects may range from a bag of garbage to a bale of marijuana.
2. Recovery methods; Apply basic drone/rextorp recovery procedures to other objects.
3. Rescue swimmers shall not be endangered in order to recover an inanimate object.
145 FOR TRAINING USE ONLY

TRAINEE GUIDE A-050-0500
OUTLINE SHEET 4.10 INANIMATE OBJECT RECOVERY
146 FOR TRAINING USE ONLY

TRAINEE GUIDE A-050-0500
OUTLINE SHEET 5.1 AMERICAN RED CROSS CPR FOR
THE PROFESSIONAL RESCUER INTRODUCTION: First Aid, in any situation, consists of emergency treatment of the sick or injured before medical help can be obtained. The American Red Cross is the nation wide standard for fist aid and CPR. This unit will teach you these standards. ENABLING OBJECTIVES: 4.1 State CPR procedures per American Red Cross CPR for the Professional Rescuer Standards (or
equivalent). 4.2 Demonstrate CPR procedures per American Red Cross CPR for the Professional Rescuer Standards (or
equivalent). TOPIC OUTLINE:
A. CPR for the Professional Rescuer book.
147 FOR TRAINING USE ONLY

TRAINEE GUIDE A-050-0500
DIAGRAM SHHET 5.1-1 LEVEL “A” MEDICAL KIT EQUIPMENT
148
FOR TRAINING USE ONLY

TRAINEE GUIDE A-050-0500
OUTLINE SHEET 5.2 LEVEL “A” MEDICAL KIT
INTRODUCTION: During this unit of instruction the rescue swimmer will learn about the different components that make up the Level “A” Medical Kit. Being familiar with these devices will help the rescue swimmer expedite the rescue. Furthermore, the rescue swimmer will know where the devices are located to assist in moulage. ENABLING OBJECTIVES: 4.3 List the contents of the Level “A” Medical Kit per NTTP 3-50.1.
4.4 State the purpose of each item in the Level “A” medical kit per NTTP 3-50.1. TOPIC OUTLINE:
A. LEVEL “A” SAR MEDICAL KIT
1. The Level “A” Medical Kit is designed for all units that maintain SAR capability. 2. It is made of heavy-gauge nylon with labeled pockets for storage of medical items. In the stowed
position it is 22” by 11”, with a length of 52” when fully opened. It contains five separate pockets.
3. Inventory IAW NTTP 3-50.1 as follows:
a. Medical Kit, Bag and Panel.
b. Pocket One contains:
(1) Two packets of 5 Band-Aids.
(2) One box of 10 Ammonia Inhalants.
(3) One package of Safety Pins.
(4) One roll of 3” by 5-yard Surgical Adhesive Tape.
(5) One, 2” wide non-pneumatic tourniquet.
(6) One eye dressing first aid kit, containing two eye patches and two tubes of medicated ointment.
(7) One pocket mask, one pair of bandage scissors,
and one mini Maglight.
149 FOR TRAINING USE ONLY

TRAINEE GUIDE A-050-0500
OUTLINE SHEET 5.2 LEVEL “A” MEDICAL KIT
150 FOR TRAINING USE ONLY
c. Pocket Two contains:
(1) Two compression Skull Cap Head Dressings.
(2) Four 4x7” First Aid Field Dressings.
(3) Four 37x37x52” Muslin Triangular Bandages (Cravats).
d. Pocket Three contains:
(1) Three, 4” Cotton Roller Bandages (Kerlix).
(2) Three, 4.5” x 5-yard Elastic Bandage Gauze (Ace wraps)
(3) Five, 4x4” Petrolatum Gauze
e. Pocket Four contains:
(1) One, 11 ¾” square First Aid Field Dressing
(2) Two Universal (SAM) Splints.
f. Pocket Five contains:
(1) One Burn-Trauma Dressing sheet, One Casualty Blanket, Two USP 0.9% Sodium Chloride
Injection (IV) bags.
(2) Cervical Collars; No Neck, Short, and Regular. One Bio Hazard Protection Kit.
B. REFERENCES
1. Information relating to the description, configuration, maintenance, and inspection of the Level “A” Medical Kit can be found in the NAVAIR 13-1-6.5, Section 14-23.
2. Information relating to the development and application of the Level “A” Medical Kit can be found
in the NTTP 3-50.1.
C. PRE-DEPLOYMENT EQUIPMENT CHECK:
1. As an essential part of the pre-deployment equipment check, you should always evaluate the condition and security of your medical equipment.
2. Verify that the tamper seal (if applicable) on the medical kit has not been broken and inventory the
bag as needed.

TRAINEE GUIDE A-050-0500
OUTLINE SHEET 5.3 PRACTICAL FIRST AID
151
ENABLING OBJECTIVES: 4.5 Explain the purposes of first aid. 4.6 List the different types of injuries and the appropriate treatment for each. TOPIC OUTLINE
A. PURPOSE OF FIRST AID FOR RESCUE SWIMMER
1. Save life.
2. Prevent .
3. Prevent .
4. Treat for .
5. Basic principles of First Aid:
a. Act quickly, but effectively.
b. _____________ the survivor in a calm manner.
c. Reveal only enough of the survivor’s injuries to ensure cooperation.
d. Do not discuss the survivor’s injuries with others while the survivor is in hearing range unless you’re uncertain about an injury or .
e. If survivor is in danger of further injury, remove them from the danger as quickly and smoothly
as possible, without putting yourself at risk.
B. FIRST AID PROCEDURES
1. Treatment begins .
2. First aid treatment begins on the rescue platform.
3. All SAR capable platforms utilize the level “ “ Medical Kit. The first step in the treatment of injuries is protecting yourself from bodily fluids as much as possible. Always utilize the surgical gloves found in the Level “A” Medical Kit at a minimum.
C. WOUNDS:
1. There are classifications of wounds:
a. Bruise
FOR TRAINING USE ONLY

TRAINEE GUIDE A-050-0500
OUTLINE SHEET 5.3 PRACTICAL FIRST AID
152
b. Scrape/abrasion
c. Laceration ( ) and incision ( ).
d. Avulsion – Skin tissue is partially or completely torn away with .
e. - Most susceptible to infection.
2. Infection is secondary to a wound. Never close or bandage a wound until it has been irrigated or
cleaned out as much as possible.
3. If severe bleeding is present, do not worry about cleaning out the wound, control the bleeding.
a. Open Wounds
1. Three types of bleeding: a. ________________: Large vessels that carry blood away from the heart. Bleeding is
bright red and spurts from the wound. This bleeding is life threatening and difficult to control.
b. ________________: Small vessels that carry blood to all body parts. Bleeding is slow and oozes from wound.
c. ________________: Veins carry blood to the heart. Bleeding is dark red and flows in a
steady stream.
2. Dressings and Bandages:
a. _______________: pads placed directly on the wound to soak up blood and keep ______ out. These will not to the wound.
b. _____________: Used to wrap and hold dressings in place, apply pressure to help control
bleeding, and help support an injured body part. Bandages include: Band-Aids, triangular bandages, and roller bandages made of gauze or elastic material.
c. Field Dressings are a ___________________________________________.
. 3. Control severe bleeding using the following methods:
a. - place direct pressure on the wound using a sterile field dressing. A
dressing may be created using any available equipment as necessary.
b. - elevate the affected extremity above the level of the .
NOTE Do not elevate an extremity until it has been properly splinted if a fracture is suspected.
FOR TRAINING USE ONLY

TRAINEE GUIDE A-050-0500
OUTLINE SHEET 5.3 PRACTICAL FIRST AID
153
c. Second dressing – apply a second dressing if the first bandage becomes blood-soaked.
Wrap dressing in place with a Roller bandage as needed. Ensure the Bandage is or to prevent loosening.
NOTE
Never remove a dressing once it has been applied. Place a new dressing over the existing one.
d. Pressure points – apply pressure to the artery by pressing against the underlying bone at a point closest to the and midway to the .
e. - used as a .
NOTE
Never remove a dressing once it has been applied. Place a new dressing over the existing one.
4. TOURNIQUET: as a last resort
a. When using a tourniquet, you risk sacrificing a limb in order to save a life. b. Tourniquets are only placed on the (arms and legs). Normally placed above the wound. c. If possible, place the tourniquet a joint. d. Write the of the tourniquet on the front of the survivor’s shirt. e. Write a capital “T” on the survivor’s forehead. f. Leave the tourniquet visible. g. Never use string, wire, or any thin material less then wide. h. Tighten only enough to . i. Never once it is in place.
WARNING When practicing on a simulated survivor, do not tighten a tourniquet.
5. Signs of Internal Bleeding:
a. Tender, swollen, bruised, or hard areas of the body (i.e.: the abdomen).
b. Rapid, pulse.
c. Skin that feels or looks .
d. Vomiting or coughing up blood.
FOR TRAINING USE ONLY

TRAINEE GUIDE A-050-0500
OUTLINE SHEET 5.3 PRACTICAL FIRST AID
154
e. .
f. Becoming confused, .
D. SHOCK:
1. A life threatening condition usually due to and caused by a
circulating through the body.
a. Signals of shock:
(1) Restlessness or irritability ( ).
(2) Altered level of .
(3) .
(4) .
(5) Weak, rapid or absent pulse.
b. Late stages of shock include:
(1) Bluish coloration around the due to a prolonged lack of oxygen.
(2) Loss of .
(3) No breathing or absent .
2. All survivors will be in some form of shock. Position survivor for transport in the rescue vehicle in
one of the following five positions:
NOTE Maintain of the head and neck if a head, neck, or spinal injury is suspected.
a. Traditional shock position:
(1) Use this shock position unless the survivor’s injuries preclude it (if no other shock position is
needed).
(2) Feet are elevated above the level of the heart.
(3) When are suspected, lift the foot end of the SAR Litter instead of the feet.
FOR TRAINING USE ONLY

TRAINEE GUIDE A-050-0500
OUTLINE SHEET 5.3 PRACTICAL FIRST AID
155
b. Flat on back position
(1) Use when is suspected, the survivor has an eye injury, flail chest, signs
of in the abdomen or torso are present, or the survivor is unconscious upon your arrival.
(2) Position the survivor on their back, keeping the body as straight as possible.
c. Side position
(1) Used for a survivor with , bleeding from the , large
amounts of oral secretions, a sucking chest wound or deviated trachea, or if a compressed air injury is suspected.
(2) Place a survivor with an open or closed chest wound, injured side . This position
allows gravity to assist in drainage of blood and keeps the uninjured lung up.
(3) If a compressed air injury is suspected, place the survivor down to keep air bubbles from forming in heart vessels.
d. Knee’s flexed position
(1) Used for a survivor with injuries. (Something going into or coming out of
the abdomen). This position does not include internal bleeding in the abdomen.
(2) Lay the survivor on their back and raise their knees to approx. 45 degree angle. This will ease tension on the abdominal muscles.
e. Semi-seated position
(1) Not to be used if you suspect head, neck, or spinal injuries, or the survivor has ejected.
(2) Used for survivors with medical problems such as or
trouble breathing.
(3) Position the torso at 45-degree angle with legs .
NOTE Survivor should be placed in the appropriate shock position upon completion of the Secondary Survey if feasible.
E. HEAD, NECK, AND SPINAL INJURIES:
1. Only an x-ray can truly determine internal head, neck, or spinal injuries. Suspect a head, neck, or
spinal injury when:
a. Fall from height greater then the survivor’s height.
FOR TRAINING USE ONLY

TRAINEE GUIDE A-050-0500
OUTLINE SHEET 5.3 PRACTICAL FIRST AID
156
b. Any diving (head first) mishap.
c. Any person found for unknown reasons.
d. Any injury involving severe blunt force to the .
e. Any injury that the head or trunk.
f. Any person thrown from a motor vehicle or not wearing a seat belt.
g. Any injury in which the victim’s helmet is broken.
h. .
i. .
2. Signals of head, neck, and spinal injuries:
a. Change in level of .
b. Complaints of severe in the head, neck, or back.
c. Tingling or in the hands, fingers, feet, or toes.
d. Partial or complete loss of movement of any body part.
e. Unusual bumps or depressions on the .
f. Blood or other fluids in the ears or nose.
g. Heavy of the head, neck, or back.
h. .
i. Impaired or loss of balance as a result of injury.
j. Bruising of the head, especially around the eyes and/or behind the ears.
3. Treatment of head, neck, and spinal injuries during in-water rescue:
a. Treat all unconscious survivors or ejected aircrew as possible head, neck, and or spinal injury.
b. Upon gaining access to the survivor and establishing ABC’s are present, perform all necessary
disentanglement procedures and stabilize the utilizing the SAR MEDEVAC litter as required.
c. This may prevent a potentially life threatening or permanent neurological injury from occurring.
FOR TRAINING USE ONLY

TRAINEE GUIDE A-050-0500
OUTLINE SHEET 5.3 PRACTICAL FIRST AID
157
d. As a rescue swimmer, you’re goal is to get the survivor into the rescue platform as quickly and
effectively as possible.
WARNING In a water rescue situation, the survivor may be placed in a litter and hoisted horizontally to prevent the effects of .
4. Hydrostatic Squeeze
a. Water exerts pressure on a body immersed in it. This effect is called hydrostatic squeeze.
b. Vertical removal from the water relieves the pressure and causes blood to flow back to the lower
extremities increasing the level of shock.
F. RESCUE LITTER PROCEDURES
1. Requires both a Lead and an Assistant rescuer.
a. Lead will establish , while the assistant takes in-line stabilization of the head. Assistant will verbally direct the movement of the survivor during transfer to the litter.
b. Lead will apply a and conduct a treating all life
threatening injuries.
c. Lead will then position the litter next to the survivor and position themselves perpendicular to the survivor’s hips.
d. On the assistant’s 1…2…3… count, lead will grip the survivor’s hips, logroll the survivor
toward them, and check the survivor’s for injuries.
e. The survivor is then rolled onto the litter and secured inside the litter straps.
G. FRACTURES AND DISLOCATIONS
1. A fracture is a , chip, or crack in a bone; classified as .
a. Open fractures:
(1) Involve . Any wound in which bone is seen or exposed is an open fracture.
(2) Treat the wound . Stop the bleeding.
(3) Do not attempt to set a broken bone. b. Closed fractures:
(1) Involves a broken bone without an open wound.
FOR TRAINING USE ONLY
TRAINEE GUIDE A-050-0500
OUTLINE SHEET 5.3 PRACTICAL FIRST AID
158
(2) .
(3) Do not attempt to set a broken bone.
c. Dislocations:
(1) The separating of bones between a joint.
(2) May be very painful. Splint in place unless circulation below the joint is compromised.
2. Splinting – there are three types of splints:
a. Rigid
b. Soft
c. Anatomical
3. Splinting is done during the . After splinting and extremity, always check
for a capillary refill to ensure proper .
4. If circulation is compromised or the injured extremity cannot be placed into the litter appropriately, it may be necessary to move the extremity to an position.
H. RIB FRACTURE
1. Simple – 1 or 2 ribs broken can be in several places.
2. Flail Chest – 2 or more consecutive ribs broken in 2 or more places. Usually recognized by a section
of the rib cage moving of the normal breathing pattern. I. OPEN AND CLOSED CHEST WOUNDS
1. Open Chest Wound – Also known as a “ _____________________“, occurs when air leaks into the chest cavity from an opening in the chest wall.
2. Due to increased air pressure outside of the body, the air is drawn into the chest as the survivor
exhales, and causes the lung to .
3. Closed Chest Wound – Occurs due to a puncture in the surface of the lung causing an increased air pressure in the chest cavity and forcing the lung to collapse. May be identified by the presence of a__________________________.
J. ABDOMINAL EVISCERATION
1. Extensive laceration to the abdominal wall causing some of the internal organs to push out.
FOR TRAINING USE ONLY

TRAINEE GUIDE A-050-0500
OUTLINE SHEET 5.3 PRACTICAL FIRST AID
159
K. PELVIC FRACTURE
1. The upper body rests on the spine connected to the pelvis. The legs are seated in the pelvic girdle.
Essentially, the pelvis is the center of the body.
2. A survivor with a pelvic fracture will feel like they are coming apart and may be in extreme pain.
3. Gently press and against the hips to test for movement, grinding, and survivor response to pain.
L. BURNS
1. Burns result from heat, electricity, chemicals, and radiation. 2. Burns are determined by the depth of tissue damage:
a. 1st Degree ( ) – A sunburn. Involves the top layer of skin only.
b. 2nd Degree ( ) – Recognized by the blisters.
c. 3rd Degree ( ) – All layers of skin and most or all underlying structures are
destroyed. Identified by black or white charred tissue.
3. Steps for care:
a. Assess the scene and remove the victim from the source.
b. Cover with loose, dry, sterile dressing.
c. Do not use or products on the burn. 4. Critical burn is any that:
a. Involves difficulty breathing.
b. Covers more than .
c. Involves the .
d. Results from chemicals, explosions, or electricity.
M. ENVIRONMENTAL INJURIES
1. Heat related injuries:
a. Heat Cramps – Painful muscle spasms, usually in the or .
Care includes:
FOR TRAINING USE ONLY

TRAINEE GUIDE A-050-0500
OUTLINE SHEET 5.3 PRACTICAL FIRST AID
160
(1) Laying the victim down in a cool place.
(2) Give cool water or moderate amounts of commercial sports drink.
(3) Light stretching of the affecting muscles might help.
(4) Do not give , as they may worsen the condition.
b. Heat Exhaustion – A more severe condition of heat cramps.
Signals include:
(1) Normal to sub-normal skin temperature. Skin may be cool, moist, pale, or flushed.
(2) .
(3) .
(4) Weakness and Fatigue/Exhaustion.
(5) Care is the same as .
c. Heat Stroke – the least common, but most severe heat emergency. Signals include:
(1) Red, Hot, . Sweating has greatly reduced or has stopped.
(2) Change in level of consciousness (may be disoriented).
(3) Rapid, weak pulse.
(4) breathing. d. Care for heat Stroke:
(1) Cool the survivor immediately. Apply to the wrists, ankles, groin, armpits,
and neck. These areas are where heat is retained and the arteries are the most shallow.
(2) Ice or cold water baths are a as they may trigger dangerous heart irregularities.
(3) Do not apply rubbing (isopropyl) alcohol.
2. Cold related injuries:
a. Hypothermia – Condition where the body core temperature drops because of a failure to keep
warm. b. Signals include:
FOR TRAINING USE ONLY

TRAINEE GUIDE A-050-0500
OUTLINE SHEET 5.3 PRACTICAL FIRST AID
161
(1) - most important indicator regarding the survivor’s condition.
(2) .
(4) A glassy stare.
(5) Apathy – loss of hope.
(6) Loss of consciousness.
NOTE Even in warm water, hypothermia is a life threatening condition.
b. Care includes:
(1) Remove any wet clothing and dry survivor.
(2) Gradually re-warm by wrapping in blankets and dry clothing (if available).
(3) Move survivor to a warm place.
(4) ____________ May be necessary for survival.
(5) Never rapidly re-warm the survivor, this may trigger dangerous heart irregularities.
N. COMPRESSED AIR INJURIES
1. May occur anytime a survivor breathes underwater.
a. Helicopter Emergency Escape Device Systems (HEEDS).
b. Seat Pan Oxygen.
c. Self Contained Underwater Breathing Apparatus (SCUBA)
2. Air Embolus and Decompression Sickness (DCS or “the bends”).
a. Breathing compressed air under water causes gases to be absorbed into the blood.
b. Rapid ascent relieves pressure on the gases, causing them to come out of solution.
c. Air Embolus and DCS are caused by gas bubbles which expand during ascent. These can either
block blood vessels, become trapped within joints, or they may travel between tissues.
d. The following symptoms may be present depending upon the location of the bubble:
FOR TRAINING USE ONLY
TRAINEE GUIDE A-050-0500
OUTLINE SHEET 5.3 PRACTICAL FIRST AID
162 FOR TRAINING USE ONLY
(1) Disorientation or personality change (2) Dizziness or blurred vision (3) Numbness, tingling, or paralysis (4) Chest pain (5) Blood froth from the mouth or nose (6) Convulsions (7) Coughing or shortness of breath (8) Unusual fatigue or weakness (9) Skin itch (10) Pain in the arms, legs or torso
3. Treatment of Air Embolus and DSC
a. Both Air Embolus and DSC require urgent recompression. Transport the survivor to capable
facilities ASAP.
(1) While the survivor is awaiting transport, administer CPR/ rescue breathing as required. (2) Keep airway open. Survivor may vomit.
(3) Keep survivor lying ( ) and quiet. This position causes the bubble(s) to rise
away from the heart.
O. DEAD-ON-ARRIVALS (DOA’S)
1. Treat the victim as humanely and gently as possible. Recovery is necessary for autopsy investigation and proper burial.
P. PSYCHIATRIC EMERGENCIES
1. A sudden onset of behavioral or emotional responses that, if not responded to, may result in a life-
threatening situation. In almost all cases, first aid treatment is a calm, professional understanding demeanor without aggravating the survivor.

TRAINEE GUIDE A-050-0500
DIAGRAM SHEET 5.3-1
163 FOR TRAINING USE ONLY

TRAINEE GUIDE A-050-0500
DIAGRAM SHEET 5.3-2
164 FOR TRAINING USE ONLY

TRAINEE GUIDE A-050-0500
DIAGRAM SHEET 5.3-3
165 FOR TRAINING USE ONLY

TRAINEE GUIDE A-050-0500
DIAGRAM SHEET 5.3-4
166 FOR TRAINING USE ONLY

TRAINEE GUIDE A-050-0500
DIAGRAM SHEET 5.3-5
167 FOR TRAINING USE ONLY

TRAINEE GUIDE A-050-0500
DIAGRAM SHEET 5.3-6
168 FOR TRAINING USE ONLY

TRAINEE GUIDE A-050-0500
DIAGRAM SHEET 5.3-7
169 FOR TRAINING USE ONLY
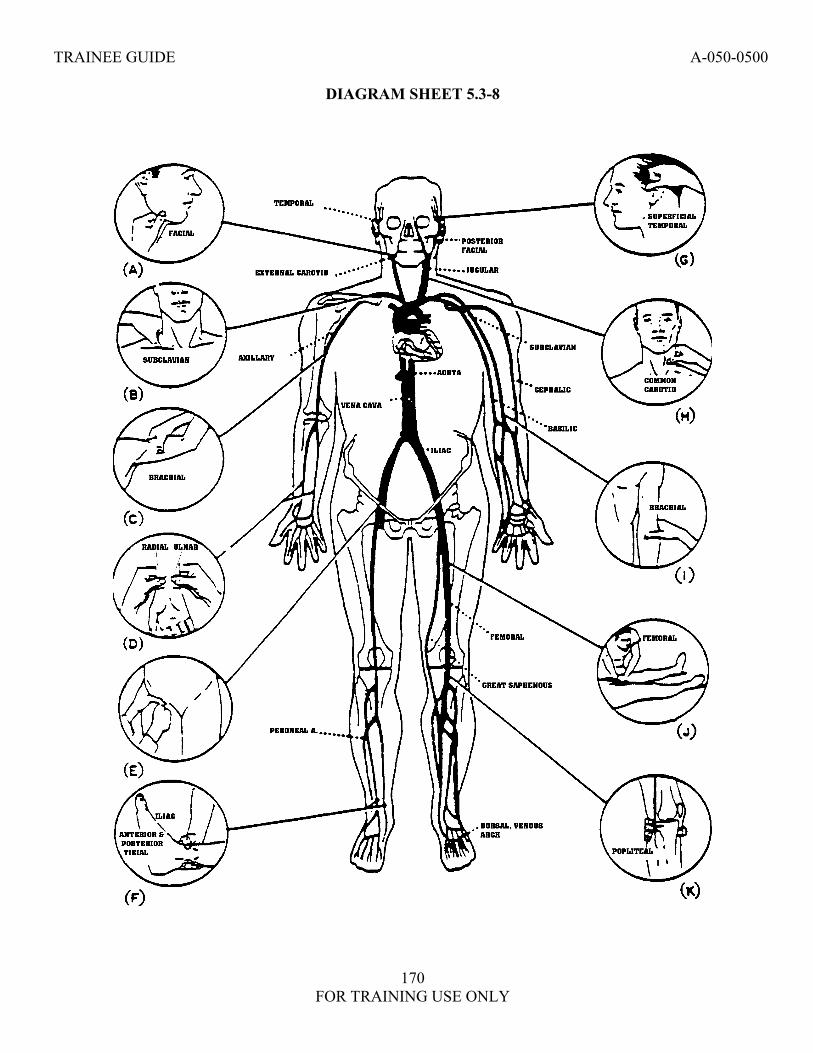
TRAINEE GUIDE A-050-0500
DIAGRAM SHEET 5.3-8
170 FOR TRAINING USE ONLY

TRAINEE GUIDE A-050-0500 JOB SHEET 5.3-1
PRACTICAL FIRST AID/MOULAGE
171 FOR TRAINING USE ONLY
Student Name:_______________________________ Date: ________________ Instructor: ___________________________ PRACTICE / FINAL Total Time:____________ * Denotes a critical area. Failure to adhere to items marked with an asterisk will result in automatic failure of this performance test. PRIMARY SURVEY SECONDARY SURVEY __ Scene safe / gloves on __ Head __ * Airway (if not, begin CPR) __ Eyes __ * Cervical collar __ Ears checked back of neck __ Nose correctly applied __ Mouth __ * Life threatening injuries __ Neck order of severity __ Chest proper dressings __ Abdomen __ * Breathing __ Pelvis equal rise & fall __ Arms front & back __ Legs __ * Circulation pulse __* Shock Position capillary refill skin temperature __ * Bloodsweep ------------------------------------------------------------------------------------------------------------------------------- SECONDARY AREAS Maximum score of 20 (Circle One , 0-2: 0-Poor 1-Average 2-Above Average) 1. Knowledge of Level "A" Medical Kit: 5. Patient Report:
a. Location of gear : ( 2, 1, 0 ) a. Correct Order: ( 2, 1, 0 ) b. Gear properly utilized: ( 2, 1, 0 ) b. Proper Information: ( 2, 1, 0 ) 2. Survey:
a. Performed correctly: ( 2, 1, 0 ) b. Thorough: (2, 1, 0 3. Dressings:
a. Proper Dressing: ( 2, 1, 0 ) b. Correctly Applied: ( 2, 1, 0 ) 4. Splinting:
a. Correct Splint: ( 2, 1, 0 ) b. Properly Applied: (2, 1, 0 ) Total:______ (Min Passing Score: 16)
TRAINEE GUIDE A-050-0500 JOB SHEET 5.3-1
PRACTICAL FIRST AID/MOULAGE
172 FOR TRAINING USE ONLY
Comments: ________________________________________________________________________________ __________________________________________________________________________________________ __________________________________________________________________________________________ __________________________________________________________________________________________ __________________________________________________________________________________________ __________________________________________________________________________________________ __________________________________________________________________________________________ __________________________________________________________________________________________ __________________________________________________________________________________________ __________________________________________________________________________________________ __________________________________________________________________________________________ __________________________________________________________________________________________ __________________________________________________________________________________________ __________________________________________________________________________________________ __________________________________________________________________________________________ __________________________________________________________________________________________ __________________________________________________________________________________________ __________________________________________________________________________________________ __________________________________________________________________________________________ __________________________________________________________________________________________ __________________________________________________________________________________________

TRAINEE GUIDE A-050-0500
OUTLINE SHEET 5.4 PRIMARY SURVEY
ENABLING OBJECTIVES: 4.7 List the procedures used in a primary survey. 4.8 Demonstrate primary survey procedures used in a mock trauma (moulage) scenario without injury to personnel or damage to equipment. TOPIC OUTLINE:
A. PRIMARY SURVEY PROCEDURES:
1. A head-to-toe examination is conducted once survivor is aboard the rescue platform .
2. Used to identify all life threatening injuries, which must be treated as they are found.
B. ARRIVING ON THE SCENE:
1. ______________________- Upon approaching the scene, it is imperative that you evaluate the safety of the area in order to protect yourself and your crew.
NOTE
During in-water rescue scenarios onboard the rescue platform, it is understood that the scene is safe. However, it is necessary to evaluate the scene at all times.
2. ______________________________- Take BSI precautions prior to touching the survivor.
3. _____________________________- Attempt verbal communication with the survivor after or
during BSI procedures.
C. INITIAL ASSESSMENT:
1. Check the Airway-
a. If survivor is conscious and talking to you, check for severe bleeding and begin Primary Survey. b. If survivor is unconscious, open the Airway using a “modified jaw thrust.”
2. _____________________: Verify that the survivor is breathing. If not breathing, give two breaths.
If unable to get the breaths in begin Obstructed Airway procedures.
NOTE If it is necessary to perform abdominal thrusts, expose the abdominal area prior to pressing on the abdomen.
1. _____________________: Verify that the survivor has a pulse. If no pulse, begin CPR procedures.
173 FOR TRAINING USE ONLY

TRAINEE GUIDE A-050-0500
OUTLINE SHEET 5.4 PRIMARY SURVEY
2. ___________________________: Take a quick look at the body from head to toe identifying any
severe bleeding prior to beginning CPR.
NOTE If severe bleeding occurs during chest compressions, it may be necessary to expeditiously bandage a wound in order to continue.
D. PRIMARY SURVEY:
1. _______________________: While maintaining in-line stabilization of the head, sweep the back of the neck checking for blood and/or deformities. Determine the correct size c-collar needed, verify placement, and secure it. Once in place, you may let go of the head.
2. Life Threatening Injuries:
a. Quickly look at the head checking for severe bleeding. If no severe bleeding, move directly to
the chest. b. Expose the survivor’s chest and abdomen. Look for and treat all life-threatening injuries present.
c. Expose an arm, look for and treat all life-threatening injuries. Repeat for the other arm.
d. Follow the same procedure for the legs.
NOTE
Following the order of assessment, if blood-soaked clothing is identified, expose and treat that extremity first.
3. Life-threatening injuries include:
a. _____________________
b. _____________________
c. _____________________
d. _____________________
e. Abdominal Evisceration
f. Obvious Bruising (internal Bleeding)
g. Critical Burns
h. Head, Neck, or Spinal Injury
i. Heat Stroke
j. Severe Hypothermia
174 FOR TRAINING USE ONLY

TRAINEE GUIDE A-050-0500
OUTLINE SHEET 5.4 PRIMARY SURVEY
k. Psychiatric Emergencies
l. Severe Shock
4. Check Breathing- Check for equal rise and fall of the chest by resting your hands on the survivor’s chest, in the front and back. Looking for breathing quality and rate.
5. Check circulation- Check pulses at the wrists (radial) and at the feet (dorsalis pedis), looking for
equal quality and rate. Check capillary refill in fingers and toes, looking for circulation return within 2 seconds or less. Check skin temperature by resting the back of a gloved hand on the survivor’s forehead and /or chest.
6. Perform Blood Sweep- Begin by wiping gloves clean or replacing them with a fresh pair.
NOTE
Do not wipe contaminated gloves on yourself.
7. Starting at the head, sweep under the body and inside the clothing looking for any bleeding you can’t see. If blood is found, investigate it.
8. ______________ - Verify that survivor is still breathing and has a pulse.
E. RULES FOR SPLINTING:
1. __________________________________________________.
2. When splinting legs, ensure extremities are in-line prior to applying a splint.
3. Ensure that the joints above and below the injury are immobilized
4. If an open wound or bruising is present, ensure a tie is placed above and below the area.
5. Tie knots across the top of the splint, not against skin.
6. Always check capillary refill after splinting.
F. IDENTIFICATION AND TREATMENT OF INJURIES:
1. Open Chest Wounds “Sucking Chest Wound”
a. Presentation:
(1) Open wound to the chest with a sucking sound during breathing
(2) Bleeding and bubbles coming from the chest
175 FOR TRAINING USE ONLY

TRAINEE GUIDE A-050-0500
OUTLINE SHEET 5.4 PRIMARY SURVEY
(3) Exit wound may be present.
2. Treatment:
a. Immediately place a gloved hand over the open wound to create a seal.
b. Evaluate wound size. If wound is smaller than a petroleum gauze foil wrapper, use foil to create a one-way valve. If wound is larger, use plastic from an IV bag cut to size.
c. Tape on three sides. Top, bottom, and side closest to the middle of the body.
d. Check for an exit wound. If an exit wound exists, determine its size. Use a combination
occlusive and field dressing placed over exit wound using survivor’s body weight to create a seal. During an overland SAR, it may be necessary to log roll the survivor to get a clear view of the injury prior to treatment.
e. Deviated trachea is a sign that the one-way valve is no longer working.
f. To relieve pressure, peel dressing up using un-taped side and “burp it”. May hear a rush of air as
pressure is relieved.
g. Lay survivor injured side down if feasible.
3. Closed Chest Wounds:
a. Presentation: (1) Difficulty breathing (2) Deviated trachea.
b. Treatment:
(1) Place the survivor in an _______________ shock position. Shock position is the only
treatment.
4. Flail Chest:
a. Presentation:
(1) Difficulty breathing
(2) Section of the rib cage moving opposite of normal breathing (This is not unequal breathing).
(3) Bruising to the chest area.
b. Treatment:
176 FOR TRAINING USE ONLY

TRAINEE GUIDE A-050-0500
OUTLINE SHEET 5.4 PRIMARY SURVEY
(1) Place a saline bag over the affected area taping the top and bottom of the bag to the chest.
May use cravats if needed, but ensure that they’re not too tight as to further hinder breathing.
(2) Check for other broken ribs before placing tape.
(3) May use a rolled up burn sheet.
5. Amputations:
a. Presentation:
(1) Severely torn or missing limb. (2) May have severe bleeding present.
(3) Limb may be fractured.
b. Treatment:
(1) ______________________. Apply direct pressure with a field dressing and tightly wrap
with an ACE bandage. (2) Splint the amputated end during the Secondary Survey. Using a SAM splint, wrap around
the end of the amputation in a “U shape” and secure it with at least two ties.
6. Open Fractures:
a. Presentation:
(1) Visible bone and/or fragments with an open wound. (2) Bleeding can be mild to severe.
b. Treatment:
(1) CONTROL BLEEDING FIRST. Place donut-shaped gauze bandage around the exposed
bone and cover with a field dressing. (2) If it’s necessary to move an arm to control bleeding from an “open hand fracture”, visualize
and palpate for other injuries before moving it.
177 FOR TRAINING USE ONLY

TRAINEE GUIDE A-050-0500
OUTLINE SHEET 5.4 PRIMARY SURVEY
(3) Ensure the dressing is snug and tied on the side. Do not cross dressing ties over the wound. This will apply unwanted pressure on the exposed bones.
(4) Splint fractures during the Secondary Survey.
(a) For fractures of the lower arms, use a SAM splint underneath the arm (palm side) with
hand in the neutral position. Secure with at least three ties with wrist and elbow immobilized.
(b) For fractures of the upper arms, use a SAM splint across the outer aspect of the arm and
secure with at least two ties. Utilize a sling and swath (swath at a minimum). Ensure the swath is not too tight as to hinder breathing.
(c) To splint fractures of the hands, wrap roller gauze around the hand and wrist, to create a
bulky soft splint. Avoid covering fingertips.
(d) For upper leg fractures, use a SAM splint across the side of the leg above the hip to below the ankle. Secure with at least five ties.
(e) Ensure the leg is placed in-line prior to splinting and that the hip, knee, and ankle are
immobilized.
(f) For lower leg fractures, use a SAM splint across the side of the leg above the knee to below the foot. Secure with at least four ties.
7. Closed Fractures:
a. Presentation:
(1) _____________________ may be visible.
b. Treatment:
(1) If bruising is present, assume a bone is broken and treat as a fracture. (2) Some bruising may be difficult to see. A thorough Secondary Survey must be performed to
identify all injuries.
(3) Splint during Secondary Survey.
8. Abdominal Evisceration:
a. Presentation:
178 FOR TRAINING USE ONLY

TRAINEE GUIDE A-050-0500
OUTLINE SHEET 5.4 PRIMARY SURVEY
(1) Open abdominal wound with internal organs visibly exposed and/or spilling out.
b. Treatment:
(1) Soak large field dressing with Normal Saline. (2) Place the large field dressing under exposed organs and fold over the organs, covering all
wound areas.
(3) Tie on the side, ensuring no pressure is placed directly on exposed organs.
9. Pelvic Fractures:
a. Presentation:
(1) Instability or grinding feeling when pressing in against the hips (2) Grinding sounds accompanying pressing in against the pelvis.
(3) Survivor may feel like they’re coming apart and survivor may be in extreme pain.
(4) Bruising to the abdominal and/or pelvic region may be present.
b. Treatment:
(1) Fold burn sheet and place it inside of the trauma sheet to fill space between the legs. (2) Place a Triangular Bandage across the hips, two on the upper legs and two on the lower legs
(applying cravats at the hips, then applying them from the feet up).
NOTE The pelvis ________________ and, if necessary, treated prior to logrolling the survivor onto the litter.
10. Penetrating Puncture Wounds:
a. Presentation:
(1) Foreign object protruding from any area of the body.
b. Treatment:
(1) Secure object with Roller Gauze on each side of the penetrating object.
179 FOR TRAINING USE ONLY

TRAINEE GUIDE A-050-0500
OUTLINE SHEET 5.4 PRIMARY SURVEY
(2) Cut a hole in the middle of a field dressing large enough for the object to fit through and apply field dressing. Tie on the side to avoid direct pressure.
(3) Ensure object is secure and visible to personnel to prevent further penetration.
11. Puncture Wounds:
a. Presentation:
(1) Puncture wound to any area of the body.
b. Treatment:
(1) Place a field dressing on wound and tie over the top of the wound. (2) Check for an exit wound.
12. Eye Avulsion:
a. Presentation:
(1) Eye missing or protruding from the socket
b. Treatment:
(1) If eye is missing, cover affected side with a field dressing. Always cover both eyes to minimize movement due to sympathetic oculomotor function.
(2) If eye is protruding from the socket, soak Roller Gauze with Normal Saline. Apply Roller
Gauze to each side of the eye and cover both eyes with a field dressing.
(3) Ensure dressing is snug and tied on the side.
13. Simple Rib Fractures:
a. Presentation:
(1) Complaining of difficulty breathing. (2) Bruising, tenderness, or pain (guarding) to affected area.
b. Treatment:
(1) Sling and swathe the arm of injured side, if no injuries to the arm are present.
180 FOR TRAINING USE ONLY

TRAINEE GUIDE A-050-0500
OUTLINE SHEET 5.4 PRIMARY SURVEY
14. Severe Burns:
a. Presentation:
(1) Signs of second and third degree burns (____________________________) to any area of the body.
(2) If burns to the chest are present, check for singed nose hairs indicating an inhalation injury
b. Treatment:
(1) Cover burned areas with a burn sheet cut to size, one sheet thick. Secure loosely with safety
pins. (2) Lightly palpate burned areas for broken bones during Secondary Survey.
NOTE
Any sterile dressing that touches the deck or becomes contaminated, is considered useless and SHALL NOT be used.
181 FOR TRAINING USE ONLY

TRAINEE GUIDE A-050-0500
OUTLINE SHEET 5.4 PRIMARY SURVEY
182 FOR TRAINING USE ONLY
THIS PAGE INTENTIONALLY LEFT BLANK

TRAINEE GUIDE A-050-0500
OUTLINE SHEET 5.5 SECONDARY SURVEY
ENABLING OBJECTIVES: 4.9 List the procedures for a secondary survey. 4.10 Demonstrate secondary survey procedures in a mock trauma (moulage) scenario without injury to
personnel or damage to equipment. TOPIC OUTLINE:
A. SECONDARY SURVEY:
1. The Secondary Survey is to be conducted upon completion of the Primary Survey in a rescue situation or once the survivor has been transported to the rescue platform.
2. Examine the survivor from head to toe by physically touching the body. Visually inspect all body
surfaces using a Mini Maglight before palpating and squeezing the body part.
3. Remove all of the survivor’s clothing to ensure a thorough assessment. If needed, cover the survivor with a blanket and expose only the areas necessary to complete the survey yet not chill the survivor.
4. Rip or cut clothes along a seam to expose injuries.
NOTE
During the Secondary Survey, treat all non life-threatening injuries and burns; and perform splinting as required.
5. Head:
a. Look for obvious depressions and bleeding around all areas of the head. b. Gently feel for lumps and soft spots.
6. Eyes:
a. Look for foreign matter, unequal pupils, eye movement, and pupillary reaction to the light.
b. Look for swelling, deformity, and bruising around the eyes. (_______________ – indicates a possible base skull fracture).
7. Ears:
a. Look for blood or cerebrospinal fluid flowing out. b. Look for bruising behind the ears (_______________ – indicates a possible base skull fracture).
183 FOR TRAINING USE ONLY

TRAINEE GUIDE A-050-0500
OUTLINE SHEET 5.5 SECONDARY SURVEY
8. Nose:
a. Look for blood, fluid, or airway obstruction. b. Look for burned nose hairs.
9. Mouth:
a. Look for foreign objects. b. Amputated tongue or bleeding in the mouth. c. Fractured or displaced teeth. d. Anything that can cause an airway obstruction.
10. Neck:
a. Deviated Trachea or bleeding.
11. Chest:
a. Starting at the shoulders, look and palpate across shoulders, collarbones, and sternum.
b. Palpate for any broken ribs in front and in back.
12. Abdomen:
a. Look for obvious bruising and swelling.
b. Palpate for tenderness or rigidity, unless an obvious injury is present. If bruising is present, note it and move on.
13. Pelvis:
a. Gently squeeze hips to check for deformity or fractures. b. If a pelvic fracture is suspected and has not been splinted, splint at this point.
14. Arms:
a. Cut and remove clothing. b. Look and feel for broken bones, deformity and swelling.
184 FOR TRAINING USE ONLY

TRAINEE GUIDE A-050-0500
OUTLINE SHEET 5.5 SECONDARY SURVEY
c. Have the survivor simultaneously squeeze your fingers with both his hands to check for equal
strengths and sensations.
d. Do not check for strengths if a fracture is suspected.
e. If a splint is required, perform splinting of the extremity as you come to it.
15. Legs:
a. Cut and remove clothing. b. Look and feel for broken bones, deformity and swelling.
c. Have the survivor simultaneously push against your hands ( GAS PEDALS) with both feet to
check for equal strengths and sensations.
d. Do not check for strengths if a fracture is suspected.
e. If a splint is required, perform splinting of the extremity as you come to it.
16. Back:
a. In an in-water rescue situation, if bleeding from the back is identified, log roll the survivor and examine for any abnormalities. Treat appropriately.
B. SHOCK POSITION: treat for the worst injury.
1. ___________________: Use this shock position unless injuries preclude it. 2. ___________________: Used for head or eye injury; flail chest; internal bleeding (bruising ) of the
torso, abdomen, or pelvis.
3. __________________: Used for something going into or coming out of the abdomen. May utilize one knee bent if a fracture exists in the other leg.
4. Side down:
a. Left side down: Used for compressed air injuries and a left side open or closed chest wound. b. Right side down: Used for a right side open or closed chest wound.
5. __________________: Medical emergencies such as; heart attack, stroke, or shortness of breath.
185 FOR TRAINING USE ONLY

TRAINEE GUIDE A-050-0500
OUTLINE SHEET 5.5 SECONDARY SURVEY
186 FOR TRAINING USE ONLY
C. SURVIVOR STATUS REPORT: Used to inform the boat/bridge of the survivor’s condition. Pertinent
information to be passed on to the medical facility should include:
1. Approximate age. 2. Gender
3. Level of Consciousness (fully, semi, or unconscious).
4. Approximate weight
5. What happened; Victim of a --- (describe the incident)
6. List of injuries, starting from the head, include cervical collar (if applied), state if CPR or Rescue
Breathing was performed, state the injury, bandage applied, and splint used.
7. __________- Initial and others if taken.
8. Shock Position
9. List of any known allergies
10. Any medication taken
11. Blood Type (A+, A-, B+, B-, AB+, AB-, O+, O-).
NOTE If allergies, medications, and /or blood type are not known, state that they are “not known.” Do not say “no known.”
12. EXAMPLE
a. I have a 21 year old unconscious male, approximately 175 pounds, victim of a helicopter crash, injuries are as follows…; allergies are (list, if any), patient is on (list medication, if any), Blood type is, breathing is (quality and rate), pulse is (quality and rate), currently in (shock position).
D. REASSESSMENT:
1. You should reassess your survivor’s condition every 5 minutes (at a minimum) until arrival at a
treatment facility.


![CTJ Booklet Complete[1]](https://static.fdocuments.us/doc/165x107/55280d344a7959ec3d8b45bb/ctj-booklet-complete1.jpg)