TracVision 12-Volt Receiver User's Guide Receiver User’s Guide Congratulations! You have chosen...
115
TracVision 12-Volt Receiver for DIRECTV ® Service User’s Guide
Transcript of TracVision 12-Volt Receiver User's Guide Receiver User’s Guide Congratulations! You have chosen...

Trac
Visi
on 1
2-Vo
lt Re
ceiv
er fo
r DIR
ECTV
®Se
rvic
e
User
’s Gu
ide

TracVisionReceiver User’s Guide
Congratulations!
You have chosen TracVision, a revolutionary antennasystem delivering live satellite TV entertainment onthe go. With hundreds of channels of digital-qualityTV and music to enjoy, traveling will never be thesame!
This User’s Guide provides all of the basicinformation you need to use the system’s receiverand receive the DIRECTV satellite entertainment youwant. For detailed installation information, pleaserefer to the TracVision Installation Guide.
Welcome Page
KVH Part # 54-0287 Rev. B
© 2005 KVH Industries, Inc., All rights reserved.

Trademarks
KVH® and TracVision® are registered trademarks of KVH Industries, Inc.
DIRECTV® and the Cyclone Design logo, DIRECTV INTERACTIVE, TOTALCHOICE, DIRECTV HOME SERVICES, FREEVIEW, and DIRECT TICKETare trademarks of DIRECTV, Inc. All trademarks, marks, names, or productnames referenced in this publication are the property of their respectiveowners, and KVH neither endorses nor otherwise sponsors any suchproducts or services referred to herein.
Dolby Laboratories Information – Manufactured under license from DolbyLaboratories. “Dolby,” “Pro Logic,” and the double-D symbol are trademarks ofDolby Laboratories.
Macrovision® Information – Macrovision is a registered trademark ofMacrovision Corporation. This device incorporates an anticopy processtechnology that is protected by U.S. patents 4,631,603; 4,577,216; 4,819,098;and other intellectual property rights. The anticopy process is licensed fornoncommercial, home use only. Reverse engineering or disassembly isprohibited.
StarSight® Information – StarSight features licensed under one or more of thefollowing patents: 4,706,121; 5,151,789; 5,353,121; 5,353,277; 5,479,266;5,479,268; and 5,532,754. Use rights reserved.
TruSurround™ Information – TruSurround and the symbol aretrademarks of SRS Labs, Inc. TruSurround technology is incorporated underlicense from SRS Labs, Inc.
WINK® Information – WINK and the symbol are registered trademarks ofWINK Communications, Inc.
ENERGYSTAR® Information – ENERGYSTAR and the ENERGYSTARcertification mark are registered U.S. marks.
Software contained in the TracVision receiver and referenced in this manualis copyright ©1995-2005 by Hughes Network Systems, Inc., a wholly ownedsubsidiary of Hughes Electronics Corporation. Some features are patentpending. WatchWizard, PreSelect, TurboTune, and OneLine Guide aretrademarks of Hughes Network Systems. “NFL,” the NFL Shield, and “NFLSUNDAY TICKET” are registered trademarks of the National Football Leagueand its affiliates. “NHL,” the NHL Shield, and “NHL CENTER ICE” areregistered trademarks of the National Hockey League. “MLB,” “MLB EXTRAINNINGS,” “Major League Baseball,” and the Major League Baseballsilhouetted batter logo are service marks of Major League BaseballProperties, Inc. Major League Baseball trademarks and copyright are usedwith permission of Major League Baseball Properties, Inc. All othertrademarks and service marks are the property of their respective owners.
Disclaimer
Every effort has been made to ensure the correctness and completeness ofthe material in this document. No company shall be liable for errorscontained herein. The information in this document is subject to changewithout notice. No warranty of any kind is made with regard to this material,including, but not limited to, the implied warranties of merchantability andfitness for a particular purpose.
Note on recording programming
Most television programs and films are copyrighted. This means thatsomeone has legal rights governing the reproduction and distribution of thismaterial. In certain circumstances, copyright law may apply to private tapingof copyrighted materials. In most cases, it is permissible to record for yourpersonal use, as long as you do not sell the material. You must actresponsibly in this area–check into the matter if you are unsure.
Some pay-per-view programs may be licensed from producers as “view-only”programs. These are copyrighted programs, and may not be copied orreproduced for any purpose without the express written permission of thecopyright owner.
54-0287ii
TracVision Receiver User’s Guide

Important Safety Instructions - Please Read
For your safety and protection, read this safetysection carefully.
Heed Cautions – Be sure to follow all cautions on theproduct and in the operating instructions. Cautionsare indicated by a icon.
Follow Instructions – Be sure to follow all operatinginstructions as detailed in this manual.
The following caution appears on the back of thereceiver:
Do not open the receiver’s cover. Opening orremoving the cover may expose you to dangerousvoltage.
Do Not Attempt Repairs YourselfRefer all servicing needs to qualified servicepersonnel. Servicing is required when a unit hasbeen damaged in any way or does not operatenormally. Evidence of tampering or unauthorizedrepairs will void the warranty.
54-0287iii
Important Safety Instructions
CAUTION
Avoid Driver DistractionIt is dangerous to watch televisionor operate the remote controlwhile you are driving a vehicle orvessel. TracVision is designed
specifically to provide entertainment topassengers and should never be connected toactive video screens visible to the vehicle/vesseldriver while in motion. Failure to pay fullattention to travel conditions could result in anaccident or collision with personal injury ordeath resulting.
WARNING!

Federal Communications Commission (FCC)Regulatory Information for Vehicle Use
Declaration of Conformity – Standards to which Conformity is declared:FCC Part 15
This device complies with Part 15 of the FCC Rules. Operation is subjectto the following two conditions: (1) this device may not cause harmfulinterference, and (2) this device must accept any interference received,including interference that may cause undesired operation.
Responsible Party’s Name: KVH Industries, Inc.
Address: 50 Enterprise Center, Middletown, RI 02842
Telephone: 1-401-847-3327
Trade Name: KVH
Type of Equipment: Satellite Receiver
Model Number: TracVision A5
Federal Communications Commission (FCC) –This equipment complieswith Part 15 of the FCC rules.
Part 15 Compliance – This equipment has been tested and found to complywith the limits for a Class B digital device, pursuant to Part 15 of the FCCrules. These limits are designed to provide reasonable protection againstharmful interference in a vehicle installation. This equipment generates, uses,and can radiate radio frequency energy and, if not installed and used inaccordance with the instructions, may cause harmful interference to radiocommunications.
However there is no guarantee that interference will not occur in a particularinstallation. If this equipment does cause harmful interference to radio ortelevision reception, which can be determined by removing and applyingpower to the equipment, the user is encouraged to try to correct theinterference by one or more of the following measures:
• Increase the separation between the equipment and the receiver.
• Connect the equipment on a circuit different from that to which thereceiver is connected.
• Consult the dealer or an experienced auto electronics technician for help.
The user may find the following booklet, prepared by the FederalCommunications Commission, helpful: “How to Identify and Resolve Radioand TV Interference Problems.” This booklet is available from the U.S.Government Printing Office, Washington, DC.
To meet FCC requirements, only components certified to comply with Class B limits may be attached to this device. Operation with noncertifiedperipherals is likely to result in interference to radio and TV reception.
To meet FCC requirements, shielded cables are required to connect thedevice to another Class B certified device.
54-0287iv
TracVision Receiver User’s Guide

Receiver ActivationNOTICE: This product will NOT work correctlyunless you follow the procedure below.
Before you can start watching satellite TV viaTracVision, the receiver must be activated. Once yourantenna system is fully installed, follow the stepsbelow to activate the receiver.
1. Ensure your antenna has a clear view of the skythen turn on your TracVision system and tune tothe preview channel (channel 100).
2. Locate your red Activation Card.
3. Call KVH’s Activation Department at:
1-866-551-8004(24 hours a day, 7 days a week)
4. After activation is complete, KVH’s ActivationDepartment will provide an access card number,receiver ID number, Hughes serial number, andmodel number. Enter these numbers in theassociated boxes on the red Activation Card.
Technical SupportThe TracVision system has been designed withdurability and low maintenance in mind. If youexperience an operating problem or otherwise requiretechnical assistance, please call your local authorizedTracVision dealer/installer. If an authorizeddealer/installer is not located nearby, contact KVHTechnical Support directly:
Phone: 1-401-847-3327E-mail: [email protected]
Internet: www.kvh.com/help
54-0287v
Technical Support
Please have the antenna and receiverserial numbers handy when calling toactivate. The serial numbers are noted onthe red Activation Card. The receivercannot be activated without these numbers.
54-0287vi
TracVision Receiver User’s Guide
Send Us Your Comments About This ManualIf you have any comments regarding this manual,please e-mail them to [email protected]. Yourfeedback is greatly appreciated!

54-0287vii
Table of Contents
Table of Contents1 Introduction . . . . . . . . . . . . . . . . . . . .1.1
1-1 Using this Manual . . . . . . . . . . . . . . . .1.3
1-2 System Overview . . . . . . . . . . . . . . . .1.4
1-3 Receiving Satellite TV Signals . . . . . .1.5
2 Getting Started . . . . . . . . . . . . . . . . . .2.12-1 Turning On the Antenna . . . . . . . . . . .2.3
2-2 Changing Channels . . . . . . . . . . . . . . .2.5
2-3 Turning Off the Antenna . . . . . . . . . . .2.5
2-4 Viewing a Program Description . . . . . .2.5
2-5 How the System Works . . . . . . . . . . . .2.6
3 Using the Remote Control . . . . . . . . . . .3.13-1 Remote Control Functions . . . . . . . . .3.3
3-2 Receiver Front Panel Buttons . . . . . . .3.9
3-3 Programming the Remote Controlto Operate Other Components . . . . .3.10
3-4 Controlling Multiple Receivers . . . . . .3.11
3-5 Installing the Remote Control Batteries . . . . . . . . . . . . . . . . . . . . . .3.12
4 Overview of Onscreen Displays . . . . . . .4.14-1 The Channel Banner . . . . . . . . . . . . . .4.3
4-2 The Program Guide . . . . . . . . . . . . . . .4.4
4-3 The Menu System . . . . . . . . . . . . . . . .4.5
5 Using Program Guides . . . . . . . . . . . . .5.15-1 Program Guide Styles . . . . . . . . . . . . .5.3
5-2 Using the Program Guide . . . . . . . . . .5.5
5-3 Using the OneLine Guide . . . . . . . . . .5.6
5-4 Using TurboTune for Quick Accessto Favorite Channels . . . . . . . . . . . . . .5.7
5-5 Setting Guide Preferences . . . . . . . . .5.9
6 Setting Favorites and Filters . . . . . . . . .6.16-1 Using Favorite Channel Lists . . . . . . .6.3
6-2 Filtering the Program Guide . . . . . . . .6.7

54-0287viii
TracVision Receiver User’s Guide
6-3 Selecting Guide Times . . . . . . . . . . . .6.9
6-4 Using WatchWizard to Searchfor Programs . . . . . . . . . . . . . . . . . . .6.10
7 Using Access Controls . . . . . . . . . . . . .7.17-1 Locking & Unlocking the System . . . .7.3
7-2 Setting Ratings Limits . . . . . . . . . . . . .7.5
7-3 Setting Time Limits . . . . . . . . . . . . . . .7.6
8 Other Menu Functions . . . . . . . . . . . . .8.18-1 Adjusting Audio Settings . . . . . . . . . . .8.3
8-2 Adjusting Video Settings . . . . . . . . . . .8.5
8-3 Using the Program Director to Schedule Future Programs . . . . . . . . .8.7
8-4 Reading Mail from DIRECTV . . . . . .8.10
8-5 Setting System Preferences . . . . . . .8.11
8-6 Advanced System Setup Functions . . . . . . . . . . . . . . . . . . . . . .8.12
9 Troubleshooting . . . . . . . . . . . . . . . . .9.1Troubleshooting Matrix . . . . . . . . . . . . . . . . .9.3
9-1 Causes and Remedies forCommon Operational Issues . . . . . . . .9.4
9-2 Technical Support . . . . . . . . . . . . . . .9.13
9-3 System Status Lights . . . . . . . . . . . .9.14
Appendices . . . . . . . . . . . . . . . . . . . . . . .A.1A System Wiring Diagrams . . . . . . . . . .A.3
B Satellite Elevation Map . . . . . . . . . . .A.17

54-02871.1
Introduction
1 IntroductionThis section provides a basic overview of this manual and theTracVision system. It also explains the three essentials for goodsatellite TV reception.
Contents1-1 Using this Manual . . . . . . . . . . . . . . . . . . . . . . . . . . . . .1.3
1-2 System Overview . . . . . . . . . . . . . . . . . . . . . . . . . . . . . .1.4
1-3 Receiving Satellite TV Signals . . . . . . . . . . . . . . . . . . . .1.5

1-1 Using this Manual
This manual provides complete instructions foroperating your TracVision receiver. Throughout thismanual, important information is marked for yourattention by the following icons:
A helpful tip that either directs you to arelated area within the manual or offerssuggestions on getting the highestquality out of your system.
An alert to important informationregarding procedures, productspecifications, or product use.
Indicates the most commonly usedfunctions listed in Section 3-1, “RemoteControl Functions.”
Format ConventionsThis manual uses the following typographicalconventions to help clarify instructions:
Text Example Description
...the MUTE button. Remote control buttons
...the Cancel button. Onscreen items
“Highlight”
For the purposes of this manual, the term “highlight”refers to the following operator action:
“Use the remote control’s joystick to move thehighlight onto the desired onscreen item.”
Example: “Highlight the Lock & Limits tab” means“Use the remote control’s joystick to move thehighlight onto the Lock & Limits tab.”
54-02871.3
Introduction
!

1-2 System OverviewYour TracVision system is a state-of-the-art, activelystabilized antenna system that delivers live satelliteTV to your mobile audio/video entertainmentsystem.
Receiver
The receiver decodessatellite TV signalsfrom the antenna unitand sends the signalsto the audio/video system. It also supplies power tothe TracVision antenna.
Remote Control
The wireless RF/IR remote controlallows you to control all receiverfunctions. The remote does not needto be pointed directly at the receiverfor the signal to be received.
RF Converter
The RF converter receivesRF commands from theremote control, convertsthem to digital signals, andsends them to the receiverfor processing.
54-02871.4
TracVision Receiver User’s Guide
Video Display(s)
To TracVision Antenna
Purchased Separately
Receiver
Remote ControlCH
VOL
DVD
VCR
AUX
TV
SAT
HRMC-9
GUIDE
MENU
INFO
CLEAR
TURBO
FAVSELECT
MUTE
CHPREV
PROG
SEARCH
AUDIOVIDEO
1
2
3
4
5
6
7
8
90
INPUT
REW
PLAY
FF
REC
STOP
PAUSE
PA
GE
ONELINE GUIDE
PWR
DIRECTOR
RF Converter
Input Power(12 VDC, 50 watts max)
TracVision System Diagram (Typical Installation)
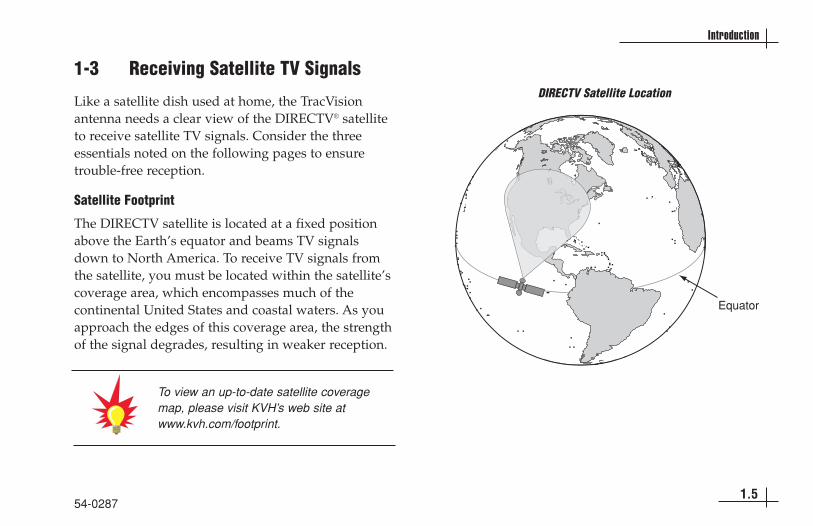
1-3 Receiving Satellite TV Signals
Like a satellite dish used at home, the TracVisionantenna needs a clear view of the DIRECTV® satelliteto receive satellite TV signals. Consider the threeessentials noted on the following pages to ensuretrouble-free reception.
Satellite Footprint
The DIRECTV satellite is located at a fixed positionabove the Earth’s equator and beams TV signalsdown to North America. To receive TV signals fromthe satellite, you must be located within the satellite’scoverage area, which encompasses much of thecontinental United States and coastal waters. As youapproach the edges of this coverage area, the strengthof the signal degrades, resulting in weaker reception.
54-02871.5
Introduction
DIRECTV Satellite Location
To view an up-to-date satellite coveragemap, please visit KVH’s web site atwww.kvh.com/footprint.

Elevation Angle
Since the satellite is located above the equator, theTracVision antenna needs to point toward thesouthern sky to receive satellite TV signals. Inaddition, the antenna must be tilted at the properelevation angle to point at the satellite. The furthersouth you go, the higher the elevation becomes. Forexample, if you’re in the Massachusetts area, thesatellite is located 33º above the southern horizon.But if you go to South Carolina, the elevationincreases to 45º.
While you’re moving, the antenna inside theTracVision radome automatically rotates toward thesouthern sky and tilts to the proper elevation,ensuring you’re always pointed at the satellite andreceiving the satellite entertainment you want.
A map showing the DIRECTV satellite’s elevationangles for the continental U.S. is provided on page A.17 of this manual.
Blockage
Since the TracVision antenna must have a clear viewof the DIRECTV satellite to receive satellite TVsignals, anything that stands between the antennaand the satellite can block the signal, resulting in lostreception. Common causes of blockage include trees,buildings, and bridges. Heavy rain, ice, or snow mayalso temporarily interrupt satellite signals.
54-02871.6
TracVision Receiver User’s Guide
Examples of Satellite Blockage
TracracVisionision

54-02872.1
Getting Started
2 Getting StartedThis section provides basic operation instructions, so you canquickly start using your TracVision system. It also briefly explainshow the system works.
Contents2-1 Turning On the Antenna . . . . . . . . . . . . . . . . . . . . . . . . .2.3
2-2 Changing Channels . . . . . . . . . . . . . . . . . . . . . . . . . . . . .2.5
2-3 Turning Off the Antenna . . . . . . . . . . . . . . . . . . . . . . . . .2.5
2-4 Viewing a Program Description . . . . . . . . . . . . . . . . . . .2.5
2-5 How the System Works . . . . . . . . . . . . . . . . . . . . . . . . .2.6

4. If Message 1 does notappear after 30 seconds,press the remote control’sSAT button. Then pressthe remote’s PWR button.The receiver beeps twiceand its Antenna Powerlight comes on.
5. If the receiver doesn’t respond, check the Voltagestatus light on top of the receiver. If the Voltagelight is off, check the rear panel power switch. Ifit is off, turn it on. The switch illuminates green.This switch is normally left on at all times.
54-02872.3
Getting Started
2-1 Turning On the Antenna
To quickly start watching satellite TV using theTracVision system, follow the simple steps below.
1. Apply power to the TracVision receiver.
2. Turn on your TV and select the satellite input (notthe VCR input).
3. Wait 30-60 seconds for the antenna to acquire thesatellite signal. The TV will show the following:
CAUTION
POWER
VEHICLE POWER(10-16 VDC)
VHF ANTENNAIN
AUDIO R AUDIO L VIDEO S – VIDEOPHONE JACK
RF REMOTEINPUT
OUT TO TVTUNERSATELLITE IN
This device complies with Part 15 of the FCC rules. Operation is subject to the following two conditions: (1) This device must not cause harmful interference, and (2) This device must accept any interference received,including interference that may cause undesired operation.
Tested to complywith FCC Standards
TO SATELLITE IN
TO KVHANTENNA
DIAGNOSTICSPORT 1
DIAGNOSTICSPORT 2
Installation
If your satellite dish is ready for DIRECTV®
service, please wait until yourAdvanced Program Guide™ is prepared.
Searching for satellite signal...
Installation
If your satellite dish is ready for DIRECTV®
service, please wait until yourAdvanced Program Guide™ is prepared.
Acquiring guide data...
Message 2
Message 1
Power Switch
PWR
DVD VCR AUX TV SAT
GUIDE
MENU TURBO FAV
NELINE GUID
Antenna Power Light
Voltage Light

2.4
TracVision Receiver User’s Guide
6. If Message 2 does not appear after Message 1,ensure that the antenna has a clear view of thesatellite. The antenna requires an unobstructedview of the sky to receive satellite TV signals.*Once the antenna locks onto the satellite, thereceiver starts downloading the program guide.This may take up to 60 seconds.
Once the program guide has loaded, you can startenjoying satellite TV!**
ÐÐ
Program Guide
54-0208
* For details about satellite reception requirements, see page 1.5.
** If you can only view the DIRECTV Preview Channel, your receiver has not been activated. See page v.

2-3 Turning Off the Antenna
To turn off the antenna, follow the steps below:
1. Press the remotecontrol’s SAT button.The button should blinkred.
2. Press the PWR button.The receiver beeps onceto indicate that power tothe antenna is turned off.
2-4 Viewing a Program Description
To view a description of thecurrently selected program,press the INFO button.
PWR
DVD VCR AUX TV SAT
GUIDE
MENU TURBO FAV
NELINE GUID
2-2 Changing Channels
To change the channel, pressthe SAT button then selectany of the following options:
Press the CHANNEL(CH) button to tune tothe next or previouschannel.orUsing the numerickeypad, enter thechannel number.orPress the GUIDE buttonto bring up theprogram guide. Whilein the program guide,use the joystick orCHANNEL (CH)button to scroll throughthe list, and press theSELECT button to tuneto a channel.
54-0287
Getting Started
PWR
DVD VCR AUX TV SAT
GUIDE
MENU
INFO CLEAR
TURBO FAV
ONELINE GUIDE
CHVOL
PWR
DVD VCR AUX TV SAT
GUIDE
MENU
INFO CLEAR
TURBO FAV
MUTE CHPREV
DIRECTOR
PROGSEARCH AUDIO
VIDEO
1 2 3
4 5 6
7 8 9
0INPUT
REW PLAY FF
REC STOP PAUSE
PAGE
ONELINE GUIDE
SELECT
A
B
C
C
C
A
B
2
1
2.5
54-02872.6
TracVision Receiver User’s Guide
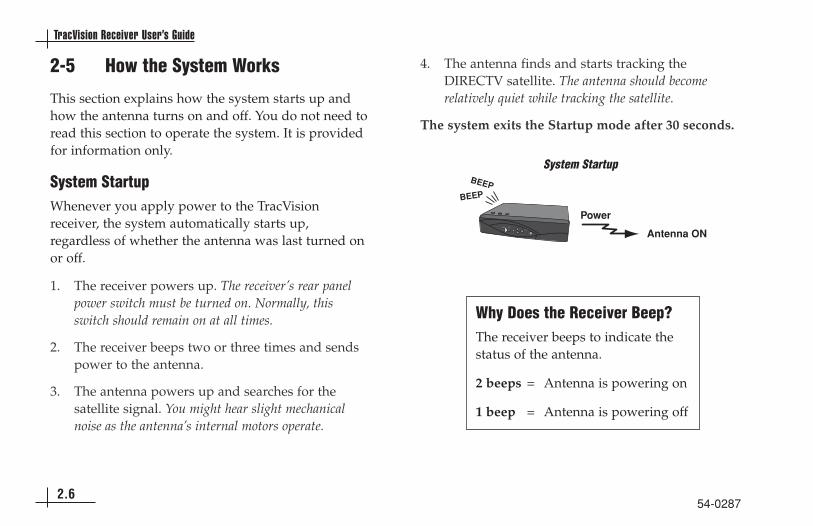
2-5 How the System Works
This section explains how the system starts up andhow the antenna turns on and off. You do not need toread this section to operate the system. It is providedfor information only.
System StartupWhenever you apply power to the TracVisionreceiver, the system automatically starts up,regardless of whether the antenna was last turned onor off.
1. The receiver powers up. The receiver’s rear panelpower switch must be turned on. Normally, thisswitch should remain on at all times.
2. The receiver beeps two or three times and sendspower to the antenna.
3. The antenna powers up and searches for thesatellite signal. You might hear slight mechanicalnoise as the antenna’s internal motors operate.
4. The antenna finds and starts tracking theDIRECTV satellite. The antenna should becomerelatively quiet while tracking the satellite.
The system exits the Startup mode after 30 seconds.
Why Does the Receiver Beep?The receiver beeps to indicate thestatus of the antenna.
2 beeps = Antenna is powering on
1 beep = Antenna is powering off
BEEP
BEEP
Power
Antenna ON
System Startup

After 30-Second System StartupImmediately following the 30-second system startup,the antenna will either power off or remain poweredon, based on its last setting.
Whenever you turn off power to the receiver, the receiversaves the current status of the antenna (turned ON orturned OFF); and whenever you restore power, the systemreverts to that setting after 30 seconds.
TracVision Antenna Is OFF:
1. The receiver beeps once and removes powerfrom the antenna. The receiver’s crescent-shapedfront panel Antenna Power light stays off.
2. The antenna stops tracking the satellite and shutsdown.
TracVision Antenna Is ON:
1. Following the 30-second system startup, theantenna stays powered on and continues to trackthe satellite.
2. The receiver does not beep, but its crescent-shaped Antenna Power light illuminates.
54-02872.7
Getting Started
OR
BEEP
Antenna OFF
60
30
After 30 Seconds
Antenna ON
Antenna PowerLight OFF
Antenna PowerLight ON
60
30
After 30 Seconds
After Startup

Turning On the AntennaIf the antenna is turned OFF, press the SAT buttonthen the PWR button on the remote control to turnthe antenna ON.
1. The receiver beeps twice and sendspower to the antenna.
2. The receiver’s crescent-shapedAntenna Power light illuminates.
3. The antenna powers up andsearches for the satellite signal. Youmight hear slight mechanical noise asthe antenna’s internal motors operate.
4. The antenna finds and startstracking the DIRECTV satellite. Theantenna should become relatively quietwhile tracking the satellite.
54-02872.8
TracVision Receiver User’s Guide
CH
VOL
DVDVCR
AUXTV
GUIDEMENU
INFO
CLEAR
TURBOFAV
MUTECHPREV
DIRECTORPROG
SEARCHAUDIO VIDEO
12
345
678
90
INPUT
REWPLAY
FFRECSTOP
PAUSE
PA
GE
ONELINE GUIDE
SELECT
SAT
PWR
Press SATthen PWR...
DVDVCR
AUXTV
GUIDEMENU
INFO
TURBO FAVONELINE GUIDE
SAT
PWR
Power
Antenna ON
BEEP
BEEP
Antenna PowerLight ON
Beeps Twice
Turning On the Antenna

Turning Off the AntennaIf the antenna is turned ON, press the SAT buttonthen the PWR button on the remote control to turnthe antenna OFF.
1. The receiver beeps once and removespower from the antenna.
2. The receiver’s crescent-shaped AntennaPower light goes out.
3. The antenna stops tracking the satelliteand shuts down.
Getting Started
54-02872.9
Antenna OFFCH
VOL
DVDVCR
AUXTV
GUIDEMENU
INFO
CLEAR
TURBOFAV
MUTECHPREV
DIRECTORPROG
SEARCHAUDIO VIDEO
12
345
678
90
INPUT
REWPLAY
FFRECSTOP
PAUSE
PA
GE
ONELINE GUIDE
SELECT
SAT
PWR
Press SATthen PWR...
DVDVCR
AUXTV
GUIDEMENU
INFO
TURBO FAVONELINE GUIDE
SAT
PWR
BEEP
Antenna PowerLight OFF
Beeps Once
Turning Off the Antenna
54-02873.1
Using the Remote Control
3 Using the RemoteControlThis section explains how to use the remote control functions,program the remote to work with other components, and replacethe remote control batteries.
Contents3-1 Remote Control Functions . . . . . . . . . . . . . . . . . . . . . . .3.3
3-2 Receiver Front Panel Buttons . . . . . . . . . . . . . . . . . . . . .3.9
3-3 Programming the Remote Controlto Operate Other Components . . . . . . . . . . . . . . . . . . .3.10
3-4 Controlling Multiple Receivers . . . . . . . . . . . . . . . . . . .3.11
3-5 Installing the Remote Control Batteries . . . . . . . . . . . .3.12

54-02873.3
Using the Remote Control
CHVOL
PWR
DVD VCR AUX TV SAT
GUIDE
MENU
INFO CLEAR
TURBO FAV
MUTE CHPREV
DIRECTOR
PROGSEARCH AUDIO
VIDEO
1 2 3
4 5 6
7 8 9
0INPUT
REW PLAY FF
REC STOP PAUSE
PAGE
ONELINE GUIDE
SELECT
Power On/Off
Component Select
Receiver Control Group
Channel (CH)
Previous Channel
Director Group
Numeric Keypad
NOT USEDInput
VCR Control
Backlight On/Off
Volume
Mute
TracVision Remote Control
GUIDE
MENU
INFO CLEAR
TURBO FAV
ONELINE GUIDE
SELECT
Program Guide
TurboTune
Favorites
Clear
Joystick
NOT USED
Main Menu
Information
Select
3-1 Remote Control Functions
Your system comes with an easy-to-use, backlitremote control that allows you to operate the receiverfrom virtually anywhere in the vehicle/vessel, day ornight. This page shows the locations and names of theremote control buttons. The next few pages detail thebuttons’ functions. A! icon indicates the mostfrequently used functions.
For your safety, this product must NOT beoperated by the driver of the vehicle orvessel.
Receiver Control Group

54-0287
TracVision Receiver User’s Guide
Press the PWR button to turn the selected component’s power on/off. If theSAT button is currently selected, pressing the PWR button turns theTracVision antenna on/off.
Press the SAT component select button to control the TracVision receiver. Tocontrol a different component, press the associated component select button.For example, press the VCR button to control the VCR.
Press the GUIDE button to display the program guide. Press it a secondtime (while a program title is highlighted) to display the Category Filtermenu. See Section 5, “Using Program Guides,” on page 5.1 for details.
Press the MENU button to bring up the main menu. The menu systemallows you to access all system features and settings. See Section 4-3, “TheMenu System,” on page 4.5 for details.
Press the TURBO button to display the TurboTune™ guide. TurboTune givesyou quick access to 27 of your favorite channels. See Section 5-4, “UsingTurboTune for Quick Access to Favorite Channels,” on page 5.7 for details.
GUIDE
PWR
SAT
MENU
TURBO
!
!
3.4
CHVOL
PWR
DVD VCR AUX TV SAT
GUIDE
MENU
INFO CLEAR
TURBO FAV
MUTE CHPREV
DIRECTOR
PROGSEARCH AUDIO
VIDEO
1 2 3
4 5 6
7 8 9
0INPUT
REW PLAY FF
REC STOP PAUSE
PAGE
ONELINE GUIDE
SELECT

54-02873.5
Using the Remote Control
Press the FAV button to view listings for your favorite channels. You can setup four different lists of favorite channels. Each press of the FAV buttonbrings up the next favorite channel list. See Section 6-1, “Using FavoriteChannel Lists,” on page 6.3 for details.
Press the INFO button to display a brief description about the program youare viewing. If the program guide is displayed, the INFO button providesscheduling information about the highlighted program.
Use the joystick to move up, down, left, or right through the onscreendisplays.
If you are currently watching a program, press the joystick up or down todisplay the OneLine guide. When the OneLine guide appears, press thejoystick up or down to step to the next higher- or lower-numbered channel.
Press the SELECT button to activate or choose a highlighted menu option.
INFO
FAV
!
ONELINE GUIDE
!
CHVOL
PWR
DVD VCR AUX TV SAT
GUIDE
MENU
INFO CLEAR
TURBO FAV
MUTE CHPREV
DIRECTOR
PROGSEARCH AUDIO
VIDEO
1 2 3
4 5 6
7 8 9
0INPUT
REW PLAY FF
REC STOP PAUSE
PAGE
ONELINE GUIDE
SELECT
SELECT!

54-02873.6
TracVision Receiver User’s Guide
Press the CLEAR button to exit from any onscreen guide, remove banners,or cancel an action.
Use the VOLUME (VOL) button to raise or lower the volume on your TV (ifthe TV component button is selected). The remote control must be programmedto operate your TV for the VOLUME button to work (see Section 3-3,“Programming the Remote Control to Operate Other Components,” on page 3.10).
Press the MUTE button to turn off the volume on your TV (if the TVcomponent button is selected). The remote control must be programmed tooperate your TV for the MUTE button to work (see Section 3-3, “Programming theRemote Control to Operate Other Components,” on page 3.10).
Press the PREVIOUS CHANNEL (PREV CH) button to toggle between thecurrent channel and the last channel you were watching.
Use the CHANNEL (CH) button to change the channel to the previous ornext available channel. Also use it to scroll through a page of programguide listings.
CLEAR
MUTE
VOL
CH PAGE
CHPREV
!
!
CHVOL
PWR
DVD VCR AUX TV SAT
GUIDE
MENU
INFO CLEAR
TURBO FAV
MUTE CHPREV
DIRECTOR
PROGSEARCH AUDIO
VIDEO
1 2 3
4 5 6
7 8 9
0INPUT
REW PLAY FF
REC STOP PAUSE
PAGE
ONELINE GUIDE
SELECT

CHVOL
PWR
DVD VCR AUX TV SAT
GUIDE
MENU
INFO CLEAR
TURBO FAV
MUTE CHPREV
DIRECTOR
PROGSEARCH AUDIO
VIDEO
1 2 3
4 5 6
7 8 9
0INPUT
REW PLAY FF
REC STOP PAUSE
PAGE
ONELINE GUIDE
SELECT
54-02873.7
Using the Remote Control
The DIRECTOR buttons provide convenient shortcuts to the followingfunctions:
If the program guide is currently displayed, press the PROG button to use theprogram director, which allows you to program an event for viewing inadvance. See Section 8-3, “Using the Program Director to Schedule FuturePrograms,” on page 8.7 for details.
Press the SEARCH button to bring up the WatchWizard™, which allows you tosearch for programs using criteria such as rating, showtime, language, andcategory. See Section 6-4, “Using WatchWizard to Search for Programs,” on page 6.10for details.
Press the AUDIO button to bring up the audio adjustment menu. See Section 8-1, “Adjusting Audio Settings,” on page 8.3 for details.
Press the VIDEO button to bring up the video adjustment menu. See Section 8-2,“Adjusting Video Settings,” on page 8.5 for details.
Use the numeric keypad buttons (0 - 9) whenever you need to enter a specificnumber, such as a channel or a lock code.
DIRECTOR
PROGSEARCH AUDIO
VIDEO
0 9

54-02873.8
TracVision Receiver User’s Guide
The INPUT button allows you to select a video feed from another sourcesuch as a VCR. Repeatedly press INPUT to cycle through each availableinput source in your system.
Use the VCR control buttons to operate your VCR or DVD player (the VCRcomponent button must be selected first). The remote control must beprogrammed to operate your VCR/DVD player for the VCR control buttons towork (see Section 3-3, “Programming the Remote Control to Operate OtherComponents,” on page 3.10).
Press the HUGHES button to turn the remote control’s backlight on/off.
REW PLAY FF
REC STOP PAUSE
INPUT
CHVOL
PWR
DVD VCR AUX TV SAT
GUIDE
MENU
INFO CLEAR
TURBO FAV
MUTE CHPREV
DIRECTOR
PROGSEARCH AUDIO
VIDEO
1 2 3
4 5 6
7 8 9
0INPUT
REW PLAY FF
REC STOP PAUSE
PAGE
ONELINE GUIDE
SELECT

54-02873.9
Using the Remote Control
3-2 Receiver Front Panel Buttons
If you don’t have the remote control handy, you canoperate the system using the receiver front panelbuttons. You can turn the antenna on/off, bring upthe main menu, navigate through the menu system,and select menu items from the receiver’s front panel.The crescent-shaped Antenna Power light is lit if theantenna is turned on.
CHVOL
PWR
DVD VCR AUX TV SAT
GUIDE
MENU
INFO CLEAR
TURBO FAV
MUTE CHPREV
PAGE
ONELINE GUIDE
SELECT
Remote Control Buttons
Receiver Front PanelButtons
Antenna Power Light
A
B
C
D
A B C D
If you lose your remote control, please callor visit your local KVH authorized dealer toorder a replacement.
Buttons Available on Both Remote Control and Receiver Front Panel

54-02873.10
TracVision Receiver User’s Guide
5. Repeatedly press the upper part of theCHANNEL (CH) button.
6. Continue pressing the CHANNEL(CH) button to step through the codesuntil the component turns off,indicating that you have found thecorrect device code. If you accidentally pass a codethat responds or realize you may not have been aimingthe remote control at the component, repeatedly pressthe lower part of the CHANNEL (CH) button to stepbackward through the codes.
7. Press the remote control’s PWR button to verifythat you have found the proper code. The correctcode will turn the component on and off.
8. Press the component button again to lock in thecode (in this example, the TV button).
To operate a component, first press the desiredcomponent button (DVD, VCR, AUX, TV, or SAT).Then use the remote control buttons that apply to thatcomponent. For example, the VOLUME (VOL) andMUTE buttons apply only to a TV; the VCR controlbuttons apply only to a VCR or DVD player.
3-3 Programming the Remote Controlto Operate Other Components
In addition to controlling the satellite receiver, youmay be able to operate your TV, VCR, DVD, or AUXcomponents using your TracVision remote control. Toprogram your remote control, follow the steps below.
1. Keep the remote control aimed at the IR input (or“eye”) for the component you want to control.For example, if you want to program the remotecontrol to operate the TV, keep the remote aimedat the TV’s IR input.
2. Press and hold the remote control’s componentbutton (for example, TV).
3. At the same time, press the MUTE button for twoseconds.
4. Release both buttons.
The component button should light and remainlit. If it doesn’t remain lit, repeat Steps 1 through4 above.
CH PAGE

54-02873.11
Using the Remote Control
3-4 Controlling Multiple Receivers
If you are using multiple KVH receivers, you canchange a remote control ID to avoid interference or“cross talk” between the two remotes. The remotecontrol ID can be a number from “001” to “008.”
For example, if you have two receivers, you can setone receiver and remote to 001 and the otherreceiver/remote to 002. That way, the 002 remotecannot operate the 001 receiver, and the 001 remotecannot operate the 002 receiver.
To set a remote control and receiver to use a differentremote ID, follow the steps below.
1. First turn off the rear panelpower switch on thereceiver you do not wish tochange.
2. Turn on the receiver you want to change.
3. Press the MENU button to access the main menu.
4. From the main menu, highlight the System Setuptab and press SELECT.
5. Highlight the Remote tab to access RemoteControl Settings.
6. Highlight the Remote ID button.
!"#$%"&'()*++,-.'*+
/0123$4)356333377895:#
;0*)<=0(
>=0?(
@0A3B*=1%0()
&'?C
DE.=*10/*)4F3%G
GB!
#*-'3#0'<
!0HC)03BC')=C+3,0))-'.(
!0HC)0
%G
:DI
GB!
JGJ
;*4)C=K3J0?*<+)(
!0HC)03&J D'-)37
Remote Control Code Entry
For details on ordering an additionalTracVision receiver, please call or visit yourlocal KVH authorized dealer/installer.
* VCR tab not available
*
POWER
VEHICLE POWER(10-16 VDC)
VHF ANTENNAIN
RF REMOTEINPUT
OUT TO TVTUNERSATELLITE IN

54-02873.12
TracVision Receiver User’s Guide
3-5 Installing the Remote ControlBatteries
To install or replace the remote control’s batteries,follow the steps below.
1. Remove the battery compartment cover, locatedon the back of the remote control.
2. Insert two AAA batteries as shown, observing thecorrect polarity.
3. Replace the battery compartment cover.
7. Press and hold the SAT button.
8. At the same time, press the MUTE button for twoseconds.
9. Release both buttons. The SAT button shouldremain lit. If it doesn’t, repeat Steps 7-9.
10. Enter the desired ID number (“001” to “008”)using the numeric keypad.
11. Press the SAT button to lock in the code.
12. Press the SELECT button twice.
The number to the right of the highlighted RemoteID button will change to the new code. Check thatthe ID has been set properly by testing the remotecontrol to ensure that it controls the satellite receiver.
Remote Control Batteries

54-02874.1
Overview of Onscreen Displays
4 Overview of Onscreen DisplaysThis section introduces the three types of onscreen displays: theChannel Banner, the Program Guide, and the Menu System.
Contents4-1 The Channel Banner . . . . . . . . . . . . . . . . . . . . . . . . . . . .4.3
4-2 The Program Guide . . . . . . . . . . . . . . . . . . . . . . . . . . . .4.4
4-3 The Menu System . . . . . . . . . . . . . . . . . . . . . . . . . . . . .4.5

54-02874.3
Overview of Onscreen Displays
4-1 The Channel Banner
Whenever you change channels while you arewatching TV, the channel banner appears at the topof the screen. You can also display the channel bannerby pressing the INFO button while watching TV.
The channel banner displays the followinginformation:
• Currently selected channel and program
• Description of the currently selected program
• Date/time
• Icons may appear below the date/time toindicate system status or details about theprogram
The channel banner disappears from the screen aftera few seconds. Or press the CLEAR button to removethe channel banner immediately.
:++3BF*''0+(L866:#)C3%F<23L866:#766
!"#$%&'!()*+,!-.&$%&/0!#1!2345(67!8)9!8&.!7%&/!:#$%&0!);<!&$&;*0!-=>0!*,&!=)*&0*!2345(67!?455735@
!%;1#.:)*%#;'!A-<)*&<!/&&B=9'!C&/0'
267D@)*+,!8)9!8&.!7%&/!8.&$%&/0!E&.&F!*)01833@C'0
/0123J0437M33333N89O>#
!!" !"#$%&'&()*
$+,*-*.!"#$%!&'&()#)*+&"),)&#)$#-
.)/&0'0"()##"1-+
2&3&(4",-565&+-
2&3&(4-07"58-+
905-)+3)&#
:#"4-+8)/(&"0),)&#)$#-
;(<-5)*+&"),)&#)$#-
=)%/-5,&-1
!)()),)&#)$#-
>0(-5)8(&,-/5"'5)33&0'),)&#)$#-
%''/0%10%2%34536
%'26%70&8
5%!922%:"
?##@!)%.&8A-(
2-((-5B"C7"53)(
!!" !"#$%&'
Channel Banner
54-02874.4
TracVision Receiver User’s Guide
4-2 The Program Guide
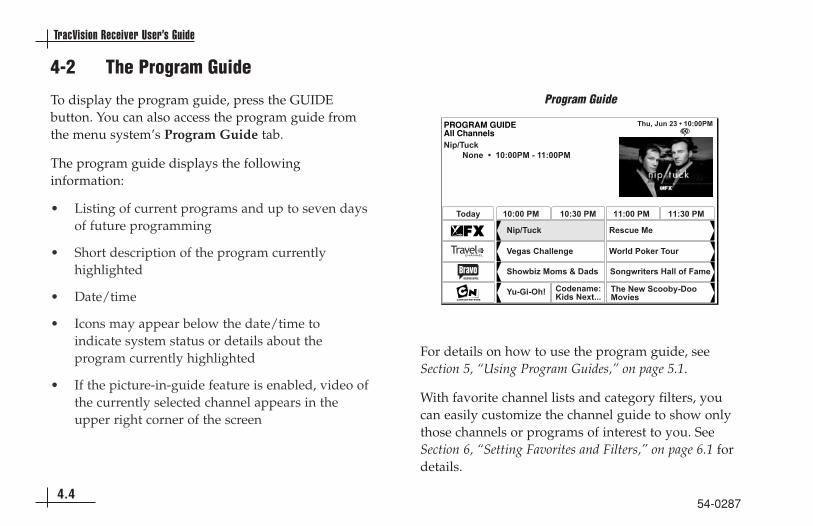
To display the program guide, press the GUIDEbutton. You can also access the program guide fromthe menu system’s Program Guide tab.
The program guide displays the followinginformation:
• Listing of current programs and up to seven daysof future programming
• Short description of the program currentlyhighlighted
• Date/time
• Icons may appear below the date/time toindicate system status or details about theprogram currently highlighted
• If the picture-in-guide feature is enabled, video ofthe currently selected channel appears in theupper right corner of the screen
For details on how to use the program guide, seeSection 5, “Using Program Guides,” on page 5.1.
With favorite channel lists and category filters, youcan easily customize the channel guide to show onlythose channels or programs of interest to you. SeeSection 6, “Setting Favorites and Filters,” on page 6.1 fordetails.
ÐÐ
Program Guide

54-02874.5
Overview of Onscreen Displays
4-3 The Menu System
To display the main menu, press the MENU button.
The menu system gives you access to all systemfunctions and settings. The common elements of allmenus are noted below.
The following icons appear in several menus:
Toggle or Step - Press SELECT to toggle(switch) a setting from “on” to “off” or tostep through the available choices each timeyou press SELECT.
List of Options - Menu button will display alist of choices in a pop-up menu when youpress SELECT.
Series of Boxes - Multiple screens willappear in a series requesting that you enternumbers and/or letters for the particularfeature when you press SELECT.
Menu Elements
!"#$%&'()"!"#$&*+,
B*++0=3&J
PC4Q3R3P-H-)(
:<1-C3R3G-10C
>=C.=*H3S<-10S<-103$E)-C'(
,K()0H3,0)<E/*)4F3%G
><=4F*(0(&')0=*4)-T0/*)4F/C=1>=C.=*H3J-=04)C=
!"#$%-*#"
./('0"&*+
1*(" &'2"
G&"/3#:&P ;=-23U<'3793333398NO3:#
#0((*.0
!0*13#0((*.0
"=*(0 73C?35 >*.03N
,04C'13E*.03C?3H0((*.03)0V)WWW
G-0A3#*-+
Main Menu#:&@3#"@D %<023@CT3L333333O8N6>#
:<1-C3R3G-10CS<-103$E)-C'(>=C.=*H3S<-10
>=C.=*H3J-=04)C=
&')0=*4)-T0/*)4F/-X*=1
><=4F*(0(PC4Q3R3P-H-)(G-0A3#*-+,K()0H3,0)<E/*)4F3%G
B*++0=3&J

54-02874.6
TracVision Receiver User’s Guide
To move the highlight:
Use the joystick to move the highlight within themenus.
To select a menu item:
Highlight the desired menu item and press theSELECT button to select a main menu item or executean action.
To exit a menu or cancel an action:
Press the CLEAR button to exit a menu or cancel anaction.
The following pages list all of the functions accessiblefrom the menu system. These functions are explainedin detail in later sections of this manual.
You will not be able to use the Caller ID,Interactive, or Purchases tabs. Thesefunctions require a phone line connection,which is not possible with TracVision.

54-02874.7
Overview of Onscreen Displays
Main Menu Tab Screens Functions See Page:
Program Guide Program Guide • View and modify the program guide 5.1
Guide Options Theme • Filter the program guide by program category 6.7
Times • Change the time period shown in the program guide 6.9
Fav List • Select a specific channel list (Fav. A, Fav. B, Fav. C, 6.4Family, or New Channels) to be an active program guide
Fav Setup • Create and edit a channel list (Fav. A, Fav. B, Fav. C, Family, 6.3or New Channels)
Options • Set Guide Options: 5.9- Guide style (grid or logo)- Picture in guide (on/off)- Guide zoom (on/off)- Multi-color (on/off)- Channel sort (numeric or alphabetical)- Filters (temporary or persistent)- Reset options to default settings
Set Turbo • Set and edit TurboTune channels 5.7

54-02874.8
TracVision Receiver User’s Guide
Main Menu Tab Screens Functions See Page:
Audio & Video Audio • Set default audio language and alternate audio language 8.3• Set left/right audio balance• SRS TruSurround (on/off)
Video • Select screen ratio (4:3 or 16:9) 8.5• Center menus on your monitor (up/down and right/left)• Color scheme, onscreen display translucency, and color balance
Caller ID Caller ID NOT USED --
Program Director Schedule • Automatically tune to programs at a specific date/time 8.7
WatchWizard WWSetup • Search for programming using specific words and 6.10other criteria
WWResult • Display search results 6.11
Channels • Search for channels based on categories of programming 6.12
Interactive Interact NOT USED --
Purchases Upcoming NOT USED --
Past NOT USED --

54-02874.9
Overview of Onscreen Displays
Main Menu Tab Screens Functions See Page:
Lock & Limits Lock • Lock and unlock the system 7.3
Fav Setup • Create a program listing containing only selected 6.3channels
Ratings • Set maximum program rating allowed for viewing 7.5
Limits • Set viewing times and maximum viewing hours 7.6
View Mail Mail • Read messages from DIRECTV 8.10
System Setup Install NOT USED --
Signal NOT USED --
Info • Display receiver information 8.13
Features • Display current receiver features 8.13
Prefs • Adjust user-selectable system settings 8.11
Remote • Change the remote ID 3.12
Test • Initiate a simple diagnostics test 8.13
New Card • Prepare a new access card 8.13
Upgrade • Display upgrade status and history 8.13

54-02875.1
Using Program Guides
5 Using Program GuidesThis section explains how to select a program guide style, use thedifferent guide features, and set guide preferences.
Contents5-1 Program Guide Styles . . . . . . . . . . . . . . . . . . . . . . . . . .5.3
5-2 Using the Program Guide . . . . . . . . . . . . . . . . . . . . . . . .5.5
5-3 Using the OneLine Guide . . . . . . . . . . . . . . . . . . . . . . . .5.6
5-4 Using TurboTune for Quick Accessto Favorite Channels . . . . . . . . . . . . . . . . . . . . . . . . . . . .5.7
5-5 Setting Guide Preferences . . . . . . . . . . . . . . . . . . . . . . .5.9

54-02875.3
Using Program Guides
5-1 Program Guide Styles
You can set up the program guide to presentinformation using either of two styles:
• Grid
• Logo
The following sections explain how to select a styleand describe the features of each style.
Selecting a Guide StyleTo select a guide style, follow the steps below.
1. Press the GUIDE button twice to display theGuide Options menu [or select Guide Optionsfrom the main menu].
2. Highlight the Options tab.
3. Highlight the Guide Style button.
4. Press the SELECT button to toggle between Gridand Logo guide styles.
5. Press the CLEAR button to return to the programyou were viewing.
SD&J"3$>%&$@, ;=-23$4)3O333337N8N9:#
/*)4F3%G
%F0H0
,0)3%<=YC
%-H0(
#*-'3#0'<
;*T3P-();*T3,0)<E$E)-C'(
!0(0)3$E)-C'(
S<-103,)K+0
>-4)<=03&'3S<-10
S<-103ZCCH
#<+)-[BC+C=
BF*''0+3,C=)
;-+)0=(
S=-1
$'
$'
$'
@<H0=-4
%0HEC=*=K
Selecting a Guide Style
When the program guide is onscreen,simply press the GUIDE button once todisplay the Guide Options menu.

54-02875.4
TracVision Receiver User’s Guide
Grid Guide• Easy to see what programs are available at a
particular time.
• Lists up to seven days of current and upcomingprogramming.
• The program title and description appear abovethe grid as you highlight each program.
Logo Guide• Select your favorite channels, rather than
selecting specific programs.
• Only current programming can be selected fromthe logo guide.
• The current program title and description appearabove the logo grid as you highlight eachchannel.
ÐÐ
Grid Guide
G!<&0+.%-*%#;!#1!*,&!-.#H.):!+>..&;*=9)%.%;H!#;!*,&!,%H,=%H,*&<!;&*/#.B:&;>!)--&).0!,&.&I!%1!)$)%=)J=&'
%F<23;0Y3M33333L866>#!!
-'/($3"4'#45$'6"
.#%'2*7"%89%(:"%/$33"#();*'3'#7%<3873*2%:'7:)'7:("6
'#%(:"%2"#$%,")"/('8#%*<<"*3,%:"3"
KLML!MA325G==!(,);;&=0
&'()"%89%(:"%<3873*2%8#%(:"%#"(=83>%,")"/("6%'#%2"#$
Logo Guide

54-02875.5
Using Program Guides
5-2 Using the Program Guide
To display the program guide:
Press the GUIDE button to bring up the guide.
To move the highlight:
Use the joystick to move the highlight within theguide.
Move the highlight to the right to show futureprogramming. Move the highlight up/down toscroll through the listing. Move the highlightonto a channel icon to view that channel’s currentprogram in the picture-in-guide window (ifenabled).
To scroll up/down one page:
Press the CHANNEL (CH) button up/down toscroll through a full page of guide entries at atime.
To jump to a specific channel listing:
Use the numeric keypad to enter the channelnumber to go directly to the listing for a specificchannel.
To view a program’s description:
Press the INFO button for a full description of thehighlighted program.
To tune to a program:
Press the SELECT button to tune to a highlightedprogram. The program must be currently in progress.
To exit the guide:
Press the CLEAR button to exit the programguide.
Cells with arrows indicate the programstarted at an earlier time or continues laterthan can be shown in the selected timeperiod.
If program information cannot entirely fit inthe space provided, an ellipsis (…) indicatesthat a portion of the title is not shown.
54-02875.6
TracVision Receiver User’s Guide
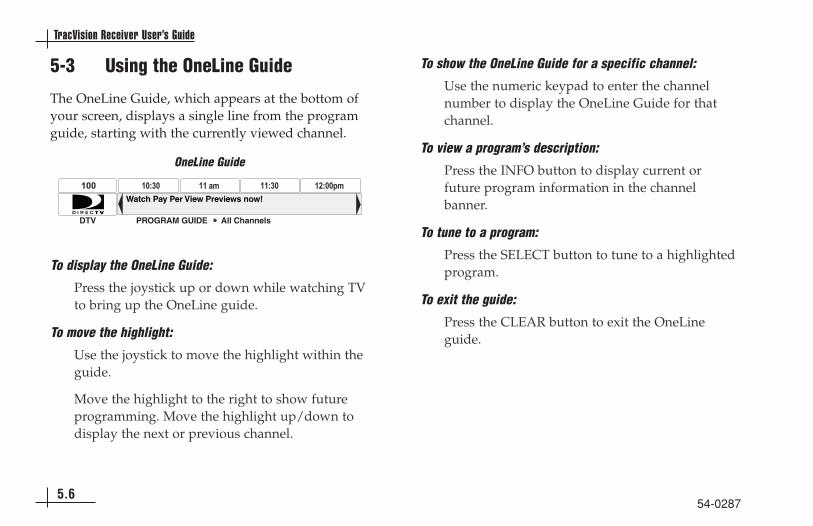
5-3 Using the OneLine Guide
The OneLine Guide, which appears at the bottom ofyour screen, displays a single line from the programguide, starting with the currently viewed channel.
To display the OneLine Guide:
Press the joystick up or down while watching TVto bring up the OneLine guide.
To move the highlight:
Use the joystick to move the highlight within theguide.
Move the highlight to the right to show futureprogramming. Move the highlight up/down todisplay the next or previous channel.
To show the OneLine Guide for a specific channel:
Use the numeric keypad to enter the channelnumber to display the OneLine Guide for thatchannel.
To view a program’s description:
Press the INFO button to display current orfuture program information in the channelbanner.
To tune to a program:
Press the SELECT button to tune to a highlightedprogram.
To exit the guide:
Press the CLEAR button to exit the OneLineguide.
@)*+,!8)9!8&.!7%&/!8.&$%&/0!;#/F#$$ 76856 773*H 77856 7N866EH
267 84LM4G"!MA325!!!!!!G==!(,);;&=0
OneLine Guide

54-02875.7
Using Program Guides
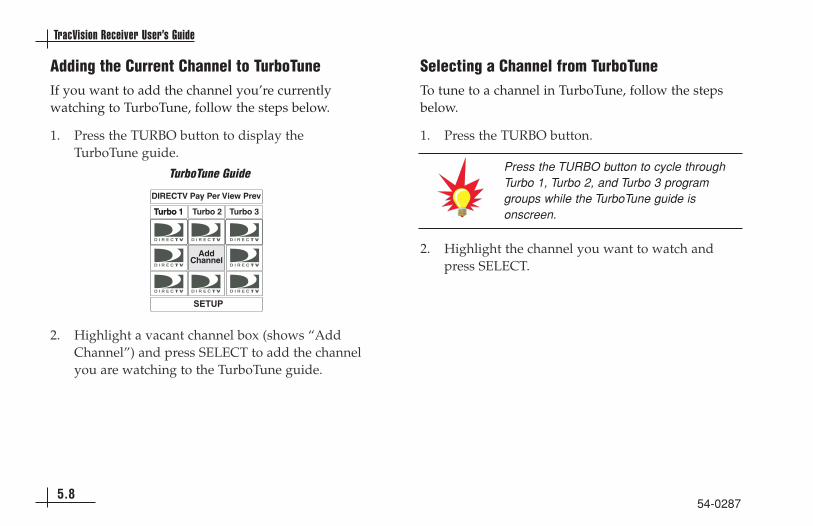
5-4 Using TurboTune for Quick Accessto Favorite Channels
The TurboTune feature gives you quick access to 27 ofyour favorite channels. Three groups of nine of yourfavorite channels are available as Turbo 1, Turbo 2,and Turbo 3.
Setting TurboTune ChannelsTo set up channels in TurboTune, follow the stepsbelow.
1. Press the TURBO button, then highlight theSetup button and press SELECT [or select GuideOptions from the main menu, then highlight theSet Turbo tab].
2. Highlight a vacant channel box (shows “AddChannel”) and press SELECT. Or you can highlightan occupied box instead to overwrite its set channelwith your new selection.
3. Using the joystick or the CHANNEL (CH) button,choose the desired channel in the setup box(shown below) and press SELECT. You can also usethe numeric remote control buttons to enter a specificchannel number.
4. Highlight the OK button and press SELECT.%&'()
2345(67!8)9!8&.!7%&/!8.&$
6>.J#!N6>.J#!N 6>.J#!O 6>.J#!P
G<<(,);;&=
TurboTune Guide
%D!\$%D@"3,"%D>
;*T3P-()
%F0H0%-H0(
#*-'3#0'<
$E)-C'(,0)3%<=YC/*)4F3%G
;*T3,0)<E
%<023J0437M33333L8663>#
6>.J#!N6>.J#!N 6>.J#!O 6>.J#!PG<<
(,);;&=G<<
(,);;&=G<<
(,);;&=
!"#$%&'(")*+'%&,-./0.12&134562&3755302&1..8&79&:$;%*<#&,-.=0>=&=7/0.
*3499.?2&&(@"A&'<+;<BC&49D&'(")<$!%E!7/0.E
BF*''0+83J%G
B*'40+
$]
966
Adding a Channel to TurboTune
54-02875.8
TracVision Receiver User’s Guide
Adding the Current Channel to TurboTuneIf you want to add the channel you’re currentlywatching to TurboTune, follow the steps below.
1. Press the TURBO button to display theTurboTune guide.
2. Highlight a vacant channel box (shows “AddChannel”) and press SELECT to add the channelyou are watching to the TurboTune guide.
Selecting a Channel from TurboTuneTo tune to a channel in TurboTune, follow the stepsbelow.
1. Press the TURBO button.
2. Highlight the channel you want to watch andpress SELECT.
%&'()
2345(67!8)9!8&.!7%&/!8.&$
6>.J#!N6>.J#!N 6>.J#!O 6>.J#!P
G<<(,);;&=
TurboTune Guide Press the TURBO button to cycle throughTurbo 1, Turbo 2, and Turbo 3 programgroups while the TurboTune guide isonscreen.

54-02875.9
Using Program Guides
Renaming TurboTune GroupsYou can rename each nine-channel TurboTune groupto anything you choose, using up to 10 letters,numbers, spaces, etc. For example, Turbo 1 could berenamed “Mom” and Turbo 2 renamed “Dad.”
To rename a group, follow the steps below.
1. Press the TURBO button [or select GuideOptions from the main menu and highlight theSet Turbo tab].
2. Highlight the grid name (Turbo 1, Turbo 2, orTurbo 3) that you want to rename and pressSELECT.
3. Use the onscreen keyboard to enter the new name(to enter a letter on the keyboard, highlight theletter and press SELECT).
4. Once you’ve entered the desired name, highlightthe OK button and press SELECT.
To redo the entry, highlight the Clear button and pressSELECT. To cancel the change, press the CLEAR button[or highlight the Cancel button and press SELECT].
5-5 Setting Guide Preferences
The Guide Options menu allows you to customize theappearance and behavior of onscreen guides.
To set guide preferences, follow the steps below.
1. Press the GUIDE button twice while watching aprogram [or select the Guide Options tab fromthe main menu].
2. Highlight the Options tab.
SD&J"3$>%&$@, ;=-23$4)3O333337N8N9:#
/*)4F3%G
%F0H0
,0)3%<=YC
%-H0(
#*-'3#0'<
;*T3P-();*T3,0)<E$E)-C'(
!0(0)3$E)-C'(
S<-103,)K+0
>-4)<=03&'3S<-10
S<-103ZCCH
#<+)-[BC+C=
BF*''0+3,C=)
;-+)0=(
S=-1
$'
$'
$'
@<H0=-4
%0HEC=*=K
Guide Options

54-02875.10
TracVision Receiver User’s Guide
3. Highlight the menu button for the setting youwish to modify:
Guide Style
Press SELECT to choose either grid or logo style ofprogram guide. See Section 5-1, “Program GuideStyles,” on page 5.3 for details.
Picture In Guide
Press SELECT to turn the picture-in-guide featureon/off. If turned on, video of the currently selectedprogram appears in a small box when you’re viewingthe program guide.
Guide Zoom
Press SELECT to turn guide zoom on/off. If turnedon, and the picture-in-guide feature is turned on,video of the currently selected program “zooms in”to the small screen when the program guide isselected. If turned off, the “zooming” animation fromfull screen to small screen is disabled.
Multi-Color
Press SELECT to turn multi-color on/off. If turnedon, program cells appear in different colors, based ontheir type of content. The four colors are as follows:
Color Category
Orange News
Green Sports
Purple Movies
Blue Other
If multi-color is turned off, all cells are blue in color.
Channel Sort
Press SELECT to choose either numeric or alpha. Ifnumeric, the program guide is sorted by channelnumber. If alpha, the program guide channels aresorted alphabetically.

54-02875.11
Using Program Guides
Filters
Press SELECT to choose either temporary orpersistent. If temporary, the filters you apply areactive only while the program guide remainsonscreen; once you exit the program guide, all filtersare cleared. If persistent, the filters you apply remainactive after you exit the program guide.

54-02876.1
Setting Favorites and Filters
6 Setting Favorites and FiltersThis section explains how to set up lists of favorite channels, filterthe program guide by category and time, and search for programsbased on content.
Contents6-1 Using Favorite Channel Lists . . . . . . . . . . . . . . . . . . . . .6.3
6-2 Filtering the Program Guide . . . . . . . . . . . . . . . . . . . . . .6.7
6-3 Selecting Guide Times . . . . . . . . . . . . . . . . . . . . . . . . . .6.9
6-4 Using WatchWizard to Search for Programs . . . . . . . .6.10

54-02876.3
Setting Favorites and Filters
6-1 Using Favorite Channel Lists
Favorite channel lists help you organize the hundredsof available channels into more manageable groups.Each of the four lists can contain as many or as fewchannels as you wish. You can customize thesegroups in several ways. For example, Fav. A could beDad’s favorite channels, Fav. B could be Mom’sfavorites, Fav. C could be the kids’ channels, andFamily could be all channels that Mom and Dad havedeemed appropriate for the entire family.
Creating a Channel List1. Press the MENU button to access the main menu.
2. Highlight the Guide Options or Lock & Limitstab from the main menu and press SELECT.
3. Highlight the Fav Setup tab and press SELECT toopen the Favorite List Setup pane.
The four columns of small boxes are called tag boxes.The first three columns of tag boxes are the Fav. A,Fav. B, and Fav. C. channel lists. The last column isthe Family list.
;:G$!&%"3P&,%3,"%D>
;*T3P-()
%F0H0%-H0(
#*-'3#0'<
$E)-C'(,0)3%<=YC/*)4F3%G
P-()833#^P&,%
_<*+-)K30')0=)*-'H0')3?C=3)F03AFC+03?*H-+K23?0*)<=-'.*'-H*)013I^Z34+*((-4(23C=-.-'*+3(0=-0(230')0=)*-'H0')
(E04-*+(23*'13HCT-0(W3&'4+<1013*)3'C3*11-)-C'*+34F*=.0-'3J&!"B%G3%$%:P3B`$&B"3>*4Q*.0(W
;*T3,0)<E
:<)C3,0)
!0'*H0
J0+0)03:++:113:++
BF*''0+7N633333/:\B
7N733333/_"J
7NN33333",>@
7N533333`\$/
;=-23,0E37a33333L8663>#
@0A3BF*'NL@0A3BF*''0+(
Favorite List Setup
Fav. A Fav. B Fav. C Family

54-02876.4
TracVision Receiver User’s Guide
4. In the desired channel list column, highlight thetag box for the channel that you want to add orremove. Use the joystick or CHANNEL (CH) buttonto scroll up or down to view other channels.
5. Press SELECT to add or remove the check markin the tag box. A check mark indicates that thechannel is included in the favorite channel list.(In the example on the previous page, WABC isincluded in the Fav. A and Family channel lists,but not the Fav. B or Fav. C channel lists.)
6. When you have added all of the channels thatyou want in your list, press the CLEAR button toresume watching TV.
Switching Between Favorite ListsOnce you have created your favorite channel lists, usethe remote control’s FAV button to cycle throughthem quickly and easily. Each press of the FAV buttonbrings up the next favorite channel list. [You can alsoselect a list by highlighting the Fav List tab from theGuide Options menu.] Only channels that are set upin the selected favorite channel list will be accessiblefor viewing.
If the Family list has not had any channelsadded to it, and the receiver is locked, nochannels can be viewed without firstunlocking the receiver. To avoid thisinconvenience, create the Family list beforelocking the receiver. See Section 7, “UsingAccess Controls,” on page 7.1 for detailsabout controlling system access.
;:G$!&%"3P&,%
,0)3%<=YC
;*T3,0)<E$E)-C'(
/*)4F3%G
;*T3P-()
%F0H0%-H0(
#*-'3#0'<
/0123U<+37a33333a87L3>#
Q&=&+*!?)$#.%*&!K%0*!*#!1%=*&.!M>%<&
:++3BF*''0+(
;:GW3:
;:GW3\;:GW3B;*H-+K
@0A3BF*''0+(
6,%0!=%0*!!,)0!PRS!(,);;&=0
Favorite Lists

54-02876.5
Setting Favorites and Filters
Renaming a Channel List1. At the Favorite List Setup pane, highlight the
Rename button and press SELECT.
A Rename List menu appears. You can renamethe first three lists. You cannot rename the All orFamily lists.
2. Highlight the list you wish to rename and pressSELECT.
3. Use the onscreen keyboard to enter the new name(to enter a letter on the keyboard, highlight theletter and press SELECT).
4. Once you’ve entered the desired name, highlightthe OK button and press SELECT.
To redo the entry, highlight the Clear button and pressSELECT. To cancel the change, press the CLEAR button[or highlight the Cancel button and press SELECT].
Generating an Auto Set ListThe Auto Set function generates a complete list ofviewable channels.
To generate an Auto Set list, follow the steps below.
1. At the Favorite List Setup pane, highlight theAuto Set button and press SELECT.
2. Highlight a favorite channel list to beprogrammed and press SELECT.
It may take several minutes for the receiver toscan through all channels and determine whichones you’re authorized to receive. The scanresults will be stored in the selected favoritechannel list.
Auto Set may exclude some channels, suchas the Music Choice channels, or includesome pay per view channels. This does notmean that the receiver is faulty. Thesechannels were excluded or included due tothe receiver’s analysis process. You canmanually edit the list to correct theseoversights.

54-02876.6
TracVision Receiver User’s Guide
Adding and Removing Channels To add or delete a channel from a selected favoritechannel list, follow the steps below.
To add all available channels to a favorite list:
1. At the Favorite List Setup pane, highlight theAdd All button and press SELECT.
2. Highlight the list you wish to modify and pressSELECT.
To remove all channels from a favorite list:
1. At the Favorite List Setup pane, highlight theDelete All button and press SELECT.
2. Highlight the list you wish to modify and pressSELECT.
To add or delete individual channels from a favorite list:
At the Favorite List Setup pane, highlight the tag boxfor the particular channel you wish to add or removeand press SELECT. A check mark indicates that thechannel is included in the selected favorite channellist. An empty tag box indicates that the channel isexcluded from the list.
Finding New ChannelsOccasionally, new channels are added to the availableprogramming selections. The number of channels thathave been added since you created your channel listappears in the New Channels window on theFavorite List Setup pane. To view these channels inthe lists, highlight the New Channels button andpress SELECT.
;:G$!&%"3P&,%3,"%D>
;*T3P-()
%F0H0%-H0(
#*-'3#0'<
$E)-C'(,0)3%<=YC/*)4F3%G
P-()833#^P&,%
_<*+-)K30')0=)*-'H0')3?C=3)F03AFC+03?*H-+K23?0*)<=-'.*'-H*)013I^Z34+*((-4(23C=-.-'*+3(0=-0(230')0=)*-'H0')
(E04-*+(23*'13HCT-0(W3&'4+<1013*)3'C3*11-)-C'*+34F*=.0-'3J&!"B%G3%$%:P3B`$&B"3>*4Q*.0(W
;*T3,0)<E
:<)C3,0)
!0'*H0
J0+0)03:++:113:++
BF*''0+7N633333/:\B
7N733333/_"J
7NN33333",>@
7N533333`\$/
;=-23,0E37a33333L8663>#
@0A3BF*'NL@0A3BF*''0+(
Favorite List Setup

54-02876.7
Setting Favorites and Filters
6-2 Filtering the Program Guide
The Category Filter menu allows you to filter theprogram guide to show just those channels thatmatch your viewing interests.
To filter the guide by program categories, such asmovies, sports, or news, follow the steps below.
1. Press the GUIDE button twice while watching TV[or select the Guide Options tab from the mainmenu]. If the Program Guide is currently displayed,press the GUIDE button just once.
2. Highlight the Theme tab.
3. Highlight a category (other than All) and pressSELECT.
4. A subcategory menu appears, allowing you tofurther refine a chosen theme (see the illustrationon the following page). To choose a subcategory,highlight the subcategory and press SELECT.
B:%"S$!^3;&P%"!
;*T3P-()
%F0H0%-H0(
#*-'3#0'<
/0123,0E37a33333O8N6>#
;*T3,0)<E$E)-C'(,0)3%<=YC/*)4F3%G
Q&=&+*!)!()*&H#.9!*#!1%=*&.!M>%<&
:++#CT-0(
,EC=)(&')0=0()(
@0A(
P-?0()K+0(
%F03H*)0=-*+3-(3*3HCT-0230-)F0=)F0*)=-4*+3C=3H*10[?C=[%GW
%F0H0(
Category Filter

54-02876.8
TracVision Receiver User’s Guide
For example, if you select the Movies category, youcan then refine your selection using a subcategorysuch as Action/Adventure, Animation, Biography,Comedy, and others as shown below.
Once you’ve selected a category/subcategory, theprogram guide will be filtered to show only thosechannels offering programs of the selected categoryand subcategory. In this example, the guide wouldonly display channels featuring Action/Adventuremovies.
B:%"S$!^3;&P%"!
;*T3P-()
%F0H0%-H0(
#*-'3#0'<
/0123,0E37a33333O8N6>#
;*T3,0)<E$E)-C'(,0)3%<=YC/*)4F3%G
Q&=&+*!)!()*&H#.9!*#!1%=*&.!M>%<&
:++#CT-0(
,EC=)(&')0=0()(
@0A(
P-?0()K+0(
%F03H*)0=-*+3-(3*3HCT-0230-)F0=)F0*)=-4*+3C=3H*10[?C=[%GW
%F0H0(
:310(4=-E)-C'3C?3)F03(0+04)0134*)0.C=K3*EE0*=(3F0=0W
"#$%&0
>!"G3P"G"P:++
:4)-C'b:1T0')<=0
\-C.=*EFK:'-H*)-C'
B<==0')3:??*-=(BC')0')3:1T-(C=-0(
BCH01K
Filtering by Movie Categories

54-02876.9
Setting Favorites and Filters
6-3 Selecting Guide Times
The Guide Times menu provides easy access to futureprogramming information.
To advance the guide to a future day/time period,follow the steps below.
1. Press the GUIDE button twice while watching TV[or select the Guide Options tab from the mainmenu]. If the Program Guide is currently displayed,press the GUIDE button just once.
2. Highlight the Times tab.
3. Highlight the AM/PM button and press SELECTto toggle between AM and PM.
4. Highlight the day you want the guide to beginand press SELECT.
SD&J"3%&#",
;*T3P-()
%F0H0%-H0(
#*-'3#0'<
;*T3,0)<E$E)-C'(,0)3%<=YC/*)4F3%G
:1T*'403)F03>=C.=*H3S<-10)C3)F03,0+04)013%-H0
98663>#
%F<23,0E37c333339879>#
:#3b3>#
%F<=(1*K23,0E)0HY0=37c
%F
7c
;=
N6
,*
N7
,<
NN
#C
N5
%<
NO
/0
N9
%F
7c
;=
N6
,*
N7
,<
NN
#C
N5
%<
NO
/0
N9
%F
7c
;=
N6
,*
N7
,<
NN
#C
N5
%<
NO
/0
N9
,"P"B%@*T-.*)03YK3<(-'.3)F03*==CA3Q0K(W>=0((33333333333333333)C34FCC(03)F03)-H0W
Guide Times

54-02876.10
TracVision Receiver User’s Guide
6-4 Using WatchWizard to Searchfor Programs
WatchWizard allows you to search for programsusing criteria such as rating, showtime, language, andcategory. You can even search for a specific wordfound in program titles or descriptions. WatchWizardcan store up to eight separate searches using anycombination of criteria and text.
Performing a Search1. Press the SEARCH button [or select the
WatchWizard tab from the main menu].
2. Highlight the WWSetup tab.
3. Highlight one of the eight search buttons andpress SELECT.
4. A search menu appears where you can enter yoursearch criteria. Narrow your search results bycombining multiple criteria. To choose a criteria,highlight the associated button and pressSELECT.
/:%B`/&Z:!J3,"%D> /0123$4)W3N3333378O93>#
/*)4F3%G
//,0)<E//!0(<+)
#*-'3#0'<
/*)4F/-X*=13>=C.=*H3,0*=4F0(
"HE)K
"HE)K
"HE)K
"HE)K
"HE)K
"HE)K
"HE)K
,0*=4FBF*''0+( !0(<+)(3S<-10
!0'*H0 B+0*= B+0*=3:++
WatchWizard Program Searches
/:%B`/&Z:!J3,"%D> /0123$4)W3NM3333378773>#
/*)4F3%G
//,0)<E//!0(<+)
#*-'3#0'<
,0*=4F37BF*''0+(
\*4Q
,FCA)-H0( B*)0.C=K
!*)-'.(
P*'.<*.0
J-=04)C=
:4)C=
!0(0)
@CA
:++
"'.+-(F
#CT-0(23:4)-C'b:1T0')<=0
:++
:++
/*)4F/C=1
WatchWizard Search Menu

54-02876.11
Setting Favorites and Filters
Viewing Search ResultsTo view a list of programs matching your searchcriteria, highlight the WWResult tab. To view thesearch results as a guide, highlight the Results Guidebutton on the WWSetup tab and press SELECT.
When a program guide is onscreen, press theSEARCH button on the remote control toautomatically highlight programs matching yoursearch results. Press the SEARCH button again tohighlight the next result, based on starting time.
To enter text, use the onscreen keyboard (to enter aletter on the keyboard, highlight the letter and pressSELECT). Once you’ve entered the desired text,highlight the OK button and press SELECT.
/:%B`/&Z:!J3!",DP%, /0123$4)W3NM3333378773>#
/*)4F3%G
//,0)<E//!0(<+)
#*-'3#0'<
/*)4F/-X*=13!0(<+)BF*''0+( !0(<+)83N,0*=4F-'.WWW
%C1*K ,0*=4F375866># 766>=C.=*H3%-)+037
%C1*K ,0*=4F375856># 769>=C.=*H3%-)+03N
WatchWizard Results/:%B`/&Z:!J3,"%D> %<023$4)37933333c8N5:#
/*)4F3%G
//,0)<E//!0(<+)
#*-'3#0'<
,0*=4F3?C=3AC=1(3-'3)F03>=C.=*H3%-)+0(*'13J0(4=-E)-C'(3A-)F-'3S<-10W
)=CE-4*+
!CY0=)(
"HE)K
4*(-'C
=C10C
/*)4F/-X*=13"')=K
BF*''0+(
,*+-=
\C==*=
$]d e f g R h i j
J0+
k
l
8 m [[ n o p b q
r7 N 5 9
sM a c 6
:
% D G / I ^ Z W 2 t] P # @ $ > _ ! ,
\ BOJ " ; S ` & U
L
u
v
d e f g R h i j
J0+
k
l
8 m [[ n o p b q
r s
Z I B G \ @ # W 2 t: , J ; S ` U ] P v
u
_ / " ! % ^ D & $ >caML9O5N7 6
WatchWizard Keyboard Entry
If you prefer, you can change the keyboardto a standard (QWERTY) layout. Simplyhighlight the toggle icon on the defaultbutton board and press SELECT.

54-02876.12
TracVision Receiver User’s Guide
Using the Channels Search You can also search for channels that offer a specifictype of programming by using the category-basedchannels search.
1. Press the SEARCH button while watching TV [orselect the WatchWizard tab from the main menu].
2. Highlight the Channels tab.
3. Highlight the Category button and pressSELECT.
4. Highlight the desired category from the list andpress SELECT.
5. A subcategory menu appears, allowing you tofurther refine your search. To choose asubcategory, highlight the subcategory and pressSELECT. A list of channels offering the selectedtype of programming appears.
B`:@@"P,3,":!B`//,0)<E
,*)23$4)3933333L8NO3>#
>+0*(03(0+04)3*3B*)0.C=K)C3Y0.-'3(0*=4FW
//!0(<+)BF*''0+(
B*)0.C=K3\*(013BF*''0+3,0*=4F
B*)0.C=K#CT-0(/*)4F3%G
#*-'3#0'<
#$G&"3,`$/B:,"3C'3J&!"B%GE=0T-0A(3AF*)w(3FC)3)F-(3A00Q3C'E=0H-<H3HCT-03(0=T-40(3`\$2,%:!Zd3*'13,`$/%&#"23E+<(3)F0'0A3=0+0*(0(3C'3\P$B]\D,%"!>*K3>0=3G-0A3#CT-0(W3#CT-0W
766J%G
Channels Search

54-02877.1
Using Access Controls
7 Using Access ControlsThis section explains how to lock and unlock the system using apasscode. It also explains how to set rating and time limits.
Contents7-1 Locking & Unlocking the System . . . . . . . . . . . . . . . . . .7.3
7-2 Setting Ratings Limits . . . . . . . . . . . . . . . . . . . . . . . . . .7.5
7-3 Setting Time Limits . . . . . . . . . . . . . . . . . . . . . . . . . . . .7.6

54-02877.3
Using Access Controls
7-1 Locking & Unlocking the System
You can easily set limits to restrict the viewing ofsatellite TV programming. When accompanied by thechannel lists, these limits provide a great degree ofcontrol.
When you first install the TracVision receiver, it willbe unlocked. That is, no limits or restrictions are ineffect. To enforce limits (ratings, TV timer, and“Family” favorite list), you must lock the systemusing a passcode.
Locking the ReceiverTo lock the system, follow the steps below.
1. Press the MENU button to access the main menu.
2. Highlight the Lock & Limits tab and pressSELECT.
3. Highlight the Lock tab to display the ParentalLock pane.
4. Highlight the Lock button and press SELECT.
>:!"@%:P3P$B]
!*)-'.(
PC4Q;*T3,0)<E
P-H-)(/*)4F3%G#*-'3#0'<
"'?C=403=*)-'.23(E0'1-'.23*'1T-0A-'.3+-H-)(23*'13=0()=-4)
*440((3)C3;*H-+K3+-()34F*''0+(W
"')0=3)F03O31-.-)3E*((4C103)C+C4Qi<'+C4Qj3KC<=3=040-T0=W
PC4Q
/0123U<+37a33333c8793:#
PC4QB*'40+
$]KL(T!QUQ65">*((4C10V V V V
PC4QB*'40+
$](LC?34"!8GQQ(L25
>*((4C10V V V V
Parental LockOnce the system is locked, only existingFamily list channels will be accessible. If theFamily list does not contain any channels,no channels can be viewed without firstunlocking the system. To avoid this, verifythe contents of the Family list before lockingthe receiver. See Section 6-1, “UsingFavorite Channel Lists,” on page 6.3 fordetails.

54-02877.4
TracVision Receiver User’s Guide
5. The Lock System pop-up panel appears. Enter afour-digit passcode using the remote control’snumeric keypad.
6. Highlight the OK button and press SELECT.
7. Enter the code again to confirm, then highlightthe OK button and press SELECT.
Once you select OK, the satellite receiver islocked. You must enter the proper passcodeto unlock it. A lock icon appears in theprogram guide and channel banner toremind you that the system is locked.
Overriding the System LockWhen the system is locked, inaccessible channels willshow a “limit exceeded” message. To temporarilyoverride the system lock, follow the steps below.
1. While the “limit exceeded” message is onscreen,press SELECT.
2. Enter your four-digit passcode using the remotecontrol’s numeric keypad.
3. Highlight the OK button and press SELECT.
An icon indicating lock override appearsunder the date/time whenever theprogram guide or channel banner isdisplayed.
If you forget your four-digit code, please callDIRECTV at 1-800-DIRECTV (347-3288).
To abort the locking process, highlight theCancel button and press SELECT.

54-02877.5
Using Access Controls
Unlocking the SystemTo remove the lock and all of its restrictions, followthe steps below.
1. Press the MENU button to access the main menu.
2. Highlight the Lock & Limits tab and pressSELECT.
3. Highlight the Lock tab.
4. Highlight the Unlock button and press SELECT.
5. Use the remote control’s numeric keypad to enterthe same code you entered to lock the system.
6. Highlight the OK button and press SELECT. Toabort and keep the lock in effect, highlight the Cancelbutton and press SELECT.
Once the system is unlocked, all limits andrestrictions are removed!
7-2 Setting Ratings Limits
Ratings help you to determine whether a program’scontent is appropriate for a particular audience. Toselect the maximum ratings limits that can be viewedon your system, follow the steps below.
1. Press the MENU button to access the main menu.
2. Highlight the Lock & Limits tab and pressSELECT.
3. Highlight the Ratings tab.
The button used to lock the system is alsoused to unlock the system. !:%&@S,3P&#&%,
!*)-'.(
PC4Q;*T3,0)<E
P-H-)(/*)4F3%G#*-'3#0'<
,*)23$4)3933333O8O6>#
BF-+1=0'
@C)3!*)01
:++CA3:++
#CT-0(
G-C+0'40P*'.<*.0
S0'0=*+3:<1-0'40J-*+C.<0,0V
:++CA3%G[7O
:++CA3%G[7O
:++CA3%G[7O
:++CA3%G[7O:++CA3%G[7O
:++CA3>S:++CA3:++
Ratings Limits Setup
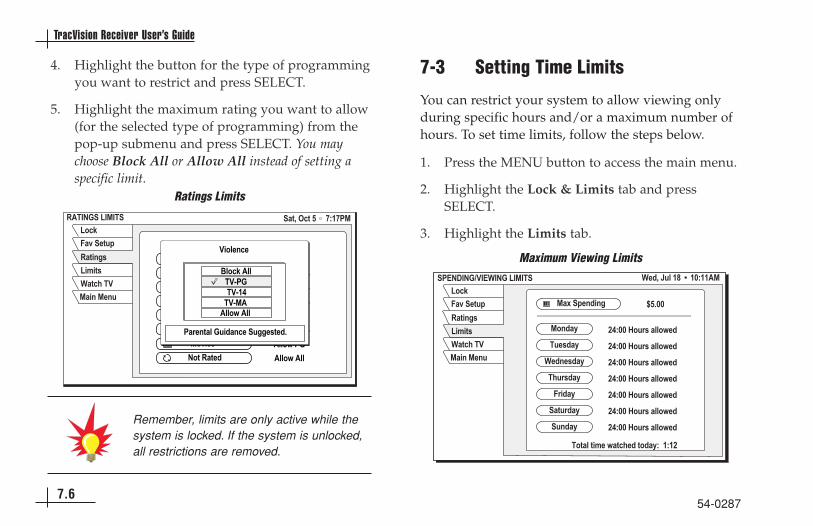
54-02877.6
TracVision Receiver User’s Guide
7-3 Setting Time Limits
You can restrict your system to allow viewing onlyduring specific hours and/or a maximum number ofhours. To set time limits, follow the steps below.
1. Press the MENU button to access the main menu.
2. Highlight the Lock & Limits tab and pressSELECT.
3. Highlight the Limits tab.
4. Highlight the button for the type of programmingyou want to restrict and press SELECT.
5. Highlight the maximum rating you want to allow(for the selected type of programming) from thepop-up submenu and press SELECT. You maychoose Block All or Allow All instead of setting aspecific limit.
!:%&@S,3P&#&%,
!*)-'.(
PC4Q;*T3,0)<E
P-H-)(/*)4F3%G#*-'3#0'<
,*)23$4)3933333M87M>#
BF-+1=0'
@C)3!*)01
:++CA3:++
#CT-0(
:++CA3%G[7O
:++CA3%G[7O
:++CA3%G[7O
\+C4Q3:++:++CA3%G[7O
:++CA3>S:++CA3:++
G-C+0'40
G-C+0'40
>*=0')*+3S<-1*'403,<..0()01W
%G[>S%G[7O
%G[#:
\+C4Q3:++
:++CA3:++
Ratings Limits
,>"@J&@SbG&"/&@S3P&#&%,
!*)-'.(
PC4Q;*T3,0)<E
P-H-)(/*)4F3%G#*-'3#0'<
/0123U<+37a3333376877:#
#C'1*K
%<0(1*K
/01'0(1*K
%F<=(1*K
;=-1*K
,*)<=1*K
,<'1*K
g9W66#*V3,E0'1-'.
NO8663`C<=(3*++CA01
%C)*+3)-H03A*)4F013)C1*K833787N
NO8663`C<=(3*++CA01
NO8663`C<=(3*++CA01
NO8663`C<=(3*++CA01
NO8663`C<=(3*++CA01
NO8663`C<=(3*++CA01
NO8663`C<=(3*++CA01
Maximum Viewing Limits
Remember, limits are only active while thesystem is locked. If the system is unlocked,all restrictions are removed.

54-02877.7
Using Access Controls
4. Highlight the day of the week that you want tolimit and press SELECT.
5. a. If you want to limit the maximum number of viewing hours for that day, highlight the Total Time button and use the remote control’s numeric keypad to enter the limit.
b. If you want to limit that day’s viewing to a specific time period, highlight the Frombutton and use the remote control’s numeric keypad to set the earliest time. Then highlightthe Through button and set the latest time.
6. Highlight the OK button and press SELECT.
,>"@J&@S3b3G&"/&@S3P&#&%,
!*)-'.(
PC4Q;*T3P-()(
/0123#*K3c33333O8963>#
P-H-)(!0T-0A/*)4F3%G#*-'3#0'<
g76W66#*V3,E0'1-'.
#C'1*K
%<0(1*K
/01'0(1*K
%F<=(1*K
;=-1*K
,<'1*K
NO866
NO866
NO866
NO866
NO866
c856
NO866
`C<=(
`C<=(
`C<=(
`C<=(
`C<=(
`C<=(
`C<=(
*++CA01
*++CA01
*++CA01
*++CA01
*++CA01
*++CA01
*++CA01
,*)<=1*K
Q)*>.<)9!7%&/%;H!6%:&!K%:%*;=CH %F=C<.F %C)*+3)-H0
:# B*'40+$]
[$![76866 @b:>#77856
Setting Allowable Viewing Times
,>"@J&@S3b3G&"/&@S3P&#&%,
!*)-'.(
PC4Q;*T3P-()(
/0123#*K3c33333O8963>#
P-H-)(!0T-0A/*)4F3%G#*-'3#0'<
g76W66#*V3,E0'1-'.
#C'1*K
%<0(1*K
/01'0(1*K
%F<=(1*K
;=-1*K
,<'1*K
NO866
NO866
NO866
NO866
NO866
7a866
NO866
`C<=(
`C<=(
`C<=(
`C<=(
`C<=(
`C<=(
`C<=(
*++CA01
*++CA01
*++CA01
*++CA01
*++CA01
*++CA01
*++CA01
,*)<=1*K
Q)*>.<)9!7%&/%;H!6%:&!K%:%*;=CH %F=C<.F %C)*+3)-H0
B*'40+$]
[$
54-02878.1
Other Menu Functions
8 Other Menu FunctionsThis section explains how to change audio/video settings, schedulefuture programs, and change system settings.
Contents8-1 Adjusting Audio Settings . . . . . . . . . . . . . . . . . . . . . . . .8.3
8-2 Adjusting Video Settings . . . . . . . . . . . . . . . . . . . . . . . .8.5
8-3 Using the Program Director to ScheduleFuture Programs . . . . . . . . . . . . . . . . . . . . . . . . . . . . . .8.7
8-4 Reading Mail from DIRECTV . . . . . . . . . . . . . . . . . . . .8.10
8-5 Setting System Preferences . . . . . . . . . . . . . . . . . . . . .8.11
8-6 Advanced System Setup Functions . . . . . . . . . . . . . . .8.12

54-02878.3
Other Menu Functions
8-1 Adjusting Audio Settings
From the Audio Adjustment menu, you can selectlanguages for default audio and alternate audio,adjust left/right balance, and enable TruSurround™
audio processing.
To set audio preferences, follow the steps below.
1. Press the AUDIO button [or select the Audio &Video tab from the main menu].
2. Highlight the menu button for the setting youwish to modify:
Default Audio and Alternate Audio
Your receiver supports alternate audio services. Aicon appears below the date and time in a
program’s description to indicate alternate audio isavailable for that particular program.
You will hear the default audio language all the timeif that language is being transmitted and an alternatelanguage has not been activated. If your selecteddefault language is not being transmitted for aprogram, you will hear the language in which theprogram is broadcast.
%'26%70&8
Occasionally, an audio track may be offeredthat is not being broadcast, in which casethe audio will not change or you will nothear any audio. Change channels to restorethe audio track to the one specified on theAudio Adjustment menu.
AUDIO ADJUSTMENTAudio
Video
Watch TV
Main Menu
Default Audio
Alternate Audio
Audio Balance
SRS TruSurround
English
English
Center
On
Factory Defaults
Wed, Oct 16 • 2:15AM
Audio Adjustment

54-02878.4
TracVision Receiver User’s Guide
To set up your default and alternate audio languages,follow the steps below.
1. Press the AUDIO button to access the AudioAdjustment menu.
2. Highlight the Default Audio button (to set yourprimary language preference) or the AlternateAudio button (to select your alternate languagepreference) and press SELECT.
3. Highlight the desired language for the default oralternate language and press SELECT.
To select the alternate audio when watching TV,follow the steps below.
1. If the icon appears below the date and timein a program’s description, press the joystick leftor right while you are viewing that program.
2. An alternate language option based on youralternate audio selection appears. Press SELECTto listen to the program in the alternate language.
When you change the channel, audio will revertto your selected Default Audio language.
%'26%70&8
:DJ&$3:JUD,%#"@%
/*)4F3%G
:<1-CG-10C
#*-'3#0'<
;=-23,0E3N633333N8793:#
;*4)C=K3J0?*<+)(
:+)0='*)03:<1-C
"'.+-(F
"'.+-(F
,!,3%=<,<==C<'1 $'
J0?*<+)3:<1-C
:<1-C3\*+*'40 B0')0=
JC+YK3J-.-)*+
2&1)>=*!G><%#
W)-);&0&
5;H=%0,
?.&;+,
M&.:);
3*)=%);
T#.&);
(,%;&0&
Q-);%0,
$'
Selecting Default Audio Language
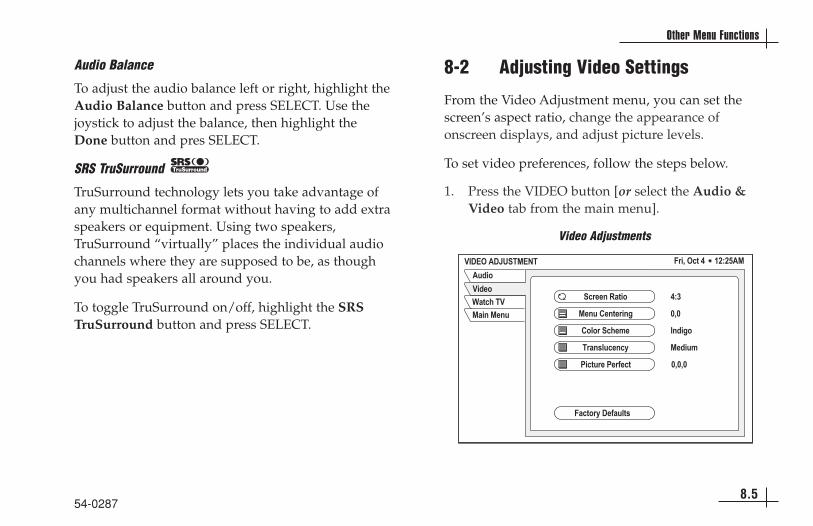
54-02878.5
Other Menu Functions
Audio Balance
To adjust the audio balance left or right, highlight theAudio Balance button and press SELECT. Use thejoystick to adjust the balance, then highlight theDone button and pres SELECT.
SRS TruSurround
TruSurround technology lets you take advantage ofany multichannel format without having to add extraspeakers or equipment. Using two speakers,TruSurround “virtually” places the individual audiochannels where they are supposed to be, as thoughyou had speakers all around you.
To toggle TruSurround on/off, highlight the SRSTruSurround button and press SELECT.
8-2 Adjusting Video Settings
From the Video Adjustment menu, you can set thescreen’s aspect ratio, change the appearance ofonscreen displays, and adjust picture levels.
To set video preferences, follow the steps below.
1. Press the VIDEO button [or select the Audio &Video tab from the main menu].
G&J"$3:JUD,%#"@% ;=-23$4)3O333337N8N9:#
:<1-C
/*)4F3%G#*-'3#0'<
G-10C
;*4)C=K3J0?*<+)(
#0'<3B0')0=-'.
BC+C=3,4F0H0
%=*'(+<40'4K
626
&'1-.C
#01-<H
>-4)<=03>0=?04) 62626
\+*4Q3P0T0+3;-+)0= $??
,4=00'3!*)-C O85
Video Adjustments

54-0287
8.6
TracVision Receiver User’s Guide
2. Highlight the menu button for the setting youwish to modify:
Screen Ratio
Press SELECT to choose either a 4:3 (standard) or 16:9(widescreen) screen aspect ratio.
Menu Centering
Press SELECT to bring up the centering pop-uppanel. Use the joystick to adjust the onscreen menuposition on your TV, then highlight the OK buttonand press SELECT.
Color Scheme
Press SELECT to bring up a color pop-up menu.Highlight the desired menu color scheme (Indigo,Ice, Sky, Forest, or Merlot) and press SELECT.
Translucency
Press SELECT to bring up the translucency pop-upmenu. Use the joystick to adjust the amount of menutranslucency, from solid to 100% translucent, thenhighlight the DONE button and press SELECT.
Picture Perfect
Press SELECT to bring up the picture perfect pop-upmenu. Use the joystick to adjust the brightness,contrast, and saturation, then highlight the DONEbutton and press SELECT.
G&J"$3:JUD,%#"@% ;=-23$4)3O333337N8N9:#
:<1-C
/*)4F3%G#*-'3#0'<
G-10C
;*4)C=K3J0?*<+)(
#0'<3B0')0=-'.
BC+C=3,4F0H0
%=*'(+<40'4K
626
&'1-.C
#01-<H
>-4)<=03>0=?04) 62626
\+*4Q3P0T0+3;-+)0= $??
,4=00'3!*)-C O85
Video Adjustments

54-02878.7
Other Menu Functions
8-3 Using the Program Director toSchedule Future Programs
The Program Director allows you to automaticallytune to a program at a specific date and time, or tuneto a program on a repeating basis. The receiver willturn on (if necessary) and tune to the specifiedchannel at the chosen date and time. You canprogram up to 32 events in advance.
Scheduling an Event from the Program GuideYou can easily schedule an upcoming program thatyou find listed in the program guide. Simplyhighlight the upcoming program in the programguide and press SELECT. A check mark appears nextto your selection. At the start date/time of thescheduled program, the receiver will automaticallytune to that program.
Scheduling an Event from the Program DirectorTo schedule a program from the Program Directormenu, follow the steps below.
1. Press the MENU button to access the main menu.
2. Highlight the Program Director tab and pressSELECT.
3. Highlight an empty slot and press SELECT.
PROGRAM DIRECTORSchedule
By Title
Watch TV
Main Menu
Chan Start Length Frequency
Wed, Oct 2 • 7:14PMAdd and Modify Scheduled Events
Program Director
From the program guide, you can schedulea program only for a specific date and time.To schedule recurring programs and futureprograms that are not yet listed on theprogram guide, use the Program Directormenu.
* By Title tab not available
*

54-02878.8
TracVision Receiver User’s Guide
4. Highlight the Scheduleto View button from theSchedule Options pop-up menu and pressSELECT.
5. Use the joystick or numeric keypad to choose thedesired channel from the channel selection pane.Then highlight the OK button and press SELECT.
6. Highlight the Start column and use the joystickor numeric keypad to set the program’s starttime. Be sure to specify AM or PM (or N fornoon, M for midnight if you specified 12:00).
7. Highlight the Length column and use the joystickor numeric keypad to set the program’s durationin hours and minutes.
8. Highlight the Frequency column and use thejoystick to select when, or how often, the eventoccurs: Today, Tomorrow, Every Mon, Every Tue,Every Wed, Every Thu, Every Fri, Every Sat,Every Sun, Everyday, Mon-Fri, or “/” (specify adate).
9. Review your settings, then highlight the OKbutton and press SELECT. To abort, highlight theCancel button and press SELECT.
If you specify a date, use the month/dayformat. The year is set automatically.
>!$S!:#3J&!"B%$!,4F01<+0
,*)23$4)3933333L8N9>#
\K3%-)+0 BF*' ,)*=) ;=0x<0'4KP0'.)F
767
G-0A833>>G/*)4F3%G#*-'3#0'<
:113*'13#C1-?K3,4F01<+013"T0')(
^C<=34F*''0+3?C=3(E04-*+3E*K3E0=3T-0A0T0')(3+-Q03YCV-'.23A=0()+-'.234C'40=)(2
*'13*3+C)3HC=0W3"T0')23>>GW
$]
B*'40+
Channel Selection Pane
Schedule to View ( )Cancel
Schedule Options

8.954-0287
Other Menu Functions
Canceling a Scheduled EventTo cancel a scheduled event, follow the steps below.
1. Press the MENU button to access the main menu.
2. Highlight the Program Director tab and pressSELECT.
3. Highlight the event you want to cancel and pressSELECT.
4. Highlight the Cancel button from the ScheduleOptions pop-up menu and press SELECT.
If the program you want to cancel is a one-time program that’s not currently inprogress, you can cancel the event fromthe program guide. Simply highlight theprogram you want to cancel in the programguide and press SELECT to remove thecheck mark.

54-02878.10
TracVision Receiver User’s Guide
8-4 Reading Mail from DIRECTV
DIRECTV uses the Mail feature to send youimportant information, notify you of special events,and tell you about special offers. When you receive anew message, a icon appears at the top of allmenus until you’ve read the message.
Reading Your MessagesTo read your mail, follow the steps below.
1. Press the MENU button to access the main menu.
2. Highlight the View Mail tab and press SELECT.
3. If the message is longer than a single page,highlight the Page button and use theCHANNEL (CH) button to step through thepages.
4. If you have more than one message in yourmailbox, highlight the Message button and usethe joystick to navigate through multiplemessages.
NEWMAIL
Erasing a MessageTo permanently remove a message, highlight theErase button and press SELECT. Messages areautomatically deleted as they become outdated or if space isneeded for newer incoming messages.
G&"/3#:&P ;=-23U<+3L3333398NO:#
#*-'3#0'</*)4F3%G#*-+
#0((*.0
!0*13#0((*.0
"=*(0 73C?35 >*.03N
,04C'13E*.03C?3H0((*.03)0V)WWW
View Mail
Once you erase a message, it cannot beretrieved.

54-02878.11
Other Menu Functions
8-5 Setting System Preferences
The Preferences menu allows you to customizevarious system settings.
To set system preferences, follow the steps below.
1. Press the MENU button to access the main menu.
2. Highlight the System Setup tab and pressSELECT.
3. Highlight the Prefs tab.
4. Highlight the menu button for the setting youwish to modify:
Output Channel
Press SELECT to choose either channel 3 or 4,whichever is unused in your area.
Input Key
Press SELECT to turn the remote control INPUTbutton on/off. If you have a VCR connected to thesystem, keep the Input Key set to “On.”
Menu Language
Press SELECT to choose either English (default) orSpanish for the menu language. The text in allonscreen menus will be shown in the selectedlanguage.
Time Zone
Press SELECT to bring up the time zone pop-upmenu. Then highlight your time zone and pressSELECT. The program guide will show programmingtimes based on this time zone.
>!";"!"@B",&'()*++,-.'*+
;=-23$4)3O333337895>#
;0*)<=0(
%0()!0HC)0
@0A3B*=1%0()
&'?C
DE.=*10
>=0?(
;*4)C=K3J0?*<+)(
>=0?0=0'403,0))-'.(
/*)4F3%G
GB!
#*-'3#0'<
B*++0=3&J $'
$<)E<)3BF*''0+ 5
&'E<)3]0K $'
#0'<3P*'.<*.0 "'.+-(F
%-H03XC'0J*K+-.F)3,*T-'. $Y(0=T01
\*''0=3,)K+0 ,FC=)
J0?*<+)
Preferences

54-02878.12
TracVision Receiver User’s Guide
Daylight Saving
Press SELECT to bring up the Daylight Saving pop-up menu. Then highlight the desired daylight savingoption (Observed, Not Observed, or Default) andpress SELECT.
Banner Style
Press SELECT to choose either a Short or Full bannerstyle. A full banner always shows the programdescription within the channel banner; a short bannershows just the program’s title.
Caller ID
NOT USED.
Factory Defaults
Press SELECT to restore the Preferences options totheir original factory settings.
8-6 Advanced System Setup Functions
Besides the Remote and Preferences menus describedpreviously, the System Setup menu provides otherfunctions, all of which are rarely, if ever, used.
To use the advanced system setup functions, followthe steps below.
1. Press the MENU button to access the main menu.
2. Highlight the System Setup tab and pressSELECT.
When you press the INFO button whilewatching TV, a full channel banner isdisplayed, regardless of the Banner Stylesetting.
,^,%"#3%",%
;0*)<=0(
&'()*++,-.'*+
#*-'3#0'<
/0123$4)35333337687O3>#
@0A3B*=1DE.=*10
&'?C
/*)4F3%G
,K()0H3%0()(
GB!&!3\+*()0=
%0()
\0.-'3%0()
>=0((33333333333333)C3()*=)3)F03,K()0H3%0()W,"P"B%
>=0?(!0HC)0
System Setup Menu (Test Tab Selected)
54-02878.13
Other Menu Functions
3. Highlight the menu button for the advancedfunction you wish to use:
Install
NOT USED.
Signal
NOT USED.
Info
The System Information pane lists generalinformation about your TracVision receiver, includingmanufacturer, model, ID number, access card, andsoftware version.
Features
The Features pane lists some of the receiver’s specialfeatures.
Test
The Test function performs a simple diagnostics teston the system. When complete, a report showssystem information and indicates whether the Signal,Tuning, and Front Panel functions passed the test.
New Card
In the unlikely event that your receiver’s access cardmust be replaced, use the New Card function toinitialize the new card.
Upgrade
The Upgrade pane shows your receiver’s upgradehistory. Occasionally, DIRECTV will automaticallyupdate your receiver’s software. This update iscompletely transparent to the user.
If you need a new access card, pleasecall KVH at 401-847-3327.

54-02879.1
Troubleshooting
9 TroubleshootingThis section identifies some basic trouble symptoms, along withtheir possible causes and solutions. It also explains what thesystem status lights indicate and how to get technical support.
ContentsTroubleshooting Matrix . . . . . . . . . . . . . . . . . . . . . . . . . . . . . . . .9.3
9-1 Causes and Remedies for CommonOperational Issues . . . . . . . . . . . . . . . . . . . . . . . . . . . . .9.4
9-2 Technical Support . . . . . . . . . . . . . . . . . . . . . . . . . . . . .9.13
9-3 System Status Lights . . . . . . . . . . . . . . . . . . . . . . . . . .9.14

System does not power on
No picture on video screen
Intermittent picture for short intervals
System works at rest, but not on the move
System does not find satellite
System restarts itself
Receiver beeps continuously at startup
Snowy DIRECTV television picture
Picture jumbled or freezing
Certain channels do not work
Remote does not work
Remote does not operate other component
Only Preview channels are accessible
Only certain channels are accessible
Program guide does not load
Sat
ellit
e co
vera
ge is
sue
Wea
k sa
telli
te s
igna
l
Ant
enna
faul
tyR
ecei
ver f
aulty
Sat
ellit
e si
gnal
blo
cked
PO
SS
IBLE
CA
US
E
SYMPTOM Rem
ote
cont
rol b
atte
ries
dead
Rec
eive
r loc
ked
up
Rec
eive
r pow
er s
witc
h tu
rned
off
Loos
e ca
ble
conn
ecto
rs
Rec
eive
r not
act
ivat
ed
Pro
per c
ompo
nent
but
ton
not p
ress
ed
INP
UT
butto
n no
t set
to s
atel
lite
sour
ce
Sys
tem
lock
ed b
y pa
ssco
deR
emot
e co
ntro
l not
pro
gram
med
Blo
wn
fuse
X X X X X X
X X X
X XX X X X
X X
X XX XX
X
X
X
X
XX
X
X
X
X
X
X
X X X
X
X X X X
X
X
X
X X
X
Audi
o/vi
deo
syst
em n
ot s
et u
p pr
oper
ly
Pro
gram
Gui
de lo
ad in
terr
upte
d R
F co
nver
ter t
oo c
lose
to re
ceiv
er
X
X
Audi
o/vi
deo
syst
em fa
ulty
X
X
X
X
X
X
Rec
eive
r los
t act
ivat
ion
info
rmat
ion
X
Insu
ffici
ent p
ower
X
X
X
X
X
X
Favo
rite
chan
nel l
ist a
ctiv
e
X
Rec
eive
r set
to "U
nsta
cked
LN
B"
X
X
X
X
X
54-02879.3
Troubleshooting
Troubleshooting Matrix

54-02879.4
TracVision Receiver User’s Guide
9-1 Causes and Remedies forCommon Operational Issues
There are a number of common issues that can affectthe signal reception quality or the operation of theTracVision system. The following sections identifythese issues and provide potential solutions.
Receiver Power Switch Turned OffYour TracVision receiver’s rear panel power switch(see below) must remain on for the system to work. Ifthe system is entirely non-functional, check the switchto ensure that it is turned on. The switch illuminatesgreen when turned on.
Blown FuseThe receiver’s power input cable includes an in-linefast-blow fuse, rated for 6 amps, located on the end ofthe cable nearest the receiver. If this fuse has blown,the system will not operate. Unscrew the cap on thefuse holder and replace the fuse. If you replace thefuse, but it blows again, check the receiver to ensurethat it is clear of debris and the connectors are tight.Do not replace the fuse with a larger amperage fuse.
Receiver Power Switch
CAUTION
POWER
VEHICLE POWER(10-16 VDC)
VHF ANTENNAIN
AUDIO R AUDIO L VIDEO S – VIDEOPHONE JACK
RF REMOTEINPUT
OUT TO TVTUNERSATELLITE IN
This device complies with Part 15 of the FCC rules. Operation is subject to the following two conditions: (1) This device must not cause harmful interference, and (2) This device must accept any interference received,including interference that may cause undesired operation.
Tested to complywith FCC Standards
TO SATELLITE IN
TO KVHANTENNA
DIAGNOSTICSPORT 1
DIAGNOSTICSPORT 2
Power SwitchIf the TracVision system is not workingproperly, try resetting the system beforeyou begin troubleshooting. To reset,follow the simple steps below.
1. Stop in a blockage-free area.
2. Turn off the receiver’s rear panel power switch.
3. Turn the receiver’s rear panel power switch back on.
4. If the TracVision antenna is turned off, turn it on (press SAT then PWR).
5. Wait one minute for the antenna to acquire the satellite.
54-02879.5
Troubleshooting
Insufficient PowerWith the vehicle/vessel powered up and the receiverturned on, power at the receiver must measure atleast 10 VDC for the TracVision system to workproperly. Check the receiver’s power connection andensure that it is wired to a dedicated circuit. If otherdevices are wired to the same circuit, these additionalloads will drain power away from the receiver.
Loose Cable ConnectorsA loose connector can reduce the signal quality.Check the cable connections at the antenna unit,receiver, RF converter, and audio/video componentsto ensure they are securely attached.
Satellite Signal BlockedSatellite signals can be blocked or degraded by tall orsolid stuctures such as trees, buildings, mountains, orbridges. Simply moving to clear an obstruction willrestore signal quality. Rain clouds, heavy rain, andsnow can also affect satellite signal reception. Formore details about satellite blockage, see Section 1-3,“Receiving Satellite TV Signals,” on page 1.5.
In addition, dirt, snow, ice, or heavy moisture on theantenna dome can disrupt satellite signals, so be sureto clean the antenna regularly.
Satellite Coverage IssueTracVision will provide good satellite TV receptionthroughout the entire satellite coverage area.However, signal quality can be degraded as youapproach the fringe of this area. To view the most up-to-date coverage map, visit KVH’s web site at www.kvh.com/footprint. For more details about satellite coverage, seeSection 1-3, “Receiving Satellite TV Signals,” on page 1.5.
Weak Satellite SignalJust like radio stations, some satellite TV channelstransmit a stronger signal than others. If you’reunable to receive a clear signal on one channel, tryswitching to another channel. Weaker channels aremore vulnerable to interference, such as rain or snow.

54-02879.6
TracVision Receiver User’s Guide
Receiver Not ActivatedIf you can only access the DIRECTV previewchannels, such as channel 100, while all otherchannels show a message to call DIRECTV, yourreceiver has not been activated. To activate yoursystem, please call KVH’s Activation Department at 1-866-551-8004. Activation support is available 24 hours a day, seven days a week.
Receiver Lost Activation InformationIf you can only access the DIRECTV previewchannels, such as channel 100, while all otherchannels show a message to call Ext. 722, and youhave already activated the receiver, the receiver mayhave lost its stored activation data. This may occur ifthe receiver is left idle (does not receive a satellitesignal) for an extended period of time. To fix thisproblem, please call DIRECTV customer service at 1-800-DIRECTV (347-3288). Be sure the TracVisionsystem is turned on, has a clear view of the southern sky,and is tuned to the DIRECTV preview channel before youcall. The system will need to receive a signal from thesatellite to correct the problem.
Proper Component Button Not PressedTo operate the satellite TV system using the remotecontrol, first press the remote control’s SAT button.The remote control will not operate the receiverunless the SAT button is active. To operate acomponent other than the satellite receiver, first pressthe corresponding component button on the remotecontrol. For example, to operate the TV monitor usingthe remote control, first press the TV button.
INPUT Button Not Set to Satellite SourceIf satellite programming is not displayed on your TV,you may have selected an alternate video input. Pressthe remote control’s INPUT button until the correctsatellite input is displayed.
You can disable the INPUT button byturning it off via the menu system. SeeSection 8-5, “Setting System Preferences,”on page 8.11 for details.

54-02879.7
Troubleshooting
Audio/Video System Not Set Up ProperlyIf satellite programming is not displayed on your TV,you may have the wrong input selected on youraudio/video system. Try switching to another input(for example, VIDEO 1 or VIDEO 2; AUX1, AUX2, orA/V) whichever input is assigned to the satellitereceiver. In addition, ensure that the audio/videosystem is powered on.
System Locked by PasscodeIf you can only access Family list channels, and thelock icon ( ) appears under the date/time, thesystem has been locked with a passcode. For detailson unlocking the system, see Section 7-1, “Locking &Unlocking the System,” on page 7.3.
Favorite Channel List ActiveIf a favorite channel list is active, only channels set upin that list are accessible. Press the remote control’sFAV button to cycle through the lists. See Section 6-1,“Using Favorite Channel Lists,” on page 6.3 for details.
Remote Control Not ProgrammedIf you cannot operate a component with the remotecontrol, first ensure that the associated componentbutton (DVD, VCR, AUX, or TV) is selected. If thecorrect button is selected, you need to program theremote control to operate the component. See Section 3-3, “Programming the Remote Control to OperateOther Components,” on page 3.10 for details.
Program Guide Load InterruptedIf the program guide load is interrupted at startup,certain channels may not be viewable temporarily.Guide load interruptions could occur as a result ofsatellite blockage (see “Satellite Signal Blocked” on page 9.5). The missing channels will eventually berestored as the receiver completes the program guidedownload during normal operation.
If the Family list does not have anychannels assigned to it, NO channels canbe viewed without first unlocking thesystem.

54-02879.8
Receiver Locked UpSince your receiver is a computing component, it issusceptible to erratic changes in power and/or signal,like any other computer, and these sudden changescan cause it to become “confused.” To clear thiscondition, try pressing the remote control’s SATbutton before trying to control the receiver. If thatdoesn’t work, press the SAT and MUTE buttonstogether and try again.If that doesn’t work,turn off vehicle/vesselpower or the receiver’srear panel powerswitch for 30 seconds,then turn it back on.
RF Converter Too Close to ReceiverThe RF converter must be placed at least three feetaway from the receiver. Placing the RF convertercloser to the receiver may result in interference,causing the remote control to operate intermittentlyor not at all.
Remote Control Batteries DeadTo replace the remote control’s batteries, follow thesteps below.
1. Remove the battery compartment cover on theback of the remote control.
2. Insert two AAA batteries as shown, observing thecorrect polarity.
3. Replace the battery compartment cover.
TracVision Receiver User’s Guide
CAUTION
POWER
VEHICLE POWER(10-16 VDC)
VHF ANTENNAIN
AUDIO R AUDIO L VIDEO
RF REMOTEINPUT
OUT TO TVTUNERSATELLITE IN
Remote Control Batteries
If you lose your remote control, please callor visit your local KVH authorized dealer toorder a replacement.
Power Switch
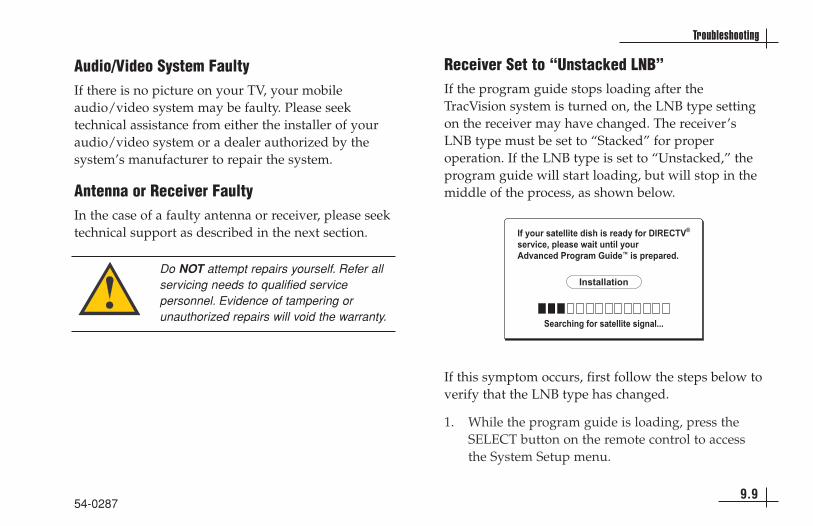
Audio/Video System FaultyIf there is no picture on your TV, your mobileaudio/video system may be faulty. Please seektechnical assistance from either the installer of youraudio/video system or a dealer authorized by thesystem’s manufacturer to repair the system.
Antenna or Receiver FaultyIn the case of a faulty antenna or receiver, please seektechnical support as described in the next section.
Receiver Set to “Unstacked LNB”If the program guide stops loading after theTracVision system is turned on, the LNB type settingon the receiver may have changed. The receiver’sLNB type must be set to “Stacked” for properoperation. If the LNB type is set to “Unstacked,” theprogram guide will start loading, but will stop in themiddle of the process, as shown below.
If this symptom occurs, first follow the steps below toverify that the LNB type has changed.
1. While the program guide is loading, press theSELECT button on the remote control to accessthe System Setup menu.
54-02879.9
Troubleshooting
Do NOT attempt repairs yourself. Refer allservicing needs to qualified servicepersonnel. Evidence of tampering orunauthorized repairs will void the warranty.

2. Highlight the Install tab and check the “LNB”setting.
3. If the LNB type is set to “Stacked,” you do notneed to change the setting. A different problem iscausing the program guide not to load. Please callKVH Technical Support at 401-847-3327 (or [email protected]) for assistance.
If the LNB type is set to “Unstacked,” follow thesteps in the next section to change the setting to“Stacked.”
Setting the LNB Type to “Stacked”
If the LNB type is set to “Unstacked,” follow the stepsbelow to change the setting to “Stacked.”
1. Highlight the Test tab.
2. Highlight the Begin Test button.
3. Press the FAV button on the remote control.
54-02879.10
TracVision Receiver User’s Guide
,^,%"#3%",%
;0*)<=0(
&'()*++,-.'*+
#*-'3#0'<
/0123$4)35333337687O3>#
@0A3B*=1DE.=*10
&'?C
/*)4F3%G
,K()0H3%0()(
GB!&!3\+*()0=
%0()
\0.-'3%0()
>=0((33333333333333)C3()*=)3)F03,K()0H3%0()W,"P"B%
>=0?(!0HC)0
Test Tab
Install Tab
Do not press theSELECT button!
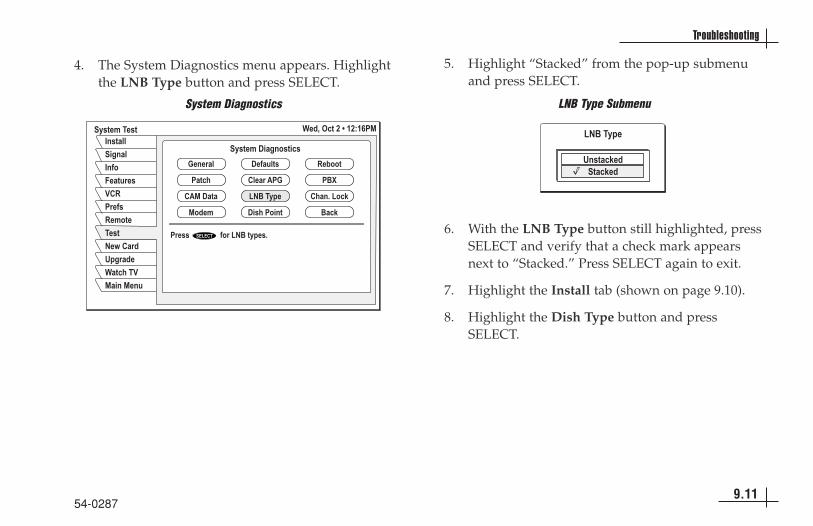
4. The System Diagnostics menu appears. Highlightthe LNB Type button and press SELECT.
5. Highlight “Stacked” from the pop-up submenuand press SELECT.
6. With the LNB Type button still highlighted, pressSELECT and verify that a check mark appearsnext to “Stacked.” Press SELECT again to exit.
7. Highlight the Install tab (shown on page 9.10).
8. Highlight the Dish Type button and pressSELECT.
54-02879.11
Troubleshooting
System Diagnostics
LNB Type
UnstackedStacked
LNB Type Submenu
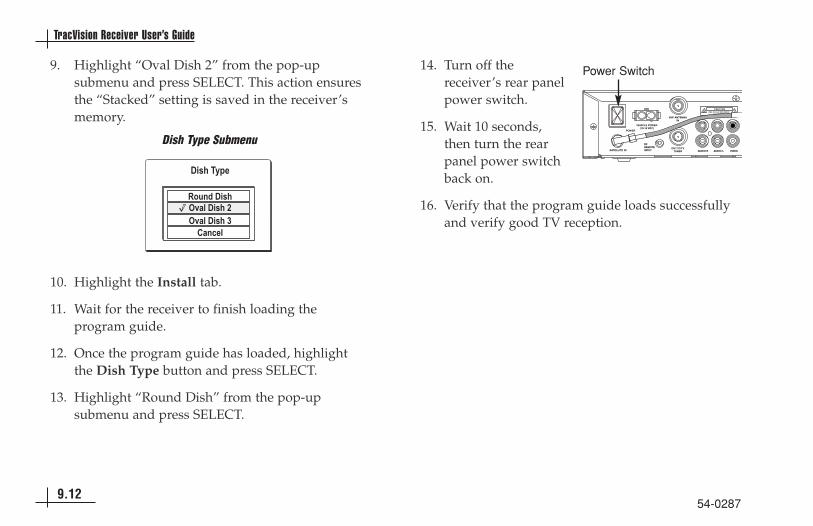
9. Highlight “Oval Dish 2” from the pop-upsubmenu and press SELECT. This action ensuresthe “Stacked” setting is saved in the receiver’smemory.
10. Highlight the Install tab.
11. Wait for the receiver to finish loading theprogram guide.
12. Once the program guide has loaded, highlightthe Dish Type button and press SELECT.
13. Highlight “Round Dish” from the pop-upsubmenu and press SELECT.
14. Turn off thereceiver’s rear panelpower switch.
15. Wait 10 seconds,then turn the rearpanel power switchback on.
16. Verify that the program guide loads successfullyand verify good TV reception.
54-02879.12
TracVision Receiver User’s Guide
Dish Type
Round DishOval Dish 2Oval Dish 3
Cancel
Dish Type Submenu
CAUTION
POWER
VEHICLE POWER(10-16 VDC)
VHF ANTENNAIN
AUDIO R AUDIO L VIDEO
RF REMOTEINPUT
OUT TO TVTUNERSATELLITE IN
Power Switch

9-2 Technical Support
If you experience an operating problem or requiretechnical assistance, please contact your localauthorized TracVision dealer/installer first. You canfind an authorized technician near you by visitingour web site at www.kvh.com/wheretogetservice.
If an authorized dealer/installer is not located nearby,contact KVH Technical Support directly:
Phone: 401-847-3327
E-mail: [email protected]
Internet: www.kvh.com/help
Please have your antenna and receiver serial numbersready before calling technical support. The serialnumbers are located on the red Activation Card, aswell as on the antenna and receiver.
54-02879.13
Troubleshooting
Detailed information on KVH’s globalsupport program is available atwww.kvh.com/global_support.

9-3 System Status Lights
Three status lights on the top of the receiver indicatethe current status of the system and can help youidentify problems.
VOLTAGE light
RECEIVER light
ANTENNA light
During normal operation, all three status lightsshould be lit green. The following tables explain whatthe different light conditions indicate.
54-02879.14
TracVision Receiver User’s Guide
System Status Lights
Light is... Indicates Description
Off Off Receiver is OFF (rear panel power switch is off) or no power input
Green OK Good power (between 10-18 VDC at receiver)
Orange Low Power Low power (between 8-10 VDC at receiver)
Red, flashing Bad Power Insufficient power (less than 8 VDC or more than 18 VDC input)
VOLTAGE Light Indications
A B C
A
B
C
A
If multiple receivers are connected, theANTENNA light on any additional receiverswill remain red at all times. Only the originalmaster receiver can monitor antenna status.

54-02879.15
Troubleshooting
Light is... Indicates Description
Off Off Antenna is OFF, insufficient power, or no receiver video detected
Green Tracking Antenna is tracking the DIRECTV satellite
Green, flashing slowly Searching Antenna is searching for a satellite
Green, flashing quickly Identifying Antenna has found a satellite and is checking its identification code
Orange, flashing Overload Overload or short circuit detected on the antenna cable
Red No Comm Receiver cannot communicate with the antenna
Red, flashing Fault Error detected in antenna
ANTENNA Light Indications
Light is... Indicates Description
Off Off Receiver is OFF (rear panel power switch is off)
Green OK Receiver is ON
Orange Standby Receiver is ON but antenna is turned OFF
Orange, flashing Overload Overload or short circuit detected on the antenna cable
Red Fault 1 Internal power fault
Red, flashing Fault 2 Antenna power or power supply problem
RECEIVER Light IndicationsB
C

54-0287A.1
Appendices
AppendicesThis section provides wiring diagrams for typical TracVisioninstallations and a map showing the DIRECTV® satellite’s elevationangle off the horizon.
ContentsA System Wiring Diagrams . . . . . . . . . . . . . . . . . . . . . . . .A.3
B Satellite Elevation Map . . . . . . . . . . . . . . . . . . . . . . . . .A.17

54-0287A.3
System Wiring Diagrams
Appendix ASystem Wiring DiagramsThe diagrams on the following pages show how towire the system for various configurations:
Original TracVision A5/M3 12V receiver* AND: Total # receivers: Requires Kit P/N: See page:
No additional receivers 1 N/A A.4
One (1) additional TracVision A5/M3 12V receiver** 2 02-1340 A.6
Two (2) additional TracVision A5/M3 12V receivers** 3 02-1340 (x2) A.8
One (1) generic (non-A5/M3) receiver – M3 use only 2 72-0182 A.10
Two (2) generic (non-A5/M3) receivers – M3 use only 3 72-0181 A.12
Three (3) or more receivers of any type – M3 use only 4+ 72-0181 & 19-0123 A.14
* The original TracVision A5/M3 12V receiver (supplied with the TracVision A5/M3 system) is required in all configurations. This receiver suppliespower to the antenna.** If you connect a non-A5/M3 TracVision 12V receiver for DIRECTV service (KVH P/N 02-1442), treat it as a generic receiver.
For complete system wiring details, refer to the installation instructions provided with the system orupgrade kit. Before making any wiring changes, be sure to turn off vehicle/vessel power.

54-0287A.4
TracVision Receiver User’s Guide
To Antenna
RF Converter
Receiver
Service/Maintenance
Only
DC Power
Ground
To Audio
To Video(Option 1)To Video(Option 1)
To Video(Option 3)
To Video(Option 2)
To VHF Antenna(Optional)
Input Power(10-16 VDC)
Fuse
POWER
VEHICLE POWER(10-16 VDC)
VHF ANTENNAIN
AUDIO R AUDIO L VIDEO S – VIDEOPHONE JACK
RF REMOTEINPUT
OUT TO TVTUNERSATELLITE IN
CAUTION
This device complies with Part 15 of the FCC rules. Operation is subject to the following two conditions: (1) This device must not cause harmful interference, and (2) This device must accept any interference received,including interference that may cause undesired operation.
Tested to complywith FCC Standards
TO SATELLITE IN
TO KVHANTENNA
DIAGNOSTICSPORT 1
DIAGNOSTICSPORT 2
Wiring Diagram for a Single TracVision A5/M3 12V Receiver

Single TracVision A5/M3 12V Receiver• DO NOT disconnect the short cable that connects
from one jack to another on the receiver’s rearpanel. The system will not work if this cable isremoved.
• You can connect the receiver to the entertainmentsystem using one of the following options:
Option 1 - RCA-type A/V jacks (use bottom row)Option 2 - S-Video jackOption 3 - RF coaxial connector
• Standard audio/video (A/V) cables with RCA-type connectors are included with the receiver.
• Be sure to tighten all connections adequately.
• Before you connect the power wires, be sure toread the important guidelines provided in theInstallation Guide (included with the system).
Connector Function
Vehicle Power Connect to input power (+12 VDC);applies to a vehicle or a vessel
RF Remote Input Connect to RF converter
VHF Antenna In Not applicable for satellite TV; can be used for over-the-air channels if you have a TV tuner & VHF antenna
To KVH Antenna Connect to the TracVision antenna
Diagnostics Ports, Technician’s use only, forPhone Jack diagnostics purposes
Audio R, Connect right (R) and left (L) Audio L outputs to your audio component
Out to TV Tuner Connect to your TV if it only has an RF (coaxial) connector and built-in TV tuner
Video Connect to your TV if it has standard RCA-type A/V jacks (better picture quality)
S-Video Connect to your TV if it has an S-Video input (best picture quality)
54-0287A.5
System Wiring Diagrams
TracVision A5/M3 12V Receiver Rear Panel Connections

54-0287A.6
TracVision Receiver User’s Guide
POWER
VEHICLE POWER(10-16 VDC)
VHF ANTENNAIN
AUDIO R AUDIO L VIDEO S – VIDEOPHONE JACK
RF REMOTEINPUT
OUT TO TV TUNERSATELLITE IN
CAUTION
This device complies with Part 15 of the FCC rules. Operation is subject to the following two conditions: (1) This device must not cause harmful interference, and (2) This device must accept any interference received,including interference that may cause undesired operation.
Tested to complywith FCC Standards
TO SATELLITE IN
TO KVHANTENNA
DIAGNOSTICSPORT 1
DIAGNOSTICSPORT 2
To Antenna
Receiver #1
Splitter
Receiver #2
OUT OUT
INPUT
POWER
VEHICLE POWER(10-16 VDC)
VHF ANTENNAIN
AUDIO R AUDIO L VIDEO S – VIDEOPHONE JACK
RF REMOTEINPUT
OUT TO TV TUNERSATELLITE IN
CAUTION
This device complies with Part 15 of the FCC rules. Operation is subject to the following two conditions: (1) This device must not cause harmful interference, and (2) This device must accept any interference received,including interference that may cause undesired operation.
Tested to complywith FCC Standards
TO SATELLITE IN
TO KVHANTENNA
DIAGNOSTICSPORT 1
DIAGNOSTICSPORT 2
Wiring Diagram for Two TracVision A5/M3 12V Receivers

Two TracVision A5/M3 12V Receivers• A two-way splitter is provided in the Additional
TracVision A5/M3 Receiver Kit (KVH partnumber 02-1340). The splitter has a frequencyrange of 40-2150 MHz with one port DC passive.
• In this diagram, receiver #1 is the master receiver.Receiver #1 must be turned on in order to usereceiver #2.
• The receiver and remote control provided in thesecond receiver kit are programmed for ID code“002.” This avoids interference or “cross talk”between remotes. In other words, the remote forthe second receiver will only operate receiver #2,and not receiver #1.
• If you order a replacement remote control (KVHpart number 19-0335), and you want to use it tooperate the second receiver, you will need tochange the remote’s ID code to “002.” Refer to theinstructions in Section 3-4, “Controlling MultipleReceivers,” on page 3.11.
• Both receiver #1 and receiver #2 must be activatedfor DIRECTV service. To activate the secondreceiver under the same account, call KVH’sActivation Department at 866-551-8004. Be sure totell the representative that you need to add asecond receiver to your account.
• The Antenna status light on receiver #2 willremain red at all times. This is normal. Onlyreceiver #1, which is connected directly to theantenna, can monitor antenna status.
54-0287A.7
System Wiring Diagrams
Always Red
Receiver #2

POWER
VEHICLE POWER(10-16 VDC)
VHF ANTENNAIN
AUDIO R AUDIO L VIDEO S – VIDEOPHONE JACK
RF REMOTEINPUT
OUT TO TVTUNERSATELLITE IN
CAUTION
This device complies with Part 15 of the FCC rules. Operation is subject to the following two conditions: (1) This device must not cause harmful interference, and (2) This device must accept any interference received,including interference that may cause undesired operation.
Tested to complywith FCC Standards
TO SATELLITE IN
TO KVHANTENNA
DIAGNOSTICSPORT 1
DIAGNOSTICSPORT 2
To Antenna
Receiver #1
Splitter OUT OUT
INPUT
Receiver #2
POWER
VEHICLE POWER(10-16 VDC)
VHF ANTENNAIN
AUDIO R AUDIO L VIDEO S – VIDEOPHONE JACK
RF REMOTEINPUT
OUT TO TVTUNERSATELLITE IN
CAUTION
This device complies with Part 15 of the FCC rules. Operation is subject to the following two conditions: (1) This device must not cause harmful interference, and (2) This device must accept any interference received,including interference that may cause undesired operation.
Tested to complywith FCC Standards
TO SATELLITE IN
TO KVHANTENNA
DIAGNOSTICSPORT 1
DIAGNOSTICSPORT 2
Receiver #3
POWER
VEHICLE POWER(10-16 VDC)
VHF ANTENNAIN
AUDIO R AUDIO L VIDEO S – VIDEOPHONE JACK
RF REMOTEINPUT
OUT TO TVTUNERSATELLITE IN
CAUTION
This device complies with Part 15 of the FCC rules. Operation is subject to the following two conditions: (1) This device must not cause harmful interference, and (2) This device must accept any interference received,including interference that may cause undesired operation.
Tested to complywith FCC Standards
TO SATELLITE IN
TO KVHANTENNA
DIAGNOSTICSPORT 1
DIAGNOSTICSPORT 2
Splitter
OU
TO
UT
INP
UT
54-0287A.8
TracVision Receiver User’s Guide
Wiring Diagram for Three TracVision A5/M3 12V Receivers
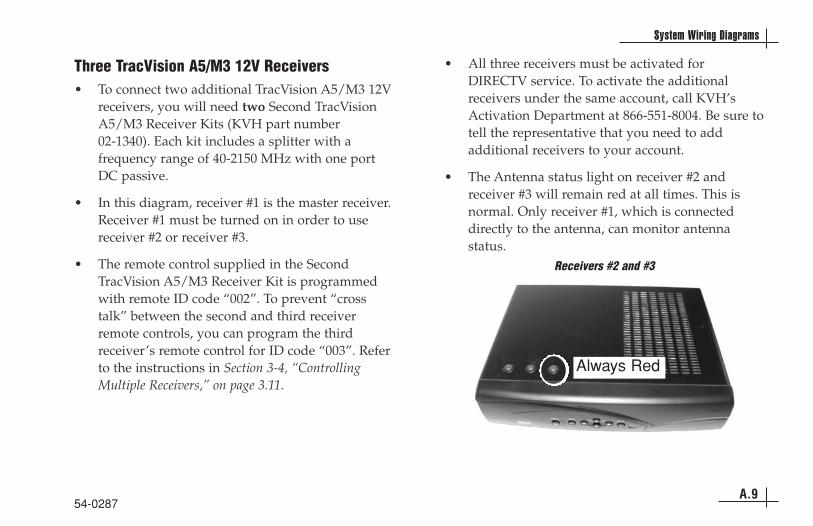
Three TracVision A5/M3 12V Receivers• To connect two additional TracVision A5/M3 12V
receivers, you will need two Second TracVisionA5/M3 Receiver Kits (KVH part number 02-1340). Each kit includes a splitter with afrequency range of 40-2150 MHz with one portDC passive.
• In this diagram, receiver #1 is the master receiver.Receiver #1 must be turned on in order to usereceiver #2 or receiver #3.
• The remote control supplied in the SecondTracVision A5/M3 Receiver Kit is programmedwith remote ID code “002”. To prevent “crosstalk” between the second and third receiverremote controls, you can program the thirdreceiver’s remote control for ID code “003”. Referto the instructions in Section 3-4, “ControllingMultiple Receivers,” on page 3.11.
• All three receivers must be activated forDIRECTV service. To activate the additionalreceivers under the same account, call KVH’sActivation Department at 866-551-8004. Be sure totell the representative that you need to addadditional receivers to your account.
• The Antenna status light on receiver #2 andreceiver #3 will remain red at all times. This isnormal. Only receiver #1, which is connecteddirectly to the antenna, can monitor antennastatus.
54-0287A.9
System Wiring Diagrams
Always Red
Receivers #2 and #3

54-0287A.10
TracVision Receiver User’s Guide
POWER
VEHICLE POWER(10-16 VDC)
VHF ANTENNAIN
AUDIO R AUDIO L VIDEO S – VIDEOPHONE JACK
RF REMOTEINPUT
OUT TO TVTUNERSATELLITE IN
CAUTION
This device complies with Part 15 of the FCC rules. Operation is subject to the following two conditions: (1) This device must not cause harmful interference, and (2) This device must accept any interference received,including interference that may cause undesired operation.
Tested to complywith FCC Standards
TO SATELLITE IN
TO KVHANTENNA
DIAGNOSTICSPORT 1
DIAGNOSTICSPORT 2
To Antenna
TracVision A5/M3 12V Receiver
Splitter
SATELLITE INOUT TO TV
TV ANT/CABLE IN
AUDIO VIDEO S-VIDEO PHONE JACK
R L
SATELLITE IN
Generic (Non-A5/M3) Receiver
Destacker
NOT USED
OUT OUT
INPUT
INPUT TERRESTRIAL / TV
OUTPUT / SAT RECEIVER
UnstackedSignal
StackedSignal
Stacked Signal Stacked Signal
Wiring Diagram for One TracVision A5/M3 12V Receiver and One Generic (Non-A5/M3) Receiver

54-0287A.11
System Wiring Diagrams
One Generic (Non-A5/M3) Receiver – M3 Marine Use Only
• If you wish to connect a single generic (non-A5/M3) receiver to the system, you will need aSingle AC Receiver Add-on Kit (KVH partnumber 72-0182). This kit includes a splitter, asingle-output destacker, connecting cables, andinstructions.
• The output of the TracVision antenna is a specialstacked signal, which the TracVision A5/M3 12Vreceiver is configured to decode. However, allgeneric (non-A5/M3) receivers are configured todecode unstacked signals instead. Therefore, asingle-output destacker is needed to convert theantenna’s stacked signal into an unstacked signalthat a generic (non-A5/M3) receiver can decode.
The TracVision M3 is compatible with allnew DIRECTV receiver modelsmanufactured today (when wired in theconfiguration shown on the previous page).Older receiver models may function differently, however, and KVH does notsupport their use.

54-0287A.12
TracVision Receiver User’s Guide
To Antenna
TracVision A5/M3 12V Receiver
Splitter
POWER
VEHICLE POWER(10-16 VDC)
VHF ANTENNAIN
AUDIO R AUDIO L VIDEO S – VIDEOPHONE JACK
RF REMOTEINPUT
OUT TO TVTUNERSATELLITE IN
CAUTION
This device complies with Part 15 of the FCC rules. Operation is subject to the following two conditions: (1) This device must not cause harmful interference, and (2) This device must accept any interference received,including interference that may cause undesired operation.
Tested to complywith FCC Standards
TO SATELLITE IN
TO KVHANTENNA
DIAGNOSTICSPORT 1
DIAGNOSTICSPORT 2
Destacker
NOT USED
SATELLITE INOUT TO TV
TV ANT/CABLE IN
AUDIO VIDEO S-VIDEO PHONE JACK
R L
SATELLITE IN
Generic (Non-A5/M3) Receiver #1
SATELLITE INOUT TO TV
TV ANT/CABLE IN
AUDIO VIDEO S-VIDEO PHONE JACK
R L
SATELLITE IN
Generic (Non-A5/M3) Receiver #2
INPUT TERRESTRIAL / TV
TO RECEIVER / DBS OUTPUTA B
Stacked Signal
OUT OUT
INPUT
StackedSignal
UnstackedSignal
UnstackedSignal
Stacked Signal
Wiring Diagram for One TracVision A5/M3 12V Receiver and Two Generic (Non-A5/M3) Receivers

Two Generic (Non-A5/M3) Receivers– M3 Marine Use Only
• If you wish to connect two generic (non-A5/M3)receivers to the system, you will need a MultipleAC Receivers Add-on Kit (KVH part number 72-0181). This kit includes a splitter, a dual-output destacker, connecting cables, andinstructions.
• The output of the TracVision antenna is a specialstacked signal, which the TracVision A5/M3 12Vreceiver is configured to decode. However, allgeneric (non-A5/M3) receivers are configured todecode unstacked signals instead. Therefore, adual-output destacker is needed to convert theantenna’s stacked signal into an unstacked signalthat a generic (non-A5/M3) receiver can decode.
54-0287A.13
System Wiring Diagrams
The TracVision M3 is compatible with allnew DIRECTV receiver modelsmanufactured today (when wired in theconfiguration shown on the previous page).Older receiver models may function differently, however, and KVH does notsupport their use.

54-0287A.14
TracVision Receiver User’s Guide
To Antenna
TracVision A5/M3 12V Receiver
SplitterOUT OUT
INPUT
POWER
VEHICLE POWER(10-16 VDC)
VHF ANTENNAIN
AUDIO R AUDIO L VIDEO S – VIDEOPHONE JACK
RF REMOTEINPUT
OUT TO TVTUNERSATELLITE IN
CAUTION
This device complies with Part 15 of the FCC rules. Operation is subject to the following two conditions: (1) This device must not cause harmful interference, and (2) This device must accept any interference received,including interference that may cause undesired operation.
Tested to complywith FCC Standards
TO SATELLITE IN
TO KVHANTENNA
DIAGNOSTICSPORT 1
DIAGNOSTICSPORT 2
Destacker
NOT USED
INPUT TERRESTRIAL / TV
TO RECEIVER / DBS OUTPUTA B
Multiswitch
Input Power
LNBLHCP/+18V
VHF/UHFINPUT
LNBRHCP/+13V
POWER
OUT 1 OUT 4OUT 3OUT 2
To 4 Receivers(Any Type)
StackedSignal
UnstackedSignal
UnstackedSignal
Stacked Signal
Stacked Signal
UnstackedSignals
Wiring Diagram for Multiple Receivers of Any Type

Four or More Receivers – M3 Marine Use Only
• If you wish to connect three or more additionalreceivers to the system, KVH recommends youinstall an active multiswitch along with a dual-output destacker and a splitter. The Multiple ACReceivers Add-on Kit (KVH part number 72-0181) includes the dual-output destacker and asplitter. The active multiswitch is sold separately(KVH part number 19-0123).
• An active multiswitch amplifies the signal tocompensate for signal loss. A simple splitter orpassive multiswitch does not provide thenecessary amplification.
• A dual-output destacker is needed to modify theTV signal for connection to a multiswitch.
• You can connect multiple TracVision A5/M3 12Vreceivers and/or generic (non-A5/M3) receiversto the multiswitch.
• Any TracVision A5/M3 12V receivers that youconnect to the multiswitch need to beconfigured for an unstacked signal (follow all ofthe steps in “Receiver Set to ‘Unstacked’ LNB’” onpage 9.9, except select “Unstacked” instead of“Stacked”).
54-0287A.15
System Wiring Diagrams
The TracVision M3 is compatible with allnew DIRECTV receiver modelsmanufactured today (when wired in theconfiguration shown on the previous page).Older receiver models may function differently, however, and KVH does notsupport their use.

Appendix BSatellite Elevation Map
54-0287A.17
Satellite Elevation Map
30
30
35
35
40
45
5055
55
50
45
40
Satellite at Equator

IndexAA/V jacks, A.5
access card, 8.13
activating the receiver, 9.6
adjusting audio settings, 8.3-8.5
adjusting video settings, 8.5-8.6
advanced setup, 8.12-8.13
Antenna light, 9.14-9.15
Antenna Power light, 3.9
antenna unit
connection to receiver, A.4
repairing, 9.9
turning on, 2.3
turning off, 2.5
arrows, in program guide, 5.5
aspect ratio, 8.6
audio adjustments, 8.3-8.5
AUDIO button, 3.7
audio/video input, 9.7
audio/video system repairs, 9.9
Auto Set, 6.5
Bbacklight, 3.3, 3.8
banner style, 8.12
batteries, remote control, 3.13
beeping, receiver, 2.6
blockage, 1.6, 9.5
brightness, 8.6
buttons, receiver 3.9
buttons, remote control, 3.3-3.8
Ccabling diagrams, A.3
Caller ID tab, 4.6
Category Filter, 6.7-6.8
caution, 3.3, 9.9, A.3
centering the menu, 8.6
CH button, 3.6
54-0287A-C
Index
changing channels, 2.5
changing LNB type, 9.10-9.12
changing remote ID, 3.11-3.12
channel banner, 4.3, 8.12
check mark, in program guide, 8.7
CLEAR button, 3.6
color scheme, menus, 8.6
colors, program guide, 5.10
connections
one A5/M3 receiver, A.4
two A5/M3 receivers, A.6
three A5/M3 receivers, A.8
one generic receiver, A.10
two generic receivers, A.12
four or more receivers, A.14
connectors, receiver, A.4
contrast, 8.6
controlling other components, 3.10
coverage area, 1.5, 9.5
cross talk, 3.11

Ddaylight saving, 8.12
default settings, 8.12
deleting mail, 8.10
description, system, 1.4
destacker, A.10-A.15
device code, 3.10
dew on antenna, 9.5
diagnostics test, 8.13
diagram, system, 1.4
DIRECTOR buttons, 3.7
DIRECTV customer service, 7.4
DIRECTV receiver, other, A.10-A.15
dirt on antenna, 9.5
downloading the program guide, 2.4
DVD player control, 3.8, 3.10
Eelevation angle, 1.6, A.17
ellipsis, in guide field, 5.5
equator, 1.5
erasing mail, 8.10
FFamily list, 6.4, 7.3
FAV button, 3.5
favorite channel lists, 6.3-6.6
filtering the program guide, 6.7-6.8
footprint, satellite, 1.5
fuse, 9.4
future programs, viewing, 6.9
Ggrid guide, 5.4
GUIDE button, 3.4
Guide Options, 5.9-5.11
Guide Times, 6.9
Hhighlight, 1.3
HUGHES button, 3.8
54-0287D-L
TracVision Receiver User’s Guide
Iice on antenna, 9.5
icons, channel banner, 4.3
icons, menu, 4.5
INFO button, 3.5
initializing a new access card, 8.13
INPUT button, 3.8, 9.6
installing batteries, 3.12
Interactive tab, 4.6
interference, remote controls, 3.11
IR eye, 3.10
Jjoystick, 3.5
Kkeyboard, 6.11
Llanguage, menu, 8.11
languages, alternate, 8.3-8.4

lights
Antenna Power, 3.9
Voltage, 9.14
Receiver, 9.14-9.15
Antenna, 9.14-9.15
limit exceeded message, 7.4
limiting access, 7.3-7.4, 7.5-7.7
locating the RF-to-IR converter, 9.8
lock icon, 7.4
lock override icon, 7.4
lock up, receiver, 9.8
locking the system, 7.3-7.4
logo guide, 5.4
lost remote, 3.9
Mmail, 8.10
main menu, 4.5
MENU button, 3.4
menu color scheme, 8.6
menu elements, 4.5
menu functions, table, 4.7-4.9
menu system, 4.5-4.6
multiswitch, A.14-A.15
MUTE button, 3.6
Nnew channels, 6.6
New Mail icon, 8.10
noise, antenna, 2.6
number buttons, 3.7
OOneLine Guide, 5.6
operating other components, 3.10
ordering a receiver, 3.11
ordering a remote control, 3.9
overriding lock, 7.4
Ppasscode, 7.4
picture-in-guide, 4.4, 5.10
power indications, 9.14
54-0287L-P
Index
power input, A.4
power switch, receiver, 2.3
powering off the system, 2.5, 2.9
powering on the system, 2.3-2.4, 2.8
preferences, system, 8.11-8.12
PREV CH button, 3.6
preview channel, 9.6
PROG button, 3.7
Program Director, 8.7-8.9
program guide
colors, meaning, 5.10
description, 4.4
download, 2.4
filtering, 6.7-6.8
future programs, 6.9
preferences, 5.9-5.11
styles, 5.3-5.4
using, 5.5
programming, remote control, 3.10
Purchases tab, 4.6
PWR button, 3.4

Rratings limits, 7.5-7.6
reading mail, 8.10
receiver
activation, 9.6
beeping, 2.6
buttons, 3.9
connectors, A.4
description, 1.5
lights, 9.14-9.15
multiple, A.3-A.15
generic, A.10-A.15
ordering additional, 3.11
power switch, 2.3
repairing, 9.9
software upgrade, 8.13
Receiver light, 9.14-9.15
reception, 1.5-1.6
recurring programs, scheduling, 8.7
remote control
batteries, 3.12
buttons, 3.3
changing ID, 3.11-3.12
description, 1.4
ordering a replacement, 3.9
programming, 3.10
remote control ID, changing, 3.11-3.12
repairs, 9.9
replacing batteries, 3.12
resetting the system, 9.4
RF converter
connection to receiver, A.4
description, 1.4
distance from receiver, 9.8
SS-Video, A.5
safety warning, 3.3, A.3
SAT button, 3.4
satellite
coverage area, 1.5, 9.5
elevation angle, 1.6, A.17
location, 1.5
54-0287R-S
TracVision Receiver User’s Guide
saturation, 8.6
scheduling programs, 8.7-8.9
SEARCH button, 3.7
searching for programs, 6.10-6.12
SELECT button, 3.5
setting guide preferences, 5.9-5.11
setting system preferences, 8.11-8.12
setup, advanced, 8.12-8.13
snow on antenna, 9.5
software upgrade, 8.13
sorting the program guide, 5.10
spending limit, 7.7
splitter, A.6-A.15
SRS TruSurround, 8.5
system startup, 2.6
Stacked LNB, setup, 9.10-9.12
status lights, 9.14-9.15
symptoms, troubleshooting, 9.3
system information, 8.13

Ttag box, 6.3
technical support, 9.13
test, 8.13
time limits, 7.6-7.7
time zone, 8.11
translucency, menu, 8.6
troubleshooting, 9.1
troubleshooting matrix, 9.3
TruSurround, 8.5
TURBO button, 3.4
TurboTune, 5.7-5.9
turning off the system, 2.5, 2.9
turning on the system, 2.3-2.4, 2.8
TV control, 3.6, 3.10
Uunlocking the system, 7.5
Unstacked LNB, 9.9
VVCR control, 3.8, 3.10
VCR control buttons, 3.8
vehicle power, A.5
VHF antenna, A.5
video adjustments, 8.5-8.6
VIDEO button, 3.7
viewing a program description, 2.5
viewing future programs, 6.9
viewing mail, 8.10
VOL button, 3.6
Voltage light, 9.14
volume, 3.6
WWatchWizard, 6.10-6.12
weather, inclement, 9.5
widescreen, 8.6
wiring diagrams, A.3
54-0287T-W
Index
wiring
one A5/M3 receiver, A.4
two A5/M3 receivers, A.6
three A5/M3 receivers, A.8
one generic receiver, A.10
two generic receivers, A.12
four or more receivers, A.14

KVH Industries, Inc. • 50 Enterprise Center • Middletown, RI 02842-5279 U.S.A . • Phone: (401) 847-3327 • Fax: (401) 849-0045 • E-mail: [email protected]
www.kvh.com
© Copyright 2005, KVH Industries, Inc. DIRECTV is a registered trademark of DIRECTV, Inc., .KVH and TracVision are registered trademarks of KVH Industries, Inc.